canonthe ujj§cll - canon classics · 1. ae photography is possible only w ith a canon fd lens. see...
TRANSCRIPT
canonTHE UJJ§cll The Basic Steps to Picture-Taking
fdreview
.com
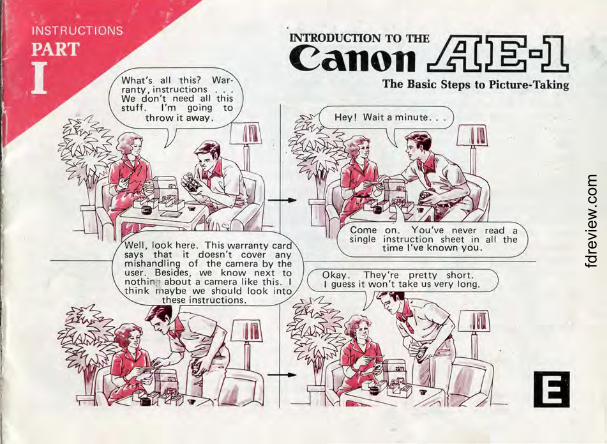
Congratulations on your purchase of a Canon AE-1. We know that you are anxious to start taking pictures with it . Our first hint for taking great ones is to read these instructions. Follow the steps in order and become well acquainted with the camera . Then, once you have a good understanding of PART I, move on to PART II. It contains a lot of information you won't find elsewhere. The brief time spent in reading these instructions is a sound investment in satisfaction and enjoyment .
Symbols 9' Signals an important DO.
® Signals an important DON'T.
Copyright © 1980 by Canon Inc.
All rights reserved .
Printed in Japan 2
CONTENTS 1. Attach the lens ... . ...... . 2 . Set the lens for AE photography 3 . Load the battery ... . . . . .. ... .
4 . Check the battery ....... .... . 5. Before loading film, learn to operate
basic controls
6. Set the ASA . 7 . Load the film
8. Learn to hold the camera correctly
9 . One shot at a time . ..... . 10. At the end of the roll , rewind
the film .. .. ...... ... . *Dedicated Flash Photography
*Self-Timer .. . ...... . *Carry ing the Camera .. .
* Pre-Shooting Checklist . .
pp.3-4
p.5 p.6 p.7
p.8
p.9
pp.10-12 ... p .13 pp.14-15
. . . p.16
. .. p.17 pp .18-19
p.20 p.21
Camera parts are labeled on the insides of the foldout flaps at the beginning and end of PART II.
fdreview
.com
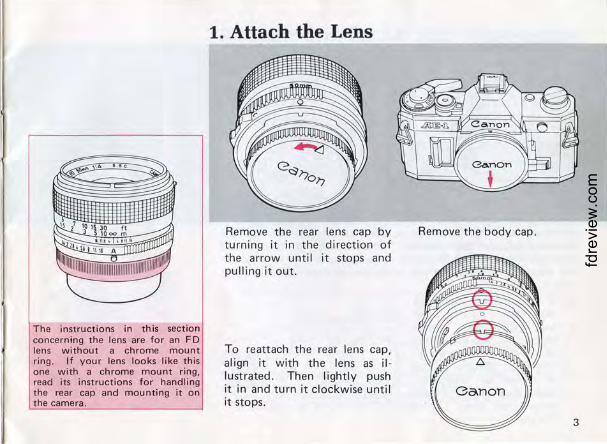
The instructions in this section concerning the lens are for an F D lens without a chrome mount ring. If your lens looks like this one with a chrome mount ring, read its instructions for handling the rear cap and mounting it on the camera .
1. Attach the Lens
Remove the rear lens cap by turning it in the direct ion of the arrow until it stops and pulling it out.
To reattach the rear lens cap, align it with the lens as illustrated. Then lightly push it in and turn it clockwise until it stops.
Remove the body cap.
3
fdreview
.com
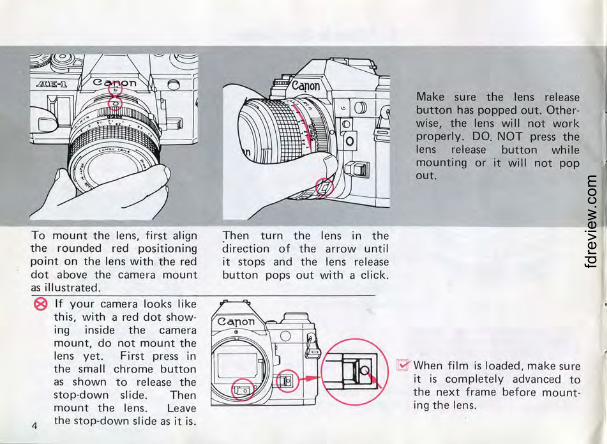
To mount the lens, first align the rounded red positioning point on the lens with the red dot above the camera mount as illustrated . 8 If your camera looks like
this, with a red dot showing ins ide the camera mount, do not mount the lens yet . First press in the small chrome button as shown to release the stop·down slide. Then mount the lens. Leave
4 the stop-down slide as it is.
Then turn the lens in the direction of the arrow until it stops and the lens release button pops out with a click.
Make sure the lens release button has popped out. Other· wise, the lens will not work properly. DO. NOT press the lens release button while mounting or it will not pop out.
[S' When film is loaded, make sure it is completely advanced to the next frame before mount· ing the lens.
fdreview
.com
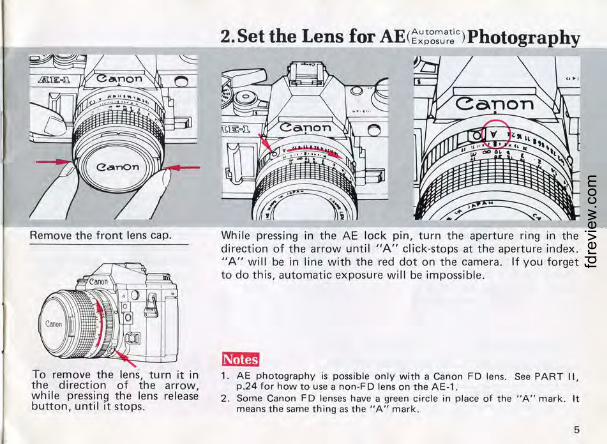
Remove the front lens cap.
To remove the lens, turn it in the direction of the arrow, while pressing the lens release button, until 1t stops.
2. Set the Lens for AE(~~~~~~~c) Photography
While pressing in the AE lock pin, turn the aperture ring in the direction of the arrow until "A" click-stops at the aperture index. "A" will be in line with the red dot on the camera. If you forget to do this, automatic exposure will be impossible.
~ 1. AE photography is possible only w ith a Canon FD lens. See PART II,
p.24 for how to use a non-FD lens on the AE-1 . 2 . Some Canon FD lenses have a green circle in place of the "A" mark. It
means the same thing as the "A" mark.
5
fdreview
.com
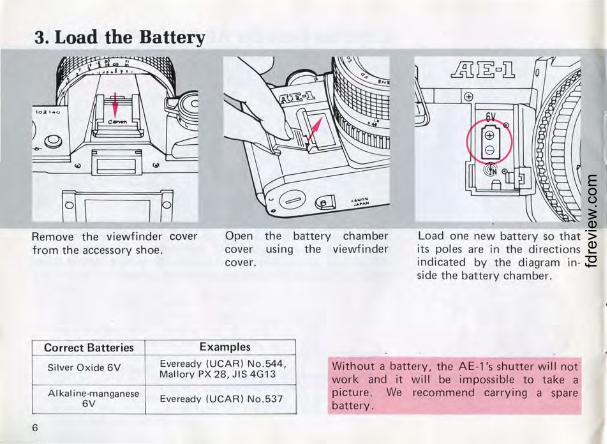
3. Load the Battery
Remove the viewfinder cover from the accessory shoe.
Open the battery chamber cover using the viewfinder cover.
Load one new battery so that its poles are in the directions indicated by the diagram inside the battery chamber.
Correct Batteries
Silver Oxide 6V
AI kal ine-manganese 6V
6
Examples
Eveready (UCAR) No.544, Mallory PX 28 , JIS 4G13
Eveready (UCAR) No .537
Without a battery, the AE-1 's shutter will not" work and it will be impossible to take a picture . We recommend carrying a spare battery .
fdreview
.com
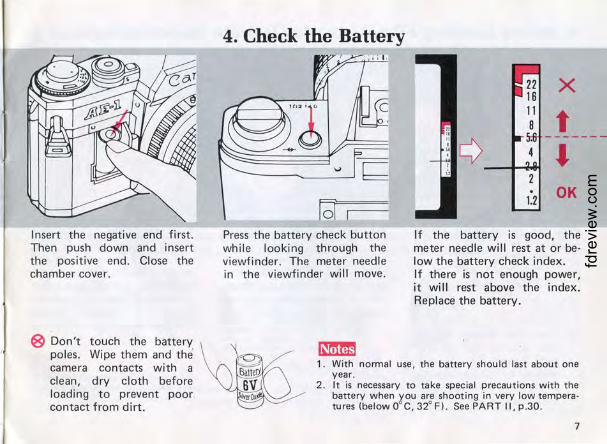
Insert the negative end first. Then push down and insert the positive end. Close the chamber cover.
8 Don't touch the battery poles . Wipe them and the camera contacts with a clean, dry cloth before loading to prevent poor contact from dirt.
4. Check the Battery
Press the battery check button while looking through the viewfinder. The meter needle in the viewfinder will move .
~
X
t -------
' OK
If the battery is good, the meter needle will rest at or below the battery check index. If there is not enough power, it will rest above the index. Replace the battery.
1. With normal use, the battery should last about one year .
2. It is necessary to take special precautions with the battery when ;tou are shooting in very low temperatures(belowO C,32° F). SeePARTII,p.30.
7
fdreview
.com
5. Before Loading Film, Learn to Operate Basic Controls
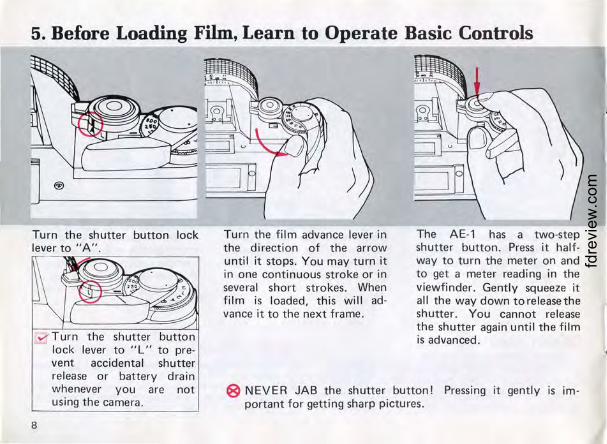
Turn the shutter button lock lever to "A" .
i@I' Turn the shutter button lock lever to "L" to prevent accidental shutter release or battery drain whenever you are not using the camera.
8
Turn the film advance lever in the direction of the arrow until it stops. You may turn it in one continuous stroke or in several short strokes . When film is loaded, this will ad vance it to the next frame .
The AE-1 has a two-step shutter button . Press it halfway to turn the meter on and to get a meter reading in the viewfinder. Gently squeeze it all the way down toreleasethe shutter . You cannot release the shutter again until the film is advanced.
8 NEVER JAB the shutter button! Pressing it gently is important for getting sharp pictures.
fdreview
.com
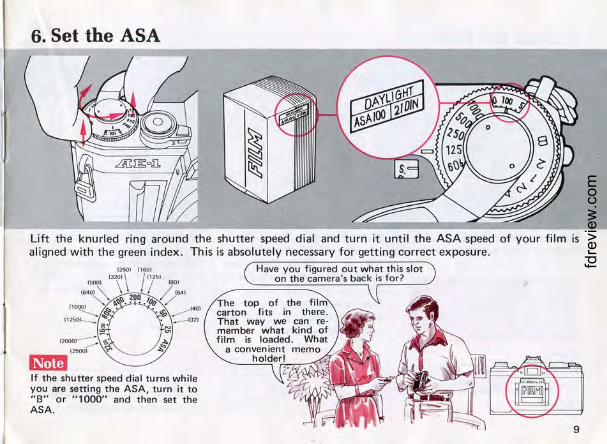
6. Set the ASA
Lift the knurled ring around the shutter speed dial and turn it until the ASA speed of your film is aligned with the green index . This is absolutely necessary for getting correct exposure .
9
fdreview
.com

7. Load the Film
Pull the rewind knob up until the back cover pops open .
A plastic insc;t is attached to the pressure plate of a new AE-1 to protect it in transport. Before loading the first film cartridge, it is important to remove this insert . It may be thrown away.
10
The AE-1 uses color (negative or slide) or black and white film in standard 35mm cartridges. Place the cartr idge in the film chamber as shown . Then push the rewind knob down, rotating it until it drops into its normal position .
Pull the film leader across the camera and insert it into any slot of the take-up spool.
'q Shield the film from direct sunlight while loading.
fdreview
.com
t t
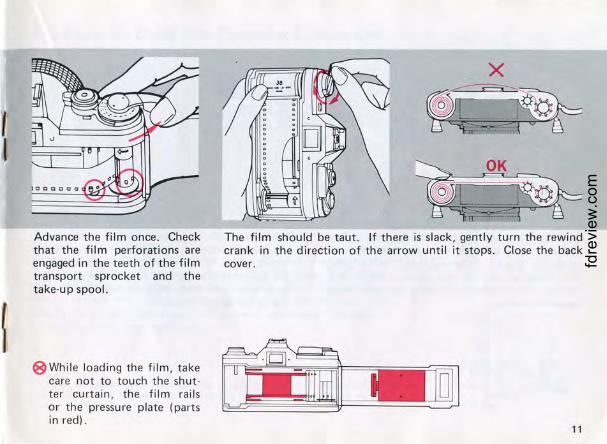
Advance the film once. Check that the film perforations are engaged in the teeth of the film transport sprocket and the take-up spool.
8 While loading the film, take care not to touch the shutter curtain, the film rail s or the pressure plate (parts in red) .
The film should be taut. If there is slack, gently turn the rewind crank in the direction of the arrow until it stops. Close the back cover .
11
fdreview
.com
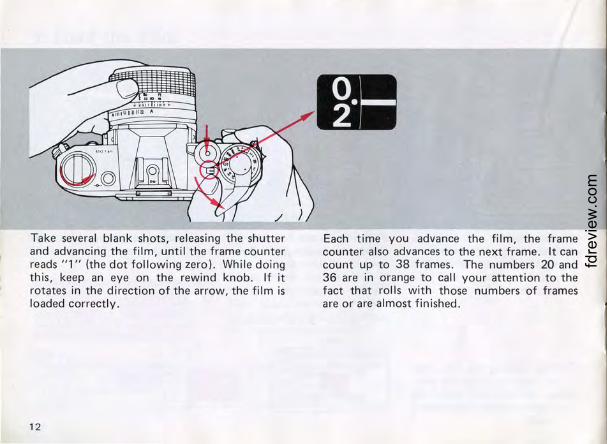
Take several blank shots, releasing the shutter and advancing the film, until the frame counter reads "1" (the dot following zero) . While doing this, keep an eye on the rewind knob. If it rotates in the direction of the arrow, the film is loaded correctly .
12
Each time you advance the film, the frame counter also advances to the next frame . It can count up to 38 frames. The numbers 20 and 36 are in orange to call your attention to the fact that rolls with those numbers of frames are or are almost finished .
fdreview
.com
8. Learn to Hold the Camera Correctly
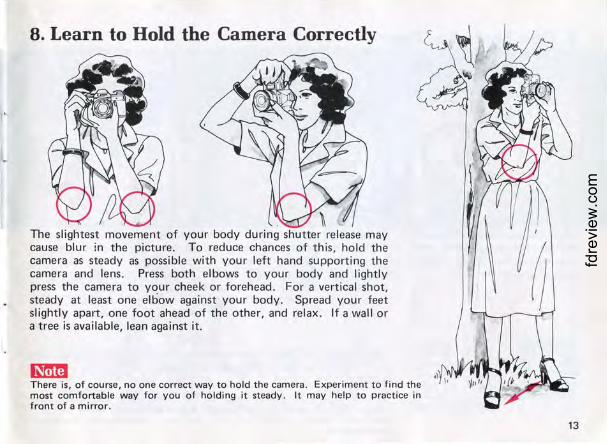
The slightest movement of your body during cause blur in the picture. To reduce chances of this, hold the camera as steady as possible with your left hand supporting the camera and lens . Press both elbows to your body and lightly press the camera to your cheek or forehead. For a vertical shot, steady at least one elbow against your body. Spread your feet slightly apart, one foot ahead of the other, and relax. If a wall or a tree is available, lean against it.
~ There is, of course, no one correct way to hold the camera . Experiment to find the most comfortable way for you of holding it steady . It may help to practice in front of a mirror.
13
fdreview
.com
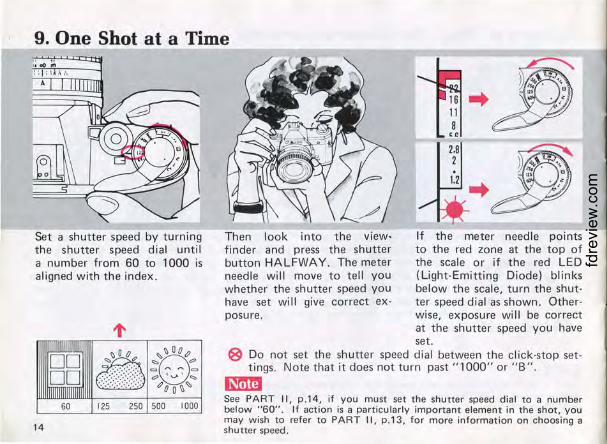
9. One Shot at a Time
Set a shutter speed by turning the shutter speed dial unti l a number from 60 to 1000 is aligned with the index .
14
11111111111111111
DD DO
1111111111111111 1
60 125 250 500 I 000
Then look into the viewfinder and press the shutter button HALFWAY. The meter need le will move to tell you whether the shutter speed you have set wi II give correct ex-posure.
If the meter needle points to the red zone at the top of the scale or if the red LED (Light-Emitting Diode) blinks below the scale, turn the shutter speed dial as shown. Otherwise, exposure wi II be correct at the shutter speed you have set .
8 Do not set the shutter speed dial between the cl ick-stop set -tings. Note that it does not turn past "1000" or "8".
mm See PART II, p .14, if you must set the shutter speed dial to a number below "60". If action is a particularly important element in the shot, you may wish to refer to PART II, p.13 , for more information on choosing a shutter speed .
fdreview
.com
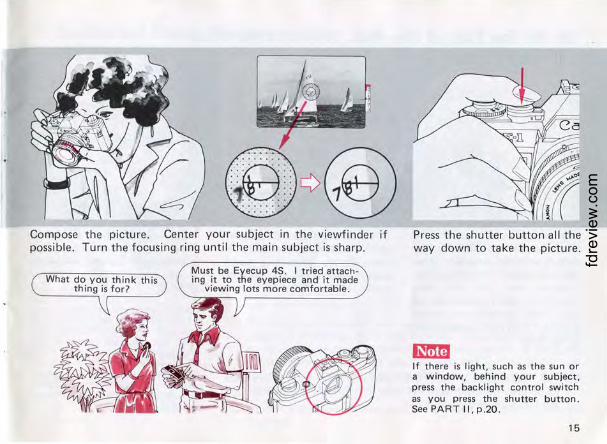
Compose the picture. Center your subject in the viewfinder if possible. Turn the focusing ring until the main subject is sharp.
Must be Eyecup 4S. I tried attaching it to the eyepiece and it made
viewing lots more comfortable.
Press the shutter button all the way down to take the picture.
lmm If there is light, such as the sun or a window, behind your subject, press the backlight control switch as you press the shutter button . See PART ll,p.20 .
15
fdreview
.com
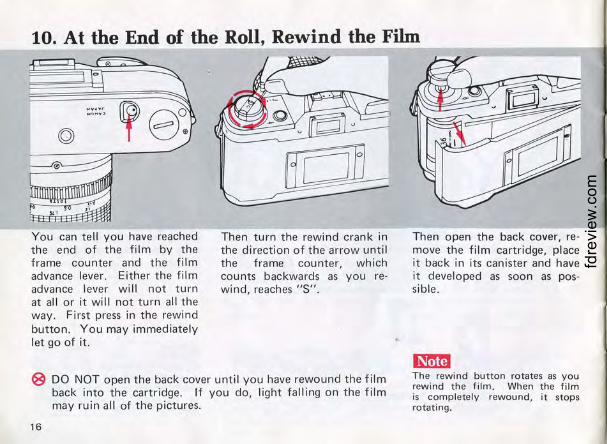
10. At the End of the Roll, Rewind the Film
You can tell you have reached the end of the film by the frame counter and the film advance lever. Either the film advance lever will not turn at all or it will not turn all the way . First press in the rewind button . You may immediately let go of it.
Then turn the rewind crank in the direction of the arrow until the frame counter, which counts backwards as you rewind, reaches " S".
® DO NOT open the back cover until you have rewound the film back into the cartridge. If you do, light falling on t he film may ruin all of the pictures.
16
Then open the back cover, remove the film cartridge, place it back in its canister and have it developed as soon as possible .
~ The rewind button rotates as you rewind the film . When the film is completely rewound, it stops rotating.
fdreview
.com
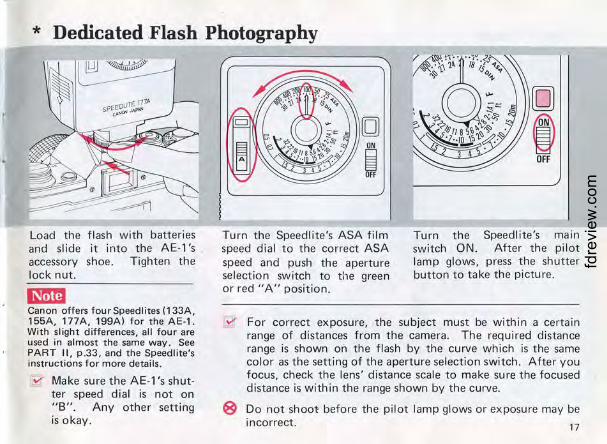
* Dedicated .Flash Photography
Load the flash with batteries and slide it into the AE-1's accessory shoe. Tighten the lock nut.
~ Canon offers four Speed lites (133A, 155A, 177A, 199A) for theAE-1. With slight differences, all four are used in almost the same way . See PART II, p .33, and the Speedlite 's instructions for more details .
a-- Make sure the AE-1 's shutter speed dial is not on "B". Any other setting is okay .
[]
9 OFF
Turn the Speedl ite's ASA film speed dial to the correct ASA speed and push the aperture selection switch to tile green or red "A" position .
[OJ
i OFF
Turn the Speedlite's main switch ON. After the pilot lamp glows, press the shutter button to take the picture.
For correct exposure, the subject must be within a certa in range of distances from the camera. The required distance range is shown on the flash by the curve which is the same color as the setting of the aperture selection switch . After you focus, check the lens' distance sca le to make sure the focused distance is with in the range shown by the curve.
Do not shoot before the pilot lamp glows or exposure may be incorrect . 17
fdreview
.com
*Self-Timer
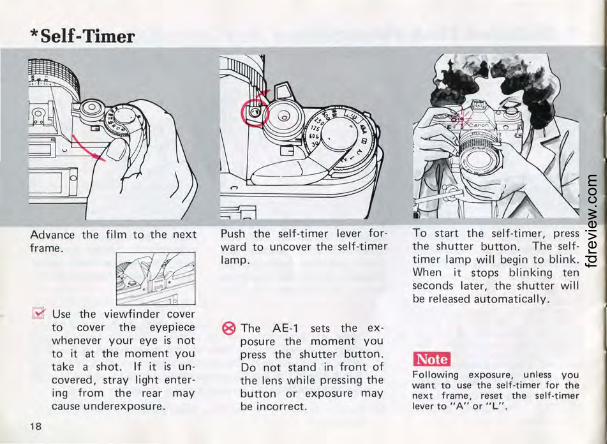
Advance the film to the next frame .
~ ~ Use the viewfinder cover
to cover the eyepiece whenever your eye is not to it at the moment you take a shot. If it is uncovered, stray light entering from the rear may cause underexposure .
18
Push the self-timer lever forward to uncover the self-timer lamp.
8 The AE-1 sets the exposure the moment you press the shutter button . Do not stand in front of the lens while pressing the button or exposure may be incorrect .
To start the self-timer, press the shutter button. The selftimer lamp will begin to blink. When it stops blinking ten seconds later, the shutter will be released automatically .
mm Following exposure, unless you want to use the self-timer for the next frame, reset the self-timer lever to "A" or "L" .
fdreview
.com
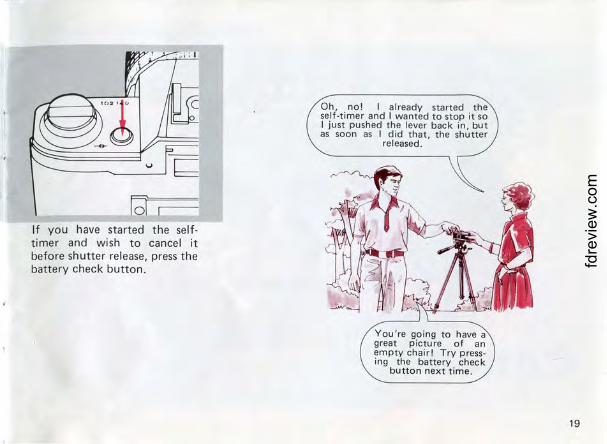
If you have started the selftimer and wish to cancel it before shutter re lease, press the battery check button.
Oh, no! I already started the self-timer and I wanted to stop it so I just pushed the lever back in, but as soon as I did that, the shutter
released.
You're going to have a great picture of an empty chair! Try pressing the battery check
button next time.
19
fdreview
.com
*Carrying the Camera
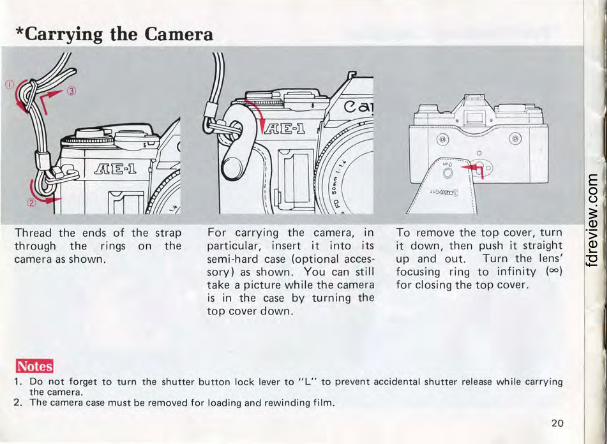
Thread the ends of the strap through the rings on the camera as shown.
~
For carrying the camera, in particular, insert it into its semi-hard case (optional accessory) as shown . You can still take a picture while the camera is in the case by turning the top cover down .
To remove the top cover, turn it down, then push it straight up and out. Turn the lens' focusing ring to infinity (00 )
for closing the top cover.
1. Do not forget to turn the shutter button lock lever to "L" to prevent accidental shutter release while carrying the camera.
2 . The camera case must be removed for loading and rewinding film.
20
fdreview
.com
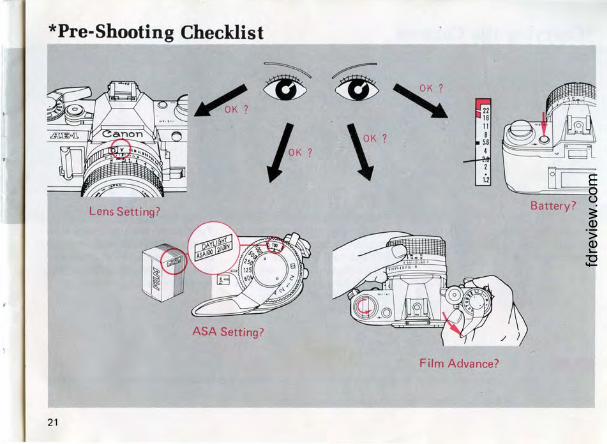
*Pre-Shooting Checklist
Lens Setting? Battery?
ASA Setting?
Film Advance?
21
fdreview
.com
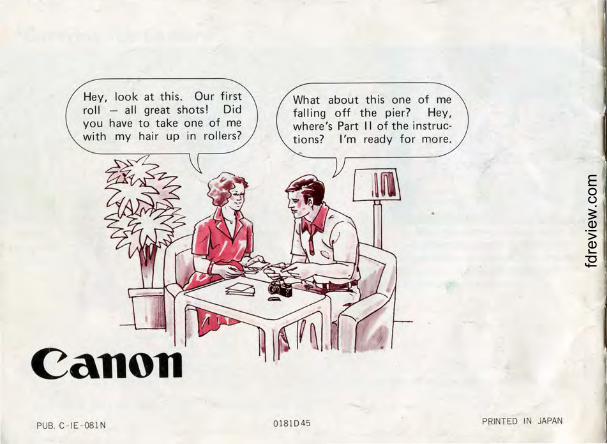
Hey, look at this. Our first roll - all great shots! Did you have to take one of me with my hair up in rollers?
Canon PUB. C- IE - 081N
What about this one of me falling off the pier? Hey, where's Part II of the instructions? I'm ready for more.
0181045 PRINTED IN JAPAN
fdreview
.com