cape dory 31 · chapter 13 rigging instructions ... it was written as a guide for owners of cape...
TRANSCRIPT

CAPE DORY
31
Edited by: Catherine Monaghan, 2006

Page 2
TABLE OF CONTENTS PAGE Forward & Disclaimer . . . . . . . . . . . . . . . . . . . . . . . . . . . . . . . . . . . . . . . . . . . . . . . . . . . . . . . 5 Letter of Welcome . . . . . . . . . . . . . . . . . . . . . . . . . . . . . . . . . . . . . . . . . . . . . . . . . . . . . . . . . . 6 Cape Dory Owner’s Association . . . . . . . . . . . . . . . . . . . . . . . . . . . . . . . . . . . . . . . . . . . . . . . 7 Customer Service . . . . . . . . . . . . . . . . . . . . . . . . . . . . . . . . . . . . . . . . . . . . . . . . . . . . . . . . . . . 8 CHAPTER 1 INTRODUCTION . . . . . . . . . . . . . . . . . . . . . . . . . . . . . . . . . . . . . . . . . . . . . . 9 Cape Dory Owner’s Record . . . . . . . . . . . . . . . . . . . . . . . . . . . . . . . . . . . . . . . . . . . . . . 10 Dealer’s Commissioning Checklist . . . . . . . . . . . . . . . . . . . . . . . . . . . . . . . . . . . . . . . . 11 1.1 Receiving Record . . . . . . . . . . . . . . . . . . . . . . . . . . . . . . . . . . . . . . . . . 11 1.2 Pre-Launch Checklist . . . . . . . . . . . . . . . . . . . . . . . . . . . . . . . . . . . . . . 11 1.3 Post-Launch Checklist . . . . . . . . . . . . . . . . . . . . . . . . . . . . . . . . . . . . . . 12 1.4 Engine Start-Up Checklist . . . . . . . . . . . . . . . . . . . . . . . . . . . . . . . . . . . 12 1.5 Rigging Checklist: . . . . . . . . . . . . . . . . . . . . . . . . . . . . . . . . . . . . . . . . . 13 1.6 Miscellaneous Checklist . . . . . . . . . . . . . . . . . . . . . . . . . . . . . . . . . . . . . 14 CHAPTER 2 CONSTRUCTION . . . . . . . . . . . . . . . . . . . . . . . . . . . . . . . . . . . . . . . . . . . . . . 15 2.1 Hull . . . . . . . . . . . . . . . . . . . . . . . . . . . . . . . . . . . . . . . . . . . . . . . . . . . . . . . . . . 15 2.2 Deck And Headliner . . . . . . . . . . . . . . . . . . . . . . . . . . . . . . . . . . . . . . . . . . . . . . 15 2.3 Ballas . . . . . . . . . . . . . . . . . . . . . . . . . . . . . . . . . . . . . . . . . . . . . . . . . . . . . . . . . 16 2.4 Rudder . . . . . . . . . . . . . . . . . . . . . . . . . . . . . . . . . . . . . . . . . . . . . . . . . . . . . . . . 16 2.5 V-Berth, Galley And Sub-Floor Assembly . . . . . . . . . . . . . . . . . . . . . . . . . . . . 16 2.6 Engine Installation . . . . . . . . . . . . . . . . . . . . . . . . . . . . . . . . . . . . . . . . . . . . . . . 17 2.7 Mechanical Installation . . . . . . . . . . . . . . . . . . . . . . . . . . . . . . . . . . . . . . . . . . . . 17 2.8 Hull To Deck Joint . . . . . . . . . . . . . . . . . . . . . . . . . . . . . . . . . . . . . . . . . . . . . . . 18 2.9 Chainplate System . . . . . . . . . . . . . . . . . . . . . . . . . . . . . . . . . . . . . . . . . . . . . . . 18 CHAPTER 3 STEERING . . . . . . . . . . . . . . . . . . . . . . . . . . . . . . . . . . . . . . . . . . . . . . . . . . . . 20 CHAPTER 4 ELECTRICAL SYSTEMS . . . . . . . . . . . . . . . . . . . . . . . . . . . . . . . . . . . . . . . . 21 4.1 D.C. 12 Volt System . . . . . . . . . . . . . . . . . . . . . . . . . . . . . . . . . . . . . . . . . . . . . 21 4.2 A.C. 110 Volt System . . . . . . . . . . . . . . . . . . . . . . . . . . . . . . . . . . . . . . . . . . . . 22 CHAPTER 5 GROUNDED SYSTEMS . . . . . . . . . . . . . . . . . . . . . . . . . . . . . . . . . . . . . . . .. 24 5.1 Bonding System . . . . . . . . . . . . . . . . . . . . . . . . . . . . . . . . . . . . . . . . . . . . . . . . . 24 5.2 Lightning Ground System . . . . . . . . . . . . . . . . . . . . . . . . . . . . . . . . . . . . . . . . . 24 CHAPTER 6 THRU-HULLS & SEACOCKS . . . . . . . . . . . . . . . . . . . . . . . . . . . . . . . . . . . . 25 CHAPTER 7 ENGINE SYSTEMS . . . . . . . . . . . . . . . . . . . . . . . . . . . . . . . . . . . . . . . . . . . . . 27 7.1 Engine Electrical System . . . . . . . . . . . . . . . . . . . . . . . . . . . . . . . . . . . . . . . . . . 27 7.2 Exhaust System . . . . . . . . . . . . . . . . . . . . . . . . . . . . . . . . . . . . . . . . . . . . . . . . . 27 7.3 Cooling . . . . . . . . . . . . . . . . . . . . . . . . . . . . . . . . . . . . . . . . . . . . . . . . . . . . . . . . 27 7.4 Fuel System . . . . . . . . . . . . . . . . . . . . . . . . . . . . . . . . . . . . . . . . . . . . . . . . . . . . 28 7.5 Shafting . . . . . . . . . . . . . . . . . . . . . . . . . . . . . . . . . . . . . . . . . . . . . . . . . . . . . . . 29 7.6 Stuffing Box . . . . . . . . . . . . . . . . . . . . . . . . . . . . . . . . . . . . . . . . . . . . . . . . . . . . 29

Page 3
7.7 Maintenance . . . . . . . . . . . . . . . . . . . . . . . . . . . . . . . . . . . . . . . . . . . . . . . . . . . . 30 7.8 Winterization . . . . . . . . . . . . . . . . . . . . . . . . . . . . . . . . . . . . . . . . . . . . . . . . . . . 30 CHAPTER 8 PRESSURE WATER SYSTEM . . . . . . . . . . . . . . . . . . . . . . . . . . . . . . . . . . . . 31 8.1 Pumps . . . . . . . . . . . . . . . . . . . . . . . . . . . . . . . . . . . . . . . . . . . . . . . . . . . . . . . . . 32 8.2 Gray Water Drainage . . . . . . . . . . . . . . . . . . . . . . . . . . . . . . . . . . . . . . . . . . . . . 32 CHAPTER 9 HEAD SYSTEM . . . . . . . . . . . . . . . . . . . . . . . . . . . . . . . . . . . . . . . . . . . . . . . . 34 CHAPTER 10 SAIL CARE . . . . . . . . . . . . . . . . . . . . . . . . . . . . . . . . . . . . . . . . . . . . . . . . . . 35 CHAPTER 11 INTERIOR OPERATION & MAINTENANCE . . . . . . . . . . . . . . . . . . . . . . 36 11.1 Cushions . . . . . . . . . . . . . . . . . . . . . . . . . . . . . . . . . . . . . . . . . . . . . . . . . . . . . . . 36 11.2 Ice Box . . . . . . . . . . . . . . . . . . . . . . . . . . . . . . . . . . . . . . . . . . . . . . . . . . . . . . . . 36 11.3 Ports And Hatches . . . . . . . . . . . . . . . . . . . . . . . . . . . . . . . . . . . . . . . . . . . . . . . 36 11.4 Curtains . . . . . . . . . . . . . . . . . . . . . . . . . . . . . . . . . . . . . . . . . . . . . . . . . . . . . . . 37 11.5 Sinks . . . . . . . . . . . . . . . . . . . . . . . . . . . . . . . . . . . . . . . . . . . . . . . . . . . . . . . . . . 37 11.6 Head . . . . . . . . . . . . . . . . . . . . . . . . . . . . . . . . . . . . . . . . . . . . . . . . . . . . . . . . . . 37 11.7 Scupper Drains . . . . . . . . . . . . . . . . . . . . . . . . . . . . . . . . . . . . . . . . . . . . . . . . . . 37 11.8 Interior Wood Surfaces . . . . . . . . . . . . . . . . . . . . . . . . . . . . . . . . . . . . . . . . . . . 38 11.9 Stoves . . . . . . . . . . . . . . . . . . . . . . . . . . . . . . . . . . . . . . . . . . . . . . . . . . . . . . . . . 38 11.10 General . . . . . . . . . . . . . . . . . . . . . . . . . . . . . . . . . . . . . . . . . . . . . . . . . . . . . . . . 38 11.11 Bilge Pump . . . . . . . . . . . . . . . . . . . . . . . . . . . . . . . . . . . . . . . . . . . . . . . . . . . . . 39 CHAPTER 12 EXTERIOR OPERATION & MAINTENANCE . . . . . . . . . . . . . . . . . . . . . . 40 12.1 Gelcoat And Fiberglass . . . . . . . . . . . . . . . . . . . . . . . . . . . . . . . . . . . . . . . . . . . 40 12.2 Bottom Paint, Boot Top Paint . . . . . . . . . . . . . . . . . . . . . . . . . . . . . . . . . . . . . . . 41 12.3 Maintaining Exterior Teak . . . . . . . . . . . . . . . . . . . . . . . . . . . . . . . . . . . . . . . . . 42 12.4 Spars . . . . . . . . . . . . . . . . . . . . . . . . . . . . . . . . . . . . . . . . . . . . . . . . . . . . . . . . . . 42 125 Standing Rigging . . . . . . . . . . . . . . . . . . . . . . . . . . . . . . . . . . . . . . . . . . . . . . . . 43 12.6 Turnbuckles . . . . . . . . . . . . . . . . . . . . . . . . . . . . . . . . . . . . . . . . . . . . . . . . . . . . 45 12.7 Deck Hardware And Chainplates . . . . . . . . . . . . . . . . . . . . . . . . . . . . . . . . . . . . 45 12.8 Running Rigging . . . . . . . . . . . . . . . . . . . . . . . . . . . . . . . . . . . . . . . . . . . . . . . . 46 12.9 Lifelines, Pulpits, And Stanchions . . . . . . . . . . . . . . . . . . . . . . . . . . . . . . . . . . . 46 12.10 Winches And Blocks . . . . . . . . . . . . . . . . . . . . . . . . . . . . . . . . . . . . . . . . . . . . . 46 12.11 Jiffy Reefing . . . . . . . . . . . . . . . . . . . . . . . . . . . . . . . . . . . . . . . . . . . . . . . . . . . . 46 12.12 Optional Sails . . . . . . . . . . . . . . . . . . . . . . . . . . . . . . . . . . . . . . . . . . . . . . . . . . . 47 CHAPTER 13 RIGGING INSTRUCTIONS . . . . . . . . . . . . . . . . . . . . . . . . . . . . . . . . . . . . . 49 13.1 Stepping The Spar And Tuning . . . . . . . . . . . . . . . . . . . . . . . . . . . . . . . . . . . . . 50 CHAPTER 14 WINTERIZING . . . . . . . . . . . . . . . . . . . . . . . . . . . . . . . . . . . . . . . . . . . . . . . 51 CHAPTER 15 SAFETY . . . . . . . . . . . . . . . . . . . . . . . . . . . . . . . . . . . . . . . . . . . . . . . . . . . . . 53 15.1 Weather Forecasts . . . . . . . . . . . . . . . . . . . . . . . . . . . . . . . . . . . . . . . . . . . . . . . 55 15.2 Boating Safety Organizations . . . . . . . . . . . . . . . . . . . . . . . . . . . . . . . . . . . . . . . 55

Page 4
CHAPTER 16 COMMISSIONING & WARRANTY . . . . . . . . . . . . . . . . . . . . . . . . . . . . . . 56 16.1 Commissioning . . . . . . . . . . . . . . . . . . . . . . . . . . . . . . . . . . . . . . . . . . . . . . . . . 56 16.2 Warranty Notification Procedures . . . . . . . . . . . . . . . . . . . . . . . . . . . . . . . . . . . 56 CHAPTER 17 DRAWINGS & PLANS . . . . . . . . . . . . . . . . . . . . . . . . . . . . . . . . . . . . . . . . . 58 17.1 Sail Plan . . . . . . . . . . . . . . . . . . . . . . . . . . . . . . . . . . . . . . . . . . . . . . . . . . . . . . . 58 17.2 Arrangement . . . . . . . . . . . . . . . . . . . . . . . . . . . . . . . . . . . . . . . . . . . . . . . . . . . . 59 17.3 Wiring Layout . . . . . . . . . . . . . . . . . . . . . . . . . . . . . . . . . . . . . . . . . . . . . . . . . . 60 17.4 A.C. Wiring Diagram . . . . . . . . . . . . . . . . . . . . . . . . . . . . . . . . . . . . . . . . . . . . . 61 17.5 D.C. Wiring Diagram . . . . . . . . . . . . . . . . . . . . . . . . . . . . . . . . . . . . . . . . . . . . . 62 17.6 Plumbing . . . . . . . . . . . . . . . . . . . . . . . . . . . . . . . . . . . . . . . . . . . . . . . . . . . . . . . 63 17.7 Head System . . . . . . . . . . . . . . . . . . . . . . . . . . . . . . . . . . . . . . . . . . . . . . . . . . . . 64 17.8 Water Pressure . . . . . . . . . . . . . . . . . . . . . . . . . . . . . . . . . . . . . . . . . . . . . . . . . . 65 17.9 Hull/Deck Joint . . . . . . . . . . . . . . . . . . . . . . . . . . . . . . . . . . . . . . . . . . . . . . . . . . 66 17.10 Chainplate Reinforrcement . . . . . . . . . . . . . . . . . . . . . . . . . . . . . . . . . . . . . . . . . 67 17.11 Lifting Strap Placement . . . . . . . . . . . . . . . . . . . . . . . . . . . . . . . . . . . . . . . . . . . 68 17.12 Seacock Details . . . . . . . . . . . . . . . . . . . . . . . . . . . . . . . . . . . . . . . . . . . . . . . . . 69 17.13 Jiffy (Quick) Reefing . . . . . . . . . . . . . . . . . . . . . . . . . . . . . . . . . . . . . . . . . . . . . 70 TECHNICAL INFORMATION . . . . . . . . . . . . . . . . . . . . . . . . . . . . . . . . . . . . . . . . . . . . . . . 71 STANDING & RUNNING RIGGING . . . . . . . . . . . . . . . . . . . . . . . . . . . . . . . . . . . . . . . . . . 72 VENDOR LIST . . . . . . . . . . . . . . . . . . . . . . . . . . . . . . . . . . . . . . . . . . . . . . . . . . . . . . . . . . . . 73 VENDOR ADDRESSES . . . . . . . . . . . . . . . . . . . . . . . . . . . . . . . . . . . . . . . . . . . . . . . . . . . . 76

Page 5
FOREWORD & DISCLAIMER This is a modified version of the 1983 Cape Dory Owner’s Manual which was included with the vintage Cape Dory 31 sailboat built by Cape Dory Yachts, Inc., a company that ceased operations in 1991. It is offered here for use by those seeking a replacement for their original owners manual or for any sailboat owner who might benefit from the useful information it contains on general sailboat maintenance and repair. It is not suggested that it be relied upon implicitly, but that it act as a supplement to other sources of information currently available. References to people, companies and products mentioned within the Manual may now be obsolete; there is no longer a factory or Cape Dory Service Department to contact for support as the Manual states, no Dealers, no newsletter, etc. Also, it should be kept in mind that the information in this Manual may be not only dated, but may contain inaccuracies or omissions and that neither I nor anyone connected with the original Manual shall be held liable for any losses, injuries, or damages arising from its use. It was written as a guide for owners of Cape Dorys specifically and its application and suitability for use with other types of boats is not expressed or implied. Further, it is meant to be distributed freely and not to be used for profit. All trademarks, logos, products and businesses appearing in the Manual are the sole property of their respective owners and they retain all rights. I have no association with and do not represent any of the products, businesses, or persons named in the Manual. Cathy Monaghan, January 2006.

Page 6
LETTER OF WELCOME
Dear Skipper,
Welcome to the Cape Dory fleet!
You have joined the select group of sailors who recognize the quality construction and traditional workmanship found in every Cape Dory yacht.
This manual has been prepared to assist you in getting to know you new yacht before setting sail for the first time. It also is a helpful guide to follow for proper care and maintenance in the future.
The Cape Dory team of managers, supervisors and quality control personnel do their very best through every step of the construction process and strive to build boats of exceptional quality which will provide their owners with many years of sailing pleasure and retain a high resale value.
Please review the material carefully. You will enjoy your new Cape Dory more if you are familiar with the designs and construction of the yacht and with the equipment used on board.
Any questions you may have can be answered by your authorized dealer as he is a knowledgeable professional and is familiar with your new boat. He will continue to be your most important contact for information about your boat and for any problems should they develop.
We appreciate your confidence in our product and assure you that with proper care, you should have many years and miles of enjoyable sailing in your new Cape Dory.
Again, welcome to the fleet. May the wind always be fair.
Sincerely,
Andrew C. Vavolotis President Cape Dory Yachts, Inc.

Page 7
Cape Dory Owner’s Association
The Cape Dory Owner’s Association was formed as the company grew from its original beginnings in 1964 as a sailing dory builder. The earliest Cape Dory owners would gather for regattas, races and picnics in summer and during the frostbite season in the winter months. Later, as the Typhoon spread in popularity, more and more activities began taking place involving that class. With the advent of the Cape Dory 25, other Cape Dory owners readily welcomed the newcomers.
Today, the Cape Dory Owners Association is national in scope, and activities are increasing in number rapidly. Several Typhoon fleets are actively established and most Cape Dory owners find the Association an excellent means of communication. The Association publishes a periodic newsletter which contains interesting as well as helpful information.
If you are a Cape Dory owner, and are not receiving the newsletter, please write to us and well enroll you immediately. We need to know your name, address, and the model and hull number of your Cape Dory.
[Addendum: The Cape Dory Owners Association sponsored by Cape Dory disappeared with the demise of the company but there are several independent owners associations from which to choose: Cape Dory Sailboat Owners Association (CDSOA, Inc.): http://www.capedory.org/
This is a national association of Cape Dory sailboat owners headquartered in Maryland. It has members located nationwide, as well as abroad, and with several regional fleets they hold multiple on-the-water rendezvous events annually for both Cape Dory and Robinhood sailboat and powerboat owners in each region.
California Cape Dory Owners Association: http://www.toolworks.com/capedory/
This owners group is based in California and most of its activities take place in the San Francisco Bay area.
Lake Michigan Cape Dory Owners Association: http://www.lmcdoa.org/
This owners group centers its activities around Lake Michigan. End of addendum.]

Page 8
CUSTOMER SERVICE
The Cape Dory Yachts Customer Service Department has been established to provide technical information and a replacement parts ordering service for Cape Dory Owners.
Please do not hesitate to contact us with any questions or comments on your boat. We appreciate any suggestions that you might have to improve the product.
We suggest that you place any parts orders through your Cape Dory Dealer, but will be happy to accommodate you for special orders. Whenever you make an order, please provide the dealer or Cape Dory with your hull number and an accurate description of the part.
Situations may arise when we will be referring you to local marine stores or marine hardware manufacturers. Our intent in these cases is to provide you with the fastest and least expensive service.
Through our customer service department we strive to maintain our reputation for product quality and excellent service.
Sincerely, Eric J. Brehm Karla J. Johnson Customer Service Department

Page 9
CAPE DORY OWNER’S MANUAL
CHAPTER 1
INTRODUCTION
The intent of this manual is to help the owner of a Cape Dory to understand and maintain his yacht. This manual should be used in conjunction with other publications to fully understand the demands and pleasures of sailing. A suggested reading list is provided and monthly periodicals such as Sail, Cruising World, Motor Boating, Sailing, Rudder, etc. are also recommended. Obviously, personal knowledge and skills are required to handle and maintain any boat successfully.
Cape Dory yachts are constructed in a recently remodeled building facility located in East Taunton, Massachusetts. Our boats are assembled using modern methods, equipment, and materials obtained from the most reputable suppliers. The Cape Dory team of managers, supervisors and quality control personnel do their very best through every step of the construction process. Cape Dory strives to build boats of exceptional quality which will provide their owners with many years of sailing pleasure and retain high resale value.
The basic hull design of Cape Dory yachts is a traditional one which has proven itself over many years of use and thousands of miles of cruising. The long keel with attached rudder hull configuration combined with a generous but not bulbous beam provides stiffness and longitudinal stability; it also provides protection for the rudder, propeller and propeller shaft. Our sail plans are not as lofty as those used on more race oriented designs of similar size. Instead of high aspect ratio main sails, Cape Dory has continued with what it considers to be a more sensible cruising sail plan. This means that a smaller head sail is needed, that a family or few crew can handle a Cape Dory, and that the stresses on the rig and boat are less than those on high aspect ratio rigged boats under identical conditions. The interior layouts of Cape Dory yachts are designed to provide comfortable accommodations for a reasonably sized crew on boats of their size.
To protect your investment and to insure the enjoyment of your Cape Dory we recommend that you read this manual carefully and complete the Commissioning Checklist contained in it with your dealer. This list will serve as a guide in determining that no loss or damage has occurred to your boat while it was being transported from the factory to your dealer, and that all equipment is in order when you accept delivery. The checklist is for your protection; insist that it be completed. One copy must be returned to Cape Dory Yachts as a warranty registration. Once this registration process has been satisfactorily completed, your dealer will, if necessary, be able to file warranty claims for parts or service. He cannot do so unless the checklists are completed and returned. You will also become a member of the Cape Dory Owners’ Association.

Page 10
CAPE DORY OWNER’S RECORD
Complete and save this form for your records and future reference.
Yacht Name_____________________________Home Port______________________________
Hull Identification Number* ______________________________________________________
Dealer Name___________________________Address_________________________________
Salesman______________________________Delivery Date_____________________________
Date Commissioning Checklist/Warranty returned to CDY______________________________
* * * * * * * * * * * * * *
Owner’s Name_____________________________Address______________________________
State Registration/Documentation__________________________________________________
Engine Model and Serial Number___________________________________________________
Head Model and Serial Number____________________________________________________
Stove Model Number and Serial Number_____________________________________________
Spar Number__________________________Rigging Kit Number________________________
*Your Cape Dory is identified by a hull identification number (HIN) on the starboard corner of the transom. This identifies the number of the hull and supplies goverment officials with additional information concerning the builder, and the year of manufacture. There is also a builder’s plate with the hull number. In addition, there are serial numbers on your boat’s engine (see the engine manufacturer’s owner’s manual) and on some of the accessory equipment which you may elect to have installed.
We recommend that you record these important numbers carefully and keep copies of them both at home and aboard (see “Owner’s Record” form). These numbers and an accurate description of your property, in the event of theft, could be essential to their recovery.
Marking an inconspicuous place such as the inside of a locker underside of a door or drawer of a door or drawer, or the base of the mast with your initials, social security number or other unique “brand” may also aid in the prompt identification of your property, should the need to do so ever arise.

Page 11
DEALER’S COMMISSIONING CHECKLIST
Model_____________________________Hull Number_________________________________
Owner’s Name and Address _______________________________________________________
______________________________________________________________________________
Dealer_________________________________________________________________________
Date Sold__________________________ Date Launched_______________________________
*Indicates further information and/or drawings elsewhere in manual
1.1 Date Initials Receiving Record
1. __________ ___________ * All items on receiving checklist received in good order. Dealer should notify factory within ten (10) days of receipt, of any shortages or damaged goods.
1.2 PRE-LAUNCH CHECKLIST
2. ___________ ___________ Visually check underwater hull surface for any damage sustained during trucking or handling.
3. ___________ ___________ Through hulls all tight and clear of any foreign objects.
4. ___________ ___________ * Seacocks and valves all closed. Hose clamps tight.
5. ___________ ___________ * Check propeller retaining nut and perry nut for tightness. Cotter pin in place and bent over.
Record propeller information below:
Diameter_________________inches
Pitch____________________inches
Rotation _______________left or right hand
# of Blades________________2 or 3 (optional)
6. ___________ ___________ *Rudder swings freely side to side.
7. ___________ ___________ *Stuffing box packing adjusted. (Inspect to make sure packing is properly installed.)
8. ___________ ___________ *Bottom under cradle poppets or bulkheads sanded, primed and painted. (Fresh coat of bottom paint prior to launching, highly recommended.)
9. ___________ ___________ *Bilge dry.

Page 12
10. ___________ ___________ *Bilge pump connections okay and handle on board.
11 .__________ ___________ Check hull for any chips in gel coat.
1.3 POST-LAUNCH CHECKLIST:
12. ___________ ___________ Immediately after launching, check bilge for water. If water is present, check all through hulls and stuffing box.
13. ___________ ___________ Open seacocks or valves one at a time and check for leaks.
14. ___________ ___________ *Check stuffing boxes. The propeller stuffing box should drip water slowly, approximately one drop every ten seconds while shaft is turning to insure that the bearing and packing gland are lubricated by water. The rudder shaft stuffing box may not weep at all except in rough conditions.
15. ___________ ___________ *Check battery switch and electrical system operation.
16. ___________ ___________ Check battery electrolyte and charge level.
17. ___________ ___________ *Check head operation.
18. ___________ ___________ *Check bilge pump operation.
1.4 ENGINE START-UP CHECKLIST:(CD-22D, 25D, 27, 28, & 30 only)
19. ___________ __________ Check engine and transmission oil level and condition.
20 ___________ __________ Check belt tension on all belt driven components.
21 ___________ ___________ *Check that cooling water intake seacock is open.
22. ___________ ___________ Check to see that all clamps on exhaust hose are tight
23. ___________ ___________ On fresh water cooled engine check water level and antifreeze in the expansion tank.
24. __________ __________ Check engine mount nuts for tightness.
25. ____________ __________ *Check transmission bolts for tightness.
26. ____________ __________ *Check shift and throttle cable connections.
27. ___________ __________ *While coupling is disconnected, check prop shaft alignment using feeler gauges - .002” gap between flanges maximum – Note: Alignment should be checked several times during the first season after the rig has been tensioned and the flexible mounts have taken a set.
Page 13
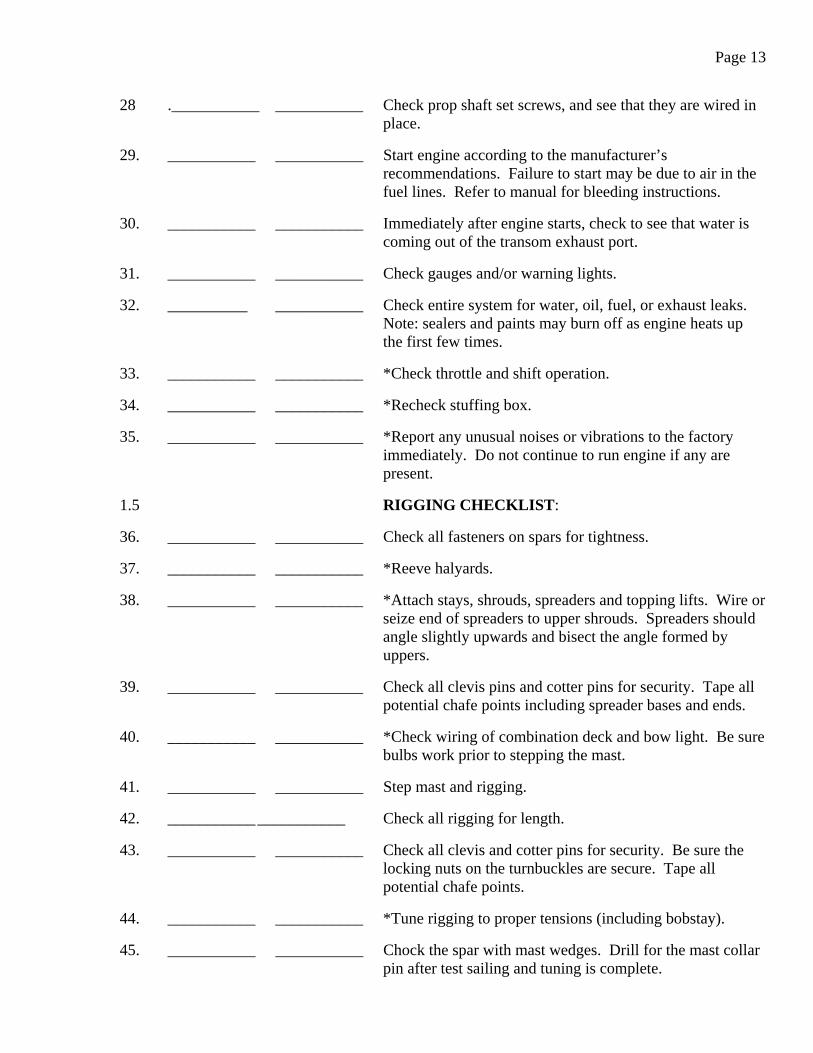
28 .___________ ___________ Check prop shaft set screws, and see that they are wired in place.
29. ___________ ___________ Start engine according to the manufacturer’s recommendations. Failure to start may be due to air in the fuel lines. Refer to manual for bleeding instructions.
30. ___________ ___________ Immediately after engine starts, check to see that water is coming out of the transom exhaust port.
31. ___________ ___________ Check gauges and/or warning lights.
32. __________ ___________ Check entire system for water, oil, fuel, or exhaust leaks. Note: sealers and paints may burn off as engine heats up the first few times.
33. ___________ ___________ *Check throttle and shift operation.
34. ___________ ___________ *Recheck stuffing box.
35. ___________ ___________ *Report any unusual noises or vibrations to the factory immediately. Do not continue to run engine if any are present.
1.5 RIGGING CHECKLIST:
36. ___________ ___________ Check all fasteners on spars for tightness.
37. ___________ ___________ *Reeve halyards.
38. ___________ ___________ *Attach stays, shrouds, spreaders and topping lifts. Wire or seize end of spreaders to upper shrouds. Spreaders should angle slightly upwards and bisect the angle formed by uppers.
39. ___________ ___________ Check all clevis pins and cotter pins for security. Tape all potential chafe points including spreader bases and ends.
40. ___________ ___________ *Check wiring of combination deck and bow light. Be sure bulbs work prior to stepping the mast.
41. ___________ ___________ Step mast and rigging.
42. ___________ ___________ Check all rigging for length.
43. ___________ ___________ Check all clevis and cotter pins for security. Be sure the locking nuts on the turnbuckles are secure. Tape all potential chafe points.
44. ___________ ___________ *Tune rigging to proper tensions (including bobstay).
45. ___________ ___________ Chock the spar with mast wedges. Drill for the mast collar pin after test sailing and tuning is complete.

Page 14
46. ___________ ___________ *Attach booms, sheets, blocks, oars, reefing lines toping lifts, etc.
47 .___________ __________ Wire bow and deck lights.
1.6 MISCELLANEOUS CHECKLIST:
48. ___________ ___________ *Fill water tanks and check operation of all pumps and drains.
49. ___________ ___________ Fill alcohol tank. Check for leaks and test operation of stove. See manufacturer’s literature on all stoves.
50. ___________ ___________ Water test ports and hatches.
51. ___________ ___________ *Recheck all through hulls, valves, seacocks, hose clamps, hoses, and stuffing boxes.
52. ___________ ___________ *Bend on sails.
53. ___________ ___________ *Interior appointments complete.
54. ___________ ___________ Optional equipment installed and operational.
55. ___________ ___________ Owner’s packet, ship’s papers, and ignition key given to owner.
56. ___________ ___________ Checklist (warranty registration) ready for mailing to factory.
I CERTIFY THAT I HAVE READ AND UNDERSTAND THE CONDITIONS AS LISTED IN
CAPE DORY YACHTS’ WRITTEN LIMITED WARRANTY.
Owner ________________________________Dealer__________________________________
Date ________________________ WITHIN SEVEN DAYS OF LAUNCHING,
RETURN CHECKLIST TO: Cape Dory Yachts, Inc. 160 Middleboro Avenue East Taunton, Mass. 02718

Page 15
CHAPTER 2
CONSTRUCTION
2.1 HULL
The hull is molded in a one piece mold which is turned from side to side as successive layers of fiberglass are applied during the laminating process. By placing the mold on its side we can place the fiberglass and work the resin more accurately than would be possible if the mold was always upright.
The exterior finish of the boat is pigmented gel coat which Is sprayed into the polished mold. Next, we apply two layers of multidirectional glass strand fiber to minimize roving pattern transfer from successive layers of laminate.
Finally, alternating layers of glass strand fiber and woven roving are applied until the desired thickness has been achieved, The thickness of the hull varies depending on the structural requirements a particular area needs, with the thickness increasing as you go from the sheer to the keel area.
2.2 DECK AND HEADLINER
Like the hull, the deck is molded in a one piece mold as a single unit. All exterior surfaces, including the non-skid compound are pigmented gel coat molded into the deck.
The deck is laid up with glass strand fiber and woven roving incorporating a balsa core for stiffness and insulation. Where hardware and equipment are bolted through, wood blocks, aluminum or solid glass replace the balsa wood core. In the highly stressed cockpit corners, unidirectional roving is utilized near the gel coat surface and on the backside of the laminate, giving high flexural strength in these areas. This minimizes stress cracking.
The headliner is a fiberglass part used to provide a cosmetic surface to the inside of the cabin as well as providing attachment points for the major bulkheads. It also provides an effective vapor barrier and thermal insulation due to the air gap separating the deck and the headliner.
The headliner is built with glass strand fiber and woven roving. After it has been parted from the mold, key areas are filled solid so that screws may be installed later. The headliner is then bonded to the deck accurately with a polyester adhesive compound. This is done with the aid of a jig that holds the liner in place while the adhesive cures. At this point the deck is parted from the mold and sent to the deck hardware department.
Some yachts, including the CD-45, have headliners made of plywood formica and teak which are backed up with a combination of plywood and fir fairing strips for fastening support. This system also provides an easily maintained interior surface with similar vapor barrier and insulating qualities.

Page 16
2.3 BALLAST
The ballast is cast in two sections and mounted inside the keel cavity. The cast pieces are first prefit and their location correctly determined. The Quality Control Department accurately checks the location of every ballast and records its weight against our specifications. Next. they are lowered into and encapsulated in a mixture of special low shrink bonding resin and microspheres. Besides its shrink characteristics, the bonding resin was chosen for having some resiliency should the keel be subjected to some sharp impact loads.
The ballast is then sealed with several layers of fiberglass, securely holding the ballast into the hull. This glass is gel coated, sealing the ballast from the rest of the boat and giving a smooth clean bilge.
2.4 RUDDER
The rudder assembly consists of two pre-molded fiberglass half shells completely filled with a reinforced polyester compound. This compound surrounds the pre-formed rudder shaft creating a solid rudder of exceptional strength. The blade is further reinforced by two layers of glass tape applied to the shell joints.
The rudder shaft is a solid bar of type 304 stainless steel, 1-3/8” in diameter, bent to fit inside the rudder shell. A bronze gudgeon casting imbedded in the bottom of the rudder to accept the bronze pintle casting and stainless steel pin which is attached to the keel. The pintle is set in polysulfide bedding compound and fastened onto the hull with bronze rods passing through the solid heel portion of the keel. The entire casting is then faired with polyester putty and glassed into the keel. This eliminates the electrolysis problem commonly found when stainless steel weldments are used in seawater.
2.5 V-BERTH, GALLEY AND SUB-FLOOR ASSEMBLY
The v-berth area has a molded liner which starts at the main cabin bulk-head and runs all the way forward to the anchor rode locker. This is built as the other FRP parts are, utilizing various cores and laminates as required.
It is then installed in the hull where it is glassed to the hull with two layers of alternating mat and roving. In some places the liner is joined further to the hull using a polyester adhesive.
The galley area also has another separate molded liner very similar to the v- berth in concept.
The molded fiberglass sub-floor assembly is designed to fit accurately and lock to the contours of the hull. This is bonded in place and a teak and holly sole is screwed down to it. This is installed after the v-berth and galley units are in place.

Page 17
Fiberglass inner liners offer three basic benefits:
1. added structural integrity
2. minimizes condensation problems
3. provides an easy-to-clean surface in storage
2.6 ENGINE INSTALLATION
One of the more critical installations we perform is the installation of the inboard diesel engine. The diesel is installed with fully adjustable flexible mounts attached to a heavily reinforced welded steel engine bed. This system effectively spreads the engine load over a large portion of the hull.
The exhaust is a wet system consisting of a fiberglass muffler and heavily reinforced rubber hose. The main advantage of this type of exhaust system is that it allows the cooling water to cool the exhaust gasses as they leave the engine. This system produces a quieter sound and reduces temperatures in the engine room preventing burns and minimizes a fire hazard.
The fuel system incorporates a custom 20 gallon aluminum fuel tank and a combination of flexible fuel lines and reinforced rubber hose. Flexible fuel lines have been chosen as they are very easily repaired in the field should a leak develop. Copper fuel lines require special tools to repair which may not be available at sea. Every installation includes a fuel filter and another fuel filter/water separator for that extra measure of safety.
2.7 MECHANICAL INSTALLATION
While the carpenters are completing their joiner work, the bulk of the mechanical installations are completed. The water tanks are layed in place. The plumbing is run to the manifold located under the galley sink and then into the respective compartments where the pumps and water heater are located. The heavy wiring from the engine is run up to the electrical panel. The lightning ground system wires are run from the areas where the chainplates will later be fitted to the external ground plate located in the bilge. The bonding system joining all underwater thru hulls is completed.
The 28 gallon holding tank, which was installed when the ballast was installed, is plumbed and hoses running under the sole from the head itself to the tank are run and the alcohol line is run. The engine plumbing including the water, exhaust and fuel lines are run and secured at this time.
The engine is aligned and the stuffing box on the prop shaft and rudder shaft receive final attention along with the upper rudder bearing assembly.

Page 18
2.8 HULL TO DECK JOINT
When most of the major components of the interior have been installed, the hull is made ready to receive the deck. Built into the hull is an internal hull flange approximately 3-1/4” wide and 3/8” thick. (See the enclosed drawing for details of this assembly.) This internal flange is made up of the same layers of woven roving that form the topsides of the hull.
The deck is raised over the hull and the process of fitting the deck to the hull is begun. All bulkheads are carefully scribed and cut until the deck rests on the hull flange.
The flange is then prepped and coated liberally with a special polyester bonding material and the deck bonded into place. The joint is later thru-bolted by ¼” bolts on 12” centers. A teak toe-rail is then screwed down with #14 screws through the deck and the hull flange, adding to its strength. A teak rub strake is finally added, completing the installation.
We feel our deck to hull joint to be one of the best for several reasons:
1. The flange should be internal. This gives the largest possible flange area, important for flexural strength. Also, boats with external flanges are subject to damage and leakage when run hard into a dock or other immovable objects. Impact in this area starts a crack that water is sure to find its way through under normal sailing conditions.
2. We use a semi-rigid bonding compound between the hull and the deck as well as through bolts. Due to the abrupt angular discontinuity created at the hull/deck intersection, large forces can be built up while underway. It is best to prevent movement here, otherwise things start to work and leaks occur. A rigid compound used here might seem the best but they generally don’t have enough impact strength and resiliency to prevent leakage over a long period of time.
3. Many builders use aluminum toe rail extrusions and thru bolt this structure every 4”. This is a very difficult assembly to keep watertight because the fastener heads are exposed while our bolt heads are covered over and the toe rail screws are bunged.
4. The strength of the bonded and bolted hull/deck is greater than the thru-bolted joint. If it takes about 1000 PSI to delaminate the joint and the joint is 3” wide, over a 4” length, you need (4 x 3 x 1000) or 12,000 lbs. of force to rupture it. On a boat that is thru-bolted every 4” you have the strength of one bolt to contend with (provided they haven’t used a semi-rigid adhesive). The shearing strength of the ¼” stainless steel bolt generally won’t exceed 4000 lbs. and thus is considerably weaker than the bonded joint.
2.9 CHAINPLATE SYSTEM
Our chainplate system is easy to understand and does what any chainplate system must do – transmit the rigging loads to the hull and not leak. We use chainplate castings with substantial base areas so that when installed and caulked the resulting seal is impervious to water penetration. Thru-bolting the casting to the hull flange also prevents movement in this area. Many builders attach chainplates

Page 19
to the knees glassed to the hull. These plates then pass on through the deck. It is virtually impossible to prevent the deck from moving in this type of installation and hence the resulting leaks.
Every Cape Dory chainplate design has been subjected to structural evaluation including destructive pull tests assuring that they meet our structural requirements. All bolts are tightened to specific tolerances using a torque wrench.
The rigging was designed using a safety factor of 3 while the chainplates were designed to meet a minimum safety factor of 4.
Please refer to the drawing for further details.

Page 20
CHAPTER 3
STEERING
The pedestal steering system on your Cape Dory has been carefully designed, installed and aligned here at the factory to give you excellent service with minimal maintenance.
A metal weldment comprised of the pedestal sheaves, wire turning sheaves and quadrant stop is bolted under the deck tying the entire sheave assembly into one integrated unit. This is fastened in place by the four pedestal bolts through the cockpit sole.
The weldment also has a quadrant stop, limiting the swing of the rudder to about 35 degrees port and starboard. This is especially useful when motoring in reverse, as the rudder would tend to swing completely to one side with great force resulting in possible damage to either the hull or steering system.
During installation we have replaced many of the vendor supplied nuts with self locking nuts as we have found they will otherwise loosen during road transit, engine vibration and general use.
It is imperative that the owner take the initiative to inspect the steering system for proper wire tension, wire alignment, and fastener tension during the sailing season. Periodic maintenance is also required on all moving parts. In particular, the lubrication of the bronze sheaves is critical to the smooth operation of the steering unit.
The keyway that is cut into the rudder shaft is purposely cut a little long to accept an attachment for a number of automatic pilot systems. This saves a very costly alteration from having to be performed in the field were another keyway to be cut and eliminates the need to bolt something to the shaft which would tend to weaken it.
The head of the rudder shaft above the pillow block bearing has been keyed to accept an emergency tiller. Access for this is gained by removing the bronze deck plate in the cockpit sole.
Should anything ever happen to your primary steering system, the key for the deck access plate and the emergency tiller should be readily accessible and not buried in the bottom of a locker.
Please review carefully the enclosed maintenance hints supplied by the vendor. A thorough understanding of how your steering system works is the only way you can be assured of its proper performance year after year.

Page 21
CHAPTER 4
ELECTRICAL SYSTEMS
Your Cape Dory has been equipped with a comprehensive electrical system designed to meet your present and future needs. Wiring runs and connections are placed to prevent exposure to water or other hazards, yet to remain accessible for repairs or additions. The A.C. (alternating current - Shore Power) and D.C. (Direct Current - Ship’s Power) wiring is plastic coated, stranded copper wire with crimped-on connectors or soldered joints as required. The electrical system is basically maintenance free, with only the batteries requiring periodic inspection.
4.1 D.C. 12 VOLT SYSTEM
The D.C. system is powered by 12 volt, 75 amp hour batteries located in the cockpit seat lockers. They are enclosed in an impact resistant, noncorroding plastic case which is firmly attached to the hull. All Cape Dory yachts use standard negative ground system which must be considered when purchasing and installing additional equipment.
The batteries are controlled by means of the BATTERY SELECTOR SWITCH located on the bottom of the D.C. POWER PANEL which is in the companionway area. This switch acts as a master disconnect as well as a selector for battery #1, battery #2 or batteries #1 and #2 together. Commonly one battery is reserved for engine starting duty while the second battery supplies all other needs.
CAUTION: NEVER TURN THE BATTERY SWITCH TO THE OFF POSITION WHILE THE ENGINE IS RUNNING. SERIOUS DAMAGE TO THE ALTERNATOR WILL RESULT.
The level of charge of the batteries may be checked with a BATTERY CONDITION METER located in the center of the D.C. POWER PANEL. The level of charge of the battery, alternator output, state of the voltage regulator and power draw to services can all be checked with the use of the DC voltmeter supplied on the 12 volt power panel. A voltmeter gauge is located on the engine instrument panel. Your voltmeter will indicate differently, depending on when the readings are taken. Here are a few simple guidelines. Fully charged batteries that are in a static state should read between 12.3 - 12.6 volts on the numerical scale, and just barely be touching the high end of the yellow band on the colored dial of a gauge (The term static means that the battery hasn’t been charged or discharged for at least two hours) . If the pointer is in the yellow, or red low band on a gauge, or reads between 11 - 11.5 volts on a voltmeter, then the battery is about half discharged and should be charged to insure its usefulness. If the engine is started, and the needle does not move up this would indicate that no charge is being delivered to the battery.
When the battery is being charged, the pointer should be between 12.6 - 13 volts, which is approximately the center of the green band on gauge types. The pointer may move up to about the 13.7 volt range (the high end of the green band) toward the end of the charge cycle, at which time the pointer drops back to the 12.6 - 13 volt range, as voltage regulation controls this function. If the battery voltage reaches 15 volts (which is the high red band on the gauge) this indicates that the

Page 22
battery is being overcharged and will damage the battery if left unchecked. The voltage regulator is most likely at fault.
When the battery is being discharged (having electrical loads placed upon it) and no charging current applied, it is normal for the pointer to indicate between 11.4 - 12.6 volts, or be in the yellow band.
A FINAL WORD: The above guidelines provided are merely to help you to establish what is normal - the usefulness of the meter will depend on your own routine observations which will spot trouble when it occurs.
The BATTERY TEST SWITCH adjacent to the meter is used to directly connect the meter to the individual batteries. The condition may then be read directly from the meter. The BATTERY SELECTOR SWITCH must NOT be in the ALL position and the engine should NOT BE RUNNING or false readings will result.
The batteries should be inspected and serviced at least once a month, more frequently when under heavy use. The terminals should be free from corrosion and tight on the battery posts and the electrolyte kept at the proper level by topping up with distilled water.
CAUTION: Avoid spilling battery electrolyte into the bilge and avoid getting any salt water in the battery. If this should occur, ventilate extremely well since poisonous gas will be given off.
A Red PILOT LIGHT is provided on the panel. This light is illuminated whenever the batteries are connected to the system and provides you with an additional reminder that the batteries are on and also provides enough light to read the switch panel labels at night. The PILOT LIGHT draws very little current and will not run the batteries down even when left on for long periods of time.
There are several individual circuits provided on the D.C. POWER PANEL. Each circuit is activated by a toggle switch and protected by a circuit breaker. Before adding additional electrical equipment, check the required rating of the circuit breaker. Also be certain the number and size of the batteries is sufficient for the added loads.
A tripped circuit breaker is indicated by a raised white button. The breaker is reset by first turning the toggle switch off and then depressing the white button. Before attempting to reset a tripped breaker, an effort should be made to find the cause of the overload, the most common being a short circuit in one of the fixtures or wires, or trying to operate too many devices on one circuit.
4.2 A.C. 110 VOLT SYSTEM
The A.C. system operates on 115 volt, 60 cycle current. Power is supplied from a 30 amp shore service by connecting the shore power cord to the receptacle in the cockpit well. Make sure the main circuit breaker on the A.C. POWER PANEL is in the off position when connecting the shore power cord.
IMMEDIATELY after connecting the shore power cable, check the 110 pilot light. If it is on and the main breaker off this indicates a live circuit from the shore power receptacle. Next check the reverse polarity indicator light. If it is on, disconnect the shore power cable IMMEDIATELY and

Page 23
determine the source of the problem as serious electrical shock hazards may exist to persons on board or along side your yacht, even if the main circuit breaker is off. The ship’s wiring has been thoroughly checked and is of the proper polarity when it leaves the factory. If the system has not been altered, the reverse polarity condition is in the shore side system and should be brought to the attention of the system operator. If the reverse polarity light does not come on, the system is safe to operate. Turn on the MAIN CIRCUIT BREAKER at the top of the panel and then select whichever branch circuit is needed.
CAUTION: Before turning on the hot water heater insure that the tank is full of water. Permanent damage will result from operating the heater with an empty or partially full tank. To check that it is full, simply open the hot water tap on the pressure water system and watch for continuous water flow.
On each Cape Dory that has been fitted out with a factory installed 110 volt AC system we have included or added a #8 green coated copper wire as a ground. This wire is led from the common AC ground to the engine, and is in turn tied into the boat’s ground system. This ground cable is a safety feature installed to avoid serious electrical shock hazards should a connection to a faulty dockside power source be made.
Under no circumstances should this cable be disconnected irrespective of claims that a certain amount of electrolysis could be created by the addition of this wire.

Page 24
CHAPTER 5
GROUNDED SYSTEMS
5.1 BONDING SYSTEM
All thru hulls and seacocks below the waterline, including the stern tube, are connected to one another, to the engine block and to the external ground plate with a continuous loop of #8 copper wire. This is done to minimize the effects of electrolysis should one fitting become “hot” for any reason. Generally, a fiberglass hull is considered to be non-conducting and as such the chance of stray electrical currents forming is minimal. (Bonding system is standard on all diesel equipped Cape Dorys.)
As more and more electrical equipment is added to a boat, it becomes increasingly important to BE ALERT TO THE THREAT OF ELECTROLYSIS. We recognize that there are various types of instrumentation available to further monitor strong currents and any potential difference between ground and the thru hulls. These instruments can all be added to the supplied ground wire system. It is highly recommended that a sacrificial zinc be installed on the shaft (see shafting section).
5.2 LIGHTNING GROUND SYSTEM
Your Cape Dory is equipped with a lightning ground system installed in accordance with the American Boating and Yacht Council (A.B.Y.C.) specifications. Every shroud and stay is connected to an external ground plate by a #8 A.W.G. stranded copper wire. Other equipment requiring bonding include the engine, fuel tank, mast step and fuel fill cap. Within practical working restraints, the wires are lead directly to the ground plate.
While no one can predict how lightning will react when it hits a spar, we know from actual experience that this system offers added protection.
During a lightning storm refrain from touching any metal objects such as shrouds, mast, stanchions, pulpit, etc., as these may attract lightning.
Do not paint the external ground plate with bottom paint as this prevents the plate from grounding out with the seawater.
Periodically inspect the connections in the bilge to see that they are tight and clean and free from corrosion.

Page 25
CHAPTER 6
THRU-HULLS & SEACOCKS
Since some holes below the waterline are necessary, ball valves and seacocks are used to open and close those reliably. They have been in use for years aboard craft of all types, and have proven their value many times over.
The seacock is essentially a round tapered bronze shaft with a hole running along its diameter. It can be rotated from one end in a 90 degree arc within a pipe junction to the open or closed position. The seacock is least likely to jam open with seaweed or other foreign matter.
Before launching, and regularly throughout the season, you should check to see that all hose clamps are tight and in good condition. Seacocks are designed to provide a positive means of stopping a flow of water into the hull, should a connection fail or hose rupture. These fittings are the single most important safety devices that affect the watertight integrity of your boat. Checking them for ease and effectiveness of operation means making certain that the handles move the full arc that they were designed for, and that sinks, toilets, and cockpits drain easily when filled.
Whenever the boat is left unattended in the water, ALL thru hull fittings should be left in the CLOSED position except for those serving the cockpit scuppers. Be certain to open the engine cooling seacock BEFORE starting a diesel engine. The water pump impeller could be damaged and/or the engine and exhaust system damaged by overheating if the engine were to be started with the seacock closed.
Routine maintenance of seacocks calls for disassembling them when the boat is out of the water, applying a waterproof grease to all friction-bearing parts and reassembling. When disassembling seacocks, do so one at a time as the components are individually fitted to each other by their manufacturer. Your dealer or marina will suggest a good grease available in your locality. Automotive water pump grease or Lubriplate may be used.
Seacocks should be worked frequently to keep corrosion from forming, causing them to jam.
To Disassemble Your Seacocks: there is a locknut on the outer end of the shaft - back it off and remove it. Next, back off the hexagonal end plate, removing it completely from the shaft. Then from the opposite end, pull the shaft out of the housing. Do not use a hammer or hard object to force the shaft out of the barrel as you may damage the threads. After you have cleaned off the old grease - inside and out -replaced it with new grease, reverse the procedure and reassemble. Be sure that you tighten the end plate tight enough so that the seacock will not leak, but not too tight or the mechanism will not turn. A thin layer of lubricant between the end plate and locknut will facilitate tearing down next season. For obvious reasons, this procedure is to be carried out while the boat is out of the water.
Your seacocks for the cockpit drain should almost always be left open. Their primary function is to be able to shut off a flow of water should the drain hose burst or come disconnected. Because these are the least used seacocks on the boat, there is a tendency to forget that they are there. DON’T!

Page 26
Work them frequently, and service them annually so that they will work should an emergency arise. Leave all seacocks open when the boat is stored for the winter so there is no freezing damage.
The other seacocks should normally be left in the closed position when you leave the boat. Be sure that you establish a routine of opening and closing seacocks so that you don’t overheat your engine or burst hoses in the head. Since the head bowl is near the waterline particular attention should be paid to the seacocks that serve the head. They should be shut off anytime you are asleep or off the boat. A malfunction in the head or leaving the head intake valve open could cause the boat to flood or sink if undetected. Simply closing the seacocks eliminates this hazard. Set up a routine to do this all the time.

Page 27
CHAPTER 7
ENGINE SYSTEMS
The engine fitted in the CD-31 is the Universal Model 25. This is a 4 stroke diesel with direct fuel injection. There are 3 cylinders with a total displacement of 52.2 cubic inches. A hefty flywheel is mounted to dampen vibration and 2:1 reduction gear/transmission provides the output. Parts and service availability are excellent due to the fine Universal network in this country.
The engine installation is best broken down into several systems and a description of each system follows. The systems are electrical, exhaust, cooling, fuel, shafting, maintenance and winterization. Included in each section is our experience of what has gone wrong with other boats which might help should you encounter a problem.
7.1 ENGINE ELECTRICAL SYSTEM
All Universal 25’s are fitted with a 55 amp alternator which charges the two batteries. The alternator has a transistorized regulator. Additionally there is an electric starter with a solenoid for remote starting. Fuel is pumped electrically and the engine is fitted with glow plugs for easy year-round starting.
7.2 EXHAUST SYSTEM
The exhaust gases enter a waterlock muffler on the aft port side of the engine. Here they are mixed with the cooling water and forced out the transom. Little maintenance of this system is required. It is recommended that every time the engine is started you look over the transom to see if the cooling water is coming out with the exhaust. If it isn’t, not only will the engine block overheat but the exhaust system will overheat as well. The routing of the exhaust hose should not be changed or problems may develop. For winterizing the exhaust system a drain plug is fitted to the exhaust muffler allowing it to be drained.
7.3 COOLING
The Universal 25 Diesel is fresh water cooled. As previously mentioned, the cooling water is discharged into the exhaust system. The cooling water enters the hull through a screened seacock and is pumped through a Jabsco impeller type pump mounted on the engine. If the engine is started with the seacock closed or water obstructed in another way, damage to the rubber impeller will result. A spare impeller should be carried aboard at all times and is easily changed.
After the seawater has passed through the engine’s heat exchanger, it is diverted through the heat exchanger in the sail locker, heating the potable water supply. After the water heater, the water passes through a vented loop located under the bridge-deck and is injected into the exhaust elbow,
Page 28
where it passes overboard. The vented loop is to provide antisiphon protection which will prevent a siphon from forming which could flood the engine. The antisiphon valve should be cleaned often so that it functions properly and does not spurt water.
As the engine is fresh water cooled, there is a separate loop that the engine cooling water must make. The fresh water comes in “contact” with the seawater in the engine’s heat exchanger where it is cooled. Before it is cooled, the water has passed through the engine block and manifold and then through the potable water’s heat exchanger. From here it goes to an expansion tank located in the sail locker. This tank must be the highest point in the fresh water loop to allow trapped air to escape and not block the flow of water. You should periodically inspect the water level in the expansion tank to be certain the water level is satisfactory. Never open the pressure cap on the engine as the entire cooling system will drain out and you will have to replace it through the expansion tank. The pressure rating on the expansion tank’s pressure cap is considerably lower than on the one on the engine to prevent water from escaping there should the engine become overheated.
The fresh water used to cool the engine should have antifreeze in it to inhibit rusting and prevent it from freezing during the winter months.
7.4 FUEL SYSTEM
In order to run, a diesel’s only requirement is clean, water-free, air-free fuel and combustion oxygen. There are no spark plugs or ignition requirements. 95% of all diesel engine problems result from fuel problems. The engine manual that comes with the engine describes the bleeding procedures and every owner should know how to do this. The fuel feed line must be 100% air tight or it will suck in air which eventually will reach the high pressure pump and cause the engine not to start until this air is expelled. All engines are test run here at the plant and are fully bled, however air may be introduced in trucking or launching and must be bled out once the boat is launched. The fuel system consists of rubber hoses secured with hose clamps and threaded fittings made tight with pipe dope tape or sealer. The complete fuel line from the pick-up tube in the tank to the fuel pump in the engine must be tight or air will be introduced.
All CDY engine installations incorporate two fuel filters which also must be air tight. Any time the fuel system is opened up, as when changing a fuel filter, air will be introduced into the system which must be bled out.
The only other problems that can occur are caused by dirty or water laden fuel. Water is especially harmful in that its presence in the delicate passages of the high pressure pump will cause rust which may ruin the very costly fuel injection system. The best way to avoid water in the fuel is to keep the fuel tank nearly full at all times. This reduces the air space in the tank, which cuts down on condensation. A water separator which should be periodically checked and drained when necessary, is also provided.
Diesel fuel stabilizer also works, is highly recommended, and can be obtained from your local fuel dealer.
When filling the fuel tank, care must be taken not to overfill it. This will result in excess fuel being expelled out the vent hose and into the ocean which is illegal. Care must also be taken to see that the

Page 29
fuel fill cap is replaced securely so that no water will leak into the tank. Fuel drawn from a cool underground tank will expand when placed in the warmer ships fuel tank. Therefore the tank should only be filled to 95% of capacity to allow for expansion.
Diesel fuel while less volatile than gasoline is still explosive and extreme care should be taken while fueling or working on the fuel system. Never allow a mechanic to use ether as a starting aid. Ether can cause over pressurizing of the small cylinder on an auxiliary diesel.
7.5 SHAFTING
All Cape Dory 31’s are fitted with 1” diameter bronze “Tru Shaft” propeller shafts. The propellers require a standard tapered SAE bore and are secured with one 3/4” nut, a Perry Nut zinc and a 1/8” cotter pin. Vibration is minimized through the use of flexible engine mounts.
Alignment is very critical and should be checked carefully several times the first year and at the beginning of every season. Alignment can only be accomplished in the water, with the rig tuned. All engine mounts are adjustable up and down and athwartships. IT IS MANDATORY THAT THE FLEXIBLE COUPLING, IF FITTED, BE REMOVED WHEN CHECKING ALIGNMENT. A common problem is the installation of a zinc between the prop eller and the hull which prevents the alignment from being checked. To eliminate this problem a “Perry Nut” zinc is used. This zinc is used in place of the propeller nuts and can be ordered from Perry’s Boat Harbor and Drydock, Isleton, CA 95641 (916/777-6461). The nut is 3/4” with 10 threads to the inch and a 1-3/4” hub diameter.
Alignment is checked by mating the two metal coupling flanges together by hand and measuring the gap between them with a common automotive feeler gauge around the entire periphery. There should be no more that .002” gap anywhere. Once alignment is arrived at the flex coupling should be installed and all bolts tightened. Particular attention should be paid to the engine mount nuts and bolts. These should be checked on a routine basis.
7.6 STUFFING BOX
The propeller shaft and the rudder shaft are fitted with stuffing boxes to control leaking. The adjustment of the stuffing box is especially critical on the propeller shaft. If it is too tight the packing will overheat and burn and once burned, leak uncontrollably. If too loose, it will leak excessively. When new, the packing will wear in and may require frequent adjustment. The ideal is to have one or two drops of water every ten seconds or so. In practice the stuffing box is properly adjusted as long as it is permitted to leak and the leaking is not excessive.
If you are having trouble keeping the stuffing box from leaking excessively, alignment should be rechecked. Misalignment will cause the packing to wear excessively and once corrected should solve the leaking problem. All CDY stuffing boxes use 1/4” waxed flax packing. Do not use synthetic or Teflon® packing.

Page 30
7.7 MAINTENANCE
Owners should refer to the engine manual for recommended maintenance. Daily checks should be made on the oil levels and fuel level. Particularly important is that the engine mounts and coupling bolts be checked often to see that they remain tight. Periodically it is a good idea to go over the entire engine with a set of wrenches tightening all bolts. Care must be taken not to overtighten and strip bolts and particular care must be taken on bolts that require certain torques such as head bolts. Engine vibration loads may have been experienced during shipment over the roads. Beyond the above, the engine itself should be kept clean and dry, and the fuel fresh, water free and dust free. The oil and filter should be changed often and the two fuel filters changed at least annually.
7.8 WINTERIZATION
Winterization is best left up to your storage yard. If you do it yourself, you should follow the instructions in the engine manufacturer’s owner’s manual. The major problem that can arise during winter layup is the danger of the engine water freezing. This can be prevented by either draining the water completely out of the engine and exhaust system, or by treating this water with antifreeze. Refer to the label for the proper mixing instructions for the degree of protection required in your locale. If the antifreeze system is used, it is mandatory to remove the thermostat to insure that water enters all areas of the block.

Page 31
CHAPTER 8
PRESSURE WATER SYSTEM
Your yacht is equipped with an automatic demand type fresh water system. In use, it is quite similar to a typical home water system in that no switches need be turned or pedals pushed in order to get water.
The system is activated by a circuit breaker on the D.C. Panel. Once the system is switched on1 the pump maintains a pre-set pressure at all times. When you open one of the faucets, the slight decrease in pressure which results is sensed by the pressure regulator built into the pump. The pump starts and runs until the faucet is shut. The pressure then builds back up and the regulator shuts off the pump.
Three water tanks feed the system: A port and starboard tank of 30 gallons each under the main cabin berths, and a bow tank of 24 gallons for a total of 84 gallons. All three tanks enter a common manifold under the galley sink. The tanks enter from below and each is fitted with a bronze shut off valve. Note: Only one valve at a time should be open to prevent the syphoning of water between the port and starboard tanks in extreme conditions and to prevent air from entering the system from empty tanks.
If water is left standing in tanks for an extended period of time, it may adopt an unappetizing odor and appearance. If flushing the tank does not eliminate this problem a mild solution of baking soda may be used. After letting the baking soda stand for several hours the tank and water system should be flushed thoroughly before refilling with fresh water.
Cape Dory water tanks are constructed of polypropylene. If too much water pressure is used when filling the tank it may burst or crack. To eliminate this possibility the 3” access covers should be opened while filling. This also allows you to see when the tanks are full. Care must also be taken not to overtighten the access cover.
Coming off one side of the manifold through a valve is the line leading to the manual backup galley pump. This pump is intended for use only when there is a power loss or mechanical difficulty with the electric pump. The valve at the manifold should be kept closed when the pressure pump is being used so that the electrical pump won’t try to take its suction back through the hand pump and introduce air into the system and/or damage the backup pump.
Coming off the other side of the manifold is the line leading into the fresh water strainer and then into a pressure pump. The water leaves the pump at 25-35 PSI and goes to a “T” fitting. Here the cold and hot water systems separate.
On the hot side of the “T” fitting there is a check valve to prevent hot water from backing into the cold water side and a manual shut off valve used to isolate the hot water system for trouble shooting and safety purposes. From here the water goes into the hot water tank and back to a “T” under the galley sink. One side of the “T” feeds the galley sink and the other the head sink with no fittings in between. The cold water leaves the first “T” and passes back to a second “T” under the sink, and then on to the two sinks with no intervening fitting between the faucets and “T”.

Page 32
Start-up varies depending when your boat was shipped from the factory. Boats shipped between April 15th and September 15th do not have antifreeze in them while boats shipped September 15th through April 15th do.
On boats which have antifreeze in them the valve leading into the hot water side of the system was kept closed and only the cold water side of the system was tested here at the factory. This water should be flushed out and then the hot water side filled. The antifreeze used is safe for potable water systems and made by Sudbury Laboratories here in Massachusetts. BE CERTAIN THE HOT WATER TANK IS COMPLETELY FILLED BEFORE TURNING THE 110 VOLT HEATING ELEMENT ON OR IT WILL BURN OUT THE ELEMENT. Also be careful not to accidently activate the high temperature, high pressure relief valve which projects out from the side of the tank. Once the lever arm has been pulled, the valve will not reset and it must be replaced.
To activate the water system, fill up the tanks and open one valve on the manifold. We suggest you run the pump and open the cold water side of BOTH faucets until a steady flow of water comes out. Close the faucets and repeat on the hot water side. You must be sure to eliminate any trapped air from the system or the pump will cycle rapidly or never shut off.
We hope that we have found any problems here at the plant but always check the clear hose where it qoes into the pump for air bubbles flowing in the line.
If air appears you must find its source, i.e. a leaking connection, leaking strainer, faulty manifold, or an empty tank.
Also, periodically check for a leak in the pressure side of the system. One tip off that something is leaking is the pump coming on at times when no faucet was opened. This signifies a loss in pressure which a leak would cause.
8.1 PUMPS
The hand and/or foot operated fresh water pumps located in the galley and head areas are self priming. If a pump fails to operate, check first to be certain that there is water in the tank, and then to see if the hose is kinked or being constricted by some heavy object. If the hose is clear and the pump still fails to operate, disassemble the pump and inspect the operation of the internal check valve.
8.2 GRAY WATER DRAINAGE
The shower, head sink and melted icebox water drain into a common sump box just under the cabin sole. The sump is equipped with an electric pump which pumps the water overboard. The pump is activated by a switch on the electrical panel and should be run periodically in addition to after using the shower or head sink. Should the water level get too high in the sump due to power failure, pump failure or just not turning the pump on, there is an emergency overflow hole which will allow the water to spill over into the bilge. It can then be pumped out with the manual bilge pump.

Page 33
We suggest that you clean the sump regularly with a strong detergent or bilge cleaner. There is a plugged hole in the bottom of the sump box side to assist in cleaning.

Page 34
CHAPTER 9
HEAD SYSTEM
Refer to the head manufacturer’s instructions on use of the marine toilet. It is recommended that a minimum amount of flushing water be used on each cycle to maximize the capacity of the holding tank. There is a deck pump-out fitting conveniently located on deck from which your marina can pump out the tank.
Government regulations require all U.S. yacht manufacturers to install a holding tank system or approved waste treatment system to prevent pollution. The CD-31 is fitted with a 28 gallon fiberglass holding tank built into the keel cavity.
All tanks have a 3” access cover on the top for inspection and clean-out. The use of deodorizing chemicals as sold for recirculating toilet systems is recommended to control odor. All tanks are fitted with a deck pump out plate from which your marina can pump out the tank.
The tank and head should be winterized by cleaning and treating them with a Winterguard® type antifreeze. Winterguard® is a non-toxic antifreeze which can also be used to winterize your fresh water systems.
If optional overboard discharge system is fitted, a “T” is placed in the deck pump out line. This leads to a vented loop, then to a Whale Gusher GP-10, or similar, manual diaphragm pump and then overboard through a seacock. With this system it is not possible to avoid using the holding tank. It is possible to use a diverter or “Y” valve in the system to isolate the holding tank completely where this is legal. Consult your local dealer for recommendations on this.

Page 35
CHAPTER 10
SAIL CARE
Sails should be protected from chafe by padding spreaders and other gear or by installing chafe patches on the sails themselves. Spreaders and shrouds can chafe genoas and other overlapping jibs when those sails are sheeted in tightly and can chafe the mainsail when running before the wind. Topping lifts frequently chafe the leach of the mainsails.
Inspect your sails frequently and take care of chafed stitching or small tears before they become a major problem. A small ditty bag with some thread and a few sail maker’s tools on board can come in handy and save you a few dollars.
Sails should also be protected from sunlight as much as is practical. Ultra violet light can break down the Dacron in the sail cloth and stitching. Sails that are left furled on booms, jib club booms and forestays without suitable covers are most susceptible to this problem. Suitable sail covers are available from Cape Dory through your dealer.
Mildew is no longer the major concern that it was in the days of natural fiber sails. Your new sails should be dry before folding if for no other reason than to prevent the unsightly growth of this dark mold.
In order to retain the shape of your sails they should be folded after each use. In the case of the mainsail, outhaul tension should be relieved before folding the sail on the boom.
After the season, sails should be inspected and if necessary, serviced by a competent sailmaker. For appearance’s sake stains should be removed and the sails washed gently with a mild soap and thoroughly rinsed.
The mainsail has plastic slugs which are inserted into the track on the after side of the mast. A hinged mast gate is provided. After the sail slugs are inserted in the track, close the gate and install the cotter pin with ends directed away from the sail so they will not tear it. Bend the ends of the pin over and tape them. Insert plastic slugs at the foot of the main into the boom sail track.
Battens are thin wooden or fiberglass stiffeners inserted in the trailing edge of your boomed sails to support the outward curved leach. When inserting the batten, the thin edge goes into the batten pocket first. Battens, particularly wooden battens, can twist and warp if they are not kept flat. Keep this in mind when storing them. Battens should always be removed when the mainsail is furled.

Page 36
CHAPTER 11
INTERIOR OPERATION & MAINTENANCE
Periodic cleaning is essential to keep the interior of your boat clean and bright. Choose sunny, breezy days for your boatkeeping chores as sun and fresh air are a great help in drying and airing interior cushions, etc. while you continue with chores below; they also contribute to your enthusiasm for the task!
11.1 CUSHIONS
Cloth covered interior cushions are made from several different materials depending on which color or style you selected. We, therefore, recommend that you either have the cushions dry cleaned or clean them with an upholstery shampoo of the spray foam type.
Vinyl interior cushions and cockpit cushions should be cleaned with a commercial vinyl upholstery cleaner. Follow the manufacturer’s instructions regarding the use of these products. To prevent the growth of mildew beneath vinyl cabin cushions, elevate them when leaving the boat to allow air to circulate. Remove traps on boats so equipped so lockers will be aired.
11.2 ICE BOX
The ice box on your Cape Dory is designed to drain water from melted ice through scuppers into the sump box. Periodically run the sump pump to empty melted ice water.
Food items should not be left for long periods of time in a closed ice box without ice. Spoilage, odors, mold and mildew will result. Plan to clean out your ice box (both ice and food items) at the end of each sail or cruise when you are leaving the boat for an extended period of time. Remove the ice box cover to permit thorough drying. Clean up any spillage of food in the ice box, etc. to prevent blocking of the scuppers and drainage of this material into the bilge.
Clean the fiberglass interior surfaces of your ice box periodically with a sponge dampened with a water and bleach solution (this will help prevent mildew and odors in the ice box).
11.3 PORTS AND HATCHES
The Spartan ports fitted on your yacht are made of bronze, tempered glass and stainless steel. A neoprene gasket bedded in a contact adhesive is used to seal the port. This gasket should be periodically coated with a silicone spray, 3M or Krylon 1325 is recommended.

Page 37
The hinge pins and port knobs should receive a light periodic oiling to combat any build-up of salt spray that may accumulate. The glass may be cleaned with any non-abrasive household glass cleaner.
Optional port screens are available which snap into place on the outside of the port. Do not use strong solvents on the plastic portions of the screen.
Hatches made of Lexan® material should not be cleaned with any solvent or abrasive cleaner. They should be rinsed with warm water only and cleaned with an acrylic cleaner. Other soaps and detergents will cause the Lexan® to film over losing some of its clear qualities.
11.4 CURTAINS
Generally the curtains supplied have a content of 77% cotton and 23% acetate and therefore should be dry cleaned.
11.5 SINKS
Stainless steel sinks may be cleaned with any stainless steel cleaner according to the manufacturer’s instructions or with a non-abrasive cleaner and soft cloth or sponge.
11.6 HEAD
The plastic seat and vitreous china bowl of your head should be cleaned with a non-abrasive cleanser and sponge or soft cloth.
11.7 SCUPPER DRAINS
The cockpit scupper drains on your Cape Dory use multi-ply wire reinforced hose throughout. The hose is 1-5/8” inside diameter. All connections are sealed with gasket sealer and secured with stainless steel hose clamps. Scupper drains and galley sink drains discharge overboard. Protect these hoses from sharp objects and chafe. Inspect hose clamps for security regularly. Hose clamps that were tight when the boat was built may loosen in transit or due to the contraction of the rubber hose and should be checked often. A failure here could cause your yacht to sink if the seacock was left open.

Page 38
11.8 INTERIOR WOOD SURFACES
Rubbing the wood periodically with a fine bronze wool when oiling will help produce a smooth satin surface. Many excellent teak oils are available as well as other household products such as Liquid Gold®.
Some finishes are in a wax base such as the Minwax® products. Repeated use of this type product builds up a finish that produces a very smooth surface. Care should be exercised, however, when using these products as oiling or varnishing at a later date may not be possible due to the layer of wax that has accumulated.
Make sure that adequate ventilation is provided when it is called for by a product’s manufacturer.
11.9 STOVES
The manufacturer of the stove includes an owner’s manual with the appliance. Read it carefully and make sure that everyone who uses the stove understands its operation. Remember alcohol fires can be extinguished with water or Type B fire extinguishers. Kerosene fires must be extinguished by smothering or with Type B extinguishers.
The following precautions refer to all types of stoves. Refer to the owner’s manual for specific instructions.
1. Never leave lighted stove unattended.
2. Never leave a stove while it is still hot. Remember alcohol can burn with an almost invisible flame.
3. Always release pressure in the fuel tank when leaving.
4. Close fuel valve (if applicable) in case of emergency.
5. Exercise caution when priming burners. Improper priming is one of the most common causes of galley fires.
11.10 GENERAL
Dirt, hair, etc. should not be washed Into the bilge during any cleaning process as these may plug the bilge pump strainer and prevent it from functioning when needed. Use a dust pan to collect dirt, etc. when cleaning the cabin sole of your boat.
Raise covers of lockers when leaving the boat to permit adequate ventilation and prevent mildew should these contain moisture. Remove excess moisture which may have collected in lockers with a sponge.

Page 39
11.11 BILGE PUMP
Your yacht is equipped with a permanently installed diaphragm-type bilge pump. The pump itself is located in the cockpit area and is operated by inserting the (removable) handle into the through deck fitting. This arrangement allows the pumping of the bilge with all hatches closed; a safety precaution should you have to pump in severe conditions.
Water is carried from the bilge to the pump by a reinforced plastic hose with a strainer at the bilge end. This strainer should be checked FREQUENTLY and cleaned as needed. The pump discharges water overboard through a fitting located above the waterline near the transom.
The pump is designed to pump water containing a variety of debris, but can become clogged by excessive solid matter. If the pump should fail to prime itself after several strokes check to see that the pick-up hose is positioned properly, then check the pump body for debris. The rubber diaphragm may be removed by loosening the screw which holds the stainless steel clamp. Inspect the pump body for foreign material and gently lift the intake and outlet flapper valves to determine that they are clear. Reassemble the pump and continue pumping. Another problem causing the pump to not prime could be a chafed hose. This can be checked by holding your hand over the end of the hose to see if suction is felt.
It is wise to pump the bilge before casting off and again on returning to see if the boat is taking on unusual amounts of water.
Note: If you decide to have an electric bilge pump installed, be sure to consult an expert on the wiring and plumbing of that piece of equipment.

Page 40
CHAPTER 12
EXTERIOR OPERATION & MAINTENANCE
12.1 GELCOAT AND FIBERGLASS
Fiberglass is one of the most maintenance-free materials utilized today in boat construction. If given proper care and treatment, the gel coat surface will look new for years. If not maintained, it will eventually turn to a flat, chalky texture.
We recommend that you wash the exterior fiberglass surfaces of you boat several times each season with a mild soap and plenty of warm fresh water. Rinse liberally with fresh water. After the boat has dried, use a good quality fiberglass cleaner in paste form; follow this process with a wax or polish prepared for marine use. A fiberglass cleaner with a very gentle abrasive in it may help remove minor scratches and surface wear. Be careful, as the continued use of cleaners containing abrasives will gradually erode the gel coat surface. Marine wax will fill small scratches and provide a gloss finish. We suggest you use a wax that does not contain silicone as it gets into the gel coat and is almost impossible to remove should you want to paint the boat at a later date.
Stubborn stains may be removed with fiberglass cleaner in some instances. More difficult stains may be worked out with judicious use of a very mild abrasive powder such as Bon Ami®. Stubborn tar and petroleum stains may be removed with careful application of acetone. (Acetone is a powerful but EXTREMELY flammable solvent which is available in most paint and hardware stores)
Stress or “spider cracks” are a common occurrence on the fiberglass boats of even the most careful boat builders and boat owners. Most of the time, these cracks are limited to the gel coat surface and are of cosmetic considerations only, not structural. If you have any doubt about the seriousness of any crack, consult your dealer. Cosmetic repair of gel coated surfaces is not a difficult task and a reasonably handy person with a little practice and study can make adequate repairs. Structural fiberglass repairs are best left to the experts.
If for any reason you desire to apply paint to areas of the boat other than to the bottom or boot-top, seek the advice of qualified personnel at a boat yard in your area for information about the latest development in chemically-based paints for fiberglass, and the recommended surface preparation procedure.
Minor repairs of the gel coat surfaces may be done by the owner using one of the following methods:
SURFACE IMPERFECTIONS: On imperfections that do not penetrate the gel coat, you may sand them out with #320 wet and dry sandpaper. Finish with 400 and 600 grit paper and hand buff with an fine rubbing compound.
DEEP SCRATCHES AND FLAWS: (exposed fiberglass) Thoroughly clean the damaged area with acetone to remove dirt, grease, or wax. Tape off the area around the flaw with masking tape. Thicken a small amount of matching gel coat with talcum powder or cabosil to obtain a putty-like

Page 41
consistency. When ready to apply the putty, thoroughly mix a small amount of hardener into the gel putty. A tablespoon quantity of gel putty will require ONE DROP of hardener to cure into a hard plastic in mild temperatures. Some experimenting will allow you to adjust the amount of hardener to suit your needs. Over-catalyzing results in a rubber-like substance, never permitting a complete cure.
Apply the gel putty with a putty knife, filling the flaw slightly above the surrounding surface. Allow to harden. Sand and buff as previously mentioned for shallow scratches. Clean up hands and tools with acetone before putty hardens.
CAUTION: The clear hardener should be handled with great care. Flush skin or eyes with large amounts of water if accidentally splashed.
Be careful of discarding uncured, mixed gel coat material. Once hardener is added, a chemical reaction takes place that generates heat. Large quantities can become very hot. Submerge material in water until cured for maximum safety.
NON-SKID IMPERFECTIONS: Repair of the non-skid is similar to that of deep imperfections only that you add trace amounts of non-skid grit and dab the gel coat on with the end of a brush with short hand movements.
GELCOAT BLISTERS: Below the water line it is possible for water to get beneath the gelcoat and cause it to blister. This occurrence is rare and usually takes the form of small blisters less than 1/4” in diameter. While we try to use the latest materials and techniques in combating this phenomenon, it is not within our ability to guarantee this never happening due to the very nature of the materials used. If you should find yourself with a serious case of the “measles”, contact the factory for the latest recommended repair practices and advice. The successful repair is difficult and time consuming and the services of an expert repair facility is advised. To minimize the potential of blisters ever forming on your bottom, this advice is offered: Never sand your bottom gelcoat off. Do not use pumice stones or a coarse sandpaper when preparing your bottom for new bottom paint. This only deeply scratches the gelcoat surface which increases the chance for water to pass into the laminate. Gelcoat is a water proof barrier coating required to protect your boat’s laminate, not merely a cosmetic coating.
The continued use of an epoxy based bottom paint is recommended.
12.2 BOTTOM PAINT, BOOT TOP PAINT
Your Cape Dory was painted with anti fouling paint before it left the factory. The area under the cradle poppets and keel supports may require additional painting prior to launching. These areas should be well sanded with 120 grit paper and washed with solvent to remove wax prior to painting.
In certain geographical areas some bottom paints work much better than others. If you intend to repaint the bottom of your Cape Dory, seek the advice of your dealer or knowledgeable local boat owners on what brand of bottom paint works well in your area. CAUTION: Not all bottom paints are chemically compatible. Be sure to tell paint dealer what paint is currently on the bottom of your boat to be certain that you purchase compatible anti-fouling paint.

Page 42
The boot top paint is INTERLUX DADO BROWN #246. When repainting, this area should be well sanded before applying a new coat.
12.3 MAINTAINING EXTERIOR TEAK
Teak above deck on Cape Dory yachts has been sanded and oiled to a full golden hue before it leaves the assembly area. As it gets exposed to sunlight and drying conditions, the woods begin to take on a gray appearance that will eventually lead to surface deterioration of the wood. Teak which is ignored will eventually begin to split and grain will lift.
Contrary to what you may have heard, teak is not a miracle wood that is totally maintenance free. It is easy to maintain. There are a number of excellent teak cleaning and sealing preparations on the market. We suggest that you ask your sailing friends (who have teak you admire) for their suggestions. (Many excellent teak cleaning and sealing products are not available nationwide, so use the best available in your area.)
The teak may also be varnished; put three to six coats on initially; plan to apply another coat at midseason, and a final coat prior to winter layup. Follow manufacturer’s directions for the varnish which you purchase (use only quality marine varnish.)
12.4 SPARS
Your spar is made of high performance aluminum type 6061T6 and has a clear anodized coating type 215-RI to provide the longest possible life with minimum maintenance. Rinsing with fresh water periodically is recommended to help increase the life of the spar system. If scratches do occur they can be touched up with a two phase prep and coat aluminum touch up system. See your local dealer.
It goes without saying that removing the spar and storing it inside after the sailing season is over (northern climates only) is preferable to leaving the spar stepped or outside. Regardless of where you sail, the spar should be waxed once a season and inspected carefully. As a general rule, aluminum masts require minimal care and maintenance. When they are removed from the boat for the winter, they should be thoroughly washed with plenty of fresh water and a mild detergent. After a complete rinsing with fresh water, and after all halyards and lifts have been neatly tied-off to prevent tangling and fouling, a thorough inspection should commence. Start at the base of the mast. Water will collect here if the drain hole in the mast step has not been kept clear. This may hasten the breakdown of the anodizing and start the corrosion process. If water has collected and caused corrosion, clear the mast step drain hole and refinish the mast base or heel. Waxing will help preserve anodizing.
Proceed up the mast noting any areas that are scratched or abraded. If these are small they may be covered with a clear lacquer of a Mast-Kote type product to keep corrosion from starting or spreading. Sometimes it is recommended that you apply to the mast a good hard wax as this helps to protect it further. As you proceed up the mast, check every cleat and fitting for tightness, and for corrosion which may have begun in the screw holes. Make certain that no bronze, brass, or iron

Page 43
fastenings are used on the aluminum as the two metals are incompatible and electrolytical decomposition will start at once.
Check the tang fittings of the lower shrouds and the base mounts of the spreaders as you proceed up the mast. Carefully check all tangs, straps and fittings at the masthead.
Examine the main and jib halyard sheaves for signs of wear or needed maintenance. If you see anything that looks at all unusual, ask your dealer or local boatyard for assistance. Booms and jib clubs should be inspected as carefully, with particular attention to gooseneck fittings, sheet blocks, and bails. The combination bow and stern light should also be checked. It is good-practice to change the bulbs every year as a mid-season failure is very difficult to correct. Record bulb sizes and carry spares aboard your boat.
The spreaders that support the upper shrouds should be inspected. They are designed to angle slightly upward to best support the mast in column. The inboard and outboard ends should be covered with chafe tape or spreader boots to prevent tearing sails or halyards. If any damage is sustained during mast stepping or winter storage, replace the spreader. DO NOT sail with defective spreaders, spar or hardware. We do not recommend that a spar be left stepped all winter, especially in northern climates where the boat is used for 1/2 year. Stress chafe, abrasion, and generally the shortening of the life of the spar and its components is accelerated when left exposed on the land.
All moving parts on the spar were treated with a Teflon lubricant when they were installed. At least once a season you should do the same.
125 STANDING RIGGING
Standing rigging consists of shrouds and stays which support the mast in an upright position. Running rigging is used to hoist or trim sails. Standing rigging requires attention, as failure could result in the loss of a mast. Most failures occur from lack of attention, poor tuning or improper maintenance rather than a structural failure.
Standing Rigging, the fixed rigging supporting your mast, should be inspected frequently to ensure trouble-free sailing. New rigging will often form a thin layer of rust, especially at the terminal ends. This is caused by impurities surfacing when the wire is cold worked during manufacture. The oxidation should eventually stop forming and when it does the stain should be removed with an unchlorinated cleanser. If the rusting persists after several cleanings, contact your dealer.
Before stepping your mast each season, inspect all standing rigging thoroughly. Starting at the top of the mast, systematically check each upper shroud and stay tang and be certain that each clevis pin is secured with a properly placed cotter pin with its ends bent over. Wipe down each shroud and stay with bronze wool dipped in a solution of water and mild detergent. The bronze wool will catch any broken wire in the rigging, calling attention to potential trouble; use bronze wool as, unlike steel wool, it will not leave particles to rust and soil your sails. Follow the bronze wool with a piece of terrycloth sprayed with a water- dispersing agent, such as CRC® or WD-40®.
Next, see that the spreaders are firmly fastened in place, and that the upper shrouds are locked in place on the grooved end of the spreader with a short length of stainless steel wire. You should use a

Page 44
spreader boot or some other form of chafing gear to protect your sails from the spreader tip. Check the mast tangs, clevis pins and cotter pins for the lower shrouds as outlined above for upper shrouds and stays. The tangs for the lower shrouds are designed to allow for some movement, so do not overtighten the tang bolt.
Prior to stepping the mast, be sure that halyards are properly reeved. Tradition indicates that the main halyard’s hauling part is ways secured to the starboard side of the mast, and the jib halyard secured on the port side.
After checking each piece of standing rigging for broken wires, rust spots, and for secure clevis and cotter pins, inspect the swaged terminal fittings at the ends of each shroud and stay. These fittings should all be examined, using a magnifying glass, for any hairline cracks. These cracks sometimes develop after water has entered the body of the fitting (by following the lay of the wire) causing the wire to corrode and expand. Although this problem is more prevalent in the southern latitudes, many owners seal the space between the wire and swages with bees wax. Turnbuckle boots are also quite popular, but are not recommended by Cape Dory as they cover turnbuckles which should be inspected frequently. We DO NOT recommend oiling or greasing the swage fittings as a means of preventing water from running inside them.
Report to your dealer any fittings that you find to be defective. Wire and fittings with any of the following defects require replacement: kinked wire, wire with broken strands, cracked swage fittings, bent turnbuckles, turnbuckles with stripped threads, clevis pins with grooves worn in them, and tangs or other fittings with distorted holes. The existence of any of the aforementioned conditions should be investigated, the reasons for them determined, and corrective action taken.
After completing the above inspections, the mast may be stepped and the standing rigging secured to the chainplates. In all Cape Dory yachts the upper shrouds are attached to the chainplate in a direct line ATHWART to port and starboard of the mast step. Lower shrouds are attached fore and aft of the upper. The single lower shroud on the Typhoon Weekender is attached aft.
Turnbuckles should be checked that there are sufficient threads exposed and that the cotter pins are in place and taped over.
The judicious use of a silicone-type product on sail, genoa, and traveler tracks works well to keep these running free in a salt air environment. Sheaves should be disassembled occasionally, washed, and well lubricated with a thin oil.
Check the spreaders to be certain that they are angled upward with the angle between the upper shroud and the top of the spreader the same as the angle formed by the bottom of the spreader and the shroud. The spreader tip should be securely seized to the shroud and it all protected by chafing gear.
Once a month you should go aloft and check all shrouds, tangs, masthead assembly, etc. to be certain all bolts are tight and all cotterpins are in place.
All running rigging on Cape Dory yachts is Dacron. It requires only protection from chafe and the ultraviolet rays of the sun. Stow in neat, seamanlike coils when not in use so that it will run freely without kinks or hockles when it is needed. A rinsing in fresh water at the end of the sailing season is recommended.

Page 45
12.6 TURNBUCKLES
Cape Dory boats are equipped with open body integral toggle turnbuckles. Prior to every sail, all turnbuckles should be checked to see that they are properly adjusted (see section on Tuning) and above all, pinned, so that they will not loosen. The two cotter pins should be inserted and spread open. The threaded sections above and below the barrels may be taped once the turnbuckles are adjusted and locked in place. Engine vibration and even wave action at mooring or slip are enough to allow an improperly pinned turnbuckle to work loose.
Occasionally, during the season, you should completely disassemble and inspect all turnbuckles. DO NOT attempt to do this when sea or wind conditions are placing strain on the mast. The shroud turnbuckles (upper and lower sidestays) may be disconnected and inspected ONE AT A TIME. The remaining shrouds will provide adequate mast support.
Prior to disconnecting headstay and backstay turnbuckles for inspection, special measures to support the mast are necessary. This can be accomplished by using the halyards as temporary stays. Attach the jib halyard to the jib tack shackle; haul it in tight and cleat it. This will temporarily replace the headstay, so that you may disassemble the turnbuckle for inspection. Lead the main halyard aft to a stern cleat and follow the above procedure to check the backstay turnbuckle. Do not use the coaming mounted genoa sheet cleats for anything other than sheeting the genoa and then only if the sheet is around the winch first. These cleats are handily mounted but may pull out of the coaming if the main tension of the sheet is not taken by the winches.
The barrel section of the turnbuckle should be backed off entirely from the top and bottom sections. All threads should be carefully inspected both for broken or worn threads as well as rust, corrosion, or breakdown of the metal itself. The threads in the barrel should be inspected as well as those on the long, threaded ends. Prior to reassemble, lightly lubricate the ends, barrel, and locking nuts with waterproof grease.
12.7 DECK HARDWARE AND CHAINPLATES
Most deck hardware is thru-bolted and backed up where necessary. Periodically these items can leak and should be rebedded with a good brand of caulk such as Life Caulk®. Care must be taken not to overtighten the fasteners as the strength can be reduced severely. Particular attention should be paid to the chainplate fasteners as they are very critical to the safety of the rig. The chainplates were torqued at the factory and when recaulking them you should not exceed the torques listed below:
1/2” bolts ------------------200 inch pounds
3/8” bolts ------------------150 inch pounds
5/16” bolts ------------------90 inch pounds
Page 46
12.8 RUNNING RIGGING
Because of the recent advances made with pre-stretched Dacron® line and the age old problem of fish hooks forming in stainless halyards after one season of use, your boat is equipped with pre-stretched halyards. They have gone around the world and received acclaim from almost every notable offshore cruising man.
Periodic inspection of the running rigging will point out any areas excessive chafe. Often the offending item causing the chafe can be corrected. Otherwise, one way to extend the life of the rigging is to either end for end it or move the shackled end of it up a foot or so every year to move the point of wear away from the sheave, winch turning block etc. Only experience will dictate when they need replacement.
12.9 LIFELINES, PULPITS, AND STANCHIONS
Lifelines, like standing rigging, should receive periodic checks. The terminal ends should be engaged properly in the barrels of the tumbuckles and the lock nuts tight. As the lines stretch, the slack should be taken up. Check all swaging for dents or cracks.
Check pulpits and stanchions for cracks, dents, and cracks in the weld. Check that the bases are tight and properly sealed.
Periodically, some of this stainless hardware shows signs of rusting as mentioned in the standing rigging section. If after a period of time the rusting continues, contact your dealer.
12.10 WINCHES AND BLOCKS
The winches installed on your yacht are the finest available. Most problems occur when a proper maintenance schedule is not followed. It is important that your winches be cleaned and inspected at least twice a season or after a two or three week offshore passage. We recommend a high density grease and not an oil for the required lubrication. Check to see that all bolts holding the winch down are tight.
Blocks require little maintenance except periodic washing in fresh water and a light oiling or spraying with a silicone lubricant. Check all aluminum T tracks for signs of lifting or loose fasteners.
12.11 JIFFY REEFING
Remember : IF YOU ARE THINKING ABOUT WHETHER OR NOT TO REEF, IT’S THE TIME TO DO IT. Being over-canvassed is hard on a crew and boat, potentially dangerous, and will not make the boat go any faster.

Page 47
“Jiffy Reefing” is the traditional method of shortening sail. You do not have to raise the main to its full height on the mast to properly reef, but it is somewhat easier if you do as it keeps the sail out of your way.
Reeve the reefing lines through the reefing cringles. The grommets on the luff and the leach will then become your new tack and clew. Ease off the halyard and pull the tack down to the top of the boom. Make the line fast to the cleat on the mast and take up on the halyard until the luff is set with the proper tension. Next, haul on the clew line, pulling the clew down and aft. The clew line runs from a padeye up through the grommet, down to a cheek block and forward to a cleat. It is important that during a jiffy reef the main sheet and the vang, should your boat have one, be eased to allow proper tensioning along the new foot of the sail. The key to this type of reefing is to have sufficient tension on the foot of the sail. When the clew has been pulled out and the foot is tight, make the line fast around the cleat on the boom.
There are reef “points” in the mainsail of Cape Dory Yachts fitted with “jiffy” reefing. Use 18” lengths of 1/4” line and run them through each reef point. (For permanent reefing lines, use 30” lengths of ¼” or 3/8” line and run them through each reef point. Then tie two knots in each line, one on each side of each reefing point cringle.) Lead the line through the reef point, under the foot of the sail and tie the reef lines in a reef knot. It is the seamanlike procedure to keep the unused sail out of the way and reduce windage.
To shake out the reef, release the lines through the reef points, stow them (permanents reefing lines need only be untied) and release the reef line through the reefing cringle that is serving as your clew. Then release the reef line on the reefing cringle for the tack,and hoist the mainsail so that the luff is tight. Return the topping lift to its original position. Again, make sure the sheet and vang have been eased.
Generally speaking, reefing is desirable when you find yourself heeling more than 20 degrees or wish to slow the boat down to keep it manageable in heavy airs. When going off the wind, the boat will probably sail as well running under headsails alone, since the reefed main will usually blanket the headsail. You may wish to leave the mainsail reefed, furled and ready to hoist when you change direction to windward.
The enclosed explanation of “quick reefing” is from the catalogue of Schaefer Marine Products of New Bedford, Massachusetts. It is reprinted here with their permission.
12.12 OPTIONAL SAILS
The first sail that you will probably want to add to the complement of working sails provided with your Cape Dory is a large genoa (130-150%). This sail provides more power and speed in lighter wind conditions and is particularly effective going to windward. Cape Dory has genoa and genoa gear packages for all models.
If you choose to add a spinnaker or other sails to your inventory, select your equipment carefully. Your Cape Dory dealer will assist you in selecting suitable equipment and will make you aware of the optional sails and equipment that Cape Dory has available. Due to a very low demand for the spinnaker gear Cape Dory cannot supply this gear other than the gear attached to the mast. A

Page 48
popular sail which acts like a spinnaker and a reaching genoa is a flasher. This sail is also known as an MPS (Multy Purpose Spinnaker). It does not require a spinnaker pole and is easier to set and trim than a spinnaker. Most Cape Dory brochures show this sail.

Page 49
CHAPTER 13
RIGGING INSTRUCTIONS
IMPORTANT: Read instructions carefully before rigging your sailboat.
SPARTAN MARINE PRODUCTS INC.
160 Middleboro Avenue East Taunton, Mass. 02718
(617) 623-6776 1.) Hold each coil of wire firmly and carefully, unwind with extra precaution avoiding injury from retracting rigging ends that
are under tension. (Take care not to crimp the wire while uncoiling). 2.) Leave I.D. tags on shrouds and stays to avoid confusion till completion. A helpful hint is to document wire numbers on
your rigging kit list enclosed and retain in a safe place for future reference. 3.) Attach each piece to its respective location on the mast making sure to insert proper clevis pin and locking it with a cotter
pin. (The mast lights should be checked before the mast is installed so that defective bulbs can be replaced easily.) 4.) When all rigging is properly located, identification tags and turnbuckles are in place, make sure again that each turnbuckle is
stationed with a corresponding clevis pin and locked in place with a cotter pin. 5.) Take note of the maximum dimension your turnbuckle should be opened with turnbuckle barrel equally located between
threaded sections.
Measuring from the center of the clevis pin to the top of the swage, the maximum “Y” dimension should be as follows:
CD-33/36 Lowers Y = 15-3/4” WIRE SIZE = ¼” CD-36 Staysail Y = 15-3/4” WIRE SIZE = ¼” CD-33/36 Uppers, backstay, forestay Y = 19” WIRE SIZE = 9/32”
6.) Tighten every shroud and stay so that they have the correct tension and the mast is stayed plumb with no bends or curves in it. Insert cotter pins in the threaded studs and spread them to prevent them from falling out. Tape the cotter pins with chafe tape to prevent lines and other objects from becoming snagged on them.
7.) Because of the manufacturing process used in fabricating the wire used on the shrouds and stays, you will experience a
certain amount of stretch in your rigging after sailing in the first rough weather of the season. Repeat the above procedure to be certain that your mast is always well tuned.
8.) ATTENTION: SKIPPER
a.) Please note: When rigging and mast are properly assembled and installed, avoid taking unnecessary risks that would use rigging assembly for purposes other than what it was designed for. Exercise good judgement.
b.) Frequent checks for excessive rigging wear and weak areas should be made to ensure maximum safety. Especially check for chafing. Sails and running rigging can be easily chafed.
c.) Worn rigging or any pieces that are in question should be replaced as soon as possible. (For further clarification consult your Dealer on any pieces in question.)
d.) Your sparset also demands attention and periodic checks to ensure that all pieces are secure and free from wear.

Page 50
13.1 STEPPING THE SPAR AND TUNING
Your yacht, having a keel stepped spar, has an adjustable mast step. It also has a mast collar utilizing wooden wedges and a mast pin. The mast pin is provided so that from the mainsheet lead aft, the vertical pull placed on the deck won’t tend to lift the deck away from the bulkheads. This will also allow for adding custom hardware like halyards lead aft. This type of device is not required on deck stepped spars but it is a very desirable feature on keel stepped spars.
We recommend that you align your mast fore and aft, centering the spar in the mast collar. Wedge the spar lightly but don’t install the collar pin until after your first sail. Then alter the rake if required and check the spar firmly and install the mast collar pin. Be sure to tighten the mast step bolts securely when final tuning is done.
The fore and aft alignment of your mast can be checked by comparing it to a vertical structure such as a radio tower, chimney, etc. It can also be checked by hanging a heavy object on the main halyard on a calm day and observing the rake.
Upper shrouds should also be tightened equally and have about an inch of “give” to them. To check the spar to be certain that no athwartship rake is in it, get your boat on her lines and using the main halyard, measure the distance from the masthead to the aft lower shroud on both sides. If the distance is between ½” of being the same, you know that the mast is plumb. It should also be approximately in the center of the mast collar. Forward lower shrouds should have one to two inches of “give” and the aft lowers slightly more.
UNDER NO CIRCUMSTANCES TAKE UP THE RIGGING TO BAR TIGHT TENSION. Both the mast and the boat can be severely damaged by excessive tension.
Fine tuning of the rig can be completed after the boat has been sailed, and may have to be done again after the boat has been out in strong winds. When sailing, it is important that the mast remain straight and as nearly in column as possible at all times. While sailing close hauled, sight up the mast track and note any mast curve. Does the mast appear to be falling off to leeward at the top, or does it hook upwind? Repeat this procedure on the opposite tack.
If the masthead is falling off on both tacks, the forward lower shrouds are too tight and the upper shrouds are too loose. If the masthead hooks to windward, the upper shroud is too tight in relation to the lower on the same side. When sailing to windward, the forward lower shrouds bear a greater load than the after lower shrouds; however, the after lower shrouds on the windward side should never be loose. All shroud tuning should be done from the leeward side. If the rig seems to be equally balanced when you begin, duplicate every half turn from side to side.
CHECK TO SEE THAT ALL COTTER PINS OR RINGS ARE IN PLACE AND THAT ALL SHARP EDGES ARE TAPED.

Page 51
CHAPTER 14
WINTERIZING
Winterizing your yacht is a relatively simple procedure. We are assuming that the boat will be dry stored in the following instructions. If you should decide to wet store your boat, be sure to take adequate precautions against water freezing in the engine and plumbing systems on your boat.
BLOCKING THE HULL
A good boat yard is, no doubt, expert at properly supporting the hull. Check to make sure that the weight of the hull is resting on the keel. The purpose of cradle bulkhead or poppets is to balance the boat in an upright position, not to bear the weight of the boat.
Before hoisting out, show the boat yard the profile of the hull so that they will know how to position crane or straddle the hoist straps. The usual locations for the straps of a typical marine lift are just forward of the rudder heel bearing and in the hollow of the fore foot.
COCKPIT SCUPPERS
Flush with fresh water and leave seacocks in the open position so that hoses will not fill with rain water and freeze.
ICE BOX
Clean ice box thoroughly and leave open.
STOVE
Clean stove thoroughly including burners. Release pressure in fuel tank and leave tank empty.
ELECTRICAL SYSTEM
Remove batteries from boat and store in a warm dry location off a cement or stone floor. They should be completely charged before storing or left on a trickle charge.
The balance of your electrical system requires little maintenance. If you wish, each bulb can be removed and the light fixtures given a spray of water dispersant such as WD4O®, CRC®, or similar products. The main switch and fuse panel can also be treated this way to minimize corrosion.
PROPELLER
Examine the propeller for any damage or nicks. If evidence of either is apparent, have the propeller removed and trued.

Page 52
HEAD
Follow manufacturer’s directions closely. Remove any water to prevent from freezing. The holding tank should be empty when the yacht is laid up for the winter. If possible, flush the tank with a mixture of non-toxic antifreeze and water prior to hauling. This will assure a minimum of problems when the system is reactivated in the spring.
WATER SYSTEM
Pump tanks as dry as possible, then add a non-toxic water system winterizer that your local marine hardware store will recommend. (Caution: do not use antifreeze or other poisonous substances.) Pump this solution through the entire fresh water and drain system.
ENGINE
Follow the instructions in the engine owner’s manual supplied by the manufacturer and read the section in this manual.
Disconnect engine cooling water intake to make sure that no water remains in the line. Reconnect line and secure hose clamps. Remove the drain plug in the muffler and drain.
FUEL TANKS
The best way to store a fuel tank is empty. Partially filled tanks invite condensation. Completely filled tanks leave you with old fuel in the spring and possible gum deposits. Much has been written lately on this subject and new products are being developed to prevent gum deposits. Keep informed and consult your dealer or shipyard for recommendations.
COVERING
It is far better to store a boat under cover than to leave it open to the elements. The teak trim will fare far better during the winter and the boat will not be subject to the pressure of freezing water, a common cause of gel coat stress cracks. If your boat cover is durable, open a couple of ports to allow air to circulate below decks.

Page 53
CHAPTER 15
SAFETY
Federal regulations REQUIRE certain safety equipment to be onboard your boat (personal and throwable floatation devices, fire extinguishers, horn, whistle, etc.). Know what equipment is required and have it aboard and properly stowed before you cast off for the first time.
In addition to the equipment requirements outlined here, the U. S. Coast Guard can provide additional information and answer your questions. It is highly recommended that, although not required, certain additional items be kept aboard. This list is not complete, you should have all USCG required gear.
1. An anchor of appropriate size and design and rode of good quality, appropriate size and length.
2. First-aid kit.
3. Compass.
4. Paddle.
5. Flashlight.
6. Up-to-date charts of the waters to be sailed.
7. Flares.
Fire extinguishers are not standard equipment on your Cape Dory; they are to be provided by you, the owner. Fire aboard any boat is a real serious hazard. It is important to take adequate precautions against fire and to be well prepared to extinguish one quickly and thoroughly should it occur. For this reason, U.S. Coast Guard approved fire extinguishers of the appropriate type and size (check U.S.C.G. regulations) should be installed immediately.
The permanent location of fire extinguishers where they are easily accessible (near areas where fires most likely are to occur - engine, fuel tanks, and galley) is important. They should not be located where fire may prevent their use. At least one extinguisher in a cockpit locker (reachable from outside the cabin) and one extinguisher installed below is a minimum.
CHARTS
There is no substitute for complete and up-to-date charts. The Coast Guard is constantly making improvements on the aids to navigation which change buoy locations, numbers, configurations, etc. These changes are reported in the respective Coast Guard District’s Local Notice to Mariners, and are on display at all NOAA Chart Distributors. Before embarking on any trip outside your home port, make certain that you have the latest editions of the chart, and that they are fully corrected.

Page 54
FUELING
Appropriate safety precautions are important before, during and after fueling. Before fueling the first time, be familiar with the instructions provided by the engine manufacturer.
1. Fuel docks should be approached at REASONABLE speed without wake. Observe posted speed limits and instructions. Be considerate of others using the docks, and watch for a dockmaster or hand who may give you instructions. Maintain control of your boat at all times and have your dock lines ready for use before you approach in the event that these are unavailable at the dock.
2. Use bow, stern and spring lines to properly secure your boat.
3. Close and secure all hatches and ports.
4. FORBID SMOKING while taking on fuel on or near fuel docks. Completely extinguish all smoking materials well in advance of approaching the docks; do not recommence until you are well clear of it after fueling and conditions aboard are safe to do so.
5. Extinguish any other open flames aboard and see that all equipment (e.g. engine, stove, cabin heater, radios, and lights - both lanterns and electrical lights, etc.) which may generate heat or sparks of any kind turned OFF...Turn off all switches for branch circuits so that there are no live electrical circuits. MAIN SWITCH should also be turned off AFTER engine is stopped (to avoid alternator damage).
6. If possible, crew members not involved in fueling should leave the boat.
7. An adequate fire extinguisher (USCG approved for Class B fires) should be readily available in case of emergency.
8. Remove fuel fitting. Be certain that you are putting fuel in the fuel tank. Note the approximate amount required to fill the tank by either looking at the fuel level gauge if one is in the tank.
9. Be certain (double check) that you are taking on the appropriate fuel, diesel not gasoline. Errors of this type do occur and will result in serious engine damage if not immediately detected and corrected.
10. Sometimes If you are in an unfamiliar area you may want to first take a sample of the fuel you plan to pump on board for a visual and smell check to insure that it is diesel and not gasoline.
11. Maintain contact between the nozzle of the fuel hose and the fill pipe rim to prevent generation of static electricity sparks.
12. Fill slowly to about 95% of capacity; do NOT overfill. (Allowance must be made for thermal expansion of fuel without overflow.)
13. Replace and secure fill fitting after fueling. Carefully clean any spillage. Check fuel tank vents at stern for overflow. Check below decks and in the bilge for fumes or leakage. If
Page 55
fumes or leakage are present, adequately ventilate and clean areas completely BEFORE PROCEEDING.
14. Open all ports and hatches fully for ventilation.
15. Do not fuel during electrical storms; avoid fueling at night or in rough water, except in emergencies when extreme caution must be exercised.
16. Note the diesel fuel is flammable; handle it accordingly in a cautious manner.
17. Those Cape Dory owners with outboard engines should note that perhaps the safest fueling practice, when possible, is to remove the tank(s) from the boat before filling.
15.1 WEATHER FORECASTS
The U.S. Coast Guard is in the process of discontinuing the display of weather signals at its stations and other locations along all coasts in favor of the NCAA weather broadcasts which are continuously broadcast on weather channels Wx-l and Wx- 2 (162.40 MHz and 162.55 MHz)
Good seamanship requires attention to the weather forecast before leaving port, and while you are sailing. Tune in to VHF weather, and make it a practice to check the broadcast on a regular basis in case there are changes in the forecast.
15.2 BOATING SAFETY ORGANIZATIONS
Every sailor was once a beginner. Very few were born into sailing families and learned at their parents’ knees. Therefore, it is to everyone’s benefit that there are several fine non-profit organizations that are ready to teach interested persons everything from basic seamanship and piloting to celestial navigation.
Two of these organizations are:
• United States Power Squadrons (U.S.P.S.)
• United States Coast Guard Auxiliary

Page 56
CHAPTER 16
COMMISSIONING & WARRANTY
16.1 COMMISSIONING
Cape Dory dealers are chosen because they are knowledgeable professionals. Since you are bearing the launching and commissioning expenses of your new yacht you have the right to expect a thorough and professional job.
Please note that the checklist provided in this manual is to assist you and your dealer with the first launching of your boat. In subsequent years, you may wish to review this list in preparing your boat for launching.
Before your boat is launched, we strongly recommend that you read the entire manual. In particular, read and become familiar with the DEALER’S COMMISSIONING CHECKLIST as this is really a step by step set of instructions for launching your yacht.
WARRANTY
16.2 WARRANTY NOTIFICATION PROCEDURES
Cape Dory Yachts is very proud of its “track record” of minimum warranty problems. After commissioning, you as an owner should not expect problems to develop. However, should you need assistance, there is only one very important thing to do...CONTACT YOUR CAPE DORY DEALER.
Your Cape Dory dealer is a knowledgeable professional who is familiar with your boat and capable of answering most of the questions which you may have. He will communicate any problems or inquiries which you may have directly to Cape Dory so that we can both work together toward an expeditious and satisfactory solution.
YOUR DEALER IS NOT, HOWEVER, AUTHORIZED BY CAPE DORY TO CONSENT TO REPAIRS OR THE REPLACEMENT OF PARTS WITHOUT THE EXPRESS WRITTEN APPROVAL OF CAPE DORY.
Cape Dory Yachts, like most other sailboat manufacturers, offers a written limited warranty.
Federal law requires that a written warranty contain certain information and statements.
To you as an owner, we at Cape Dory Yachts pledge to provide you with a product that is as defect-free as possible. Our goal will continue to be one of standing behind our products and one of continual improvement.

Page 57
CAPE DORY YACHTS, INC. 160 Middleboro Avenue
East Taunton, Massachusetts 02718 (617) 823-67876
Limited Warranty 1. Cape Dory Yachts, Inc. (Cape Dory) warrants all yachts and parts manufactured by it to be free from defects in material and workmanship under normal use and service for a period of twelve (12) months from the date of delivery to the original purchaser. This Limited Warranty is extended to the original purchaser of the yacht, and is not extended to any subsequent purchaser.
2. This Limited Warranty applies only to those components of the yacht manufactured or built by Cape Dory. It specifically does not extend to paints, gel coats, anodized finishes and other surface coatings, wooden parts which may split, crack or check (due to climatic factors over which Cape Dory has no control) and all accessories, and installed equipment not manufactured by Cape Dory, including without limitation engines, engine parts, instruments and controls, sails, pumps, batteries, winches, wheel steering hardware, upholstery, turn buckles and plumbing equipment. Any warranty made by the manufacturer of such items will, if possible, be passed on to the purchaser. This Limited Warranty does not extend to yachts used for commercial purposes or those which have been altered or subjected to negligence or misuse.
3. To validate this Limited Warranty, the “Dealer’s Commissioning Checklist” must be mailed to Cape Dory, 160 Middleboro Avenue, East Taunton, Massachussetts 02718 as soon as possible after the commissioning date. In order to obtain performance of any warranty obligation, the owner must report within fifteen days of its discovery any claim in respect of defects in material or workmanship to an authorized Cape Dory dealer. Cape Dory or its authorized representative my make an inspection within a reasonable length of time after receipt of notice of a claim. When a warranty claim is valid, Cape Dory or its authorized representative will repair or replace the defective component part free of charge. Cape Dory may require a yacht or any part thereof to be returned to the factory, its dealer or representative for examination, transportation charges prepaid. Cape Dory neither assumes nor authorizes any person to assume for it any liability or expense in the replacing of parts or correction of defects in a yacht within the warranty period, except when such expense is authorized in advance and in writing by Cape Dory.
4. Exclusion of Warranties: This Limited Warranty is in lieu of all other express warranties, and shall expire twelve months from the date of delivery to the original purchaser. Any implied warranty, including the warranty of merchantability and fitness for a particular purpose, is limited to the duration of this limited warranty.
5. Cape Dory does not under any circumstances assume responsibility for any consequential damages incurred including without limitation expenses for transportation and travel, telephone, lodging, loss or damage to personal property or loss of revenue.
6. Cape Dory reserves the right to improve its products through changes in design and material without incurring any obligations to incorporate such changes in units already completed or in the hands of dealers or purchasers.
7. Some states do not allow limitations on how long an implied warranty lasts or the exclusion of incidental or consequential damages, so the above limitations or exclusions may not apply to you. This warranty gives you specific legal rights and you may also have other rights which vary from state to state.
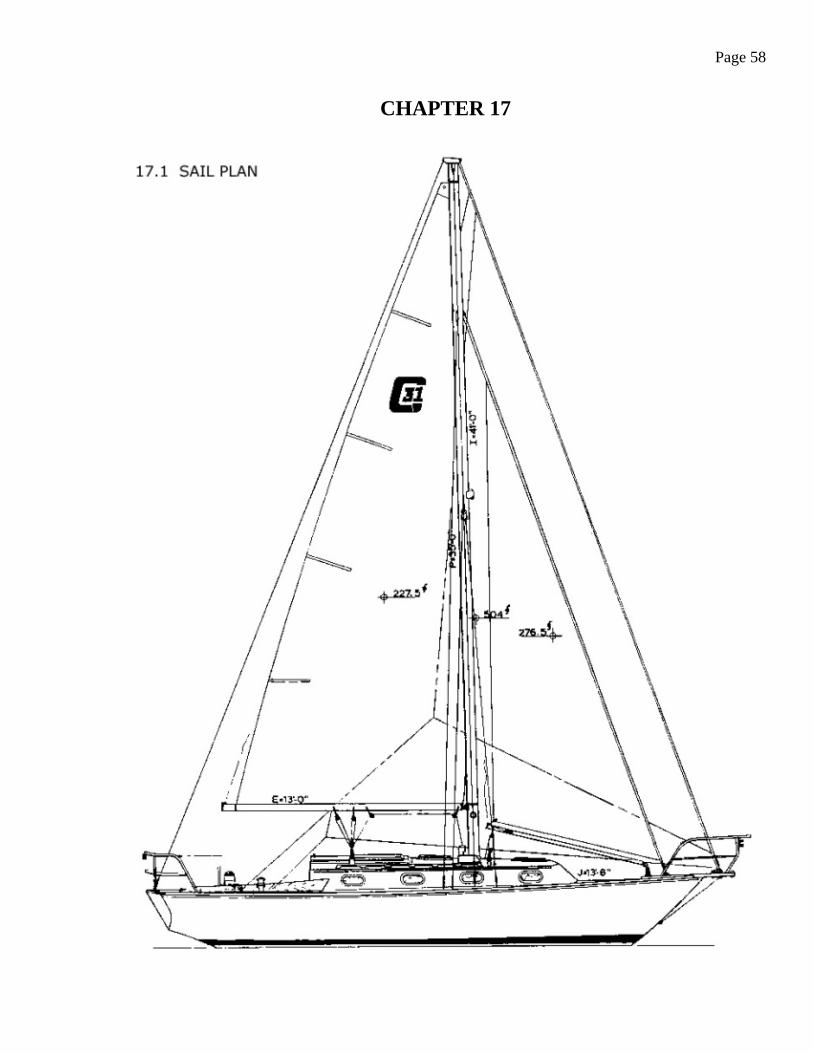
Page 58
CHAPTER 17

Page 59

Page 60

Page 61

Page 62

Page 63

Page 64

Page 65

Page 66

Page 67
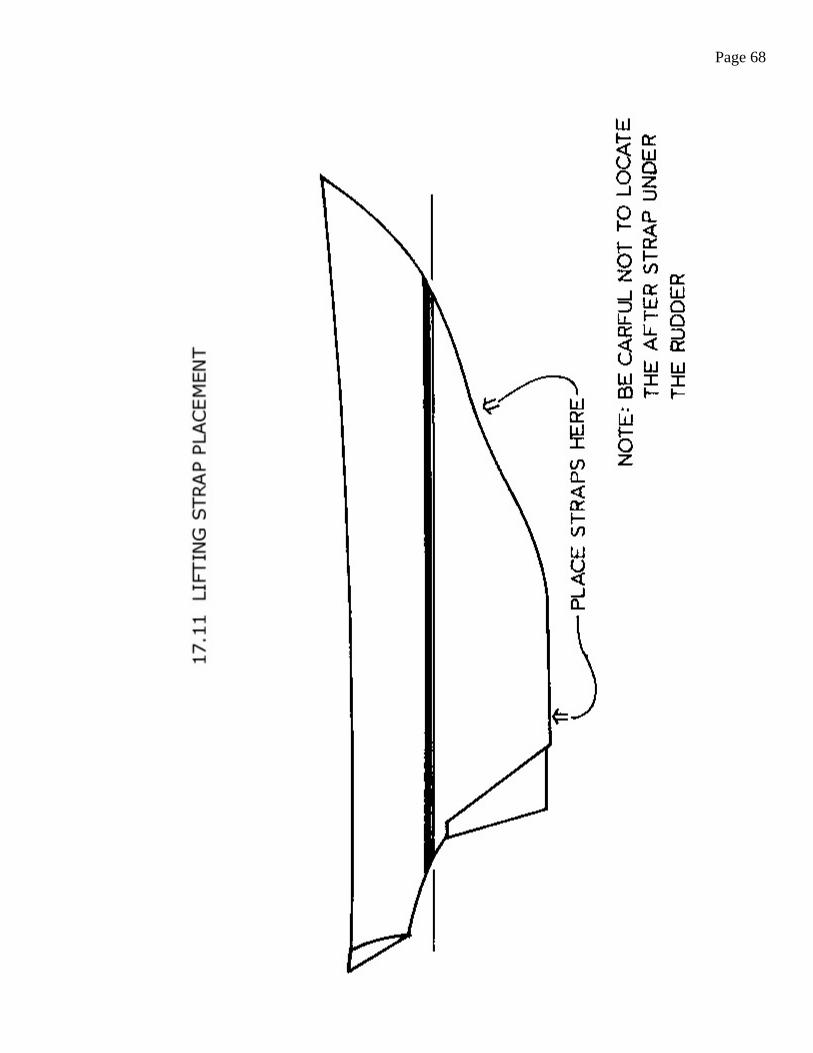
Page 68

Page 69

Page 70

Page 71
TECHNICAL INFORMATION
Cape Dory 31
L.O.D. 31’ 4”
L.W.L. 23’ 3”
Beam 9’ 9”
Draft 4’ 9”
Displacement(Lbs.) 11,500 lbs.
Ballast(Lbs.) 4,350 lbs.
Sail Area (Sq. Ft.) (w/100% foretriangle)
504 sq. ft.
I 41’ 0”
P 35’ 0”
J 13’ 6”
E 13’ 0”
Spartan Mast Section CD-4.5
Main Luff Slug Size 15/16" flat slides
(A008M) Internal Slug Size SP-E127
Spartan Boom Section CD-3.5
Main Foot Slug Size 3/4" flat slides (A006M)
Main Tack Cut Back 2-3/16”

Page 72
STANDING & RUNNING RIGGING
Forestay (W) ¼” x
Backstay (W) ¼” x
Uppers (W) ¼” x
Lowers (W) 7/32 x
Intermediates (W) 3/16” x
Staysail Stay (W) 3/16” x
Bob Stay (W) NAVTEC ½” Rod 54” pin to pin
Main Halyard (P) 7/16” x 85’
Jib Halyard (P) 7/16” x 85’
Staysail Halyard (P) 3/8” x 75’
Main Sheet (D) 7/16” x 65’
Jib Sheet (D) 7/16” x 45’
Staysail Sheet (D) 7/16” x 55’
Genoa Sheet (D) 7/16 x 40’
Boom Topping Lift (D) 5/32” x 35’
Club Topping Lift (D) 5/16” x 35’
Clew Reef (D) 3/8” x 23’
Note : All wire lengths are approximate. Key: (W) = 1 x 19 Stainless Steel Wire (P) = Prestretched Dacron (D) = Braided Dacron

Page 73
VENDOR LIST
[See Note in Vendor Addresses Section. (Ed.)]
In the interest of faster and more efficient service, Cape Dory has developed a list of the more important equipment and manufacturers. We produced this list so that the Cape Dory owner will be able to go directly to the original vendor for replacement parts, but we still want you to feel free to call us here at the factory for any additional information.
ITEM DESCRIPTION MANUFACTURER’S PART # VENDOR BLOCKS: Top Lift Block 02-14 Schaefer Marine Jib Track Blocks 08-91 “ “ Main Traveler Block 09-53 “ “ Main Sheet Boom Block 07-03 “ “ Boom Block 07-13 “ “ Reef Cheek Block 30-11 “ “ Top Lift Cheek Block 03-30 “ “ BOTTOM PAINT: Antifouling Blue or Brown Epoxy Cap Rule Industries Boot Top Dado Dark Brown 246 Interlux Boot Top Seminole Red 593 Gloucester Paints ELECTRICAL: Battery – 12 volts – 75 amps 5124M Bay State Battery Dome Lights (bulb 12v15cp) 10-1252 Bass Products Single Swivel (bulb GE1142) 10-2162 Bass Products Double Swivel (bulb GE1142) 10-2222 Bass Products 8 watt florescent (GEFT5-CW) 10-1872 Bass Products Panel Lorco Marine Port & Starboard Lights 33512-302 Aquasignal/Ahlemann &
Schlatter Stern Light (bulb 12v10w) 33509-002 Aquasignal/Ahlemann &
Schlatter Mast Light Assembly 33106-002 Aquasignal/Ahlemann &
Schlatter ENGINE: Universal Diesel Model 25 Water Pump Impeller Kit 298416 Apponaug Harbor Marina Fuel Filter 298854 “ “ Oil Filter 300209 “ “ Glo Plug 296985 “ “ V Belt 300290 “ “ Thermostat 300281 “ “

Page 74
w/gasket 300237 “ “ PORTS & HATCHES: Medium Hatch 139-medium Bomar, Inc. Bronze Oval Ports P-560 Spartan Marine HEAD: Groco HE-HTP Gross Mechanical HOT WATER HEATER: Raritan 6E Raritan Engineering Spare Parts: Heating Element WH1A Raritan Engineering Safety Valve WH3 “ “ Heat Exchanger HE “ “ Thermostat WH2 “ “ PEDESTAL STEERING:
Fuel Rev. Pedestal Y101-200 Merriman/Yachts Specialities
Fuel Rev. Engine Cont. Y321-100 “ “ Adjustable Sheave Assembly Y416-104 “ “ #50 Chain w/links Y420-524 “ “ 10” Quadrant-Offset Y502-310 “ “ 3/16” Wire 2 pcs Y426-206 “ “ Chain to wire swages Y424-3012 “ “ Eyebolts Y425-212 “ “ Cable Clamps Y428-206 “ “ Pedestal Guard Y300-246 “ “ 28” Wheel Varies G.G. Schmitt Brake (optional) Y150-0000 Merriman/Yachts
Specialities PROPS AND PROP SHAFTS: Prop 13 x 13 RH Essex Machine 1” Bore Coupling 256743 Medalist Stuffing Box B162 low profile Spartan Cutlass Bearing Blackfish (1” x 4”) “ “ Shaft 23-1/4” “ “ Shaft/stuff box assembly 5705 “ “ Nuts 1 ¾-10 Brass Hx “ “ 1 ¾-10 “ “ Jam “ “ Cotter Pin 1/8 x 1” Brass “ “ Perry Nut 1-3/4 hub diameter Perry’s Boat Harbor and
Drydock PUMPS: Manual Bilge Pump Urchin 8 BP9064 Imtra

Page 75
Pressure Water Pump RX-27 Scott-Ardox Galley Back-up V-pump GP-0604 Imtra Electric Sump Pump RX-19 Scott-Ardox TRAVELERS: 4’ Track 1169 Nicro Fico Car 1165 “ “ Track Stops 1176 “ “ Adjustable Stops 1177 “ “ Bridge Assembly B-142 Spartan Marine TRACKS: 1-1/4” End Stops S653 Spartan Marine 1” End Stops S652 Spartan Marine Genoa Tracks (1-1/4” x T715-06C Spartan Marine 3/16” x 6’) Club staysail (1”x18”x3’) T714-03C Spartan Marine SHIFT & THROTTLE CABLES: 8’ Throttle Cable 3300BC Northwest Controls 8’ Shift and Throttle 3300BC Northwest Controls Note: Be sure to check actual length on your boat before ordering VENTS: 3” Low Vent 108836 Nicro Fico 3” Vent Deck Plate 10863DW Nicro Fico 3” Vent to Hose Adapter 10863HA Nicro Fico 3” Hi Vent 10923C Nicro Fico 3” Stainless Steel lMushroom Porthos Vetus Denouden Ventilator WINCHES: Genoa Sheet Winches 30 B (2 speed) Lewmar Main Sheet Winch 16 B (2 speed) “ “ Staysail Sheet Winch 7 B “ “ Main Halyard Winch 7 C “ “ Jib Halyard Winch 8 C “ “ Staysail Halyard Winch 6 C “ “ Jiffy Reefing Winch 6 C “ “

Page 76
VENDOR ADDRESSES
[Note: Vendors with * indicates no current information could be located via Internetsearch of business addresses and telephone listings. All other addresses and telephone numbers are believed to be current as of January, 1999, but it can’t be guaranteed. (Ed.)]
*Ahlemann & Schlatter/ Browning Marine
P.O. Box 806 St. Charles, IL 60174
Apponaug Harbor Marina 21 Arnolds Drive Warwick, RI 02886
Bass Products 50 Grove Street 978-744-7003
Salem, MA 01917
*Bay State Battery 70 Shawmut Road Canton, MA 02021
C.E. Beckman 11-35 Commercial St. 508-994-9674
New Bedford, MA 02740
Bomar (Owned by Pompanette) P.O. Box W 603-826-5791
Charlestown, NH 03603
*Dipetro Kay Corp 914 Cromwell Avenue Rocky Hill, CT 06067
Edson Corporation 146 Duchaine Blvd. 508-995-9711
New Bedford, MA 02745
Essex Machine Works 50 West Avenue 860-767-8285
Essex, CT 06426
Gem Products 140 Industrial Blvd. 904-264-0173
Orange Park, FL 32073
*Gloucester Paints P.O. Box 860 Gloucester, MA 01930
Gross Mechanical Lab. 7240 Standard Drive 410-712-4242
Hanover, MD 21076
Imtra Corp. 30 Samuel Barnet Blvd. 508-995-7000
New Bedford, MA 02155
International Paint Co. (Now Interlux/Courtaulds Coatings, Inc.)
2270 Morris 1-800-INTERLUX
Union, NJ 07083
Lewmar Marine New Whitfield Street 1-800-362-7212
Guilford, CT 06437
*Lorco Marine Electric (Reported to be defunct)
715 Perimeter Road Manchester, NH 03032
Mack Boring & Parts Co. 2365 US HWY 22W 908-964-0700
Union, NJ 07063

Page 77
*Medalist (purchased by Westerbeke Corporation)
Box 3008 Oshkosh, WI 54903
Merriman-Holbrook 301 River Street Grand River, OH 44045
*New England Engines Route 1 Rowley, MA 01969
Nicro Fico (Marinco) 2655 Napa Valley Corp. Drive Napa, CA 94558
Northwest Controls Vernfield Village Harleysville, PA 19438
Parr Jabsco Products (Now ITT Jabsco)
1485 Dale Way P.O. Box 2158 714-545-8251
Costa Mesa, CA 92628
*Perry’s Boat Harbor & Drydock Isleton, CA 95641
Raritan Engineering Co. 530 Orange Street 954-525-0378
Millville, NJ 08332
Rule Industries (Owned by ITT Jabsco)
Cape Ann Industrial Park 978-281-0440
Gloucester, MA 01930
Schaefer Marine Products Industrial Park 158 Duchaine Blvd. 508-995-9911
New Bedford, MA 02745
*Scott Ardox 1218 South West First Avenue Fort Lauderdale, FL 33315
Spartan Marine Hardware HC 33 Box 1460 1-800-325-3287
Georgetown, ME 04548
Westerbeke 41 Ledin Drive 508-588-7700
Avon, MA 02322