capture and analysis of 802.11 wireless traffic - connect one
TRANSCRIPT

Capture and analysis of 802.11 wireless traffic
October 2012
Ver. 1.00
Copyright © Connect One Ltd., 2008-2012

The information in this document is subject to change without notice and shall not be construed as a commitment on the part of Connect One. Connect One assumes no liability for any errors that may appear in this document. 3rd party software described in this document may require registration or a license at present or in the future. It is the user’s sole responsibility to adhere to all requirements and licenses relevant for installing and using the 3rd party software. No part of this document may be reproduced or transmitted in any form or by any means, electronic or mechanical, including but not limited to photocopying, recording, transmitting via fax and/or modem devices, scanning, and/or information storage and retrieval systems for any purpose without the express written consent of Connect One. Connect One is a trademark of Connect One Ltd. Copyright © 2012 Connect One Ltd. All rights reserved.

Revision History 20-1100-01 Version Date Description 1.00 October 2012 Initial Release.

Table of Contents
Introduction....................................................................................................................5 What you need ...............................................................................................................5 Brief Background...........................................................................................................5 Downloading BackTrack 5 ............................................................................................5 Burning BackTrack 5 Image..........................................................................................6 Booting into BackTrack 5..............................................................................................7 Starting the Shell (Linux command line).......................................................................8 Configuring Wi-Fi card for Monitor Mode ...................................................................9 Selecting Wi-Fi Channel for Monitoring.....................................................................10 Starting Wireshark .......................................................................................................10 Capturing & Filtering Network Traffic........................................................................12 Saving Network Traffic ...............................................................................................13 Recommended Reading ...............................................................................................15
Capture and analysis of 802.11 wireless traffic
Introduction In many instances in order to help debug connectivity problems between Connect One Wi-Fi modules and other Wi-Fi devices (AP, Another Station or Radius), you may be asked to provide a capture of the Wi-Fi network traffic for further analysis by Connect One. There are Windows based solutions but they are not free. This guide proposes a free alternative via the use of the Linux operating system and tools.
What you need 1. A Computer (laptop) with a DVD Drive and a wireless adapter 2. The ability to burn ISO images to CD or DVD 3. A copy of BackTrack 5 from http://www.backtrack-linux.org/downloads/ 4. Wireshark packet analyzer (already installed with BackTrack 5)
Brief Background BackTrack 5 is a legal and mostly open-source security suite designed by security experts in the computer and software Industry. Its creation is intended as both an educational tool and as a toolbox for network administrators who wish to secure a private or corporate network, or used in testing a ‘secured’ network.
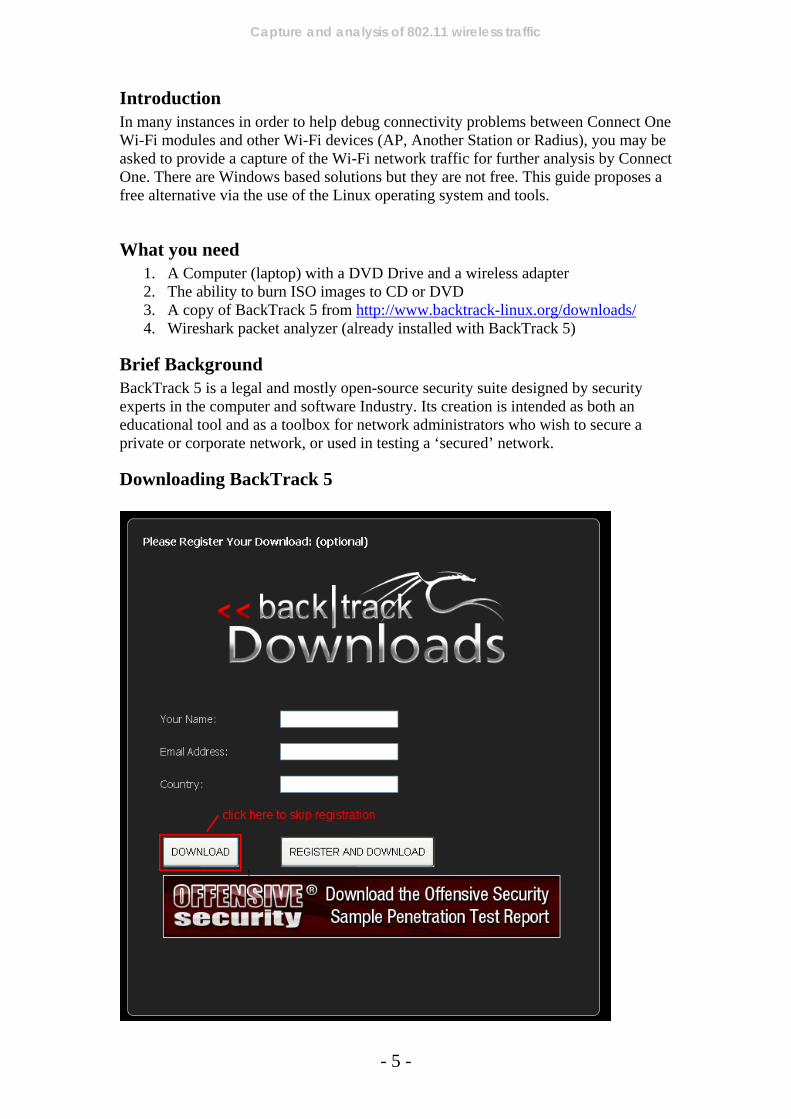
Downloading BackTrack 5
- 5 -

Capture and analysis of 802.11 wireless traffic
Choose from the drop down list (BackTrack Release) BackTrack 5 R3. You can choose either KDE or GNOME Windows Manager. Both are fine.
Burning BackTrack 5 Image It is not necessary to install the Linux distribution on your computer. The DVD ISO image downloaded is a LiveDVD (http://en.wikipedia.org/wiki/Live_CD), i.e. the OS can be run without installation to your hard drive. All you need to do is burn the ISO image on a DVD and boot your PC from the DVD. Here are a few links to free CD/DVD burning software for Windows: http://cdburnerxp.se/http://www.freeisoburner.com/http://www.imgburn.com/ More information on BackTrack, check out the BackTrack WiKi - http://www.backtrack-linux.org/wiki/index.php/Main_Page
- 6 -

Capture and analysis of 802.11 wireless traffic
Booting into BackTrack 5 Insert the Backtrack 5 disc into your laptop or desktop, set your BIOS to boot from your optical drive, and BOOT! You’ll get a prompt asking how to boot into Backtrack 5.
1. A boot menu will appear. Select the first item and hit ENTER.
2. After some time you will get a Shell (command prompt). Type in "startx" and
hit ENTER. This will load the BackTrack 5 graphical environment.
- 7 -

Capture and analysis of 802.11 wireless traffic
Starting the Shell (Linux command line) Most of the configuration work is done via the Shell (aka Command Prompt in Windows - http://en.wikipedia.org/wiki/Shell_(computing)). Start the shell.
KDE
Click this icon to start the shell
GNOME
Click this icon to start the shell
- 8 -

Capture and analysis of 802.11 wireless traffic
Configuring Wi-Fi card for Monitor Mode Next we need to create the network interface configured in monitor mode.
1. List all current network interfaces to find your wireless adapter name. The wireless adapter name usually starts with wlanX, where X is a number. Type "iwconfig" and hit ENTER
- 9 -
2. Create a network interface configured in monitor mode
Type "airmon-ng start wlan2" and hit ENTER. You should replace wlan2 in the above command with the name of your wireless network interface. The airmon-ng command will create the network interface mon0. You can confirm this by typing again the "iwconfig" command to list all network interfaces.

Capture and analysis of 802.11 wireless traffic
Selecting Wi-Fi Channel for Monitoring
Note: if Wireshark is already running, you will need to close it first. We need to select the Wi-Fi channel we would like to scan and capture data from. This can be done using the "iwconfig" command. Type "iwconfig mon0 channel 11" and hit ENTER.
- 10 -
Starting Wireshark Note: Wireshark is already installed with BackTrack 5.
1. Start Wireshark from shell in background mode. Type "wireshark &" and hit ENTER.
2. The Wireshark application will launch and you may see this dialog box. Tick the box next to "Don't show this message again." and click OK.

Capture and analysis of 802.11 wireless traffic
3. Now, select mon0 from the interface list and click Start.
- 11 -

Capture and analysis of 802.11 wireless traffic
Capturing & Filtering Network Traffic As you can see in the above section, Wireshark is now showing all wireless packets that are captured on the mon0 interface on channel 11. If you wish to filter out the displayed information so that it will only show data exchange between your devices you may do so by adding a display filter. Example Let's filter all traffic either coming or going from MAC address 00:b0:8c:05:32:41 Type in the Filter box (without the quotes) "wlan.addr == 00:b0:8c:05:32:41" and click Apply.
More Wireshark filter examples: http://sharkfest.wireshark.org/sharkfest.10/B-5_Parsons%20HANDS-ON%20LAB%20-%20WLAN%20Analysis%20with%20Wireshark%20&%20AirPcap%20Exercises.pdf Wireshark: Wireless Display and Capture Filters Samples (by Joke Snelders) Part 1: http://www.lovemytool.com/blog/2010/02/wireshark-wireless-display-and-capture-filters-samples-by-joke-snelders.htmlPart 2: http://www.lovemytool.com/blog/2010/07/wireshark-wireless-display-and-capture-filters-samples-part-2-by-joke-snelders.html Note: Wireshark keeps on capturing packets and displays only the ones defined by the display filter. To save your capture you must first stop it. Stop the capture once you have enough data by clicking on the STOP button in the toolbar or go to "Capture Stop" in the top menu.
- 12 -

Capture and analysis of 802.11 wireless traffic
Saving Network Traffic Insert a USB key to your desktop/laptop. The system should automatically recognize and mount the USB key. Here I am using a very OLD 128MB USB key! Click on "File Save As…" on the top menu.
Click on "File System" to select your USB key.
- 13 -

Capture and analysis of 802.11 wireless traffic
Give your capture a name and click on "Save".
Note: this will save everything captured by Wireshark not just what is currently filtered and displayed. To save only the traffic that is filtered use "File Export Specified Packets…"
Name your capture, select your USB key, make sure "Displayed" is selected, and click "Save".
If you have any questions or comments on this guide, please feel free to contact us: [email protected]
- 14 -

Capture and analysis of 802.11 wireless traffic
- 15 -
Recommended Reading 1. Wireshark & Ethereal Network Protocol Analyzer Toolkit
A chapter excerpt from the book -http://www.willhackforsushi.com/books/377_eth_2e_06.pdf