card esystem learning module for cmdi
DESCRIPTION
CARD eSystem Learning Module for CMDITRANSCRIPT

� Module �
c a r d e s y s t e m
Learning Module

� Introduction �
This learning module is specifically created for the CARD eSystem User’s Training being
conducted by the CARD MRI Development Institute. It is designed for a two-day training course
focusing on making the most out of the capabilities and functionalities of CARD eSystem.
Course Outline
Day 1
Familiarization with CARD eSystem
Accessing, modifying, and adding new client profiles
Viewing Savings and Loan accounts
Viewing, editing, and adding new centers
Day 2
Generating reports
Posting single and multiple cash and non-cash transactions
Configuring organizational parameters
� Getting Started �
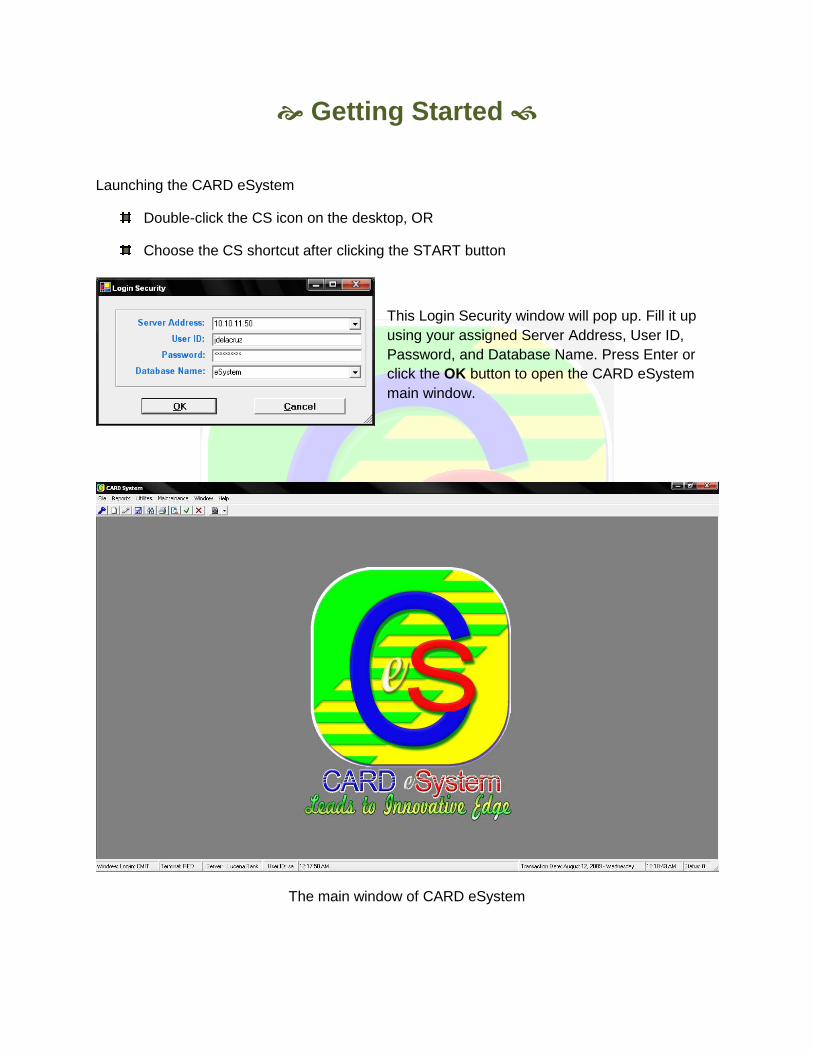
Launching the CARD eSystem
Double-click the CS icon on the desktop, OR
Choose the CS shortcut after clicking the START button
This Login Security window will pop up. Fill it up using your assigned Server Address, User ID, Password, and Database Name. Press Enter or click the OK button to open the CARD eSystem main window.
The main window of CARD eSystem
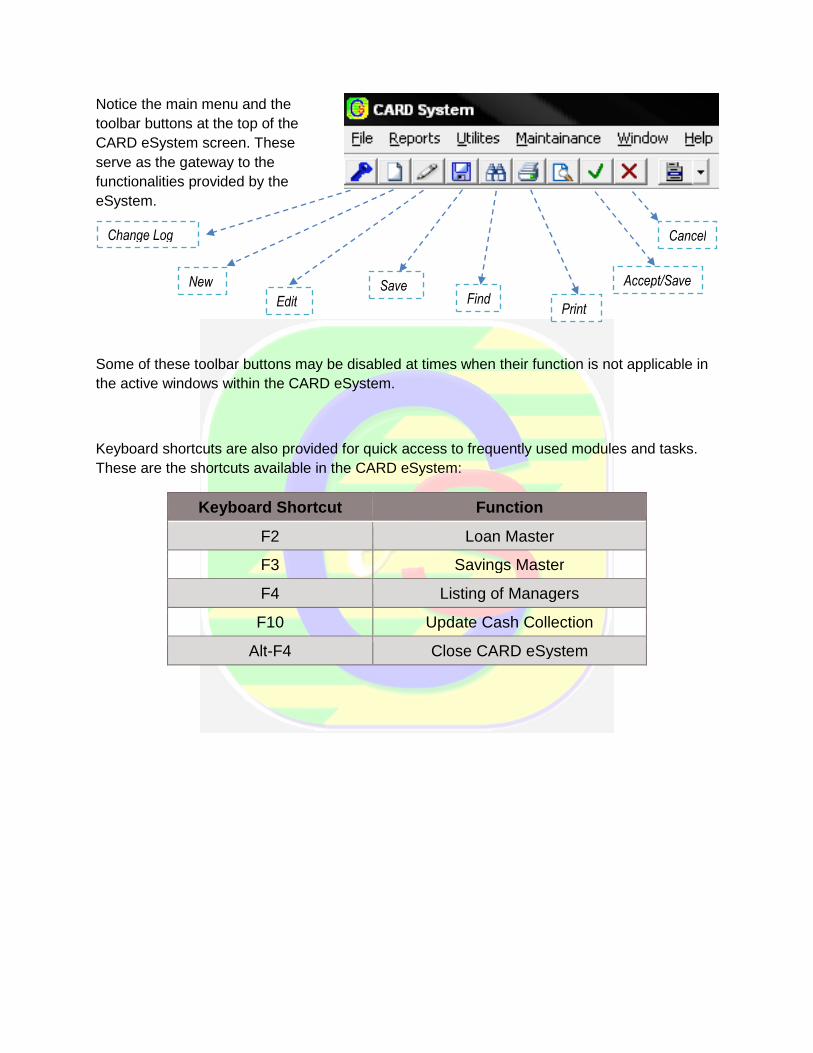
Notice the main menu and the toolbar buttons at the top of the CARD eSystem screen. These serve as the gateway to the functionalities provided by the eSystem.
Some of these toolbar buttons may be disabled at times when their function is not applicable in the active windows within the CARD eSystem.
Keyboard shortcuts are also provided for quick access to frequently used modules and tasks. These are the shortcuts available in the CARD eSystem:
Keyboard Shortcut Function
F2 Loan Master
F3 Savings Master
F4 Listing of Managers
F10 Update Cash Collection
Alt-F4 Close CARD eSystem
Change Log
New
Edit Save
Find Print
Accept/Save
Cancel

� Client �
CARD eSystem’s main menu has six categories namely File, Reports, Utilities, Maintenance, Window, and Help.
Client is the first submenu under File.
Searching for Existing Client
To retrieve existing client data, open the Customer Information window and make use of the uppermost text fields (on a row labeled “Client ID”).
The left text field accepts numerical input for searching a client using his/her unique Client ID number.
The right field is for searching a client’s name using one or more alphabet characters from his/her name.
Press Enter after typing an input in either box to view a matching client record. In case of multiple results, simply select a client from the generated list.
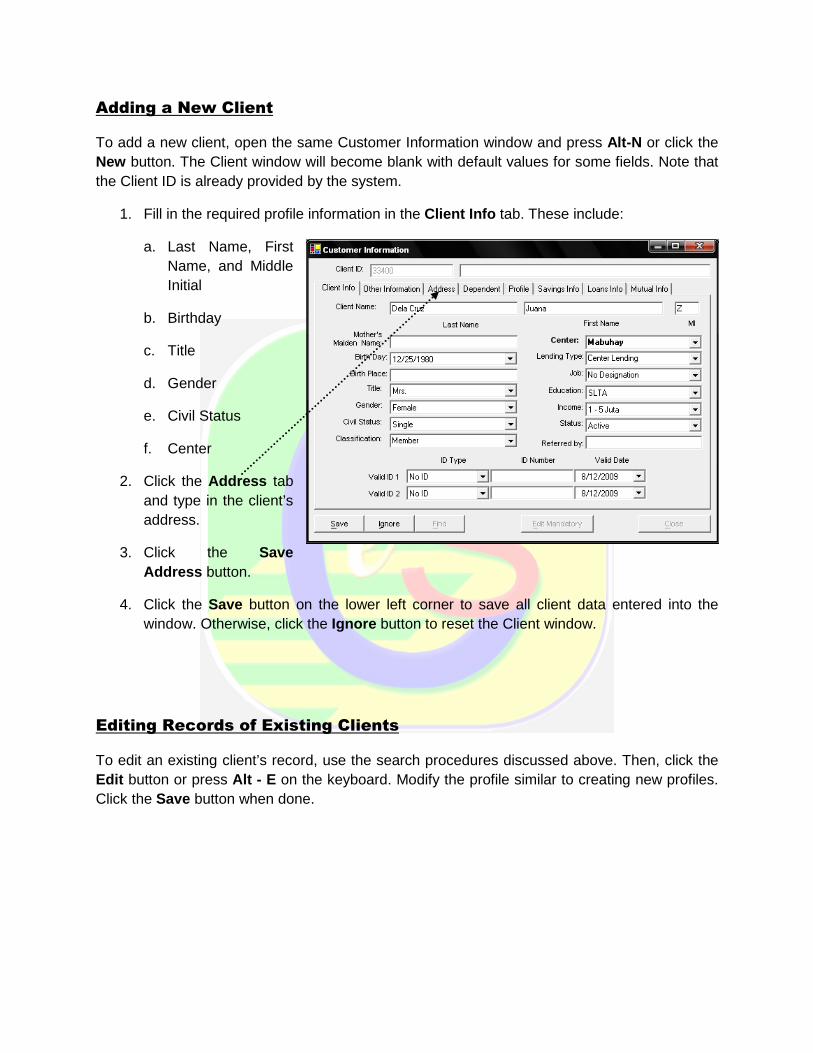
Adding a New Client
To add a new client, open the same Customer Information window and press Alt-N or click the New button. The Client window will become blank with default values for some fields. Note that the Client ID is already provided by the system.
1. Fill in the required profile information in the Client Info tab. These include:
a. Last Name, First Name, and Middle Initial
b. Birthday
c. Title
d. Gender
e. Civil Status
f. Center
2. Click the Address tab and type in the client’s address.
3. Click the Save Address button.
4. Click the Save button on the lower left corner to save all client data entered into the window. Otherwise, click the Ignore button to reset the Client window.
Editing Records of Existing Clients
To edit an existing client’s record, use the search procedures discussed above. Then, click the Edit button or press Alt - E on the keyboard. Modify the profile similar to creating new profiles. Click the Save button when done.

Client Resignation
To resign a client from the CARD eSystem, search first for the record through the Customer Information window. A Resign button will then become visible at the bottom of the window.
Click the Resign button.
Confirm the resignation by clicking the Yes button in the pop-up dialog box.

� Loans�
New Loan Release
1. Press F2 to open the Loans Master window.
2. Search for the client to whom the loan will be released using the same search procedures as in the Customer Information window.
3. Click the button.
4. Select the Type of Loan and fill in the Loan Amount, Loan Term and the Purpose of Loan.
5. If the loan is to be paid in modes other than weekly (i.e. lump sum, semi-monthly, etc), click the Amortization tab and click the Rebuild button after choosing the correct Frequency of Payment.
6. Click the Save button. The new loan will then appear at the listing of loans in the Basic Info tab but its status is still “Approved for Release.”
7. Click the new loan from the list to select it and click the Release button to finalize the transaction.
8. A small window will ask for a Reference Number; input the Promissory Note number and click OK.

Loan Inquiry
1. In the Client Loan window, open a client’s profile and select a loan from the listing by clicking on its row. The loan type, status, date of release, balance, and account number is displayed in the Basic Info tab.
2. Click the Amortization tab to view the amortization schedule for the selected loan account.
3. To view the payment history, open the Transaction tab, select inclusive dates, and click the Display button.
Cancelling a New Loan Release
1. Click File > Loans > Cancel Release.
2. Search for the client whose loan will be voided.
3. Click on a loan account from the listing of loans.
4. Click the Cancel Release button.
Note: only those loans released within the day can be cancelled.
.

� Savings �
The CARD eSystem’s Savings window provides an account inquiry facility not only for pledge accounts but also for MBA contributions.
Press F3 to access the Savings window.
Searching for clients and viewing transaction history also follow the same procedures as in Client Loan Information.

� Center �
The Center Register provides options for:
• adding new center
• editing center information
• changing assigned Account Officer
• changing meeting day
• splitting a center
• printing a single Collection Sheet
Adding New Center
1. Click the New button in the Center Register window.
2. Type in the Center Name in the topmost field and the Center Address underneath it.
3. Select the Account Officer, Meeting Day, and Unit Name from the drop-down boxes.
4. Click the Save button.

Editing Center Information
1. Search for the center’s data by typing its name in the Search box within the Center Register. The closest search match will be highlighted in light blue as you type.
2. Click on the row of the center to be edited.
3. Click the Edit button.
4. Modify the center’s information similar to creating to a new center. If the Account Officer who will handle the center is not yet in the available choices, create his/her profile first in the Account Officer window (see instructions below in the Center Splitting topic).
5. Click the Save button when done.
Previewing/Printing a Collection Sheet
1. Search for the center name and click on its row to highlight it.
2. Click the Print Collection Sheet button. A preview of the collection sheet will be generated.
3. Click the Printer button to print it.
Center Splitting
1. If a new Account Officer will handle the center:
a. Select Account Officer from the File > Reference Table menu to open the Managers window.
b. Click the New button.
c. Input the new Account Officer’s information.

d. Click the Save button.
2. Open the Center Register window and create or edit center information if necessary.
3. Click File > Client to open the Customer Information window.
4. Search for each client to be transferred to the new center.
5. Edit the client’s information to change the Center assigned to him/her.
6. Save the changes made to each client.
� Reports �
All types of financial reports for portfolio management, auditing, and compliance are readily available and easily accessible within the CARD eSystem.
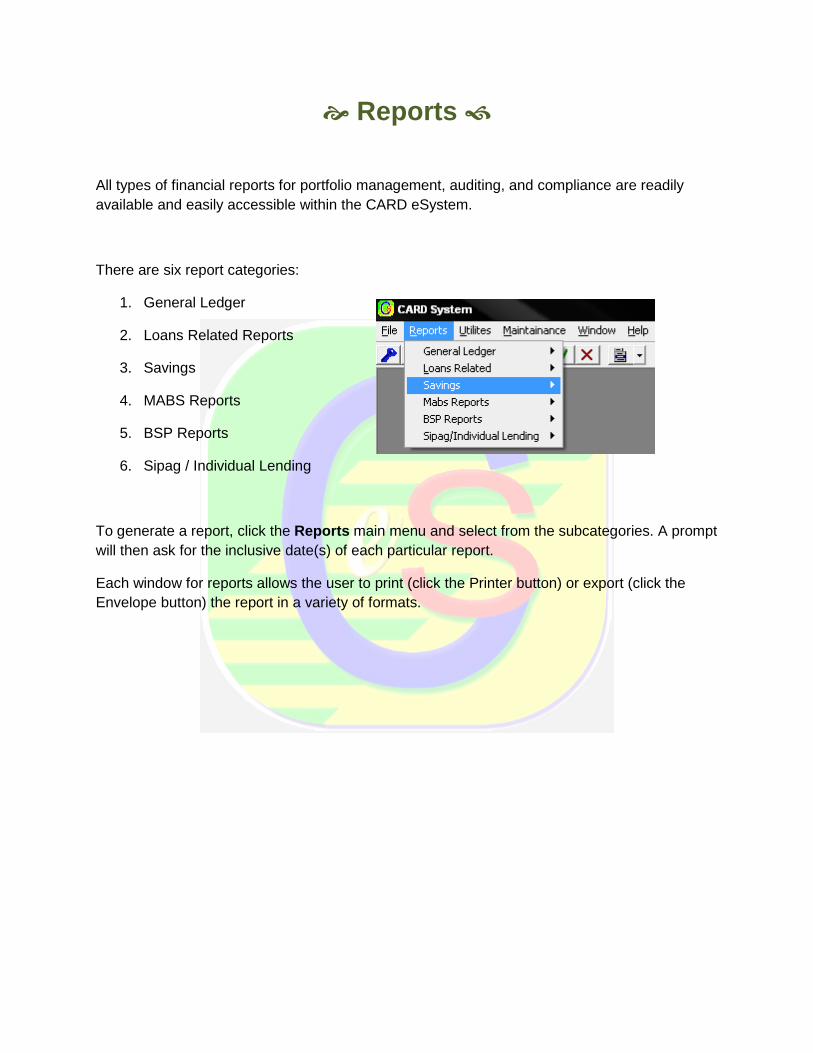
There are six report categories:
1. General Ledger
2. Loans Related Reports
3. Savings
4. MABS Reports
5. BSP Reports
6. Sipag / Individual Lending
To generate a report, click the Reports main menu and select from the subcategories. A prompt will then ask for the inclusive date(s) of each particular report.
Each window for reports allows the user to print (click the Printer button) or export (click the Envelope button) the report in a variety of formats.

� Utilities �
Multiple Payment Posting
1. Press F10 or click Update Cash Collection from the Utilities menu.
2. Select the Unit and Center from the drop-down boxes.
3. Click the Display button to view the center’s members and their dues for the week.
4. Fill up the Net Cash text field.
5. Click one of the Due, Amort, or Zero buttons to set the client’s paid amount to their weekly due, amortization amount, or to zero, respectively for easier posting.

6. Individually edit each client’s payments in the Paid column and the withdrawals in the Withdraw column.
7. For specific posting like full, advance or loan-only payments, click the Payment Details tab for a per-client breakdown of payments. Properly distribute the client’s payments to his/her MBA, Pledge, and loan accounts. Click the Client List tab to go back to the member listing.
8. Make sure that the center’s collection has no variance through the text field next to Total Collection.
9. Click the Post Transaction button to finalize the transaction.
Single Payment Posting
To post individual transactions, use the same window as multiple transactions. But instead of displaying all clients of a center, use the search box at the bottom of the window to view one client at a time.
1. At the bottom of the Multiple Cash Payment window, click within the search box (encircled above), type a few characters to query a client’s name and press Enter or click the Add New to List button.

2. If the search produced multiple results, double-click the name of the client from the result window.
3. More clients can be added to the list for posting by repeating Steps 1 to 2 (i. e. for clients who share the same Official Receipt).
4. Follow the same steps as multiple posting starting with the Net Cash input.
Non-Cash Posting
Posting non-cash transactions is also similar to that of multiple cash payments.
1. Click the Utilities menu and select Update Non Cash Collection.
2. Follow the same procedures discussed in posting Multiple Cash Collection.

� Maintenance �
Organizational Parameters
In the Parameters window (select Parameters from the Maintenance menu), the user can configure the report headers, signatories, interest waiving, and the setting for printing of Official Receipts during posting of Multiple Payments.
It also has tabs for configuring the parameters for each savings and loan products including the interest rates applicable for each.

Modifying the Account Titles and Account Codes is also possible through the Chart of Accounts window. To view and/or edit them, choose General Ledger from the File menu and click Chart of Accounts.
card mri development institute
Brgy. Tranca, Bay, Laguna, Philippines
phone +63 49 573 0031
fax +63 49 536 7265
www.cardinstitute.com
T RA I NI N G
C O NS UL TA N CY
S U P P O RT
E -L E A R NI N G
The CARD MRI Development Institute
(CMDI), being the training arm of the
CARD Mutually-Reinforcing
Institutions, provides up-to-date and
customizable training to hundreds of
CARD employees every year.
More famous though is its offering of
Degree Courses in Microfinance.