cardinal - detecto · 1 part 1 description 1.1 introduction 1.2 purpose 1.3 description of scale...
TRANSCRIPT

OPERATION MANUAL
25 Pound CapacityCounter Type
Electronic Scale
MSB-25 Series
© Cardinal Scale Manufacturing CompanyP.O. Box 151, Webb City, MO 64870
PH: (417) 673-4631
Printed In U.S.A.
8540-M222-O1 Rev C07/10
Cardinal®

2

1
PART 1 Description1.1 Introduction1.2 Purpose1.3 Description of scale1.4 Principles of operation1.5 Precautions
PART 2 Specifications
PART 3 Unpacking, Installation and Preparation for use
3.1 Unpacking3.2 Placement3.3 Level adjustment3.4 Power supply connection
PART 4 Operation4.1 Key functions4.2 LED indicator functions4.3 Operation: weighing, sampling and counting4.4 Test mode
PART 5 Calibration
PART 6 Serial Interface6.1 Purpose6.2 Interconnection6.3 Message format
PART 7 Care and Maintenance
PART 8 Parts Breakdown8.1 Exploded View8.2 Parts list
TABLE OF CONTENTS

2
1.0 DESCRIPTION
1.1 IntroductionThis manual provides descriptive data, specifications, operating instructions, calibration procedures, care andmaintenance instructions and information on interchangeable parts for the Detecto model MSB-25 scale.
This scale is manufactured by Detecto Scale Co., Webb City, MO 64870.
1.2 PurposeThis scale is designed for the following functions:
1. General purpose weighing of mailable objects up to 25 pounds in weight.2. Displaying weight of a single mailpiece, number of mailpieces per pound or number of pieces on the
scale after a number of identical pieces have been weighed.3. Manual entry of a tare weight or automatic zeroing of weight on the scale, for purpose of using a
container for weighing.4. Ability to display weight digitally in pounds and ounces or in pounds only.5. Perform all of the above functions with an input from a remotely located weighing device.6. Direct output of data to a printer or other device.
1.3 Description of scaleThe Detecto MSB-25 is a ruggedized, fully-electronic digital weight indicator employing a single-point loadcell, stainless steel weighing platform, digital electronics, full-travel keypad, LED annunciators to indicatescale mode, twenty character alphanumeric dot matrix display with 7/16 inch high characters, and serialinterface. Operating instructions are readily visible on a pull-out instruction placard.
1.4 Principles of operationThe scale may be used to display weight; either gross weight or net weight (gross minus tare). Displayedunits may be either pounds or pounds-ounces format. Known container tare weight may be entered via thekeyboard. Unknown container tare weight may be zeroed off. An average weight per piece of identical mailpieces may be taken from a known sample quantity. The sample quantity must be large enough to total 0.2lbs of weight. The default sample quantity is 10 pieces, however a more convenient sample quantity may beselected via the keyboard. The weight per piece or pieces per weight may be displayed. Number of pieces(count) may also be displayed.
1.5 PrecautionsBefore using this instrument read this manual and pay special attention to all "WARNING" symbols:
IMPORTANT ELECTRICAL WARNING

3
2.0 SPECIFICATIONS
Power requirements: 110/120 VAC, 60 Hz
Count capacity: 999,999
Weight resolution: 1 part in 8,000
Computing resolution: 1 part in 16 x 106 with floating decimal
Dimensions: 5" H x 17" W x 21" D
Weight: 28 lb
Operating temperature: 32° F - 104° F (0° C - 40° C)
Weighing accuracy: This equipment is manufactured in accordance with the recommendations set forth by Handbook #44, issued by theUnited States Department of Commerce, National Insitute of Standards andTechnology.
Capacity: 25 lb x 0.05 oz (0.005 lb)

4
3.0 UNPACKING, INSTALLATION ANDPREPARATION FOR USE
3.1 UNPACKINGInspect the scale for any signs of damage due to shipping such as loosescrews or exterior dents and scratches on the covers and case. Keepcarton and packing for return shipment of scale if necessary. It is theresponsibility of the purchaser to file all claims for any damages or loss intransit incurred, unless this responsibility has been accepted by the Sellerin its proposal.
3.2 PLACEMENTPlace the scale on a stable, vibration-free location away from directsunlight and away from any rapidly moving air source.
CAUTION!!! DO NOT place the scale on any unstablecart, stand or table. The scale may fall causing injury tothe operator, and seriously damage the scale, or properoperation of the scale may be inhibited.
3.3 LEVEL ADJUSTMENTBefore mounting the commodity tray onto the scale, level the scale ifnecessary by adjusting the four legs on scale bottom, up or down, until thebubble in the level gage located on the top cover is centered as shown inthe illustration below. After level is achieved, lock legs in place bytightening lock nuts on legs against the scale bottom.
AdjustingLegs
(on bottomof scale)
Leveled
Not Leveled

5
3.4 POWER SUPPLY CONNECTION3.4.1 Plug power cord into a grounded, 3-pronged wall receptacle thatsupplies 115 VAC power. If an extension cord must be used, it should bea 3-wire, grounded type.
3.4.2 If a 2-pronged wall receptacle is encountered, it is the responsibilityof the customer to contact a qualified electrician to replace the 2-prongedreceptacle with a properly grounded 3-pronged wall receptacle or to havea grounding adapter properly installed.
CAUTION!!! - To avoid electrical hazard, DO NOT underany circumstances, cut, remove, alter, or in any waybypass the power cord grounding prong. Be certainpower cord is routed out of the way of normal traffic.
3.4.3 START-UPWhen the power switch is turned ON the scale will perform a brief display ofmodel and version numbers. On conclusion, the display will show zeroweight, signaling that the scale is ready for use.When the unit is plugged in and turned OFF, power is provided to the loadcell and circuitry, so that the unit will be ready to weigh accuratelyimmediately after power-up.If plugging the unit in after an extended period, allow the unit to warm up forapproximately 15 minutes.
CAUTION!!! - If it becomes necessary to replace a fuse,use only fuses of type 3AG 1/4 ASB for 115 VACoperation. ALWAYS UNPLUG THE POWER CORDBEFORE CHANGING THE FUSE.

6
This section describes the use of each of the keys on the keypad of the MSB-25 Scale.
4.1 KEY FUNCTIONS
The TARE key is used to enter a known tare (container) weight via thenumeric keypad. Pressing the TARE key will display zeros or the previouslyentered tare (if any) and illuminate the TARE annunciator.
Pressing the ZERO key with weight on the scale, will set the gross weight tozero, and clear the tare weight, if any. If the display is in count mode, thecount will be set to zero.
TARE
WEIGHT
ZERO
The WEIGHT key is used to place the scale in the weight display mode.Pressing the WEIGHT key will display the scale weight as indicated byillumination of either the lb or lb-oz indicator. If a tare was previously enteredvia the TARE key, the net weight will be displayed and the NET annunciatorwill illuminate. If no tare has been entered, the weight displayed will be grossweight, and the GROSS annunciator will illuminate.
4.0 OPERATION
The DECIMAL key is used to enter a decimal point where desired whenkeying in a number sequence.
The NUMERIC KEYS are used to enter numeric values required in thevarious operational modes and calibration procedures of the scale. The 1 and0 keys are also used to answer YES and NO questions displayed in certainoperations. The 1 and 2 keys are also used to select between scale #1 (local)and scale #2 (remote).
.
4
1
7
0
5
2
8
.
6
3
9
CLEAR
.
CAUTION!!! - Dropping packages weighing more than 3pounds onto the scale platform can cause permanentdamage to the load cell.

7
The SAMPLE key is used to weigh a specific number of pieces to be added toor removed from the scale in preparation for a new counting operation. TheSAMPLE key is also used to change the sample quantity. Pressing theSAMPLE key repeatedly will cause the sample size to step in multiples of 10from 10 to 250. In this manner sample quantities other than the first onerequested by the instrument may be used for counting operations. Samplequantities may optionally be entered via the numeric keypad in any desiredquantity. The SAMPLE key may be used to return the display to a sampledisplay from any weight or count display mode.
SAMPLE
The COUNT key is pressed after removing or adding the sample requested,to initiate the counting operation and place the display in the COUNT mode.The COUNT key will return the display to the count mode from any weightdisplay or sample mode.
COUNT
Pressing the WT/PC key will:• display the calculated average piece weight from a current sampling and
counting operation• allow the entry of a known piece weight to be used in a counting operation.
KEY FUNCTIONS, Cont.
WT/PC
Pressing the PRINT XMIT key will transmit RS-232 data to an optionallyinstalled printer, printing data which is currently shown on the scales display,along with descriptive headings. See section 6.0 for further information.
PRINTXMIT
Pressing the 1 key while displaying any weight or count information will selectthe instrument platform (LOCAL, SCALE #1) for use in all weighing andcounting operations. The SCALE ID digit in the display will show a "1". If anon-zero tare was previously entered, the net weight will be displayed and theNET annunciator will illuminate. If no tare has been entered, the weightdisplayed will be gross weight, and the GROSS annunciator will illuminate.
1
Pressing the 2 key while displaying any weight or count information will selectan external weight indicator platform (REMOTE, SCALE #2) for use in allweighing and counting operations. The SCALE ID digit in the display willshow a "2". If a non-zero tare was previously entered, the net weight will bedisplayed and the NET annunciator LED will illuminate. If no tare has beenentered, the weight displayed will be gross weight, and the GROSSannunciator LED will illuminate.
2

8
KEY FUNCTIONS, Cont.
The CLEAR key is used to erase an erroneous entry, and return the cursorback to the first character in the entry field.
The lb key is used to select the mode whereby weights are to be displayed indecimal pounds format, pp.ppp pounds. The lb annunciator LED willilluminate.
The lb-oz key is used to select the mode whereby weights are to be displayedin pounds-ounces format, pp pounds oo.oo ounces. The lb-oz annunciatorLED will illuminate.
CLEAR
lb
lb-oz
Pressing the PC/WT key will display the calculated number of pieces perpound. This number is calculated as the reciprocal of the WT/PC value. ThePC/WT annunciator will illuminate.
The ENTER key is used when keying in some calibration and operationaldata, to accept or terminate the entry.
PC/WT
ENTER
The TEST key is located on the bottom of the scale enclosure. Pressing thisswitch will place the scale in the test mode as indicated by a "T" displayed inthe right edge of the display. In this mode of operation, the weight is displayedeither in 0.01 ounce or 0.001 pound graduations to check how closely thescale approaches zero tolerance error.
9
4.2 LED INDICATOR FUNCTIONS
The following describes the functions of each of the LED indicators andassociated legends contained on the face of the instrument display.
NETThe NET indicator shows the weight displayed is the net weight. Net weight isdetermined by subtracting the stored tare weight from the gross or scale weight. The tareweight, usually the weight of the empty container, is entered using the tare operation key.Note that the NET indicator is only active when the display is in the weight mode asshown by the illumination of either the lb or lb-oz indicator.
TAREThe TARE indicator shows that the scale is in a weight mode in which a known tare(container) weight may be keyed in via the numeric keypad, or in a mode that will displaythe current TARE weight.
lbThe lb indicator shows that the display is in the weight mode and that the weightdisplayed is in decimal pounds.
lb-ozThe lb-oz indicator shows that the display is in the weight mode and the weight displayedis in pounds and ounces.
MOTIONThe MOTION indicator shows that the scale weight is unstable. An unstable weightreading may be caused by motion on the scale platform. The ZERO and PRINT/XMITfunctions are disabled while the MOTION indicator is illuminated.
ZEROThe ZERO indicator is active during any mode and is used to indicate that the scalegross weight is within ± 1/4 of a graduation of true zero.
SAMPLEThe SAMPLE indicator shows that the display is in the sample mode and that the valueshown is the sample quantity requested in pieces.
MOTION
ZERO
lb
GROSS NET
lb - oz SAMPLE
TARE
COUNT
WT/PC PC/WT
10
INDICATOR FUNCTIONS, Cont.
COUNTThe COUNT indicator shows that the display is in the count mode, and that the valueshown is the count quantity of either the pieces removed from the scale platform (reversecounting) or the number of pieces added to the scale platform (normal counting). Thecount value is determined by dividing the net weight by the average piece weight.
WT/PC (WEIGHT PER PIECE)The indicator shows that the displayed value is the average weight of a single part (froma previous sampling operation; or entered via the numeric keypad ). The data display willshow a message in the form PP.PPPP with the lb LED lit, or PP oo.oooo with the lb-ozLED lit.
GROSSThe GROSS indicator shows that the weight displayed is the gross weight. Gross weightmay be displayed only when the WEIGHT key is pressed and a zero tare weight (or notare weight) value is stored. The net weight (used in all sampling and counting functions)is determined by subtracting the stored tare weight from the gross weight. Note that theGROSS indicator is only active when the display is in the weight mode as shown by theillumination of either the lb or lb-oz indicator.
PC/WTThe PC/WT indicator shows that the indicator is displaying the calculated number ofpieces per pound, based on the last sample taken. The data display will show a messagein the form PC/LB XXX.XXX, and is the calculated number of pieces per pound,calculated as the reciprocal of the WT/PC value.
The SCALE ID character in the display's rightmost character indicates which scale isoperational for weighing, sampling and counting. A "1" indicates the internal scale, and a"2" indicates an external scale. A "T" indicates that the internal scale is being used in"TEST" mode (.01 oz divisions).
The message "INSUFFICIENT ADD XXX" when seen during a sampling operation,indicates that the sample size placed on the scale was insufficient to calculate anaccurate piece weight.
11
4.3 OPERATION: WEIGHING, SAMPLING AND COUNTING
4.3.1 STANDARD SAMPLING AND COUNTING1. With the scale in any mode...2. Press the SAMPLE key and place on scale the number of pieces indicated on
display. (A different sample size may be selected by following procedure below).3. Press the ENTER key. The display will change to count mode and the COUNT
indicator will illuminate.4. Add to scale the number of additional pieces to be counted and read the total
count on display.5. When sampling, if the weight is too small, the display will show "INSUFF. ADD
XXXXXX", where XXXXXX is the number of additional pieces required for asufficient sample.
6. Add to scale the number of additional parts requested and press the ENTERkey. The display will change to count mode and the COUNT indicator willilluminate.
7. Add to scale the additional pieces to be counted and read the total count.
4.3.2 ADJUSTING THE SAMPLE QUANTITY1. Press the SAMPLE key.2. Press the SAMPLE key again to step to the next sample quantity. Pressing the
SAMPLE key repeatedly will cause the sample quantity to step in multiples of 10from 10 through 250; OR
3. Key in the desired sample value via the numeric keypad.4. Place on scale the indicated sample quantity and press the ENTER key. The
display will change to count mode and the COUNT indicator will illuminate.5. Add to or remove from scale pieces to be counted and read the total count.
4.3.3 SAMPLING AND COUNTING OUT FROM A CONTAINER1. Place the filled container on the scale platform and press the SAMPLE key.2. Remove the number of pieces shown in the display and press the ENTER key.3. Remove the pieces from the container and read the total number removed.
4.3.4 TO DISPLAY WEIGHT1. Press the WEIGHT key. The display will show the gross weight if tare is zero, or
the net weight if tare is non-zero. Either the lb or lb-oz indicator will illuminate.
4.3.5 COUNTING WITH INSUFFICIENT SAMPLEIf the weight of a sample is below 0.2 pounds, the message "INSUFF. ADDXXXXXX" will be displayed. Although not recommended, it is possible to overridethis message and proceed with counting by pressing the COUNT key when themessage is displayed. The unit will save the weight per piece and proceed toCOUNT mode.
12
4.3 OPERATION WEIGHING,SAMPLING AND COUNTING, Cont.
4.3.6 TO ZERO THE GROSS WEIGHT1. With the display in weight or count mode...2. Press the ZERO key. The tare weight will be set to zero and a new gross weight
center of zero point will be established. If the display was in count mode, thecount will be set to zero. If the display was in the weight mode, a zero grossweight will be displayed and the GROSS indicator will illuminate. In either case,the ZERO indicator will illuminate.
4.3.7 TO ENTER A KNOWN TARE WEIGHT1. With the scale in any weight or counting mode...2. Press the TARE key. The display will show the previously entered tare weight
and the TARE indicator will illuminate.3. Key in desired tare: pounds with decimal point followed by ENTER; or
pounds-ENTER, ounces-ENTER (depending upon the weight units in effect).4. The scale will change to weight mode. Gross weight will be displayed if the tare
is zero, and the GROSS indicator will illuminate. If the tare is non-zero, netweight will be displayed (gross minus tare) and the NET indicator will illuminate.
4.3.8 COUNTING WITH A KNOWN AVERAGE WEIGHT PER PIECE1. Press the WT/PC key.2. Key-in desired average piece weight value in decimal pounds format only via the
numeric keypad followed by ENTER. Place items to be counted on scale thenpress the COUNT key.
3. Read count on display.
4.3.9 TO DISPLAY WEIGHT PER PIECE OR PIECE PER WEIGHT1. To display the average weight per piece, based on the most recent sample,
press the WT/PC key.2. To display the average number of pieces per pound, press the PC/WT key. The
appropriate indicator will illuminate.
4.4 TEST MODE OPERATION4.4.1 To Enter the Test Mode1. Press the test mode pushbutton located on the bottom of the scale. It will be
necessary to lift one side of the scale to gain access to this button. (see figure8.1)
2. The selection of the test mode is indicated by a "T" shown at the rightmostdisplay position.
3. While in the test mode note that the only keys that are active are the lb, lb-oz,and zero keys. All others are disabled.
4. While in the test mode the weight will be displayed in graduations of 0.01 ounceor 0.001 pound.
4.4.2 To Exit The Test Mode1. Press the test mode pushbutton a second time to resume normal operation. The
"T" in the display will be replaced by a "1" to indicate selection of the normaloperating mode and scale no.1. (see figure 8.1)

13
5.0 CALIBRATION
The following describes the Calibration of the MSB-25 scale in the event that the scale should need recalibration. A qualified technician should perform this function to maintain the instrument’s high degree of accuracy. 1. Unplug the scale from the power outlet. This unit applies power to the load cell and
circuits even when the power switch is OFF. . 2. Ensure that the bulls-eye level indicates that the scale platform is level. Adjust if
necessary. Refer to section 3.3.
IF BREAKING THE SEALING WIRES IS REQUIRED FOR PURPOSES OF CALIBRATION, PROPER PROCEDURES COVERED UNDER NIST HANDBOOK 44 MUST BE ADHERED TO.
3. Remove the weighing platform and weighbridge. Remove the eight screws securing the top cover and remove the cover. Refer to the drawing in section 8.1 for location of parts.
4. Referring to the drawing in section 5.1, locate the calibration seal (plastic cover) and remove it by removing the two (2) small slotted screws on the bottom of the scale. This will expose the calibration switch. Refer to the drawing in section 8.1 for location.
5. Using a small screwdriver or pencil, push the switch lever to the opposite setting (toward the front of scale).
6. Replace the weighbridge with the two hex-drive bolts and lock washers. Replace the weighing platform.
7. Plug in the power cord and turn the scale ON. The display will show "LOAD SCALE TO 25 LB". If it is desired to bypass calibration and only change AUTOZERO, press the CLEAR key at this point, and proceed to step 9. Allow load cell and electronics to stabilize for at least 5 minutes if power had previously been off 30 minutes or more.
8. Apply an accurate 25 pound test weigh to the platform and press the ENTER key. The scale will go through a brief display sequence and the show "UNLOAD SCALE".
9. Remove the test weight and press the ENTER key. The scale will again go through a brief display sequence and display "AUTOZERO?".
10. Press the 1 key to enable Autozero, or the 0 key to disable. It is recommended that Autozero should be disabled only for testing purposes. When Autozero is enabled, weights below 0.005 lb (0.08 oz) are automatically zeroed off within 3 seconds after weight is applied or removed.
11. The display will show "DONE". Turn the scale OFF and unplug the power cord from the wall outlet.
12. Remove the weighing platform and weighbridge. Return the calibration switch lever to the original setting (toward the rear of the scale). Replace the calibration seal (plastic cover) by re-installing the two (2) small slotted screws on the bottom of the scale.
13. Replace the top cover and eight (8) screws. Replace the weighbridge and weighing platform. The scale is ready for use.
14. The test mode may be used to determine how closely the scale's performance approaches zero tolerance error. Refer to section 4.4.

14
5.1 CALIBRATION SEAL
CALIBRATION SEAL (PLASTIC COVER)
15
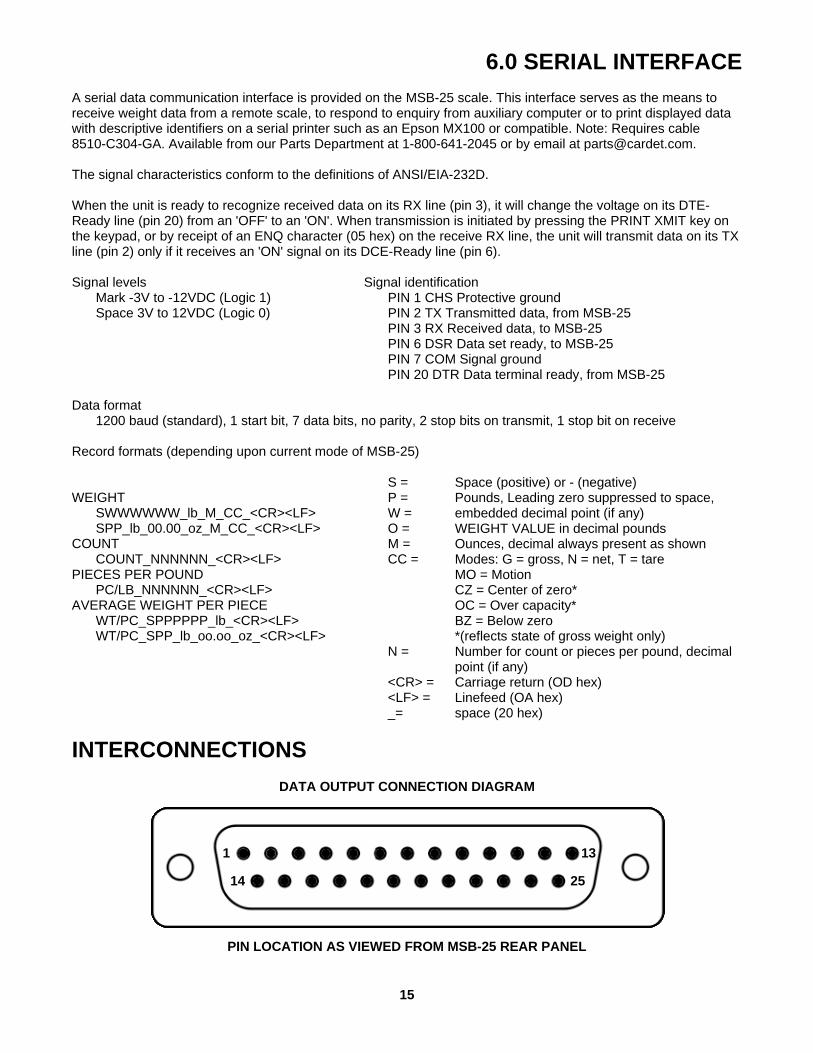
6.0 SERIAL INTERFACE A serial data communication interface is provided on the MSB-25 scale. This interface serves as the means to receive weight data from a remote scale, to respond to enquiry from auxiliary computer or to print displayed data with descriptive identifiers on a serial printer such as an Epson MX100 or compatible. Note: Requires cable 8510-C304-GA. Available from our Parts Department at 1-800-641-2045 or by email at [email protected]. The signal characteristics conform to the definitions of ANSI/EIA-232D. When the unit is ready to recognize received data on its RX line (pin 3), it will change the voltage on its DTE-Ready line (pin 20) from an 'OFF' to an 'ON'. When transmission is initiated by pressing the PRINT XMIT key on the keypad, or by receipt of an ENQ character (05 hex) on the receive RX line, the unit will transmit data on its TX line (pin 2) only if it receives an 'ON' signal on its DCE-Ready line (pin 6). Signal levels
Mark -3V to -12VDC (Logic 1) Space 3V to 12VDC (Logic 0)
Signal identification PIN 1 CHS Protective ground PIN 2 TX Transmitted data, from MSB-25 PIN 3 RX Received data, to MSB-25 PIN 6 DSR Data set ready, to MSB-25 PIN 7 COM Signal ground PIN 20 DTR Data terminal ready, from MSB-25
Data format
1200 baud (standard), 1 start bit, 7 data bits, no parity, 2 stop bits on transmit, 1 stop bit on receive Record formats (depending upon current mode of MSB-25) WEIGHT
SWWWWWW_lb_M_CC_<CR><LF> SPP_lb_00.00_oz_M_CC_<CR><LF>
COUNT COUNT_NNNNNN_<CR><LF>
PIECES PER POUND PC/LB_NNNNNN_<CR><LF>
AVERAGE WEIGHT PER PIECE WT/PC_SPPPPPP_lb_<CR><LF> WT/PC_SPP_lb_oo.oo_oz_<CR><LF>
S = P = W = O = M = CC = N = <CR> = <LF> = _=
Space (positive) or - (negative) Pounds, Leading zero suppressed to space, embedded decimal point (if any) WEIGHT VALUE in decimal pounds Ounces, decimal always present as shown Modes: G = gross, N = net, T = tare MO = Motion CZ = Center of zero* OC = Over capacity* BZ = Below zero *(reflects state of gross weight only) Number for count or pieces per pound, decimal point (if any) Carriage return (OD hex) Linefeed (OA hex) space (20 hex)
INTERCONNECTIONS
DATA OUTPUT CONNECTION DIAGRAM
PIN LOCATION AS VIEWED FROM MSB-25 REAR PANEL
1 13
14 25

16
7.0 CARE AND MAINTENANCE
1. DO NOT subject the commodity tray to sudden shocks.2. DO NOT submerge the scale in water or spray water directly on the
scale. The scale may be cleaned using a damp soft cloth and mild detergent. Be certain power is removed before cleaning is begun. DO NOT use an abrasive cleaner on this instrument.
3. DO NOT replace a fuse with the power cord plugged in or use fuses ofsizes other than specified.
4. DO NOT use acetone or other volatile solvents for cleaning.5. DO NOT use any sharp or pointed instrument to depress keys.6. DO follow all warnings and instructions marked on this product and listed
in this manual.

17
PARTS DIAGRAM

18
8.2 PARTS LIST
This section lists parts which are interchangeable by field or factory service personnel. Referto the MSB-25 exploded view in section 8.1 for the location of each item. Unless otherwisenoted, the quantity of each item is 1.
Item Description Part 1 Enclosure bottom housing 8540-C201-0A 2 Enclosure trim panel, silkscreened 8540-D215-08 3 Subpanel 8540-D214-08 4 Top cover 8540-C204-0A 5 Weighing platform 8540-C211-08
6 Weighbridge 8540-C208-0A 7 Level Indicator 6690-0001 8 Load cell, 25 lb, with cable 2950-C009-4A 9 Adjustable leveling foot (4 per assembly) 6540-1011/6540-101210 Pull-out instruction placard 8540-C213-0A11 Keypad, 24 key, full travel 8540-D207-0A12 LED display board 8540-D206-0A13 Display, alphanumeric, dot matrix, 20 char. 8542-D013-1A14 Controller board 8540-D034-2A15 Serial I/O board 8540-D205-0A16 Analog board 584GR67017 Calibration set-up switch 8540-B033-0818 Power cord, grounding, molded plug, SJO, 12' length 8540-B049-1A19 Power switch, rocker 6910-509520 Fuse holder 6610-404621 Fuse, 3AG, 1/4 ASB 6610-401922 Identification plate 593M72923 Serial interface connector 8540-C216-0A24 Test button 8540-B226-0A

2

UNAM&
EDSI
GUN
ED
FACTRED
I N U S A...
UNAM&
EDSI
GUN
ED
FACTRED
I N U S A...