carport construction guidelines · the foundation for your carport depends upon local soil and...
TRANSCRIPT
CARPORT CONSTRUCTION GUIDELINES
© FUTURE STEEL BUILDINGS INTL. CORP., 2009 “FUTURE STEEL” IS A REGISTERED TRADEMARK OF FUTURE STEEL HOLDINGS, LTD.
ALL RIGHTS RESERVED

IMPORTANT NOTICE
PLEASE READ THESE GUIDELINES THOROUGHLY IMMEDIATELY UPON RECEIVING YOUR CARPORT AND AGAIN BEFORE AND DURING CONSTRUCTION
QUESTIONS If at any time you have questions about the construction of your carport, DO NOT PROCEED. Contact our Technical Support and Engineering Services Department toll-free at (800) 387-2343. Have your order number ready, so that we may better assist you. Your order number is located on your purchase order, bill of lading and in the bottom right hand corner of your blueprint. Record your order number below for future reference: ORDER NUMBER: STORAGE GUIDELINES Our components are not intended to be stored for excessive lengths of time prior to construction. If you must store the components, be sure to observe the following guidelines to help prevent staining, discoloration and deformation:
• Store the components indoors in a dry, well-ventilated area; • Cut the banding on all bundles and pallets and separate the components to allow air to circulate freely around each
component and to prevent the weight of other components from deforming one another ; and • Never allow moisture on or between any steel components prior to construction.
A clear coating has been applied to the Galvalume Plus steel for added protection during the shipment and storage of the carport. The coating will protect the steel for approximately thirty days if your building components are stored outdoors. Indoor storage is strongly recommended. We do not recommend and will not be responsible for outdoor storage. If you must store your carport components outdoors, we strongly recommend that you take the following additional precautions to reduce the likeliness of staining or discoloration:
• Lay a tarp or moisture barrier on the ground; • Do not set in vegetation, as this can deteriorate the protective coating on the steel components; • Cut the banding and separate all components with dry pieces of wood so that no two pieces of steel are in contact; • Do not drape the steel components (which can cause condensation), but they may be stored below a canopy; • Ensure that water or moisture does not accumulate on or in any of the steel components; and • Do not simply cover the bundles and pallets with tarps. Doing so will not prevent moisture damage that can occur
as a result of condensation. CAUTION: If two damp pieces of steel are in contact, a gray, white or black deposit known as a “wet storage stain” will
form on the surface of the steel. The guidelines provided above will help prevent such staining and/or discoloration, which is not covered by your warranty.
NOTE: We are not responsible for damage that occurs after the carport is picked up for delivery, including, without
limitation, staining or discoloration caused by improper storage. Therefore, it is in your own interest to follow the above guidelines and take all other necessary precautions.
CONSTRUCTION AND BUILDING INSURANCE We recommend that you inform your insurance company of the purchase of your carport. As a precaution, your insurance policy should be adjusted before you begin construction. A rider on your policy for construction insurance could protect you and your investment in the event an unforeseen problem. ENSURE THAT YOUR PRODUCT IS SUITABLE FOR YOUR AREA You must consult with a local authority (i.e. Planning or Building Department) to determine if a permit is required and to ensure the carport complies with local requirements before you begin construction.
CAUTION: The carport does not reach its designed load capacity until it is fully and correctly assembled and complete.

CONTENTS INTRODUCTION 1 TOOLS & EQUIPMENT 1 COMPONENTS 2 FOUNDATION 3 INSTALLING THE BASE CLIPS 3 INSTALLING THE POSTS 4 INSTALLING THE BEAMS 5 INSTALLING THE ARCHES & CURVE ANGLES 6 COMPLETING YOUR CARPORT 10 MAINTENANCE & WARRANTY 12
6
INTRODUCTION Please read this manual thoroughly before beginning the construction of your carport. If you have any questions, do not proceed without first contacting our Technical Support and Engineering Services Department at (800) 387-2343. By now, you should have recorded your order number on the first page of this manual. Please ensure that you have this number readily available when you call us, so that we may better assist you.
In several places throughout the manual, you will find cautions and notes. They are intended to assist you in the safe and correct construction of the carport. Please read and follow the instructions contained in the cautions explicitly.
CAUTION: A caution indicates that a failure to observe or follow directions within the caution could result in bodily harm, loss of life and/or damage to components or equipment.
NOTE: These notations present clarifying information, special instructions, or interesting points of information.
CAUTION: Work safely. Take all necessary precautions to guard against accidents during the construction of your
carport. Be sure that everyone on or around the building site is supplied with and is correctly using all appropriate safety gear and devices. Safety standards vary from location to location. Ensure that you and your crew are aware of and abide by the pertinent safety standards in your area. Some building components have sharp edges. At a minimum, workers and anyone else on or around the construction site should wear work gloves, safety glasses, safety boots and hard hats. Our cautions and not exhaustive and you must take all other reasonable precautions to prevent injuries or damage from occurring.
We recommend that you purchase construction insurance before you begin the construction of your
carport. The carport does not reach its load capacity until fully and correctly assembled. Inclement weather during construction can cause damage and/or injuries. The relatively low cost of construction insurance could help protect you from losses that may occur during the construction period.
NOTE: Be sure to check your inventory against the Bill of Lading at the time your carport is delivered. If any components
are missing, damaged, or do not appear to relate to what you ordered, note them on the Bill of Lading. Special care should be taken when unloading to avoid injury and so that you do not damage any of the building components.
These guidelines are for reference purposes only. These guidelines include suggestions that are intended to assist
you or your contractor to assemble your carport correctly and efficiently. We are not, however, responsible in any way for the construction or assembly of your carport and are not liable for any losses related in any way thereto.
The photographs and illustrations in these guidelines are generic and are intended as general references only.
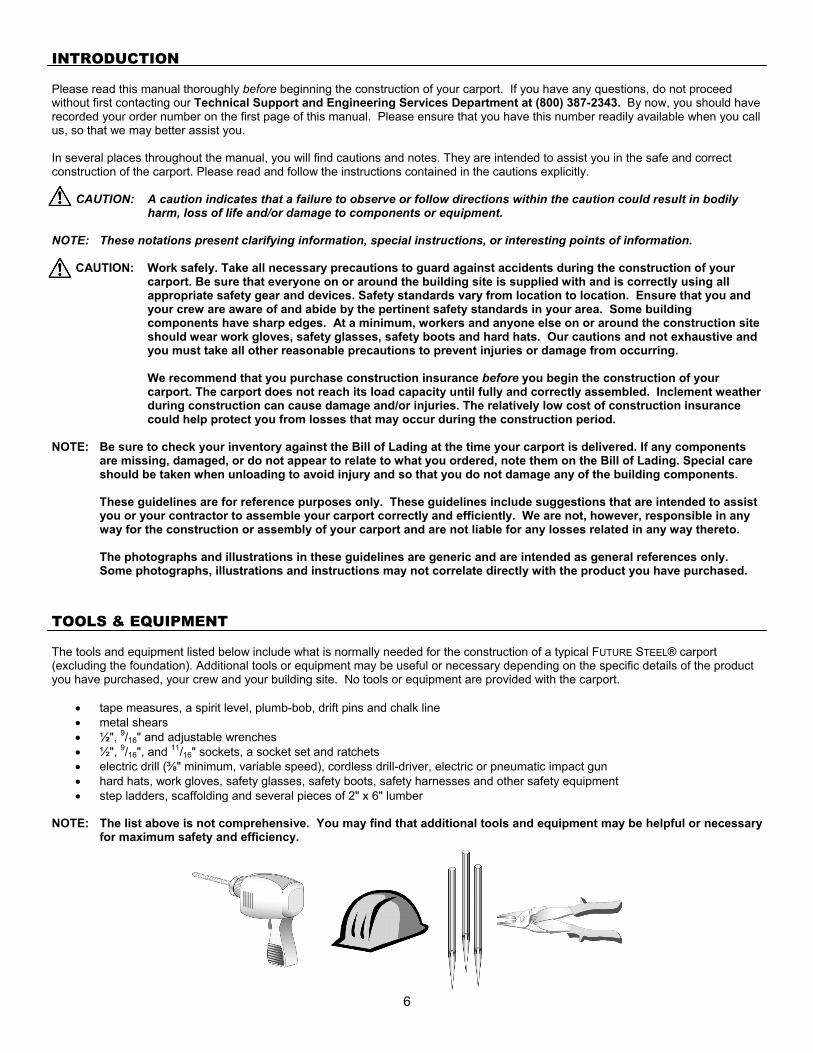
Some photographs, illustrations and instructions may not correlate directly with the product you have purchased. TOOLS & EQUIPMENT The tools and equipment listed below include what is normally needed for the construction of a typical FUTURE STEEL® carport (excluding the foundation). Additional tools or equipment may be useful or necessary depending on the specific details of the product you have purchased, your crew and your building site. No tools or equipment are provided with the carport.
• tape measures, a spirit level, plumb-bob, drift pins and chalk line • metal shears • ½", 9/16" and adjustable wrenches • ½", 9/16", and 11/16" sockets, a socket set and ratchets • electric drill (⅜" minimum, variable speed), cordless drill-driver, electric or pneumatic impact gun • hard hats, work gloves, safety glasses, safety boots, safety harnesses and other safety equipment • step ladders, scaffolding and several pieces of 2" x 6" lumber
NOTE: The list above is not comprehensive. You may find that additional tools and equipment may be helpful or necessary for maximum safety and efficiency.
7
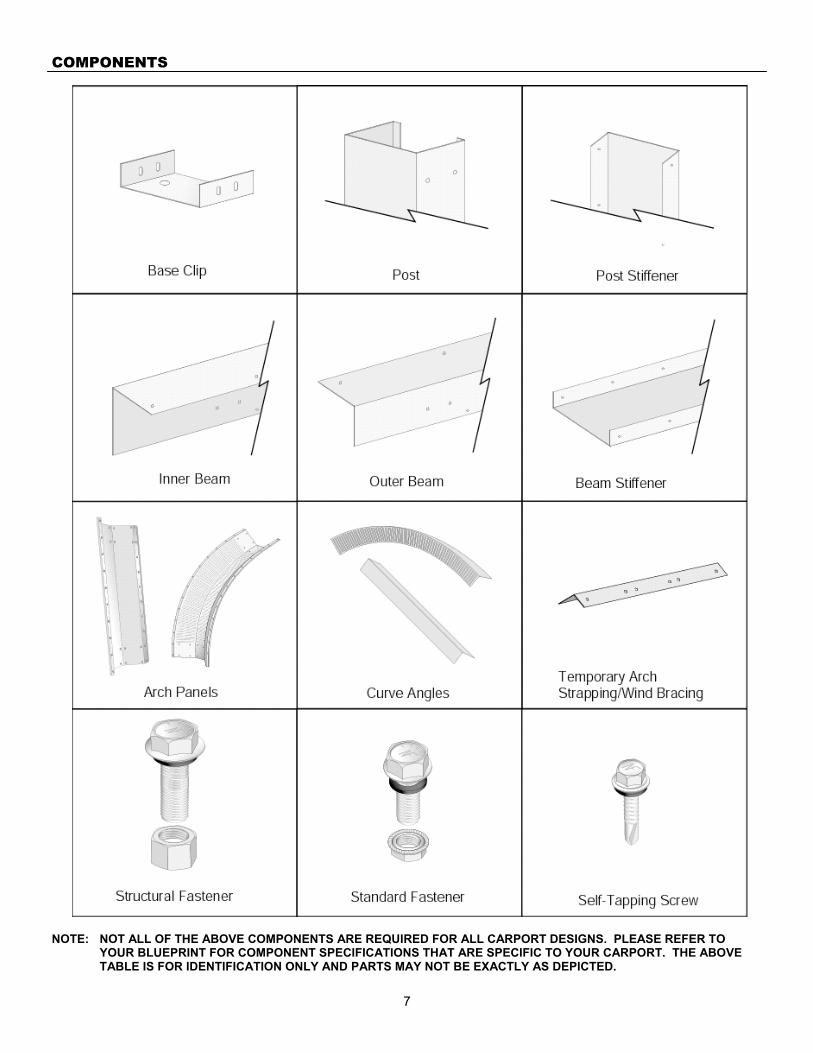
COMPONENTS
NOTE: NOT ALL OF THE ABOVE COMPONENTS ARE REQUIRED FOR ALL CARPORT DESIGNS. PLEASE REFER TO YOUR BLUEPRINT FOR COMPONENT SPECIFICATIONS THAT ARE SPECIFIC TO YOUR CARPORT. THE ABOVE TABLE IS FOR IDENTIFICATION ONLY AND PARTS MAY NOT BE EXACTLY AS DEPICTED.
8
FOUNDATION The foundation for your carport depends upon local soil and loading conditions. Accordingly, we are not responsible for the design or supply of the foundation for your carport or any aspect thereof. You should consult with a local engineer and building authority to determine an appropriate design for the foundation for your carport. We have provided a foundation design on your blueprint. This is a suggested minimum foundation design only, which we have used in the design of your carport and which has been designed to meet foundation design requirements in most jurisdictions. A local engineer or building authority may have greater foundation requirements.
CAUTION: If you intend to use the foundation design supplied, you must consult with a local engineer and/or building
authority to ensure that our design is adequate for your specific building site. If you intend to vary from this design, your engineer should consult with us to obtain requisite information about our product.
Proper design and construction of your foundation is a critical factor in the longevity of your FUTURE
STEEL® carport. Therefore, the foundation should be carefully designed, formed and set by properly qualified individuals.
Upon receiving the order for your building, our team of engineers prepared a blueprint for your carport. This document provides you with the carport dimensions and other technical and construction-related information. You should provide a copy of the blueprint to your contractor, engineer, and/or local building authority before construction begins and retain a copy of the blueprint on-site during construction. When complete, the foundation must be level, square and set at the correct dimensions in accordance with your blueprint or your engineer’s design to accommodate the carport that you have purchased.
CAUTION: Any defects in your foundation will seriously impact the structural integrity and ease of construction of
your carport. The remainder of this manual assumes that your foundation has been correctly designed, formed and set.
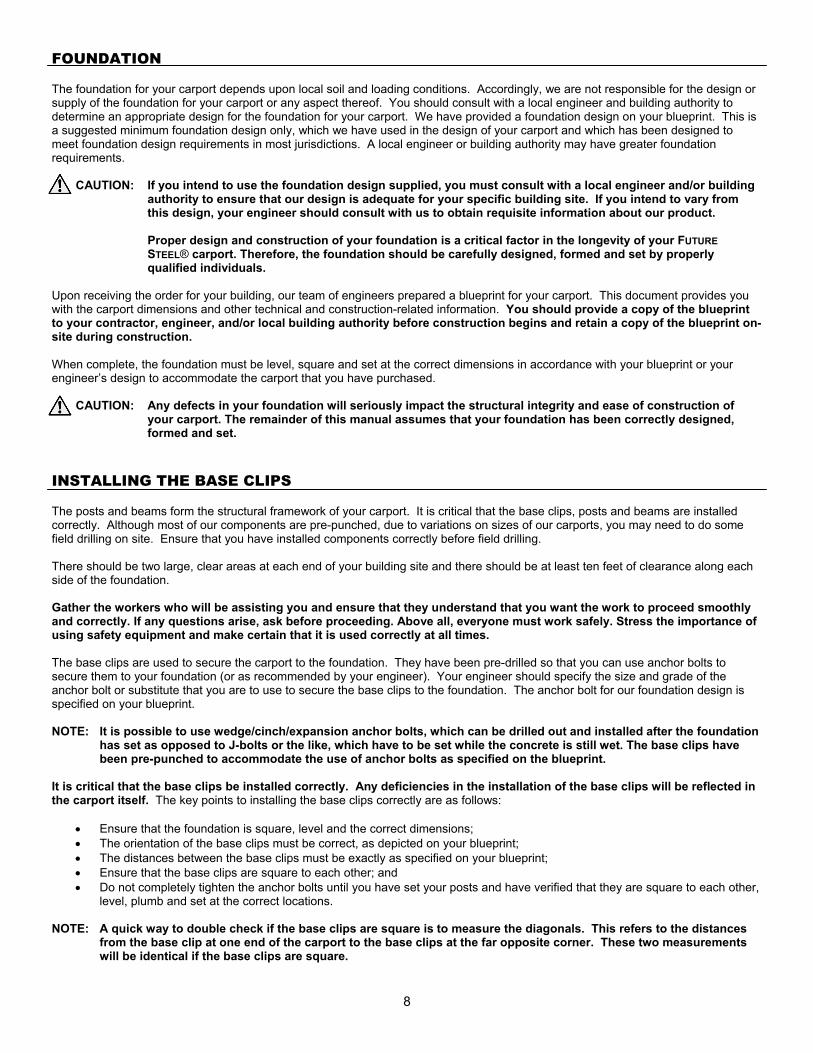
INSTALLING THE BASE CLIPS The posts and beams form the structural framework of your carport. It is critical that the base clips, posts and beams are installed correctly. Although most of our components are pre-punched, due to variations on sizes of our carports, you may need to do some field drilling on site. Ensure that you have installed components correctly before field drilling. There should be two large, clear areas at each end of your building site and there should be at least ten feet of clearance along each side of the foundation. Gather the workers who will be assisting you and ensure that they understand that you want the work to proceed smoothly and correctly. If any questions arise, ask before proceeding. Above all, everyone must work safely. Stress the importance of using safety equipment and make certain that it is used correctly at all times. The base clips are used to secure the carport to the foundation. They have been pre-drilled so that you can use anchor bolts to secure them to your foundation (or as recommended by your engineer). Your engineer should specify the size and grade of the anchor bolt or substitute that you are to use to secure the base clips to the foundation. The anchor bolt for our foundation design is specified on your blueprint. NOTE: It is possible to use wedge/cinch/expansion anchor bolts, which can be drilled out and installed after the foundation
has set as opposed to J-bolts or the like, which have to be set while the concrete is still wet. The base clips have been pre-punched to accommodate the use of anchor bolts as specified on the blueprint.
It is critical that the base clips be installed correctly. Any deficiencies in the installation of the base clips will be reflected in the carport itself. The key points to installing the base clips correctly are as follows:
• Ensure that the foundation is square, level and the correct dimensions; • The orientation of the base clips must be correct, as depicted on your blueprint; • The distances between the base clips must be exactly as specified on your blueprint; • Ensure that the base clips are square to each other; and • Do not completely tighten the anchor bolts until you have set your posts and have verified that they are square to each other,
level, plumb and set at the correct locations. NOTE: A quick way to double check if the base clips are square is to measure the diagonals. This refers to the distances
from the base clip at one end of the carport to the base clips at the far opposite corner. These two measurements will be identical if the base clips are square.
9
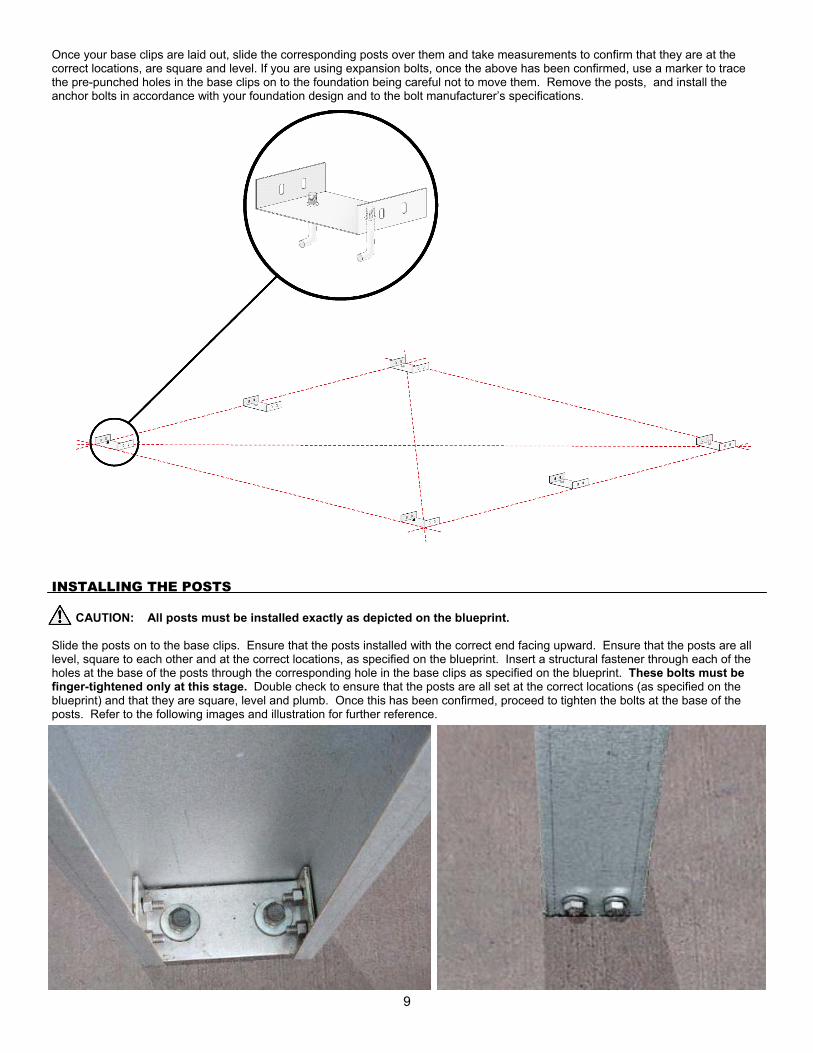
Once your base clips are laid out, slide the corresponding posts over them and take measurements to confirm that they are at the correct locations, are square and level. If you are using expansion bolts, once the above has been confirmed, use a marker to trace the pre-punched holes in the base clips on to the foundation being careful not to move them. Remove the posts, and install the anchor bolts in accordance with your foundation design and to the bolt manufacturer’s specifications. INSTALLING THE POSTS
CAUTION: All posts must be installed exactly as depicted on the blueprint.
Slide the posts on to the base clips. Ensure that the posts installed with the correct end facing upward. Ensure that the posts are all level, square to each other and at the correct locations, as specified on the blueprint. Insert a structural fastener through each of the holes at the base of the posts through the corresponding hole in the base clips as specified on the blueprint. These bolts must be finger-tightened only at this stage. Double check to ensure that the posts are all set at the correct locations (as specified on the blueprint) and that they are square, level and plumb. Once this has been confirmed, proceed to tighten the bolts at the base of the posts. Refer to the following images and illustration for further reference.
10
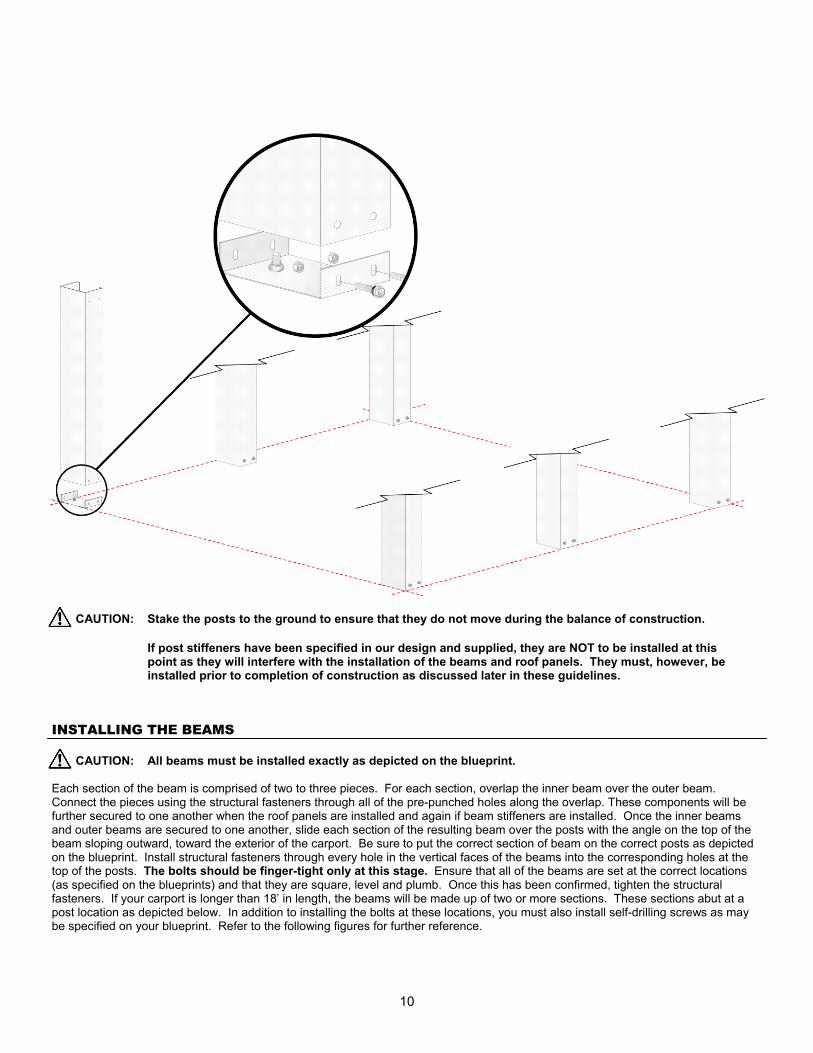
CAUTION: Stake the posts to the ground to ensure that they do not move during the balance of construction.
If post stiffeners have been specified in our design and supplied, they are NOT to be installed at this point as they will interfere with the installation of the beams and roof panels. They must, however, be installed prior to completion of construction as discussed later in these guidelines. INSTALLING THE BEAMS
CAUTION: All beams must be installed exactly as depicted on the blueprint.
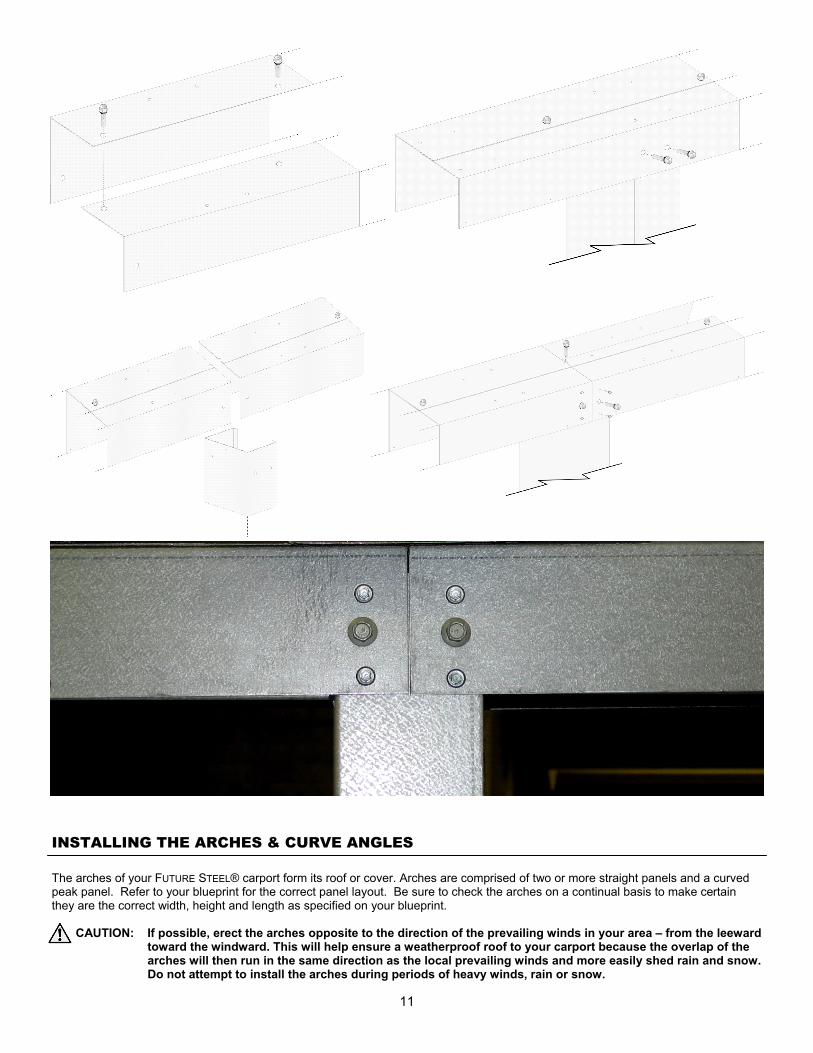
Each section of the beam is comprised of two to three pieces. For each section, overlap the inner beam over the outer beam. Connect the pieces using the structural fasteners through all of the pre-punched holes along the overlap. These components will be further secured to one another when the roof panels are installed and again if beam stiffeners are installed. Once the inner beams and outer beams are secured to one another, slide each section of the resulting beam over the posts with the angle on the top of the beam sloping outward, toward the exterior of the carport. Be sure to put the correct section of beam on the correct posts as depicted on the blueprint. Install structural fasteners through every hole in the vertical faces of the beams into the corresponding holes at the top of the posts. The bolts should be finger-tight only at this stage. Ensure that all of the beams are set at the correct locations (as specified on the blueprints) and that they are square, level and plumb. Once this has been confirmed, tighten the structural fasteners. If your carport is longer than 18’ in length, the beams will be made up of two or more sections. These sections abut at a post location as depicted below. In addition to installing the bolts at these locations, you must also install self-drilling screws as may be specified on your blueprint. Refer to the following figures for further reference.
11
INSTALLING THE ARCHES & CURVE ANGLES The arches of your FUTURE STEEL® carport form its roof or cover. Arches are comprised of two or more straight panels and a curved peak panel. Refer to your blueprint for the correct panel layout. Be sure to check the arches on a continual basis to make certain they are the correct width, height and length as specified on your blueprint.
CAUTION: If possible, erect the arches opposite to the direction of the prevailing winds in your area – from the leeward
toward the windward. This will help ensure a weatherproof roof to your carport because the overlap of the arches will then run in the same direction as the local prevailing winds and more easily shed rain and snow. Do not attempt to install the arches during periods of heavy winds, rain or snow.
12
Determine the end of the carport at which you will begin installing the arches, set up step ladders on the outsides of the beams at that end of the structure. Set up your scaffolding in between the ladders on the inside of the carport frame.
CAUTION: Do not rest your step ladders against the posts and/or beams. Anyone working on a ladder or scaffolding must take extra precaution and must use a safety harness.
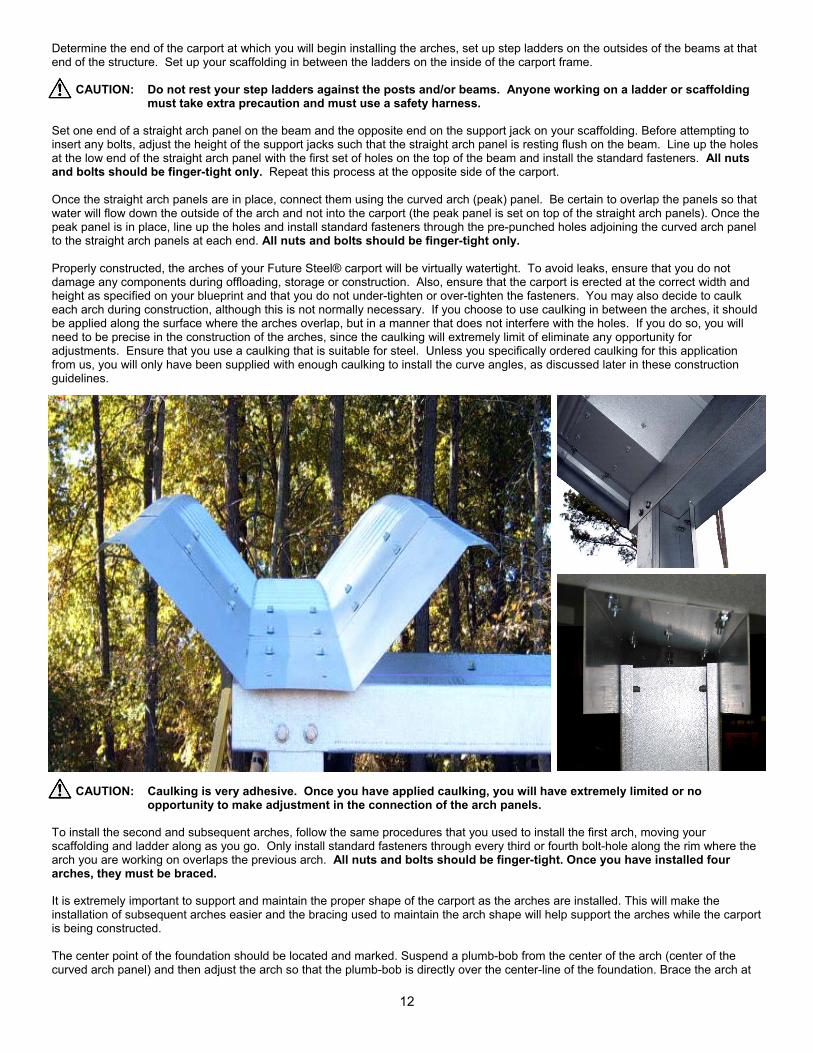
Set one end of a straight arch panel on the beam and the opposite end on the support jack on your scaffolding. Before attempting to insert any bolts, adjust the height of the support jacks such that the straight arch panel is resting flush on the beam. Line up the holes at the low end of the straight arch panel with the first set of holes on the top of the beam and install the standard fasteners. All nuts and bolts should be finger-tight only. Repeat this process at the opposite side of the carport. Once the straight arch panels are in place, connect them using the curved arch (peak) panel. Be certain to overlap the panels so that water will flow down the outside of the arch and not into the carport (the peak panel is set on top of the straight arch panels). Once the peak panel is in place, line up the holes and install standard fasteners through the pre-punched holes adjoining the curved arch panel to the straight arch panels at each end. All nuts and bolts should be finger-tight only. Properly constructed, the arches of your Future Steel® carport will be virtually watertight. To avoid leaks, ensure that you do not damage any components during offloading, storage or construction. Also, ensure that the carport is erected at the correct width and height as specified on your blueprint and that you do not under-tighten or over-tighten the fasteners. You may also decide to caulk each arch during construction, although this is not normally necessary. If you choose to use caulking in between the arches, it should be applied along the surface where the arches overlap, but in a manner that does not interfere with the holes. If you do so, you will need to be precise in the construction of the arches, since the caulking will extremely limit of eliminate any opportunity for adjustments. Ensure that you use a caulking that is suitable for steel. Unless you specifically ordered caulking for this application from us, you will only have been supplied with enough caulking to install the curve angles, as discussed later in these construction guidelines.
CAUTION: Caulking is very adhesive. Once you have applied caulking, you will have extremely limited or no opportunity to make adjustment in the connection of the arch panels.
To install the second and subsequent arches, follow the same procedures that you used to install the first arch, moving your scaffolding and ladder along as you go. Only install standard fasteners through every third or fourth bolt-hole along the rim where the arch you are working on overlaps the previous arch. All nuts and bolts should be finger-tight. Once you have installed four arches, they must be braced. It is extremely important to support and maintain the proper shape of the carport as the arches are installed. This will make the installation of subsequent arches easier and the bracing used to maintain the arch shape will help support the arches while the carport is being constructed. The center point of the foundation should be located and marked. Suspend a plumb-bob from the center of the arch (center of the curved arch panel) and then adjust the arch so that the plumb-bob is directly over the center-line of the foundation. Brace the arch at
13
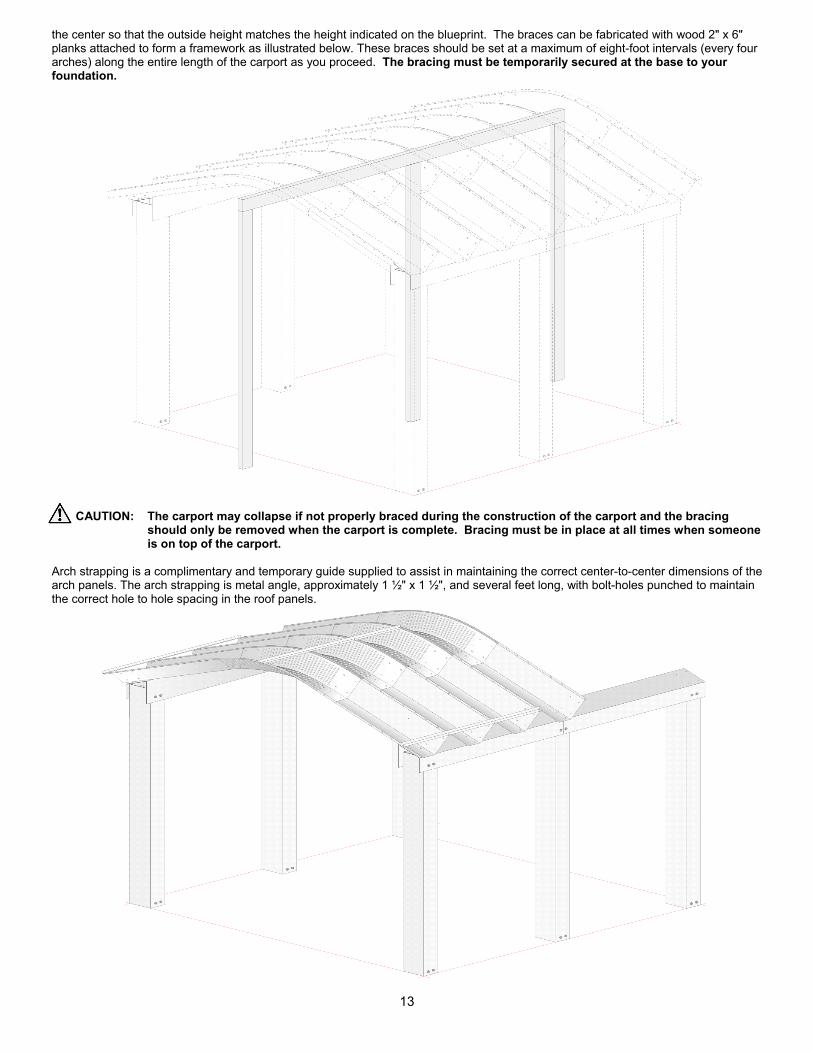
the center so that the outside height matches the height indicated on the blueprint. The braces can be fabricated with wood 2" x 6" planks attached to form a framework as illustrated below. These braces should be set at a maximum of eight-foot intervals (every four arches) along the entire length of the carport as you proceed. The bracing must be temporarily secured at the base to your foundation.
CAUTION: The carport may collapse if not properly braced during the construction of the carport and the bracing should only be removed when the carport is complete. Bracing must be in place at all times when someone is on top of the carport.
Arch strapping is a complimentary and temporary guide supplied to assist in maintaining the correct center-to-center dimensions of the arch panels. The arch strapping is metal angle, approximately 1 ½" x 1 ½", and several feet long, with bolt-holes punched to maintain the correct hole to hole spacing in the roof panels.
14
The arch strapping must be used along at least three points of the carport arches: at the peak or center of the carport; and at both ends of the arches. If you do not have enough arch strapping to span the entire length of the carport, you must leap-frog the arch strapping as you proceed with the erection of the arches.
CAUTION: The arch strapping is used as a temporary guide only – it is not designed to add structural support to the
carport. After all the arches have been erected, the arch strapping must be removed, as it can obstruct proper snow drift if left on the structure. If your carport is in an area that experiences high winds, you may opt to cut the arch strapping into smaller sections and permanently install them on the first 2-3 arches on each end of the carport to reduce vibration.
After all the arches have been installed and the carport has been checked to confirm that the length, width and height are all correct, and that the carport is plumb, you are ready to finish the construction of the arches. Install standard fasteners into all the vacant bolt-holes in the arches (except for the bolt-holes along the outer rim at the very ends of the carports). Begin tightening the standard fasteners at the bottom of the end panels and work up to the peak of the carport. The bolts should only be tightened at 12 foot-pounds of torque. This will permit the sealing washers to compress to form a watertight seal. Over-tightening the bolts could damage the washers and create leaks in the carport. Tighten all bolts, except those that are holding the arch strapping in place. Once all other bolts are installed and tightened, remove the temporary arch strapping. Install and tighten bolts in all of the resulting vacant holes. You can only remove stakes attached to the posts and the 2" x 6" bracing used to support the arches after all of the bolts have been installed and tightened.
CAUTION: Be very careful and ensure that all appropriate safety equipment and safety measures are used when
tightening the bolts including, without limitation, the proper use of the interior bracing as discussed above. Temporary arch strapping must be removed when construction is complete. The stakes attached to the posts and the bracing on the interior of the building may only be removed after construction of the carport is complete.
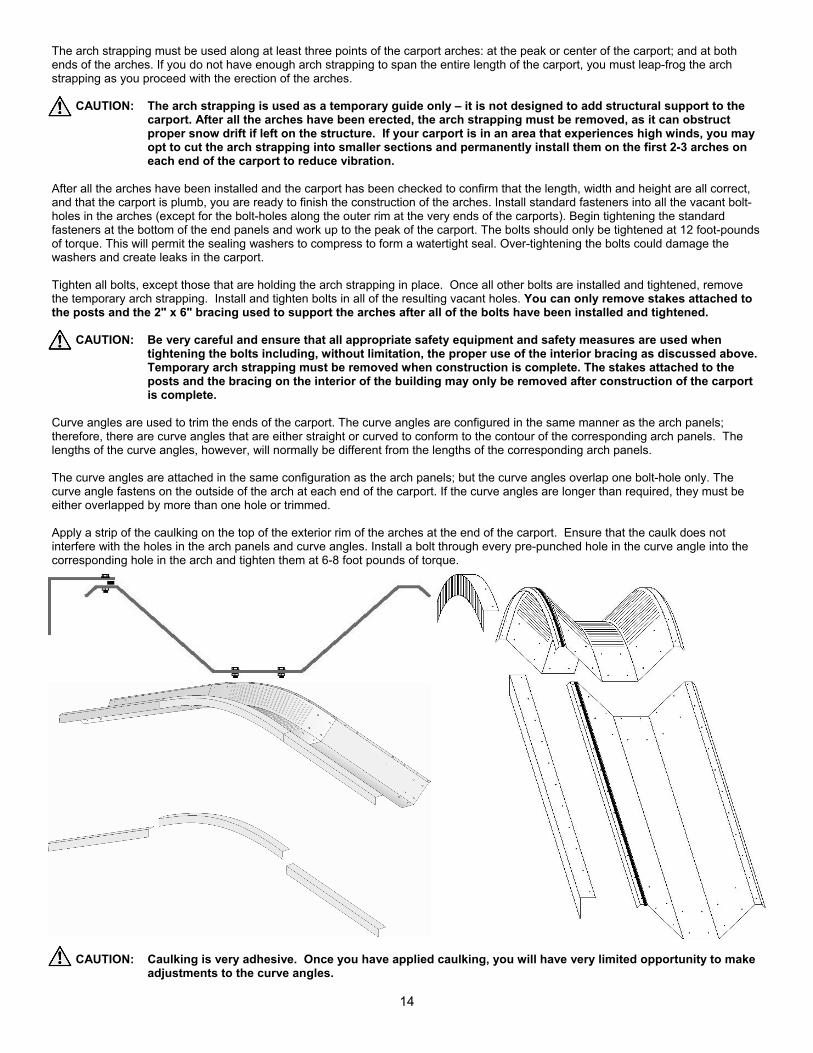
Curve angles are used to trim the ends of the carport. The curve angles are configured in the same manner as the arch panels; therefore, there are curve angles that are either straight or curved to conform to the contour of the corresponding arch panels. The lengths of the curve angles, however, will normally be different from the lengths of the corresponding arch panels. The curve angles are attached in the same configuration as the arch panels; but the curve angles overlap one bolt-hole only. The curve angle fastens on the outside of the arch at each end of the carport. If the curve angles are longer than required, they must be either overlapped by more than one hole or trimmed. Apply a strip of the caulking on the top of the exterior rim of the arches at the end of the carport. Ensure that the caulk does not interfere with the holes in the arch panels and curve angles. Install a bolt through every pre-punched hole in the curve angle into the corresponding hole in the arch and tighten them at 6-8 foot pounds of torque.
CAUTION: Caulking is very adhesive. Once you have applied caulking, you will have very limited opportunity to make adjustments to the curve angles.
15
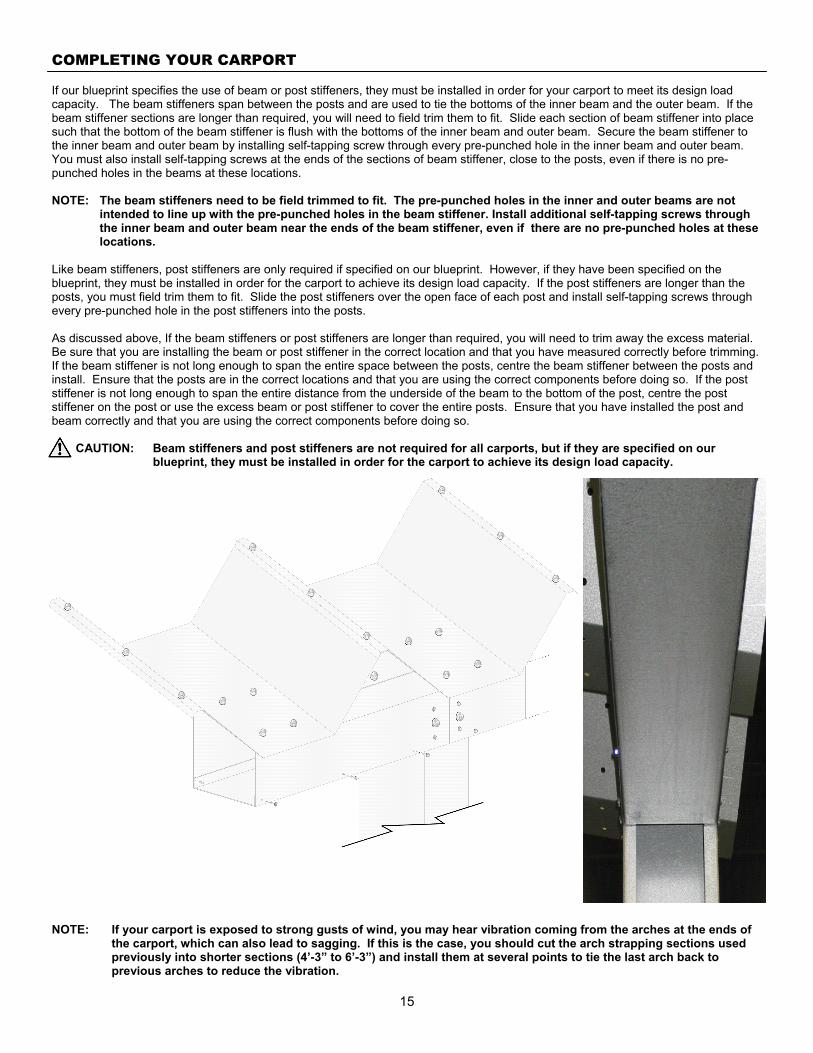
COMPLETING YOUR CARPORT If our blueprint specifies the use of beam or post stiffeners, they must be installed in order for your carport to meet its design load capacity. The beam stiffeners span between the posts and are used to tie the bottoms of the inner beam and the outer beam. If the beam stiffener sections are longer than required, you will need to field trim them to fit. Slide each section of beam stiffener into place such that the bottom of the beam stiffener is flush with the bottoms of the inner beam and outer beam. Secure the beam stiffener to the inner beam and outer beam by installing self-tapping screw through every pre-punched hole in the inner beam and outer beam. You must also install self-tapping screws at the ends of the sections of beam stiffener, close to the posts, even if there is no pre-punched holes in the beams at these locations. NOTE: The beam stiffeners need to be field trimmed to fit. The pre-punched holes in the inner and outer beams are not intended to line up with the pre-punched holes in the beam stiffener. Install additional self-tapping screws through the inner beam and outer beam near the ends of the beam stiffener, even if there are no pre-punched holes at these locations. Like beam stiffeners, post stiffeners are only required if specified on our blueprint. However, if they have been specified on the blueprint, they must be installed in order for the carport to achieve its design load capacity. If the post stiffeners are longer than the posts, you must field trim them to fit. Slide the post stiffeners over the open face of each post and install self-tapping screws through every pre-punched hole in the post stiffeners into the posts. As discussed above, If the beam stiffeners or post stiffeners are longer than required, you will need to trim away the excess material. Be sure that you are installing the beam or post stiffener in the correct location and that you have measured correctly before trimming. If the beam stiffener is not long enough to span the entire space between the posts, centre the beam stiffener between the posts and install. Ensure that the posts are in the correct locations and that you are using the correct components before doing so. If the post stiffener is not long enough to span the entire distance from the underside of the beam to the bottom of the post, centre the post stiffener on the post or use the excess beam or post stiffener to cover the entire posts. Ensure that you have installed the post and beam correctly and that you are using the correct components before doing so.
CAUTION: Beam stiffeners and post stiffeners are not required for all carports, but if they are specified on our blueprint, they must be installed in order for the carport to achieve its design load capacity.
NOTE: If your carport is exposed to strong gusts of wind, you may hear vibration coming from the arches at the ends of the carport, which can also lead to sagging. If this is the case, you should cut the arch strapping sections used previously into shorter sections (4’-3” to 6’-3”) and install them at several points to tie the last arch back to previous arches to reduce the vibration.
16
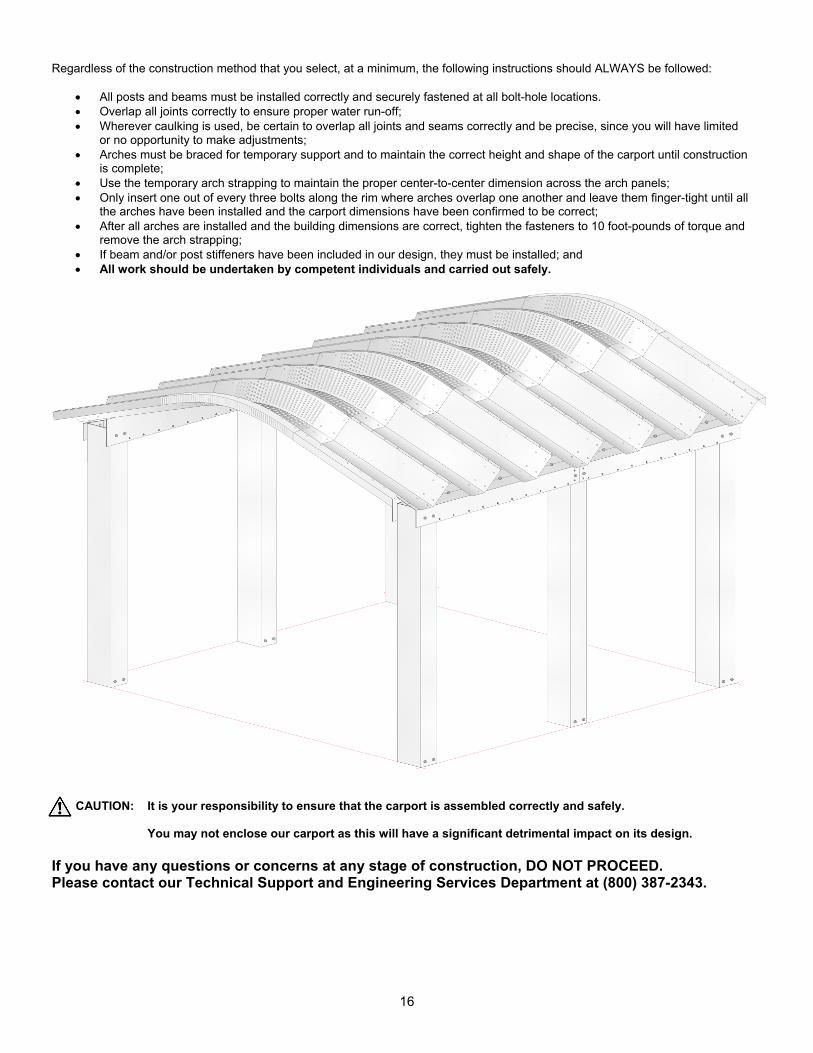
Regardless of the construction method that you select, at a minimum, the following instructions should ALWAYS be followed:
• All posts and beams must be installed correctly and securely fastened at all bolt-hole locations. • Overlap all joints correctly to ensure proper water run-off; • Wherever caulking is used, be certain to overlap all joints and seams correctly and be precise, since you will have limited
or no opportunity to make adjustments; • Arches must be braced for temporary support and to maintain the correct height and shape of the carport until construction
is complete; • Use the temporary arch strapping to maintain the proper center-to-center dimension across the arch panels; • Only insert one out of every three bolts along the rim where arches overlap one another and leave them finger-tight until all
the arches have been installed and the carport dimensions have been confirmed to be correct; • After all arches are installed and the building dimensions are correct, tighten the fasteners to 10 foot-pounds of torque and
remove the arch strapping; • If beam and/or post stiffeners have been included in our design, they must be installed; and • All work should be undertaken by competent individuals and carried out safely.
CAUTION: It is your responsibility to ensure that the carport is assembled correctly and safely.
You may not enclose our carport as this will have a significant detrimental impact on its design. If you have any questions or concerns at any stage of construction, DO NOT PROCEED. Please contact our Technical Support and Engineering Services Department at (800) 387-2343.
17
MAINTENANCE & WARRANTY PREVENTING DAMAGE TO YOUR CARPORT
Properly constructed and well-maintained, your FUTURE STEEL® carport can provide you with a lifetime of high-quality performance. We strongly encourage you to observe the following instructions to prevent avoidable damage to your FUTURE STEEL® carport. SNOW REMOVAL
Your carport has been designed to meet the snow and wind loads specified on your blueprint. It is your responsibility to ensure that these design loads are sufficient for your intended carport location. The carport will not achieve its full loading capacity unless it is properly constructed (including the foundation). Also, from time to time, an area will receive unusually high quantities of snow, rain, ice and/or wind that exceed design requirements. If you notice that snow is accumulating on your FUTURE STEEL® carport, ensure that it is removed. DO NOT SUSPEND ITEMS FROM OR ATTACH ITEMS TO YOUR CARPORT
Do not suspend any items from or attach any items to your carport. We are in no way responsible for damage that may result to a carport as a result of suspended or attached items. DO NOT ENCLOSE YOUR CARPORT
Do not enclose your carport. Enclosing a carport or part thereof drastically alters its design and can result in damage. We are in no way responsible for damage that may result to a carport that has been partially or completely enclosed. DO NOT MODIFY YOUR CARPORT COMPONENTS
Do not modify your carport components in any way that will cause the carport to vary from our design as specified on our blueprints. We are in no way responsible for damage that may result to a carport where its components have been modified. PREVENTING STAINING, DISCOLORATION AND CORROSION
Galvalume Plus® steel components of your carport are covered by a limited warranty against perforations caused by rust. This warranty, however, does not apply to staining and discoloration or corrosion that does not result in perforations. To help avoid these situations, please observe the following:
Wet storage stains are not covered under the warranty. To reduce the likeliness of such stains, carefully follow the Storage Guidelines contained in these guidelines. If your carport has been stained, you may wish to paint the affected areas.
When construction is complete, you may notice some residue on some of your panels. Most of the time, this is just residue from your carport’s protective coating or dirt. Residue of this nature, as well as dust and dirt can normally be removed using simple dishwashing detergent and lukewarm water.
There are some corrosive materials that may cause discoloration to your carport. This includes, without limitation, contact with or run-off from copper and/or lead. Discoloration that results from the application or exposure to any such corrosive materials is not covered by your warranty. If your carport has discoloration or oxidation as a consequence of being exposed to such chemicals, you may wish to paint the affected areas using aluminum paint.
It is possible to paint your carport. Consult with local professionals for instructions regarding the painting of galvalume and/or galvanized steel.
CAUTION: Use safety equipment including harnesses, hard hats and safety boots when cleaning or painting your
carport to avoid injury. The carport can be especially slippery when it has just been cleaned. Oxidation may affect the strength of your carport. If components become rusted, they must be replaced. Painting these areas will not improve or restore the strength of the carport.
SELLING OR MOVING YOUR CARPORT
As stated above, your carport has been specifically designed to meet the snow and wind loads specified on our blueprint. If you intend to erect your building at any location other than the address stated on your purchase order, please consult an independent engineer or our Technical Support and Engineering Services Department at (800) 387-2343 to ensure that the carport is adequately designed for the new location. We are not responsible for any damages that may occur to a carport that has not been properly constructed or has been constructed at an address other than the one stated on the purchase order. If you sell your carport to someone at another location, you must advise them of this issue.
CAUTION: Do not construct your carport at any location other than the one specifically stated on your our certified
blueprint and ensure the carport’s load capacities are adequate for your local requirements.
18
UNDERSTANDING OUR WARRANTY
Our carport is covered by a limited warranty. This warranty is extended by us, the manufacturer, to the sales company that purchased the carport components from us. This section is intended to assist you in understanding what is and is not covered by our warranty to the sales company, which may or may not be the warranty that has extended to you. Please consult the sales company that you purchased the carport from if you have any inquiries about it’s warranty. PERFORATIONS CAUSED BY RUST
We provide a 30-year warranty backed, in part, by the steel mill against perforations caused by rust on all AZ-180 Galvalume Plus™ materials that we supply. This does not extend to bolts or any other components constructed out of any other materials. It also does not apply to surface rust that does not result in perforations to the steel components. If our carport has perforations caused by rust, they must be reported to our Technical Support and Engineering Services Department at (800) 387-2343 immediately and should be documented in writing and supported with photographs.
We will produce replacements for the perforated AZ-180 Galvalume Plus™ components and will deliver them to the original delivery location by a method of delivery of our selection at no charge, provided that we were notified of the perforations in writing immediately upon their discovery, that we received full cooperation in our investigation of the claim and that the warranty is otherwise applicable.
This warranty is in lieu of any other warranty or representation made or implied and does not extend to parts exposed to corrosive, aggressive, harmful or other abnormal conditions, including but not limited to: areas subject to salt water atmospheres, fallout or exposure to corrosive chemicals, fumes, ash, cement dust or animal waste; areas subject to water run-off from lead or copper flashings or areas in metallic contact with lead or copper; areas in contact with or in close proximity to damp insulation or other corrosive materials or subject to frequent spraying of water; areas where corrosive fumes or condesates are generated or released inside the carport; areas that come into contact with green or wet lumber; areas where the free drainage of water has been prevented and debris was allowed to accumulate on the surface of the product; or areas where damage was caused to the metallic coating by improper scouring or cleaning procedures. SHORT-SHIPMENTS
We follow carefully-designed processes and procedures to prevent short-shipments. If, however, you believe that you have not received all of the components to the carport that you have purchased, this must be documented on the Bill of Lading and immediately. If you do not notice the short-shipment until after the truck has left, it must still be reported to our Shipping Department immediately upon discovery. We will conduct a prompt investigation to verify the claim. We must receive full cooperation in our investigation. When a short-shipment claim has been verified, we will arrange to send the short-shipped component(s) to the original delivery location by a delivery method of our selection provided, however, that the claim was made within no more than thirty (30) days of the delivery date. DEFECTS IN MATERIALS
We warrant that the components of our carport are free from substantial defects in material and/or workmanship. Any claim of defective materials must be reported to us immediately upon discovery. We will conduct a prompt investigation to verify a defective material claim and determine the cause thereof and the method we will select to address the issue. We may require photographs or other documents or information in the course of our investigation. When a defect claim has been verified, we will determine a method for resolving the issue (including in some instances, sending replacement part(s) by a delivery method of our selection at no charge) provided, however, that the claim was made within thirty (30) days of the delivery date and that we have received full cooperation in our investigation. EXCLUSIONS FROM THE WARRANTY AND OTHER DISCLAIMERS
In addition to the limitations set out above, the following are further exclusions form the warranty:
• The warranty is in lieu of and not in addition to any other warranty or representation made or implied, does not extend to minor aesthetic defects or those that are beyond our control.
• Without limiting the generality of the foregoing, the warranty does not include damages caused by neglect, abuse, willful damage or faulty handling or erection.
• We are not responsible for consequential damages, including, but not limited to labor, construction expenses or losses related to temporary inabilities to use the carport. We are not responsible or liable for erection, construction or repairs to the carport.
• The warranty is limited to the replacement of the defective or short-shipped components only and by a delivery method of our own selection.
• We do not warrant that the carport will be suitable for your intended purposes. • We will not process any warranty claim where there has been a failure, refusal or neglect to accede to any reasonable
request we may make in the investigation of a warranty claim.

