cascade - helena laboratories manuals/cascade m4 op man...cascade m-4 four - hazards 4-1 section 4 -...
TRANSCRIPT

Cascade® M-4 Hemostasis Analyzer
Operator’s Manual Cat. No. 1711, 120/240 Vac

Cascade® M-4 Hemostasis Analyzer
Operator’s Manual
Cat. No. 1711, 120/240 Vac

Cascade M-4 Table of Contents
-i-
Contents
Section 1 - Instrument Use and Function............................................................................1-1
Section 2 - Principles of Operation......................................................................................2-1
Section 3 - Precautions and Limitations .............................................................................3-1
Section 4 - Hazards ...............................................................................................................4-1
Section 5 - Installation Instructions.....................................................................................5-1 5.1. Unpacking and Inspection ............................................................................................5-1 5.2. Installation ....................................................................................................................5-1 5.3. Select Parameters ........................................................................................................5-2
5.3.1. General Parameters...............................................................................................5-2 5.3.2. Test Parameters.....................................................................................................5-3 5.3.3. Station Number ......................................................................................................5-3
Section 6 - Controls and Displays .......................................................................................6-1 6.1. Controls ........................................................................................................................6-1 6.2. Displays ........................................................................................................................6-1 6.3. Reports .........................................................................................................................6-2
6.3.1. Worklist ..................................................................................................................6-2 6.3.2. Test Results ...........................................................................................................6-2 6.3.3. Standard Curve ......................................................................................................6-3 6.3.4. Levey-Jennings Plot (QC Reports).........................................................................6-3 6.3.5. System Parameters................................................................................................6-3
Section 7 - Operating Instructions.......................................................................................7-1 7.1. Preparation ...................................................................................................................7-1 7.2. In Case of Power Failure ..............................................................................................7-1 7.3. Prepare and Load Samples ..........................................................................................7-1 7.4. Enter Data ....................................................................................................................7-1 7.5. QC of Cascade M4 .......................................................................................................7-2 7.6. Using QC Controls........................................................................................................7-2 7.7. Run Assays ..................................................................................................................7-2 7.8. Abort a Run ..................................................................................................................7-3 7.9. Results..........................................................................................................................7-3 7.10. Export Data.................................................................................................................7-3 7.11. Shut Down ..................................................................................................................7-4 7.12. Standard Curves.........................................................................................................7-4
7.12.1. Run Standard .......................................................................................................7-4 7.12.2. Edit Standard Curve.............................................................................................7-4 7.12.3. Print Standard Curve............................................................................................7-5
7.13. Utilities ........................................................................................................................7-5 7.13.1. QC Lot Numbers ..................................................................................................7-5 7.13.2. Set Date/Time for Instrument ...............................................................................7-5 7.13.3. Set Date Format...................................................................................................7-5 7.13.4. Keypad Beep On or Off ........................................................................................7-5

Cascade M-4 Table of Contents
-ii-
7.13.5. Adjust Display Brightness.....................................................................................7-6 7.13.6. Reset to Default Values .......................................................................................7-6 7.13.7. Print Parameter List .............................................................................................7-6
Section 8 - Test Functions and Quality Control..................................................................8-1 8.1. End of Month QC..........................................................................................................8-1 8.2. Delete QC Control ........................................................................................................8-1 8.3. Add QC Control ............................................................................................................8-1 8.4. Export QC Data ............................................................................................................8-2 8.5. Print Levey-Jennings Plot .............................................................................................8-2 8.6. QC for Assays Using Standard Curves.........................................................................8-2
Section 9 - Performance Specifications ..............................................................................9-1
Section 10 - Maintenance, Troubleshooting, Warranty....................................................10-1 10.1. Maintenance .............................................................................................................10-1
10.1.1. Cleaning Spills ...................................................................................................10-1 10.1.2. Clean Injection Ports and Optical Wells .............................................................10-1 10.1.3. Fuse Replacement .............................................................................................10-1 10.1.4. Replacing Printer Paper .....................................................................................10-2 10.1.5. Cleaning the Filter ..............................................................................................10-2 10.1.6. Momentary Lid Adjustment.................................................................................10-2
10.2. Troubleshooting........................................................................................................10-4 10.3. Warranty ...................................................................................................................10-5
Section 11 - Symbology......................................................................................................11-1
Section 12 - Index................................................................................................................12-1
List of Figures
Figure 1-1. Cascade M-4........................................................................................................1-2
Figure 2-1. Block Diagram......................................................................................................2-2
Figure 5-1. Cascade M-4........................................................................................................5-4
Figure 5-2A. Back of Cascade M-4 with Rectangular Fuse Holder ........................................5-5
Figure 5-2B. Back of Cascade M-4 with Round Fuse Holders ...............................................5-5
Figure 5-3. General Parameters Utility Menus .......................................................................5-6
Figure 5-4. Test Parameters Utility Menus .............................................................................5-7
Figure 6-1. On/Off Switch and Port for Optional Electronic Pipettor .......................................6-4
Figure 6-2. Simultaneously Press Optics Chamber Lid and Pipette Reagent ........................6-4
Figure 6-3. Keypad.................................................................................................................6-5

Cascade M-4 Table of Contents
-iii-
Figure 6-4. Worklist ................................................................................................................6-6
Figure 6-5. Report Showing Test Data ...................................................................................6-6
Figure 6-6. Printout of Standard Curve...................................................................................6-7
Figure 6-7. Levey-Jennings Plot of QC Data..........................................................................6-8
Figure 6-8. Printout of System Parameters ............................................................................6-9
Figure 7-1. PT Assay..............................................................................................................7-8
Figure 7-2. APTT Assay .........................................................................................................7-9
Figure 7-3. Fibrinogen Assay ...............................................................................................7-10
Figure 7-4. TCT Assay .........................................................................................................7-11
Figure 7-5. FII, FV, FVII, or FX Assay (FX Shown) ..............................................................7-12
Figure 7-6. FVIII, FIX, FXI, or FXII Assay (FXII Shown) .......................................................7-13
Figure 7-7. Standards Menus...............................................................................................7-14
Figure 7-8. Utility Menus ......................................................................................................7-15
Figure 8-1. QC Menus............................................................................................................8-3
Figure 8-1. QC Menus, cont. ..................................................................................................8-4
Figure 10-1A. Back Showing Location of Rectangular Fuse Holder.....................................10-3
Figure 10-1B. Back Showing Location of Round Fuse Holders............................................10-3
List of Tables
Table 5-1. Inventory ...............................................................................................................5-1
Table 7-1. Sample and Reagent Information for Factory Programmed Procedures...............7-7
Table 10-1. Preventative Maintenance.................................................................................10-1
Table 10-2. Troubleshooting ................................................................................................10-4

Cascade M-4 ONE - Instrument Use and Function
1-1
Section 1 - Instrument Use and Function Cascade® M-4 (Fig. 1-1) is a Hemostasis Analyzer used for measuring clotting times on samples of human plasma. Prothrombin Time (PT), Activated Partial Thromboplastin Time (APTT), Thrombin Clotting Time (TCT), Fibrinogen and Factor Assays (factors II, V, VII, VIII, IX, X, XI and XII) may be performed using this instrument. The Cascade M-4 is intended for in-vitro diagnostic use only. The Cascade M-4 is a simplified manual instrument for coagulation measurements. After addition of reagents, activation periods are timed and optical density measurements are performed automatically. Results are automatically quantitated, displayed and printed. Refer to the procedures supplied with the reagents for information on the following areas:
Summary Principle Reagents Specimen Collection and Handling Reagent Preparation Results Interpretation of Results Bibliography

Cascade M-4 ONE - Instrument Use and Function
1-2
Figure 1-1. Cascade M-4

Cascade M-4 TWO - Principles of Operation
2-1
Section 2 - Principles of Operation The Cascade M-4 is factory programmed for clotting time analysis. Four cuvettes can be analyzed at a time. The user delivers sample and then reagents into the sample in the cuvettes, and the changes in optical density are monitored and clot times are determined. The reagents are for PT, APTT, Thrombin Clotting Time (TCT), Fibrinogen, and Factor Assays (factors II, V, VII, VIII, IX, X, XI and XII). The functional units of the Cascade M-4 are shown in figure 2-1, and include a keypad, display, printer, optics, a 4-channel analog module, thermal sensors and heater, and switch sensors, all controlled and monitored by an internal computer (CPU). Each channel uses a 550 nm LED light source, and is operated and controlled independently. All user input is through the keypad. Entries are used to select the type of test, start or stop the automatic sequence of operations, run standards, select instrument parameters, and to change displayed selections. The printer can be used automatically or on demand to print test results or quality control records. RS232 outputs are provided for data export to external computers. The computer runs a checksum self-test at power on to detect error conditions or potential problems. If an error is detected, the computer responds by displaying an error message (see Section 10.2, Trouble-shooting).

Cascade M-4 TWO - Principles of Operation
2-2
AnalogModule
Keypad Displays
OpticsChannels
ThermalSensors
SwitchSensors
Printer
Heater
RS232 Port
CPU Module
Fuses
Power Supply
(To Instrument)
On/Off Switch
Figure 2-1. Block Diagram

Cascade M-4 THREE - Precautions and Limitations
3-1
Section 3 - Precautions and Limitations 3.1. The entire operator’s manual should be read and understood before attempting instrument operation. 3.2. Refer to the procedure supplied with the reagents for reagent preparation and handling and other information. 3.3. Provide adequate room at the sides and back of the instrument for good air circulation. 3.4. No harsh cleansers, acids, or bases should be used or spilled on inner or outer surfaces. Do not immerse the unit. ALWAYS UNPLUG THE MAIN POWER CORD BEFORE CLEANING. Should an instrument be contaminated by blood or blood derivative, spray any contaminated surface with a commercial virucidal and germicidal agent. Observe where the specimens are used inside the instrument and confine cleaning to that area. Wipe up the residue. These materials contain alcohol and alcohol is a corrosive to metal surfaces. 3.5. Do not expose the instrument to direct sunlight. Do not operate at temperatures above 86°F (30°C) or below 59°F (15°C), or allow prolonged exposure to high humidity. 3.6. The Cascade® system is designed for use with Helena reagents. Refer to the procedures supplied with the reagents for precautions and limitations specific to the reagents. 3.7. Do not place the instrument near a strong source of electromagnetic interference, such as a centrifuge, x-ray machine, etc. 3.8. For emergency shut down, disconnect the power cord or use the power on/off switch located on the right side of the instrument. 3.9. If the printout is to be part of a permanent record, photocopy it and save the photocopy.

Cascade M-4 FOUR - Hazards
4-1
Section 4 - Hazards 4.1. This device contains very high voltages which can be extremely dangerous. Safeguards are built into the instrument to prevent user contact with high voltages; however, ALWAYS TURN OFF THE POWER, DISCONNECT THE MAIN POWER CORD, AND USE EXTREME CARE when attempting disassembly for cleaning, repair, or adjustments. Do not operate any instrument with the cover removed unless instructed to do so by a qualified service technician directly representing Helena Laboratories, its subsidiaries, or its distributors. 4.2. Do not attempt to operate the instrument without plugging the power cord into a grounded wall outlet of the proper voltage and frequency. This information is contained on the serial number plate located on the bottom of the instrument. 4.3. If power is lost during operation, a power failure detection alarm sounds and a message appears when power is restored. The unit must be turned off and on again to reset it. Data in process of being acquired is lost. Discard all cuvettes in the optics wells and replace them with fresh samples. The instrument contains internal filters which protect it against power surges. The line fuse also protects the instrument; however should the fuse blow, replace the fuse and proceed as for power loss, above.

Cascade M-4 FIVE - Installation Instructions
5-1
Section 5 - Installation Instructions WARNING: Read Section Three (Precautions and Limitations) and Section Four (Hazards) before attempting installation or operation.
5.1. Unpacking and Inspection 1. Check all shipping containers for signs of damage. If damage is found, immediately notify the shipping carrier. 2. Carefully unpack the instrument and accessories and remove them from the shipping cartons. The packing material should be removed undamaged, if possible, should repacking be necessary. 3. Remove plastic wrappings from the instrument and accessories. If scissors or a knife are used to cut the plastic or binding tape, take care not to scratch the instrument. 4. Inspect the instrument for any obvious signs of damage. If damage is found, notify the shipping carrier and Helena Laboratories. 5. Inventory all items: If any parts are missing, recheck the packing materials before notifying Helena Laboratories.
Table 5-1. Inventory 1 Cascade M-4 1 Line Power Cord 1 Printer 1 Printer Interface Cable 1 Printer Power Cable 1 Cascade M-4 Printer Paper, Cat. No. 1720 5 Pkgs (100/pkg) Cascade M-4 Cuvettes, Cat. No. 1718 2 Test Tube Holders 2 Fuses 1 Allen Wrench 1 Dust Cover 1 Cascade M-4 Installation Report 1 Cascade M-4 Quick Procedure Guide 1 Operator’s Manual
Materials Required But Not Provided Adjustable Pipettor, 50, 100, 200 µL
5.2. Installation 1. Select an environment free of direct sunlight, excessive humidity and dust, and large temperature fluctuations. Ambient temperature should not be above 86°F (30°C) or below 59°F (15°C). 2. Place the Cascade M-4 on a level, flat surface. Make sure that there is enough space behind and around it to allow good air circulation. 3. Put the printer on top of the Cascade M-4 (Fig. 5-1). 4. Plug the large printer interface cable into the lower receptacle in back of the printer and secure the clips. Plug the other end into the back of the Cascade M-4 in the receptacle marked “PRINTER PORT”. Secure the clips (see Fig. 5-2A and 5-2B). 5. Plug the small printer power cable into the round receptacle in back of the printer. Plug the other end into the back of the Cascade M-4 in the receptacle marked “PRINTER POWER”. 6. Plug the female end of the line power cord into the receptacle in the back of the Cascade M-4 below the fuses. Plug the other end into a grounded wall outlet of the proper voltage and frequency. This information can be found on the serial number plate located on the bottom of the instrument. The wall outlets should not be on the same circuit as any large load device such as a refrigerator, compressor, centrifuge, etc. The instrument’s circuitry contains filters to reduce the effect of line voltage fluctuations; however, they should still be avoided. If the operator experiences difficulty, it may be necessary to install an isolation transformer. 7. Turn on the printer power switch (top lower right). 8. Turn on the Cascade M-4 power switch (front right). The first menu below appears, followed, after initialization of the Cascade M-4, by the second menu.

Cascade M-4 FIVE - Installation Instructions
5-2
Cascade M-4 Version #.## Please wait, initializing system . . .
Cascade M-4 Version #.## 37.0C Press ENTER to continue
9. Press Enter. If a checksum error appears instead, call Helena Laboratories.
5.3. Select Parameters The Cascade M-4 is ready to use as programmed. Skip to Section Six if you wish to use factory programming. If you wish to change selections for the general system or for tests, proceed with Section 5.3.
5.3.1. General Parameters 1. Press Util. The following menu appears.
Utility Menu Select Option: Test parameters →
2. Press the right arrow once. The menu below appears.
Utility Menu Select Option: General parameters ←→
3. Press Enter. The first General Parameters menu appears.
Utility Menu Select: Duplicates/Singles →
Move to other categories by pressing the right/left arrows. Make selections by pressing the appropriate keys, as shown in Fig. 5-3. Press ESC to back out of the menus. Duplicates/Singles: Select Yes for duplicate samples of the same patient or control, select No for single samples. NOTE: When running singles, the runs on both channels must be finished before a report can be printed. If only one channel will be run, Abort the other channel. Standard Curve Graph Type: Select Yes to prepare a graph using the Helena method. The Helena Method produces a 4 point standard curve and is normally used with Helena procedures.
Select No to produce a 7 point curve, used when there are a minimum of 3 points and a maximum of 7 points. Seven point curves require longer read times. The read time should be edited under Test Parameters for each test when a seven point curve will be used. The time selected should be longer than the longest anticipated clot time for that assay. Save QC data: Select Yes to automatically save QC data in the Cascade M-4 memory. Select No to omit saving QC data. Export: Not for Customer use. The exported data will output through serial port 1. The format of the data is standard ASCII numbers, with the first number in the stream being the number of raw data points to follow. Each data point is separated by a space, and after 10 characters a new line character (line feed) is sent. The number of data points is equal to 10 times the read time for the test being run. This data can be used for service analysis. Calculate INR: An INR calculation is included in the software for converting PT clotting time into INR units (International Normalized Ratio). This conversion is based on the particular lot of thromboplastin used. If you do not wish to use INR conversion, select No. If you are using INR conversion, select Yes. INR ISI value: If using INR conversion, enter the proper ISI value for the lot of thromboplastin to be used here. Press Del, type the numbers, and press Enter. (For values from 0.00 to 9.90 only.) When you use a new lot of thromboplastin, check the ISI value on the package insert and enter it here, if different. INR - Normal Mean Value: If using INR conversion, you must enter a normal mean PT value for your laboratory here. Press Del, type the numbers, and press Enter. (For values from 0 to 99 only.)

Cascade M-4 FIVE - Installation Instructions
5-3
Calculate PT Ratio: For PT runs, select Yes to calculate the ratio of results divided by the INR normal mean value (determined in the laboratory). Select No to omit PT ratios. Calculate APTT Ratio: For APTT runs, select Yes to calculate the ratio of results divided by the normal mean value (determined in the laboratory) for APTT. Select No to omit APTT ratios. APTT - Normal Mean Value: For APTT runs, you may enter a normal mean APTT value for your laboratory here. Press Del, type the numbers, and press Enter. This will be used when calculating APTT ratios. (For values from 0 to 99 only.)
5.3.2. Test Parameters 1. From the main menu, press Util. The following menu appears.
Utility Menu Select Option: Test parameters →
2. Press Enter. The first Test Parameters menu appears.
Utility Menu Select test from keypad.
3. Press the key for the test type you wish to reprogram. Refer to Fig. 5-4 page to make selections by pressing the appropriate keys. Press Enter to edit the parameter shown, press an arrow key to go to other parameters. Press ESC to back out of the menus. NOTE: The Cascade M-4 is factory programmed and will successfully assay all tests using Helena reagents with the factory programmed settings. For all parameters, change the numbers shown by pressing Del, typing the new numbers, and pressing Enter. Edit Read time: Read time is the time during which data is collected to detect a clot. Too short a read time will result in no clot (N/C) being detected. Edit Blank time: Blank time is a period at the beginning of an assay when no data is
taken. This is done to eliminate interference from premixing reagents, bubbles, etc. Note that the maximum detectable clotting time is the blank time plus the read time; for example, a 14 sec. blank time plus an 86 sec. read time equals 100 sec. total. Edit Activation time: Activation time is the time allowed for activating reagent (in APTT-based assays) to interact with the plasma, and is usually 180 sec. or 300 sec. (refer to APTT reagent procedure, supplied with the reagent). Edit Equilibration time: Equilibration time is the time allowed for the plasma samples to warm to 37°C. It can be set to zero if samples are prewarmed to this temperature. Edit Gain: It is not recommended that the customer change gain settings without contacting Helena Laboratories for assistance. Do this if you are not detecting clots. Edit Duplicate Flag: This is the agreement between the results of duplicate samples in percent. For example, if set to “5”, the two channels must be within 5% of each other. If the variance in clot times exceeds this percentage, an asterisk “*” will be printed by the average results on the report.
5.3.3. Station Number If you will be exporting data to an external computer, you may assign a station number to your Cascade M-4. This must be the same number used for the instrument by the external computer. 1. From the main menu, press Util, then press the right arrow eight times or until the following menu appears.
Utility Menu Select Option: Test parameters ←→
2. Press Enter and use the numeric keys to fill in station number, then press Enter.

Cascade M-4 FIVE - Installation Instructions
5-4
Figure 5-1. Cascade M-4
Printer
Displays
Chamber Lid
Incubator Area for Cuvettes
and Vials
Printer On/Off Button
Keypad
Pipettor Rack
Optional Electronic Pipettor Port

Cascade M-4 FIVE - Installation Instructions
5-5
Figure 5-2A. Back of Cascade M-4 with Rectangular Fuse Holder
Figure 5-2B. Back of Cascade M-4 with Round Fuse Holders
Printer InterfaceCable
Fuse Holder
Main PowerReceptacle
Printer Power Cable
Printer InterfaceCable
Fuse Holder
Main PowerReceptacle
Printer Power Cable

Cascade M-4 FIVE - Installation Instructions
5-6
Note: To escape form the Utility menu at any point in the program, press Test, Std or QC.
Utility MenuSelect Option: General parameters
General parametersSelect: Duplicates / Singles
General parametersSelect:Standard Curve GraphType
General parametersSelect: Save QC data
General parametersSelect: Export
General parametersSelect: Calculate INR
General parametersSelect: INR ISI value
General parametersSelect: INR-Normal Mean Value
General parametersSelect: Calculate PT Ratio
General parametersSelect: Calculate APTT Ratio
General parametersSelect: APTT-Normal Mean Value
General parametersDuplicates? No [Yes]
PressEnter
PressArrow,Enter
Press Enter
Press Util and Right Arrow
General parametersSTD Graph: Helena method? No [Yes]
General parametersSave QC data? No [Yes]
General parametersExport raw data? No [Yes]
General parametersISI value: [ 0.0]
General parametersCalculate INR? No [Yes]
General parametersINR - Normal mean value: [ 0.0]
General parametersCalculate PT Ratio: No [Yes]
General parametersCalculate APTT Ratio: No [Yes]
General parametersAPTT - Normal mean value: [ 0.0]
PressEnter
PressEnter
PressEnter
PressEnter
PressEnter
PressEnter
PressEnter
PressEnter
PressEnter
PressArrow,Enter
PressArrow,Enter
PressArrow,Enter
PressArrow,Enter
PressArrow,Enter
PressArrow,Enter
PressDel, ##'sEnter
PressDel, ##'sEnter
PressDel, ##'sEnter
Press Arrow
Press Arrow
Press Arrow
Press Arrow
Press Arrow
Press Arrow
Press Arrow
Press Arrow
Press Arrow
Figure 5-3. General Parameters Utility Menus

Cascade M-4 FIVE - Installation Instructions
5-7
Note: To escape from Utility menu at any point in the program, tress Test, Std or QC.
Utility MenuSelect Option: Test parameters
Utility MenuSelect test from keypad
PT ParametersEdit Read time?
PT ParametersEdit Blank time?
PT ParametersEdit Activation time?
PT ParametersEdit Equilibration time?
PT ParametersEdit Gain?
PT ParametersEdit Duplicate Flag? f
Press test key (PT)
Press Util
PT ParametersRead time (sec): [ 56.0]
PT ParametersBlank time (sec): [ 4.0]
PT ParametersActivation time (sec): [ 0.0]
PT ParametersGain (units): [ 3]
PT ParametersEquilibration time (sec): [ 120.0]
PT ParametersFlag (%): [ 5]
PressEnter
PressEnter
PressEnter
PressEnter
PressEnter
PressEnter
PressDel, ##'sEnter
PressDel, ##'sEnter
Press Enter
Press Arrow
Press Arrow
Press Arrow
Press Arrow
Press Arrow
PressDel, ##'sEnter
PressDel, ##'sEnter
PressDel, ##'sEnter
PressDel, ##'sEnter
Figure 5-4. Test Parameters Utility Menus

Cascade M-4 SIX - Controls and Displays
6-1
Section 6 - Controls and Displays
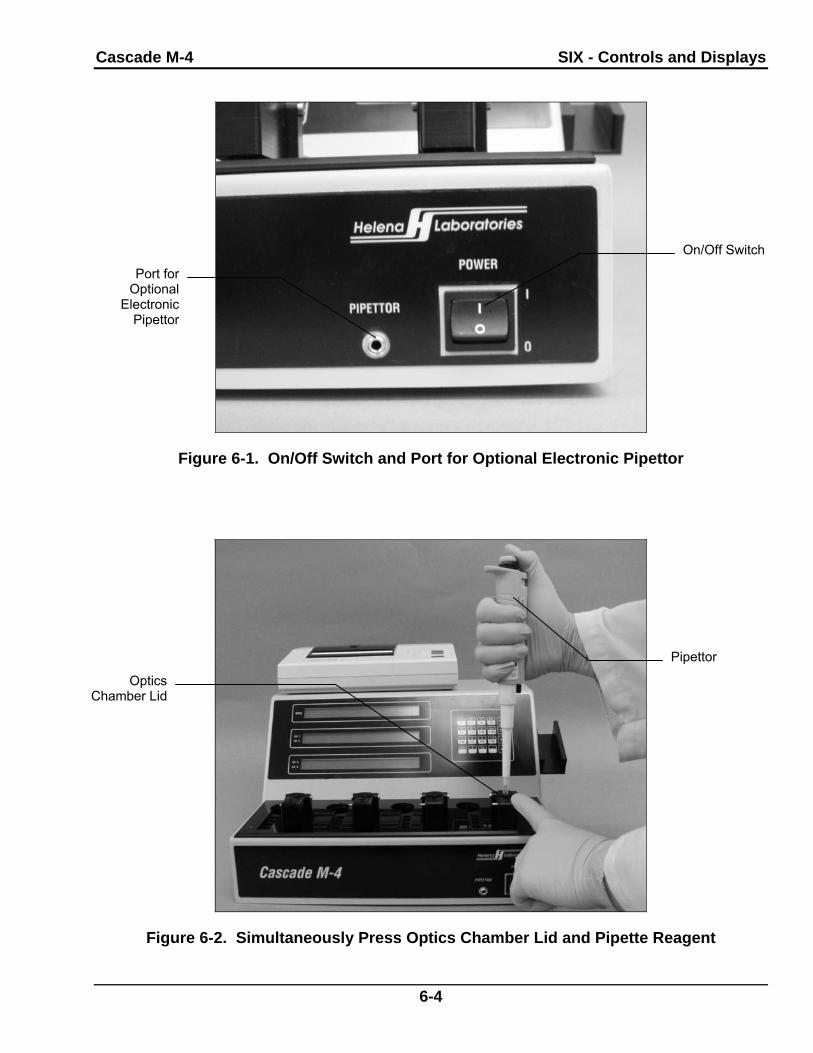
6.1. Controls Main Power Switch: Located at lower right front of the instrument (Fig. 6-1), controls power to Cascade® M-4 and printer (when printer is on). Printer Power Switch: Located on the top right side of the printer, controls power to printer and should always be left on. Optics Chamber Lid: Located on the front top side of the instrument, controls beginning timed functions during a run (Fig. 6-2). Keypad: Includes test selection, function, editing and numerical keys (Fig. 6-3).
Major Function Keys (Fig. 6-3) Test: Press to use Test menus and run a test (including a QC Control). If reference standard curves have been run, clot times will appear along with mg/dL or percent activity. QC: Press to use QC menus and save data on up to 180 values for each of 3 levels of controls for each test type. Std: Press to use Standard menus and save data on dilutions of reference controls for standard curves. One standard curve is stored for each test type that uses a standard curve. Util: Press to use Utility menus in order to select and save instrument and test parameters.
Numeric/Test Type Keys (Fig. 6-3) Used to select test type after pressing Test key, or to enter numeric data as needed. The following tests can be run: PT: Prothrombin Time aPTT: Activated Partial Thromboplastin Time Fib: Fibrinogen TCT: Thrombin Clotting Time F II: Factor II F V: Factor V F VII: Factor VII F VIII: Factor VIII F IX: Factor IX F X: Factor X
F XI: Factor XI F XII: Factor XII
Menu/Edit Keys (Fig. 6-3) Enter: Press Enter to select an action or data displayed on a menu, or to begin a test run. Esc: Press Esc to go back to previous menus, or to pause the display during a test run (then choose to abort or continue as shown on the display). Del/TCT: Press Del (shared with the TCT test function) to erase data when editing so that data can be written in. Press TCT to select that test when running samples. Right/Left Arrows: Press right arrow to “scroll” forward through selections within a menu category. Press left arrow to “scroll” backward through selections. The arrows shown on the display indicate which direction can be selected. Decimal Point ( . ) : Use to enter a decimal point in numbers, or to enter “QC Control” instead of a patient ID number. Numeric (0-9): Used to enter numbers during editing or data entry. All except 0 are shared with a test type key.
6.2. Displays Three displays each contain two lines of 40 characters each. The top display is for menus, the bottom two displays show run data or other numerical information for each channel. The menu display shows the selection made and instrument status. For example, in the menu below, the test selected is PT and the instrument is running the test.
Test Menu - Duplicates 37.0C Running Tests
FIB Reading data ### FIB Reading data ###
FVIII Lvl:1 Reading data ### FVIII Lvl:1 Reading data ###
Menu
Ch. 1 Ch. 2
Ch. 3 Ch. 4

Cascade M-4 SIX - Controls and Displays
6-2
The channel displays show the status of the test runs and the run data. In the example above, the instrument is actually reading data on the test samples, and the numerical results would be shown to the right. You can make menu selections by pressing buttons on the keypad. To move through a list of options for any menu, press the right/left arrows. For example, the menu below appears when you press the Test button.
Test Menu Select: Run Tests →
Press Enter to go to All same Patient IDs?, select Yes or No and press Enter, then select channels and enter the patient ID number using the keypad. You are ready to select the test type. Use the keypad to select the correct test. If you press the APTT button, for example, the menu display will change as shown below.
Test Menu - Duplicates 37.0C Running Tests
APTT: Start sample equilibration APTT: Start sample equilibration
Channels represent the optics channels, with 1 being the left most and 4 the right most channel on the instrument. When the sample cuvette is in the optics chamber, the user simultaneously presses the optics chamber lid and pipettes the reagent, causing a beep to sound and indicating that you should go to the next step. In the following menu, an arrow appears to the right of the menu display. Press the right arrow to scroll forward through the displays in this menu.
Utility Menu Select Option: Test parameters →
Once you begin scrolling through the displays, a two-way arrow appears, indicating that you can press either the right or left arrow
to move forward or backward through the menu choices.
Utility Menu Select Option: General parameters ←→
When you reach the end of the list in the menu, a left arrow is shown, indicating that you can only scroll backward.
Utility Menu Select Option: Print parameter list ←
When you want to select a displayed option, press Enter. If you press Enter while the display above is shown, Cascade M-4 will print a list of test parameters and general parameters for the instrument. If you press Enter while the display below is shown, and realize you made a mistake, press ESC to return to it and go on from there.
Utility Menu Select Option: General parameters ←→
When you have made selections by pressing Enter, you can usually “back out” of the selection by pressing ESC.
6.3. Reports
6.3.1. Worklist A worklist of selections for the four channels is printed immediately after filling in the data (Fig. 6-4). Whether duplicates or singles were run are printed at the top. Patient ID, test type and dilution are printed below for each channel.
6.3.2. Test Results A printout of test data is shown in Fig. 6-5. Date, time and temperature (of the incubator) are printed at the top. The name of the test is printed next. The test data follows, with dilution (if any) and clot times. Other pertinent data is also listed, calculated by the instrument. A place for the technician’s identification is provided at the bottom of the printout.

Cascade M-4 SIX - Controls and Displays
6-3
6.3.3. Standard Curve A typical standard curve is shown in Fig. 6-6. Standard curves must be generated using references of known concentration for all Fibrinogen and Factor Assay tests, and for PT if you want results in % activity. The Cascade M-4 automatically refers to a standard curve to determine patient results for these tests.
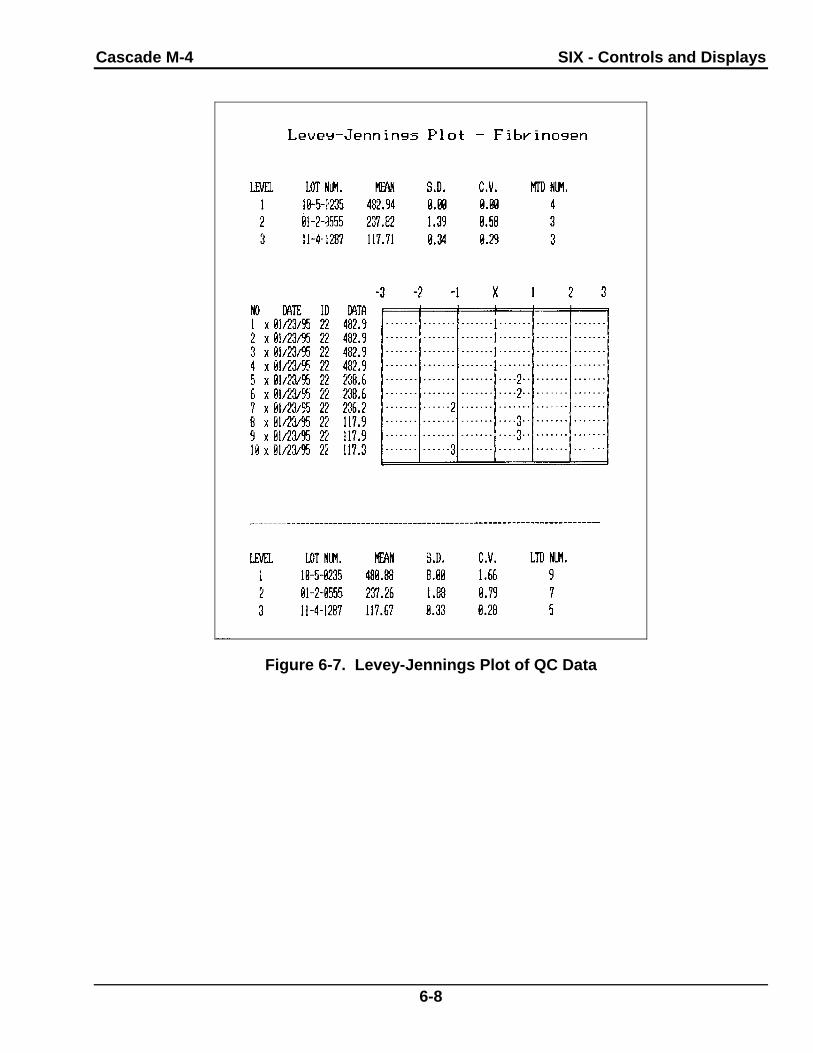
6.3.4. Levey-Jennings Plot (QC Reports)
A typical Levey-Jennings Plot of QC data is shown in Fig. 6-7. Information for Month-to-Date (MTD) is shown above the graph, and Lot-to Date (LTD) is listed below the graph. MTD and LTD information includes the lot number, mean, standard deviation, coefficient of variation and number of data points for each level of the control. The Levey-Jennings plots themselves show the variation from the mean in standard deviations for each data point. The point number, date, ID number and numerical value for each data point are listed to the left of the graph. The graph illustrates the level number of the point and where the point falls in relation the mean value.
6.3.5. System Parameters A printout of system parameters (general and test) is shown in Fig. 6-8. The instrument can run assays as programmed by the factory, however, system parameters can be altered as described in section 5.3.
Cascade M-4 SIX - Controls and Displays
6-4
Figure 6-1. On/Off Switch and Port for Optional Electronic Pipettor
Figure 6-2. Simultaneously Press Optics Chamber Lid and Pipette Reagent
Port forOptional
ElectronicPipettor
On/Off Switch
OpticsChamber Lid
Pipettor

Cascade M-4 SIX - Controls and Displays
6-5
Figure 6-3. Keypad

Cascade M-4 SIX - Controls and Displays
6-6
Figure 6-4. Worklist
Figure 6-5. Report Showing Test Data

Cascade M-4 SIX - Controls and Displays
6-7
Figure 6-6. Printout of Standard Curve
Cascade M-4 SIX - Controls and Displays
6-8
Figure 6-7. Levey-Jennings Plot of QC Data

Cascade M-4 SIX - Controls and Displays
6-9
Figure 6-8. Printout of System Parameters
Cascade M-4 SEVEN - Operating Instructions
7-1
Section 7 - Operating Instructions
7.1. Preparation 1. Sample and reagent information for each procedure is given in Table 7-1. For instructions on specimen collection and handling, reagent preparation, and preparation of patient samples and controls, refer to the appropriate sections in the procedures supplied with the reagents. 2. Turn on the main power switch (on right-front side of instrument) and allow the instrument to warm up until it stabilizes at 37°C (10 to 20 minutes). The menus below should appear. Only a short time is required for the instrument to initialize before the second menu appears.
Cascade M-4 Version #.## Please wait, initializing system . . .
Cascade M-4 Version #.## 37.0C Remove all cuvettes from instrument
Press ENTER to continue
If the display shows a checksum error instead, call Helena Laboratories for assistance. 3. The checksum is printed and the following menu appears.
Cascade M-4 Version #.## 37.0C Press ENTER to continue
Date: ##-##-## Time: ##:##:##
4. Press Enter. The menu below appears. Test Menu Select: Run Tests
5. Remove any cuvettes that might be in the optical chambers. Press Enter. The instrument runs a baseline check. If a baseline error is noted on the display, refer to Troubleshooting, section 10.2. 6. Prepare the reagents you will use. Refer to the procedures provided with the reagents for handling precautions and other information.
7. If needed, Thromboplastin and CaCl2 vials may be placed in the wells in the rear of the incubator area. The center well provides stirring when a stirbar is added to the vial. For best equilibration, the liquid levels should not be higher than the top of the well. Alternatively, equilibrate small amounts of reagent in cuvettes in the cuvette warming area between the optical wells. 8. The instrument is normally set up to run tests in duplicates. If single runs are desired, refer to section 5.3.1 to select Singles.
7.2. In Case of Power Failure In case of power loss during operation, a power failure detection alarm sounds and a message appears when the power returns. The unit must be turned off and on again to restart it. Data in process of being acquired is lost. Discard all cuvettes and replace them with fresh samples.
7.3. Prepare and Load Samples 1. Prepare patient samples and control samples as directed by the procedure supplied with the reagents. 2. Pipette the appropriate amount (see Table 7-1) of patient sample or control into the cuvettes. Avoid forming bubbles in the cuvettes, since they will interfere with optical density readings. 3. Place up to five cuvettes per channel in the cuvette holders in the incubator areas for factor assays.
7.4. Enter Data 1. After warmup, this menu should be displayed.
Test Menu Select: Run Tests
2. Press Enter. The menu below appears. Test Menu - Duplicates All same Patient IDs? [No] Yes

Cascade M-4 SEVEN - Operating Instructions
7-2
3. Press Enter if patient IDs will vary. Press the right arrow and Enter if all patient IDs will be the same. The menu below appears.
Test Menu - Duplicates Select Channel No. 1/2 or 3/4
4. Press number 1 or 2 to select channels 1 and 2 (for duplicates). Press number 3 or 4 to select channels 3 and 4 (for duplicates). For single channels, press the correct channel number. 5. This menu appears next.
Test - Duplicates Ch.1 - Enter Patient ID [ ]
6. Use the number keys to enter the patient ID and press Enter (if the sample is a control, see section 7.5). The menu below appears.
Test Menu - Duplicates Select test type for channel 1
7. Press the test type key for the channel. The test type fills in at the selected channel as shown below. If the test uses dilutions, the following menu appears.
Test Menu - Duplicates Select Dilution: 1 : 10 ←→
FIB FIB
8. Press the arrow keys to select the correct dilution and press Enter. 9. Continue this process until the information is filled in for all four channels. A work list prints automatically when all channels are completed.
7.5. QC of Cascade M4 Run the required levels of quality control per shift and with each change of personnel. All four channels have a common optics system. They share the same optics board and therefore the QC does not need to be done in all channels.
7.6. Using QC Controls 1. When using a control in a channel, press the period ( . ) and Enter at Enter Patient ID. [QC Control] will fill in for ID. 2. The following menu appears.
Test Menu - Duplicates Enter Operator ID: [ ]
3. Use the keyboard to enter an ID number and press Enter. 4. After selecting test type and entering an operator ID, the following menu appears for QC Control channel.
Test Menu - Duplicates Level: [ 1 ] 2 3
5. Press Enter to select Control Level 1, press the arrow key and Enter to select level 2 or 3. A level 1 control is usually a normal control, levels 2 and 3 are usually abnormal controls. NOTE: Control values should be within the ranges established by the laboratory for the controls. If they are out of range after a repeat run, there may be a system problem. After consulting Troubleshooting Table 10-2, call Helena Laboratories for assistance.
7.7. Run Assays Refer to Figures 7-1 through 7-6 for instructions on running each test. Each optics chamber is independently operated. At the end of the run, press Enter to return to the first test menu. NOTE: Premix the reagent, if required, just before use by aspirating and delivering it repeatedly into the test tube. NOTE: The delivery of sample and reagents must be done with the pipette tip held perpendicular to the chamber lid while holding down the lid. When withdrawing the pipettor, remove it gently from the optical chamber to avoid opening the lid and aborting the test.

Cascade M-4 SEVEN - Operating Instructions
7-3
NOTE: For convenience, the menus in Figure 7-1 through 7-6 show only channels 1 and 2, and both channels are shown at the same stage of operation. All four channels are actually totally independent from each other. For example, the display shown below is a possibility, with channel 1 finished before channel 2 has been started. Even though a clot time for channel 1 is shown, a printout can not be made until all four channels have also been run (or aborted).
PT CLOT AT 12.3 secs. PT Ready to equilibration
7.8. Abort a Run NOTE: The easiest way to abort operation is to simply raise the lid over the optical well of the channel while the instrument is reading data. 1. If you wish to stop operation of a channel during a run, press Esc. Operation will stop and the following display will appear.
Test Menu - Singles 37.0C Abort? [All] 1 2 3 4 None
2. Press Enter to abort all four channels (All), or use the arrow keys to select the channel number or None and press Enter. You must rerun the assay for the aborted sample if you abort during a run. To cancel the abort, press Esc again, or use the arrows to select None and press Enter.
7.9. Results Results are displayed at the end of each assay, and printed. NOTE: If the printout is to be part of a permanent record, photocopy it and save the photocopy. Several symbols, listed below, can occur on a printout of test data. Call Helena Laboratories for assistance if these problems persist. N/C (No Clot): The Cascade M-4 did not detect a clot. If a clot is physically present in the cuvette, or if plasma is very dilute (i.e.
1:320, 1.6%), the N/C error occurred due to too short a read time. Edit read time (see section 5.3.2) to lengthen it. B/E (Baseline Error): The sample data fell below the lower range of the optics. This indicates a lack of sample, low reagent addition, improper baseline value, or an empty cuvette. No data is taken. O/R (Overrange): The sample data exceeded the upper range of the optics. @ by clot time (i.e. 12.5@): This means that the sample data exceeded the upper range of the optics, but the Cascade M-4 was able to make a clot time determination. The clot time is still valid but high fibrinogen is suspected, and follow-up testing is recommended. x (lower case letter “x”): This means that a QC value was manually changed (on a QC sample, only). * (asterisk): This indicates that the duplicate samples were not within a given percentage of each other (default values of 7% for Fibrinogen and 5% for all others). # (pound sign): This indicates that the test result value was outside of the standard curve limits. This symbol is only used for PT, Fibrinogen, and Factor Assays. < > (brackets): Printed on Levey Jennings plots for values greater than 999.9. The actual value is stored and used in calculation of mean, standard deviation and CVs, and will be printed during export of data. Refer to the following sections of the procedure supplied with the reagents for a complete discussion of results and their interpretation: Instruments, Stability of End Product, Results, Expected Values, Performance Characteristics, and Interpretation of Results.
7.10. Export Data At the end of the test run, you can choose to export test data to an external, host computer. You must already have assigned a station number to this Cascade M-4 (see
Ch. 1 Ch. 2

Cascade M-4 SEVEN - Operating Instructions
7-4
section 5.3.3 for instructions and section 9 for output specifications). In addition, the computer should be connected to the Cascade M-4 RS232 port number 1 (the port on the right when looking at the back of the instrument). You can export only the data which is displayed at the end of a run. The following menu will appear.
Test Menu Select: Run Tests →
1. Press the right arrow key to go to the menu below.
Test Menu Select: Export to host computer
2. Press Enter to export data. The data listed below is sent for each channel, as shown in examples to the right.
Data Sent Example 1 Example 2 1) Station Number Station Number: Station Number:
33401 33401 2) Date of Run 1-5-95 1-5-95 3) Time of Run 9:55 9:55 4) Number of
patient sample 1 2 5) Patient ID QC Control 86600 6) Test Type Factor II Factor II 7) Dilution <Blank> 1:40 8) QC Level 2 <Blank> 9) Clottime 1 15.34 17.15 10) Clottime 2 15.94 17.98 11) Average 16.64 17.57 12) Duplication Flag <Blank> * 13) Out of range <Blank> <Blank> 14) High FIB 1 <Blank> <Blank> 15) High FIB 2 <Blank> <Blank> 16) Activity 143.21 75.34 17) INR <Blank> <Blank> 18) Ratio <Blank> <Blank>
7.11. Shut Down To shut down the instrument: 1. Cap all reagents and controls (do not mix up the caps) and store appropriately. 2. Remove all cuvettes and test tubes and discard in a solid waste container. 3. Turn off the power switch. 4. Clean any spills (see section 10.1.1).
7.12. Standard Curves The Cascade M-4 refers to a standard curve based on known reference values to calculate results for Fibrinogen and Factor Assays or for PT (with results in % activity). Each time a new lot of reagent or control will be used, a new standard curve must be run. One standard curve is stored for each test type.
7.12.1. Run Standard NOTE: If you are using a seven point curve, longer read times are required. The read time should be edited during setup of Test Parameters for each test when a seven point curve will be used. The time selected should be longer than the longest anticipated clot time for that assay. Refer to section 5.3.2. 1. Prepare dilutions of the control according to the instructions provided in the procedure packaged with the control. 2. Follow the instructions in Fig. 7-7 to run the curve. NOTE: For a PT % Activity curve, a 75% dilution is not required, although it can be used if desired. If you do not need to use a particular dilution, do not select it when running the standard curve. 3. Repeat until all dilutions have been run. 4. Press ESC. The new standard curve is stored for the selected test type.
7.12.2. Edit Standard Curve This feature can be used to reenter a deleted standard curve or to correct an existing curve. Refer to Fig. 7-7 to edit standard curves stored in memory. 1. Press Std, right arrow one time, Enter, and test type key. 2. To edit, retype user ID number, press Enter, retype lot number of standard, press Enter. 3. To edit, retype the reference value (see insert with control) and press Enter. (To clear

Cascade M-4 SEVEN - Operating Instructions
7-5
the number on display, press Del, then type the number and press Enter.) 4. Press the arrows to select the dilution of the point you want to edit, and press Enter. 5. At New:, type the new value for the point and press Enter. 6. Press ESC and either repeat steps 3 and 4 as needed, or press ESC again when finished. 7. Use the arrows to select Yes or No at Save the changes? and press Enter. NOTE: To remove a point from a standard curve, print the curve (in order to show all points available). Then delete the curve (as in starting a standard curve run and then aborting the run). Finally, edit in only the points desired. This is the only way to remove a point that has been previously run (or edited in). Once a point has been run or edited in, it will remain a part of the curve. Attempting to remove a point by entering 0 sec. of time removes the point from the graph but not from the printout.
7.12.3. Print Standard Curve 1. Press Std, right arrow twice, and Enter. 2. If you want to print a curve for one test type, press Enter and go to step 3. To print curves for all test types, just press the right arrow and Enter and the instrument will print out the curves. 3. Press the test type key. The printer will produce a standard curve for the test selected. NOTE: If the printout is to be part of a permanent record, photocopy it and save the photocopy.
7.13. Utilities 1. Press Util. The following menu appears.
Utility Menu Select Options: Test parameters
NOTE: For Test Parameters and General Parameters, see sections 5.3.1 and 5.3.2. 2. Press the right arrow twice to get to the menus shown in Fig. 7-8.
7.13.1. QC Lot Numbers When you start using a new control lot number, you must enter the lot number into the Cascade M-4. This must be done before you run an assay using the new control as a reference during a run. 1. Press Util and press the right arrow twice to get the menu below.
Utility Menu Select Option: QC Lot Numbers
2. Press Enter. The following menu appears. Utility Menu Select test type from keypad
3. Press the test type key (PT in this example). The following menu appears.
Utility Menu -PT Level: [ 1 ] 2 3
4. Press Enter for level 1 (normal control) or press the arrow and Enter for levels 2 or 3. The following menu appears.
Utility Menu - PT Level 1 Lot Num [??] -0-0000
5. Press Del, the numbers for lot number, and Enter until the lot number is complete. 6. Press Esc when finished.
7.13.2. Set Date/Time for Instrument Refer to Figure 7-8 for instructions. This will correct the date or time printed on the reports.
7.13.3. Set Date Format Refer to Figure 7-8 for instructions. Use this to redo date format if necessary.
7.13.4. Keypad Beep On or Off Refer to Figure 7-8 for instructions. When on, the keypad will beep every time a button is pressed. When off, the instrument beeps only at various steps of operation.

Cascade M-4 SEVEN - Operating Instructions
7-6
7.13.5. Adjust Display Brightness Refer to Figure 7-8 for instructions. The brightness should be at a comfortable level for the operator, and the background should appear plain green.
7.13.6. Reset to Default Values Refer to Figure 7-8 for instructions. When you reset to default values, factory programmed values are used for the instrument. NOTE: Reset to default values will reset Yes/No parameter choices to No. The user will have to reselect parameters but numerical values will remain in memory.
7.13.7. Print Parameter List Refer to Figure 7-8 for instructions. The parameter list includes both test parameters and general instrument parameters.

Cascade M-4 SEVEN - Operating Instructions
7-7
Table 7-1. Sample and Reagent Information for Factory Programmed Procedures
Test Type PT APTT Fibrinogen TCT
Sample Volume 100 µL 100 µL 200 µL 200 µL
Reagent Type Thromboplastin Rgt. APTT Reagent Thrombin Rgt. TCT Rgt Premix? Yes Yes Yes Yes Vol. Added 200 µL 100 µL 100 µL 100 µL
Reagent Type None Calcium Chloride None None Premix? No Vol. Added 100 µL
Test Type Factor Assays
Reagent Type Factor Deficient Substrate Factor Deficient Substrate Premix? No No Vol. Added 100 µL 100 µL
Sample Type PT Factors II, V, VII, X APTT Factors VIII, IX, XI, and XII Sample Volume 100 µL 100 µL
Reagent Type Thromboplastin Rgt. APTT Reagent Premix? Yes Yes Vol. Added 200 µL 100 µL
Reagent Type Calcium Chloride Premix? No Vol. Added 100 µL
Cascade M-4 SEVEN - Operating Instructions
7-8
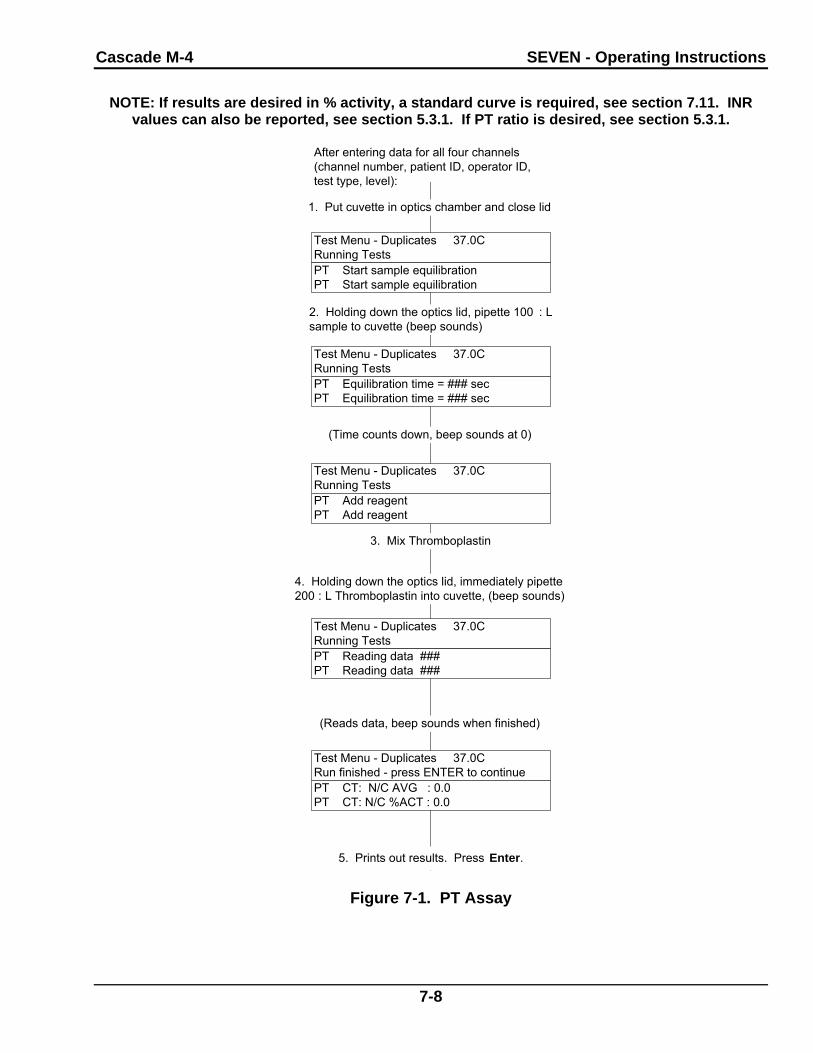
NOTE: If results are desired in % activity, a standard curve is required, see section 7.11. INR values can also be reported, see section 5.3.1. If PT ratio is desired, see section 5.3.1.
Test Menu - Duplicates 37.0CRunning Tests
1. Put cuvette in optics chamber and close lid
After entering data for all four channels(channel number, patient ID, operator ID,test type, level):
PT Start sample equilibrationPT Start sample equilibration
2. Holding down the optics lid, pipette 100 :Lsample to cuvette (beep sounds)
Test Menu - Duplicates 37.0CRunning TestsPT Equilibration time = ### secPT Equilibration time = ### sec
3. Mix Thromboplastin
4. Holding down the optics lid, immediately pipette200 :L Thromboplastin into cuvette, (beep sounds)
Test Menu - Duplicates 37.0CRunning TestsPT Reading data ###PT Reading data ###
(Reads data, beep sounds when finished)
Test Menu - Duplicates 37.0CRun finished - press ENTER to continuePT CT: N/C AVG : 0.0PT CT: N/C %ACT : 0.0
5. Prints out results. Press Enter.
Test Menu - Duplicates 37.0CRunning TestsPT Add reagentPT Add reagent
(Time counts down, beep sounds at 0)
Figure 7-1. PT Assay

Cascade M-4 SEVEN - Operating Instructions
7-9
NOTE: No standard curve needs to be run for this assay. If APTT ratio is desired, see section 5.3.1.
Test Menu - Duplicates 37.0CRunning Tests
1. Put cuvette in optics chamber and close lid
After entering data for all four channels(channel number, patient ID, operator ID,test type, level):
aPTT Start sample equilibrationaPTT Start sample equilibration
2. Holding down the optics lid, pipette 100 :Lsample to cuvette (beep sounds)
Test Menu - Duplicates 37.0CRunning TestsaPTT Equilibration time = ### secaPTT Equilibration time = ### sec
(Time counts down, beep sounds at 0)
4. Holding down the optics lid, immediately pipette100 :L APTT Reagent into cuvette, (beep sounds)
Test Menu - Duplicates 37.0CRunning TestsaPTT Start reagent activationaPTT Start reagent activation
3. Mix APTT Reagent
Test Menu - Duplicates 37.0CRun finished - press ENTER to continue
aPTT Activation time = ### secaPTT Activation time = ### sec
(Time counts down, beep sounds at 0)
6. Prints out results. Press Enter.
Test Menu - Duplicates 37.0CRunning Tests
Test Menu - Duplicates 37.0CRunning TestsaPTT Add reagentaPTT Add reagent
Test Menu - Duplicates 37.0CRunning Tests
5. Holdingdown theoptics lid,immediatelypipette 100 :LCa Cl2 intocuvette, (beepsounds)
aPTT Reading data ###aPTT Reading data ###
(Reads data, beep sounds when finished)
aPTT CT: N/C AVG : 0.0aPTT CT: N/C Ratio : 0.00
Figure 7-2. APTT Assay

Cascade M-4 SEVEN - Operating Instructions
7-10
NOTE: A standard curve must be run prior to running this assay, see section 7.11 and Helena Fibrinogen Assay Procedure.
Test Menu - Duplicates 37.0CRunning Tests
1. Put cuvette in optics chamber and close lid
After entering data for all four channels(channel number, patient ID, operator ID,test type, level):
FIB 1:10 Start sample equilibrationFIB 1:10 Start sample equilibration
2. Holding down the optics lid, pipette 200 :Ldiluted sample to cuvette (beep sounds)
Test Menu - Duplicates 37.0CRunning TestsFIB 1:10 Equilibration time = ### secFIB 1:10 Equilibration time = ### sec
3. Mix Thrombin Reagent
4. Holding down the optics lid, immediately pipette100 :L Thrombin Reagent into cuvette, (beep sounds)
Test Menu - Duplicates 37.0CRunning TestsFIB 1:10 Reading data ###FIB 1:10 Reading data ###
(Reads data, beep sounds when finished)
Test Menu - Duplicates 37.0CRun finished - press ENTER to continuePT CT: 8.1 AVG : 8.1PT CT: 8.2 %ACT : 250
5. Prints out results. Press Enter.
Test Menu - Duplicates 37.0CRunning TestsFIB 1:10 Add reagentFIB 1:10 Add reagent
(Time counts down, beep sounds at 0)
Figure 7-3. Fibrinogen Assay

Cascade M-4 SEVEN - Operating Instructions
7-11
NOTE: No standard curve needs to be run for this assay.
Test Menu - Duplicates 37.0CRunning Tests
1. Put cuvette in optics chamber and close lid
After entering data for all four channels(channel number, patient ID, operator ID,test type, level):
TCT Start sample equilibrationTCT Start sample equilibration
2. Holding down the optics lid, pipette 200 :Lsample to cuvette (beep sounds)
Test Menu - Duplicates 37.0CRunning TestsTCT Equilibration time = ### secTCT Equilibration time = ### sec
3. Mix TCT Reagent
4. Holding down the optics lid, immediately pipette100 :L TCT Reagent into cuvette, (beep sounds)
Test Menu - Duplicates 37.0CRunning TestsTCT Reading data ###TCT Reading data ###
(Reads data, beep sounds when finished)
Test Menu - Duplicates 37.0CRun finished - press ENTER to continueTCT CT: N/C AVG : 0.0TCT CT: N/C
5. Prints out results. Press Enter.
Test Menu - Duplicates 37.0CRunning TestsTCT Add reagentTCT Add reagent
(Time counts down, beep sounds at 0)
Figure 7-4. TCT Assay

Cascade M-4 SEVEN - Operating Instructions
7-12
NOTE: A standard curve must be run prior to running this assay, see section 7.11 and appropriate Helena Factor Deficient Substrate Procedure.
Test Menu - Duplicates 37.0CRunning Tests
1. Put cuvette in optics chamber and close lid
After entering data for all four channels(channel number, patient ID, operator ID,test type, level):
FX 1:10 Add deficient substrateFX 1:10 Add deficient substrate
2. Holding down the optics lid, pipette 100 :LFactor Deficient Substrate to cuvette (beep sounds)
Test Menu - Duplicates 37.0CRunning TestsFX 1:10 Start sample equilibrationFX 1:10 Start sample equilibration
(Time counts down, beep sounds at 0)
Test Menu - Duplicates 37.0CRunning TestsFX 1:10 Equilibration time = ### secFX 1:10 Equilibration time = ### sec
3. Holding down the optics lid, immediately pipette100 :L diluted sample to cuvette (beep sounds)
Test Menu - Duplicates 37.0CRun finished - press ENTER to continue
FX 1:10 Add reagentFX 1:10 Add reagent
6. Prints out results. Press Enter.
Test Menu - Duplicates 37.0CRunning Tests
Test Menu - Duplicates 37.0CRunning Tests
5. Holdingdown theoptics lid,immediatelypipette 200 :LThromboplastinReagent intocuvette, (beepsounds)
FX 1:10 Reading data ###FX 1:10 Reading data ###
(Reads data, beep sounds when finished)
FX 1:10 CT: N/C AVG : 0.0FX 1:10 CT: N/C % ACT : 0.0
4. Mix Thromboplastin Reagent
Figure 7-5. FII, FV, FVII, or FX Assay (FX Shown)

Cascade M-4 SEVEN - Operating Instructions
7-13
NOTE: A standard curve must be run prior to running this assay, see section 7.11 and appropriate Helena Factor Deficient Substrate Procedure.
Test Menu - Duplicates 37.0CRunning Tests
1. Put cuvette in optics chamber and close lid
After entering data for all four channels(channel number, patient ID, operator ID,test type, level):
FXII 1:10 Add deficient substrateFXII 1:10 Add deficient substrate
2. Holding down the optics lid, pipette 100 :L FactorDeficient Substrate to cuvette (beep sounds)
Test Menu - Duplicates 37.0CRunning TestsFXII 1:10 Start sample equilibrationFXII 1:10 Start sample equilibration
(Time counts down, beep sounds at 0)
Test Menu - Duplicates 37.0CRunning TestsFXII 1:10 Equilibration time = ### secFXII 1:10 Equilibration time = ### sec
3. Holding down the optics lid, immediately pipette100 :L diluted sample to cuvette (beep sounds)
Test Menu - Duplicates 37.0CRun finished - press ENTER to continue
FXII 1:10 Add reagentFXII 1:10 Add reagent
7. Prints out results. Press Enter.
Test Menu - Duplicates 37.0CRunning Tests
Test Menu - Duplicates 37.0CRunning Tests
(Time countsdown, beepsounds at 0) FXII 1:10 Reading data ###
FXII 1:10 Reading data ###
(Reads data, beep sounds when finished)
FXII 1:10 CT: N/C AVG : 0.0FXII 1:10 CT: N/C % ACT : 0.00
4. Mix APTT Reagent
Test Menu - Duplicates 37.0CRunning TestsFXII Start reagent activationFXII Start reagent activation
5. Holding down the optics lid, immediately pipette200 :L APTT Reagent into cuvette (beep sounds)
Test Menu - Duplicates 37.0CRunning TestsFXII Activation time = ### secFXII Activation time = ### sec
6. Holding down the optics lid, immediatelypipette 100 :L CaCl2 into cuvette (beep sounds)
Figure 7-6. FVIII, FIX, FXI, or FXII Assay (FXII Shown)

Cascade M-4 SEVEN - Operating Instructions
7-14
PressArrow
PressArrow
Standard MenuSelect: Edit Standard Curve
Standard Menu - FIBEnter user ID: [ 1]
Standard MenuSelect test type from keypad.
Standard MenuSelect: Run Standard
Standard MenuSelect: Print Standard Curve
Standard Menu - FIBEnter Lot number: [255185]
Standard Menu - FIBSelect Dilution: 1:5
A: 1:5 Clot time: 11.2 New: [11.4]B: 1:5 Clot time: 11.5
Standard Menu - FIBEnter reference value: [303.0]
Standard Menu - FIBEnter new point(s)
A: 1:5 Clot time: 5.4B: 1:5 Clot time: 5.3
A: 1:5 Clot time: 11.4 New: 11.4B: 1:5 Clot time: 11.5 New: [11.5]
Standard Menu - FIBEnter new point(s)
Standard Menu - FIBSave the changes? [No] Yes
Standard MenuSelect test type from keypad.
Standard Menu - FIBDelete old standard? [No] Yes
Standard Menu - FIBEnter user ID: [ ]
Standard Menu - FIBEnter Lot number: [ ]
Standard Menu - FIBEnter reference value: [ 0.0]
Standard Menu - FIBSelect Dilution: 1:5
Standard Menu - FIBContinue to run dilution? No [Yes]
Standard MenuPrint ALL test types? [No] Yes
Standard MenuSelect test type from keypad.
Press Enter
Press test key (Fib)
Press Arrow,Enter (Yes)
Press Numbers, Enter
Press Numbers, Enter
Press Del, ##s, Enter
Press Arrows, Enter to select dilution.NOTE: From this point, same steps asfor running test, see Fig. 7-1 to 7-6.Repeat for all dilutions. After clot times:
Press Arrow,Enter (No)
Press Enter (Yes)
Press Enter
Press test key (Fib)
Press Numbers, Enter
Press Numbers, Enter
Press Del, ##s, Enter
Press Arrows (1:5), Enter
Press Del, ##s, Enter
Press Del, ##s, Enter
Press Enter
Press Enter (No)
Press test key (Fib)Standard Curve Printed
Press Std
Press Enter(No)
Press Arrows, EnterWhen finished, press ESC
When finished, press ESC
Repeatuntil allchannelsare done
Press Arrows,Enter (Yes)
Figure 7-7. Standards Menus

Cascade M-4 SEVEN - Operating Instructions
7-15
PressEnter
PressEnter
Utility MenuLevel: 1 Lot Num [??]-0-0000
Utility MenuDate: [2]-20-95
Utility MenuDate: 2-[20]-95
Utility MenuTime: [15]:31:53
Utility MenuTime: 15:[31]:53
Utility MenuTime: 15:31:[53]
Utility MenuSave the changes? [No] Yes
Utility MenuSelect test type from keypad
Utility MenuKeypad beep: Off [On]
Utility Menu to adjust, ENTER when done
Utility MenuSelect Option: Print parameter list
Utility MenuReturn to default values? [No] Yes
Utility MenuDate Format: DD-MM-YY [MM-DD-YY]
Utility MenuSelect Option: Default values
Utility MenuSave the changes? [No] Yes
Utility MenuDate: 2-20-[95]
Utility MenuLevel: [1] 2 3
Utility MenuSelect Option: Keypad beep
Utility MenuSelect Option: Display adjust
Press Arrow
Utility MenuSelect Option: Date format
Press Arrow
Press Arrow
Press Arrow
Press Enter
Press Enter
Press Enter
Press Enter
Utility MenuSelect Option: QC Lot Numbers
Press Esc
Press Esc
Utility MenuSelect Option: Date/Time
Utility MenuSelect Option: Date
Utility MenuSelect Option: Time
Press Enter
Press Arrow
Press Enter, parameter list is printed out
PressArrow,Enter
PressArrow,Enter
PressArrow,Enter
PressArrow,Enter
Tochange,pressDel, ##s,Enter.To skipto next,pressEnter.
Press Enter
PressArrow,Enter
Tochange,pressDel, ##s,Enter.To skipto next,pressEnter.
PressArrow,Enter
Press Del,Numbers &Enter 3x.
PressEnter,Arrow,Enter
Press Test,Type button
Press Util and press right arrow twice
Press Arrow
Figure 7-8. Utility Menus

Cascade M-4 EIGHT - Test Functions and Quality Control
8-1
Section 8 - Test Functions and Quality Control The instrument automatically performs a self-test any time the power is turned on. Should an error message appear on the display, see Section 10.2, Troubleshooting. Each laboratory should establish a quality control program that includes normal and abnormal controls to evaluate the instrument, reagent, and technologist performance. Control data should be compared to the ranges established by the laboratory for the controls. If controls are out of range, appropriate troubleshooting procedures should be followed. Contact Helena Laboratories for assistance. The patient data should be compared to the normal range values for the procedure in use and to the laboratory normal range values. Refer to the procedure supplied with the reagents for further information. QC data is normally stored in battery backed- up memory in the Cascade M-4.
8.1. End of Month QC Refer to the flowchart in Fig. 8-1 to print the end of month QC report. When the end of month (EOM) function is selected, data (for up to 180 data points) is erased. You can choose to delete the cumulative mean, SD and CV value, as well as the data points if you will be using a different lot of control. Do not delete the mean, SD and CV if you are using the same lot of control and want to keep a continuing record (lot-to-date, LTD).
8.2. Delete QC Control Refer to the flowchart in Fig. 8-1 to delete a data point from the QC record. 1. To delete a QC record, press QC, press arrows to select Delete QC Control and press Enter. 2. Press the test type key for the test that the control is used for.
3. Delete ONE? appears. Use the arrows to select Yes if deleting only one data point, or select No if deleting more than one data point, and press Enter. 4. To delete a single point, type in the point number and press Enter. (To clear the number on display, press Del, then type the number of the point to be deleted, and press Enter.) To delete a series of points, press Del, type the first number of the series to be deleted, and press Enter. Then press Del, type the second number, and press Enter. 5. Delete? appears. Use the arrows to select Yes (to delete) or No (not to delete) and press Enter.
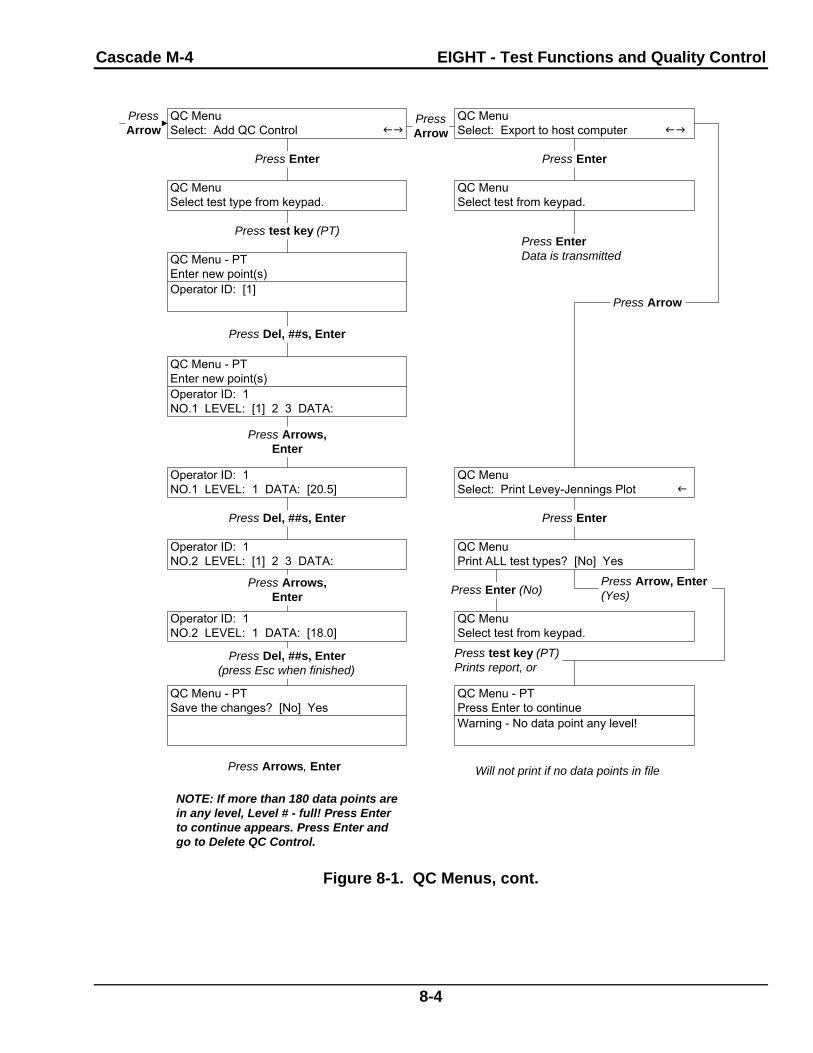
8.3. Add QC Control Refer to the flowchart in Fig. 8-1 to add a data point to the QC record. 1. To add a point to the Levey-Jennings plot of control data, press QC, press arrows to select Add QC Control and press Enter. 2. Press the test type key for the test that the control is used for. NOTE: Before you can add a point to a plot for Factor Assays or Fibrinogen, a standard curve must exist for that test. 3. Type in the operator ID and press Enter. (To clear the number on display, press Del, then type the two-digit number and press Enter.) 4. Press the arrows to select the LEVEL of the reference (Level 1 is usually a normal control, levels 2 and 3 are usually abnormal controls) and press Enter. 5. Press Del, then type the value and press Enter. 6. Repeat steps 4 and 5 until finished, then press ESC. 7. Save the changes? appears. Press the arrows to select Yes to save the changes, or

Cascade M-4 EIGHT - Test Functions and Quality Control
8-2
No to leave the original data unchanged, and press Enter.
8.4. Export QC Data Refer to the flowchart in Fig. 8-1 to export QC data to an external host computer. The computer will receive the following data. 1) Station Number 2) Test type 3) Level 4) MTD Numbers (items) 5) Data points 6) MTD (month to date) Mean 7) MTD S.D. 8) MTD C.V. 9) LTD (lot to date) number 10) LTD Mean 11) LTD S.D. 12) LTD C.V.
8.5. Print Levey-Jennings Plot Refer to the flowchart in Fig. 8-1 to print a Levey-Jennings plot of QC data at any time. Levey-Jennings plots display data as mean ±3 standard deviations with individual data points on the graph. The data are derived from assay results on the QC controls run (section 8.1). 1. To make a print out of a Levey-Jennings plot, press QC, arrows to select Print Levey-Jennings Plot and press Enter. 2. Press the test type key for the test that the control is used for. A printout is produced if there are at least 2 data points. If a QC value was manually changed, an “x” will be printed by the value. If no points are stored for the test, a message appears instead of a printout being produced. NOTE: If the printout is to be part of a permanent record, photocopy it and save the photocopy.
8.6. QC for Assays Using Standard Curves QC Controls at three levels can be stored for each of the factor assays as well as PT and Fibrinogen. These are selected and run just
as for other assays. The major difference is that if you choose to edit in data, the number must be entered as clot time in seconds. For factor assays, the data printed in the Levey-Jennings plot is the % activity. This is calculated from the clot time entered versus the standard curve stored in the memory. In the case of fibrinogen, the clot time is edited in and the fibrinogen concentration (mg/dL) is calculated from the fibrinogen standard curve and stored. For instructions on running QC Controls, see section 7.6.

Cascade M-4 EIGHT - Test Functions and Quality Control
8-3
QC MenuSelect: Delete QC Control
QC MenuSelect: End of Month
QC Menu - PTDelete? [No] Yes
QC Menu - PTDelete? [No] Yes
QC Menu - PTDelete no. [1]
QC MenuSelect test from keypad.
QC Menu - PTDelete no. from 3 to [4]
QC Menu - PTDelete no. from 3 to [6]
QC Menu - PTDelete no. from [3] to 6
QC Menu - PTDelete no. from [1] to 6
QC Menu PTDelete one value? [No] Yes
QC MenuPrint ALL test types [No] Yes
QC MenuSelect test from keypad.
QC MenuDelete MEAN, SD and CV? [No] Yes
Press QC
Press Enter
Press Enter (No) Press Arrow,Enter (Yes)
Press test key (PT)
No QC datafor testexists, pressEnter
Levey-Jennings plot formonth is printed. QCdata points are erasedbut Mean, SD and CVfor month are stored (tokeep track of data for acontrol lot)
Press Arrows,Enter (No)
Press Arrows,Enter (Yes)
Levey-Jennings plot formonth is printed. AllQC data is erased;Mean, SD and CV arenot stored (becausenew control lot will beused)
PressArrow
Press Enter
Press test key (PT)
Press Arrows,Enter (No)
Press Arrows,Enter (Yes)
Press Del, 3
Press Enter
Press Del, 4
Press Enter
Press Arrows, Enter (Yes)(Positions 1, 2, 5, and 6 are left)
Press Del, # (1), Enter
Press Arrow, Enter (Yes)(Positions 2-6 are left)
PressArrow
No QC Controlexists, pressEnter
Figure 8-1. QC Menus
Cascade M-4 EIGHT - Test Functions and Quality Control
8-4
QC MenuSelect: Export to host computer
QC MenuSelect: Add QC Control
Operator ID: [1]
Operator ID: 1NO.1 LEVEL: [1] 2 3 DATA:
QC Menu - PTEnter new point(s)
QC MenuSelect test from keypad.
QC MenuSelect test from keypad.
QC MenuPrint ALL test types? [No] Yes
QC MenuSelect: Print Levey-Jennings Plot
QC Menu - PTPress Enter to continue
QC MenuSelect test type from keypad.
QC Menu - PTEnter new point(s)
Press Enter
Press Arrows,Enter
PressArrow
Press Enter
Press EnterData is transmitted
Press Enter
Press Enter (No)
Press Del, ##s, Enter
Press test key (PT)
Will not print if no data points in file
Operator ID: 1NO.1 LEVEL: 1 DATA: [20.5]
Operator ID: 1NO.2 LEVEL: [1] 2 3 DATA:
Press Del, ##s, Enter
Press Arrows,Enter
Operator ID: 1NO.2 LEVEL: 1 DATA: [18.0]
QC Menu - PTSave the changes? [No] Yes
Press Del, ##s, Enter(press Esc when finished)
Press Arrows, Enter
Warning - No data point any level!
NOTE: If more than 180 data points arein any level, Level # - full! Press Enterto continue appears. Press Enter andgo to Delete QC Control.
Press Arrow, Enter(Yes)
Press test key (PT)Prints report, or
Press Arrow
PressArrow
Figure 8-1. QC Menus, cont.

Cascade M-4 NINE - Performance Specifications
9-1
Section 9 - Performance Specifications Assays: PT (one stage prothrombin time),
APTT (activated partial thromboplastin time), fibrinogen, thrombin clotting time (TCT), and Factors II, V, VII, VIII, IX, X, XI and XII
Optics Channels: 4 independently operating channels for timing and reading results
Modes: Duplicate or Single samples Data Export: Data may be exported to an
external host computer via RS232 data port
RS232 Specifications: 7 bit, even parity, 1 stop bit, 9600 Baud
Printed Reports: Results printed on 4.5” wide thermal paper (Cat. No. 1720); also standard curves, Levey-Jennings plots (QC) and system parameters can be printed out
Incubator Temperature: 37°C +/- 0.5°C Cuvette: Disposable cuvettes, maximum cell
capacity is 600 µL (Cat. No. 1718, 5 pkgs of 100)
Input Power: 120/240 Vac, 50/60 Hz, 100 Watts Max.
Printer Power: 8.4V ±10%, short circuit protected, connector provided on back of instrument to power companion printer
Fuses (2): 120V/240V: 3A/250V slo blo Dimensions, Assembled:
8 in. (20 cm) High 11 in. (28 cm) High with printer 14 in. (35 cm) Wide 14 in. (35 cm) Deep
Weight: 20 lbs (9 kg) and 23 lbs (10 kg) with printer
Environment: 15° to 30°C (59° to 86°F)

Cascade M-4 TEN - Maintenance, Troubleshooting, Warranty
10-1
Section 10 - Maintenance, Troubleshooting, Warranty
10.1. Maintenance This section describes routine operator maintenance procedures. For instrument calibration or for maintenance not described in this manual, call Helena Laboratories for assistance.
Table 10-1. Preventative Maintenance Daily, if used: Check for spills Weekly: Clean Injection Ports and
Optical Wells Every Month: Check the Filter, Clean if Dirty
10.1.1. Cleaning Spills AFTER TURNING OFF THE POWER AND UNPLUGGING THE POWER CORD, clean spills with a cotton swab, soft cloth or sponge. Do not use corrosive or abrasive cleansers. Thoroughly dry the unit before plugging the power cord in. Should an instrument be contaminated by blood or blood derivative, spray any contaminated surface with a commercial virucidal and germicidal agent. Observe where the specimens are used inside the instrument and confine cleaning to that area. Wipe up the residue. These materials contain alcohol which is corrosive to metal surfaces. A spill in the optical well should pour out the hole in the bottom of the well. Clean the inside of the optical well, the bottom of the unit and the bench area.
10.1.2. Clean Injection Ports and Optical Wells
Once a week, or more often if crossover contamination is suspected, clean the injection ports and the optical wells. 1. Open the lids. 2. Clean the ports in the lids with a swab dipped in alcohol. If necessary, ports can be unscrewed and removed from the lid for cleaning.
3. Use the cotton swab (dipped in alcohol) to rub the inside of the optical wells to remove any internal residue. 4. Close the lids.
10.1.3. Fuse Replacement The fuse holders are located on the back panel of the Cascade M-4 in one of two configurations. The fuses will be either in one rectangular holder as part of the power receptacle (Fig. 10-1A) or two round fuse holders above the power receptacle (Fig. 10-1B). Follow the appropriate instructions for type of fuse holder on your instrument. Rectangular fuse holder (Fig. 10-1A): 1. Switch the main power to off and unplug the power cord. 2. Using a screwdriver, press the retainer clips inward to remove the fuse holder and withdraw the old fuses. 3. Replace the fuses with ones of the proper rating (see labeling on back). 4. Reinsert the fuse holder, with the fuses installed, into the receptacle. Round fuse holders (Fig. 10-1B): 1. Switch the main power to off and unplug the power cord. 2. Use a screwdriver to turn the fuse holder counter-clockwise, remove it and withdraw the old fuse. 3. Replace the fuse with one of the proper rating (see labeling on back). 4. Insert the fuse holder and fuse into the instrument and use a screwdriver to turn the fuse holder clockwise until secured. If the fuse blows out immediately after replacement, other causes must be considered. Call Helena Laboratories for assistance.

Cascade M-4 TEN - Maintenance, Troubleshooting, Warranty
10-2
10.1.4. Replacing Printer Paper 1. Remove the old paper core from the printer. 2. Use scissors to cut a clean leading edge (a triangular point is best) on the new roll of printer paper. 3. Put the new roll in the printer with the roll feeding from the underside toward the front of the printer. 4. Manually feed the paper straight into the slot in the printer and press LF (line feed) until paper catches and moves through the printer.
10.1.5. Cleaning the Filter One filter is located on the right side of the Cascade M-4. Remove the filter and check to see if the filter needs cleaning once a month. 1. Turn off the power and unplug the power cord. 2. Pull off the filter cover and remove the filter. 3. Wash the filter in soap and water. 4. Rinse the filter in water and allow to air dry. 5. Replace the filter and then the cover. 6. Turn on the power.
10.1.6. Momentary Lid Adjustment In the Cascade M-4, the lid over each optical channel contains two switches. One is a “momentary” switch, used to begin timing of a process, and the second is a “magnetic” switch which monitors opening and closing of the lid. The momentary lid switch may need adjustment if a timer does not start when the lid switch is pressed. (Note that if all channels have this problem at the same time and an electronic pipettor is in use, the switch in the pipettor may be at fault, not the lid switch.) 1. Locate the 0.05” Allen wrench supplied with the instrument. Turn on the power to the Cascade M-4.
2. Look at the top of the lid switch to be adjusted, and find the very small hole on top of the lid, toward the front side. 3. Insert the long end of the Allen wrench into the hole and hold it there. 4. Begin a test sequence by pressing Test and the Test Type buttons. You need not use reagents or cuvettes to simulate a test. 5. If an electronic pipettor is not in use, press and hold the optics chamber lid. If an electronic pipettor is in use, insert the pipettor into the lid needing adjustment, press and hold down both the pipettor button and the optics chamber lid. 6. Turn the wrench slowly clockwise, until the timing process begins. 7. Now turn the wrench 1/8 turn further clockwise. 8. Release pressure on the lid switch (and pipettor button), then press the Abort key to stop the test in progress. 9. Check the lid switch for proper operation by running another simulated test. If the switch performs satisfactorily, adjustments are complete. If not satisfactory, turn the wrench clockwise about 1 turn and repeat steps 1 to 8 until the switch operates correctly.

Cascade M-4 TEN - Maintenance, Troubleshooting, Warranty
10-3
Figure 10-1A. Back Showing Location of Rectangular Fuse Holder
Figure 10-1B. Back Showing Location of Round Fuse Holders
Fuse Holder
Fuse Holders

Cascade M-4 TEN - Maintenance, Troubleshooting, Warranty
10-4
10.2. Troubleshooting If the recommended solutions should fail to solve a problem, call Helena Laboratories for assistance.
Table 10-2. Troubleshooting Problem Possible Cause Solution
No power to instrument Power cord unplugged Plug cord into properly grounded wall outlet.
Blown fuse Replace fuse.
Error message is displayed or error code is printed
Error found during self-test or operation
Do as directed by the message or see Section 7.9 for a list of error codes (on results printout). If message returns, or an error code reappears, call Helena Laboratories for assistance.
Error - Baseline setting message appears
Light path obstructed Turn power off, remove any cuvettes from wells, clean wells. Turn power on. If message reappears, call Helena Laboratories for assistance.
Poor sample duplication Pipette tip contaminated Use clean pipette tips for each addition of reagent or sample.
Old reagent Replace reagent.
Air bubbles in cuvette Push pipette button more slowly.
Injection port contaminated Clean port (see section 10.1.2).
No clots indicated Read time too short Go to longer read time (see section 5.3.2).
Low fibrinogen level Increase gain setting (call Helena Laboratories for assistance).
No patient sample in cuvette Add sample to cuvettes.
Old or contaminated reagent Replace reagent.
No displays Fuse blown Check fuses, replace if required.
Power supply problem Call Helena Laboratories.
Incubator too hot or cold Temperature not set to 37°C See General Parameters (see section 5.3.1).
Electrical problem Call Helena Laboratories.
Timer will not start when lid switch is pressed
The momentary lid switch needs adjustment
Adjust momentary lid switch (see section 10.1.6).

Cascade M-4 TEN - Maintenance, Troubleshooting, Warranty
10-5
10.3. Warranty Helena Laboratories warrants its products to meet Helena’s published specifications and to be free from defects in materials and workmanship. Helena’s liability under this contract or otherwise shall be limited to replacement or refund of any amount not to exceed the purchase price attributable to the goods as to which such claim is made. These alternatives shall be the buyer’s exclusive remedies. In no case will Helena Laboratories be liable for consequential damages even if Helena has been advised as to the possibility of such damages. The foregoing warranties are in lieu of all warranties expressed or implied, including, but not limited to, the implied warranties of merchantability and fitness for a particular purpose.

Cascade M-4 ELEVEN - Symbology
11-1
Section 11 - Symbology NOTE: The following symbols may be used in this manual, or on the instrument, to provide information necessary to the user, if applicable.
Caution, electric shock hazard, high voltages capable of causing personal injury - shut down the instrument and unplug the power cord before touching - do not operate with the cover(s) removed
Caution, heat hazard - allow heated components to cool before handling
Caution, general hazard - see Precautions and Hazards (Sections 3 and 4) of Operator’s Manual before proceeding
Direct current
Alternating current
Both direct and alternating current
Ground (earth) terminal
Protective conductor terminal (grounded conductors)
Frame or chassis terminal
Equipotentiality (conductor with all parts at a single potential)
On (power switch)
Off (power switch)
Equipment protected throughout by double insulation or reinforced insulation (equivalent to Class II of IEC 536)
Cascade M-4 TWELVE - Index
12-1
Section 12 - Index
A Abort, 5-2, 6-1, 7-3 Activated partial
thromboplastin time, 9-1 Activated Partial
Thromboplastin Time, 1-1, 6-1
Activation time, 5-3 APTT, 1-1, 2-1, 5-3, 6-1,
6-2, 9-1 APTT ratio, 5-3 Assay(s), 1-1, 2-1, 6-3,
7-1, 7-2, 7-4, 8-1, 8-2, 9-1
Assays Using Standard Curves, 8-2
B Baseline, 7-3 Blank time, 5-3 Brightness, 7-6
C CaCl2, 7-1 Chamber Lid, 6-1 Channel(s), 2-1, 5-2, 5-3,
6-1, 6-2, 7-1, 7-2, 7-3, 9-1
Checksum, 2-1, 7-1 Cleaning, 3-1, 4-1, 10-1,
10-2 Clotting time, 1-1, 2-1, 5-2,
5-3, 6-1, 9-1 Coagulation, 1-1 Computer, 2-1, 5-3, 7-3,
8-2, 9-1 Control values, 7-2 Control(s), 2-1, 5-2, 6-1,
6-3, 7-1, 7-2, 7-4, 8-1, 8-2
Cuvette(s), 2-1, 4-1, 5-1, 6-2, 7-1, 7-3, 7-4, 9-1
D Date, 6-2, 6-3, 7-5 Date format, 7-5 Default, 7-3, 7-6 Display(s), 2-1, 6-1, 7-6 Duplicate(s), 5-2, 5-3, 6-2,
7-1, 7-2, 7-3, 9-1
E Edit standard, 7-4 End of Month QC, 8-1 Equilibration time, 5-3 Export, 2-1, 5-2, 7-3, 8-2,
9-1 External computer, 5-3
F Factor Assay, 1-1, 2-1,
6-3, 7-1, 7-3, 7-4, 8-1, 8-2
Fibrinogen, 1-1, 2-1, 6-1, 6-3, 7-3, 7-4, 8-1, 8-2, 9-1
Filter(s), 4-1, 10-2 Flag, 5-3 Fuse(s), 4-1, 9-1, 10-1
G Gain, 5-3 General parameters, 5-2,
6-2, 7-5
H Hazards, 4-1 Hemostasis, 1-1
I Incubator, 6-2, 9-1 Incubator temperature, 9-1 INR, 5-2, 5-3 Inspection, 5-1 Installation, 5-1 ISI value, 5-2
K Keypad, 2-1, 6-1, 7-5 Keypad beep, 7-5
L Levey-Jennings Plot, 6-3,
8-1, 8-2, 9-1 Limitations, 3-1 Lot number(s), 7-4, 7-5 Lot-to-date, 8-1 LTD, 6-3, 8-1, 8-2
M Month-to-date, 6-3 MTD, 6-3, 8-2
N Normal mean value, 5-2
O Optical well(s), 7-1, 7-3,
10-1 Optics, 2-1, 4-1, 6-1, 6-2,
7-2, 7-3, 9-1
P Paper, 9-1, 10-2 Parameter list, 7-6 Patient sample(s), 7-1 Performance, 7-3, 8-1 Pipette tip, 7-2 Power failure/loss, 4-1, 7-1 Precautions, 3-1 Preparation, 1-1, 3-1, 7-1 Print standard, 7-5 Printer, 2-1, 5-1, 6-1, 7-5,
9-1, 10-2 Printer paper, 10-2 Procedure(s), 1-1, 3-1, 5-1,
5-3, 7-1, 7-3, 8-1 Prothrombin time, 1-1, 6-1,
9-1 PT, 1-1, 2-1, 5-2, 5-3, 6-1,
6-3, 7-3, 7-4, 8-2, 9-1 PT Ratio, 5-3

Cascade M-4 TWELVE - Index
12-2
Q QC Control, 6-1, 7-2, 8-1,
8-2 QC data, 5-2, 6-3, 8-1, 8-2 Quality control (QC), 2-1,
6-1, 6-3, 7-2, 7-3, 8-1, 8-2, 9-1
R Read time, 5-2, 5-3, 7-3,
7-4 Reports, 6-2, 7-5, 9-1 Reset, 4-1, 7-6 RS232, 2-1, 7-4, 9-1 Run, 2-1, 5-2, 5-3, 6-1,
6-2, 6-3, 7-1, 7-2, 7-3, 7-4, 8-2
S Select parameters, 5-2 Shut down, 3-1, 7-4 Singles, 5-2, 6-2, 7-1 Specifications, 7-4, 9-1,
10-5 Spills, 7-4, 10-1 Standard curve(s), 5-2,
6-1, 6-3, 7-3, 7-4, 8-1, 8-2, 9-1
Station number, 5-3, 7-3, 8-2
System parameters, 6-3, 9-1
T TCT, 1-1, 2-1, 6-1, 9-1 Test parameters, 5-2, 5-3,
6-1, 6-2, 7-4, 7-5, 7-6 Test results, 2-1, 6-2 Thrombin clotting time,
1-1, 2-1, 6-1, 9-1 Thromboplastin, 1-1, 5-2,
6-1, 7-1, 9-1 Troubleshooting, 10-4
U Unpacking, 5-1 Utilities, 7-5
V Vial, 7-1
W Warranty, 10-5

© November, 2005 D6500077K Helena Laboratories 11/05
Cascade® M-4 Operator’s Manual
For additional information, call Helena Laboratories at 800-231-5663 toll free.
Helena Laboratories PO BOX 752
Beaumont, TX 77704-0752 USA