cassell - internet archive
TRANSCRIPT


CASSELL & COMPANY'S ANNOUNCEMENTS.
Practical Electricity. Completely re-
written by W. E. AYRTON, F.R.S., etc. CURRENT,
PRESSURE, RESISTANCE, ENERGY, POWER, AND
CELLS. With 247 Illustrations. $2.00.
The Electric Current, How Producedand How Used. By R. MULLINEUX WALMSLEY,
D.Sc.(Lond.). Illustrated. 82.00.
Electricity in the Service of Man.Revised byR. MULLINEUX WALMSLEY, D.Sc.(Lond.).
With upwards of 950 Illustrations. 83.00.
Elements of Machine Constructionand Drawing. By Prof. HENRY J. SPOONEP,
C.E., etc., and EDWARD G. DAVF.Y, A.M.I.M.E.
Fifty Sheets. Size i6| x 12^ inches. Complete
Set in Wrapper, 82,00. Also in One Vol., 83.50.
Numerical Examples in PracticalMechanics and Machine Design. By R. G-
ELAINE, M.E. Illustrated. 81.00.
Cassell's Popular Educator. with
Coloured Plates, Maps in Colours, and numerous
Illustrations. In Eight Vols., 81.50 and 82.00 each.
Cassell's Technical Educator, with
Coloured Plates and Engravings. Cheap Edition.
In Six Vols., $1.25 each.
Lathe Construction. By PAUL N. HASLUCK.
24 Coloured Plates drawn to scale. locts. each,
or $2.25 per set.
CASSELL & COMPANY, LIMITED, 7 and g, West i8M Street, New York.
Cover a.] ["WORK" HANDBOOKS, AMER.

" WORK ' HANDBOOKS.
A Series of Practical Manuals.
Edited by PAUL N. HASLUCK, Editor of "Work."
Price 4.0cts., each vast paid.
House Decoration* Comprising WHITEWASHING, PAPERHANGING,PAINTING, etc. With 79 Engravings and Diagrams.
Contents. Colour and Paints, Pigments, Oils, Driers,Varnishes, etc. Tools used by Painters.
How to Mix Oil Paints. Distemper or Tempera Painting. Whitewashing and Decorating a
Ceiling. Painting a Room. Papering a Room. Embellishment of Walls and Ceilings.
Boot Maklne and Mending. Including REPAIRING, LASTING, andFINISHING. With t?9 Engravings rind Diagrams.
Contents. Repairing Heels and Half-Soling. Patching Boots and Shoes. Re-Welting and
Re-Soling. Boot Making. Lasting the Upper. Sewing and Stitching. Making the Heel.
Knifing and Finishing. Making Riveted Boots and Shoes.
How to Write Signs, Tickets, and Posters. With 170 Engravingsand Diagrams.
Contents. The Formation of Letters, Stops, and Numerals. The Sign-writer's Outfit,
Making Signboards and Laying Ground Colours. The Simpler Forms of Lettering. Shadedand Fancy Lettering. Painting a Signboard. Ticket-Writing. Poster-Painting. Letteringwith Gold, etc.
Wood Finishing. Comprising STAINING, VARNISHING, and POLISHING.With Engravings and Diagrams.
Contents. Processes of Finishing Wood. Processes of Staining Wood. French Polishing.Fillers for Wood and Filling In. Bodying In and Spiriting Off. Glazing and Wax Finishing.Oil Polishing and Dry Shining. Re-polishing and Reviving. Hard Stopping or Beaumontage.Treatment of Floors. Stains. Processes of Varnishing Wood. Varnishes. Re-polishingShop Fronts.
Dynamos and Electric Motors. With 142 Engravings and Diagrams.Contents. Introduction. Siemens Dynamo. Gramme Dynamo. Manchester Dynamo-
Simplex Dynamo. Calculating the Size and Amount of Wire for Small Dynamos. Ailmentsof Small Dynamo Electric Machines: their Causes and Cures. Small Electro-Motors withou
Castings. How to Determine the Direction of Rotation of a Motor. How to Make a Shuttle.
Armature Motor. Undertype 50-Watt Dynamo. Manchester Type 440-Watt Dynamo.
Cycle Building and Repairing. With 142 Engravings and Diagrams
.
Wheel-Mating. Tyres and methods of Fixing them. Enamelling. Repairing.
Decorative Designs of All Ages for All Purposes. With277 Engravings and Diagrams.
Contents. Savage Ornament. Egyptian Ornament. Assyrian Ornament. Greek Orna-ment. Roman Ornament. Early Christian Ornament. Arabic Ornament. Celtic andScandinavian Ornaments. Mediaeval Ornament. Renascence and Modern Ornaments.Chinese Ornament. Persian Ornament. Indian Ornament. Japanese Ornament.
Mounting and Framing Pictures. With 240 Engravings, etc.
Contents. Making Picture Frames. Notes on Art Frames. Picture Frame Cramps.Making Oxford Frames. Gilding Picture Frames. Methods of Mounting Pictures. MakingPhotograph Frames. Frames covered with Plush and Cork. Hanging and Packing Pictures.
Smiths' Work. With 211 Engravings and Diagrams.Contents. Forges and Appliances. Hand Tools. Drawing Down and Upsetting. Welding
and Punching. Conditions of Work : Principles of Formation. Bending and Ring Making.Miscellaneous Examples of Forged Work. Cranks, Model Work, and Die Forging. Home-made Forges. The Manipulation of Steel at the Forge.
(Continued on next page.)
CASSELL & COMPANY, LIMITED, 7 atufg, West -&th Street, New York
Face cover 2.]

WORK" HANDBOOKS (continued'].
Glass Working by Heat and Abrasion. With 300 Engravings andDiagrams.
Contents. Appliances used in Glass Blowing. Manipulating Glass Tubing. Blowing Bu'bsand Masks. Jointing Tu!>es to Bulbs forming Thistle Funnels, etc. Blowing and EtchirgGlass l-ancy Articles : Embossing and Gilding Flat Surfaces. Utilising Broken Glass Appaia-tus : Boring Holes in, and Riveting Class. Hand-working of Telescope Specula. Turning,Chipping, and Grinding Glass. 1 lie Manufacture of Glass.
Building Model Boats. With 168 Engravings and Diagrams.Contents. -Bui ding Mo lei Yachts. Rigging and Sailing Mo lei Yachts. Making and
Fitting Simple Model Boats. Building a Model Atla itic I.iner. Vertical Engine for a ModelLaunch. Model Launch Engine with Reversing Gear. Making a Show Case for a Model Boat.
Electric Bells, Bow to Make and Fit Them. With 162 Engravingsan I Diagrams
Contents.- The Electric Current and the Laws that Govern it. Current Conductors usedin Electric-Bell Work. Wiri.ig for Electric Bells. Elaborated Systems of W.riug ; BurglarAlarms. Batteries for Electric Bells. The Construction of Electric Bells, Pushes, andSwitches. Indicators for Electric-Bell Systems.
Bamboo Work. With 177 Engravings and Diagrams.1
Contents. Bamboo : Its Sources and Uses. How to Work Bamboo. Bamboo Tables.Bamboo Chairs and Seats. Bamboo Bedroom Furniture. Bamboo Hall Racks and Stands.Bamboo Music Racks. Bamboo Cabinets and Bookcases. Bamboo Window Blinds. Miscel-laneous Articles of Bamboo. Bamboo Mail Cart.
Taxidermy. With 108 Engravings and Diagrams."Content*. Skinning Birds. Stuffing and Mounting Birds. Skinning and Stuffing Mammals."Content*. Skinning Birds. Stuffing and Mounting Birds. Skinning and Stuffing Mammals.Mounting Animals' Horned Heads : Polishing and Mounting Horns. Skinning. Stuffing, andCasting Fish. Preserving,
'
Cases for Mounting SpeciCasting Fish. Preserving, Cleaning, and Dyeing Skins. Preserving Insects, and Birds' Eggs.
es for M
Tailoring. With 180 Engravings and Diagrams.Contents. Tailors' Requisites and Methods of Stitching, Simple Repairs' and Pressing.
Relining, Repocketing, and Recollaring. How to Cut and Make Trousers How to Cut andMake Vests. Cutting and Making Lounge and Reefer Jackets. Cutting and Making Morningand Frock Coats.
TECHNICAL INSTRUCTION.Important New Series of Practical Volumes. Edited by PAUL
N. HASLUCK. With numerous Illustrations in the Text.
Each book contains about 160 pages, crown 8vo. Cloth,
fti.oo each.
Practical Staircase Joinery. With 275 Illustrations." A handy volume that cannot fail to be of great value to the young workman. The amateur
also may find many hints. It will repay perusal by anyone." Nottingham Guardian.
Practical Metal Plate Work. With 247 Illustrations." The style of the book is wonderfully true and clear, and numerous engravings and
grams help out the text." Lloyd's News.
Practical Draughtsmen's Work. With 200 Illustrations.Contents. Drawing Boards. Paper and Mounting. Draughtsmen's Instruments. Drawing
Straight Lines. Drawing Circular Lines. Elliptical Curves. Projection. Back LiningDrawings. Scale Drawings and Maps. Colouring Drawings Making a Drawing.
Festival Illuminations. Gas Fires and Cooking Stoves.
CASSELL & COMPANY, LIMITED, ^ and 9, West i%th Street, Ar<> York.

TAXIDERMYCOMPRISING THE SKINNING, STUFFING, AND
MOUNTING OF BIRDS, MAMMALS,AND FISH
WITH NUMEROUS ENGRAVINGS AND DIAGRAMS
EDITED BY
PAUL 1ST. HASLUOKEDITOR OK "WORK" AND "BUILDING WORLD,"
AUTHOR OK " HANDYBOOKS KOR HANDICRAFTS,"
BTC. ETC.
CASSELL AND COMPANY, LIMITED
LONDON, PARIS, NEW YORK < MELBOURNE
1901
ALL 1UGHTS KESEKVEIJ

PREFACE,
THIS Handbook contains, in a form convenient for
everyday use, a comprehensive digest of the know-
ledge of Taxidermy, scattered over nearly twenty
thousand columns of WORK one of the weekly
journals it is my fortune to edit and supplies con-
cise information on the general principles of the
subjects on which it treats.
In preparing for publication in book form the
mass of relevant matter contained in the volumes
of WORK, some of it necessarily had to be re-
arranged and partly re-written. However, the prin-
cipal contents of this handbook consist substantially
of illustrated articles by Mr. J. Fielding - Cottrill
originally contributed to WORK.
Headers who may desire additional information
respecting special details of the matters dealt with in
this Handbook, or instructions on kindred subjects,
should address a question to WORK, so that it maybe answered in the columns of that journal.
P. N. HASLUCK.La Belle Sauvage, London,
April, 1901.
2039954

CONTENTS.
CHAP. PAGE
I. Skinning Birds...... 9
II. Stuffing and Mounting Birds . . . .24III. Skinning and Stuffing Mammals ... 48
IV. Animals' Horned Heads : Polishing and Mount-
ing Horns .68
V. Skinning, Stuffing, and Casting Fish . . 94
VI. Preserving, Cleaning, and Dyeing Skins . . 107
VII. Preserving Insects and Birds' Eggs. . .132
VIII. Cases for Stuffed Specimens .... 149
Index 157

LIST OF ILLUSTRATIONS.
FIX1. Skinning Knife .
2. Scissors
3. Round-nose Pliers
4. Cutting Nippers.5. Side Cutters
6. Side Cutters
7. Flat-nose Pliers .
8. Bellhanger's Pliers
9. Brain-spoon and Hook10. Feather Pliers .
11 Staffing-iron
12. Stuffing-iron
13. Bodkin
14. Suspending Hook15. Chain and Hooks16. Diagram of Bird.
17. Modelled Body for Bird
18. Method of Sewing Up Bird
19. Method of Bolting Leg Wire
20. Bird Bound with Threads .
21. Bird Bound with Threads .
22. Bird, Braced and Bound23. Wiring for Soft Body of
Bird .
24. Cork Foundation for Bodyof Bird .
25. Artificial Eyes .
26. Bird's Wings Spread Out
27. Section of Bird's Head on
Screen
28. Handle for Bird Screen
29. Diagram of Screen
30. Diagram of Screen
31. Turned Base for Screen
32. Screen with Stuffed Bird
33. Measurement of Waterbuck
St. Squirrel
35. Hand of Monkey36. Bones of Animal's Hind Leg37. Artificial Hind Leg
PAOB

TAXIDERMY.
FIG. PAGE
68. Wire Shape of Fish . . 96
69. Fish embedded in Clay . 102
70. Clay - embedded Fish cov-
ered with Plaster . . 103
71. Section of Plaster Fish-
mould .... 104
72. Plaster Cast of Fish . . 105
73. Skin-stretching Frame . 108
74. Corner of Skin-stretchingFrame . . . .108
75. Shave-hook for DressingSkins . . . ,109
76. Serrated Blade of Shave.
hook . . . .109
77. Furrier's Double - edgedKnife . . . .110
78. Furrier's Single-edged Knife 110
79. Furrier's Horse or Beam . Ill
80. Sandpaper Block for Rub-
bing Skins . . .111
81, 82. Insect Envelope . . 133
83. Section of Setting Board . 135
84. Butterfly on Setting Board 135
85. Single Book Box for Insects 139
FK5. PAGE
86. Half of Double Book Boxfor Insects . . .139
87. Double Book Box for Insects 140
88. Cork Lining of Insect
Cabinet . . . .140
89. Drawers with Hinged Pillar 141
90. Body of Cabinet . . .14491. Drawer Section showing
Groove and Runner . . 144
92. Drawer with Grooved Side . 14J
93, 94. Drawer Sections show-
ing Grooves and Runners 14u
95. Screw to Prevent Drawers
Coming Out . . . 14(5
96-100. Fixing Glass in Drawers 14ti
101. Fixing Glass in Drawers . 147
102 Partitions for Egg Cabinet. 147
103. Joint for Box Case . . 150
104. Section of Case Upright . 150
10.3. Section of Bamboo Case
Upright . . . .150100. Canted Comer Case . .151
107, 108. Sections of Fish Cases
having Bent Glass Fronts 10:!

TAXIDERMY.
CHAPTER I.
SKINNING BIRDS.
TAXIDERMY has been defined as the art of preparingand preserving the skins of animals, and also of
stuffing and mounting them so as to impart to themas close a resemblance to. the living forms as possible.The art is classified easily into three broad divisions :
(1) Birds, (2) Mammals, (3) Fish ; and, as may beseen by a glance through the following pages, this
classification is adhered to in this book. Also,
taxidermy has been extended further so as to
include the preserving and setting of insects, a
subject really forming part of the science of en-
tomology ; brief instructions in this minor branch of
taxidermy are given, however, in order to make this
handbook complete. The skinning, stuffing, and
mounting of birds is the first part of the subject to
receive treatment.
Very few tools are required by the taxidermist, it
being possible to skin both birds and small mam-mals with only a penknife and a pair of scissors, andwith the further aid of a pair of pliers to stuff andset them up.
It is not, however, always well to work withmakeshift tools, and most, if not all, of the followingshould be obtained ;
but beginners are advised not
to purchase the"boxes of bird-stuffing tools," as
advertised, or they may find half of the tools useless
and the other half unnecessary.The first indispensable article is a knife (Fig. 1).
A penknife, if it is capable of holding a good edge,

io TAXIDERMY.
will answer just as well as a case of lancets and
scalpels. A good knife for the purpose is an old"skiving
"knife, used by shoemakers, and this may
be kept keen on a strop covered with two different
grades of emery-cloth ; or an oilstone may be used
instead of the strop.
r\
Fig. 1. Skinning Knife. Fig. 2. Scissors.
The next tool required is a pair of fine-pointedscissors (Fig. 2) of the kind known as
"grape scis-
sors," which are used for thinning grapes ; they have
long handles and short, straight, fine blades. It is
advisable, but not essential, to have a second and
stronger pair with blunt ends for cutting up tow,and they should be large and strong.

SKINNING BIRDS. n
Hound-nose pliers (Fig. 3) are mainly used for
fine wire, so the finer they are the better. Cuttingnippers (Fig. 4) should be large and strong, as theyare for use in cutting wire ; they can have the cut-
ting planes either in front or at the sides. Side
cutters (Figs. 5 and 6), also, are useful ; they are the
kind used for opening champagne or soda-water
3. Round-nose Pliers.
bottles. They are similar in shape to the ordinarynail nippers, but they have the jaws straight in-
stead of being curved. These are not used generally
by taxidermists, but they are almost invaluable,
serving as bone forceps for cutting legs, wings,
etc., and they will cut a muscle as well as will scis-
sors, besides being very useful for fine wires. Flat-
nose pliers (Fig. 7) are useful for heavier wires. Many

12 TAXIDERMY.
use the common shape of bellhanger's pliers (Fig. 8),
as these combine the cutting and the flat-nosed
pliers.
Fig. 4. Fig. 5.
Fig. 7.
Fix
Fig. 4, Cutting Nippers ; Figs. 5 and 6, Side Cutters ;
Fig. 7, Flat-nose Pliers; Fig. 8, Bellhanger's Pliers.
The brain-spoon and hook are used bysome, but are not really necessary. To make a

SKINNING
useful tool, file a knitting needle into a gradually
tapering point, and while hot turn it into a small
hook as shown in Fig. 9. Hammer the other endinto the approximate shape of a spoon, and thentrim it up with a file.
An appliance is required with which to put the
feathers straight, and for this purpose some use a
Fig. 9.
Brain-spoon and Hook.
Fig. 10.
Feather Plier?
pair of watchmaker's pliers with rather long jaws.But very little strength is necessary, so they may beas fine as possible, and have rather broad "noses."
Scissor pliers (Fig. 10) seem to be a perfect tool for
the purpose when the bars at the end of both jawshave been filed down. Next best to the scissor pliers
are straight or curved tweezers, G in. to 8 in. long.

14 TAXIDERMY.
The stuffing-iron is shown by Figs. 11 and 12;to
make it, hammer one end of a steel knitting needle
flat like a chisel, and file one or two nicks in the
flattened part; then fit it into a handle.
Two shoemaker's awls should be obtained, one
Fig. 12.
Fig. 13.
Figs. 11 and 12, Stuffing-iron ; Fig. 13, Bodkin.
fine and the other large ; they will come in for a lot
of useful work. One or two knitting needles will
be found useful.
A bodkin inserted into a handle is also useful;
it
can be made from a knitting needle, one end of
which is sharpened to a fine tapering point, the
other being put into a handle (see Fig. 13). A three-

SKINNING JliRDS. 15
cornered file for sharpening the wires is also re-
quired.A small sharp hook is fastened to a cord sus-
pended from a hook fixed in the ceiling. On this
hook (Fig. 14) the bird is hung whilst being
skinned, and thus the left hand of the operator is at
liberty to keep the feathers away from the flesh.
Some use instead a chain and hooks, as shown by
Fig. 15.
With the tools enumerated above any bird can be
Fig. 14.
Fig:. 15.
Fig1
. 14, Suspending Hook; Fig1
. 15, Chain and Hook?.
stuffed, or, with the addition of a large stuffing-iron,
any animal at least up to a wolf, and but few
beginners will venture beyond this. Other requi-sites are a packet of pins, a reel of cotton, a needle
(the ordinary kind will do, though many use the
triangular-pointed glover's needle), some tow, a
little cotton-wool, and some plaster-of-paris. This
plaster is extremely useful, and should always bewithin reach. Instead of tow, a kind of fine shav-
ing, known as wood-wool, is coming into use as a
stuffing material.
The taxidermist will require some kind of pre-servative. Those mentioned below are considered
1 6 TAXIDERMY.
specially suitable for birds, but in a later chaptersome additional recipes may be given for use in
stuffing mammals.The preservative is put on to dry the skins, and
during this drying the fibres naturally contract,
drawing up the skin in every direction. To counter-
act this, it is usual to place inside the skin a false
body of tow or wool.
The preservative used by most taxidermists is the
arsenical soap invented by Becoeur in 1770, or a
modification of it. Its composition is camphor,5 oz. ; white arsenic, 2 Ib. ; white soap, 2 Ib. ; salts
of tartar, 2 oz. ; chalk, 4 oz. Several modifications
of this soap used by some taxidermists are givenbelow :
(1) Corrosive sublimate, \ oz. ; arsenic, \ oz. ;
spirit of wine, 4 drams ; camphor, -i- oz.;white soap,
6 oz.
(2) Arsenic, 1 oz.; white soap, 1 oz.
;carbonate
potash, 1 dram ; water, 6 drams; camphor, 2 drams.
(3) White soap, 4 Ib.; arsenic, 1 Ib. ; camphor.
1 oz.
Most taxidermists have their own special recipe,
but the above are sufficient to show the proportionsin general use.
Preservatives are made something after this
manner. The soap is cut up into a vessel containingwater placed over or near a fire and left to dissolve.
When cooked, and while still hot, the arsenic in
all cases in the form of powder is gradually stirred
in, as are the chalk, tartar, sublimate, etc. Do not
hold the head over the pan, because disagreeablefumes are given off. The camphor, in all cases, is
best dissolved in spirit of wine separately and addedto the cooling, but not yet cold, mixture, stirring
briskly all the time. Label the mixture " DEADLYPOISON," and be careful in using it. It should be of
the same consistency as thick dairy cream, and a
small brush should be kept solely for use with it. If

SKINNING BIRDS. 17
too dry, dilute it with warm water. Arsenical soapis good in its way, but is very dangerous to use, andthe taxidermist cannot be too careful with it.
Do not be persuaded to use a powder compoundedwith arsenic, or injury to the skin of the hands will
result.
Browne's non-poisonous preservative is perhapsthe most popular preserving soap, and consists of
whiting Ij lb., white curd soap ^ Ib.; chloride of lime
i oz., tincture of musk oz., and water 1 pt. Toprepare it, cut the soap into thin pieces, and boil
it with the whiting and water. The boiling is simplyto dissolve the soap, and when that is done, and the
whiting mixed in, it should be removed from the
fire. The longer it is boiled, the more water is re-
quired. When it attains the consistence of thick
cream, take it off the fire, and stir in the chloride,but keep the head away, because of the disagreeablefumes which arise. When cold, add the musk,which is used mainly to hide the objectionable smell.
Tincture of musk can be replaced by tincture of cam-
phor, made by dissolving camphor in spirit of wine,
though it is much less permanent. Be careful to
add the tincture to the mixture when cold, or muchof its strength will be lost. The mixture is perhapseasier made by slightly increasing the amount of
water, though it is better to make it thick and thenfor use thin it with methylated spirit. If placed in
small jars, securely fastened down, this preservativewill keep for an indefinite time. Of course, if it getstoo dry it may be diluted with water. It is superiorto any of the arsenical soaps, and is cheap, non-
poisonous, and has a pleasant smell. So cheap is it,
that it works out at less than a farthing for a starling
or blackbird ; by using the tincture of camphor in-
stead of musk it is a little cheaper but not so good.This preservative is painted on the inside of the
skins, then the"stuffing
"is done
;thus the pre-
servative is left on for all time. Of course, the pre-

1 8 TAXIDERMY.
servative applies to the skin alone, the hair or
feathers not requiring such treatment.
Having the tools, plaster-of-paris, tow, cotton-
wool, needle and cotton, preservative, etc., within
reach of the hands, a beginning can be made at
skinning the bird, which by preference should be a
starling, because it is of medium size and its skin
is tough.
Spread a piece of paper upon the table and uponthis place the bird, with its head pointing towardsthe operator. See that the mouth is well filled with
wadding to prevent anything running out and stain-
ing the feathers. Then pass a needle and cotton
through the nostrils and tie the mandibles together ;
this is very important with white-fronted birds, andalso with woodpeckers ; but, though not quite so
imperative with a starling, it had better be donein all cases.
Now break the bones of the wing as close to the
body as possible (see Fig. 16, D D). In cases wherethe fingers or pliers are not able to do this, the wingshould be struck a smart blow with a piece of wood
(a round heavy ruler will do), the bird being held
with the wing resting against the edge of the table.
With the fingers and the point of the knife carefully
separate the feathers along the breast, leaving the
skin bare. Cut the skin along the full length of the
breast, cutting towards the tail, as shown at A B
(Fig. 16). Having done this, carefully lift up oneside of the shining edges of the skin and proceed to
separate the skin from the flesh by pushing, cutting,
or anything but pulling, and in doing this keep the
edge of the knife upon the flesh. Take time over this
or the skin may easily be stretched out of all pro-
portion. Continually sprinkle plaster-of-paris uponthe bare flesh to prevent the feathers getting soiled,
and frequently dip the fingers in the powderedplaster for the same prnpose. Having gone as far
as possible on the one side, turn and repeat with

BIRDS* 19
the other. With a little care the neck may now be
exposed, and with the aid of the side cutters (Fig. 5,
p. 12), it must be cut off as near the body as possible,
as shown at c, Fig. 16. Use plenty of plaster now.The cutting away of the neck considerably frees the
shoulders, and it will now, no doubt, be possible to
work to the wing sufficiently to cut it off (see D),
Here, again, the side cutters can be used ; in fact>
no difficulty will be met with in cutting through the
16. Diagram of Bird.
largest bird's wing with them, though in the presentcase the scissors will be quite sufficient. Cut off the
other wing,and suspend the bird by the hanging-hook(Fig. 14, p. 15). With great care release the skin fromthe back, using the left hand to keep the feathers
away from the flesh. Sprinkle on plenty of plaster.
The legs will soon be reached. Seize the foot with
the right hand and push upwards, at the same time
pushing the skin down with the left hand. Daylightis now seen between the flesh and the skin. Slip

20 TAXIDERMY.
in the scissors and cut the leg at the joint (see E E,
Fig. 16). Repeat with the other leg and proceed with
the skinning, but be careful, as the skin along the
back is very thin. The two oval-shaped bodies seen
presently are the oil glands on the tail (the"parson's
nose " known to the cook). The bone should be care-
fully cut through with the side cutters or scissors
(see F, Fig. 16). Skin upwards, instead of downwards,as the corner is being turned now to get to the vent.
Careful work here will quickly leave the skin hang-
ing by the lower part of the bowel, which, being cut
through with the scissors, releases the whole skin.
Take the body off the hook, but do not throw it
away yet. Then fasten the hook into the neck,
and, with the fingers only, proceed to ease, not by
any means pull the skin from the neck. A little care
is wanted when the head is reached. Still the skin
slides off easily until a whitish piece of skin appearson each side (H, Fig. 16). These pieces are the ears,
and the skin must come out entirely. This is mucheasier done by putting the awl under and lifting up ;
take care that the awl goes under the bottom skin.
If done properly, the skin of the ear will stand out
like a little pocket until the air is pressed out of it.
Now carefully work on until progress is stopped
again by a darker part on each side. These are the
eyes (i, Fig. 16), and with the knife cut towards the
flesh very gently. An almost transparent skin near
the eye now is cut through, and the skin is found to
hang only by the corner nearest the beak. Now cut off
the neck at the base of the skull (G, Fig. 16). Laydown the skin, take out the wadding from the mouth,and lift out each eye with the awl. Next remove the
tongue by placing the knife under it and the thumbover it, then pull steadily. Now enlarge the openingat the back of the skull, cutting more towards the
mouth ;in fact, none of the top of the skull should
be removed. Now, with the point of the knife or
the brain-spoon, scoop out the brains. Then care-

SKINNING BIRDS. 21
fully scrape and cut away all the little pieces of flesh
which will be found at the bottom of the orbits and
along the sides of the head.
The legs and wings now require cleaning and free-
ing from flesh. It is immaterial which are donefirst. The skin of the legs is easily turned back to
as far as the feathers go, and, by cutting the tendonsat the
" knee "joint, the whole of the flesh may be
removed in one piece. Now paint the bone and theskin with preservative. Wrap some fine tow roundthe bone till it is about equal to the real leg, andthen draw the skin back. Repeat on the other side.
To clear the tail it is necessary to take away the oil
glands, but much care will be required to preventcutting the tail feathers, in which case they will fall
out and cannot be replaced.Now turn to the wings. By holding the bone in
one hand the joint is soon reached, and no difficulty
is found in passing this joint. Here there are twobones enclosing a small oval piece of flesh. As the
wing feathers are attached to the larger of these
bones, it cannot well be skinned, so the flesh is
removed by using the point of the knife and cutting
away the flesh in little pieces. In larger birds the
wing is opened on the underside, all flesh removed,well painted with preservative, the space refilled
with tow, and then neatly sewn up. Tie a piece of
thread through this opening to the larger bone, andleave one end long. Then repeat with the other
wing.
Any lines of fat on the skin are now removed byscraping, not cutting. The head, its skin, and the
skin of the neck are well anointed with preservative,the skull filled with cut tow, the orbits with cotton-
wool, and the skin turned back again. This is rather
difficult to describe, as well as to perform. A cer-
tain amount of knack is necessary in this. Place the
thumb at the back of the skull and push, at the sametime drawing the skin over by a kind of scratching

22 TAXIDERMY.
motion. When once it starts to slide, all will goright. Anoint the wing-bones and the skin with
preservative and pull them right. Do the samewith the tail. By this time the whole skin is rightside out, and the head, neck, wings, legs, and tail
have been covered with preservative, but the bodypart has been neglected ; therefore, carefully paintall this part, the left hand keeping the feathers from
being injured. Put right the feathers on the head
by using the knitting needle ; place this in the eye,
carefully pass it between the skin and the skull, and
gently draw it along the inside of the skin of the
head, etc., scratching it, as it were, with the end.
The wings must now be tied together by the
threads which were left for this purpose. Measurethe distance across the back of the real body, andleave the wings that distance only apart.
Many taxidermists work upwards instead of
downwards. They cut an opening from the breast
to the vent, release the legs, then the tail, and workround to the wings. A free course is thus gained to
the skull, where the separating cut is made, leavingthe body and neck in one piece.
Many white-fronted birds are quite spoilt bybeing opened down the breast, for sooner or later
the fat is drawn from the interior by capillary attrac-
tion through the thread used in sewing up, andmakes its presence shown by an ugly line of rusty
brown, lying in relief against the snow-white feathers
of the breast. Even after removing, with much care,
patience, and trouble, the disfiguring line it will
reappear over and over again, and it is hopeless to
try to prevent it. For this reason white birds should
be opened on the back, where there are plenty of
feathers to conceal the cut, and the breast will beleft uninjured. Make a cut from the neck to above
the legs. Separate the wings and then the neck. Nowhang the bird by the hook and continue to the legs ;
separate at the tail. Be careful over the breast, as

SKINNING BIRDS. 23
if the skin is stretched at all the feathers will separatein a straight line, forming a very disfiguring parting.Another method is to skin from under the wing, a
cut being made reaching from under the wing to over
the leg. The wing is separated, and the bird is sus-
pended and finished as usual.
Some birds have heads larger than their necks,
the skin refusing to pass over the head. Amongthese are ducks, geese, swans, some grebes, and
woodpeckers. With these skin as far up the neck as
possible, cut off the neck, and turn the skin rightside out. Cut the skin on the side of the face to
about as far as the remnant of the neck. The skull
is next skinned through this opening, cleaned,
anointed with preservative, stuffed, and returned.
When carefully sewn up, a cursory glance should not
ascertain that the side has been touched. If the
bird is crested, the cut may well be made by the side
of the crest.
In skinning; owls, take great care with the head
and tail. The skin is little thicker than tissue paper,and any carelessness might cause injury. Thereare many little points to be observed in the skinningand mounting of owls. For instance, the orifices of
the ears are very large, and if they be skinned some
difficulty will be found in disposing of this skin.
If the skinning be continued to the beak, the charac-
ter of the face will be lost. The best plan is to skin
up to the ears, and leave this part alone as it is ;
then skin on the top of the head and the eye. Withthe largest awl, lift out the eye between the boneand the skin. If this is not understood, the tongueand the greater part of the bottom of the skull (form-
ing the palate) may be cut out, the brain removed,and the eyes taken out from this position with ease.
The full expression is left, and owls skinned in this
way will be very lifelike. A dirty and inferior planis to skin down to the beak and gouge out the con-
tents of_the eye, leaving the cup of the eye still in its place.

CHAPTER IT.
STUFFING AND MOUNTING BIRDS.
IF a bird skin has been kept unstuffed for a longwhile, it will have become stiff, and must be softenedor relaxed before stuffing should be attempted. Forthis purpose, a relaxing box is necessary. This is
a wooden box with a tightly-fitting cover, the wholeof the inside of which has. been covered to the depthof 1 in. or 2 in. with plaster-of-paris mixed in the
usual way with water. This plaster, when dry, ad-
heres to the wood. Water is poured into the boxand allowed to stay until the plaster has absorbed
as much as it can. The rest is poured away, and the
box is ready for use. Place the skin in the box andallow to remain until the feet and wings can be
opened and closed. The time varies with the size
of the birds, humming-birds taking a day or less,
while the eagle may require four days or more. All
the stuffing must be removed and the inside of the
skin well scraped to stretch the fibres;the legs of
some birds require a drill, needle, or pricker forced
up to make a passage for the supporting wires.
Everything must be in readiness before the skin is
taken from the box, and the work finished without
delay, as relaxed skins dry quickly. In place of the
relaxing box an earthen pan half filled with dampsand may be used. Wrap each skin in a clean ragand place it on the damp sand ; then cover with
more damp sand, cover the whole with a damp cloth,
and place in a shady place. In the course of, say,
two or three days remove the top sand and examinethe skins. If the feet and wings can be spread out
by gently working them, they are ready for stuffing ;
if not, the skins are again covered and placed awayfor another day or two. Practical taxidermists fre-

STUFFING AND MOUNTING THIRDS. 25
quently pour warm water into the skin, or some-times immerse the whole of the skin in water, cover-
ing the feathers afterwards with plaster. The skins
of both birds and squirrels are certainly much easier
and better mounted fresh. Relaxed skins dry veryquickly, and many have a wooden and unnatural
appearance when stuffed.
There are many ways of stuffing birds, and manyways of wiring them. Waterton perfected a neat buttroublesome method of setting up birds without
using wires, but this is hardly a practical method.A good working method consists in modelling a firm
body of tow. A piece of wire about twice as longas the bird has one end filed to a sharp point ; if for
a large bird it is left with a bayonet-shaped or tri-
angular point, so that each edge will cut. The other
end may or may not be pointed. Now commenceat about 1 in. from the blunt end to wrap some towround it until it approaches in size to the real body.This end of the wire must now be hooked andturned back into the tow
;then by pulling at the
other end, it will be firmly locked (see Fig. 17).
Measure carefully in every direction, bindingon more tow with cotton where wanted,and if there are any hollows difficult to beformed a long darning needle may be usedto sew through and through. Continue this
binding on and stitching through till the body is
an exact facsimile of the original. Practically this
takes but a few minutes to do. The only variation
which can be allowed is that the artificial body maybe a shade smaller than the real one, for then it is
easy by means of the stuffing-iron to stuff in moretow. cut up into small pieces. If, however, it be
only a little larger the result will be anything but
pleasing. If the breast be too wide the feathers will
never sit right, and in many birds an ugly partingwill be shown all down the breast, while the wingswill not lie properly. Having done this, two wires,

26 TAXIDERMY.
at least a size larger than the body wire, and abouttwice as long as the leg, must be cut. These require
pointing with the file, and are then to be entered in
at the ball of the foot and gradually pushed up. Becareful how the
" knee "joint (really the heel) is
passed ; push it on through the artificial leg already
Fig-. 17. Modelled Body for Bird.
made. Repeat with the other leg. In practice, it
will be found better to leave this artificial leg until
the wire is in, and then wrap the tow round bothwire and bone.
The wings are already tied together at the original
distance, and nothing more is required here. Thehead, too, is already stuffed with tow, and the orbits
STUFFING AND MOUNTING BIRDS, 27
with cotton-wool ;but be careful that the cotton-
wool is confined to the orbits, for, though a pointedwire will readily pass through tow, if only a little
cotton-wool be present the wire will not pass.
Now gently pass some pieces of tow up the neck,
using the feather pliers (Fig. 10, p. 13), making sure
that they rest well against the base of the skull;
one piece may be forced into the skull and another
into the mouth, so that they form a connection be-
tween the head and neck. The only thing to guardagainst here is making the neck too long. In some
positions the artificial neck is almost absent. Takethe artificial body in the hands, and gently force the
pointed wire up the neck and through the skull,
allowing the point to come out of the centre, level
with the middle of the eyes, but rather further back.
Now gradually pull the skin over, using more persua-sion than force. It may, perhaps, make matters
somewhat easier if the neck wire be bent at right
angles before putting the artificial body into the skin,
and then to straighten it again.
Having placed the body in nicely, the next thingis bolting the leg wires. To do this, the foot mustbe taken in the left hand and lifted up. Then the
wire is taken in the right hand and forced throughthe body for some distance, the skin being pusheddownwards out of the way. With the round-nose
pliers (Fig. 3, p. 11) the pointed end is bent at
right angles, and then bent again so that the
point enters the body. A strong, steady pull is
now given to this wire, the body being held firmlywith the left hand, until the whole of the
returning piece is fixed tightly. A reference
to Fig. 17, p. 26, should make this clear.
Now lift up the bird by this leg and see if
all is firm. There should not be the slightest signof a shake. Nothing more must be done until this
is quite firm. Now attend to the other leg, and againtest it. Lift up the skin into place again, and pro-
28 TAXIDERMY.
ceed with the finishing. The legs must be bent
downwards and forwards. In many stuffed birds it
will be seen that the legs are too far back. This is
a very great, but a very common, fault. The op-
posite fault, having the legs too far forward, is very
rarely seen, and beginners will do well to aim for it
t first. The body should be closely examined to
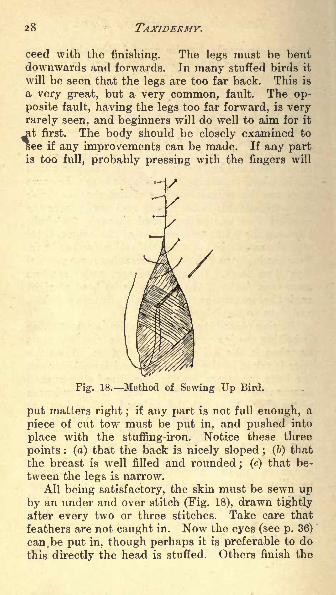
ee if any improvements can be made. If any partis too full, probably pressing with the fingers will
Fig. 18. Method of Sewing Up Bird.
put matters right ; if any parb is not full enough, a
piece of cut tow must be put in, and pushed into
place with the stuffing-iron. Notice these three
points : (a) that the back is nicely sloped ; (6) that
the breast is well filled and rounded ; (c) that be-
tween the legs is narrow.
All being satisfactory, the skin must be sewn upby an under and over stitch (Fig. 18), drawn tightly
after every two or three stitches. Take care that
feathers are not caught in. Now the eyes (see p. 36)
can.be put in, though perhaps it is preferable to do
this directly the head is stuffed. Others finish the

STUFFING AND MOUNTING BIRDS. 29
body without the eyes, and put them in when the
bird is dry.
The method of inserting the artificial eye is first
to put a small quantity of putty into the orbit andthen put in the eye, which should not be nearly as
large as the real eye, but just a shade larger thanthe iris. Now with a needle gently pull the lid over,and do not leave it till it is perfectly round.
Fig. 19. Method of Bolting Leg Wire.
also, against leaving them too staring. Dealers in
taxidermists' requisites supply a gross of artificial
eyes, assorted, for a few shillings.
Birds with white or light feathers may be stained
if putty is used in them, so this may be replaced by
pipeclay. Some do not use anything, but this is not
a wise course. Cut off the head wire, leaving a small
piece still projecting from the skull. As one end of
this wire is pointed, it comes in well to support the
tail. Push it through the butt of the tail firmly into

30 TAXIDERMY.
the body so that there will be no fear of its giving
way.Birds that have wattles will require these fleshy
lobes to be produced artificially, as the wattles will
be found to have shrunk to mere scraps of skin.
They are treated so that the original shape and colour
is restored, by adding an external compositionwax or, better, papier-mache. Apply the wax whenhot with a brush, or the papier-mache with the
fingers and a penknife. Model with awls and the
Fig. 20. Bird Bound with Threads.
knife (failing modelling tools), and then colour.
Wattles vary in colour, but usually are of some bright
tint, such as red, blue, or yellow.The bird is now ready for fixing to its stand. The
leg wires must go quite through and be firmly bolted
in (see Fig. 19). Of course, if fixed on a temporarybranch or perch, they will not be so bolted, but canbe made sufficiently secure by slightly twisting the
wire. Bend the head downwards and then upwardsto imitate nature, and the bird will look rather morelifelike. The wings now drop, and they should be

STUFFING AND MOUNTING BIRDS. 31
lifted up into their places and pinned into position
by one or more pins or pointed wires. Now, withthe feather pliers, every feather must very carefullybe coaxed into place, using only a very gentle hand
indeed, though many use a camel-hair mop or brushto assist in this work, which will require muchpatience. After all, probably a few feathers will
persist in rising, and these must be bound down,and whatever position is given to them when wet will
be retained when dry. Several pins or wires are
Fig. 21. Bird Bound with Threads.
standing part of their distance out of the wings.Another pin or two should be put into the middle of
the back and another into the breast, and then,
starting from one of these, that on the back for
preference, a piece of cotton or wool is wound in a
zigzag fashion from one to the other, pressing rather
heavier where the feathers rise, and lighter whereall appears right (see Fig. 20). Probably some
regular method of proceeding will be preferred, so
make it a rule to bind down the back first, then the
breast, etc.,or begin at the head and gradually wind
the cotton down the neck and round the body(see Fig. 21). Tapes or strips of paper may be used

32 TAXIDERMY.
instead of the cotton. No two taxidermists work
exactly the same, and one man rarely binds twobirds alike, because ifc is not always the same feathers
which require this treatment, although the upperwing-coverts will generally be found the troublesomeones.
If the tail was not attended to before the bird
was bound, it must now be seen to. A fine ento-
mological pin (see p. 136) may be forced through the
quills of the tail feathers, and the feathers may be
spread or closed upon this pin as desired. A simpler
Fig. 22. Bird Braced and Bound.
and commoner plan is to spread the tail as desired,and then pin the feathers between slips of thin card.
When dry the paper or card can be removed, and the
feathers will retain their position (see Figs. 20, 21,
and 22). This latter method is largely used uponthe wings, when they are raised or extended, as in
Fig 22. Now cut off the head wire close to the
head, for if left till the bird is dry the feathers will
be permanently ruffled.
Another plan of making a body is sometimesknown as the soft body process. In this case a loopis formed about two-thirds down the body wire,

STUFFING AND MOUNTING BIRDS. 33
both ends of which are pointed. The longer end is
pushed up into the neck and out of the skull, so
that the other end can enter the body, and then the
Fig. 23. Wiring for Soft Body of Bird.

34 TAXIDERMY.
whole is pulled backwards till the shorter end goesinto the tail, leaving the loop in the middle of the
body, where it lies upon a piece of tow reaching fromthe neck to the tail. Two other pointed wires are
pushed up the legs and fastened to the loops of the
body wire by being twisted firmly through it. Thelast wire is bent at right angles at each end, the bent
parts going into the broken wing-bones, and thus
the wings are supported. When the wings are tied,
as already described, this last wire is not used. Thebody is now stuffed by putting in pieces of tow,about 2 in. long, and pushing each into its place with
the stuffer. In this way the body is gradually
formed, but the risk of over-stuffing the bird andthe difficulty of giving it true form are so great, that
this method is rarely used now, and only by menof experience. It is illustrated by Fig 23, where Ais the body wire ; B, wing-bearers ; o, leg and bodywires joined. Sometimes a cork is used on the bodywire (as shown in Fig 24) instead of the loop, andthe other wires are bolted into this. In fact, the
variations in form of the wirework are many, but
they all have this in common that they are fastened
as firmly together as possible, so that any one wire
should be able to support the whole without allowing
any shake. It is possible to carve the body out of
peat and insert this into the skin, but this method
is not desirable, because the bird is sure to look
wooden when done, and there is no possibility of al-
teration. Besides, peat is a dirty thing to work with,
and there is a risk of introducing some injurious in-
sect or larva into the skin, which may sooner or later
destroy it. Because of this risk it is not advisable
to use peat either in stuffing or in the fitting up of
the case.
Now the stuffing of the bird is complete ;but be-
fore it can be put in a case it must be placed some-
where out of the way of dust and insects in order to
dry, which may take a fortnight or more. If put

STUFFING AND MOUNTING BIRDS. 35
in a case before it is thoroughly dry it will slowlyrot. Before the bird is put away, notice should betaken of the colour of the feet, cere (base of man-dibles), or round the eyes, for, though in the bird,now being mounted, touching up is not needed, it
must be remembered that the bright colours of somebirds disappear, and then the colours as the birds
Fig. 24. Cork Foundation for Body of Bird.
dry have to be restored with oil paint. Perhaps it
is better to paint these parts before the colours fade,as they serve as good guides which prevent mistake.
Best tube colours are used for the purpose, but in
minute quantities, and they should be thinned with
turpentine only, and applied with a small brush
thinly and evenly so as not to hide the scales or
scutellae on the legs ; the colours should not be
glossy, for a glance at a live duck or other bird will

36 TAXIDERMY.
show that the legs are not polished. Five minutes'
study of a live bird will give more instruction thancan possibly be given here
; strive to avoid conven-
tionality in colouring and mounting birds, and aimat imitating nature. Do not, on any account, copystuffed specimens, for such a course is merely to
perpetuate mistakes already committed.
Following are a few points to be observed in the
work of stuffing birds.
As regards eyes, most little birds, up to starlingsor thrushes, are very well suited with black eyes,but above that size the real iris should be matchedin colour. In buying eyes, it is far better to procureuncoloured ones, known as flints, as it is a simplematter to colour them as required. The most useful
sizes are : No. 3, finches;No. 5, blackbirds ; Nos. 8
and 9, ducks ; No. 9, crows, partridges, and jays ;
No. 11, gulls (small) and pheasants ;Nos. 12 and 13,
owls, geese, and gulls ; Nos. 13 and 14, herons andhawks
; Nos. 15 and 16, eagles and owls. Fig. 25
shows a few of the eyes that are usually employedfor birds and mammals.
The wire used in the bodies of the birds is gal-
vanised iron generally, and it will be found safer to
err on the side of stoutness, for nothing is more
annoying than to find the bird all shaking and trem-
bling when set up. The body wire is always thinner
than the leg wires. The following may be a roughguide for a commencement : No. 23, small finches
;
No. 21, large finches; No. 19, starlings ; Nos. 16 and
17, pigeons ;No. 13, crows
; No. 12, owls, ducks, andhawks ;
No. 10, herons; Nos. 7 and 8, eagles and
geese.The positions and attitudes of birds can be learnt
only from nature. It is in most cases worse than
useless to go to taxidermists and copy their work.
Good photographs and pictures by competent artists
should be relied on in preference to the work of a
taxidermist, if it is impossible to see the birds in the

STUFFING AND MOUNTING BIRDS. 37
^ -*.
Fig. 2o. Artificial Eyes.

38 TAXIDERMY.
midst of their natural surroundings. Taxidermists,other than trained and observant naturalists, should
procure some good standard work on natural history,and study the illustrations. A caged song-bird, if
carefully studied, will give all necessary information
with respect to small birds, and in the course of
half an hour will present dozens of new attitudes
which have never yet appeared in a case of stuffed
birds. Notice that the legs are not as straight as
drumsticks, but the heels are closer together thanthe feet. Five minutes spent in watching a fewducks will teach more than weeks spent in gazinginto glazed cases. Ducks walk pen-toed, that is,
with the toes turned inward. Their beaks are notso highly polished as those of some specimens in
show-cases.
A day in the country when snow is on the groundwill give an intelligent person who cares to take
measurements and make drawings of footprints more
object lessons in setting up birds correctly than
years of haphazard work. Footprints on the mudare nature's guide for the distance and position of
the feet of wading birds.
The following notes are on special subjects that
reasonably may not be supposed to come under the
ordinary notice of individuals.
Hawks seizing their prey have their wings raised;
tail spread downwards (fanlike) ; body inclined to
the prey ; head and neck also bent towards the
prey ; eyes glaring, and feathers round head raised ;
and claws extended.
Birds when flying have their wings extended ;tail
spread in a line with the body ; claws shut ; and feet
close to the breast.
Woodpeckers are best shown climbing a tree,
with the tail resting upon the bark.
Nightjars generally sit lengthways upon a branch,and not, as most birds, at right angles to it.
Gulls look most unnatural if their legs are bent

STUFFING AND MOUNTING HIRDS. 39
like those of most other birds. Only a very small
portion of the feathered part should be seen, andtheir legs should be quite straight.
When a bird is surprised or alarmed, the wing onthe side from which the alarm has come will be
slightly raised, as will that side of the drooping tail,
and the head will be turned in that direction.
The webs of ducks, gulls, etc., can be kept from
shrivelling by fitting a piece of stiff card, cut to the
exact shape, between each two toes, and then fasten-
ing it to the board by tin tacks or gimp pins.Birds in flight, as mentioned on p. 38, have their
wings extended. To extend the wings, insert a
pointed wire below the wrist joint (K, Fig. 16, p. 19),
and let it pass along the underside of this bone (reallythere are two bones together). Be careful about the
next joint. Now let it pass along the two bonesthat were met when skinning the wing ;
lift up the
wing at the angle desired, and force the wire into
the body. This will be found sufficient to supportthe wing. Several other wires may pass under the
larger feathers into the body if thought necessary,but these are only temporary, and will afterwards
be removed. The wire to support the bird will be
entered under the wing on one side, pushed right
through the bird and firmly bolted into the bodyunder the other wing. There are plenty of feathers
here to hide it. Sometimes this supporting wire is
put under the tail.
Frequently birds require cleaning in some part.
Benzoline should be used for this purpose. It should
be applied by means of cotton-wool, frequently
changed, in the same direction as the feathers lie.
When all appears clean, plenty of plaster-of-paris
should be applied, and when this is caked together,
it should be shaken off and more applied. Whenall is dry, a few taps should make the feathers spring
up ;if not, arrange them with the feather pliers.
Blood is best removed with water, followed by

40 TAXIDERMY.
benzoline and plaster. The most obstinate cases
will yield to water ; then apply turpentine, next
benzoline, and then plaster. If all is not satisfactorywhen quite dry, repeat the cleaning.
To restore the head of a bird to its original white
colour, perhaps years after it was mounted, first
well dust it with feathers and then adopt the method
just explained. Or try the following American plan :
Dissolve a piece of pipeclay the size of a walnut in
rather less than 1 pt. of warm water;well wash the
bird with a soft flannel dipped in the liquid and well
soaped with Sunlight soap. When clean, wash
again in clean water, and roll in a cloth to dry. Thenhold in front of a fire and beat briskly with a folded
towel. Do not adopt this method with a valuable
skin, but after the washing apply benzoline, then
plaster, and beat with feathers in preference to a
towel. Otherwise, the bird will probably dry rough.
Covering the birds with pure benzoline will kill
all insects, and directly it has evaporated the speci-
mens should be put in a case, where they will last
indefinitely. The benzolines of the oilshops gener-
ally contain paraffin, and this will do more harm than
good. The specimen is then enclosed till dry in a
frame covered with muslin, something like a meatsafe. This allows the air to enter freely, but keepsaway the moths. When dry the specimen should
be cased. A solution in alcohol or methylated spirit
of corrosive sublimate (bichloride of mercury) is
good both for birds and mammals, and poured over
the feathers or fur prevents further attacks of in-
sects. The spirit soon evaporates, leaving the
poison behind, and no insect will touch a specimenthus treated. To make the solution of corrosive sub-
limate, agitate this in the solvent to form a saturated
solution, and then reduce it by adding more alcohol
until a black feather dipped in and allowed to dryshows no white deposit upon its filaments. This,
poured over the specimen, will defy the attacks of

STUFFING AND MOUNTING BIRDS. 41
both insects and mildew. But it is too dangerousto be used on uncased specimens. Turpentine maybe used for animals, and if these are to be uncased,a good brushing to remove the dust, followed by a
thorough covering with turpentine, once, or at most
twice, a year, will keep them right for many years.The method of making the corrosive sublimate
solution recommended by Dr. Oliver Davie (an
American) is as follows : To make 2 qt. of the
solution place 1^ oz. of corrosive sublimate in 1 qt.
of alcohol. Allow the mixture to stand for a short
time, and then (as the alcohol does not take up all
the sublimate) pour off the liquid from that whichsettles at the bottom. Now add 1 qt. of water to
that which has been poured off, and the solution is
ready for use. The solution may be poured over
sufficient clean white sand in which the bird skin is
buried for from twelve to twenty -four hours. For
skins of animals the solution may be made somewhatstronger, and applied by pouring, it through anearthenware teapot. Smaller or larger quantities
can, of course, be made by decreasing or increasingthe ingredients. A black feather, as noted 0:1 p. 40,
may be used for testing the strength of the solu-
tion.
Stuffed birds are not, as a general rule, dyed.The less the feathers are disturbed, and the less arti-
ficial cleaning that is done, the greater will be the
gloss. The natural gloss of the feathers dependsupon the arrangement of the barbules and plumulesof the feather. During cleaning, it is impossible to
avoid unfastening the small booklets on these
plumules, and thus destroying the natural gloss of
the feather.
Instructions on mounting stuffed birds in cases,
and also on constructing the cases, are given in
Chapter VIII., pp. 149 to 156.
Specimens of apparently animated nature, pre-served and arranged mainly as ornaments by the art

42 TAXIDERMY.
of the taxidermist, take so many and such varied
forms that it would be almost impossible to
enumerate them, much less to describe them;
of
course, the usual plan is to enclose stuffed birds in
glass cases, but they lend themselves to more than
one form of ornament. One of their most tasteful
applications is in the decoration of screens. All
such screens are more or less useful as well as beingornamental ;
the one most commonly seen is the
hand screen, and this will be described first. The
Fig.' 26. Bird's Wings Spread Out.
birds most suitable for these are gulls, hooded crows,
carrion crows, owls, and hawks.
Procure one of these birds with unbroken wings
if possible and proceed to skin it by an opening on
the back, according to the instructions given in
Chapter I. Having cleaned the bones satisfactorily,
cut off the wings and tail, and fasten them tempor-
arily to a piece of wood or the back of a door by
means of pointed wires, pins, etc. Arrange them so
that they form a symmetrical pattern. Sometimes
their inner parts are made to meet all the way
down, as in Fig. 26. Fine needles or entomological

STUFFING AND MOUNTING BIRDS. 43
pins (see p. 136) passing through the webs may beused to spread the quill feathers into the form of an
oval, and card braces or binding cotton may sup-
plement these to ensure all the feathers lying downin their places.
Wiring is not absolutely necessary, though it is
a good plan to use a wire for each wing, entering it
as near the tip as possible, and letting it pass inside
the skin down through the butt. This, besides
giving more rigidity, is of assistance in fastening the
wing to its final block. The tail is also spread in a
Fig. 27. Section of Bird's Head on Screen.
similar manner. The head and breast are nowstuffed either by loose stuffing, or, preferably, bybinding tow round a piece of wire, in which has beenformed a ring, to prevent the wire drawing through.This is made sufficiently clear by the section (Fig. 27).
The wrapped end, of course, enters the skin, and the
naked end of the wire which projects from the towis forced through the skull, which necessitates its
being pointed ;or it may lie in the mouth, as shown
by the dotted line in Fig. 27, when it need not be
pointed. By means of the other end of the wire the
bird is fastened to a flat piece of wood. Bore a hole
in this wood, pass the wire through, and pull it until

44 TAXIDERMY.
the skin rests upon the board. Then bend the wire
and bolt it into the back of the wood to hold the
whole securely. Now pass a knitting needle or
pricker under the feathers resting upon the woodwhilst arranging them in Older. Bend the head side-
ways, if preferred, and, should any feathers rise,
which is rather improbable, bind cotton aroundthem. The wire projecting from the top of the headshould next be cut off, and the beak closed, after
which the work should be placed away, out of the
dust, to dry. The eyes should be inserted before the
stuffing is done ; for instructions on this and other
points, see the earlier part of this chapter. Sometaxidermists, instead of leaving the breast open,and merely resting upon the board, stitch it upafter stuffing it, but the final results are not so satis-
factory, as the outside feathers do not spread out
so well to hide the junction of the breast and wings.While the wings, etc., are drying, procure the
screen handle, which should be turned from a pieceof wood about 10 in. long and f in. square, andshould have its top left square and unturned for from1 in. to 1^ in. This square piece has a slit cut in it
for its full length to take a flat piece of wood to
which the wings, tail, and head are fastened finally,
and has two holes drilled through it, as shown byFig. 28, by means of which to secure the flat pieceor block. The block, about j in. thick, will vary in
length and breadth with the size of the bird, and
may be left rectangular, or, preferably, be cut to an
oval. Fit the handle and block together by glue and
pegs, driven through the two holes drilled for this
purpose. Then finish the handle by staining and
polishing, or enamelling, or gilding, and, when quite
dry and hard, cover it with paper to keep it clean.
Information on the points just mentioned, namely,the finishing of the woodwork, is hardly within the
scope of this book;but these subjects are treated
fully in a companion WORK handbook.

STUFFING AND MOUNTING BIRDS, 45
When the wings, etc., are quite set and dry, theyare placed upon the block attached to the handle
and secured to it by glue, wires, tacks, etc. The
wings are fastened first, and attention must be paidto their position with regard to the handle that is
Fig-. 28. Handle for Bird Screen.
to say, if one forms an angle with the handle the
other must form a similar angle.
Glue the tail, place it upon the wings, and secure
with wires, pins, or tacks, the feathers thus radiating
30.
Diagram of Screen.
round the bottom of the wings. The breast, etc.,
is glued upon these, and the head wire, which is
passed through the block, pulled well home andbolted securely into the back of the block. Overthe back of the block glue silk, satin, 'or velvet, in
order to hide the wires and to provide a finish; but

46 TAXIDERMY.
a much better plan is to cut an oval piece of thin
wood or card and upon it place two thicknesses of
cotton-wool. This is then covered with silk, etc.,
Fig. 31. Turned Base for Screen.
the edges of which are pulled over and fixed down.The block is covered with glue, the prepared back
Fig. 32. Screen with Stuffed Bird.
placed upon it, and an ornamental brass pin as used
in upholstery forced through the silk, wadding, andboard into the block, thus pressing the wadding

STUFFING AND MOUNTING BIRDS. 47
down in the centre and making the padding ap-
parent. In Figs. 29 and 30, A A represent the wings,B B denote the tail, c the position of the breast, Dthe block, E E the padded back, F the fancy brass
pin, and G the handle.
Larger birds, such as herons and large gulls, maybe treated in a similar manner, but, instead of beingfixed to a handle, may be provided at the back withtwo wires, by means of which they are hung to the
bars of an unused fire-grate in summer, thus forminga much more effective grate screen than the commonpictorial card or paper screens.
For a useful as well as an ornamental fire-screen,the back may be of polished wood, upon which is
fixed a fancy brass ring, to enable it to be moved upor down a turned and polished upright rod risingfrom a turned base (Fig. 31), or from carved legs
(Fig. 32). The latter figure shows the fire-screen
complete.Other screens are sometimes seen resembling
cases with glass fronts and backs, and filled with
brightly-coloured foreign birds. These may be madeto slide along a rod at each side, and may be fixedat any height by thumbscrews, or they may have fixedfeet provided with casters. Bamboo does admirablyfor these cases, the bright markings of the bambooharmonising well with the brilliant colours of thebirds. A handle is usually fixed at the top of the
screens, by which they can be moved as required.

CHAPTER III.
SKINNING AND STUFFING MAMMALS.
HAVING followed the directions given in the previous
chapters on skinning, stuffing, and mounting birds,
slightly more difficult work may be attempted,
namely, the setting up of mammals. The tools for
this purpose are the same as those mentioned on
pp. 9-15 for the treatment of birds. In fact, with
the addition of a larger stuffing-iron (see Figs. 11 and
12, p. 14), made from a broken fencing foil, or from
boxwood, about 18 in. or 2 ft. long, the tools used
in skinning and mounting a humming-bird answer
equally well with a wolf or a larger mammal.The preservatives recommended for birds (pp.
16 and 17) will also be found quite as applicable to
mammals as large as a cat;but beyond this, some-
thing of a rather different character may well be
used. The best composition is simply a mixture of
4 parts of powdered burnt alum with 1 part of pow-dered saltpetre. The experience of years guaranteesthis to give complete satisfaction, being thoroughlyeffective in its action and harmless to the user.
Many taxidermists still use nothing but powderedalum (known as
"hards "), but alum readily absorbs
moisture and becomes liquid ; therefore, if the speci-men on which it has been used is placed in a dampsituation, it naturally follows that the alum, owingto its affinity for water, will soon render the specimendamp, and thus quickly destroy its beauty.
Ordinary table salt is used, either alone or mixedwith alum, by some foreign taxidermists, especiallyAmericans. Carbolic acid may be used with goodresults, but for all-round excellence nothing can
equal the mixture of burnt alum and saltpetre.

AND STUFFING MAMMALS. 49
Probably the first attempt will be made uponsome small and easily obtained mammal, and for
this reason the squirrel will be taken as an example.Having the tools well within reach, the first thingis to take measurements. It is easy to stretch a
fresh skin, during the process of stuffing, out of all
proportion and resemblance, and therefore the
Pig. 33. Measurement of Waterbuck.
measurements must on no account be omitted. It
is not necessary to make the full series of measure-ments on a squirrel, so, for future reference, the
measurement of a waterbuck (Fig. 33) will be con-
sidered. The measurements are : 1. Head to tail,
made by a tape measure close to the skin. 2. Heightat shoulders, most easily made by a straight rule.
3. Height at back legs, made by a straight rule.

50 TAXIDERMY.
4. Length of neck, from ear to collar, made by tapemeasure. 5. Length of body, from chest to rump.6. Femur to humerus. 7. Femur to rump. 8. Cir-
cumference of neck, near the head. 9. Circum-ference of neck, near the chest. 10. Circumferenceof body near the fore legs. 11. Circumference of
body, near the hind legs. 12. Humerus to humerus,over the back. 13, 14, 15. Circumference of fore
legs. 16, 17, 18. Circumference of hind legs. Thedistance from ear to ear must also be taken.
The circumference of the head should be taken
in several places, also the distance between the fore
legs and between the hind legs. Any particularcurves desired may easily be obtained by bendingthin strips of lead along the mammal before skinning,and applying these to the outside of the specimenas the stuffing is progressing.
It will be found a good plan to make a roughsketch of the animal, and insert these measurements,
placing below any remarks, notes, etc. Then, if
necessary, the skin may be put away and stuffed
accurately years afterwards. Of use, also, in mount-
ing the specimen is a photograph of the animal be-
fore skinning, and, if possible, whilst it was alive;
this, of course, is not always convenient.
In the case of the squirrel,* it may be sufficient
to measure : 1. From the nose to the tail. 2. Lengthof the tail. 3. Circumference of the body.
The skinning now may be commenced. A pieceof paper is spread upon the table, and upon this the
squirrel is placed, belly upwards, with its head to-
wards the skinner. Enter the point of the knife
between the fore legs, and cut in a straight line to
near the vent. The dotted line in Fig. 34 shows the
cut. Be careful when past the ribs that the knife
does not cut through the thin walls of the abdomen,or the bowels will protrude and cause trouble. Pro-
ceed to separate the skin on each side, and be careful
about pulling for fear of stretching the skin, keeping
SKINNING AND STUFFING MAMMALS. 51
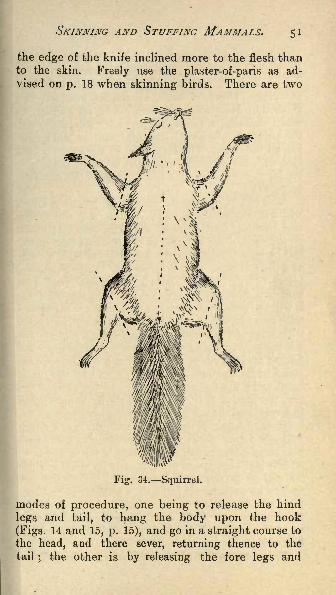
the edge of the knife inclined more to the flesh thanto the skin. Freely use the plaster-of-paris as ad-
vised on p. 18 when skinning birds. There are two
Fig. 34. Squirrel.
modes of procedure, one being to release the hind
legs and tail, to hang the body upon the hook
(Figs. 14 and 15, p. 15), and go in a straight course to
the head, and there sever, returning thence to the
tail; the other is by releasing the fore legs and
52 TAXIDERMY.
cutting through the neck, to suspend the body fromthe shoulder, etc.
,and then skin downwards, return-
ing to the neck and skinning to the head, and then
severing. There is little to choose between the
methods. Remember, there must be no pulling, as
when skinning a rabbit for culinary purposes, butthe knife must be used constantly, cutting and scrap-
ing all the time. The legs must be cut at the joints
(see Fig. 34) either by using the point of the knife,
or, far more easily, by the side cutters (Figs. 5 and
6, p. 12).
The tail in most small mammals can be skinnedwithout cutting the skin by holding one end firmlyand pushing (not pulling) the skin completely off.
In the case of the squirrel, if the thickest part of the
tail be held firmly with the flat pliers (Fig. 7, p. 12),
and the following part be placed in the bellhangers'
pliers (Fig. 8, p. 12), which are closed with justsufficient firmness to prevent the skin doubling in,
it will be found that when the two tools are separatedwith some force the tail will slide quite out to the tip
without turning the skin. The bell-hangers' pliers are
a great convenience here, but not a necessity, as the
fingers and thumb of the right hand will answer in-
stead,while the butt of the tail is held by the other
hand or by the flat-nosed pliers. In the case of the
fox, the butt of the tail is best held by being placedin a vice, and then, by encircling the next part by the
hollows of a pair of carpenters' nail pincers, a sharp
pull or a series of jerks with these pincers will cause
it to slide. Or the tail may be held between the door
and its jamb instead of the vice, and be made to slide
by holding the next part between the thumb and two
fingers of both hands, and then pulling or jerking.
It is only necessary to see that the skin does not
turn inside out. Still, it is trying to some fingers,
as at times the tail holds firmly and some strengthis required.
It is necessary to free the limbs and head from

SKINNING AND STUFFING MAMMALS, 53
flesh. Starting, then, to skin the skull, very little
progress will be made before two gristly or cartilag-
inous bodies will be met with, one on each side.
These are the ears, and should be freed by cuttinginto the flesh towards the bone. By carefully cuttingall round, about J in. more progress is made whentwo more stoppages are met with, one on each side
again. These are the eyes, and the greatest care
must be taken now. The cuts must be very minuteand the hand very light. Very soon the skin ap-
pears almost transparent, and the dark eye is seenbeneath. This skin should be carefully cut through,
keeping close to the eye. Now the most difficult
part is reached. The lips, upper and lower, mustbe skinned quite to their very edges. This is a
tedious affair, for the cuts must be by hair-breadths
only at a time. This is called"pocketing
" the
lips. It may simplify matters to cut through the
cartilage of the nose down to the bone, as then
more freedom is gained in pocketing the lips and
skinning the nose. Much care must be taken, for
the skin of the nose is extremely thin, and is the
worst place possible for a slip to be made. If the
hand holding the skin has the forefinger inside and
against the lips, the cuts can be much better di-
rected. Doubtless, before reaching quite so far,
several small oval-shaped bodies will be met with
on the sides of the upper lip. These are the roots
of the whiskers, and, if the cuts are carelessly made,and these roots cut through, the whiskers will fall
out and cannot easily be replaced. However,assuming that the lip has been skinned quite to the
edge, and the cartilage of the nose separated fromthe skin, the next thing is to pocket the lower lip.
This is more difficult in a squirrel because the place
is so confined ;but by proceeding slowly, by minute
cuts, and feeling and directing with the finger in-
side the skin, it is quite possible to get quite to the
edge. The result of not separating the cartilage

54 TAXIDERMY.
of the nose from the skin, or only partially doingso, will be shown by an unsightly shrivelling whenthe squirrel dries, instead of the plumpness andfulness seen in a live squirrel's nose.
The head is now quite skinned and requires
cleaning, but measurements must again be madebefore the flesh is removed. Measure the circum-
ference in several places, notice where the swellingof the cheeks begins, the gradual slope towards the
eyes, and the shape of the cheeks not bulging outlike half apples. Having made a rough sketch and
put in the measurements and anything else noticed,the flesh should now be all removed. The tongueand neighbouring flesh is quickly removed in one
piece by a cut along each side of the lower jaw, and
quite close to the bone. If this were a fox's tongue,or the tongue of an animal to be represented with
open mouth, it might be required for subsequentoperations, such as casting from it, or modellingfrom it, etc., and would therefore have to be savedfor a time, probably in salt and water, or by cover-
ing it with plenty of the preservative. On the topof many skulls is a ridge of bone, on each side of
which is a thick pad of flesh. By starting at this
ridge and keeping close to the bone it is possible to
remove -most of this in one piece. The eyes are
readily removed with the awl or with the brain-
spoon- (Fig. 9, p. 13). Beneath the eye is a bonyridge, and below this the fleshy pad forming the
cheek. By cutting with the point of the knife alongthis ridge quite to the lower jaw and then com-
mencing at the lower edge of the jawbone, most of
the cheek comes away in one piece. Now the topof the palate must be removed, for between this andthe skull lie the brains. In the squii'rel the knife or
scissors will do this, but in a larger animal a small
saw or a hatchet, or at least a chisel and a mallet,will be called into play. The brains are now easily
removed, very probably almost unbroken. There
SKINNING AND STUFFING MAMMALS. 55
still remain some small pieces of flesh, which these
cuts have missed, and every bit that is possiblemust come away. The cleaner fche skull is the
better the finish will be. Now the fore legs must be
freed from flesh. No difficulty will be met with in
skinning quite down past the wrist until the toes
are seen. Nothing will be gained by going anyfarther, but in the case of a dog or fox further workwould be required as described subsequently.There is but little flesh about the wrist, so nothingneed be done here, but about the two upper bones
(ulna and radius, corresponding to the part of the
human arms between the wrist and elbow) somemasses of flesh will be seen, and these can all beremoved by two or three cuts. Repeat with all the
legs, and now give all, both skin and bone, a dress-
ing with the preservative. Do not neglect the in-
side of the skull nor the tail, using the knitting
needle, a piece of wire, or some similar thing to getthe preservative well down.
The squirrel is now ready for stuffing. Before,
however, describing this process there are several
things necessary to be noticed, which may now bementioned.
Most of the carnivora (flesh- eating animals) giveout a rather strong effluvium when their bodies are
disturbed, and for this reason it is always the better
plan to plug up the orifices (throat, nostrils, vent,
etc.) of the animal with cotton-wool before skinning.This is especially the case with the weasel family
(weasels, stoats, polecats, ferrets, etc.), becausenear the root of the tails of the members of this
family are yellowish glands for the secretion of a
most pungent fluid, the disgusting odour of whichwill cling to the room for a long while if this simpleprecaution be neglected and the knife should hap-pen to pierce them.
Insectivora (insect- and fruit-eating animals) and
graminivora (grass-eating animals) decompose more
56 TAXIDERMY.
quickly than carnivora, and this is shown by theskin along the abdomen turning green and the hairor fur
"slipping
" or coming away in large quanti-ties.
When skinning, keep as much as possible of theflesh and fat upon the body, and as little as possibleupon the skin, or in subsequently removing thesethe skin may be stretched
; but guard against cut-
ting the skin.
Males and pouched animals should be opened onthe side of the organ if it is necessary to retain thesecharacteristics.
As regards the feet of dogs and foxes, it will befound almost impossible to skin the leg and foot to
the toes from the inside. Therefore, upon reachingthe wrist from the inside a stop must be made, andthe bone cleaned and preserved. Then the skin is
returned to its original position, and a cut madefrom the outside, beginning at the back of the wrist
and going across the pad, the inside of which will
be found to be a mass of firm fat. This must all becut away, and with a little care the knife can easilybe made to pass almost to the tips of the toes and
upwards to the wrist. Although little flesh may be
removed, this separation must not be omitted nordone carelessly, or the part neglected will eventu-
ally shrivel. The skin and bones are then well
dressed with preservative, and the removed fat,
etc., are replaced with chopped tow, or with clay or
putty. When neatly sewn up with strong thread,close inspection should not be able to ascertain that
it has been opened.
Monkeys are difficult subjects, for the hands andfeet must be opened on the undersides, as shown
by dotted lines in Fig. 35. They are then skinned
quite to the tips of their fingers and toes throughthese cuts, and all the flesh noticed must be care-
fully removed. Their bodies are best opened alongthe back, because most of the hair lies there, and

SKINNING AND STUFFING MAMMALS. 57
also because their front is generally made the show-
piece of the specimen.
Having turned the skin to its normal position, byreturning the legs and head into their skins, the
flesh which has been taken away must be replaced
by tow. Here again many methods are in vogue.The usual plan is to place putty or clay into the
pockets of the lips, and then with the stuffing-iron
to'force pieces of tow up into the skull, by the sides
Fig. 35. Hand of Monkey.
of the face and into the mouth, modelling this into
shape as well as possible. This method, howevercommon it may be, must be strongly condemned,for it is impossible to make a really artistic piece of
work thus. If the modelling appears perfect at one
time, during the subsequent drying a certain amountof shrinkage must take place, and this, to an observ-
ant naturalist, is at once apparent by the unequalappearance of the two sides of the face. Themethod which can be recommended on all groundsis to replace the flesh of the head with an unyieldingsubstance such as plaster of-paris, stuffing the rest

58 TAXIDERMY.
of the body with tow. In the larger animals it is
the practice of the best workmen to form a frame-work of wood and iron, and on this skeleton to makea body of tow, wood-wool, etc., then over this bodyto place a layer of clay, plaster, pulped paper, or amixture of the three, and in this to carefully modelthe various superficial muscles. When this model,or manikin, is complete, the skin is stretched overand finished by sewing, nailing, etc.
It may be advantageous to return to the squirrelrather more in detail. An excellent method of
treating the head, large or small, is the following :
In the orbits and the places where large masses of
flesh have been taken away, pieces of tow for small
mammals, or of peat (treated with corrosive sub-
limate to kill insects) carved roughly into shape,for larger ones, are fixed, being kept in place bythread, string, or wire. Some tow, in long pieces,is forced into the hollow of the skull, and made equalin diameter to the neck. Some more is now wrappedround this, special attention being paid to the junc-tion of the head and neck. This artificial neckserves to hold the head, in the case of the squirrel,
during the next process. Some plaster-of-paris is
now prepared by sprinkling the plaster into waterand stirring into a cream-like mass. With this the
whole head is covered and quickly smoothed into
shape with an ordinary table knife or putty knife.
A sketch of the head was made previously to the
flesh being removed, and upon this various measure-
ments, notes, etc., were recorded. These are ap-
plied to the head now in hand, more plaster being
put on or smoothed away until the whole is an exact
reproduction of the head as it came from the skin.
In a very few minutes the plaster sets, but eventhen any alteration may be made, if necessary, byscraping with a knife, or, in larger cases, by using a
rasp. Some putty is put into the"pockets
"of the
lips and round the nose, and then the whole is

SKINNING AND STUFFING MAMMALS. 59
forced into the skin. Two small wires may be
pushed up the nostrils and into the skull, to keep the
nose in position, leaving, of course, enough to with-
draw them by when the squirrel is dry. The puttymay be pushed to the edge of the skin, if out of
place, by putting the knitting needle or stuffing-
iron through the eyelids, and it may again bemodelled into shape by the fingers from the outside.
The great advantage of this method is that, the
plaster being unyielding, shrinkage cannot possiblytake place. And complex though the process ap-
pears in print, it will probably be found, in practice,to take but five or ten minutes at the outside verylittle longer, in fact, than when using tow alone
while satisfaction is assured. The eyes may nowbe inserted and fixed upon a bed of putty, or may beleft until later. Guard against leaving the eyes too
staring. It is advisable here to refer to the informa-tion given on these points with reference to birds
(see Chapter II.).
If it is found very difficult to close the mouth of
the specimen, one, or perhaps two, faults have beencommitted. Either the lips have not been pocketedto their edges, or the putty has not been pressed to
the extreme edge of the lips. The lips must beskinned quite to their edges, as advised above.Then the putty can be worked to these edges, andwhen the skin, etc., dries and contracts, this puttywill keep the external and internal skins apart. Anextra means of keeping the lips together is to pinthem through. In the case of larger animals the
lips are sometimes sewn together, and the stitches
removed when the specimens are dry.Before the skull is returned to the skin, and while
the plaster is setting, the six wires can be got readyfour for the limbs, one for the body, and a thin
one for the tail. A list of suitable wires scarcelycan be given, because they will vary very much in-
deed with the age and position of the mammal.

60 TAXIDERMY.
However, an examination of a number of finished
mammals discloses the following :
No. 18 Gauge suitable for weasels.17
., ,, ,, squirrels and stoats.
>. 15,, ,, ,, ferrets and polecats.
,, 12 & 13 ,, ,, ,, cats and small dogs... 9&10,, ,, ,, foxes and larger
dogs.
> 7&8 ,, ,, ,, still larger dogs andwolves.
It is much better to err on the side of stoutness, if
at all; for nothing is worse than to find the specimen
Fig. 36. Bones of Animal's Hind Leg.
wobbling and trembling when finished and set up.The body wire will be about 12 in. long, the tail wire,
thinner, about the same length, and the leg wires
8 in. or 9 in. long. Point one end of the body and
leg wires and both ends of the tail wire with a file,
giving them triangular or bayonet-shaped points.Now take the body wire and, at about an inch
from the blunt end, commence to wr*ap pieces of tow
firmly round it to form an artificial body. Continuethis wrapping till the false body is about as long andrather less in diameter than the real body was-remember the neck is already formed. Turn up the
blunt end of the wire as advised when making the
body for the bird (Fig. 17, p. 26). Push the pointed

SKINNING AND STUFFING MAMMALS. 61
ends of the leg wires into the soles or pads of the feet,
and let them travel along the back of the bones ;
wrap some tow round bones and wires, binding both
together to represent the flesh. The hind leg has
the most character in it, and requires careful work.
In it the wrapping on the front side of the bone
(tibia) is very thin. Remember that this part corre-
sponds to the part of the human leg from the knee
to the ankle, and that the human "shin
"lies close
to the skin. The muscles lie mainly at the back, and
consequently most of the tow must be there. The
thigh is flat inside and rounded outside.
In a larger mammal it will be particularly neces-
Fig. 37. Artificial Hind Leg-
sary to notice the tendon of Achilles the thick
strong cord which, at its lower extremity, is joinedto the calcaneum in other words, the
" ham string,"which rises upwards from "
the point of the hock."This tendon is most easily represented in a largesubject by drilling a hole through the calcaneumand through this passing a piece of copper wire.
This wire is then wrapped with tow to the diameterof the original cord, and the free end is fastened to
the tibia. When the skin is returned to its normal
position, a stitch or two through the hollow spaceleft between the tendon and the bone will draw bothsides of the skin together and give a realistic appear-ance to this part which mere stuffing cannot give (see
Figs. 36 and 37).
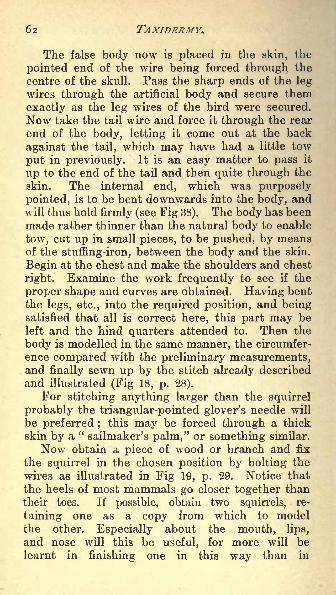
62 TAXIDERMY.
The false body now is placed in the skin, the
pointed end of the wire being forced through the
centre of the skull. Pass the sharp ends of the leg
wires through the artificial body and secure them
exactly as the leg wires of the bird were secured.
Now take the tail wire and force it through the rear
end of the body, letting it come out at the back
against the tail, which may have had a little tow
put in previously. It is an easy matter to pass it
up to the end of the tail and then quite through the
skin. The internal end, which was purposely
pointed, is to be bent downwards into the body, andwill thus hold firmly (see Fig 38). The body has beenmade rather thinner than the natural body to enable
tow, cut up in small pieces, to be pushed, by meansof the stuffing-iron, between the body and the skin.
Begin at the chest and make the shoulders and chest
right. Examine the work frequently to see if the
proper shape and curves are obtained. Having bent
the legs, etc., into the required position, and beingsatisfied that all is correct here, this part may beleft and the hind quarters attended to. Then the
body is modelled in the same manner, the circumfer-
ence compared with the preliminary measurements,and finally sewn up by the stitch already described
and illustrated (Fig 18, p. 28).
For stitching anything larger than the squirrel
probably the triangular-pointed glover's needle will
be preferred ; this may be forced through a thick
skin by a "sailmaker's palm," or something similar.
Now obtain a piece of wood or branch and fix
the squirrel in the chosen position by bolting the
wires as illustrated in Fig 19, p. 29. Notice that
the heels of most mammals go closer together thantheir toes. If possible, obtain two squirrels, re-
taining one as a copy from which to modelthe other. Especially about the mouth, lips,
and nose will this be useful, for more will be
learnt in finishing one in this way than in
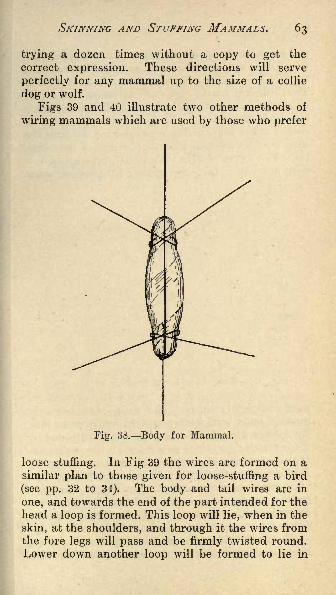
SKINNING AND STUFFING MAMMALS. 63
trying a dozen times without a copy to get the
correct expression. These directions will serve
perfectly for any mammal up to the size of a collie
dog or wolf.
Figs 39 and 40 illustrate two other methods of
wiring mammals which are used by those who prefer
Fig. 38. Body for Mammal.
loose stuffing. In Fig 39 the wires are formed on asimilar plan to those given for loose-stuffing a bird
(see pp. 32 to 34). The body and tail wires are in
one, and towards the end of the part intended for the
head a loop is formed. This loop will lie, when in the
skin, at the shoulders, and through it the wires fromthe fore legs will pass and be firmly twisted round.
Lower down another loop will be formed to lie in

64 TAXIDERMY.
the neighbourhood of the hips. Through this the
wires from the hind legs will pass and be fastened
by twisting. In Fig. 40 another variation is shown.
Two ordinary bottle corks are obtained and cut to
correspond in length with the width of the shoulders
and hips respectively. They are then fastened to-
gether at the same distance as the hips are from the
shoulders, measuring from the carcase of the squir-rel. The figure clearly shows how the ends of this
wire are bolted into the corks. All four leg wires
Fig. 39. Wiring for Loose Stuffing of Mammal.
pass completely through the corks, and have the
pointed ends bent back again to make them firm.
Two other wires for the head and tail (both ends of
these require pointing) pass through the corks, andare also made fast by bolting the ends into the corks.
A reference to the figure will make this plain. Thisis certainly an improvement upon Fig. 39, though it
entails much more work. Neither, however, can
compare with the method illustrated by Fig. 38,
either for ease, quickness, or accuracy.Mammals with open mouths (snarling) have the
lips raised, showing the gums and inside of the lips.

SKINNING AND STUFFING MAMMALS. 65
These will require to be painted (see the notes on p.
35), but the colours must not be made too deep.The teeth may be cleaned with weak muriatic acid.
The teeth of foxes, dogs, etc., can be bleached bywashing well in warm soda and water, rinsing, and
applying a mixture of 1 oz. of hydrogen peroxideand twenty to thirty drops of strong ammonia ;
apply this often during a period of ten hours, andthen wash. If required, polish with a wet cloth
dipped in finely powdered pumice-stone, and lastly
Fig. 40. Wiring for Loose Stuffing of Mammal.
with whiting and a little warm soapsuds. Allow to
dry very slowly.
Very little information can be given about the at-
titudes of mammals, but notice that an animal rarelyshows its emotions in its face without a correspond-ing action of its limbs and body, and, as these actions
vary with different species, it is impossible to givea general rule
;but much may be learnt by watch-
ing a dog or a cat. When the cat is angry its ears
are almost level with the skin of the head;
its backis arched as highly as possible ; its hair is slightly
raised, mouth open, showing teeth. Probably onefoot is half raised ready to strike, the other legs being
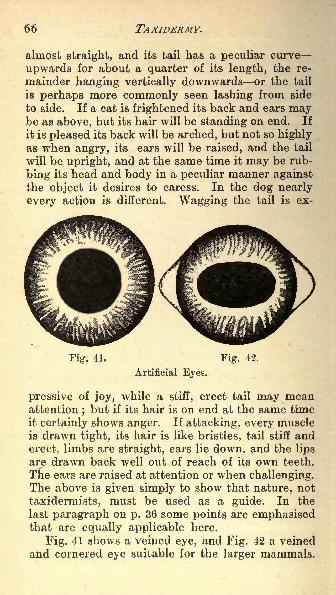
66 TAXIDERMY.
almost straight, and its tail has a peculiar curve
upwards for about a quarter of its length, the re-
mainder hanging vertically downwards or the tail
is perhaps more commonly seen lashing from side
to side. If a cat is frightened its back and ears maybe as above, but its hair will be standing on end. If
it is pleased its back will be arched, but not so highlyas when angry, its ears will be raised, and the tail
will be upright, and at the same time it may be rub-
bing its head and body in a peculiar manner againstthe object it desires to caress. In the dog nearly
every action is different. Wagging the tail is ex-
Fig. 42.
Artificial Eyes.
pressive of joy, while a stiff, erect tail may meanattention ; but if its hair is on end at the same time
it certainly shows anger. If attacking, every muscleis drawn tight, its hair is like bristles, tail stiff and
erect, limbs are straight, ears lie down, and the lips
are drawn back well out of reach of its own teeth.
The ears are raised at attention or when challenging.The above is given simply to show that nature, not
taxidermists, must be used as a guide. In the
last paragraph on p. 36 some points are emphasisedthat are equally applicable here.
Fig. 41 shows a veined eye, and Fig. 42 a veined
and cornered eye suitable for the larger mammals.

SKINNING AND STUFFING MAMMALS. 67
Other and smaller eyes are illustrated by Fig. 25,
p. 37.
From the "body of a mole a pretty little purse maybe made. Make a cut along the belly from the front
legs to the hind ones ; then separate the skin alongeach side as far as possible. Cut the hind legs fromthe body, then the tail, and skin the body up to the
fore legs. Cut these free, and skin up to the tip of
the nose. Separate the whole body by cutting at
the base of the skull. Remove the brain, and clean
all the flesh from the skull and feet. The tail is as
well left alone. Then dress with Browne's preserva-tive (p. 17), and put some putty round the nose and
Fig. 43. Moleskin Purse.
mouth, and well fill the skull with tow, leaving some
protruding to form a neck; also put some tow along
the cheeks and in the mouth to replace the flesh and
tongue. Return the skin to its original position, and
properly shape the head by modelling the putty withthe fingers from- the outside. Eyes need not be putin. Now form a bag of chamois leather to fit inside
the body, and finish as is shown by Fig 43.

68
CHAPTER IV.
ANIMALS' HORNED HEADS : POLISHING ANDMOUNTING HOENS.
ANIMALS' horned heads are among the most favourite
specimens of the taxidermist's art. The possibilityof making a good job of any head depends greatly onthe length of neck skin that has been left.
Gamekeepers and others, who should knowbetter, when dealing with a deer, frequently slit the
skin up the throat. Then it is impossible to sew upthe skin without showing an ugly line of stitches in
the most prominent part. Another fault is, that
even those who are anxious to send the specimen
correctly leave a long piece of skin attached to the
back of the head only, whereas a little thought mighthave convinced them that not only must the neck
skin be long at the back, but the front should be even
longer.
Upon receiving the head, unless it can be taken
in hand at once, it is much safer to place it without
delay in a pail of strong brine. Unless this simple
precaution be taken, it will most likely be found that
the hair will"slide
" when the work is begun, andthen it will be impossible to make a satisfactory pieceof work of it.
When about to begin, take out the head, washit in clean water to remove the salt, and as it is
presumed that a deer's head is to be mounted, at
the same time with soap and water scrub andclean the antlers or horns.
The necessary tools and materials are : Knife,
strong scissors, tenon saw, chisel, mallet, awls,
hammer, long screws or French nails, a piece of 1-in.
or Ij-in. deal, putty, tow, thread, eyes, cardboard or
sheet zinc or copper, peat, and plaster-of-paris.

ANIMALS' HORNED HEADS. 69
Commence with pencil and paper. Make a few
rough sketches, and on them place the measm-e-ments. Notice the shape and size of the nostrils,
the formation of the lips, and the way in which the
eyelids lie when the eye is open. It is mainly, if not
altogether, upon these points that the character of
the animal depends, and it is upon these points that
so many so-called naturalists fail, for a sheep, goat,
44. Back of Horned Head.
or deer, although possessing so many characteristicsin common, has each its own peculiarities, and tomiss these special points and treat them all the sameis to perpetrate some of the glaring mistakes whichhave brought on taxidermy the ridicule of those whoare real naturalists.
The head is placed with its back towards the
operator, and cut midway up the back to within 2 in.
of the base of the antlers, and from this point taketwo other cuts to the antlers, and cut up the back of

70 TAXIDERMY.
these (see Fig. 44). Some carry this cut up to a point
midway between the antlers, and then make a cross
cut to the antlers, forming in this way a long-
legged T, but this is not nearly so good as the methodindicated in Fig. 44, where the cuts form a Y with a
long leg.
Lifting up one of these pieces of skin, quickly skin
along until stopped by a piece of flesh, which appearsto project outwards from the head this is, of course,the ear and at once cut well into the flesh so as to
sever the ear quite close to the skull. This leaves a
lot of flesh inside the ear;but do not mind this, as
it can be attended to later. Repeating this on the
other side, the antlers may be reached, but here
caution is necessary. The skin should be removedfrom the antler without leaving a particle of hair
behind. This is one test of a good hand. But this
skin is so intimately attached that it cannot be gotto move very easily, so proceed to work by a kind of
digging action, more difficult to describe than per-
form. However, dig the knife in at the burr of the
antlers and gradually work it round by digging, so
as to separate the hair from the antler. By merely
cutting round with the knife instead of digging, pro-
bably some small pieces of skin and hair will be left
attached.
Rapidly skin along until the eyes are reached,where great care is required because the eyelids haveto be split, and this is most easily accomplished byplacing the left forefinger inside the eyelid and feel-
ing, as it were, how the edge of the knife is going,
directing it with gentle movements, and making the
cuts of little more than hair breadths. When aninch has been done a stop must be made at a dark
line, for this is the junction of the internal and ex-
ternal skins, and from this part the eyelashes pro-ceed. Now the eyelid is like an empty pocket turned
inside out. Cut this loose, close to the eye. Theuse of this pocket will be seen shortly.

ANIMALS' HORNED HEADS. 71
Leading from the corner of the eye nearest the
nose will be found a hollow channel running down-wards towards the nose. This is the lachrymal sinus
or tear channel. Cut well into this, rather than to-
wards the skin, or daylight will certainly be shown,
especially towards the lowest part, and this is not
desired. Before this, however, the inner angle of
the skin of the mouth will be met, but as this is large,
thick, and roomy, no difficulty will be found in split-
ting this from the teeth to the edge of the lips. It
will be found advantageous to cut away a good partof the return of this skin, namely the
"prickly
"or
papillated part that lies along the cheek inside the
mouth. Rapidly pass on to the nose, and, as there
is plenty of room, this will not be difficult. It is
quicker and easier to skin if the cartilage of the nose
is cut through. Take care that plenty of the mucous
membrane, or skin inside the nostrils, is left.
The head has now been skinned, and the internal
and external skins of the eyelids, the lips, and the
nostrils have been separated to their tips.
Now the ears must receive attention. They mustbe split as near to the tips as possible, but if the
worker goes to the very edge he is likely to cut the
skin, which at the edge is very thin indeed. The
fingers alone can do most of this, the knife beingcalled into play only to cut through the connecting
strings or fibres as they are found impeding pro-
gress. Thus the ear is turned inside out, and formedinto a large pocket. The cartilage is to be left, but
all the adhering flesh should next be removed. Afew rough sketches and measurements may be madeof the skinned head. Note that the cheeks are not
protruding like hemispheres, but lying nearly flat,
with an almost imperceptible swelling outwards, and
filling up all the space between the jaws, comingnearly, but not quite, flush with the bony ridge under
the eye (the orbital ridge or process).There are two ways of proceeding now : 1. To

72 TAXIDERMY.
remove the skin completely from the head by cutting
the skin from the teeth. The skin is then dressed
with a preservative of some kind, or plunged into
brine while the skull is next operated upon. This
method has many advantages, and is best in the case
of a large head, where the skull cleaning is likely to
be a long affair, for it can then be boiled and got
beautifully clean and free from flesh and fat, while
the skin is being penetrated by the preservative.
But the subsequent arrangement of the mouth is
perhaps not quite so easy in all respects ; therefore,
for a first trial, the adoption of the second methodis recommended. 2. The second method is to leave
the skin joined to the head.
The skull may be cleaned now. By cutting down-wards along the orbital process and then keepingalong the flat bone underneath, it is quite possibleto take away the cheek in one huge piece. By cut-
ting down at the centre of the back of the skull and
scraping downwards, as it were, towards the ear,
most likely nearly all the flesh in this part will comeaway in a piece. Now attend to the eye. By cut-
ting along the edge of the orbit, the whole of the
eye, fat, etc., can be gently pushed inwards from the
bone, showing how loosely attached they are. Thenwith a knife to cut through the connecting nerves,
fibres, etc., and a steel or other lever to force or lift
the whole upwards, the whole contents of the orbit
may be brought away in a piece. By turning the
head so that the lower jaw is uppermost, and cuttingalong the inside of the jaw, grazing the bone all
along, the tongue and most of the adhering flesh
will come away in a piece. Thus most of the flesh,
etc., has been cleared from the skull in seven
large pieces, viz., two cheeks, two eyes, two roundthe ears, and the tongue. With the saw make twosloping cuts into the floor of the skull, letting thecuts enter as near the sides as the jaws will allow,and the termination of the triangular prism thus
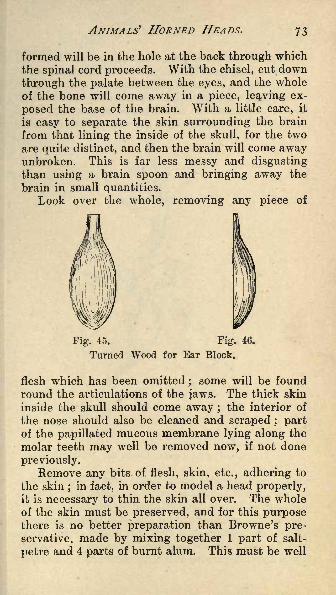
ANIMALS' HORNED HEADS. 73
formed will be in the hole at the back through which
the spinal cord proceeds. With the chisel, cut down
through the palate between the eyes, and the whole
of the bone will come away in a piece, leaving ex-
posed the base of the brain. With a little care, it
is easy to separate the skin surrounding the brain
from that lining the inside of the skull, for the two
are quite distinct, and then the brain will come awayunbroken. This is far less messy and disgustingthan using a brain spoon and bringing away the
brain in small quantities.Look over the whole, removing any piece of
Fig. 45. Fig. 46.
Turned Wood for Ear Block.
flesh which has been omitted;some will be found
round the articulations of the jaws. The thick skin
inside the skull should come away ; the interior of
the nose should also be cleaned and scraped ; partof the papillated mucous membrane lying along the
molar teeth may well be removed now, if not done
previously.Remove any bits of flesh, skin, etc., adhering to
the skin;in fact, in order to model a head properly,
it is necessary to thin the skin all over. The wholeof the skin must be preserved, and for this purposethere is no better preparation than Browne's pre-
servative, made by mixing together 1 part of salt-
petre and 4 parts of burnt alum. This must be well
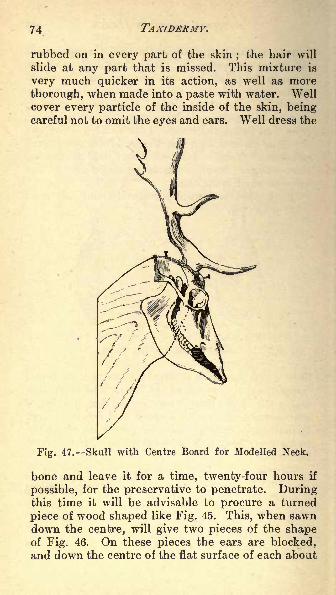
74 TAXIDERMY.
rubbed on in every part of the skin;the hair will
slide at any part that is missed. This mixture is
very much quicker in its action, as well as more
thorough, when made into a paste with water. Wellcover every particle of the inside of the skin, beingcareful not to omit the eyes and ears. Well dress the
Fig. 47. Skull with Centre Board for Modelled Neck.
bone and leave it for a time, twenty-four hours if
possible, for the preservative to penetrate. Duringthis time it will be advisable to procure a turned
piece of wood shaped like Fig. 45. This, when sawndown the centre, will give two pieces of the shapeof Fig. 46. On these pieces the ears are blocked,and down the centre of the flat surface of each about

ANIMALS' HORNED HEADS. 75
half a dozen or more tacks may be driven in to sup-
port the threads used in binding the ear to the block.
Procure also some putty and a piece of cardboard.
Out of the cardboard cut a piece of the same shapeand size as the cartilage of the ear. Many use thin
sheet zinc or copper for this purpose.
Fig1
. 48. Skull with Centre Board for Loose Xeck.
The second part of the work, namely modelling,
may be begun now. First cut a piece of l^-in. deal
upon which to fix the skull. The length of this will
depend upon the length of the neck skin attached
to the head, and this should have been determined
before the work began. By referring to Figs. 47
and 48 it will be seen that there are two shapes of
these supports or centre boards. Whichever form

76 TAXIDERMY.
is used, the skull must be firmly fixed to this support
by long screws or French nails passing through holes
previously drilled in the skull. These nails will be
seen partly driven in in Figs 47 and 48. Keep the
jaws fixed rigidly together by means of copper wire.
Having fixed the skull firmly, proceed to replacethe larger masses of flesh by pieces of peat, roughlycut to shape, which may be attached by nails, wire,
twine, etc. Peat is not absolutely necessary ;
paper, crumpled up and well rammed together, or
tow rolled up into balls, may be used. Whatever material
is used, it must be securely attached. One large
Fig. 49. Neck Board for Horned Head.
piece will replace the tongue, two others will formthe cheeks, two others will partially fill the orbits,
etc. Leaving this for a time, mix some plaster-of-
paris by sprinkling the plaster into the waterand stirring until a rather thick cream is formed.
With this the whole head is quickly covered
wherever any flesh has been removed, gently but
quickly modelling it into shape with a flat knife.
Properly done, this will set very quickly indeed, so
that speed is essential ;but it may even then be
brought into shape by the use of a rasp or knife. See
that plenty of plaster goes down into the skull to
help to fix the wood support or centre board.

ANIMALS' HORNED HEADS. 77
If the method shown by Fig. 47, p. 74, were
chosen, the neck board (Fig. 49) would have to be cut
out first; then the size of this, its length, as well as
the angle at which the head is to hang, should havebeen determined by the length of the neck skin be-
fore operations were commenced. Attach this neck
board to the centre board by three long screws as
Fig. 50. Plaster Head with Tow Xeck.
shown in Fig. 49, where the dotted lines representthe position of the centre board.
Now proceed to bind tow, peat, shavings, wood-
wool, or even paper, to form an artificial neck, mak-
ing it full on the sides and gradually tapering, beingcareful to form all the depressions or swellings of
the various muscles, not bringing everything to a
dead level of uniform plumpness (see Fig. 50). Many

78 TAXIDERMY,
of the more advanced taxidermists now cover the
whole of the neck with plaster or modelling clay,
giving the final touches with knives, rasps, model-
ling tools, etc., reproducing, as far as possible, every
muscle. This, of course, requires a good knowledgeof anatomy, which the beginner is not likely to
possess ;but good work can be done without this
latter modelling.
Gently work the shapes cut out of cardboard,
zinc, or copper, into the ears. Some flesh was re-
moved from the bases of the ears, and this is re-
placed by putty. Take more putty, and place a layer
inside the pockets of the lips and eyelids, also well
pad the nose with the same. Now draw the skin
over the model, taking care to get the inner anglesof the eyehole correctly upon its proper part of the
orbit, and at once drive in a fine tack or brad, or
steel pin, to keep this in position, for if this is wrong,
everything else will be wrong. Then press the tear
track under the projecting ridge of bone, and drive
in another pin at its deepest and furthest end. Nowget the skin into position round the antlers more
by gentle persuasion than by absolute force. Drive
in one or two steel points through the skin into the
bone close to the burrs, and proceed to sew this up,
using the stitch illustrated by Fig. 18, p. 28. Con-tinue down one arm of the Y, then leave off here,and with another piece of thread sew up the skin
round the base of the other antler ; carry the stitches
down the other arm of the Y and tie the two threads
together.Be sure that the bases of the ears are well filled
with putty, and that the ears stand out at equal
angles.If the centre board shown by Fig. 48, p. 75, is
used, then the loose method of stuffing for the neck
must be adopted. The neck board, as seen in Fig. 49,
p. 76, is an egg-shaped piece of wood, cut from f-in.
or 1-in. deal. The neck is stuffed by ramming in

ANIMALS' HORNED HEADS. 79
with the stuffing-iron (Figs. 11 and 12, p. 14) some
pieces of tow, stitching downwards a couple of inches
at a time, and making sure as the stuffing proceedsthat the neck is well formed, nicely rounded at the
top, and narrower towards the throat. On arriving at
the neck board, the end of the skin must be forcibly
drawn over and secured with tacks driven in at the
back (Fig. 51). Then temporarily fasten it to a
rough mount in order to hang it, when it is finished,
out of the way to dry.The lips and nose must be nicely modelled. The
^*&,
Fig. 51. Skin Nailed on Neck Board.
weight of the putty in the pocket of the lower lipwill have a tendency to cause this to droop, anddoubtless too much of the mucous membrane of the
upper lip is shown. The nose, too, is all out of
shape. The notes and sketches taken before the
skinning began now have their value. By strokingfrom the forehead downwards to the tip of the nose,the putty is forced downwards, lengthening the nose.
The upper angles of the nostrils will require pinch-ing in a little, making this part slightly narrower.The inside skin of the nose can be put into place witha penholder, and the lower angles also arranged bythis means.
The rest of the work is difficult to describe } but

8o TAXIDERMY.
is very easy to do. Having got the nose correct,
gently press the upper lip downwards with the fin-
ger, and the putty will go down,making this lip right.
The lower lip requires pressing up from the chin,when the putty will go upwards, but would not keepthere because of its weight and the contraction of
the skin in drying. Therefore it is usual to keep the
lips in position by stitching them together or by fine
steel points driven into them. The latter method is to
be preferred. Nothing now requires attention but
the eyes. Fill in the orbits with putty,put in the arti-
ficial eye, noticing how the iris is arranged, then
Fig. 52. Fig. 53.
Figs. 52 and 53. Ear. Blocked and Bound.
gently draw over the lids and, with the awl, modelin the depressions above and below the eyes. Nowput an ear block (Fig. 46, p. 73) into each ear andbind it round with threads, allowing the threads to
rest upon the tacks driven in the flat surfaces
(Figs. 52 and 53), when they cannot become dis-
arranged ; see the finished head, Fig. 54.
Now the head on its temporary shield may be
hung up out of the way to dry, a process which will
take some weeks. During this time may be made the
permanent mount or shield, some suitable designsfor which are shown by Figs. 55 to 61, pp. 82 and 83.
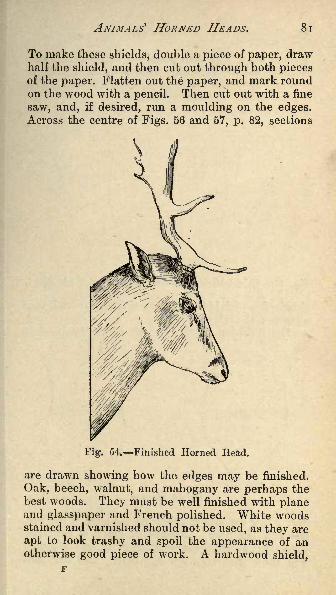
ANIMALS' HORNED HEADS. 81
To make these shields, double a piece of paper, drawhalf the shield, and then cut out through both piecesof the paper. Flatten out the paper, and mark roundon the wood with a pencil. Then cut out with a fine
saw, and, if desired, run a moulding on the edges.Across the centre of Figs. 56 and 57, p. 82, sections
Fig. 54. Finished Horned Head.
are drawn showing how the edges may be finished.
Oak, beech, walnut, and mahogany are perhaps the
best woods. They must be well finished with planeand glasspaper and French polished. White woodsstained and varnished should not be used, as they are
apt to look trashy and spoil the appearance of anotherwise good piece of work. A hardwood shield,

82 TAXIDERMY.
stained black and then polished, looks well behinda light coloured head. Dull-polished ebony or
Fig. 55. Shield Mount showing1
position of Neck Board.
ebonised wood is rather too gloomy for ordinary
purposes, though often used.
The finishing touch is given when the head is
Fig. 57.
Shield Mounts.
dry. This consists in colouring the edge of the eye-lids and the nose. Brunswick black is generally
used ;but a casual examination of an animal's nose
will show that very few are black, and that still

POLISHING AND MOUNTING HORNS.
fewer are all of one hue. In most cases there areseveral shades, browns predominating, and theseshould be matched as nearly as possible.
Fig. 58.
Shield Mounts.
As all uncased specimens are liable to the attacksof moths, or rather their larvae, it is advisable, at
least once a year, to take them down, brush themwell to remove the dust, and then cover them with
turpentine. When this has dried they may be re-
Fig'. 60.
Shield Mount.
Fig-. 61.
Oval Mount.
placed, and will well repay the small trouble entailed
by enduring far longer than if neglected.A pair of stag's antlers may be cleaned and
mounted in the following way.

TAXIDERMY.
Well wash and scrub the antlers with warm water
and soap. Thoroughly dry them with a cloth or
towel, then give another smart rubbing with a per-
fectly dry cloth to remove some of the dulness from
the sharp edges and prominences. Fig. 62 shows
how, by cutting a piece off the back of the antler,
it may be fixed to the mount by means of a screw
passing through a hole previously drilled in the
antler. Fig. 63 shows an artificial forehead of wood,with short processes upon which the antlers rest,
being fixed from the back by a long screw. Anothermethod is to drill a large hole lengthways into the
antler from the base, and in this hole to place a
Fig. 63.
Methods of Mounting Stag's Antlers.
dowel (see Fig. 64), by means of which the antler
may be fixed as in Figs. 62 or 63. Designs of suit-
able shields or mounts are shown by Figs. 55 to 61.
Deers' antlers may be mounted to form hat-pegsin a very simple manner.
Procure a piece of hard wood, oak for preference,and cut it into a heart-shaped shield. After well
dressing the surface, and either chamfering or
moulding the edges, polish the whole. With an
ordinary tenon saw begin about an inch behind the
antlers and cut the bone in a slanting direction to-
wards the forehead, causing the saw to come outabout 3 in. in front of the antlers. Thus the antlers
attached to the forehead will have been detached
from the rest of the skull, and when the forehead

POLISHING AND MOUNTING HORNS. 85
is placed in position upon the shield, each antler
should be the same distance from the shield. It is
therefore necessary to see that the same amount of
bone is left on each side. Now fasten the antlers
to the shield by driving in a couple of long screws
through the forehead and into the shield. A brass
plate, similar to those used for holding overmantelsand pier-glasses, may be fixed at the back of the
shield by which to support it.
Deers' horns and ox horns are not polished in the
same way. The horns in the two cases are of different
materials, the animals producing them being on this
account placed by naturalists in separate families.
Bullocks' horns are of true horn, and are detachablefrom the bony core 011 which they grow as a sort of
hardened skin. Deers' horns are solid throughout,and grow direct from the skull, to which they are
rooted. The most successful way to clean a pair of
antlers is to wash them well with soap and waterand a scrubbing brush, and then let them dry. Thesurface can then be further scrubbed with a hardclean brush till a gloss appears on the more prom-inent parts. The tips of the prongs can be scrapedwith pieces of newly-broken glass till the whiter partunderneath appears. The appearance thus impartedis very good if the grade from white at the tip to
dark brown is made gradual by careful scraping.A further gloss can be given by touching up the tipsand more prominent parts with a thin solution of
bleached shellac dissolved in spirit of wine and ap-
plied with a camel-hair brush. Some varnish the
whole surface of the antlers with shellac solution,but in the opinion of others this does not look so well
as when parts only are glossy and the general surface
left dull.
Deers' horns and horns of the same nature canalso be polished in the following way. Remove all
the rough outer part with a rasp, followed bya file. Then well scrape with a knife, steel

86 TAXIDERMY.
scraper, or side of a steel chisel to remove all
file marks. Then glasspaper off with various sizes
of glasspaper, finishing off with the finest. Nowcarefully remove any particles of dust, and repeatthis dusting between every two of the subsequent
operations. To polish the horns, apply, by meansof a rag dipped in linseed oil, some of the horn dust
saved during the previous processes, and rub
Fig. 65. Front View of Elephant Tusk Mount.
smartly. Next apply some putty-powder or rotten-
stone by means of a flannel damped in water, and
again use plenty of rubbing. Whiting is next em-
ployed by the aid of a rag damped in vinegar. Fol-
low this with a chamois leather and a little oil, thenwith a clean dry leather, and finish off with a sharp
rubbing with the bare palm.
Elephants' tusks are polished in exactly the samemanner as described above for horns. Whiting is

POLISHING AND MOUNTING HORNS.
made into a cream with water, vinegar, or methy-lated spirit, and applied with a nail-brush. After
briskly rubbing till all surface marks have been re-
moved, it is again rubbed with a brush and water.
It is then dried with a soft cloth and finally rubbedwith a brush having just a drop of oil upon it.
Another method is as follows. Obtain a piece of
I
Fig. 66. Side View of Elephant Tusk Mount.
wood, say 18 in. by 2 in. by \ in., and cover one
side with felt or thick cloth. The other side is to
be covered with chamois, buff, or wash leather.
In fastening these, let the nails enter the ends of
the boards, then there will be no risk of scratchingthe work. A razor strop may be taken as a model,the leather, etc., being fastened near the handle
first, then turned back and fastened by nails enter-

88 TAXIDERMY.
ing the end. The moistened whiting is applied to
the cloth-covered side and rubbed on the tusk
briskly, but no flats should be formed. The workis then dried with a cloth, and finally polished bymeans of dry whiting applied with the leather side
f the board.
Figs. 65 and 66, pp. 86 and 87, show a design for a
mount suitable for a pair of tusks. The shield-shapedboard should be 1 in. thick, of oak, mahogany, or
pitch pine, chamfered at the sides and rounded at
the corners, as in Fig. 65. To this should be fixed
a piece of similar wood, about 3^ in. thick, with
the front and ends moulded as shown in section,
Fig. 66. In the top of this two holes 1^ in. deepshould be drilled to receive the ends of the
tusks. Fix two brass rings with back plates and
screws, as shown in Figs. 65 and 66. The smaller
ends of the tusks pass through these, and are
thereby held in position.When polishing African horns, steam them for a
few hours, and then with an old razor carefully
scrape them ;or a piece of glass broken off clean will
answer the purpose. Next get some of the finest
glasspaper, and face them up, rubbing always with
the curve of the horn. Follow up with putty-powder(oxide of tin) and water on a piece of thick cloth or
blanket;next with putty-powder in a dry state.
With the aid of a polishing lathe, a brilliant polish
may be got with a soft leather buff and fine dry lime.
The mounting of such horns very much depends
upon their size and shape. They may be made into
snuff- and tobacco-boxes by fitting with silver or
electro-plated mounts, having for a base a polishedoak or mahogany stand, furnished with four ball-
shaped feet. Or, as already described, they could
be mounted in pairs on a tablet, and fixed againstthe wall as an ornament. And, if not too large, theycould be arranged in the form of a hat- and coat-
stand for the hall.

POLISHING AND MOUNTING HORNS. 89
A ram's horn often is mounted to form the handleof a walking-stick. To do this wash the horn with
strong soda-water, so as to remove all dirt andadherent matter. To polish it, scrape the roughnessoff with a broken glass or steel scraper, and further
smooth it with the finest glasspaper. Next, colour
by a penny packet of black dye. Or the horn may beleft in boiling hot writing ink till black enough. Tomount the horn on a stick, shape the stick's end witha knife, rasp, and coarse glasspaper till it fits the
interior of the horn tightly. Then dip it into the dyeor ink
; and, when dry, cover it evenly all over the
shaped end with cycle cement, holding it over a gasflame or near a fire, and spreading the cement about
iV in. thick. Warm the interior of the horn andsoften the cement till it begins to run ; then insert
the stick and hold it till cold. In half an hour or so
scrape off superfluous cement. Reduce the hornand stick there to true circular section. A band of
silver or other metal, fastened with three or four
rivets, should hide the joint. Cut a round hole of
the required size in a piece of tinplate ; cut the
tinplate in two, and use one half as a gauge.
Wrap a piece of thin card of the proper widthround the rounded part of the stick, which should,of course, be as long as the band is to be wide.
Push a pin through where the ends overlap, un-
wrap the band, and shape it with scissors. Thencut out a piece of brass, silver, or other metal to
the cardboard, and fasten it round the joints with
rivets. The horn can be .polished with whitingand water.
To polish a pair of ox horns, first remove all
roughness from the horns by means of a spokeshaveor rasp, followed by a scraper, a knife, the side of
a chisel, a wood scraper, etc. Then go over themwith sandpaper or glasspaper, using coarse paperfirst, then finer, and the finest last. Pumice powdershould next be used, followed by the dust removed

90 TAXIDERMY.
from the horn ; these can be applied on a rag dippedin oil. Then apply putty powder in the same way,followed by whiting moistened with vinegar. Nowuse dry cloths, commencing with a coarse one and
finishing with a soft one, or even tissue paper.
Lastly, use the bare palm of the hand. In applyingeach of the above-mentioned substances plenty of"elbow grease
" must be used, and the work must be
very carefully dusted between successive stages to
remove any trace of coarse grit. The use of a lathe
with calico mops, etc., if procurable, will save timeand labour and will give a better result.
To remove bone from an ox horn, place the wholein a moist, warm place a manure heap, if available,will act splendidly. Bury the horn among the
manure and leave it for a week or so, then take it
out and try if the two parts can be separated. Byfixing the butt of the horn in a vice, more force canbe applied. Failing to separate them, bury them for
another week. Now well wash the horn with water
containing carbolic acid, to remove the rottingmatter and to destroy the smell. Another methodof removing the bone from an ox horn is to drill a
hole in the bone and into it to turn a large coach
bolt or similar screwed piece of iron. This, held in a
vice if necessary, will form a handle to pull at. Leavethe horn out of doors for a few days, or put it into a
copper of hot water, till the core separates. The
parting will be assisted by twisting and shaking the
core by means of the handle. The core will event-
ually come out clean and leave nothing objectionable
behind. These methods are suitable for many kinds
of horns.
The cleaning and polishing of rams' horns, if
these are dirty and have an unpleasant smell about
them, is done after the core has been removed byone of the methods detailed in the above para-
graph. Then boil the bony core and care-
fully remove all mealiness from it; painting with

POLISHING AND MOUNTING HORNS. 91
carbolic acid will also help to preserve it from de-
cay. The horns proper may then be washed with
hot water and soap and a scrubbing-brush to remove
dirt, and then dried. Crinkled horns such as ranis'
had better not be scraped unless enough patience is
possessed to go over all the ins and outs with a glass
scraper and some fine glasspaper. To give a glossy
appearance it is usual to varnish them with white
shellac dissolved in spirit of wine, \ oz. in 1 gill.
This is applied with a camel-hair brush. Then the
horns can be refixed on the cores with glue.
Buffalo horns are polished by rasping, scraping,and glasspapering,the polishing being carried onwardwith pumice- and rotten-stone until the surface is
smooth and fairly polished ;the horns may require
bleaching if of a yellow colour, but any bleaching or
dyeing should be done before the final polish is
given. To bleach, use a weak solution of chloride
of lime. Another method exposure to the sun
is ?afe, but very slow. Experiment on a small scale,
beginning with about half a teaspoonful of chloride
to 2 oz. of water. Before dyeing the tips of the
horns prepare a mash by boiling good bran in water
for an hour. Strain off the liquor, and soak the
tips in this for half a day or more; then dry well,
and touch with the hands as little as possible. Fora black dye, take 2 oz. of logwood chips, \\ oz. of
copperas, 1 qt. of water, and just a dash of Chinablue. Boil all together in an old iron pot. Applyhot in one or more coats. When dry, wipe over with
vinegar in which has been steeped a handful of rustynails or iron filings to the pint. This latter prepara-tion fixes and intensifies the colour.
To mount a pair of buffalo horns, first obtain a
piece of hard wood, oak for preference, sufficiently
long to go some inches into each horn, leaving a
space between the horns of at least 6 in. the longerthe horns the greater the space between them.
Dress the wood with a plane, spokeshave, and rasp

92 TAXIDERMY.
into a cylinder rather larger in diameter than thebutts of the horns. Then shape each end to fit thehorns. Now warm both the wood and horns, andfix them together with glue, cycle cement, etc.
, /indfinally drive a French nail through each horn
(previously drilled) into the wood. A piece of blackastrachan or dyed lambskin is finally used to coverthe bare wood and the junctions of the horns. Acouple of screw-rings fixed into the block will
enable the horns to be suspended.The taxidermist often requires to produce
skeletons of animals, and there are two or three
methods of effecting this ; not one of them is verypleasant.
For such animals as horses and dogs, first take
away the skin and the internal organs, and then with
the knife remove the greater part of the flesh. Nextplace the bones in frequently changed water until
the flesh has putrefied, and then either pick or washit off. This, though very disgusting, is the method
usually adopted. During the maceration, the con-
nections or ligaments will give way, so that it maybe advisable to tie or bind the bones with wires
(copper preferred) before beginning the work. After
the bones are cleaned, they must be permanentlyjoined by brass or copper wires of sizes to suit the
bones, holes being drilled for the purpose.Another method of producing a skeleton is to boil
the bones until the flesh can be picked off by the
fingers, aided by blunt tools, bits of wood, etc. This
is easiest done while the flesh is still hot. Another
boiling will still further cleanse the bones, after
which the skull should be placed in clean cold
water, frequently changed, for a week or two. Thebones may be placed on an anthill, or near a wasps'
nest, or, if near a pond or the sea, immersion in the
water will enable tadpoles, fish, etc., quickly to re-
move the flesh. To bleach, wash the bones in soapand water, using plenty of soda to free them from

POLISHING AND MOUNTING HORNS. 93
grease, etc. Then place them in a weak solution of
chloride of lime in water, say 1 oz. to the pint, and
proceed as under.
The simplest method of producing a skeleton,
though liable to make the bones greasy-looking, is
to boil the skull until all the flesh can be easily
removed with pieces of blunt wood;but steaming
the skull would be better if it could be arranged.The other method, by which the skull is maceratedin cold water, and, when the flesh has putrefied, is
afterwards scraped and scrubbed until clean, is very
disgusting. Special bone-scrapers are used by pro-fessional osteologists, but for a single specimen a
penknife would suffice. The dirt can be removed
by well scrubbing with plenty of soap and soda,combined with the scraping ; and if, after soaking in
the chloride of lime solution, the result is not satis-
factory, wet the skull every morning and evening,and leave it exposed to the sun and wind until
bleached. Two things should be remembered
every particle of flesh, skin, etc., must be removed ;
and the scraping having been commenced must be
finished, or the skull placed back in the water.
Perhaps the best way of bleaching bones is bymeans of hydrogen peroxide. The bones are placedin a pot with water, and hydrogen peroxide and
strong ammonia are added while the pot is gentlyheated ; the bones are then removed and allowed to
dry in the sun. This is an expensive process. Forcommon purposes the bones may be bleached bysteeping in dilute nitric acid or chloride of lime, with
thorough washing in water afterwards. Previousto any bleaching operations the bones should beboiled for some time with soda and water, to removethe grease.
Bone is softened by placing it in a kettle togetherwith ashes and about one peck of lime to one barrelof bones. This is covered with water and boiled as
long as required.

94
CHAPTER V.
SKINNING, STUFFING, AND CASTING FISH.
THE skinning and mounting of fish are attended withfar greater difficulty than are the skinning and
mounting of either birds or mammals, for, thoughthe skin is tough enough in most parts to renderthe fear of rupture very remote, yet the danger of
dislodging the scales, which cannot be replaced, is
so great that the utmost care has to be taken. Butif the skinning be performed without mishap the
rest of the work is easily accomplished.The most suitable fish for the beginner to take
in hand first is a fair-sized perch, for the skin is
tough, and the scales are small and tightly fixed.
Before beginning to open it, place it with the better
side downward, and get a piece of stoutish wire andbend it to the exact shape of the fish. It is well to
be very careful over this, for it will afterwards beof the greatest possible use in affording an exact
guide for the modelling, and will almost preventthe most common fault making the fish too longand thin.
Fig. 67 represents the fish before it is opened, and
Fig. 68 is the wire shape, in which A B and c D exactly
correspond in size and curves to those parts of the
fish between the head and the tail. Between A and c
a wedge-shaped form is given to act as a supportfor the head, and at the apex a loop E is formed, the
use of which will be seen shortly. The two free ends
at B and D are now bent over to cross at F, midwaybetween B and D. Hold them together with the
flat-nosed pliers (see Fig. 7, page 12), and twist them
together for some distance. Bend one end over, and
leave it as shown by Fig. 68 at Q. Pass the other

SKINNING FISH. 95
end through the loop E, twist it back upon itself to
correspond with the other wire G, and bend it to the
angle shown, as at H. There is now an exact wire
Fig. 67. Perch Ready for Opening.
outline of the fish with a wedge-shaped support for
the head, which is joined to the tail end by a central
wire, the whole lying in the same plane, and fromwhich project two wires at right angles for support-
ing the fish in the case. The shaping of the wire
will not take even a beginner more than five minutes.
Fig. GS. Wire Shape of Fish.
Place the wire shape out of the way, and beginwith the skinning. Cover the better side of the fish
with paper or muslin in order to keep the scales in

g6 TAXIDERMY.
place. This will most likely adhere by the natural
mucus of the fish, but, if not, should be made to
adhere with a little glycerine and gum water. Wrapthe fins and tail in wet rags and tow to keep them
moist, for if they get dry they will split. The fish
should now be opened in a straight line along the
worse side from the head to the tail, midway betweenthe back and the belly. Some fish are marked with
a line (the lateral line) which will serve as a guide.
In the perch this line is too high, and is curved.
Commence by cutting through the scapular arch
the bone under the gill cover with the scissors, andthen with either knife or scissors continue this cut
to the tail ; the cut is indicated by a straight line
in Fig. 67. With the point of the knife lift up the
upper edge of the skin, and hold it with the left
finger and thumb, while the knife separates the skin
from the flesh all along and up to the top of the back.
A little sand is useful to dip the fingers in to pre-vent the skin slipping. Repeat with the lower side.
When the fins are reached much more care will be
required, for the skin here is very delicate. It is
safer to leave some flesh on, and the bones rather
long, for a rupture here would be very awkward.The skin near the vent is also very thin ; therefore
do not clear away too much before separating. Oneside is now quite clear, and, by working with the
fingers alone, much of the underside may be sep-arated from the flesh, especially along the back ;
but be careful, in passing the fingers down this, that
they are not torn by the sharp edges of the bonesleft attached to the fins. Use the knife wherever it
is possible, and, as soon as the fingers can be madeto meet near the tail, slip the scissors in and cut
through both flesh and bone, but leave plenty of
flesh in. Now the work gets easier, and quick pro-
gress is made, the fingers alone separating the skin
from the flesh along the back and part of the side.
When the fins are reached the scissors are used.

SKINNING FISH, 97
The pectoral fin is the most awkward to manage.Cut through the backbone near the head, then
through the gullet, and any flesh which may hold,and the body will come away in one piece. In the
case of a larger fish it may be advisable to take the
body away in sections. The skin now lies flat uponthe table, and some flesh will be seen still attached
to it along the lower side, at the tail and fins, andnear the skull
;also there may be a wedge-shaped
piece between the lower jaw. First attend to the
tail and clear the skin to the end of the bone. Plentyof patience will be needed. Scrape away the flesh,
and cut the bone off short. Carefully scrape, not,
by any means, cut, away the flesh near the fins, andshorten these bones. Assuming that all the rest is
done, the head next needs attention. The gills are
first removed by separating them at the top andbottom and pulling them away. Then, by openingthe skull, on the under side, the brain is exposed for
removal. Next, by removing a little more of the
bone, the eyes may be taken out from the inside.
The cheeks now require attention. By working from
the outside, through the orbits, the flesh may be
removed by the aid of the larger awl, the knife, and
the fingers, using plenty of sand to give a grip.
The wedge-shaped piece, running between the
pectoral fins to a point beneath the jaw, is enclosed
in a delicate silvery skin, and much care and patience
must be exercised here. All the flesh' has to be
taken away. The tongue is best removed with any
adjacent flesh, unless desired to be shown, when it
will be necessary to cut from the outside and scrape
out all the flesh, replacing this with putty and then
sewing up. Now give another look all round, bear-
ing in mind that any flesh which is not removed will
ultimately shrivel up.
The preservatives recommended for birds and
mammals (see pp. 16 and 17), are equally applicable
to fish, but the stuffing material may be different.

98 TAXIDERMY.
Some use bran, others sawdust, or a mixture of
bran and sawdust. Others use dry plaster-of-paris.
It is difficult to say which is best. Tow alone is nob
a success, though sometimes used. Sawdust, witha sprinkling of carbolic powder, may be recom-
mended.Commence by filling the head with tow, and the
cheeks, etc., with putty. Then place a good pad of
putty round the tail, fins, and pectoral process (the
wedge-shaped piece under the jaw). Insert the pre-
pared wire stiffener (Fig. 68, p. 95), and fit it into
shape, allowing it to lie as close to the skin as
possible. Enough sawdust, bran, or dry plastershould now be put in to about half fill the skin.
Begin to sew up at once, using a fine glover's needle.
Drill two small holes through the scapular arch, passthe needle through both, and tie the thread. Thenpass the needle through a hole drilled in the gill
cover immediately above them, and then througheach side of the skin alternately, far enough from the
edges to prevent tearing, and continue this down to
the first supporting wire, putting more sawdust in,
and well pressing and ramming it towards the head.
Tie the thread firmly to the supporting wire, andleave off here and attend to the tail, making the
first stitch at the tail, and carrying the stitches upto the second supporting wire, putting more sawdustin as progress is made, and pressing and ramming it
well towards the tail. It is advisable to tie the
thread to the second supporting wire, as then the
stitches cannot slip. The ramming is most easily
performed with a piece of wood or the end of a
cedar pencil. Before continuing further it is well
to make sure that the forepart and the tail end are
well stuffed and rammed. Then gradually intro-
duce more sawdust, pressing it well in all directions,
and continuing the stitching an inch at a time.
When fill is firm and well filled, finish the stitching.Now obtain another piece of wood, larger in every

STUFFING FISH. 99
direction than the fish;bore two holes at the same
distance apart as the two supporting wires, pass the
wires through and bend them over, and the fish will
be found fastened to the board;turn over the board,
when, of course, the show side of the fish is broughtinto view.
The fish is now noticed to be too flat, which is
caused by the skin accommodating itself to the flat
surface upon which it lay while the stuffing was done.
To correct this, tap it into shape by gentle blows
given with the handle of a table-knife or a piece of
wood shaped like a small cricket bat. A shoemaker's
hammer may be used, but great care and experienceare required in using this, and, in the hands of a be-
ginner, it would do more harm than good, as the
blows would almost certainly be given with too
much force. Before doing this shaping it would be
well to draw a damp cloth over the skin, to remove
sawdust, etc. The gill cover probably opens too
much, which is easily corrected by placing a piece of
cork between the nose and the board, in order to
raise this part and therefore close the gill cover.
From the commencement of the skinning up to
the present time the fins and tail should have been
kept constantly damp, and it is now time to removethe wet rags, tow, etc., in which they were wrapped,and to set them into position. For this purposenothing can be better than some pieces of sheet cork
about \ in. thick. The fins are stretched and pinnedbetween two pieces of cork which are kept in this
position until the fins are quite dry. Directly the
outer surface of the fish is dry, it will be found ad-
vantageous to give it a coat of quickly-drying spirit
varnish in order to prevent the scales rising duringthe drying of the skin. The gill cover, if not quite
close, should be bound down with cotton, wrappedround both board and fish
;and this wrapping may
also be done to any scales which have already risen.
Nothing more is required until the fish is quite dry,

100 'lAXWERMY.
when it will be found that it has lost all colour andassumed almost the appearance of leather.
The colour of a stuffed fish must be restored bycoating with thin oil paints (using artists' tube co-
lours) which must be so gradually run one into I In-
other that no lines of separation can be seen. For
this colouring, obtain a similar fish to the presn \ <-d
one, and use this as a copy from which to colour the
one in hand. It is impossible to go far wrong whennature is taken as a guide. The colouring of a dried
fish is a delicate operation requiring a fair amountof artistic ability, which can be gained only bypractice. Very little colour should be used, and it
should be well thinned with turps and colourless
varnish to represent wetness. The colours should
be so applied as to leave neither streaks nor un-
natural markings.In the case of a jack or pike, as a rule, the irides
are golden yellow ;the back and front dark greenish
brown, fading off on the sides to a dirty white, with
perhaps a tinge of blue ; oval spots vary from a white
to a yellow or even brown ; the belly is white.
Others have the back of a greenish gold colour,
shaded to a creamy white under the belly, with the
lozenge-shaped spots yellowish, somewhat faint onthe back, then bright on the sides and again fadingtowards the belly. The fins are brownish or yel-
lowish, with deep purple edges and ribs and wavybars. At spawning time the colours are muchbrighter.
In the roach the iris, lips, and fins are red (ver-
milion and carmine), the back greenish, in some
specimens approaching black, and the sides and belly
silvery. Silver paint should not be used on fish, as
it has a tendency to darken with age. Practically,the same silvery effect can be obtained by the use
of artists' tube colours white with a very little
blue for a golden fish colouring ; try annatto or
methyl orange amongst the coal-tar colours the

STUFFING FISH. 101
latter is a brilliant golden dye in a neutral or
alkaline solution.
In the case of a trout, the colours vary, some be-
ing silvery with minute spots, and others nearlyblack with large spots. In some, again, the spotsare jet black, while in others the black spot is sur-
rounded by one or more rings of quite different
colours. In one case, the nose and front of a trout's
head were deep brown;the cheeks yellow with a
greenish tinge ;the pupil black with a red edge ; the
iris silvery with a black crescent border;the back
grey with a tinge of green ; the sides yellowish
green ; spots on the back, black, those on the sides
being reddish surrounded by blue; pectoral fins fine
light brown ;the ventral fins red ; the anal fin purple
near the body, fading to yellowish grey ; the tail
deep greenish brown; adipous fin yellow, bordered
with brown;dorsal fin grey, with purple spots. The
most useful colours in painting a trout are black,
white, reds (light red, vermilion, crimson), yellows
(chrome, ochre), blues (Prussian, permanent), andbrowns (sepia, vandyke).
The eyes used are known as"flints," and are
colourless. Before being used they require tintingand gilding. They are usually placed in with puttywhen the fish is dry, and just before colouring it,
though for some reasons they are best inserted di-
rectly the fish is stuffed. If any of the fins should
have split, they may be repaired with thin paperpasted on the back of the fin and then coloured.
The greatest objection to the above method of
stuffing, and every other method of fish stuffing, is
the shrivelling of parts of the head, especially abovethe eyes and round the mouth. This can be hidden
by coating them with hot wax, and then colouring.This waxing is very simple, and should always bedone.
Another method of stuffing is often employed.This consists in forming a body of tow, paper, etc.,

IO2 TAXIDERMY.
well pasted, and wrapped with cotton round a cen-
tral wire. This is made to correspond as closely as
possible in size with the original body. A pad of
putty is now placed round each fin, and sometimes a
layer is put all over the skin. The prepared body is
inserted in the skin, placed accurately in position,and then sewn up.A more accurate method than either of the above
is to form a mould in plaster-of-paris of one-half of
the fish. Then skin the fish, place the skin exactlyin position upon the mould, and stuff with well-
rammed sawdust, bran, or plaster. In this case the
shape must be accurate.
It is impossible accurately to represent water
Fig. 69. Fish embedded in Clay.
with the fish swimming in it, and it is best not to
attempt it; therefore, leave the glass of the show-
case uncoloured, and the back of the case simplytinted pale blue. The bottom of the case may be
covered with sand, varnished to appear wet, and a
few pebbles, rushes, etc., introduced. The two
positions of fish which are most realistic are : (1) ly-
ing in a flat basket partly filled with straw, as thoughthe fish had just been unpacked ; and (2) lying on a
grassy bank as though just caught.Two cases most suitable for fish are mentioned
in Chapter VIII., pp. 150 and 151.
A few hints upon fish casting and modelling maybe of service, since fish casts are more in publicfavour at present owing to the unavoidable shrivel-
ling of the soft parts of the head in the set up speci-

C FJSH. 103
mens. This shrivelling can readily and easily behidden with wax, though very few taxidermists do
this, preferring to leave the plump, pouting lips dried
up and mummified rather than improve on the old-
fashioned process.First remove the natural mucus or slime from the
fish by washing in dilute sulphuric acid or vinegar ;
then place it in the desired position upon a piece of
wood, paper, or cardboard. Take some pieces of
wood and place them round the fish to form four
walls, one or two inches higher than the highest
part of the fish. Get some small pieces of wood and
pack them round the fish. Now put some well-
tempered clay over the wood and round the fish
Fig. 70. Clay-embedded Fish covered with Plaster.
until the lower half of the fish is quite hidden (see
Fig. 69). The clay will thus form a support for the
dorsal fins and tail, and if these will not keep the
desired position, fine headless pins may be driven
through the outer parts and into the clay ;but these
should be cut off so as not to project above the fins.
With a broad flat knife, such as a putty knife, smooth
the clay, because when finished this part forms a
tablet upon which the fish rests. Now mix up the
plaster, which should be the finest possible kind
known as S. F., by sprinkling the plaster in the
water and stirring well. Continue this sprinkling
and stirring until it is of the consistency of cream.
Give both fish and clay a good wetting with water,
and then pour the plaster quickly but gently uponthe fish. Enough should be mixed to cover the

104 TAX/DERM}:
whole at once. More should then be mixed to cover
this;and more after that, if wanted, until it stands,
say, about an inch above the side of the fish (see
Fig. 70, p. 103). Now leave all for a time, probablyabout half an hour will suffice. By the end of this
time the plaster should be firm enough to enable the
whole to be turned over and the fish to be taken out.
Then there is a mould in which every mark and everyscale has left its impression. Fig. 71 gives a section
of the plaster mould, which should be well oiled
or wetted, or have a good dressing of soaplather. Into this mould more plaster, mixed as
before, is poured, and, when well set, it should be
gently tapped till it separates from the mould, whena perfect impression of the fish will be seen lying
upon a plaster slab (see Fig. 72).
Fig. 71. Section of Plaster Fish-mould.
The greatest drawbacks to plaster casts are
their weight and brittleness. To avoid these,other substances are sometimes employed, the
most satisfactory of which is paper, in someform or other. The easiest method, and in
many respects the most satisfactory, is to take
several sheets of tissue paper, paste them on both
sides with good flour paste, apply them to the
mould, and well press them in with a brush in
order to get them in'o every depression ; thus is
made a kind of papier-mache. These are followed
by somewhat stouter sheets, until from five to eightsheets of paper have been employed. The whole is
placed in a warm room until dry, when the modelwill readily leave the mould providing it was well
oiled before the paper was applied. This modelwill weigh but a few ounces, and will be more

CASTING FISH. 105
satisfactory in every way than a plaster cast one
great gain being that paper will readily take colour
whilst plaster will not, without preliminary treat-
ment.
Another papier-mache method is, briefly, to beat
or mix paper and flour paste together and work themin a mortar, with or without pipeclay, until theyform a homogeneous mass greatly resembling putty.Take about 1 oz. of tissue paper (say four sheets),
5 oz. of thick flour paste, and 1 oz. of powdered pipe-
clay. Beat the whole in a metal mortar to a pulp,and then work it a little at a time, in a similar
manner to grinding paint, by a muller or spatula
Fig-. 72. Plaster Cast of Fish.
upon a stone or glass. Powdered colours may beadded when mixing, and therefore save time whenfinally tinting. To use it, oil the mould, put a thin
layer of the composition into the mould, and presswell with the fingers to send it into every depression.Then place upon this a couple of layers of well-
pasted strips or pieces of muslin, to form a backingto the papier-mache, and allow the edges of the
muslin to overlay about \ in. This will prevent
buckling. It should be allowed to dry slowly ;
probably a week will suffice. When dry, it will
readily take colour, if a dressing of boiled oil be
applied first.
Fish bones may be preserved in a white and semi-
transparent state by many methods. By one as
much fish as possible is removed in a raw state;then

ro6 TAXIDERMY.
the bones are soaked in water, frequently changed,for about a week, or until the remnants of the fish
still adhering can be taken off by sharpened piecesof wood. By another, the whole is boiled, and the
fish removed while .hot by any suitable instrument;
knives are not suitable for this purpose. This boil
ing, if too prolonged, will cloud some of the bones.
They are then boiled again and cleaned, left in cold
water for a few days, and then dried in the sun.
Lastly, they are covered with colourless varnish. If
required to be semi-transparent bleaching must not
be attempted. Most of the usual bleaching agentsturn them white and cloudy.
Crabs are not boiled if it is desired to retain the
natural colour. When dead, they must be carefully
cut at the joints, and all the flesh must be removed.
The joints of the legs will nob need cutting, as the
matter in them, if exposed to the air, will quickly
dry ;the claws should be quite emptied. The body
of the crab should be opened, and the liver or cream
removed. The thorax, where the legs are articulated,
will be rather difficult. When all the parts are clean
they must be set in their proper positions by meansof glue or cement.

icy
CHAPTER VI.
PRESERVING, CLEANING, AND DYEING SKINS.
ONE important branch of the taxidermist's art is
the treatment of skins for making rugs, mats, etc.,
or, as in the case of skins from small animals, for
making fur necklets, muffs, bags, etc. The manyprocesses of treating skins for these purposes are
quite distinct from ordinary leather tanning;though sometimes tanned hides are used for makingrugs.
Tawing skins or whita leather dressing is carried
on in many countries and in many forms, but in all
the methods there are three distinct operations :
(1) Fleshing the skins; (2) tawing or preservingthem
; and (3) currying or softening the leather.
Fleshing consists in removing every particle of
fat and flesh still remaining on the skin, and also
the inner skin, which locks up, as it were, the true
skin ;but this thinning is frequently done after
the tawing. In a commercial way this is generally
accomplished by throwing the skin across a beamand shaving with a sharp two-handled knife ; but
later is described the method usually adopted bythose who only occasionally have this work to do.
Tawing consists in immersing the skins in a
liquid preservative, the skins being weighted or
pressed down with strips of wood, so that they are
quite covered with the liquid. They are left in
this for about a day, but the exact duration
depends upon the weather, and upon the thickness
of the skin. If a piece of the skin be folded over
and pinched, a white line will be left when the
action of the preservative is completed. The
preservatives are many. One of the best consists

io8 TAXIDERMY.
of a solution of 1 Ib. alum and \ Ib. salt in about1 gal. of hot water. The action of this will probably
Fig. 73. Skin-stretching Frame.
be found much quicker if the solution is usedlukewarm.
Fig. 74. Corner of Skin-stretching Frame.
Then the skins are stretched in every direction,
being fixed by means of nails upon a door or thefloor. Professional leather dressers use a frame of
wood suited to the size of the skin, the four sides

PRESERVING SKIXS. 109
of the frame being bored for a number of holes.
Into these holes pegs fit, and the skin is quicklystretched by cords going through the edges of the
Fig. 75. Shave-hook for Dressing Skins.
skin and round the pegs (see Fig. 73). Fig 74 showshow the corners of the frame are secured together.The skins thus stretched are allowed to dry.
Currying proper consists in working the skins
over a sharp iron stake, but the same result may
Fig. 70. Serrated Blade of Shave-hook.
be accomplished by scraping the skin to remove the
inner skin, which locks up the real skin in whichthe hair or fur is fixed. A very convenient tool
is a plumber's shave-hook (Fig. 75), having one edgecut into teeth (Fig. 76) by means of a three-cornered
saw-file ;the teeth may be pointed in the rcrund
part, but chisel-shaped along the side. When the

no TAXIDERMY.
skin is stretched and nearly dry, it should be
scraped in every part to tear off the hard piecesand to stretch open the fibres
;this must be done
well if the skin is to be soft. It should now bewell rubbed between the knuckles, as in washingclothes. Of course, it should have been previouslyremoved from the frame ; and if an old table or
Fig. 77. Furrier's Double-edged Knife.
bench, or even a box, is handy to throw the skin
over, the scraper can be used more forcibly alongthe part lying over the edge.
In Fig. 77 is shown a double-edged flexible knife
used by leather dressers and furriers for fleshingand reducing the thickness of the skins. Fig. 78
shows a curved stouter knife used in dressing the
skins. This is frequently more curved than the
sketch, being sometimes semi-circular. Fig. 79 is
one form of a furrier's horse or beam. It is a
Fig. 78. Furrier's Single-edged Knife.
scaffold pole fixed upon wooden supports, and uponthis the skin is thrown while the knives are beingused.
There are but one or two means, other thanthe paring-knife, of reducing the leather of fur
skins. It is impossible to reduce the substance of
the skins by the ordinary splitting machines as used
for leather, owing to the presence of the hair or fur.
But perhaps a block similar to that shown by Fig. 80

PRESERVING SKINS. in
may be found useful, being both simple to make and
inexpensive. Get a piece of wood about 2 in. thick
and 10 in. square. Shape the top A as shown,and glue to it a sheet of coarse glass-paper c.
There should be no sharp edges round the uppersurface, or furrows and unevenness will result.
To reduce the skin to the required substance, hold
Fig. 79. Furrier's Horse or Beam.
the block firmly in a vice by a strong cross-piece
B, fixed to the top by three screws, and work the
flesh side of the skin over its surface, commencingat the thickest part. Examine it frequently to
see that the parts operated upon are not reduced
too much or otherwise injured. This will prove
Fig. 80. Sandpaper Block for Rubbing Skins.
not only a safe and efficient method, but a very
expeditious one also, besides rendering the skin
very soft and pliant.
The following are some of the many modifica-tions of these processes. Supposing the skins aresmall (say rabbits') and fresh, they may bestretched upon a board and the edges secured withtacks. All the flesh and fat are now scraped away.

112 TAXIDERMY.
and Spirits of cnnlphor well rubbed iiito the skin.A mixture of two parts of yellow soap and One partfine Oatmeal is prepared and made into a ratherthick paste, to which a small quantity of rum orother spirit is added. This is then spread upon the
skin, and well rubbed in by means of a blunt,knife-shaped piece of wood. This process is
repeated on several days, more of the mixturebeing added as required. The skins may then befinished off with dry oatmeal.
Colonel Park's method is to stretch the skinsand nail them down to dry, and when enough are
ready to thin them as usual, damping them withwater previously. Then mix \ pt, of salt, 1 oz. of
best oil of vitriol, and 3 qt. of soft water, stirringwith a stick. The solution should taste sharp, and
may make the hands smart a little, but will do noharm ; dipping the hands in cold water if neces-
sary will relieve the smarting. When the skins
have been in this for thirty minutes they maybe taken out, squeezed, but not wrung, and then
hung in the shade to dry.Another method for fresh skins is to mix bran
and soft water sufficient to cover the skins, but to
let this stand for some hours before* being used;
immerse the skins, keeping them covered for
twenty-four hours, and then take them out and
carefully scrape off all flesh. To 1 gal. of hot
water add 1 Ib. of alum and \ Ib. of salt. Whenthese have dissolved and the mixture will bear
the hand, immerse the skins and leave for twenty-iour hours ;
take out, stretch, and dry in the
shade, scrape well with the scraper, and give a
.good rubbing with the knuckles. Stir the liquor,
and again immerse for twenty-four hours. Dryand hand-rub as before, and then put the skins
for twenty-four hours into warm oatmeal and
water, stirring occasionally. Dry in the shade, and
when nearly dry rub till quite dry. This is a good

PRESERVING SKINS. 113
method, but it may be found just as efficacious to
mix the bran, alum, and salt with the hot water,thus saving one operation. In this form it will
answer as well for dry skins as for fresh ones.
The furrier's method is to mix up a paste of
alum, salt, flour, yolk of eggs, and water, and to
vvork this into the skin until it has penetrated, whenthe remainder is scraped off and the skin is cleaned
with bran or sawdust.
Another method is to steep and scour in a bath
of alum, bran, and salt, and then in one of soapand soda to remove the fat
;finish by thoroughly
washing and drying.Another method consists in using Browne's
skin preservative, and to follow this by the usual
currying. The composition of this preservative is
given on page 73.
A new method, an American one, of preservingthe skins of small animals for the sake of the fur
is to wash the skins, freed from flesh and fat, witha strong lye of wood ashes, till the gluten is de-
stroyed, but not prolonging the washing till the fibre
is eaten away. Sperm oil is applied, and the skin
is softened by rubbing equally all over it. In this
way a squirrel-sized skin can be dressed in ten
minutes, a rabbit-sized skin in fifteen minutes, anda calf skin in thirty minutes.
The uncombined oil in the skins must beremoved. Some skins are very fat, especially
those of dogs ;but the excess of fat may be re-
moved by washing in a solution of potash, or in
a bath of soap and soda, or they may be scrubbed
with a hard brush and hot soft water, during whicha mixture of two parts by weight of salts of tartar
and one part of ammonia may be sprinkled on.
Hunters abroad are sometimes anxious to knowhow to treat skins just separated from the animal ;
these skins should be "fleshed," laid down upon the
ground and well rubbed with a paste of Browne's
H

ii4 TAXIDERMY.
skin preservative (see p. 73) and a little water.
Especial care should be taken with the eyes, nose,and ears, otherwise the hair may
' ;
slide"
at these
parts later on. The skin should then be folded,and the dressing repeated next day ;
then it shouldbe dried in the sun and air. If convenient, it is
best to stretch the skin upon a frame before
applying the preservative, and keep it so till dry.
Failing this, it must be stretched by pegging it
to the ground. It is now ready to be packed awayin the flat is best, but that cannot always be
done.
A skin that is to be dressed must be dampedand shaved either with a currier's sharp-handled
knife, or, as a makeshift, with a spoke-shave.Curriers would use a beam or
" horse " when
doing this, but the edge of a table will answer.
When nearly dry the skin should be folded with
the hair inside and the edges secured with a few
stitches here and there, say a foot apart ;this is
to protect the hair. Cover the skin with lard,
using about 3 Ib. for a leopard's skin;then rub
the skin so as to force the grease in. The hands
are poor tools for this. A professional would putthe greased skin into a tub and tread the grease in
with his naked feet, but probably many persons
would prefer to put it into a tub and use a washer-
woman's dolly. Whichever method feet, hands,
or"dolly pegs "is used, the grease must be made
to penetrate the skin. Now cut the stitches, and,
if necessary, further shave the skin, after which
proceed with the cleaning of the fur. This is ac-
complished by rubbing sawdust containing no resin
into the fur; mahogany dust from a veneer mill is
>iest. When thoroughly well rubbed, shake and
beat with light canes till the sawdust is all out,
when the full beauty of the skin will be seen.
To those who want "skins as soft as chamois
leather," it will be sufficient to state that up to

PRESERVING SKINS. 115
the present no powder or solution has been foundwhich will render the skins soft and pliable with-out further labour. This softness can only be ob-
tained by a vast amount of patience and care beingbestowed over the currying. It is the constant
scraping and rubbing during the latter part of the
drying that makes the skin pliable, and unless this
is done thoroughly well the result will not be
exactly satisfactory.
Following will be found a number of miscel-
laneous notes on the treatment of skins.
The grease in skins can be killed before apply-
ing a preservative by placing them in a mixture of
bran and soft water, and allowing them to remaincovered for twenty-four hours. This mixture
should be prepared some hours before being used,as it acts better if it is in a state of fermentation.
If preferred, the alum, bran, and salt may be
made into a bath with water, and in it the skins
may be placed, thus doing two operations in one.
To clean a badger skin, the white hair about
the head of which is a dirty earth colour, place the
skin upon the table, hair upwards, and have readya basin of warm water, soap, sponge, and towel.
Now wash the head, using no more water than is
necessary ;do not allow water to get upon the
underside. Then soak out all the water the spongewill take, and finish the drying with the cloth or
towel. Any stains that still remain would require
to be bleached out by a rather severe process.
The cleaning of a white sheepskin can be ac-
complished with soap and water. Dissolve 1 Ib. of.
soap in 2 qt. of boiling water rain water if pos-
sible. Put half of this in a tub with 4 qt. of
cold rain water, and rub the sheepskin with the
suds till they will not extract further dirt. Then
use the other quart, diluted as before, to get the
rest of the dirt out, Passing the sheepskin through
a roller wringer will help matters considerably.

n6 TAXIDERMY,
Rinse very thoroughly in warmed rain water, andpass through a roller wringer. Dry in the sun,the flesh side being exposed. Shake, and alter the
position of hanging frequently as the drying pro-ceeds. A little washing blue added to the last
rinsing water will make the wool whiter.
In the case of the skin covering a mountedsheep's head, loose dirt may be removed by a
thorough brushing ; 'then wash it with soft flannel,warm water and white soap, a little laundry blue
added to the final water being an improvement.Dry it with a sponge or flannel, followed by cloths
or towels, and place it in the sun, wind, or a warmroom to dry.
Of the many methods of cleaning a tiger's skin
five are here given. (1) Moisten bran with hotwater and well rub it into the fur with a pieceof clean flannel. Finish by well rubbing in fresh
dry bran with a clean dry flannel. (2) Rub damp(not wet) whiting well into the fur so that it goesdown to the actual skin. Leave it till next day,vvhen the whiting, which in the meantime has;
dried, should be well rubbed, then removed byshaking and brushing with an ordinary clothes
brush. Place the skin over the back of a chair,
and well brush along the parting thus made, blow-
ing away the dust and whiting at the same time.
To brighten up the colours, benzoline should be
applied by means of a clothes-brush, which should
be passed lightly in the way of the fur, not againstthe fur. (3) Heat in an oven a mixture of equal
parts of flour and powdered salt, and while hot
thoroughly rub it into the fur. When the whole
has been dressed, shake and brush out the mixture
as described above. (4) To wash the skin, cut upa bar of soap and dissolve it in about 2 gal. of
boiling water. Place the skin upon a table and
wet the whole fur with the solution. A gentle
rubbing with the hands will loosen most of the

PRESERVING SKINS. 117
dirt. Now dilute about 2 qt. of the solution with2 gal. of warm water, and continue the washing,the skin still lying upon the table. When the skinin quite clean, remove the soap with plenty of
clean water. Then dry it by means of a clean
sponge, followed by clean cloths. In this waylittle of the actual skin will become wet. Nowhang it in the shade, and frequently take it downand shake it well, hanging it by a different parteach time. Any part that appears to be gettinghard should be well rubbed between the hands.
Skins that have been soaked in alum to pre-vent the hair coming out may have a dirty ap-
pearance, and may require cleaning. To do this,
well soak them in several changes of warm water,to remove as much of the salt and alum as pos-
sible. Now well wash the skins in two or three
fresh baths of soap and water. Then rinse in cold
water, and finally in water containing a little laun-
dry blue. Then wring out and hang each in the
shade to dry. During the drying they should be
well worked by pulling, rubbing, shaking, 9>*wl
beating, and the hair brushed.
Before goat skins can be dyed, they imist be
thoroughly washed in soapsuds, and afterwards in
clean water to remove any grease adhering to, the
hair. For a black dye prepare a mordant bath by
dissolving f Ib. of copperas, 2 oz. of sulphate of
copper, and 1 Ib. of cream, of tartar in 1 gal. of
water;heat nearly "to boiling, and pass the skin
into, it ; let it stand for one or two hours, then,
remove and expose to air overnight ;then dye in,
a hot bath made by boiling 5 Ib. of logwood chips
in 1 gal. of water ; remove, wash in cold water,
and dry in the open air. For a grey dye soak
the skin in a warm bath of | Ib. of logwood chipsin 1 gal. of water
; remove, and pass into a mor-dant bath of 2 oz. of copperas or bichromate of
potash in 1 gal. of water. For a brown dye pass

1 1 8 TAXIDERMY.
the skin into a warm bath of 1 Ib. of catechu in
1 gal. of water ; allow to remain two hours ; remove,and steep in a warm bath of \ Ib. of copper sul-
phate or sulphate of iron. Experiments should betried with small pieces of the skins. If thecolours are not suitable for the particular skin in
hand, alter the proportions of the dye.In dyeing rabbit skins black, the mordant con-
sists of sulphate of iron (copperas) and acetate of
lead (sugar of lead) ;these two react, the result
being a precipitate of sulphate of lead and the
formation of acetate of iron. The acetate of iron
is really the mordant in this case. In making this
solution have it fairly strong \\ Ib. of sulphate of
iron and 3 Ib. of sugar of lead to 1 gallon. Forthe dye, quantities of logwood, galls, and turmeric
may be varied according to the hue of the black
required ; try equal parts first that is, 1 Ib. each
of logwood chips, galls, and turmeric to 1 gallon,
and vary the quantity if the black is not satisfac-
tory. A little sulphate of copper (about 2 oz.) in
the mordant is generally an improvement. To
keep the backs of the skins free from colour, only
brush the liquors on. First apply the mordant,and then the dye ;
and if the dye does not readily
take, again apply the mordant and dye, and so
on. Before dyeing, the hair should be carefully
washed with soap and water to remove the
greasiness ;ammonia may be used with advantage
when washing.For dyeing skins, the usual aniline colours do
not seem suitable, as after a time they lose their
proper tint. But it has been claimed that the colours
may be made much faster if they are rubbed with
Reimann's composition. This is a solution of 12^ oz.
of gum arabic in about 7 pints of water, or of shellac
in alcohol in the same quantities. Of course, a
smaller quantity may be made, keeping to the
proper proportions. The dyed skin is vigorously

PRESERVING SKIN'S, 119
rubbed with the composition. Reimann also recommends a mixture of 8^ oz. of liquid ammonia and7 pints of water
;this is heated to a temperature of
about 167 F., 6j oz. of caseine is dissolved in it,
and the whole stirred till boiling point is reached.
When cold, decant, and rub the skin with the clear
liquid. Skins so treated may be rendered supple bywell rubbing with a mixture of 8 oz. of yolk of eggand 4 oz. of glycerine. Only a little is applied, andwhen the skin is half dry, it is rubbed with a cleanwoollen rag until quite dry.
In rendering fox brushes soft and pliableColonel Park's method of curing skins (see p. 112)can be adopted. But if the brushes have beenskinned clean off the tails, not cut down, a some-what different process must be adopted. Thescraping can be done by forming a tool somethinglike the stuffing-iron (Fig. 11, p. 14), but broader.
Then the flattened end should be bent at right
angles, the edge made sharp and toothed, andthe corners removed with a file to prevent cuttingthe skin. By inserting this into the brushes, the
skin can be scraped and the fibres still further
loosened by bending and twisting.To cure a goat's skin, trim it on the flesh side
with a sharp knife, and then well brush with a
solution of 2^ Ib. of alum and 1 Ib. of commonsalt in 1 gal. of warm water
; the skin should be
treated two or three times with this solution onsuccessive days. Now sprinkle bran all over the
skin, brush out, and nail the skin to a board and
dry it. As a preservative against insects, the
flesh side may be treated with a mixture of arsenic
and black pepper previous to drying. All skins
have a smell peculiar to themselves, but in mostcases these smells are totally removed during the
curing and dressing. But if the smell after dress-
ing is very strong, hang the skin frequently in the
open air when a fairly strong wind is blowing. If

120 TAXIDERMY.
this does not entirely remove the smell, disguiseit by adding oil of birch, or sprinkling a few dropsof essence of musk on the skin. Both of these are
lasting perfumes. The peculiar smell of Russiandressed skins is due to the addition of oil of
birch.
For making rugs the treatment of skins withalum and salt, or
"tawing," as it is called, is more
often resorted to than is the process of tanning.As explained before, the skin is thrown across a
bench, and the adhering flesh and fatty tissue
either cut or scraped away with a sharp knife.
The flesh side of the hide may next be treated for
a week or two with a bi'an mash, which, by a
process of fermentation, softens the inner integu-
ment, and allows it to be removed. This mayprove useful in softening the inner membrane of
tough skins, and afterwards allows it to be separ-ated with the knife. The object of this treatment
is to remove all material that may afterwards tend
to putrefy. Next treat the skin with the preserva-tive mentioned in the previous paragraph, a por-tion of the solution being made slightly warm, and
well rubbed into the skin with a brush. The skin
should be allowed to remain damp for a few days,
then pinned down tightly stretched on a board,
and placed in the sunlight to dry. For tanning
skins it matters very little what proportions of
material are used. Half fill a copper or earthen-
ware vessel with oak bark chips, and fill up with
boiling water; keep simmering for a few hours,
then strain. Place the skin in the infusion as soon
as it becomes tepid, and allow it to remain for at
least three weeks ; remove, shake well, peg on a
board, and allow to dry. The length of time re-
quired in tanning a skin depends upon its thick-
ness and upon the strength of the solution. With
a strong solution the time is lessened ;but it is
not advisable to use a strong infusion at first, or.
SKINS. 121
the skin may be only superficially tanned. Treat-
ing as above described, three weeks is a fair time to
give it.
Hare skins can be cured so as to turn out soft
and pliable. The preservative is common table
salt 1 lb., and burnt alum 4lb. These are well
powdered, mixed, and rubbed into the skin, whichis stretched on a flat board as soon as removedfrom the animal. When dry, it is rubbed downwith pumice-stone, or a solution is made of thesalt and alum, and the skin is steeped in it, dried,and pumice-stoned, and the process repeated till it
is pliable ;then it is rubbed with lard, and, when
this has had time to soak in and soften, the super-fluous grease is removed by thoroughly kneadingwith plenty of bran. Another way is to nail the
freshly stripped skin on a board and cover it with
lard. Leave it to soak in for a week, watching it
so that any part that threatens to go dry mayhave more lard applied at once. At the end of
the week remove the skin from the board andwash in warm water with soap to remove the
surface greasiness. Then let it dry, rolling, rub-
bing, pulling, and stretching it about in every
way possible the while. For freshly stripped cats',
rabbits', and similar small skins the following is
recommended : Whiting, 2|lb. ;soft soap, 1 Ib.
;
chloride of lime, 2 oz;
tincture of musk, 1 oz.
Boil the soap and whiting together in 1 pint of
water, powder the chloride of lime, and then stir
it in. Wrhen nearly cold, add the musk, stirring
it well in. After dressing with this and drying,
the larding, washing, and rubbing are proceededwith to finish the skin?.
The method described on p. 114 is suitable for
a leopard skin. If the skin has been salted, the
skin must first be freed from all salt by soakingand steeping it in water, frequently changed. It
should then, be tawed,, that is^, made into, white

*22 TAXIDERMV,
leather by steeping and scouring in a bath of bran,alum, and salt, using a gallon of hot water to 1 Ib.
of alum, \ Ib. of salt, and, roughly, about \ peckof bran. If not already done, all the inside of theskin must be cut and scraped away with a currier's
or other sharp knife. It should then be stretchedout to its full extent upon a wooden frame andallowed to dry in the shade. When nearly dry,remove the nails, and rub and work the skin withthe hands, the action, as before mentioned, beingsimilar to that of washing clothes. The shavingand rubbing must be done perfectly. If necessary,the processes can be repeated. Next, lard is workedinto the flesh side of the skin as before described,and then all surface grease is removed with
sawdust, with which also the hair is well rubbed;
some use bran on the fur side. A vigorous shak-
ing, a few smart strokes with a light cane, fol-
lowed by a good"grooming
" with a scratch-card,
will complete the operation. The skin should be
as soft as kid, and not affected by climatic varia-
tions. The work is extremely dirty and very hard,
for the scraping and rubbing must be really
thorough. A novice should not make his first at-
tempt on a valuable skin. To mount a leopard
skin as a rug, place it upon red cloth and mark
with chalk the outline of the skin. Cut this out,
and then cut strips of the same material from 4 in.
to 6 in. wide. One edge of all these strips is then
pinked, scolloped, or pounced to form a border.
The skin is now placed upon the cloth shape, the
border arranged in pleats or gathers between
these, and all stitched together. It would be
easier to stitch the border to the skin first, and
then sew the cloth shape to the border.
Methods of curing rabbit skins have already
been given, but the following gives some moreinformation on the subject. To cure a rabbit skin,
it must be fresh flayed and cleaned of all fat and
PRESERVING SKINS. 123
particles of flesh by scraping it with a bluntknife whilst stretched, fur inwards, upon a roundedsurface such as a baluster rail. Then steep it in
the usual solution of 4 parts alum and 1 partsalt. Mix them thoroughly together when dry,and then add as much warm water as will dissolve
the mixture. The quantity depends on the size of
the skin. To ascertain Avhen it has soaked longenough, squeeze the liquid from it. Then double
it, with the skin side outwards, so as to make a
crease, and when the line shows white the soak-
ing can be stopped. The soaking usually takes
about forty-eight hours. Make a paste of flour and
water, and having rinsed the skin dip it for a
minute in the warm gruel. Then wash it clean
with cold water, and dry it. When about half dry,
stretch again on a board, and rub with pumice.Small skins, when freshly flayed, can be cured by
being soaked for a few days in a solution of tan.
This tan can be made by boiling oak bark or oak
galls in rain or distilled water, or by dissolving
tannin in soft water. Fill a pot with oak bark, and
boil it in twice as much water for three hours.
Use the solution cold, and take out and rub the
skin as often as possible during the process.
Cats' skins if required to be soft when finished
should be tanned. Remove every particle of flesh
from the skin, scraping with a blunt knife, but
being careful not to injure the skin itself. Drywell by rubbing with towels ;
and with a scrubbing
brush apply to the skin side some hot water and
soft soap. Mix together 2 oz. of salts of tartar and
1 oz. of ammonia, both in powder, and sprinkle
this on the skin and scrub well to remove the
grease. Rub the skin till dry with clean, dry saw-
dust. Leave for an hour or two, and then pickle
it in this mixture : Fine ground oatmeal, 8 oz. ;
corrosive sublimate (a deadly poison, not to be
allowed to touch any scratch or scab on the oper-

124 TAXIDERMY.
ator's hands), 4 oz. ; saltpetre, 2 oz. ; vinegar,2 qts. Boil the vinegar, and then pour it on theother ingredients, stirring well the while. Whenquite cold, put the skin in and leave it to soak for
forty-eight hours, stirring and working it about as
often as possible. Rinse clean, Avring it out, andstretch to dry on a board. It will be finished in a
week. To soften a stiff skin it has to be rubbed,after tanning, by the hands with an action similar
to that used in washing clothes. The use pre-
viously of a wooden mallet and a cane switch will
reduce the hardness somewhat. Another mixture
is alum, 5 Ib. ; salt, 2 Ib.; oatmeal, 2 lb., all finely
powdered. Mix with just enough sour milk or
buttermilk to make a creamy paste. This is to
be rubbed well into the skin side only, whilst the
skin is stretched on a firm table. When no morecan be worked into the skin, apply a thin surface
coating of the mixture, and leave it in a cool place
till next day, when add more mixture, working it
in with the hands. Repeat this for the third and
fourth days, then wash all off, and wring and shake
it. When half dry, apply fresh mixture, and go
over the five days' operations once more. Then
wash thoroughly for some hours in running water
till all the mixture is cleaned completely out.
Make a saturated solution of alum that is, dis-
solve alum in hot water until the water will nob
dissolve more. Apply this when cool to. the skin,
and let it dry, stretched on a board in the open
air. When dry it will be hard, and must be
softened by beating and rubbing. Thorough
cleansing with soap and water, and immersion
thereafter in water that has had oak bark boiled
in it will tan small skins, as is explained in the
previous paragraph.Cured skins, usually more or less hard, can be
rendered more pliant by working them with the
ha.nds at intervals during the drying, also by

PRESERVING SKINS. 125
stretching and pulling to and fro upon a block of
wood;a little curd soap, or yolk of egg, rubbed
into the skins while they are wet, will also help to
soften them. The smell arising from decomposi-tion may be stopped by adding a little mercuricchloride (corrosive sublimate) to the curing bath,or rubbing in a little white arsenic ; both these
are deadly poisons. A little oil of citronella or
nitrobenzol (oil of mirbane) will disguise the
odour.
Sheepskins may be cured by one of the manymethods already described. Still another methodis to cleanse the wool thoroughly and tack the
skin down, fleshy side upwards, on a board. Scrapeoff all fat and shreds of membrane, then applyplentifully a dressing composed of carbonate of
soda 1 part, Hudson's soap, 2 parts, and pow-dered alum, 3 parts. Let this remain for about a
week, occasionally rubbing the powder in and stir-
ring it about, and finally shake off all the surplus
powder (which may be preserved for future
use), when the skin will be ready for a lining. If
for a rug, a pinked border of red baize will set it
off to advantage. It may be mounted on the cloth
as described on p. 122.
In bleaching a sheepskin the first thing to bedone is to clean the wool by using soap and water.
Whilst the skin is fresh that is, newly strippedfrom the carcase wash it thoroughly in a solu-
tion of soap, made by dissolving one bar in 2 gal-
lons of boiling water, and allowing it to get cool,
but not cold, before using. Hot water destroyswool
;so does very cold water. Thoroughly pound
and wash the wool in 1 qt. of this liquor diluted
with 4 qts. of warm water, and with a tablespoon-ful of paraffin oil in it. Any very dirty patches can
be treated first by themselves with a little of the
strong liquor. After washing, rinse well in clean,
warm water. Dry by squeezing and shaking out.

126 TAXIDERMY.
Do not put the skin in hot sunshine. Dissolve
\ Ib. of salt and \ Ib. of alum in 3 pts. of boilingwater, and add sufficient cold water to makeenough liquor to about cover the skin whilst laid
in a shallow tray. Soak it here for twelve hours.
Take it out, rinse it well in warm water, andsqueeze it dry ; passing through a clothes-
wringing machine is the best way to dry it. Nextrub the skin side with a mixture of half alum, half
saltpetre ;from 1 oz. to 2 oz. of each is enough
for one skin, according to its size. Rub this in
for as long as is convenient, or for one or twohours. Fold the skin in two, so as to bring the
salted parts together, and put it away for three
days, opening it out every day and rubbing it well.
At the end of the three days scrape it over with a
blunt knife, rub it with pumice-stone, and trim
the edges. To actually bleach the wool a further
process is necessary. Get a large box without
cracks or holes in it, and with one side large
enough to allow the skin being spread upon it.
Upon this side (inside) tack the skin, so that the
flesh side is against the wood and the wool awayfrom i;. The skin must be firmly fastened, andmust not hang down at the middle or elsewhere.
See that the lid fits tight over the top of the box.
Put \ Ib. of sulphur in an iron plate, and placethis at the bottom of the box. Make a nail red
hot, and drop it on the sulphur. Put the lid on,
and weight it down. The box should not allow
of fhe fumes escaping ; but, as some will find their
way out, do the job out of doors. In six or
eight hours the fumes of the sulphur will have
bleached the wool. When done hang the skin in
the open air for the smell to go off. The wool
can be combed out with an ordinary comb or a
piece of wire carding cloth.
Skins that are very much creased by havingbeen folded can be smoothed by going over the

PRESERVING SKINS. 727
creases with a warm iron having a smooth face;
cover as large a space as possible so as not to let
the iron stop long enough in one place to damage it.
To remove wool from sheepskins without in-
juring either the wool or the skins, they are placedin heaps in a warm place until an ammoniacalodour shows that putrefaction has commenced.Then place the skin across an unhairing beam, andwith a blunt two-handled dressing-knife removethe hair. By another method, first the wool is
sheared off, and then the skins are well soaked in
lime-water and placed across a rounded piece of
wood or beam;
the rest of the hair, wool, etc. ,
together with the greater part of upper scaly
skin, is removed by a blunt two-handled knife.
A commercial method of removing wool from
sheep skins, as practised at a London fellmonger's
yard is the following. First, they are beaten ona wooden block with a mallet to bruise the con-
gealed blood on the necks;
then they are thrown
into water to rinse the dirt and blood from the
wool, and are hung over trestles for the water to
drain out. The skins are limewashed on the flesh
side, and folded down the back so as to make the
bellies match together, being then left for anhour or two so that the lime will set slightly. Theyare then hung by the thick part of the back of the
head upon tenter hooks in large, dark, closed
sheds or rooms, and in about two days in the sum-
mer the wool will come off quite easily. Thesheds have to be heated in the winter. If any
grit gets in the lime it will make the"pelt," as it
is called, limespecked.In the North of England the wool is removed
in the following manner. The skins are taken
either to the riverside or dipped in a water pit
to moisten the fleshy side, the wool being kept
quite dry. Then they are laid on top of each
other, pelt upwards, and lime, of the thickness of

128 TAXIDERMY.
batter, is applied with a mop. The skins are takenoff and laid flat on the ground, pelt to pelt, in
heaps of eight or ten. They remain two days in
this condition, and are next taken to the riversideor other convenient place and thoroughly washedto remove all lime and dirt. Next, they aredoubled so that the bellies match each other, andare put on a wooden horse to dry over night. Whilestill doubled they are hung up on rails to dry. Inwinter they are put into a heated room for the
same purpose. When dry, they are taken into the"pulling shop," where each man takes one on his
" beam " and draws the wool off with his hands,
sorting it into four or five qualities. The pelts are
put into lime water to remain till sold to the
tanner. Skins that have been shorn known as
shearlings are put into a large shallow pit whenthey have been " limed "
for two or three days,and covered with water. Then follow the various
processes of long-wooled skins till they are readyfor removing the wool from the pelt. This is done
by means of a blunt knife, with two handles at
each end, called a rubbing knife.
Sheep skins often are dyed, but before theywill take any dye they must be soaked in a solu-
tion of carbonate of ammonia and well washed in
a solution of soft soap and soda (say 1 Ib. of soda
to 1 gal. of water) to free them from dirt and
grease. They are now ready for dyeing. Aniline dyesare cheapest, but by themselves are fugitive, and
therefore require something to fix them (see p. 118).
Acetic acid will do this for the greens and blues,
and so will vinegar. In the case of reds, preparea boiling solution of sumach 1 part, alum 5 parts,
tartar 2 parts, and in this place the wool. Then
place it in the dye. Sulphate of indigo (1 Ib. to
1 gal. of water) may be used for blue ; if not dark
enough, increase the indigo to 2 Ib.
Ti'opseolin orange with a small quantity of acid

PRESERVING SKINS. 129
brown will yield a golden brown, the intensity ofwhich may be varied by altering the proportionsof the two dyes. A bronze green may be obtained
by a mixture of fast green and acid brown. Alkaliblue may be used for blues, methyl violet for
violets, picric acid for pale yellow, magenta for
the colour of that name, eosin for pink, rose, etc.
For a black, boil f Ib. of copperas, 2 oz. of sul-
phate of copper, and 1 Ib. of cream of tartar in 1
gal. of water. This is the fixing bath. The dyeis made by boiling 5 Ib. of logwood in 1 gal. of
water. For a grey dye, boil Ib. of logwood in 1 gal.of water
;for the fixing bath, boil 2 oz. of copperas in
1 gal. of water. To make a brown dye, boil 1 Ib.
of catechu in 1 gal. of water;and for the fixing
bath boil ^ Ib. of sulphate of copper in 1 gal. of
water. These proportions may be varied accord-
ing to the tint desired. After the skins are dressed
and softened, they should be placed in the dye(temperature from 120 to 140 degrees F.), wool
downwards, and allowed to remain for an hour or
two. They should then be washed in cold water,and hung up to dry till the next day. Then theyshould be put into the hot fixing solution, allowed
to remain for an hour or two, washed in cold
water, and hung up to dry. As it is only neces-
sary to immerse the wool in the solutions, some
strips of wood can be placed along the bath con-
taining the dye to prevent the skin sinking. Take
great care that the solutions are hot when used,
and, during the drying, frequently shake the
skins and rub them to prevent them drying hard.
Repeat the operations if the colour is not intense
enough. Try the colour on a waste piece of skin
first.
Sheepskin mats or rugs that are hard, and
crackle when walked over, can be softened first
by reducing their thickness and then by applying
grease. The skin, if very thick, should be reducedI

I3O TAX1DERMY,
by scraping with a rounded rasp or curry-combwhilst nailed out flat on a firm, hard table. Whenall inequalities have been levelled, rub, with con-
siderable force, a little fresh lard or vaseline over
every part till the skin has become soft and pliant.The process may be resumed time after time for
several days. When thoroughly soft, the skin
should be well rubbed for several days withsawdust that does not contain resin, or with bran,to get off all the greasiness that rises to the sur-
face. Finally, some pipeclay should be rubbed
vigorously into the restretched skin, and left to see
if it discolours with the grease. Beat and scrapeoff any discoloured pipeclay, and put a new lot
on till it remains for twenty-four hours without
exhibiting signs of greasiness. Then brush andclean the hair side, using a large, clean cotton
cloth dipped in paraffin and wrung out dry. Rubthe hair hard
;then rinse the dirt out in the paraffin,
and repeat the process till all dirt is removed. The
sheepskin can be cleaned with soap and water, as
described on pp. 115 and 116.
Snake skins can be softened by soaking in water
for a night ; they should then be soft enough to un-
roll. Soaking should be carried far enough to en-
able the skins to be opened without force, but mustnot be prolonged. By using warm water, about an
hour's soaking may suffice.
In curing and dressing an otter's skin, as the longhairs have their roots in the deeper parts of the
skin, it is the usual plan among furriers to dress the
skin, and then thin and curry it, during which the
longer roots of the coarse hair will be cut through,and a smart brushing will remove most of the loosely-
held hairs. Any remaining must be pulled away byhand. There is no alternative, as if the thickness
of the skin be reduced sufficiently to cut through the
shorter hair roots there is danger of spoiling the
skin.

PRESERVING SKINS. 131
Strips of rhinoceros hide sometimes are cured,and walking-sticks made from the strips ;
first theymust be straightened by damping and suspendingfrom a nail with a weight at the lower end, and when
thoroughly dry they should be trimmed by knife,
rasp, file, emery, etc.,and made as smooth as pos-
sible. Now French polish them without any"stop-
ping," thus allowing the polish to penetrate. Whena good surface has been obtained and a ferrule puton, the work is complete. This produces a semi-
transparent appearance, tinted by the polish, andbroken abruptly by large dark, or even black,
patches. The usual preservatives replace the semi-
transparent appearance by a whitish opaque ap-
pearance, similar to wood, and cause the elasticity
to suffer.

132
CHAPTER VII.
PRESERVING INSECTS AND BIRDS' EGGS.
COLLECTORS of butterflies and moths generally placethe freshly caught insects in envelopes and "
set"
them at home. The usual method of killing an in-
sect is to pinch it under the wings between the finger
and thumb, its wings being kept close together, thus
preventing the " view side" from being rubbed.
A small square of paper is now creased as shown bythe dotted lines in Fig. 81. By folding 1 over 2 and3 over 1 a triangular envelope is formed, into whichthe insect is dropped ;
fold 4 over 3, and the insect
will be in the position shown by Fig. 82. Instead of
pinching the insects, they may be killed in a "killing
bottle," made by pouring into a 4-oz. wide-mouthed
stoppered jar 1 oz. of cyanide of potassium,and covering it with wet plaster-of-paris. Shakethe bottle as the plaster is setting, so that
it forms an even surface, and, when quite set, cover
the plaster with a piece of blotting-paper to absorb
the moisture and to keep the insect from contact
with the damp plaster. This blotting-paper should
be renewed when necessary. The cyanide is a
deadly poison, so must be used with care, and the
bottle kept corked. Put the insect into the bottle,
cork it up, and leave the insect in for about ten or
fifteen minutes. A few drops of strong spirits of
ammonia poured on a piece of cotton-wool in a bottle
will also form a killing bottle. Bruised laurel leaves
may also be put into a bottle, and prussic acid will
be given off, thus forming another killing bottle.
A few drops of chloroform poured upon blotting-
paper at the bottom of a bottle will also stupefy the

PRESERVING INSECTS. 133
insects to death. As soon as an insect is quite dead,
remove it from the bottle, catching hold of it by the
middle that is, where the legs join the body and
use a pair of tweezers, not fingers or anything as
clumsy. Suitable tweezers can be bought at manyshops, and can be made by bending double a strip
of thin sheet steel or brass f in. or \ in. wide and
6 in. or 8 in. long till the two ends meet and form a
delicate substitute for forefinger and thumb. The
spring of the metal at the bend should keep the ends
Fig. 81.
Insect Envelope.
about | in. or 1 in. apart. The ends can be filed
to a blunt point. Touch the insect as little as pos-
sible, and always catch hold of it by the thorax.
The wings and other parts are covered with minute
scales, which are ruffled, rubbed off, and defaced at
the slightest touch. The dead insect stiffens anddries up rapidly ; therefore, have ready a setting
board, on which to hold it in position whilst drying.A common system is to leave the killed insects to
dry unset, so that they may be relaxed and set
properly at leisure. Dry insects are easily relaxed,

134 TAXIDERMY.
and then they may be treated on the setting board
precisely as if they had but just been killed.
To relax insects, a simple but risky method is to
put them on a piece of cardboard and place this
on the bricks of a damp cellar, covering the card, of
course, to exclude all dust and rubbish. By this
means it is quite possible to get out the wingsgradually when the specimen is of fair size. A bettermethod is to put them into a tin box in which is
placed a rather shallow bed of damp sand. At theend of a day or so it will be an easy matter to
transfer them to a proper setting board and strapdown the wings by means of paper braces secured
by pins. The sand in the relaxing box should notbe too damp, or the specimens will be ruined.
Special relaxing boxes are sold by dealers in ento-
mological materials.
A setting board for insects is made by glueingtwo strips of soft, smooth cork, each 9 in. by 1 in.
by T3a in., to a piece of grooved wood 9 in. by 2j in.
by \ in. or so. The two cork strips are glued to
the wood with a J-in. groove between their longer
edges, and the cork is slightly bevelled off on the
outer edge (see Fig. 83). Insect setting boards
used by Continental naturalists are, however,
quite flat; but English naturalists consider in-
sects to be spoilt if set flat. Of course, the
larger the insect the wider will the board requireto be. In the J-in. groove the body of the insect
lies whilst its wings are extended over the cork on
each side. Along the bottom of the central groove
glue a strip of cork. Having laid the dead insect in
the groove, a pin is pushed vertically through the
centre of its thorax down into the cork ; the heightof the latter should be just sufficient to bring the
wing above the edge of the side cork, and packing must
be inserted where necessary to ensure this.
Braces for securing the wings of insects on setting
boards are of thin card cut into strips about \\ in.

PRESERVING INSECTS. 135
long, or longer if the insects are large in . is the
width of the widest end. The actual process of
setting a butterfly or moth is as follows. Taking upan insect, pass a suitably sized entomological pinthrough the centre of the thorax, being careful not
to push off the legs. Now select a setting board
(shown in section by Fig. 83) with a groove A wide
enough for the body, and with sides broad enough
Fig. 84.
Fig. 83. Section of Setting Board. Fig. 84. Butterfly on
Setting Board.
to support the wings, and, placing the body in the
groove, press the pin into the cork B at the bottomof the groove. The wings are now standing uprightand close together. Take one of the card strips or
braces c (see Fig. 84), place it between the wings,and gently draw one wing towards the setting board.
Having brought this wing nearly down, with
ordinary pins pushed through the ends of the brace,fasten the wing in this position to the cork of the
setting board, D, Fig. 83.

136 TAXIDERMY.
The "pin
'' which passes through the thorax maybe a long, thin needle fixed in a light cane handle,
say 1 in. long, or preferably an entomological pin,
long and thin with a small head, such as are sold
specially for the purpose. If the wings can be
spread with a couple of sparrow - tail or flight
feathers fixed in a handle, all the better. Contactwith fingers or tweezers or such like spoils the wings.
Now, with a fine needle, working from the underside
of the wing, gently move the upper wing towardsthe body. Having spread these satisfactorily, pressthe pins in the brace firmly into the cork D, so that
the wing is brought into contact with the setting
board. Treat the other wing in the same way, andsee that the wings form corresponding angles onboth sides. One, or perhaps two braces for each
wing will be quite sufficient. The antennae may be
bent down and fixed by pins alone. These are very
brittle, and, if broken off, should be fixed withcement. Fig. 84 shows the method of bracing the
butterflies. The dotted lines are smaller braces,which may either supplement the larger ones or re-
place them. Put the set insect aside for a week or
so, remove the straps, and pin the specimen inside
a store box or case.
Caterpillars may be preserved in the following
way. Press out the contents of the body with the
fingers, working from the head to the tail, and
dragging away the mass with a crochet needle.
Great care must be exercised. Now place the end
of a fine blowpipe in the orifice at the tail end and
blow up the empty skin and keep it distended till
dry. This drying must be hastened by artificial
means. Some use a glass jar over a spirit lamp in
which to place the skin while blowing ;but an
ordinary" box-iron
"may be used, heated in the
same manner as in the laundry. Heat an iron,
place it in the box, close the slide, and leave it till
the box is hot. Then take out the iron, place the

PRESERVING INSECTS. 137
skin in, and blow it up. In a short time it will be
dry, but, of course, the air must not be allowed to
escape until the skin is dry. Do not unnaturallydistend the skin, and do not allow the skin to touch
any part of the heated box, or it will be burnt and,of course, spoilt.
As regards beetles, it is advisable, unless there
are good reasons for delay, to kill the beetles as
soon as caught, as some specimens are likely to be
damaged by long captivity. If, however, they mustbe kept alive till home is reached, each specimenmust be kept alone. If kept together in one re-
ceptacle, they not only damage each other in their
efforts to escape, but the carnivorous kinds devourthe others. To set a beetle, pin it through the right
elytron (wing case) with an entomological pin,
raising the body high enough to give sufficient spacefor the proper arrangement of the legs. The beetle
is then pinned to a flat piece of cork, and the legs
arranged, each joint of the legs being kept in
position with common pins. Pins are also used to
display the antennae, and the specimen is then left
for a few days to dry. When dry, the common pinsare withdrawn, and the beetle is removed to the
specimen drawer and pinned down on a card bear-
ing its common and its scientific name. Beetles
may also be set with gum. On a piece of card dropa little gum where the legs of the beetle are likely
to come. Pin the beetle upon the card, and draweach leg into position and keep it there till the gumhas set. Then put the specimen away to dry, andwhen set release from the card by dipping into warmwater ;
then lightly touch the underside of the feet
with gum, and place upon a clean card, bearing
name, date, locality, etc. The beetles may also be
set by means of card braces or pins, left to dry, and
placed in the cabinet with the name, etc., upon a
separate card. The first method of setting beetles
described above is the one to be preferred.

138 TAXIDERMY.
The setting of insects having been dealt within sufficient detail, information on preserving egg-shells may be given.
In order to blow eggs without making more thanone hole, two tools are necessary a drill and a
blowpipe, which may be either purchased or made.The egg drills sold by naturalists have the endsformed much like the rose of a woodworker's coun-
tersink, and cost from Id. to 6d., but a substitute
may quickly be formed by filing the end of a pieceof steel wire into a square point. Round wire will
answer if the edges of the point are left sharp, butthe best wire is the pinion wire used by watch-
makers. This should be filed to a point, then the
channels should be relieved by a triangular file.
The other tool is a blowpipe, which may be
made from a piece of glass tubing, obtainable fromthe chemist. One end should be heated and drawnto a point. These blowpipes may be bought readymade for about 2d., or much better and finer ones,
made of metal, for 6d. To use them, the egg should
be held by the left fingers, and the drill by the righthand. Then, placing the drill on the egg, exactlyin the centre of the side, and rotating by a kind of
circular motion between the finger and the thumb,a perfectly round hole is made.
To blow an egg, place the finer end of the blow-
pipe near the hole (some say in the hole) and blow.
The contents of the egg will be quickly forced out bythe air. When all is clear, rinse out the shell with
water containing a few drops of oil of cloves, to
prevent putrefaction. Now place the shell, hole
downwards, upon a piece of blotting paper, which
will readily absorb any moisture left inside. Whendry, cover the hole with a small piece of gummedpaper to exclude dust, and the eggshell is ready for
the collection.
To prevent birds' eggs cracking or crumbling
after they are blown, well rinse them out with

PRESERVING BIRDS' EGGS. 139
corrosive sublimate dissolved in spirits of wine (afew grains to the ounce) ; this is a deadly poison.Insert a small quantity into the egg by means of a
glass egg-blower with a bulb, then shake the eggso that the solution comes out of the egg by the
blower, and return it to the bottle. Now place the
egg with the hole resting upon blotting-paper, so thatthe last drop or two may be drawn out, and finallycover the hole with a small piece of gummed paper.Water containing a few drops of oil of cloves maybe used in place of the sublimate if desired.
Cabinets in which insects and eggs are kept areof many different kinds. The first arrangement to
Fig. 85.
Fig. 85. Single Book Box for Insects. Fig. 86. Half of
Double Book Box for Insects.
be mentioned is an exhibition case in the form of a
book, of which a section is shown by Fig. 85. One
cover, the lower one, is a fixture, but the other
is hinged to the back. The glass under this latter
cover rests upon small slips of wood glued inside
the case, and is finally fixed, when the specimensare complete and the case is filled, by pasted slips of
ornamental paper. Some of these box cases havethe back of (say) mahogany with the bands of
another wood, either ebony or whitewood, but ii<
is far better to cover the back with leather, fix uponthis the title in gilt, and well tool the back ; the
result will be to all intents and purposes a volume.
Bookbinders usually fix the leather upon the backs

140 TAXIDERMY.
of books by means of good flour paste, but cloth
requires glue. It is not usual, however, to see these
single book-boxes ; generally two are hinged to-
gether at the back, opening therefore in front. In
fchis case the section would be as in Fig. 86. Of
course, when the volumes are not open the glasscover of the one faces (and would touch but for
the paper binding) the glass cover of the other,
thus keeping all the interior dark, a necessary con-
Fig. 87. Fig. 88.
Fig. 87. Double Book Box for Insects. Fig. 88. CorkLining of Insect Cabinet.
dition with entomological specimens, as light, and
especially sunshine, really causes the colours of
many butterflies and moths to fade. Fig. 87 showsthe appearance of the hinged book-box whenfinished.
The bottom requires to be covered with cork in
order to support the pins. The cork used is cut speci-
ally for this purpose, and is known as"cabinet " or
"entomological
"cork
; it is sold in sheets of threeor four principal sizes, but being only about \ in.
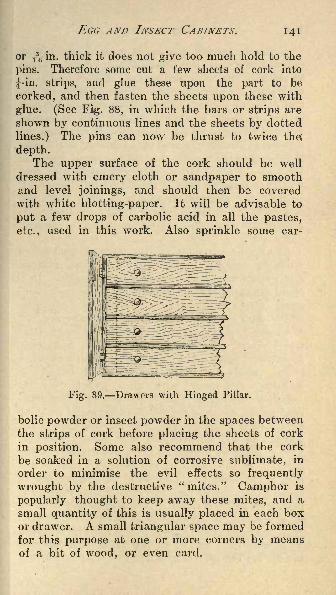
EGG AND INSECT CARINETS. 141
or/,.-
in. thick it does not give too much hold to the
pins. Therefore some cut a few sheets of cork into
i-in. strips, and glue these upon the part to be
corked, and then fasten the sheets upon these with
glue. (See Fig. 88, in which the bars or strips are
shown by continuous lines and the sheets by dotted
lines.) The pins can now be thrust to twice the
depth.The upper surface of the cork should be well
dressed with emery cloth or sandpaper to smoothand level joinings, and should then be coveredwith white blotting-paper. It will be advisable to
put a few drops of carbolic acid in all the pastes,
etc., used in this work. Also sprinkle some car-
Fig. 89. Drawers with Hinged Pillar.
bolic powder or insect powder in the spaces betweenthe strips of cork before placing the sheets of cork
in position. Some also recommend that the cork
be soaked in a solution of corrosive sublimate, in
order to minimise the evil effects so frequently
wrought by the destructive "mites." Camphor is
popularly thought to keep away these mites, and a
small quantity of this is usually placed in each boxor drawer. A small triangular space may be formedfor this purpose at one or more corners by meansof a bit of wood, or even card.
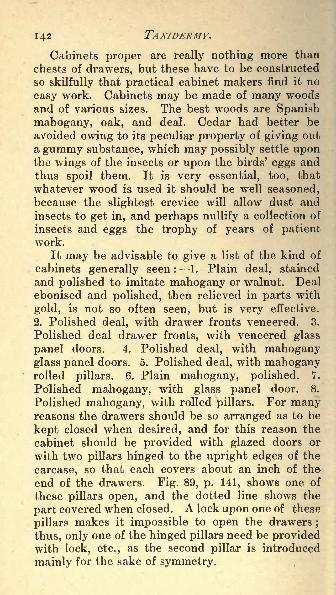
142 TAXIDERMY.
Cabinets proper are really nothing more than
chests of drawers, but these have to be constructed
so skilfully that practical cabinet makers find it no
easy work. Cabinets may be made of many woodsand of various sizes. The best woods are Spanish
mahogany, oak, and deal. Cedar had better beavoided owing to its peculiar property of giving out
a gummy substance, which may possibly settle uponthe wings of the insects or upon the birds' eggs andthus spoil them. It is very essential, too, that
whatever wood is used it should be well seasoned,because the slightest crevice will allow dust and
insects to get in, and perhaps nullify a collection of
insects and eggs the trophy of years of patientwork.
It may be advisable to give a list of the kind of
cabinets generally seen: 1. Plain deal, stained
and polished to imitate mahogany or walnut. Dealebonised and polished, then relieved in parts with
gold, is not so often seen, but is very effective.
2. Polished deal, with drawer fronts veneered. 3.
Polished deal drawer fronts, with veneered glass
panel doors. 4. Polished deal, with mahoganyglass panel doors. 5. Polished deal, with mahoganyrolled pillars. 6. Plain mahogany, polished. 7.
Polished mahogany, with glass panel door. 8.
Polished mahogany, with rolled pillars. For manyreasons the drawers should be so arranged as to be
kept closed when desired, and for this reason the
cabinet should be provided with glazed doors or
with two pillars hinged to the upright edges of the
carcase, so that each covers about an inch of the
end of the drawers. Fig. 89, p. 141, shows one of
these pillars open, and the dotted line shows the
part covered when closed. A lock upon one of these
pillars makes it impossible to open the drawers ;
thus, only one of the hinged pillars need be providedwith lock, etc., as the second pillar is introduced
mainly for the sake of symmetry.

EGG AND INSECT CABINETS.
The following is a list of standard sizes of ento-
mological cabinets :
Number ofDrawers.

TAXIDERMY.
(hawks and owls). 2. Insessores or perchers (mostbirds). 3. Rasores or scratchers (doves, game,ostrich). 4. Grallatores or waders (shore birds,
herons, woodcocks, rails, coots, etc.). 5. Natadoresor swimmers (ducks and gulls).
'
Having selected the wood and decided upon the
size and number of drawers, the cabinet may bemade. The work of constructing an egg cabinet
consists of three independent parts : (1) making the
carcase or frame of the whole, (2) making the
drawers, and (3) covering the drawers with glass.
Fig. 90. Fig. 91.
Fig. 90. Body of Cabinet. Fig. 91. Drawer Section showingGroove and Runner.
The carcase may be made exactly like an ordinarychest of drawers, and Fig. 89 gives a sketch of a
part of a cabinet of this form.
The next form of egg cabinet has outside walls
only, as shown in Fig. 90. Here the drawers touch
their neighbours, at least in front, and are not
separated as in Fig. 89, p. 141. Therefore some ar-
rangement must be made for sliding the drawers in.
This must take the form of either a groove cut in the
bide of the drawer in which slides a runner attached
to the inner side of the carcase, or rice versa. Thedotted lines in Fig. 90 show the position of these
grooves. Fig. 91 shows the section of part of a

EGG AND INSECT CABINETS.
drawer provided with a groove ploughed out to
receive a runner fastened to the inside of the frame-work or carcase. This is the best arrangement, andthe exercise of a little ingenuity will enable it to beso made as not to disfigure the front. Fig. 92 showsa simple method of accomplishing this. It consists
in simply halving the end of the front piece, andnot allowing the groove to be cut through the front
part which is left..
Fig. 93 gives a similar section to Fig. 91, butwith the runner and the groove reversed. This is
Fig. 93. Fig. 94.
Fig. 92. Drawer with Grooved Side. Figs. 93 and 94.
Drawer Sections showing Grooves and Kunner.
nob nearly so good as the method shown by Fig. 91,as the front is necessarily disfigured by the runner
showing. Sometimes the drawers are arranged asin Fig. 94, in which the runner is formed by thebottom of the drawer being prolonged sufficientlyto go into the channel. But, for both ease in con-struction and neatness in appearance, preferencemust certainly be given to the method shown byFig. 91.
It is an advantage to have the cabinet drawersso arranged that they cannot be drawn quite out,
thus obviating the risk of the drawer coming out
upon the floor with a crash, ruining probably both

146 TAXIDERMY.
the drawer and its contents. This may easily be
arranged by placing a screw through the side of the
frame and near the front, the point of which should
work in the groove cut deeply enough for the
runner, but not for the screw, consequently the
drawer is stopped upon the back reaching the screw.
Fig. 98. Fig. 99.
Fig. 95. Screw to Prevent Drawers Coming Out. Figs. 96 to
100. Fixing Glass in Drawers.
Fig. 95 shows a brass screw arranged for this pur-
pose, but an ordinary wood screw will answer
equally well, although it is not quite so easily taken
out should the drawer require removal. A screw
at one end only will answer as well as one at both
ends of the cabinet. It is in the part of the work
just described that the difficulty of making a really
first-class cabinet comes in. The drawers ought to
be perfectly interchangeable, and this should apply

EGG AND INSECT CABINETS. 147
whether the drawers fit into the carcase by runners
or by the tongues and grooves just described.
The method of fixing the glass cover upon each
drawer needs explanation. Several methods of
doing this are shown in Figs. 96 to 101. (1) Thefirst method, illustrated by Fig. 96, simply con-
sists of the glass dropping into a space formed
by rebating out a space from the inner surface of
the drawer itself or by fixing inside the drawerfour strips of wood to support the glass, as in Fig.
Fig. 101. Fixing Glass in Drawers.
Fig. 102. Partitions for Egg Cabinet.
97. Fig. 96 is the better as regards neatness, butneither is recommended, as dust, etc., can readily
get between the glass and wood. Velvet gluedalong the rebate will somewhat obviate this, butthe only case in which this method should be usedis when the drawer is complete and there is nolikelihood of its contents being disturbed. Thenthe glass may be fixed down by means of pasted
strips of paper, and the case thus made, air-tight
as well as dust-tight. (2) Fig. 98 shows another
method sometimes used. A groove is ploughed out
along the inside of each side and the front, into

148 TAXIDERMY.
which the glass slides from the back, which is
lowered for this purpose. (3) A better plan, but a
more difficult one to carry out, is to set the glass
into a frame which will exactly cover the top of the
drawer, and in the bottom of this frame to form a
tongue fitting into a groove in the top of the drawer.
The top of the drawer may in this case be covered
with velvet, and then no dust can possibly enter.
(See Figs. 99 and 100.) (4) Another method is a
modification of No. 1. In this the glass is framed,and this frame is hinged to the top of the drawerand drops into the rebate formed in the four walls
of the drawer. (5) In another form (Fig. 101) the
frame into which the glass is fixed exactly cor-
responds in size with that of the drawer upon whichit drops. Dust is excluded by a fillet or tonguefixed to the inner surface of the frame, and just
large enough to "fit into the drawer. (6) In other
cases the glass is puttied in on the top, and thus is
a fixture. The bottom is fixed by screws, whichmust be removed to allow of any change beingmade inside.
The drawers of egg cabinets need not be corked ;
they are best divided into compartments by thin
(i-in.) wood, as shown by Fig. 102. Each compart-ment then is lined with cotton-wool. Sometimesthe drawers are plain, the fixed partitions beingreplaced by cardboard boxes lined with wadding,but this is not a plan often adopted. If it is desir-able to keep the nests, each should be placed in a
separate cardboard box provided with a glazedtop. These can then be placed side by side in adrawer deep enough to contain them.

149
CHAPTER VIII.
CASES FOR STUFFED SPECIMENS.
THE making of cases for stuffed specimens will be
dealt with in this, the concluding, chapter. The
commonest, and at the same time the most useful,
case is the ordinary box case, with glass in front
only, which is made thus. Each -piece of wood is
first dressed and squared ; then, with a fillister,
about half the depth is cut out along each edge.To fit the case together, it is first glued and then
nailed from both end and side. This makes it
thoroughly dust-proof and firm. Fig. 103 shows the
joint. The rebate at the back receives the wooden
back, which is fixed there with glue and brads. Thefront rebate is for the glass, held in place by a fine
mitred beading ;or it may be fixed by strips of paper
pasted to both wood and glass, or both paper and
beading may be used at the same time. Gilt mould-
ing may be used outside the glass instead of the
beading, or, as is preferable, inside the glass, in
addition to beading.In the glass-ended case, the front and two ends
are of glass, and the top, bottom, and back of
wood, rebated and fixed as described above. Toprevent the back joints giving way, uprights arefixed between the top and bottom at the frontcorners. In small cases these uprights may be ofwire bolted into both top and bottom, and will beafterwards hidden by the paper binding. In largercases, the uprights should be of wood ; in plaincases only a i in. strip, with the inside cornerrounded off, serves as an upright. These also willbe hidden by narrow strips of black paper, which

TAXIDERMY,
are pasted down the vertical edges of the glass to
hide their junction. Better cases have the up-
rights | in. square, with rebates for the glass cut
on opposite sides (Fig. 104). The outer corner
should be nicely rounded off. This case may carry
a piece of moulding both on the top and bottom.
An easily made fancy case may have bamboo up-
rights fixed on the outside of the glass (see
Fig. 105). Thin strips of bamboo can replace the
beading at the top and bottom of the glass, while
moulding, etc., can be formed of bamboo split down
the middle and glued and pinned to wood. The
Fig. 103. Fig. 104.
Fig. 103. Joint for Box Case. Fig. 104. Section of Case
Upright. Fig. 105. Section of Bamboo Cane Upright.
working of bamboo is dealt with fully in the com-
panion handbook," Bamboo Work."
The canted cornered case is mentioned solely
that it may be condemned. A plan of it is given in
Fig. 106, A B and c D being the sides and u c the
back, all of wood. The remaining part, A E P D, is
glass. It need scarcely be said that at E and F will
be two black lines, which will either make the
triangular parts B A E and CDF quite useless, or
spoil the appearance of anything put into them.
The best cases for fish are those in which the
glass is curved. Fig. 107 is the plan of a case for
swimming fish;A B, c D, and B c are the wood sides
and back, and A D the curved glass front. Fig. 108
is a section through a case suitable for fish lying

'CASES FOR STUFFED SPECIMENS. 151
upon a bank : A B is the back, B c the bottom, bothof wood, and A c is the bent glass. Sometimes birds
are pub into these cases.
Glass shades are of three kinds the undesirable
round shape ; oval, which are rather better ; and
square, which are the best and most expensive.Far neater and better in every way are "mounts,"which are simply the tops of round shades fitting
into turned stands. These are very n-eat, and with
one or two little birds (say goldfinches), and somenice grasses, form really handsome ornaments to
hang upon a wall. The glass is fixed in the stand
F
Fig. 106. Canted Cornered Case.
with plaster-of-paris mixed with water. Thejunction may be hidden by a band of colour or gilt,
but the usual method is by a band of chenille. Onekind of mount may be made of five pieces of glass,
with a bottom of wox)d, this having a rebate alongeach edge and the glasses being fastened together
by strips of paper or tape. Large cases may bemade in this way, and bamboo strips put along each
edge outside, cut from the bamboo canes as in Fig.105.
The case is ebonised as follows. Into some
hot, thin glue, stir enough lampblack to form a
paint and brush this well into the case, etc., while
still hot. When dry, smooth it, if required, with
emery paper, and then coat with brunswick black

152 TAXIDERMY.
or japan black. With regard to the finishing of the
inside, the back may be ploughed out deeply
enough to take in a piece of canvas stretched upona wooden frame. Upon this some appropriatescene is painted in oil colours. In this case, prob-
ably the top and ends would also be covered with
canvas and coloured, and the glass might be fixed
with putty. This is the only case in which the glass
may be thus fixed, for if the lining is of paper the
oil in the putty will spread all over it, completely
spoiling it. In most cases the inside is covered
with paper, pasted on, and then coloured with
distemper, and the colours used for this purposeare dry white lead, lime blue, carmine, and chrome
B
Fig. 107. Fig. 108.
Figs. 107 and 108. Sections of Fish Cases having Bent Glass
Fronts.
yellow ; the white lead, it is thought, is less liable
to be streaky than whiting. A small quantity of
blue should be mixed with the white for a toned sky,
and half way down the back the yellow may be in-
troduced, gradually increasing in colour till the
bottom part is a bright yellow. If some light streaks
of carmine are introduced, a good idea of sunset,
with floating fleecy clouds, will be produced. But
very little of the carmine must be used.
The paper for the insides of the cases may be
good cartridge paper, but what is known by paper-
hangers as white linings or ceiling paper is also verysuitable. The paper used for fixing the glass and
for covering the upright edges in the smaller cases

CASES FOR STUFFED SPECIMENS. 153
is black glazed foolscap. Scenes may be painted in
distemper upon the inside instead of putting in atoned sky only ; and one or two large grasses or
flowers are finally painted across the whole.
Having the case made, coloured, and papered,the purpose in view will be served by describinghow to place, say, a stuffed bird inside it
;the bird
will have been stuffed as described in Chapter II.,
and must be thoroughly dry. The points noted on
pp. 36 to 39 should be studied. As the object is to
represent the bird in the midst of its natural sur-
roundings, the soil or rock must be replaced bysomething light, and yet so like the original sub-
stance that the difference is not noticeable. Brownpaper is the material used for this purpose. It is a
good plan, in all cases, to make a false bottom, fix
the rockwork, etc., upon this ; then put in the whole,
fastening it with fine screws from the bottom.
Having cut the piece or pieces of, say, 3 in. stuff
(old boxes will do) as large as the bottom of the
case, chamfer the ends and front (if a glass-endedcase is used), then fix the bird, or birds, by meansof strips of wood in the position and at the height
thought most suitable. Suppose that at one end a
hillock is wanted; get a piece of straight brown
paper, fasten one edge down with gimp pins, pushsome shavings or paper under it, dust some carbolic
powder or insect powder among it, and draw downthe other end towards the false bottom, fastening
this again with gimp pins. After having made the
other edges safe, proceed to form other hillocks
where it is thought they are required. Continue
this until there is some rough likeness to the sketch
that should always be made before beginning this
work. Now get some finer paper ;the best to use
is the thin, light brown, wrapping paper used by
drapers. Tearing off a little piece, perhaps as bigas a penny, cover this with paste, and proceed to
join the hillocks together. This is a tiresome job,

154 TAXIDERMY.
but everything now depends upon the thoroughnesswith which this is done. All creases and sharpedges must be hidden, all the hillocks joined to-
gether (in the valleys), and the edges of the brownpaper well pasted down to the bottom with it. Useonly small pieces of paper, and plenty of paste.
Leave the work until it is dry, and then mixenough plaster-of-paris with some hot, thin glueto make a cream. Then with a small brushcover every part of the groundwork with this
composition while it is still hot, putting it on with,
no sparing hand. Probably by the next day it will
be dry. Then paint it with thin glue and dash on
plenty of sharp sand (silver sand is the best). Thewhole of the glue must be hidden by the sand, andtherefore this must be thrown on rather forcibly.
When dry, proceed to colour the work with oil
colours, well thinned with turps, blending themwell one with the other. It is impossible for any-one to colour a case exactly from written descrip-tions alone
; nature must be copied if success is
to be achieved. Select a piece of suitable ground,or rock, make a sketch, and reproduce it in the case.
It may be necessary to chip off a piece of rock, or
carefully cany home some soil, etc., and then mix the
colours to match;suitable colours are :
Si til. Yellow, burnt sienna (with or without
burnt umber), and black, making the hollow partsrather darker, and dusting on Saxon green on the
higher parts.
Chalk. Mix the sand with the glue and plaster,
and do not throw on sand afterwards. First a thin
wash of yellow, then in parts the faintest tinge of
carmine, and a line or two with a lead pencil to
mark the strata. Damp, slimy surfaces may be dark
green. Varnish if intended to look wet.
Sandstone. The colours are similar, but the
points may be whitened, red sand dusted on in
parts, and horizontal places made slimy.

CASES FOR STUFFED SPECIMENS. 155
Hough sea rocks. These are almost black, with
green edges and the faintest trace of white over all.
Varnish if intended to look wet. Very suitable for
white or light sea birds.
Footprints on mud. These are sometimes dark
slate colour, sunk about i in. deep.Peat. This is often used for groundwork, espe-
cially where time is an object It can be carved
into any shape, glued and nailed down, and then
covered with plaster, etc., as above.
Virgin cork. This is useful for sharp irregular
rocks, and for tree trunks.
Branches. These may be made of any shape bywrapping tow round wires, then covering all with
glue and throwing on powdered lichens. But theyare easiest made by nailing small branches togetherin various directions and concealing the junctionswith glue and wadding, then covering with lichens.
Oak is the best wood to use, but it must be
thoroughly well dried and have plenty of turpentine,
slightly coloured with green paint, put over it whenfixed together. The paint improves the appearance,and the turpentine destroys small larvae.
Ferns. The English ferns suitable for cases are
but few, the best being the common brake. This
should be gathered on a dry day in autumn, pressedbetween sheets of newspaper or blotting-paper, and,when dry, coloured with oil paints. They look
better if varied in colour;
therefore colour somewith light green, making the centres darker. Others
can be coloured with stone colour or yellow, with
brown or red centres. (These have quite faded.)Some are green, with the tips brown (beginning to
fade) ; others are green on one side and brown onthe other, and so on. They may be bent to almost
any shape when the paint is dry by being carefully
drawn between the finger and thumb.Leaves. The artificial leaves are used, but they
should be the best that can be bought.

156 TAXIDERMY.
Grasses. Any hayfield supplies a variety of
grasses, which, when in seed, dry well and readilytake dye ;
but dull colours only should be used,and most grasses, indeed, are best used un-coloured. Many coarse grasses (not the seed stalks)
grow near the sea and in uncultivated places, in
tufts, and most of these dry well and can be easilycoloured. Hosts of the seed stalks of weeds maybe collected in late autumn, and take colour nicely,but the seed must be removed first. Use oil colours
for all ferns, grass, etc. The most difficult colour
to imitate is the green colour of grass ; but a mix-
ture of white and chromo green should prove satis-
factory. Dyes should be used only for grass in
flower and for moss. Sedges and rushes dry well,
and also colour well. Hushes, etc., are usuallyironed to keep them from -shrivelling.
Seaweeds. These must be well washed in order
to remove the salt, and should be varnished if in-
tended to look wet. Starfish dry well (after beingwell washed), but should be tinted to restore the
colours. These and shells, as well as all the above,are fixed sufficiently tightly with glue.
Having finished colouring the rockwork, the dis-
coloured parts (feet, legs, cere, etc.) of the stuffed
bird must be restored by painting, if not already
done, all unnecessary wires, etc., removed, and the
grasses, etc., fixed; and then, as a last operation,
the whole bird should be covered with benzoline to
destroy any insect which may be present (see also
pp. 40 and 41). The benzoline will soon evaporate, and
the whole should then be put into the case and
fastened with two or three screws. The glass is
now fixed, and strips of paper placed where re-
quired, these strips being coated afterwards with
either brunswick black or japan bb.^k.

INDEX.
American Skin-preserving Method, 113Animals (see separate headings)Antlers (see also Horns)
, Cleaning, 84, 85, 8(3
, Mounting, as Hat-pegs, 84
, Polishing, 84, 85, 80Arsenical Soap, 1(3
Artificial Earth, etc., 154, 155
Eyes, 30, 37, 0(5, 101
Awls, Using, 14
Badger Skin, Cleaning, 115
Bamboo Uprights, Cases with, 150Becceur's Preservative, 10
Beetles, Setting, 137
Ik'lllmnger's Pliers, 12
Bird, Arranging Feathers of, 31, 32
, Attitudes of, 30, 38, 39Bodies of Cork and Peat, 34
, "Soft," 32
, Tow, 25
,Wire for, 30
Cases, 149-153
, Cleaning, 39, 40
Eggs (see Eggs)in Flight, 38, 39
, Fixing, to Stand, 30
, Inserting Artificial Eyes in, 29
, Protecting, from Insects, 40, 41,150
, Placing, in Case, 153
, Preservatives for, 10, 17
, Removing Blood from, 3D
, Restoring Bright Colours of, 35
Screens, 42-47
Skinning, 18-23
Skins, Relaxing, 24
, Removing Fat from, 21-
. Sewing, 28
Stuffing, 25-39
Wattles, 30Webs Shrivelling, 39
, White-fronted, Skinning, 22
Wiring, 25-28, 33, 34Black Dye for Skins, 118, 119, 129
Blackbirds, Eyes for, 30
Bleaching Bones and Horns, 91-93
Sheepskin, 120, 127
Teeth, 65
Blood, Removing, from Birds, 39
Blowing Eggs, 138
Blowpipe for Eggs, 138Blue Dye for Sheepskin, 129
"~p:
Bodkin, 14
Bolting Leg Wires, 27
Bone, Removing, from Horns, 90
Bones, Bleaching, 92, 93
, Cleaning, 92, 93
, Fish, Preserving, 105, 106
, , Varnishing, 100
, Softening, 93Book Boxes for Insects, 139
Braces for Setting Insects, 134, 135
Brain-spoon and Hook, 12
Branches, Imitating, in Cases, 155
Brown Dye for Skins, 118, 129
Browne's Preservatives, 17, 73
Brushes, Fox, Softening, 119Buffalo Horns, Bleaching, 91
, Dyeing, 91
, Mounting, 91, 92
, Polishing, 91Bullock Horns, Polishing, 89
, Removing Bone from 90
Butterflies, Braces for, 134, 135
, Envelopes for, 132
, Killing, 132
,Pins for Fixing, 136
,Preservative for, 141
, Relaxing, 134
, Setting, 134-136]
, Setting-boards for, 134
,Tweezers for Holding, 133
Cabinets, Egg and Insect, 139-148Case with Bamboo Uprights, l^o
, Canted Cornered, 150
, Curved Glass, 150, 151
, Ebonising, 151for Eggs, 139-148
, Ferns and Grasses used in, 15;j
, Finishing Inside of, 152for Fish, 102, 150, 151
--, Glass-ended, 149
,Hillocks in, 153, 154
,Artiticial Branches in, 155
, Chalk and Rocks in, 154
, Mud Footprints in, 155
, Sandstone in, 154
, Soil in, 154for Insects, 139-143
,Leaves used in, 155
, Lining, with Paper, 152
, Painting Inside of, 152, 153
, Peat used in, 155
, Placing Stuffed Bird in, 153
, Seaweed used in, 156for Stalled Specimens, 149-153

TAXIDERMY,
Casting Fish, 102-104
Cat, Attitude of, 05, 00
Skins, Treatment of, 121
,Wires for Body of, 00
Caterpillars. Preserving, 130, 137Chain and Hooks, 15
Chalk, Imitating, in Cases, 154
Cleaning Birds, 39, 40Fish Bones, 105, 100Ram's Horns, 89, 91
Sheep's Head, 115, 110, 125
Skin, 115-117, 125
Stag's Antlers, 84-80
Teeth, 65
Colouring Fish, 100, 101Cork Body of Bird, 34
for Insect Cabinets, 140, 141Corrosive Sublimate, 40, 41
Crabs, Preserving, 106
Crows, Eyes for, 30
,Wire for Bodies of, 36
Curing (see Preserving and Skins)Currying, 109
Cutting Nippers, 11
Davie's Corrosive Sublimate, 41
Deer's Antlers as Hat-pegs, 84
Head, Mounting, 08-83
Dog, Attitude of, GO
, Feet of, 50
, Producing Skeleton of, 92
Teeth, Bleaching, 05
, Wires for Body of, 60
Duck, Attitudes of, 38
, Eyes for, 30
, Skinning, 23Webs Shrivelling, 39
,Wire for Body of, 30
Dye Fixative, Beimann's, 118
Dyeing Horn, 89, 91
Skins, 117-119, 128, 129
Eagles, Eyes for, 30
,Wires for Bodies of, 36
Ear Blocks, 74
Eggs, Blowing, 138
,Cabinets for, 139-148
. Classification of, 143, 144
Crumbling, Preventing, 138, 139
Elephant Tusks, Mounting, 88
, Polishing, 87
Entomological Cabinets, 139-143
Pins, 130
Envelopes, Insect, 132
Eyes, Artificial, 29, 36, 37, 00, 101
Eye-lids, Colouring Edge of, 82
Fat, Removing, from Bird Skins, 21
, Removing, from Skins, 113Feathers of Bird, Arranging, 31
Stained by Putty, 29
Feet, Mammals', 50Ferns used in Cases, 155
, Painting, 155
Ferrets, Wires for Bodies of, 00
File, 15
Finches, Eyes for, 30
,Wire for Bodies of, 36
Fire-screens, Stuffed Bird, 47
Fish, Artificial Eyes for, 101
Bones, Preserving, 105, 100
, Varnishing, 106
,Cases for, 102, 150, 151
Casting, 102-105
, Colouring, 100, 101
Fins, Treating, 99, 101
,Flints for, 101Head Shrivelling, 101, 103
, Modelling, 102-104
, Painting, 100, 101
, Skeletonising, 105, 100
, Skinning, 94-97
, Stuffing, 98-102
,Wire Shape of, 94, 95
Fleshing Skins, 107
Flints, 101 (see Artificial Eyes)Folding Skins, Method of, 114
Footprints, Imitating, in Cases, 155
, Measuring, 38Fox Brushes, Softening, 119
Feet, 50
Tail, Skinning, .Y2
Teeth, Bleaching, 05
, Wires for Body of, 00Furrier's Knives, 110
Method of Preserving Skins, 113
Geese, Eyes for, 30
, Skinning, 23
, Wire for Bodies of, 30Glass Mounts and Shades, 151
Glass-ended Cases, 149-151
Goat Skins, Cleaning, 117
, Curing, 119
, Dyeing, 117, 118
Grape Scissors, 10Grasses used in Cases, 150Grease in Skins, Killing, 115
Greasing Skins, 114Green Dye for Sheepskin, 129
Grey Dye for Skins, 118, 129
Grebes, Skinning, 23
Gulls, Attitudes of, 38, 39
, Eyes for, 36Gull's Webs Shrivelling, 39
Hare Skins, Curing, 121
Hat-pegs, Mounting Antlers as, s4
Hawks, Eyes for, 30
Seizing Prey, Attitude of, 3S
,Wire for Bodies of, 30
Heads, Horned, Cleaning, 72
, , Keeping Insects from, 83
, , Modelling, 75-80
, , Mounting, 08
, ,Mounts or Shields for, 81
, , Preserving Skin of, 68, 73
, , Skinning, 09-72

INDEX. '59
Heads, Sheep, Cleaning, 110
Herons, Byes for, 36
, Wire for Bodies of, 3(5
Hillocks in Showcase, 153, 154Hook and Brain-spoon, 12Hooks and Chain, 15
, Suspending, 15Horned Heads (see Heads)Horns (see also Antlers and names of
respective Animals), Bleaching, 91
-, Cleaning, 84-80, 89, 91
, Dyeing, 89, 01
, Mounting, 88, 89, 91, 92
, Polishing, 84-0, 88, 89, 91
, Removing Bone from, 90
, Varnishing, 91
Horses, Producing Skeletons of, 92Hunters' Treatment of Skins, 113
Insect Preventives, 40, 41, 83, 119Insects (see also Butterflies)
, Cabinets for, 139-143
, Preserving, 132-137
Jack, Colouring, 100
Jays, Eyes for, 30
Killing Butterflies, etc., 132
Killing-bottles, 132Knife for Bird Skinning, 0, 10
, Double-edged, 110
, Single-edged, 110
, Skiving. 10
Leaves used in Cases, 150Leather of Skins, Reducing, 110,
111
Leg Wires, Bolting, 27
Leopard Skin, Curing, 114, 121, 122
Lining Cases, 152
Mammals, Attitudes of, 05
, Cleaning Teeth of, 05with Open Mouths, 04
, Preservative for, 4S
, Skinning and Shifting, 49
, Wiring, 02-64
Mats, Skin, 122, 125, 130
Modelling Fish, 102-104Tow Body of Bird, 25
Mole, Making Purse from, 07
Monkey's Hands and Feet, 56Moths (see Butterflies)Mould, Plaster, for Fish, 103, 104
-Mounting Antlers, 84
Elephant's Tusks, 87
Horns, 88-92Mounts for Birds, 151
Horned Heads, 81Mud Footprints in Cases, 155
Nightjars, Attitudes of, 38
Xosc, Animal's, Colouring, 82
Oil Removing, from Skins, 113Otter Skin, Dressing, 130
Owls, Eyes for. 36
, Skinning,' 23
,Wire for Bodies of, 36
Ox Horns, Polishing, 8!)
, Removing Bone from, 90
Paint for Brightening Colours of
Bird, 35
Painting Ferns, 155
Fish, 100, 101Insides of Cases, 152
Papier-mache Cast of Fish, 104, 105Park's Skin-preserving Method, 112
Partridges, Eyes for, 30
Peat, Stuffing Birds with, 34used in Cases. l.v>
Perch, Skinning and Stuffing, 94-101
Pheasants, Eyes for, 30
Pike, Colouring, 100
Pins, Entomological, 130Plaster Cast of Fish, 102-104
Modelling, 70Plaster - of -
paris, Use of, in Bird
Skinning, IS
Pliers, 11-13Plumber's Shave-hook, 108
Polishing Elephant Tusks, 87
Horns, 88, 89, 91
Preservative, Becueur's, 16for Birds, 16, 17
, Browne's, 17for Butterflies, etc., 141
Mammals, 48
Skins, 108, 112-131
Preserving Caterpillars, 136, 137
Eggs, 138, 139
Insects, 132-137
Skins, 73, 107-131
Purse made from Mole, 67
Putty Staining Feathers, 29
Rabbit Skins, Cleaning, 118
, Curing, 111, 121-123
, Dyeing, Black, 118
, Tanning, 123Ram's Horn, Cleaning, 89, 91
, Dyeing, 89
, Mounting, 89
, Polishing, 89, 91
, Removing Bone from, 90
, Varnishing, 91
Red Dye for Sheepskin, 129
Keimann's Dye Fixative, 118
Relaxing Bird Skins, 24- Insects, 134
Rhinoceros Hide, Curing, 131
Roach, Colouring, 100
Rocks, Imitating, in Cases, 155
Rugs, Skin, 122, 125, 129, 130
Scissor or Feather Pliers, 13
Scissors, 10

i6o TAXIDERMY.
Screens, Bird, 42-47Seaweed used in Cases, 100
Setting Insects, 134-137
Setting-boards, 134
Sewing Bird Skin, 28
Shades, Glass, 151
Shave-hook, 109
Sheep's Head, Cleaning, 116
Sheepskins, Bleaching, 125, 127
, Cleaning, 115, 110, 125
, Curing, 125, 120
, Dyeing, 128, 129
, Removing Wool from, 127, 128
, Rugs made from, 125
, Smoothing, 127
, Softening, 130Shields for Horned Heads, SI
Shoemaker's Awls, 14
Showcases, 102, 149-156Side Cutters, 11
Skeletons, Producing, 92, 93, 105,100
Skinning Birds, 18-23
Fish, 94-97
Mammals, 48-57Skins (see also names of animals)
, American Method of Preserving,113
, Cleaning, 115-117, 125
, Disguising Smell of, 125
, Dyeing, 118, 119, 129
, Fleshing, 107
, Folding, 114
,Furrier's Method of Preserving,
113
, Greasing, 114of Horned Heads, Preserving,
08,73,Hunters' Treatment of, 113
, Killing Grease in, 115
, Knives for Dressing, 110
, Park's Method of Preserving,112
, Preservatives for, 73, 108, 112-131
, Reducing Leather of, 110, 111
, Removing Fat from, 113
, Oil from, 113, Rugs made from, 122, 125, 130
, Russian-dressed, 120
, Small, Preserving, 111, 121
, Softening, 115, 119, 125, 130, 131
, Stretching, 108
, Tanning, 120
, Tawing, 120
,Tool for Scraping, 109
Skiving Knife, 10Snake Skins, Softening, 130
Soap, Arsenical, 10
, Browne's, 17Soft Body Process, 3J
Softening Bones, 93
Skins, 115, 119, 125, 130
Soil, Imitating, in Cases, 154
Squirrel, Measuring, 50
, Skinning and Stuffing, 49
Stag's Antlers (see Antlers)
Stand, Fixing Bird to, 30
Starlings, Eyes for, 30
, Skinning and Stuffing, 18-34
,Wire for Bodies of, 30
Stick Handle, Mounting Horn as, S9
Sticks, Rhinoceros Hide, 131
Stoats, Wires for Bodies of, 00
Stretching-frame for Skins, 108
Stuffing Birds, 25-39
Fish, 98-102
Mammals, 57-69Star Fish, 100
Stuffing-iron, 13
Swans, Skinning, 2o
Tails, Bird. Setting, 32
, Mammals, Skinning,*
>.
Tanning Skins, 120, 123
Tawing, 107, 120Tendon of Achilles, 61
Thrushes, Eyes for, 30
Tigur Skin, Cleaning, 110
Tools, 9-15Tow Body, Modelling, 25
Trout, Colouring, 101
Tweezers, Insect, 133
Varnishing Fish Bones, 106
Horns, 75, 91
Veined Eyes, 60
Walking - stick Handle, MountingRam's Horn as, 89
Walking-sticks, Rhinoceros Hide, 131
Water-buck, Measuring, 49
Waterton's Method of Bird Stuffing,25
Wattles, Bird, 30
Weasels, Skinning, 55
,Wires for Bodies of, 60
Webs, Preventing, Shrivelling, 30
White Leather Dressing, 107
White-fronted Bird, Skinning, 22
Wire for Bodies of Birds, 30
Mammals, 60
Shape of Fish, 94, 95
Wiring Birds, 25-28, 33, 34
Mammals, 02-64
Wolves, Wires for Bodies of, 6u
Woodpeckers, Attitudes of, 38
, Skinning, 23
Wool, Removing, from Skins, 127, 128
Yellow Dye for Sheepskin, 129
I'UINTKU BY C'ASSJBLL & CoMl'ANY, LIMITED, LUDOATK HlLL, LONDON, B.C.

The Illustrated Journal for Mechanics.
Subscription Price, $/.75 a Year for either Weeklyor Monthly Parts.
What Readers of WORK say of their favourite Journal.
Thefollowing is a small selectionfrom the hundreds of letters
received by the Editor:
" WORK has been a god-send in my every-day work
and a gold-mine to me."
" With WORK by my side I never feel afraid to
tackle any job."
"I owe to WORK a house for my family, a tranquil
night's rest, and an education for my children."
"I have earned many pounds with WORK as my
tutor;
it is the best pennyworth I ever bought."
"WORK has been the means of putting i a week
in my pockets ;I shall never forget WORK as long as I
live."
" WORK has increased my wages by zos. per week ;
it is the best paper in existence."
" WORK has been as valuable to me as a gold-
mine."
CASSELL & COMPANY, LIMITED, ^ and 9 West i8tA Street, New York.
I

bound in cloth.
Applied Mechanics. By Sir ROBERT BALL, LL.D. 75cts.
Bricklayers, Drawing for. $ i.oo.
Building Construction. 75cts.Cabinet Makers, Drawing for. $1.00.
Carpenters and Joiners, Drawing for. $1.25.Gothic Stonework. $1.00.
Handrailing and Staircasing. 75cts.Linear Drawing. 7Scts.Linear Drawing and Projection. The Two Vols. in One, $1.25.Machinists and Engineers, Drawing for. $1.50.Model Drawing. $1.00
Orthographical and Isometrical Projection. 75cts.
Practical Perspective. $1.00.
Stonemasons, Drawing for. f i.oo.
Systematic Drawing and Shading. 75cts.
Manuals of Technology.Edited by Professor AYRTON, F.R.S., and RICHARDWORMELL, D.Sc., M.A. Illustrated throughout.
The Dyeing of Textile Fabrics. By Prof. HUMMEL. $i .75.
Watch ana Clock Making. By D. GLASGOW. $1.50.Steel and Iron. By Prof. W. H. GREENWOOD, F.C.S., &c. $1.75.
Spinning Woollen and Worsted. By W. S. B. MCLAREN.1.50.
Design in Textile Fabrics. By T. R. ASHENHURST. WithColoured Plates. 1.50.
Practical Mechanics. By Prof. PERRY, M.E. $1.25.
Cutting Tools worked by Hand and Machine. By Prof.
R. H. SMITH. $1.25.
The Polytechnic Series.Consisting of Practical Illustrated Manuals specially preparedfor Students of the Polytechnic Institute, Regent Street,
London, and suitable for the Use of all Students.
Forty Lessons in Carpentry Workshop Practice. By C. F.and G. A. MITCHELL, socts.
Practical Plane and Solid Geometry, including GraphicArithmetic. Vol. I. ELEMENTARY STAC.B. By Prof. H. J. SPOONER,C.E. and C.I. Cloth gilt, *i.oo.
Forty Lessons in Engineering Workshop Practice. ByC. F. and G. A. MITCHELL, socts.
Technical Scales. In set of Ten in cloth case. By C. F.MITCHELL. 4octs. per set.
Elementary Chemistry for Science Schools and Classes.By ROBERT AVEY WARD. Crown 8vo, socts.
Building Construction Plates. A Series of 40 Drawings.Cl>th, 4.50; or copies of any plate may be obtained in quantities of
not less than one dozen, price 60 cts. per dozen.
Elements of Machine Construction and Drawing. FiftySheets. Size i6J x izi inches. Complete Set in Paper Wrapper, 82.00.
Also published in One Volume, bound in cloth, 3.50.
CASSELL & COMPANY, LIMITED, ; and 9, West iStA Street, New York.
II

Magazines.UC SOUTHERN REGIONAL LIBRARY FACIUTY
The SPECTATOR sa;
these periodicals, so muconductors, that it is di A 000103691 2
really deserved without seeming extravagant.
The Quiver. For Sunday and General Reading.\$cts. Monthly ; $1.50 per Year.
Cassell's Magazine. i 5fts. Monthly; #i.S o
per Year.
Little Folks. \yts. Monthly ; $1.50^ Year.
The Magazine of Art. 35^. Monthly; $3.50tier Year.
THE CREAM OF THE WORLD'S LITERATURE
AT TEN CENTS PER VOLUME.
CASSELL'S
NATIONAL LIBRARY.EDITED BY
Prof. HENRY MORLEY, LLD.
In neat volumes, size 3| by sf inches. Each containing about
200 pages of clear, readable print, on good
paper, at the low price of
TEN CENTS PER VOLUME.This Series is extensively Used in Schools and Colleges
for Supplementary Reading-.
Cassell's Classified Catalogue win be sent on
request, post free, to any address.
CASSELL & COMPANY, LIMITED',7 and 9, West iStk Street, New York.
Cover 3. Ill

UnivenSoul
Lit