catalog #166-2500edu explorer.bio-rad...biotechnology explorer gmo investigator kit catalog...
TRANSCRIPT
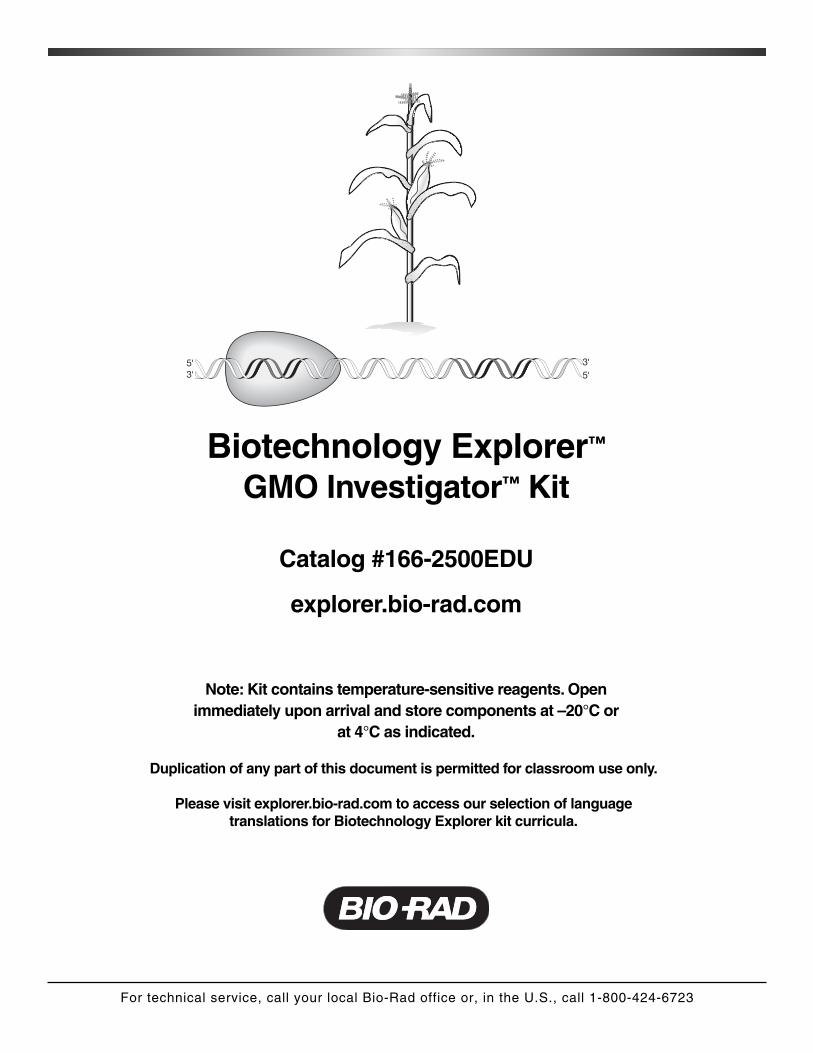
Biotechnology Explorer™
GMO Investigator™ Kit
Catalog #166-2500EDU
explorer.bio-rad.com
Note: Kit contains temperature-sensitive reagents. Open immediately upon arrival and store components at –20°C or
at 4°C as indicated.
For technical service, call your local Bio-Rad office or, in the U.S., call 1-800-424-6723
Duplication of any part of this document is permitted for classroom use only.
Please visit explorer.bio-rad.com to access our selection of language translations for Biotechnology Explorer kit curricula.
To the InstructorAre Your Favorite Foods Genetically Modified?
Currently, genetically modified (GM) foods do not have to be labeled as such in the US andfoods with less then 5% genetically modified content can be labeled "GMO-free". In Europeand Asia, genetically modified foods do require labeling if they contain >1% GM content.
The purpose of this kit is for students to test their favorite store-bought food products (forexample corn chips and veggie burgers) for the presence of genetically modified organisms(GMOs). Moreover, students engage in a scientific inquiry experiment where they gather fooditems from the grocery store, extract DNA from the food, amplify the DNA using the polymerasechain reaction (PCR) and use gel electrophoresis to identify the presence or absence of theamplified GMO sequences.
In this activity students employ state-of-the-art molecular biology techniques to test familiarfood items. The kit will work best with students that have some basic understanding of molecularbiology and previous experience with some of the techniques involved. The exercise covers awide variety of subject areas, including: genetic engineering and transformation; DNA transcription and translation; gene regulation; DNA replication and PCR; plant developmentand physiology; agricultural and environmental science.
Teaching Strategy: Guided, Inquiry-Based InvestigationThe GMO Investigator kit allows a guided inquiry approach to this exercise. The studentsconduct sophisticated scientific procedures that have multiple levels of controls. This allowsthem to assess the validity of their results. Thus not only is the presence or absence of GMOsequences in their test food determined, but they also ask and answers the questions: did wesuccessfully extract DNA; did our PCR work as expected and do we have contamination?
Are GM Crops a Good Thing?Many people object to the use of GM crop plants. They argue that there is a potential tocreate super-weeds through cross-pollination with herbicide-resistant crops or that super-bugswill evolve that are no longer resistant to the toxins in pest-resistant crops. Many are concerned with potential allergic reactions to the novel proteins or antibiotic resistance arisingfrom the selectable markers used to develop the crops or other unforeseen effects on publichealth. Proponents of genetically modified foods argue these crops are actually better forthe environment. Fewer toxic chemicals are put into the environment and thus fewer toxicchemicals can harm the environment and human health. In addition, these crops can preserve arable land by reducing stresses on the land, improve the nutritional value of foodin developing countries, and allow crops to be grown on previously unfarmable land. Weinclude a formal debate in Appendix D to aid discussion of these issues.
This manual is available to download from the Internet. Visit us on the Web at explorer.bio-rad.com or call us in the US at 1-800-4BIORAD (1800-424-6723).
We strive to continually improve our curricula and products and welcome your stories, ideasand suggestions.
Biotechnology Explorer TeamBio-Rad Life Science Group6000 James Watson DriveHercules, California [email protected]
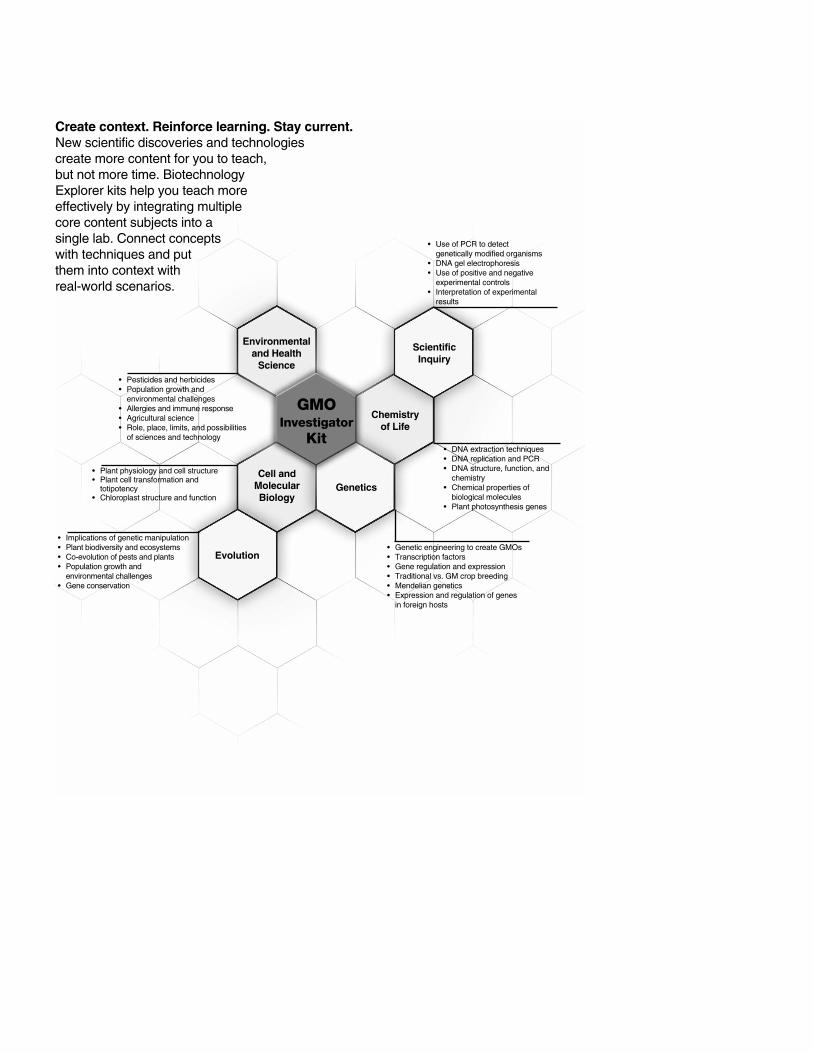
Create context. Reinforce learning. Stay current.New scientific discoveries and technologiescreate more content for you to teach,but not more time. BiotechnologyExplorer kits help you teach moreeffectively by integrating multiplecore content subjects into a single lab. Connect conceptswith techniques and putthem into context withreal-world scenarios.
GMOInvestigator
Kit
Environmentaland Health
Science• Pesticides and herbicides• Population growth and
environmental challenges• Allergies and immune response• Agricultural science• Role, place, limits, and possibilities
of sciences and technology
• Plant physiology and cell structure• Plant cell transformation and
totipotency• Chloroplast structure and function
• Use of PCR to detectgenetically modified organisms
• DNA gel electrophoresis• Use of positive and negative
experimental controls• Interpretation of experimental
results
• Genetic engineering to create GMOs• Transcription factors• Gene regulation and expression• Traditional vs. GM crop breeding• Mendelian genetics• Expression and regulation of genes
in foreign hosts
• DNA extraction techniques• DNA replication and PCR• DNA structure, function, and
chemistry• Chemical properties of
biological molecules• Plant photosynthesis genes
• Implications of genetic manipulation• Plant biodiversity and ecosystems• Co-evolution of pests and plants• Population growth and
environmental challenges• Gene conservation
ScientificInquiry
Chemistryof Life
GeneticsCell and
MolecularBiology
Evolution

Table of Contents
PageKit Summary ....................................................................................................................1
Kit Inventory Checklist ......................................................................................................2
Curriculum Fit ..................................................................................................................4
Background for Instructors................................................................................................6
Instructor's Advance Preparation ....................................................................................12
Lesson 1: Extraction of DNA From Food Samples ..................................................14
Lesson 2: Set Up PCR Reactions ............................................................................15
Lesson 3: Electrophoresis of PCR Products ............................................................17
Lesson 4: Drying Gels and Analysis of Results ........................................................23
Typical Classroom Results ............................................................................................24
Tips and Frequently Asked Questions ............................................................................26
Quick Guide ..................................................................................................................30
Student Manual ..............................................................................................................33
Background..............................................................................................................33
Lesson 1: Extraction of DNA From Food Samples ..................................................35
Lesson 2: PCR Amplification....................................................................................40
Lesson 3: Electrophoresis of PCR Products ............................................................47
Lesson 4: Drying Gels and Analysis of Results ........................................................52
Appendix A: Introduction to PCR..........................................................................................55
Appendix B: PCR Amplification and Sterile Technique ....................................................60
Appendix C: Glossary of Terms ............................................................................................61
Appendix D: Post-Lab Debate Activity ................................................................................63
Appendix E: Programming Instructions for T100™ and MyCycler™ Thermal Cyclers 65
Appendix F: Teacher Answer Guide ....................................................................................68
Appendix G: Mini-PROTEAN® Tetra Cell Electrophoresis Module Assembly ................71
Appendix H: Recommended GMO-Based Web Sites and References ............................73
Appendix I: Run Agarose DNA Gels in Under 20 Minutes................................................74
I

II
Kit SummaryThe purpose of this kit is to test grocery store food products (e.g., corn chips, vegetarian
sausages) for the presence of genetically modified organisms (GMO). This kit contains sufficient materials to extract and amplify DNA from 16 samples and requires a minimum of4 lab periods:
• Lesson 1: Extraction of DNA from food samples
• Lesson 2: Set up PCR reactions
• Lesson 3: Electrophoresis of PCR products
• Lesson 4: Drying gels and analysis of results
The reagents for gel electrophoresis are available as separate modules; you canchoose to perform agarose gel electrophoresis or polyacrylamide gel electrophoresis(PAGE).
The GMO Investigator kit uses PCR to test for the presence of two different GMO-associated sequences: the 35S promoter of the cauliflower mosaic virus (CaMV 35S)and the terminator of the nopaline synthase (NOS) gene of Agrobacterium tumefaciens.One or both of these sequences are present in most of the genetically modified crops thatare approved for distribution in North America, Asia, and Europe. The GMO Investigator kitallows a guided-inquiry approach to this exercise by providing multiple levels of controls toassess the validity of the results obtained. It mimics the process of research by using multiple procedures to address open-ended questions. The integrity of the plant DNAextracted from food is tested using PCR to identify a third sequence of DNA, the photosystem II chloroplast gene, which is common to most plants. The integrity of the polymerase chain reaction is tested by amplifying the 35S promoter and the photosystem IIgene sequences directly from template DNA provided in the kit. Potential contamination ofthe test samples is identified by extracting DNA from a Bio-Rad certified non-GMO foodcontrol provided in the kit and performing PCR to test for the presence of GMO sequences.
Agarose or Polyacrylamide Gel Electrophoresis?The DNA fragments amplified from the 35S promoter and NOS terminator are 203 and 225
base pairs (bp) respectively. The PCR product generated frm the photosystem II gene is 455 bp.Resolving bands of these sizes requires either a 3% agarose gel or a 10% polyacrylamide gel.Both gel techniques give excellent results. Your choice of gel technique will depend on the equipment that is available to you and the techniques you wish to teach your students.Polyacrylamide gels are much more fragile than 3% agarose gels and thus may be suitable onlyfor more experienced students. However polyacrylamide gels resolve bands to a greater degree,which may allow separation of the similar sized DNA bands generated from a test food that contains both the CaMV 35S promoter and NOS terminator, such as genetically modifiedpapaya. Refer to page 2 for the accessories that you will need depending on whether youchoose agarose or polyacrylamide gel electrophoresis.
Storage InstructionsPlace the reagent bag at –20°C and the InstaGene matrix at 4°C within 1 week of
arrival. The other reagents may be stored at room temperature.
1
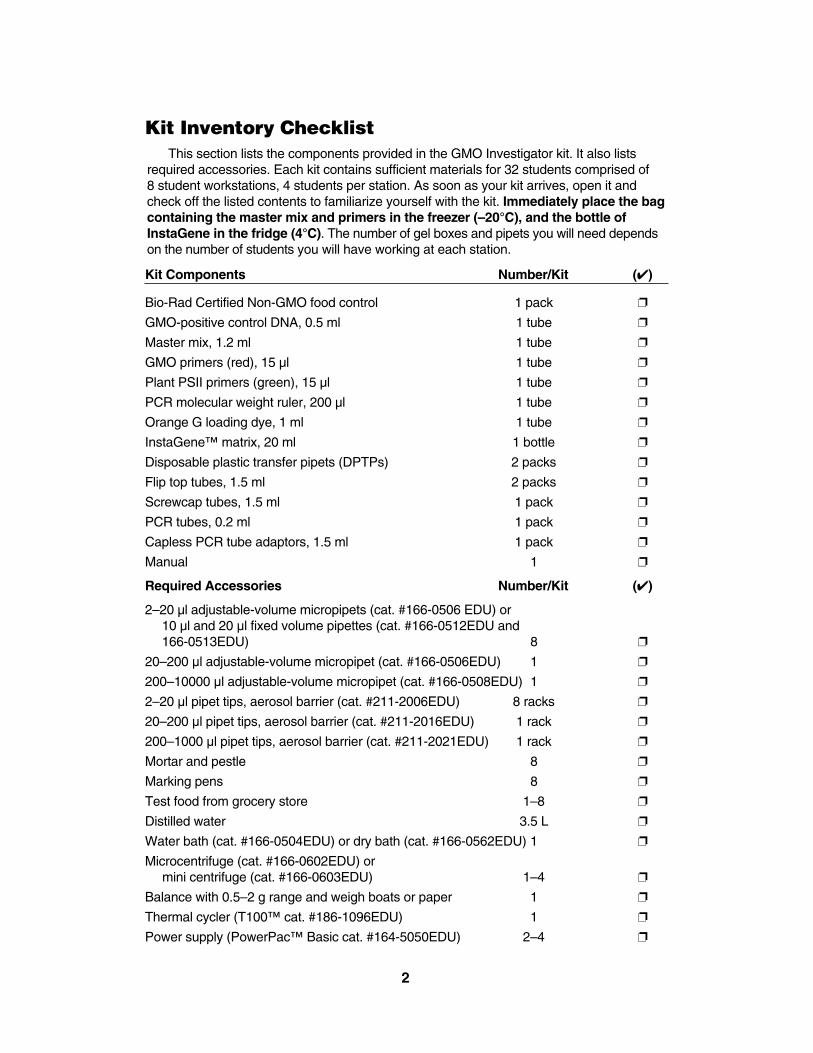
Kit Inventory ChecklistThis section lists the components provided in the GMO Investigator kit. It also lists
required accessories. Each kit contains sufficient materials for 32 students comprised of 8 student workstations, 4 students per station. As soon as your kit arrives, open it andcheck off the listed contents to familiarize yourself with the kit. Immediately place the bagcontaining the master mix and primers in the freezer (–20°C), and the bottle ofInstaGene in the fridge (4°C). The number of gel boxes and pipets you will need dependson the number of students you will have working at each station.
Kit Components Number/Kit (✔)
Bio-Rad Certified Non-GMO food control 1 pack ❐
GMO-positive control DNA, 0.5 ml 1 tube ❐
Master mix, 1.2 ml 1 tube ❐
GMO primers (red), 15 µl 1 tube ❐
Plant PSII primers (green), 15 µl 1 tube ❐
PCR molecular weight ruler, 200 µl 1 tube ❐
Orange G loading dye, 1 ml 1 tube ❐
InstaGene™ matrix, 20 ml 1 bottle ❐
Disposable plastic transfer pipets (DPTPs) 2 packs ❐
Flip top tubes, 1.5 ml 2 packs ❐
Screwcap tubes, 1.5 ml 1 pack ❐
PCR tubes, 0.2 ml 1 pack ❐
Capless PCR tube adaptors, 1.5 ml 1 pack ❐
Manual 1 ❐
Required Accessories Number/Kit (✔)
2–20 µl adjustable-volume micropipets (cat. #166-0506 EDU) or10 µl and 20 µl fixed volume pipettes (cat. #166-0512EDU and 166-0513EDU) 8 ❐
20–200 µl adjustable-volume micropipet (cat. #166-0506EDU) 1 ❐
200–10000 µl adjustable-volume micropipet (cat. #166-0508EDU) 1 ❐
2–20 µl pipet tips, aerosol barrier (cat. #211-2006EDU) 8 racks ❐
20–200 µl pipet tips, aerosol barrier (cat. #211-2016EDU) 1 rack ❐
200–1000 µl pipet tips, aerosol barrier (cat. #211-2021EDU) 1 rack ❐
Mortar and pestle 8 ❐
Marking pens 8 ❐
Test food from grocery store 1–8 ❐
Distilled water 3.5 L ❐
Water bath (cat. #166-0504EDU) or dry bath (cat. #166-0562EDU) 1 ❐
Microcentrifuge (cat. #166-0602EDU) ormini centrifuge (cat. #166-0603EDU) 1–4 ❐
Balance with 0.5–2 g range and weigh boats or paper 1 ❐
Thermal cycler (T100™ cat. #186-1096EDU) 1 ❐
Power supply (PowerPac™ Basic cat. #164-5050EDU) 2–4 ❐
2
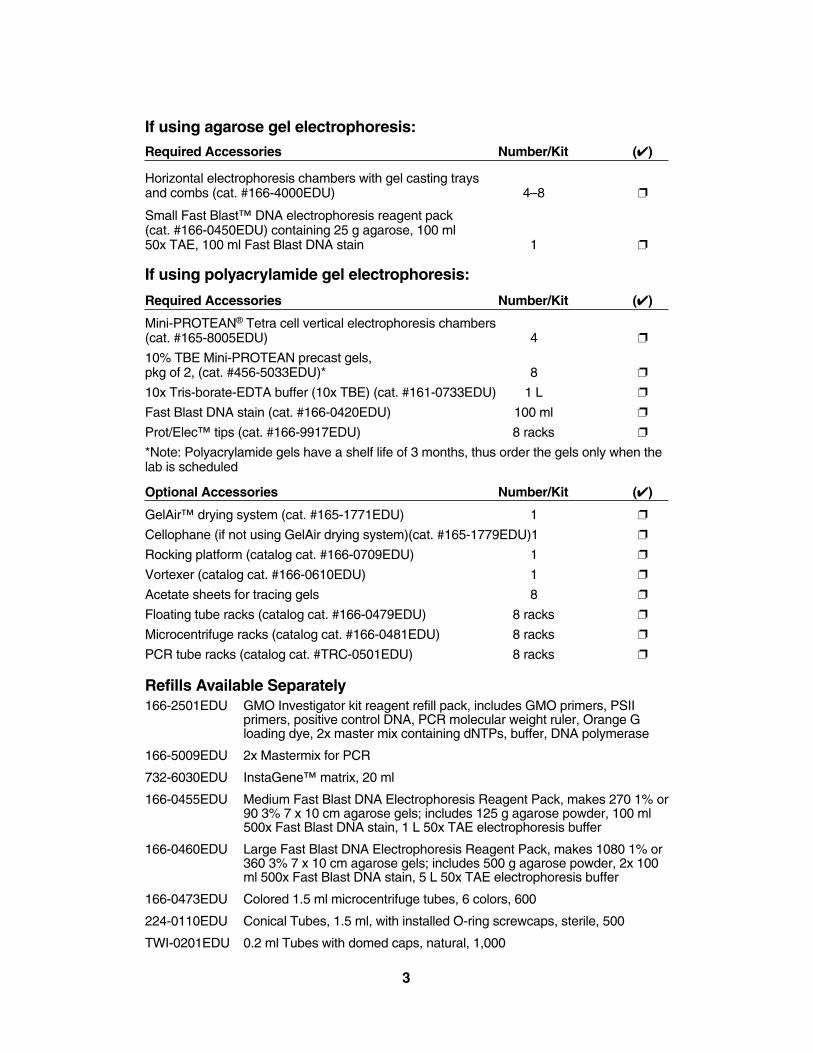
If using agarose gel electrophoresis:
Required Accessories Number/Kit (✔)
Horizontal electrophoresis chambers with gel casting trays and combs (cat. #166-4000EDU) 4–8 ❐
Small Fast Blast™ DNA electrophoresis reagent pack(cat. #166-0450EDU) containing 25 g agarose, 100 ml 50x TAE, 100 ml Fast Blast DNA stain 1 ❐
If using polyacrylamide gel electrophoresis:
Required Accessories Number/Kit (✔)
Mini-PROTEAN® Tetra cell vertical electrophoresis chambers (cat. #165-8005EDU) 4 ❐
10% TBE Mini-PROTEAN precast gels, pkg of 2, (cat. #456-5033EDU)* 8 ❐
10x Tris-borate-EDTA buffer (10x TBE) (cat. #161-0733EDU) 1 L ❐
Fast Blast DNA stain (cat. #166-0420EDU) 100 ml ❐
Prot/Elec™ tips (cat. #166-9917EDU) 8 racks ❐
*Note: Polyacrylamide gels have a shelf life of 3 months, thus order the gels only when thelab is scheduled
Optional Accessories Number/Kit (✔)
GelAir™ drying system (cat. #165-1771EDU) 1 ❐
Cellophane (if not using GelAir drying system)(cat. #165-1779EDU)1 ❐
Rocking platform (catalog cat. #166-0709EDU) 1 ❐
Vortexer (catalog cat. #166-0610EDU) 1 ❐
Acetate sheets for tracing gels 8 ❐
Floating tube racks (catalog cat. #166-0479EDU) 8 racks ❐
Microcentrifuge racks (catalog cat. #166-0481EDU) 8 racks ❐
PCR tube racks (catalog cat. #TRC-0501EDU) 8 racks ❐
Refills Available Separately166-2501EDU GMO Investigator kit reagent refill pack, includes GMO primers, PSII
primers, positive control DNA, PCR molecular weight ruler, Orange Gloading dye, 2x master mix containing dNTPs, buffer, DNA polymerase
166-5009EDU 2x Mastermix for PCR
732-6030EDU InstaGene™ matrix, 20 ml
166-0455EDU Medium Fast Blast DNA Electrophoresis Reagent Pack, makes 270 1% or90 3% 7 x 10 cm agarose gels; includes 125 g agarose powder, 100 ml500x Fast Blast DNA stain, 1 L 50x TAE electrophoresis buffer
166-0460EDU Large Fast Blast DNA Electrophoresis Reagent Pack, makes 1080 1% or360 3% 7 x 10 cm agarose gels; includes 500 g agarose powder, 2x 100ml 500x Fast Blast DNA stain, 5 L 50x TAE electrophoresis buffer
166-0473EDU Colored 1.5 ml microcentrifuge tubes, 6 colors, 600
224-0110EDU Conical Tubes, 1.5 ml, with installed O-ring screwcaps, sterile, 500
TWI-0201EDU 0.2 ml Tubes with domed caps, natural, 1,000
3
4
Curriculum FitIn 1996 the US National Academy of Sciences and its working groups, in conjunction
with the National Research Council, published the National Science Education Standards.These standards call for a movement away from traditional science teaching, whichincludes memorizing scientific facts and information, covering many subject areas, andconcluding inquiries with the result of an experiment. Instead, teachers are encouraged toengage students in investigations over long periods of time, learning subject matter in thecontext of inquiry, and applying the results of experiments to scientific arguments andexplanations. The Biotechnology Explorer GMO Investigator kit follows this approach. It provides a guided investigation in which students gather common food items, extract DNAfrom the sample, amplify genetic sequences using PCR, and use gel electrophoresis toidentify the presence or absence of the amplified marker sequences. Students are encouraged to analyze their results in the context of the experimental controls to assesswhether they can determine if food they commonly consume has been genetically modified(GM). The kit can be used to cover the following content areas.
Scientific Inquiry
Use of sophisticated techniques to detect GMOsUse of multiple positive and negative experimental controlsAnalysis and interpretation of experimental results
Chemistry of Life
Chemical properties of cell componentsDNA extraction techniquesDNA replication and PCRGel electrophoresis of DNA
Heredity & Molecular Biology
Genetic transformation to create GMOsControl of gene expressionDNA profiling techniquesCrop breeding: traditional vs. GMExpression and regulation of genes in foreign hosts
Structure & Function of Organisms
Plant transformation and regenerationCell structure
Evolutionary Biology
Implications of genetic manipulationImplications of altering plant biodiversity and ecosystemsEvolutionary race between pests and plants
Environmental & Health Sciences
Pesticides and herbicidesPopulation growth, environmental quality & global challengesRole, place, limits & possibilities of science and technology
5
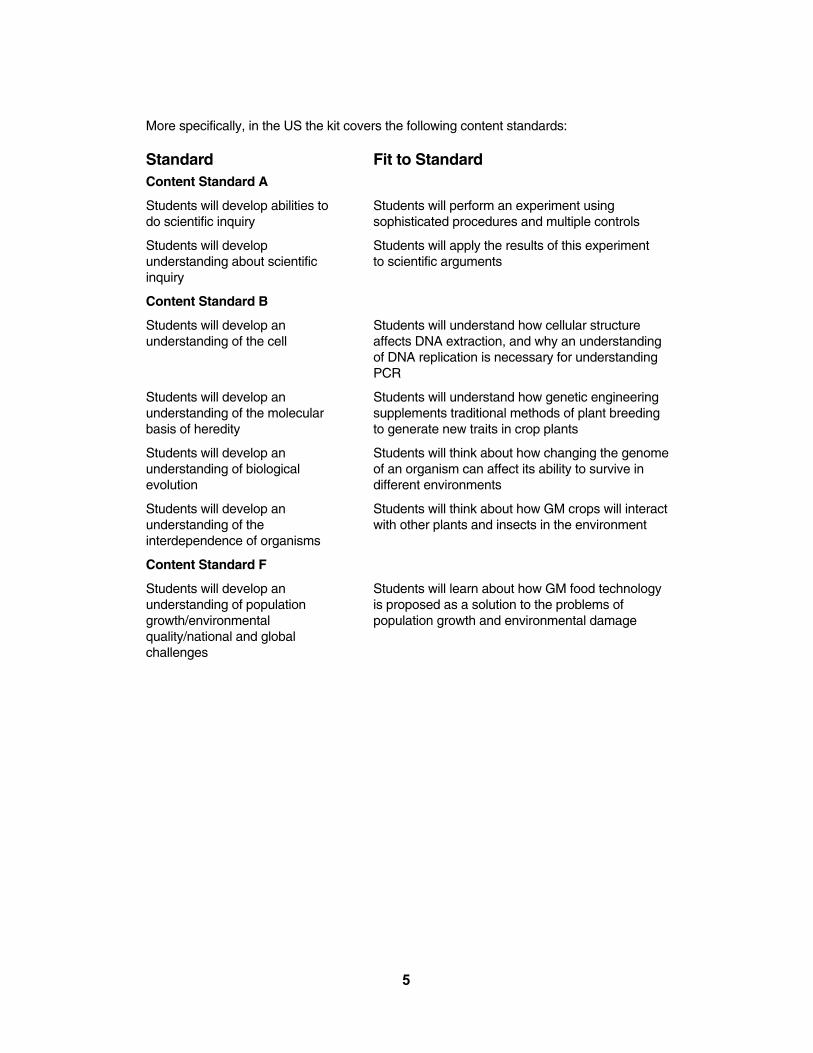
More specifically, in the US the kit covers the following content standards:
Standard Fit to StandardContent Standard A
Students will develop abilities to Students will perform an experiment usingdo scientific inquiry sophisticated procedures and multiple controls
Students will develop Students will apply the results of this experimentunderstanding about scientific to scientific argumentsinquiry
Content Standard B
Students will develop an Students will understand how cellular structure understanding of the cell affects DNA extraction, and why an understanding
of DNA replication is necessary for understandingPCR
Students will develop an Students will understand how genetic engineeringunderstanding of the molecular supplements traditional methods of plant breedingbasis of heredity to generate new traits in crop plants
Students will develop an Students will think about how changing the genomeunderstanding of biological of an organism can affect its ability to survive inevolution different environments
Students will develop an Students will think about how GM crops will interactunderstanding of the with other plants and insects in the environmentinterdependence of organisms
Content Standard F
Students will develop an Students will learn about how GM food technologyunderstanding of population is proposed as a solution to the problems ofgrowth/environmental population growth and environmental damagequality/national and globalchallenges
Background for TeachersSince the release of the first genetically modified (GM) crop in the US in 1996, scientists
have debated the use of these crops because of potential health and environmental risks.GM foods are foods that contain components of GM crops—plants that have been geneticallymodified by the insertion of foreign genetic material. The foreign genetic material may havecome not only from another plant but possibly from a species of another kingdom (e.g., animal, fungal, bacterial). The foreign genetic material is usually a gene that codes for aprotein that gives the plant an advantage over similar crop plants. Examples of conferredtraits include pest resistance, herbicide tolerance, delayed fruit ripening, improved fruityield, increased nutrient content, etc.
How Do You Genetically Modify a Crop?The first step in the genetic modification process is to identify a protein that has the potential
to improve a crop. One popular class of GM crops has a gene from the soil bacterium Bacillusthuringiensis (Bt) inserted into their genomes. Bt crops produce a protein called delta-endotoxinthat is lethal to European corn borers, a common pest on corn plants. Farmers who plant Btcrops do not have to apply pesticide because the plants produce the toxic protein inside theircells. Bt toxin was first identified on silk farms as a toxin that kills silkworms (which are in thesame genus as European corn borers).
The second step is to isolate (clone) the gene that codes for the protein. The entiregene must first be localized within an organism's genome; then it must be copied so that itcan be isolated or cloned out of the organism. Although a gene's coding region may just bea few hundred or thousand base pairs long, the gene itself may be tens of thousands ofbase pairs long, due to its introns (noncoding sequences). The cloning of an entire gene canbe very laborious and can take many years.
Genes contain signals that regulate their expression in their host's cells, but these signalsare often not understood by another organism's cells. Thus, the third step is to engineer thegene so that the crop plant's cells will read it correctly and manufacture the protein of interest.This is done by streamlining the gene to remove unnecessary introns, and adding or changingsequences that will enable the gene to be expressed within the crop's cells, including a promoterand a terminator (see Figure 1). The promoter serves as a docking site for RNA polymeraseand a signal for where it should start transcribing a gene. The terminator is the signal to stoptranscription. The native promoters and terminators of unmodified genes interact with othercomponents of a host cell to turn genes on or off depending on cell type and situation, but scientists can engineer the constructs for GMOs so that the foreign gene is continually transcribedand the foreign protein is produced throughout the entire plant. The most common promoterused in GM crops is the 35S promoter from the cauliflower mosaic virus (CaMV 35S). This promoter is chosen because it is already designed by nature to activate transcription in all plantcell types. The most common terminator used in GM crops is the nopaline synthase (NOS) terminator from Agrobacterium tumefaciens. The GMO Investigator kit can identify both of thesegenetic modifications in grocery store food products. One or both of these genetic elements arepresent in ~85% of all GM crops currently approved around the world.
6
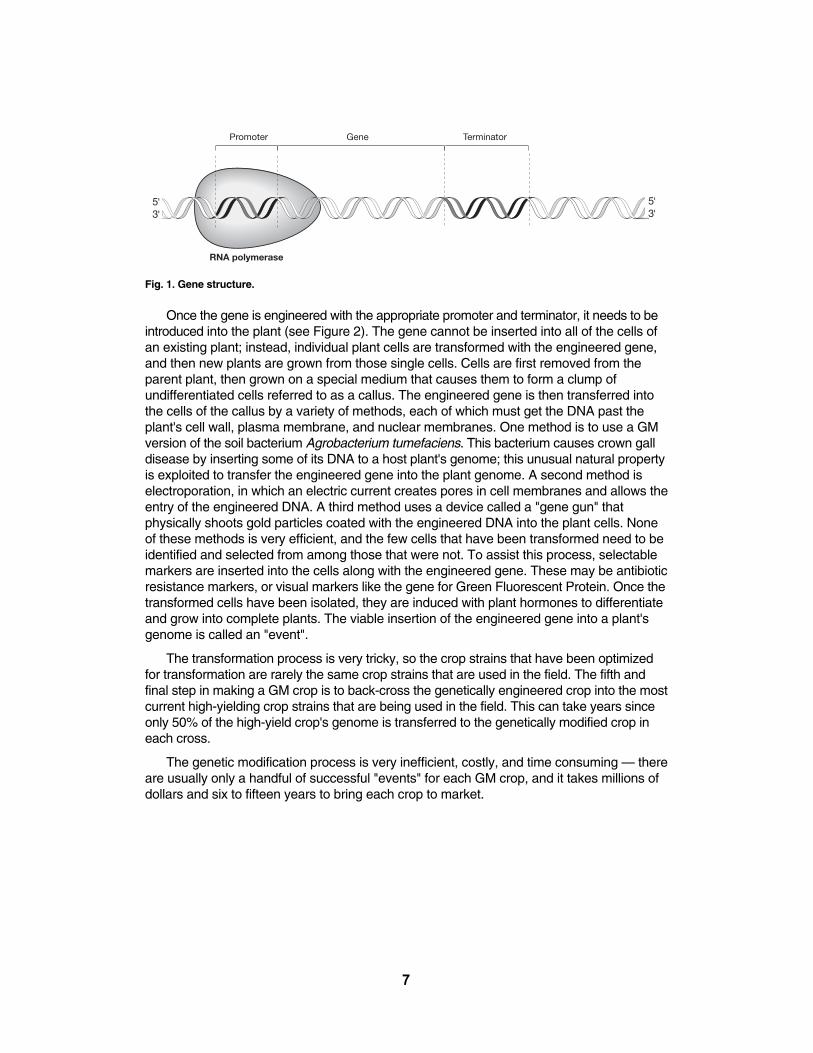
Fig. 1. Gene structure.
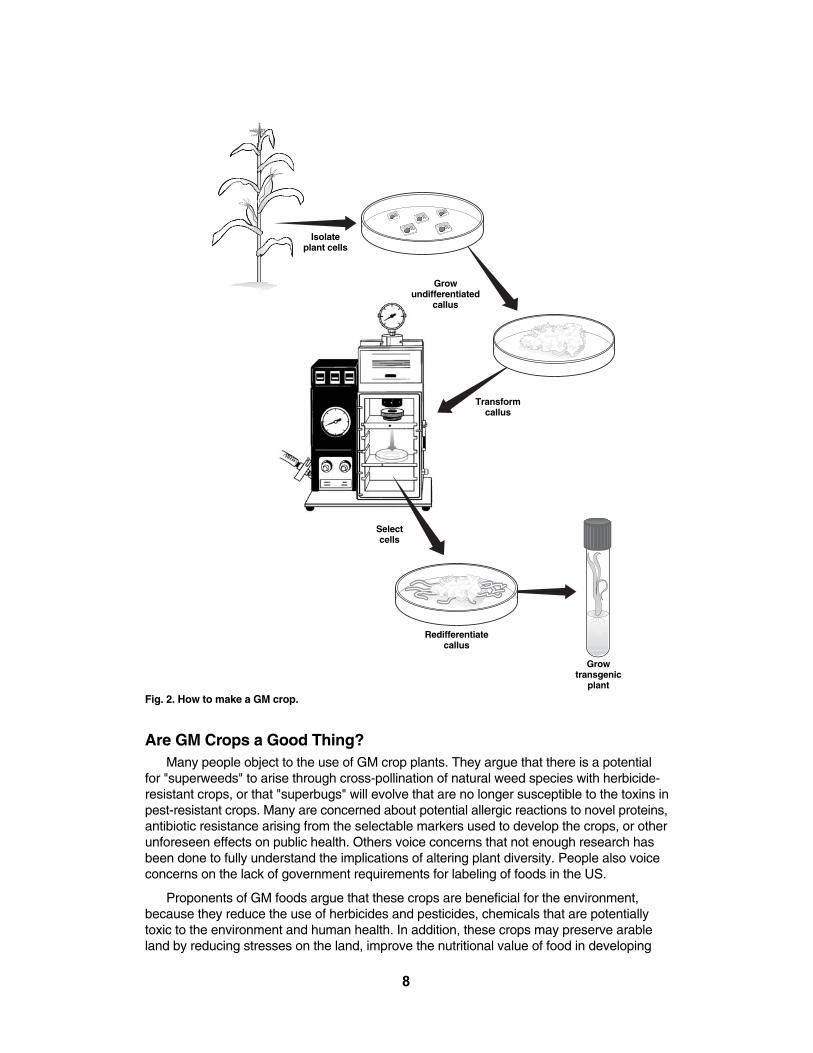
Once the gene is engineered with the appropriate promoter and terminator, it needs to beintroduced into the plant (see Figure 2). The gene cannot be inserted into all of the cells ofan existing plant; instead, individual plant cells are transformed with the engineered gene,and then new plants are grown from those single cells. Cells are first removed from the parent plant, then grown on a special medium that causes them to form a clump of undifferentiated cells referred to as a callus. The engineered gene is then transferred intothe cells of the callus by a variety of methods, each of which must get the DNA past theplant's cell wall, plasma membrane, and nuclear membranes. One method is to use a GMversion of the soil bacterium Agrobacterium tumefaciens. This bacterium causes crown galldisease by inserting some of its DNA to a host plant's genome; this unusual natural propertyis exploited to transfer the engineered gene into the plant genome. A second method iselectroporation, in which an electric current creates pores in cell membranes and allows theentry of the engineered DNA. A third method uses a device called a "gene gun" that physically shoots gold particles coated with the engineered DNA into the plant cells. Noneof these methods is very efficient, and the few cells that have been transformed need to beidentified and selected from among those that were not. To assist this process, selectablemarkers are inserted into the cells along with the engineered gene. These may be antibioticresistance markers, or visual markers like the gene for Green Fluorescent Protein. Once thetransformed cells have been isolated, they are induced with plant hormones to differentiateand grow into complete plants. The viable insertion of the engineered gene into a plant'sgenome is called an "event".
The transformation process is very tricky, so the crop strains that have been optimizedfor transformation are rarely the same crop strains that are used in the field. The fifth andfinal step in making a GM crop is to back-cross the genetically engineered crop into the mostcurrent high-yielding crop strains that are being used in the field. This can take years sinceonly 50% of the high-yield crop's genome is transferred to the genetically modified crop ineach cross.
The genetic modification process is very inefficient, costly, and time consuming — thereare usually only a handful of successful "events" for each GM crop, and it takes millions ofdollars and six to fifteen years to bring each crop to market.
Promoter Gene Terminator
RNA polymerase
7
8
Fig. 2. How to make a GM crop.
Are GM Crops a Good Thing?Many people object to the use of GM crop plants. They argue that there is a potential
for "superweeds" to arise through cross-pollination of natural weed species with herbicide-resistant crops, or that "superbugs" will evolve that are no longer susceptible to the toxins inpest-resistant crops. Many are concerned about potential allergic reactions to novel proteins,antibiotic resistance arising from the selectable markers used to develop the crops, or otherunforeseen effects on public health. Others voice concerns that not enough research hasbeen done to fully understand the implications of altering plant diversity. People also voiceconcerns on the lack of government requirements for labeling of foods in the US.
Proponents of GM foods argue that these crops are beneficial for the environment,because they reduce the use of herbicides and pesticides, chemicals that are potentiallytoxic to the environment and human health. In addition, these crops may preserve arableland by reducing stresses on the land, improve the nutritional value of food in developing
Isolateplant cells
Grow undifferentiated
callus
Transformcallus
Selectcells
Redifferentiatecallus
Growtransgenic
plant
countries, and allow crops to be grown on previously unfarmable land. You may want toorganize a debate with your students to address these arguments. A formal debate isincluded in Appendix D.
Identifying GM cropsHow does one test foods and crops to identify which contain GM genomes (see Figure 3)?
Two methods are currently used. One, the enzyme-linked immunosorbent assay (ELISA),identifies proteins. It is an antibody-based test, and it identifies the specific proteins producedby GM plants. ELISA can only test fresh produce, due to protein degradation during foodprocessing. In addition, since ELISA identifies the proteins produced in GMO crops, thetests must be individualized according to the type of crop. For example, a Bt ELISA test canonly detect Bt corn, and not herbicide-tolerant GM corn. However, ELISA is inexpensive andaccurate, and can be performed in the field with little expertise.
The second test, using the polymerase chain reaction (PCR), identifies sequences ofDNA that have been inserted into the GM plant. In contrast to proteins, DNA is a relativelystable molecule, thus DNA fragments can be isolated from highly processed foods and aresufficiently intact to be amplified by PCR. A modified version of PCR, real-time PCR, can alsoquantitate the percentage of GM material in the food sample. In contrast to an ELISA test thatis specific to a single crop, a single PCR test like this one can detect 85% of all GM crops.This is because genetic engineers use only a small number of regulatory sequences (promoterand terminator sequences) to control the expression of the inserted genes, and so thesesequences are common to the majority of GM crops. Two of the most common regulatorysequences are the 35S promoter from cauliflower mosaic virus and the nopaline synthase(NOS) terminator from Agrobacterium tumefaciens, which are the sequences that are detectedby this kit. A review of PCR is included in Appendix A.
9

Fig. 3. How to detect GMOs in food.
Detect GMOs by ELISA
No — Plant DNA not viable
No conclusions can be made repeat test
Grind food sample
Detect GMOs by PCR
Extract DNA
Did you obtain plant DNA? Check for PSII choroplast gene by PCR
Yes — Plant DNA viable
Is the DNA GM? Check for 35S promoter and NOS terminator by PCR
Yes — GMO DNA present
Quantify GM content by real-time PCR
No — GMO DNA not present
Food contains no GMOFood contains GMO
10
A Guided Inquiry ExperimentThis kit is an advanced lab because of its use of multiple controls. Your students should
be aware that these are the types of controls that are used by scientists in real laboratoriesand that if the errors occur that these controls identify then the scientists will repeat the test.These controls allow the students to:
Check that DNA Extraction Was Successful
The kit contains one set of primers (colored red) to detect GMO-specific sequences, butalso contains a second set of primers (colored green) that identify plant DNA, whether it isGMO-derived or not. The second primer set allows you to tell if a GMO-negative result isdue to lack of GMO material or simply an unsuccessful DNA extraction. These primersamplify a 455 bp region of the photosystem II (PSII) chloroplast gene that is common tomost plants. Please note that viable DNA is not always extracted from every food. We provide a list on p. 26 of recommended foods that give viable plant DNA. The kit has beenoptimized to test corn and soy-based foods.
Guard Against Contamination
The kit contains a sample of Bio-Rad certified non-GMO food that should be processedlike your chosen test food sample. This sample controls against false positive results. If thissample gives a GMO-positive result, it indicates contamination of the reaction. If your testfood also gives a GMO-positive result, you cannot trust this result. Please note that contamination is a very common occurrence in PCR due to its very high sensitivity, andsafeguards should be taken to prevent contamination. Refer to Appendix B for a list of precautions to protect against contamination.
Ensure That the PCR Reaction Works As Expected
The kit also contains template DNA that codes for the plant and GMO sequences. Thisserves as a control against false negatives. If these control sequence are not amplified,there is a problem with the PCR reaction and you cannot trust a GMO-negative result fromyour test food. This also gives you reference bands for those yielded by the test samples.
Test for a Broad Range of GM Foods
This kit uses "duplex" PCR, which means that two target sequences are simultaneouslyamplified. The two pairs of primers in the PCR reaction will amplify two DNA sequences, a203 bp fragment of the CaMV 35S promoter and a 225 bp fragment of the NOS terminator.These primers have been included so that a greater range of GM foods can be detected,since some foods contain just the CaMV 35S promoter, some just the NOS terminator, andsome both. By using these two sequences about 85% of all GM foods currently availableare detectable with this kit, whereas CaMV 35S primers alone can detect only ~70% of GMfoods.
It is not necessary for your students to understand duplex PCR for a full comprehensionof the principles of this laboratory, and in the student manual, the text refers to amplificationof "GMO sequences", without detailed explanation of these different sequences. However,if a food contains both the CaMV 35S and NOS sequences, such as GM papaya, a doubletband may appear in the GMO lane, where both the 203 and 225 bp PCR products havebeen generated. This will be especially visible on a polyacrylamide gel.
11
Instructor’s Advance PreparationThis section describes the preparation that needs to be performed by the instructor
prior to each laboratory period. If block periods are used, prepare for Lessons 1–2 andLessons 3–4 at the same time. An estimation of preparation time is included.
TimelineThe entire investigation requires a minimum of four 50-minute laboratory periods or two
90-minute block lessons. Be aware that an additional 4-hour cycling period is needed outside of class time. We also recommend 2–3 days of background review and lectures toprepare your students for the exercise.
Prior to Lab
• Read manual (2 hr)
• Purchase food samples from grocery store (as needed)
• Inventory required accessories (1 hr)
• Perform instructor's advance preparation (30 min–3 hr each lab)
• Set up student workstations (30 min–1 hr each lab)
50-minute Lessons
• Lesson 1: Extract DNA (50 min)
• Lesson 2: Set up PCR reactions (50 min)
• Run PCR reactions (4 hr)–typically overnight
• Lesson 3: Electrophoresis of DNA and staining of gels (50 min)
• Lesson 4: Analysis of results (50 min)
90-minute Block Lessons
• Lessons 1 – 2: Extract DNA and set up PCR reactions (90 min)
• Run PCR reactions (4 hr)
• Lessons 3 – 4: Electrophoresis of DNA, staining of gels, analysis of results (90 min)
Safety Issues
Eating, drinking, smoking, and applying cosmetics are not permitted in the work area.Wearing protective eyewear and gloves is strongly recommended. Students should washtheir hands with soap before and after this exercise. If any solution gets into a student'seyes, flush with water for 15 minutes. Although Fast Blast DNA stain is not toxic, latex orvinyl gloves should be worn while handling the stain to keep hands from becoming stained.Lab coats or other protective clothing should be worn to avoid staining clothes.
12
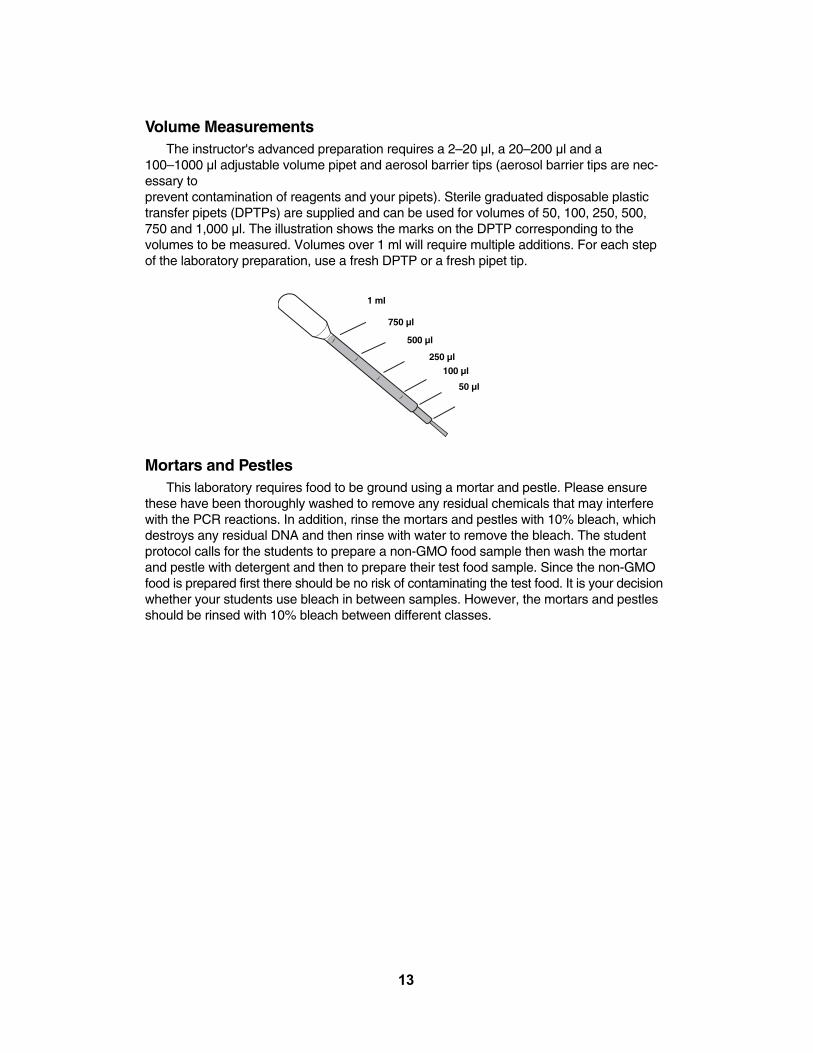
Volume MeasurementsThe instructor's advanced preparation requires a 2–20 µl, a 20–200 µl and a
100–1000 µl adjustable volume pipet and aerosol barrier tips (aerosol barrier tips are nec-essary to prevent contamination of reagents and your pipets). Sterile graduated disposable plastictransfer pipets (DPTPs) are supplied and can be used for volumes of 50, 100, 250, 500,750 and 1,000 µl. The illustration shows the marks on the DPTP corresponding to the volumes to be measured. Volumes over 1 ml will require multiple additions. For each stepof the laboratory preparation, use a fresh DPTP or a fresh pipet tip.
Mortars and PestlesThis laboratory requires food to be ground using a mortar and pestle. Please ensure
these have been thoroughly washed to remove any residual chemicals that may interferewith the PCR reactions. In addition, rinse the mortars and pestles with 10% bleach, whichdestroys any residual DNA and then rinse with water to remove the bleach. The studentprotocol calls for the students to prepare a non-GMO food sample then wash the mortarand pestle with detergent and then to prepare their test food sample. Since the non-GMOfood is prepared first there should be no risk of contaminating the test food. It is your decisionwhether your students use bleach in between samples. However, the mortars and pestlesshould be rinsed with 10% bleach between different classes.
13
1 ml
750 µl
500 µl
250 µl
100 µl
50 µl
14
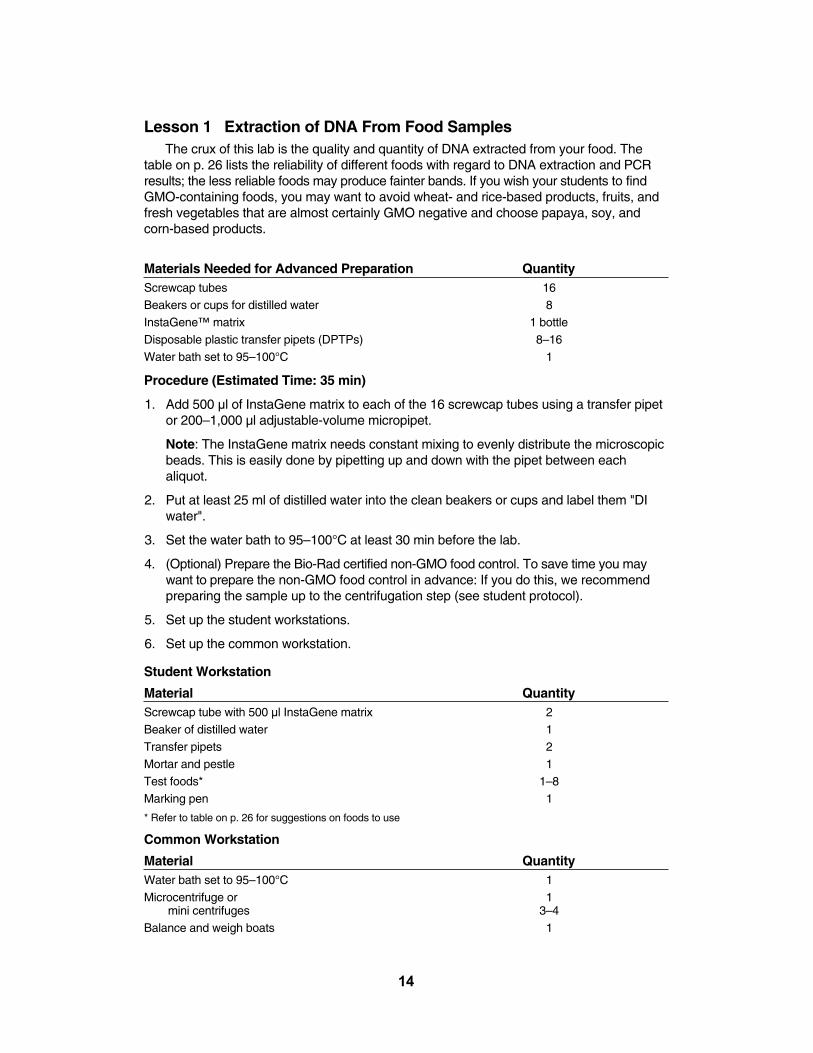
Lesson 1 Extraction of DNA From Food SamplesThe crux of this lab is the quality and quantity of DNA extracted from your food. The
table on p. 26 lists the reliability of different foods with regard to DNA extraction and PCRresults; the less reliable foods may produce fainter bands. If you wish your students to findGMO-containing foods, you may want to avoid wheat- and rice-based products, fruits, andfresh vegetables that are almost certainly GMO negative and choose papaya, soy, andcorn-based products.
Materials Needed for Advanced Preparation QuantityScrewcap tubes 16Beakers or cups for distilled water 8InstaGene™ matrix 1 bottleDisposable plastic transfer pipets (DPTPs) 8–16Water bath set to 95–100°C 1
Procedure (Estimated Time: 35 min)
1. Add 500 µl of InstaGene matrix to each of the 16 screwcap tubes using a transfer pipetor 200–1,000 µl adjustable-volume micropipet.
Note: The InstaGene matrix needs constant mixing to evenly distribute the microscopicbeads. This is easily done by pipetting up and down with the pipet between eachaliquot.
2. Put at least 25 ml of distilled water into the clean beakers or cups and label them "DIwater".
3. Set the water bath to 95–100°C at least 30 min before the lab.
4. (Optional) Prepare the Bio-Rad certified non-GMO food control. To save time you maywant to prepare the non-GMO food control in advance: If you do this, we recommendpreparing the sample up to the centrifugation step (see student protocol).
5. Set up the student workstations.
6. Set up the common workstation.
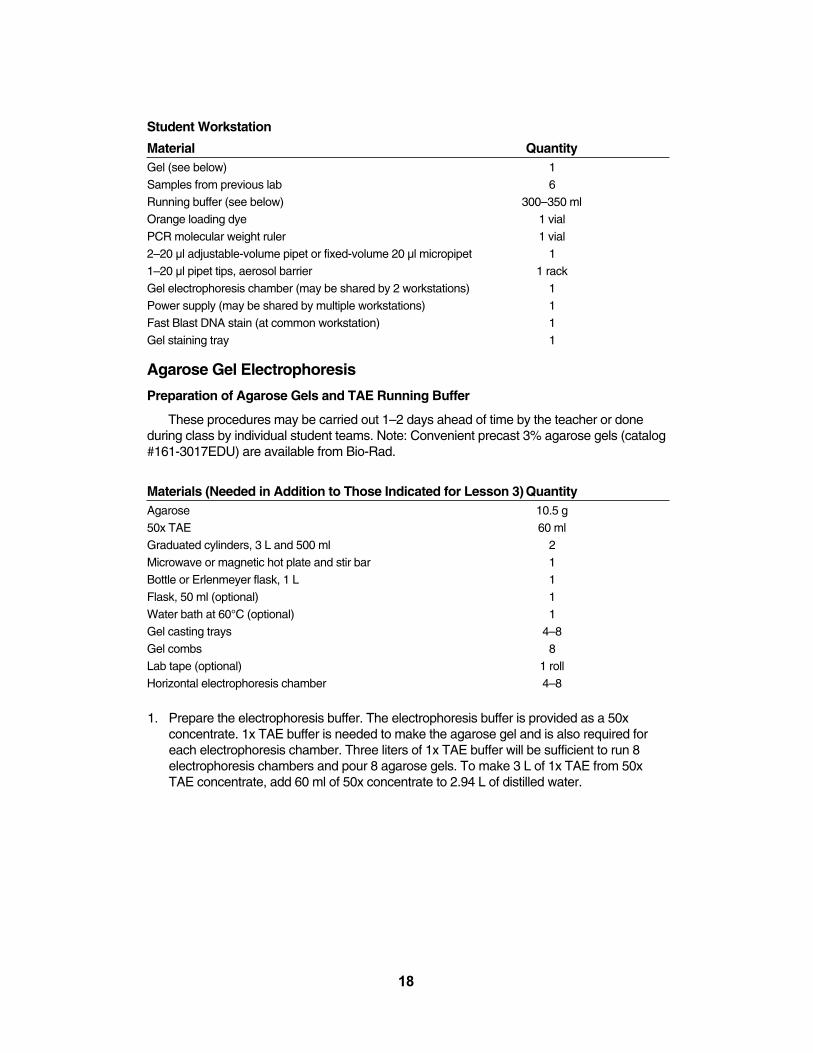
Student Workstation
Material QuantityScrewcap tube with 500 µl InstaGene matrix 2Beaker of distilled water 1Transfer pipets 2Mortar and pestle 1Test foods* 1–8Marking pen 1
* Refer to table on p. 26 for suggestions on foods to use
Common Workstation
Material QuantityWater bath set to 95–100°C 1Microcentrifuge or 1
mini centrifuges 3–4Balance and weigh boats 1
15
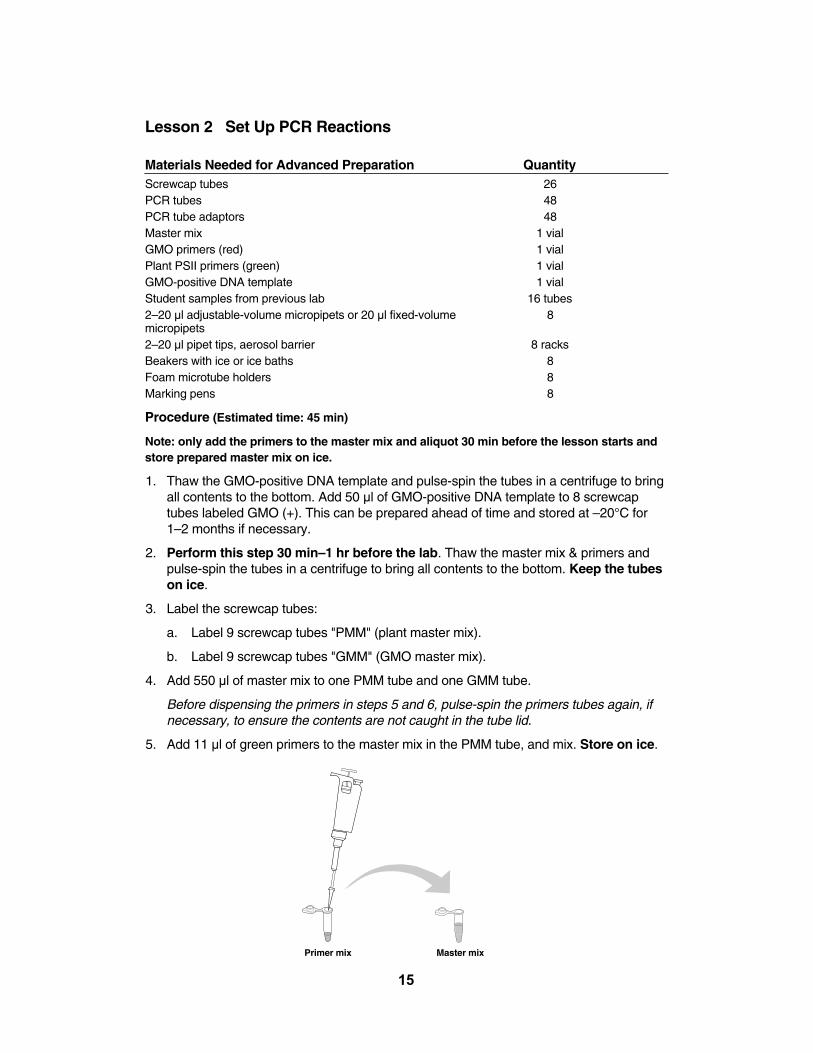
Lesson 2 Set Up PCR Reactions
Materials Needed for Advanced Preparation QuantityScrewcap tubes 26PCR tubes 48PCR tube adaptors 48Master mix 1 vialGMO primers (red) 1 vialPlant PSII primers (green) 1 vialGMO-positive DNA template 1 vialStudent samples from previous lab 16 tubes2–20 µl adjustable-volume micropipets or 20 µl fixed-volume 8micropipets2–20 µl pipet tips, aerosol barrier 8 racksBeakers with ice or ice baths 8Foam microtube holders 8Marking pens 8
Procedure (Estimated time: 45 min)
Note: only add the primers to the master mix and aliquot 30 min before the lesson starts andstore prepared master mix on ice.
1. Thaw the GMO-positive DNA template and pulse-spin the tubes in a centrifuge to bringall contents to the bottom. Add 50 µl of GMO-positive DNA template to 8 screwcaptubes labeled GMO (+). This can be prepared ahead of time and stored at –20°C for1–2 months if necessary.
2. Perform this step 30 min–1 hr before the lab. Thaw the master mix & primers andpulse-spin the tubes in a centrifuge to bring all contents to the bottom. Keep the tubeson ice.
3. Label the screwcap tubes:
a. Label 9 screwcap tubes "PMM" (plant master mix).
b. Label 9 screwcap tubes "GMM" (GMO master mix).
4. Add 550 µl of master mix to one PMM tube and one GMM tube.
Before dispensing the primers in steps 5 and 6, pulse-spin the primers tubes again, ifnecessary, to ensure the contents are not caught in the tube lid.
5. Add 11 µl of green primers to the master mix in the PMM tube, and mix. Store on ice.
Primer mix Master mix
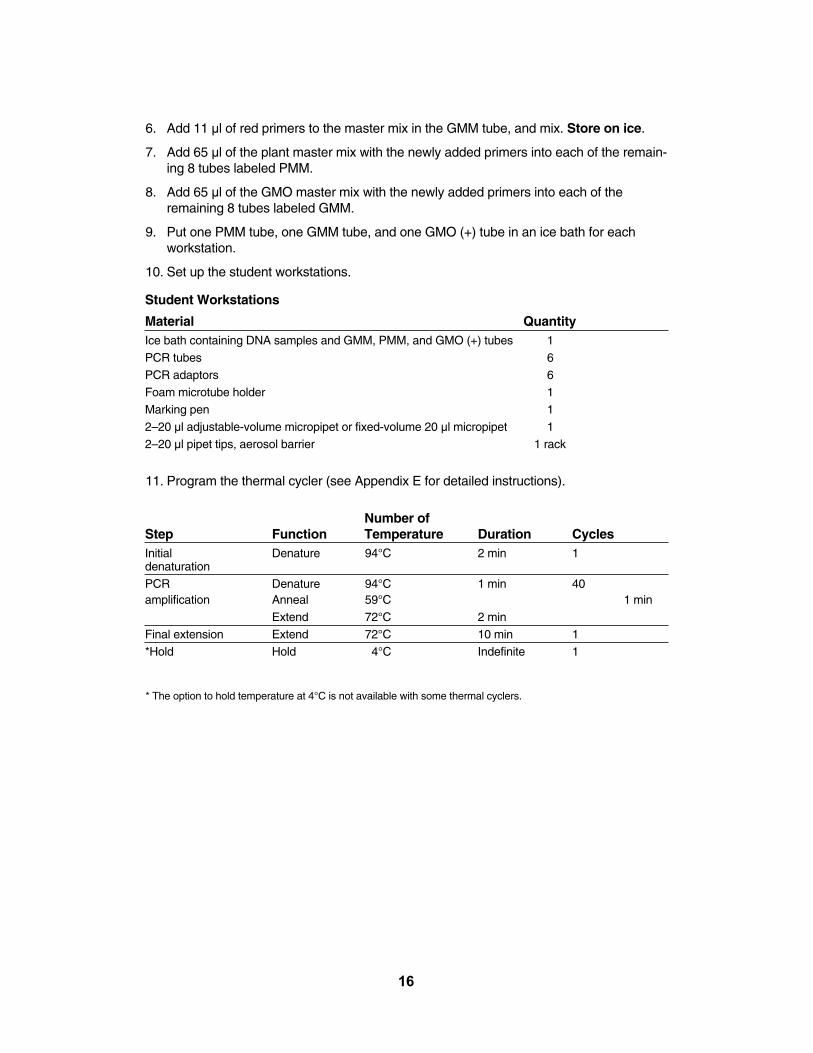
6. Add 11 µl of red primers to the master mix in the GMM tube, and mix. Store on ice.
7. Add 65 µl of the plant master mix with the newly added primers into each of the remain-ing 8 tubes labeled PMM.
8. Add 65 µl of the GMO master mix with the newly added primers into each of theremaining 8 tubes labeled GMM.
9. Put one PMM tube, one GMM tube, and one GMO (+) tube in an ice bath for eachworkstation.
10. Set up the student workstations.
Student Workstations
Material QuantityIce bath containing DNA samples and GMM, PMM, and GMO (+) tubes 1PCR tubes 6PCR adaptors 6Foam microtube holder 1Marking pen 12–20 µl adjustable-volume micropipet or fixed-volume 20 µl micropipet 12–20 µl pipet tips, aerosol barrier 1 rack
11. Program the thermal cycler (see Appendix E for detailed instructions).
Number of Step Function Temperature Duration CyclesInitial Denature 94°C 2 min 1denaturationPCR Denature 94°C 1 min 40amplification Anneal 59°C 1 min
Extend 72°C 2 minFinal extension Extend 72°C 10 min 1*Hold Hold 4°C Indefinite 1
* The option to hold temperature at 4°C is not available with some thermal cyclers.
16
17
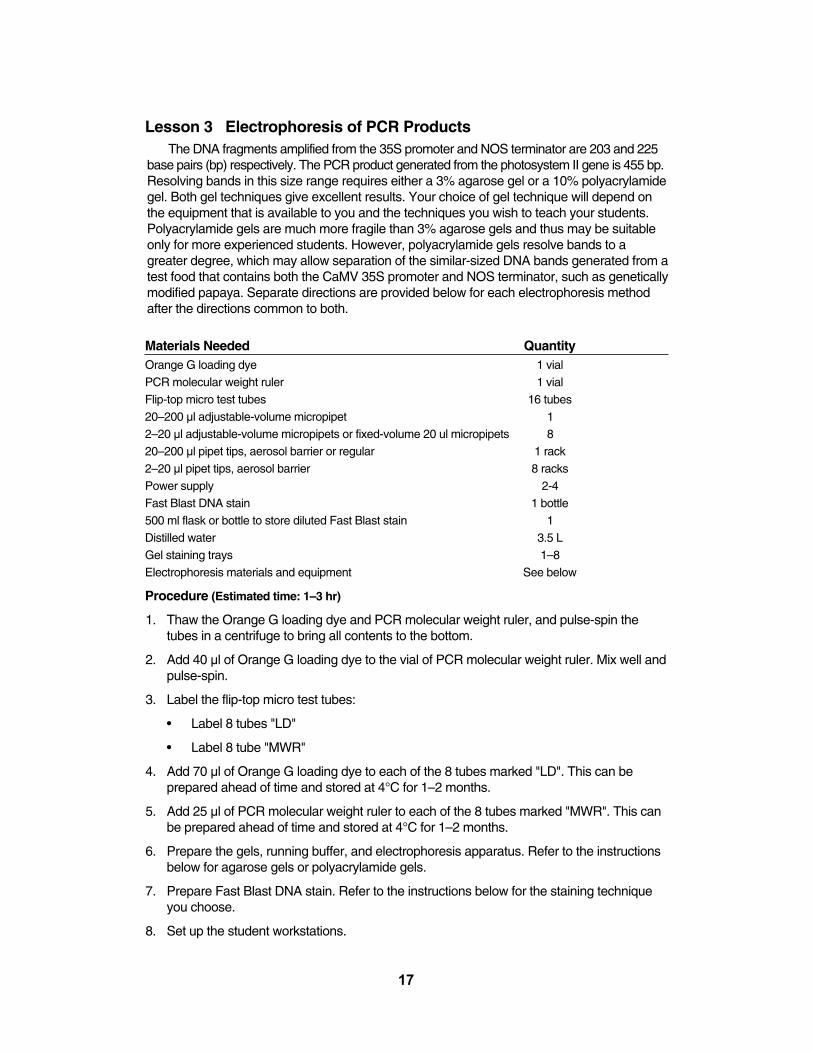
Lesson 3 Electrophoresis of PCR ProductsThe DNA fragments amplified from the 35S promoter and NOS terminator are 203 and 225
base pairs (bp) respectively. The PCR product generated from the photosystem II gene is 455 bp.Resolving bands in this size range requires either a 3% agarose gel or a 10% polyacrylamidegel. Both gel techniques give excellent results. Your choice of gel technique will depend onthe equipment that is available to you and the techniques you wish to teach your students.Polyacrylamide gels are much more fragile than 3% agarose gels and thus may be suitableonly for more experienced students. However, polyacrylamide gels resolve bands to agreater degree, which may allow separation of the similar-sized DNA bands generated from atest food that contains both the CaMV 35S promoter and NOS terminator, such as geneticallymodified papaya. Separate directions are provided below for each electrophoresis methodafter the directions common to both.
Materials Needed QuantityOrange G loading dye 1 vialPCR molecular weight ruler 1 vialFlip-top micro test tubes 16 tubes20–200 µl adjustable-volume micropipet 12–20 µl adjustable-volume micropipets or fixed-volume 20 ul micropipets 820–200 µl pipet tips, aerosol barrier or regular 1 rack2–20 µl pipet tips, aerosol barrier 8 racksPower supply 2-4Fast Blast DNA stain 1 bottle500 ml flask or bottle to store diluted Fast Blast stain 1Distilled water 3.5 LGel staining trays 1–8Electrophoresis materials and equipment See below
Procedure (Estimated time: 1–3 hr)
1. Thaw the Orange G loading dye and PCR molecular weight ruler, and pulse-spin thetubes in a centrifuge to bring all contents to the bottom.
2. Add 40 µl of Orange G loading dye to the vial of PCR molecular weight ruler. Mix well andpulse-spin.
3. Label the flip-top micro test tubes:
• Label 8 tubes "LD"
• Label 8 tube "MWR"
4. Add 70 µl of Orange G loading dye to each of the 8 tubes marked "LD". This can be prepared ahead of time and stored at 4°C for 1–2 months.
5. Add 25 µl of PCR molecular weight ruler to each of the 8 tubes marked "MWR". This canbe prepared ahead of time and stored at 4°C for 1–2 months.
6. Prepare the gels, running buffer, and electrophoresis apparatus. Refer to the instructionsbelow for agarose gels or polyacrylamide gels.
7. Prepare Fast Blast DNA stain. Refer to the instructions below for the staining techniqueyou choose.
8. Set up the student workstations.
18
Student Workstation
Material QuantityGel (see below) 1Samples from previous lab 6Running buffer (see below) 300–350 mlOrange loading dye 1 vialPCR molecular weight ruler 1 vial2–20 µl adjustable-volume pipet or fixed-volume 20 µl micropipet 11–20 µl pipet tips, aerosol barrier 1 rackGel electrophoresis chamber (may be shared by 2 workstations) 1Power supply (may be shared by multiple workstations) 1Fast Blast DNA stain (at common workstation) 1Gel staining tray 1
Agarose Gel Electrophoresis
Preparation of Agarose Gels and TAE Running Buffer
These procedures may be carried out 1–2 days ahead of time by the teacher or done during class by individual student teams. Note: Convenient precast 3% agarose gels (catalog#161-3017EDU) are available from Bio-Rad.
Materials (Needed in Addition to Those Indicated for Lesson 3) QuantityAgarose 10.5 g50x TAE 60 mlGraduated cylinders, 3 L and 500 ml 2Microwave or magnetic hot plate and stir bar 1Bottle or Erlenmeyer flask, 1 L 1Flask, 50 ml (optional) 1Water bath at 60°C (optional) 1Gel casting trays 4–8Gel combs 8Lab tape (optional) 1 rollHorizontal electrophoresis chamber 4–8
1. Prepare the electrophoresis buffer. The electrophoresis buffer is provided as a 50x concentrate. 1x TAE buffer is needed to make the agarose gel and is also required foreach electrophoresis chamber. Three liters of 1x TAE buffer will be sufficient to run 8electrophoresis chambers and pour 8 agarose gels. To make 3 L of 1x TAE from 50xTAE concentrate, add 60 ml of 50x concentrate to 2.94 L of distilled water.
2. Make the agarose solution. The recommended gel concentration for this application is 3%agarose. This agarose concentration provides excellent resolution and minimizes run timerequired for electrophoretic separation of PCR fragments. To make a 3% solution, add 3 gof agarose powder per 100 ml of 1x TAE electrophoresis buffer in a suitable heatproofcontainer that is large enough to accommodate vigorous boiling (e.g., 1,000 mlErlenmeyer flask, Wheaton bottle, etc.). For 8 gels, you will need approximately 350 ml ofmolten agarose (10.5 g agarose plus 350 ml 1x TAE buffer). The agarose must be madeusing electrophoresis buffer, not water. Swirl to suspend the agarose powder in thebuffer. If using an Erlenmeyer flask, invert a 50 ml Erlenmeyer flask into the open end ofthe 1,000 ml Erlenmeyer flask containing the agarose. The small flask acts as a refluxchamber, allowing boiling without much loss of buffer volume by evaporation. Theagarose can be melted for gel casting on a magnetic hot plate or in a microwave oven.Caution: Use protective gloves, oven mitts, goggles, and lab coats as appropriate whilepreparing and casting agarose gels. Contact with boiling molten agarose or the vesselscontaining hot agarose can cause severe burns.
Magnetic hot plate method. Add a stirbar to the flask containing agarose and buffer. Heatthe mixture to boiling while stirring on a magnetic hot plate. Bubbles or foam should breakbefore rising to the neck of the flask. Boil the solution until all of the small transparent agaroseparticles are dissolved. With the small flask still in place, set aside the agarose to cool to 60°Cbefore pouring gels (a water bath set to 60°C is useful for this step).
Microwave oven method. Place the flask or bottle containing the agarose solution into themicrowave oven. Loosen the bottle cap if present. Use a medium setting and set to 3 minutes.Stop the microwave oven every 30 seconds and swirl the flask to redistribute any undissolvedagarose. This technique is the most efficient way to dissolve agarose. Alternate boiling andswirling the solution until all of the small transparent agarose particles are dissolved. With thesmall flask or bottle cap still in place, set aside to cool to 60°C before pouring (a water bathset to 60°C is useful for this step).
Casting Agarose Gels
Using Bio-Rad's Mini-Sub® Cell GT system, gels can be cast directly in the gel box usingthe casting gates with the gel tray. If casting gates are unavailable, use the taping method forcasting gels, as described below. Other methods are detailed in the Bio-Rad Sub-Cell® GTinstruction manual. 7 x 7 cm gel trays allow a single gel to be cast. 7 x 10 cm gel trays allowcasting of a "double" gel, i.e., a gel with two rows of wells that can be loaded with the samplesof two student teams. These longer gels do not fit within the casting gates and need to bemade by the taping method.
1. Seal the ends of the gel tray securely with strips of standard laboratory tape. Press thetape firmly onto the edges of the gel tray to form a fluid-tight seal and lay the gel tray flat.
2. Prepare an agarose solution of the desired concentration and amount in 1x TAE electrophoresis buffer.
3. Cool the agarose to at least 60°C before pouring (a water bath is useful for this step).
4. While the agarose is cooling, place the comb into the appropriate slots of the gel tray. Gelcombs should be placed within ~2 cm of the end of the gel casting tray.
5. Pour 30–50 ml of molten agarose into the tray to a depth of approximately 0.5 cm.
6. Allow the gel to solidify at room temperature for 10 to 20 minutes — it will be translucentwhen it is ready to use.
7. Carefully remove the comb from the solidified gel. Remove the tape from the edges of thegel tray. Agarose gels can be stored wrapped in plastic wrap, sealed plastic bags or submerged in 1x TAE buffer for up to 2 weeks at 4°C.
19
Load and Run Agarose Gels
1. Place the gel in the gel tray onto a leveled DNA electrophoresis chamber so that the sample wells are at the cathode (black) end of the base. DNA samples will migratetowards the anode (red) end of the base during electrophoresis.
2. Fill the electrophoresis chamber with 1x TAE running buffer to about 2 mm above the surface of the gel.
3. Load the gels as directed in the student manual.
4. Run gels at 100 V for 30 min. Greater resolution can be obtained using a longer run time(eg, 45 min), but if double gels are used, only run gels at 100 V for 30 min since the DNAfrom the upper gel may run into the lower gel. Do not let the orange dye migrate off thegel.
5. Stain the gels in Fast Blast DNA stain — see below.
Preparation for Staining Agarose Gels
Fast Blast DNA stain is provided as a 500x concentrate that must be diluted prior touse. The stain can be used as a quick stain when diluted to 100x to allow the visualizationof DNA within 15–20 minutes, or can be used as an overnight stain when diluted to 1x. FastBlast DNA stain is a convenient, safe, and nontoxic alternative to ethidium bromide for thedetection of DNA. Fast Blast contains a cationic compound that belongs to the thiazin familyof dyes. The positively charged dye molecules are attracted to and bind to the negativelycharged phosphate groups on DNA. The proprietary dye formula stains DNA deep blue inagarose gels and provides vivid, consistent results. Detailed instructions on using FastBlast stain are included in the student manual.
WARNING
Although Fast Blast DNA stain is nontoxic and noncarcinogenic, latex or vinylgloves should be worn while handling the stain or stained gels to keep hands frombecoming stained blue. Lab coats or other protective clothing should be worn toavoid staining clothes. Dispose of the staining solutions according to protocols atyour facility. Use either 10% bleach solution or 70% alcohol solution to remove FastBlast from most surfaces. Verify that these solutions do not harm the surface priorto use.
Preparation for Overnight Staining Protocol (Recommended)
To prepare 1x stain (for overnight staining), dilute 1 ml of 500x Fast Blast with 499 ml ofdistilled or deionized water in an appropriately sized flask or bottle, and mix. Cover the flaskand store at room temperature until ready to use.
Preparation for Quick Staining Protocol
To prepare 100x stain (for quick staining), dilute 100 ml of 500x Fast Blast with 400 mlof distilled or deionized water in an appropriately sized flask or bottle and mix. Cover theflask and store at room temperature until ready to use.
Destaining requires the use of at least one large-volume container, capable of holdingat least 500 ml, at each student workstation. 100x Fast Blast can be reused at least seventimes. Please note, in contrast to 1% agarose gels, 3% agarose gels require 5 min staining,prior to destaining in warm water. Due to the high percentage of agarose, gels stained bythis quick method may take longer to destain to a satisfactory level than 1% agarose gels.Multiple washes with warm tap water will assist the destaining of these gels.
20
Polyacrylamide Gel Electrophoresis (PAGE)
Preparation of Polyacrylamide Gels and TBE Running Buffer
Materials needed in addition to those indicated for Lesson 3 Quantity
10% TBE Mini-PROTEAN precast gels (cat. #456-5033) 8
10x TBE (cat. #161-0733EDU) 300 mlGraduated cylinder, 3 L 1Mini-PROTEAN® Tetra cell vertical electrophoresis chamber 4–8Prot/Elec™ tips 8 racksSharp knife or razor 1
Ready Gel 10% TBE Precast Polyacrylamide Gels
Polyacrylamide gels should be stored in a refrigerator until the time of use. Order gels2–3 weeks before the lab for optimal results. Do not freeze them. To set up the gels forthe laboratory, cut the gel packages open over a sink or container, drain out the excessbuffer, and throw away the filter paper and plastic wrap. Remove the comb from betweenthe plates by pushing it upward gently with your fingertips. Peel off the strip of plastic cover-ing the bottom of the gel, as indicated on the gel cassette. Make sure the entire section oftape is removed completely, to allow the full length of the bottom of the gel to be exposedto electric current. For best results, use a transfer pipet and 1x TBE running buffer to rinseany debris out of the wells. Note: The Mini-PROTEAN TBE gels used to electrophoreseDNA for this laboratory are different from the 15% SDS-containing gels used to run proteinsfor SDS-PAGE and the two types should not be substituted for each other.
Note: Instructors may choose to assemble the gel boxes up to 1 hour prior to the laboratory.
Prepare Mini-PROTEAN Tetra Cell Electrophoresis Chambers
1. 1x TBE running buffer. One Mini-PROTEAN Tetra cell with two gels requires 700 mlof 1x TBE running buffer. One Mini-PROTEAN Tetra cell using the companion runningmodule to run four gels requires 1.1 L of 1x TBE running buffer. To make 3 L of 1x TBErunning buffer, mix 300 ml of 10x TBE with 2,700 ml of distilled water. Store at roomtemperature.
Tip:You may want to prepare 1–2 L of extra 1x TBE buffer in case your gel boxes leak afterassembly. If you do have a leak, the outer chamber of the gel box can be filled toabove the inner small plates to equalize the buffer levels in both reservoirs. Thisrequires approximately 1,200 ml of 1x TBE buffer per gel box and is a more convenientfix than reassembling the apparatus mid-lesson.
2. Follow Appendix G for detailed instructions in assembling the apparatus.
21
Load and Run Polyacrylamide Gels
1. If available, place a sample loading guide on the top of the electrode assembly. Theguide will direct the pipet tip to the correct position for loading each sample in a well.
2. Use Prot/Elec tips to load the samples into the wells. These very narrow tips can fitbetween the two gel plates and deliver the samples directly into the wells. If Prot/Elec orsimilar tips are not available, hold the tip directly above the well and between the twogel plates, and allow the sample to gently fall into the well.
3. After loading, run the polyacrylamide gels at 200 V for 30 min. It is acceptable for theorange dye front to migrate out but stop the electrophoresis if the red dye gets to 2 cmfrom the bottom of the gel.
4. When the gels are finished running, turn off the power supply and disconnect the leads.Remove the lid and lift out the electrode assembly and clamping frame.
5. Pour out the running buffer from the electrode assembly. Open the clamps and removethe gel cassettes.
6. To keep the gel free of contamination from your fingertips, wear gloves to handle thegels from this point on. Lay a gel cassette flat on the bench with the short plate facingup. Carefully pry apart the gel plates using the gel opening key supplied with the gels.The gel will usually adhere to one of the plates. Transfer the plate with the gel adheringto it to a tray containing 1x Fast Blast stain (see below), allowing the liquid to detach thegel from the plate. The gel may also be lifted directly (very gently!) from the plate andplaced into the stain.
Preparation for Staining Acrylamide Gels
Fast Blast DNA stain is provided as a 500x concentrate that must be diluted to 1x priorto use and stains DNA in polyacrylamide in around 30 minutes. It is a convenient, safe, andnontoxic alternative to ethidium bromide for the detection of DNA. Fast Blast contains acationic compound that belongs to the thiazin family of dyes. The positively charged dyemolecules are attracted to and bind to the negatively charged phosphate groups on DNA.The proprietary dye formula stains DNA deep blue in acrylamide gels and provides vivid,consistent results. Detailed instructions on using Fast Blast are included in the studentmanual.
WARNINGAlthough Fast Blast DNA stain is nontoxic and noncarcinogenic, latex or vinylgloves should be worn while handling the stain or stained gels to keep hands frombecoming stained blue. Lab coats or other protective clothing should be worn toavoid staining clothes. Dispose of the staining solutions according to protocols atyour facility. Use either 10% bleach solution or 70% alcohol solution to remove FastBlast from most surfaces. Verify that these solutions do not harm the surface priorto use.
Preparation for Staining Protocol
To prepare 1x stain, dilute 1 ml of 500x Fast Blast with 499 ml of distilled or deionizedwater in an appropriately sized flask or bottle, and mix. Cover the flask and store at roomtemperature until ready to use.
Lesson 4: Drying Gels and Analysis of Results For a permanent record of the experiment, gels can be dried between cellophane
sheets and incorporated into lab notebooks; see below and student manual for protocols onthese two drying methods.
22
To document the wet gels, they can be scanned, photocopied (a yellow backing providesoptimal contrast), or traced onto acetate film. Note: 3% agarose gels do not adhere well toagarose gel support film.
GelAir™ drying method:
Materials Needed for Drying 8 Gels Using Gel Drying System (cat. #165-1771EDU) QuantityGelAir cellophane (cat. #165-1779EDU) 4 sheetsGelAir assembly table (cat. #165-1776EDU) 1GelAir drying frames (cat. #165-1775EDU) 2GelAir clamps (cat. #165-1780EDU) 16GelAir drying oven (optional) (cat. #165-1777EDU) 1Distilled water 500 ml
Alternatively, you may use the cellophane sandwich and plastic container method:
Materials Needed for Drying 8 Gels Using Plastic Containers QuantityGelAir cellophane (cat. #165-1779EDU) 16 sheetsPlastic container 8Rubber bands 16Distilled water 500 ml
Procedure
1. Prewet 2 sheets of cellophane in a container of water for 15–20 seconds.
2. Place one sheet of cellophane over a plastic container. Pull the cellophane taut so thatit makes a flat surface over the top of the container, and use a rubber band to hold thesheet in place.
3. Place a gel onto the cellophane. Flooding the surface of the cellophane around the gelwith water will aid in the removal of bubbles.
4. Place the second sheet of wetted cellophane over the gel. Because of their thicknessyou cannot avoid bubbles at the edges of agarose gels, but avoid bubbles between thecellophane and the face of the gel. Secure the second sheet of cellophane to the boxwith a second rubber band.
5. Allow the gel to dry for several days in a well-ventilated area.
6. Contrast on agarose gels can be improved by peeling off the cellophane once theagarose gels have dried. This is not possible with polyacrylamide gels.
23
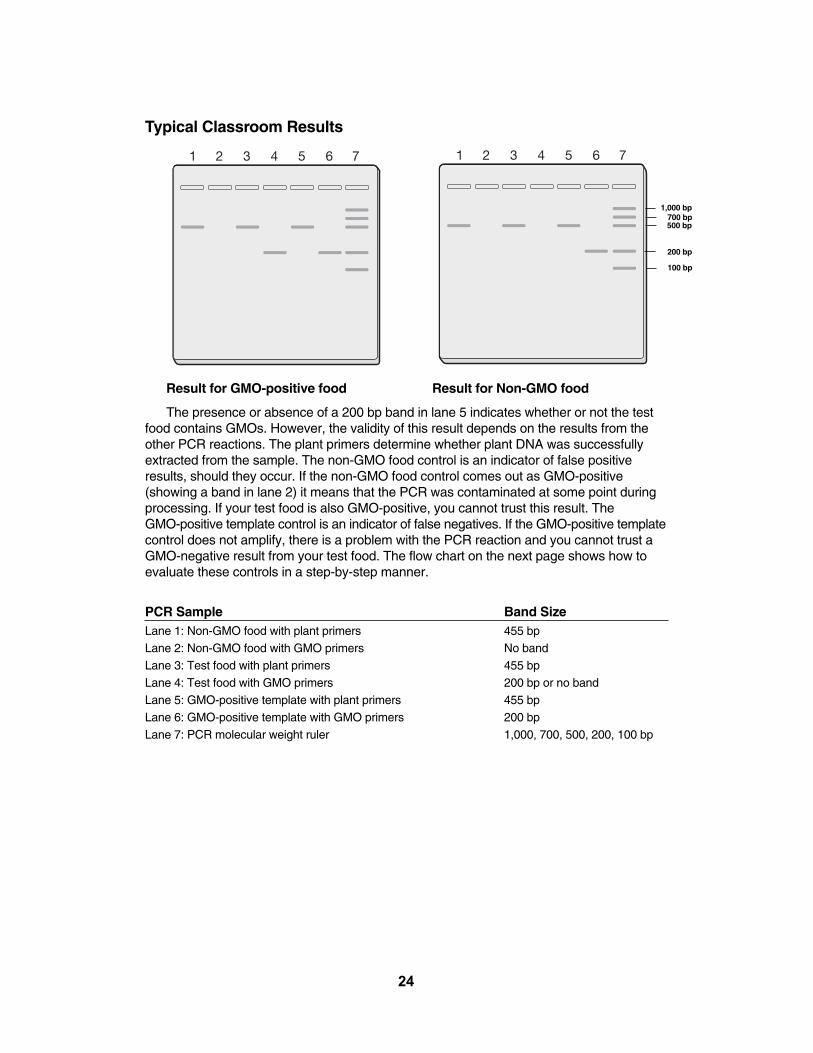
Typical Classroom Results
Result for GMO-positive food Result for Non-GMO food
The presence or absence of a 200 bp band in lane 5 indicates whether or not the testfood contains GMOs. However, the validity of this result depends on the results from theother PCR reactions. The plant primers determine whether plant DNA was successfullyextracted from the sample. The non-GMO food control is an indicator of false positiveresults, should they occur. If the non-GMO food control comes out as GMO-positive (showing a band in lane 2) it means that the PCR was contaminated at some point duringprocessing. If your test food is also GMO-positive, you cannot trust this result. The GMO-positive template control is an indicator of false negatives. If the GMO-positive templatecontrol does not amplify, there is a problem with the PCR reaction and you cannot trust aGMO-negative result from your test food. The flow chart on the next page shows how toevaluate these controls in a step-by-step manner.
PCR Sample Band SizeLane 1: Non-GMO food with plant primers 455 bpLane 2: Non-GMO food with GMO primers No bandLane 3: Test food with plant primers 455 bpLane 4: Test food with GMO primers 200 bp or no bandLane 5: GMO-positive template with plant primers 455 bpLane 6: GMO-positive template with GMO primers 200 bpLane 7: PCR molecular weight ruler 1,000, 700, 500, 200, 100 bp
24
1,000 bp700 bp500 bp
200 bp
100 bp
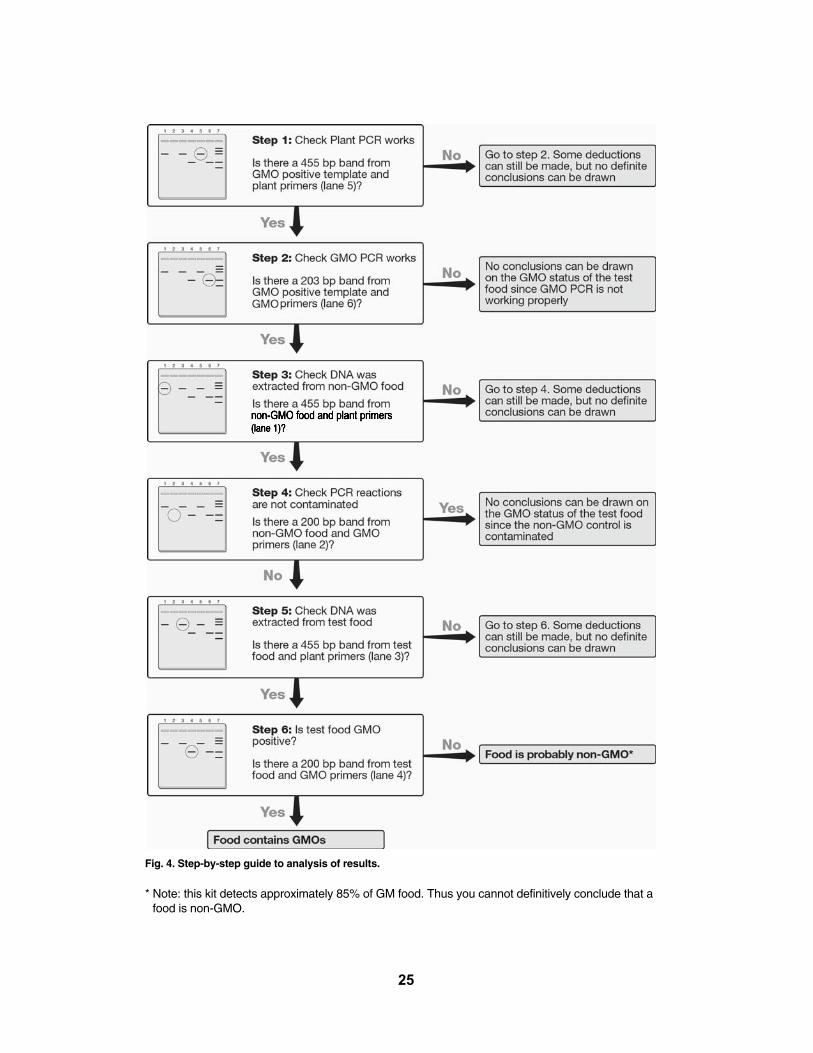
Fig. 4. Step-by-step guide to analysis of results.
* Note: this kit detects approximately 85% of GM food. Thus you cannot definitively conclude that afood is non-GMO.
25
Tips and Frequently Asked Questions
Lesson 1 Extraction of DNA From Food SamplesBio-Rad Certified Non-GMO Food Control:
• Grinding whole grains takes a while, but total grinding is not necessary. You willfind that the water will help to soften the grains and facilitate grinding.
• It is important to process the Bio-Rad certified non-GMO sample first, since PCR isvery sensitive and any GMO-positive DNA may contaminate your equipment.
• To reduce the risk of contamination or to save time, you may want to prepare thissample ahead of time and have your students prepare only their test samples.
What Foods Should I Choose for the Lab?
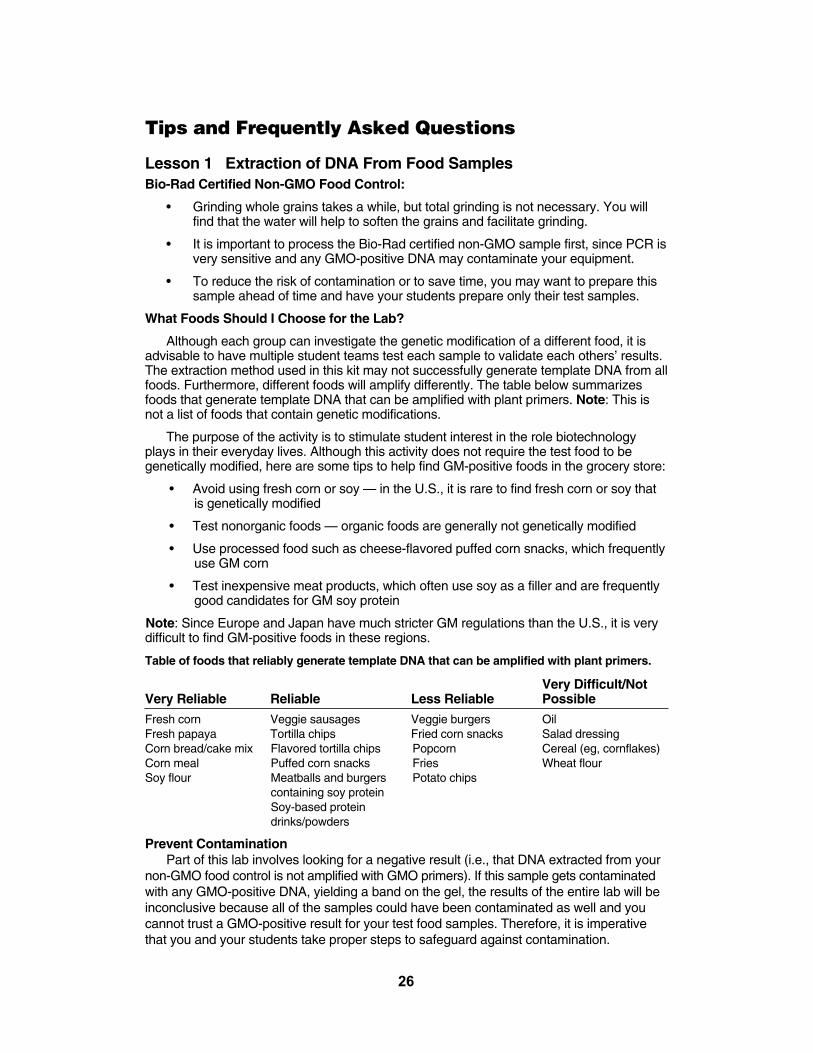
Although each group can investigate the genetic modification of a different food, it isadvisable to have multiple student teams test each sample to validate each others’ results.The extraction method used in this kit may not successfully generate template DNA from allfoods. Furthermore, different foods will amplify differently. The table below summarizesfoods that generate template DNA that can be amplified with plant primers. Note: This isnot a list of foods that contain genetic modifications.
The purpose of the activity is to stimulate student interest in the role biotechnologyplays in their everyday lives. Although this activity does not require the test food to begenetically modified, here are some tips to help find GM-positive foods in the grocery store:
• Avoid using fresh corn or soy — in the U.S., it is rare to find fresh corn or soy thatis genetically modified
• Test nonorganic foods — organic foods are generally not genetically modified
• Use processed food such as cheese-flavored puffed corn snacks, which frequentlyuse GM corn
• Test inexpensive meat products, which often use soy as a filler and are frequentlygood candidates for GM soy protein
Note: Since Europe and Japan have much stricter GM regulations than the U.S., it is verydifficult to find GM-positive foods in these regions.
Table of foods that reliably generate template DNA that can be amplified with plant primers.
Very Difficult/Not Very Reliable Reliable Less Reliable Possible
Fresh corn Veggie sausages Veggie burgers OilFresh papaya Tortilla chips Fried corn snacks Salad dressingCorn bread/cake mix Flavored tortilla chips Popcorn Cereal (eg, cornflakes)Corn meal Puffed corn snacks Fries Wheat flourSoy flour Meatballs and burgers Potato chips
containing soy proteinSoy-based protein drinks/powders
Prevent ContaminationPart of this lab involves looking for a negative result (i.e., that DNA extracted from your
non-GMO food control is not amplified with GMO primers). If this sample gets contaminatedwith any GMO-positive DNA, yielding a band on the gel, the results of the entire lab will beinconclusive because all of the samples could have been contaminated as well and youcannot trust a GMO-positive result for your test food samples. Therefore, it is imperativethat you and your students take proper steps to safeguard against contamination.
26
Remember that DNA can aerosolize, get itself into pipet barrels, and float about in the air.Keeping tubes capped except during immediate use, using aerosol barrier pipet tips at allstages of the lab, wiping down work areas and equipment, and rinsing out pipet barrels with10% bleach (to destroy DNA) will assist in reducing contamination risk. Detailed guidelinesare given in Appendix B.
InstaGene™ matrix: What Function Does It Perform?
InstaGene matrix consists of a suspension of negatively charged, microscopic beadsthat bind divalent cations such as magnesium (Mg2+). It is important to remove divalentcations from the extracted DNA samples because the cations assist enzymes that degradethe DNA template. When cheek cells are lysed and boiled in the presence of InstaGenematrix, the divalent cations released from the cells bind to the beads, and the heat inactivatesthe DNA-degrading enzymes. The beads are pelleted by centrifugation, and the supernatant,which contains clean, intact genomic DNA, can be used as template in PCR reactions.
The beads in the InstaGene matrix quickly settle out of the suspension. It is thereforeextremely important that the vial of matrix be thoroughly mixed before pipetting aliquots foreach student workstation, so that the aliquots contain equivalent amounts of beads.
If the DNA samples are not going to be amplified within 24 hours, they can be stored inthe refrigerator in the InstaGene matrix for up to 1 week. For longer storage, place samplesin the freezer to prevent DNA degradation. Before the samples are used in PCR, the beadsshould be repelleted by centrifugation just prior to making up the PCR reactions.
Lesson 2 Set Up PCR Reactions
Contamination
Again, the students should be reminded to guard against contamination, to use freshaerosol-filtered tips at each step, and to keep tubes capped unless they are immediatelyadding a reagent to them.
Do I Have to Remove the InstaGene Matrix Before PCR?
It is extremely important to pellet the InstaGene beads completely before any of thelysate is removed for the PCR reaction. The beads bind and remove divalent cations suchas Mg2+, which is essential to the function of Taq polymerase. Thus, if any beads are carriedover into the PCR reaction, the reaction could be inhibited. The InstaGene matrix can beeffectively pelleted by centrifugation (6,000 x g for 5 min). When transferring the DNA samples from the InstaGene samples, carefully remove 20 µl of the supernatant above thebeads (which contains the genomic DNA).
Master Mix: What Is It?
The master mix contains a mixture of nucleotides, or dNTPs (dATP, dTTP, dCTP, anddGTP), buffer, and Taq DNA polymerase. Complete master mix is prepared by addingprimers to the master mix just prior to the laboratory period. When 20 µl of the DNA templateis added to 20 µl of complete master mix, all of the necessary components for a 40 µl PCRreaction are present.
Note: Once the master mix and primers are mixed, the complete mix should be kept on iceand used within 30 minutes to 1 hr. These reagents are extremely sensitive.
Why Are the Primers Red and Green?
The primer mixes contain PCR-compatible dyes that allow students to easily visualizeand distinguish the different master mixes. The dyes also migrate in the gel giving a visualdemonstration of electrophoresis.
27
PCR in a Thermal Cycler
The PCR amplification takes place in a thermal cycler that performs cycles of alternatingheating and cooling steps. This lab utilizes a three-step cycle: the DNA undergoes denaturation at 94°C for 1 minute, annealing at 59°C for 1 minute, and extension at 72°Cfor 2 minutes. This cycle is repeated 40 times during the course of PCR amplification.During the denaturation, the two strands of the DNA template are melted apart to provideaccess for the PCR primers. During the annealing step, the PCR primers recognize and bindto the DNA template. Once the primers are bound, Taq DNA polymerase extends theprimers to replicate the segment of DNA during the extension step. The PCR reaction willtake approximately 3.5 hours to complete.
The PCR tubes are very small and require care when handling. It is important to carefully and completely cap the tubes before placing them into the thermal cycler. If thetubes are not closed completely, substantial evaporation can take place, and PCR amplification will be inhibited. Bio-Rad's thermal cyclers were developed for oil-free operation.Oil is not needed in the thermal block wells or in the sample tubes. The sample wells areshaped to provide uniform contact with most standard 200 µl thin-wall PCR tubes. Do notuse 500 µl thin-wall micro test tubes with these thermal cyclers. The heated sampleblock cover maintains a higher temperature than the sample block at all times during a thermal cycling program. This keeps water vapor from condensing under the cap of thesample tube, thereby reducing sample evaporation and eliminating the need for oil overlaysin the tubes.
How Stable Are Newly Set Up PCR Reactions?
Extended incubation of master mix and genomic DNA decreases amplification efficiency.Thus if you wish to put two classes into one PCR machine or if you have more PCR reactionsthan you have space in your thermal cycler we suggest incubating the reactions on ice forno more than one hour prior to cycling.
Manual PCR
It is possible to perform PCR manually without an automated thermal cycler, although thePCR will not be as efficient. For manual PCR amplification, reactions should be performed inscrewcap tubes and topped off with a drop of mineral oil to prevent evaporation. The tubesare placed in a heat block or water bath set at 95°C for 1 minute, then manually transferred toa heat block or water bath set at 59°C for 1 minute, and finally transferred to a heat block orwater bath set at 72°C for 2 minutes. Forty cycles of manual PCR should take ~3 hours. It istedious but it works. Good luck!
Lesson 3 Electrophoresis of PCR products
Agarose or Polyacrylamide Gel Electrophoresis?
The DNA fragments amplified from the 35S promoter and NOS terminator are 203 and 225base pairs (bp) respectively. The PCR product generated frm the photosystem II gene is 455 bp.Resolving bands in this size range requires either a 3% agarose gel or a 10% polyacrylamidegel. Both gel techniques give excellent results. Your choice of gel technique will depend onthe equipment that is available to you and the techniques you wish to teach your students.Polyacrylamide gels are much more fragile than 3% agarose gels and thus may be suitableonly for more experienced students. However polyacrylamide gels resolve bands to a greaterdegree, which may allow for separation of the similar-sized DNA bands generated from a testfood that contains both the CaMV 35S promoter (203 bp) and NOS terminator (225 bp), suchas genetically modified papaya. Refer to page 3 for the accessories that you will needdepending on whether you choose agarose or polyacrylamide gel electrophoresis.
28
Orange G Loading Dye
Before the amplified samples are electrophoresed, students need to add 10 µl of 5xorange G loading dye to each of their PCR tubes. The loading dye contains glycerol, whichincreases the density of the sample and ensures that it sinks into the well of the agarosegel. In addition, the loading dye contains a dye called Orange G that comigrates with DNAof ~50 bp in a 3% agarose gel or with ~20 bp in a 10% acrylamide gel.
Dye Migration
Agarose Gels — The orange dye from the loading dye should not be allowed to migrateoff an agarose gel, otherwise some samples may be lost.
Polyacrylamide Gels — The orange dye front may migrate off the polyacrylamide gel.The red dye front from the GMO primer dye should not be allowed to migrate off polyacrylamide gels.
As a side point, the different dyes used to color the primers migrate at different rates dueto charge differences, and they provide a useful visible demonstration of electrophoresis.
Can I Use Ethidium Bromide to Stain My Gels?
This lab has been optimized for use with Fast Blast DNA stain, a nontoxic, safe DNAstain. Ethidium bromide (EtBr) is the traditional stain used to visualize DNA and is moresensitive than Fast Blast, and it will work well to stain gels for this lab. However, EtBr is aknown mutagen and suspected carcinogen and requires the use of UV light to visualizeDNA. One disadvantage of using EtBr is that, due to its higher sensitivity, primer-dimerbands may be more visible with EtBr than with Fast Blast and may confuse interpretation ofresults with less experienced students. If EtBr is used as a stain for agarose gels, the gelsshould contain 0.05 µg/ml EtBr in the agarose. This concentration produces maximum contrast of the amplified bands. Note: Fast Blast DNA stain quenches EtBr staining, sovisualize with EtBr before Fast Blast stain. Polyacrylamide gels must be stained after electrophoresis. Stain the gels in 0.05 µg/ml EtBr and destain in water at least 2 times for20 min.
Lesson 4 Analysis of Results
Why Do Foods Labeled As "Non-GMO" or "Organic" Come up As GMO-Positive?
First, check your controls. Does your non-GMO food control test negative for GMO? If theanswer is yes, you may still have contamination in just that one sample, rather than in all ofthe reactions, so the best way to confirm your result is to repeat the test. However, theremay well be GMOs in food labeled as "non-GMO". Different countries have different regulations for food labeling. Most countries allow food to be labeled as "non-GMO" (oralternatively, not labeled as "GMO") when the percentage of GMO-derived material in thefood is below a legislated level (usually 1–5%). The PCR test is sensitive enough to detectthese low levels. Quantitative tests for detecting the percentage of GMOs in food can beperformed by a GMO testing laboratory using real-time PCR.
Why Are My Non-GMO Controls GMO-Positive?
Somewhere in the process the samples were contaminated with GMO-positive DNA. Referto Appendix B for ways to safeguard against contamination.
Why Did I Not Get Viable Plant DNA?
Mistakes may have been made during DNA extraction, which can be verified by repeating thetest. However, some foods do not yield PCR amplifiable plant DNA. This kit was optimized totest corn, soy, and papaya based foods. Refer to the table on p. 26 for recommended reliablefoods.
29
30
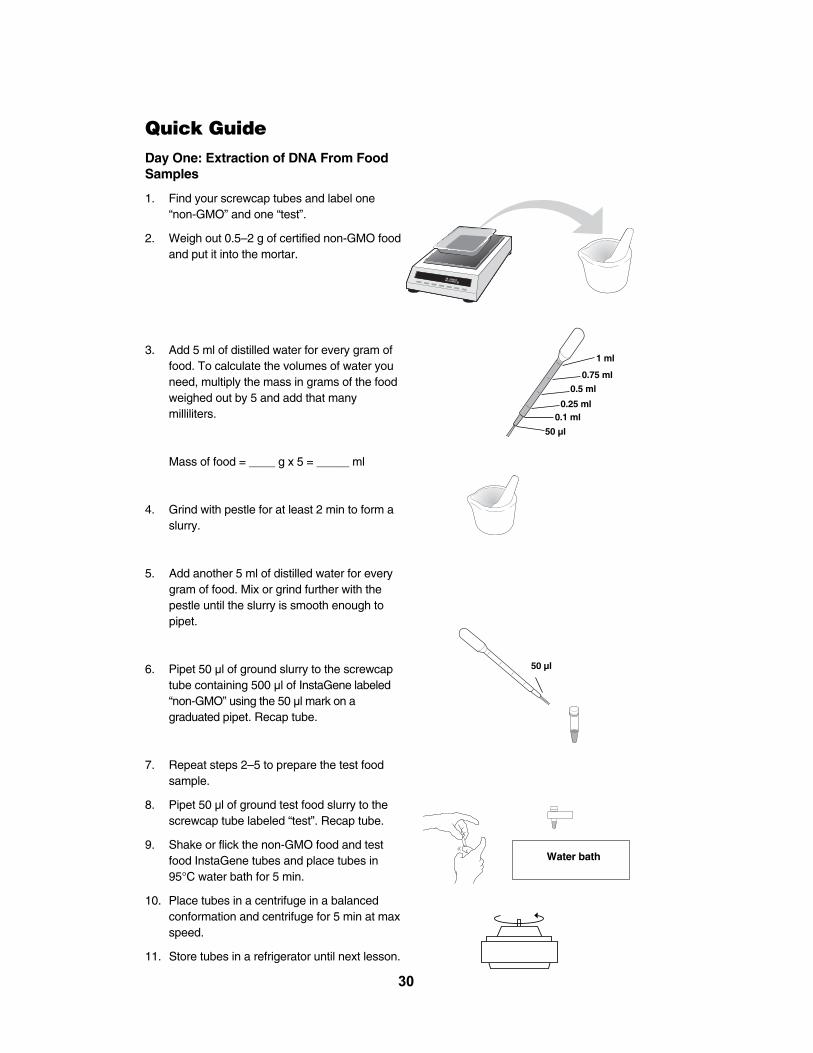
Quick GuideDay One: Extraction of DNA From FoodSamples
1. Find your screwcap tubes and label one “non-GMO” and one “test”.
2. Weigh out 0.5–2 g of certified non-GMO foodand put it into the mortar.
3. Add 5 ml of distilled water for every gram offood. To calculate the volumes of water youneed, multiply the mass in grams of the foodweighed out by 5 and add that manymilliliters.
Mass of food = ____ g x 5 = _____ ml
4. Grind with pestle for at least 2 min to form aslurry.
5. Add another 5 ml of distilled water for everygram of food. Mix or grind further with thepestle until the slurry is smooth enough topipet.
6. Pipet 50 µl of ground slurry to the screwcaptube containing 500 µl of InstaGene labeled“non-GMO” using the 50 µl mark on a graduated pipet. Recap tube.
7. Repeat steps 2–5 to prepare the test foodsample.
8. Pipet 50 µl of ground test food slurry to thescrewcap tube labeled “test”. Recap tube.
9. Shake or flick the non-GMO food and testfood InstaGene tubes and place tubes in95°C water bath for 5 min.
10. Place tubes in a centrifuge in a balanced conformation and centrifuge for 5 min at maxspeed.
11. Store tubes in a refrigerator until next lesson.
Water bath
1 ml
0.75 ml
0.5 ml
0.25 ml0.1 ml
50 µl
50 µl
31
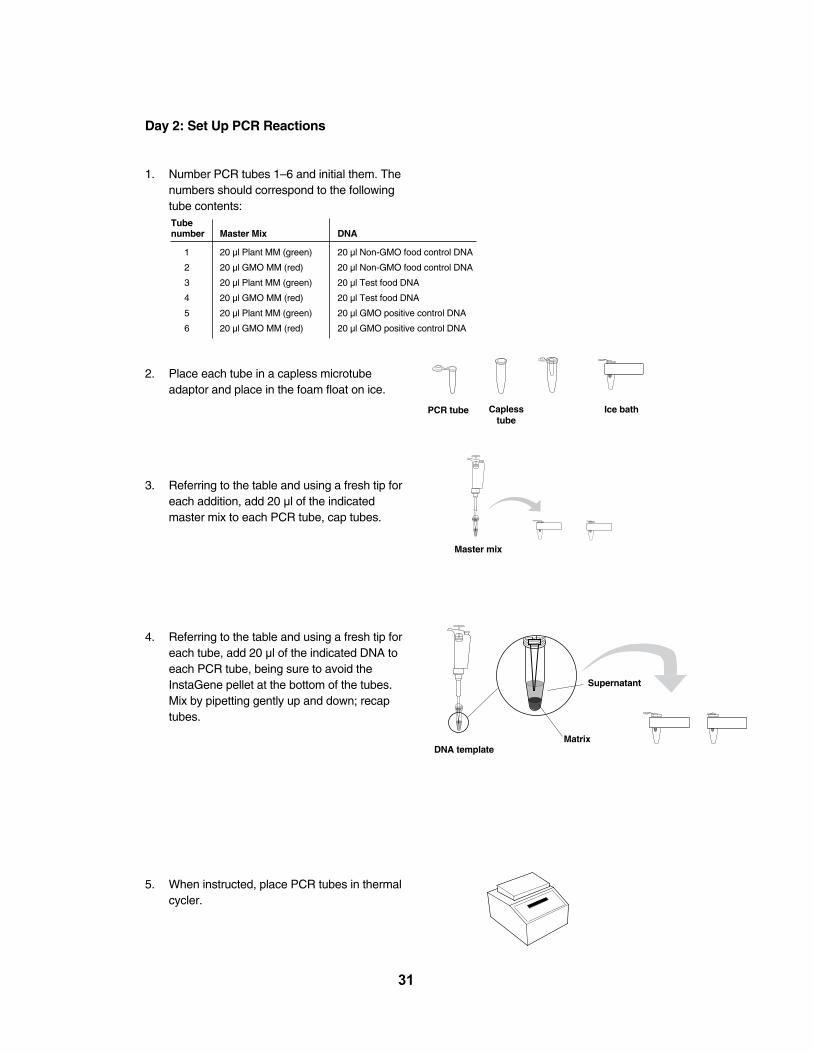
Day 2: Set Up PCR Reactions
1. Number PCR tubes 1–6 and initial them. Thenumbers should correspond to the followingtube contents:
2. Place each tube in a capless microtube adaptor and place in the foam float on ice.
3. Referring to the table and using a fresh tip foreach addition, add 20 µl of the indicated master mix to each PCR tube, cap tubes.
4. Referring to the table and using a fresh tip foreach tube, add 20 µl of the indicated DNA toeach PCR tube, being sure to avoid theInstaGene pellet at the bottom of the tubes.Mix by pipetting gently up and down; recaptubes.
5. When instructed, place PCR tubes in thermalcycler.
PCR tube Caplesstube
Ice bath
Master mix
DNA template
Supernatant
Matrix
Tubenumber Master Mix DNA
1 20 µl Plant MM (green) 20 µl Non-GMO food control DNA
2 20 µl GMO MM (red) 20 µl Non-GMO food control DNA
3 20 µl Plant MM (green) 20 µl Test food DNA
4 20 µl GMO MM (red) 20 µl Test food DNA
5 20 µl Plant MM (green) 20 µl GMO positive control DNA
6 20 µl GMO MM (red) 20 µl GMO positive control DNA
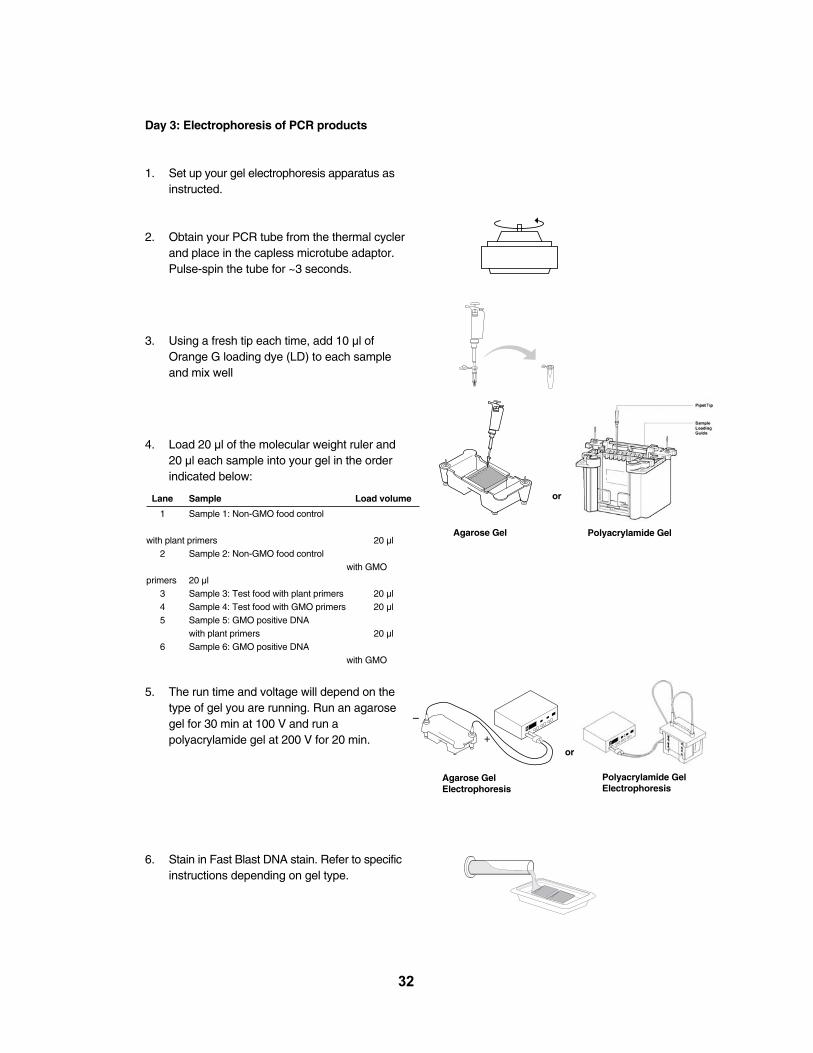
Day 3: Electrophoresis of PCR products
1. Set up your gel electrophoresis apparatus asinstructed.
2. Obtain your PCR tube from the thermal cyclerand place in the capless microtube adaptor.Pulse-spin the tube for ~3 seconds.
3. Using a fresh tip each time, add 10 µl ofOrange G loading dye (LD) to each sampleand mix well
4. Load 20 µl of the molecular weight ruler and20 µl each sample into your gel in the orderindicated below:
5. The run time and voltage will depend on thetype of gel you are running. Run an agarosegel for 30 min at 100 V and run a polyacrylamide gel at 200 V for 20 min.
6. Stain in Fast Blast DNA stain. Refer to specificinstructions depending on gel type.
32
+
–
or
Agarose Gel Polyacrylamide Gel
or
Agarose GelElectrophoresis
Polyacrylamide GelElectrophoresis
Lane Sample Load volume
1 Sample 1: Non-GMO food control
with plant primers 20 µl2 Sample 2: Non-GMO food control
with GMOprimers 20 µl
3 Sample 3: Test food with plant primers 20 µl4 Sample 4: Test food with GMO primers 20 µl5 Sample 5: GMO positive DNA
with plant primers 20 µl6 Sample 6: GMO positive DNA
with GMO
Student ManualBackground
With the world population exploding and farmable land disappearing, agricultural specialistsare concerned about the world's ability to produce enough food to feed the growing population.Environmentalists are concerned about the overuse of pesticides and herbicides and the long-term effects of these chemicals on the environment and human health. Might there be asolution to both of these problems? The biotechnology industry thinks so. Its proponents believegenetically modified organisms (GMOs), particularly genetically modified (GM) crop plants, cansolve both problems. This proposed solution, however, has met with great opposition throughoutthe world. Dubbed "frankenfoods" by opponents and restricted in most European countries,GMOs are widely produced and sold in the United States. Currently in the US, foods that contain GMOs do not have to be labeled as such.
Genetic manipulation of crop plants is not new. Farmers have been genetically modifyingcrops for centuries and crop breeding to encourage specific traits, such as high yield, is stillan important part of agriculture today. However, there is now the option to place genes forselected traits directly into crop plants. These genes do not have to originate from the sameplant species—in fact, they do not have to come from plants at all. One popular class ofGM crops has a gene from the soil bacterium Bacillus thuringiensis (Bt) inserted into theirgenomes. Bt crops produce a protein called delta-endotoxin that is lethal to European cornborers, a common pest on corn plants. Farmers who plant Bt crops do not have to applypesticide because the plants produce the toxic protein inside their cells. When the corn borers feed on the genetically modified plant, they die. Other GMOs include those that areherbicide-resistant delayed for fruit ripening, are resistant to fungi or drought, haveincreased crop yield, or bear improved fruits.
Many people object to the use of GM crop plants. They argue that there is a potential tocreate super-weeds through cross-pollination with herbicide-resistant crops or that super-bugs will evolve that are no longer resistant to the toxins in pest-resistant crops. Many areconcerned with potential allergic reactions to the novel proteins or antibiotic resistance arisingfrom the selectable markers used to develop the crops or other unforeseen effects on publichealth. Proponents of GM foods argue these crops are actually better for the environment.Fewer toxic chemicals are put into the environment and thus fewer toxic chemicals canharm the environment and human health. In addition, these crops can preserve arable landby reducing stresses on the land, improve the nutritional value of food in developing countries, and allow crops to be grown on previously unfarmable land.
Whatever position one takes in the GMO debate, it would be beneficial to be able totest foods found in the grocery store for the presence of GMO-derived products. This canbe done in several ways. One would be to use an antibody-based test such as the enzyme-linked immunosorbent assay (ELISA), which can detect the proteins that areproduced specifically by GM crops. However, the ELISA is not useful for testing foods thathave been highly processed, because the proteins have most likely been destroyed anddifferent GM foods produce different proteins. Another method is to use the polymerasechain reaction (PCR) to look for a DNA sequence common to GM foods. DNA is moreresistant than proteins to processing and can be extracted from even highly processedfoods. It is these GMO DNA sequences that we will be testing for in this laboratory.
In the first lesson you will extract genomic DNA from food samples, in the second labyou will run PCR reactions to amplify GMO and natural plant sequences from the DNA, andin the third lab you will electrophorese the amplified samples to visualize the DNA.
Let's see if your favorite food contains GMOs!
33
Fig. 1. Detecting GM foods by PCR. Genomic DNA is extracted from test foods (Lesson 1) and then two PCRreactions are performed on each test food genomic DNA sample (Lesson 2). One PCR reaction uses primers specific to a common plant gene (plant primers) to verify that viable DNA was successfully extracted from thefood. No matter whether the food is GM or not, this PCR reaction should always amplify DNA (See lanes 1 and 3of the gel above). The other PCR reaction uses primers specific to sequences commonly found in GM crops(GMO primers). This PCR reaction will only amplify DNA if the test food is GM (See lane 4). If the test food is non-GM, then the GMO primers will not be complementary to any sequence within the test food genomic DNAand will not anneal, so no DNA will be amplified (see lane 2). To find out whether DNA has been amplified or not,the PCR products are electrophoresed on a gel and stained to visualize DNA as bands (Lesson 3). A molecularweight ruler (lane 5) is electrophoresed with the samples to allow the sizes of the DNA bands to be determined.
Non-GM food
Plant primers
455 bp
No GMO
GM food
455 bp 200 bp
GMO primers Plant primers GMO primers
Extractgenomic
DNA
Extractgenomic
DNA
34
1,000 bp700 bp500 bp
200 bp
100 bp
Lesson 1 Extraction of DNA From Food Samples
In this lesson you will extract DNA from a control non-GMO food and a grocery storefood item that you will test for the presence of GMOs. The most commonly modified foodsare corn and soy-based, and so the test food could be fresh corn or soybeans, or a preparedor processed food such as cornmeal, cheese puffs, veggie sausage, etc. You will processthe non-GMO control first.
You will first weigh your food sample, then grind it with water to make a slurry. You willthen add a tiny amount of the slurry to a screwcap tube containing InstaGene matrix and boilit for 5 minutes.
The cellular contents you are releasing from the ground-up sample contain enzymes(DNases) that can degrade the DNA you are attempting to extract. The InstaGene matrix ismade of negatively charged microscopic beads that “chelate” or grab metal ions out ofsolution. It chelates metal ions such as Mg2+, which is required as a cofactor in enzymaticreactions. When DNA is released from your sample in the presence of the InstaGenematrix, the charged beads grab the Mg2+ and make it unavailable to the enzymes thatwould degrade the DNA you are trying to extract. This allows you to extract DNA withoutdegradation. Boiling the samples destroys these enzymes.
After you centrifuge the samples to remove the InstaGene matrix and debris, the supernatant will contain intact extracted DNA. This extracted DNA will be used in the nextlaboratory as your target DNA.
35
Lesson 1 Extraction of DNA From Food Samples
Focus Questions
1. How can you test a food to find out if it contains material derived from a geneticallymodified organism (GMO)?
2. In what organelles is plant DNA located?
3. Many foods containing GM crops are highly processed. Can you suggest how DNAfrom whole plants may differ from that extracted from processed foods, e.g., corn chips,cornmeal, etc.?
4. What molecules are present in the cell that might interfere with DNA extraction?
5. Why do you also perform analysis on food that is known to be a non-GMO food control?
6. Why was the non-GMO food control prepared prior to your test food sample?
36
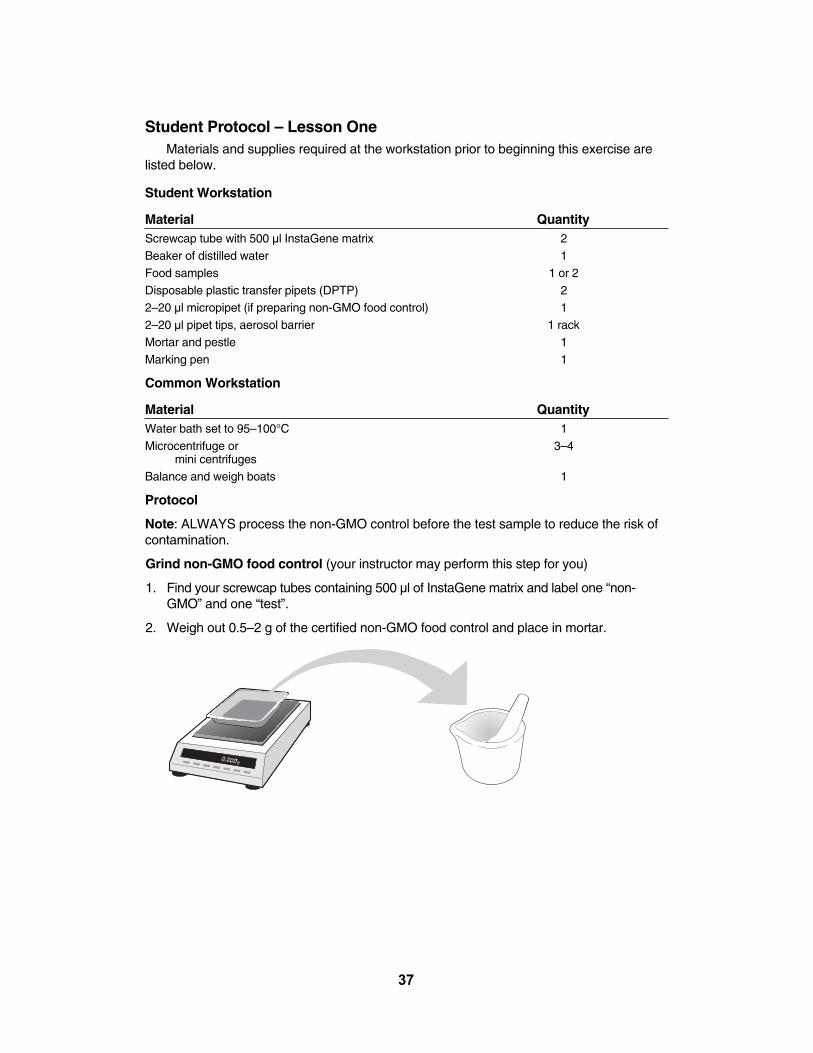
Student Protocol – Lesson OneMaterials and supplies required at the workstation prior to beginning this exercise are
listed below.
Student Workstation
Material QuantityScrewcap tube with 500 µl InstaGene matrix 2Beaker of distilled water 1Food samples 1 or 2Disposable plastic transfer pipets (DPTP) 22–20 µl micropipet (if preparing non-GMO food control) 12–20 µl pipet tips, aerosol barrier 1 rackMortar and pestle 1Marking pen 1
Common Workstation
Material QuantityWater bath set to 95–100°C 1Microcentrifuge or 3–4
mini centrifugesBalance and weigh boats 1
Protocol
Note: ALWAYS process the non-GMO control before the test sample to reduce the risk ofcontamination.
Grind non-GMO food control (your instructor may perform this step for you)
1. Find your screwcap tubes containing 500 µl of InstaGene matrix and label one “non-GMO” and one “test”.
2. Weigh out 0.5–2 g of the certified non-GMO food control and place in mortar.
37
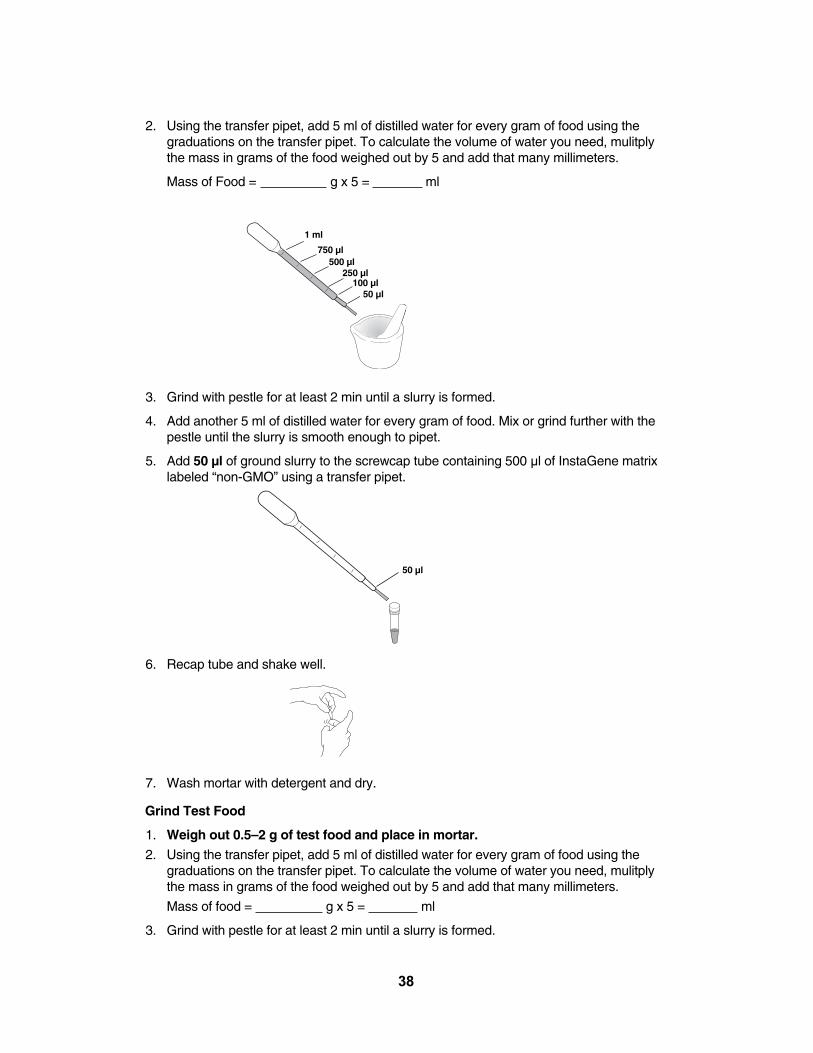
2. Using the transfer pipet, add 5 ml of distilled water for every gram of food using thegraduations on the transfer pipet. To calculate the volume of water you need, mulitplythe mass in grams of the food weighed out by 5 and add that many millimeters.
Mass of Food = g x 5 = ml
3. Grind with pestle for at least 2 min until a slurry is formed.
4. Add another 5 ml of distilled water for every gram of food. Mix or grind further with thepestle until the slurry is smooth enough to pipet.
5. Add 50 µl of ground slurry to the screwcap tube containing 500 µl of InstaGene matrixlabeled “non-GMO” using a transfer pipet.
6. Recap tube and shake well.
7. Wash mortar with detergent and dry.
Grind Test Food
1. Weigh out 0.5–2 g of test food and place in mortar.
2. Using the transfer pipet, add 5 ml of distilled water for every gram of food using thegraduations on the transfer pipet. To calculate the volume of water you need, mulitplythe mass in grams of the food weighed out by 5 and add that many millimeters.
Mass of food = g x 5 = ml
3. Grind with pestle for at least 2 min until a slurry is formed.
38
1 ml
750 µl500 µl
250 µl100 µl
50 µl
50 µl
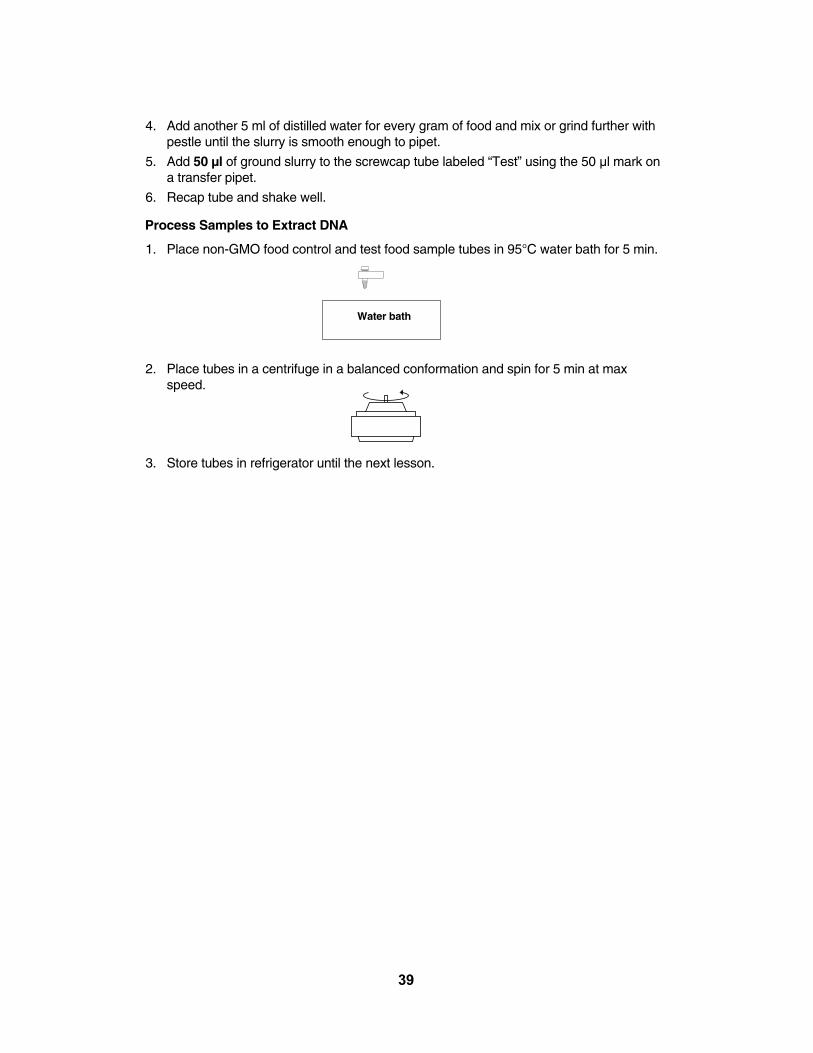
4. Add another 5 ml of distilled water for every gram of food and mix or grind further withpestle until the slurry is smooth enough to pipet.
5. Add 50 µl of ground slurry to the screwcap tube labeled “Test” using the 50 µl mark ona transfer pipet.
6. Recap tube and shake well.
Process Samples to Extract DNA
1. Place non-GMO food control and test food sample tubes in 95°C water bath for 5 min.
2. Place tubes in a centrifuge in a balanced conformation and spin for 5 min at maxspeed.
3. Store tubes in refrigerator until the next lesson.
39
Water bath
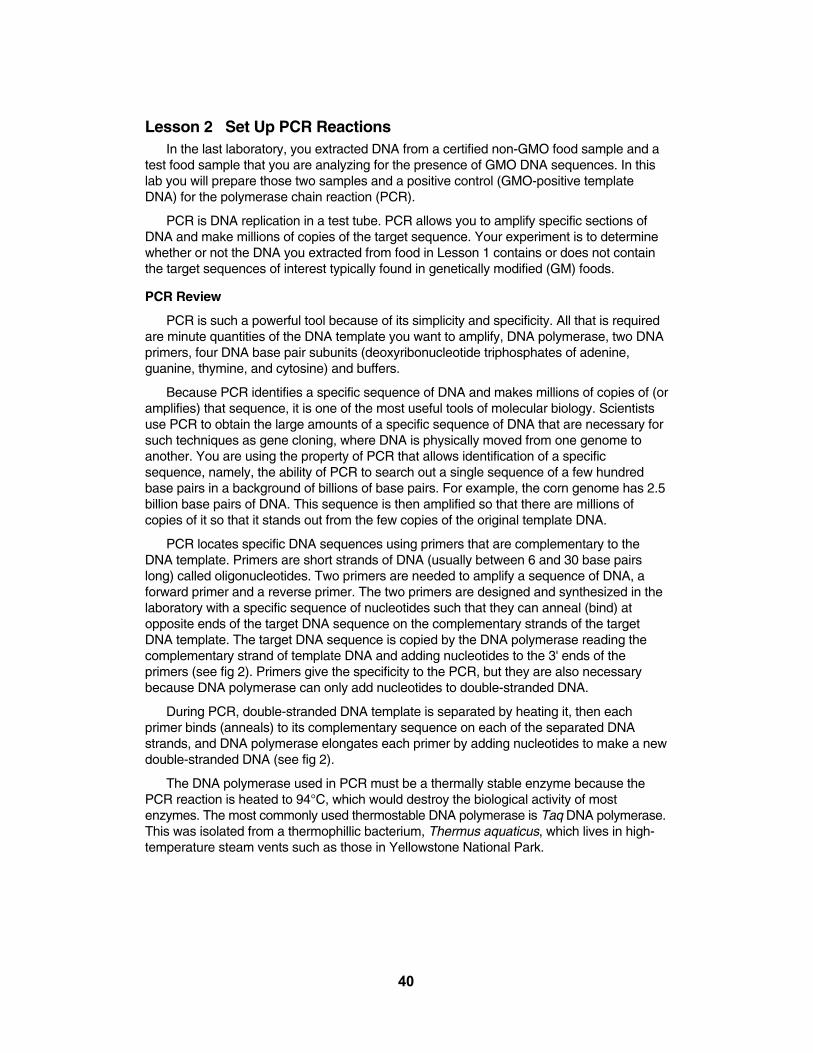
Lesson 2 Set Up PCR ReactionsIn the last laboratory, you extracted DNA from a certified non-GMO food sample and a
test food sample that you are analyzing for the presence of GMO DNA sequences. In thislab you will prepare those two samples and a positive control (GMO-positive templateDNA) for the polymerase chain reaction (PCR).
PCR is DNA replication in a test tube. PCR allows you to amplify specific sections ofDNA and make millions of copies of the target sequence. Your experiment is to determinewhether or not the DNA you extracted from food in Lesson 1 contains or does not containthe target sequences of interest typically found in genetically modified (GM) foods.
PCR Review
PCR is such a powerful tool because of its simplicity and specificity. All that is requiredare minute quantities of the DNA template you want to amplify, DNA polymerase, two DNAprimers, four DNA base pair subunits (deoxyribonucleotide triphosphates of adenine, guanine, thymine, and cytosine) and buffers.
Because PCR identifies a specific sequence of DNA and makes millions of copies of (oramplifies) that sequence, it is one of the most useful tools of molecular biology. Scientistsuse PCR to obtain the large amounts of a specific sequence of DNA that are necessary forsuch techniques as gene cloning, where DNA is physically moved from one genome toanother. You are using the property of PCR that allows identification of a specificsequence, namely, the ability of PCR to search out a single sequence of a few hundredbase pairs in a background of billions of base pairs. For example, the corn genome has 2.5billion base pairs of DNA. This sequence is then amplified so that there are millions ofcopies of it so that it stands out from the few copies of the original template DNA.
PCR locates specific DNA sequences using primers that are complementary to theDNA template. Primers are short strands of DNA (usually between 6 and 30 base pairslong) called oligonucleotides. Two primers are needed to amplify a sequence of DNA, a forward primer and a reverse primer. The two primers are designed and synthesized in thelaboratory with a specific sequence of nucleotides such that they can anneal (bind) atopposite ends of the target DNA sequence on the complementary strands of the targetDNA template. The target DNA sequence is copied by the DNA polymerase reading thecomplementary strand of template DNA and adding nucleotides to the 3' ends of theprimers (see fig 2). Primers give the specificity to the PCR, but they are also necessarybecause DNA polymerase can only add nucleotides to double-stranded DNA.
During PCR, double-stranded DNA template is separated by heating it, then eachprimer binds (anneals) to its complementary sequence on each of the separated DNAstrands, and DNA polymerase elongates each primer by adding nucleotides to make a newdouble-stranded DNA (see fig 2).
The DNA polymerase used in PCR must be a thermally stable enzyme because thePCR reaction is heated to 94°C, which would destroy the biological activity of mostenzymes. The most commonly used thermostable DNA polymerase is Taq DNA polymerase.This was isolated from a thermophillic bacterium, Thermus aquaticus, which lives in high-temperature steam vents such as those in Yellowstone National Park.
40
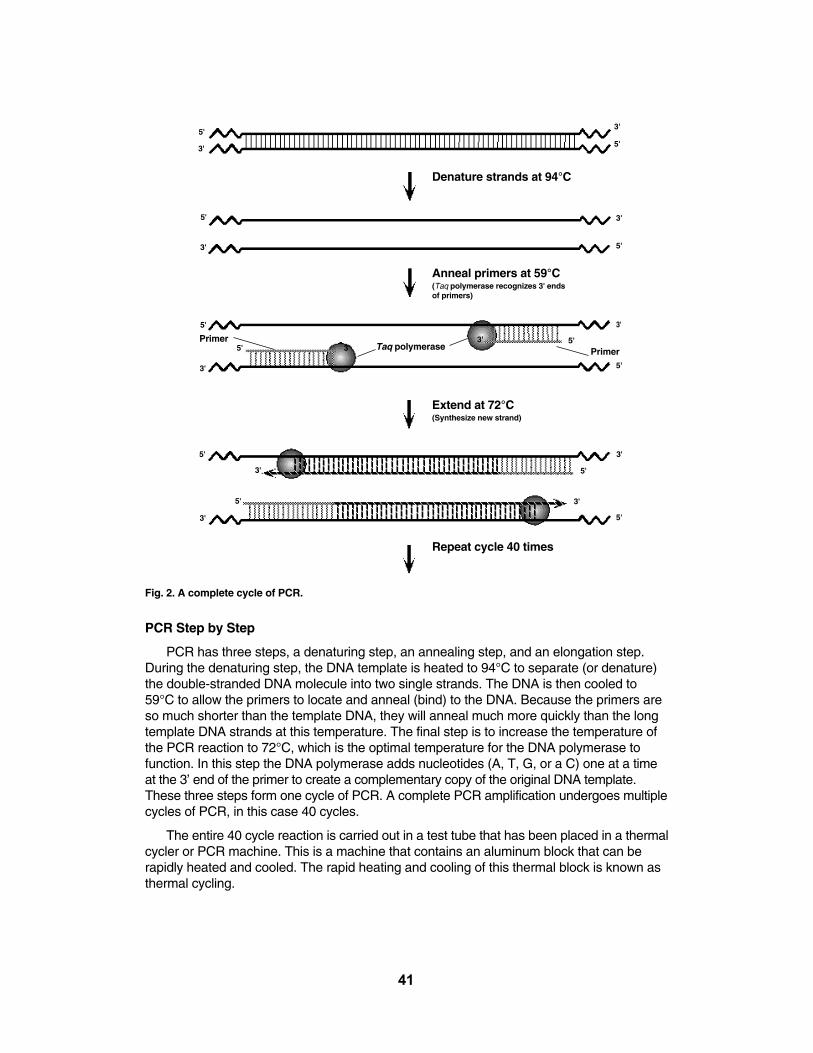
Fig. 2. A complete cycle of PCR.
PCR Step by Step
PCR has three steps, a denaturing step, an annealing step, and an elongation step.During the denaturing step, the DNA template is heated to 94°C to separate (or denature)the double-stranded DNA molecule into two single strands. The DNA is then cooled to59°C to allow the primers to locate and anneal (bind) to the DNA. Because the primers areso much shorter than the template DNA, they will anneal much more quickly than the longtemplate DNA strands at this temperature. The final step is to increase the temperature ofthe PCR reaction to 72°C, which is the optimal temperature for the DNA polymerase to function. In this step the DNA polymerase adds nucleotides (A, T, G, or a C) one at a timeat the 3’ end of the primer to create a complementary copy of the original DNA template.These three steps form one cycle of PCR. A complete PCR amplification undergoes multiplecycles of PCR, in this case 40 cycles.
The entire 40 cycle reaction is carried out in a test tube that has been placed in a thermalcycler or PCR machine. This is a machine that contains an aluminum block that can berapidly heated and cooled. The rapid heating and cooling of this thermal block is known asthermal cycling.
41
Denature strands at 94°C
Anneal primers at 59°C(Taq polymerase recognizes 3' endsof primers)
Extend at 72°C(Synthesize new strand)
Repeat cycle 40 times
5'
5'
5'
5'
5'
5'
5'
5'
5'
5'
3'
3'
3'
3'
3'
3'
3'
3'
3'
3'
5'
5'3'
3'
Taq polymerase PrimerPrimer
Two new template strands are created from the original double-stranded template duringeach complete cycle of PCR. This causes exponential growth of the number of target DNAmolecules, i.e., the number of target DNA molecules doubles at each cycle; this is why it iscalled a chain reaction. Therefore, after 40 cycles there will be 240, or over1,100,000,000,000 times more copies than at the beginning. Once the target DNAsequences of interest have been sufficiently amplified, they can be visualized using gelelectrophoresis. This allows researchers to determine the presence or absence of the PCRproducts of interest.
Your Task for This Lesson
For this experiment you will set up two PCR reactions for each DNA sample, whichmakes 6 PCR reactions in total. One PCR reaction, using the plant master mix (PMM), is acontrol to determine whether or not you have successfully extracted plant DNA from yourtest food. This is done by identifying a DNA sequence that is common to all plants by usingprimers (colored green in the kit) that specifically amplify a section of a chloroplast geneused in the light reaction (photosystem II). Why is this necessary? What if you do not amplifyDNA using the GMO primers? Can you conclude that your test food is not GM or might itjust be that your DNA extraction was unsuccessful? If you amplify DNA using the plantprimers, you can conclude that you successfully amplified DNA, therefore whether or notyou amplify DNA with your GMO primers, you will have more confidence in the validity ofyour result.
The second PCR reaction you carry out will determine whether or not your DNA samplecontains GM DNA sequences. This is done by identifying DNA sequences that are commonto most (~85%) of all GM plants using primers specific to these sequences. These primersare colored red and are in the GMO master mix (GMM).
Why do you have to set up a PCR reaction with DNA from certified non-GMO food?What if some GMO-positive DNA got into the InstaGene or master mix from a dirty pipet tipor a previous class? This DNA could be amplified in your test food PCR reaction and giveyou a false result. By having a known non-GMO control that you know should not amplifythe GMO target sequences, you can tell if your PCR reactions have been contaminated byGMO-positive DNA.
42
Lesson 2
Focus Questions
1. What chemicals and molecules are needed for PCR, and what is the function of eachcomponent?
2. Examine the 150 base promoter sequence below.
5'TAGAAAAGGA AGGTGGCTCC TACAAATGCC ATCATTGCGA TAAAGGAAAG
GTATCATTC AAGATGCCTC TGCCGACAGT GGTCCCAAAG ATGGACCCCC
ACCCACGAGG AGC ATCGTGG AAAAAGAAGA CGTTCCAACC ACGTCTTCAA3'
Write in the sequence of the complementary strand and mark the 3' and 5' ends of thecomplementary strand.
43
Remembering that DNA polymerases can only add nucleotides to the 3' end of DNA,design a forward primer and a reverse primer, each 10 bases long, to amplify a targetsequence of the DNA that is at least 100 bp long. Write the sequence of the primers below,with their 3' and 5' ends indicated. Also indicate on the sequence above which strand theyare complementary to (will anneal to).
Forward primer sequence:
Reverse primer sequence:
4. Why are you performing two PCR reactions on each DNA sample?
5. What is the purpose of the GMO-positive control DNA?
44
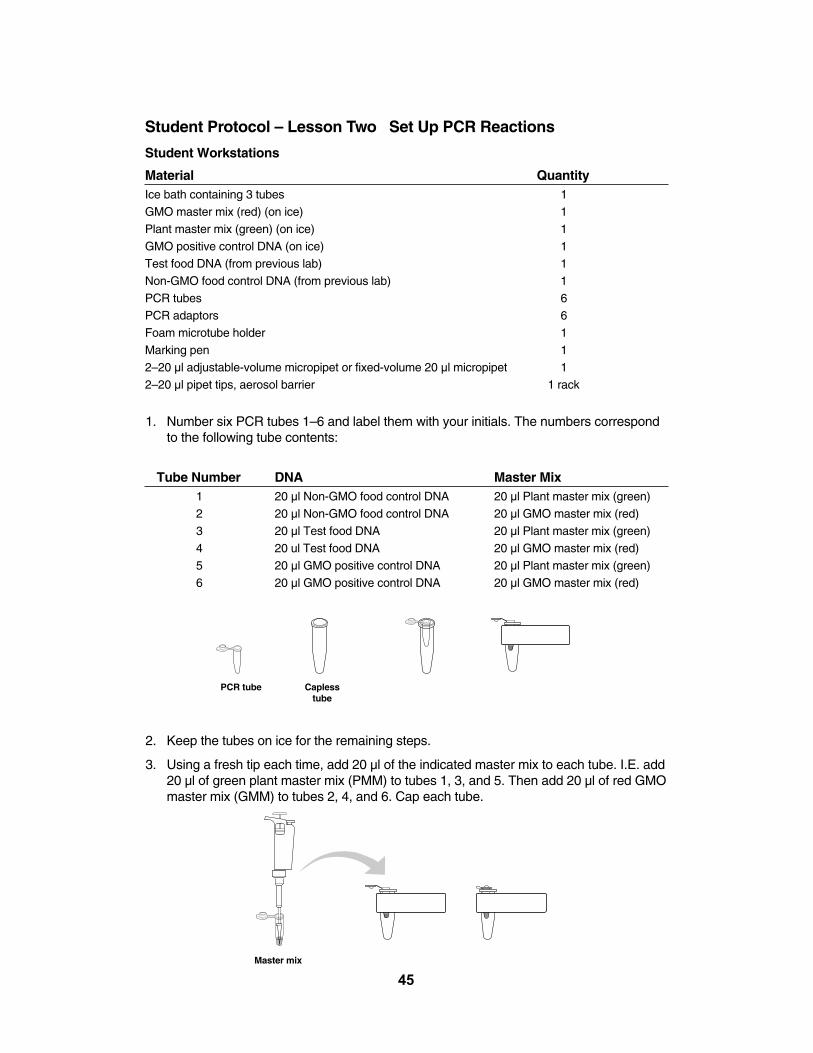
Student Protocol – Lesson Two Set Up PCR Reactions
Student Workstations
Material QuantityIce bath containing 3 tubes 1GMO master mix (red) (on ice) 1Plant master mix (green) (on ice) 1GMO positive control DNA (on ice) 1Test food DNA (from previous lab) 1Non-GMO food control DNA (from previous lab) 1PCR tubes 6PCR adaptors 6Foam microtube holder 1Marking pen 12–20 µl adjustable-volume micropipet or fixed-volume 20 µl micropipet 12–20 µl pipet tips, aerosol barrier 1 rack
1. Number six PCR tubes 1–6 and label them with your initials. The numbers correspondto the following tube contents:
Tube Number DNA Master Mix1 20 µl Non-GMO food control DNA 20 µl Plant master mix (green)2 20 µl Non-GMO food control DNA 20 µl GMO master mix (red)3 20 µl Test food DNA 20 µl Plant master mix (green)4 20 ul Test food DNA 20 µl GMO master mix (red)5 20 µl GMO positive control DNA 20 µl Plant master mix (green)6 20 µl GMO positive control DNA 20 µl GMO master mix (red)
2. Keep the tubes on ice for the remaining steps.
3. Using a fresh tip each time, add 20 µl of the indicated master mix to each tube. I.E. add20 µl of green plant master mix (PMM) to tubes 1, 3, and 5. Then add 20 µl of red GMOmaster mix (GMM) to tubes 2, 4, and 6. Cap each tube.
45
PCR tube Capless tube
Master mix
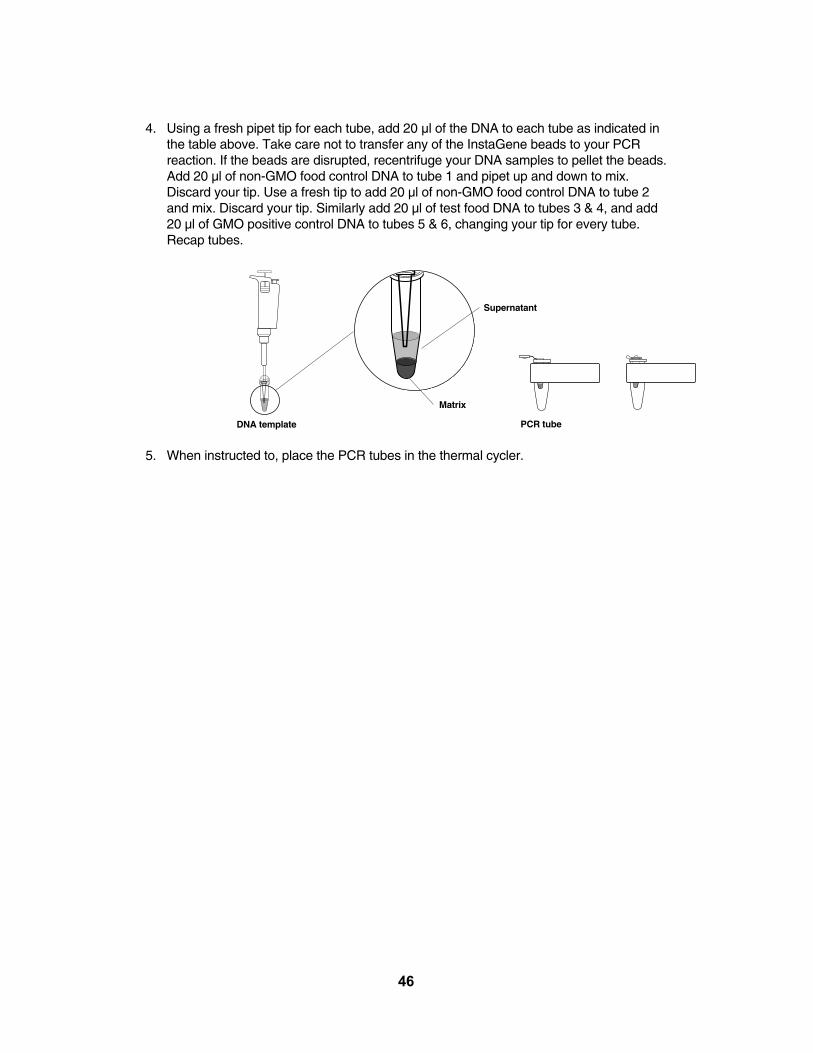
4. Using a fresh pipet tip for each tube, add 20 µl of the DNA to each tube as indicated inthe table above. Take care not to transfer any of the InstaGene beads to your PCRreaction. If the beads are disrupted, recentrifuge your DNA samples to pellet the beads.Add 20 µl of non-GMO food control DNA to tube 1 and pipet up and down to mix.Discard your tip. Use a fresh tip to add 20 µl of non-GMO food control DNA to tube 2and mix. Discard your tip. Similarly add 20 µl of test food DNA to tubes 3 & 4, and add20 µl of GMO positive control DNA to tubes 5 & 6, changing your tip for every tube.Recap tubes.
5. When instructed to, place the PCR tubes in the thermal cycler.
46
DNA template
Supernatant
Matrix
PCR tube
Lesson 3 Electrophoresis of PCR ProductsYou have completed your PCR amplification. You cannot, however, at this point
determine whether or not you have PCR products. To do this, you must visualize yourproducts. You will do this using gel electrophoresis.
Your PCR product bands are very small compared to those in other DNA experimentsyou may have done. For example, fragments produced from a HindIII digest of lambdaDNA are 23,130, 9,416, 6,557, 4,361, 2,322, 2,027, and 500 base pairs (bp). The productband sizes in this lab are 455 bp for the plant primers and 200 bp for the GMO primers, anda 1% gel would not separate these bands. Instead, a tighter gel matrix is needed to impedethe movement of these bands so that they are separated more on the gel and can be seen.Therefore, if you are using agarose electrophoresis, you will use a 3% agarose gel.Alternatively, your teacher may elect to use a polyacrylamide gel, which has smaller pores,to separate your products. Polyacrylamide gel electrophoresis (PAGE) is used to separatesmaller molecules for visualization.
Regardless of the gel type, you will load a molecular weight ruler (DNA standard) sothat you have a reference to determine your product bands' sizes. The gel will then bestained with Fast Blast stain to make the bands visible.
47
Lesson 3
Focus Questions
1. Why did you resolve your PCR products by electrophoresis?
2. Explain why DNA fragments separate according to size in an electrophoresis gel.
3. Why do you need a molecular weight ruler alongside your samples?
4. What results do you expect in each lane? Fill in the chart below.
Expect band Lane Sample (Yes, No, Don’t know)?1 Sample 1: Non-GMO food control with plant primers2 Sample 2: Non-GMO food control with GMO primers3 Sample 3: Test food with plant primers4 Sample 4: Test food with GMO primers5 Sample 5: GMO positive control DNA with plant primers6 Sample 6: GMO positive control DNA with GMO primers
48
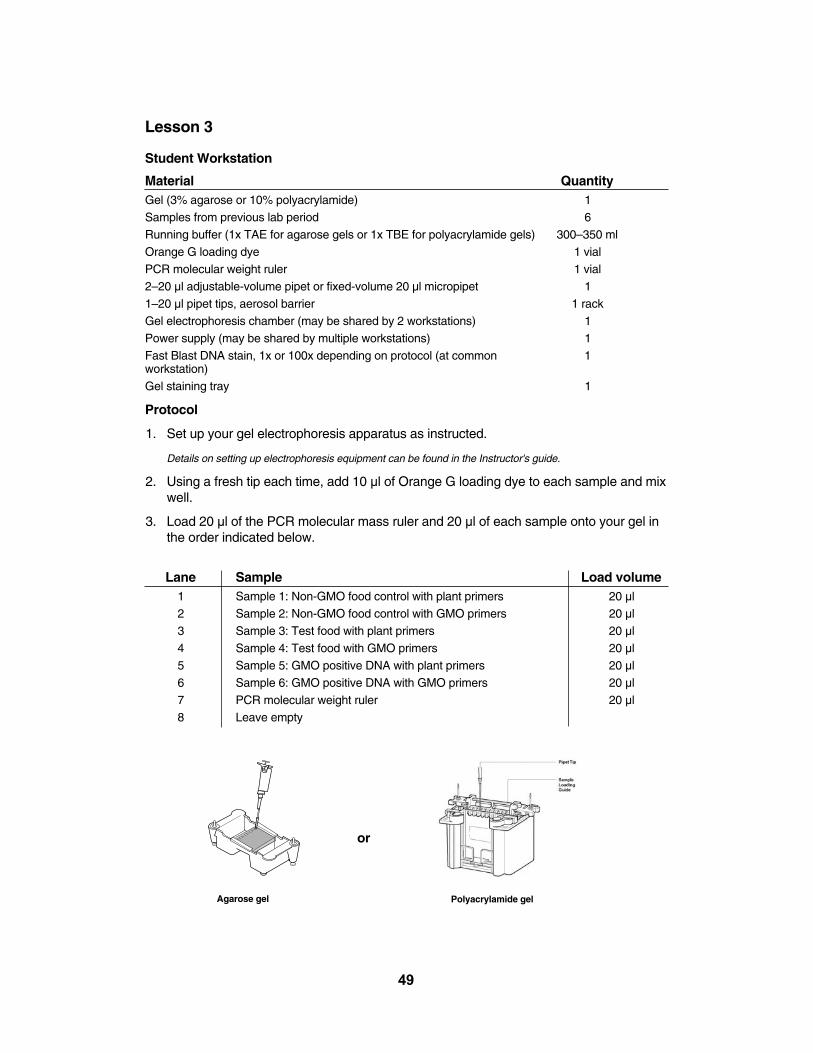
Lesson 3
Student Workstation
Material QuantityGel (3% agarose or 10% polyacrylamide) 1Samples from previous lab period 6Running buffer (1x TAE for agarose gels or 1x TBE for polyacrylamide gels) 300–350 mlOrange G loading dye 1 vialPCR molecular weight ruler 1 vial2–20 µl adjustable-volume pipet or fixed-volume 20 µl micropipet 11–20 µl pipet tips, aerosol barrier 1 rackGel electrophoresis chamber (may be shared by 2 workstations) 1Power supply (may be shared by multiple workstations) 1Fast Blast DNA stain, 1x or 100x depending on protocol (at common 1workstation)Gel staining tray 1
Protocol
1. Set up your gel electrophoresis apparatus as instructed.
Details on setting up electrophoresis equipment can be found in the Instructor's guide.
2. Using a fresh tip each time, add 10 µl of Orange G loading dye to each sample and mixwell.
3. Load 20 µl of the PCR molecular mass ruler and 20 µl of each sample onto your gel inthe order indicated below.
Lane Sample Load volume1 Sample 1: Non-GMO food control with plant primers 20 µl2 Sample 2: Non-GMO food control with GMO primers 20 µl3 Sample 3: Test food with plant primers 20 µl4 Sample 4: Test food with GMO primers 20 µl5 Sample 5: GMO positive DNA with plant primers 20 µl6 Sample 6: GMO positive DNA with GMO primers 20 µl7 PCR molecular weight ruler 20 µl8 Leave empty
49
Agarose gel Polyacrylamide gel
or
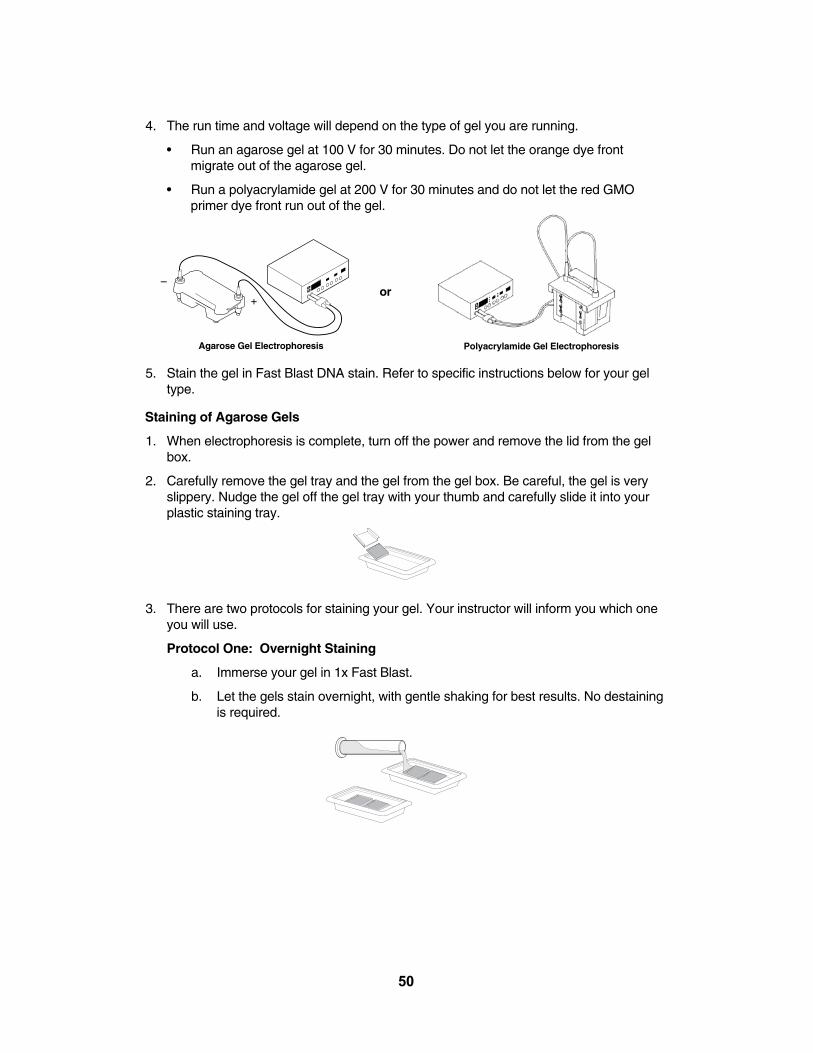
50
4. The run time and voltage will depend on the type of gel you are running.
• Run an agarose gel at 100 V for 30 minutes. Do not let the orange dye frontmigrate out of the agarose gel.
• Run a polyacrylamide gel at 200 V for 30 minutes and do not let the red GMOprimer dye front run out of the gel.
5. Stain the gel in Fast Blast DNA stain. Refer to specific instructions below for your geltype.
Staining of Agarose Gels
1. When electrophoresis is complete, turn off the power and remove the lid from the gelbox.
2. Carefully remove the gel tray and the gel from the gel box. Be careful, the gel is veryslippery. Nudge the gel off the gel tray with your thumb and carefully slide it into yourplastic staining tray.
3. There are two protocols for staining your gel. Your instructor will inform you which oneyou will use.
Protocol One: Overnight Staining
a. Immerse your gel in 1x Fast Blast.
b. Let the gels stain overnight, with gentle shaking for best results. No destainingis required.
+
–
Agarose Gel Electrophoresis Polyacrylamide Gel Electrophoresis
or

Protocol Two: Quick Staining (requires 20 minutes)–This method will allow you tosee bands quickly (within 15 min) but may require extensive destaining to obtain optimalband-to-background intensity. Note: it is important to use warm water for destainingsteps of this protocol.
a. Immerse your gel in 100x Fast Blast.
b. Stain the gel for 5 minutes with gentle agitation. Save the used stain for futureuse.
c. Transfer the gels into a large washing container and rinse with warm (40–55°C)tap water approximately 10 seconds.
d. Destain by washing three times in warm tap water for 5 minutes each withgentle shaking for best results. You should be able to visualize bands after 10 min if you view the gel with light coming through the bottom of the stainingtray. If necessary continue destaining in warm water until the desired contrastis reached.
Staining of Polyacrylamide Gels
1. When gels are finished running, turn off the power supply and disconnect the leads.Remove the lid and lift out the electrode assembly and clamping frame.
2. Pour out the running buffer from the electrode assembly. Open the cams and removethe gel cassettes.
3. To keep the gel free of contamination from your fingertips, wear gloves to handle thegels from this point on. Lay a gel cassette flat on the bench with the short plate facingup. Cut the tape along the sides of the gel cassette. Carefully pry apart the gel plates,using a spatula or your fingertips. The gel will usually adhere to one of the plates.Transfer the plate with the gel adhering to it to a tray containing 1x Fast Blast stain (seebelow), allowing the liquid to detach the gel from the plate. The gel may also be lifteddirectly (and gently!) from the plate and placed into the stain.
4. Bands will start to appear after 10 minutes and staining will be complete in 1 hour.However, gels can be left in stain overnight. No destaining is required.
51
Lesson 4 Drying Gels and Analysis of ResultsFor a permanent record of the experiment, gels can be dried between cellophane
sheets and incorporated into lab notebooks. To document the wet gels, they can bescanned, photocopied (a yellow backing provides optimal contrast), or traced onto acetatefilm. Your teacher will direct you on what method to use.
GelAir™ Drying Method
Materials Needed for Drying 8 Gels Using Gel Drying System QuantityGelAir cellophane 4 sheetsGelAir assembly table 1GelAir drying frames 2GelAir clamps 16GelAir drying oven (optional) 1Distilled water 500 ml
Procedure
1. Prewet 2 sheets of cellophane in a container of water for 15–20 seconds.
2. Place a plastic drying frame on the GelAir assembly table. Center one sheet of cellophaneon the assembly table.
3. Carefully lay a gel on the cellophane, positioning it to accommodate other gels (up to six total). If there are bubbles between the gel and the cellophane, gently push themout with your gloved finger. Note polyacrylamide gels must have the ridge at the bottomof the gel removed by chopping them off (not slicing) using a plastic card, e.g., an I.D.card.
4. Flood the gels with water and lay the second sheet of cellophane on top of them. If youare drying polyacrylamide gels, try not to trap any bubbles in the sandwich since bubbleswill cause cracks in the gel during drying. If there are any bubbles, gently push them outwith a gloved finger. Because of their thickness, you cannot avoid bubbles at the edgesof agarose gels, but avoid bubbles between the cellophane and the face of the gel.
5. Place the square metal frame on top of the cellophane sandwich. Secure the eightclamps onto the frame, two on each side. If you are not using a GelAir drying oven,place the frames in a well-ventilated area for 12–36 hours. If you have a GelAir dryingoven, place up to four drying frames into the oven, turn the heater switch on, and setthe dial to 3 hours. The dryer will shut off automatically.
6. When the gels are completely dry, they will be flat. Remove the clamps and take thegel/cellophane sandwich from the frame. Trim the excess cellophane surrounding thedried gels with scissors.
Cellophane Sandwich and Plastic Container Method
Materials Needed for Drying 8 Gels Using Plastic Containers QuantityGelAir cellophane 16 sheetsPlastic container 8Rubber bands 16Distilled water 500 mlMaterials needed for drying 8 gels using plastic containers Quantity
52
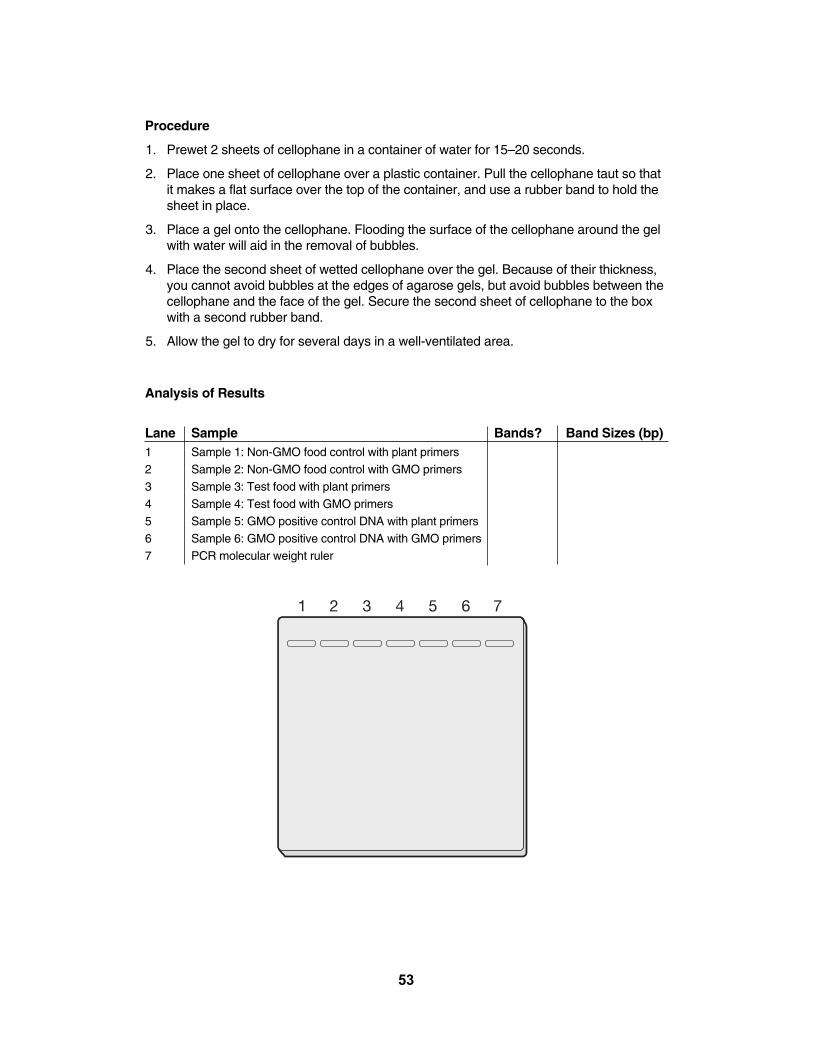
Procedure
1. Prewet 2 sheets of cellophane in a container of water for 15–20 seconds.
2. Place one sheet of cellophane over a plastic container. Pull the cellophane taut so thatit makes a flat surface over the top of the container, and use a rubber band to hold thesheet in place.
3. Place a gel onto the cellophane. Flooding the surface of the cellophane around the gelwith water will aid in the removal of bubbles.
4. Place the second sheet of wetted cellophane over the gel. Because of their thickness,you cannot avoid bubbles at the edges of agarose gels, but avoid bubbles between thecellophane and the face of the gel. Secure the second sheet of cellophane to the boxwith a second rubber band.
5. Allow the gel to dry for several days in a well-ventilated area.
Analysis of Results
Lane Sample Bands? Band Sizes (bp)1 Sample 1: Non-GMO food control with plant primers2 Sample 2: Non-GMO food control with GMO primers3 Sample 3: Test food with plant primers4 Sample 4: Test food with GMO primers5 Sample 5: GMO positive control DNA with plant primers6 Sample 6: GMO positive control DNA with GMO primers7 PCR molecular weight ruler
53
Lesson 4
Focus Questions
1. What was your test food?
2. Did your test food generate a 200 bp band with GMO primer (lane 4)?
3. What does this tell you about the GMO status of your food?
4. What other information do you need to confirm the GMO status of your sample?
5. How do the results of your other five PCR reactions help support or undermine yourresult for your test food?
6. If you were to repeat the procedure what laboratory practice might yield better results?
54
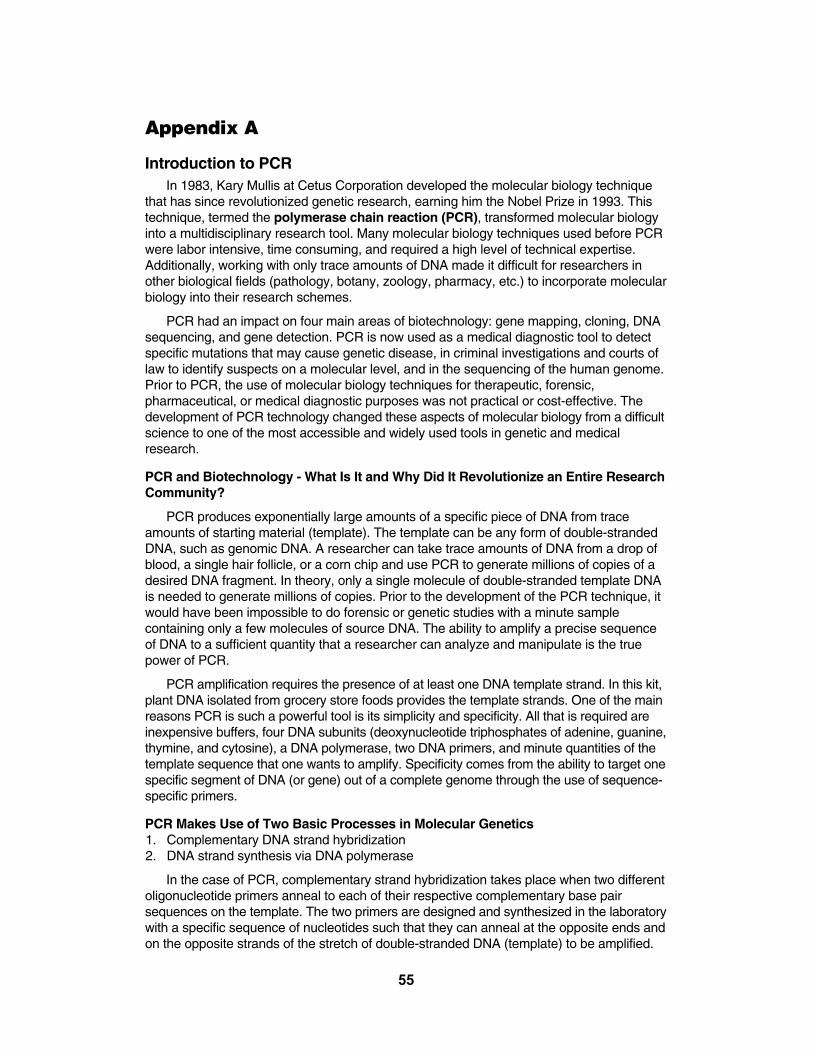
Appendix A
Introduction to PCR In 1983, Kary Mullis at Cetus Corporation developed the molecular biology technique
that has since revolutionized genetic research, earning him the Nobel Prize in 1993. Thistechnique, termed the polymerase chain reaction (PCR), transformed molecular biologyinto a multidisciplinary research tool. Many molecular biology techniques used before PCRwere labor intensive, time consuming, and required a high level of technical expertise.Additionally, working with only trace amounts of DNA made it difficult for researchers inother biological fields (pathology, botany, zoology, pharmacy, etc.) to incorporate molecularbiology into their research schemes.
PCR had an impact on four main areas of biotechnology: gene mapping, cloning, DNAsequencing, and gene detection. PCR is now used as a medical diagnostic tool to detectspecific mutations that may cause genetic disease, in criminal investigations and courts oflaw to identify suspects on a molecular level, and in the sequencing of the human genome.Prior to PCR, the use of molecular biology techniques for therapeutic, forensic, pharmaceutical, or medical diagnostic purposes was not practical or cost-effective. Thedevelopment of PCR technology changed these aspects of molecular biology from a difficultscience to one of the most accessible and widely used tools in genetic and medicalresearch.
PCR and Biotechnology - What Is It and Why Did It Revolutionize an Entire ResearchCommunity?
PCR produces exponentially large amounts of a specific piece of DNA from traceamounts of starting material (template). The template can be any form of double-strandedDNA, such as genomic DNA. A researcher can take trace amounts of DNA from a drop ofblood, a single hair follicle, or a corn chip and use PCR to generate millions of copies of adesired DNA fragment. In theory, only a single molecule of double-stranded template DNAis needed to generate millions of copies. Prior to the development of the PCR technique, itwould have been impossible to do forensic or genetic studies with a minute sample containing only a few molecules of source DNA. The ability to amplify a precise sequenceof DNA to a sufficient quantity that a researcher can analyze and manipulate is the truepower of PCR.
PCR amplification requires the presence of at least one DNA template strand. In this kit,plant DNA isolated from grocery store foods provides the template strands. One of the mainreasons PCR is such a powerful tool is its simplicity and specificity. All that is required areinexpensive buffers, four DNA subunits (deoxynucleotide triphosphates of adenine, guanine,thymine, and cytosine), a DNA polymerase, two DNA primers, and minute quantities of thetemplate sequence that one wants to amplify. Specificity comes from the ability to target onespecific segment of DNA (or gene) out of a complete genome through the use of sequence-specific primers.
PCR Makes Use of Two Basic Processes in Molecular Genetics1. Complementary DNA strand hybridization2. DNA strand synthesis via DNA polymerase
In the case of PCR, complementary strand hybridization takes place when two differentoligonucleotide primers anneal to each of their respective complementary base pairsequences on the template. The two primers are designed and synthesized in the laboratorywith a specific sequence of nucleotides such that they can anneal at the opposite ends andon the opposite strands of the stretch of double-stranded DNA (template) to be amplified.
55
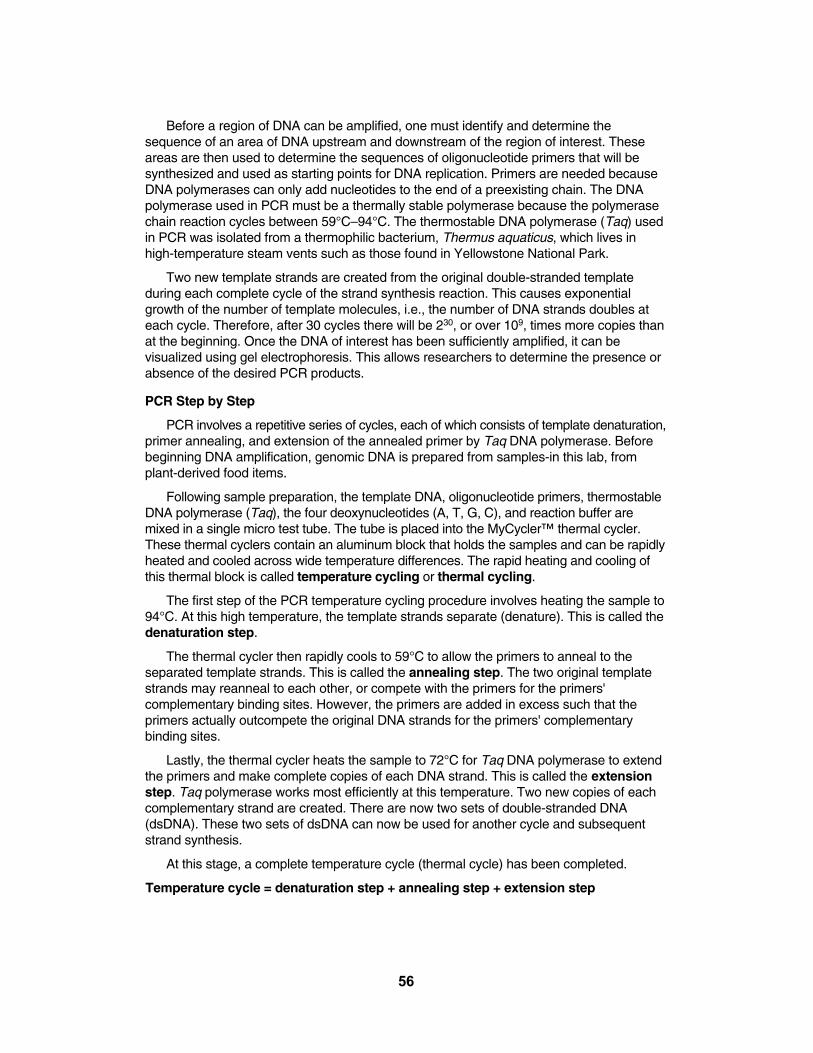
Before a region of DNA can be amplified, one must identify and determine thesequence of an area of DNA upstream and downstream of the region of interest. Theseareas are then used to determine the sequences of oligonucleotide primers that will be synthesized and used as starting points for DNA replication. Primers are needed becauseDNA polymerases can only add nucleotides to the end of a preexisting chain. The DNApolymerase used in PCR must be a thermally stable polymerase because the polymerasechain reaction cycles between 59°C–94°C. The thermostable DNA polymerase (Taq) usedin PCR was isolated from a thermophilic bacterium, Thermus aquaticus, which lives in high-temperature steam vents such as those found in Yellowstone National Park.
Two new template strands are created from the original double-stranded template during each complete cycle of the strand synthesis reaction. This causes exponentialgrowth of the number of template molecules, i.e., the number of DNA strands doubles ateach cycle. Therefore, after 30 cycles there will be 230, or over 109, times more copies thanat the beginning. Once the DNA of interest has been sufficiently amplified, it can be visualized using gel electrophoresis. This allows researchers to determine the presence orabsence of the desired PCR products.
PCR Step by Step
PCR involves a repetitive series of cycles, each of which consists of template denaturation,primer annealing, and extension of the annealed primer by Taq DNA polymerase. Beforebeginning DNA amplification, genomic DNA is prepared from samples-in this lab, fromplant-derived food items.
Following sample preparation, the template DNA, oligonucleotide primers, thermostableDNA polymerase (Taq), the four deoxynucleotides (A, T, G, C), and reaction buffer aremixed in a single micro test tube. The tube is placed into the MyCycler™ thermal cycler.These thermal cyclers contain an aluminum block that holds the samples and can be rapidlyheated and cooled across wide temperature differences. The rapid heating and cooling ofthis thermal block is called temperature cycling or thermal cycling.
The first step of the PCR temperature cycling procedure involves heating the sample to94°C. At this high temperature, the template strands separate (denature). This is called thedenaturation step.
The thermal cycler then rapidly cools to 59°C to allow the primers to anneal to the separated template strands. This is called the annealing step. The two original templatestrands may reanneal to each other, or compete with the primers for the primers' complementary binding sites. However, the primers are added in excess such that theprimers actually outcompete the original DNA strands for the primers' complementary binding sites.
Lastly, the thermal cycler heats the sample to 72°C for Taq DNA polymerase to extendthe primers and make complete copies of each DNA strand. This is called the extensionstep. Taq polymerase works most efficiently at this temperature. Two new copies of eachcomplementary strand are created. There are now two sets of double-stranded DNA(dsDNA). These two sets of dsDNA can now be used for another cycle and subsequentstrand synthesis.
At this stage, a complete temperature cycle (thermal cycle) has been completed.
Temperature cycle = denaturation step + annealing step + extension step
56
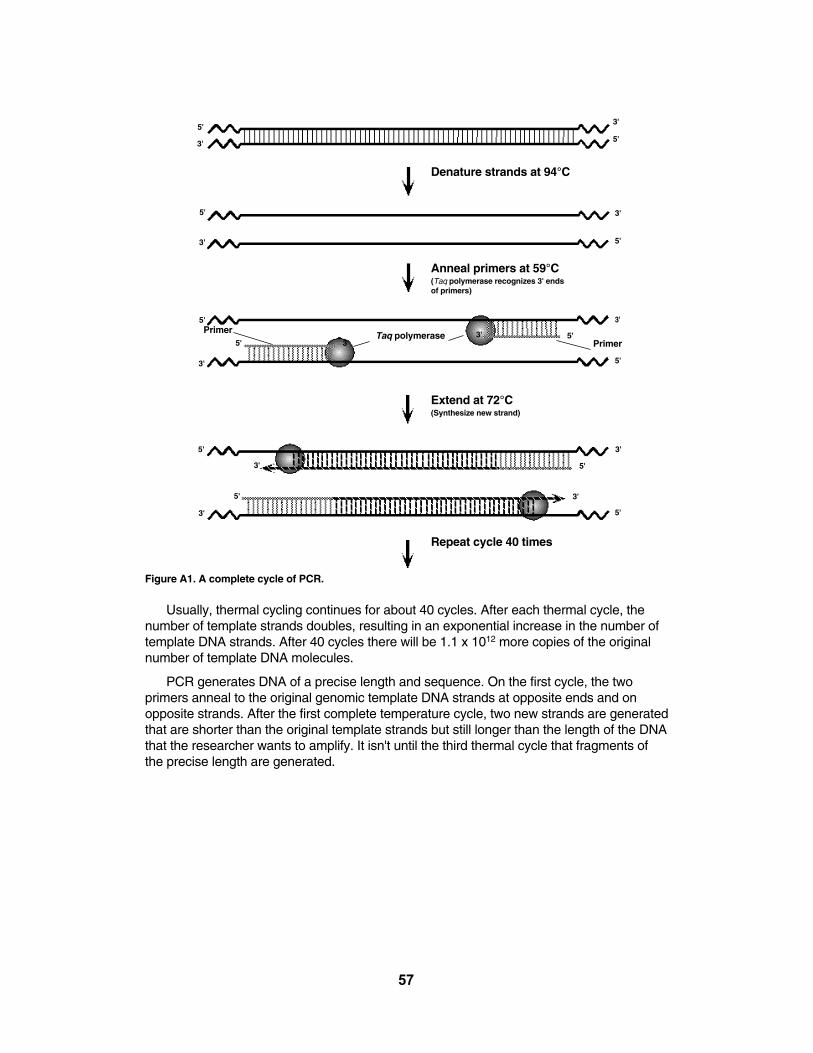
Figure A1. A complete cycle of PCR.
Usually, thermal cycling continues for about 40 cycles. After each thermal cycle, thenumber of template strands doubles, resulting in an exponential increase in the number oftemplate DNA strands. After 40 cycles there will be 1.1 x 10¹² more copies of the originalnumber of template DNA molecules.
PCR generates DNA of a precise length and sequence. On the first cycle, the twoprimers anneal to the original genomic template DNA strands at opposite ends and onopposite strands. After the first complete temperature cycle, two new strands are generatedthat are shorter than the original template strands but still longer than the length of the DNAthat the researcher wants to amplify. It isn't until the third thermal cycle that fragments ofthe precise length are generated.
57
Denature strands at 94°C
Anneal primers at 59°C(Taq polymerase recognizes 3' endsof primers)
Extend at 72°C(Synthesize new strand)
Repeat cycle 40 times
5'
5'
5'
5'
5'
5'
5'
5'
5'
5'
3'
3'
3'
3'
3'
3'
3'
3'
3'
3'
5'
5'3'
3'
PrimerTaq polymerase
Primer
Figure A2. Generation of precise-length fragments.
It is the template strands of the precise length that are amplified exponentially (Xn,where X = the number of original template strands and n = the number of cycles). There isalways one set of original long-template DNA molecules that are never fully duplicated.After each thermal cycle, two intermediate-length strands are produced, but because theycan only be generated from the original template strands, the intermediate strands are notexponentially amplified. It is the precise-length strands generated from the intermediatestrands that are amplified exponentially at each cycle. Therefore, if 20 thermal cycles were conducted from one double-stranded DNA molecule, there would be 1 set of originalgenomic template DNA strands, 20 sets of intermediate template strands, and 1,048,576sets of precise-length template strands. After 40 cycles, there would be 1 set of originalgenomic template DNA strands, 40 sets of intermediate template strands, and 1.1 x 10¹²
sets of precise-length template strands.
58
Total 40 cycles
Extend new strands at 72°C
Anneal primers at 59°C
Denature at 94°C
Extend new strands at 72°C
Anneal primers at 59°C
Denature at 94°C
3'
3'
3'
3'
3'
3'
3'
3'
3'
3'
3'
3'
3'
3'
3'3'
3'
3'
3'
3'
5'
5'
5'
5'
5'
5'
5'
5'
5'
5'
5'
5'
5' 3'
5'
5'
5'
5'
5'
5'
5'
5'
Extension step cycle 1
New intermediate templates
Precise length fragments
CYCLE1
CYCLE2
CYCLE3
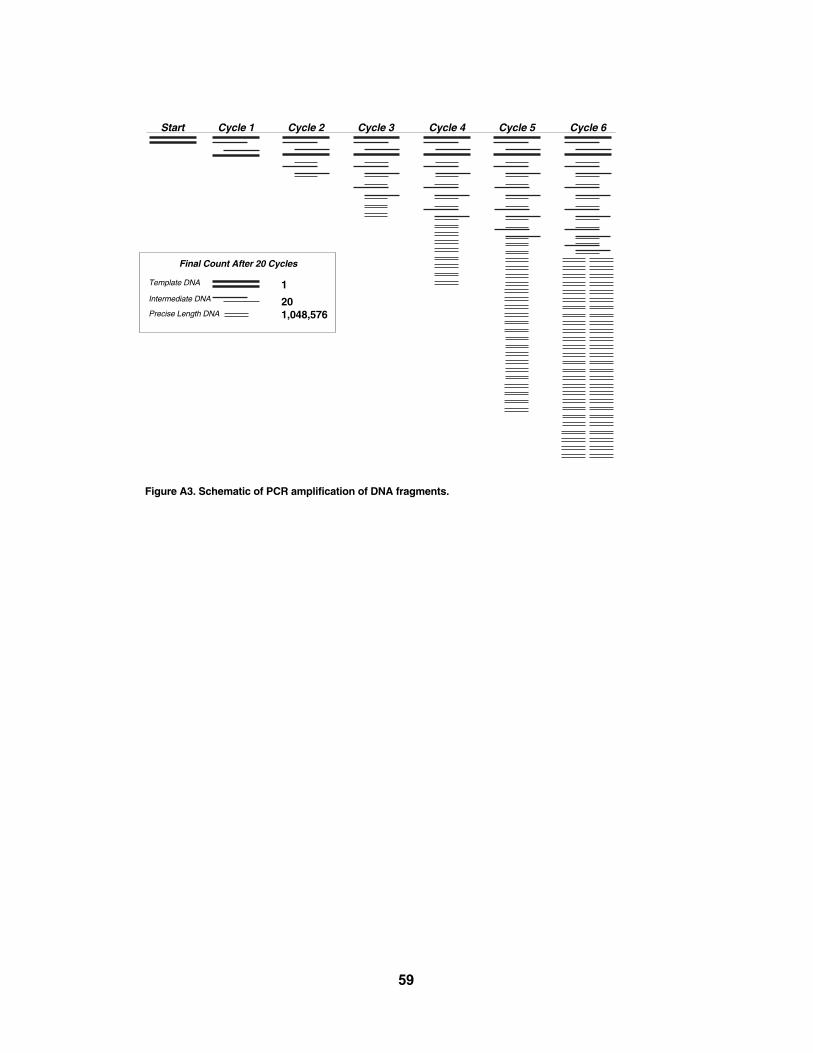
Figure A3. Schematic of PCR amplification of DNA fragments.
59
Start Cycle 1 Cycle 2 Cycle 3 Cycle 4 Cycle 5 Cycle 6
1
201,048,576
Final Count After 20 Cycles
Template DNA
Intermediate DNA
Precise Length DNA
Appendix B
PCR Amplification and Sterile TechniquePCR is a powerful and sensitive technique that enables researchers to produce large
quantities of specific DNA from very small amounts of starting material. Because of thissensitivity, contamination of PCR reactions with unwanted DNA is always a possible problem. Therefore, utmost care must be taken to prevent cross-contamination of samples.Steps to be taken to prevent contamination and failed experiments include:
1. Filter-type pipet tips. The end of the barrels of micropipets can easily become contaminated with aerosolized DNA molecules. Pipet tips that contain a filter at the endcan prevent aerosol contamination from micropipets. DNA molecules that are foundwithin the micropipet cannot pass through the filter and contaminate PCR reactions.Xcluda® aerosol barrier pipet tips (catalog #211- 2006EDU and 211-2016EDU) areideal pipet tips to use in PCR reactions.
2. Aliquot reagents. Sharing of reagents and multiple pipetting into the same reagent tubecan easily introduce contaminants into your PCR reactions. When at all possible, dividereagents into small aliquots for each team, or if possible, for each student. If only onealiquot of a reagent does become contaminated, then only a minimal number of PCRreactions will become contaminated and fail.
3. Change pipet tips. Always use a new pipet tip when entering a reagent tube for the firsttime. If a pipet tip is used repeatedly, contaminating DNA molecules on the outside ofthe tip will be transferred to other solutions, resulting in contaminated PCR reactions. Ifyou are at all unsure if your pipet tip is clean, err on the safe side and discard the tipand get a new one. The price of a few extra tips is a lot smaller than the price of failedreactions.
4. Use good sterile technique. When opening tubes or pipetting reagents, leave the tubesopen for as little time as possible. Tubes that are open and exposed to the air can easilybecome contaminated by aerosolized DNA molecules. Go into reagent tubes efficiently,and close them as soon as you are finished pipetting. Also, try not to pick tubes up bythe rim or cap, as you can easily introduce contaminants from your fingertips.
5. Bleach at a concentration of 10% destroys DNA, so wiping down surfaces and rinsingplastic pipet barrels, mortars, and pestles with 10% bleach can get rid of any surfaceDNA contamination that may arise.
60
Appendix C
Glossary of TermsAliquot – The division of a quantity of material into smaller, equal parts.
Annealing – Binding of single-stranded DNA to complementary sequences.Oligonucleotide primers anneal to denatured (single-stranded) DNA strands.
Bt – Bacillus thuringiensis – In the context of GM crops Bt refers to a specific modificationin which a gene for a member of the Cry family of proteins from the soil bacterium Bacillusthuringiensis is inserted into the crop. The gene confers resistance to the European cornborer.
Back-cross – In the context of GMO crops, the method by which a newly made geneticallyengineered crop is repeatedly bred into a commercially viable crop to transfer the geneticmodification into a high yield or commercially viable background.
Callus – An undifferentiated mass of plant cells.
Chelate – To bind metal ions in solution. An example of a common chelating agent isEDTA (ethylene diamine tetraacetic acid).
Cofactor – Ion or other small molecule needed by an enzyme to function properly. Forexample, Taq DNA polymerase needs Mg2+ in order to function properly. Mg2+ is considered a cofactor.
Denaturation – The process of melting apart two complementary DNA strands. In vivodenaturation is accomplished by enzymes; in the (in vitro) PCR reaction, denaturation isaccomplished by heat.
DNase – Enzyme that degrades DNA.
dNTPs – Commonly used abbreviation for all four deoxynucleotide triphosphates (dATP,dTTP, dGTP, dCTP) used in synthesizing DNA.
Ethidium bromide – A fluorescent dye that is used to detect DNA. It intercalates betweenDNA base pairs and fluoresces when exposed to ultraviolet light.
Exons – The coding regions of a transcribed messenger RNA that get spliced together andleave the nucleus for translation into protein sequence.
Extension – Elongation of a primer by addition of dNTPs (deoxynucleotide triphosphates— dATP, dTTP, dCTP, or dGTP) by a DNA polymerase. Extension follows the base pairingrule and proceeds in the 5' to 3' direction.
Genomic DNA – The sum total of the DNA that is found within a cell.
Genetic engineering – The process by which scientists change the genetic makeup of anorganism.
GM – Genetically modified
GMO – Genetically modified organism
InstaGene™ matrix – Microscopic beads that bind divalent cations in solution. The bindingof divalent cations to these beads prevents their availability to enzymes that can degradeDNA.
Intron – Region of a transcribed messenger RNA that is spliced out of and is not translatedinto protein sequence.
61
Lysis – The process of rupturing a cell to release its constituents. In this laboratory, plantcells are lysed to release genomic DNA for the PCR reactions.
Master mix – A premixed reagent solution designed for PCR reactions, containing all ofthe necessary components (dNTPs, primer, buffer, salts, polymerase, Mg2+) of the reactionexcept the template DNA.
Nucleotide – A fundamental unit of DNA or RNA. Consists of a sugar (deoxyribose orribose), phosphate, and nitrogenous base (adenine, cytosine, guanine, thymine, or uracil).
PCR – Polymerase chain reaction. A process used to amplify (synthesize large quantitiesfrom a small starting sample) DNA within a test tube.
Primer – A small chain of nucleotides (usually 16–24 bases in length) that provides a freeend for DNA polymerase to extend from. Primers for PCR are designed (synthesized in alaboratory) to be complementary to specific sequences near the target DNA sequence, sothat they will "anchor" to the template and provide a starting point for the DNA polymeraseto copy the region of interest.
Taq DNA polymerase – Heat-stable DNA polymerase that was isolated from the heat-stablebacterium Thermus aquaticus. This DNA polymerase is commonly used in PCR reactions.
Template – The DNA that contains the sequence to be copied (into a complementarysequence) in a DNA-synthesizing reaction. Double-stranded DNA serves as a template forreplication of copies of itself, because each strand's sequence serves as a template for thereplication of the other strand's sequence. A single-stranded DNA, on the other hand, canonly serve as template for copies of its complementary sequence, and not for copies ofitself.
62
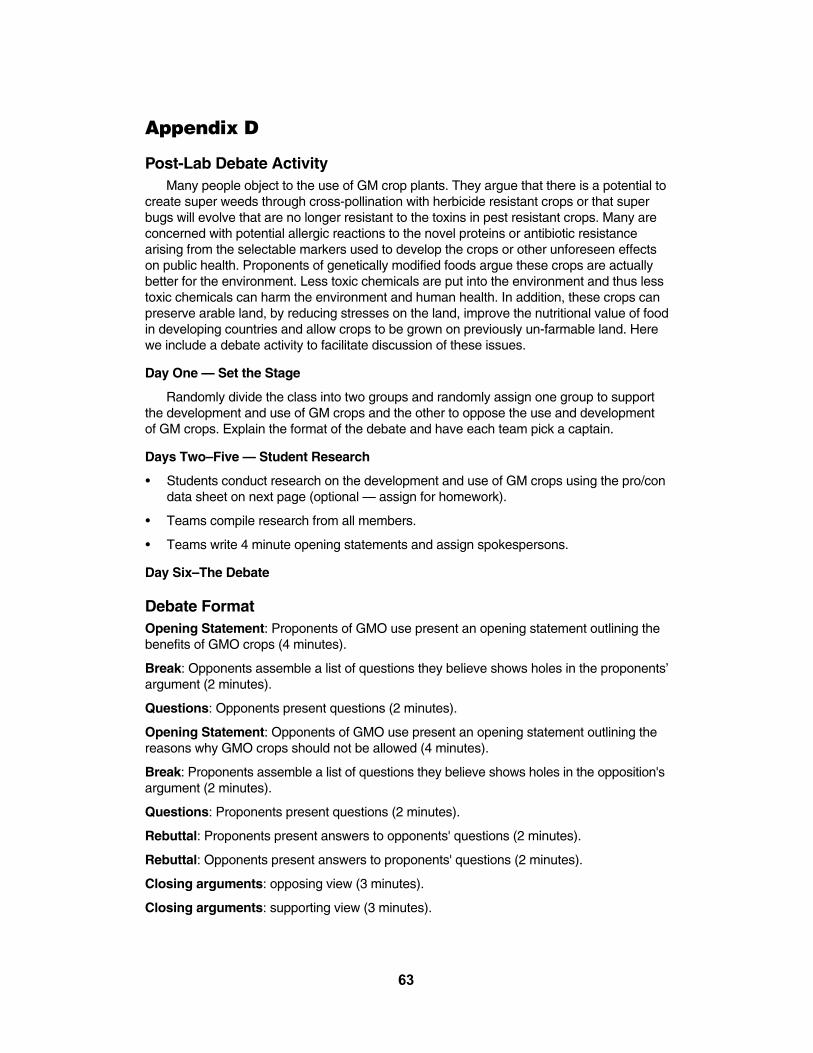
Appendix D
Post-Lab Debate ActivityMany people object to the use of GM crop plants. They argue that there is a potential to
create super weeds through cross-pollination with herbicide resistant crops or that superbugs will evolve that are no longer resistant to the toxins in pest resistant crops. Many areconcerned with potential allergic reactions to the novel proteins or antibiotic resistance arising from the selectable markers used to develop the crops or other unforeseen effectson public health. Proponents of genetically modified foods argue these crops are actuallybetter for the environment. Less toxic chemicals are put into the environment and thus lesstoxic chemicals can harm the environment and human health. In addition, these crops canpreserve arable land, by reducing stresses on the land, improve the nutritional value of foodin developing countries and allow crops to be grown on previously un-farmable land. Herewe include a debate activity to facilitate discussion of these issues.
Day One — Set the Stage
Randomly divide the class into two groups and randomly assign one group to supportthe development and use of GM crops and the other to oppose the use and developmentof GM crops. Explain the format of the debate and have each team pick a captain.
Days Two–Five — Student Research
• Students conduct research on the development and use of GM crops using the pro/condata sheet on next page (optional — assign for homework).
• Teams compile research from all members.
• Teams write 4 minute opening statements and assign spokespersons.
Day Six–The Debate
Debate FormatOpening Statement: Proponents of GMO use present an opening statement outlining thebenefits of GMO crops (4 minutes).
Break: Opponents assemble a list of questions they believe shows holes in the proponents’argument (2 minutes).
Questions: Opponents present questions (2 minutes).
Opening Statement: Opponents of GMO use present an opening statement outlining thereasons why GMO crops should not be allowed (4 minutes).
Break: Proponents assemble a list of questions they believe shows holes in the opposition'sargument (2 minutes).
Questions: Proponents present questions (2 minutes).
Rebuttal: Proponents present answers to opponents' questions (2 minutes).
Rebuttal: Opponents present answers to proponents' questions (2 minutes).
Closing arguments: opposing view (3 minutes).
Closing arguments: supporting view (3 minutes).
63

Grading Ruberic
Opening Statements4 Eloquent, very well organized, researched, and presented.3 Well organized, researched, and presented.2 Somewhat organized, researched, and presented.1 Lacking organization, partially correct research, not well presented.
Questions4 Questions were thoughtful, raised legitimate concerns, were research based and were
well presented.3 Questions were somewhat thoughtful, raised some concerns, and were well presented.2 Questions were not research based, did not raise legitimate concerns, or not well
presented.1 Questions were unrelated to the subject, did not raise legitimate concerns, or not well
presented.
Rebuttal4 Students used research to directly refute the questions.3 Students used research to partially refute the questions.2 Students improperly used research to attempt to refute the questions.1 Students did not refute the questions.
Closing statements4 Closing statement was eloquent, very well organized, presented.3 Closing statement was well organized, researched, and presented.2 Closing statement was somewhat organized, researched, and presented.1 Closing statement lacked organization, used partially correct research, and was not
well presented.
Working as a team member (as ranked by other team members)4 Fully participated and contributed to the team.3 Participated and contributed to the team.2 Partially participated, somewhat helpful.1 Little participation, little help.
Pro/Con Data SheetMake a list of why we should use GM crops (include references).
Make a list of why we should not use GM crops (include references).
If you are pro, find research to refute the con. If you are con, find research to refute the pro.Include these in your opening or closing statements.
64
Appendix E
Programming Instructions for T100 or MyCycler Thermal CyclerAbbreviated instructions for programming your T100 or MyCycler for the proper amplifi-
cation cycles and temperatures used in this lab are provided below. Refer to the T100 orMyCycler instruction manual for more detailed instructions and troubleshooting.
T-100 Thermal CyclerProgram the T100 (only necessary the first time you perform the lab)Turn on the T100 by flipping the power switch at the rear of the machineSelect “New Protocol”Press “50 µl” on top right of the screenEnter 40Press “OK”
Program the Initial DenaturationPress “95ºC” in column 1Enter 94Press “OK”Press “3:00” in column 1Enter 200Press “OK”
Program the 40 PCR cyclesPress “95ºC” in column 2Enter 94Press “OK”Press “0:30” in column 2Enter 100Press “OK”Press “55ºC” in column 3Enter 59Press “OK”Press “0:30” in column 3Enter 100Press “OK”Press “1:00” in column 4Enter 200Press “OK”Press “34X” in column 5Enter 40Press “OK”Program the Final ExtensionPress “5:00” in column 6Enter 1000Press “OK”Save the ProtocolPress “Save” on the lower menu bar of the screenEnter “GMO”Press “Save”Press “Home” on the lower menu bar of the screen
65

Run the GMO ProgramPress “Saved Protocols”Press “Main” in the Folders columnPress “GMO” in the Files columnPress “Run” on the lower menu bar of the screenPress “OK”
MyCycler Thermal CyclerProgram the MyCycler (only necessary the first time you perform the lab)Select "Standby" to turn the machine onSelect "Create"Scroll down to "Standard-3"Press "Enter"Program the Initial DenaturationEnter 94.0Press the down arrowEnter 2.00Press the down arrowEnter 1.00Press the right arrowProgram the 40 PCR CyclesEnter 94.0Press the down arrowEnter 1.00Press the right arrowPress the up arrowEnter 59.0Press the down arrowEnter 1.00Press the right arrowPress the up arrowEnter 72.0Press the down arrowEnter 2.00Press the down arrowEnter 40X cyclesPress EnterProgram the Final ExtensionPress the right arrowEnter 72.0Press the down arrowEnter 10.00Press the down arrowEnter 1X cyclePress the right arrowProgram the Final Chill HoldEnter 1X cyclePress "Done"Save the ProtocolPress "Save Protocol As"
66
Press "Enter"Enter “GMO” using the alphanumeric keypadPress "Enter"
Run the GMO ProgramSelect "Protocol Library"Select "GMO"Press "Enter"Press "Enter" to run protocolEnter "Algorithmic Measurement"Enter 40 µl volumeSelect "No Hot Start"Select "Begin Run"The MyCycler should now begin running
67
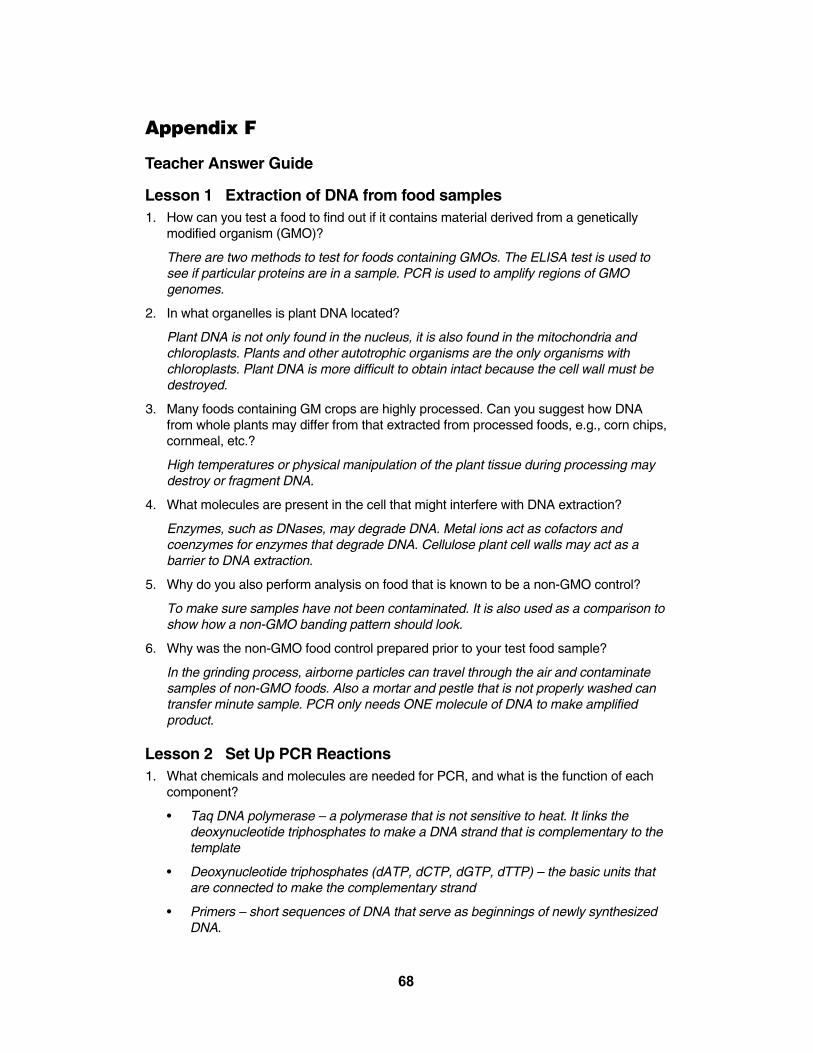
Appendix F
Teacher Answer Guide
Lesson 1 Extraction of DNA from food samples1. How can you test a food to find out if it contains material derived from a genetically
modified organism (GMO)?
There are two methods to test for foods containing GMOs. The ELISA test is used tosee if particular proteins are in a sample. PCR is used to amplify regions of GMOgenomes.
2. In what organelles is plant DNA located?
Plant DNA is not only found in the nucleus, it is also found in the mitochondria andchloroplasts. Plants and other autotrophic organisms are the only organisms withchloroplasts. Plant DNA is more difficult to obtain intact because the cell wall must bedestroyed.
3. Many foods containing GM crops are highly processed. Can you suggest how DNAfrom whole plants may differ from that extracted from processed foods, e.g., corn chips,cornmeal, etc.?
High temperatures or physical manipulation of the plant tissue during processing maydestroy or fragment DNA.
4. What molecules are present in the cell that might interfere with DNA extraction?
Enzymes, such as DNases, may degrade DNA. Metal ions act as cofactors and coenzymes for enzymes that degrade DNA. Cellulose plant cell walls may act as a barrier to DNA extraction.
5. Why do you also perform analysis on food that is known to be a non-GMO control?
To make sure samples have not been contaminated. It is also used as a comparison toshow how a non-GMO banding pattern should look.
6. Why was the non-GMO food control prepared prior to your test food sample?
In the grinding process, airborne particles can travel through the air and contaminatesamples of non-GMO foods. Also a mortar and pestle that is not properly washed cantransfer minute sample. PCR only needs ONE molecule of DNA to make amplifiedproduct.
Lesson 2 Set Up PCR Reactions1. What chemicals and molecules are needed for PCR, and what is the function of each
component?
• Taq DNA polymerase – a polymerase that is not sensitive to heat. It links thedeoxynucleotide triphosphates to make a DNA strand that is complementary to thetemplate
• Deoxynucleotide triphosphates (dATP, dCTP, dGTP, dTTP) – the basic units thatare connected to make the complementary strand
• Primers – short sequences of DNA that serve as beginnings of newly synthesizedDNA.
68

• Buffers and cofactors needed to make the reaction take place at an optimal rate3.Examine the 150 base sequence below.
5'TAGAAAAGGA AGGTGGCTCC TACAAATGCC ATCATTGCGA TAAAGGAAAG 3'ATCTTTTCCT TCCACCGAGGATGTTTACGG ATCAAACGCT ATTTCCTTTCforward 5'AGGAAGGTGG3'
GCTATCATTC AAGATGCCTC TGCCGACAGT GGTCCCAAAG ATGGACCCCCCGATAGTAAGTTCTACGGAG ACGGCTGTCA CCAGGGTTTC TACCTGGGGG
3'CTTCT GCAAG5' Reverse primerACCCACGAGG AGC ATCGTGG AAAAAGAAGA CGTTCCAACC ACGTCTTCAA3'TGGGTGCTCC TCGTAGCACC TTTTTCTTCT GCAAGGTTGG TGCAGAAGTT5'
Write in the sequence of the complementary strand and mark the 3' and 5' ends of thecomplementary strand (see italics)
Remembering that DNA polymerases can only add nucleotides to the 3' end of DNA,design a forward primer and a reverse primer, each 10 bases long, to amplify a targetsequence of the DNA that is at least 100 bp long. Write the sequence of the primers below,with their 3' and 5' ends indicated. Also indicate on the sequence above which strand theyare complementary to (will anneal to).
These primers can be any sequence so long as their orientation and complementaritymatches these examples in bold.
Forward primer 5'AGGAAGGTGG3'Reverse primer 3'CTTCTGCAAG5'
If you are teaching about primer design in more depth, you may want to give more criteria for their primer design
such as % GC content and primer dimer formation.
4. Why are you performing two PCR reactions on each DNA sample?
One reaction is a control to show we extracted plant DNA using primers to a universalplant DNA sequence. The second reaction is to identify the GMO target sequence.
5. What is the purpose of the GMO positive control DNA?
We want to make sure our PCR reaction worked; if the positive control produces a positive result but I do not get a band in my test sample, the test is most likely non-GMO.If I do not get the 200 base pair band in the positive control, I can assume the PCRreaction did not work.
Lesson 3 Electrophoresis of PCR products1. Why did you resolve your PCR products by electrophoresis?
Gel electrophoresis separates DNA molecules based on charge and size. After thebands are separated the gel is stained to visualize the band pattern. We can calculatethe size of the DNA molecules, in base pairs, in each band.
2. Explain why DNA fragments separate according to size in an electrophoresis gel.
DNA is negatively charged and is repelled by the negative electrode (cathode) andattracted by the positive electrode (anode) when an electric current is applied acrossthe gel. It separates because different lengths of DNA move through the gel matrix atdifferent rates. Longer fragments move more slowly than shorter fragments.
69
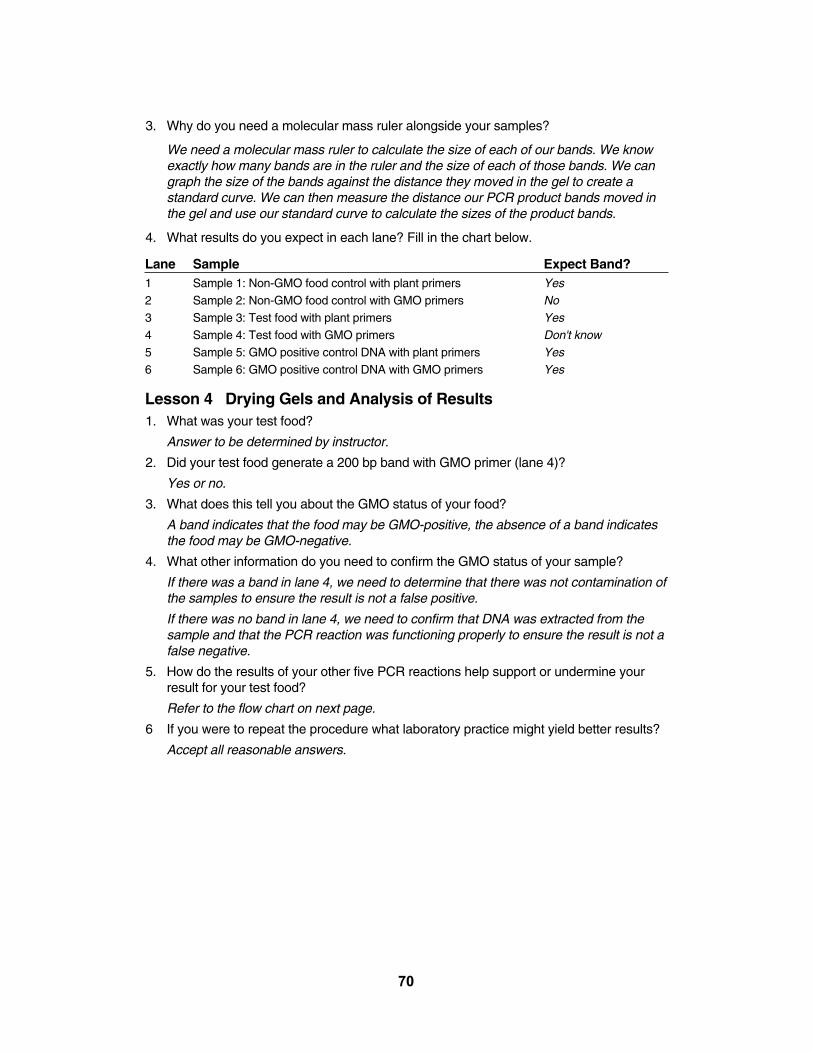
3. Why do you need a molecular mass ruler alongside your samples?
We need a molecular mass ruler to calculate the size of each of our bands. We knowexactly how many bands are in the ruler and the size of each of those bands. We cangraph the size of the bands against the distance they moved in the gel to create a standard curve. We can then measure the distance our PCR product bands moved inthe gel and use our standard curve to calculate the sizes of the product bands.
4. What results do you expect in each lane? Fill in the chart below.
Lane Sample Expect Band?1 Sample 1: Non-GMO food control with plant primers Yes2 Sample 2: Non-GMO food control with GMO primers No3 Sample 3: Test food with plant primers Yes4 Sample 4: Test food with GMO primers Don't know5 Sample 5: GMO positive control DNA with plant primers Yes6 Sample 6: GMO positive control DNA with GMO primers Yes
Lesson 4 Drying Gels and Analysis of Results1. What was your test food?
Answer to be determined by instructor.
2. Did your test food generate a 200 bp band with GMO primer (lane 4)?
Yes or no.
3. What does this tell you about the GMO status of your food?
A band indicates that the food may be GMO-positive, the absence of a band indicatesthe food may be GMO-negative.
4. What other information do you need to confirm the GMO status of your sample?
If there was a band in lane 4, we need to determine that there was not contamination ofthe samples to ensure the result is not a false positive.
If there was no band in lane 4, we need to confirm that DNA was extracted from thesample and that the PCR reaction was functioning properly to ensure the result is not afalse negative.
5. How do the results of your other five PCR reactions help support or undermine yourresult for your test food?
Refer to the flow chart on next page.
6 If you were to repeat the procedure what laboratory practice might yield better results?
Accept all reasonable answers.
70

Appendix GMini-PROTEAN® Tetra Cell Electrophoresis ModuleAssembly1. Set up Mini-PROTEAN Tetra gel box.
2. Prepare a Mini-PROTEAN TBE gel by peeling awaythe plastic strip from the bottom of the gel.
3. Remove the comb from the gel.
4. Place the gel cassette into the electrodeassembly that has the banana plugs with the short plate facing inward. Place a buffer dam or another gel cassette on the opposite side of the electrode assembly, with notch on buffer damfacing inward.
5. Push both gels (or gel and buffer dam) toward eachother, making sure that they are against the greengaskets that are built into the clamping frame; makecertain that the short plates sit just below the notch atthe top of the green gasket. Slide the green arms ofthe clamping frame over the gels, locking them intoplace.
6. Lower the electrode assembly with the gels in it intothe mini tank on the side of the tank with the plastictabs. Make sure that the red banana plug goes on theside of the tank with the red oval.
CAUTION: When running 1 or 2 gels only, DO NOTplace the Companion Running Module in the tank.Doing so will cause excessive heat generationand prevent electrophoretic separation.
7. Completely fill the inner chamber with 1xTBE electrophoresis buffer, making sure the buffercovers the short plate (~150 ml).
8 Fill mini tank with approximately 700 ml of1x TBE electrophoresis buffer until the buffer reachesthe 2 gels line on the tank.
9. If using, place sample loading guide on top of theelectrode assembly.
71
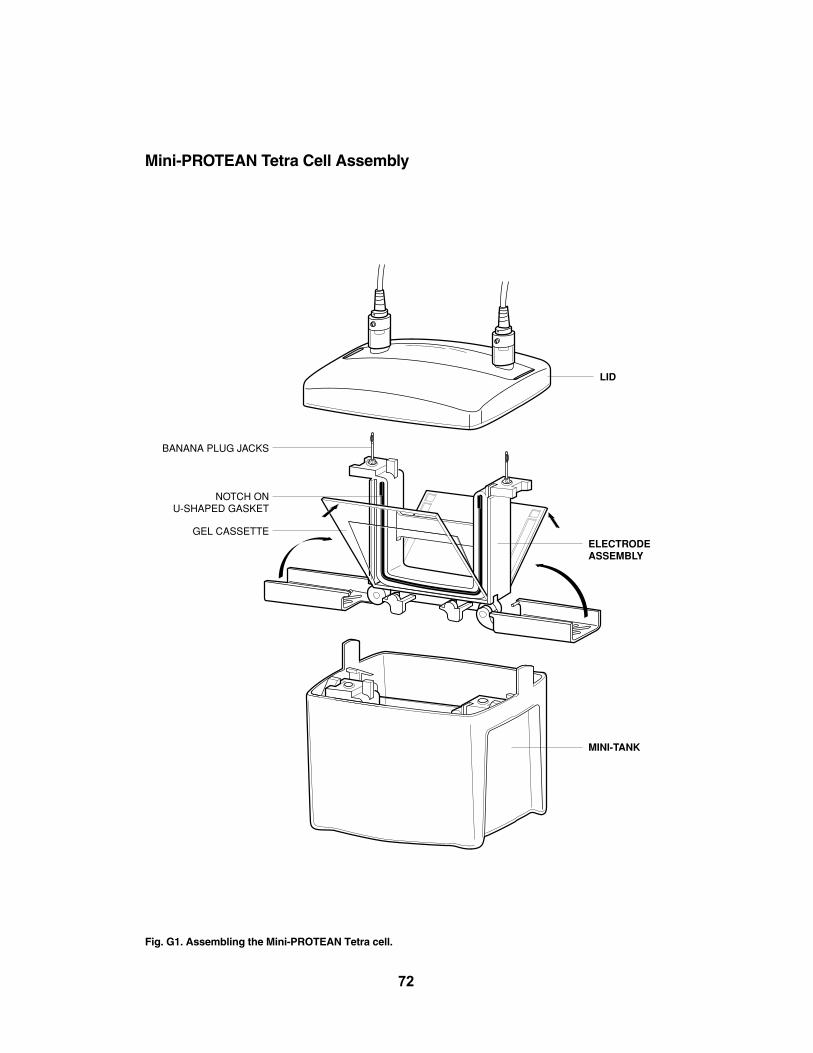
Mini-PROTEAN Tetra Cell Assembly
Fig. G1. Assembling the Mini-PROTEAN Tetra cell.
72
LID
ELECTRODEASSEMBLY
BANANA PLUG JACKS
GEL CASSETTE
NOTCH ONU-SHAPED GASKET
MINI-TANK
Appendix H
Recommended GMO-Based Websites and References
University of Nebraska online lessons (http://croptechnology.unl.edu/).
Center for Environmental Risk Assessment database of GMO crops, how they were madeand when they were approved (http://www.cera-gmc.org).
U.S. Dept of Agriculture Economic Research Service data on how much of the US is grow-ing GMO crops (http://www.ers.usda.gov/Data/biotechcrops/).
European Commission, Joint Research Centre, Review of GMO Detection andQuantification Techniques, 2002-07-23, Bonfini Laura, Heinze Petra, Kay Simon, Van denEede Guy (http://mbg.jrc.ec.europa.eu/home/documents/EUR20384Review.pdf).
Pro-GMO web site with educational links (http://www.monsanto.com).
Anti-GMO web site (http://www.greenpeace.org).
73
Appendix IRun Agarose DNA Gels in Under 20 Minutes
Bio-Rad’s BioEducation R&D team has developed a new electrophoresis buffer formula.Using a reduced concentration of running buffer (0.25x TAE), and higher voltage (200 V),any agarose gel can be run 33% faster. Advantages of this new formula include:
• Excellent gel resolution
• Minimal run time
• Fast separation of DNA in gels of any agarose gel concentration (0.8–4.0%)
• Compatibility with all Bio-Rad Biotechnology Explorer program kits
TAE buffer is provided as a 50x concentrate that can be mixed with distilled water toyield the necessary concentrations for making agarose gels and electrophoresis runningbuffer.
Use 1x TAE to make agarose gels:
350 ml of 1x TAE is sufficient to pour eight 7 x 10 cm agarose gels. To make 350 ml of1x TAE from a 50x TAE concentrate, add 7 ml of concentrate to 343 ml of distilled water.Detailed instructions for making agarose gels can be found in individual kit instruction manuals.
• Use 1x TAE to make 3% agarose gels for the GMO Investigator™ kit
– With the small DNA electrophoresis pack, dissolve 10.5 g of agarose in 350 ml of 1x TAE buffer, boil, and pour 40 ml per gel to make 8 handcast 3% agarose gels.Gels can be stored submerged in buffer for several weeks at 4°C
– For added convenience, precast 3% agarose gels made with 1x TAE are availablefrom Bio-Rad (catalog #161-3017EDU)
Use 0.25x TAE to make electrophoresis running buffer:
A 2.5 L volume of 0.25x TAE buffer is required to run eight 7 x 10 cm agarose gels. Tomake 2.5 L of 0.25x TAE from a 50x TAE concentrate, add 12.5 ml of concentrate to 2.49 Lof distilled water. To make 2.5 L of 0.25x TAE from a 1x TAE solution, add 625 ml of 1xTAE to 1,875 ml of distilled water.
Note: Do not use 0.25x TAE to make agarose gels; doing so can lead to a loss of DNA resolution.
To run gels:
Place the gel in an electrophoresis chamber and cover it with 0.25x TAE; ensure the gelis submerged. Run gels at 200 V for no more than 20 min. Monitor gel loading dyeprogress to get a relative idea of electrophoresis progress.
74
Legal Notices
Notice regarding Bio-Rad thermal cyclers and real-time systems: Purchase of thisinstrument conveys a limited, non-transferable immunity from suit for the purchaser’s owninternal research and development and for use in applied fields other than Human In VitroDiagnostics under one or more of U.S. Patents Nos. 5,656,493, 5,333,675, 5,475,610(claims 1, 44, 158, 160–163, and 167 only), and 6,703,236 (claims 1–7 only), or corresponding claims in their non-U.S. counterparts, owned by Applera Corporation. Noright is conveyed expressly, by implication, or by estoppel under any other patent claim,such as claims to apparatus, reagents, kits, or methods such as 5' nuclease methods.Further information on purchasing licenses may be obtained by contacting the Director ofLicensing, Applied Biosystems, 850 Lincoln Centre Drive, Foster City, California 94404,USA. Bio-Rad’s real-time thermal cyclers are licensed real-time thermal cyclers underApplera’s United States Patent No. 6,814,934 B1 for use in research and for all other fieldsexcept the fields of human diagnostics and veterinary diagnostics. Purchase of iTaq™ DNApolymerase includes an immunity from suit under patents specified in the product insert touse only the amount purchased for the purchaser’s own internal research. No other patentrights (such as 5’ Nuclease Process patent rights) are conveyed expressly, by implication,or by estoppel. Further information on purchasing licenses may be obtained by contactingthe Director of Licensing, Applied Biosystems, 850 Lincoln Centre Drive, Foster City,California 94404, USA
Trademarks
Roundup Ready is a trademark of Monsanto Company.
© 2011 Bio-Rad Laboratories Inc.
75

76

77

Life ScienceGroup
00-0000 0000 Sig 0211Bulletin 0000 Rev A US/EG
Bio-Rad Laboratories, Inc.
Web site www.bio-rad.com USA 800 424 6723 Australia 61 2 9914 2800 Austria 01 877 89 01 Belgium 09 385 55 11 Brazil 55 31 3689 6600 Canada 905 364 3435 China 86 21 6169 8500 Czech Republic 420 241 430 532 Denmark 44 52 10 00 Finland 09 804 22 00 France 01 47 95 69 65 Germany 089 31 884 0 Greece 30 210 777 4396 Hong Kong 852 2789 3300 Hungary 36 1 459 6100 India 91 124 4029300 Israel 03 963 6050 Italy 39 02 216091 Japan 03 6361 7000 Korea 82 2 3473 4460 Malaysia 60 3 2117 5260 Mexico 52 555 488 7670 The Netherlands 0318 540666 New Zealand 64 9 415 2280 Norway 23 38 41 30 Poland 48 22 331 99 99 Portugal 351 21 472 7700 Russia 7 495 721 14 04 Singapore 65 6415 3170 South Africa 27 861 246 723 Spain 34 91 590 5200 Sweden 08 555 12700 Switzerland 061 717 95 55 Taiwan 886 2 2578 7189 Thailand 66 2 6518311 United Kingdom 020 8328 2000
10002155 Rev C