caution: read instructions before using the machine … manual cl343.pdf · caution: read...
TRANSCRIPT

BC Titan RG90IND Part Number: 083546900 Date: 01/12/2016
CAUTION: Read instructions before using the machine

Calls are charged at the basic rate, please check with your telephone service provider for exact charges
Alternatively general, spares and service information is available from our website at: www.gdpacatering.com
Glen Dimplex Home Appliances, Stoney Lane, Prescot, Merseyside, L35 2XW
Warranty Registration0344 815 3737
Spares StoreBurco - 0344 815 3744
Lec - 0344 815 3737
Customer Care Helpline0344 815 3755
In case of difficulty within the UK
To contact us by email:
[email protected] register your appliance by mail:
Please complete the warranty card and return to the address
supplied
To register your appliance online:
www.gdpacatering.com
Your new appliance comes with our 3 years parts, 3 year labour warranty, protecting you against electrical and mechanical breakdown. To register, please complete the registration form included, register online or by phone. For full terms & conditions of the manufacturer’s guarantee, please refer to the website above. In addition, you may wish to purchase an extended warranty. A leaflet explaining how to do this is included with your appliance.
Our policy is one of constant development and improvement, therefore we cannot guarantee the strict accuracy of all of our illustrations and specifications. Changes may have been made subse-quent to publishing.
To contact Burco about your appliance, please call:
GB - Great Britain þIE - Ireland þDE - GermanyES - Spain
FR - France IT - ItalyPL - PolandNL - Netherlands
SE - SwedenCN - ChinaNZ - New Zealand AU - Australia
Countries of destination:

Thank you for buying this British-built appliance from us.
This user guide book is designed to help you through each step of owning your new product. Please read it carefully before you start using your appliance, as we have endeavored to answer as many questions as possible, and provide you with as much support as we can. General information, spares and service information is available from our website.
If you should find something missing from your product or have any questions that are not covered in this user guide, please contact us (see contact information inside the front cover).
European DirectivesAs a producer and a supplier of cooking appliances we are committed to the protection of the environ-
ment and are in the compliance with the WEEE directive. All our electric products are labelled accordingly with the crossed out wheeled bin symbol. This indicates, for disposal purposes at end of life, that these products must be taken to a recognized collection points, such as local authority sites/local recycling centres.
This appliance Complies with European Community Directives (CE) for household and similar electrical appliances and Gas appliances where applicable.
This appliance conforms to European Directive regarding Eco design requirements for energy-related products. Our policy is one of constant development and improvement, therefore we cannot guarantee the strict accuracy of all of our illustrations and specifications - changes may have been made subse-quent to publishing.
Disposal of Packaging MaterialThe packaging materials used with this appliance can be recycled. Please dispose of the packaging materials in the appropriate container at your local waste disposal facilities.
UK ONLY GAS WARNING:If you smell gas, Do not try to light any appliance. Do not touch any electrical switch.
Call the Gas Emergency Help line at 0800 111999
INTRODUCTION

WARNING
• If the hob surface is cracked, broken or shattered, switch off the appliance to avoid the possibility of electric shock and call for a service engineer’s visit.
• During use the appliance becomes hot. Care should be taken to avoid touching heating elements.
• Do not use harsh abrasive cleaners or sharp metal scrapers to clean the oven door glass since they can scratch the surface, which may result in shattering of the glass.
• Take care when operating the appliance, as ring, watches and similar objects may become hot when in close proximity to the hob surface.
• Do not use a steam cleaner on any cooking range, hob or oven appliance.
• Do not place aluminium foil, plastic vessels or metallic objects such as knives, forks, spoons or lids on the hob surface, as these surfaces may get hot.
• Only use vessels of the type and size recommended.• After use, switch off the hob element by its control and do not rely
on the pan detector.• To avoid electric shock, ensure that the appliance is switched off
before replacing the lamp.• The appliance is not intended to be operated by means of an
external timer or separate control system.• Unattended cooking on a hob with fat or oil can be dangerous and
may result in fire. • NEVER try to extinguish a fire with water, but switch off the
appliance and then cover the flame with a lid or damp cloth.• Danger of fire: Do not store items on the cooking surfaces.• Only use hob guards designed by the manufacturer of the cooking
appliance or indicated by the manufacturer of the appliance in the instructions for use as suitable or hob guards incorporated in the appliance. The use of inappropriate hob guards can cause accidents.
SAFETY
• If the cooker is placed on a base, measures have to be taken to prevent the appliance slipping from the base.
• Never put items directly on the base of the oven or cover the oven with foil, as this can cause the base element to overheat.
• This induction hob complies with the applicable EMC and EMF standards. Therefore it should not interfere with other electronic units. Persons fitted with a pacemaker or any other electrical implant should clarify with their doctor or the producer of the implant, whether there implant is adequate and fail-safe.
CAUTION• The cooking process has to be supervised. A short term cooking
process has to be supervised continuously.• This appliance must not be installed behind a decorative door in
order to avoid overheating.• In order to avoid a hazard due to inadvertent resetting of the
thermal cut-out, this appliance must not be supplied through an external switching device, such as a timer, or connected to a circuit that is regularly switched on and off by the utility.
• Fire Safety AdviceIf you do have a fire in the kitchen, don’t take any risks - get everyone out of your home and call the Fire Brigade.
Ifyouhaveanelectricalfireinthekitchen:• Pull the plug out, or switch off the power at the fuse box - this may be enough to stop the fire imme-
diately • Smother the fire with a fire blanket, or use a dry powder or carbon dioxide extinguisher • Remember: never use water on an electrical or cooking oil fire.
• Other Safety Advice• Servicing should be carried out only by authorised personnel.• Do not operate the appliance without the glass panel correctly fitted.• Do not modify the outer panels of this appliance in any way.• This appliance must be earthed.• The appliance must never be disconnected from the mains supply during use, as this will seriously
affect the safety and performance, particularly in relation to surface temperatures becoming hot and gas operated parts not working efficiently. The cooling fan (if fitted) is designed to run on after the control knob has been switched off.
• GAS WARNING! - If you smell gas: Do not try to light any appliance, Do not touch any electrical switch. Contact your local gas supplier immediately.

USING YOUR APPLIANCE
Getting to know your product Note: Your appliance layout may differ depending on the model.
Hob
Control panel
Cook zones
Left hand rear
Left hand front Right hand front
Centre
Right hand rear
Oven control
Thermostat indicator
Mains indicator
Cook zones symbols
Hob controls

Overview
Function Description Symbol
Power Level Once a cook zone is selected, a power level can be set to a low or high temperature. 1-9
Residual HeatAfter use, the cooking surface remains hot and the residual heat symbol will be displayed. As it cools, the residual heat
symbol will disappear from the display.
Pan detection
If no pan or an unsuitable pan is detected on an activated cook zone, the pan detection symbol will be displayed.
Suitable pans - cast iron, metals with magnetic properties. Non-suitable pans - copper, stainless steel, aluminium,
glass, ceramic, terra-cotta.
Pan overheatTo prevent the cookware from overheating, the hob will
reduce the power or switch off all cook zones depending if a power level or power boost is in use.
N/A
Booster function
The booster function temporarily increases the power to a cook zone allowing for a faster heat up time. It will deactivate
automatically after 10 minutes or if a lower power level is selected.
Auto heat up
The Auto Heat Up delivers full power (9) to the zone for a fixed period of time, before automatically turning back down to the desired setting. The Auto Heat Up has been tuned to
provide the best heat up period for each setting.
Melting function The melting function is used to heat up the pot to 45°C.
Keep warm function The keep warm function is used to heat up the bottom of the pot to 70°C.
Simmer function The simmer function is used to heat up the bottom of the pot to 94°C.
Child lockChild lock can be activated to stop the hob from being
accidentally turned on. In the child lock mode, error codes will not display.
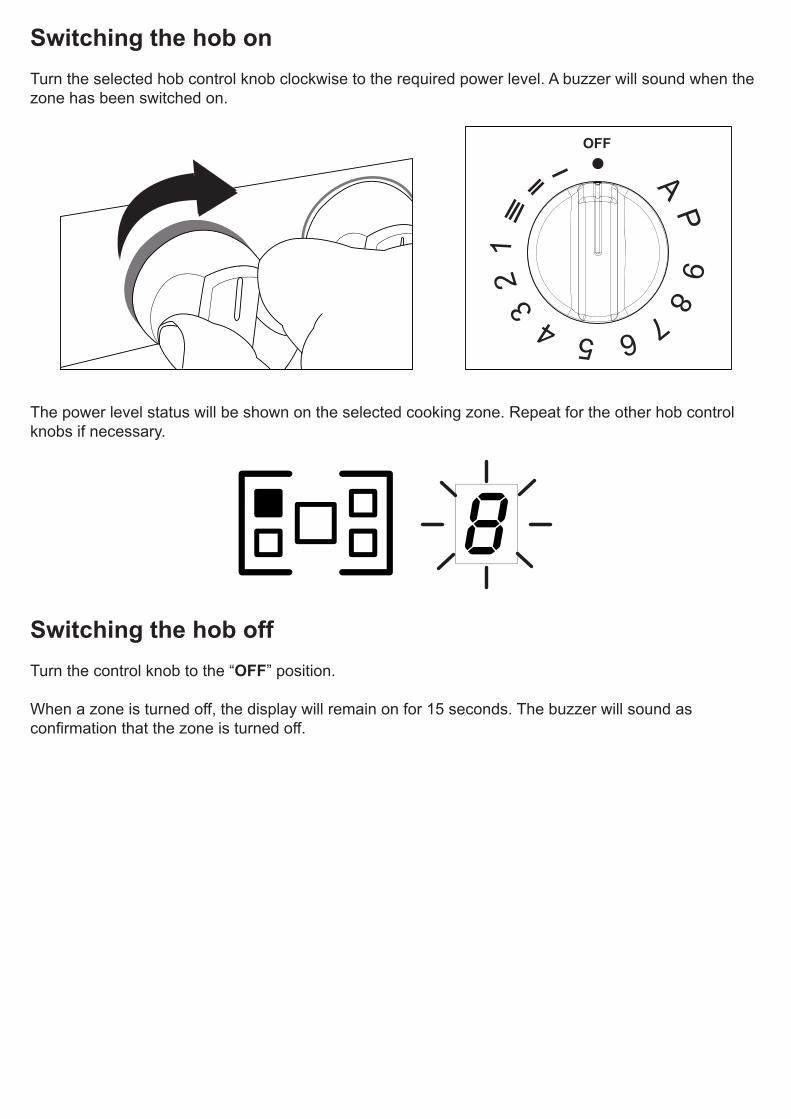
Switching the hob onTurn the selected hob control knob clockwise to the required power level. A buzzer will sound when the zone has been switched on.
A P 9 8 7 6 5 4 3 2
1
OFF
The power level status will be shown on the selected cooking zone. Repeat for the other hob control knobs if necessary.
Switching the hob offTurn the control knob to the “OFF” position.
When a zone is turned off, the display will remain on for 15 seconds. The buzzer will sound as confirmation that the zone is turned off.

Melting function
1 Turn the control knob clockwise to the meltingsymbol
A P 9 8 7 6 5 4 3
2 1
OFF
2 The melting symbol will appear on the hob display
Keep warm function
1 Turn the control knob clockwise to the keepwarm symbol
A P 9 8 7 6 5
4 3
2 1
OFF
2 The keep warm symbol will appear on the hobdisplay
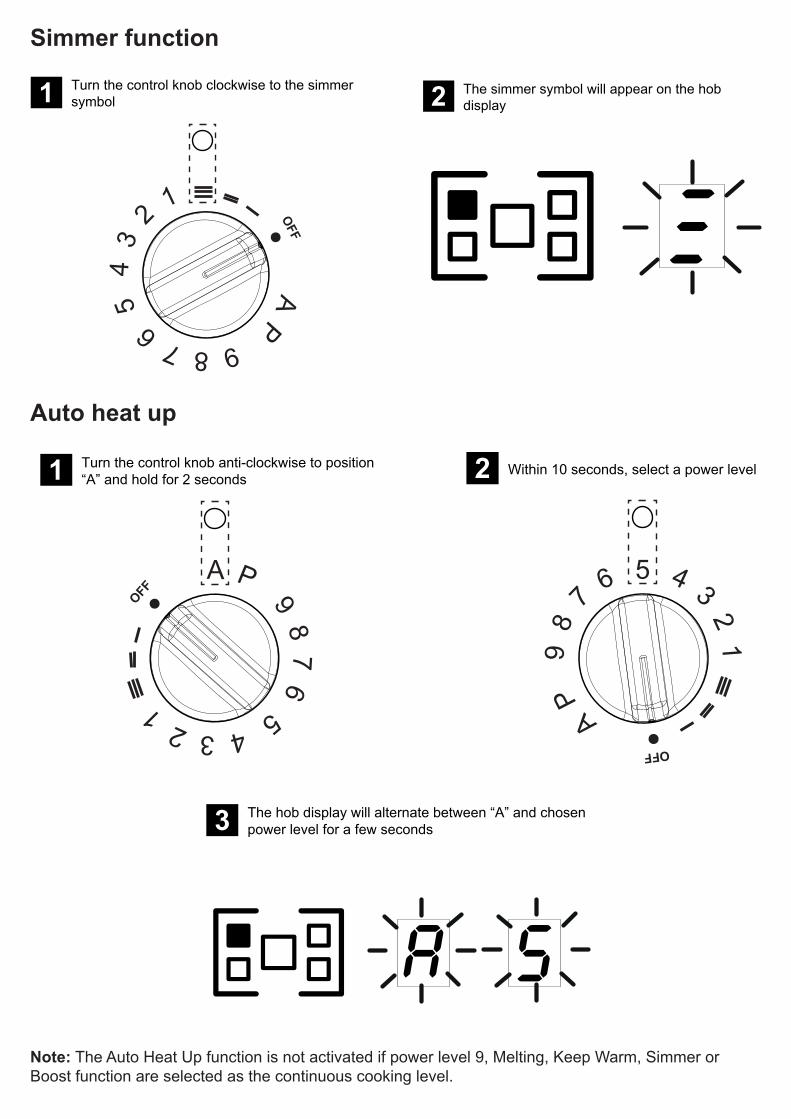
Simmer function
1 Turn the control knob clockwise to the simmersymbol
A P 9 8 7 6 5
4
3 2
1 OFF
2 The simmer symbol will appear on the hobdisplay
Auto heat up
1 Turn the control knob anti-clockwise to position“A” and hold for 2 seconds
A P 9 8 7 6 5 4 3 2 1OFF
2 Within 10 seconds, select a power level
A P
9 8
7 6 5 4 3 2 1
OFF
3 The hob display will alternate between “A” and chosenpower level for a few seconds
Note: The Auto Heat Up function is not activated if power level 9, Melting, Keep Warm, Simmer or Boost function are selected as the continuous cooking level.

Power Boost
1 Turn the control knob clockwise to the “P” position
A P 9 8 7 6 5 4 3 2 1
OFF
2 The “P” symbol will appear on the hob display
Note: The Power Boost function will only operate for 10 minutes. This function will deactivate automatically if the hob is too hot or to prevent cookware from overheating.
Pan detection
A power level can be selected even if no pan is present. The power will only switch on when a pan is placed on a cooking zone. The pan detection symbol will appear on the display if the pan is removed or unsuitable for the cooking zone.
When a pan is removed off the cooking zone, the hob automatically reduces the power, and only switches back on when you replace the pan.

Activating child lockCentre cook zone
1 Turn the centre control knob fully anti-clockwiseand hold for 2 seconds
A P 9 8 7 6 5 4 3 2 1
OFF
2 The “L” symbol will appear on the hob displays
Other hob controls
The two left hand side cook zones and the two right hand side cook zones act as “paired” zones (left side one paired zone, right side one paired zone).
1 Turn the two “paired” control knobs fully anti-clockwiseand hold for 2 seconds
A P 9 8 7 6 5 4 3 2 1
OFF A P 9 8 7 6 5 4 3 2 1
OFF
2 The “L” symbol will appear on the “paired” hobdisplays
Deactivating child lockRepeat the same procedure as “Activating child lock”. Once deactivated, the hob cook zone displays will flash “0”.
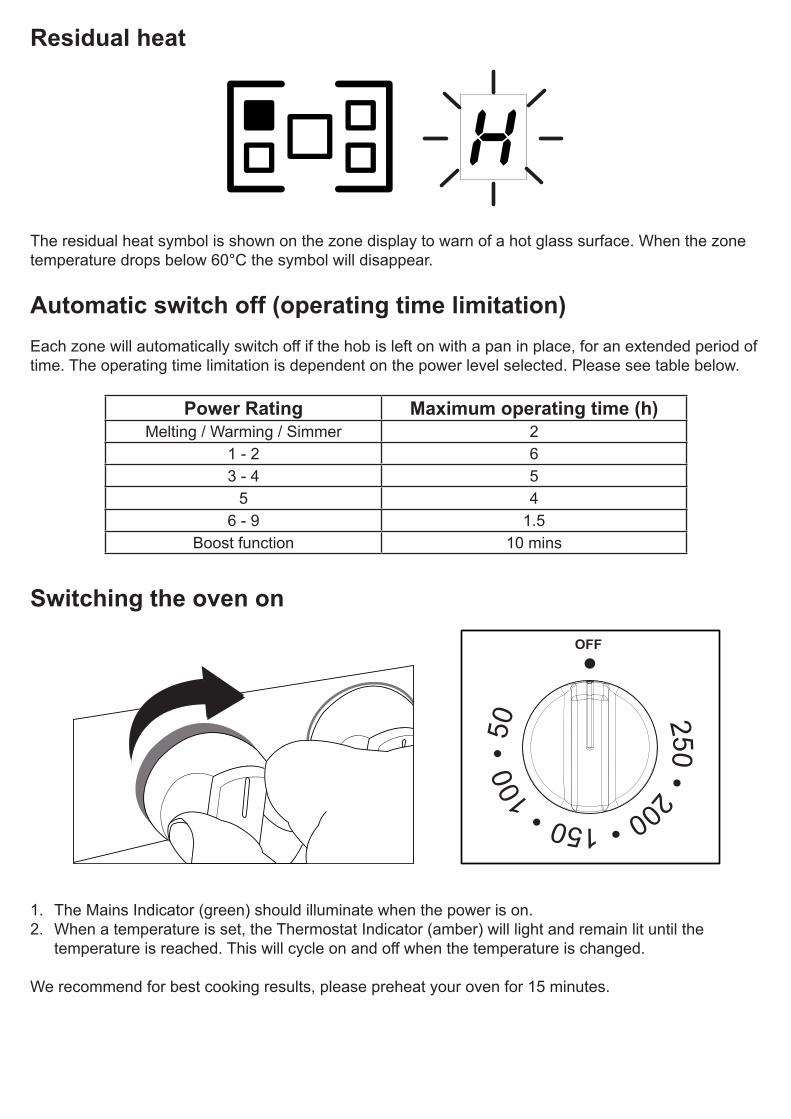
Residual heat
The residual heat symbol is shown on the zone display to warn of a hot glass surface. When the zone temperature drops below 60°C the symbol will disappear.
Automatic switch off (operating time limitation)Each zone will automatically switch off if the hob is left on with a pan in place, for an extended period of time. The operating time limitation is dependent on the power level selected. Please see table below.
Power Rating Maximum operating time (h)Melting / Warming / Simmer 2
1 - 2 63 - 4 5
5 46 - 9 1.5
Boost function 10 mins
Switching the oven on
250 200 150 100
5
0
OFF
1. The Mains Indicator (green) should illuminate when the power is on.2. When a temperature is set, the Thermostat Indicator (amber) will light and remain lit until the
temperature is reached. This will cycle on and off when the temperature is changed.
We recommend for best cooking results, please preheat your oven for 15 minutes.
Switching the oven off Turn the control knob to the “OFF” position.
Oven statusWhen the oven is active, the cooling fans come on to keep the appliance cool during cooking. The fans may continue to operate for a period of time after the oven has been switched off. During use the fans may cycle on and off, this is normal.
A thermal switch is fitted to prevent the induction generators from overheating when the oven is on. If activated, this will shut down the power to the oven and the Mains Indicator will turn off.
Non-functional cooling fans or blocked filters will cause the thermal switch to be activated.
Note: The filters and cooling fans are located at the rear of the range.
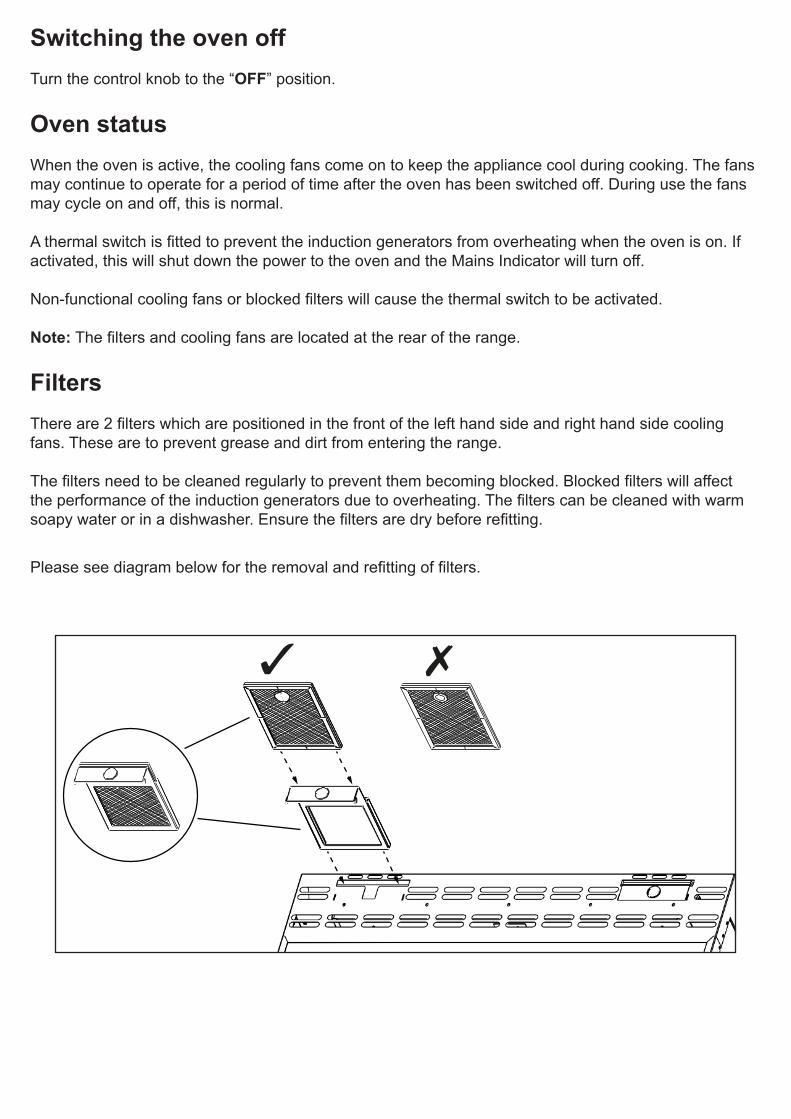
FiltersThere are 2 filters which are positioned in the front of the left hand side and right hand side cooling fans. These are to prevent grease and dirt from entering the range.
The filters need to be cleaned regularly to prevent them becoming blocked. Blocked filters will affect the performance of the induction generators due to overheating. The filters can be cleaned with warm soapy water or in a dishwasher. Ensure the filters are dry before refitting.
Please see diagram below for the removal and refitting of filters.
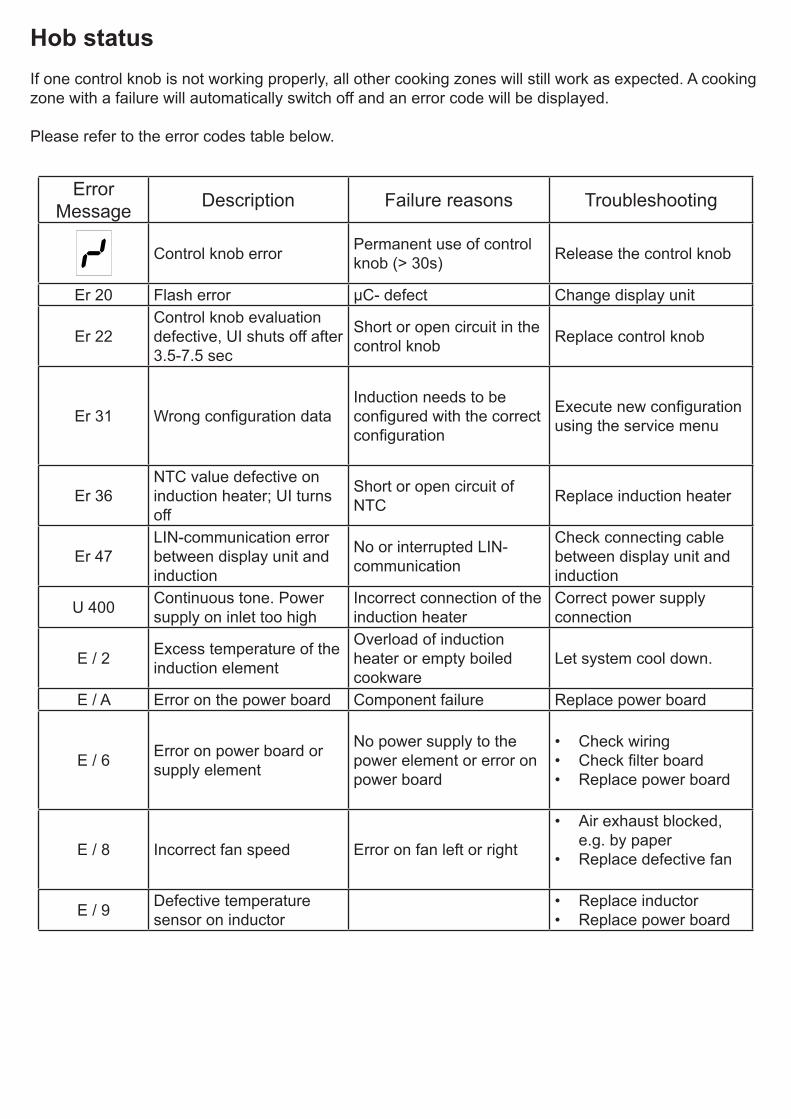
Hob statusIf one control knob is not working properly, all other cooking zones will still work as expected. A cooking zone with a failure will automatically switch off and an error code will be displayed.
Please refer to the error codes table below.
ErrorMessage Description Failure reasons Troubleshooting
Control knob error Permanent use of control knob (> 30s) Release the control knob
Er 20 Flash error µC- defect Change display unit
Er 22Control knob evaluation defective, UI shuts off after 3.5-7.5 sec
Short or open circuit in the control knob Replace control knob
Er 31 Wrong configuration dataInduction needs to beconfigured with the correct configuration
Execute new configuration using the service menu
Er 36NTC value defective on induction heater; UI turns off
Short or open circuit of NTC Replace induction heater
Er 47LIN-communication error between display unit and induction
No or interrupted LIN-communication
Check connecting cable between display unit and induction
U 400 Continuous tone. Power supply on inlet too high
Incorrect connection of the induction heater
Correct power supplyconnection
E / 2 Excess temperature of the induction element
Overload of induction heater or empty boiled cookware
Let system cool down.
E / A Error on the power board Component failure Replace power board
E / 6 Error on power board or supply element
No power supply to the power element or error on power board
• Check wiring• Check filter board• Replace power board
E / 8 Incorrect fan speed Error on fan left or right
• Air exhaust blocked, e.g. by paper
• Replace defective fan
E / 9 Defective temperature sensor on inductor
• Replace inductor• Replace power board

SPARES LIST
Part Number Description Qty083545800 Glass 1083545400 Induction Unit 1083545500 Induction Unit 2083545700 PCB 3083574400 5 Way LIN cable 5083574500 8 Way LIN cable 3083545600 Rotary encoder 5503545100 Trim (front) 1503545200 Trim (side) 2503544400 Trim (rear) 1082233401 Fan 2503544801 Filter cartridge 2083545900 Filter 2083546000 Badge 1083546200 Control knob (selector) 5082983804 Control knob (oven) 1082986700 Shelf oven 2083056100 Seal oven 1082983500 Handle door 2082983600 Wheel (no brake) 2082983601 Wheel (with brake) 2082558001 Thermostat oven 1082091800 Selector switch 1081581800 Oven stir fan 2081561600 Oven element 2083055600 Relay 2082930601 Neon indicator green 1082930602 Neon indicator amber 1083281900 Terminal block 3082808901 Thermal cutout 100C 1083055700 Thermal cutout 150C 1083089400 Thermal switch 50C 2083546900 Handbook 1

CLEANING YOUR APPLIANCEDo’s Note: Always switch off your appliance and allow it to cool down before you clean any part of it.Note: Please take extra care when cleaning over the symbols on the control panel, as this can lead to them fading.
H
Tips: Some foods can mark or damage the metal or paint work e.g.; Vinegar, fruit juices and salt. Always clean food spillages as soon as possible.
Dont’s
IT IS IMPORTANT TO CLEAN YOUR APPLIANCE REGULARLY AS A BUILD UP OF FAT CANAFFECT IT’S PERFORMANCE OR DAMAGE IT AND MAY INVALIDATE YOUR GUARANTEE.
IN ADDITION TO THE ABOVE, DO NOT USE METAL SCRAPERS TO CLEAN THE OVEN DOOR GLASS.
• Undiluted bleaches• Chloride products
• Warm, soapy water • Wipe with damp cloth• Dry with a soft cloth
• Clean, wrung out cloth
• Wire Wool• Abrasive cleaners• Nylon pads• Steam cleaners
Do not place in the dishwasher:• Cast iron griddle• Pan supports
We offer a great range of cleaning products and accessories for your appliance. To shop, please visit our website located at the front of this User Guide.

TITAN INDUCTION
Wiring colour code: Bk=Black, Bn=Brown, Bu=Blue, Gn=Green or Green/Yellow, Or=Orange, W=White, Y=Yellow.
© This diagram is the property of Glen Dimplex Home Appliances Not to be reproduced or transmitted in any shape or form without the permission of Glen Dimplex Home Appliances. 24/11/2016
CIRCLED NUMBERS INDICATE WIRE PART NUMBER:
BASE NUMBER 08-2462-4XX, WIRES 401 TO 499.
BASE NUMBER 08-24564-XX, WIRES 1 TO 99.
BASE NUMBER 08-2503-3XX, WIRES 301 TO 399.
BASE NUMBER 08-2462-5XX, WIRES 501 TO 599.BASE NUMBER 08-2517-6XX, WIRES 601 TO 699.
BASE NUMBER 08-2485-2XX, WIRES 201 TO 299.BASE NUMBER 08-2474-1XX, WIRES 101 TO 199.
INLET TERMINAL BLOCK
OVENELEMENT
STAT.NEON
OVENSTIR FAN
MANUALRESET
THERMALCUTOUT
Fit All Links For Single Phase
L1 L2 L3 N4 N5
OVENELEMENT
OVENSTIR FAN
ON.NEON
A
B
1
3
4
6
7
9
OperatingRelay
A
B
1
3
4
6
7
9
SafetyRelay
2AmpFuse
Bk
Bk
Bk
Bk
Bk
Bk
Bk
Bk
Bk
W
Or
Bn
RBn
Bn
Bn
Bn
Bn
Bn
Bn
W
R
W
ROr
Y
Bu
Bu
Bu
BuBu
Bu
Y
Y
Y
YY
681
681
681
683
683
683
683
684
685
685
Bk
Bk
Bk
776
686
686
687
687
689688
689
689
689
689
690
690
690
691
691
691
692
693
Y
T/STAT
12
1
P2
P1
2
WIRING DIAGRAM
21
TOPTRAY
EARTHPOINT Gn
FAN STALLT/SWITCH
FANOVERRUNTHERMALSWITCH
Or
COOLING FAN
COOLING FAN
776
776
776
773
773
R
R
R
Bn
Bn
774
774
774 R
R
R
Or682
457
457
Bu
Bu
L N L N L N
INDUCTION UNIT
Induction LHharness 083541900
Induction RHharness 083542100
Induction Centreharness 083542000
Bn Bn Bn BuBu
BuBn BnBn Bu Bu
Gn
Gn Gn Gn
Gn
Gn
3-WayT/Block777
777 Bn
Bn
778
778
Bn
Bn
FANOVERRUNTHERMALSWITCH
437
437
Or
Or
785689
R
590
Y
785 Y
N6
102
102
590
R
102W
R
W
590
102
W
BuBu

Please keep this handbook for future reference, or for anyone else
who may use the appliance.

Range - electric induction
TECHNICAL DATA
Electrical supply Hotplate Zone Power rating (kW) Boost rating (kW)
230 / 400V 3N~ 50 Hz Induction
Left hand front 1.85 3.00Left hand rear 1.85 3.00Right hand front 1.85 3.00Right hand rear 1.85 3.00Middle 2.60 3.50
Hob
Electrical supply Maximum power rating (kW)
230 / 400V 3N~ 50 Hz
Hob 11.10
Oven 4.80
Total 15.90
Electrical supply Load
230 / 400V 3N~ 50 Hz
Line L1 L2 L3Current (A) 26.5 26.5 16
Electrical Ratings