cbpr training manual for community-based researchers … · a training manual for community-based...
TRANSCRIPT

Community-Based Participatory Research
A Training Manual for Community-Based Researchers
Sadaf Shallwani and Shama Mohammed
2007

Shallwani & Mohammed, 2007 CBPR Training Manual
1
Contents Introduction........................................................................................................................... 2
Research Concepts .............................................................................................................. 3
Introduction to Research................................................................................................... 4
Introduction to Research Ethics ........................................................................................ 8
Introduction to Participation............................................................................................. 14
Introduction to Participatory Action Research ................................................................. 18
Research Methodologies .................................................................................................... 24
Survey Methodology ....................................................................................................... 25
Interview Methodology .................................................................................................... 30
Focus Group Discussion Methodology............................................................................ 38
PhotoVoice Methodology ................................................................................................ 43
Community Timeline Methodology.................................................................................. 50
Community Mapping Methodology.................................................................................. 55
Additional Resources.......................................................................................................... 60

Shallwani & Mohammed, 2007 CBPR Training Manual
2
Introduction
The following training modules and handouts were developed for a three-week training workshop on Community-Based Participatory Research held in June 2006 for community-based workers in Tando Jam, Sindh, Pakistan. These workers had been working on a community-based early child development programme for approximately one year. This training workshop was intended to be the first formal step of an ongoing process of learning and development, to launch and enhance community-based workers’ role as community-based researchers in a community-based participatory action research project. Our goal was to facilitate participatory activities and discussions through which participants could develop a basic understanding of community-based participatory research concepts and methodologies, such that they could participate meaningfully in the different phases of the research process (including planning, data collection, data analysis, dissemination of findings, and action) in their community. Accordingly, the first half of the training workshop focused on introducing some of the concepts upon which community-based participatory research rests: research, ethics, participation, and action research. These modules attempted to demystify theoretical concepts by relating them to participants’ own lived experiences. In the second half of the workshop, we demonstrated, practiced, and evaluated different research methodologies – both traditional research methodologies and participatory reflection and action (PRA) methodologies. The following methodologies were explored: surveys, interviews, focus group discussions, PhotoVoice, community timelines, and community mapping. The modules on research methodologies followed a common format: first, an opportunity to directly or indirectly experience the methodology; then, a discussion of its advantages, disadvantages, and appropriateness within the community; and finally, a review of ethical guidelines in light of the methodology. Urdu translations of handouts summarizing key points were provided to participants at the end of each module and these can be made available by the authors of this manual. We hope that you can adapt and use some of the materials we have developed in your own workshops on community-based participatory research. We acknowledge the many shortcomings of our work, due to external constraints as well as our own limited experience, and would appreciate your feedback and suggestions. We would like to acknowledge the institutional, administrative, and financial support given to us by the Aga Khan University – Human Development Programme, funded by the USAID Releasing Confidence and Creativity project, for the development and delivery of this workshop. Shama Mohammed [email protected]
Sadaf Shallwani [email protected]
2007

Shallwani & Mohammed, 2007 CBPR Training Manual
3
Research Concepts:
Modules & Handouts
Shallwani & Mohammed, 2007 CBPR Training Manual
4
Introduction to Research: Module
Overview: This module introduces participants to the concept of research, and some of the principles involved. The module is centred around a case study specific to the Pakistani culture about a woman considering a marriage proposal for her daughter. This case study is drawn upon throughout the module to highlight key concepts, and relate these research concepts to ‘real life’. Learning Outcomes: By the end of the module, participants should:
• Have been introduced to the concept of research
• Have considered qualities of good research
• Have brainstormed means of collecting data Materials:
• Photocopies of case study for participants
• Plain white paper
• Drawing and colouring materials (such as markers and crayons)
• Flipchart paper and markers
• Pins or masking tape to display materials on wall
• Photocopies of handout for participants Time: Approximately 3-4 hours. Learning Activities: What is Research?
1. Small group discussion: Divide participants into groups of 4. Give each group the following case study and ask them to answer the associated question on a flipchart paper. Ask each group to briefly share their responses in the larger group. (Later activities will relate this discussion to the concept of research.) Put the flip charts up around the training room.
Case Study: Sadiqa’s Story A marriage proposal has come for Sadiqa’s daughter Shehla from the Malik family. Sadiqa does not know the boy or his family at all. They live in the neighbouring village in which her sister Rehmat lives. If you were Sadiqa, what would you do to determine whether or not Asad, the Maliks’ son, is a suitable match for Shehla?
2. Visioning exercise and gallery walk:
Shallwani & Mohammed, 2007 CBPR Training Manual
5
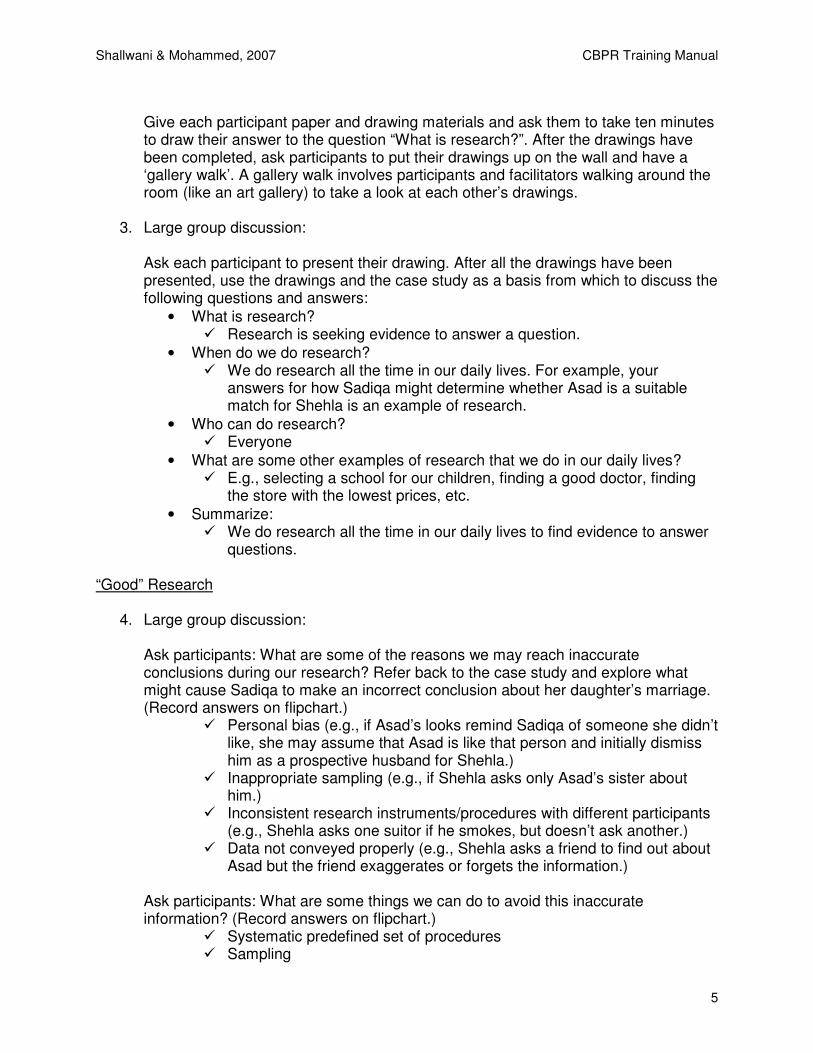
Give each participant paper and drawing materials and ask them to take ten minutes to draw their answer to the question “What is research?”. After the drawings have been completed, ask participants to put their drawings up on the wall and have a ‘gallery walk’. A gallery walk involves participants and facilitators walking around the room (like an art gallery) to take a look at each other’s drawings.
3. Large group discussion:
Ask each participant to present their drawing. After all the drawings have been presented, use the drawings and the case study as a basis from which to discuss the following questions and answers:
• What is research? � Research is seeking evidence to answer a question.
• When do we do research? � We do research all the time in our daily lives. For example, your
answers for how Sadiqa might determine whether Asad is a suitable match for Shehla is an example of research.
• Who can do research? � Everyone
• What are some other examples of research that we do in our daily lives? � E.g., selecting a school for our children, finding a good doctor, finding
the store with the lowest prices, etc.
• Summarize: � We do research all the time in our daily lives to find evidence to answer
questions.
“Good” Research
4. Large group discussion: Ask participants: What are some of the reasons we may reach inaccurate conclusions during our research? Refer back to the case study and explore what might cause Sadiqa to make an incorrect conclusion about her daughter’s marriage. (Record answers on flipchart.)
� Personal bias (e.g., if Asad’s looks remind Sadiqa of someone she didn’t like, she may assume that Asad is like that person and initially dismiss him as a prospective husband for Shehla.)
� Inappropriate sampling (e.g., if Shehla asks only Asad’s sister about him.)
� Inconsistent research instruments/procedures with different participants (e.g., Shehla asks one suitor if he smokes, but doesn’t ask another.)
� Data not conveyed properly (e.g., Shehla asks a friend to find out about Asad but the friend exaggerates or forgets the information.)
Ask participants: What are some things we can do to avoid this inaccurate information? (Record answers on flipchart.)
� Systematic predefined set of procedures � Sampling

Shallwani & Mohammed, 2007 CBPR Training Manual
6
� Be open (i.e. finds are not predetermined) � Triangulation of data (i.e. use a variety of methods) � Recording of data
Summarize discussion: When all of these things are accounted for and documented, and ethics have been considered (which will be discussed in the next module), then our research is considered to be good research.
Methods of Collecting Evidence for Research
5. Large group discussion: Ask participants: What are some of the methods that we can use to collect evidence? Refer back to the case study, thinking about different steps Sadiqa might take to find out more about Asad. (Record answers on flipchart.)
� Observation (e.g., is he good-looking, clean, well-mannered, etc.) � Assessments (e.g., asking him his salary, dowry, whether he smokes,
whether he snores, etc.) � Interviews (e.g., talk to him, his sister, his neighbour, his teacher,
someone who doesn’t like him; ask Shehla what she thinks of him) � Survey (e.g., ask everyone “Is he a good guy?” and tabulate the yes and
no responses; ask him his age, number of siblings, etc.) � Focus group discussions (e.g., asking a group of people what they think
about Asad) Summarize: There are many different methods that we can use to collect evidence for research, depending on what information we are looking for, and on what is appropriate given the situation. Using multiple methods can help ensure we get more comprehensive information. Some research methodologies will be explored in-depth during this training workshop.
Distribute and review handout with participants.

Shallwani & Mohammed, 2007 CBPR Training Manual
7
Introduction to Research: Handout What is Research? Research consists of an investigation that:
- seeks answers to a question - systematically uses a predefined set of procedures to answer the question - collects evidence in order to answer a question - produces findings that were not determined in advance - produces findings that are applicable beyond the immediate boundaries of the study
“Good” vs. “Not so Good” Research
“Not so Good” Research “Good” Research
“Not so good” research has inaccurate data and inaccurate conclusions. This may be due to the following reasons:
“Good” research uses systematic procedures to collect and analyze data, which may include:
- The researcher’s is unwilling to consider evidence that contradicts her personal opinions.
- The researcher is open to new and unexpected findings.
- The researcher uses inconsistent procedures with different participants or in different situations.
- The researcher uses a predefined set of procedures.
- The researcher’s sampling does not ensure that different people are represented.
- The researcher uses sampling techniques which ensure different people are represented.
- The researcher’s method of data collection leads to a particular type of answer. (A bias in the method.)
- The researcher uses different methods of data collection to see if they give the same answers (this is called “triangulation of data”).
- The researcher does not record and maintain the data properly.
- The researcher records the data and keeps it in a safe and secure place.
“Not so good” research does not follow ethical guidelines.
“Good” research follows ethical guidelines.

Shallwani & Mohammed, 2007 CBPR Training Manual
8
Introduction to Research Ethics: Module
Overview: This module provokes participants to consider ethical aspects in research. In small and large group discussions, participants discuss different case studies highlighting different ethical issues. Participants then work together to create a list of ethical guidelines to guide their own research work. Learning Outcomes: By the end of the module, participants should:
• Have considered ethical considerations related to research
• Have collectively developed a list of general ethical guidelines for research Materials:
• Photocopies of six case studies for participants
• Plain white paper (or participants’ personal journals) and writing materials (pens/pencils)
• Flipchart paper and markers
• Pins or masking tape to put things up on wall
• Photocopies of handouts for participants Time: Approximately 2-3 hours. Learning Activities: Considering Ethics
1. Small group discussion of case studies: Divide participants into small groups. Give each group one of the six case studies. (The case studies are available at the end of this module). Ask each group to discuss their assigned case study and answer the questions that follow in their notebooks or on a piece of paper.
Ethical Guidelines in Research
2. Large group discussion: Ask one representative from each group to read out the case study and questions, followed by a summary of the group’s responses. Ask for additional thoughts from the larger group, and facilitate a discussion.
3. Large group brainstorming:

Shallwani & Mohammed, 2007 CBPR Training Manual
9
(Record answers on flipchart and keep this flipchart in the training room, to refer back to throughout the training. Participants should also keep a copy of these guidelines, once they are finalized, for use throughout their research work.)
• Based on the above case studies, what do you think are some guidelines for research ethics that should be maintained? � Confidentiality (Irfan’s story) � Informed voluntary consent (Zainab’s story) � Right to withdraw at any time (Saira’s story) � Sharing results with your research participants (Yaqub’s story) � Special consideration for vulnerable groups in seeking consent (Rubab’s
story) � Storing data without names in a secure location (Ziyad and Asifa’s story)
• Ask participants: Based on your own experiences, do you think there should be any other ethical guidelines that should be included? (Add any new guidelines that they share onto the flip chart.)
• Summarize discussion: This was just an introduction to research ethics. Because ethics are a very crucial aspect of research, we will keep coming back to research ethics throughout the course of this training and throughout our work.
Distribute and review handouts with participants.

Shallwani & Mohammed, 2007 CBPR Training Manual
10
Introduction to Research Ethics: Case Studies
Case Study #1: Irfan’s Story The Malik family wants to propose to Shehla for their son Asad. Asad’s father, Irfan Malik, is a very private person. Irfan disclosed his income to Shehla’s mother, Sadiqa, when she was trying to find out more about the Maliks. Sadiqa shared this information with her sister who in turn shared it with the Maliks’ neighbours. Now the entire neighbourhood knows what Irfan’s income is and Irfan is very upset.
a) Why do you think Irfan is upset? b) Do you think Sadiqa should have disclosed Irfan’s income? Why or why not?
Case Study #2: Zainab’s Story Zainab is a 14-year-old girl. One day she was at her neighbour Fehmida’s house for a birthday party. At the party, Fehmida’s family took lots of photographs. Recently, Zainab and her family found out that Fehmida’s family has given copies of Zainab’s photograph to numerous families for prospective marriage proposals without their knowledge. Zainab and her parents are very upset.
a) Why do you think Zainab and her parents are upset? b) Do you think Fehmida’s family should have circulated Zainab’s photograph?
Why or why not?
Case Study #3: Saira’s Story Saira is approached by a journalist who wants to interview her for an article on young women in Pakistan. She agrees to participate and sets a date and time for the interview. After the interview begins, Saira realizes that she is not comfortable having this information shared in a newspaper. She tells the journalist that she no longer wants to participate in the interview. The journalist says she has to finish the interview because she agreed to participate..
a) How would you feel if you were Saira? b) Do you think that it is okay that Saira changed her mind about participating in
the interview? Why or why not? c) Do you think the journalist should pressure Saira to continue the interview
because she agreed initially, or should the journalist accept that she has changed her mind? Why?
d) Should the journalist use the information she got from Saira before Saira withdrew from the interview? Why or why not?
Continued on next page.
Shallwani & Mohammed, 2007 CBPR Training Manual
11
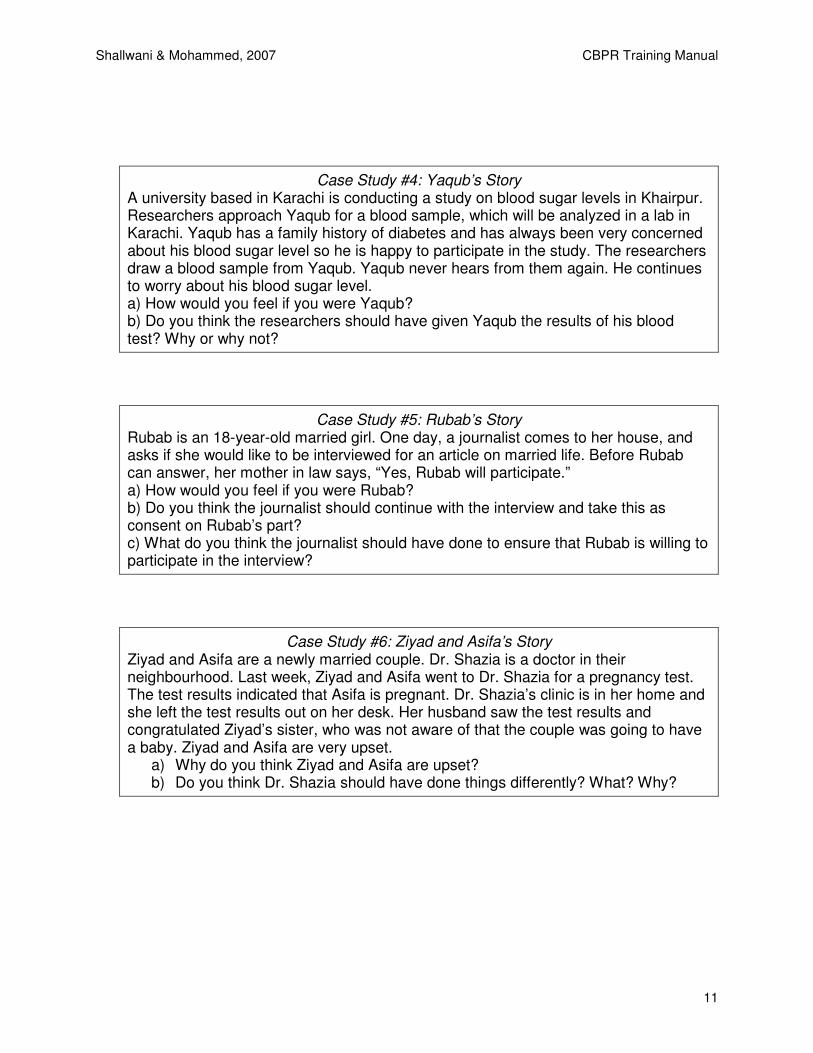
Case Study #4: Yaqub’s Story A university based in Karachi is conducting a study on blood sugar levels in Khairpur. Researchers approach Yaqub for a blood sample, which will be analyzed in a lab in Karachi. Yaqub has a family history of diabetes and has always been very concerned about his blood sugar level so he is happy to participate in the study. The researchers draw a blood sample from Yaqub. Yaqub never hears from them again. He continues to worry about his blood sugar level. a) How would you feel if you were Yaqub? b) Do you think the researchers should have given Yaqub the results of his blood test? Why or why not?
Case Study #5: Rubab’s Story Rubab is an 18-year-old married girl. One day, a journalist comes to her house, and asks if she would like to be interviewed for an article on married life. Before Rubab can answer, her mother in law says, “Yes, Rubab will participate.” a) How would you feel if you were Rubab? b) Do you think the journalist should continue with the interview and take this as consent on Rubab’s part? c) What do you think the journalist should have done to ensure that Rubab is willing to participate in the interview?
Case Study #6: Ziyad and Asifa’s Story Ziyad and Asifa are a newly married couple. Dr. Shazia is a doctor in their neighbourhood. Last week, Ziyad and Asifa went to Dr. Shazia for a pregnancy test. The test results indicated that Asifa is pregnant. Dr. Shazia’s clinic is in her home and she left the test results out on her desk. Her husband saw the test results and congratulated Ziyad’s sister, who was not aware of that the couple was going to have a baby. Ziyad and Asifa are very upset.
a) Why do you think Ziyad and Asifa are upset? b) Do you think Dr. Shazia should have done things differently? What? Why?
Shallwani & Mohammed, 2007 CBPR Training Manual
12
Introduction to Research Ethics: Handout #1
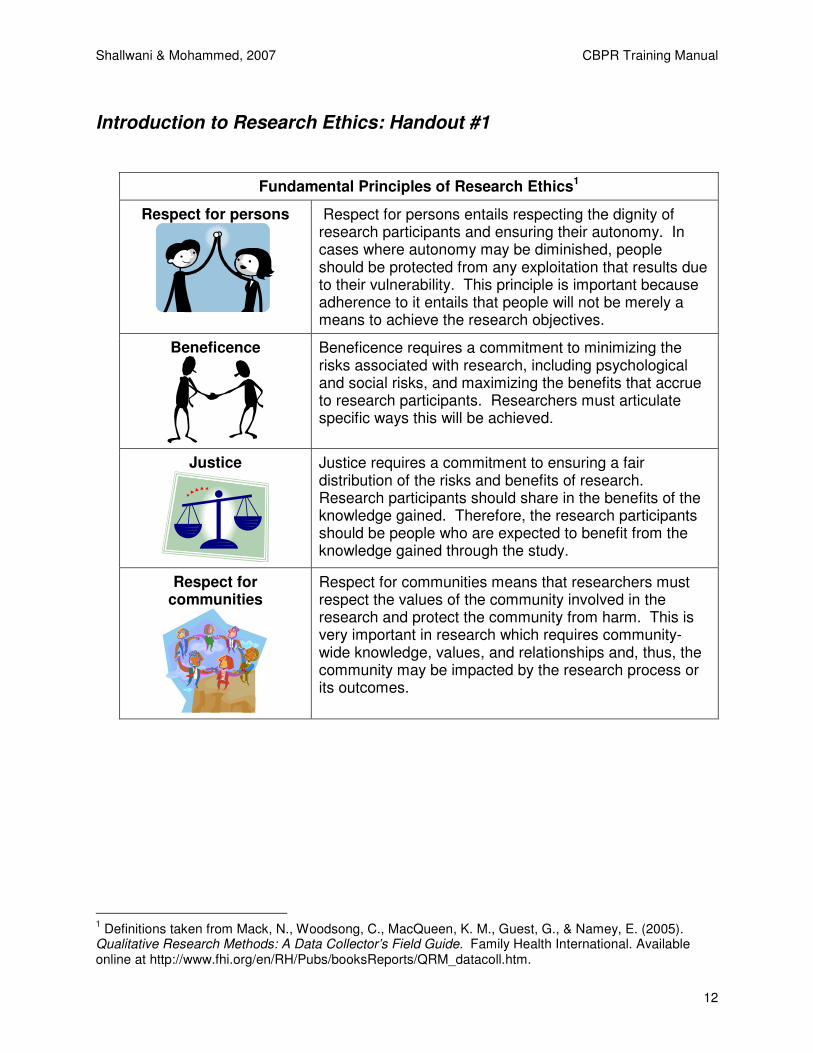
Fundamental Principles of Research Ethics1
Respect for persons
Respect for persons entails respecting the dignity of research participants and ensuring their autonomy. In cases where autonomy may be diminished, people should be protected from any exploitation that results due to their vulnerability. This principle is important because adherence to it entails that people will not be merely a means to achieve the research objectives.
Beneficence
Beneficence requires a commitment to minimizing the risks associated with research, including psychological and social risks, and maximizing the benefits that accrue to research participants. Researchers must articulate specific ways this will be achieved.
Justice
Justice requires a commitment to ensuring a fair distribution of the risks and benefits of research. Research participants should share in the benefits of the knowledge gained. Therefore, the research participants should be people who are expected to benefit from the knowledge gained through the study.
Respect for communities
Respect for communities means that researchers must respect the values of the community involved in the research and protect the community from harm. This is very important in research which requires community-wide knowledge, values, and relationships and, thus, the community may be impacted by the research process or its outcomes.
1 Definitions taken from Mack, N., Woodsong, C., MacQueen, K. M., Guest, G., & Namey, E. (2005).
Qualitative Research Methods: A Data Collector’s Field Guide. Family Health International. Available online at http://www.fhi.org/en/RH/Pubs/booksReports/QRM_datacoll.htm.

Shallwani & Mohammed, 2007 CBPR Training Manual
13
Introduction to Research Ethics: Handout #2 General Ethical Guidelines for Research Confidentiality: It is very important to ensure the confidentiality of participants in a research study at all times. Identifying information should not be used when discussing results with anyone, including other researchers. This holds true even when sharing anecdotes or statements that seem inconsequential. When storing data or discussing the results of a study, care should be taken to eliminate names and other identifying information. Before any research study is undertaken, it is imperative to discuss how the confidentiality of participants will be maintained. Informed voluntary consent: It is imperative to ensure that participants understand the implications of participating in a research study so that they are able to make an informed decision about whether or not they would like to participate in a study. This entails ensuring that participants understand the purpose of the research, what is expected of them, the expected risks and benefits, and that participation is voluntary. Right to refuse or withdraw at any time: It is imperative that participants have the right to refuse to participate in the study or withdraw at any time without any negative repercussions. Reporting back: It is important that participants be given access to the findings of the study once data analysis is completed. This will allow them to see how their data is being represented and gain from the findings of the study. Special consideration for vulnerable groups: Some groups are traditionally considered vulnerable research participants. They include minors, pregnant women, and persons with mental disabilities. Other groups such as people without literacy, those with limited economic resources, and women who do not have decision-making power regarding their participation in a study may also be vulnerable. Vulnerable persons can still participate in a research study; however, they need special protections.

Shallwani & Mohammed, 2007 CBPR Training Manual
14
Introduction to Participation: Module
Overview: This module introduces participants to the concept of participation, through a role play and small and large group discussion on levels of participation. Learning Outcomes: By the end of the module, participants should:
• Have an understanding of the concept of participation
• Be able to identify different levels of participation in programme development
• Have critically analyzed participation in their own work Materials:
• Large floor-size version of the Ladder of Participation (shown in handout), with the labels and definitions of the different levels cut separately from the ladder.
• Markers or stickers
• Pins or masking tape to put things up on wall
• Photocopies of handout for participants Time: Approximately 2-3 hours Learning Activities: Concept of Participation
1. Role play and discussion: This role play may be enacted by facilitators, or if time to prepare in advance is available, a few participants can be recruited to do it. After the role play, discuss it with participants using the debriefing questions provided.
Participation: Role Play2 Scene 1:
Four villagers are sitting waiting for a meeting to begin. A community worker comes in and greets each person (but is not very friendly). She asks each person how they are and they each speak of a different problem which they are struggling with: unemployment, no water, a house falling down, an abusive husband, etc. The community worker hardly listens to these complaints. She is a busy person wanting to get work done. The community worker sits (facing the audience) and opens the meeting. She has come this day to say that this village needs a clinic. There is money from the government but the village needs to collect money as well.
2 Adapted from Hope, A. & Timmel, S. (1984). Training for Transformation Book I; Zimbabwe.

Shallwani & Mohammed, 2007 CBPR Training Manual
15
The community worker tells each person what they must do to organize the fundraising day: one is to collect chickens, others must call a meeting for Saturday, etc. The community worker is dominating and authoritarian. During this meeting, each member of the village group becomes more passive. One gets sleepy, one looks around. One begins to argue with the community worker but gives up very quickly. One walks out. The animator stops when the point is made.
Scene 2:
This is another village and four villagers are waiting for a meeting to begin. The community worker comes in and greets each person, asking how they are. Each person has a different problem and the community worker listens very carefully, questions each person a bit and says that we really need to discuss these problems in the meeting. The community worker then sits down and begins the meeting. She asks what they think is the most important thing that needs to be done in the village. One person says, they really need a playground. The community worker looks very surprised and questions this, remembering the other problems she has heard about. Another villager supports the playground. Then a third villager disagrees with the playground and suggests a clinic. The community worker is not really convinced of the playground, but listens and asks questions. The original idea of the playground is argued by the three villagers and the one against if finally decides that a playground is a good idea. Then the community worker agrees. The community worker then says, “Where is the land?” Someone suggests an available piece of land; ‘Who will clear it?’ They all say they will get the people; the date and time is chosen by the villagers. The villagers get excited and very active during the meeting. The community worker says she will come to help. When the point is made, the play is cut.
Debriefing Questions:
1. How did the community worker behave in the first village? How did the community worker behave in the second village?
2. How did the villagers react in each situation? 3. What are the advantages and disadvantages of the approach used by each
community worker? 4. After six months, what do you think would have happened in the two different
villages? 5. What do you think a community’s role should be in a programme? Why?
� Ownership � Community knows its own needs, strengths, appropriateness,
sustainability, etc.
Shallwani & Mohammed, 2007 CBPR Training Manual
16
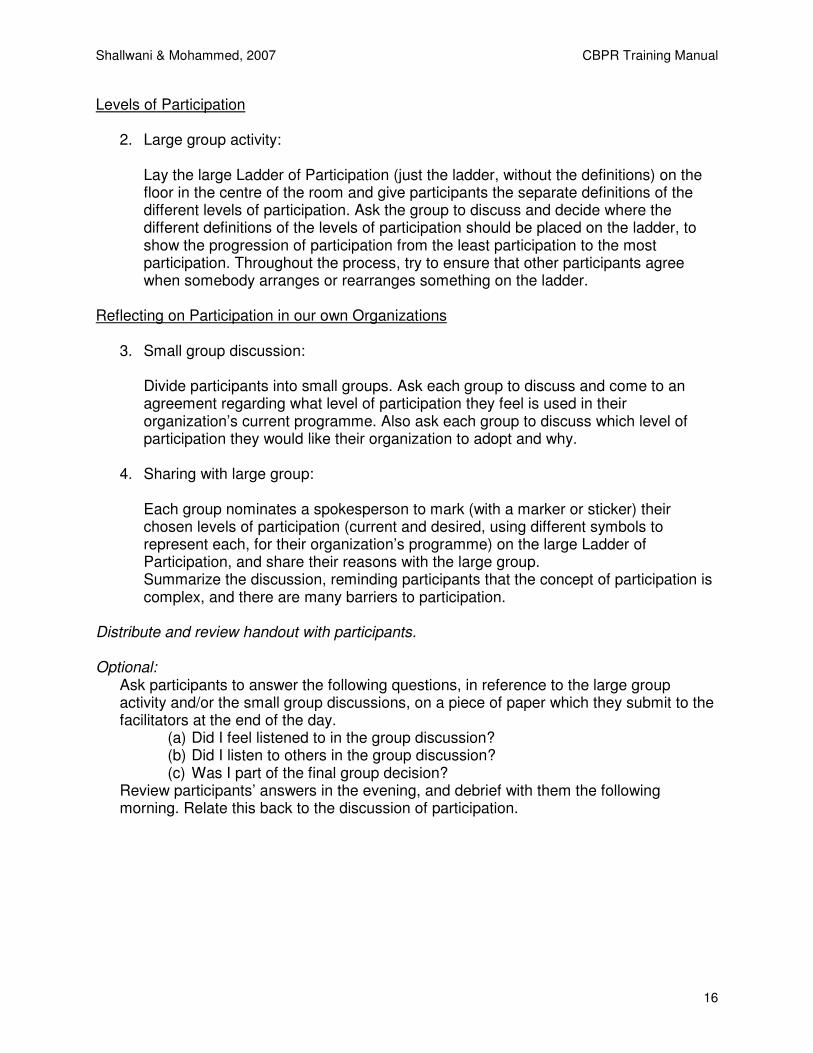
Levels of Participation
2. Large group activity: Lay the large Ladder of Participation (just the ladder, without the definitions) on the floor in the centre of the room and give participants the separate definitions of the different levels of participation. Ask the group to discuss and decide where the different definitions of the levels of participation should be placed on the ladder, to show the progression of participation from the least participation to the most participation. Throughout the process, try to ensure that other participants agree when somebody arranges or rearranges something on the ladder.
Reflecting on Participation in our own Organizations
3. Small group discussion: Divide participants into small groups. Ask each group to discuss and come to an agreement regarding what level of participation they feel is used in their organization’s current programme. Also ask each group to discuss which level of participation they would like their organization to adopt and why.
4. Sharing with large group:
Each group nominates a spokesperson to mark (with a marker or sticker) their chosen levels of participation (current and desired, using different symbols to represent each, for their organization’s programme) on the large Ladder of Participation, and share their reasons with the large group. Summarize the discussion, reminding participants that the concept of participation is complex, and there are many barriers to participation.
Distribute and review handout with participants. Optional:
Ask participants to answer the following questions, in reference to the large group activity and/or the small group discussions, on a piece of paper which they submit to the facilitators at the end of the day.
(a) Did I feel listened to in the group discussion? (b) Did I listen to others in the group discussion? (c) Was I part of the final group decision?
Review participants’ answers in the evening, and debrief with them the following morning. Relate this back to the discussion of participation.

Shallwani & Mohammed, 2007 CBPR Training Manual
17
Introduction to Participation: Handout
Ladder of Participation3
Self-Motivated Community Action: Ideas come from the community, the community does their own research, and the community mobilizes their own funds for their own plans.
Supporting Independent Community Interests: Local groups or organizations are offered funds, advice or other support to develop their own agendas within guidelines.
Acting Together: Different parties join together to decide what is best, and form a partnership to carry it out.
Deciding Together: Encouraging additional options and ideas, and providing opportunities for joint decision-making.
Consultation: Offering some options, listening to feedback, but not allowing new ideas.
Information: Merely telling people what is planned.
3 Adapted from Wilcox, D. (1994). The Guide to Effective Participation, Partnership Books: Brighton.
Available online at http://www.partnerships.org.uk/guide/index.htm.

Shallwani & Mohammed, 2007 CBPR Training Manual
18
Introduction to Participatory Action Research: Module Overview: This module introduces participants to action research, and participation in action research. This module is conducted primarily through large group discussions. Learning Outcomes: By the end of the module, participants should:
• Have discussed the stages of action research.
• Have discussed the notion of participation in action research.
• Have examined practical examples of research studies in light of concepts of participatory action research.
Materials:
• Illustrations (or other forms of visual representation) representing the different stages of the action research cycle (see example at the end of this module):
o Formulating a research question o Planning the study o Collecting data o Analyzing data o Developing actions based on data collected o Analyzing/reflecting on actions o Disseminating results
• Flipchart paper and markers
• Pins or masking tape to put things up on wall
• Photocopies of handout for participants Time: Approximately 1-2 hours. Learning Activities: Action Research Cycle
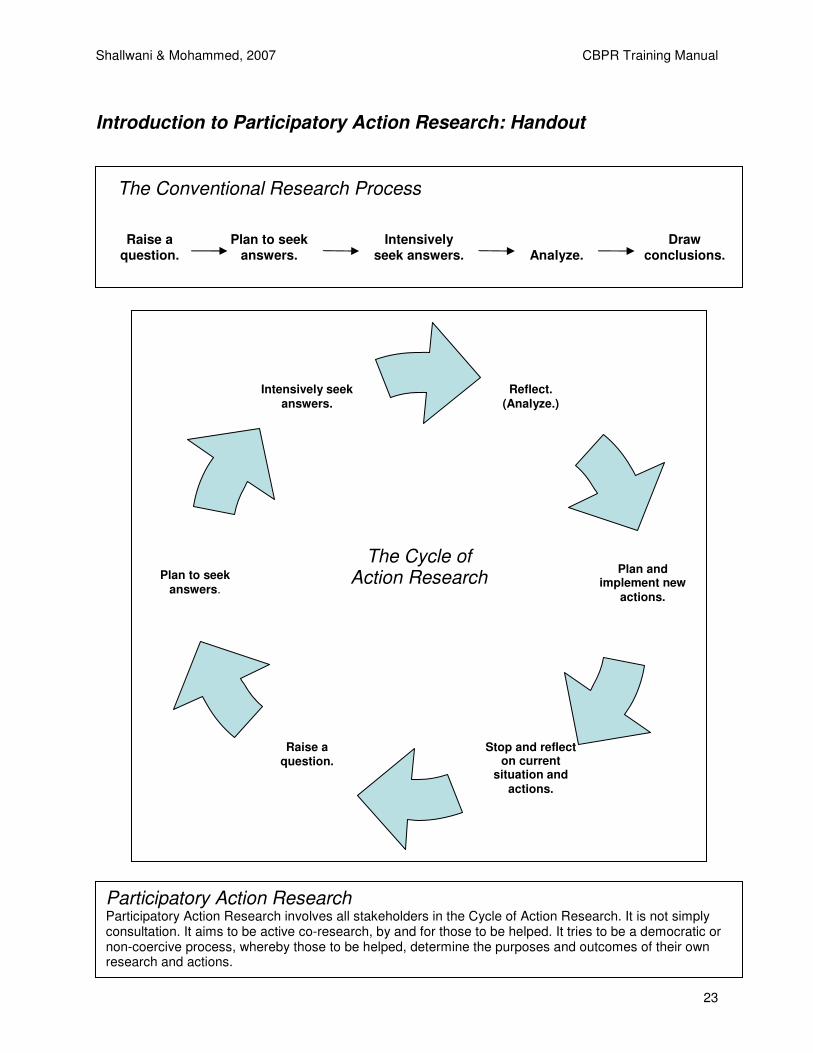
1. Presentation: Introduce participants to the concept of Action Research: Action Research is research in which action is an integral part of the research process (as opposed to conventional research, where action may or may not be part of the research process).
2. Large group activity:
Give participants the illustrations and ask them to discuss and collectively determine where each stage goes in the action research cycle. Throughout the process, try to ensure that other participants agree when somebody arranges or rearranges the stages in the cycle. During the discussion, each phase should be discussed so that
Shallwani & Mohammed, 2007 CBPR Training Manual
19
participants are clear about what the illustration represents and what each stage entails. After the action research cycle is complete, put it up on a wall in the training room (see example at the end of this module).
Participation in Action Research
3. Large group discussion: Introduce the notion of participation in research, and why it is important, particularly in conducting research that is relevant and useful to communities. Explain that Participatory Action Research requires that participation be promoted throughout the different stages of the action research cycle. In a large group, go through each stage of the action research cycle and discuss with participants what participation might entail at each of these stages (see example below).
Distribute and review handout with participants. Practical Examples
4. Large group discussion: Present a research study with which the participants are familiar (e.g., a research project with which they or their organizations have been involved). If there is no such study, then present an example of a research study (see example below). Use the cycle to discuss what was done at each stage of the study. If the study did not include the action component in the research cycle, this should be noted. At each stage, discuss whether that stage was conducted in a participatory manner and whether the study could be considered to be a participatory research study.
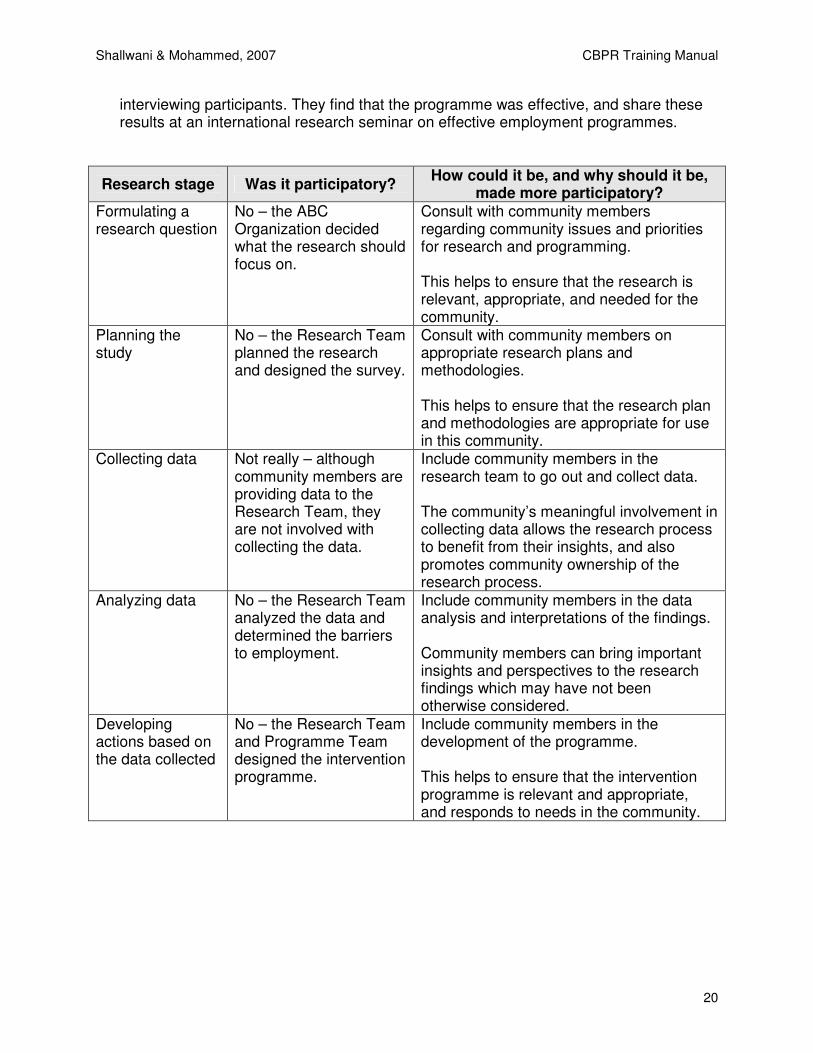
Example Research Study: This example research study may be used to illustrate the discussion on participation in research. See the table following the description for a look at participation in light of the different stages of the research study.
The ABC Organization wants to determine the barriers to employment in the XYZ community, so that they can develop an intervention programme to promote employment rates. The ABC Organization puts together a Research Team to conduct this research on barriers to employment. The Research Team decides to conduct a survey with a sample of the population in the XYZ community. The Research Team designs the survey and then goes out into the XYZ community to administer the survey. After the survey results have been collected, the Research Team analyzes the findings and determines the key barriers to employment in the XYZ community. The Research Team then works with the Programme Team to develop an intervention programme in the XYZ community based on the research findings. One year later, the Research Team and Programme Team conduct an evaluation of the programme by
Shallwani & Mohammed, 2007 CBPR Training Manual
20
interviewing participants. They find that the programme was effective, and share these results at an international research seminar on effective employment programmes.
Research stage Was it participatory? How could it be, and why should it be,
made more participatory? Formulating a research question
No – the ABC Organization decided what the research should focus on.
Consult with community members regarding community issues and priorities for research and programming. This helps to ensure that the research is relevant, appropriate, and needed for the community.
Planning the study
No – the Research Team planned the research and designed the survey.
Consult with community members on appropriate research plans and methodologies. This helps to ensure that the research plan and methodologies are appropriate for use in this community.
Collecting data Not really – although community members are providing data to the Research Team, they are not involved with collecting the data.
Include community members in the research team to go out and collect data. The community’s meaningful involvement in collecting data allows the research process to benefit from their insights, and also promotes community ownership of the research process.
Analyzing data No – the Research Team analyzed the data and determined the barriers to employment.
Include community members in the data analysis and interpretations of the findings. Community members can bring important insights and perspectives to the research findings which may have not been otherwise considered.
Developing actions based on the data collected
No – the Research Team and Programme Team designed the intervention programme.
Include community members in the development of the programme. This helps to ensure that the intervention programme is relevant and appropriate, and responds to needs in the community.

Shallwani & Mohammed, 2007 CBPR Training Manual
21
Research stage Was it participatory? How could it be, and why should it be,
made more participatory?
Analyzing / reflecting on actions
Not really – although the participants provided their feedback, it was the Research Team and Programme Team which actually conducted the evaluation.
Include community members in deciding which aspects of the programme to evaluate, and how to evaluate it. The community’s meaningful involvement in evaluating allows the programme evaluation to benefit from their insights and perspectives. It enables an evaluation process which better examines whether the programme is effective in the eyes of the community.
Disseminating results
No – the Research Team and Programme Team shared the results at an international seminar.
Share findings with the community. Involve community members in sharing the findings both with the community and at professional seminars. The community’s meaningful involvement allows the research dissemination to benefit from their insights and perspectives, and promotes community ownership of the research process.

Shallwani & Mohammed, 2007 CBPR Training Manual
22
Example illustrations to represent the action research cycle:
Shallwani & Mohammed, 2007 CBPR Training Manual
23
Introduction to Participatory Action Research: Handout
Raise a question.
Plan to seek answers.
Intensively seek answers.
Analyze.
Draw conclusions.
The Conventional Research Process
Participatory Action Research Participatory Action Research involves all stakeholders in the Cycle of Action Research. It is not simply consultation. It aims to be active co-research, by and for those to be helped. It tries to be a democratic or non-coercive process, whereby those to be helped, determine the purposes and outcomes of their own research and actions.
Stop and reflect
on current situation and
actions.
Plan and
implement new actions.
Reflect. (Analyze.)
Raise a
question.
Plan to seek answers.
Intensively seek answers.
The Cycle of Action Research

Shallwani & Mohammed, 2007 CBPR Training Manual
24
Research Methodologies:
Modules & Handouts

Shallwani & Mohammed, 2007 CBPR Training Manual
25
Survey Methodology: Module
Overview: This module introduces participants to surveys as a research methodology. Participants will fill out a survey, and use the group results of this survey to discuss aspects of this methodology. Participants will also discuss advantages and disadvantages, as well as ethical considerations, in this methodology. Learning Outcomes: By the end of the module, participants should:
• Have an experiential understanding of surveys as a research methodology.
• Have discussed the advantages and disadvantages or surveys.
• Have discussed ethical considerations related to surveys. Materials:
• Photocopies of simple survey prepared in advance.
• Flipchart paper and markers
• Pins or masking tape to put things up on wall
• Photocopies of handout for participants Time: Approximately 2-3 hours Learning Activities: Experiential Understanding of Surveys
1. Filling out a survey: In advance, prepare a survey relevant to participants. Give participants copies of the survey to fill out. (The survey example offered here relates to participants’ understanding of the action research cycle presented to them the previous day.)
Question Not at all Somewhat A lot How well do you feel you understand the action research cycle?
To what extent did you find the following parts to be clear:
• Formulating a research question
• Planning the study
• Collecting data
• Analyzing data
• Developing actions based on data collected
• Analyzing/reflecting on actions
• Disseminating results
Shallwani & Mohammed, 2007 CBPR Training Manual
26
Collect the responses and tell the participants that you will be sharing the results with them later on in the day.
2. Large group discussion:
Ask participants: What are surveys?
• Surveys are questionnaires with close-ended questions that have a limited number of options from which people can select their responses.
BREAK: During this break, consolidate the results from the surveys. Visually represent the results if possible using pie charts, bar graphs, or any other visual representation. Advantages and Disadvantages of Surveys
3. Large group discussion: Share the survey results and ask participants: What type of information were we able to get from this survey? How is it different from the information that we would get from an open-ended questionnaire? (Record answers on flipchart.)
• Surveys allow us to quantify participants’ reactions to the proposal (i.e., X% of participants understood a lot about action about formulating a research question) but this is more difficult with an open-ended questionnaire.
• Open-ended questionnaires are qualitative and therefore give details about the difficulties in understandings of the participants. For example, in the survey we can find out the extent to which participants understood the proposal or some aspect of it, but not what they found difficult about it.
Ask participants: Think about surveys and about what sort of questions can be answered using this methodology and how easy they are to administer. Think about your past experience with surveys. What do you think are the advantages and disadvantages of using surveys as a research methodology? (Record answers on flipchart.)
• Some advantages of surveys � Surveys are relatively quick to administer compared to other research
methodologies. � Surveys are relatively easy to administer for both the researcher and
respondent compared to other research methodologies � Surveys allow for a greater degree of confidentiality than other research
methodologies � Surveys can be conducted almost anywhere � Surveys allow for breadth of information which can be represented
numerically � Surveys are relatively cheap to administer compared to other research
methodologies
• Some disadvantages of surveys � Surveys do not allow for depth of information � Surveys are difficult to use for “why” and “how” questions � Respondents may speed through questions in a survey without thinking

Shallwani & Mohammed, 2007 CBPR Training Manual
27
� In a survey, the researcher cannot get feedback or request clarification from respondents
Ask participants: Would surveys be an appropriate and acceptable research methodology to use in your community?
Ethical Considerations Related to Surveys
4. Large group discussion: Refer to the list of ethical guidelines for research that was developed during the session on research ethics. Ask participants to come up with ways we can maintain these ethical considerations while doing surveys. (Record answers on flipchart.)
• Confidentiality: storing data (surveys) safely and without names.
• Right to refuse or withdraw at any time.
• Informed voluntary consent: consent forms with complete information on the purpose of the survey and how the data will be used.
• Reporting back: tell participants how they can access the results of the survey
• Special consideration for vulnerable groups: for children you must get parents’ permission; you must ensure that consent is truly voluntary and not coerced in any way, etc.
Distribute and review handout with participants.
Shallwani & Mohammed, 2007 CBPR Training Manual
28
Survey Methodology: Handout
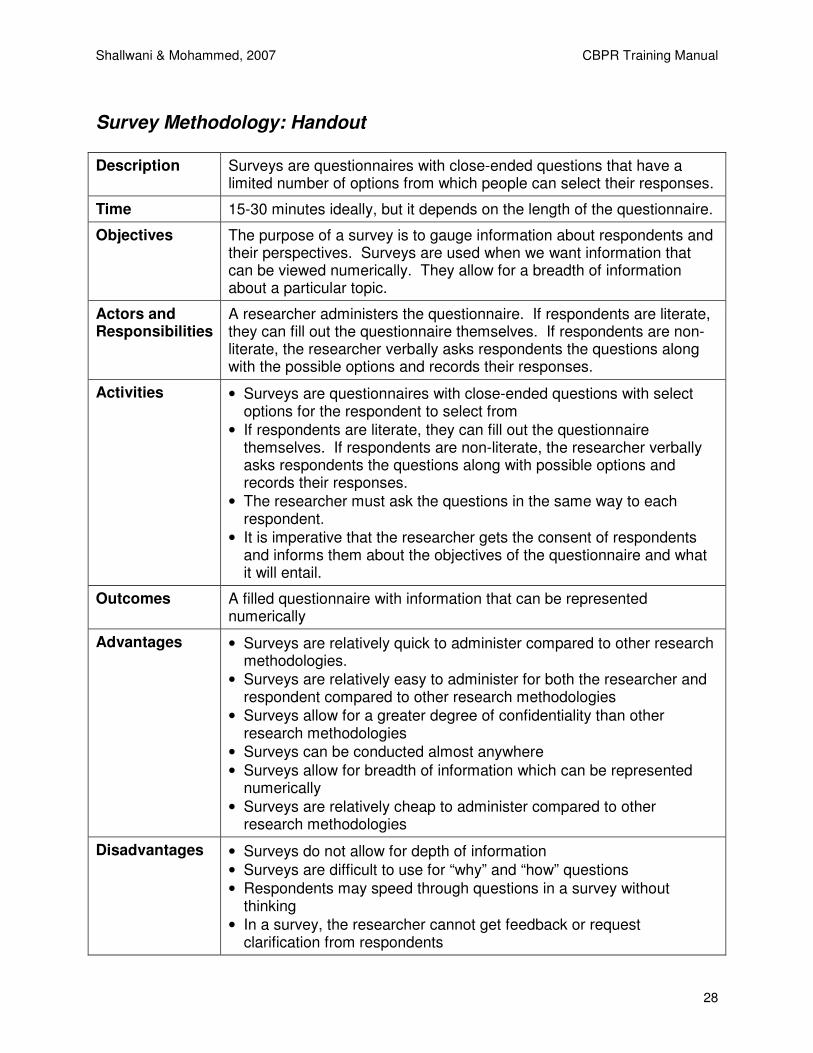
Description Surveys are questionnaires with close-ended questions that have a limited number of options from which people can select their responses.
Time 15-30 minutes ideally, but it depends on the length of the questionnaire.
Objectives The purpose of a survey is to gauge information about respondents and their perspectives. Surveys are used when we want information that can be viewed numerically. They allow for a breadth of information about a particular topic.
Actors and Responsibilities
A researcher administers the questionnaire. If respondents are literate, they can fill out the questionnaire themselves. If respondents are non-literate, the researcher verbally asks respondents the questions along with the possible options and records their responses.
Activities • Surveys are questionnaires with close-ended questions with select options for the respondent to select from
• If respondents are literate, they can fill out the questionnaire themselves. If respondents are non-literate, the researcher verbally asks respondents the questions along with possible options and records their responses.
• The researcher must ask the questions in the same way to each respondent.
• It is imperative that the researcher gets the consent of respondents and informs them about the objectives of the questionnaire and what it will entail.
Outcomes A filled questionnaire with information that can be represented numerically
Advantages • Surveys are relatively quick to administer compared to other research methodologies.
• Surveys are relatively easy to administer for both the researcher and respondent compared to other research methodologies
• Surveys allow for a greater degree of confidentiality than other research methodologies
• Surveys can be conducted almost anywhere
• Surveys allow for breadth of information which can be represented numerically
• Surveys are relatively cheap to administer compared to other research methodologies
Disadvantages • Surveys do not allow for depth of information
• Surveys are difficult to use for “why” and “how” questions
• Respondents may speed through questions in a survey without thinking
• In a survey, the researcher cannot get feedback or request clarification from respondents

Shallwani & Mohammed, 2007 CBPR Training Manual
29
Suggestions and Comments
• The researcher must stick to the exact questions as they are written in the questionnaire
• The researcher should not put any identifying information on the questionnaire in order to maintain the confidentiality of respondents.
Shallwani & Mohammed, 2007 CBPR Training Manual
30
Interview Methodology: Module
Overview: This module introduces participants to interviews as a research methodology. Participants will observe role plays of good and bad interviews, and discuss aspects of this methodology. Participants will discuss advantages and disadvantages, as well as ethical considerations, in this methodology. Participants will also practice interviewing each other, both in session and as a take-home assignment. Learning Outcomes: By the end of the module, participants should:
• Have an experiential understanding of interviews as a research methodology.
• Have considered the qualities of good interviews.
• Have discussed the advantages and disadvantages of interviews.
• Have discussed ethical considerations related to interviews.
• Have practiced interviews: being the interviewer, being the interviewee, and transcribing interviews.
Materials:
• Photocopies of a simple interview guide prepared in advance for use during the session.
• Flipchart paper and markers
• Pins or masking tape to put things up on wall
• Photocopies of handouts for participants
• Photocopies of simple interview guide (different from previous one) for take-home practice. (Sample provided on page 41.)
• Tape recorders and audio cassettes for participants’ take home interview practice and transcription.
Time: Approximately 3-5 hours. Learning Activities: Experiential Understanding of Interviews
1. Large group discussion: Ask participants: What are interviews?
• An interview is a research method designed to draw out details of a participant’s perspective. During the interview, the person being interviewed is considered the expert and the interviewer uses techniques to learn as much as possible from the participant regarding their perspective.
2. Interview role plays:

Shallwani & Mohammed, 2007 CBPR Training Manual
31
In advance, prepare a simple interview guide. Ask for two volunteers from the participants. In front of the large group, one facilitator does a ‘good interview’ with one volunteer, and another facilitator does a ‘bad interview’ with the other volunteer.
• Good interview: Interviewer follows the interview guideline, listens well, picks up on cues, and asks probing questions to elicit details.
• Bad interview: Interviewer doesn’t follow the interview guideline, or follows it unnaturally, isn’t listening, and asks leading questions.
3. Large group debriefing:
Ask the interviewees how they felt during the interview.
• Were you comfortable?
• Did you feel listened to? Ask the group as a whole: Which interviewer was able to get more information from the participant? Which interviewer had a better rapport with the interviewee? Why?
• listening skills, body language, eye contact, reflective statements
• responding to what they’re saying, picking up on cues
• probing questions
• non-leading questions
• open-ended questions Advantages and Disadvantages of Interviews
4. Large group discussion: Ask participants: What is the difference between surveys and interviews? (Record answers on flipchart.)
• Interviews ask open-ended questions and are therefore appropriate for responses to ‘how’ and ‘why’.
• Interviews allow the researcher to get more contextual information.
• Surveys allow researcher to sample a larger population and quantify results (i.e., X% of participants…) and the results are therefore are more generalizable.
• Interviews provide depth of information whereas surveys provide a breadth of information
Ask participants: What are the advantages and disadvantages of using interviews as a research methodology? (Record answers on flipchart.)
• Some advantages of interviews � Interviews allow researchers to gather in-depth information about an
individual’s perspective. � Interviews allow for more confidentiality than Focus Group Discussions
and other research methodologies which use groups.
• Some disadvantages of interviews � Interviews are time-consuming. � Interviews require a quiet space. � Interviews need to be recorded or otherwise documented in detail.

Shallwani & Mohammed, 2007 CBPR Training Manual
32
� The interviewer needs to be alert and skilled in responding to cues from the participant.
Ask participants: Would this be an appropriate research methodology in your community?
Interview Practice
5. Participant interview practice: Ask participants to pair up with the person sitting next to them. Ask them to interview one another about their plans for the weekend. The interviews should be five minutes each. Tell participants to first take a few minutes to plan out what they want to ask, including pertinent probes.
6. Large group debriefing:
Discuss the following questions with participants:
• How did it feel to be the interviewer?
• How did it feel to be the interviewee?
• What do you think you did well in interviewing your colleague?
• What did you find difficult in interviewing your colleague? � Did you get stuck? Where? � Was there somewhere you wished you had probed for more
information? Ethical Considerations Related to Interviews
7. Large group discussion: Refer to the list of ethical guidelines for research that was developed during the session on research ethics. Ask participants to come up with ways we can maintain all of the ethical considerations while doing interviews. (Record answers on flipchart.)
• Confidentiality: storing data (cassettes and transcripts) safely and without names.
• Right to refuse or withdraw at any time.
• Informed voluntary consent: consent forms with complete information on the purpose of the interview and how the data will be used.
• Reporting back: tell share interview results with participants so that they can see how their views are being represented.
• Special consideration for vulnerable groups: for children you must get parents’ permission; ensure that consent is truly voluntary and not coerced in any way, etc.
Distribute and review handouts (including interview guide) with participants. Take-Home Interview Practice
Shallwani & Mohammed, 2007 CBPR Training Manual
33
8. Homework assignment: The take-home interview practice requires the handout on conducting an interview and the interview guide. Ask participants to pair up into twos, and give the following instructions:
• Each pair should interview one another, using the “conducting an interview” handout and the interview guide. Each interview should take approximately thirty minutes.
• Each interviewer should record and transcribe their interviews and submit the recording and transcript to the facilitator.
• To reduce the time-intensiveness of transcription for participants, participants can be asked to transcribe only a segment of the interview – for example, only a 5 minute segment, or a maximum of 4 pages of transcription.
Distribute tape recorders and audio cassettes to each pair. Remind participants of the importance of storing data carefully and guarding confidentiality. After cassettes and transcriptions are submitted, the facilitator should review segments of the recording and the transcript and provide individual feedback to participants.

Shallwani & Mohammed, 2007 CBPR Training Manual
34
Interview Methodology: Handout #1
Description An interview is a research method designed to draw out details of a participant’s perspective. During the interview, the person being interviewed is considered the expert and the interviewer uses techniques to learn as much as possible from the participant regarding their perspective.
Time 1-1.5 hour
Objectives The purpose of an interview is to elicit details of a participant’s perspective on a research topic.
Actors and Responsibilities
The interviewer conducts the interview.
Activities • Interviews are generally conducted face-to-face, and involve one interviewer and one participant.
• Before the interview, the interviewer prepares for the interview. The interviewer familiarizes herself with the interview questions and guidelines, and also prepares the materials, equipment, and space needed for the interview.
• At the beginning of the interview, the interviewer obtains informed consent from the participant.
• Throughout the interview, the interviewer ensures to address all questions or topics listed in the interview guide.
• The interviewer uses listening skills and probing questions to elicit details from the participant.
• The interviewer takes notes throughout the interview to supplement the recording.
Outcomes • Interview recording and transcript describing the individual’s perspective.
• Interviewer’s notes.
Advantages • Interviews allow researchers to gather in-depth information about an individual’s perspective.
• Interviews allow for more confidentiality than Focus Group Discussions and other research methodologies which use groups.
Disadvantages • Interviews are time-consuming.
• Interviews require a quiet space.
• Interviews need to be recorded or otherwise documented in detail.
• The interviewer needs to be alert and skilled in responding to cues from the participant.
Suggestions and Comments
The interviewer should be skilled in listening and in asking questions that are probing but not leading.

Shallwani & Mohammed, 2007 CBPR Training Manual
35
Interview Methodology: Handout #2
Conducting an Interview
Step 1: Familiarize Yourself with the Interview Guideline Read through the following interview guideline. Interview questions need to be open and elicit a response and explanation from the participant.
• Main interview questions are the interview questions you have to ask the participant.
• Probing questions are questions you ask to elicit more details. You can have specific probing questions, or general probing questions.
Step 2: Select Your Participant Identify the person you would like to interview. Tell them about the interview and ask if they are willing to be interviewed. Inform them that the interview will be recorded, and how long you expect the interview to take. If they are willing to be interviewed, proceed to Step 3. If they are unwilling to be interviewed, ask someone else. Arrange a time and place to conduct the interview. Ensure you have a quiet space and uninterrupted time to do the interview. Step 3: Prepare for the Interview Before the interview, read through the interview guideline thoroughly. Prepare the space to make it comfortable, and set up your tape recorder. Ensure you have a blank cassette and spare batteries. Step 4: Conduct the Interview Before you begin the interview, turn on the tape recorder. Ask the participant again if they consent to participate in the interview. If they agree, you begin the interview. Use the interview guideline to structure your interview. Show interest in what the participant is saying. Use both specific and general probing questions to elicit more details from the participant. Take notes throughout the interview. These are useful to note down observations that cannot be recorded on a tape recorder (e.g., if the participant was visibly upset during a particular part of the interview), and also in case the recording gets erased. This is particularly important in cases where you cannot record the interview either due to a lack of equipment or if the participant consents to the interview but not to the recording. Immediately after the interview is complete, it is important to go back to your notes and fill in things that you remember but were unable to write down during the interview.

Shallwani & Mohammed, 2007 CBPR Training Manual
36
Step 5: Transcribe the Interview After the interview is complete, the recording needs to be transcribed. This involves writing down, word-for-word, what was said during the interview. Include pauses (which can be recorded as (2s) for a 2-second pause, (5s) for a 5-second pause, etc.), laughter, and other such occurrences. For example:
Interviewer: So, um. Was this the first time this has happened to you?
Participant: (Laugh). No, um, actually, a few months ago the same thing happened.
Interviewer: Could you tell me more about that?
Participant: Sure. Hmm. Where do I start. (2s.2). Well, I was doing some housework when suddenly there was a knock at the door.
Supplement the transcription with the notes you took down during the interview. Keep the data safe and secure without identifying information. Step 6: Reflecting on the Experience Listen to your taped interview and answer the following questions in your journal.
• How did the interview go?
• What went well? What didn’t go well?
• What did I do well? What would I do differently if I were to do this interview again?
• Where did I get stuck?
• Did I listen well? Did I interrupt the participant? Did I ask questions that elicited more detail?
• Did I pick up on cues from the participant? Which cues did I miss?

Shallwani & Mohammed, 2007 CBPR Training Manual
37
Interview Methodology: Handout #3
Practice Interview Guide
Favourite Memories What is your favourite memory from your childhood? (Main question)
• What happened?
• When did this happen?
• Where did this happen?
• Why is this one of your favourite memories? What is your favourite memory from the past year? (Main question)
• What happened?
• When did this happen?
• Where did this happen?
• Why is this one of your favourite memories? You can use general probing questions to elicit more details from the participant. For example,
• “That’s really interesting. Can you tell me more about that?”
• “What do you mean by that?”
• “Could you elaborate on this?”

Shallwani & Mohammed, 2007 CBPR Training Manual
38
Focus Group Discussion Methodology: Module
Overview: This module introduces participants to focus group discussions as a research methodology. Participants will engage in an actual focus group discussion, as one of the following: facilitator, participant, note-taker, or observer. Participants will also discuss advantages and disadvantages, as well as ethical considerations, in this methodology. Learning Outcomes: By the end of the module, participants should:
• Have an experiential understanding of focus group discussions as a research methodology.
• Have discussed the advantages and disadvantages of focus group discussions.
• Have discussed ethical considerations related to focus group discussions. Materials:
• Photocopies of simple focus group discussion guide prepared in advance.
• Flipchart paper and markers
• Pins or masking tape to put things up on wall
• Photocopies of handout for participants Time: Approximately 3-4 hours. Learning Activities: Experiential Understanding of Focus Group Discussions (FGDs)
1. Large group discussion: Ask participants: What are focus group discussions (FGDs)?
• FGDs are a qualitative data collection method in which one or two researchers and several participants meet as a group to discuss a given research topic.
2. FGD demonstration:
In advance, prepare a simple FGD question guide. Ask for volunteers from the participants: 2 FGD facilitators, 8 FGD participants, and 2 FGD note-takers. The rest of the participants will act as observers. Arrange participants into a fishbowl setting with the FGD facilitators and participants in a circle in the centre of the room, with the rest of the participants (observers) in a circle around the periphery of the room. Give the FGD facilitators the FGD guide and give them some time to familiarize themselves with it. Have the FGD facilitators conduct a 5-10 minute FGD with the participants in front of the group.
3. Large group debriefing:

Shallwani & Mohammed, 2007 CBPR Training Manual
39
Ask questions as follows:
• Ask participants: � Did you feel listened to? � Did you feel comfortable to share your perspective? � What did you like about the FGD? What could have been improved?
• Ask facilitators: � How did it feel to facilitate an FGD? � What did you appreciate about your facilitation of the discussion? � What did they feel you could have done better?
• Ask note-takers: � What did you find challenging about note-taking?
• Ask observers: � What went well during the FGD? � What could have been done better?
Advantages and Disadvantages of Focus Group Discussions
4. Large group discussion: Ask participants: What type of information are we able to get from FGDs? What are the advantages and disadvantages of using FGDs as a research methodology? (Record answers on flipchart.)
• Some advantages of FGDs � FGDs yield a large amount of information over a short period of time. � FGDs are effective for accessing a broad range of views on a specific
topic, and for capturing information about social norms. � FGDs are well-suited for research that will be used to develop or
measure services that meet the needs of a given population.
• Some disadvantages of FGDs � FGDs are not the best method for acquiring information on highly
personal or socially sensitive topics. � In FGDs, confidentiality of the participants is difficult to ensure as
numerous members of the community are present and participating in the discussion.
� FGDs are difficult to facilitate because they involve ensuring that everyone gets a chance to speak and contribute.
Ask participants: Would this be an appropriate research methodology in your community?
Ethical Considerations Related to Focus Group Discussions
5. Large group discussion: Refer to the list of ethical guidelines for research that was developed during the session on research ethics. Ask participants to come up with ways we can maintain all of the ethical considerations while doing FGDs. (Record answers on flipchart.)
Shallwani & Mohammed, 2007 CBPR Training Manual
40
• Confidentiality: Emphasizing the importance of confidentiality before beginning the FGD; storing FGD data (cassettes and transcripts) safely and without names.
• Right to refuse or withdraw at any time.
• Informed voluntary consent: consent forms with complete information on the purpose of the FGDs and how the data will be used.
• Reporting back: share FGD results with participants so that they can see how their views are being represented.
• Special consideration for vulnerable groups: for children you must get parents’ permission; ensure that consent is truly voluntary and not coerced in any way, etc.
Distribute and review handout with participants.

Shallwani & Mohammed, 2007 CBPR Training Manual
41
Focus Group Discussion Methodology: Handout
Description Focus group discussions are a qualitative data collection method in which one or two researchers and several participants meet as a group to discuss a given research topic.
Time 1-2 hours
Objectives The purpose of a focus group discussion is to enable participants to share and discuss their different views on a specific topic.
Actors and Responsibilities
• The facilitator guides the discussion.
• The note-taker takes detailed notes on the discussion.
• The discussion involves 8 to 12 participants.
Activities • Focus group discussions work best when conducted by two researchers. One researcher facilitates the discussion and the other researcher takes detailed notes during the discussion. Both researchers should be prepared to perform either role, in case it becomes necessary to switch roles during the focus group.
• The facilitator is responsible for leading the discussion, posing all the questions specified in the focus group question guide, keeping the discussion on track, and encouraging all participants to contribute.
• The note-taker is primarily responsible for taking detailed notes of the discussion. The note-taker is also generally responsible to facilitate logistics of participant arrivals and departures, and for tasks related to recording (operating the tape recorder, labeling the cassette tapes, and taking appropriate measures to protect the tapes once the session is over), and handling any external distractions that come up during the focus group discussion.
• Informed consent should be obtained from participants when they are initially recruited for the focus group. Participants should be informed about the purpose of the research, the topic of the focus group discussion, and how the focus group discussion data will be used and who will have access to it.
• Generally focus groups should be held with 8 to 10 people, with a maximum of 12.
• The researchers should remind participants of the time and place for the focus group discussion.
• Before the focus group discussion, the two researchers prepare for the discussion. They familiarize themselves with the focus group question guide, and prepare the materials, equipment, and space needed for the discussion. They discuss their respective roles.
• When participants arrive for the discussion, informed consent should be obtained again. The facilitator welcomes everyone and clarifies her role, as well as the role of the note-taker. The facilitator discusses the

Shallwani & Mohammed, 2007 CBPR Training Manual
42
importance of confidentiality and asks for everyone’s agreement to keep the discussion confidential.
• The facilitator begins the discussion with the first main question from the focus group question guide. The facilitator uses listening skills, facilitation skills, and probing questions to elicit discussion from participants. Throughout the discussion, the facilitator ensures to address all questions or topics listed in the focus group question guide. The note-taker takes detailed notes on the discussion. The note-taker also handles logistical issues. When the discussion is complete, the facilitator reminds participants of the need to maintain confidentiality, and thanks everyone for participating.
• After participants leave, the two researchers debrief and share additional insights on the discussion.
Outcomes • Tape recordings and transcripts of the focus group discussions.
• Facilitator’s and note-taker’s notes.
Advantages • Focus group discussions yield a large amount of information over a relatively short period of time.
• Focus group discussions are effective for accessing a broad range of views on a specific topic, and for capturing information about social norms.
• Focus group discussions are well suited for research that will be used to develop or measure services that meet the needs of a given population.
Disadvantages • Focus group discussions are not the best method for acquiring information on highly personal or socially sensitive topics.
• Confidentiality of participants is difficult to ensure as numerous members of the community are present and participating in the discussion.
• Focus group discussions are difficult to facilitate because they involve ensuring that everyone gets a chance to speak and contribute.
Suggestions and Comments
Hold your focus group discussion at a location that is comfortable, easily accessible for participants, and free of distractions. Try to arrange child care arrangements if your target group includes mothers so that they can attend and actively participate. The facilitator needs to be skilled in facilitation skills and handling group dynamics. The facilitator also needs to respond to cues, ask probing open-ended questions, and avoid leading questions.

Shallwani & Mohammed, 2007 CBPR Training Manual
43
PhotoVoice Methodology: Module
Overview: This module is divided into two parts. In the first part, participants are introduced to PhotoVoice as a research methodology, discuss the ethics of photography, and prepare for their own use of PhotoVoice in their communities. Then participants go out into their communities, take photos, and return the rolls of film to the facilitators for development. In the second part, participants review their photos and engage in group analysis of their photos. Participants will also discuss advantages and disadvantages, as well as ethical considerations, in this methodology.
Note: For a more comprehensive understanding of PhotoVoice methods and ethical considerations, visit www.photovoice.com.
Learning Outcomes: By the end of the module, participants should:
• Have an experiential understanding of PhotoVoice as a research methodology.
• Have discussed the advantages and disadvantages of PhotoVoice.
• Have discussed ethical considerations related to PhotoVoice. Materials:
• Photographs for activity to introduce PhotoVoice
• Flipchart paper and markers
• Pins or masking tape to put things up on wall
• Photocopies of handout for participants
• Prepared research question for PhotoVoice activity
• Participant notebooks
• Disposable or inexpensive cameras and rolls of film Time: Part 1: Approximately 1-2 hours. Part 2: Approximately 3-4 hours. Learning Activities:
PART 1 Introducing PhotoVoice
1. Reviewing photos in small groups: In advance, prepare some photographs to use for this activity. These photographs should be of something that participants will associate with, such as a popular location in their community, an event at which they were present, etc. Divide participants into small groups. Give each group a photograph. Ask the groups to discuss their photograph and what memories, thoughts, and feelings the photograph invokes.

Shallwani & Mohammed, 2007 CBPR Training Manual
44
2. Large group discussion:
Ask each group to share some of their recollections with the larger group. Summarize:
• Pictures can be used to tell stories. As we think about the memories and stories that came from just these pictures, we can the power of images.
Introduce PhotoVoice:
• PhotoVoice is a research methodology that uses this very power of pictures. Using photography, people can identify, represent, and analyze their communities and their associated strengths and needs. The visual images are accompanied by stories shared the by the photographer.
PhotoVoice Ethics
3. Small group discussion: Divide participants into small groups, and ask the groups to discuss the following questions and record their answers on flipchart paper:
• What would you not want to be photographed doing?
• Should someone take pictures of other people without their knowledge?
• What kind of power does carrying a camera involve?
• What kind of responsibility does carrying a camera involve?
• What is an acceptable way to approach someone to take their picture?
• What kind of risks can you put yourself at with taking pictures in your community?
• How might community members react to photographs being taken in the community? How can we manage this?
• Is taking photographs acceptable in your community? 4. Large group discussion:
Based on their small group discussions, ask participants to suggest ethical guidelines for PhotoVoice in their community that promote people’s rights and minimize any risk to the photographer. Record these on a flipchart and ensure all participants have a copy of the final list of ethical guidelines.
Preparing to Use PhotoVoice
5. Presenting the research question: In advance, prepare the research question for this activity. Usually it is beneficial to have a question that asks about positives/strengths as well as negatives/needs. For example, strengths/needs of your community (general, or as related to a particular topic), things/places/etc. that make me feel safe/unsafe, things/places/etc. that make me feel strong/weak, etc. Share the research question with participants, and explain that participants will take photos to represent their answers to the question. Provide

Shallwani & Mohammed, 2007 CBPR Training Manual
45
clarification as needed, while trying not to influence the types of photos the participant may take.
• Example: If this was a study asking about my religious beliefs, I may take photographs of a mosque because it is where I go to pray, or a photo of my mother because she taught me about religion, or a photo of a flower because I feel a flower represents the miracle of life which is rooted in my faith
6. Details of using PhotoVoice:
Provide the following instructions to participants regarding PhotoVoice:
• Ask participants to note the following in their notebooks for each photo they take: � Who took the photo � A brief description of the photo � Why they took the photo
• Hand out the cameras and explain the mechanics of operating a camera to participants.
• Remind participants to return the cameras at the set date/time so that the film can be processed before the next PhotoVoice session.
• Ask participants to keep the PhotoVoice ethical guidelines in mind throughout the use of this methodology.
• Note: Participants should have their own written copy of the ethical guidelines, the research question, and other details of using PhotoVoice before they go out to take photos in the community.
When rolls of film are returned to the facilitators, the facilitators arrange to have 2 copies of each developed. One set of photos will be used in discussion and analysis, and the other set will be given to the participant for them to either keep or give to community members who have been photographed.
PART 2 Review and Analysis of Photos
1. Individual review: Give each participant the photographs they have taken. Ask them to review their photos, and select a few (4-5) that they would like to use for the discussion and analysis.
2. Small group discussion and analysis:
Divide groups into small groups, each with a facilitator.
• Sharing: After everyone has selected/prioritized their photographs, go around the circle and have each participant present their photograph(s), contextualizing the photograph by explaining why it was taken and how it answered the research question for them. During the sharing of the

Shallwani & Mohammed, 2007 CBPR Training Manual
46
photographs, facilitate any discussion that arises about the issues highlighted.
• Thematic analysis: After the photographs have been shared and discussed, ask the group to categorize the photographs into major themes that they see to be emerging from the data, through discussion and physical manipulation of the photos. Throughout the process of thematically arranging the photographs, ensure that other group members agree when somebody has arranged or rearranged photographs. If they disagree, ask for reasons and try to facilitate the process to reach a general agreement. Ask the group to then prepare their thematic analysis for sharing with the larger group (e.g., placing their photos by theme on flipchart, with each photographer’s written explanations next to the displayed photo).
3. Large group sharing:
After the thematic arrangements by the small groups are complete, reconvene into the large group. Ask each group to present its findings to the larger group. Ask the large group to put all the data together into a collective thematic arrangement of the data for the entire group. Facilitate discussion and further analysis of the findings.
Advantages and Disadvantages of PhotoVoice
4. Large group discussion: Debriefing:
• What strikes you about this activity?
• How did you feel during the PhotoVoice session?
• What did you like about the session?
• What did you find challenging? What are the advantages and disadvantages of using PhotoVoice as a research methodology? (Record answers on flipchart.)
• Some advantages of PhotoVoice � PhotoVoice allows individuals to present their own perceptions of the
community through photographs. � PhotoVoice is particularly a good methodology to include vulnerable
populations in a research study, as it gives a voice and a platform for discussion to individuals.
� PhotoVoice enables community members to do their own analysis of their community strengths and concerns.
� PhotoVoice is a method that allows people to define for themselves and others, including policy makers, what is worth remembering and what needs to be changed.
� PhotoVoice is a particularly effective methodology to use with policy makers, as the visuals of the photographs and their attached stories make for powerful evidence of a community’s perceptions of its own situation.
• Some disadvantages of PhotoVoice

Shallwani & Mohammed, 2007 CBPR Training Manual
47
� PhotoVoice is relatively expensive as it involves the costs of cameras and developing reels of film.
� Confidentiality of participants is difficult to ensure as multiple members of the community will be present at the discussions regarding the photographs.
� PhotoVoice is difficult to facilitate because it involves ensuring that everyone gets a chance to speak and contribute.
� PhotoVoice may not be considered appropriate in certain communities. Would this be an appropriate research methodology in your community?
Ethical Considerations Related to PhotoVoice
5. Large group discussion: Refer to the list of ethical guidelines for research that was developed during the session on research ethics. Ask participants to come up with ways we can maintain all of the ethical considerations while doing PhotoVoice. (Record answers on flipchart.)
• Confidentiality: Emphasizing the importance of confidentiality before beginning the PhotoVoice session; storing data safely and without names; ensuring that permission for dissemination of photographs has been sought from both the photographer and any person photographed
• Right to refuse or withdraw at any time
• Informed voluntary consent: consent forms with complete information on the purpose of PhotoVoice and how the data will be used
• Reporting back: share PhotoVoice findings with participants so that they can see how their views are being represented; give photographers one set of copies of the photographs that they took so that they can give copies to those who were photographed
• Special consideration for vulnerable groups: for children you must get parents’ permission; ensure that consent is truly voluntary and not coerced in any way etc.
Distribute and review handout with participants.

Shallwani & Mohammed, 2007 CBPR Training Manual
48
PhotoVoice Methodology: Handout
Description PhotoVoice is a participatory action research methodology, in which community members use photography to record and reflect their community’s strengths and problems. PhotoVoice promotes critical dialogue and knowledge about personal and community issues through large and small group discussions of photographs.
Time Two sessions, approximately 1 hour each.
Objectives • PhotoVoice aims to have participants represent their perspectives on community issues through photographs they have taken.
• PhotoVoice aims to have participants share, discuss, and analyze community issues through discussion stimulated by the photographs.
Actors and Responsibilities
PhotoVoice requires one facilitator to run the sessions and a note taker to note down salient features of the discussion. PhotoVoice can be conducted with groups of 8 to 10 people at a time.
Activities • In the first session, participants are told about the purpose of the research study and the PhotoVoice methodology. The ethics of photography are discussed, and participants are taught how to use the cameras. The facilitator and participants agree upon a time by which completed reels of film are to be given to the facilitator for development.
• In between the first and second sessions, participants take photographs to represent their perspectives on the research topic. The reels of film are returned to the facilitator by the agreed upon time. The facilitator gets two sets of each reel of film developed.
• At the second session, the facilitator returns the developed photos to the participants. Participants are asked to look through their own photos and select the ones they feel most accurately reflect the community’s concerns and assets.
• The participants then share stories with the group to explain what their photographs mean. This allows the photographs to be contextualized. It is imperative that the photographs be attached to the stories that people tell about them to allow people to voice their individual and collective experience.
• Finally, the group works together to codify the photographs by identifying the issues, themes, and theories that emerge from the photographs and the discussion. This is done through a facilitated discussion.
Outcomes Photographs representing the answer to your research question. Detailed notes about the discussion and the codification of the pictures.
Advantages • PhotoVoice allows individuals to present their own perceptions of the community through photographs.
• PhotoVoice is particularly a good methodology to include vulnerable populations in a research study, as it gives a voice and a platform for

Shallwani & Mohammed, 2007 CBPR Training Manual
49
discussion to individuals.
• PhotoVoice enables community members to do their own analysis of their community strengths and concerns.
• PhotoVoice is a method that allows people to define for themselves and others, including policy makers, what is worth remembering and what needs to be changed.
• PhotoVoice is a particularly effective methodology to use with policy makers, as the visuals of the photographs and their attached stories make for powerful evidence of a community’s perceptions of its own situation.
Disadvantages • PhotoVoice is relatively expensive as it involves the costs of cameras and developing reels of film.
• Confidentiality of participants is difficult to ensure as multiple members of the community will be present at the discussions regarding the photographs.
• PhotoVoice is difficult to facilitate because it involves ensuring that everyone gets a chance to speak and contribute.
• PhotoVoice may not be considered appropriate in certain communities.
Suggestions and Comments
• The ethical considerations of PhotoVoice are particularly important. Thus, it is imperative that discussions be conducted in the first session about the ethics of photography. Questions can include: What is an acceptable way to approach someone to take their picture? Should someone take pictures of other people without their knowledge? To whom might you wish to give photographs and what might be the implications?
• It is important to give copies of the photographs to the participants who can in turn share them with their subjects.
• A photo display is an effective dissemination mechanism. However, it is important that photographers get permission for this from their subjects while taking photographs.
• For more comprehensive information on PhotoVoice, visit www.photovoice.com

Shallwani & Mohammed, 2007 CBPR Training Manual
50
Community Timeline Methodology: Module
Overview: This module introduces participants to community timeline as a research methodology. Participants will engage in an actual community timeline exercise by creating a timeline of their shared experiences. Participants will also discuss advantages and disadvantages, as well as ethical considerations, in this methodology. Learning Outcomes: By the end of the module, participants should:
• Have an experiential understanding of community timelines as a research methodology.
• Have discussed the advantages and disadvantages of community timelines.
• Have discussed ethical considerations related to community timelines. Materials:
• Flipchart paper and markers
• Notecards, stickers, and other materials for timeline activity
• Pins or masking tape to put things up on wall
• Photocopies of handout for participants
• Prepared research question for PhotoVoice activity
• Participant notebooks Time: Approximately 1-2 hours. Learning Activities: Experiential Understanding of Community Timelines
1. Large group discussion: Ask participants: What are community timelines?
• A community timeline is a research methodology in which community members work together to create a timeline of their community’s history. This tool draws on the knowledge community members have about their community’s history.
2. Community timeline activity:
Conduct the community timeline activity as follows:
• Creating the map: Divide participants into small groups. Assign each group a time period in their organization’s or project’s history. Give each group flipcharts, notecards, markers, and other materials, and ask them to note and illustrate the key events in their organization or project’s history during the period assigned to them. When the small groups are done, have them
Shallwani & Mohammed, 2007 CBPR Training Manual
51
integrate their mini-timelines into a larger timeline which covers the history of their organization or project.
• Discussion and analysis: Ask participants if anything is missing; if participants feel that they would like to add something, allow them to add it to the timeline. Ask participants: What strikes you? What do you see?
• Recording: Keep a copy of the community timeline (or photograph it). Advantages and Disadvantages of Community Timeline
3. Large group discussion: Debriefing: Ask participants:
• How did you feel during the community timeline exercise?
• What information do you think was gained during this exercise?
• What information do you think was not obtained through this exercise? Ask participants: What are the advantages and disadvantages of using community timelines as a research methodology? (Record answers on flipchart.)
• Some advantages of community timelines � Community members share their own perspectives on major events in
their community’s history, and do their own analysis of this timeline. � Community timelines can be created fairly quickly and at low cost. � We can gather a great deal of information about the community from
many different community members in a short time.
• Some disadvantages of community timelines � Confidentiality of participants is difficult to ensure as numerous
members of the community will be present and participating in this activity and discussion.
� Community timelines can be difficult to facilitate because they involve ensuring that everyone gets a chance to speak and contribute.
� Since community timelines involve many members of the community, community power dynamics may play out during the activity. For example, one person may dominate the community resource map activity (perhaps due to seniority in age or status in the community) and thereby silence other points of view.
Ask participants: Would this be an appropriate research methodology in your community?
Ethical Considerations Related to Community Timelines
4. Large group discussion: Refer to the list of ethical guidelines for research that was developed during the session on research ethics. Ask participants to come up with ways we can maintain all of the ethical considerations while doing community timeline. (Record answers on flipchart.)
Shallwani & Mohammed, 2007 CBPR Training Manual
52
• Confidentiality: Emphasizing the importance of confidentiality before beginning the community timeline exercise; storing data safely and without names.
• Right to refuse or withdraw at any time.
• Informed voluntary consent: consent forms with complete information on the purpose of the community timeline exercise and how the data will be used.
• Reporting back
• Special consideration for vulnerable groups: for children you must get parents’ permission; ensure that consent is truly voluntary and not coerced in any way, etc.
Distribute and review handout with participants.
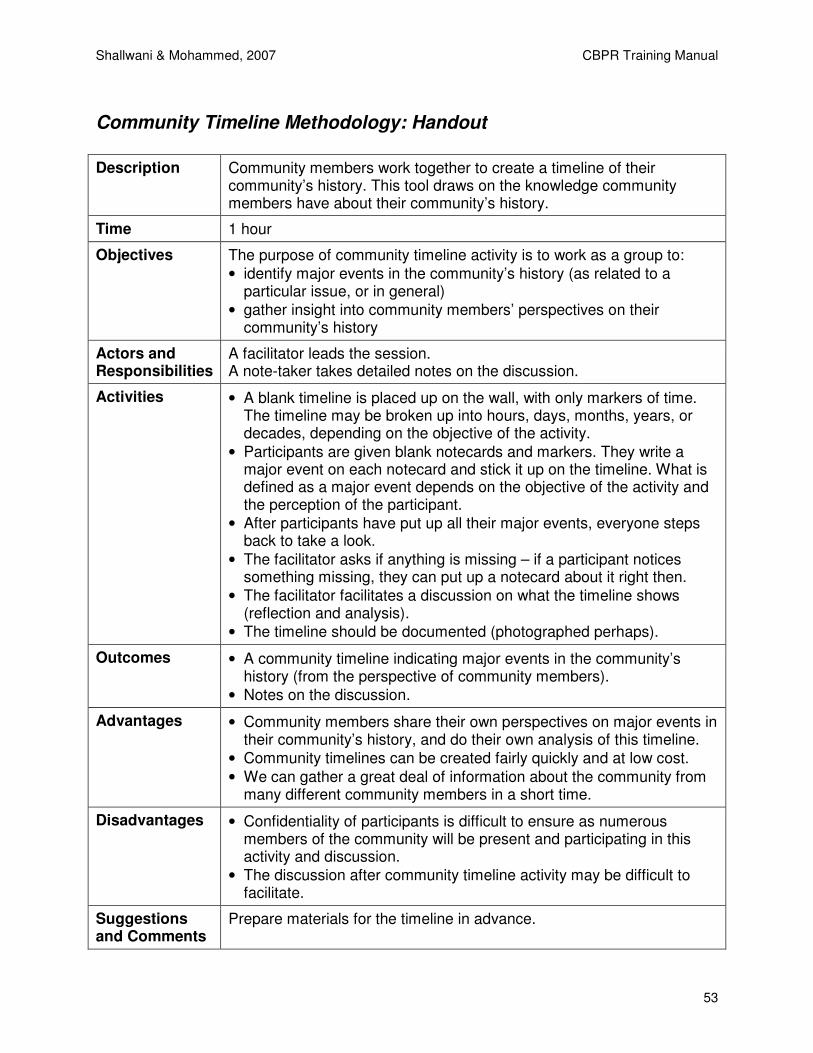
Shallwani & Mohammed, 2007 CBPR Training Manual
53
Community Timeline Methodology: Handout
Description Community members work together to create a timeline of their community’s history. This tool draws on the knowledge community members have about their community’s history.
Time 1 hour
Objectives The purpose of community timeline activity is to work as a group to:
• identify major events in the community’s history (as related to a particular issue, or in general)
• gather insight into community members’ perspectives on their community’s history
Actors and Responsibilities
A facilitator leads the session. A note-taker takes detailed notes on the discussion.
Activities • A blank timeline is placed up on the wall, with only markers of time. The timeline may be broken up into hours, days, months, years, or decades, depending on the objective of the activity.
• Participants are given blank notecards and markers. They write a major event on each notecard and stick it up on the timeline. What is defined as a major event depends on the objective of the activity and the perception of the participant.
• After participants have put up all their major events, everyone steps back to take a look.
• The facilitator asks if anything is missing – if a participant notices something missing, they can put up a notecard about it right then.
• The facilitator facilitates a discussion on what the timeline shows (reflection and analysis).
• The timeline should be documented (photographed perhaps).
Outcomes • A community timeline indicating major events in the community’s history (from the perspective of community members).
• Notes on the discussion.
Advantages • Community members share their own perspectives on major events in their community’s history, and do their own analysis of this timeline.
• Community timelines can be created fairly quickly and at low cost.
• We can gather a great deal of information about the community from many different community members in a short time.
Disadvantages • Confidentiality of participants is difficult to ensure as numerous members of the community will be present and participating in this activity and discussion.
• The discussion after community timeline activity may be difficult to facilitate.
Suggestions and Comments
Prepare materials for the timeline in advance.

Shallwani & Mohammed, 2007 CBPR Training Manual
54
The community timeline activity can be adapted for different purposes:
• This activity can be used to make individual timelines, demonstrating major events in the life of an individual. It might be used to chart major milestones in a child’s development.
• This activity can also be used for planning. Community members and working groups can chart their action plans on the timeline.
Shallwani & Mohammed, 2007 CBPR Training Manual
55
Community Mapping Methodology: Module Overview: This module introduces participants to community mapping as a research methodology. Participants will engage in an actual community mapping exercise by mapping the communities in which they live and/or work. Participants will also discuss advantages and disadvantages, as well as ethical considerations, in this methodology. Learning Outcomes: By the end of the module, participants should:
• Have an experiential understanding of community mapping as a research methodology.
• Have discussed the advantages and disadvantages of community mapping.
• Have discussed ethical considerations related to community mapping. Materials:
• Local natural materials for community map
• Stick or chalk
• Large Bristol board and markers
• Photocopies of handout for participants Time: Approximately 1-2 hours Learning Activities: Experiential Understanding of Community Mapping
1. Large group discussion: Ask participants: What is a community resource map?
• A community resource map is a map constructed by community members using local materials to depict the resources in their community (such as natural resources, infrastructure, and social facilities. This tool involves the community’s analysis of the resources in their community and the associated disparities that exist.
2. Community mapping activity:
Conduct the community mapping activity as follows:
• Creating the map: Ask each group to draw a map on the ground (using a stick if the floor is made of sand or chalk) of the community in which they live or work, including what they perceive to be the important items in the community. The items marked can include natural resources (e.g., land, fields, forests, rivers, etc.), infrastructure (e.g., roads, paths, wells, water tanks, etc.), and social facilities (e.g., schools, hospitals, houses, community-based organizations, etc.). Ask the participants to use local natural materials
Shallwani & Mohammed, 2007 CBPR Training Manual
56
(or materials available in the training hall) as symbols to represent the various things on the map. Throughout the process, ensure that other participants agree when somebody has arranged or rearranged something on the map. If they disagree, ask for reasons and try to facilitate the process to reach a general agreement.
• Discussion and analysis: Ask participants which populations they think are vulnerable in the community and where these populations are located. For example, ask participants where there is a greater concentration of people with illnesses on the map and ask them to characterize these populations based on ethnicity, socio-economic indicators, distance from facilities, etc. in order to identify the reasons for these vulnerabilities.
• Recording: Ask one or two participants to draw a copy of the map on paper for documentation purposes. Make sure that the copy represents the original and that the legend is complete.
Advantages and Disadvantages of Community Mapping
3. Large group discussion: Debriefing: Ask participants:
• How did you feel during the community mapping exercise?
• What information do you think was gained during this exercise?
• What information do you think was not obtained through this exercise? Ask participants: What are the advantages and disadvantages of using community mapping as a research methodology? (Record answers on flipchart.)
• Some advantages of community mapping � Community members do their own analysis of their community. � Community resource maps are relatively cheap to conduct. � Community resource maps are quick to conduct because in an hour or
two we can get information from many members of one community. � We can garner lots of information about a community using a community
resource map.
• Some disadvantages of community mapping � Confidentiality of participants is difficult to ensure as numerous
members of the community will be present and participating in this activity and discussion.
� Community resource mapping is difficult to facilitate because it involves ensuring that everyone gets a chance to speak and contribute.
� Since community resource mapping is open to all members of the community, community power dynamics may play out during the activity. For example, one person may dominate the community resource map activity (perhaps due to seniority in age or status in the community) and thereby silence other points of view.
Ask participants: Would this be an appropriate research methodology in your community?
Ethical Considerations Related to Community Mapping

Shallwani & Mohammed, 2007 CBPR Training Manual
57
4. Large group discussion:
Refer to the list of ethical guidelines for research that was developed during the session on research ethics. Ask participants to come up with ways we can maintain all of the ethical considerations while doing community mapping. (Record answers on flipchart.)
• Confidentiality: Emphasizing the importance of confidentiality before beginning the community mapping exercise; storing data safely and without names.
• Right to refuse or withdraw at any time.
• Informed voluntary consent: consent forms with complete information on the purpose of the community mapping exercise and how the data will be used.
• Reporting back
• Special consideration for vulnerable groups: for children you must get parents’ permission; ensure that consent is truly voluntary and not coerced in any way, etc.
Distribute and review handout with participants.
Shallwani & Mohammed, 2007 CBPR Training Manual
58
Community Mapping Methodology: Handout
Description A community map is a map constructed by community members using local materials to depict the resources in their community (such as natural resources, infrastructure, and social facilities). This activity involves the community’s analysis of the resources in their community and the associated disparities that exist.
Time 1-2 hours, depending on how many community members participate and the size of the community.
Objectives This activity is conducted to gain an overview of the resources in an area, as perceived by community members. Through this activity, the researcher learns about community members’ perceptions about the disparities in the community regarding its resources and the possibilities, problems, and needs that arise through the information garnered through the community resource map activity.
Actors and Responsibilities
This activity will be conducted by a facilitator who will lead the community resource map activity and a note taker who will note down the key discussion points that arise during the process. This activity is open to all members of the community who wish to participate.
Activities • Invite community members to participate in this activity. Try to include a diversity of community members in terms of ethnicity, religion, gender, etc.
• Ask the participants to draw a map on the ground showing the whole village with all the important items, based on their perception. These should include natural resources (i.e. land, fields, forests, rivers, etc.), infrastructure (i.e. roads, paths, well, water tanks, etc.), and social facilities (schools, hospitals, houses, CBOs, etc.).
• Ask the participants to use local materials (such as leaves, seeds, stones, etc.) to represent the various items on the map.
• Throughout the process, ensure that other community members agree when somebody has arranged or rearranged something on the map. If they disagree, ask for reasons and try to facilitate the process to reach a general agreement.
• Ask community members which populations they think are vulnerable in the community and where these populations are located. For example, ask community members where there is a greater concentration of people with illnesses on the map and ask them to characterize these populations based on ethnicity, socio-economic indicators, distance from facilities, etc. in order to identify the reasons for these vulnerabilities.
• Ask one of the community members to draw a copy of the resource map on paper. Make sure that the copy really represents the original and that the legend is complete.
Outcomes A community resource map depicting the resources available in the

Shallwani & Mohammed, 2007 CBPR Training Manual
59
community. The note taker will also have notes on the salient features of the discussion that takes place as the map is being constructed.
Advantages • Community members do their own analysis of their community.
• Community resource maps are relatively cheap to conduct.
• Community resource maps are quick to conduct because in an hour or two we can get information from many members of one community.
• We can garner lots of information about a community using a community resource map.
Disadvantages • Confidentiality of participants is difficult to ensure as numerous members of the community will be present and participating in this activity and discussion.
• Community resource mapping is difficult to facilitate because it involves ensuring that everyone gets a chance to speak and contribute.
• Since community resource mapping is open to all members of the community, community power dynamics may play out during the activity. For example, one person may dominate the community resource map activity (perhaps due to seniority in age or status in the community) and thereby silence other points of view.
Suggestions and Comments
• Choose a suitable place for the construction of the map.
• Ensure that many people in the community are involved. Encourage non-participants to get involved.
• Try to draw conclusions about the relative perspectives of various groups in the community. Listen carefully to what people say during the activity.

Shallwani & Mohammed, 2007 CBPR Training Manual
60
Additional Resources
Here are some additional resources which you may find useful in developing your training workshop for community-based research:
• Field Guide for Participatory Needs Assessment http://www.ifsp-srilanka.org/TP-06-pna-fieldguide.pdf
• The Community Tool Box http://ctb.ku.edu/en/
• The Guide to Effective Participation http://www.partnerships.org.uk/guide/
• Qualitative Research Methods: A Data Collector’s Field Guide http://www.fhi.org/en/RH/Pubs/booksReports/QRM_datacoll.htm