cbs web policy + best practices + drupal guide
TRANSCRIPT

Updated July 2013
CBS web policy + best practices + Drupal guide

www.cbs.umn.edu/faculty-staff/communications/web-policy/guide 2
Table of contents Web policies and guidelines …………………………………………………………………… 3
Developing new websites Branding requirements for existing sites U of M guidelines and resources
Drupal quick-tips ……………………………………………………………………………… 4-6 Linking Images – Sizes, cropping, uploading Homepage style ………………………………………………………………………………… 7 Secondary-page style …………………………………………………………………………… 9 Seminar listing pages …………………………………………………………………………… 11 Creating seminar listings Embedding a Google calendar Drupal How-to Create a contact ……………………………………………………………………… 14 Create a contact/directory page ……………………………………………………… 15 Create a page …………………………………………………………………………. 16 Create a photo gallery ………………………………………………………………… 17 Create a slideshow …………………………………………………………………….. 18 Create a webform ……………………………………………………………………... 19

www.cbs.umn.edu/faculty-staff/communications/web-policy/guide 3
Web policies and guidelines Developing new websites
• Before creating a new website/web page, please contact CBS Communications or CBS-IT ([email protected]) to discuss your options.
Branding requirements for existing sites
• The University of Minnesota, Driven to Discover header and search bar are required elements of every webpage.
• The CBS logo appearing over the left-hand navigation is a required element of every CBS webpage.
• The University of Minnesota equal opportunity statement footer must appear on all webpages.
• Unique maroon contact bar information footers can be created for individual units and departments. Please contact CBS-IT ([email protected]) to request a customized footer.
U of M guidelines and resources
• University branding requirements and guidelines | www.ur.umn.edu/brand/requirements-and-guidelines/index.php
• Photo and video library | www.ur.umn.edu/brand/photos-and-video/index.php • Logo and presentation templates | www.ur.umn.edu/brand/logo-and-template-
downloads/index.php

www.cbs.umn.edu/faculty-staff/communications/web-policy/guide 4
Drupal quick-tips Linking
• Please note that there are several ways to link to additional webpages, email addresses and telephone numbers. To begin, if you are in the “body content,” “side bar,” or “quote” section of the edit page, highlight the desired text for linking and click the hyperlink button.
• Linking to a page WITHIN the cbs.umn.edu URL
o Select text, click hyperlink button, insert desired link WITHOUT www.cbs.umn.edu. All you need for a page within the cbs.umn.edu URL is the last half of the URL, preceded by a backslash. For example, if you are linking from your page, to the CBS Student Services majors page, you would enter the following as the hyper link: /students/cbs-majors
• Linking to a page OUTSIDE the cbs.umn.edu URL o Select text, click hyperlink button, insert full desired link. For example, if you
wish to link to the CSE homepage, you would enter the link as follows: www.cse.umn.edu
• Linking to an email address o Select text, which should be the email address in parentheses. Click hyperlink
button, under Link Type, select Email. Enter email address in the “To” field. • Linking to an anchor in the text
o Use the flag button, to the right of the hyperlink button to create an anchor in the text.
§ To link to the anchor from WITHIN the same content box, highlight text, click hyperlink button and select Link to an anchor in the text from the Link Type dropdown. Your anchor will appear in dropdown.
§ To link to an anchor on another page within the cbs.umn.edu URL, or an anchor in a different content box on your page, highlight desired text, click hyperlink button. Treat this type of link like you would a link within the cbs.umn.edu URL, with a #name of anchor at the end. For example: /students/cbs-majors#anchor
• Linking to pages from Related Links or Menus o Linking to a page WITHIN the cbs.umn.edu URL in Related Links or Menus
§ Enter link title. In URL section, add desired link location as you would for a link within cbs.umn.edu in a content section, omitting the

www.cbs.umn.edu/faculty-staff/communications/web-policy/guide 5
backslash. For example: Title – CBS undergraduate majors, URL – students/cbs-majors
o Linking to a page OUTSIDE the cbs.umn.edu URL in Related Links or Menus § Enter link title. In URL section, add full URL for desired link location.
For example: http://www.cse.umn.edu Please note: It is important to differentiate between links going within and outside of the cbs.umn.edu URL. By using (or omitting) the backslash when linking to pages within the cbs.umn.edu URL, we insure that site visitors stay in the same window, and thus can easily navigate back to their starting page. Inserting “http://www” or “www” causes pages to be opened in new windows.
o Linking to an uploaded document, pdf, image, etc. § Use the “File Attachment” box to upload your document. In order to
avoid any coding/url issues, please save your documents WITHOUT spaces. For example: “Test document.doc” should be saved as “Test-document.doc” or “Test_document.doc.”
§ Follow the instructions in the “File Attachment” box to link to your uploaded document.

www.cbs.umn.edu/faculty-staff/communications/web-policy/guide 6
Images – sizes, cropping, uploading First and foremost, please crop all images BEFORE uploading them to the site. This will ensure that you get the best possible picture quality.
• Homepage banner images, rotating or stationary, +add slideshow items o All large banner photos should be cropped to 756 x 346 pixels.
§ You can crop photos in Photoshop, Preview or Microsoft Office on a PC.
o If you are using +add slideshow photos on your homepage, keep text in the special feature box to three lines. You will want to be mindful of your images, so as to prevent your text from covering faces, etc.
• Secondary page 3-image banner photos
o Images must be cropped accordingly before uploading: § First and second photos – 272 x 242 pixels § Third photo – 190 x 242 pixels
o Be aware that a golden/green banner will show up on the bottom portion of the photo. If you have faces in your images, they may be cut off if you don’t crop the photo with more space left at the bottom of the image.
• Placing images in body content and side bar o Images should be cropped before uploading:
§ Body content – no larger than 500 x 300 pixels § Side bar – no larger than 165 pixels wide
o Images in the body content and side bar should NEVER be copy and pasted into place. All images need to be uploaded to Drupal to prevent coding issues and potential site breaks.
o To upload an image, select the “image” icon in the editing tool bar. From there, click “Browse server,” “Upload,” “Browse,” “Upload,” “Insert file.”
§ Photos can be right and left aligned, with various horizontal and vertical padding.

www.cbs.umn.edu/faculty-staff/communications/web-policy/guide 7
Homepages
1. Drive traffic into your site a. Use the +Add button to create special feature banner items. These help lead
people into your site. i. Keep the text to three lines ii. Remember to crop your photos before uploading. Rotating banner
images should be cropped to 756x346 2. Page titles should be in all caps 3. News blocks
a. Add recent news items and articles about faculty and staff.
1
2 3 4

www.cbs.umn.edu/faculty-staff/communications/web-policy/guide 8
b. Please just include the title of the article or a ONE-sentence description of the news item on the homepage, link to a full article or longer description by creating a news page within your site.
c. There should be no more than 3 or 4 news items on your homepage at any one time.
d. Add a link to your department news page as the last item in your news block. Use an H4 heading or bold the link.
4. Event blocks a. Use this space for upcoming departmental and college seminars and events. b. Keep the text to 2-3 lines total whenever possible
i. MONTH DAY Event title location | time | info/calendar link
c. Add a link to your departmental calendar at the bottom of your news block. Use an H4 heading or bold the link.
A note about spotlight boxes: Information in spotlight boxes should be kept brief. These blocks should hold no more than 4-5 items, roughly 3 inches worth of content.

www.cbs.umn.edu/faculty-staff/communications/web-policy/guide 9
Secondary pages
1. Banner images are optional on secondary pages. If you used photos, the stationary 3-
across style is preferred. *See below for example of secondary page without photos. 2. Body text, for the most part, should be in “normal” format. Headers create a hierarchy
within your page, so use heading 2 sparingly and usually only at the top of the page. Heading 3 can be used to create subheadings as needed. Example:

www.cbs.umn.edu/faculty-staff/communications/web-policy/guide 10
3. Related links are set to “unstyled” as a default. This page uses the styled version. Please note that using the styled version may cause your page to look “busy,” but they are nice for Secondary pages that serve as launching points for “mini-sites” within a section.
This is an example of a secondary page without a photo banner.
1. Notice the use of specific Headers to define sections of the content 2. The related links on this page are in the default “unstyled” setting. In general, this is the
preferred setting for a secondary page. On secondary pages, it is best not to use the quote box. The box is meant to be used for quotes in feature stories. If you do use it, to emphasize the message of your page, please no links. The sidebar area on secondary pages is for additional information and can also hold images. Images in the sidebar should be no more than 165 pixels wide.

www.cbs.umn.edu/faculty-staff/communications/web-policy/guide 11
Seminar listing pages CBS is asking that all departmental seminars be added to a Google calendar, which can be fed into BLINK, the life sciences calendar maintained by CBS. Creating a seminar listing When creating seminar listings on Google calendar, please follow the guidelines below.
1. Create new event

www.cbs.umn.edu/faculty-staff/communications/web-policy/guide 12
2. In the "Untitled event" box a. Enter the speaker's name and the title of their presentation.
3. In the "Where" box a. Enter the room number and building name, and indicate which campus this
seminar takes place (i.e., St. Paul, East Bank, West Bank).
4. In the "Description" box a. Include the name of the presenter, their home institution and department, the
title of their presentation and the name of the seminar host, if applicable. We strongly encourage providing a link to your speaker's website.
i. To create a link to the speaker's webpage or lab site, please enter their name with the following HTML code: <a href= "web address, with http:// in it">Presenter name</a>
Please contact Katie Hoffman ([email protected] | 625-2247) if you have any difficulty with linking to your presenter's webpage.
5. Save
www.cbs.umn.edu/faculty-staff/communications/web-policy/guide 13
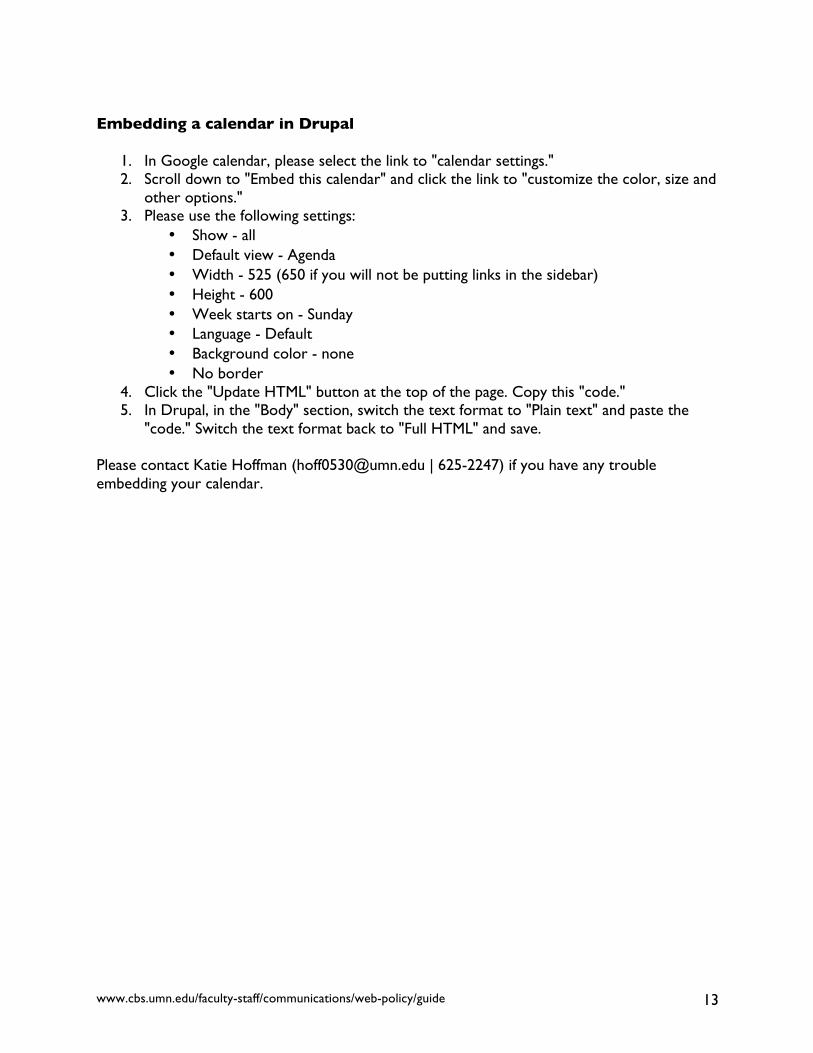
Embedding a calendar in Drupal
1. In Google calendar, please select the link to "calendar settings." 2. Scroll down to "Embed this calendar" and click the link to "customize the color, size and
other options." 3. Please use the following settings:
• Show - all • Default view - Agenda • Width - 525 (650 if you will not be putting links in the sidebar) • Height - 600 • Week starts on - Sunday • Language - Default • Background color - none • No border
4. Click the "Update HTML" button at the top of the page. Copy this "code." 5. In Drupal, in the "Body" section, switch the text format to "Plain text" and paste the
"code." Switch the text format back to "Full HTML" and save. Please contact Katie Hoffman ([email protected] | 625-2247) if you have any trouble embedding your calendar.

www.cbs.umn.edu/faculty-staff/communications/web-policy/guide 14
Drupal How-To… Create a contact Add an individual with contact information, such as Faculty, office staff, graduate students, etc.
1. Click Add content in the grey menu bar at the top of the page.
2. Select Contact 3. Choose an image to upload. Keep in mind if you are going to be placing this contact on a
Grid style contact page, you will need to pre-crop your image to 150x112 pixels. This is a landscape-oriented photo. If you are going to place your contact on a Teaser style contact page, you will pre-crop your image to 144x180 pixels. This is a portrait-oriented layout. *Teaser style is the popular choice for contact pages.
4. Follow screen prompts, enter first name, last name, title, phone number, etc. (“Company” is unnecessary).
5. Insert teaser text into Bio Teaser box. This is the perfect spot for a brief description of research interests, a description of job duties or a short Q&A. Examples can be found here, here and here.
6. The Detailed Information box holds just that, detailed information. This is where you will have a detailed description of faculty research, recent publications, links to CVs and lab pages. Examples can be found here and here.
7. Use the Related, Quote, and Sidebar Content sections for additional information and links off of the contact page.
8. Before saving, uncheck the box at the bottom of the page that says “Generate automatic URL alias.” In the URL alias box, be sure to create a proper path to your contact page, so that your department/unit menu appears in the left navigation. For example, a GCD contact should have a URL alias like this: gcd/faculty/name. A contact in EEB should have a URL alias like this: eeb/contacts/first name-last name.
9. Click SAVE Add your Contact to a Contact Page
1. Go to your Contact/Directory page and click Edit. Please see below for instructions on how to create a Contact/Directory page.
2. Scroll to a blank Contact box and begin typing the name of the Contact you just created. It should auto-populate. You can then reposition your new contact by dragging it by the compass symbol with your mouse.
3. Click SAVE

www.cbs.umn.edu/faculty-staff/communications/web-policy/guide 15
Create a contact/directory page Add a Contact Page that will have Contact information highlighted on it.
1. Click Add content in the grey menu bar at the top of the page.
2. Select Contact Page 3. Title your contact page and choose a Display format. Grid format positions contacts
in two columns with 150x112 pixel landscape photos and basic contact information. Click here to see an example of a Grid format. Teaser format displays a single column of 144x180 pixel portrait photos with contact information and room for teaser text. See above for more info on teaser content. Click here for an example of Teaser format.
4. Use the Body to describe your unit or department, or simply leave it blank. 5. You can create and title several “groups” of contacts on your contact page. An example
would be grouping faculty by appointment; assistant, associate, etc., or grouping staff by function; human resources, finance, etc.
6. To insert contacts, simply begin typing the name of the contact. The box will begin to auto-populate.
7. Continue inserting contacts and groups this way. 8. Before saving, uncheck the box at the bottom of the page that says “Generate automatic
URL alias.” In the URL alias box, be sure to create a proper path to your contact page, so that your department/unit menu appears in the left navigation.
9. Click SAVE

www.cbs.umn.edu/faculty-staff/communications/web-policy/guide 16
Creating a page
1. Click Add content in the grey menu bar at the top of the page.
2. Select Page 3. Title your page. 4. Select your pre-cropped banner images. For secondary pages, CBS Communications
recommends the Stationary 3-image layout. Photos should be cropped as follows: 272x242, 272x242, 190x242 pixels.
5. Please reference the CBS Web Style Guide for tips on styling your content in the Intro text, Body text, Related links, Quote and Sidebar areas.
6. Select a Menu for Sidebar. NOTE: If you are creating a page that won’t have one of the seven primarily listed menus, skip down to Menu settings or URL path settings.
a. By clicking Provide a menu link, you can title your page link and select a Parent menu for it. This drop-down box should include every menu associated with www.cbs.umn.edu. The Weight of your link determines what order it will appear in your menu. Links with smaller weights are displayed before links with larger weights. If you are unsure how to add your page to a menu, please feel free to contact CBS-IT or Katie Hoffman ([email protected]).
b. Alternatively, by clicking on URL path settings, you can enter a custom URL for your content. Be sure to use a path so that your URL alias works and you have a left-nav menu. For example: faculty-staff/communications/web-policy
7. Click SAVE

www.cbs.umn.edu/faculty-staff/communications/web-policy/guide 17
Create a photo gallery For placement of photo slideshows A photo gallery is the page where your photo slideshow lives. You’ll need to create a gallery before a slideshow.
1. Click Add content in the grey menu bar at the top of the page.
2. Select Photo gallery 3. Title your photo gallery. If you plan on having multiple slideshows on the page, you’ll
want to give your gallery a more generic name, like “BMBB event photos” or “Poster sessions, 2009-2013.”
4. Banner images on photo gallery pages may make your page appear too “busy.” CBS-Communications recommends against using them.
5. The Body content section is option. It can be used to describe the slideshow(s) on the page.
6. Menu/URL creation. a. Click on URL path settings, you can enter a custom URL for your content.
Be sure to use a path so that your URL alias works and you have a left-nav menu. For example: alumni/event-photos/2013
b. Or, by clicking Provide a menu link, you can title your page link and select a Parent menu for it. This drop-down box should include every menu associated with www.cbs.umn.edu. The Weight of your link determines what order it will appear in your menu. Links with smaller weights are displayed before links with larger weights. If you are unsure how to add your page to a menu, please feel free to contact CBS-IT or Katie Hoffman ([email protected]).
7. Click SAVE

www.cbs.umn.edu/faculty-staff/communications/web-policy/guide 18
Creating a slideshow Insert photos, add slideshow to photo gallery
1. Click Add content in the grey menu bar at the top of the page.
2. Select Slideshow 3. Title your slideshow and add Teaser text. Think about adding the date the photos were
taken and the location. 4. Begin browsing for and uploading your photos. 5. Create a URL alias that follows the path of the photo gallery you created previously. 6. Click SAVE

www.cbs.umn.edu/faculty-staff/communications/web-policy/guide 19
Creating a Webform Create a form or questionnaire accessible to users. Submission results and statistics are recorded and accessible to privileged users.
1. Click Add content in the grey menu bar at the top of the page.
2. Select Webforms 3. Title your form and create an appropriate URL alias. If a left-nav menu isn’t necessary
for your form, you can leave the “generate automatic URL alias” box checked. 4. Click save.
There are several types of fields that can be added to your webform. Here, you will see an example of each.
5. Begin your form with a welcome or introductory text. You’ll call this component “Intro” and you will select “Markup” as the field type. Click ADD
6. Treat the value box like you would a body content box on a regular page. You can format text, upload images and create links.
a. This is the perfect spot for form instructions, event details, or application guidelines.
7. Begin adding fields, the “label” is where you’d enter a question you wish to have answered, such as “What is your favorite flavor of ice cream?”
a. Before you “save component” you can choose to have your label display Above, In-line, or not at all with the component.
8. It is good practice to ask for some kind of contact information, be it an email address or first/last name. There is no other way to find out who submitted a form.
9. When using the File component, be sure to check off all types of file extensions you’re willing to accept.
10. Adding questions/answers in the grid component requires you to enter information as “safe_key|Some readable option.”
11. Hidden components are basically useless. 12. A page break is helpful for separating different sections of your form. 13. You enter information in a select options component much like you do with a grid. 14. A text area is a large space for typing in. If you are asking form users to write multiple
sentences or answer an essay question, use a text area. 15. A text field is for short answers, first name, last name, major, etc.
After adding all of your questions/components, click the E-mails button in the upper left. 16. Add your email address, or the address of whoever will be collecting responses.
a. Customize the look of the email that will be sent by changing the email subject, from address and name.

www.cbs.umn.edu/faculty-staff/communications/web-policy/guide 20
17. Click Save email settings 18. If you want your survey participant to receive a confirmation email, click the box that
says “component value: Email address.” a. You may want to add a special message to the email template, thanking them for
participating. 19. Click SAVE 20. After setting up desired email notifications, click Form settings in the top left corner.
Here you can choose to create a custom confirmation message or redirect participants to a new page after completing your form.
a. You can also open and close your form here. 21. Click SAVE CONFIGURATION
Click the view button and preview your form.