cellica database for ipadcellica.com/ipadcellicadatabaseuserguide.pdf2.2.5.6.9 go to form ... 2.2.7...
TRANSCRIPT

CELLICA DATABASE FOR IPAD
USER GUIDE
.

User Guide
Cellica Database for iPad Page 1
CONTENTS
1 INTRODUCTION ..................................................................................................................7
1.1 FEATURES ....................................................................................................................7
2 USING THE CELLICA DATABASE ON THE DESKTOP .....................................................................9
2.1 PROFILE MANAGER .......................................................................................................9 2.1.1 Add Profile. ...............................................................................................................10 2.1.2 Edit Profile.................................................................................................................10 2.1.3 Remove Profile. .........................................................................................................10 2.1.4 View Profile Data ......................................................................................................11 2.1.5 Selection of File base and DSN base database. ........................................................11 2.1.6 File Based Database..................................................................................................13 2.1.7 DSN based Database.................................................................................................16 2.1.8 Select Tables from your Database ............................................................................17 2.1.9 Select Views/Queries from your Database ...............................................................18 2.1.10 Apply Filters ..............................................................................................................19 2.1.11 Apply Sort..................................................................................................................21 2.1.12 Apply Column Sequence:...........................................................................................22 2.1.13 Selection of Stored Procedure ...................................................................................22 2.1.14 “Profile available for sync” indication.......................................................................26
2.2 FORM MANAGER ........................................................................................................27 2.2.1 Add Form (Create Form) ...........................................................................................27 2.2.2 Edit Form...................................................................................................................30 2.2.3 Export Form(s) ..........................................................................................................31 2.2.4 Remove Form ............................................................................................................31 2.2.5 Form Controls............................................................................................................31
2.2.5.1 Label .......................................................................................................................................... 31 2.2.5.2 Text Box..................................................................................................................................... 32 2.2.5.3 QR Code/Bar Code .................................................................................................................... 34 2.2.5.4 Check Box .................................................................................................................................. 34 2.2.5.5 Combo Box ................................................................................................................................ 36 2.2.5.5.1 ComboBox Fixed Value List ................................................................................................. 36 2.2.5.5.2 ComboBox based on Another Profile (Lookup) .................................................................. 37
2.2.5.6 Button ....................................................................................................................................... 38 2.2.5.6.1 First...................................................................................................................................... 38 2.2.5.6.2 Previous............................................................................................................................... 38 2.2.5.6.3 Next ..................................................................................................................................... 38 2.2.5.6.4 Last ...................................................................................................................................... 38 2.2.5.6.5 New ..................................................................................................................................... 38 2.2.5.6.6 Edit ...................................................................................................................................... 38 2.2.5.6.7 Delete .................................................................................................................................. 39 2.2.5.6.8 Find...................................................................................................................................... 39

User Guide
Cellica Database for iPad Page 2
2.2.5.6.9 Go To Form.......................................................................................................................... 39 2.2.5.6.10 Go To Record..................................................................................................................... 41 2.2.5.6.11 Send email......................................................................................................................... 42 2.2.5.6.12 Go to url ............................................................................................................................ 42 2.2.5.6.13 Phone Call ......................................................................................................................... 42 2.2.5.6.14 Go to Map ......................................................................................................................... 42 2.2.5.6.15 Copy Record ...................................................................................................................... 42 2.2.5.6.16 Capture.............................................................................................................................. 42
2.2.5.7 Date Time .................................................................................................................................. 42 2.2.5.8 Radio Button ............................................................................................................................. 43 2.2.5.9 Formula ..................................................................................................................................... 44 2.2.5.10 Image (Unbound) .................................................................................................................. 46 2.2.5.11 Location................................................................................................................................. 46 2.2.5.12 Grid........................................................................................................................................ 46 2.2.5.12.1 Grid On Main Form ........................................................................................................... 46 2.2.5.12.2 Grid on Subform:............................................................................................................... 47
2.2.5.13 Add Page ............................................................................................................................... 49 2.2.5.14 Delete Page ........................................................................................................................... 49 2.2.5.15 Delete .................................................................................................................................... 49
2.2.6 SubForm ....................................................................................................................49 2.2.6.1 Create SubForm ........................................................................................................................ 50
2.2.7 Quick designing tips for Form..................................................................................52 2.2.7.1 Align controls to each other ..................................................................................................... 52 2.2.7.2 Resize controls uniformly relative to each other on a form..................................................... 53 2.2.7.3 Move multiple controls............................................................................................................. 54 2.2.7.4 Manage spacing between controls uniformly relative to each other on a form ..................... 54 2.2.7.5 Copy / Paste Controls................................................................................................................ 54 2.2.7.6 Aspect Ratio .................................................................................................................................. 55 2.2.7.7 Manage spacing between pixels on form ..................................................................................... 55
2.2.8 Import/Export Form Design .....................................................................................55 2.2.8.1 Export Form Design................................................................................................................... 55 2.2.8.2 Import Form design .................................................................................................................. 56
2.3 PREFERENCES .............................................................................................................58 2.3.1 Set Password:............................................................................................................58 2.3.2 Start Synchronization/Stop Synchronization: ...........................................................58 2.3.3 Synchronization Settings...........................................................................................59 2.3.4 Connection Settings ..................................................................................................59 2.3.5 Reset .........................................................................................................................59
2.4 HOW TO REGISTER THE SOFTWARE? ................................................................................59
3 USING THE CELLICA DATABASE ON THE IPAD ..........................................................61
3.1 FORMS AND PROFILE LIST ON IPAD .................................................................................61 3.2 FORMS ON IPAD .........................................................................................................62
3.2.1 Form View .................................................................................................................62

User Guide
Cellica Database for iPad Page 3
3.2.2 Edit Record in Form...................................................................................................63 3.2.3 ComboBox (Lookup) in Form on iPad........................................................................64 3.2.4 Date/Time control in Form on iPad...........................................................................66 3.2.5 Find Button in Form on iPad .....................................................................................66 3.2.6 Add/Edit/Delete data on sub form ...........................................................................67 3.2.7 Image Control on iPad ..............................................................................................68 3.2.8 Send record data as a .pdf ........................................................................................69
3.3 PROFILES ON IPAD .......................................................................................................71 3.3.1 Mulitple Record View ................................................................................................71 3.3.2 Single Record View....................................................................................................74 3.3.3 Add Record on iPad...................................................................................................76 3.3.4 Edit Record on iPad ...................................................................................................77 3.3.5 Delete Record on iPad...............................................................................................78 3.3.6 Detail View ................................................................................................................79 3.3.7 Search Contents ........................................................................................................80 3.3.8 Create Database on iPad ..........................................................................................83 3.3.9 Standard Database on iPad ......................................................................................85 3.3.10 Custom Database on iPad.........................................................................................86 3.3.11 Set Field Properties ...................................................................................................88
3.3.11.1 Fields properties to Text Field .............................................................................................. 88 3.3.11.2 Fields properties to Integer Field.......................................................................................... 93 3.3.11.3 Set properties to Float/Double datatype Field ..................................................................... 94 3.3.11.4 How to use predefined value................................................................................................ 95
3.4 PREFERENCES .............................................................................................................96 3.4.1 Data Operation Confirmation ...................................................................................96 3.4.2 Data Synchronization Settings ..................................................................................96 3.4.3 View Settings ............................................................................................................98 3.4.4 Password Protection .................................................................................................98 3.4.5 Get Location (Longitude and Latitude) ...................................................................100
4 FREQUENTLY ASKED QUESTIONS .......................................................................................101
4.1 DESKTOP .................................................................................................................101 4.1.1 Does software send complete database every time? .............................................101 4.1.2 Is my database secured?.........................................................................................101 4.1.3 How to get UDID of iPad? .......................................................................................102 4.1.4 How I can can input/read qrcode/barcode in Cellica Database ?.........................102 4.1.5 How to use image control for displaying logo? ......................................................103 4.1.6 How to use FileMaker Pro to create profiles in desktop application? ...................103 4.1.7 How to use phone call Feature and Send Email Feature on forms? ......................103 4.1.8 How to select multiple controls on form designer? ...............................................103 4.1.9 How to work with multiple controls in form designer?..........................................104 4.1.10 I am getting message, Device ID “XXXXXX” already present? ...............................104 4.1.11 Can I associate record timestamp with database record? .....................................104 4.1.12 How I can backup my form design work/ Forms/ How I can avoid redesigning of forms/ How I can reuse form/ How I can rename form?........................................................................................................105 4.1.13 Can I use forms designed with single user edition in enterprise edition? ...................105

User Guide
Cellica Database for iPad Page 4
4.2 IPAD.......................................................................................................................105 4.2.1 Does I need to create forms compulsary in desktop software? ..............................105 4.2.2 Can I hide Profiles List on home screen...................................................................105 4.2.3 Whenever I add/edit/delete record on iPad, in Record view I get Red/Cyan color.106 4.2.4 I am not satisfied with current font and font size, is there any option to change it?108
5 SUPPORTED DATA TYPES .................................................................................................110
6 SYSTEM REQUIREMENT....................................................................................................111
7 CONTACT US .................................................................................................................112

User Guide
Cellica Database for iPad Page 5
List of Figures Figure 1: Profile Manger .................................................................................................................10
Figure 2: Database Selection ..........................................................................................................12
Figure 3: File Based Database Selection ........................................................................................13
Figure 4: Excel Selection................................................................................................................14
Figure 5: DSN Database Selection .................................................................................................16
Figure 6: Table selection.................................................................................................................17
Figure 7: Select Table from your database.....................................................................................18
Figure 8: Select Views/Queries of your database ..........................................................................19
Figure 9: Apply Filter ......................................................................................................................20
Figure 10: Apply Sort ......................................................................................................................21
Figure 11: Arrange Columns ...........................................................................................................22
Figure 12: Select DSN of Stored Procedure ....................................................................................23
Figure 13: Selection of Stored Procedure.......................................................................................24
Figure 14: Enter Parameter Values for Stored Procedure..............................................................25
Figure 15: Profile Ready for Sync....................................................................................................26
Figure 15: Form Manager ...............................................................................................................27
Figure 16: Profile Selection for Form..............................................................................................28
Figure 18: Textbox Control Properties ...........................................................................................33
Figure 19: Checkbox Control Properties.........................................................................................35
Figure 20: Combo Box Control Properties with Source Type: Valued List .....................................36
Figure 21: Combo Box Control Properties with Source Type: Another Profile ..............................38
Figure 22: Location Control (Longitude/Latitude).........................................................................46
Figure 23: Grid Control Field Selection on Main Form Grid.........................................................47
Figure 24: Profile selection for Subform.........................................................................................51
Figure 25:Create relation between Main form and subform .........................................................52
Figure 30: Export Form design........................................................................................................56
Figure 31: Import form design........................................................................................................57
Figure 32: Preferences available on Desktop side Cellica Database ..............................................58
Figure 33: Synchronization Settings ...............................................................................................59
Figure 34: Software Registration ....................................................................................................60
Figure 35: Home screen of CellicaDatabase on iPad ......................................................................62
User Guide
Cellica Database for iPad Page 6
Figure 36: Form View......................................................................................................................63
Figure 37: Edit record on Form.......................................................................................................64
Figure 38: Combo Box in Form on iPad ..........................................................................................65
Figure 39: Date/Time Control on form ...........................................................................................66
Figure 40: Find functionality on form .............................................................................................67
Figure 41: Multiple Records View ..................................................................................................73
Figure 42: Single Record View ........................................................................................................75
Figure 43: Add Record ....................................................................................................................77
Figure 44: Edit Record. ...................................................................................................................78
Figure 45: Delete Record ................................................................................................................79
Figure 46: Detail View.....................................................................................................................80
Figure 47: Search Data....................................................................................................................82
Figure 48: Template Manager ........................................................................................................85
Figure 49: Standard Database on iPad ...........................................................................................86
Figure 50:Custom Database ...........................................................................................................88
Figure 51: Set Field Properties .......................................................................................................90
Figure 52: Add Predefined values and set Default value ...............................................................92
Figure 53: Field Properties to Integer Data type ............................................................................93
Figure 54: Field Properties to Float/Double Data type ..................................................................94
Figure 55: Select value from predefined values .............................................................................95
Figure 56: Preferences....................................................................................................................97
Figure 57: Password Protection....................................................................................................100
Figure 58: How to get UDID..........................................................................................................102
Figure 59: Change Font and Font Size ..........................................................................................109

User Guide
Cellica Database for iPad Page 7
1 INTRODUCTION
Being away from your office does not mean not having the access to your data. Consider the scenario when you want to carry a copy of the database on your iPad, update the data and send updated data from iPad to original database on PC. Now it is possible with the Cellica Database. Cellica Database for iPad allows you to be more productive by allowing viewing and updating the database contents on your iPad. Cellica Database for iPad allows to sync with Microsoft Access, Microsoft Excel and any ODBC Compliant databases like Oracle, SQL Server etc. The software package consists of two software components: the Cellica Database Desktop (Server) that runs on Microsoft Windows, and iPad Cellica Database (Client) that runs on the iPad. You will use the Desktop side software component to select the database Tables/Queries/Views (Create the profile) for iPad device and data will be synchronize with iPad depending on your sync settings on iPad. Using Desktop component, you can design the forms for your iPad also. Cellica Database on iPad will receive these profiles and forms respectively, and view the contents of the database in designed forms.
1.1 Features
• Synchronize data Wirelessly with iPad (Using Internet). • View and update data on iPad, which will reflect to Server database immediately. • Synchronize Table/View or Stored Procedure of your database with iPad. • Synchronize only updated desktop data to iPad. • Apply SQL Select queries, Filters; Sort the fields and Synchronize data according to it. • Supported Databases: Microsoft Access 97/2000/2003/2007/2010, Microsoft Excel
97/2000/2003/2007/2010, Oracle, Microsoft SQL Server, Sybase, FileMaker Pro, DB2, MySQL, PostgreSQL, FoxPro, dBase, R:BASE and any ODBC Compliant Database
• Get the data of Views and Stored Procedure of DSN base database on iPad. • Create your own custom database on iPad, or choose from one of the pre-designed templates such as
Vehicle Info, Bank Account, and Membership Info etc. • Supports Unicode language database such as Japanese, Chinese, Korean, Russian etc. • Supported Forms on iPad. • Design form on desktop using Label, Text Field, Buttons, Checkbox, Radio buttons, Combo box, Page,
Formula, Location control. • Supports Sub forms, Design a master/detail form, or a parent/child form using sub form. • Send single record data on form as a .PDF by Email.

User Guide
Cellica Database for iPad Page 8
• Create forms in Portrait/ Landscape mode. • Import/Export form design. • Synchronize image and signature data with desktop database. Supported Jpg, bmp and png image
formats. • Support QR Code scanning. • Password protection supported for device side application.

User Guide
Cellica Database for iPad Page 9
2 USING THE CELLICA DATABASE ON THE DESKTOP
This section will explain how to use Cellica Database software on the PC. Run CellicaDatabase from the shortcut available on the desktop, or use Start Menu: Start->Programs-> Cellica Database ->Cellica Database . There are three modules available here.
1. Profile Manager 2. Form Manager 3. Preferences.
Profile Manager allows you to select Tables/Views/Queries/Stored Procedure to transfer to iPad. Form Manager allows you to design the form on the already created profiles in Profile Manager Module. Preference allows setting various application preferences such as Synchronization settings, Connection Settings etc. First use “Profile Manger” to select your database tables/Views/Queries/Stored Procedure then only use “Form Manager” to design the form. Once you create the Profile and Forms in desktop side Cellica Database software, just sync from iPad to get the desktop designed form and database to iPad.
2.1 Profile Manager
Use Profile Manager to add profiles (list of database) for your iPad. Use Add Profile/Remove Profile buttons to update the profiles list.

User Guide
Cellica Database for iPad Page 10
Figure 1: Profile Manger
2.1.1 Add Profile.
Use Add Profile button to select the database, which you want to synchronize with iPad. On clicking “Add Profile” button, you will get “New Profile: Database Connection” dialog.
2.1.2 Edit Profile.
Use Edit Profile button to update the selected profile. You can select another Table/Views/Queries/Stored Procedure. Also you can change the Filter/Sort/Column Sequence of selected profile.
2.1.3 Remove Profile.
Use “Remove Profile” button to remove the selected profile from device and desktop. This action will remove profile first from desktop software and then on next sync from device, it will be deleted from device also.

User Guide
2.1.4 View Profile Data
Allows viewing records of selected profile in single record mode.
2.1.5 Selection of File base and DSN base database.
Select the database, which you want to synchronize with iPad. User can select File based as well as DSN based database. Apply Filter/ Sort for selected tables.
Cellica Database for iPad Page 11

User Guide
Figure 2: Database Selection
Cellica Database for iPad Page 12

User Guide
2.1.6 File Based Database
Figure 3: File Based Database Selection
Click on Browse button to select file of type: MS Access, MS Excel, FoxPro, dBase, you will get the screen as follows.
Cellica Database for iPad Page 13

User Guide
1. Select Files of type such as Microsoft Access Database (*.mdb, *.accdb), Excel Files (*.xls, *.xlsx,
*.xlsm), or FoxPro/dbase Database (*.dbf) files and then select File name of your choice, for example NWIND.mdb, and click Open.
2. When you select an Excel file using Browse button, you will get a dialog prompt as:
Figure 4: Excel Selection
Cellica Database for iPad Page 14

User Guide
Here, when you select "View As Excel Worksheet", contents will be shown similar to that of Excel Worksheet. Whereas, when you select "Use first row as a field header", it will be treated as a database. In this case, customized SQL queries will work on your Spreadsheet.
To manually apply filters and sort orders click on "Filters" and "Sort" buttons.
Cellica Database for iPad Page 15

User Guide
2.1.7 DSN based Database
Click on popup provided to select database via Database Source (DSN) such as Oracle, MySQL, and SQL Server. You will get list of available Database Source Name.
Figure 5: DSN Database Selection
Cellica Database for iPad Page 16

User Guide
You can manage DSN via ODBC Data Source Manager in Windows Control Panel.
Figure 6: Table selection
2.1.8 Select Tables from your Database
After selection of your database, you will get following screen. Here “Select List Type” has two options. 1. Tables 2. Views/Queries. Table’s option is default option and shows all the tables available in your database. Select one of the tables which you want to transfer to iPad.
Cellica Database for iPad Page 17
User Guide
Cellica Database for iPad Page 18
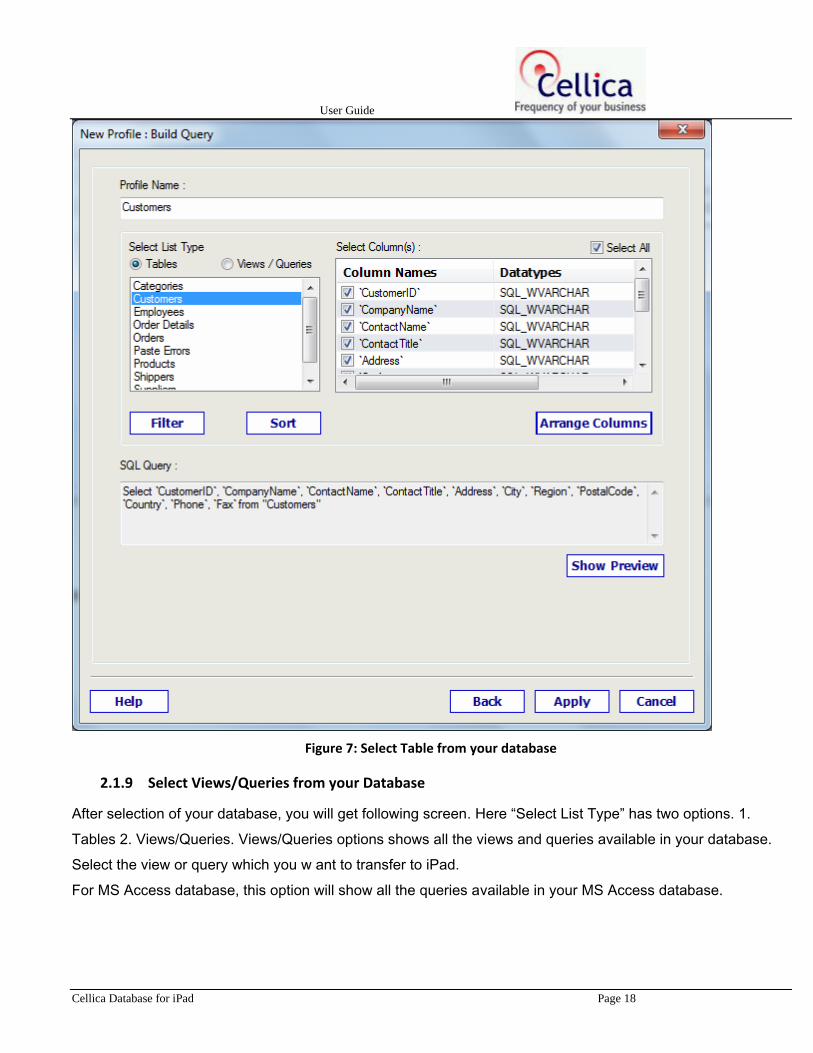
Figure 7: Select Table from your database
2.1.9 Select Views/Queries from your Database
After selection of your database, you will get following screen. Here “Select List Type” has two options. 1. Tables 2. Views/Queries. Views/Queries options shows all the views and queries available in your database. Select the view or query which you w ant to transfer to iPad. For MS Access database, this option will show all the queries available in your MS Access database.

User Guide
Figure 8: Select Views/Queries of your database
2.1.10 Apply Filters In the above dialog box, click on "Filters” button, you will see the following filter dialog:
Cellica Database for iPad Page 19

User Guide
Figure 9: Apply Filter
Here, you can apply as many filters as you want. Click on "Add" button to have more filters. Select field from "Field" dropdown control, select operator from "Operator" dropdown control and click on "Value" edit box and enter value, which you want as a filter condition value.
Cellica Database for iPad Page 20

User Guide
2.1.11 Apply Sort
In “New Profile: Build Query” dialog (Fig. 11), click on the "Sort” button, you will get the following sort order Dialog.
Figure 10: Apply Sort
Cellica Database for iPad Page 21

User Guide
Use “Add” button to implement Sorting on particular column.
2.1.12 Apply Column Sequence:
Here you can alter the order in which your database field should appear / will appear on your iPad. Select the fields in the order in which you want those to appear on your iPad. Use “Clear All” button to uncheck all the selected fields. Use “Undo Select” button to undo last selection.
Figure 11: Arrange Columns
2.1.13 Selection of Stored Procedure After selecting “ODBC Database” option (in fig.7), you will get “Stored Procedure” check mark option, enable this check mark and you will get list of stored Procedure in your database. Select Stored Procedure from this list.
Cellica Database for iPad Page 22

User Guide
Figure 12: Select DSN of Stored Procedure
Cellica Database for iPad Page 23

User Guide
Figure 13: Selection of Stored Procedure
If your stored Procedure will have parameter values, then Parameter values dialog will appear. Select Particular Parameter and click on Value field for that parameter. Enter specific value you want. Use OK button to finish it.
Cellica Database for iPad Page 24

User Guide
Figure 14: Enter Parameter Values for Stored Procedure
Cellica Database for iPad Page 25

User Guide
2.1.14 “Profile available for sync” indication
Newly created profile will be listed in red color. It indicates that profile is available for syncing from device. Once profile is synced with device, profile color will change to normal color.
Figure 15: Profile Ready for Sync
Cellica Database for iPad Page 26

User Guide
2.2 Form Manager
Figure 16: Form Manager
In Form Manager, you can create the form on the profiles, which are created in Profile Manager.
Following options are available to work with forms on Form Manager Dialog Add: Add/Create new Form. Edit: Edit selected form. Export: Export one or multiple forms. Remove: Remove selected form.
2.2.1 Add Form (Create Form)
Click on “Add Form” button to create the form. You will get following “Database Profile Selection” screen, which will show list of profiles which you have created in Profile Manager.
Cellica Database for iPad Page 27

User Guide
Cellica Database for iPad Page 28
Figure 17: Profile Selection for Form
After selection of profile, you will get following screen, which will ask option if you want to import form or want to create new custom form or want to use standard template. If you select “New Custom Form” then you can design the form in Portrait as well as Landscape mode. Select the option which you want. Import Form will allow you to import already created form. You have to just map the fields and update the form as per your requirement. For Export/Import form design feature, please check “2.2.7 Import/Export Form Design” section in this user guide. In “Standard Template” options Cellica has designed some form templates for various categories such as Business, Education and personal. These are just samples, users can customize them as per their requirement.

User Guide
After selection of “New Custom Form” option, you will get following type of form designer windows which will show blank canvas of iPad to design form for your iPad. Add controls to canvas from Control Pallet according to your requirement. You can add controls to canvas by two ways, Either select the control in Control pallet and drag it to canvas or select the particular control and then click on canvas. See the “Form Controls” section in this manual for properties of each control provided. See Tab Properties section for Form properties.
Cellica Database for iPad Page 29

User Guide
Cellica Database for iPad Page 30
2.2.2 Edit Form
Use Edit Form button, to update the selected Form. You can redesign the complete form here.

User Guide
2.2.3 Export Form(s)
Select one or more forms from available form list and then click “Export Form” button to backup forms at desired location.
2.2.4 Remove Form
Use Remove Form button to remove selected form from both desktop and device. Your form will be removed from desktop software first and then on next sync, it will be deleted from device also.
2.2.5 Form Controls
Following section will explain controls available for form. To design form, you have to drag the control as per your requirement and set the properties for each control. Following description of each control assumes that you are on the Form Design page.
2.2.5.1 Label
You use labels on a form to display descriptive text such as titles, captions, or brief instructions. Labels don't display values from fields or expressions; they're always unbound and they don't change as you move from record to record. Use following procedure to create a stand-alone label (a label that isn't attached to another control).
Cellica Database for iPad Page 31

User Guide
1. Click the Label tool in the Tool Box. 2. On the form, click where you want to place the label, and then type the text for the label in Caption property in Label Control Properties. You can resize the label after you enter all the text. Other Label Control Properties: [X, Y]: Set the location of control by entering the value of X/Y co-ordinate. [Width, Height]: Use this to set the width and height of the control. Align Text: You can align the text of label to Left, Right and Center. ForeColor: This property allows user to change the text color of label. Font Name: Set font name for label, this property shows the list of font names supported by iPad application. Font Size: Here select the font size as per your requirement.
2.2.5.2 Text Box
Use text boxes on a form to display data from a record source. This type of text box is called a bound text box because it's bound to data in a field. User can use Text box for getting UDID of his device and save the record with his UDID. For this user needs to set content type to “UDID” Use following procedure to create a Text box.
1. Click the Text Box tool in the Tool Box. 2. On the form, click where you want to place the Text Box In Text Box Control Properties, click the “Data Column”.
Cellica Database for iPad Page 32

User Guide
Select the field, which you want to bind with this text field.
Figure 18: Textbox Control Properties
When you will drag the Textbox control on form, software maps it (Data Column) to ‘None’. Please Change it according to your required column. Control ID: You can use it in Formula control. [X,Y]: Set the location of control by entering the value of X/Y co-ordinate. [Width,Height]: Use this to set the width and height of the control. Content Type: TextBox – This is default content type. UDID - User can get UDID of device by setting this property to UDID. On new record, user will get UDID in this control. QRCode – Set this for reading Barcode/QRCode values directly in textbox using inbuilt camera for read them. Default value: Set default value for text box when user will add new record. Read Only: If you want this text box non editable then set it to True. ForeColor: Set text color for this text box. Font Name:
Cellica Database for iPad Page 33

User Guide
Set Font for this text box. Font Size: Set font size here for the text in the Text Box.
2.2.5.3 QR Code/Bar Code
Use text box on the form to get QR Code/Bar Code data. Drag Text Box control on form and set Content Type to “QRCode”. Now on iPad, you need to tap on this control to scan the QR Code and transfer the scanned value in to this Text box control. You can search QR Code data in your database. On “Find” dialog, you will get “Scan QR Code” button, This will allow you to scan QR Code data and after scanning QR code, you can search it in your database.
2.2.5.4 Check Box
You can use a check box on a form as a stand-alone control to display a Yes/No, True/False, or On/Off value. If the check box contains a check mark, the value is Yes; if it doesn't, the value is No. You can bind check box control to a column defined as a Bit data type. When the value in this column is 1, it is equivalent to Yes, On, or True conditions. When the value is 0, the column indicates No, Off, or False conditions. Use following procedure to create a Check box.
1. Click the Check Box tool in the Tool Box. 2. On the form, click where you want to place the Check Box 3. In Check Box Control Properties, click the “Data Column”.
Cellica Database for iPad Page 34

User Guide
4. Select the field which you want to bind with this Check Box field.
Figure 19: Checkbox Control Properties
Data Column: Select the column of your database which you want to bind with this control. Caption: Give caption to checkbox control. Default Value: Set default value(checked or unchecked) for this control when you will add new record. UnChecked: User can set value for which check mark control shows unchecked. Checked: Here set value for which check mark control shows checked. Disabled: If you do not want to change the value of this control then set this property to True. ForeColor: Change text color of this control. Font Name: Change the Font of text of this control. Font size: Change the font size.
Cellica Database for iPad Page 35

User Guide 2.2.5.5 Combo Box
Combo Box is a quicker and easier way to select a value from a list than to remember a value to type. With a combo box, you can do either without using too much space on a form. A combo box is like a text box and a list box combined. When you enter text or select a value in a combo box, if the combo box is bound, the entered or selected value is inserted into the field that the combo box is bound to. Another important feature of this combo box is that it works like quick navigator. Example. If user has two tables Artists and Albums. Then map Artists name from Artists Table to combo box on main form. Now add subform with Grid control. Create relation between main form and subform on Artist id. Now when user will select any Artist name in Combo box, he will get Album list in Grid Control on subform. Use following procedure to create a Combo box.
1. Click the Combo Box tool in the Tool Box. 2. On the form, click where you want to place the Combo Box 3. In Combo Box Control Properties, click the “Data Column”. 4. Select the field which you want to bind with this Combo Box field. Combo box lists data two ways.
1. Combo Box can be based on a fixed value list (Combo Box Fixed Value List) 2. It can be based on Another Profile (Lookup)
2.2.5.5.1 COMBOBOX FIXED VALUE LIST
s
Figure 20: Combo Box Control Properties with Source Type: Valued List
Cellica Database for iPad Page 36

User Guide
Data Column: Select the data column, which you want to bind with this control. Source Type:
Select “Valued List” option here and then use Items option to add/edit/remove your own values to combo box.
Default Value: Here select default value, which will be used as default when you will add new record. Allow Item Edit: If it is “True” then user can add his own value, rather than selecting it from available list. Disabled: If you do not want to change the value of this control then set this property to True. ForeColor: Set text color of this control. Font Name: Set the Font of text of this control. Font size: Set the font size. 2.2.5.5.2 COMBOBOX BASED ON ANOTHER PROFILE (LOOKUP)
Combo box can have values from column of another profile. This column can be any column of profiles available in profile manager. Select “Source Type” as “Another Profile”. Now in Lookup Profile property, select the profile whose column you want to map to combo box. After selecting profile, select the Lookup Column, column which you want to map to combo box. View Column is another option provided here which allows user to select the column whose data he wants to view in combo box.
Cellica Database for iPad Page 37

User Guide
Figure 21: Combo Box Control Properties with Source Type: Another Profile
2.2.5.6 Button
You use a command button on a form to start an action or a set of actions. For example, you can create a command button that opens another form. You can create over 10 different types of command buttons. Use following procedure to create a Button.
1. Click the Button tool in the Tool Box. 2. on the form, click where you want to place the Button.
3. In Button Control Properties, Select the Actions as per your requirement. Following section will explain Action supported by Button.
2.2.5.6.1 FIRST
Set this Action to Move to First record. 2.2.5.6.2 PREVIOUS
Set this Action to Move to Previous record. 2.2.5.6.3 NEXT
Set this Action to Move to Next record. 2.2.5.6.4 LAST
Set this Action to Move to Last record. 2.2.5.6.5 NEW
Set this Action to create new record. 2.2.5.6.6 EDIT
Set this Action to edit a record.
Cellica Database for iPad Page 38

User Guide 2.2.5.6.7 DELETE
Set this Action to delete a record. 2.2.5.6.8 FIND
Set this Action to implement Find a record functionality. 2.2.5.6.9 GO TO FORM
Set this Action to open another form. To use this feature, form on which you want to jump should be ready first. Now while designing the form, from which you have to jump on another form, follow the following steps.
1. Drag “Button” control on the iPad canvas area. 2. Now in right side, Button control properties, select the Action “Go to Form”.
3. Now select the form on which you want to jump.
Cellica Database for iPad Page 39

User Guide
After clicking button, you will get following dialog.
Here use “Add” Button and you will get following dialog that ask you to select Source Field, Select Form, Destination Field.
Cellica Database for iPad Page 40

User Guide
You can add more than one Form for one “Go to Form” button. If you map more than one form to this button, then on iPad, when you will use this button, you will get a dialog that will ask you to choose the form on which you want to jump. Source Field: It is the field (column name) of profile on which you are currently designing the form. When you will jump on destination form, data will be searched on destination form according to this field data and will be displayed on jumped form (Destination Form). Select Form: Here select the Form on which you have to jump (Destination form). Destination Field: Destination Field is the field on which data will be search in the destination form and import data for that record and displayed in destination form. 2.2.5.6.10 GO TO RECORD Set this Action to implement Go To Record functionality. When user will click on this Button, he will get a dialog on iPad, which will ask record number where user wants to jump.
Cellica Database for iPad Page 41

User Guide 2.2.5.6.11 SEND EMAIL
You need to map data column in “Button Control Property”, On device side, Tapping on this button will open Email application and Value from mapped data column will be appeared in “To” of Email application. 2.2.5.6.12 GO TO URL You need to map data column in “Button Control Property”. On device side, Tapping on this button will open the URL from mapped data column in Browser of the device. 2.2.5.6.13 PHONE CALL Set this Action to make a phone call for Particular Phone call data. Map “Data Column” property to your data column which have phone numbers data and on device, tapping on this button will make a phone call for respective data.
2.2.5.6.14 GO TO MAP
You need to map Latitude_Field and Longitude_Field to particular data columns which have Longitude and Latitude data. When user will tap on this button, Google map will show the particular spot on the map corresponding to longitude and latitude column data. 2.2.5.6.15 COPY RECORD
If you want to copy particular record and get data of that record as a new record, Set Action “Copy Record” in Button Control Property. On tapping on this button on form, New record will be created with the data and “Copy Record” button will be change to “Save” button. Update the record where you want and use “Save” button to save the record. 2.2.5.6.16 CAPTURE Software will open the Email application and attach the viewable form screen in .PDF format.
2.2.5.7 Date Time
Date Time Control will allow user to create “Date & Time”, Date or Time control on form.
Just drag control on form and set Format property in DateTime Control Properties according to your requirement. Format Property will allow to select Date & Time”, Date or Time.
Cellica Database for iPad Page 42

User Guide
Def Val_Type (Default Value Type): Allow to set default value from one of the following options a) Now : Use this option to get current Date/Time on Adding new record. b) Exact : Use this option if you want to set fixed Hard coded value to Date control. c) TimeStamp: Use this option if you want to set Timestamp( Tracking last change timestamp for
record ) for each New/Edit record.
2.2.5.8 Radio Button
You can use Radio Button on a form to display a limited set of alternatives. Radio Button makes selecting a value easy because you can just click the value that you want. Only one option in radio group can be selected at a time. Use following procedure to create a Radio Button.
1. Click the RadioButton tool in the Tool Box. 2. On the form, click where you want to place the RadioButton.
3. In RadioButton Control Properties, First Select RadioGroup and map data column to this Group.
Use button to create various Radio Group and map data column to them.
Cellica Database for iPad Page 43

User Guide
Use button to delete the Group. For one Radio group you can assign number of radio button. After assigning Data Column to Radio Group, set caption to Radio button. In RadioButton Control Properties, for Selected Property, Set it True if you want to set selected radio button as a default selected. In Group Property, select the group in which you have to keep this radio button. Drag number of radio buttons on form as per your requirement. Select proper Group for those radio buttons.
2.2.5.9 Formula
You can create formula field in your iPad form by dragging Formula control from Control Palette. After putting Formula control on iPad canvas area, Set formula from the right side FormulaField Control
Properties. First on this button and you will get Formula Dialog.
In Formula field, you can use +, -, *, /, (, ) operators in formula along with the function provided in List Control. Select Form Options to select the field which you want to use in the formula.
Cellica Database for iPad Page 44

User Guide
Select Functions, to use various conversions and Math functions in your Formula. Select Operators to select operators like +.-, *, /. Double click on the Field names, functions or operators you want to use in the formula. Double click or Paste button will write selected function or field name in Formula control.
After writing Formula for Formula field, you can assign column to this formula field. In “FormulaField Control Properties”, set “Is Data Column” property to “TRUE” and then “Data Column” property will be enabled, here select column of your database for which you have to map this formula field.
Cellica Database for iPad Page 45

User Guide
2.2.5.10 Image (Unbound)
Drag this control to map the images which you have on device. Change the size of it as per your requirement. On device, please tap twice to select the image from picture library. Please note that, this control will not transfer images from desktop.
2.2.5.11 Location
Drag this control to get the Longitude/Latitude of the user. This values can help user to find the location of the device. User needs to tap on this control on the form on his device to get Longitude/Latitude of the current location. Set Location_FieID property to Latitude or Longitude or Latitude/Longitude as per requirement. Also map Data Column property to your database field so location values will be stored in that column when user will save the record.
Figure 22: Location Control (Longitude/Latitude)
2.2.5.12 Grid
To view Multiple Records on the form, user can use this control. Drag control on form to view multiple records. You can use this control on Main Form as well as on Sub form. 2.2.5.12.1 GRID ON MAIN FORM User can view multiple records on main form instead of single record and traverse through multiple records fast. Also user can put subform below the Grid control and view details of records (Which can be from other database table)when user will tap on particular record on Grid control.
Cellica Database for iPad Page 46

User Guide
1. Drag a Grid Control on subform and resize it as per your requirement.
2. Set “Column Settings” by clicking on button in Grid Control Properties. You will get following type of dialog to select the columns for Datasheet View (Grid Control). Select the fields which you want on Grid Control. Fields will be
displayed in grid as per sequence of selection of fields.
Figure 23: Grid Control Field Selection on Main Form Grid
2.2.5.12.2 GRID ON SUBFORM: You can add Grid control on Subform also. Multiple records related to main form data can be view on Grid.
1. Drag a Grid Control on subform and resize it as per your requirement.
2. Set “Column Settings” by clicking on button in Grid Control Properties. You will get following type of dialog to select the columns for Datasheet View (Grid Control). Select the fields which you want on Grid Control. Fields will be
Displayed in grid as per sequence of selection of fields.
Cellica Database for iPad Page 47

User Guide
Figure 32 :Grid Control Field Selection
3. Click on Ok button to finalize the Grid Control. 4. You can use buttons and Formula control on subform with Grid Control.
5. When you will use New button, software will check if you have used all fields of subform profile in Grid or not. If do not use all the fields in Grid view then, when you will use “Apply” button to finalize the main Form, Software will ask to enter the default value for the fields which are not mapped to any control on main form as well as on Subform. Double click for particular column under “Default Value” to enter default value for that column when you will add new re
cord. This default value will be saved in your original database when you will add
Cellica Database for iPad Page 48

User Guide
Record from device.
• 2.2.5.13 Add Page
Use to add new page on one form.
2.2.5.14 Delete Page
Use this to delete selected page.
2.2.5.15 Delete
will delete the selected control from the form. You can delete controls on form by using “Delete” button of your keyboard.
2.2.6 SubForm
A sub-form is a form that is inserted in another form. The primary form is called the main form (main form: A form that contains one or more sub-forms.), and the form within the form is called the sub-form. A form/sub-form combination is often referred to as a hierarchical form, a master/detail form, or a parent/child form. Sub-forms are especially effective when you want to show data from tables or queries (query: A question about the data stored in your tables, or a request to perform an action on the data. A query can bring together data from multiple tables to serve as the source of data for a form or report.) with a one-to-many relationship (one-
Cellica Database for iPad Page 49

User Guide
to-many relationship: An association between two tables in which the primary key value of each record in the primary table corresponds to the value in the matching field or fields of many records in the related table.). For example, you could create a form with a sub-form to show data from a Categories table and a Products table. The data in the Categories table is the "one" side of the relationship. The data in the Products table is the "many" side of the relationship — each category can have more than one product. The main form shows data from the "one" side of the relationship. The sub-form shows data from the "many" side of the relationship. The main form and sub-form in this type of form are linked so that the sub-form displays only records that are related to the current record in the main form. For example, when the main form displays the Beverages category, the sub-form displays only the products in the Beverages category. When you create a sub-form, you can design it to be displayed in Datasheet view(Grid View) or Form view.
2.2.6.1 Create SubForm
Create SubForm on main Form by dragging control on main form. When you will drag a sub-form control, you will get a following dialog. Here select another profile, which will relational data of main form profile. Example: Main Form is designed on “Orders” profile then sub-form can be designed on “Order Details” table. Each Order can have more than one product.
Cellica Database for iPad Page 50

User Guide
Figure 24: Profile selection for Subform
After selection of profile for Subform, create relation between main form and sub form by selecting fields from main form profile and fields from subform profile. You can create relations between forms and subform by mapping upto 4 fields between both forms.
Cellica Database for iPad Page 51

User Guide
Figure 25:Create relation between Main form and subform
After mapping relational fields, click on “Apply” button to finish subform creation process. Now resize the subform as per your requirement.
2.2.7 Quick designing tips for Form 2.2.7.1 Align controls to each other
On the top of the Form designer window, there is toolbar for Alignment of form controls.
1. Select the controls (controls: such as a Label, text box, check box or command button, that lets users control the program.) that you want to align,
Cellica Database for iPad Page 52

User Guide
On Main Form : Hold CTRL Key & Select Controls one by one. OR Drag a rectangle over the controls to select the
Controls. On Sub Form : Hold CTRL Key & Select Controls one by one.
2. On the Toolbar, click one of the following Toolbar buttons:
Left: Aligns the left edges of the controls with the left edge of the leftmost control.
Right: Aligns the right edges of the controls with the right edge of the rightmost control.
Top: Aligns the top edges of the controls with the top edge of the highest control.
Bottom: Aligns the bottom edges of the controls with the bottom edge of the lowest control. 2.2.7.2 Resize controls uniformly relative to each other on a form
On the top of the Form designer window, there is toolbar for Alignment of form controls.
1. Select the controls (controls: such as a Label, text box, check box or command button, that lets users control the program.) that you want to align, On Main Form:
Hold CTRL Key & Select Controls one by one. OR Drag a rectangle over the controls to select the Controls. On Sub Form: Hold CTRL Key & Select Controls one by one.
2. On the Toolbar, click one of the following Toolbar buttons:
Tallest makes the controls as tall as the tallest selected control.
Shortest makes the controls as short as the shortest selected control.
Cellica Database for iPad Page 53

User Guide
Widest Makes the controls as wide as the widest selected control.
Narrowest makes the controls as narrow as the narrowest selected control. Also you can use Shift and Arrow keys to change the size of any control.
2.2.7.3 Move multiple controls
1. Select the controls (Controls: such as a Label, Text box, Check box or Command button, that lets users control the program.) that you want to align, On Main Form:
a. Hold CTRL Key & Select Controls one by one. OR Drag a rectangle over the controls to select the Controls.
On Sub Form: b. Hold CTRL Key & Select Controls one by one.
2. Now use Arrow keys to move the multiple controls on the form. Or Hold SHIFT Key and Drag Selected Controls.
2.2.7.4 Manage spacing between controls uniformly relative to each other on a form
On the top of the Form designer window, there is toolbar for managing spacing between controls on form.
Horizontal Spacing: Makes selected controls placed with even spacing between them horizontally.
Vertical Spacing: Makes selected controls placed with even spacing between them vertically.
2.2.7.5 Copy / Paste Controls
On the top of the Form designer window, there is toolbar for Copy/Paste controls on form.
Cellica Database for iPad Page 54

User Guide
Cellica Database for iPad Page 55
Copy: Copy one or more selected controls on clipboard. Copied controls can be paste on same form on same or different tabs.
Paste: Use this option to paste copied controls on form.
2.2.7.6 Aspect Ratio
Cellica Database allows you to design form in two aspect ratios, 1:1 (Aspect Ratio 1) and 1:2 (Aspect Ratio 2). 2.2.7.7 Manage spacing between pixels on form
Pixel grid is showed on form designer canvas for better alignment of controls. Default spacing between pixels is 10, You can change it according to your requirement.
2.2.8 Import/Export Form Design 2.2.8.1 Export Form Design
User can export the form design as a backup or to design the similar form for new profile. On form design
page, Use Toolbar button to export the form. This will export the form design, not mapping of your database column with the form controls.

User Guide
Cellica Database for iPad Page 56
Figure 26: Export Form design
2.2.8.2 Import Form design
When you will design new form by using “Add Form” button, you will get profile selection dialog for this form. After selection profile, you will get following dialog. Here select the “Import Form” option and use “Browse” button to select the already designed form design. Select the form design which is already exported. Form design must be exported from Cellica Database and with .fm extension.

User Guide
Figure 27: Import form design
Cellica Database for iPad Page 57

User Guide
2.3 Preferences
Figure 28: Preferences available on Desktop side Cellica Database
2.3.1 Set Password:
Protect the desktop side application by setting the password.
2.3.2 Start Synchronization/Stop Synchronization:
Use this button to start and stop the synchronizing database between Personal computer and iPad.
Cellica Database for iPad Page 58

User Guide
2.3.3 Synchronization Settings
Figure 29: Synchronization Settings
There are two options available to start Synchronization application (Background).
As application: As in Windows Service Mode, it's not running in any user's context, it can't access specific user's data/resources (which are specific to user account) e.g. User DSN, Network Mapped drive, network resources etc. To avoid such type of problem related to Windows Services, use “Start As Application” option.
As Windows Service: It starts without any user logged in. It does not run in any specific user's
login account.
2.3.4 Connection Settings
If your PC having Internet connection using proxy and want to change the proxy settings then use this option.
2.3.5 Reset
This will reset the Profiles and Forms data. This will clean data from your device and resend data from desktop to device.
2.4 How to register the software?
When you will open Cellica Database software on your PC, you will get following type of dialog. Use “Continue Evaluation” button to use the software in evaluation mode. Use “Install License” button to register the software.
Cellica Database for iPad Page 59

User Guide
After purchasing the software, please send UDID of your iPad to [email protected]. Support will send you
license key, use it in the registration dialog which appears at the startup of Cellica Database Desktop software. You can get registration dialog from the Preferences module also. In Preferences module(in desktop side Cellica Database), there is “Register” button, click on it to open registration dialog.
Figure 30: Software Registration
Cellica Database for iPad Page 60

User Guide
3 USING THE CELLICA DATABASE ON THE IPAD
Run the “CellicaDB” application on iPad by tapping on .
3.1 Forms and Profile List on iPad
When you will open the software now on iPad, you will get Sample Form listed there. Default screen of “Cellica Database” software shows both Profiles and Forms.
Once you finished profile creation and Forms creation on desktop side, Use icon on home screen to import forms and profile created on desktop.
Cellica Database for iPad Page 61

User Guide
Figure 31: Home screen of CellicaDatabase on iPad
3.2 Forms on iPad
To import forms from your PC, Please use button on home screen of Cellica Database software on iPad. This will import profiles as well as your Forms.
3.2.1 Form View
To view a form, tap on required form name under Forms tab on Home Screen . Here we have shown Sample form.
Cellica Database for iPad Page 62

User Guide
Figure 32: Form View
3.2.2 Edit Record in Form
When ever you will click Edit button to update the record on your Form, Edit button will convert
in to save button . Update your record and use Save button to save the changes. Form will ask confirmation for saving updated record. Following screen shows confirmation dialog. Use “Yes” button to save the changes. Use “Cancel” button to ignore the changes.
Cellica Database for iPad Page 63

User Guide
Figure 33: Edit record on Form
3.2.3 ComboBox (Lookup) in Form on iPad
Combo box will be enabled only when user will Add/Edit the record on Form.
Cellica Database for iPad Page 64

User Guide
Figure 34: Combo Box in Form on iPad
Cellica Database for iPad Page 65

User Guide
3.2.4 Date/Time control in Form on iPad
Figure 35: Date/Time Control on form
3.2.5 Find Button in Form on iPad
When user will use “Find” button in iPad Form, software will show the result with number of records found.
Cellica Database for iPad Page 66

User Guide
Figure 36: Find functionality on form
3.2.6 Add/Edit/Delete data on sub form
To update the data on subform (If you are using Subform Grid control on subform), you must put New/Edit/Delete Button control on subform.
Cellica Database for iPad Page 67

User Guide
3.2.7 Image Control on iPad
Image control (Unbound) is use to map the particular picture with respective record. User can map the picture available in “Saved Photos” or “Photo Library” on iPad. Tap twice on “picture control” available on form to select the picture you want.
Cellica Database for iPad Page 68

User Guide
3.2.8 Send record data as a .pdf
You can send particular record data on form in .PDF format by Email. Tap on icon in upper right corner of the form. Software will open the Email application and attach the form screen in .PDF format.
Cellica Database for iPad Page 69

User Guide
Cellica Database for iPad Page 70

User Guide
3.3 Profiles on iPad
Other than Form, on iPad user can view data in Profile mode also. In Profile mode, data can be view in two different views.
1. Multiple Record View (Table View) 2. Single Record View.
3.3.1 Mulitple Record View
This view is to view database contents in multiple records. In multiple record view, to move left and right, horizontally swipe to left or right and drag your finger up and down on iPad to scroll up and down.
Cellica Database for iPad Page 71

User Guide
Cellica Database for iPad Page 72

User Guide
Figure 37: Multiple Records View
Move to next set of records.
Move to previous set of records
Use this Button to move First Record.
Cellica Database for iPad Page 73

User Guide
Use this Button to move Last Record.
Use this button to open Search Dialog to search specific data
Use this button to call “Go to” Dialog, you can use it to Go to particular record.
Use this button to check the data type of each field.
3.3.2 Single Record View
In Single Record View, User can view database contents in a single record. Double click on any column in All column view and it will show a particular record in Single Record View.
To move next and previous record, horizontally swipe to left or right. To move up and down in Record View, Drag your finger up and down.
Cellica Database for iPad Page 74

User Guide
Figure 38: Single Record View
Cellica Database for iPad Page 75

User Guide
Use Edit Button to edit the data of Record view.
Use This button to Add Record.
Use this button to open Search Dialog to search specific data Use this button to call “Go to” Dialog, you can use it to Go to particular record.
Use this Button to move First Record.
Use this Button to move Last Record.
To move next record.
To move previous record.
3.3.3 Add Record on iPad
Use button on Multiple Record view to Add new record to selected database.
Cellica Database for iPad Page 76

User Guide
Figure 39: Add Record
3.3.4 Edit Record on iPad
Use button on “Single Record View” to edit the selected record.
Cellica Database for iPad Page 77

User Guide
Figure 40: Edit Record.
3.3.5 Delete Record on iPad
User can delete Record from the Edit mode. Use button to delete selected record.
Cellica Database for iPad Page 78

User Guide
Figure 41: Delete Record
3.3.6 Detail View
User can view data in detail from Single Record View by tapping on particular data.
Cellica Database for iPad Page 79

User Guide
Figure 42: Detail View
3.3.7 Search Contents
To search a particular string within the selected database, you can use button on "Single Record View" and "Multiple Record View". Here you can search data from particular fields as well as in all fields.
Cellica Database for iPad Page 80

User Guide
Cellica Database for iPad Page 81

User Guide
Figure 43: Search Data
If you want to search data from specific field, after selecting “Search all fields” option, you will get list of column name of your database. Select the Column name in which you want search data. If the data, which you want to find is in more than one record then you will get a dialog, which will show in how many records your search data is and you can view search result in Multiple Record View.
Cellica Database for iPad Page 82

User Guide
3.3.8 Create Database on iPad
Use “More options” button on home screen of Cellica Database to get the menu “Template Manager”. This menu will call Template Manager form. Using this form user can create Standard Template as well as
Custom Template, also Manage Template option allows user to delete the Templates created on iPad.
Cellica Database for iPad Page 83

User Guide
Cellica Database for iPad Page 84

User Guide
Figure 44: Template Manager
3.3.9 Standard Database on iPad
User can use standard templates on iPad. CellicaDatabase has provided some templates like Membership Info, Software serial number, Bank account, and Contacts etc. Use “Standard” option from Template Manager form to select standard database.
Cellica Database for iPad Page 85

User Guide
Figure 45: Standard Database on iPad
3.3.10 Custom Database on iPad
To create your custom database, use “Custom” option available in Template Manager.
Cellica Database for iPad Page 86

User Guide
Cellica Database for iPad Page 87

User Guide
Figure 46:Custom Database
3.3.11 Set Field Properties
IPad User can set field’s properties to text, integer, float and double data type.
3.3.11.1 Fields properties to Text Field User can add multiple predefined values for any text data type. If user wants to add predefined values for specific text fields, he can do it from Design View. Select specific column name, which have text data type and
Cellica Database for iPad Page 88

User Guide
you want to multiple values to that field. Now use Add button and you will get screen that will show edit box, here enter text value you want to add. If want to set entered value as a default value for that text field, then click “ON” button.
Cellica Database for iPad Page 89

User Guide
Figure 47: Set Field Properties
Cellica Database for iPad Page 90

User Guide
Cellica Database for iPad Page 91

User Guide
Figure 48: Add Predefined values and set Default value
Cellica Database for iPad Page 92

User Guide
3.3.11.2 Fields properties to Integer Field
Figure 49: Field Properties to Integer Data type
For Integer field, user can set Default value, Maximum and minimum value for that field.
Cellica Database for iPad Page 93

User Guide 3.3.11.3 Set properties to Float/Double datatype Field
Figure 50: Field Properties to Float/Double Data type
For Float/Double data type field, user can set Default value, Maximum and minimum value. Also user can set decimal places to be shown in that field while viewing data.
Cellica Database for iPad Page 94

User Guide 3.3.11.4 How to use predefined value
Figure 51: Select value from predefined values
While adding new record or updating record, user can select value from predefined values or enter new value for particular text field. Above image shows that default value has been set to “United States” but user can update this value or select other value from predefined values using “Select Value” option.
Cellica Database for iPad Page 95

User Guide
3.4 Preferences
In “Preferences” form you can change, Syncing option, Date and Time formats, various Font and Font size.
3.4.1 Data Operation Confirmation
If this option is Set to "ON", application will not ask user confirmation to commit changes after creating New Record or Updating existing one. (Will not show "Do you want to save New/Updated" record"? prompt, will save record directly assuming confirmation)
3.4.2 Data Synchronization Settings
In Data Synchronization Settings, Default option has been set to “Auto”. Auto sync option, will synchronize your data automatically according to time set for “AutoSync Time”. This will work when Cellica Database application open on iPad. Also this Auto mode, sync your updated record immediately to Server after Add/Edit/Delete records. If you do not want to sync data with desktop after each update on device, then set Syncing Mode to
Manual. Now to synchronize with desktop database, you need to use icon on Home Screen. Remember, due to Manual sync mode, your device side changes reflect to your desktop only when you will
use icon on home screen.
Cellica Database for iPad Page 96

User Guide
Figure 52: Preferences
User can also set Password Cellica Database application.
Cellica Database for iPad Page 97

User Guide
3.4.3 View Settings
Use View Settings option from Preferences to set column width, text color, and font.
3.4.4 Password Protection
User can secure data by using Password protection feature. From Preferences, select Password option and change status of OFF button to ON. Now “New Password” dialog will appear, here enter password you want to set. Now whenever user will open the Cellica Database application on iPad, it will ask for password. If want to remove password protection, change ON button to OFF, software will ask for password, enter proper password and your password will be disabled.
Cellica Database for iPad Page 98

User Guide
Cellica Database for iPad Page 99

User Guide
Figure 53: Password Protection
3.4.5 Get Location (Longitude and Latitude)
“Use Location Info” option in preferences to ON and you will able to save Longitude and Latitude of current location. You can assign Longitude and Latitude field from field properties option mention in Point 4.11.1.
Cellica Database for iPad Page 100

User Guide
Cellica Database for iPad Page 101
4 FREQUENTLY ASKED QUESTIONS
Frequently Asked Questions (FAQ) are questions that our customers routinely ask us or email about. We divided FAQ in two different sections.
4.1 Desktop
4.1.1 Does software send complete database every time?
No, This software sends only changed records like new/updated/deleted records and not complete database each time.
4.1.2 Is my database secured?
Yes, Data transfer between iPad side Cellica Database and Desktop application is secured as 128 bit AES is used for encryption.

User Guide
4.1.3 How to get UDID of iPad?
To get Device ID, connect your device to your Mac/PC and launch iTunes. In iTunes, select your device in the ‘Devices’ section and navigate to the Summary tab. Click on the Serial Number label to reveal the Identifier field and the 40 characters UDID. Press Ctrl+C to copy the UDID to your clipboard, and paste it in Device ID and Confirm Device ID field.
Figure 54: How to get UDID
4.1.4 How I can can input/read qrcode/barcode in Cellica Database ?
There are two ways to accomplish reading Qrcode/BarCodes
A) Using inbuilt camera to scan QR/BarCode.
In this case we need to use “Content Type” property of Text Field on form. Set this property to “QR
Code”.
B) Using external barcode scanner.
Cellica Database for iPad Page 102

User Guide
In this case, barcode scanner needs to be connected with device using Bluetooth. Tap in text field
in New/Edit mode and then scan value using external barcode scanner. It will be put in text field
automatically.
4.1.5 How to use image control for displaying logo?
Drag Unbound image control on form and set “Content Type” Property to “Logo”. Now on device you
have to choose image for this control only once and same will be displayed for all records.
4.1.6 How to use FileMaker Pro to create profiles in desktop application?
a) Until version Filemaker Pro 7
You can create profiles using File base connection (Select your Filemaker Pro Database directly
while creating Profile using “Browse” button) and Using DSN base connection (Create DSN of your
Filemaker Pro database by using the ODBC driver for Filemaker Pro) on profile connection page.
b) After Version FileMaker Pro 7
Only DSN base connection will work. Create DSN of your Filemaker Pro database by using the
ODBC driver for Filmmaker Pro.
4.1.7 How to use phone call Feature and Send Email Feature on forms?
Use button control on form and then set button action to one of the desired action, “Send email” or
“Phone call”. Now set the “Data Column” property to set the destination field of profile whose data you
want to use.
4.1.8 How to select multiple controls on form designer?
On Main form:
a. Hold CTRL Key & Select Controls one by one. b. Drag a rectangle over the controls to select the Controls.
On Sub Form:
Cellica Database for iPad Page 103

User Guide
a) Hold CTRL Key & Select Controls one by one.
4.1.9 How to work with multiple controls in form designer?
Moving multiple controls
a) Select multiple controls. b) Now use Arrow keys to move the multiple controls on the form. Or Hold SHIFT Key and Drag
Selected Controls to desired place.
Resizing multiple controls
a) Select multiple controls. b) Use Shift Key + Arrow Keys to resize multiple controls
4.1.10 I am getting message, Device ID “XXXXXX” already present?
This message appears when installation for same ID is present for single user version or device with
this ID is added in Enterprise edition.
4.1.11 Can I associate record timestamp with database record?
You can do this with Cellica Database . Profile should have column with type DateTime (Timestamp).
Drag “DateTime” control on form, set its Data column property to Timestamp column in which you
want to save “Record Timestamp”. Now set “Def Val_Type” property of DateTime control to
“Timestamp”. Now when you add or edit record on device side, this field is populated with current
timestamp. If you want to do this in background then you can do this by setting “Visible” property of
DateTime Control to “TRUE”.
Cellica Database for iPad Page 104

User Guide
4.1.12 How I can backup my form design work/ Forms/ How I can avoid redesigning of forms/ How I can reuse form/ How I can rename form?
There are 2 ways you can save your form designing work a) Export multiple forms using “Export” option available on Form Manager
Click on “Export” button on Form Manager, you will be presented with list of existing form, select one or
more forms from the list, and choose “Export”. Select location for saving forms (.fm) files.
b) Using export button on toolbar in Form Designer window
Sometimes you may want to take backup of your form while you are in between form designing process before making big change in design. For this purpose there is “Export Form” button on toolbar on Form Designer Window. Click it to export your existing form layout and save it.
4.1.13 Can I use forms designed with single user edition in enterprise edition?
Yes, Form designed with single user edition can be used in enterprise edition. You need to export forms from single user edition( ref 11) and import them in Enterprise edition form manager while creating new form.
4.2 IPad
4.2.1 Does I need to create forms compulsary in desktop software?
No, it is not compulsory. Just create profile (select tables/views/stored procedures) and sync. Make sure that in Preferences of Cellica Database software on iPad, “Preferences of Home Screen” options has set to Both or Profiles.
4.2.2 Can I hide Profiles List on home screen.
User can hide Profile List from home screen. You can select following options. 1. Forms 2. Profiles 3. Both
From Preferences of Cellica Database on iPad, you can customize home screen. On home screen, on upper
right side icon is there, use it to open Preferences of software. Following screen shows Preferences for customizing the Home Screen. Here select “Forms” option, which will show only form list on home screen. You can select Forms or Profiles or Both if you want.
Cellica Database for iPad Page 105

User Guide
4.2.3 Whenever I add/edit/delete record on iPad, in Record view I get Red/Cyan color.
Cyan color indicates that record synchronization is still in progress.
Red color indicates that Record has problem while syncing with desktop database. Icon on this screen shows information related with record syncing process.
Cellica Database for iPad Page 106

User Guide
Cellica Database for iPad Page 107

User Guide
4.2.4 I am not satisfied with current font and font size, is there any option to change it?
Yes, User can change font and font size from Preferences of Cellica Database software. In Preferences, Select “View Settings” option.
Cellica Database for iPad Page 108

User Guide
Figure 55: Change Font and Font Size
Cellica Database for iPad Page 109

User Guide
Cellica Database for iPad Page 110
5 SUPPORTED DATA TYPES
Currently Database Viewer Plus for iPad supports following data types. • Memo, Char, VarChar, VarChar2 • Number of type: Byte, Decimal, Integer, Long Integer, Single, Real, Float, Double • GUID • Date/Time • AutoNumber of type: Long Integer • Yes/No • Hyperlink • Currency

User Guide
Cellica Database for iPad Page 111
6 SYSTEM REQUIREMENT
Desktop: Windows XP, Windows 2000, Windows 2003, Windows Vista and Windows 2007 Device: iPad running OS 3.0 or higher

User Guide
Cellica Database for iPad Page 112
7 CONTACT US
You can use the following email addresses to contact us:
o Product support [email protected]
o Sales inquiries [email protected]