certificates - cisco.com · certificates displayinstalledcertificates. dcnm1# appmgrstartall/*...
TRANSCRIPT

Certificates
• Certificate Management, on page 1
Certificate Management
This section to applicable only for DCNM OVA/ISO deployments.Note
FromRelease 11.2(1), Cisco DCNMallows newmethods and newCLIs for installing, restoring after upgrade,and verifying certificates on the system. You can export certificates from the Active node to the Standby node,to ensure that both peers on the Native HA setup have the same certificates.
In a Cisco DCNMNative HA setup, after you install a CA certificate on the Active node and start the services,the certificates are automatically synchronized with the Standby node. If you need the same internal certificateon both Active and Standby nodes, you must export the certificate from the Active node to the Standby node.This ensures that both the peers on the Cisco Native HA setup have the same certificates.
From Release 11.3(1), you must use sysadmin role for certificate management.Note
Cisco DCNM stores two certificates:
• Self-signed certificate, for internal communication between the Cisco DCNM Server and variousapplications
• CA (Certificate Authority) Signed certificate, for communicating with the external world, such as WebUI.
Until you install a CA Signed certificate, Cisco DCNM retains a self-signed certificate for the communicatingwith the external network.
Note
Certificates1

Best practices for Certificate ManagementThe following are the guidelines and best practices for Certificate Management in Cisco DCNM.
• Cisco DCNM provides CLI based utilities to display, install, restore, and export or import of certificates.These CLIs are available through SSH console, and only a sysadmin user can accomplish these tasks.
• When you install Cisco DCNM, a self-signed certificate is installed, by default. This certificate is usedto communicate with the external world. After Cisco DCNM installation, you must install a CA-Signedcertificate on the system.
• On Cisco DCNMNative HA setup, we recommend that you install a CA-Signed certificate on the DCNMActive Node. The CA-Signed certificate will synchronize with the Standby node automatically. However,if you want to keep the same internal and CA-Signed certificate on both Active node and Standby node,you must export the certificates from Active node and import it to the Standby node. Both the Activenode and Standby node will have the same set of certificates.
Compute nodes in a cluster deployment do not require any action, as the computenodes use internally managed certificates.
Note
• Generate a CSR on Cisco DCNMwith a CN (common name). Provide a VIP FQDN (Virtual IP AddressFQDN) as CN to install a CA Signed certificate. The FQDN is the fully qualified domain name for themanagement subnet VIP (VIP of eth0) interface that is used to access Cisco DCNMWeb UI.
• If the CA Signed certificate was installed prior to upgrading the Cisco DCNM, then you must restorethe CA Signed certificate after you upgrade the Cisco DCNM.
You need not take a backup of certificates when you perform inline upgrade orbackup and restore.
Note
Display Installed CertificatesYou can view the details of the installed certificate by using the following command:
appmgr afw show-cert-details
In the following sample output for the appmgr afw show-cert-details command,CERTIFICATE 1 representsthe certificate offered to the external network and to the Web browsers. CEERTIFICATE 2 represents theinternally used certificate.dcnm# appmgr afw show-cert-details
****CERTIFICATE 1****[Certificate available to web gateway. This certificate is offered to webclients]:--------------Web gateway certificate---------------------------------------Certificate:
Data:Version: 3 (0x2)Serial Number: 4202 (0x106a)
Signature Algorithm: sha256WithRSAEncryptionIssuer: C=IN, ST=KA, L=BGL, O=xyz, OU=ABC, CN=<FQDN/IP>
Certificates2
CertificatesBest practices for Certificate Management
ValidityNot Before: Jun 4 13:55:25 2019 GMTNot After : Jun 3 13:55:25 2020 GMT
Subject: C=IN, ST=KA9, L=BGL9, O=XYZ123, OU=ABC123, CN=<FQDN/IP>Subject Public Key Info:
Public Key Algorithm: rsaEncryptionPublic-Key: (2048 bit)Modulus:
00:bb:52:1e:7f:24:d7:2e:24:62:5a:83:cc:e4:88:--------------Certificate output is truncated to first 15 lines--------------
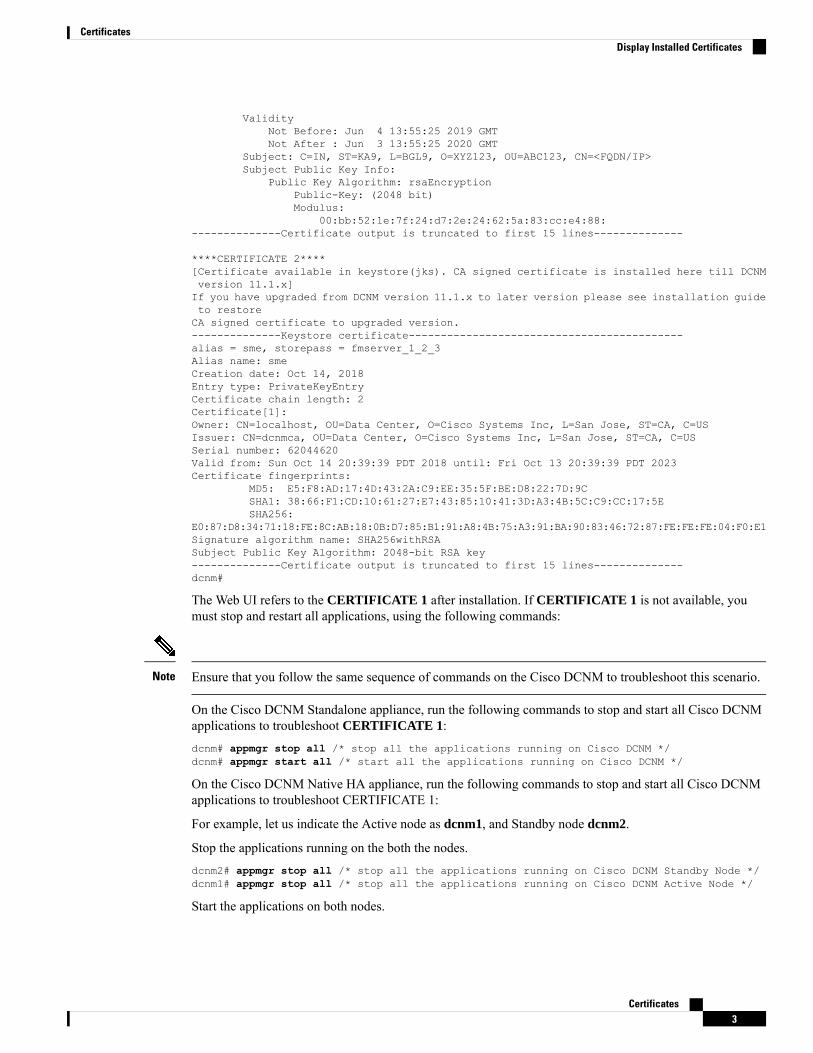
****CERTIFICATE 2****[Certificate available in keystore(jks). CA signed certificate is installed here till DCNMversion 11.1.x]If you have upgraded from DCNM version 11.1.x to later version please see installation guideto restoreCA signed certificate to upgraded version.--------------Keystore certificate-------------------------------------------alias = sme, storepass = fmserver_1_2_3Alias name: smeCreation date: Oct 14, 2018Entry type: PrivateKeyEntryCertificate chain length: 2Certificate[1]:Owner: CN=localhost, OU=Data Center, O=Cisco Systems Inc, L=San Jose, ST=CA, C=USIssuer: CN=dcnmca, OU=Data Center, O=Cisco Systems Inc, L=San Jose, ST=CA, C=USSerial number: 62044620Valid from: Sun Oct 14 20:39:39 PDT 2018 until: Fri Oct 13 20:39:39 PDT 2023Certificate fingerprints:
MD5: E5:F8:AD:17:4D:43:2A:C9:EE:35:5F:BE:D8:22:7D:9CSHA1: 38:66:F1:CD:10:61:27:E7:43:85:10:41:3D:A3:4B:5C:C9:CC:17:5ESHA256:
E0:87:D8:34:71:18:FE:8C:AB:18:0B:D7:85:B1:91:A8:4B:75:A3:91:BA:90:83:46:72:87:FE:FE:FE:04:F0:E1Signature algorithm name: SHA256withRSASubject Public Key Algorithm: 2048-bit RSA key--------------Certificate output is truncated to first 15 lines--------------dcnm#
The Web UI refers to the CERTIFICATE 1 after installation. If CERTIFICATE 1 is not available, youmust stop and restart all applications, using the following commands:
Ensure that you follow the same sequence of commands on the Cisco DCNM to troubleshoot this scenario.Note
On the Cisco DCNM Standalone appliance, run the following commands to stop and start all Cisco DCNMapplications to troubleshoot CERTIFICATE 1:dcnm# appmgr stop all /* stop all the applications running on Cisco DCNM */dcnm# appmgr start all /* start all the applications running on Cisco DCNM */
On the Cisco DCNM Native HA appliance, run the following commands to stop and start all Cisco DCNMapplications to troubleshoot CERTIFICATE 1:
For example, let us indicate the Active node as dcnm1, and Standby node dcnm2.
Stop the applications running on the both the nodes.dcnm2# appmgr stop all /* stop all the applications running on Cisco DCNM Standby Node */dcnm1# appmgr stop all /* stop all the applications running on Cisco DCNM Active Node */
Start the applications on both nodes.
Certificates3
CertificatesDisplay Installed Certificates

dcnm1# appmgr start all /* start all the applications running on Cisco DCNM Active Node*/dcnm2# appmgr start all /* start all the applications running on Cisco DCNM Standby Node*/
Ensure that you clear the browser cache before you launch the Cisco DCNMWeb UI, using the ManagementIP Address.
Note
The CERTIFICATE 1 is displayed in the Security settings on the browser.
Installing a CA Signed CertificateWe recommend that you install a CA Signed certificate as a standard security practice. The CA Signedcertificates are recognized, and verified by the browser. You can also verify the CA Signed certificate manually.
The Certificate Authority can be an Enterprise Signing Authority, also.Note
Installing a CA Signed Certificate on Cisco DCNM Standalone SetupTo install a CA Signed certificate on the Cisco DCNM, perform the following steps.
Procedure
Step 1 Logon to the DCNM server via SSH terminal.Step 2 Generate a CSR on the Cisco DCNM server using the appmgr afw gen-csr command:
CSR is unique to a Cisco DCNM, and only a corresponding CSR signed certificate must be installedon a given Cisco DCNM.
Note
dcnm# appmgr afw gen-csrGenerating CSR.........-----Country Name (2 letter code) [XX]:USState or Province Name (full name) []:CALocality Name (eg, city) [Default City]:San JoseOrganization Name (eg, company) [Default Company Ltd]:CiscoOrganizational Unit Name (eg, section) []:DCBGCommon Name (eg, your name or your server's hostname) []:dcnmhost.cisco.comEmail Address []:[email protected]
Please enter the following 'extra' attributes to be sent with your certificate requestA challenge password []: /* This field is not mandatory */An optional company name []: /* This field is not mandatory */...
A CSR file dcnmweb.csr is created in the /var/tmp/ directory.********** CA certificate installation not completed yet. Please do followings. **********CSR is generated and placed at /var/tmp/dcnmweb.csr.Please download or copy the content to your certificate signing server.
Certificates4
CertificatesInstalling a CA Signed Certificate

Step 3 Send this CSR to your Certificate signing server.
The CA Signing server is local to your organization.Note
Step 4 Get the certificate signed by your Certificate Authority.Step 5 Copy the new CA Signed certificate to Cisco DCNM server.
Ensure that the certificate is located at /var/tmp directory on the Cisco DCNM Server.
Step 6 Install the CA Signed certificate on the Cisco DCNM by using the following commands:
We recommend that you run the following commands in the same sequence as shown below.Note
dcnm# appmgr stop all /* Stop all applications running on Cisco DCNMdcnm# appmgr afw install-CA-signed-cert <CA-signed certificate directory>/* CA-signed certificate with full or relative path */Making the signed certificate available to web gateway....
CA signed certificate CA-signed-cert.pem is installed. Please start all applications asfollowings:On standalone setup execute: 'appmgr start all'
Step 7 Restart all applications with the new certificate on Cisco DCNM using the appmgr start all command.dcnm# appmgr start all
Step 8 Verify the newly installed CA Signed certificate using the appmgr afw show-cert-details command.
The system is now armed with the CA Signed certificate, which is verified at the browser.
CSR is unique to a Cisco DCNM, and only a corresponding CSR signed certificate must be installedon a given Cisco DCNM.
Note
Installing a CA Signed Certificate on Cisco DCNM Native HA setupTo install a CA Signed certificate on the Cisco DCNM, perform the following steps.
We recommend that you run the following commands in the same sequence as shown below.Note
Procedure
Step 1 On the Active node, logon to the DCNM server via SSH terminal.
For example, let us indicate the Cisco DCNMActive and Standby appliances as dcnm1 and dcnm2respectively.
Note
Step 2 Generate a CSR on the Cisco DCNM server using the appmgr afw gen-csr command:
CSR is unique to a Cisco DCNM, and only a corresponding CSR signed certificate must be installedon a given Cisco DCNM.
Note
Certificates5
CertificatesInstalling a CA Signed Certificate on Cisco DCNM Native HA setup

dcnm1# appmgr afw gen-csrGenerating CSR.........-----Country Name (2 letter code) [XX]:USState or Province Name (full name) []:CALocality Name (eg, city) [Default City]:San JoseOrganization Name (eg, company) [Default Company Ltd]:CiscoOrganizational Unit Name (eg, section) []:DCBGCommon Name (eg, your name or your server's hostname) []:dcnmhost.cisco.com/* Provide a VIP FQDN name of the eth0 interface*/Email Address []:[email protected]
Please enter the following 'extra' attributes to be sent with your certificate requestA challenge password []: /* This field is not mandatory */An optional company name []: /* This field is not mandatory */...
For generating CSR on the Active node, we recommend that you provide a VIP FQDN name ofeth0 interface, when for prompted for Common Name.
Note
This FQDN must be the web server address that you enter on the browser to launch the Cisco DCNMWebUI.
A CSR file dcnmweb.csr is created in the /var/tmp/ directory.********** CA certificate installation not completed yet. Please do followings. **********CSR is generated and placed at /var/tmp/dcnmweb.csr.Please download or copy the content to your certificate signing server.
Step 3 Send this CSR to your Certificate signing server.
The CA Signing server is local to your organization.
The CA Signing server can be the CA certificate signing authority in your organizations, or yourlocal CA to your organization.
Note
Step 4 Get the certificate signed by your Certificate Authority.Step 5 Copy the new CA Signed certificate to Cisco DCNM server.
Ensure that the certificate is located at /var/tmp directory on the Cisco DCNM Server.
Step 6 On the Standby node, logon to the DCNM server via SSH terminal.Step 7 Stop all the applications on the Standby node using the appmgr stop all command.
dcnm2# appmgr stop all /* Stop all applications running on Cisco DCNM Standby Nodedcnm2#
Step 8 On the Active node, stop all the applications by using the appmgr stop all command.dcnm1# appmgr stop all /* Stop all applications running on Cisco DCNM Active Nodedcnm2#
Step 9 On the Active node, install the CA Signed certificate on the Cisco DCNM by using the appmgr afwinstall-CA-signed-cert command.dcnm1# appmgr afw install-CA-signed-cert <CA-signed certificate directory>/* CA-signed certificate with full or relative path */Making the signed certificate available to web gateway....
CA signed certificate CA-signed-cert.pem is installed. Please start all applications as
Certificates6
CertificatesInstalling a CA Signed Certificate on Cisco DCNM Native HA setup

followings:On standalone setup execute: 'appmgr start all'
Step 10 On the Active node, restart all applications with the new certificate on Cisco DCNM using the appmgr startall command.dcnm1# appmgr start all /* Start all applications running on Cisco DCNM Active Node
Ensure that all services on Cisco DCNM Active node is operational before you proceed further.
Logon to the Cisco DCNMWeb UI and check if the Certificate details are correct.Note
Step 11 On the Standby node, restart all applications with the new certificate on Cisco DCNMusing the appmgr startall command.dcnm2# appmgr start all /* Start all applications running on Cisco DCNM Standby Node
This will ensure that the Standby node makes a fresh peer relationship with the Active Node. Therefore, thenewly installed CA Signed certificate on the Active node will be synchronized on the Standby node.
Step 12 Verify the newly installed CA Signed certificate using the appmgr afw show-cert-details command, on bothActive and Standby nodes.
The system is now armed with the CA Signed certificate, which is verified at the browser.
If the Certificates information is not displayed, we recommend that you wait for a few minutes. TheSecondary node takes a while to synchronize with the Active node.
Note
If you want to retain the same internal and CA Signed certificate on both peers on a Native HA setup, firstinstall the certificates on the Active node. After installing certificates on the Active node, export the certificatesfrom Active node and import the same certificates to the Standby node.
Exporting certificate from Active Node to Standby NodeThe following procedure applies to the Cisco DCNMNative HA setup only. The CA Signed certificate installedon the Active node is always synced to the Standby node. However, the internal certificate differs on bothActive and Standby nodes. If you want to keep the same set of certificates on both peers, you must performthe procedure described in this section.
You may choose not to export any certificates, because the internal certificates are internal to the system.These certificates can differ on Active and Standby nodes without having any functional impact.
Note
To export the CA Signed certificate from Active node and import the certificate to the Standby node, performthe following procedure.
Procedure
Step 1 On the Active node, logon to the DCNM server via SSH terminal.Step 2 Create a certificate bundle, by using the appmgr afw export-import-cert-ha-peer export command.
Certificates7
CertificatesExporting certificate from Active Node to Standby Node

dcnm1# appmgr afw export-import-cert-ha-peer export
Step 3 Copy the certificate bundle to the Standby node.
Ensure that you copy the certificate on the Standby node to the location as specified on the SSHterminal.
Note
Step 4 On the Standby node, stop all the applications by using the appmgr stop all command.dcnm2# appmgr stop all /* Stop all applications running on Cisco DCNM Standby Nodedcnm2#
Step 5 Import the certificates to the Standby node by using the appmgr afw export-import-cert-ha-peer importcommand.
The certificates bundle is imported and installed on the Standby node.
Step 6Step 7 On the Standby node, restart all applications with the new certificate on Cisco DCNMusing the appmgr start
all command.dcnm2# appmgr start all /* Start all applications running on Cisco DCNM Standby Node
This ensures that the new imported certificate are effective when applications are started on the Standby node.
Step 8 On the Standby node, verify the newly imported CASigned certificate using the appmgr afw show-cert-detailscommand.
The system is now armed with same certificates on both Active and Standby nodes.
Restoring the certificates after an upgradeThis mechanism applies to Cisco DCNM Upgrade procedure using the inline upgrade process only. Thisprocedure is not required for the backup and restore of data on the same version of the Cisco DCNM appliance.
Note that certificate restore is a disruptive mechanism; it requires you to stop and restart applications. Restoremust performed only when the upgraded system is stable, that is, you must be able to login to Cisco DCNMWeb UI. On a Cisco DCNMNative HA setup, both the Active and Standby nodes must have established peerrelationship.
A certificate needs to be restored only in following situations:
• if a CA signed certificate was installed on the system before upgrade, and,
• if you're upgrading from a version prior to 11.2(1) to version 11.2(1) or later.
Note
After upgrading the Cisco DCNM, you must always verify the certificate before restoring to check ifCERTIFICATE 1 is the CA signed certificate. You must restore the certificates, if otherwise.
Verify the certificates using the appmgr afw show-cert-details as shown in the sample output below.dcnm# appmgr afw show-cert-details****CERTIFICATE 1****
Certificates8
CertificatesRestoring the certificates after an upgrade

[Certificate available to web gateway. This certificate is offered to webclients]:--------------Web gateway certificate--------------------------------Certificate:
Data:Version: 3 (0x2)Serial Number: 1575924977762797464 (0x15decf6aec378798)
Signature Algorithm: sha256WithRSAEncryptionIssuer: C=US, ST=CA, L=San Jose, O=Enterprise CA inc, OU=Data Center, CN=dcnm1.ca.com
ValidityNot Before: Dec 9 20:56:17 2019 GMTNot After : Dec 9 20:56:17 2024 GMT
Subject: C=US, ST=CA, L=San Jose, O= Enterprise CA inc, OU=Data Center,CN=dcnm1.ca.com
Subject Public Key Info:Public Key Algorithm: rsaEncryption
Public-Key: (2048 bit)Modulus:
00:cf:6e:cd:c6:a9:30:08:df:92:98:38:49:9c:2a:--------------Certificate output is truncated to first 15 lines--------------
****CERTIFICATE 2****[Certificate available in keystore(jks). CA signed certificate is installed here till DCNMversion 11.1.x]If you have upgraded from DCNM version 11.1.x to later version please see installation guideto restoreCA signed certificate to upgraded version.--------------Keystore certificate-------------------------------------------Alias name: smeCreation date: Oct 14, 2018Entry type: PrivateKeyEntryCertificate chain length: 2Certificate[1]:Owner: CN=localhost, OU=Data Center, O=Cisco Systems Inc, L=San Jose, ST=CA, C=USIssuer: CN=dcnmca, OU=Data Center, O=Cisco Systems Inc, L=San Jose, ST=CA, C=USSerial number: 62044620Valid from: Sun Oct 14 20:39:39 PDT 2018 until: Fri Oct 13 20:39:39 PDT 2023Certificate fingerprints:SHA1: 38:66:F1:CD:10:61:27:E7:43:85:10:41:3D:A3:4B:5C:C9:CC:17:5ESHA256:
E0:87:D8:34:71:18:FE:8C:AB:18:0B:D7:85:B1:91:A8:4B:75:A3:91:BA:90:83:46:72:87:FE:FE:FE:04:F0:E1Signature algorithm name: SHA256withRSASubject Public Key Algorithm: 2048-bit RSA keyVersion: 3--------------Certificate output is truncated to first 15 lines------dcnm#
Restoring Certificates on Cisco DCNM Standalone setup after UpgradeTo restore the certificates after you upgrade the Cisco DCNM Standalone deployment to Release 11.3(1),perform the following:
Procedure
Step 1 Note When you upgrade to Release 11.3(1), a backup of the CA Signed certificate is created.
After you have successfully upgraded the Cisco DCNM Standalone appliance, logon to the DCNM server viaSSH.
Step 2 Stop all the applications using the following command:
Certificates9
CertificatesRestoring Certificates on Cisco DCNM Standalone setup after Upgrade

appmgr stop all
Step 3 Restore the certificate by using the following command:
appmgr afw restore-CA-signed-cert
Step 4 Enter yes to confirm to restore the previously installed certificate.Step 5 Start all the applications using the following command:
appmgr start all
Step 6 Verify the newly installed CA Signed certificate using the appmgr afw show-cert-details command.
The system is now armed with the CA Signed certificate, which is verified at the browser.
Restoring Certificates on Cisco DCNM Native HA setup after UpgradeIn a Cisco DCNM Native HA setup, the certificate is installed on both the Active and Standby nodes. Youmust restore the certificate only on the Active node. The certificate will synchronize with the Standby nodeautomatically.
To restore the certificates after you upgrade the Cisco DCNM Standalone deployment to Release 11.3(1),perform the following:
Procedure
Step 1 Logon to the Cisco DCNM server via SSH.
For example, let us indicate Active and Standby appliances as dcnm1 and dcnm2 respectively.Note
Step 2 On the Standby node, stop all the applications using the appmgr stop all command.dcnm2# appmgr stop all /* Stop all applications running on Cisco DCNM Standby Node
Step 3 On the Active node, stop all the applications using the appmgr stop all command.dcnm1# appmgr stop all /* Stop all applications running on Cisco DCNM Active Node
Step 4 Restore the certificate on the Active node by using the appmgr afw restore-CA-signed-cert command.dcnm1# appmgr afw restore-CA-signed-cert
Step 5 Enter yes to confirm to restore the previously installed certificate.Step 6 On the Active node, start all the applications using the appmgr start all command.
dcnm1# appmgr start all /* Start all applications running on Cisco DCNM Active Node
Ensure that all services on Cisco DCNM Active node is operational before you proceed further.
Logon to the Cisco DCNMWeb UI and check if the Certificate details are correct.Note
Step 7 On the Standby node, start all the applications using the appmgr start all command.dcnm2# appmgr start all /* Start all applications running on Cisco DCNM Standby Node
Wait for some time, while the Standby node synchronizes with the Active node.
Certificates10
CertificatesRestoring Certificates on Cisco DCNM Native HA setup after Upgrade

Step 8 Verify the newly installed CA Signed certificate using the appmgr afw show-cert-details command, on bothActive and Standby nodes.
The system is now armed with the CA Signed certificate, which is verified at the browser.
Recovering and Restoring Previously Installed CA Signed CertificatesInstalling, restoring, managing CA signed certificate is a time-consuming process as a third-party signingserver is involved. This may also lead to omissions or mistakes which can result in installing wrong certificates.In such a scenario, we recommend that you restore the certificates that were installed prior to the latest installor upgrade.
To recover and restore the previously installed CA signed certificates, perform the following steps.
Procedure
Step 1 Logon to the DCNM server via SSH terminal.Step 2 Navigate to the /var/lib/dcnm/afw/apigateway/ directory.
dcnm# cd /var/lib/dcnm/afw/apigateway/dcnm# ls -ltr /* View the contents of the foldertotal 128-rw------- 1 root root 1844 Nov 18 13:14 dcnmweb.key.2019-11-20T132939-08:00-rw-r--r-- 1 root root 1532 Nov 18 13:14 dcnmweb.crt.2019-11-20T132939-08:00-rw------- 1 root root 1844 Nov 20 10:15 dcnmweb.key.2019-11-20T132950-08:00-rw-r--r-- 1 root root 1532 Nov 20 10:15 dcnmweb.crt.2019-11-20T132950-08:00-rw------- 1 root root 1844 Dec 22 13:59 dcnmweb.key-rw-r--r-- 1 root root 1532 Dec 22 13:59 dcnmweb.crt
.
..
...
dcnmweb.key and dcnmweb.crt are the key and certificate files that are installed on the system, currently.Similar filenames, with timestamp suffix, help you in identifying the key and certificate pairs installed priorto the recent upgrade or restore.
Step 3 Stop all applications running on Cisco DCNM using appmgr stop all command.Step 4 Take a backup of dcnmweb.key and dcnmweb.crt files.Step 5 Identify the older key and certificate pair that you want to restore.Step 6 Copy the key and certificate pair as dcnmweb.key and dcnmweb.crt (without timestamp suffix).Step 7 Start all applications running on Cisco DCNM using appmgr start all command.Step 8 Verify the details of the certificate using the appmgr afw show-cert-details command. CERTIFICATE 1 is
the CA signed certificate.
If the CA signed certificate is not visible to Cisco DCNMWeb UI, or if the DCNM Server sendsany failure message, you must reboot the system.
Note
Certificates11
CertificatesRecovering and Restoring Previously Installed CA Signed Certificates

Verifying the installed certificateWhile the installed certificate can be verified using the appmgr afw show-cert-details command, the webbrowser verifies if the certificate is effective or not. Cisco DCNM supports all standard browsers (Chrome,IE, Safari, Firefox). However, each browser display the certificate information differently.
We recommend that you refer to the browser specific information on that browser provider website.
The following snippet is a sample from the Chrome Browser, Version 74.0.3729.169, to verify the certificate.
1. Enter URL https://<dcnm-ip-address> or https://<FQDN> in the address bar on the browser.
Press the Return key.
2. Based on the type of certificate, the icon on the left of the URL field shows a lock icon [ ] or an alert
icon [ ].
Click on the icon.
3. On the card, click Certificate field.
The information in the certificate is displayed.
Certificates12
CertificatesVerifying the installed certificate

The information that is displayed must match with the details as displayed on CERTIFICATE 1 whenyou view the certificate details using the appmgr afw show-cert-details.
Certificates13
CertificatesVerifying the installed certificate

Certificates14
CertificatesVerifying the installed certificate