certified switches - atlona · certified switches. at-omni-xxx 2 version release date notes 1 08/17...
TRANSCRIPT

Atlona Manuals Networked AV
AT-OMNI-232 AT-OMNI-238
AT-OMNI-121 AT-OMNI-122
AT-OMNI-512AT-OMNI-521
AT-OMNI-111 AT-OMNI-112
Certified Switches
AT-OMNI-XXX 2
Version Release Date Notes
1 08/17 Initial release2 08/17 Added Luxul XMS 7048P switch3 08/17 Added static route information4 11/17 Added Luxul AMS 4424P switch5 06/18 Added Pakedge S3L-24P6 07/18 Added Cisco SG350 and SG550X switches7 08/18 Added Luminex GigaCore 26i8 09/18 Added Ruckus ICX 7150-48ZP9 11/18 Added IGMP and PoE budget requirements for switches used with OmniStream10 12/18 Added Ubiquiti ES-48-500W / 750W switch
Version Information
AT-OMNI-XXX 3
Introduction 4Switch Requirements 4
IGMP 4PoE Budget 4
Features of Configurations 5Known Limitations 5Home Router Static Routing 6
Default Configurations 7Cisco SG300-10MPP 7Cisco SG300-28MP 8Cisco SG300-52MP 9Cisco SG350-10MP 11Cisco SG350-28MP 12Cisco SG350-52MP 13Cisco SG550X-24MP 14Cisco SG550X-48MP 15Luxul XMS-7048P 16Luxul AMS-4424P 18Pakedge S3L-24P 20Luminex GigaCore 26i 22Ruckus ICX 7150-48ZP 25Ubiquiti ES-48-500W / ES-48-750W 28
Table of Contents

AT-OMNI-XXX 4
Introduction
Switch Requirements
Atlona has made every effort to make sure that all switches listed in this document, meet or exceed functionality with OmniStream products, identifying them as OmniStream Certified Switches. Atlona will continue to update this document as more switches are tested. However, due to the vast number of manufacturers and switch models on the market today, it is not possible to test each one. Before purchasing a switch that is not included in this document, make sure that it supports the following features.
IGMP
• IGMP Snooping
• IGMP Querier
• IGMP Immediate Leave
• Unregistered Multicast Flooding
• Static Multicast Groups (optional)
PoE Budget
In addition to the above requirements, the power budget of the PoE switch must be identified. To determine the maximum number of PoE devices that can be connected to a switch, two factors need to be considered:
1) The PoE budget of the switch.2) The power requirements of each device.
When purchasing a switch, identify the PoE budget or power dedicated to PoE, in the switch specifications. This number is the total power that the switch can provide when PoE devices are connected. For example, a 24-port 370-watt PoE switch can supply up to 15.4 W of power on all 24 ports. In this case, you can connect 24 OmniStream units.
IMPORTANT: Failing to meet all of the above requirements (except for Static Multicast Groups) may lead to performance issues.
NOTE: If connecting OmniStream devices to a non-PoE switch or if using the analog audio capabilities, then OmniStream units must be connected to the external power supply (Atlona part no. AT-PS-48083-C). The power supply is not included and sold separately.

AT-OMNI-XXX 5
Switch
Home Router
Encoder
DecoderDecoder
Encoder
AMS VM
12
ID
PWR
LINK
TM
OMNISTREA
M
12
ID
PWR
LINK
TM
OMNISTREA
M
HDMI
PWR
LINK
TM
OMNISTREA
M
VOLU
MEDIS
PLAY
INPUT
ID
12
12
HDMI
PWR
LINK
TM
OMNISTREA
M
VOLU
MEDIS
PLAY
INPUT
ID
12
12
Legend
VLAN 10
VLAN 1
Features of Configurations
• Connect OmniStream devices plug and play.
• Connect management ports to an external network, such as a home router.
NOTE: Devices that are connected to either OmniStream ports (VLAN 10) or management ports (VLAN 1) on the OmniStream switch will be able to communicate with both the OmniStream units as well as the Internet (using a connected home router). Devices that are connected to the home router will only be able to connect to OmniStream devices if a static route is configured on the home router. Refer to Home Router Static Routing (page 6) on the next page.
Known Limitations
• The network configuration file is applicable only to one standalone switch.
• If planning to connect multiple switches together, then a custom configuration will be required.
• Management network must use IP addresses from 192.168.1.1 through 192.168.1.253. If a different range is used, then a custom configuration will be needed.
• The management ports have DHCP disabled, as a typical home router will handle this task. If the system will not be connected to another network using the management ports, one of the OmniStream ports should be used for management.
• Without a static route configured on the home router, any devices connected to the home router will not be able to connect to the OmniStream devices.
• The home router must be set to 192.168.1.x in order for the Internet to be accessible from the OmniStream VLAN (VLAN 10).
Introduction

AT-OMNI-XXX 6
Introduction
Home Router Static Routing
In order for devices that are connected to the home router, to be able to connect to OmniStream devices on VLAN 10, a static route must be configured on the home router. This static route is required to send the network traffic to the proper destination. Configuring static routing will vary by manufacturer, but most home routers have this ability. Essentially, the router must be instructed to route any traffic bound for the 10.1.0.0/23 range (also referred to as the range starting with 10.1.0.0 with a subnet mask of 255.255.254.0) will use the gateway 192.168.1.254. However, if the home router is using the same gateway, then the IP address of the switch must be changed to 192.168.1.253.
A static route for the OmniStream ports (VLAN 10) has been defined assuming that the home router is set to 192.168.1.1. If this is not the case, then the static route will need to be modified to enable Internet access to the OmniStream VLAN.
NOTE: Without defining a static route on the home router, the system will still function properly but without connectivity to the OmniStream devices (VLAN 10) from the home router.
NOTE: If the home router is not set to 192.168.1.1, then the configuration file may still be used as is, but VLAN 10 will not have Internet access.

AT-OMNI-XXX 7
Summary Version: 1.4.7.6
Ports 1 through 8 are to be used only for OmniStream.
Ports 9 and 10 are to be used for management and can be connected to another network, such as a router that has Internet access.
Cisco SG300-10MPP
Configuration Details
• Hostname: DemoSw
• Login credentials
* Username: admin
* Password: Atlona
• VLAN 1
* Ports: 9 and 10
* Static routing: 192.168.1.1 (home router for Internet traffic)
NOTE: DHCP is not enabled on VLAN 1. It is expected that these ports would be connected to an external network with its own DHCP server, which must be using the 192.168.1.1 through 192.168.1.254 range to function properly with this configuration. If a different IP range is used, then the switch configuration must be modified, accordingly.
• VLAN 10
* Ports: 1 through 8
* DHCP range: 10.1.0.1 through 10.1.0.254
• DHCP lease time: 7 days
• Spanning tree mode: RSTP
• BPDU guard: Enabled
• Green Ethernet: Disabled
• Loop protection: Enabled
• SSH: Enabled
• IGMP (VLAN 10 only)
* Snooping: Enabled
* Unregistered flooding: Disabled
* Immediate leave: Enabled
* Querier: Enabled
* Custom multicast address for AT-OMNI-232 management added
NOTE: Static address assignments may be made in the 10.1.1.1 through 10.1.1.254 range with a subnet mask of 255.255.254.0.
NOTE: Before uploading the configuration, change the System Mode to L3 (router mode).The System Mode can be changed under Administration > System Settings > System Mode. Refer to the image on page 5 for more information.
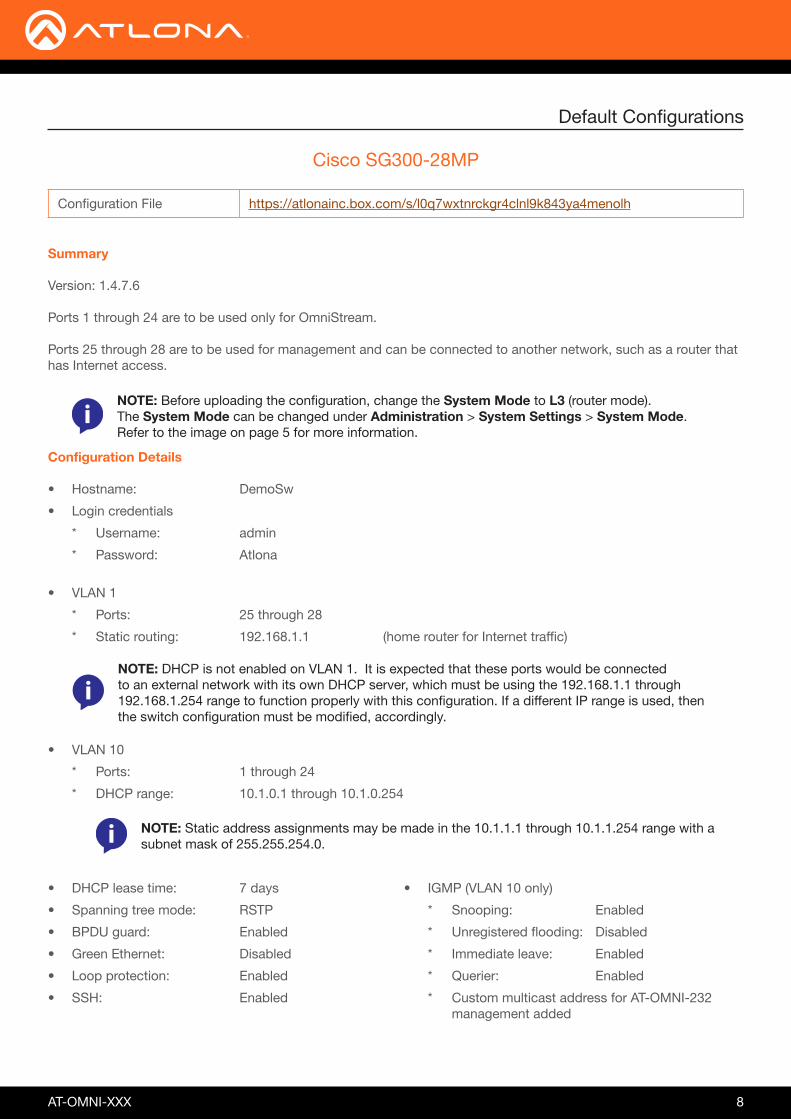
Default Configurations
Configuration File https://atlonainc.box.com/s/zxo0979vqcd2t4lelxe6ln82k7mvgizt
AT-OMNI-XXX 8
Summary Version: 1.4.7.6
Ports 1 through 24 are to be used only for OmniStream.
Ports 25 through 28 are to be used for management and can be connected to another network, such as a router that has Internet access.
Cisco SG300-28MP
Default Configurations
Configuration Details
• Hostname: DemoSw
• Login credentials
* Username: admin
* Password: Atlona
• VLAN 1
* Ports: 25 through 28
* Static routing: 192.168.1.1 (home router for Internet traffic)
NOTE: DHCP is not enabled on VLAN 1. It is expected that these ports would be connected to an external network with its own DHCP server, which must be using the 192.168.1.1 through 192.168.1.254 range to function properly with this configuration. If a different IP range is used, then the switch configuration must be modified, accordingly.
NOTE: Before uploading the configuration, change the System Mode to L3 (router mode).The System Mode can be changed under Administration > System Settings > System Mode. Refer to the image on page 5 for more information.
• VLAN 10
* Ports: 1 through 24
* DHCP range: 10.1.0.1 through 10.1.0.254
• DHCP lease time: 7 days
• Spanning tree mode: RSTP
• BPDU guard: Enabled
• Green Ethernet: Disabled
• Loop protection: Enabled
• SSH: Enabled
• IGMP (VLAN 10 only)
* Snooping: Enabled
* Unregistered flooding: Disabled
* Immediate leave: Enabled
* Querier: Enabled
* Custom multicast address for AT-OMNI-232 management added
NOTE: Static address assignments may be made in the 10.1.1.1 through 10.1.1.254 range with a subnet mask of 255.255.254.0.
Configuration File https://atlonainc.box.com/s/l0q7wxtnrckgr4clnl9k843ya4menolh

AT-OMNI-XXX 9
Summary Version: 1.4.7.6
Ports 1 through 48 are to be used only for OmniStream.
Ports 49 through 52 are to be used for management and can be connected to another network, such as a router that has Internet access.
Configuration Details
• Hostname: DemoSw
• Login credentials
* Username: admin
* Password: Atlona
• VLAN 1
* Ports: 49 through 52
* Static routing: 192.168.1.1 (home router for Internet traffic)
Cisco SG300-52MP
NOTE: Before uploading the configuration, change the System Mode to L3 (router mode).The System Mode can be changed under Administration > System Settings > System Mode.
Default Configurations
Configuration File https://atlonainc.box.com/s/3ty9h2a2nl21csw2boa2tc0st9dxawao

AT-OMNI-XXX 10
• VLAN 10
* Ports: 1 through 48
* DHCP range: 10.1.0.1 through 10.1.0.254
• DHCP lease time: 7 days
• Spanning tree mode: RSTP
• BPDU guard: Enabled
• Green Ethernet: Disabled
• Loop protection: Enabled
• SSH: Enabled
• IGMP (VLAN 10 only)
* Snooping: Enabled
* Unregistered flooding: Disabled
* Immediate leave: Enabled
* Querier: Enabled
* Custom multicast address for AT-OMNI-232 management added
Default Configurations
NOTE: Static address assignments may be made in the 10.1.1.1 through 10.1.1.254 range with a subnet mask of 255.255.254.0.
NOTE: DHCP is not enabled on VLAN 1. It is expected that these ports would be connected to an external network with its own DHCP server, which must be using the 192.168.1.1 through 192.168.1.254 range to function properly with this configuration. If a different IP range is used, then the switch configuration must be modified, accordingly.

AT-OMNI-XXX 11
Default Configurations
Cisco SG350-10MP
Summary Version: 2.2.8.4
Ports 1 through 8 are to be used only for OmniStream.
Ports 9 and 10 are to be used for management and can be connected to another network, such as a router that has Internet access.
Configuration Details
• Hostname: DemoSw
• Login credentials
* Username: admin
* Password: Atlona
• VLAN 1
* Ports: 9 and 10
* Static routing: 192.168.1.1 (home router for Internet traffic)
NOTE: DHCP is not enabled on VLAN 1. It is expected that these ports would be connected to an external network with its own DHCP server, which must be using the 192.168.1.1 through 192.168.1.254 range to function properly with this configuration. If a different IP range is used, then the switch configuration must be modified, accordingly.
• VLAN 10
* Ports: 1 through 8
* DHCP range: 10.1.0.1 through 10.1.0.254
• DHCP lease time: 7 days
• Spanning tree mode: RSTP
• BPDU guard: Enabled
• Green Ethernet: Disabled
• Loop protection: Enabled
• SSH: Enabled
• IGMP (VLAN 10 only)
* Snooping: Enabled
* Unregistered flooding: Disabled
* Immediate leave: Enabled
* Querier: Enabled
* Custom multicast address for AT-OMNI-232 management added
NOTE: Static address assignments may be made in the 10.1.1.1 through 10.1.1.254 range with a subnet mask of 255.255.254.0.
Configuration File https://atlonainc.app.box.com/s/rankeecnh9ey21gtrxrogkafvda2i6r8
AT-OMNI-XXX 12
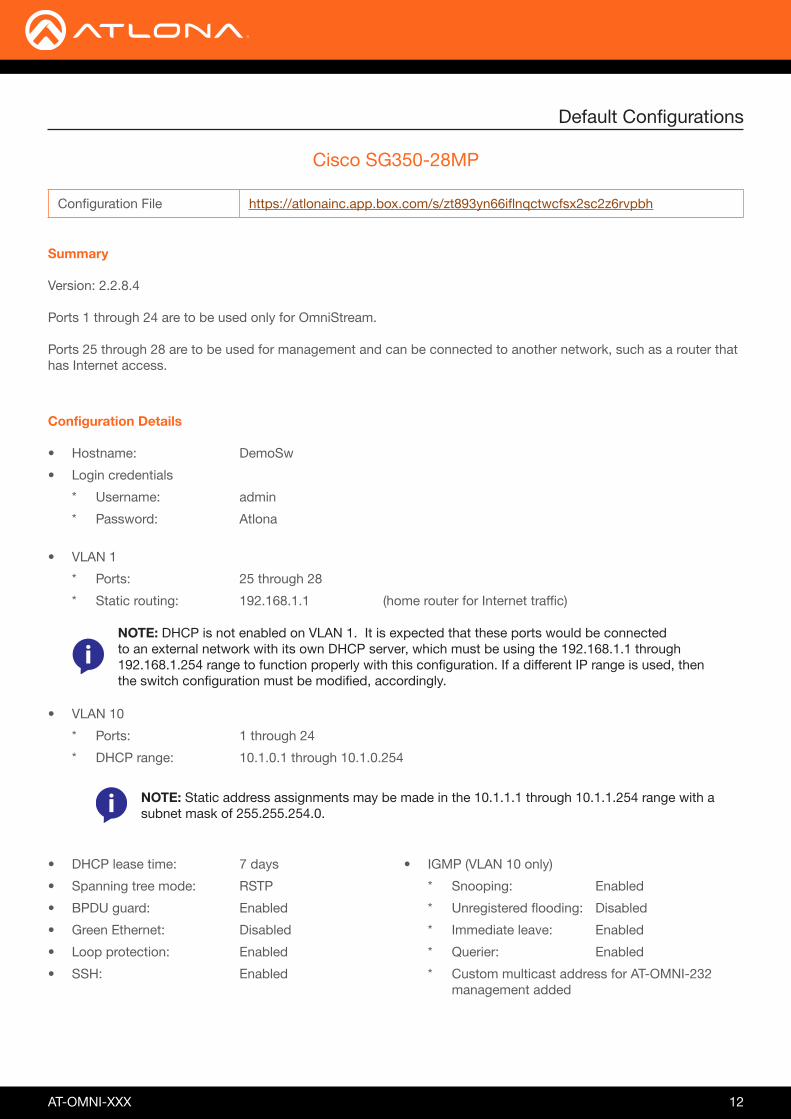
Default Configurations
Cisco SG350-28MP
Summary Version: 2.2.8.4
Ports 1 through 24 are to be used only for OmniStream.
Ports 25 through 28 are to be used for management and can be connected to another network, such as a router that has Internet access.
Configuration Details
• Hostname: DemoSw
• Login credentials
* Username: admin
* Password: Atlona
• VLAN 1
* Ports: 25 through 28
* Static routing: 192.168.1.1 (home router for Internet traffic)
NOTE: DHCP is not enabled on VLAN 1. It is expected that these ports would be connected to an external network with its own DHCP server, which must be using the 192.168.1.1 through 192.168.1.254 range to function properly with this configuration. If a different IP range is used, then the switch configuration must be modified, accordingly.
• VLAN 10
* Ports: 1 through 24
* DHCP range: 10.1.0.1 through 10.1.0.254
• DHCP lease time: 7 days
• Spanning tree mode: RSTP
• BPDU guard: Enabled
• Green Ethernet: Disabled
• Loop protection: Enabled
• SSH: Enabled
• IGMP (VLAN 10 only)
* Snooping: Enabled
* Unregistered flooding: Disabled
* Immediate leave: Enabled
* Querier: Enabled
* Custom multicast address for AT-OMNI-232 management added
NOTE: Static address assignments may be made in the 10.1.1.1 through 10.1.1.254 range with a subnet mask of 255.255.254.0.
Configuration File https://atlonainc.app.box.com/s/zt893yn66iflnqctwcfsx2sc2z6rvpbh

AT-OMNI-XXX 13
Default Configurations
Cisco SG350-52MP
Summary Version: 2.2.8.4
Ports 1 through 48 are to be used only for OmniStream.
Ports 49 through 52 are to be used for management and can be connected to another network, such as a router that has Internet access.
Configuration Details
• Hostname: DemoSw
• Login credentials
* Username: admin
* Password: Atlona
• VLAN 1
* Ports: 49 through 52
* Static routing: 192.168.1.1 (home router for Internet traffic)
NOTE: DHCP is not enabled on VLAN 1. It is expected that these ports would be connected to an external network with its own DHCP server, which must be using the 192.168.1.1 through 192.168.1.254 range to function properly with this configuration. If a different IP range is used, then the switch configuration must be modified, accordingly.
• VLAN 10
* Ports: 1 through 48
* DHCP range: 10.1.0.1 through 10.1.0.254
• DHCP lease time: 7 days
• Spanning tree mode: RSTP
• BPDU guard: Enabled
• Green Ethernet: Disabled
• Loop protection: Enabled
• SSH: Enabled
• IGMP (VLAN 10 only)
* Snooping: Enabled
* Unregistered flooding: Disabled
* Immediate leave: Enabled
* Querier: Enabled
* Custom multicast address for AT-OMNI-232 management added
NOTE: Static address assignments may be made in the 10.1.1.1 through 10.1.1.254 range with a subnet mask of 255.255.254.0.
Configuration File https://atlonainc.app.box.com/s/mr18ycd1we66q5v4m2u1i4pjms1qqvzf

AT-OMNI-XXX 14
Default Configurations
Cisco SG550X-24MP
Summary Version: 2.3.5.63
Ports 1 through 24 (Gigabit) are to be used only for OmniStream.
Ports 1 through 4 (Ten Gigabit) are to be used for management and can be connected to another network, such as a router that has Internet access.
Configuration Details
• Hostname: DemoSw
• Login credentials
* Username: admin
* Password: Atlona
• VLAN 1
* Ports (Ten Gigabit): 1 through 4
* Static routing (Ten Gigabit): 192.168.1.1 (home router for Internet traffic)
NOTE: DHCP is not enabled on VLAN 1. It is expected that these ports would be connected to an external network with its own DHCP server, which must be using the 192.168.1.1 through 192.168.1.254 range to function properly with this configuration. If a different IP range is used, then the switch configuration must be modified, accordingly.
• VLAN 10
* Ports (Gigabit): 1 through 24
* DHCP range: 10.1.0.1 through 10.1.0.254
• DHCP lease time: 7 days
• Spanning tree mode: RSTP
• BPDU guard: Enabled
• Green Ethernet: Disabled
• Loop protection: Enabled
• SSH: Enabled
• IGMP (VLAN 10 only)
* Snooping: Enabled
* Unregistered flooding: Disabled
* Immediate leave: Enabled
* Querier: Enabled
* Custom multicast address for AT-OMNI-232 management added
NOTE: Static address assignments may be made in the 10.1.1.1 through 10.1.1.254 range with a subnet mask of 255.255.254.0.
NOTE: The same configuration can be used for the Cisco SG550X-24MPP.
Configuration File https://atlonainc.app.box.com/s/w2ux7ckmvd1ezsdk962nv49bxsk2sswu

AT-OMNI-XXX 15
Default Configurations
Cisco SG550X-48MP
Summary Version: 2.3.5.63
Ports 1 through 48 (Gigabit) are to be used only for OmniStream.
Ports 1 through 4 (Ten Gigabit) are to be used for management and can be connected to another network, such as a router that has Internet access.
Configuration Details
• Hostname: DemoSw
• Login credentials
* Username: admin
* Password: Atlona
• VLAN 1
* Ports (Ten Gigabit): 1 through 4
* Static routing (Gigabit): 192.168.1.1 (home router for Internet traffic)
NOTE: DHCP is not enabled on VLAN 1. It is expected that these ports would be connected to an external network with its own DHCP server, which must be using the 192.168.1.1 through 192.168.1.254 range to function properly with this configuration. If a different IP range is used, then the switch configuration must be modified, accordingly.
• VLAN 10
* Ports (Gigabit): 1 through 48
* DHCP range: 10.1.0.1 through 10.1.0.254
• DHCP lease time: 7 days
• Spanning tree mode: RSTP
• BPDU guard: Enabled
• Green Ethernet: Disabled
• Loop protection: Enabled
• SSH: Enabled
• IGMP (VLAN 10 only)
* Snooping: Enabled
* Unregistered flooding: Disabled
* Immediate leave: Enabled
* Querier: Enabled
* Custom multicast address for AT-OMNI-232 management added
NOTE: Static address assignments may be made in the 10.1.1.1 through 10.1.1.254 range with a subnet mask of 255.255.254.0.
Configuration File https://atlonainc.app.box.com/s/o47er6etart69hxogl95c5rlzkdnp3sx
AT-OMNI-XXX 16
Default Configurations
Luxul XMS-7048P
IMPORTANT: Atlona strongly recommends that a computer be used as a DHCP server. The following links provide detailed instructions on configuring both Mac and Windows operating systems.
Mac: https://support.atlona.com/hc/en-us/articles/360007290473-KB01474-How-to-turn-your-computer-Mac-OS-into-a-DHCP-server-to-give-your-Atlona-unit-an-IP-address
Windows (Windows 7 or greater):
https://support.atlona.com/hc/en-us/articles/115001288894-KB01257-How-to-turn-your-computer-Windows-into-a-DHCP-server-to-give-your-Atlona-unit-an-IP-address
Known Issue: Luxul switches stop processing MDNS traffic. Using an MDNS query application, such as Bonjour Browser, causes the switch to stop processing MDNS traffic. The only way to recover is to power-cycle the switch and close any MDNS query applications which are present on the network.
Workarounds:Use one of the following methods to determine IP addresses of each OmniStream unit.
1. Use AMS To discover OmniStream devices connected to the Luxul switch, launch AMS and allow it to discover the units. Do not use third-party applications.
2. Manual scan If AMS is not present on the network, then perform a manual IP address scan to discover the IP address of each Omnistream unit.
Summary Version: 4.0.7
Ports 1 through 48 are to be used only for OmniStream.
Ports 49 through 52 are to be used for management and can be connected to another network, such as a router that has Internet access.
Configuration File https://atlonainc.box.com/s/ukh96xpvd6p4ohnp4gcgdv750e9hevxt
AT-OMNI-XXX 17
Default Configurations
Configuration Details
• Hostname: DemoSw
• Login credentials
* Username: admin
* Password: Atlona
• VLAN 1
* Ports: 49 through 52
* Static routing: 192.168.1.1 (home router for Internet traffic)
• VLAN 10
* Ports: 1 through 48
• Spanning tree mode: RSTP
• BPDU guard: Enabled
• Green Ethernet: Disabled
• Loop protection: Enabled
• SSH: Enabled
• IGMP (VLAN 10 only)
* Snooping: Enabled
* Unregistered flooding: Disabled
* Immediate leave: Enabled
* Querier: Enabled
* Leave Proxy: Enabled
* Proxy: Enabled
NOTE: Static address assignments may be made in the 10.1.1.1 through 10.1.1.254 range with a subnet mask of 255.255.254.0.

AT-OMNI-XXX 18
Luxul AMS-4424P
Default Configurations
IMPORTANT: Atlona strongly recommends that a computer be used as a DHCP server. The following links provide detailed instructions on configuring both Mac and Windows operating systems.
Mac: https://support.atlona.com/hc/en-us/articles/360007290473-KB01474-How-to-turn-your-computer-Mac-OS-into-a-DHCP-server-to-give-your-Atlona-unit-an-IP-address
Windows (Windows 7 or greater):
https://support.atlona.com/hc/en-us/articles/115001288894-KB01257-How-to-turn-your-computer-Windows-into-a-DHCP-server-to-give-your-Atlona-unit-an-IP-address
Known Issue: Luxul switches stop processing MDNS traffic. Using an MDNS query application, such as Bonjour Browser, causes the switch to stop processing MDNS traffic. The only way to recover is to power-cycle the switch and close any MDNS query applications which are present on the network.
Workarounds:Use one of the following methods to determine IP addresses of each OmniStream unit.
1. Use AMS To discover OmniStream devices connected to the Luxul switch, launch AMS and allow it to discover the units. Do not use third-party applications.
2. Manual scan If AMS is not present on the network, then perform a manual IP address scan to discover the IP address of each Omnistream unit.
Summary Version: 4.0.7
Ports 1 through 24 (RJ-45) are to be used only for OmniStream.
Ports 25 through 26 (SFP+) are to be used for management and can be connected to another network, such as a router that has internet access.
NOTE: When using SFP+ ports, transceivers are required.
Configuration File https://atlonainc.box.com/s/jhqkpbra26sds32rr6nj4atizkpsyhry
AT-OMNI-XXX 19
Default Configurations
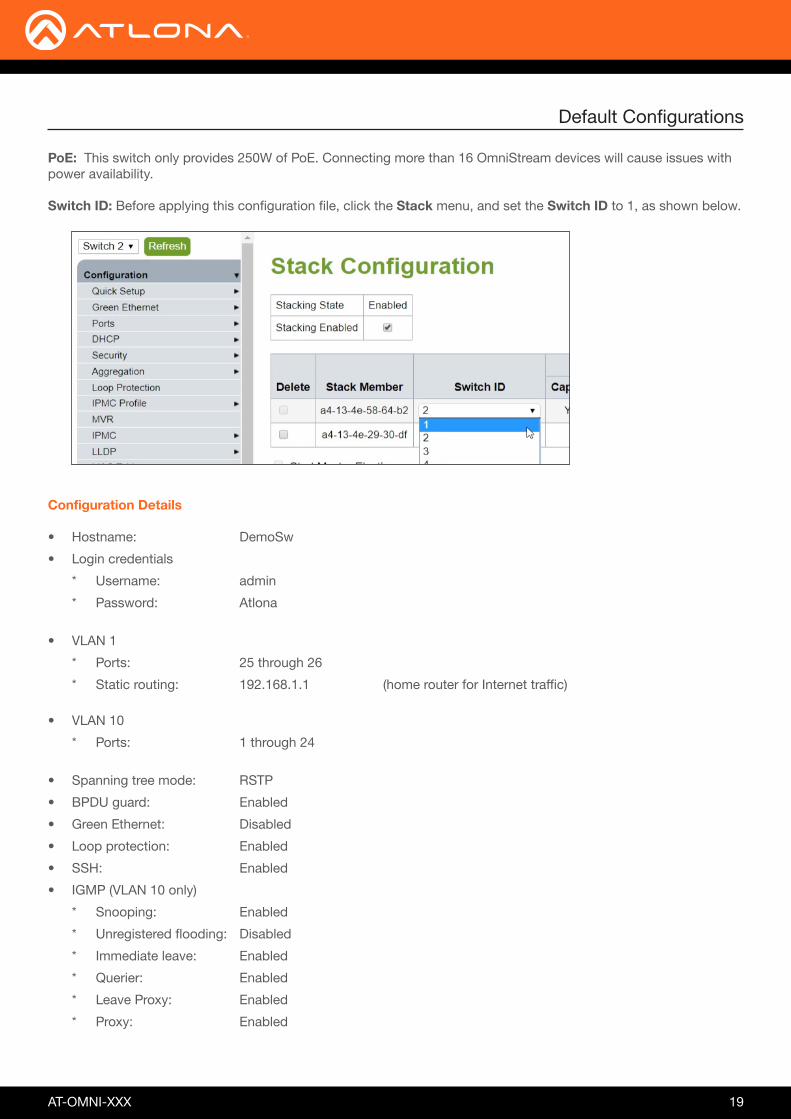
PoE: This switch only provides 250W of PoE. Connecting more than 16 OmniStream devices will cause issues with power availability.
Switch ID: Before applying this configuration file, click the Stack menu, and set the Switch ID to 1, as shown below.
Configuration Details
• Hostname: DemoSw
• Login credentials
* Username: admin
* Password: Atlona
• VLAN 1
* Ports: 25 through 26
* Static routing: 192.168.1.1 (home router for Internet traffic)
• VLAN 10
* Ports: 1 through 24
• Spanning tree mode: RSTP
• BPDU guard: Enabled
• Green Ethernet: Disabled
• Loop protection: Enabled
• SSH: Enabled
• IGMP (VLAN 10 only)
* Snooping: Enabled
* Unregistered flooding: Disabled
* Immediate leave: Enabled
* Querier: Enabled
* Leave Proxy: Enabled
* Proxy: Enabled

AT-OMNI-XXX 20
Summary Version: 1.0.0
Ports 1 through 23 are to be used only for OmniStream.
Ports 24 through 28 are to be used for management and can be connected to another network, such as a router that has Internet access.
Pakedge S3L-24P
Configuration Details
• Hostname: DemoSw
• Login credentials
* Username: admin
* Password: Atlona
• VLAN 1
* Ports: 24 through 28
* Static routing: 192.168.1.1 (home router for Internet traffic)
NOTE: DHCP is not enabled on VLAN 1. It is expected that these ports would be connected to an external network with its own DHCP server, which must be using the 192.168.1.1 through 192.168.1.254 range to function properly with this configuration. If a different IP range is used, then the switch configuration must be modified, accordingly.
• VLAN 10
* Ports: 1 through 23
* DHCP range: 10.1.0.1 through 10.1.0.254
• DHCP lease time: 7 days
• Spanning tree mode: Point-to-Point
• BPDU guard: Enabled
• IGMP (VLAN 10 only)
* Snooping: Enabled
* Immediate leave: Enabled
* Querier: Enabled
NOTE: Static address assignments may be made in the 10.1.1.1 through 10.1.1.254 range with a subnet mask of 255.255.254.0.
Default Configurations
Configuration File https://atlonainc.box.com/s/l8gl6566483jf5idrst9okv8qqfk16xu

AT-OMNI-XXX 21
Default Configurations
Instructions for uploading the configuration file for the Pakedge S3L-24P
1. Download the Pakedge S3L-24P configuration file from the link on page 5.
2. Open a web browser and enter the IP address of the switch in the address bar.
3. Enter the login credentials. The following are the default login credentials: Username: pakedge Password: pakedges
4. Click Maintenance > Configuration at the top of the page.
4. Select HTTP Restore from the Configuration drop-down list.
5. Click Choose File and select the Pakedge S3L-24P.conf file.
6. Click the Restore button, on the right.
7. Configuration is complete.
AT-OMNI-XXX 22
Default Configurations
Summary Version: 2.6.1
Ports 1 through 26 are to be used only for OmniStream.
Luminex GigaCore 26i
Configuration Details
• Hostname: DemoSw
• Login credentials
* Username: admin
* Password: Atlona
• VLAN 1
* Ports: 1 through 26
* Static routing: 192.168.1.1
NOTE: The Luminex GigaCore26i switch cannot act as a DHCP server. For installations that require DHCP, connect an external DHCP server to the switch. The Luminex GigaCore26i switch is a L2 switch and can accommodate multiple L2 VLANs or networks, but cannot route between those networks. In order to route traffic between multiple VLANs, a user has to connect a router that will handle the routing between multiple networks.
• VLAN 1
* Ports: 1 through 26
* DHCP range: N/A
• DHCP lease time: N/A
• Spanning tree mode: RSTP
• BPDU guard: Enabled
• Green Ethernet: Disabled
• Loop Protection: Enabled
• SSH: Enabled
• IGMP
* Snooping: Enabled
* Unregistered flooding: Disabled
* Immediate leave: Enabled
* Querier: Enabled
Configuration File https://atlonainc.box.com/s/gqdm9ulolk7mr4oxr6e28mc7xov9see4

AT-OMNI-XXX 23
Instructions for uploading the configuration file for the Luminex GigaCore 26i
1. Download the Luminex GigaCore 26i configuration file from the link on page 5.
2. Open a web browser and enter the IP address of the switch in the address bar.
3. Enter the login credentials. The following are the default login credentials: Username: admin Password: (no password)
4. Click Profiles in the side menu bar to access the Profile Manager.
5. In the Profile Manager window group, click the Import button and select the Luminex GigaCore 26i Configuration for Atlona OmniStream.txt file.
Default Configurations
NOTE: The default IP address of the switch is 192.168.13.53 (255.255.0.0).

AT-OMNI-XXX 24
Default Configurations
NOTE: After the Recall all button is clicked, the switch will reboot and load the Atlona configuration file. The IP address of the switch will change from 192.168.13.53 (255.255.0.0) to 192.168.1.254 (255.255.255.0).
NOTE: This configuration is based on VLAN 1. If a user requires configuration for a specific VLAN, then it will need to be a custom configuration.
7. Change the IP address of the laptop to match the IP address range of the switch.
8. Login to the switch with the following credentials: Username: admin Password: Atlona
6. Click the Recall button. The Recall Profile dialog box will be displayed. Click Recall all, as shown on the next page.
Once the file has been uploaded, a message box will be displayed indicating that the import procedure was successful. Click the “X” in the upper-right corner of the message box to dismiss it.

AT-OMNI-XXX 25
Default Configurations
Summary Version: 08.0.70a
Ports 1 through 48 are to be used only for OmniStream.
Ruckus ICX 7150-48ZP
Configuration Details
• Hostname: DemoSw
• Login credentials
* Username: admin
* Password: Atlona
• VLAN 1
* Ports: 1 through 48
* Static routing: 10.10.8.1
NOTE: Ruckus switches use two types of images: 1. Switch Image 2. Router Image.This configuration is based on the Switch image. Before applying this configuration, make sure that the switch is running the Switch image. Assumptions: This configuration is a flat Layer 2 configuration. To route across multiple networks, a router will be required. This configuration also assumes that there is an external DHCP server (home router).
• VLAN 1
* Ports: 1 through 48
* DHCP range: N/A
• DHCP lease time: N/A
• Spanning tree mode: RSTP
• BPDU guard: Enabled
• Green Ethernet: Disabled
• Loop Protection: Enabled
• SSH: Enabled
• Telnet: Enabled
• IGMP
* Snooping: Enabled
* Unregistered flooding: Disabled
* Immediate leave: Enabled
* Querier: Enabled
Configuration File https://atlonainc.box.com/s/cpzy20qmnfdbf8sg3gga27hgkca6ddvx

AT-OMNI-XXX 26
Default Configurations
NOTE: By default, Ruckus switches do not have a static IP address, but can act as a DHCP client.
Instructions for uploading the configuration file for the Ruckus ICX 7150-48ZP
1. Download the Ruckus ICX 7150-48ZP configuration file from the link on page 5.
2. Open a console session to the switch.
3. Enter the en command at the command prompt.
4. Press [ENTER] then type conf t at the command prompt.
5. Press [ENTER].
6. Open the configuration file in a text editor and copy-and-paste the contents of the configuration file into the console window.
7. Type the wr mem command at the command prompt and press [ENTER].
AT-OMNI-XXX 27
Default Configurations
8. Configuration is complete. To access the switch, use the IP address 10.10.8.254 and login using the following credentials: username: admin password: Atlona

AT-OMNI-XXX 28
Default Configurations
Ubiquiti ES-48-500W / ES-48-750W
It should be noted that the only difference between the ES-48-500W and ES-48-750W switch is the power consumption. The configuration information for both switches is identical. Refer to the next page for instructions on how to upload the configuration file to the switch.
Summary Version: 1.8.0
Ports 1 through 46 are to be used only for OmniStream.
Ports 47 through 52 are to be used for management and can be connected to another network, such as a router that has Internet access.
Configuration Details
• Hostname: DemoSw
• Login credentials
* Username: admin
* Password: Atlona
• VLAN 1
* Ports: 47 through 52
* Static routing: 192.168.1.1 (home router for Internet traffic)
NOTE: DHCP is not enabled on VLAN 1. It is expected that these ports would be connected to an external network with its own DHCP server, which must be using the 192.168.1.1 through 192.168.1.254 range to function properly with this configuration. If a different IP range is used, then the switch configuration must be modified, accordingly.
• VLAN 10
* Ports: 1 through 46
* DHCP range: 10.1.0.1 through 10.1.1.0
• DHCP lease time: 7 days
• Spanning tree mode: Point-to-Point
• BPDU guard: Enabled
• IGMP (VLAN 10 only)
* Snooping: Enabled
* Immediate leave: Enabled
* Querier: Enabled
NOTE: Static address assignments may be made in the 10.1.1.1 through 10.1.1.254 range with a subnet mask of 255.255.254.0.
Configuration File https://atlonainc.box.com/s/7mmkw4un41u77v0u7kxb6wp1ois02r5r

AT-OMNI-XXX 29
Default Configurations
Uploading the Configuration File
1. Download the configuration file from the link on page 5. Note that the configuration file is the same for both the ES-48-500W and ES-48-750W.
2. Open a web browser and enter the IP address of the switch in the address bar.
3. Enter the login credentials to access the user interface. Once the switch is powered, it will attempt to locate a DHCP server to assign an IP address. However, by default, if no DHCP server is found, it will be assigned a static IP address of 192.168.1.2. While the switch is restarting, continue with steps 4 through 9.
4. In Windows, go to the command prompt, type cpna.cpl, and press [ENTER]. This will display the network properties for Windows.
5. Right-click on the adapter for the network switch and select Properties from the context menu.
6. Under the Ethernet Properties dialog box, click Internet Protocol Version 4 and then click the Properties button.
7. Click the Use the following IP address radio button and enter an IP address that is within the range of the network switch. For example, if the switch is 192.168.1.2, then enter an IP address of 192.168.1.10.
8. Set the Subnet mask field to 255.255.255.0.
9. Click the OK button, then minimize the Network Connections window. This window will be used again, later in the procedure.
10. Enter the IP address of the switch in a web browser, login, and click System > Utilities > Transfer.

AT-OMNI-XXX 30
11. In the Transfer tab, click the Download button in the HTTP row, highlighted below. Once this button is clicked, the HTTP File Download dialog will be displayed.
Download button
12. Click the File Type drop-down list and select Configuration.
13. Click the Choose File button to display the Open File dialog box. Select the configuration file that was downloaded in step 1.
14. Click the Open button to select the configuration file.
15. Click the Begin Transfer button on the HTTP File Download dialog. The download sequence should only take less than a few seconds.
16. Click Close to dismiss the HTTP File Download dialog box.
17. Click System > Utilities > Restart Switch.
18. In Windows, return to the Network Connections window, which was minimized in step 9. If the window was closed, go to the command prompt, type cpna.cpl, and press [ENTER] to restore the window.
19. Right-click on the adapter for the network switch and select Properties from the context menu.

AT-OMNI-XXX 31
20. Under the Ethernet Properties dialog box, click Internet Protocol Version 4 and then click the Properties button.
21. Restore DHCP by clicking the Obtain an IP address automatically radio button.
22. Click OK to commit changes, then click OK on the Ethernet Properties dialog to dismiss it.
23. Go to the windows command prompt and check for the IP of the network switch using the ipconfig command. Note that it may take a minute or so for the switch to complete the reboot procedure. Once the switch is up and running, the DHCP IP address will be displayed.
Switch IP address
24. Enter the new IP address of the switch in a web browser window. In the example above, the IP address is 10.1.0.5.
25. Configuration is complete. Login to the switch using the following credentials: username: admin password: Atlona

atlona.com • 408.962.0515 • 877.536.3976
© 2018 Atlona Inc. All rights reserved. “Atlona” and the Atlona logo are registered trademarks of Atlona Inc. All other brand names and trademarks or registered trademarks are the property of their respective owners. Pricing, specifications and availability subject to change without notice. Actual products, product images, and online product images may vary from images shown here.