ch3: capturing and managing checks online · web viewfigure 58. check processing>batch...
TRANSCRIPT
Chapter 3: Capturing and Managing Checks Online
OTCnet Participant User Guide

(This page left intentionally blank)
Bureau of the Fiscal Service Capturing and Managing Checks Online
TABLE OF CONTENTSAudience, Overview, and Topics...................................................................................................
Audience........................................................................................................................1Overview........................................................................................................................1Topics.............................................................................................................................2
Topic 1. Purpose of Capturing and Managing Checks Online......................................................Topic 2. Capture a Check Online.................................................................................................
Introduction to Capturing a Check..................................................................................5Types of Acceptable and Unacceptable Checks............................................................7Batch Processing Modes................................................................................................8Processing Methods.......................................................................................................9Item Types......................................................................................................................9Accounting Codes........................................................................................................10Check Scanner Types and Check Placement..............................................................11Check Capture Acceptance..........................................................................................13Capture a Check Online...............................................................................................15
Capture a Check Online........................................................................................26Topic 3. Manage Poor Check Image Quality..............................................................................
Managing a Check with Poor Image Quality................................................................37Manage a Check with Poor Image Quality............................................................39
Topic 4. Resolve a Duplicate Check...........................................................................................Resolving a Duplicate Check.......................................................................................42
Resolve a Duplicate Check...................................................................................45Topic 5. Void a Check................................................................................................................
Void a Check................................................................................................................48Void a Check.........................................................................................................53
Void All Checks in a Batch...........................................................................................56Void All Checks in a Batch....................................................................................60
Topic 6. Override a Master Verification Database (MVD) Record..............................................Override a MVD Record...............................................................................................64
Override a MVD Record........................................................................................65Topic 7. Perform Batch Control and Batch Balancing................................................................
Batch Control Options..................................................................................................68On Batch Close (Optional/Mandatory).........................................................................70
Perform Batch Control (Optional or Mandatory)....................................................72Batch Balancing....................................................................................................73
Topic 8. View and Print a Batch List/ Item Detail Report............................................................Batch List Report..........................................................................................................76Item Detail Report........................................................................................................81
View and Print a Batch List Report.......................................................................85View and Print an Item Detail Report....................................................................87
Topic 9. Activate/Deactivate a Batch..........................................................................................Activating/Deactivating a Batch....................................................................................89
Activate/Deactivate a Batch..................................................................................93
Check Capture and Check Processing
Capturing and Managing Checks Online Bureau of the Fiscal Service
Topic 10. Classify a Batch........................................................................................................... Classify or Edit a Batch at the Summary Level...........................................................96
Classify or Edit a Batch at the Summary Level in OTCnet Online......................101Topic 11. Close a Batch............................................................................................................
Closing a Single Batch..............................................................................................106 Closing Multiple Batches...........................................................................................112
Close a Single or Multiple Batch(es)...................................................................118Topic 12. Approve a Batch........................................................................................................
Approve a Single Batch.............................................................................................121 Approve Multiple Batches..........................................................................................128
Approve Single or Multiple Batch(es) Online......................................................134Topic 13. Print a Receipt...........................................................................................................
Receipt Printing from Check Scan (Singe/Batch Mode)...........................................142 Receipt Printing from Batch Management (Singe/Batch Mode)................................144
Print a Receipt.....................................................................................................147 Print a Receipt in Batch Management.......................................................................148
Summary...................................................................................................................................Notes..........................................................................................................................151
Glossary.....................................................................................................................................
LIST OF TABLESTable 1. Check Capture/Processing and Batch Permission Matrix...............................................4Table 2. Scanner Types..............................................................................................................11Table 3. FedACH and Check 21 Item Types...............................................................................19Table 4. Scan Controls Menu......................................................................................................21Table 5. Batch Status Types.....................................................................................................106
LIST OF FIGURESFigure 1. EC 7000i Scanner........................................................................................................11Figure 2. EC 9100i Scanner........................................................................................................12Figure 3. Panini Scanner.............................................................................................................12Figure 4. Panini I: Deal Scanner..................................................................................................13Figure 5. Check Processing > Check Scan.................................................................................15Figure 6. Click Scan- Select Batch Page.....................................................................................16Figure 7. Agency Form Data Entry Fields...................................................................................18Figure 8. Start Scan.....................................................................................................................20Figure 9. Ready for Single Check Scan – Waiting for Check.....................................................20Figure 10. Scanner Check Image (Sample Images)...................................................................21Figure 11. Agency Accounting Code - Single Accounting Code.................................................22Figure 12. Agency Accounting Code - Multiple Accounting Code...............................................23Figure 13. Account Classification – Multiple Agency Accounting Codes.....................................23Figure 14. Save Check................................................................................................................24Figure 15. Transaction Saved Successfully................................................................................25Figure 16. Scanner Configuration Menu Option..........................................................................25Figure 17. Poor Image Quality.....................................................................................................35Figure 18. Good Image Quality...................................................................................................36Figure 19. Image Quality Failed Message...................................................................................37
Check Capture and Check Processing
Bureau of the Fiscal Service Capturing and Managing Checks Online
Figure 20. Login ID and Password Dialog Box............................................................................38Figure 21. Check Scan- Perform Check Scan Page...................................................................38Figure 22. Duplicate Check Detected..........................................................................................42Figure 23. Cancel a Check Dialog Box........................................................................................43Figure 24. Accept Duplicate Prompt............................................................................................43Figure 25. Check Scanning Proceeds (print receipt as necessary).............................................44Figure 26. Check Processing> Batch Management (Voiding).....................................................48Figure 27. Search Batch Page....................................................................................................49Figure 28. View Batches (Voiding)..............................................................................................50Figure 29. View Checks (Voiding)...............................................................................................50Figure 30. Check Image/Details..................................................................................................51Figure 31. Void Confirmation Dialog Box....................................................................................51Figure 32. Enter Comment Dialog Box........................................................................................52Figure 33. Check Void Dialog Box...............................................................................................52Figure 34. Search Batch Page....................................................................................................57Figure 35. View Batches (Void All)..............................................................................................57Figure 36. View Checks (Voiding)...............................................................................................58Figure 37. Void All Checks Confirmation Dialog Box..................................................................58Figure 38. Enter Comment Dialog Box........................................................................................58Figure 39. Check Void Dialog Box...............................................................................................59Figure 40. Override Check Denial Box........................................................................................64Figure 41. Override Login Dialog Box.........................................................................................64Figure 42. Enter Comments Box.................................................................................................64Figure 43. Batch Control Page (Batch Create)............................................................................68Figure 44. Perform Check Scan Page (after Batch Control).......................................................69Figure 45. Batch Control Page (Batch Close).............................................................................70Figure 46. Print Batch List Report (Batch Close).........................................................................71Figure 47. Batch Control (Failed to Balance)..............................................................................74Figure 48. Check Processing>Batch Management (View Batch)................................................76Figure 49. Search Batch Page (View Batch)...............................................................................77Figure 50. View Batches Page (View Batch)...............................................................................78Figure 51. View Checks Page (View Batch)................................................................................79Figure 52. Batch List Report........................................................................................................80Figure 53. Batch Management....................................................................................................81Figure 54. Search Batch..............................................................................................................81Figure 55. Summary of Batches..................................................................................................82Figure 56. View Checks Page/Item ID Select..............................................................................83Figure 57. Item Detail Report......................................................................................................84Figure 58. Check Processing>Batch Management (Activate/Deactivate)...................................89Figure 59. Search Batch Page (Activate/Deactivate)..................................................................90Figure 60. View Batches Page (Activate/Deactivate)..................................................................91Figure 61. Activate/Deactivate Batch Page.................................................................................91Figure 62. Batch Activate/ Activate Confirmation........................................................................92Figure 63. Administration>Batch Management...........................................................................96Figure 64. Search Batch (Classify a Batch).................................................................................98Figure 65. View Batches..............................................................................................................98Figure 66. View Checks – View/Edit Classification.....................................................................99Figure 67. Accounting Classification – Summary Level..............................................................99Figure 68. Accounting Classification – Summary Level............................................................100Figure 69. Check Processing > Batch Management (Closing Single Batch)............................106Figure 70. Search Batch Page (Closing Single Batch)..............................................................107
Check Capture and Check Processing
Capturing and Managing Checks Online Bureau of the Fiscal Service
Figure 71. View Batches Page (Closing Single Batch)..............................................................108Figure 72. View Checks Page (Closing Single Batch)...............................................................108Figure 73. Select to Close Batch...............................................................................................108Figure 74. Confirm Close Batch................................................................................................109Figure 75. Batch Control............................................................................................................109Figure 76. Print PDF Report/Confirm Report Print....................................................................110Figure 77. Close Batch Confirmation.........................................................................................111Figure 78. View Batches Page (Closing Multiple Batches).......................................................113Figure 79. Close Batch Confirmation (Closing Multiple Batches)..............................................114Figure 80. Batch Control Setup (Closing Multiple Batches)......................................................115Figure 81. Failed to Balance Batch...........................................................................................115Figure 82. Confirm Report Print (Closing Multiple)....................................................................116Figure 83. Close Batch Confirmation (Closing Multiple)............................................................117Figure 84. Check Processing>Batch Management (Approving Single)....................................121Figure 85. Search Batch Page (Approve Single).......................................................................123Figure 86. View Batches Page (Approve Single)......................................................................123Figure 87. View Checks Page (Approve Single).......................................................................124Figure 88. View Batches (Approve Single)................................................................................124Figure 89. Confirm Batches to Approve (Approve Single).........................................................125Figure 90. Confirm Report Print To Approve (Approve Single).................................................126Figure 91. Approve Batch Page (Approve Single).....................................................................127Figure 92. Batch Management (Approve Multiple Batches)......................................................128Figure 93. Search Batches (Approve Multiple Batches)............................................................129Figure 94. View Batches Page (Approve Multiple Batches)......................................................130Figure 95. View Batches (Approve Multiple).............................................................................131Figure 96. Confirm Batches (Approve Multiple).........................................................................131Figure 97. Confirm Report to Approve (Approve Multiple)........................................................132Figure 98. Approve Batch Confirmation (Approve Multiple)......................................................133Figure 99. Receipt Print Image (Scan Check)...........................................................................142Figure 100. Print Receipt...........................................................................................................143Figure 101. Check Processing>Batch Management (Receipt).................................................144Figure 102. Search Batch (Receipt)..........................................................................................145Figure 103. View Batches (Receipt)..........................................................................................145Figure 104. View Checks Page (Receipt)..................................................................................146Figure 105. Print Receipt...........................................................................................................146
Check Capture and Check Processing
Bureau of the Fiscal Service Capturing and Managing Checks Online
Audience, Overview, and Topics
AudienceThe intended audience for the Capturing and Managing Checks Online Participant User Guide includes:
Check Capture Operator (CCO)
Check Capture Lead Operator (CCLO)
Check Capture Supervisor (CCS)
OverviewWelcome to Capturing and Managing Checks Online. In this chapter, you will learn:
The purpose of capturing and managing checks online
How to capture a check online
How to manage failed image quality
How to resolve a duplicate check
How to void a check
How to override a Master Verification Record (MVD) Record
How to perform batch control and batch balancing
How to view and print a batch list /item
How to activate/deactivate a batch
How to classify a batch
How to close a batch
How to approve a batch
How to print a receipt
Check Capture and Check Processing 1
Capturing and Managing Checks Online Bureau of the Fiscal Service
TopicsThis chapter is organized by the following topics:
1. Purpose of Capturing and Managing Checks Online
2. Capture a Check Online
3. Manage Failed Image Quality
4. Resolve a Duplicate Check
5. Void a Check
6. Override a Master Verification Record (MVD) record
7. Perform Batch Control and Batch Balancing
8. View and Print a Batch List / Item
9. Activate/ Deactivate a Batch
10. Classify a Batch
11. Close a Batch
12. Approve a Batch
13. Print a receipt
Check Capture and Check Processing
Bureau of the Fiscal Service Capturing and Managing Checks Online
Topic 1. Purpose of Capturing and Managing Checks Online
The Check Processing functionality is primarily used to capture images of a check along with transaction data. There are two components under this tab within OTCnet. They include the Scan Check and Batch Management functionality. Once the images and data are collected under Scan Check, a user may access Batch Management to perform certain tasks prior to forwarding the batch for settlement.
During check scanning, you may opt to use the Batch Control functionality which allows you to balance your batch. If this option is configured to be optional or mandatory for your agency, the Batch Control page appears during the processing of the check.
If you are assigned the role of Check Capture Operator (CCO) or Check Capture Lead Operator (CCLO), you are the only authorized users who can capture a check.
As a CCO, you can scan checks into a Batch, change Processing Method (Customer Present / Customer Not Present), change an Accounting Code, change Item Type (Personal / Non-Personal checks), close a batch, and view a batch list.
Check Capture and Check Processing 3
Capturing and Managing Checks Online Bureau of the Fiscal Service
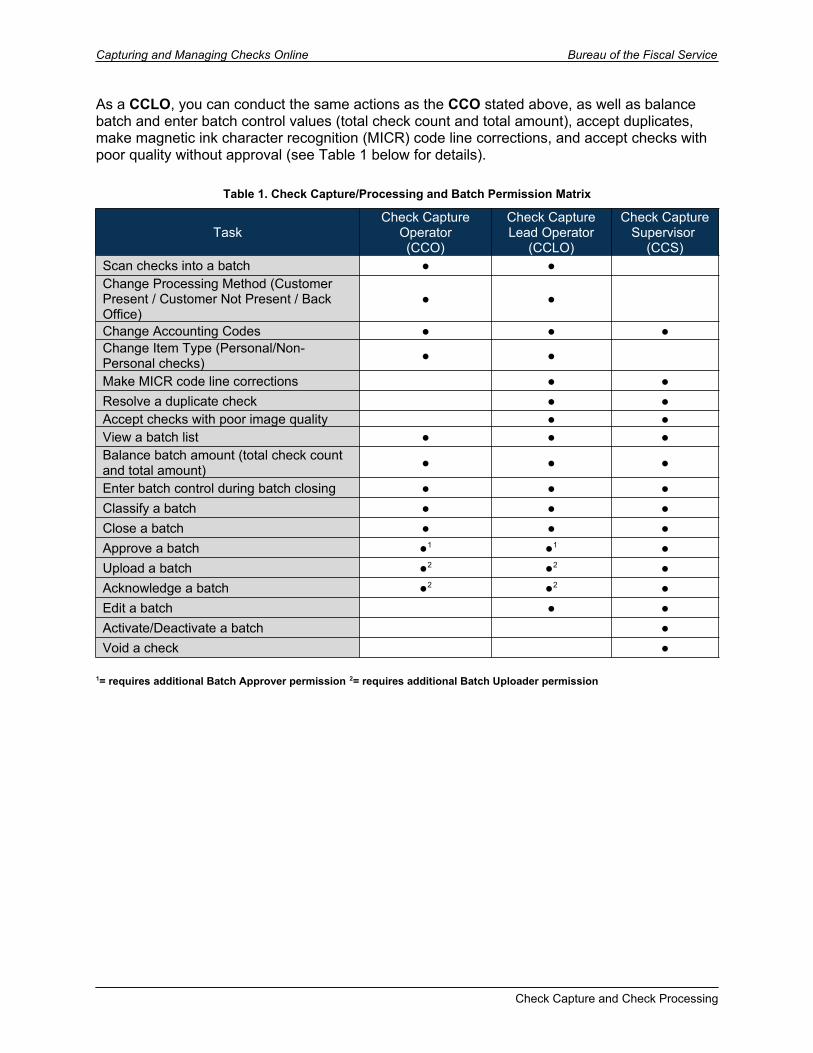
As a CCLO, you can conduct the same actions as the CCO stated above, as well as balance batch and enter batch control values (total check count and total amount), accept duplicates, make magnetic ink character recognition (MICR) code line corrections, and accept checks with poor quality without approval (see Table 1 below for details).
Table 1. Check Capture/Processing and Batch Permission Matrix
TaskCheck Capture
Operator(CCO)
Check Capture Lead Operator
(CCLO)
Check Capture Supervisor
(CCS)Scan checks into a batch ● ● blankChange Processing Method (Customer Present / Customer Not Present / Back Office)
● ● blank
Change Accounting Codes ● ● ●Change Item Type (Personal/Non-Personal checks) ● ● blank
Make MICR code line corrections blank ● ●Resolve a duplicate check blank ● ●Accept checks with poor image quality ● ●View a batch list ● ● ●Balance batch amount (total check count and total amount) ● ● ●
Enter batch control during batch closing ● ● ●Classify a batch ● ● ●Close a batch ● ● ●Approve a batch ●1 ●1 ●Upload a batch ●2 ●2 ●Acknowledge a batch ●2 ●2 ●Edit a batch blank ● ●Activate/Deactivate a batch blank black ●Void a check blank blank ●
1= requires additional Batch Approver permission 2= requires additional Batch Uploader permission
Check Capture and Check Processing
Bureau of the Fiscal Service Capturing and Managing Checks Online
Topic 2. Capture a Check Online
Introduction to Capturing a CheckAs a CCO or CCLO, you can capture a check in two modes, single or batch. Once a Check Capture Administrator (CCA) sets up your Terminal Configuration settings, you will be able to scan a check in Single or Batch check mode. There are many other settings that your CCA may have also instituted for your location. Many of which will be visible as you begin the check scanning process, as we will review in this Topic for Capture a Check Online.
Logical Processing Order for Scanning a Check
When creating a batch, it is important that the proper steps be taken to ensure that the batch reaches our system. Below is an outline of the logistics for creating a batch:
Batch Control – This function may or may not appear, based on the computer’s configuration settings. If used, key in total dollar amount of checks and the total number of checks to be scanned. This function can be setup in the configuration as disabled, optional, or mandatory by the CCA. If this option is disabled, the Batch control screen does not appear. If optional, the Batch control screen can be skipped.
If mandatory at Batch Create or Batch Close only, the user must enter the Batch Control values. However, if a user selects to set Batch Control value at both Batch Create and Batch Close, then it can only be deferred at the beginning of the batch. Batch control is required prior to closing a batch in this case.
Scan the check (or checks if processing in batch mode).
Key in amount, configurable field data, and select accounting code information for each check, if accounting codes are set up.
Cancel transactions while performing data entry, used only if necessary, i.e., image of the check is not legible.
Print the receipt – Just after the item information is keyed into the data entry screen, press Enter, then click the Receipt button to print a receipt of the item or items.
Void items – Used to delete invalid items only if necessary, prior to closing a batch if a CCA is available to authorize the void. Once data entry has been performed and the Enter key is pressed on a user’s keyboard, the item can no longer be cancelled and must be voided.
Print the Batch list – A printout of the batch listing must be done prior to closing a batch.
Pre-balance – Use the batch list that was just printed to reconcile all activity for this batch of work. If reconciling with cash drawers, count and reconcile to ensure activity is accurate.
Batch Balancing – This screen only appears if the totals that are keyed into the Batch Control screen do not match with what was actually keyed into the data entry screen, or
Check Capture and Check Processing 5
Capturing and Managing Checks Online Bureau of the Fiscal Service
if the number of checks scanned does not match the number keyed into the Batch Control screen.
Close – Closes the batch from further checks and prepared the batch for processing.
Approve - Indicates that the batch is ready for the settlement process. Once the batch is approved, it is then sent to Debit Gateway to initiate the settlement process. The batch status then becomes Forwarded.
An Agency may have multiple OTC Endpoints to process checks for. Each OTC Endpoint is unique and batches can include items for multiple OTC Endpoints, however during the configuration set up, one OTC Endpoint is chosen to be the default. The default OTC Endpoint appears each time the CCO or CCLO begins the scanning process. However, they may select an alternate OTC Endpoint before scanning begins.
Check Capture and Check Processing
Bureau of the Fiscal Service Capturing and Managing Checks Online
Types of Acceptable and Unacceptable ChecksChecks that CAN be processed through OTCnet’s Check Processing Functionality
All of the items listed below can be processed through OTCnet’s Check Processing Functionality.
These following check items should be processed as Non-personal:
US Treasury Checks Traveler's Checks Money Orders (including Postal Money Orders) Third-party Checks (even if drawn on a personal account) State and Local Government Checks Credit card Checks 'Do not ACH' Checks Official Checks Business Checks Cashier’s Checks Other US Government Checks Payroll Checks
Note: If a customer chooses to ‘opt out’ and does not want their checks to be processed via ACH, that customer’s personal check should be processed as a non-personal item. This will allow the check to clear their financial institution as a Check 21 item.
The following item(s) should be processed as Personal check Items:
Personal/Consumer Checks
List of Items that CANNOT be Processed through OTCnet’s Check Processing Functionality
The following ineligible item(s) cannot be processed using OTCnet’s Check Processing functionality and may need to be processed through the Deposit Processing tab within OTCnet instead:
Foreign items drawn on non-US Financial Institutions Check payable in non-US currency
Note: Apply any necessary stamps in a location that does not interfere with the dollar amount, financial institution information, or the signature. Since these items are not deposited at your bank, there is no need to stamp “For Deposit Only” on the back of the check. FRB-Cleveland becomes the bank of first deposit for all OTCnet’s Check Processing items scanned and forwarded for settlement.
Check Capture and Check Processing 7
Capturing and Managing Checks Online Bureau of the Fiscal Service
Batch Processing ModesSingle vs. Batch Processing Mode
Agencies can choose to process their checks in one of two processing modes. The Single check mode allows checks to be processed one at a time, and Batch processing mode allows for batches of checks to be scanned prior to data entry. The Batch processing mode is available for EC7000i, EC9100i, and all Panini scanners.
When scanning in Batch Processing Mode, ensure that the entire check image is visible on the screen and the dollar amount must be legible (a check may successfully scan even though the item was folded going into the device). If the image is not legible, click Cancel under Scanner Controls and re-scan the check.
A best practice approach while scanning in Batch mode is to scan a smaller quantity of items. For example, instead of scanning 150 items, scan 75. Then, perform the data input. Scan the second group of 75 and perform the data input. Using the keyboard after the 75 items are scanned may eliminate the system inactivity logout during batch processing. Because thekeyboard and mouse are typically not touched during the scanning process, the system interprets this as inactivity and an auto logout takes place. To avoid this situation, move the mouse every so often to simulate system activity during the scanning process. The default setting is 15 minutes so the operator should move the mouse every 10 minutes or so to keep the system active.
Note: The maximum number of items that should be included in one batch is 3,000 items, and the maximum dollar amount per batch is $99,999,999.99. The max number of items is also limited by the TIFF file.
All processing method types can exist within a batch, although usually Back Office processing types would be processed independently of other types. Not all agencies utilize all modes. Furthermore, a site may choose not to use all modes every day, due to fluctuation in check volume.
Check Capture and Check Processing
Bureau of the Fiscal Service Capturing and Managing Checks Online
Processing MethodsOperators are able to choose the Processing Method to which they would like to scan checks. This option indicates the mode of operation. They include Customer Present, Customer Not Present, or Back Office.
The Customer Present method is used when the person is present, i.e., standing in front the operator with their check. The Customer Not Present method is used when the writer of the check is not present, i.e., when checks are received through the mail or unmanned drop box.
The Back Office processing method allows Agencies to convert payments received at the point-of-sale locations to ACH entries in a controlled, back-office environment.
The default is to allow all Processing Methods and Item Types but restrictions can be setup to allow only the Back Office processing method or Non-personal items only. Operators need to make certain that they are selecting the proper choices for each item to avoid returned payments from the check writer’s financial institution.
Prior to scanning, checks should be pre-sorted by Customer present, Customer Not Present, and Back Office. All processing method types can exist within a batch, although usually back offices processing types would be processed independently of other types. Not all agencies utilize all methods. Furthermore, your site may choose not to use all methods every day, due to fluctuation in check volume scanning a check.
Item TypesBefore or after the check is scanned in Single mode, the user must choose the Item Type. For Batch mode scanning, a user cannot manually select Personal or Non Personal, the system will use the default (previously established in the configurations). During the scanning process, if the system detects an Item Type other than the established default, it will prompt the user for confirmation.
The choices are Personal or Non Personal. This indicates the type of item to be processed. When the operator clicks Personal, the Agency Form data entry screen displays, Check: Personal.
If the operator clicks Non Personal, the Agency Form data entry screen displays, Check: Non Personal. OTCnet can process both personal and non-personal checks within a batch. The operator needs to make certain that they are selecting the proper choices for each item. Presort all items into two groups (Personal and Non Personal) prior to scanning to avoid the pop-up message indicating that it detected a different item type for the check. While most business checks are typically larger in size, business checks can look the same as personal checks.
Using OTCnet’s Terminal Configuration functionality, authorized users can limit the Item Type to Non Personal only. When Non Personal Only is chosen under Terminal Configuration, the Item Type Personal is no longer available for the operator to choose from the drop-down options. This can be set up for Agencies who never process personal checks. For more information, please reach to your CCA or the Administration User Guide: Chapter 7: Configuring Check Processing Settings.
Check Capture and Check Processing 9
Capturing and Managing Checks Online Bureau of the Fiscal Service
Accounting CodesBy default, the Agency Accounting Code drop-down field displays a blank value. An accounting code can be selected for a check transaction before or after scanning a check.
The Agency Accounting Codes drop-down list displays the full Agency Accounting Code value (up to 50 alphanumeric characters) and some portion of the Description (up to 15 alphanumeric characters).
Accounting Codes are displayed in the drop-down field if they are mapped or inherited from the higher level OTC Endpoint. Additionally, accounting codes that are designated as Treasury Account Symbols (TASs) by the Agency are displayed if they are and have been validated by Shared Account Module (SAM).
If no accounting codes are available for selection and the Agency is a Central Accounting Reporting System (CARS)/Government Wide Accounting (GWA) Reporter, an operator cannot scan a check. If no accounting codes are available for selection, and the Agency is not a CARS/GWA Reporter, an operator can still scan a check.
If an OTC Endpoint is associated with an ALC that is designated as a CARS/GWA Reporter, all check transactions must be classified with an accounting code. If an ALC is not a CARS/GWA Reporter, classifying it with an accounting code is optional.
The same accounting code is displayed after it is selected for the first time. The selected accounting code is “sticky” (remains the same) between transactions, between batches within the same check scanning session and prior to the next user login.
Check Capture and Check Processing
Bureau of the Fiscal Service Capturing and Managing Checks Online
Check Scanner Types and Check PlacementYour Agency may scan checks using one of five scanner types (see Table 2 below). Some scanners are designed to scan only in Batch mode, whereas others may only scan in Single mode. The EC7000i, EC9100i, Panini MyVision X, Panini Vision X, and Panini I: Deal, however, can scan checks in both modes.
Table 2. Scanner Types
EC7000i This scanner will automatically scan both sides of a check and can scan in single or batch mode (one or more checks in a batch)
EC9100i This scanner will automatically scan both sides of a check and can scan in single or batch mode (one or more checks in a batch)
Panini MyVision X This scanner will automatically scan both sides of a check and can scan in single or batch mode (one or more checks in a batch)
Panini Vision X This scanner will automatically scan both sides of a check and can scan in single or batch mode (one or more checks in a batch)
Panini I: Deal This scanner will automatically scan both sides of a check and can scan in single or batch mode (one or more checks in a batch)
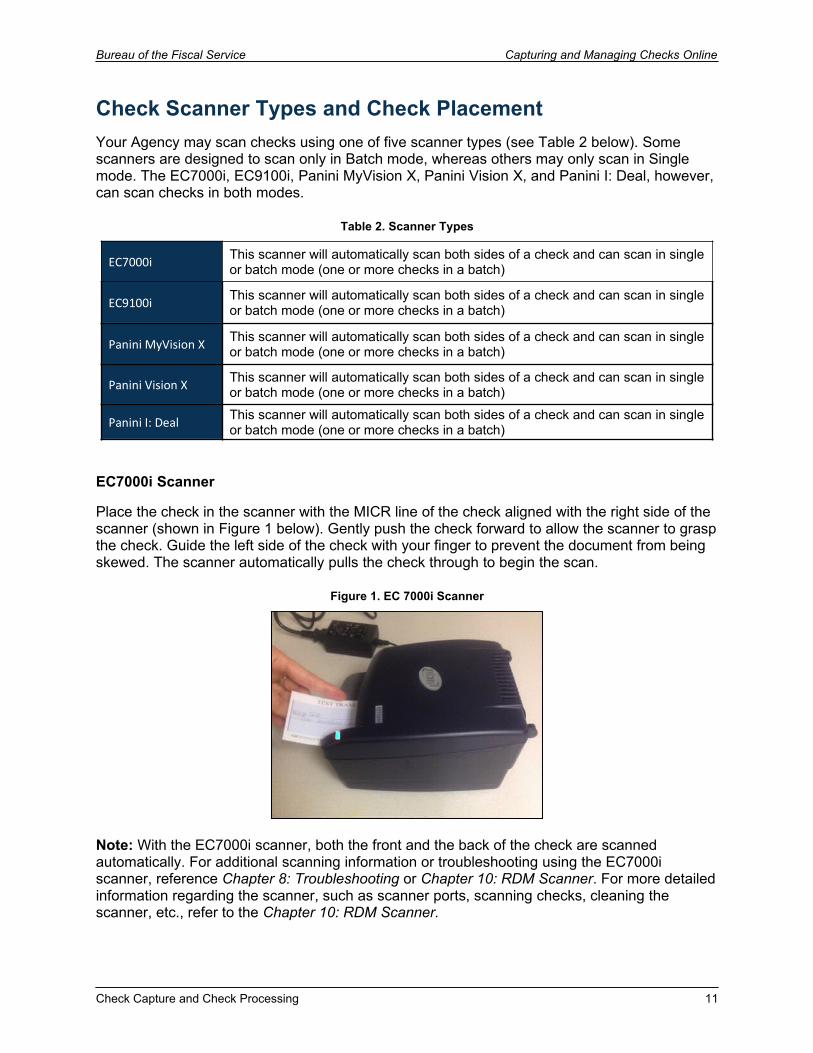
EC7000i Scanner
Place the check in the scanner with the MICR line of the check aligned with the right side of the scanner (shown in Figure 1 below). Gently push the check forward to allow the scanner to grasp the check. Guide the left side of the check with your finger to prevent the document from being skewed. The scanner automatically pulls the check through to begin the scan.
Figure 1. EC 7000i Scanner
Note: With the EC7000i scanner, both the front and the back of the check are scanned automatically. For additional scanning information or troubleshooting using the EC7000i scanner, reference Chapter 8: Troubleshooting or Chapter 10: RDM Scanner. For more detailed information regarding the scanner, such as scanner ports, scanning checks, cleaning the scanner, etc., refer to the Chapter 10: RDM Scanner.
Check Capture and Check Processing 11
Capturing and Managing Checks Online Bureau of the Fiscal Service
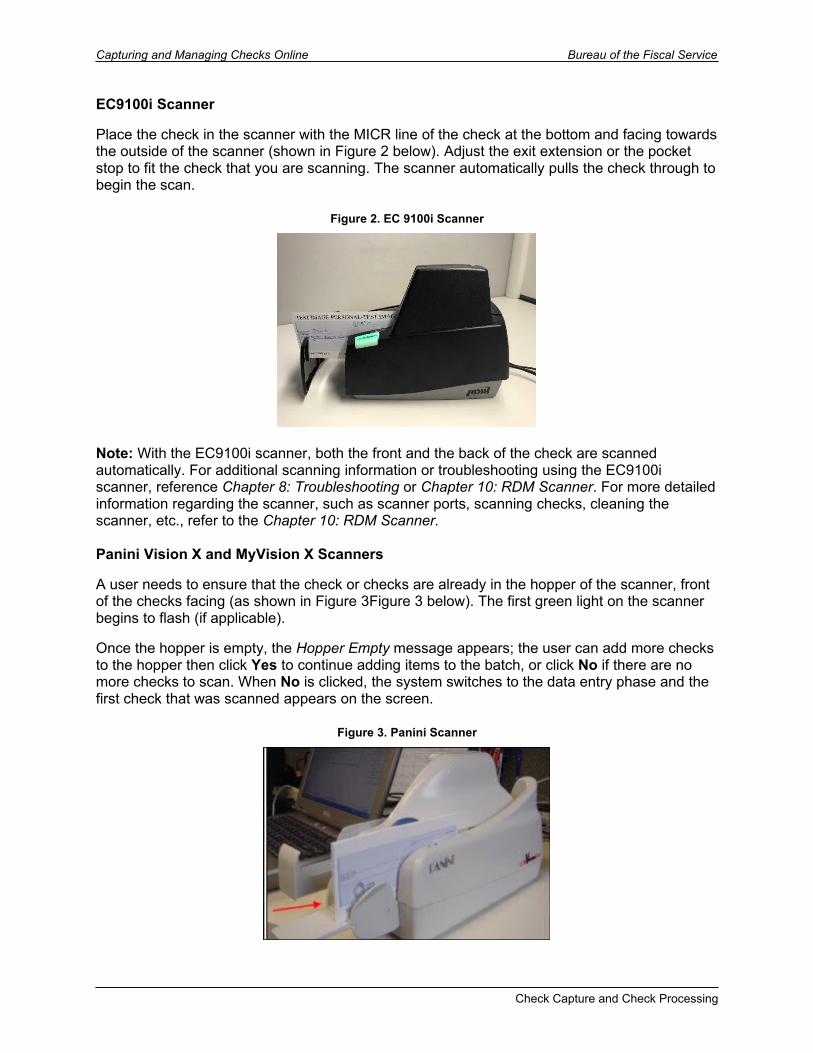
EC9100i Scanner
Place the check in the scanner with the MICR line of the check at the bottom and facing towards the outside of the scanner (shown in Figure 2 below). Adjust the exit extension or the pocket stop to fit the check that you are scanning. The scanner automatically pulls the check through to begin the scan.
Figure 2. EC 9100i Scanner
Note: With the EC9100i scanner, both the front and the back of the check are scanned automatically. For additional scanning information or troubleshooting using the EC9100i scanner, reference Chapter 8: Troubleshooting or Chapter 10: RDM Scanner. For more detailed information regarding the scanner, such as scanner ports, scanning checks, cleaning the scanner, etc., refer to the Chapter 10: RDM Scanner.
Panini Vision X and MyVision X Scanners
A user needs to ensure that the check or checks are already in the hopper of the scanner, front of the checks facing (as shown in Figure 3Figure 3 below). The first green light on the scanner begins to flash (if applicable).
Once the hopper is empty, the Hopper Empty message appears; the user can add more checks to the hopper then click Yes to continue adding items to the batch, or click No if there are no more checks to scan. When No is clicked, the system switches to the data entry phase and the first check that was scanned appears on the screen.
Figure 3. Panini Scanner
Check Capture and Check Processing
Bureau of the Fiscal Service Capturing and Managing Checks Online
Note: Use caution when clicking the Stop button during batch mode processing. Pressing too quickly (before the scanner has a chance to catch up to the system) may cause the loss of the last transaction.
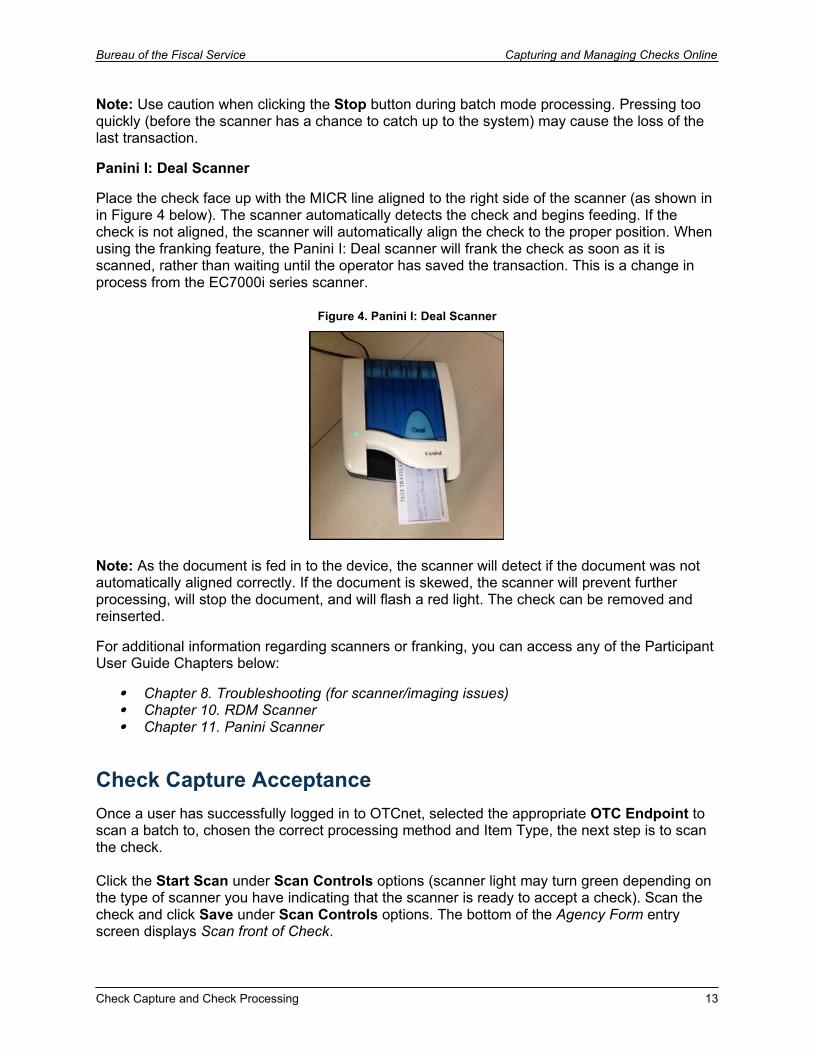
Panini I: Deal Scanner
Place the check face up with the MICR line aligned to the right side of the scanner (as shown in in Figure 4 below). The scanner automatically detects the check and begins feeding. If the check is not aligned, the scanner will automatically align the check to the proper position. When using the franking feature, the Panini I: Deal scanner will frank the check as soon as it is scanned, rather than waiting until the operator has saved the transaction. This is a change in process from the EC7000i series scanner.
Figure 4. Panini I: Deal Scanner
Note: As the document is fed in to the device, the scanner will detect if the document was not automatically aligned correctly. If the document is skewed, the scanner will prevent further processing, will stop the document, and will flash a red light. The check can be removed and reinserted.
For additional information regarding scanners or franking, you can access any of the Participant User Guide Chapters below:
Chapter 8. Troubleshooting (for scanner/imaging issues) Chapter 10. RDM Scanner Chapter 11. Panini Scanner
Check Capture AcceptanceOnce a user has successfully logged in to OTCnet, selected the appropriate OTC Endpoint to scan a batch to, chosen the correct processing method and Item Type, the next step is to scan the check.
Click the Start Scan under Scan Controls options (scanner light may turn green depending on the type of scanner you have indicating that the scanner is ready to accept a check). Scan the check and click Save under Scan Controls options. The bottom of the Agency Form entry screen displays Scan front of Check.
Check Capture and Check Processing 13
Capturing and Managing Checks Online Bureau of the Fiscal Service
Note: A Batch Control screen may appear, based on the Agency’s configuration settings.
Check Capture and Check Processing
Bureau of the Fiscal Service Capturing and Managing Checks Online
Capture a Check OnlineIn order to capture a check online, you must first start the OTCnet Local Bridge (OLB) application. For more details, refer to the Start and Stop the OTCnet Local Bridge (OLB) Application printable job aid. Before starting the OLB application, ensure the following steps have been completed:
The Check Capture Administrator downloaded the OLB application
The OLB certificate is installed on the terminal
The OLB application is installed on the terminal
The user performing check processing, check capture, or terminal configuration operations on the terminal has created the OLB profile, ensuring that:
o The OLB credential file was not renamed (the file name remained the same as it was generated)
o The OLB credential file was saved/stored in the OLB application folder on the terminal
For step-by-step instructions, refer to the Download the OTCnet Local Bridge (OLB) Application, Install the OTCnet Local Bridge (OLB) Certificate, Install the OTCnet Local Bridge (OLB) Application, and Create the OTCnet Local Bridge (OLB) Profile printable job aids.
To capture a check in OTCnet Online, complete the following steps:
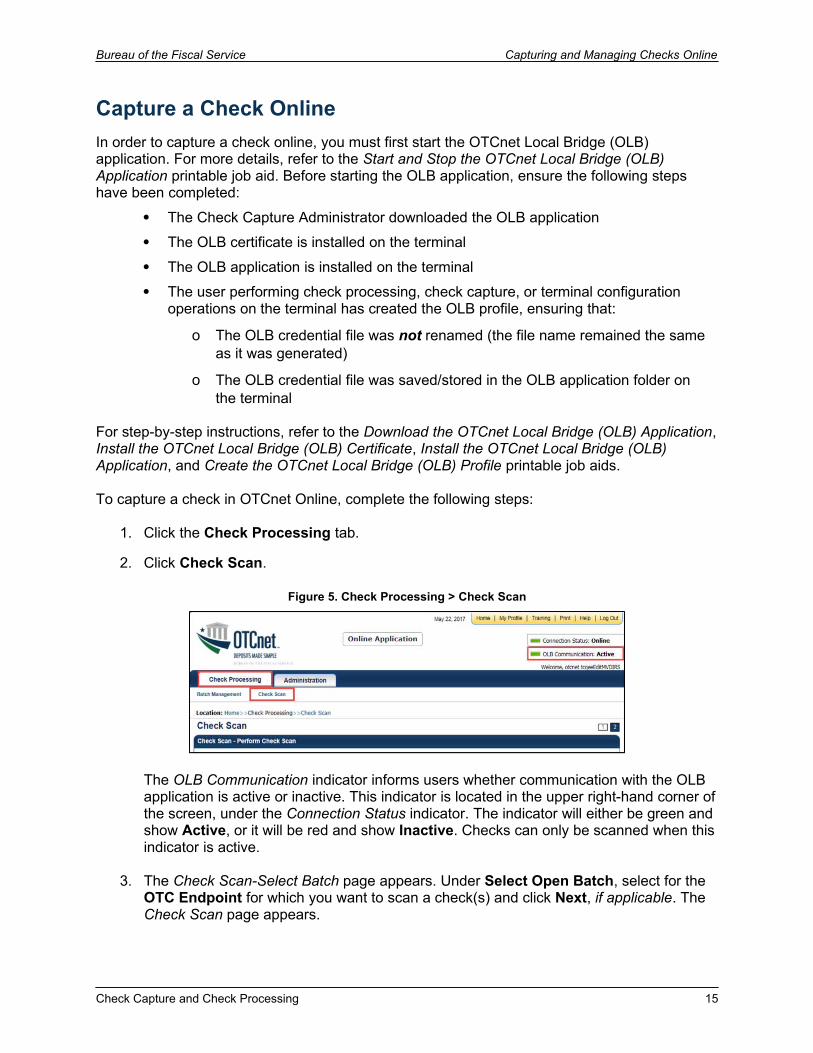
1. Click the Check Processing tab.
2. Click Check Scan.
Figure 5. Check Processing > Check Scan
The OLB Communication indicator informs users whether communication with the OLB application is active or inactive. This indicator is located in the upper right-hand corner of the screen, under the Connection Status indicator. The indicator will either be green and show Active, or it will be red and show Inactive. Checks can only be scanned when this indicator is active.
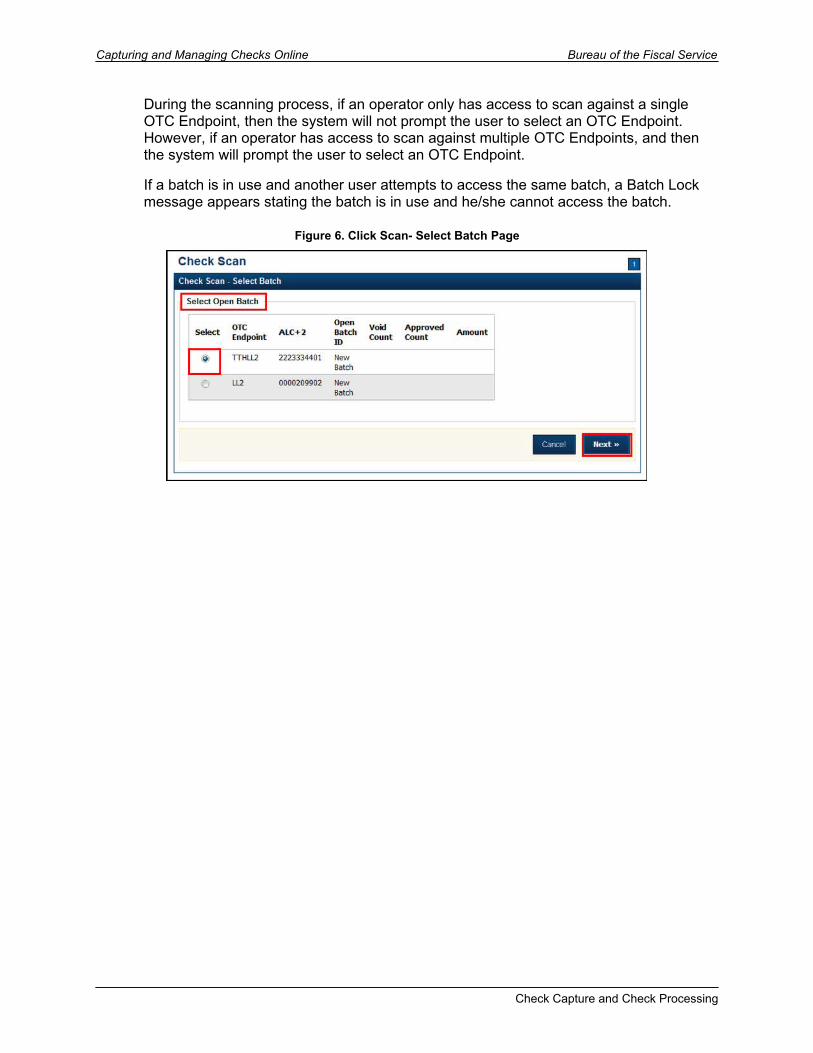
3. The Check Scan-Select Batch page appears. Under Select Open Batch, select for the OTC Endpoint for which you want to scan a check(s) and click Next, if applicable. The Check Scan page appears.
Check Capture and Check Processing 15
Capturing and Managing Checks Online Bureau of the Fiscal Service
During the scanning process, if an operator only has access to scan against a single OTC Endpoint, then the system will not prompt the user to select an OTC Endpoint. However, if an operator has access to scan against multiple OTC Endpoints, and then the system will prompt the user to select an OTC Endpoint.
If a batch is in use and another user attempts to access the same batch, a Batch Lock message appears stating the batch is in use and he/she cannot access the batch.
Figure 6. Click Scan- Select Batch Page
Check Capture and Check Processing
Bureau of the Fiscal Service Capturing and Managing Checks Online
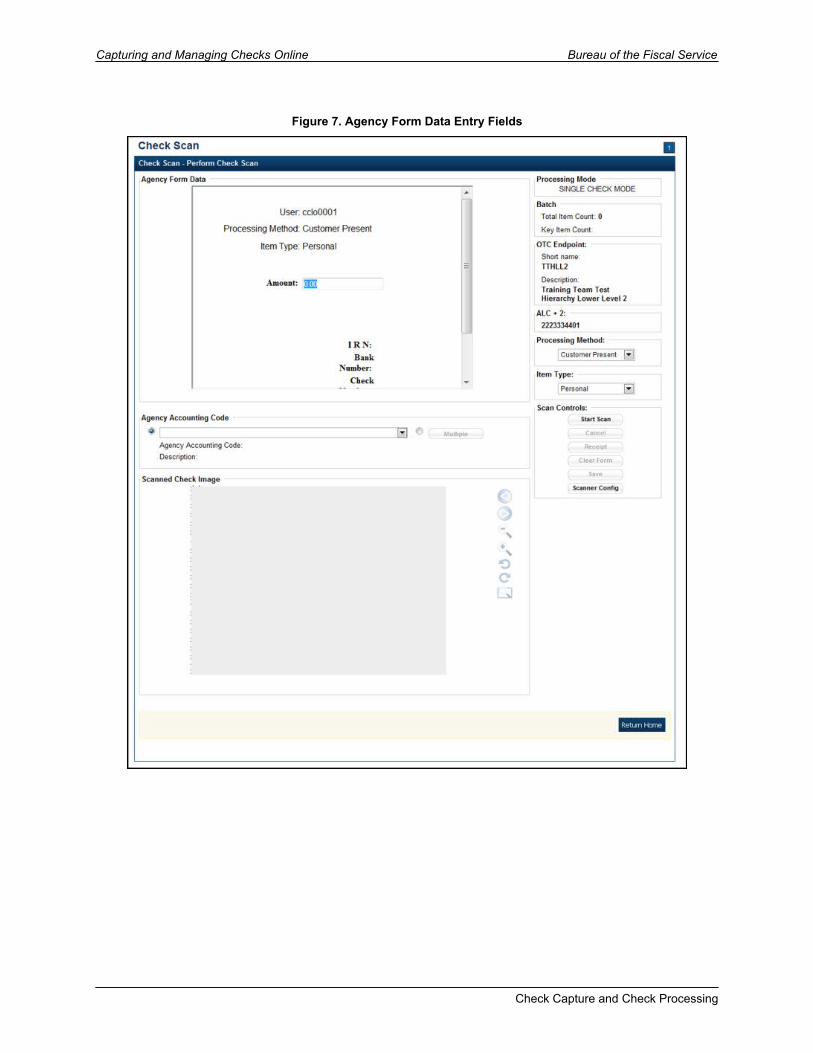
4. The Check Scan – Perform Check Scan page appears.
Under ALC+2 (Agency Location Code +2), Verify the OTC Endpoint. If you need to change the OTC Endpoint, click
Previous and return to Step 2
Under Processing Method, Select the Customer Present, Customer Not Present, or Back Office
Processing Method indicates how the check data is entered. There are three Processing Methods:
Customer Present-Customer has presented a check in person i.e., standing in front the operator with their check.
Customer Not Present-Customer has dropped off the check and is not available i.e., has submitted the check via mail or unmanned drop box.
Back Office-Customer presented a check in person and the check is being scanned in a controlled back-office environment
Under Item Type, Select Personal or Non-personal
Item Type indicates whether the check presented is a personal or non-personal check. This determines whether the check is handled through Check 21 (non-personal) or FedACH (personal).
Item Types are defined as follows:
Personal -Name on the check is an individual’s name, not acting as an organization
Non-Personal - Name on the check is an organization, or the check is a money order, traveler’s check, or third-party check
Check Capture and Check Processing 17
Capturing and Managing Checks Online Bureau of the Fiscal Service
Figure 7. Agency Form Data Entry Fields
Check Capture and Check Processing
Bureau of the Fiscal Service Capturing and Managing Checks Online
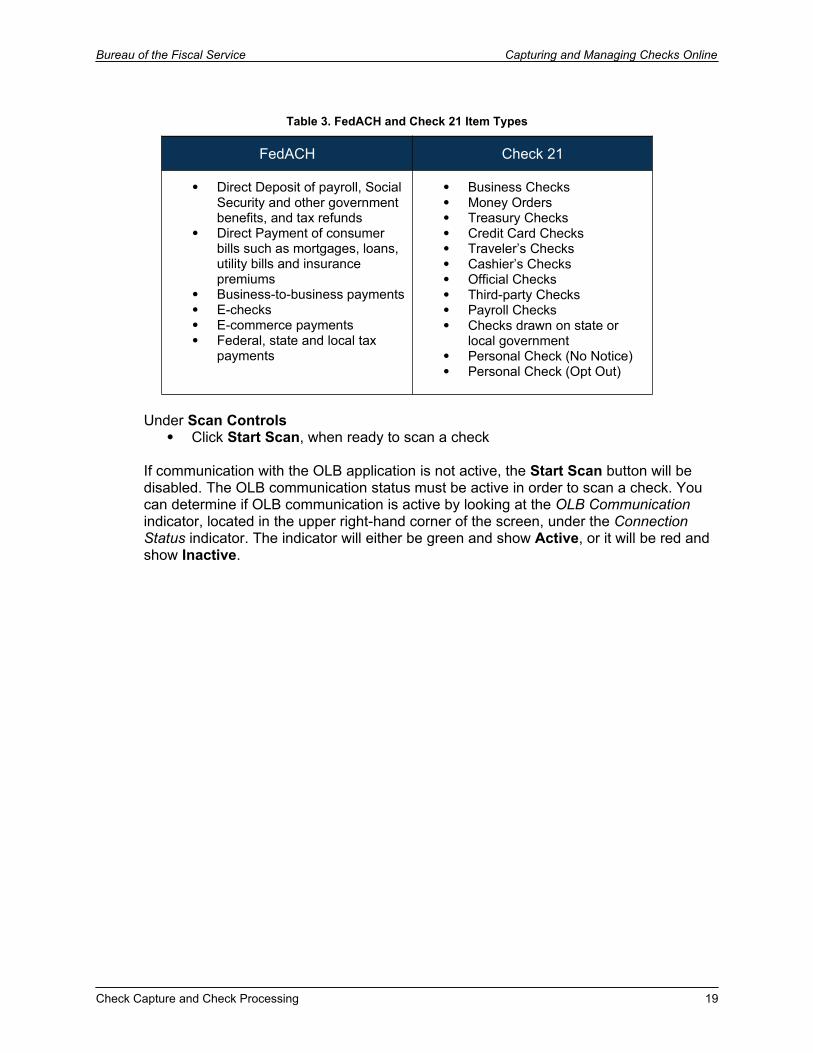
Table 3. FedACH and Check 21 Item Types
FedACH Check 21
Direct Deposit of payroll, Social Security and other government benefits, and tax refunds
Direct Payment of consumer bills such as mortgages, loans, utility bills and insurance premiums
Business-to-business payments E-checks E-commerce payments Federal, state and local tax
payments
Business Checks Money Orders Treasury Checks Credit Card Checks Traveler’s Checks Cashier’s Checks Official Checks Third-party Checks Payroll Checks Checks drawn on state or
local government Personal Check (No Notice) Personal Check (Opt Out)
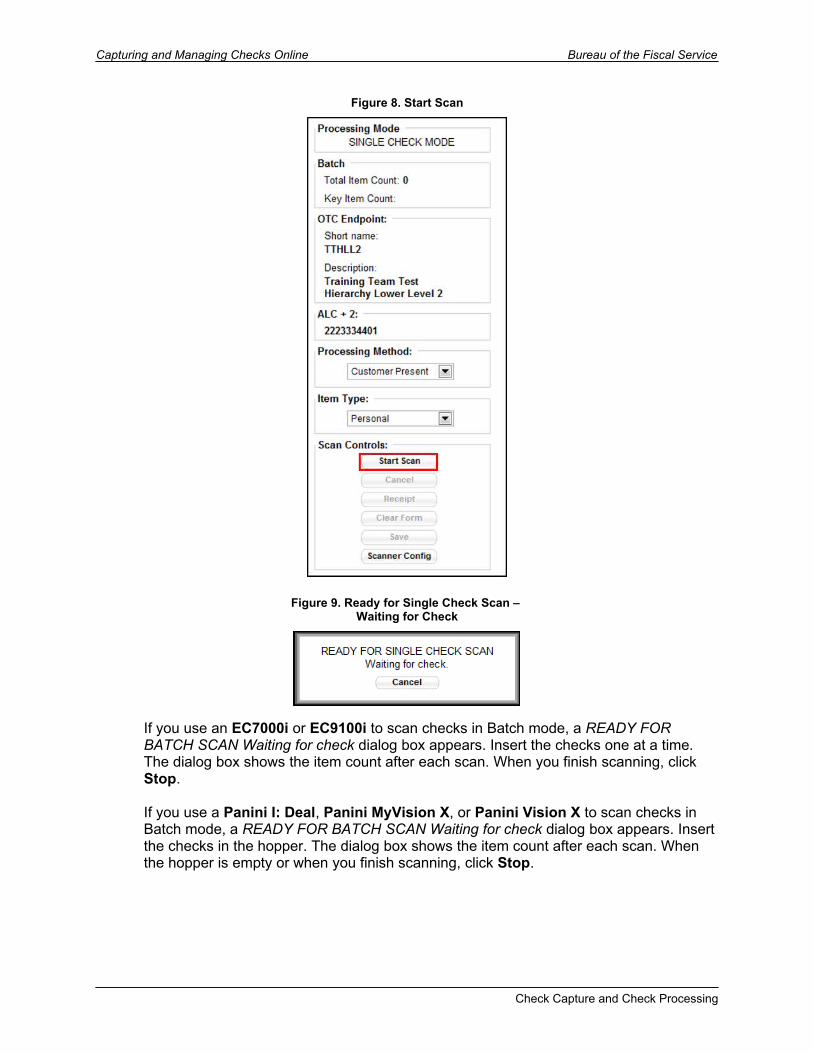
Under Scan Controls Click Start Scan, when ready to scan a check
If communication with the OLB application is not active, the Start Scan button will be disabled. The OLB communication status must be active in order to scan a check. You can determine if OLB communication is active by looking at the OLB Communication indicator, located in the upper right-hand corner of the screen, under the Connection Status indicator. The indicator will either be green and show Active, or it will be red and show Inactive.
Check Capture and Check Processing 19
Capturing and Managing Checks Online Bureau of the Fiscal Service
Figure 8. Start Scan
Figure 9. Ready for Single Check Scan – Waiting for Check
If you use an EC7000i or EC9100i to scan checks in Batch mode, a READY FOR BATCH SCAN Waiting for check dialog box appears. Insert the checks one at a time. The dialog box shows the item count after each scan. When you finish scanning, click Stop.
If you use a Panini I: Deal, Panini MyVision X, or Panini Vision X to scan checks in Batch mode, a READY FOR BATCH SCAN Waiting for check dialog box appears. Insert the checks in the hopper. The dialog box shows the item count after each scan. When the hopper is empty or when you finish scanning, click Stop.
Check Capture and Check Processing
Bureau of the Fiscal Service Capturing and Managing Checks Online
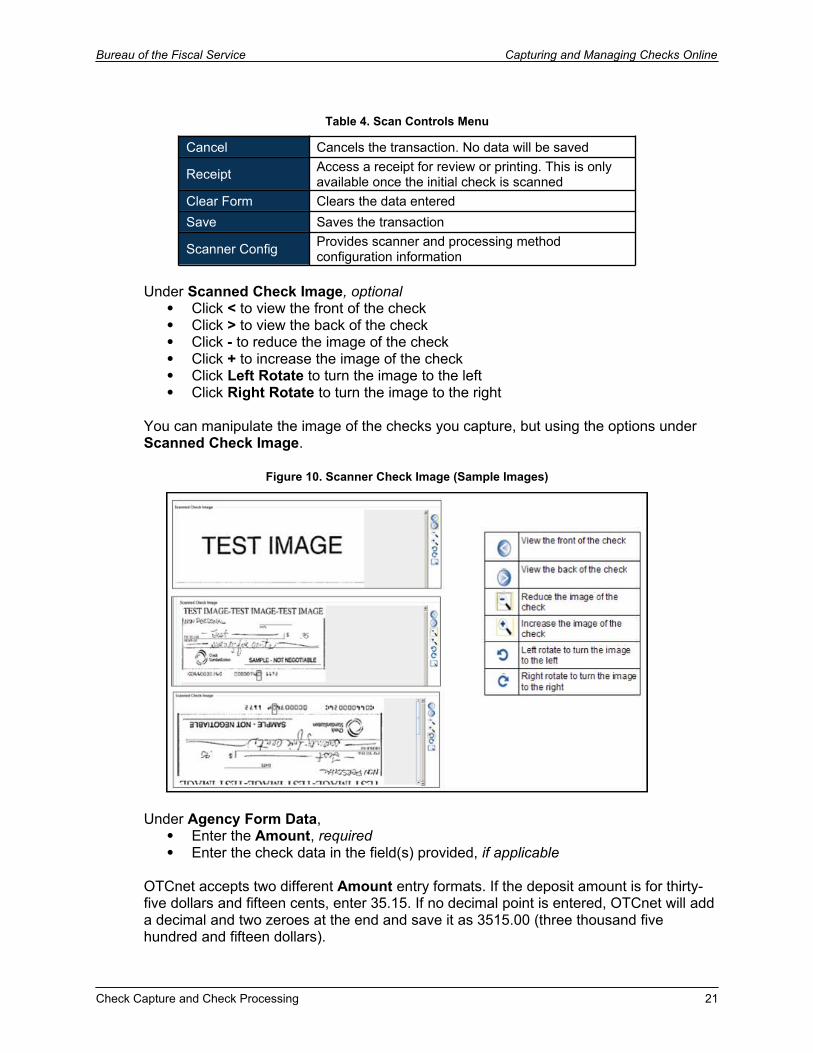
Table 4. Scan Controls Menu
Cancel Cancels the transaction. No data will be saved
Receipt Access a receipt for review or printing. This is only available once the initial check is scanned
Clear Form Clears the data enteredSave Saves the transaction
Scanner Config Provides scanner and processing method configuration information
Under Scanned Check Image, optional Click < to view the front of the check Click > to view the back of the check Click - to reduce the image of the check Click + to increase the image of the check Click Left Rotate to turn the image to the left Click Right Rotate to turn the image to the right
You can manipulate the image of the checks you capture, but using the options under Scanned Check Image.
Figure 10. Scanner Check Image (Sample Images)
Under Agency Form Data, Enter the Amount, required Enter the check data in the field(s) provided, if applicable
OTCnet accepts two different Amount entry formats. If the deposit amount is for thirty-five dollars and fifteen cents, enter 35.15. If no decimal point is entered, OTCnet will add a decimal and two zeroes at the end and save it as 3515.00 (three thousand five hundred and fifteen dollars).
Check Capture and Check Processing 21
Capturing and Managing Checks Online Bureau of the Fiscal Service
Be sure to type in the data rather than copying and pasting from another source. Data that has been copied and pasted may result in an error. Use the Tab key on the keyboard to navigate to the next data field for entry.
After saving the data, a message appears stating the transaction was successfully saved along with the Individual Reference Number (IRN) and check amount.
Only numbers need input. For example, entering in 1290 would equal $12.90, and 56321 would be equal to $563.21. The maximum dollar amount that can be keyed into the data entry screen is 99,999,999.99. The minimum amount is .01.
The Agency Form Data form is customizable and can include fields beyond the Amount field (e.g., Social Security Number). If your agency has additional fields, they display under the Amount field. Your Agency may deem the field(s) either mandatory or optional for you to complete an entry. If your Agency requires additional fields, contact your Deployment Specialist at 703-377-5586 or [email protected].
Since the configuration field requirements are established by each Agency, minimum/maximum requirements may exist for certain fields. If the operator does not satisfy those minimum/maximum field requirements, an error message is displayed in the middle of the screen and corrections must be made to the field before the transaction is accepted.
Recapture an image of a check if it inserted upside down; appears skewed; or the image is illegible. Click Cancel and reinsert the check in the scanner. Then click Start Scan and re-enter the necessary data.
Upon scanning the check and using enter on your keyboard to finalize, you will notice that the IRN, Bank Number, Check Number, Account Number, Date & Time fields automatically populates located in the frame of the Agency Form Data). For details regarding your scanner configurations, click on Scanner Config, under Scan Controls.
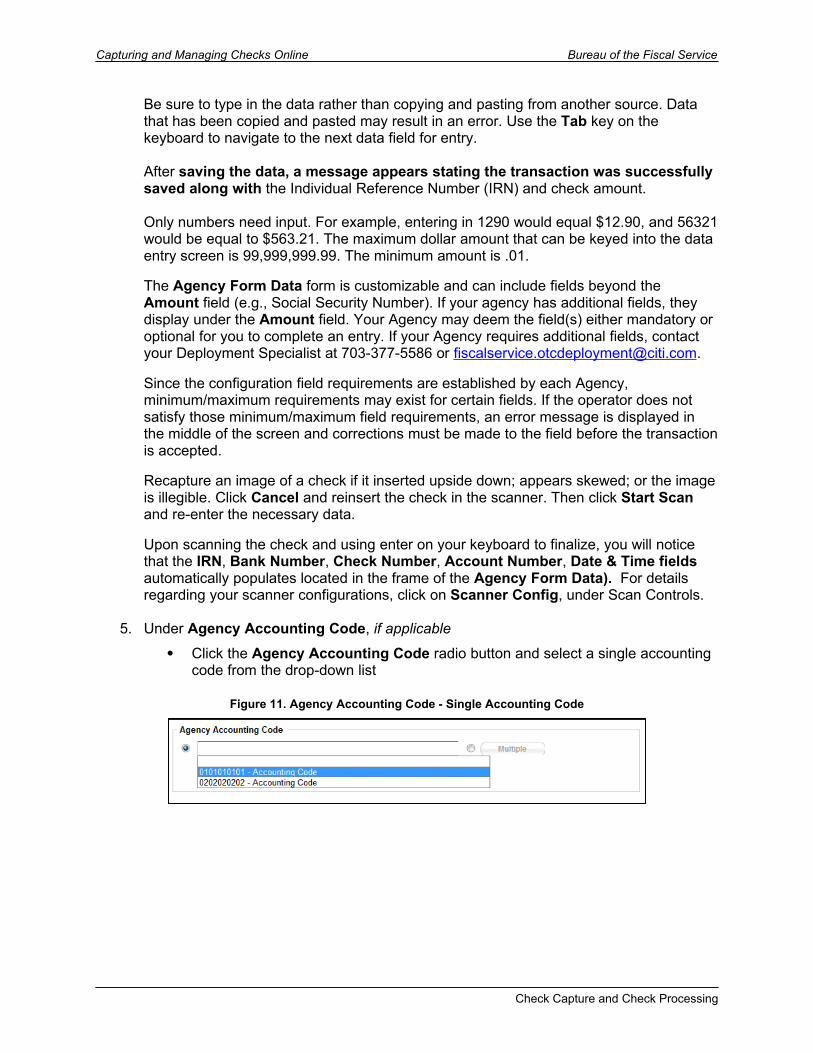
5. Under Agency Accounting Code, if applicable
Click the Agency Accounting Code radio button and select a single accounting code from the drop-down list
Figure 11. Agency Accounting Code - Single Accounting Code
Check Capture and Check Processing
Bureau of the Fiscal Service Capturing and Managing Checks Online
Or
Click the Multiple radio button. The Account Classification dialog box appears.o Select an Accounting Code, enter the Amount, and click Add for each
subtotal of the deposito Click Save and Return to Check Scan
Figure 12. Agency Accounting Code - Multiple Accounting Code
Figure 13. Account Classification – Multiple Agency Accounting Codes
If no accounting codes are available for selection and the Agency is a CARS/GWA Reporter, an operator cannot scan a check. If no accounting codes are available for selection, and the Agency is not a CARS/GWA Reporter, an operator can still scan a check.
If an OTC Endpoint is associated with an ALC that is designated as a CARS/GWA Reporter, all check transactions must be classified with an accounting code. If an ALC is not a CARS/GWA Reporter, classifying it with an accounting code is optional.
The same accounting code is displayed after it is selected for the first time. The selected accounting code is “sticky” (remains the same) between transactions, between batches within the same check scanning session and prior to the next user login.
Check Capture and Check Processing 23
Capturing and Managing Checks Online Bureau of the Fiscal Service
The single Agency Accounting Code and Multiple accounting codes options are available if checks are scanned against an OTC Endpoint designated for Item Level Classification. If an ALC is designated for Summary Level Classification the Agency Accounting Code and Multiple accounting codes options are disabled.
6. If multiple accounting codes are used, the combined accounting code subtotal must be equal to the deposit total before proceeding to the next step. If it does not, you must go back and re-validate your subtotal entries.
7. Click Save to save the image of the check and the data you entered.
Figure 14. Save Check
Upon scanning the check and using enter on your keyboard to finalize, you will notice that the IRN, Bank Number, Check Number, Account Number, Date & Time fields automatically populates located in the frame of the Agency Form Data.
A message appears stating the transaction was successfully saved along with the Individual Reference Number (IRN) and check amount.
Check Capture and Check Processing
Bureau of the Fiscal Service Capturing and Managing Checks Online
Figure 15. Transaction Saved Successfully
For details regarding your scanner configurations, click on Scanner Config, under Scan Controls.
Figure 16. Scanner Configuration Menu Option
Check Capture and Check Processing 25
Capturing and Managing Checks Online Bureau of the Fiscal Service
Capture a Check Online
Application TipThe Check Capture Operator and Check Capture Lead Operator are authorized to capture a check.
Application TipIn order to capture a check online, you must first start the OTCnet Local Bridge (OLB) application. For more details, refer to the Start and Stop the OTCnet Local Bridge (OLB) Application printable job aid. Before starting the OLB application, ensure the following steps have been completed:
The Check Capture Administrator downloaded the OLB application
The OLB certificate is installed on the terminal The OLB application is installed on the terminal The user performing check processing, check capture, or terminal
configuration operations on the terminal has created the OLB profile, ensuring that:
o The OLB credential file was not renamed (the file name remained the same as it was generated)
o The OLB credential file was saved/stored in the OLB application folder on the terminal
For step-by-step instructions, refer to the Download the OTCnet Local Bridge (OLB) Application, Install the OTCnet Local Bridge (OLB) Certificate, Install the OTCnet Local Bridge (OLB) Application, and Create the OTCnet Local Bridge (OLB) Profile printable job aids.
To capture a check in OTCnet Online, complete the following steps:
1. From the Check Processing tab, click Check Scan.
The Check Scan-Select Batch page appears.
Under Select Open Batch, if applicable Click Select for the OTC Endpoint for which you want to scan one or more
checks Click Next
Check Capture and Check Processing
Bureau of the Fiscal Service Capturing and Managing Checks Online
Application TipDuring the scanning process, if an operator only has access to scan against a single OTC Endpoint, then the system will not prompt the user to select an OTC Endpoint. However, if an operator has access to scan against multiple OTC Endpoints, then the system will prompt the user to select an OTC Endpoint.
Application TipIf an operator has an OTC Endpoint with an Open batch, then the batch details (Void Count, Approved Count, and Amount) are displayed.
Application TipIf a batch is in use and another user attempts to access the same batch, a Batch Lock message appears stating the batch is in use and he/she cannot access the batch.
Application TipIf an Agency is associated with an OTC Endpoint that is designated as a Central Accounting Reporting System (CARS)/Government-Wide Accounting (GWA) Reporter and no accounting codes are available for selection, an error message appears and the operator cannot scan a check. If an Agency is associated with an OTC Endpoint is not a CARS/GWA Reporter, the operator can scan checks and selecting an accounting code is optional.
Check Capture and Check Processing 27

Capturing and Managing Checks Online Bureau of the Fiscal Service
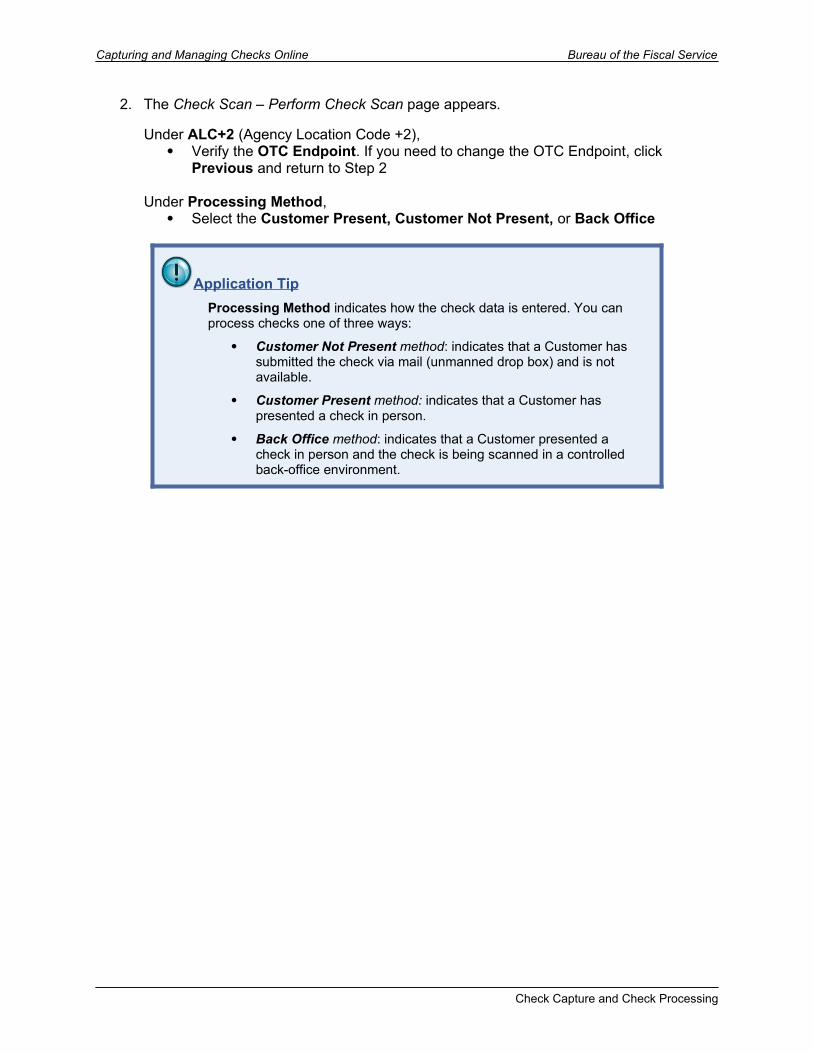
2. The Check Scan – Perform Check Scan page appears.
Under ALC+2 (Agency Location Code +2), Verify the OTC Endpoint. If you need to change the OTC Endpoint, click
Previous and return to Step 2
Under Processing Method, Select the Customer Present, Customer Not Present, or Back Office
Application TipProcessing Method indicates how the check data is entered. You can process checks one of three ways:
Customer Not Present method: indicates that a Customer has submitted the check via mail (unmanned drop box) and is not available.
Customer Present method: indicates that a Customer has presented a check in person.
Back Office method: indicates that a Customer presented a check in person and the check is being scanned in a controlled back-office environment.
Check Capture and Check Processing
Bureau of the Fiscal Service Capturing and Managing Checks Online
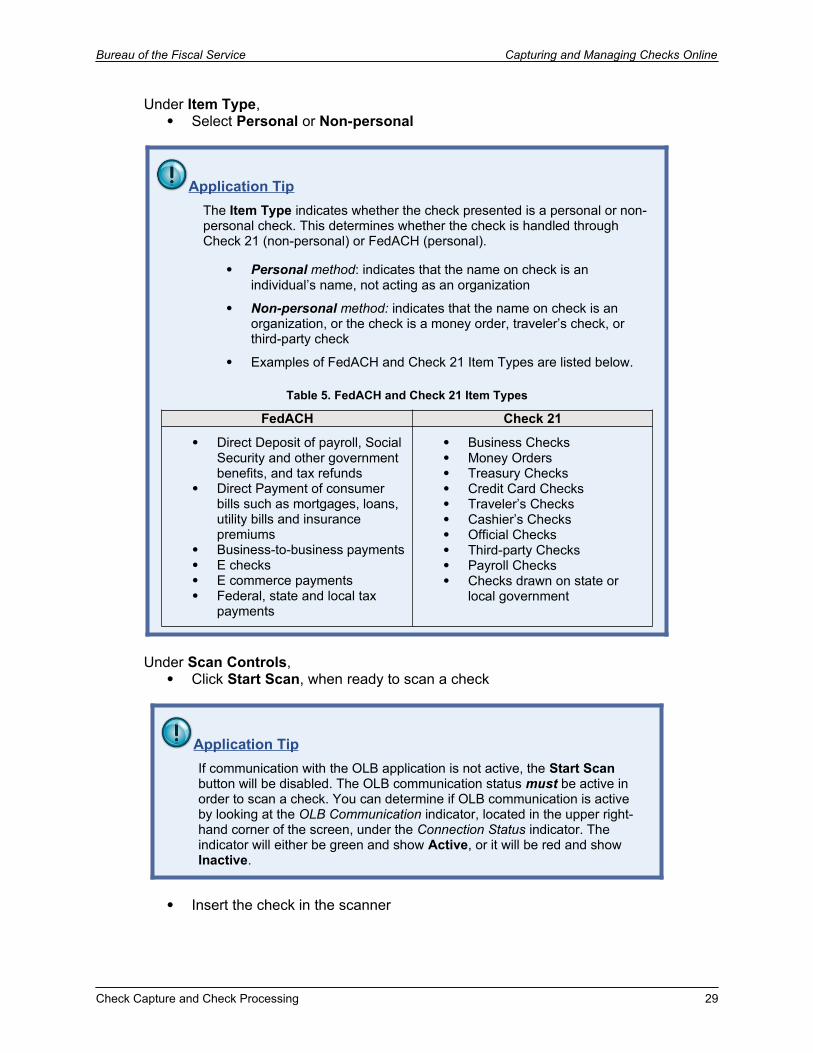
Under Item Type, Select Personal or Non-personal
Application TipThe Item Type indicates whether the check presented is a personal or non-personal check. This determines whether the check is handled through Check 21 (non-personal) or FedACH (personal).
Personal method: indicates that the name on check is an individual’s name, not acting as an organization
Non-personal method: indicates that the name on check is an organization, or the check is a money order, traveler’s check, or third-party check
Examples of FedACH and Check 21 Item Types are listed below.
Table 5. FedACH and Check 21 Item Types
FedACH Check 21
Direct Deposit of payroll, Social Security and other government benefits, and tax refunds
Direct Payment of consumer bills such as mortgages, loans, utility bills and insurance premiums
Business-to-business payments E checks E commerce payments Federal, state and local tax
payments
Business Checks Money Orders Treasury Checks Credit Card Checks Traveler’s Checks Cashier’s Checks Official Checks Third-party Checks Payroll Checks Checks drawn on state or
local government
Under Scan Controls, Click Start Scan, when ready to scan a check
Application TipIf communication with the OLB application is not active, the Start Scan button will be disabled. The OLB communication status must be active in order to scan a check. You can determine if OLB communication is active by looking at the OLB Communication indicator, located in the upper right-hand corner of the screen, under the Connection Status indicator. The indicator will either be green and show Active, or it will be red and show Inactive.
Insert the check in the scanner
Check Capture and Check Processing 29
Capturing and Managing Checks Online Bureau of the Fiscal Service
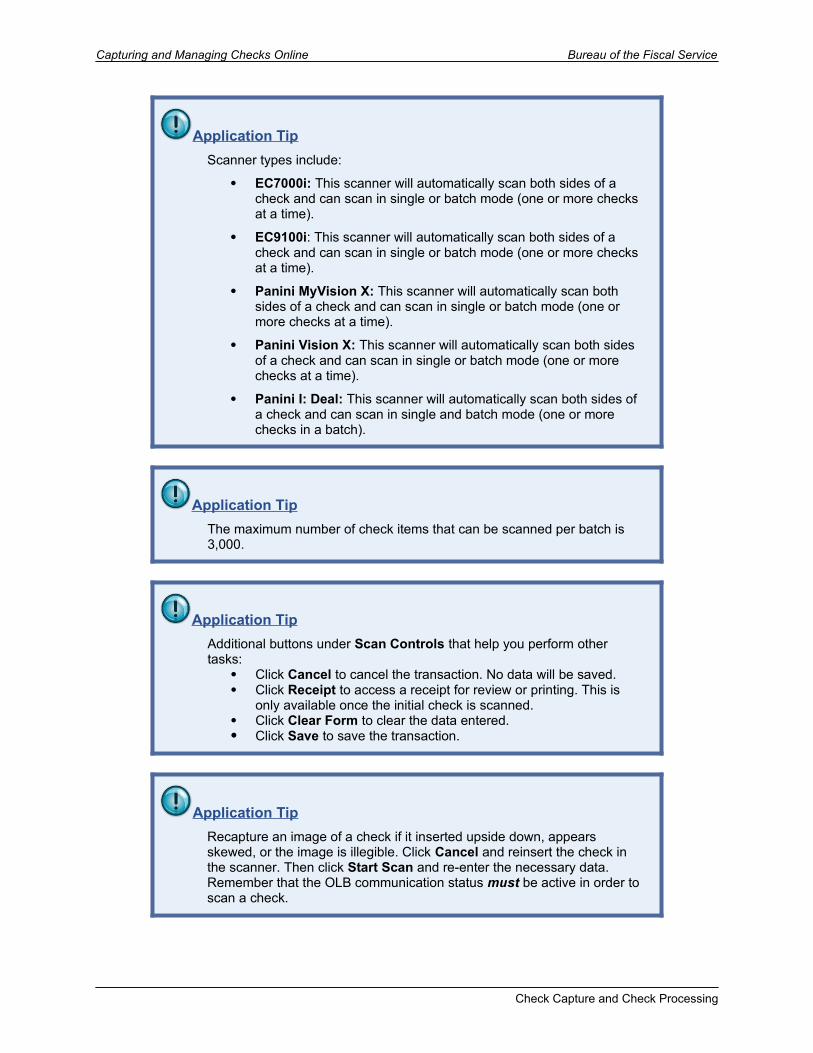
Application TipScanner types include:
EC7000i: This scanner will automatically scan both sides of a check and can scan in single or batch mode (one or more checks at a time).
EC9100i: This scanner will automatically scan both sides of a check and can scan in single or batch mode (one or more checks at a time).
Panini MyVision X: This scanner will automatically scan both sides of a check and can scan in single or batch mode (one or more checks at a time).
Panini Vision X: This scanner will automatically scan both sides of a check and can scan in single or batch mode (one or more checks at a time).
Panini I: Deal: This scanner will automatically scan both sides of a check and can scan in single and batch mode (one or more checks in a batch).
Application TipThe maximum number of check items that can be scanned per batch is 3,000.
Application TipAdditional buttons under Scan Controls that help you perform other tasks:
Click Cancel to cancel the transaction. No data will be saved. Click Receipt to access a receipt for review or printing. This is
only available once the initial check is scanned. Click Clear Form to clear the data entered. Click Save to save the transaction.
Application TipRecapture an image of a check if it inserted upside down, appears skewed, or the image is illegible. Click Cancel and reinsert the check in the scanner. Then click Start Scan and re-enter the necessary data. Remember that the OLB communication status must be active in order to scan a check.
Check Capture and Check Processing
Bureau of the Fiscal Service Capturing and Managing Checks Online
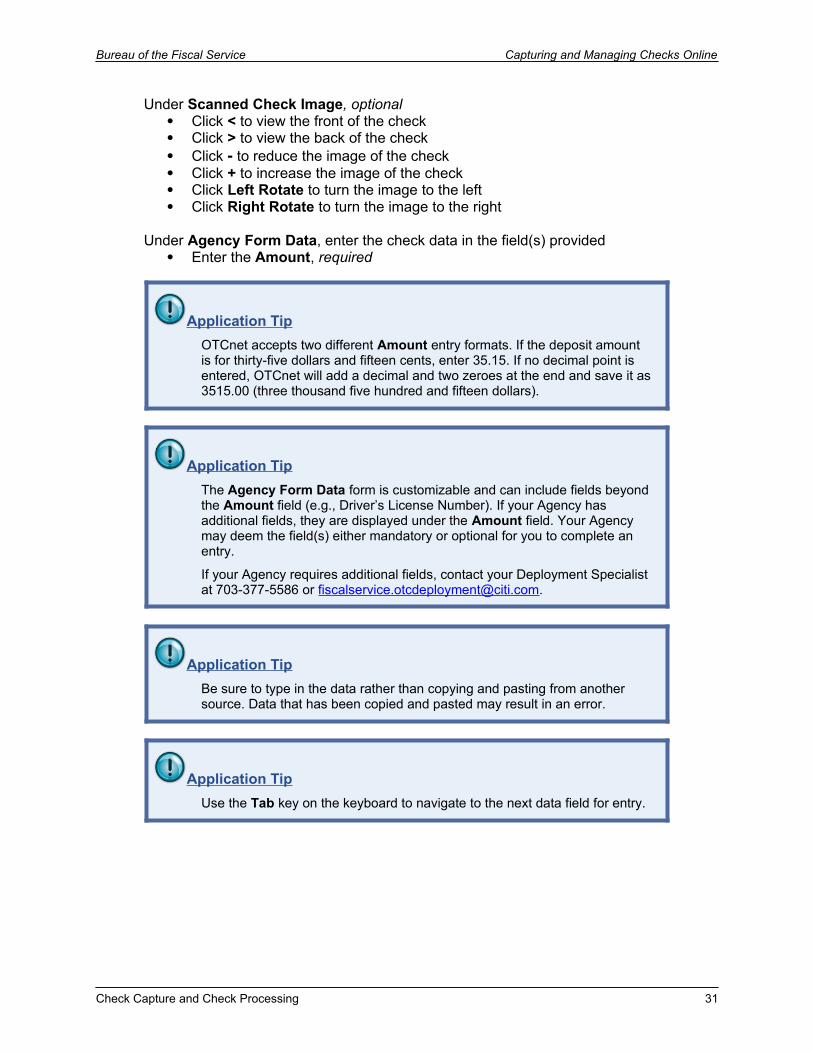
Under Scanned Check Image, optional Click < to view the front of the check Click > to view the back of the check Click - to reduce the image of the check Click + to increase the image of the check Click Left Rotate to turn the image to the left Click Right Rotate to turn the image to the right
Under Agency Form Data, enter the check data in the field(s) provided Enter the Amount, required
Application TipOTCnet accepts two different Amount entry formats. If the deposit amount is for thirty-five dollars and fifteen cents, enter 35.15. If no decimal point is entered, OTCnet will add a decimal and two zeroes at the end and save it as 3515.00 (three thousand five hundred and fifteen dollars).
Application TipThe Agency Form Data form is customizable and can include fields beyond the Amount field (e.g., Driver’s License Number). If your Agency has additional fields, they are displayed under the Amount field. Your Agency may deem the field(s) either mandatory or optional for you to complete an entry.
If your Agency requires additional fields, contact your Deployment Specialist at 703-377-5586 or [email protected].
Application TipBe sure to type in the data rather than copying and pasting from another source. Data that has been copied and pasted may result in an error.
Application TipUse the Tab key on the keyboard to navigate to the next data field for entry.
Check Capture and Check Processing 31
Capturing and Managing Checks Online Bureau of the Fiscal Service
Application TipConsider the following about Batch Mode:
If you use an EC7000i or EC9100i to scan checks in Batch mode, a READY FOR BATCH SCAN, Waiting for check dialog box appears. Insert the checks one at a time. The dialog box shows the item count after each scan. When you finish scanning, click Stop.
If you use a Panini I: Deal, Panini MyVision X, or Panini Vision X to scan checks in Batch mode, a READY FOR BATCH SCAN, Waiting for check dialog box appears. Insert the checks in the hopper. The dialog box shows the item count after each scan. When the hopper is empty or when you finish scanning, click Stop.
Under Agency Accounting Code, if applicable
Click the Agency Accounting Code radio button and select a single accounting code from the drop-down list
Or
Click the Multiple radio button and from the Account Classification dialog box, select an Agency Accounting Code, enter the Amount, and click Add for each subtotal of the deposit. Then click Save.
Check Capture and Check Processing

Bureau of the Fiscal Service Capturing and Managing Checks Online
Application TipConsider the following information about Agency Accounting Codes:
By default, the Agency Accounting Code drop-down field displays a blank value. An accounting code can be selected for a check transaction before or after scanning a check.
The Agency Accounting Codes drop-down list displays the full Agency Accounting Code value (up to 50 alphanumeric characters) and some portion of the Description (up to 15 alphanumeric characters).
Accounting Codes are displayed in the drop-down field if they are mapped or inherited from the higher-level OTC Endpoint. Additionally, accounting codes that are designated as Treasury Account Symbols (TASs) by the Agency are displayed if they are and have been validated by Shared Account Module (SAM).
If no accounting codes are available for selection and the Agency is a CARS/GWA Reporter, an operator cannot scan a check. If no accounting codes are available for selection, and the Agency is not a CARS/GWA Reporter, an operator can still scan a check.
If an OTC Endpoint is associated with an ALC that is designated as a CARS/GWA Reporter, all check transactions must be classified with an accounting code. If an ALC is not a CARS/GWA Reporter, classifying it with an accounting code is optional.
The same accounting code is displayed after it is selected for the first time. The selected accounting code is “sticky” (remains the same) between transactions, between batches within the same check scanning session and prior to the next user login.
The single Agency Accounting Code and Multiple accounting codes options are only available if checks are scanned against an OTC Endpoint designated for Item Level Classification. If an ALC+2 is designated for Summary Level Classification, the Agency Accounting Code and Multiple accounting codes options are disabled.
If multiple accounting codes are used, the combined accounting code subtotal must be equal to the deposit total before proceeding to the next step. If it does not, you must go back and re-validate your subtotal entries.
Check Capture and Check Processing 33
Capturing and Managing Checks Online Bureau of the Fiscal Service
3. Click Save to save the image of the check and the data you entered.
Application TipUpon scanning the check and using enter on your keyboard to finalize, you will notice that the IRN, Bank Number, Check Number, Account Number, and Date & Time fields automatically populate (located in the frame of the Agency Form Data).
4. A message appears stating the transaction was successfully saved along with the Individual Reference Number (IRN) and check amount.
Application TipAdditional button on the page that helps you perform other tasks:
Click Return Home to return to the OTCnet Home Page.
Check Capture and Check Processing
Bureau of the Fiscal Service Capturing and Managing Checks Online
Topic 3. Manage Poor Check Image Quality
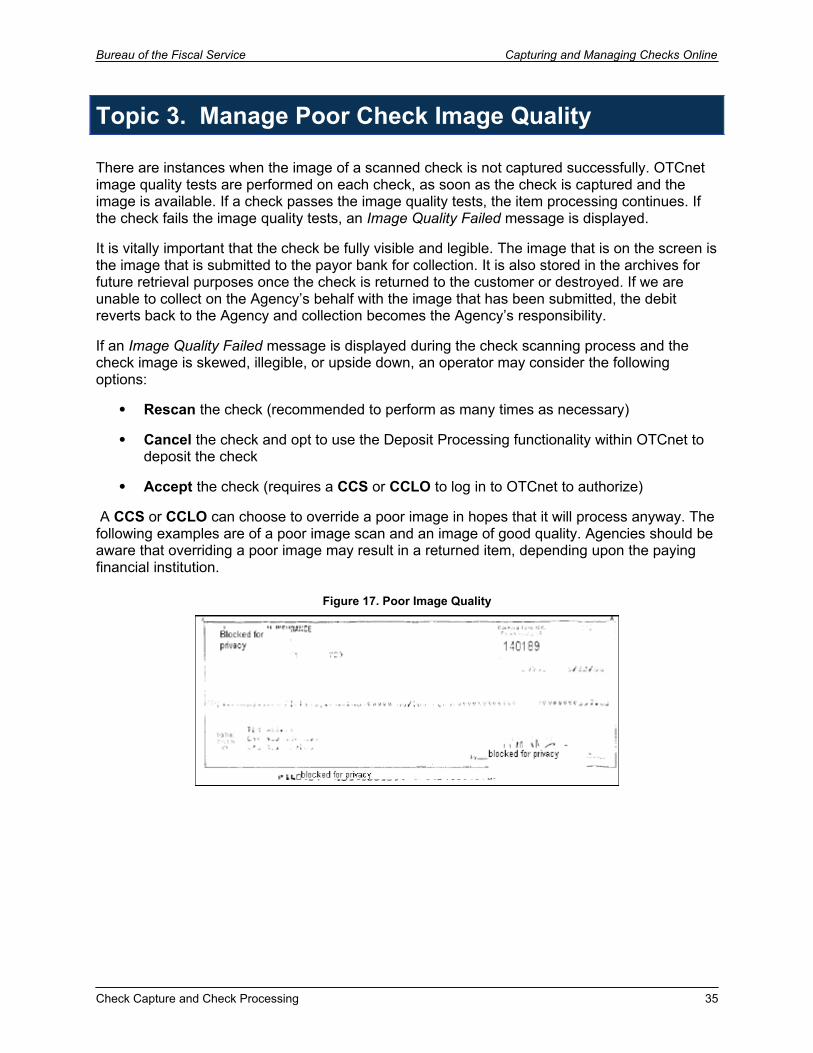
There are instances when the image of a scanned check is not captured successfully. OTCnet image quality tests are performed on each check, as soon as the check is captured and the image is available. If a check passes the image quality tests, the item processing continues. If the check fails the image quality tests, an Image Quality Failed message is displayed.
It is vitally important that the check be fully visible and legible. The image that is on the screen is the image that is submitted to the payor bank for collection. It is also stored in the archives for future retrieval purposes once the check is returned to the customer or destroyed. If we are unable to collect on the Agency’s behalf with the image that has been submitted, the debit reverts back to the Agency and collection becomes the Agency’s responsibility.
If an Image Quality Failed message is displayed during the check scanning process and the check image is skewed, illegible, or upside down, an operator may consider the following options:
Rescan the check (recommended to perform as many times as necessary)
Cancel the check and opt to use the Deposit Processing functionality within OTCnet to deposit the check
Accept the check (requires a CCS or CCLO to log in to OTCnet to authorize)
A CCS or CCLO can choose to override a poor image in hopes that it will process anyway. The following examples are of a poor image scan and an image of good quality. Agencies should be aware that overriding a poor image may result in a returned item, depending upon the paying financial institution.
Figure 17. Poor Image Quality
Check Capture and Check Processing 35
Capturing and Managing Checks Online Bureau of the Fiscal Service
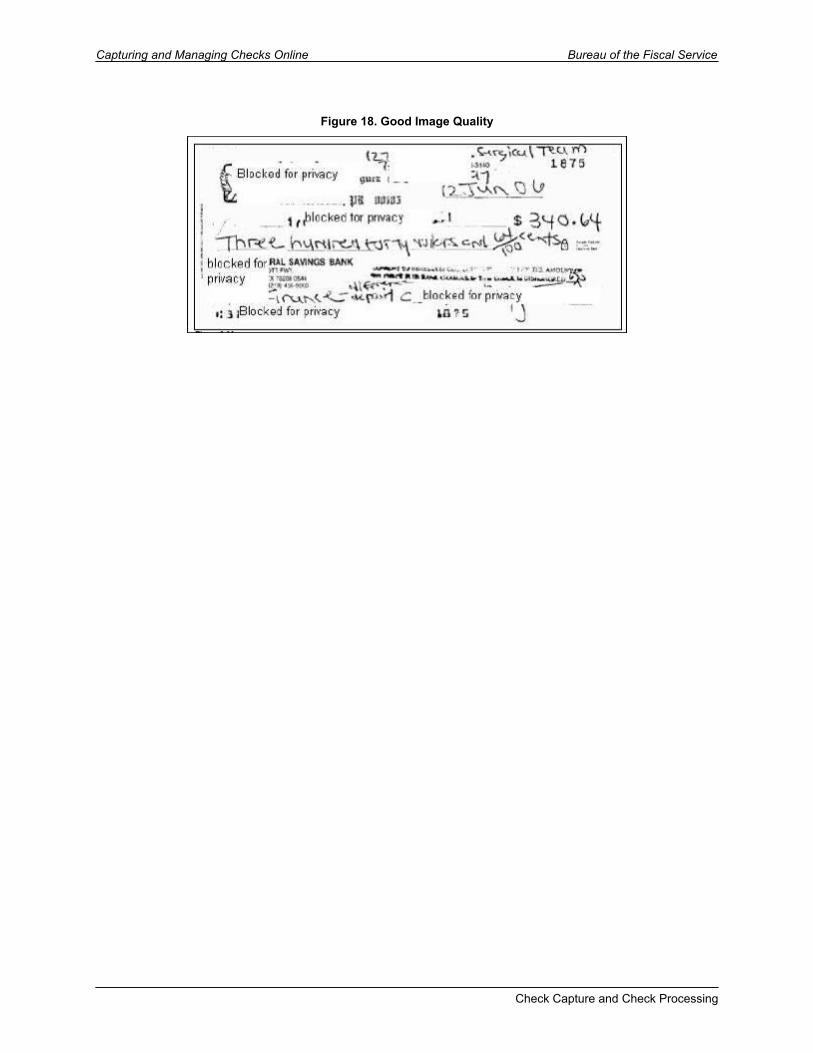
Figure 18. Good Image Quality
Check Capture and Check Processing
Bureau of the Fiscal Service Capturing and Managing Checks Online
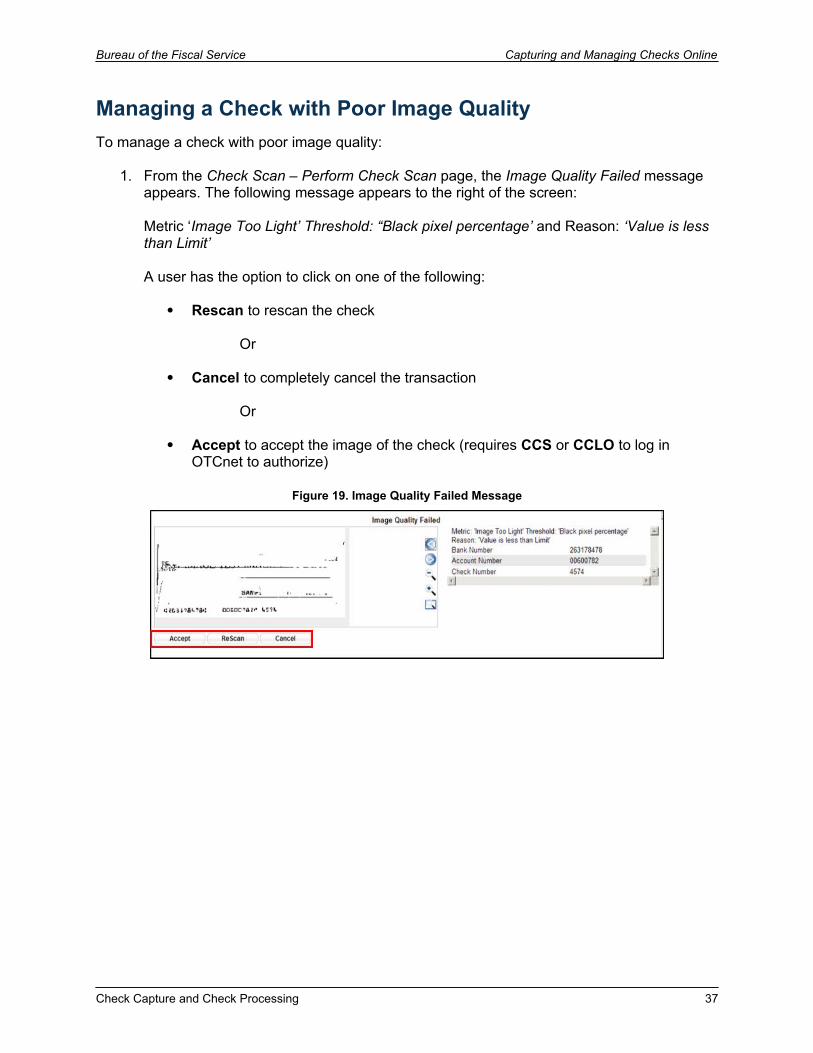
Managing a Check with Poor Image QualityTo manage a check with poor image quality:
1. From the Check Scan – Perform Check Scan page, the Image Quality Failed message appears. The following message appears to the right of the screen:
Metric ‘Image Too Light’ Threshold: “Black pixel percentage’ and Reason: ‘Value is less than Limit’
A user has the option to click on one of the following:
Rescan to rescan the check
Or
Cancel to completely cancel the transaction
Or
Accept to accept the image of the check (requires CCS or CCLO to log in OTCnet to authorize)
Figure 19. Image Quality Failed Message
Check Capture and Check Processing 37
Capturing and Managing Checks Online Bureau of the Fiscal Service
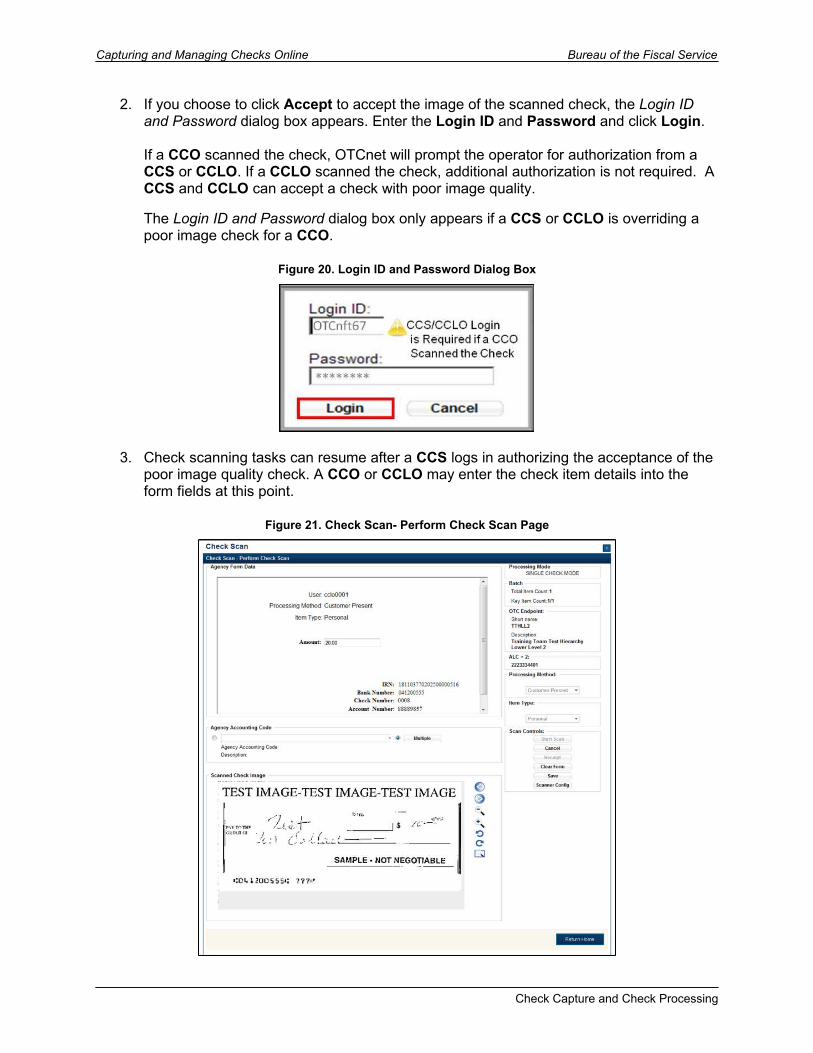
2. If you choose to click Accept to accept the image of the scanned check, the Login ID and Password dialog box appears. Enter the Login ID and Password and click Login.
If a CCO scanned the check, OTCnet will prompt the operator for authorization from a CCS or CCLO. If a CCLO scanned the check, additional authorization is not required. A CCS and CCLO can accept a check with poor image quality.
The Login ID and Password dialog box only appears if a CCS or CCLO is overriding a poor image check for a CCO.
Figure 20. Login ID and Password Dialog Box
3. Check scanning tasks can resume after a CCS logs in authorizing the acceptance of the poor image quality check. A CCO or CCLO may enter the check item details into the form fields at this point.
Figure 21. Check Scan- Perform Check Scan Page
Check Capture and Check Processing
Bureau of the Fiscal Service Capturing and Managing Checks Online
Manage a Check with Poor Image QualityTo manage a check with poor image quality:
1. From the Check Scan – Perform Check Scan page, the Image Quality Failed message appears. Click:
Rescan to rescan the check
Application TipClick Rescan if the check image is skewed, illegible, or upside down.
Or
Cancel to completely cancel the transaction
Or
Accept to accept the image of the check (requires CCS to log in). The Login ID and Password dialog box appears. Enter the Login ID and Password and click Login.
Application TipIf a Check Capture Lead Operator (CCLO) or Check Capture Operator (CCO) scanned the check, OTCnet will prompt the operator for authorization.
Only a Check Capture Supervisor (CCS) can approve a check with poor image quality. The CCS must key in his/her Login ID and Password before approving the check.
2. Resume check scanning tasks and enter the check item details into the form fields.
3. Click Save to save the image of the check and the data you entered.
Application TipUpon scanning the check and using enter on your keyboard to finalize, you will notice that the IRN, Bank Number, Check Number, Account Number, Date & Time fields automatically populates located in the frame of the Agency Form Data).
Check Capture and Check Processing 39
Capturing and Managing Checks Online Bureau of the Fiscal Service
Application TipAdditional buttons on the page that help you perform other tasks:
Click Cancel to return to the OTCnet Home Page. No data will be saved.
Click Previous to return to the previous page. Click Return Home to Return to the OTCnet Home Page.
Check Capture and Check Processing
Bureau of the Fiscal Service Capturing and Managing Checks Online
Topic 4. Resolve a Duplicate Check
If a duplicate check is detected, a Duplicate Check Detected prompt appears requesting that the user resolve the issue. OTCnet determines and detects duplicate checks based on a match of the MICR and the check amount. The system will automatically compare the check to those scanned in the last 30 days.
If a check is scanned twice and the information entered is for the same amount, OTCnet displays an error message containing both scanned images and requests confirmation. If the check is scanned twice and information entered for a different amount, OTCnet does not catch the error and will allow the duplicate entry. However, the financial institution will later reject one of the duplicate checks.
To help prevent duplicate processing of checks, checks may be hand stamped (e.g., Electronically Presented) after the transaction is complete and the check has been scanned.
During terminal configuration, the Franking Enabled option can be selected. This option allows the scanner to automatically stamp the front of checks. Franking is available for EC7000i, EC9100i, and Panini I: Deal scanners.
If the MICR line was misread by the scanner leading the system to believe that the check is a duplicate, it can be edited. To determine if the MICR line was misread, compare the two images in the window. The top image depicts the current check, and the bottom image depicts the most recently scanned check that is being deemed a duplicate by the system. Also, compare the MICR line on the bottom check with the source document. If it has been determined to be a misread of the MICR line that needs to be corrected, a CCS or CCLO can click the Edit MICR button at the bottom of the window (for details, refer to the Edit MICR topic of the Correcting Scanned Checks Participant User Guide).
If a Duplicate Check Detected prompt is displayed during the check scanning process, an operator may consider the following actions:
Rescan the check (recommended to perform as many times as necessary)
Edit MICR to correct the MICR line
Accept the check (requires a CCS to log in to OTCnet to authorize)
Cancel the check (recommended action)
A CCS and CCLO are the only authorized users who can accept a duplicate check. Therefore, before a CCO can accept a duplicate check, a CCS or CCLO must log in to authorize it. If a CCLO scanned the check, additional authorization is not required. The Login ID and Password dialog box only appears if a CCS or CCLO is accepting a duplicate check for a CCO.
Check Capture and Check Processing 41
Capturing and Managing Checks Online Bureau of the Fiscal Service
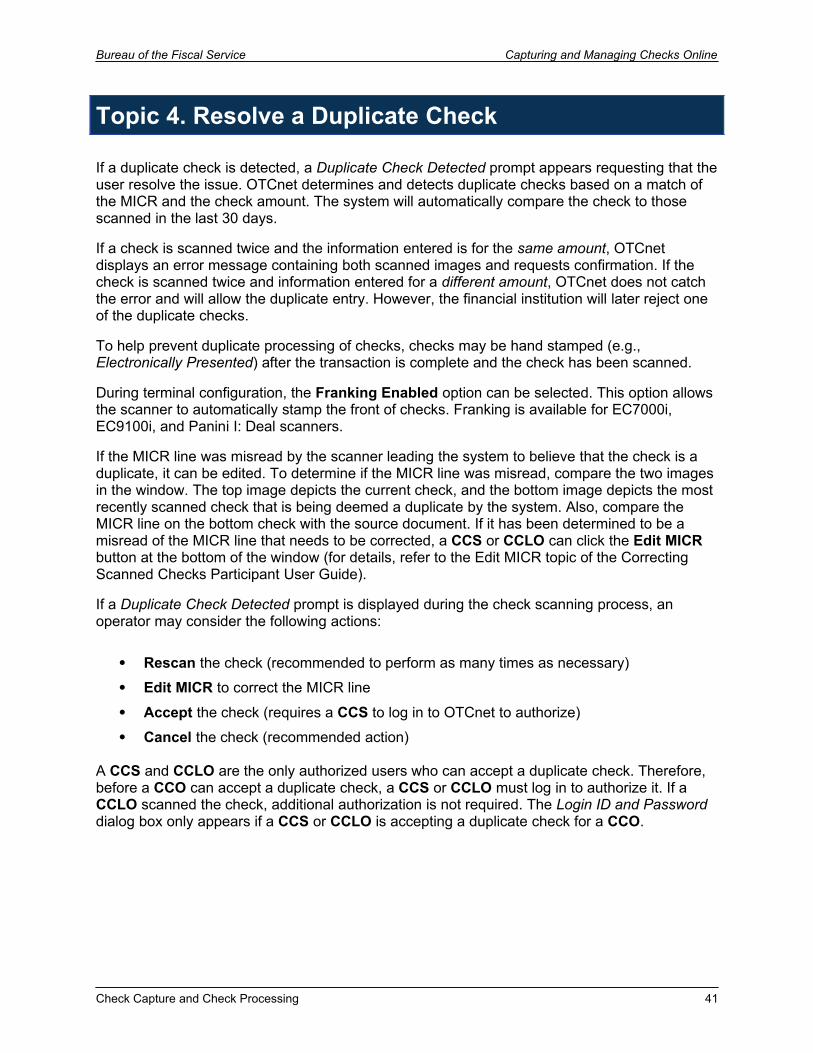
Resolving a Duplicate Check1. From the Check Scan – Perform Check Scan page, the Duplicate Check Detected
message appears. A user has the option to click on one of the following.
Accept to accept the image of the check
Or
Edit MICR to correct the MICR line
Or
Rescan to rescan the check
Or
Cancel to completely cancel the transaction
Figure 22. Duplicate Check Detected
Check Capture and Check Processing
Bureau of the Fiscal Service Capturing and Managing Checks Online
2. Click Cancel to cancel the duplicate (recommended option). Click Cancel or Cancel All at the dialog box. A Transaction cancelled successfully dialog box appears. Click Ok.
Figure 23. Cancel a Check Dialog Box
Note: If you want to edit the MICR code line, click Edit MICR, a CCS or CCLO must authorize a MICR line code correction (for details, refer to Edit a MICR line topic in Correcting Scanned Checks of the Participant User Guide).
Continue to Step 5 below if you want to Accept the duplicate check, requiring a CCS or CCLO to log in (at the Login prompt).
3. Enter CCS Login ID and Password and click Login.
If a CCLO scanned the check, additional authorization is not required. The Login ID and Password dialog box only appears if a CCS or CCLO is accepting a duplicate check for a CCO.
Figure 24. Accept Duplicate Prompt
Check Capture and Check Processing 43

Capturing and Managing Checks Online Bureau of the Fiscal Service
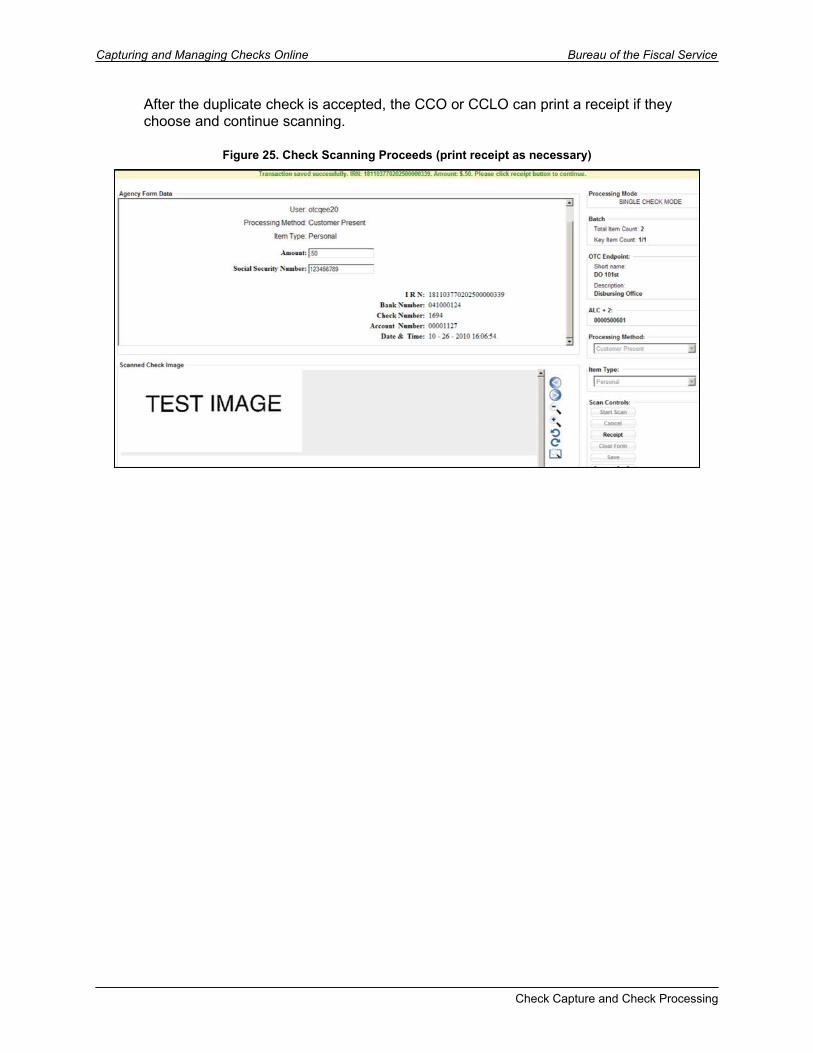
After the duplicate check is accepted, the CCO or CCLO can print a receipt if they choose and continue scanning.
Figure 25. Check Scanning Proceeds (print receipt as necessary)
Check Capture and Check Processing
Bureau of the Fiscal Service Capturing and Managing Checks Online
Resolve a Duplicate Check
To resolve a duplicate check:
1. Click Cancel to cancel the duplicate check. A Login ID and Password dialog box appears.
Application TipClick Accept to continue processing the check. The Login ID and Password dialog box only appears if a CCS or CCLO is accepting a duplicate check for a CCO. If a CCLO scanned the check, additional authorization is not required.
Application TipClick Edit MICR to correct the MICR line. A CCS or CCLO must authorize a MICR line code correction.
Application TipIt is important as the CCS or CCLO that if you opt to make a MICR code line correction that you look at the MICR line image closely to ensure all the characters are correctly entered in the code line Correction box.
2. Click Cancel or Cancel All. A Transaction cancelled successfully dialog box appears.
Application TipClick Cancel to cancel the one duplicate check. Click Cancel All to cancel all pending checks in the batch.
Check Capture and Check Processing 45
Capturing and Managing Checks Online Bureau of the Fiscal Service
3. Click OK. The Check Scan – Perform Check Scan page appears.
Application TipAdditional buttons on the page that help you perform other tasks:
Click Previous to return to the previous page. Click Return to Home to return to the OTCnet Home page.
Check Capture and Check Processing
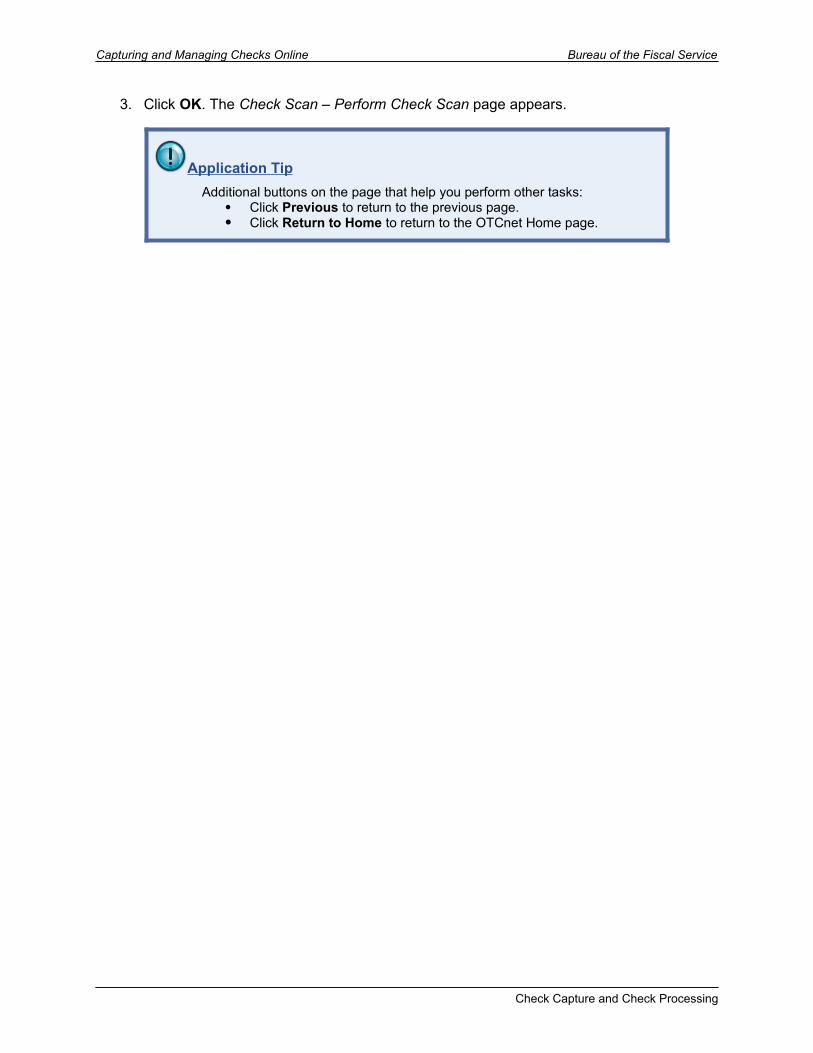
Bureau of the Fiscal Service Capturing and Managing Checks Online
Topic 5. Void a Check
As a CCS, you are the only authorized user who can void an erroneously scanned check or a batch of checks. Before you can void a check or batch of checks, you must first search for the batch in which the check resides. You can search for batches by OTC Endpoint, Created On Date, Batch ID, Cashier ID, and/or Batch Status. You can only void checks in batches for OTC Endpoints that you have permission to access and only for items with an open or closed batch status. Payments should only be entered for the amount of the item being processed. If a data-entry error is made in one of the user-defined fields, or amount entered for the check differs from the written amount of the check, two options are available:
1. Void the check and rescan with the corrected information during the check capture process (requires CCS to sign in to approve).
2. If a CCS is not available to approve the void while the operator has scanning in progress, the check will need to be voided via the Batch Management menu option. A CCS will need to sign on to Batch Management and change the incorrectly typed amount with the correct amount or update the user-defined field.
NOTE:
The minimum limit for reporting items that need to be adjusted by Treasury/Fiscal Service is $25.00. If the adjustment is $25.00 or more, the check is only corrected to the written dollar amount on the face of the check
Voided items are not archived in the Central Image Retrieval Archive (CIRA) for long-term storage.
Do not scan the item a second time to process a second item for the amount difference. Doing so would create processing errors at Treasury/Fiscal Service as well as at the check writer’s financial institution.
If a file containing the wrong amount has already been transmitted or if you ever encounter a processing issue and need assistance, please contact the Treasury OTC Support Center.
Check Capture and Check Processing 47
Capturing and Managing Checks Online Bureau of the Fiscal Service
Void a Check To void a check:
1. Click the Check Processing tab. Click Batch Management.
Figure 26. Check Processing> Batch Management (Voiding)
2. The Search Batch page appears. Select or enter the batch search conditions you would like view.
Note: If you run a search with the default From and To Created On Date range values, the search results include the most recent 30 days of batches that you have access to view. If more than 1,000 batches are created within the 30 days then only the most recent 1,000 batches appear.
If you run a search without specifying any criteria (with the exception of the Batch ID field), the search results include the most recent 30 days of batches that you have access to view. If more than 1,000 batches are created within 30 days then only the most recent 1,000 batches appear.
Under Batch Search Conditions, optional Select the OTC Endpoint you want to Edit a batch for by checking the under the
Select column
Under Created On Date, optional Enter the Created On Date by entering the From and To date range
The Created On Date range cannot exceed 30 days. Additionally, if more than 1,000 batches are created within 30 days then only the most recent 1,000 batches appear.
Enter the Batch ID, optional
If the only search criteria entered is a valid Batch ID then only a single result appears regardless of other search criteria specified
Enter the Cashier ID
Check Capture and Check Processing
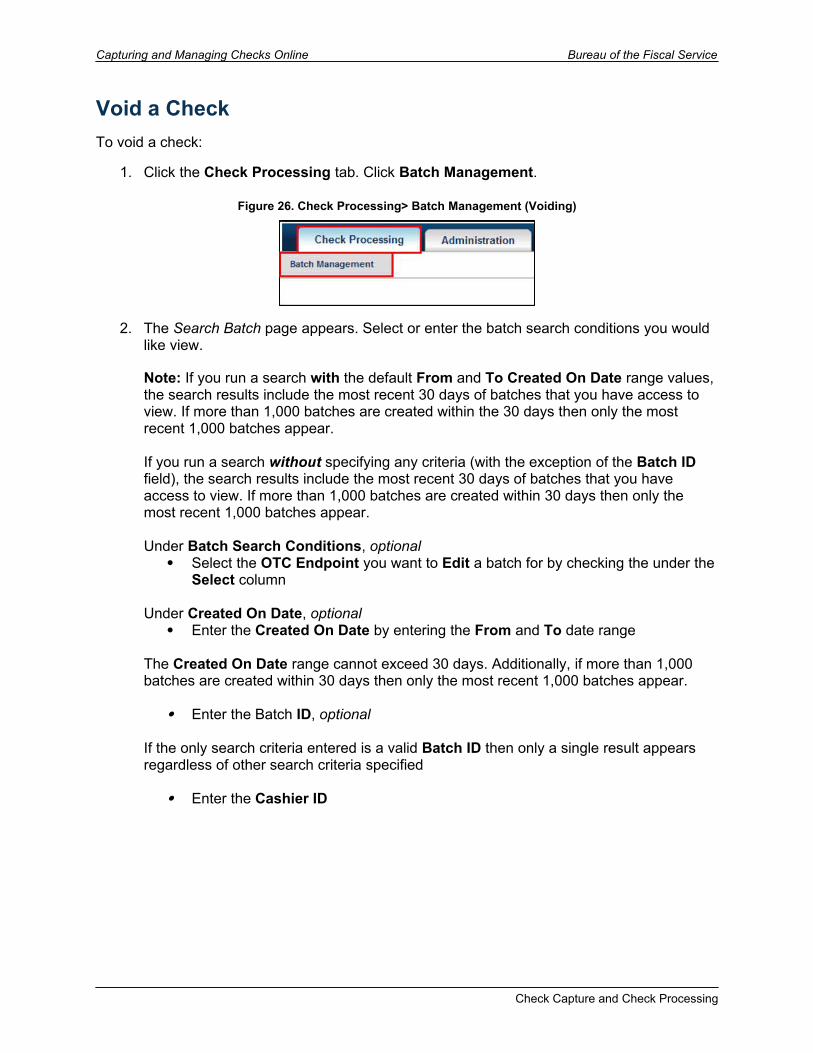
Bureau of the Fiscal Service Capturing and Managing Checks Online
Under Batch Status, optional Select the Status you want to view by checking the Open or Closed box under
the Select column, then click Search.
Figure 27. Search Batch Page
Check Capture and Check Processing 49
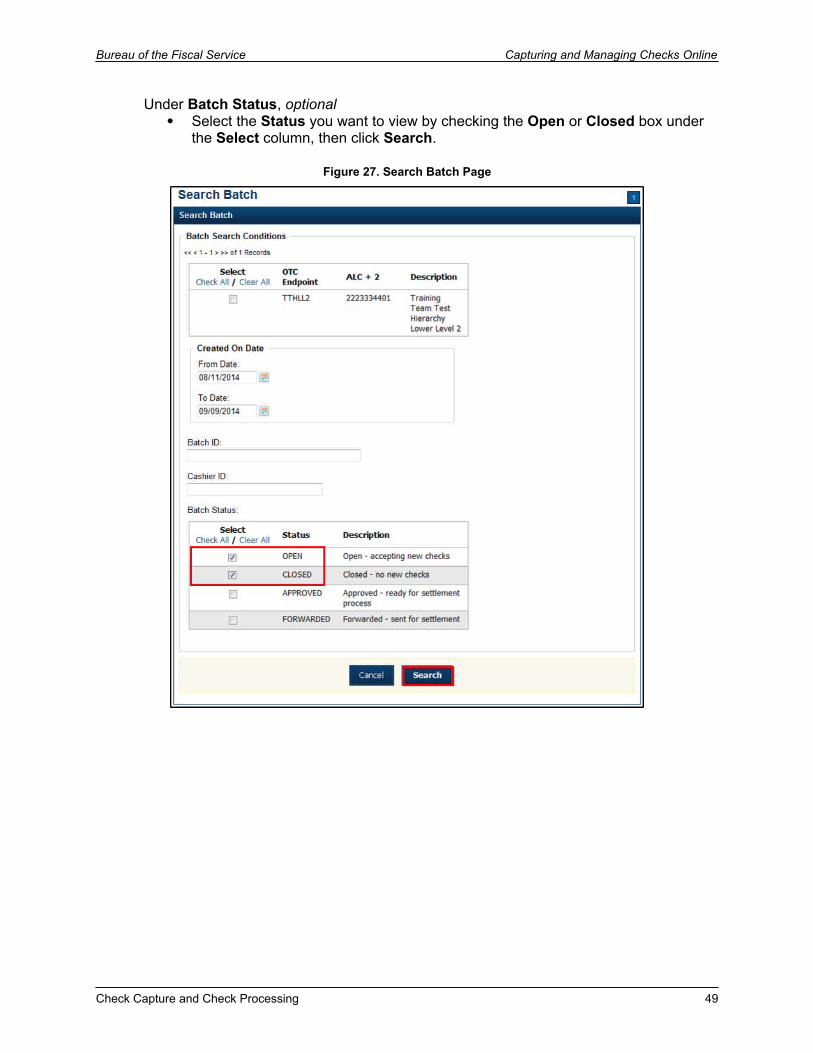
Capturing and Managing Checks Online Bureau of the Fiscal Service
The View Batches page appears. Click the Batch ID hyperlink.
Figure 28. View Batches (Voiding)
3. The View Checks page appears. Click the Item ID of the scanned check you would like to void.
If a batch is in use and another user attempts to access the same batch, a Batch Lock message appears stating the batch is in use and he/she cannot access the batch.
Note: If you intend to void the entire batch, you can click on Void All, located under Batch Commands on the right of the View Checks Page.
Figure 29. View Checks (Voiding)
Check Capture and Check Processing
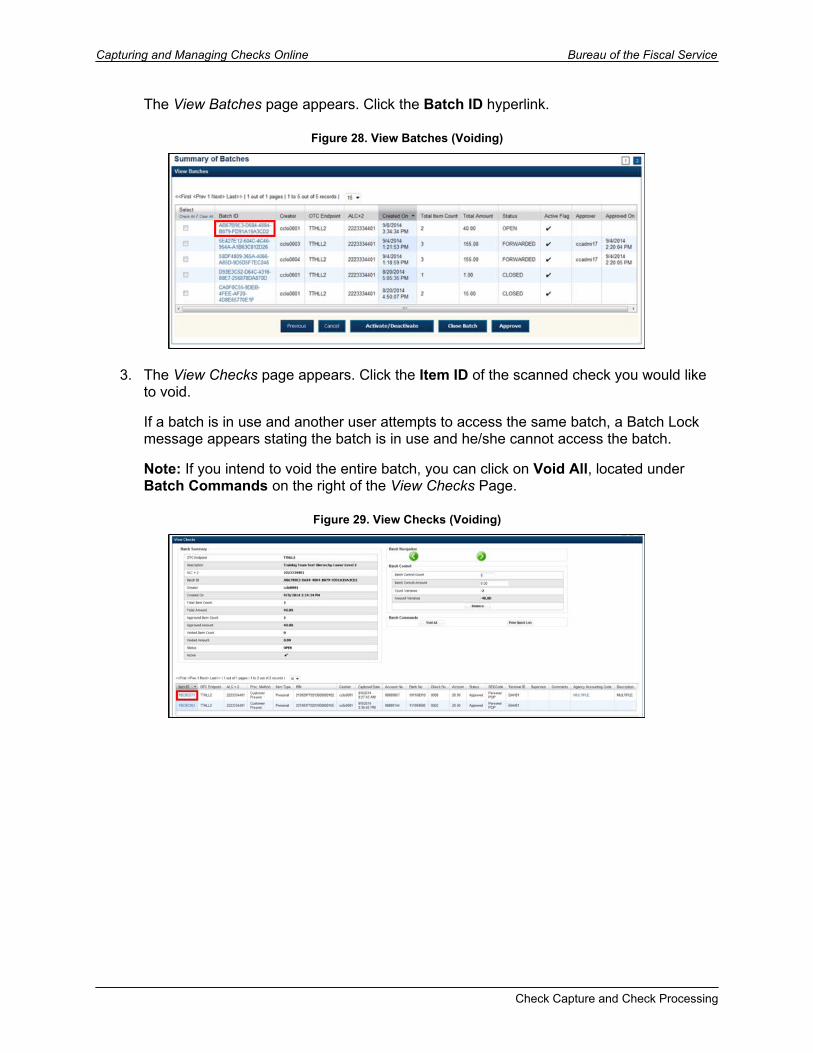
Bureau of the Fiscal Service Capturing and Managing Checks Online
4. An image and details of the check appear in a window below. Click Void to the right of the check image to void the check.
If a check is voided and there is more than one check in the batch, and the ALC is designated to classify at the summary level, ensure that the combined accounting code subtotal is equal to the batch total prior to batch approval. If it does not, you must go back and re-validate your subtotal entries.
If a check is voided and there is only one check in the batch, as a best practice it is recommended that the batch is deactivated so that it is not accidently forwarded for settlement. Deactivated batches will still be archived to the Historical Database.
Figure 30. Check Image/Details
5. Click Confirm at the prompt asking if you want to void the check.
Figure 31. Void Confirmation Dialog Box
Check Capture and Check Processing 51

Capturing and Managing Checks Online Bureau of the Fiscal Service
6. Enter comments concerning the void request at the prompt and click OK.
Figure 32. Enter Comment Dialog Box
7. Click OK at the final prompt stating that the check is voided successfully.
Figure 33. Check Void Dialog Box
Check Capture and Check Processing
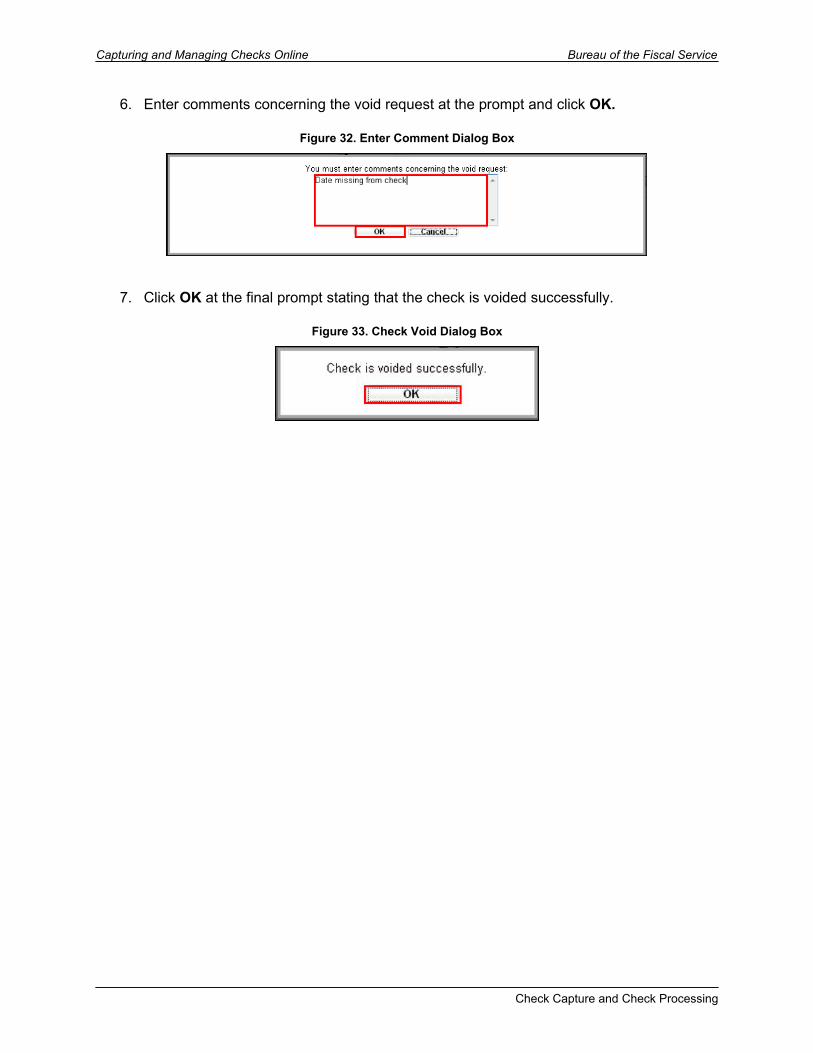
Bureau of the Fiscal Service Capturing and Managing Checks Online
Void a CheckTo void a scanned check:
1. Click the Check Processing tab.
2. Click Batch Management. The Search Batch page appears.
3. Select or enter the batch search conditions you would like view.
Under Batch Search Conditions, optional Select the OTC Endpoint you want to Edit a batch for by checking the under the
Select column
Under Created On Date, optional Enter the From and To date range
Application TipThe From and To Created On Date must be entered in MM/DD/YYYY format.
Application TipThe Created On Date range cannot exceed 30 days. Additionally, if more than 1,000 batches are created within 30 days, then only the most recent 1,000 batches appear.
Application TipIf you run a search with the default From and To Created On Date range values, the search results include the most recent 30 days of batches that you have access to view. If more than 1,000 batches are created within the 30 days, then only the most recent 1,000 batches appear.
Application TipIf you run a search without specifying any criterion (with the exception of the Batch ID field), the search results include the most recent 30 days of batches that you have access to view. If more than 1,000 batches are created within 30 days, then only the most recent 1,000 batches appear.
Check Capture and Check Processing 53
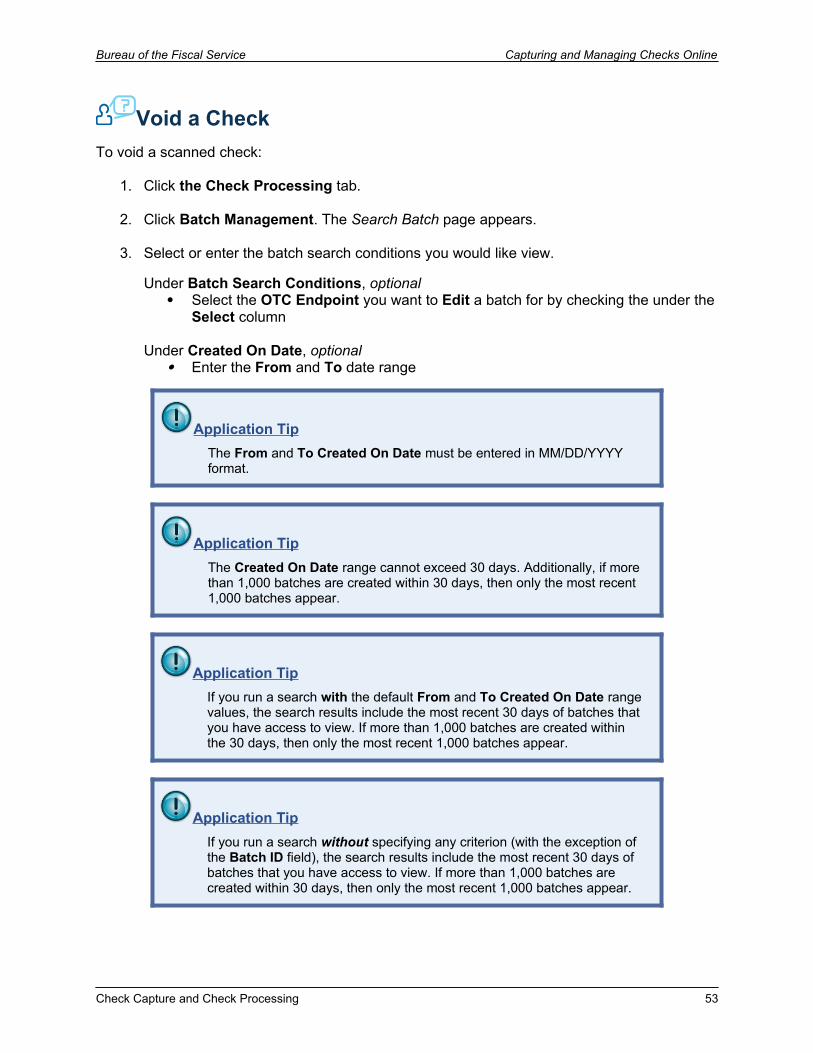
Capturing and Managing Checks Online Bureau of the Fiscal Service
Enter the Batch ID, optional
Application TipIf the only search criteria entered is a valid Batch ID, then only a single result appears regardless of other search criteria specified.
Enter the Cashier ID, optional
Under Batch Status, optional Select the Status you want to view by checking the Open or Closed box under
the Select column
4. Click Search. The View Batch page appears.
5. Click the Batch ID hyperlink. The View Checks page appears.
6. Click the Item ID of the scanned check you would like to void. An image and details of the check appear in a window below.
7. Click Void to the right of the check image to void the check.
Application TipIf a check is voided and there is more than one check in the batch, and the ALC is designated to classify at the summary level, ensure that the combined accounting code subtotal is equal to the batch total prior to batch approval. If it does not, you must go back and re-validate your subtotal entries.
Application TipIf a check is voided and there is only one check in the batch, as a best practice it is recommended that the batch is deactivated so that it is not accidently forwarded for settlement. Deactivated batches will still be archived to the Historical Database.
8. Click Confirm at the prompt asking if you want to void the check.
9. Enter comments concerning the void request at the prompt and click OK.
10. Click OK at the final prompt stating that the check is voided successfully.
Application Tip
Check Capture and Check Processing
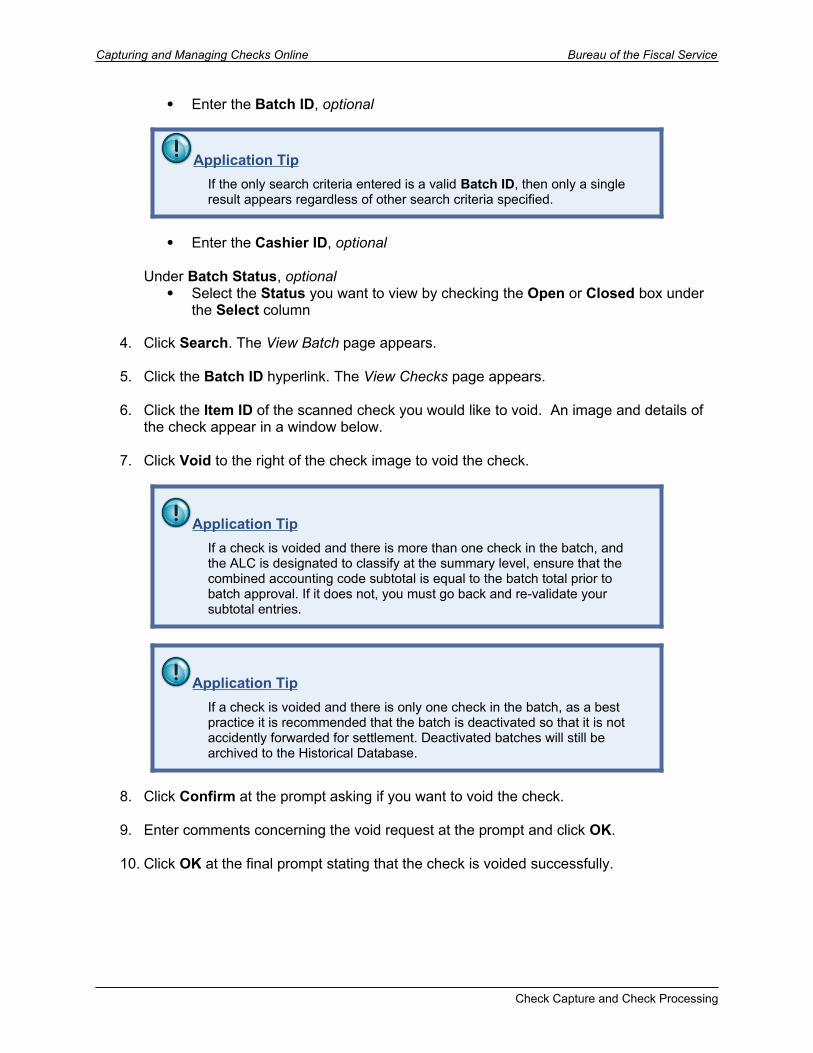
Bureau of the Fiscal Service Capturing and Managing Checks Online
Additional buttons on the pages that help perform other tasks:
Click Cancel to return to the OTCnet Home Page. No data will be saved.
Click Previous to return to the previous page. Click Void All to void all items in the batch. Click Print Batch List to print the batch list. Click < to go to the first batch. Click > to go to the next batch. Click <<Image to return to the previous check. Click >>Image to view the next check. Click Zoom- to reduce the image size. Click Zoom+ to enlarge the image size. Click Rotate Left to turn the image to the left. Click Rotate Right to turn the image to the right. Click Show Item to view the check item details. Click Void to void a single check item. Click Receipt to print a receipt. Click Print Item to print a batch list report.
Check Capture and Check Processing 55
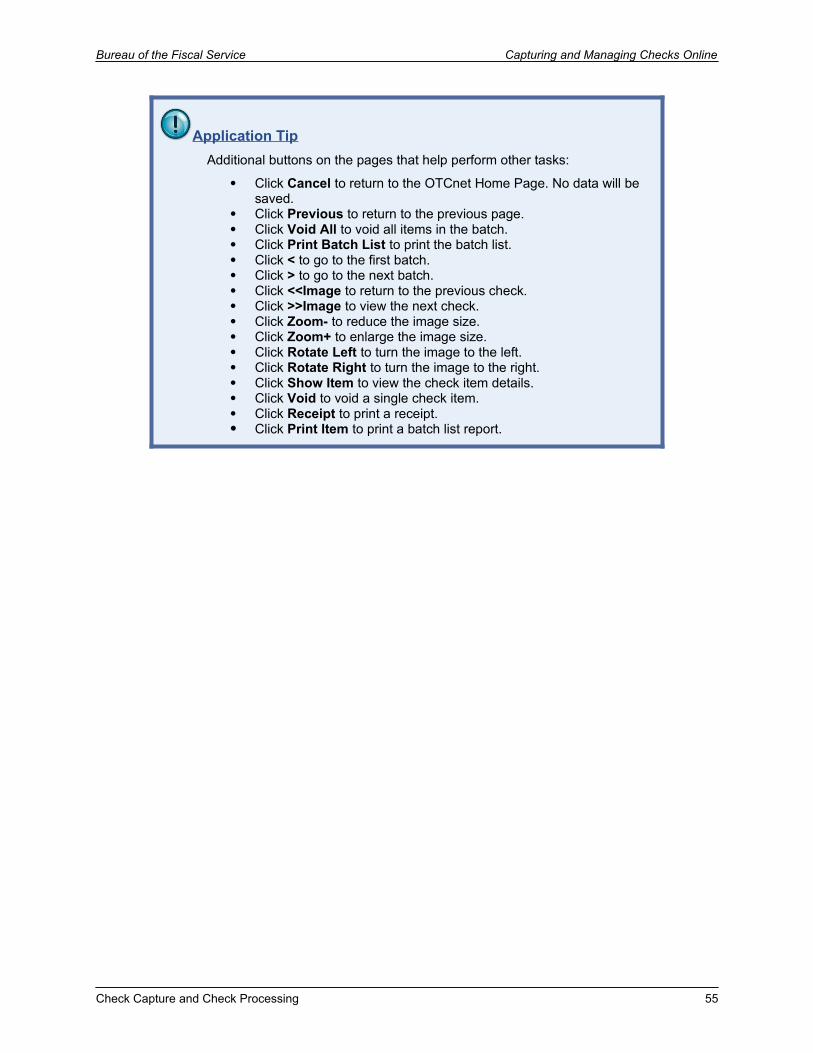
Capturing and Managing Checks Online Bureau of the Fiscal Service
Void All Checks in a Batch To void all checks in a batch:
1. Click the Check Processing tab. Click Batch Management.
2. The Search Batch page appears. Select or enter the batch search conditions you would like view.
Note: If you run a search with the default From and To Created On Date range values, the search results include the most recent 30 days of batches that you have access to view. If more than 1,000 batches are created within the 30 days then only the most recent 1,000 batches appear.
If you run a search without specifying any criteria (with the exception of the Batch ID field), the search results include the most recent 30 days of batches that you have access to view. If more than 1,000 batches are created within 30 days then only the most recent 1,000 batches appear.
Under Batch Search Conditions, optional Select the OTC Endpoint you want to Edit a batch for by checking the under the
Select column
Under Created On Date, optional Enter the Created On Date by entering the From and To date range
The Created On Date range cannot exceed 30 days. Additionally, if more than 1,000 batches are created within 30 days then only the most recent 1,000 batches appear.
Enter the Batch ID, optional
If the only search criteria entered is a valid Batch ID then only a single result appears regardless of other search criteria specified
Enter the Cashier ID
Check Capture and Check Processing
Bureau of the Fiscal Service Capturing and Managing Checks Online
Under Batch Status, optional Select the Status you want to view by checking the Open box under the Select
column, then click Search.
Figure 34. Search Batch Page
The View Batches page appears. Click the Batch ID hyperlink.
Figure 35. View Batches (Void All)
3. The View Checks page appears. Under Batch Commands, click Void All.
Check Capture and Check Processing 57
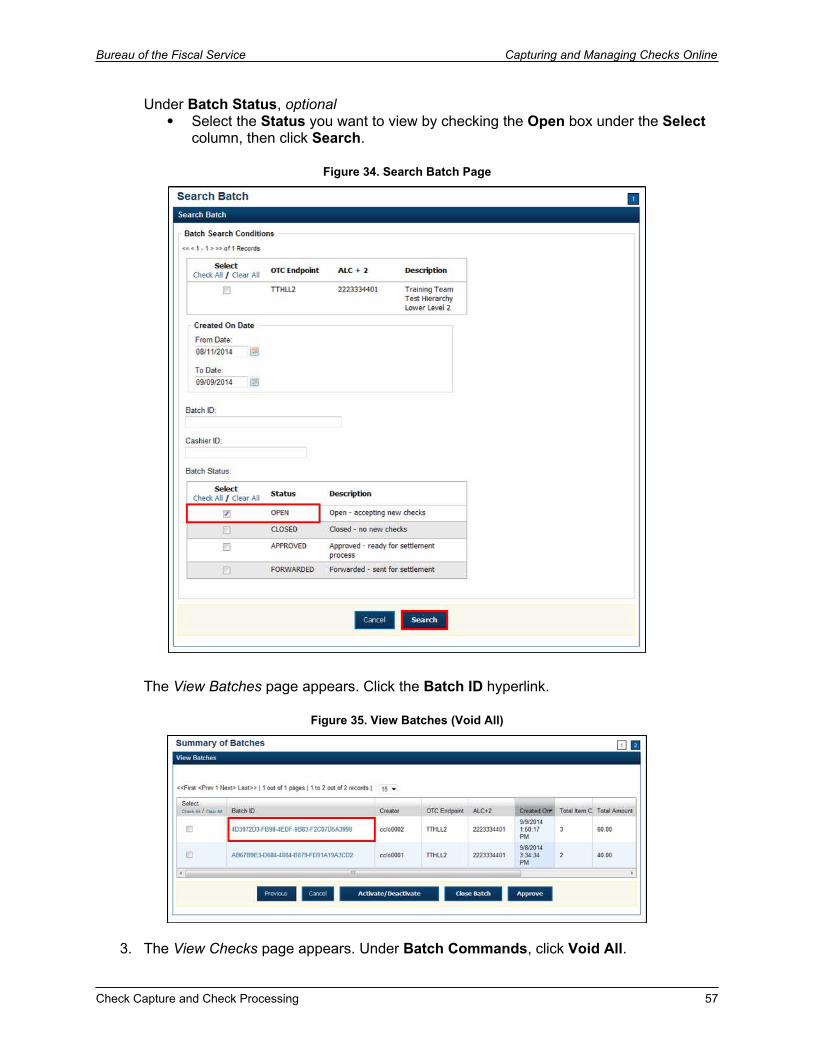
Capturing and Managing Checks Online Bureau of the Fiscal Service
Figure 36. View Checks (Voiding)
4. Click Confirm at the prompt asking if you want to void the check.
Figure 37. Void All Checks Confirmation Dialog Box
5. Enter comments concerning the void request at the prompt and click OK.
Figure 38. Enter Comment Dialog Box
Check Capture and Check Processing

Bureau of the Fiscal Service Capturing and Managing Checks Online
6. Click OK or Close & Deactivate Batch at the final prompt stating that the check is voided successfully.
Figure 39. Check Void Dialog Box
Check Capture and Check Processing 59
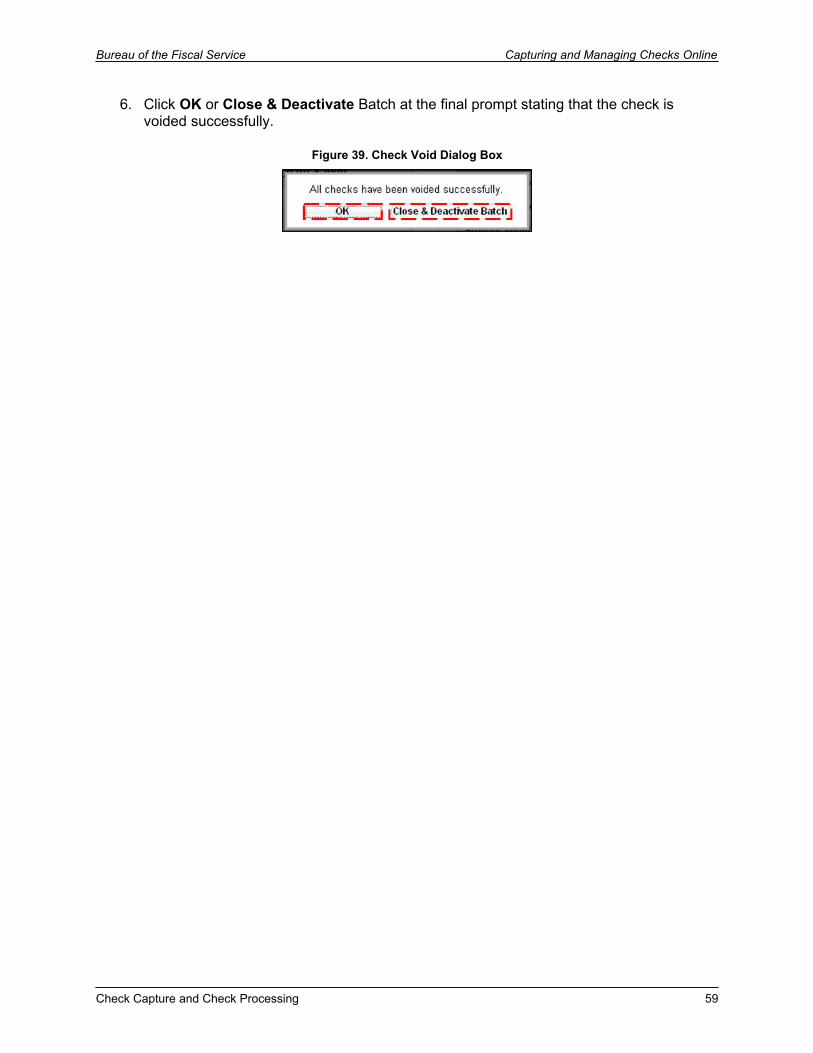
Capturing and Managing Checks Online Bureau of the Fiscal Service
Void All Checks in a BatchTo void all scanned checks in a batch:
Application TipOnly batches in Open status can have all checks voided at once.
1. Click the Check Processing tab.
2. Click Batch Management. The Search Batch page appears.
3. Select or enter the batch search conditions you would like view.
Under Batch Search Conditions, optional Select the OTC Endpoint you want to void a check for by checking the box
under the Select column
Under Created On Date, optional Enter the From and To date range
Application TipThe From and To Created On Date must be entered in MM/DD/YYYY format.
Application TipThe Created On Date range cannot exceed 30 days. Additionally, if more than 1,000 batches are created within 30 days, then only the most recent 1,000 batches appear.
Application TipIf you run a search with the default From and To Created On Date range values, the search results include the most recent 30 days of batches that you have access to view. If more than 1,000 batches are created within the 30 days, then only the most recent 1,000 batches appear.
Check Capture and Check Processing
Bureau of the Fiscal Service Capturing and Managing Checks Online
Application TipIf you run a search without specifying any criterion (with the exception of the Batch ID field), the search results include the most recent 30 days of batches that you have access to view. If more than 1,000 batches are created within 30 days, then only the most recent 1,000 batches appear.
Enter the Batch ID, optional
Application TipIf the only search criteria entered is a valid Batch ID, then only a single result appears regardless of other search criteria specified.
Enter the Cashier ID, optional
Under Batch Status, Select the Status you want to view by checking the Open or Closed box under
the Select column
4. Click Search. The View Batch page appears.
5. Click the Batch ID hyperlink. The View Checks page appears.
6. Under Batch Commands, click Void All.
7. Click Confirm at the prompt asking if you want to void all checks.
8. Enter comments concerning the void request at the prompt and click OK.
9. Click OK at the final prompt stating that the checks in the batches have been voided successfully.
Application TipAfter an entire batch of checks is voided, as a best practice, it is recommended that the batch be deactivated so that it is not accidently forwarded for settlement. Deactivated batches will still be archived to the Historical Database after 18 months as all batches and their associated check items are archived regardless of the batch status.
Check Capture and Check Processing 61
Capturing and Managing Checks Online Bureau of the Fiscal Service
Application TipAdditional buttons on the pages that help you perform other tasks:
Click Cancel to return to the OTCnet Home Page. No data will be saved.
Click Previous to return to the previous page. Click Void All to void all items in the batch. Click Print Batch List to print the batch list. Click < to go to the first batch. Click > to go to the next batch. Click <<Image to return to the previous check. Click >>Image to view the next check. Click Zoom- to reduce the image size. Click Zoom+ to enlarge the image size. Click Rotate Left to turn the image to the left. Click Rotate Right to turn the image to the right. Click Show Item to view the check item details. Click Void to void a single check item. Click Receipt to print a receipt. Click Print Item to print a batch list report.
Check Capture and Check Processing
Bureau of the Fiscal Service Capturing and Managing Checks Online
Topic 6. Override a Master Verification Database (MVD) Record
If an Agency selects to use the Master Verification Database (MVD) feature, the Agency can receive three types of check verification notifications if a check is identified as blocked, suspended, or denied. The check verification notifications are Blocked, Suspended, or D-Denied.
The CCS is the only authorized user who can override (if the transaction can be overridden) a blocked, suspended, or denied notification. When an override of a blocked check is performed, the override is a temporary, one-time event. The check remains blocked in the MVD database unless an authorized person (Master Verification Database Editor [MVDE] or CCS) clears the item out of the MVD database.
For the MVD override notification to appear the check item must meet established criteria for blocked, suspended, or denied.
Blocked Check Notification
A blocked, suspended, or denied message appears after the CCLO or CCO scans the check, enters the details, and saves the transaction.
A blocked message displays if the item matches all data as it was input on the blocked record:
Routing Transit/ Account Number Data: If the blocked record is input with only the routing transit number and account number, then that record is only flagged if the data matches
Configurable Field Data: If the blocked record was input with only configurable field 1 data (e.g., Social Security Number or Driver’s License Number), then only configurable field 1 must match for the record
Combination Data: If the blocked record input was for both pieces of information, then it must match all combinations, i.e., routing transit and account along with configurable field 1
Suspended or Denied Check Notification
The suspend or deny message displays if the item scanned matches the MVD information. This is either the match of the combination of both the routing number and account number, or a match against the configurable field 1.
Each OTC Endpoint that uses the MVD sets their policies to use certain return codes with a defined number of days within the suspension period. During that pre-determined period, if the check writer attempts to cash a check, a suspended notification appears on the OTCnet screen. A typical check cashing policy may mandate that the check writer is suspended for 30 days upon their first offense, 60 days upon their second offense and 90 days upon their third offense. During the suspension period, they cannot cash a check at that OTC Endpoint. A denied item occurs when the check writer has exceeded all suspension periods. A typical suspension policy may specify that the check writer is suspended as referenced in the paragraph above.
Check Capture and Check Processing 63
Capturing and Managing Checks Online Bureau of the Fiscal Service
Override a MVD RecordTo override an MVD record:
1. Click Override to override the blocked, suspended, or denied check.
When an override of a blocked check is performed in check capture, the override is a temporary, one-time event. The check remains blocked in the MVD database unless an authorized person clears the item out of the MVD database.
Click Cancel to close the Check Verification window. If Cancel is clicked, return the check to the customer. Click Print to print the Verification report.
Figure 40. Override Check Denial Box
2. An Override Check Denial dialog box appears. Enter the Login ID and Password and click Login. A Comment dialog box appears.
Figure 41. Override Login Dialog Box
3. Enter a reason why the check was approved for processing and click Submit. A notification appears stating the override was successful.
Figure 42. Enter Comments Box
Check Capture and Check Processing
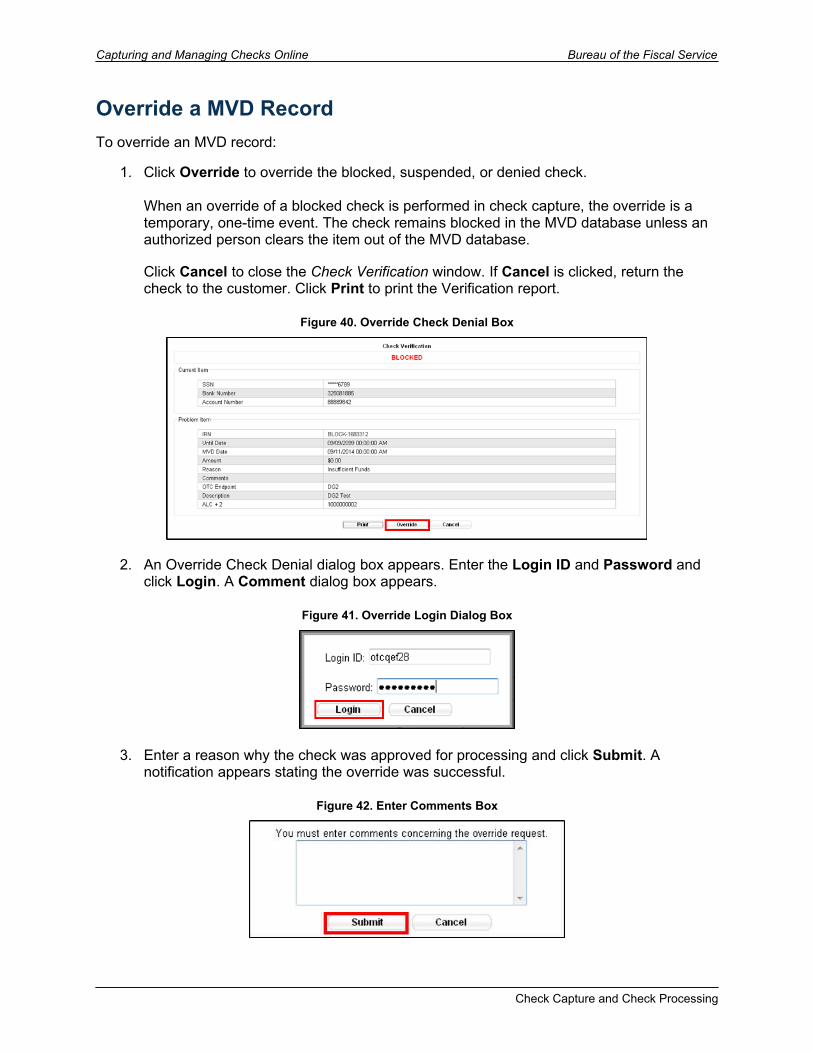
Bureau of the Fiscal Service Capturing and Managing Checks Online
Override a MVD Record
To override a MVD Record:
1. Click Override to override the blocked, suspended, or denied check. An Override Check Denial dialog box appears.
Application TipWhen an override of a blocked check is performed in check capture, the override is a temporary, one-time event. The check remains blocked in the MVD database unless an authorized person clears the item out of the MVD database.
Application TipClick Print to print the Verification report.
Figure 43. Verification Report
Application Tip
Check Capture and Check Processing 65

Capturing and Managing Checks Online Bureau of the Fiscal Service
Click Cancel to close the Check Verification window. If Cancel is clicked, return the check to the customer.
2. Enter the Login ID and Password and click Login. A Comment dialog box appears.
Application TipA Check Capture Supervisor must authorize the overriding of the blocked, suspended, or denied check.
3. Enter a reason why the check was approved for processing and click OK. A notification appears stating the override was successful.
Check Capture and Check Processing
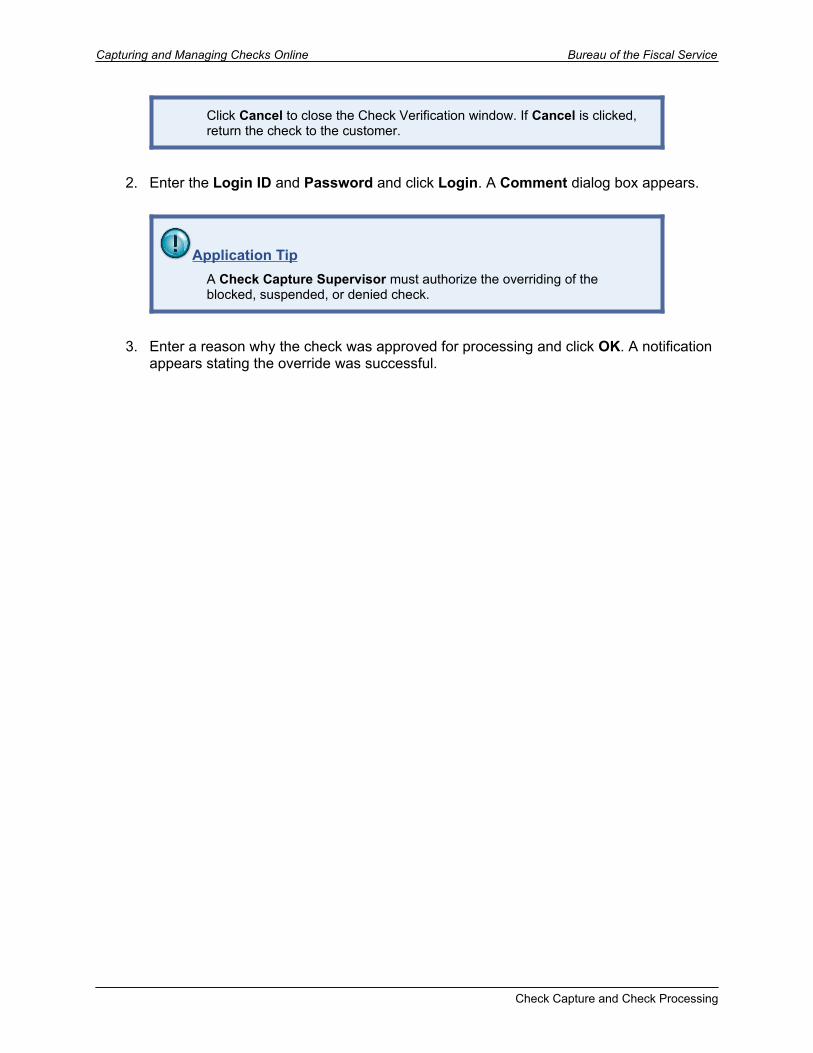
Bureau of the Fiscal Service Capturing and Managing Checks Online
Topic 7. Perform Batch Control and Batch Balancing
A CCA can configure the terminal for Batch Control as optional or mandatory on batch create, batch close, or both are an optional feature that your Agency can use as a batch balancing tool.
Batch Control can be used to perform balancing on the number of checks that have been scanned, and ensure their respective dollar amounts have been accurately keyed. The Batch Control options can be set up for each OTC Endpoint which an Agency processes. If it is used, the feature applies to both processing modes, i.e., Single and Batch.
The batch control screen displays the OTC Endpoint Information such as the OTC Endpoint short name, Description, and ALC+2 for the OTC Endpoint. Configuration settings for batch control are established in the Terminal Configuration.
If Batch Control is set at the Batch Create either optional or mandatory, then the Batch control screen will appear before scanning a batch of check and when a new batch is created. Depending on the terminal configuration settings, the batch control fields can appear at the beginning of a batch (prior to scanning the check), just prior to closing a batch, or both.
If Batch Control is set to optional, the Defer button appears on the page. If set to mandatory for either Batch Create or Batch Close, the Defer button does not appear on the page and the user cannot start scanning a batch or close the unbalanced batch. If set to mandatory for both Batch Create and Batch Close, then the Defer button will appear during Batch Create, but a user must enter the batch control value during the Batch Close action.
Set to Appear on Batch Create
If the batch control is set to appear on batch create, OTCnet prompts the CCLO or CCO to enter the batch control total amount and count before scanning a check. If the batch control is set to optional on batch create, the operators can choose to click the Next button to bypass this step.
Set to Appear on Batch Close
If the batch control is set to appear on batch close, OTCnet prompts the CCO, CCLO or CCS to enter the batch control total amount and count. Batch control balancing only occurs when closing an open batch. If the batch control is set to optional on batch close, the operators, and CCS can choose to click to Defer to skip this step.
Check Capture and Check Processing 67
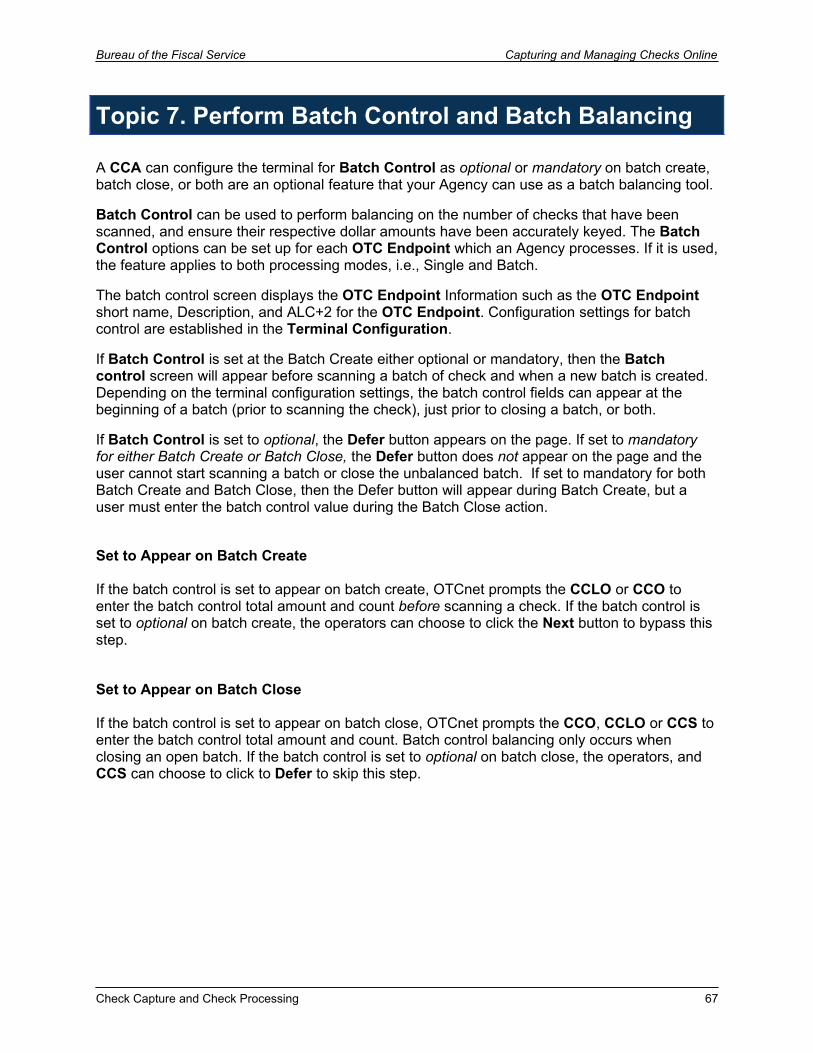
Capturing and Managing Checks Online Bureau of the Fiscal Service
Batch Control Options On Batch Create (Optional/ Mandatory):
1. From the Check Scan page,
Under Set Up New Batch, Enter the Batch Control Count Enter the Batch Control Amount
2. Click Next.
Figure 44. Batch Control Page (Batch Create)
If Batch Control is set to mandatory, the CCLO or CCO must enter the Batch Control count and amount. The Batch Control count and amount cannot be zero.
If Batch Control is set to optional, the CCLO or CCO can click the Defer button.
Check Capture and Check Processing
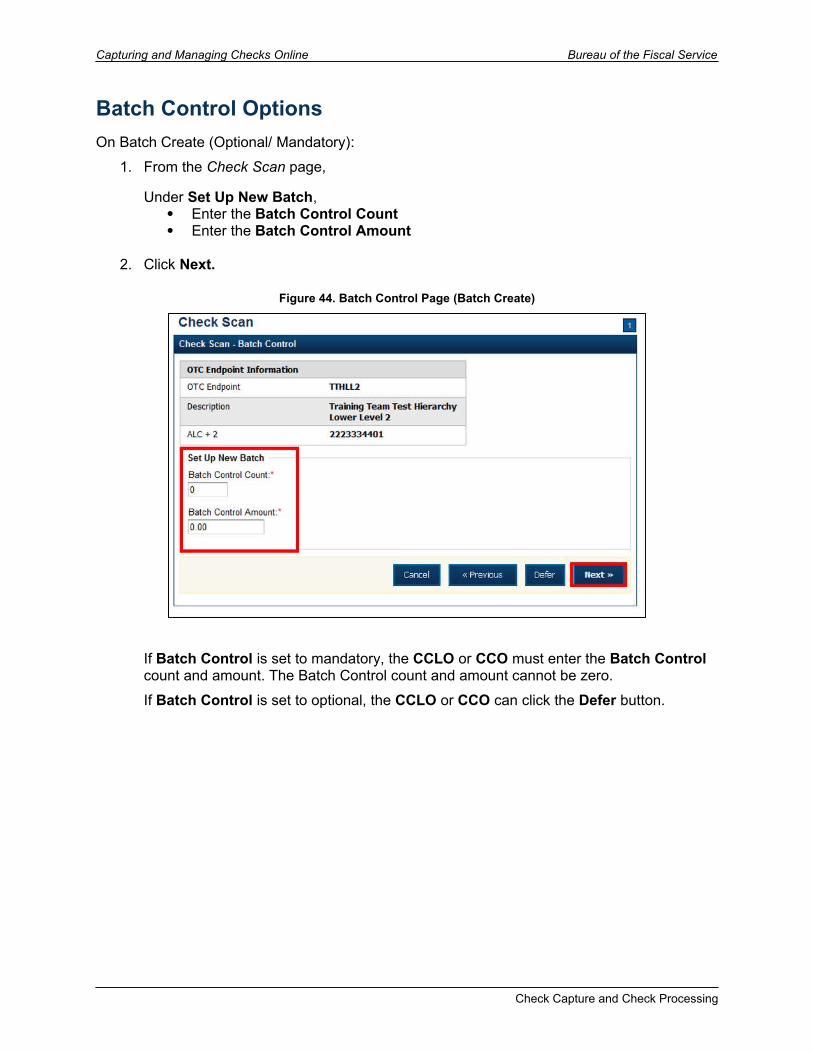
Bureau of the Fiscal Service Capturing and Managing Checks Online
3. The Check Scan-Perform Check Scan page appears. Perform check scanning as needed.
Figure 45. Perform Check Scan Page (after Batch Control)
Check Capture and Check Processing 69
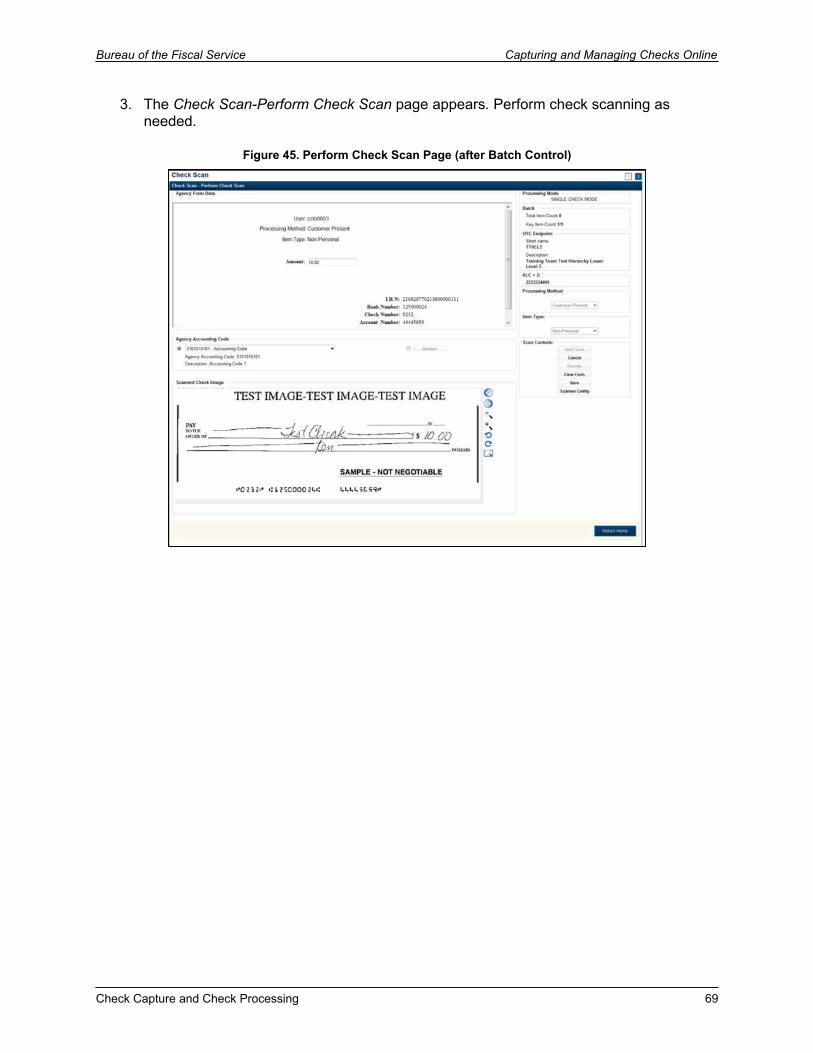
Capturing and Managing Checks Online Bureau of the Fiscal Service
On Batch Close (Optional/Mandatory)1. From the Batch Control page,
Under Batch Detail, Enter the Batch Control Count Enter the Batch Control Amount
2. Click Next.
Figure 46. Batch Control Page (Batch Close)
If Batch Control is set to optional, the CCLO, CCO, or CCS can choose to click to Next button without entering the Batch Control count and amount.
If the amount of a check item was incorrectly entered, click Cancel to return to the OTCnet Home Page. No data is saved. Refer to refer to Chapter 5. Correcting Scanned Checks of the OTCnet Participant User Guides.
If you are a CCLO or CCO and discover that the amount of the check item was incorrectly entered, contact your CCS, and edit the check using the Show Item window.
Check Capture and Check Processing
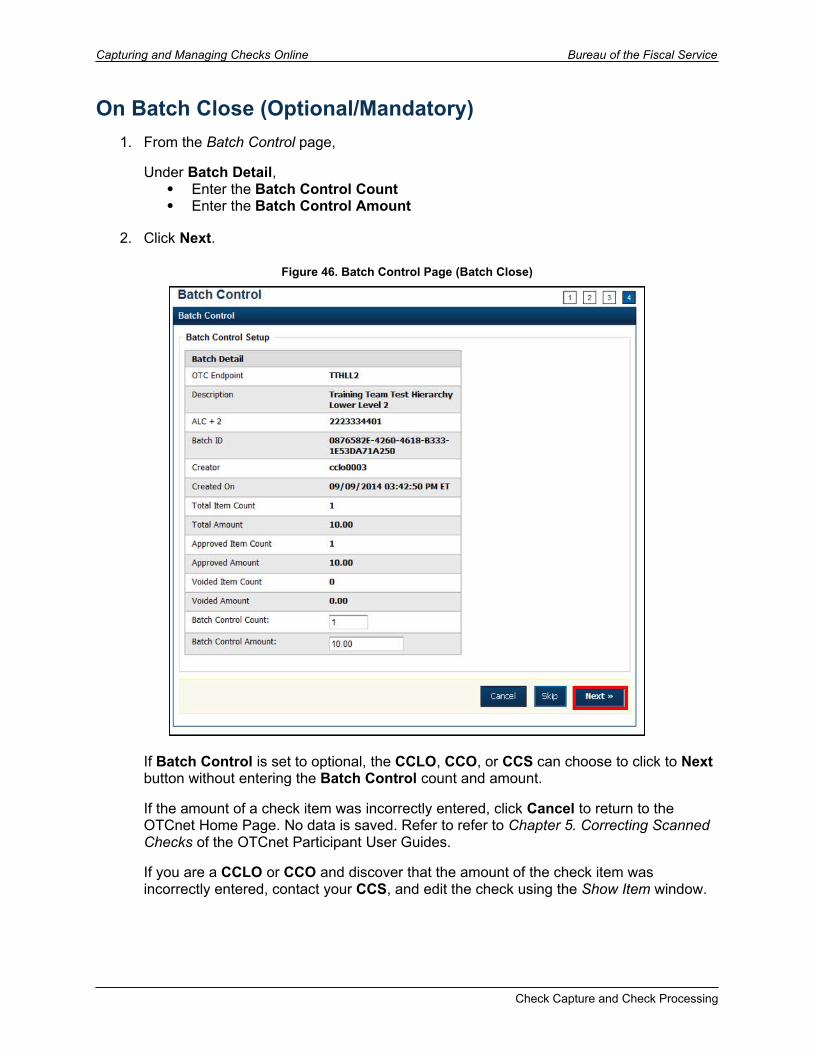
Bureau of the Fiscal Service Capturing and Managing Checks Online
3. The Close Batch page appears. Click Print PDF Report or Export and click Confirm to close the batch.
After Print PDF Report or Export is clicked, the Confirm button is enabled. The batch is not closed until Confirm is clicked.
Figure 47. Print Batch List Report (Batch Close)
A user may print the PDF report or export the batch list report, regardless if the Close Batch and/or Approve Batch checkboxes are checked or unchecked. A CCS or CCA can specify the Batch List Report Print/Export Required During options under Advanced Administration.
Check Capture and Check Processing 71
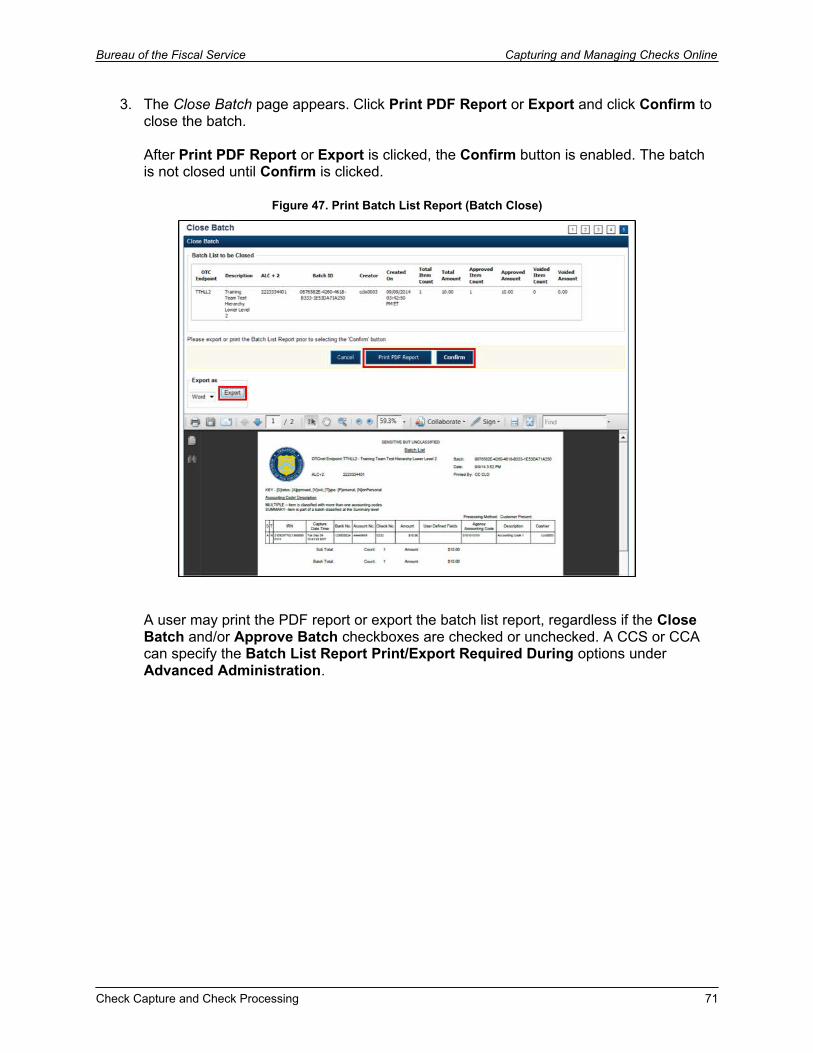
Capturing and Managing Checks Online Bureau of the Fiscal Service
Perform Batch Control (Optional or Mandatory)
To perform batch control on batch create:
1. From the Check Scan page,
Under Set Up New Batch, Enter the Batch Control Count Enter the Batch Control Amount
Application TipIf Batch Control is set to mandatory, the Check Capture Lead Operator or Check Capture Operator must enter the batch control count and amount. The batch control count and amount cannot be zero.
Application TipIf Batch Control is set to optional, the Check Capture Lead Operator or Check Capture Operator can click the Defer button.
2. Click Next. Perform Check Scan. The Check Scan-Perform Check Scan page appears.
3. Scan check(s) as needed.
To perform batch control on batch close:
1. From the Batch Control page,
Under Batch Detail, Enter the Batch Control Count Enter the Batch Control Amount
2. Click Next. The Close Batch page appears.
Application TipIf Batch Control is set to optional, the Check Capture Lead Operator, Check Capture Operator, or Check Capture Supervisor can choose to click to Next button without entering the batch control count and batch control amount.
Application Tip
Check Capture and Check Processing
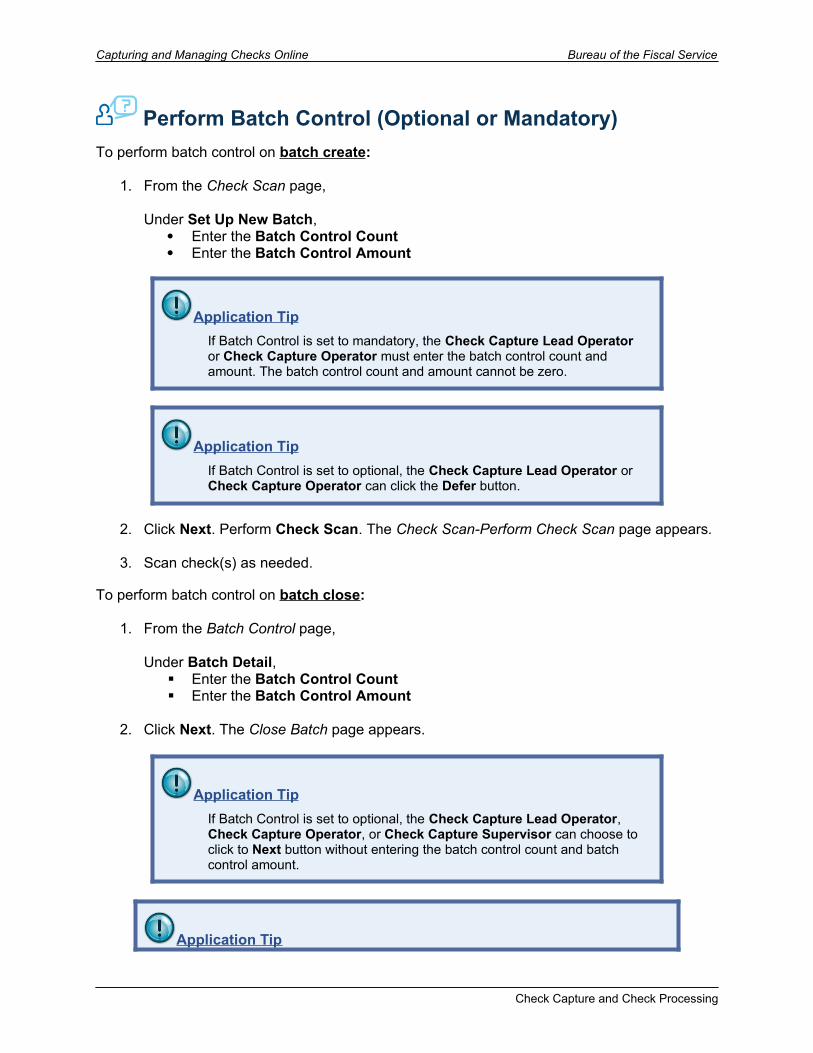
Bureau of the Fiscal Service Capturing and Managing Checks Online
If the amount of a check item was incorrectly entered, click Cancel to return to the OTCnet Home Page. No data is saved. Refer to Chapter 5. Correcting Scanned Checks of the OTCnet Participant User Guide. If you are a Check Capture Lead Operator or Check Capture Operator and discover that the amount of the check item was incorrectly entered, contact your Check Capture Supervisor, and edit the check using the Show Item window.
3. Continue batch close process and print batch list report.
Application TipA user may print the PDF report or export the batch list report, regardless if the Close Batch and/or Approve Batch checkboxes are checked or unchecked. A CCS or CCA can specify the Batch List Report Print/Export Required During options under Advanced Administration.
Batch BalancingIf the totals that are keyed into the Batch Control screen do not match what was keyed into the data entry screen, a Batch Balancing screen appears on batch close (see Figure 48 below). This screen only appears if there is a discrepancy between the totals. To reconcile the discrepancy, the operator must discover where the problem exists.
The Batch Control (balancing) screen displays the Batch Detail. Open fields include the Batch Control Count and Batch Control Amount. If these fields do not match those which you see to the right of the Approved Item Count and Approved Amount, then an error will display; Failed to balance Batch (batch number), please check batch control (see Figure 48 below).
If batch control is set to Mandatory and the batch is not balanced at this point (Batch Control Count and Batch Control Amount), a user may not proceed with closing a batch. However, if Batch Control is set to Optional, a user may click Next below, to continue closing the batch.
Check Capture and Check Processing 73
Capturing and Managing Checks Online Bureau of the Fiscal Service
Figure 48. Batch Control (Failed to Balance)
Check Capture and Check Processing
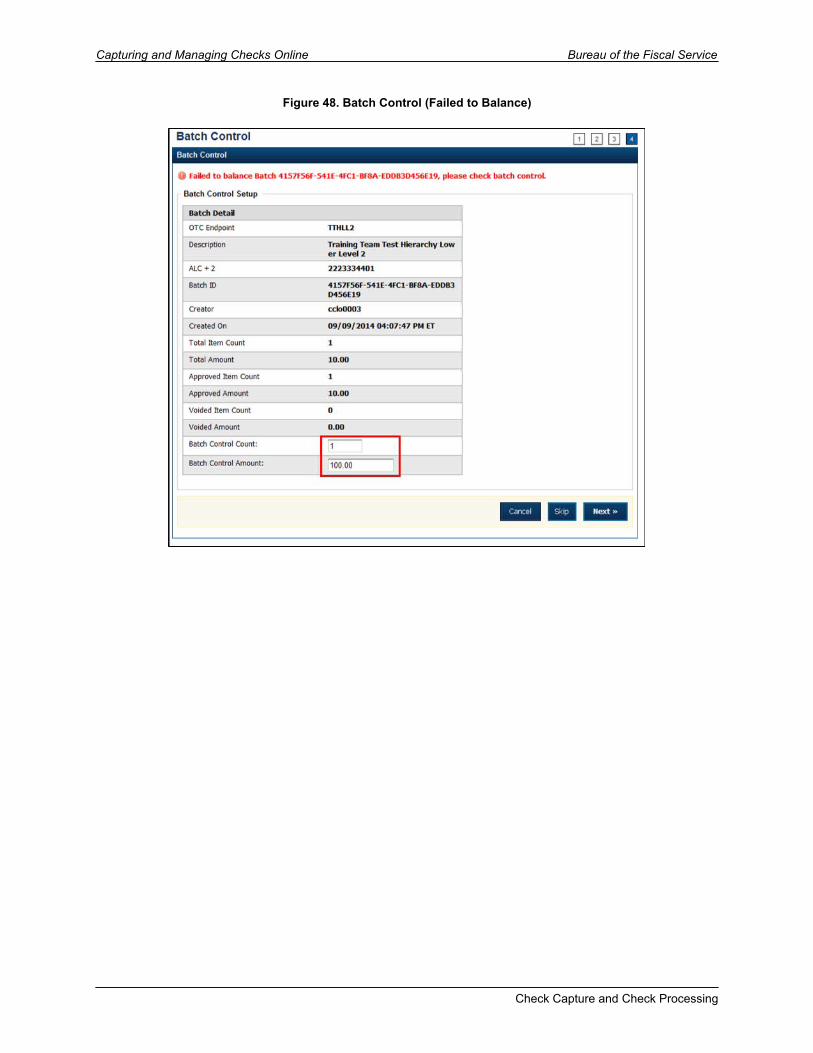
Bureau of the Fiscal Service Capturing and Managing Checks Online
Below, are some important Batch Detail descriptions that you should know:
Total Item Count: The number of checks that have been scanned in OTCnet. Batch Control Count: The number of checks keyed into the Batch Control screen by
the operator. Total Amount: The total dollar amount of the items as keyed into the Agency form data
fields when scanning checks. Batch Control Total: The total dollar amount of the checks keyed into the Batch Control
screen by the operator.
It must be determined if there is an erroneously scanned item, or if the batch should contain both of the items. The operator needs to go back to the source documents for an answer. If it is determined that the batch should contain both items, the operator would change the number in the Batch Control Count field and/or the dollar amount in the Batch Control Total.
If it has been determined that the batch does include an erroneously scanned item, follow these steps:
1. Click on the erroneous amount.
2. Click Void button.
3. Enter comments concerning the void request and click Ok.
4. Click OK to confirm the void request. The Confirmation message appears.
Note: A CCS will need to log in at the prompt, if the Void option is clicked.
Check Capture and Check Processing 75
Capturing and Managing Checks Online Bureau of the Fiscal Service
Topic 8. View and Print a Batch List/ Item Detail Report
As a CCS, CCLO, and CCO, you can view and print a Batch List report and an Item Detail report. An operator can print a Batch List for any deposits with any deposit status (i.e., Open, Closes, Approved, Forward). A Batch List consists of all transactions that have been processed. A user can view batch lists based on the search criteria applied.
The printing of a Batch List is part of the batch close procedure. During batch close, the system prompts to make certain that the user acknowledges the printout of the Batch List. The Print PDF Report button defaults to print in PDF format; however, a user may also opt to download and save the report in an alternate format such as Word, HTML, Excel, etc.
From the Close Batch page, a user can perform several actions on the same screen (such as Activate/Deactivate, Close and Approve Batches), based on their permissions.
Batch List Report1. Click the Check Processing tab and click Batch Management.
Figure 49. Check Processing>Batch Management (View Batch)
Check Capture and Check Processing
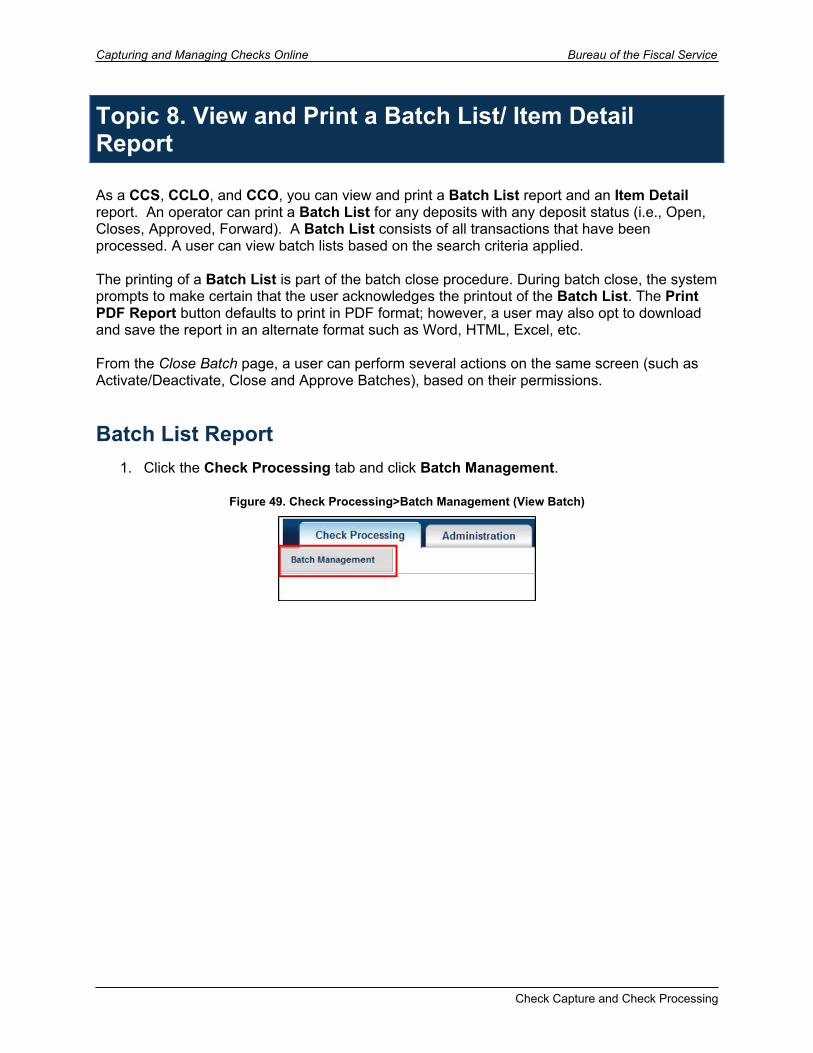
Bureau of the Fiscal Service Capturing and Managing Checks Online
2. The Search Batch page appears. Select or enter the batch search conditions you would like view, and then click Search.
Figure 50. Search Batch Page (View Batch)
Note: If you run a search with the default From and To Created On Date range values, the search results include the most recent 30 days of batches that you have access to view. If more than 1,000 batches are created within the 30 days then only the most recent 1,000 batches appear.
If you run a search without specifying any criteria (with the exception of the Batch ID field), the search results include the most recent 30 days of batches that you have access to view. If more than 1,000 batches are created within 30 days then only the most recent 1,000 batches appear.
Check Capture and Check Processing 77
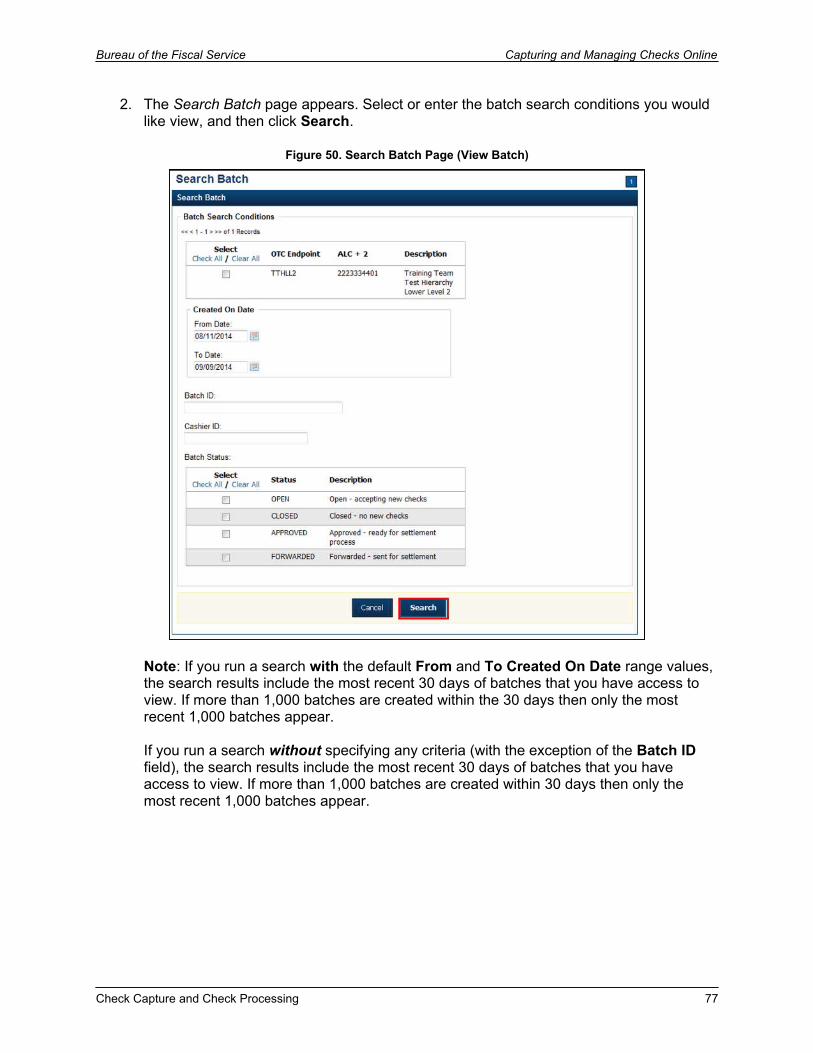
Capturing and Managing Checks Online Bureau of the Fiscal Service
Under Batch Search Conditions, optional Select the OTC Endpoint you want to Edit a batch for by checking the under the
Select column
Under Created On Date, optional Enter the Created On Date by entering the From and To date range
The Created On Date range cannot exceed 30 days. Additionally, if more than 1,000 batches are created within 30 days then only the most recent 1,000 batches appear.
Enter the Batch ID, optional
If the only search criteria entered is a valid Batch ID then only a single result appears regardless of other search criteria specified.
Enter the Cashier ID
Under Batch Status, optional Select the Status you want to view by checking the Open or Closed box under
the Select column, then click Search
3. The View Batches page appears. Click the Batch ID hyperlink.
If a batch is in use and another user attempts to access the same batch, a Batch Lock message appears stating the batch is in use and he/she cannot access the batch.
Figure 51. View Batches Page (View Batch)
Check Capture and Check Processing
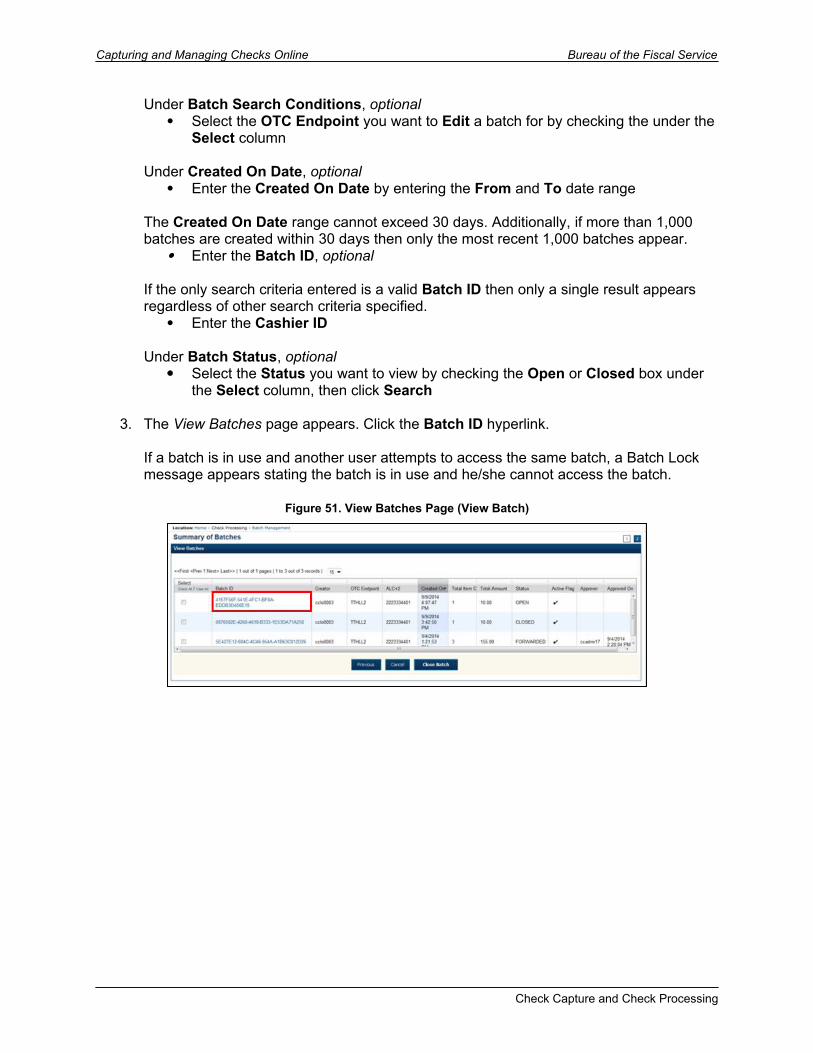
Bureau of the Fiscal Service Capturing and Managing Checks Online
4. The Batch and Check Details page appears. Click Print Batch List.
Figure 52. View Checks Page (View Batch)
Check Capture and Check Processing 79
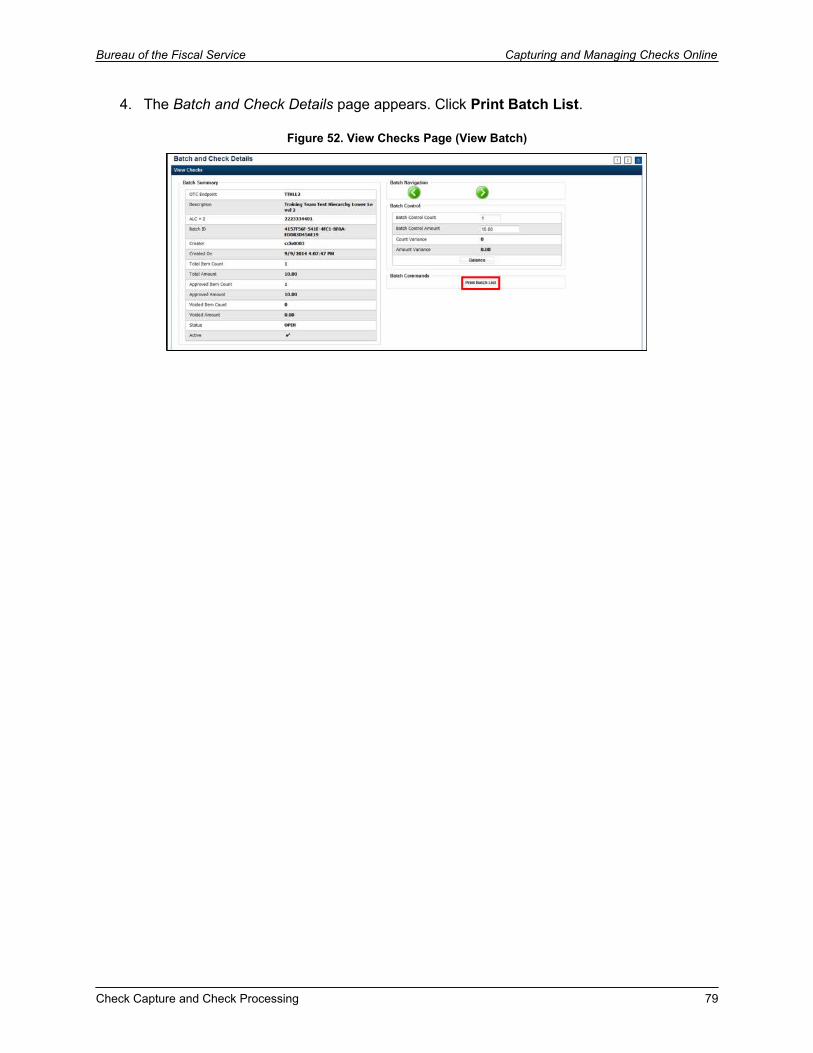
Capturing and Managing Checks Online Bureau of the Fiscal Service
5. The Batch List Report preview page appears.
Under Export as, Select PDF, Word or Excel Click Download
Or
Click Print PDF Report
Figure 53. Batch List Report
Check Capture and Check Processing
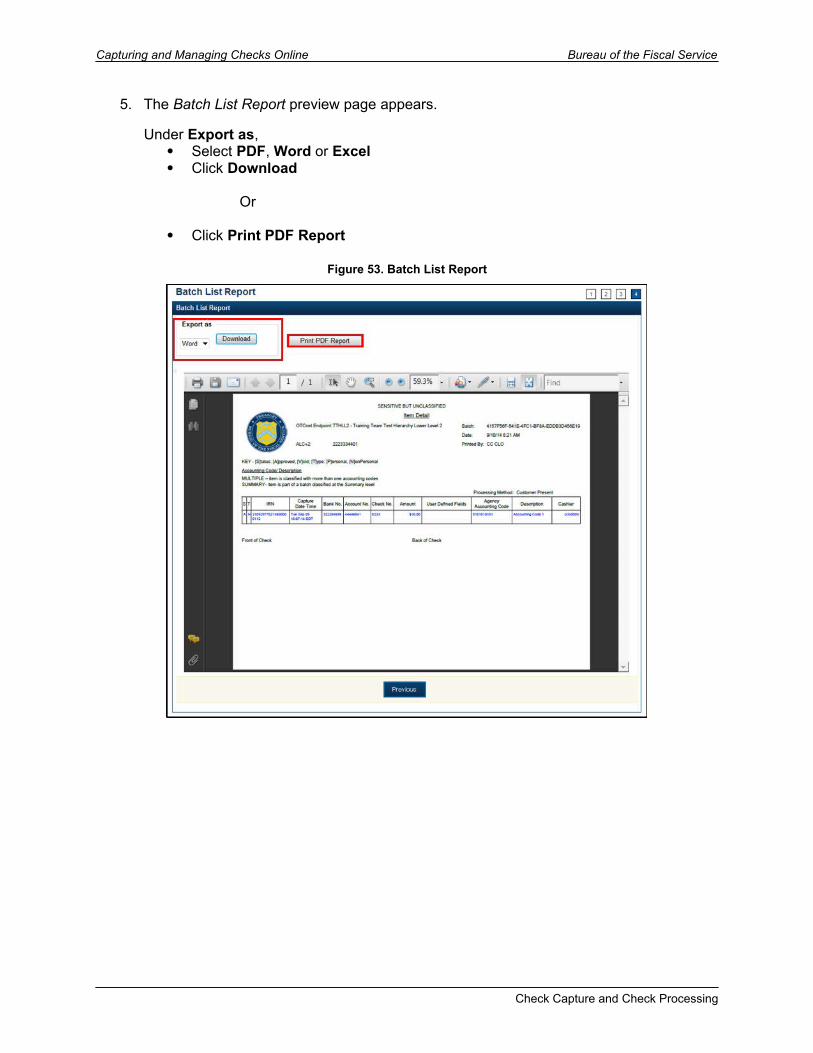
Bureau of the Fiscal Service Capturing and Managing Checks Online
Item Detail ReportTo run an item detail report:
1. Click the Check Processing tab and click Batch Management.
Figure 54. Batch Management
2. The Search Batch page appears. Select or enter the batch search conditions you would like view, then click Search.
Figure 55. Search Batch
Check Capture and Check Processing 81
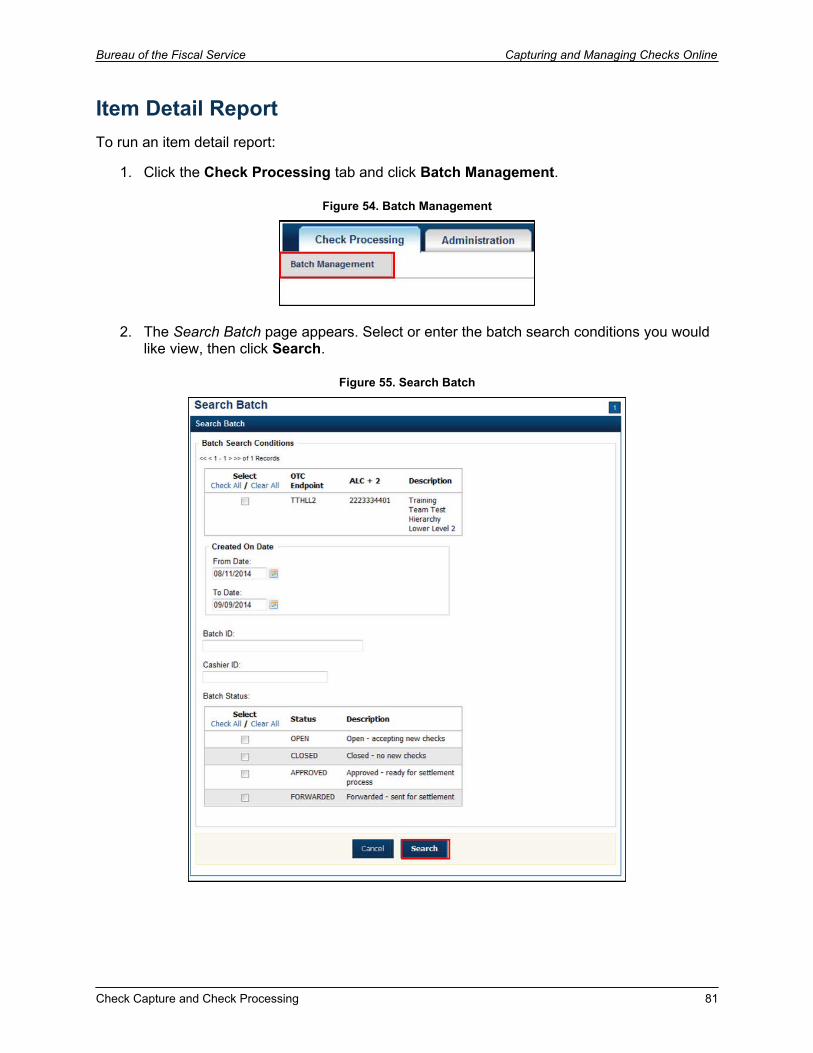
Capturing and Managing Checks Online Bureau of the Fiscal Service
Note: If you run a search with the default From and To Created On Date range values, the search results include the most recent 30 days of batches that you have access to view. If more than 1,000 batches are created within the 30 days then only the most recent 1,000 batches appear.
If you run a search without specifying any criteria (with the exception of the Batch ID field), the search results include the most recent 30 days of batches that you have access to view. If more than 1,000 batches are created within 30 days, then only the most recent 1,000 batches appear.
Under Batch Search Conditions, optional Select the OTC Endpoint you want to Edit a batch for by checking the under the
Select column
Under Created On Date, optional Enter the Created On Date by entering the From and To date range
The Created On Date range cannot exceed 30 days. Additionally, if more than 1,000 batches are created within 30 days, then only the most recent 1,000 batches appear.
Enter the Batch ID, optional
If the only search criteria entered is a valid Batch ID, then only a single result appears regardless of other search criteria specified.
Enter the Cashier ID
Under Batch Status, optional Select the Status you want to view by checking the Open or Closed box under
the Select column, then click Search
3. The View Batches page appears. Click the Batch ID hyperlink.
Figure 56. Summary of Batches
Check Capture and Check Processing
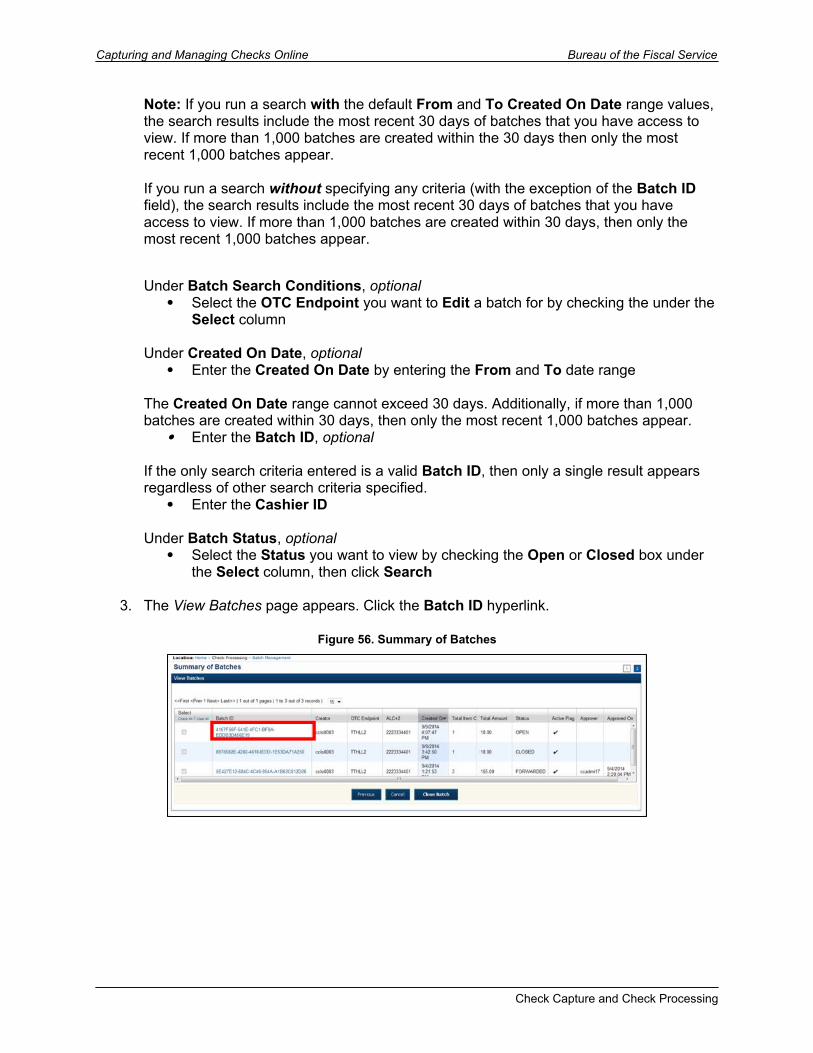
Bureau of the Fiscal Service Capturing and Managing Checks Online
4. The Batch and Item Details page appears. Click the Item ID of each scanned check, and then click Print Item for the specific check item you want to print. If a batch is in use and another user attempts to access the same batch, a Batch Lock message appears stating the batch is in use and he/she cannot access the batch.
Figure 57. View Checks Page/Item ID Select
Check Capture and Check Processing 83
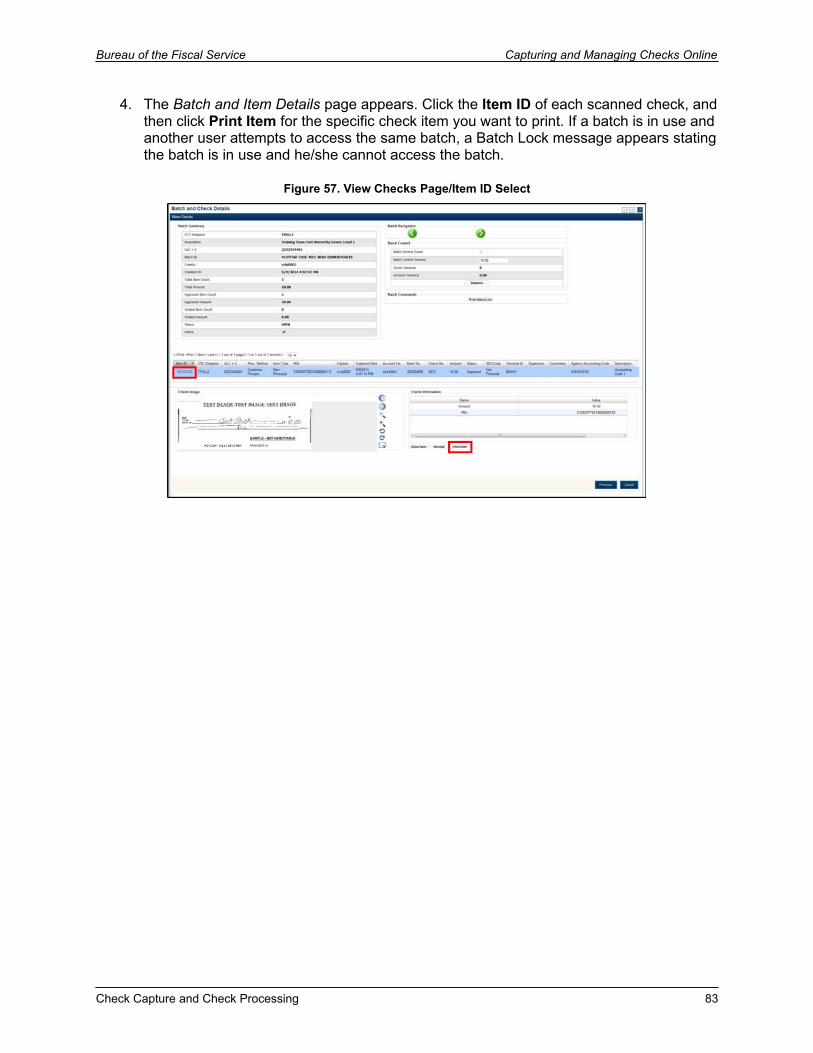
Capturing and Managing Checks Online Bureau of the Fiscal Service
5. The Item Detail Report preview page appears.
Under Export as, Select PDF, Word or Excel Click Download
Or
Click Print PDF Report
Figure 58. Item Detail Report
Check Capture and Check Processing

Bureau of the Fiscal Service Capturing and Managing Checks Online
View and Print a Batch List Report To view and print a Batch List report:
1. Click the Check Processing tab.
2. Click Batch Management. The Search Batch page appears.
3. Select or enter the batch search conditions you would like view.
Under Batch Search Conditions, optional Select the OTC Endpoint you want to Edit a batch for by checking the under the
Select column
Under Created On Date, optional Enter the From and To date range
Application TipThe From and To Created On Date must be entered in MM/DD/YYYY format.
Application TipThe Created On Date range cannot exceed 30 days. Additionally, if more than 1,000 batches are created within 30 days, then only the most recent 1,000 batches appear.
Application TipIf you run a search with the default From and To Created On Date range values, the search results include the most recent 30 days of batches that you have access to view. If more than 1,000 batches are created within the 30 days, then only the most recent 1,000 batches appear.
Application TipIf you run a search without specifying any criteria (with the exception of the Batch ID field), the search results include the most recent 30 days of batches that you have access to view. If more than 1,000 batches are created within 30 days then only the most recent 1,000 batches appear.
Check Capture and Check Processing 85

Capturing and Managing Checks Online Bureau of the Fiscal Service
Enter the Batch ID, optional
Application TipIf the only search criteria entered is a valid Batch ID then only a single result appears regardless of other search criteria specified.
Under Batch Status, optional Select the Status you want to view by checking the Open or Closed box under
the Select column
4. Click Search. The View Batches page appears.
5. Click the Batch ID hyperlink. The Batch and Check Details page appears.
Application TipIf a batch is in use and another user attempts to access the same batch, a Batch Lock message appears stating the batch is in use and he/she cannot access the batch.
6. Click Print Batch List. The Batch List Report preview page appears.
7. Under Export as, Select PDF, Word or Excel Click Download
Or
Click Print PDF Report
Application TipAdditional button on the page that helps you perform other tasks:
Click Previous to return to the previous page.
Check Capture and Check Processing
Bureau of the Fiscal Service Capturing and Managing Checks Online
View and Print an Item Detail Report
To view and print an Item Detail report:
1. Click the Check Processing tab.
2. Click Batch Management. The Search Batch page appears.
3. Select or enter the batch search conditions you would like view.
Under Batch Search Conditions, optional Select the OTC Endpoint you want to Edit a batch for by checking the under the
Select column
Under Created On Date, optional Enter the From and To date range
Application TipThe From and To Created On Date must be entered in MM/DD/YYYY format.
Application TipThe Created On Date range cannot exceed 30 days. Additionally, if more than 1,000 batches are created within 30 days, then only the most recent 1,000 batches appear.
Application TipIf you run a search with the default From and To Created On Date range values, the search results include the most recent 30 days of batches that you have access to view. If more than 1,000 batches are created within the 30 days, then only the most recent 1,000 batches appear.
Application TipIf you run a search without specifying any criteria (with the exception of the Batch ID field), the search results include the most recent 30 days of batches that you have access to view. If more than 1,000 batches are created within 30 days, then only the most recent 1,000 batches appear.
Check Capture and Check Processing 87

Capturing and Managing Checks Online Bureau of the Fiscal Service
Enter the Batch ID, optional
Application TipIf the only search criteria entered is a valid Batch ID then only a single result appears regardless of other search criteria specified.
Enter the Cashier ID, optional
Under Batch Status, optional Select the Status you want to view by checking the Open or Closed box under
the Select column
4. Click Search. The View Batches page appears.
5. Click the Batch ID hyperlink. The Batch and Item Details page appears.
6. Click the Item ID of each scanned check. An image of the check and details of the check appear in the window below.
7. Click Print Item. The Item Detail Report preview page appears.
8. Under Export as, Select PDF, Word or Excel Click Download
Or
Click Print PDF Report.
Application TipAdditional button on the page that helps you perform other tasks:
Click Previous to return to the previous page.
Check Capture and Check Processing
Bureau of the Fiscal Service Capturing and Managing Checks Online
Topic 9. Activate/Deactivate a Batch
A CCS can deactivate a batch if there is a problem with an item within the batch and further research is needed. Deactivating a batch prevents it from being closed or approved for settlement.
A deactivated batch must be activated before it can be closed or approved for settlement. Additionally, a batch currently in use cannot be deactivated. A deactivated batch is retained in the system indefinitely and can be searched for using Batch Management.
Activating/Deactivating a Batch1. Click the Check Processing tab and click Batch Management.
Figure 59. Check Processing>Batch Management (Activate/Deactivate)
2. The Search Batch page appears. Select or enter the batch search conditions you would like view and click Search. Only batches with an Open or Closed status can be activated/deactivated.
Note: If you run a search with the default From and To Created On Date range values, the search results include the most recent 30 days of batches that you have access to view. If more than 1,000 batches are created within the 30 days then only the most recent 1,000 batches appear.
If you run a search without specifying any criteria (with the exception of the Batch ID field), the search results include the most recent 30 days of batches that you have access to view. If more than 1,000 batches are created within 30 days then only the most recent 1,000 batches appear.
Under Batch Search Conditions, optional Select the OTC Endpoint you want to Edit a batch for by checking the under the
Select column
Under Created On Date, optional Enter the Created On Date by entering the From and To date range
The Created On Date range cannot exceed 30 days. If more than 1,000 batches are created within 30 days, then only the most recent 1,000 batches appear.
Enter the Batch ID, optional
Check Capture and Check Processing 89
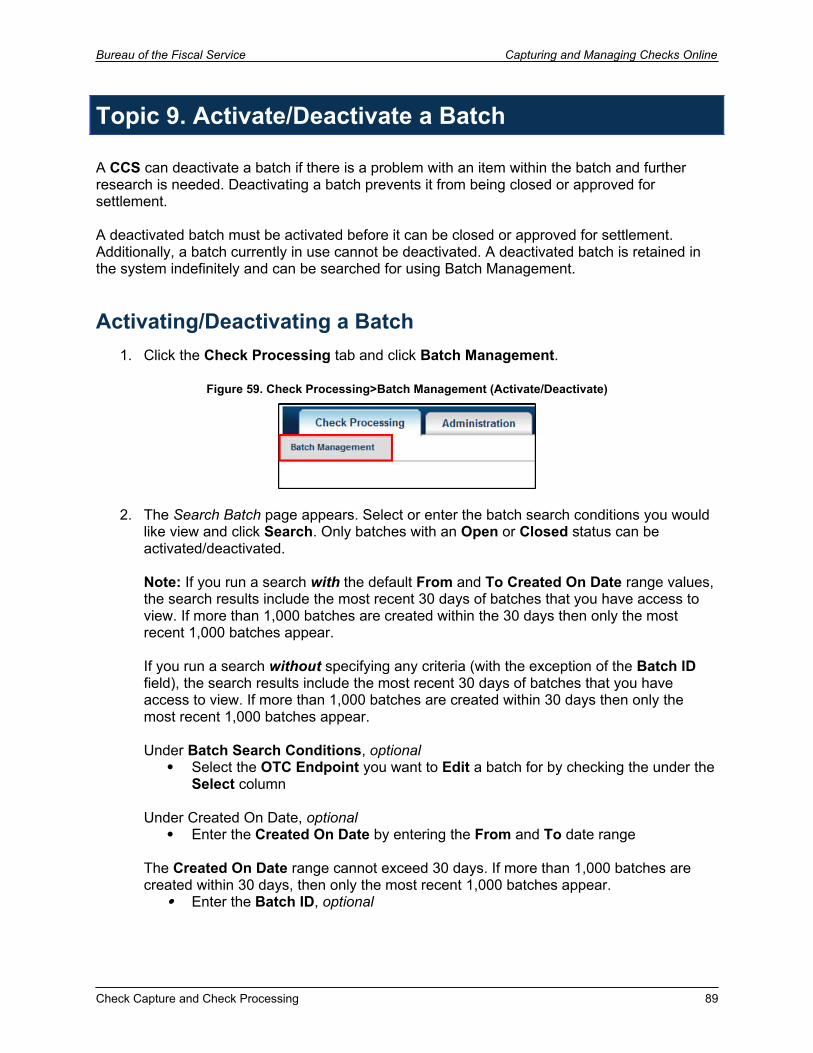
Capturing and Managing Checks Online Bureau of the Fiscal Service
If the only search criteria entered is a valid Batch ID, then only a single result appears regardless other search criteria specified.
Enter the Cashier ID
Under Batch Status, optional Select the Status you want to view by checking the Open or Closed box under
the Select column, then click Search
Figure 60. Search Batch Page (Activate/Deactivate)
Check Capture and Check Processing
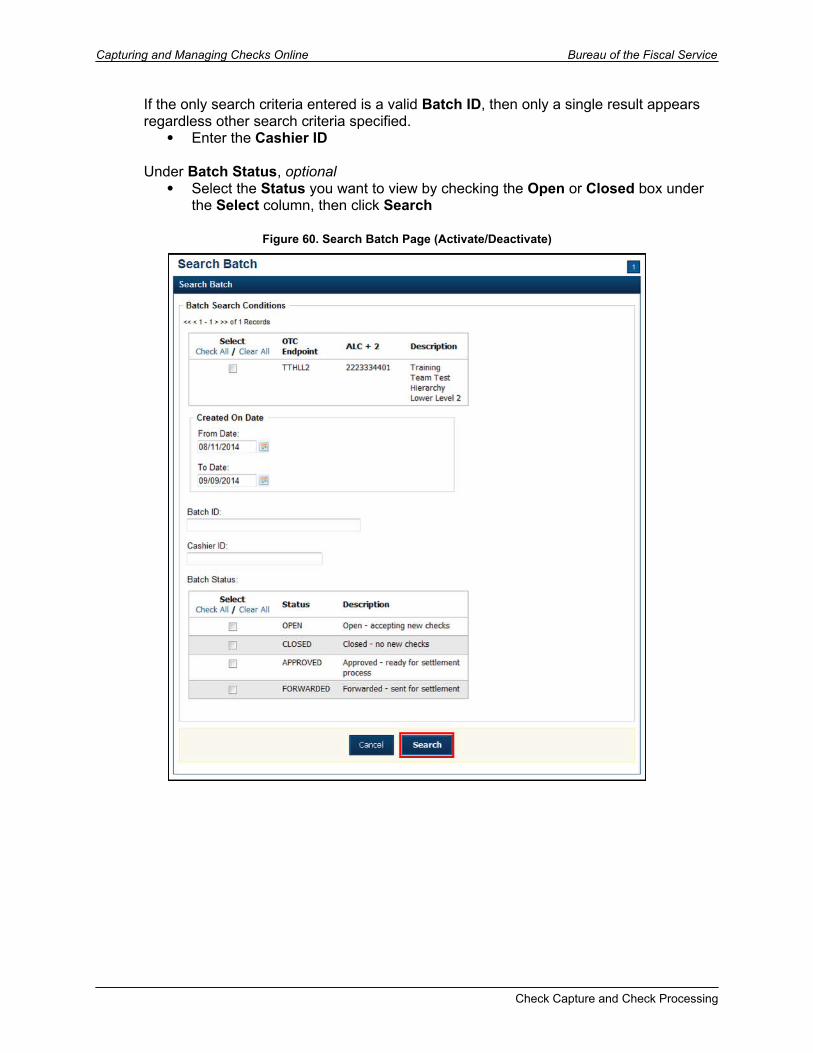
Bureau of the Fiscal Service Capturing and Managing Checks Online
3. The Summary of Batches page appears. Check the checkbox(es) of the Batch ID(s) you want to activate or deactivate and click Activate/Deactivate.
If a batch is in use and another user attempts to access the same batch, a Batch Lock message appears stating the batch is in use and he/she cannot access the batch.
If a batch is activated or deactivated, a check appears under the Active Flag column. If a batch is deactivated, the Active Flag column is blank.
Figure 61. View Batches Page (Activate/Deactivate)
The Activate/Deactivate Batch page appears. Click Confirm (see Figure 60).
Figure 62. Activate/Deactivate Batch Page
Check Capture and Check Processing 91
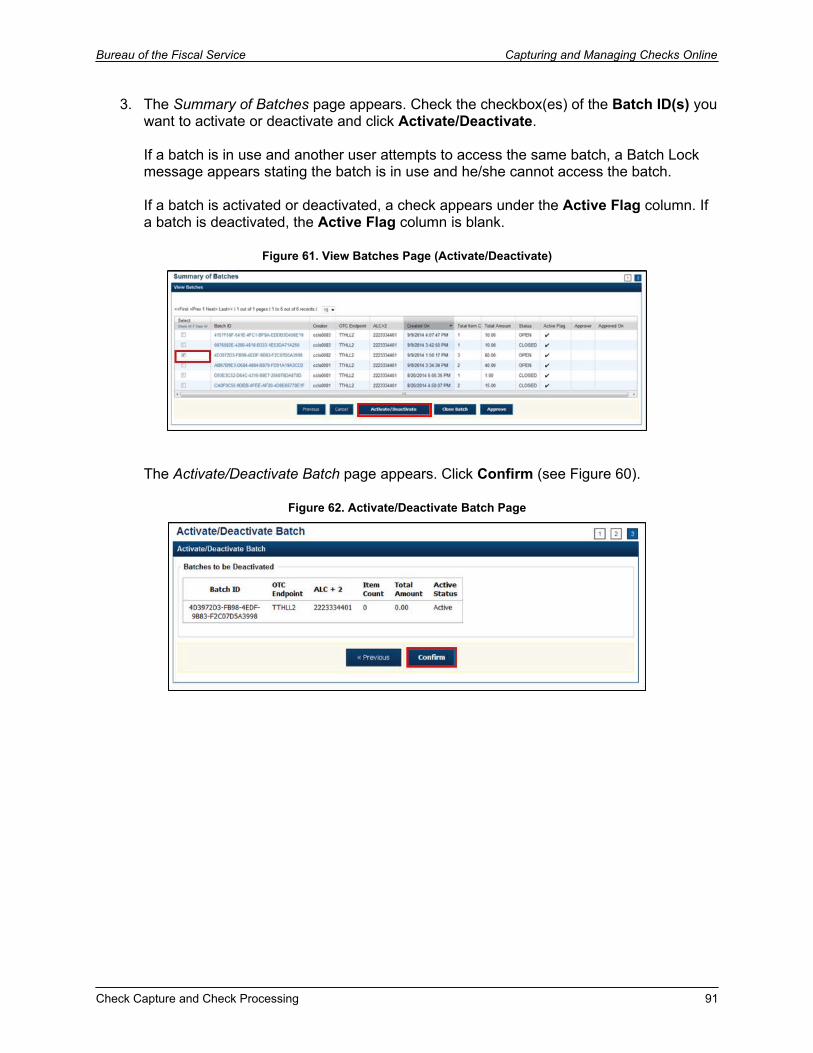
Capturing and Managing Checks Online Bureau of the Fiscal Service
4. A message appears stating the batch(es) have been deactivated/activated and the value under Active Status updates to Active/Inactive.
Figure 63. Batch Activate/ Activate Confirmation
Check Capture and Check Processing
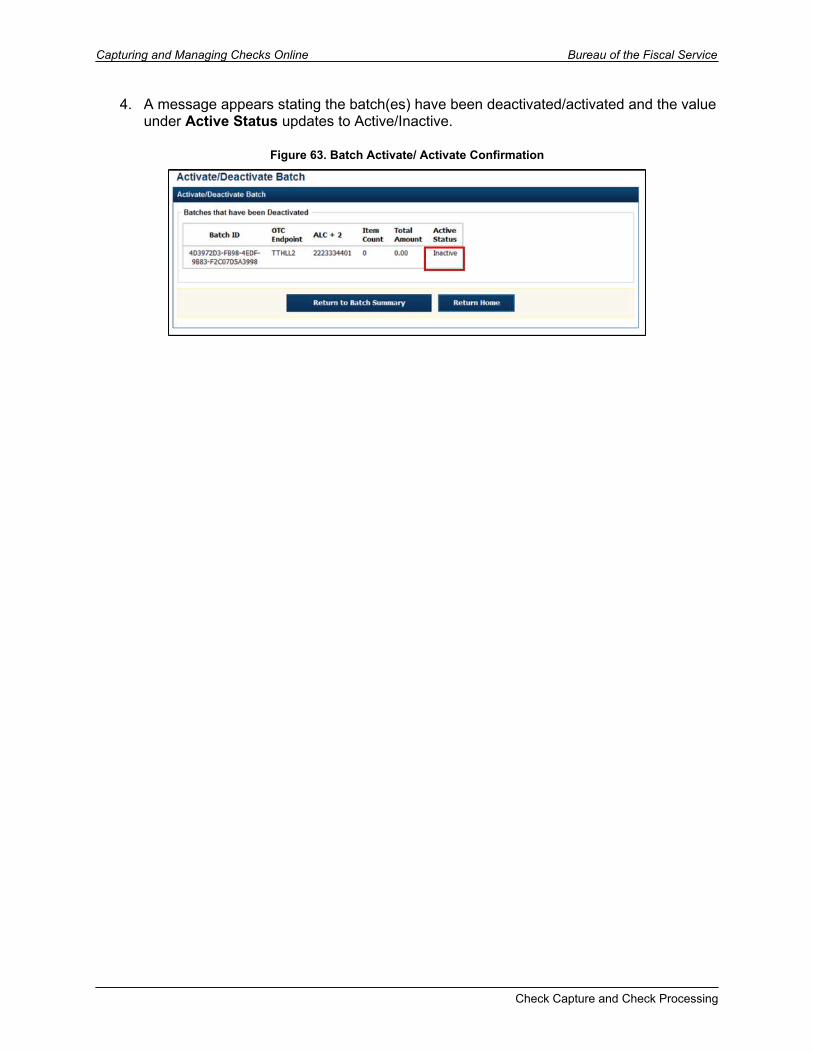
Bureau of the Fiscal Service Capturing and Managing Checks Online
Activate/Deactivate a Batch
To activate/deactivate:
1. Click the Check Processing tab.
2. Click Batch Management. The Search Batch page appears.
3. Select or enter the batch search conditions you would like view.
Under Batch Search Conditions, optional Select the OTC Endpoint you want to activate/deactivate a batch for by checking
the box under the Select column
Application TipOnly batches with an Open or Closed status can be activated/deactivated. Additionally, batches currently in use cannot be deactivated.
Under Created On Date, optional Enter the From and To date range
Application TipThe From and To Created On Date must be entered in MM/DD/YYYY format.
Application TipThe Created On Date range cannot exceed 30 days. Additionally, if more than 1,000 batches are created within 30 days then only the most recent 1,000 batches appear.
Application TipIf you run a search with the default From and To Created On Date range values, the search results include the most recent 30 days of batches that you have access to view. If more than 1,000 batches are created within the 30 days then only the most recent 1,000 batches appear.
Check Capture and Check Processing 93
Capturing and Managing Checks Online Bureau of the Fiscal Service
Application TipIf you run a search without specifying any criteria (with the exception of the Batch ID field), the search results include the most recent 30 days of batches that you have access to view. If more than 1,000 batches are created within 30 days then only the most recent 1,000 batches appear.
Enter the Batch ID, optional
Application TipIf the only search criteria entered is a valid Batch ID then only a single result appears regardless of other search criteria specified.
Enter the Cashier ID
Under Batch Status, optional Select the Status you want to activate/deactivate by checking the Open and/or
Closed boxes under the Select column
Application TipOnly batches with an Open or Closed status can be activated/deactivated. Additionally, batches currently in use cannot be deactivated.
4. Click Search. The Summary of Batches page appears.
5. Check the checkbox of the Batch ID you want to activate or deactivate and click Activate/Deactivate. The Activate/Deactivate Batch page appears.
Application TipIf a batch is activated or deactivated a check appears under the Active Flag column. If a batch is deactivated, the Active Flag column is blank.
Check Capture and Check Processing
Bureau of the Fiscal Service Capturing and Managing Checks Online
6. Click Confirm. A message appears stating the batch(es) have been activated/deactivated and the value under Active Status updates to Active/Inactive.
Application TipAdditional buttons on the page that help you perform other tasks:
Click Return to Batch Summary to return to the batch summary page.
Click Return Home to return to the OTCnet homepage.
Check Capture and Check Processing 95
Capturing and Managing Checks Online Bureau of the Fiscal Service
Topic 10. Classify a Batch
Before a batch can be classified, an OTC Endpoint must be designated as being able to classify a batch at the summary level with at least one accounting code or C-key. Additionally, if an OTC Endpoint is designated as a Central Accounting Reporting System (CARS)/Government-Wide Accounting (GWA) reporter, all batches (at the summary level) or items within a batch (at the item level) must be classified with at least one accounting code or C-key.
To classify a batch at the summary level, the CCLO or CCO first uses the Check Scan function, scans the check(s), enters the amount and any user defined field details, and saves the transaction. After the batch is saved, a Check Capture Supervisor (CCS), CCLO, or CCO accesses Batch Management, clicks View/Edit Classification and classifies the batch with an accounting code or C-key. Note: Depending on your user privileges and batch status you will see either a View/Edit Classification or a View Classification button.
The summary level (batch) classification process is independent of the batch close process. Therefore, a batch can be classified prior to closing a batch or after the batch is closed. Additionally, a CCS can classify a batch during Approve Batch.
Classify or Edit a Batch at the Summary Level To classify or edit a batch at the summary level online:
1. Click the Check Processing tab. Click Batch Management.
Figure 64. Administration>Batch Management
2. The Search Batch page appears. Select or enter the batch search conditions you would like to view.
Under Batch Search Conditions, optional Select the OTC Endpoint you want to classify or edit a batch for by checking the
under the Select column
Under Created On Date, optional Enter the From and To date range
The From and To Created On Date must be entered in MM/DD/YYYY format. The Created On Date range cannot exceed 30 days. Additionally, if more than 1,000 batches are created within 30 days then only the most recent 1,000 batches appear.
Check Capture and Check Processing
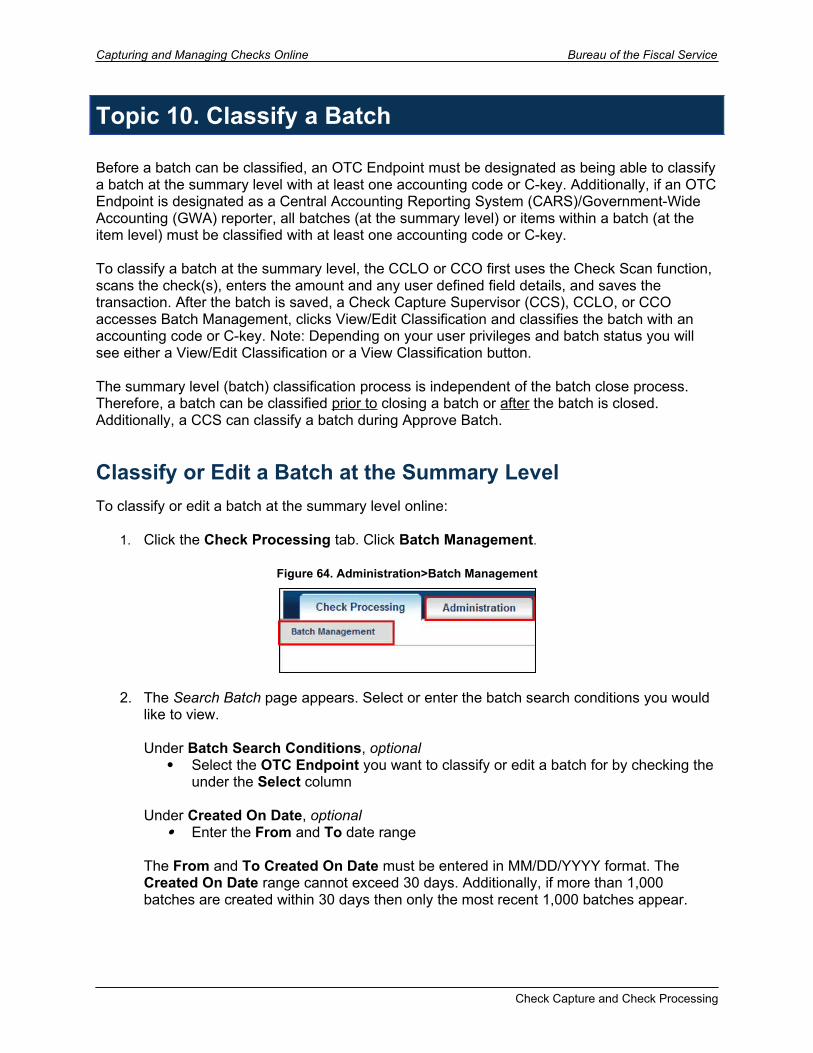
Bureau of the Fiscal Service Capturing and Managing Checks Online
If you run a search with the default From and To Created On Date range values, the search results include the most recent 30 days of batches that you have access to view. If more than 1,000 batches are created within the 30 days then only the most recent 1,000 batches appear.
If you run a search without specifying any criteria (with the exception of the Batch ID field), the search results include the most recent 30 days of batches that you have access to view. If more than 1,000 batches are created within 30 days then only the most recent 1,000 batches appear.
Enter the Batch ID, optional
If the only search criteria entered is a valid Batch ID then only a single result appears regardless of other search criteria specified.
Enter the Cashier ID, optional
Under Batch Status, optional Select the Status you want to view by checking the Open or Closed box under
the Select column
Batches in Open or Closed status can be classified or edited at the summary level.
Click Search. The View Batches page appears.
Check Capture and Check Processing 97
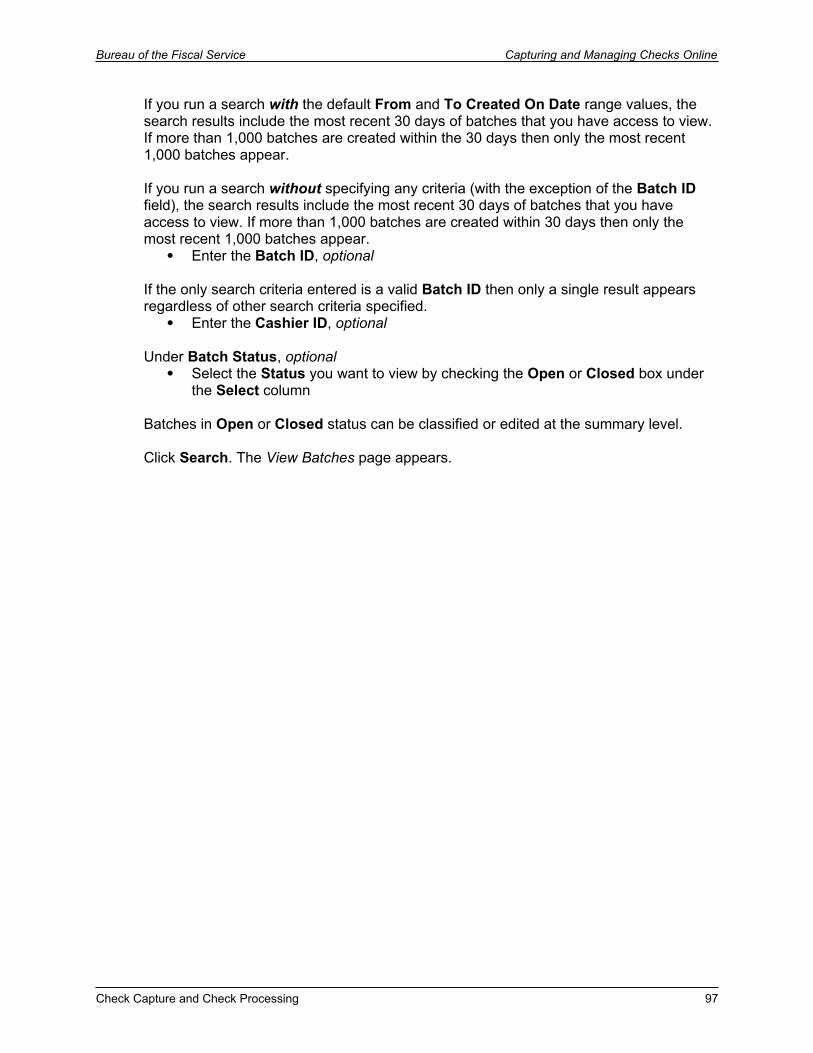
Capturing and Managing Checks Online Bureau of the Fiscal Service
Figure 65. Search Batch (Classify a Batch)
3. Click the Batch ID hyperlink. The View Checks page appears.
Figure 66. View Batches
Check Capture and Check Processing
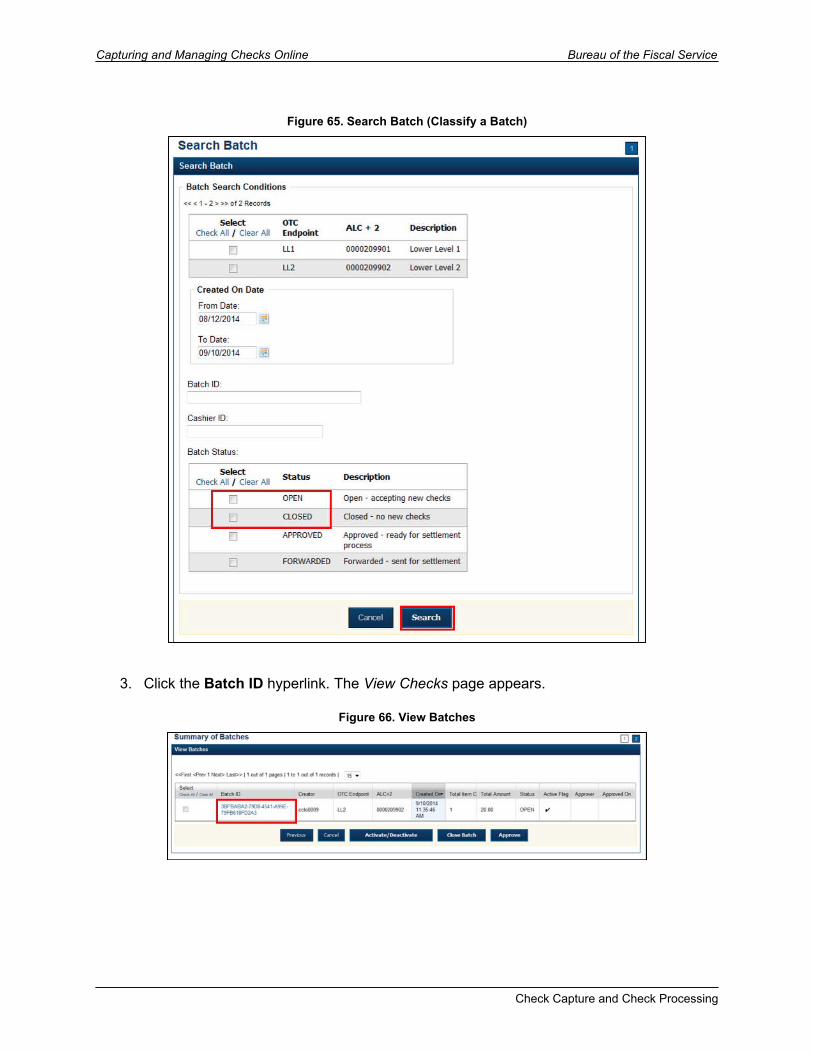
Bureau of the Fiscal Service Capturing and Managing Checks Online
4. Click View/Edit Classification. The Account Classification dialog box appears.
Depending on your user role and batch status you will either see View/Edit Classification or View Classification. View/Edit Classification indicates that the user has view and edit permissions. View Classification indicates the user has view classification permission and is not permitted to edit or delete a classification.
Figure 67. View Checks – View/Edit Classification
5. Click Edit. The Account Classification dialog box refreshes.
Figure 68. Accounting Classification – Summary Level
Check Capture and Check Processing 99
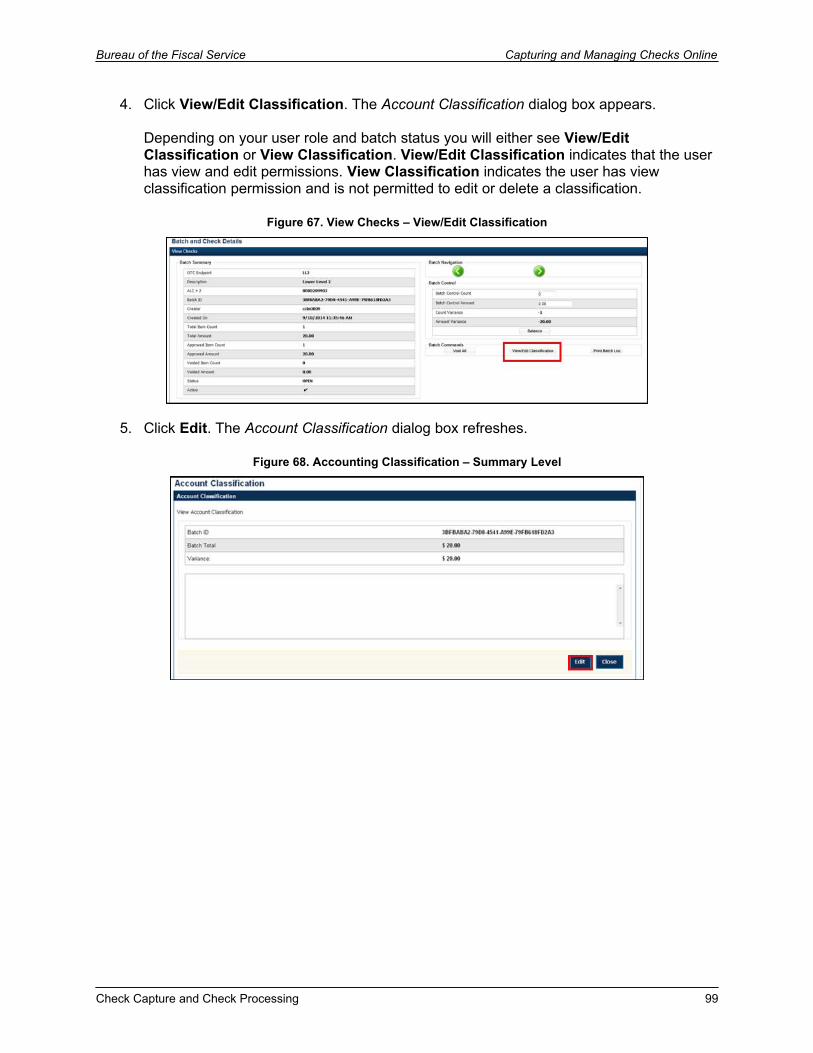
Capturing and Managing Checks Online Bureau of the Fiscal Service
6. Enter or update the necessary account classification data.
Select an Agency Accounting Code
If an OTC Endpoint is associated with an ALC that is designated as a CARS/GWA Reporter, all check transactions must be classified with an accounting code. If an ALC is not a CARS/GWA Reporter, classifying it with an accounting code is optional.
The Agency Accounting Codes drop-down list displays the full Agency Accounting Code value (up to 50 alphanumeric characters) and some portion of the Description (up to 15 alphanumeric characters).
Enter the Amount and click Add for each subtotal of the batch
The classified total and batch total can remain unbalanced until the batch is approved. However, the Variance must equal $0.00 before a batch can be approved. If it does not, you must go back and re-validate your subtotal entries.
To delete or remove an accounting code, check the Remove check box next to the accounting code you want to delete and click Update.
Click Save
Figure 69. Accounting Classification – Summary Level
Check Capture and Check Processing
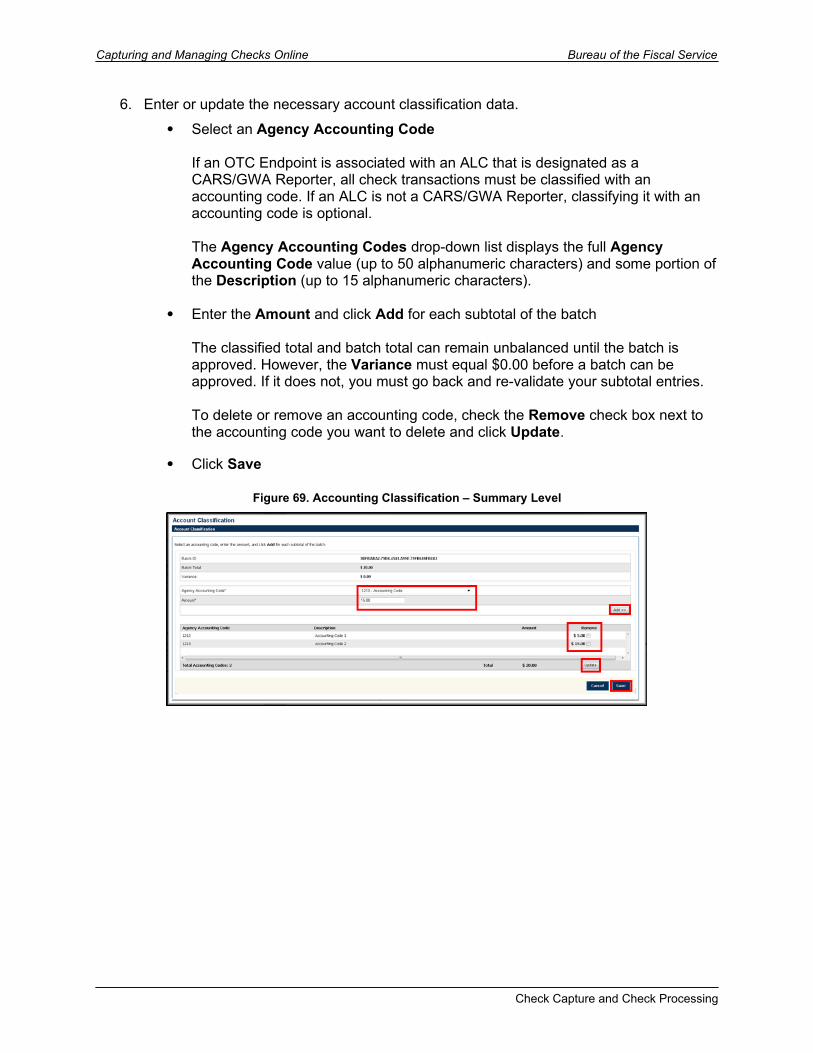
Bureau of the Fiscal Service Capturing and Managing Checks Online
Classify or Edit a Batch at the Summary Level in OTCnet OnlineTo classify or edit a batch at the summary level online:
1. Click the Check Processing tab.
2. Click Batch Management. The Search Batch page appears.
3. Select or enter the batch search conditions you would like to view.
Under Batch Search Conditions, optional Select the OTC Endpoint you want to classify or edit a batch for by checking the
under the Select column
Under Created On Date, optional Enter the From and To date range
Application TipThe From and To Created On Date must be entered in MM/DD/YYYY format.
Application TipThe Created On Date range cannot exceed 30 days. Additionally, if more than 1,000 batches are created within 30 days then only the most recent 1,000 batches appear.
Application TipIf you run a search with the default From and To Created On Date range values, the search results include the most recent 30 days of batches that you have access to view. If more than 1,000 batches are created within the 30 days then only the most recent 1,000 batches appear.
Application TipIf you run a search without specifying any criteria (with the exception of the Batch ID field), the search results include the most recent 30 days of batches that you have access to view. If more than 1,000 batches are created within 30 days then only the most recent 1,000 batches appear.
Check Capture and Check Processing 101
Capturing and Managing Checks Online Bureau of the Fiscal Service
Enter the Batch ID, optional
Application TipIf the only search criteria entered is a valid Batch ID then only a single result appears regardless of other search criteria specified.
Enter the Cashier ID, optional
Under Batch Status, optional Select the Status you want to view by checking the Open or Closed box under
the Select column
Application TipBatches in Open or Closed status can be classified or edited at the summary level.
4. Click Search. The View Batches page appears.
5. Click the Batch ID hyperlink. The View Checks page appears.
6. Click View/Edit Classification. The Account Classification dialog box appears.
Application TipDepending on your user role and batch status you will either see View/Edit Classification or View Classification. View/Edit Classification indicates that the user has view and edit permission. View Classification indicates the user has view classification permission and is not permitted to edit or delete a classification.
7. Click Edit. The Account Classification dialog box refreshes.
Check Capture and Check Processing
Bureau of the Fiscal Service Capturing and Managing Checks Online
8. Enter or update the necessary account classification data.
a. Select an Agency Accounting Code
Application TipIf an OTC Endpoint is associated with an ALC that is designated as a Central Accounting Reporting System (CARS)/ Government-Wide Accounting (GWA) Reporter, all check transactions must be classified with an accounting code. If an ALC is not a CARS/GWA Reporter, classifying it with an accounting code is optional.
Application TipThe Agency Accounting Codes drop-down list displays the full Agency Accounting Code value (up to 50 alphanumeric characters) and some portion of the Description (up to 15 alphanumeric characters).
b. Enter the Amount and click Add for each subtotal of the batch
Application TipThe classified total and batch total can remain unbalanced until the batch is approved. However, the Variance must equal $0.00 before a batch can be approved. If it does not, you must go back and re-validate your subtotal entries.
Application TipTo delete or remove an accounting code, check the Remove check box next to the accounting code you want to delete and click Update.
c. Click Save
Check Capture and Check Processing 103
Capturing and Managing Checks Online Bureau of the Fiscal Service
Application TipAdditional buttons on the pages that help you perform other tasks:
Click Cancel to return to the OTCnet Home Page. No data will be saved.
Click Previous to return to the previous page. Click Void All to void all items in the batch. Click Print Batch List to print the batch list. Click < to go to the first batch. Click > to go to the next batch. Click <<Image to return to the previous check. Click >>Image to view the next check. Click Zoom- to reduce the image size. Click Zoom+ to enlarge the image size. Click Rotate Left to turn the image to the left. Click Rotate Right to turn the image to the right. Click Show Item to view the check item and perform update. Click Void to void a single check item. Click Receipt to print a receipt. Click Print Item to print an Item List report.
Additional buttons on the Show Item page that help you perform other tasks:
Click -Front to return to the previous check. Click Back+ to view the next check. Click -Zoom to reduce the image size. Click Zoom+ to enlarge the image size. Click Rotate Left+ to turn the image to the left. Click Rotate Right+ to turn the image to the right.
Check Capture and Check Processing
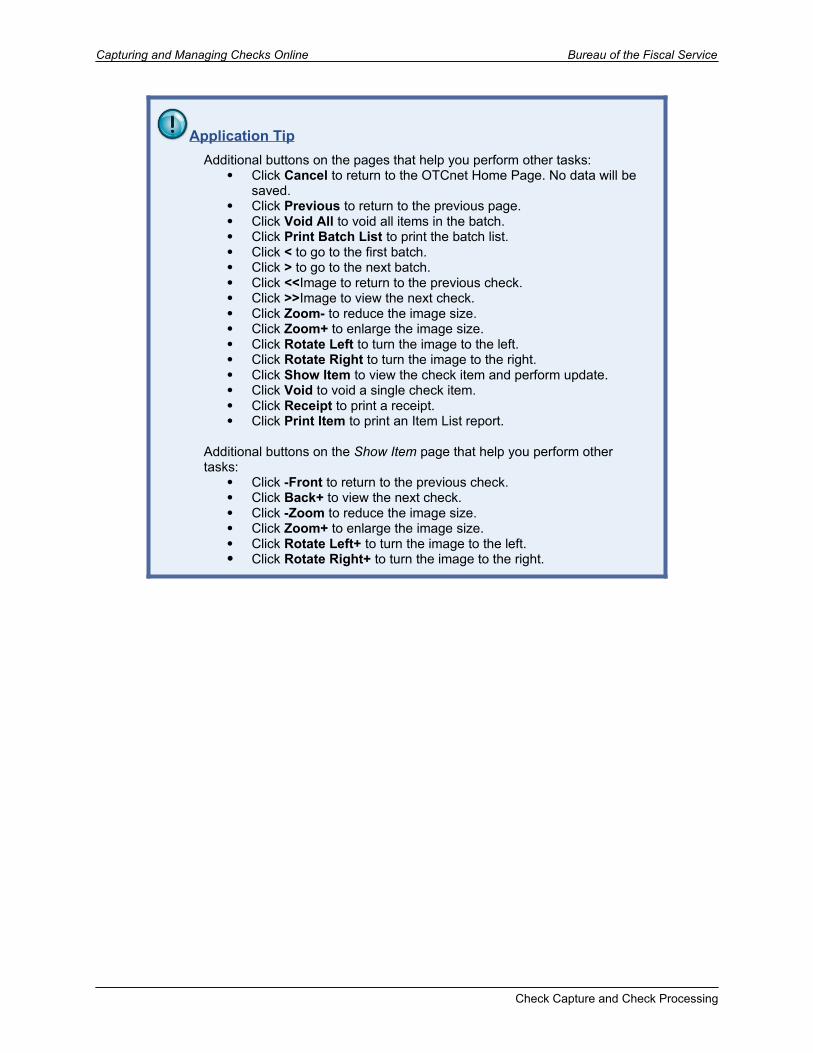
Bureau of the Fiscal Service Capturing and Managing Checks Online
Topic 11. Close a Batch
If you are assigned the role of CCS or CCLO, you are the only authorized users who can close a batch or multiple batches. You can only close batches for OTC Endpoints you have permission to access.
Before you can close a batch or multiple batches, you must first search for the batch. You can search for batches by OTC Endpoint, Created On Date, Batch ID, Cashier ID, and/or Batch Status.
There are four batch status types, see Table 4 for details below.
Table 5. Batch Status Types
Open Indicates the batch is open and you can continue scanning checks to it.
Closed Indicates the batch is closed and no new checks are accepted.Approved Indicates the batch is ready for upload and settlement.
Forwarded Indicates the batch has been sent to debit gateway to initiate the settlement process.
Note: All batches with a Received Date older than 18 months, including batches with an Open or Closed status, are saved in the Historical database and cannot be changed. Therefore, it is important that you close and approve all batches in a timely manner. For more details about Historical Reports refer to Chapter 8. Reporting on Scanned Checks and Viewing Historical Reports, Topic 5. Historical Reports of the OTCnet Participant User Guide.
Check Capture and Check Processing 105
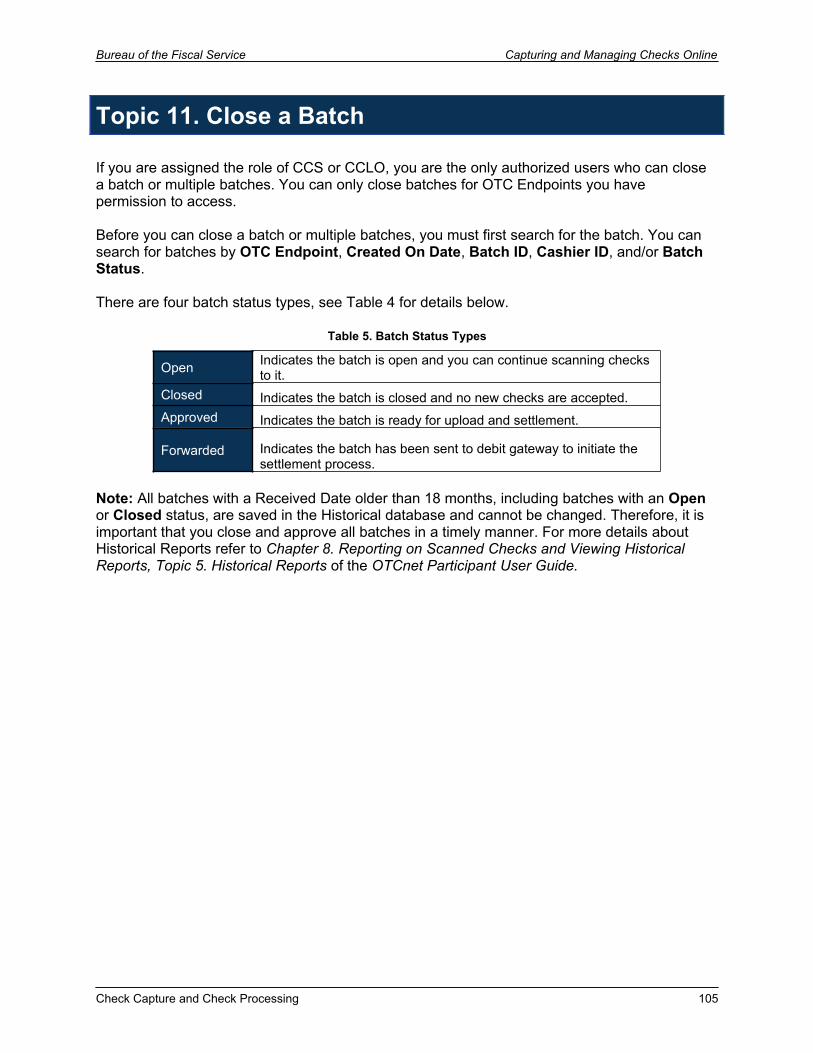
Capturing and Managing Checks Online Bureau of the Fiscal Service
Closing a Single Batch1. Click the Check Processing tab and click Batch Management.
Figure 70. Check Processing > Batch Management (Closing Single Batch)
2. The Search Batch page appears. Select or enter the batch search conditions you would like view and click Search.
If you run a search with the default From and To Created On Date range values, the search results include the most recent 30 days of batches that you have access to view. If more than 1,000 batches are created within the 30 days, then only the most recent 1,000 batches appear.
If you run a search without specifying any criterion (with the exception of the Batch ID field), the search results include the most recent 30 days of batches that you have access to view. If more than 1,000 batches are created within 30 days, then only the most recent 1,000 batches appear.
If the only search criteria entered is a valid Batch ID, then only a single result appears regardless of other search criteria specified.
Under Batch Search Conditions, optional Select the OTC Endpoint you want to Edit a batch for by checking the under the
Select column
Under Created On Date, optional Enter the Created On Date by entering the From and To date range
The Created On Date range cannot exceed 30 days. Additionally, if more than 1,000 batches are created within 30 days, then only the most recent 1,000 batches appear.
Enter the Batch ID, optional
Note: If the only search criterion entered is a valid Batch ID, then only a single result appears, regardless of other search criteria specified.
Enter the Cashier ID
Under Batch Status, optional Select the Status you want to view by checking the Open or Closed box under
the Select column, then click Search
Check Capture and Check Processing
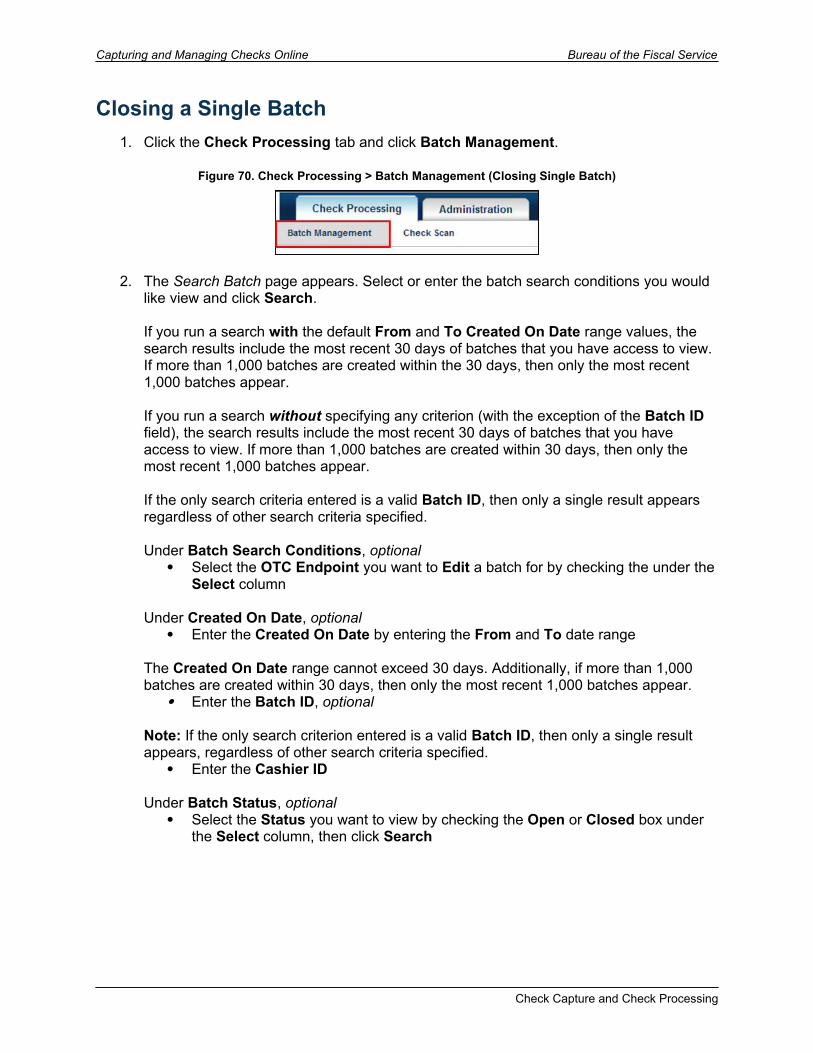
Bureau of the Fiscal Service Capturing and Managing Checks Online
Figure 71. Search Batch Page (Closing Single Batch)
Check Capture and Check Processing 107
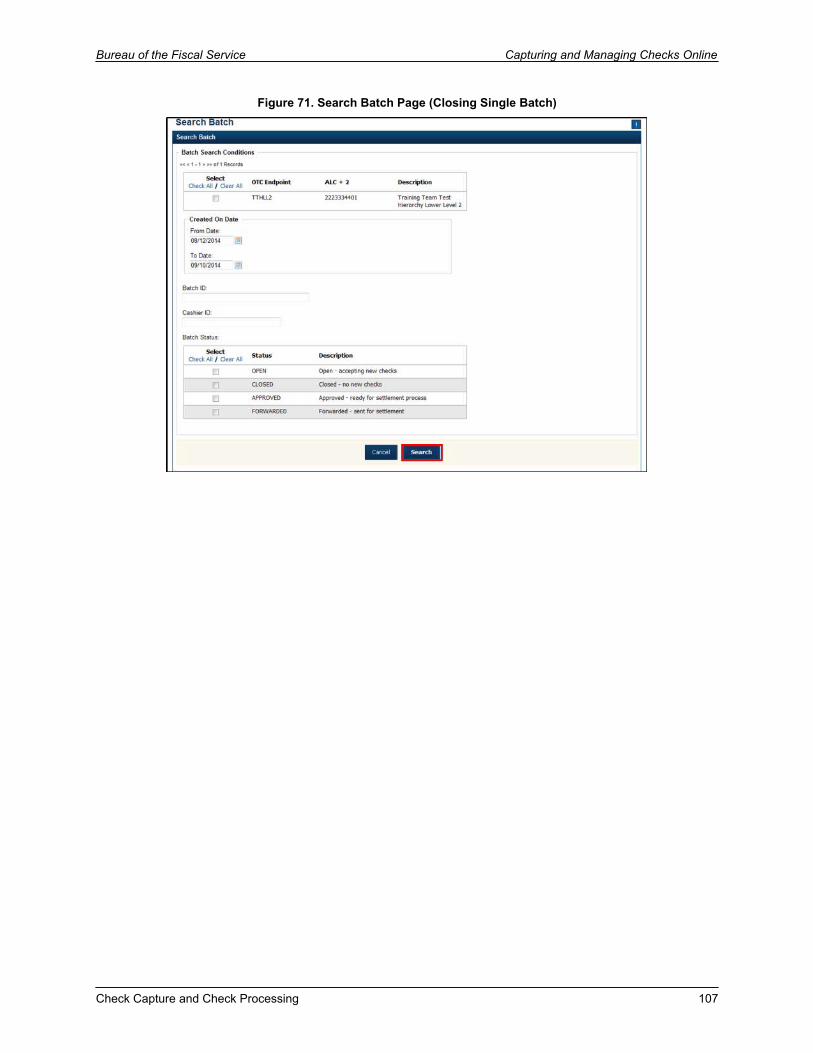
Capturing and Managing Checks Online Bureau of the Fiscal Service
3. The View Batches page appears. Click the Batch ID hyperlink.
Figure 72. View Batches Page (Closing Single Batch)
The View Checks page appears. Click the Item ID of each scanned check. An image of the check and details of the check appear in the window below. Verify the details are correct and click Previous to return to the View Batches page.
Figure 73. View Checks Page (Closing Single Batch)
4. Select the batch you want to close by checking the box to the left of the Batch ID.
5. Click Close Batch. The Close Batch page appears.
Figure 74. Select to Close Batch
Check Capture and Check Processing
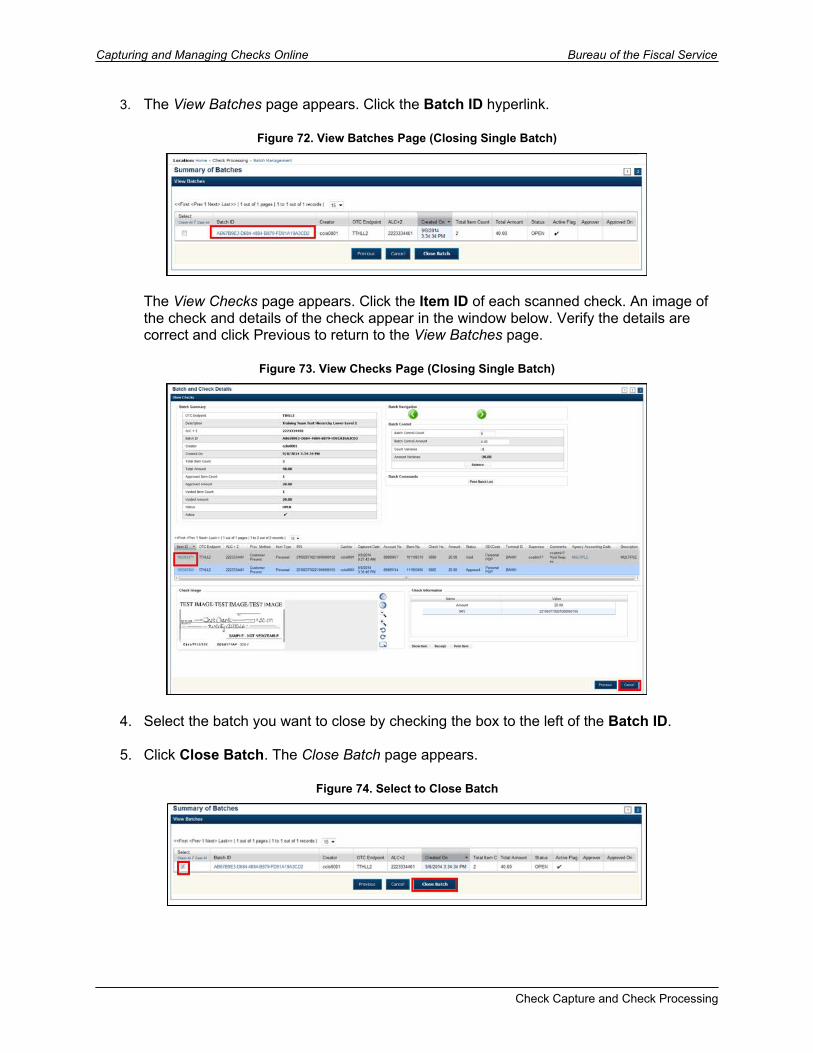
Bureau of the Fiscal Service Capturing and Managing Checks Online
6. Verify that you want to close the batch and click Confirm. The Batch Control page appears with the batch details.
Figure 75. Confirm Close Batch
7. Enter the Batch Control Count and Batch Control Amount, if your terminal is configured for this action on batch close.
8. Click Next. The Close Batch page appears.
Figure 76. Batch Control
Check Capture and Check Processing 109
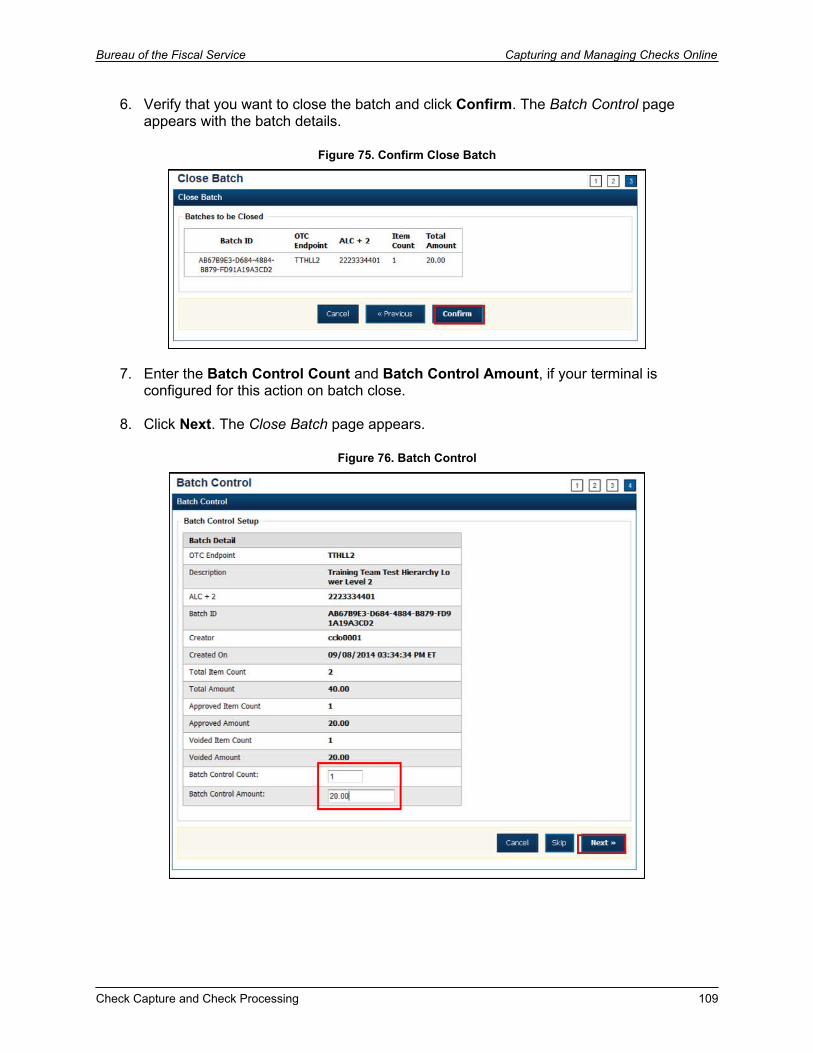
Capturing and Managing Checks Online Bureau of the Fiscal Service
9. Click Print PDF Report or Export and click Confirm to close the batch.
After Print PDF Report or Export is clicked, the Confirm button is enabled. The batch is not closed until Confirm is clicked.
Figure 77. Print PDF Report/Confirm Report Print
10. A Close Batch page appears verifying the batch has been closed.
A user may print the PDF report or export the batch list report, regardless if the Close Batch and/or Approve Batch checkboxes are checked or unchecked. A CCS or CCA can specify the Batch List Report Print/Export Required During options under Advanced Administration.
Check Capture and Check Processing
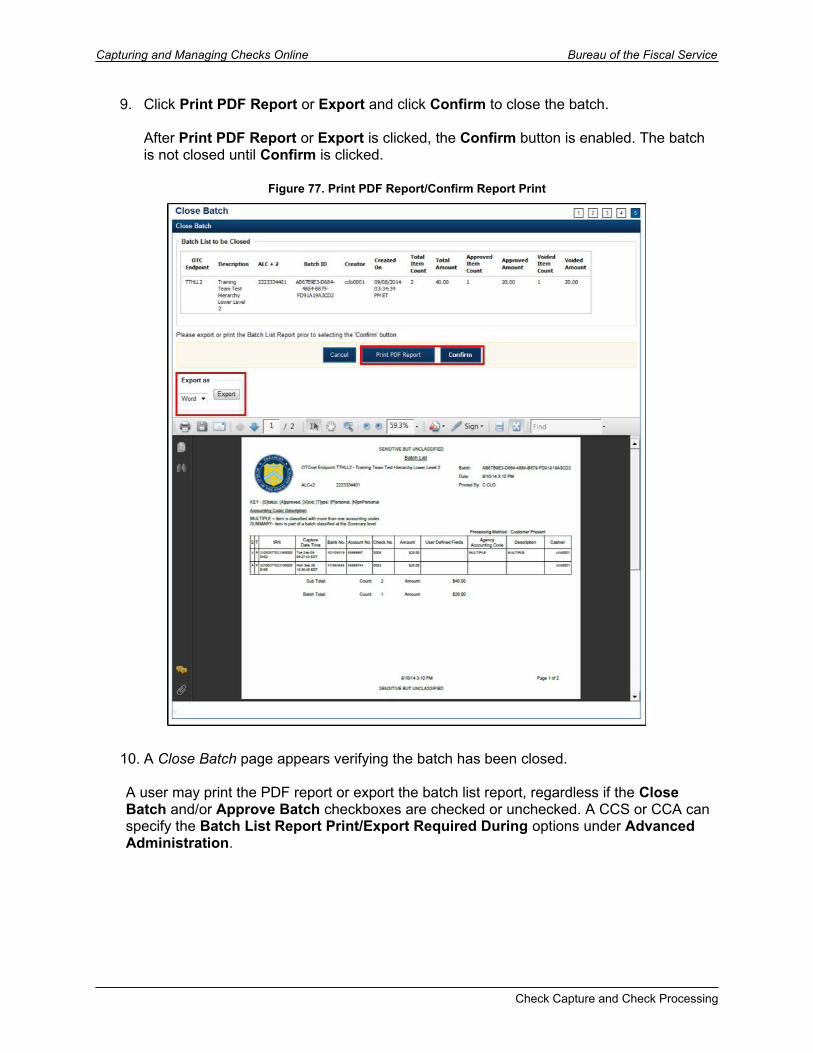
Bureau of the Fiscal Service Capturing and Managing Checks Online
11. Click Return to Batch Summary or Return Home. The View Batches page appears. If a CCLO or CCO closes a batch, the batch status changes from Open to Closed. If a CCS closes a batch, the batch status changes from Open to Approved. If Skip is clicked, the Status remains Open and the batch is not closed.
Figure 78. Close Batch Confirmation
Check Capture and Check Processing 111
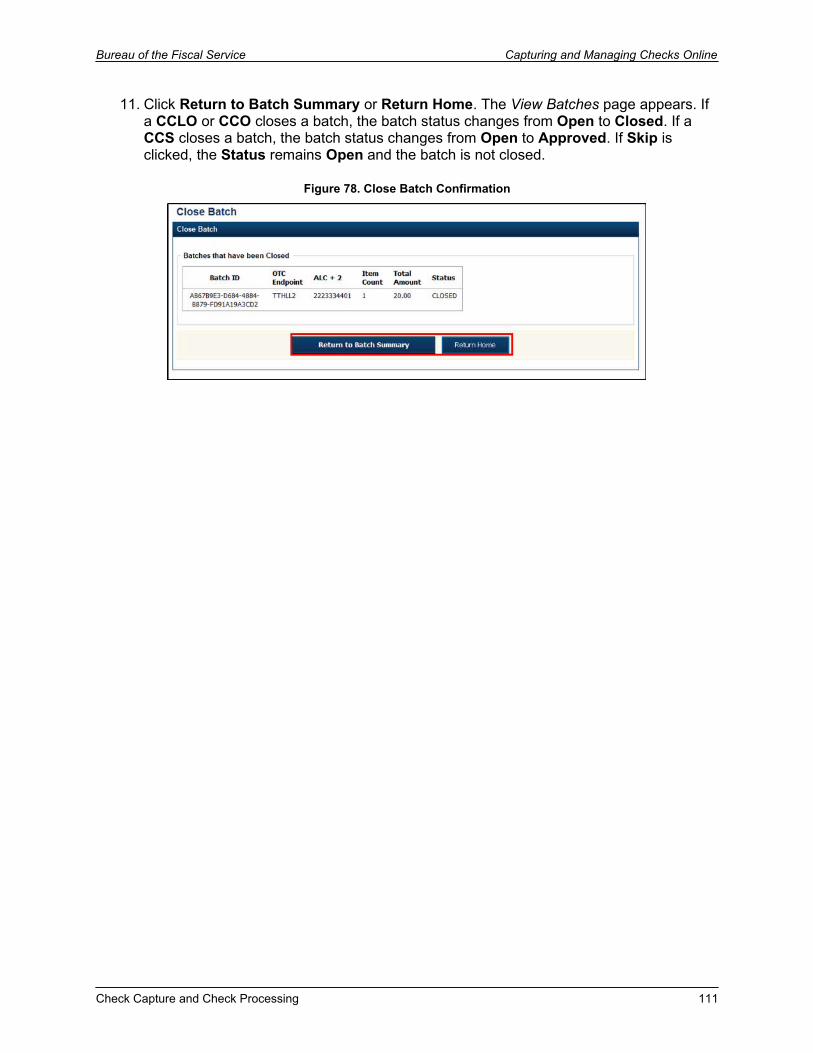
Capturing and Managing Checks Online Bureau of the Fiscal Service
Closing Multiple Batches1. Click the Check Processing tab and click Batch Management.
2. The Search Batch page appears. Select or enter the batch search conditions you would like view and click Search.
Note: If you run a search with the default From and To Created On Date range values, the search results include the most recent 30 days of batches that you have access to view. If more than 1,000 batches are created within the 30 days, then only the most recent 1,000 batches appear.
If you run a search without specifying any criterion (with the exception of the Batch ID field), the search results include the most recent 30 days of batches that you have access to view. If more than 1,000 batches are created within 30 days, then only the most recent 1,000 batches appear.
Under Batch Search Conditions, optional Select the OTC Endpoint you want to Edit a batch for by checking the under the
Select column
Under Created On Date, optional Enter the Created On Date by entering the From and To date range
The Created On Date range cannot exceed 30 days. If more than 1,000 batches are created within 30 days then only the most recent 1,000 batches appear.
Enter the Batch ID, optional
If the only search criteria entered is a valid Batch ID then only a single result appears regardless other search criteria specified.
Enter the Cashier ID
Under Batch Status, optional Select the Status you want to view by checking the Open box under the Select
column, then click Search
Check Capture and Check Processing
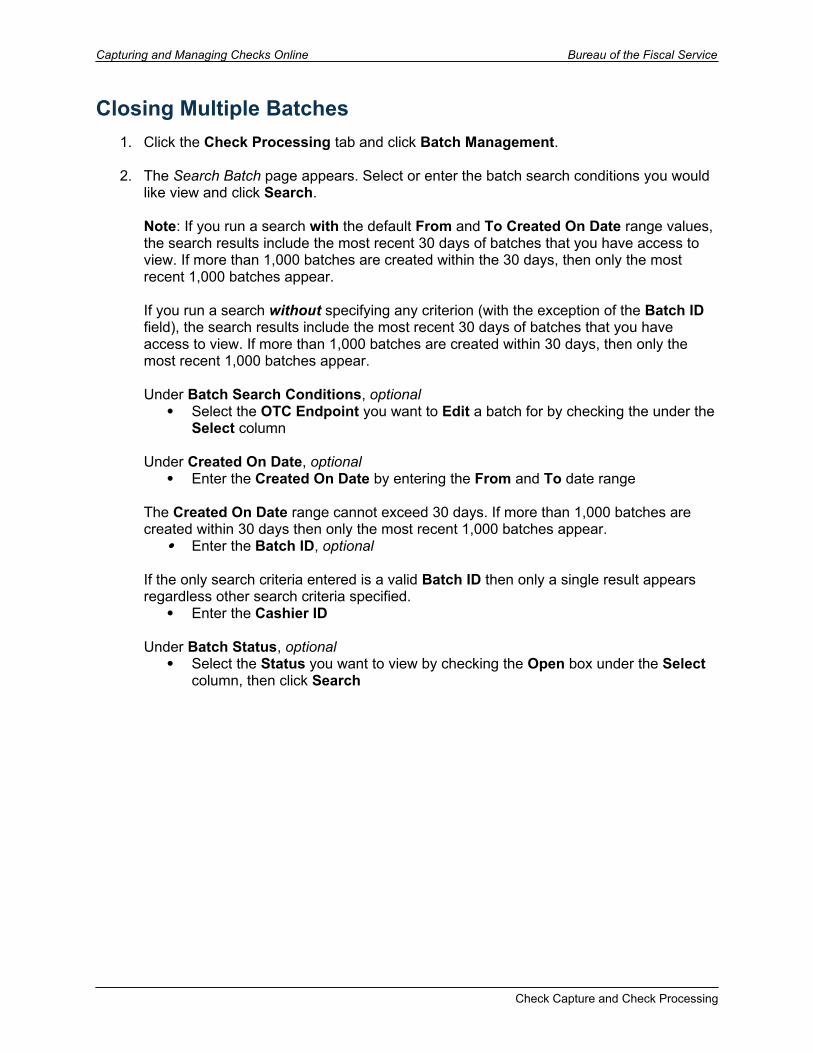
Bureau of the Fiscal Service Capturing and Managing Checks Online
3. The View Batches page appears. Click the Batch ID hyperlink for each batch you would like to review.
4. The View Checks page appears. Click the Item ID of each scanned check. An image of the check and details of the check appear in the window below. Verify the details are correct and click Previous to return to the View Batches page.
Note (if applicable only): If you are using the balancing feature for your OTC Endpoint and it has been established as mandatory, you can balance your batch here. Perform adjustments as needed and click Balance.
Once you have balanced the batch, the Batch Control Information dialog box appears. You are offered two options after balancing the batch:
Option A. If you click Close Batch you are taken directly to the Close Batch Page).
Option B. If you click OK (you return to the View Checks page. From the View Checks page, click Previous to return to the View Batches page.
You can also click Print Batch List, under Batch Controls from the View Checks page.
5. Click Confirm the View Batches page appears. Select the batches you want to close by checking the box to the left of the Batch ID for each batch and click Close Batch.
Figure 79. View Batches Page (Closing Multiple Batches)
Check Capture and Check Processing 113
Capturing and Managing Checks Online Bureau of the Fiscal Service
6. The Close Batch page appears. Verify that you want to close the batch and click Confirm.
Figure 80. Close Batch Confirmation (Closing Multiple Batches)
Note: If the Batch Control settings were established as mandatory or optional, the Batch Control page will appear for each batch, before closing a batch.
7. Click Next after balancing to proceed to closing the batches.
Click Skip to return to the Close Batch page, before returning to the View Batches page. If Skip is clicked the Status remains Open and the batch is not closed.
Check Capture and Check Processing
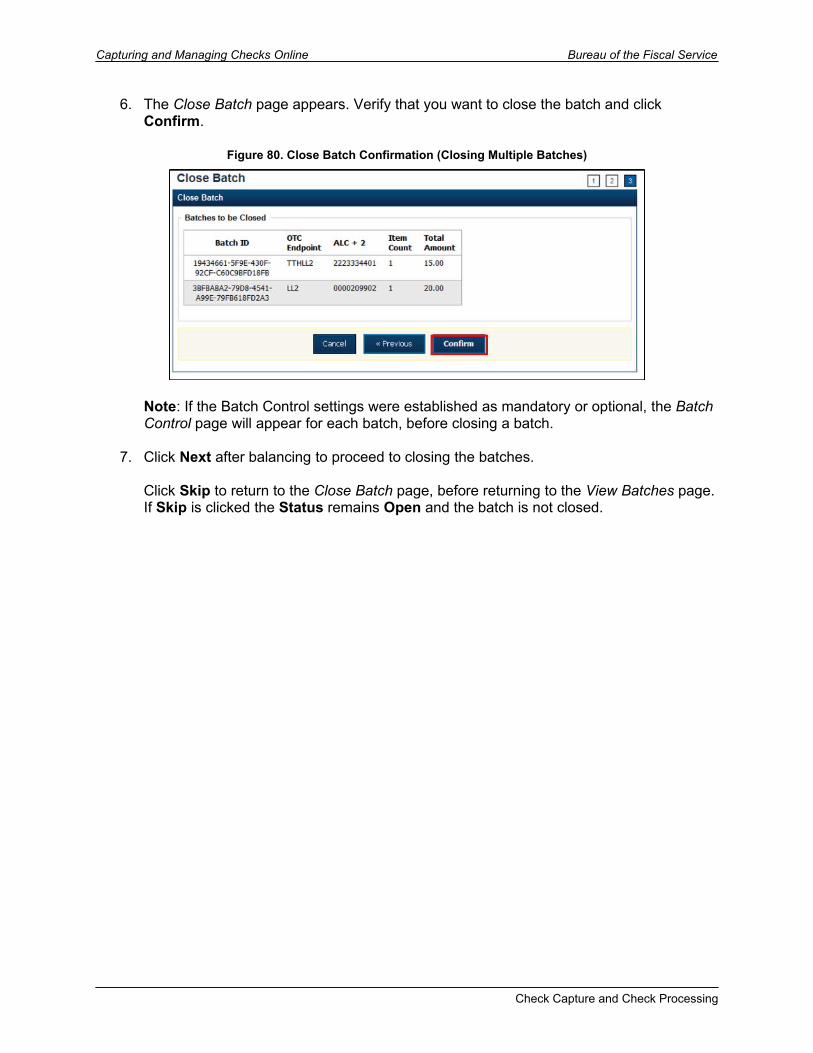
Bureau of the Fiscal Service Capturing and Managing Checks Online
Figure 81. Batch Control Setup (Closing Multiple Batches)
If Batch Control is set to mandatory on batch close and you click Next from the Batch Control page before balancing, the message below appears. The same is true for closing single batches.
Figure 82. Failed to Balance Batch
Check Capture and Check Processing 115
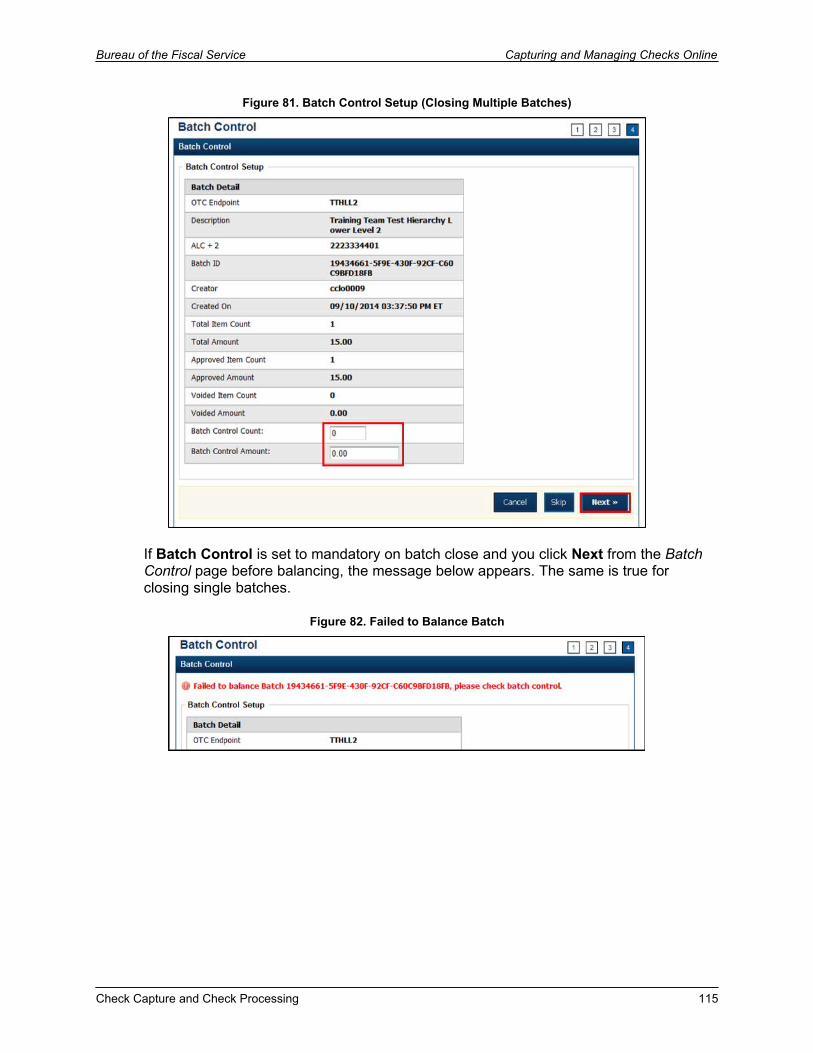
Capturing and Managing Checks Online Bureau of the Fiscal Service
8. Close Batch page appears with the batch details. Click Print PDF Report or Export and click Confirm to close the batches.
After Print PDF Report or Export is clicked, the Confirm button is enabled. The batches are not closed until Confirm is clicked.
Figure 83. Confirm Report Print (Closing Multiple)
A user may print the PDF report or export the batch list report, regardless if the Close Batch and/or Approve Batch checkboxes are checked or unchecked. A CCS or CCA can specify the Batch List Report Print/Export Required During options under Advanced Administration.
Check Capture and Check Processing
Bureau of the Fiscal Service Capturing and Managing Checks Online
A Close Batch page appears verifying the batches have been closed.
Click Return to the Batch Summary to return to the Batch Summary page. Click Return Home to return to the OTCnet Homepage.
Figure 84. Close Batch Confirmation (Closing Multiple)
Check Capture and Check Processing 117
Capturing and Managing Checks Online Bureau of the Fiscal Service
Close a Single or Multiple Batch(es)
To close single or multiple batch(es):
1. Click the Check Processing tab.
2. Click Batch Management. The Search Batch page appears.
3. Select or enter the batch search conditions you would like view.
Under Batch Search Conditions, optional Select the OTC Endpoint you want to Close a batch for by checking the under
the Select column
Under Created On Date, optional Enter the From and To date range
Application TipThe From and To Created On Date must be entered in MM/DD/YYYY format.
Application TipThe Created On Date range cannot exceed 30 days. Additionally, if more than 1,000 batches are created within 30 days, then only the most recent 1,000 batches appear.
Application TipIf you run a search with the default From and To Created On Date range values, the search results include the most recent 30 days of batches that you have access to view. If more than 1,000 batches are created within the 30 days then only the most recent 1,000 batches appear.
Application TipIf you run a search without specifying any criterion (with the exception of the Batch ID field), the search results include the most recent 30 days of batches that you have access to view. If more than 1,000 batches are created within 30 days, then only the most recent 1,000 batches appear.
Enter the Batch ID
Check Capture and Check Processing
Bureau of the Fiscal Service Capturing and Managing Checks Online
Application TipIf the only search criteria entered is a valid Batch ID, then only a single result appears regardless of other search criteria specified.
Enter the Cashier ID
Under Batch Status, optional Select the Status you want to view by checking the Open box under the Select
column
4. Click Search. The View Batches page appears.
5. Click the Batch ID hyperlink. The View Checks page appears.
6. Click the Item ID of each scanned check. An image of the check and details of the check appear in the window below.
7. Click Previous to return to the View Batches page.
Application TipRepeat steps 5–7 as needed.
8. Select the batch(es) you want to close by checking the boxes to the left of the Batch IDs.
9. Click Close Batch. The Close Batch appears.
10. Verify that you want to close the batches and click Confirm. The Batch Control page appears.
11. Enter the Batch Control Count and Batch Control Amount, if applicable.
12. Click Next. The Close Batch page appears.
13. Click Print PDF Report or Export and click Confirm to close the batch(es).
Application TipAfter Print PDF Report or Export is clicked, the Confirm button is enabled. The batch(es) is(are) not closed until Confirm is clicked.
Check Capture and Check Processing 119
Capturing and Managing Checks Online Bureau of the Fiscal Service
Application TipThe system generates one report for all selected batches.
Application TipIf the CCS or CCA checked the Close Batch checkbox under Advanced Administration, then the user must print the PDF report or export the batch list report. Afterwards, the user can proceed to close the batch.
Application TipIf the user is closing multiple batches online and the Close Batch checkbox is checked at any OTCnet endpoint, then the user must print the PDF reports or export the batch list reports. The batch is not closed until Confirm is clicked, which is enabled when the Print PDF Report or Export is clicked.
If the user is closing multiple batches online and the Close Batch checkbox is not checked, then the user can close multiple batches without printing the PDF reports or exporting the batch list reports. Confirm is enabled and the user can click to close the multiple batches.
Application TipA user may print the PDF report or export the batch list report, regardless if the Close Batch and/or Approve Batch checkboxes are checked or unchecked. A CCS or CCA can specify the Batch List Report Print/Export Required During options under Advanced Administration.
14. A Close Batch page appears verifying the batches have been closed.
15. Click Return to Batch Summary. The View Batches page appears.
16. Click Return Home to return to the OTCnet Homepage.
Application TipIf a CCLO or CCO closes a batch, the batch status changes from Open to Closed. If a CCS closes a batch, the batch status changes from Open to Approved. If Skip is clicked, the Status remains Open and the batch is not closed.
Check Capture and Check Processing
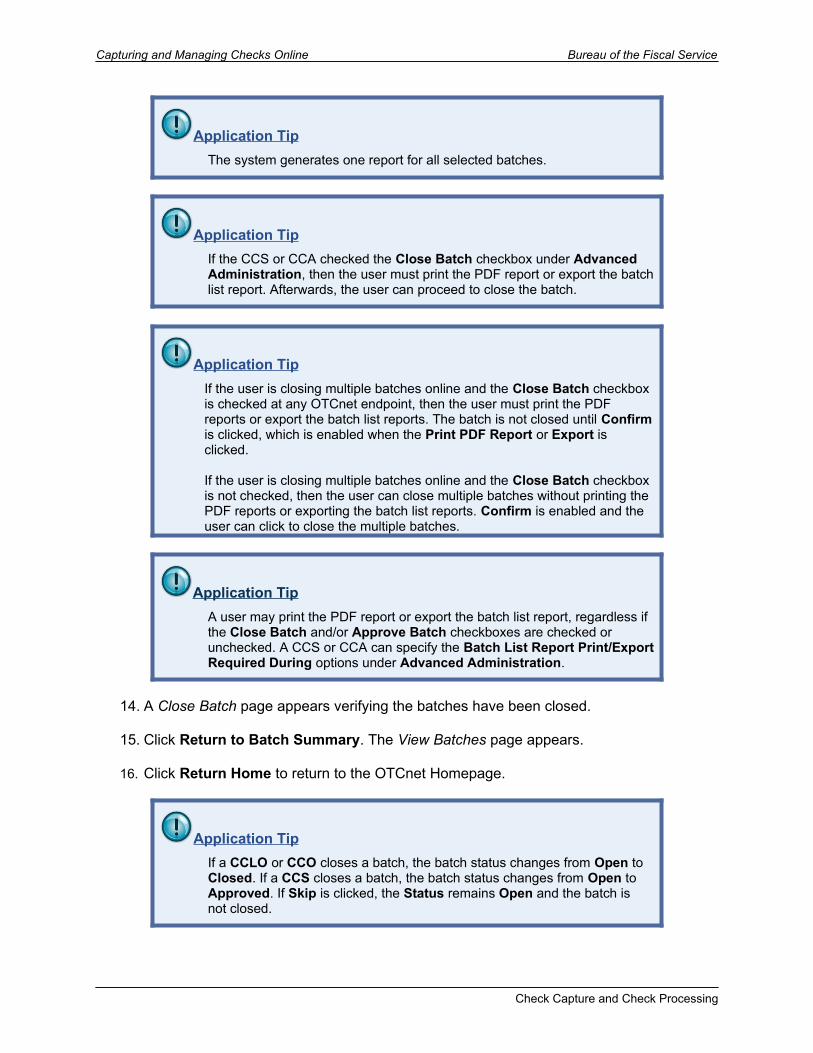
Bureau of the Fiscal Service Capturing and Managing Checks Online
Topic 12. Approve a Batch
As a CCS, you are the only authorized user who can approve a batch or multiple batches. You can only approve batches for OTC Endpoints that you have permission to access. Approving a batch(es) indicates that the batch and check details are correct and that the batch(es) is/are ready for settlement.
Before you can approve a batch or multiple batches, you must first search for the batch. You can search for batches by OTC Endpoint, Created On Date, Batch ID, Cashier ID, and/or Batch Status.
Additionally, a batch is only eligible for approval when the batch is has a Closed status. After a batch is Approved and sent to Debit Gateway to initiate the settlement process, the status becomes Forwarded. For a description of each of the four batch status types, refer to Table 4 in the previous section of this Chapter.
Transactions processed before 9:30 p.m. EST are reflected on the next day’s deposit SF215. Batches should be approved and forwarded for settlement on the same business day on which the activity occurred in order to reflect on the SF215.
We recommend reviewing Batch Management to check the status of created batches. If batch statuses within Batch Management show them to be successfully forwarded, then the funds are included on the next day’s SF215 report.
Approve a Single Batch1. Click the Check Processing tab and click Batch Management.
Figure 85. Check Processing>Batch Management (Approving Single)
Check Capture and Check Processing 121
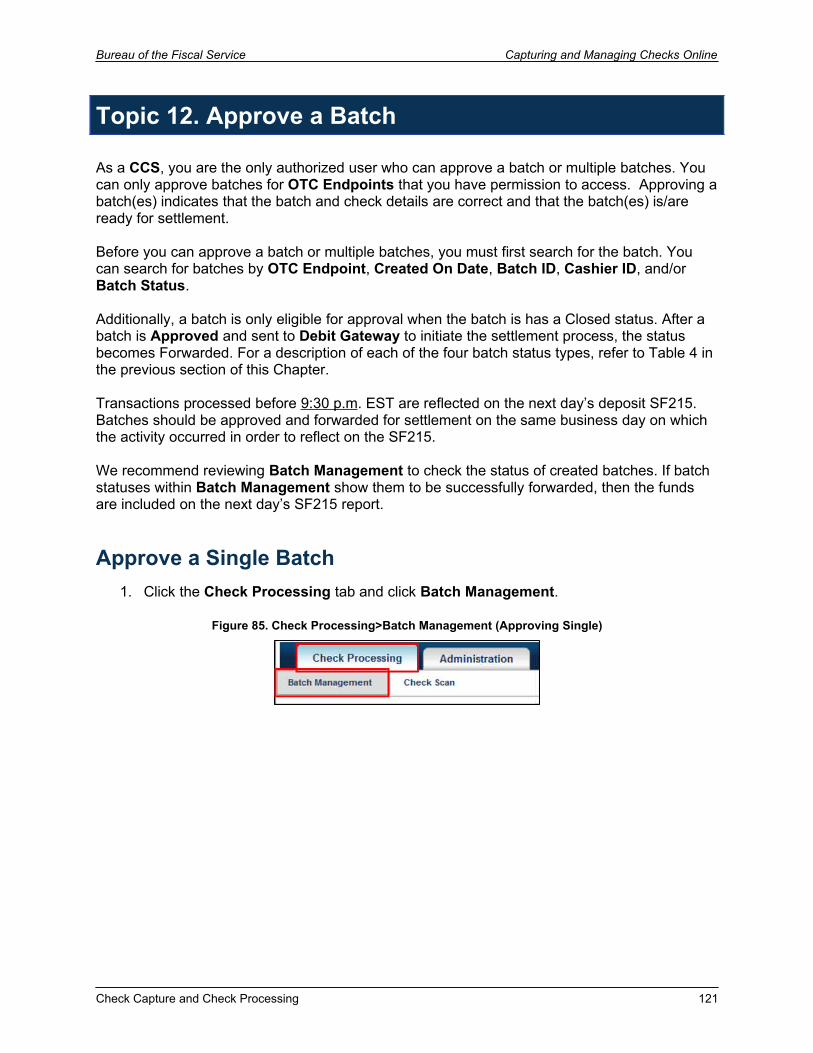
Capturing and Managing Checks Online Bureau of the Fiscal Service
2. The Search Batch page appears. Select or enter the batch search conditions you would like view and click Search.
Note: If you run a search with the default From and To Created On Date range values, the search results include the most recent 30 days of batches that you have access to view. If more than 1,000 batches are created within the 30 days, then only the most recent 1,000 batches appear.
If you run a search without specifying any criteria (with the exception of the Batch ID field), the search results include the most recent 30 days of batches that you have access to view. If more than 1,000 batches are created within 30 days, then only the most recent 1,000 batches appear.
Under Batch Search Conditions, optional Select the OTC Endpoint you want to Edit a batch for by checking the under the
Select column
Under Created On Date, optional Enter the Created On Date by entering the From and To date range
The Created On Date range cannot exceed 30 days. Additionally, if more than 1,000 batches are created within 30 days, then only the most recent 1,000 batches appear.
Enter the Batch ID, optional
If the only search criterion, entered is a valid Batch ID, then only a single result appears regardless other search criteria specified.
Enter the Cashier ID
Check Capture and Check Processing
Bureau of the Fiscal Service Capturing and Managing Checks Online
Under Batch Status, optional Select the Status you want to view by checking the Open or Closed box under
the Select column, then click Search
Figure 86. Search Batch Page (Approve Single)
3. The View Batches page appears. Click the Batch ID hyperlink.
Figure 87. View Batches Page (Approve Single)
If a CCS closes a batch, it is automatically moved into Approved status. If a batch is closed by a CCO or a CCLO without approver permission; however, an approve button is available.
Check Capture and Check Processing 123
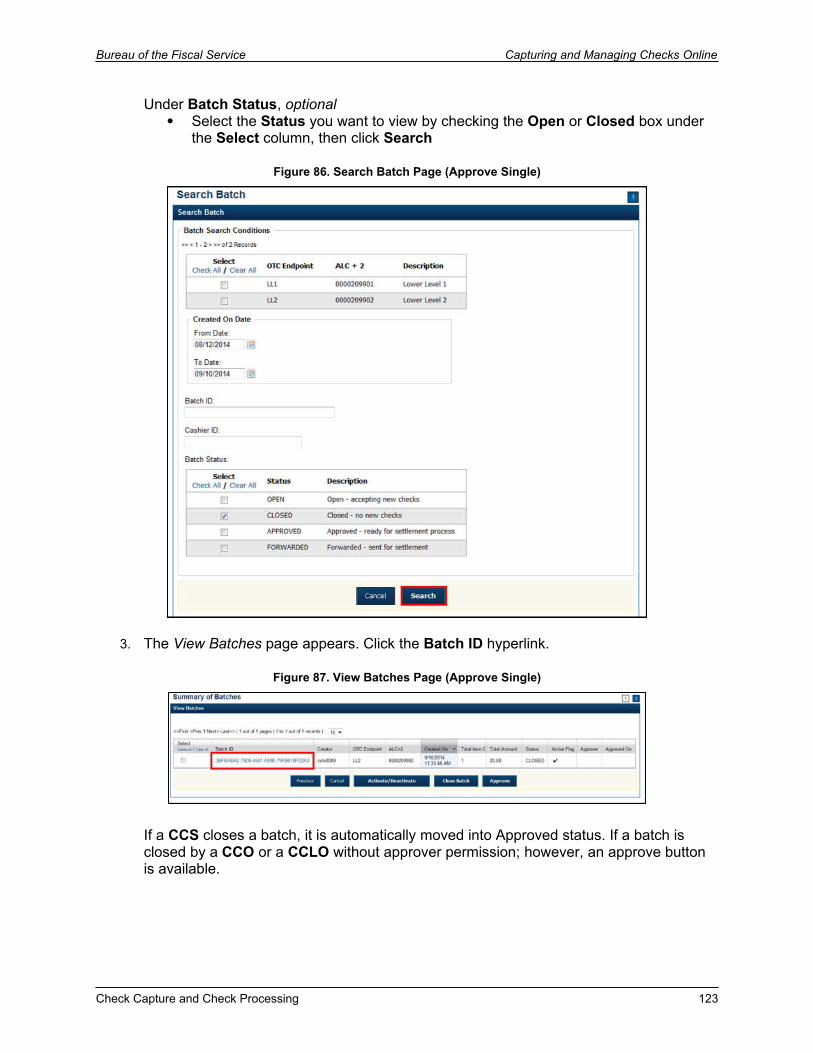
Capturing and Managing Checks Online Bureau of the Fiscal Service
4. The View Checks page appears. Click the Item ID of each scanned check. An image of the check and details of the check appear in the window below. Verify the details are correct and click Previous to return to the View Batches page.
If a batch is in use and another user attempts to access the same batch, a Batch Lock message appears stating the batch is in use and he/she cannot access the batch.
Figure 88. View Checks Page (Approve Single)
5. Select the batch you want to approve by checking the box to the left of the Batch ID and click Approve.
Figure 89. View Batches (Approve Single)
Check Capture and Check Processing
Bureau of the Fiscal Service Capturing and Managing Checks Online
6. The Approve Batch page appears. Verify that you want to approve the batch and click Confirm.
Figure 90. Confirm Batches to Approve (Approve Single)
Check Capture and Check Processing 125
Capturing and Managing Checks Online Bureau of the Fiscal Service
7. The Approve Batch page appears with the batch details. Click Print PDF Report or Export and click Confirm to approve.
After Print PDF Report or Export is clicked, the Confirm button is enabled. The batch is not approved until Confirm is clicked.
Figure 91. Confirm Report Print To Approve (Approve Single)
A user may print the PDF report or export the batch list report, regardless if the Close Batch and/or Approve Batch checkboxes are checked or unchecked. A CCS or CCA can specify the Batch List Report Print/Export Required During options under Advanced Administration.
Check Capture and Check Processing
Bureau of the Fiscal Service Capturing and Managing Checks Online
An Approve Batch page appears verifying the batch has been approved.
Click Return to Batch Summary to return to View Batches page. Click Return Home to return to the OTCnet Homepage.
After a batch is approved the status changes from Closed to Approved, except under one of these two scenarios. First, if a batch has been designated for summary level classification and the batch classification is not balanced. Second, if a batch is designated to be classified at the summary level and it is a CARS/GWA reporter, and the batch is not classified. Under these two scenarios the batch status is Closed. After the batch is classified and balanced, the batch can be approved.
Figure 92. Approve Batch Page (Approve Single)
Check Capture and Check Processing 127
Capturing and Managing Checks Online Bureau of the Fiscal Service
Approve Multiple Batches
1. Click the Check Processing tab and click Batch Management.
Figure 93. Batch Management (Approve Multiple Batches)
2. The Search Batch page appears. Select or enter the batch search conditions you would like view and click Search.
Note: If you run a search with the default From and To Created On Date range values, the search results include the most recent 30 days of batches that you have access to view. If more than 1,000 batches are created within the 30 days, then only the most recent 1,000 batches appear.
If you run a search without specifying any criteria (with the exception of the Batch ID field), the search results include the most recent 30 days of batches that you have access to view. If more than 1,000 batches are created within 30 days, then only the most recent 1,000 batches appear.
Under Batch Search Conditions, optional Select the OTC Endpoint you want to Edit a batch for by checking the under the
Select column
Under Created On Date, optional Enter the Created On Date by entering the From and To date range
The Created On Date range cannot exceed 30 days. Additionally, if more than 1,000 batches are created within 30 days, then only the most recent 1,000 batches appear.
Enter the Batch ID, optional
If the only search criteria entered is a valid Batch ID, then only a single result appears regardless other search criteria specified.
Enter the Cashier ID
Under Batch Status, optional Select the Status you want to view by checking the Open or Closed box under
the Select column, then click Search
Check Capture and Check Processing
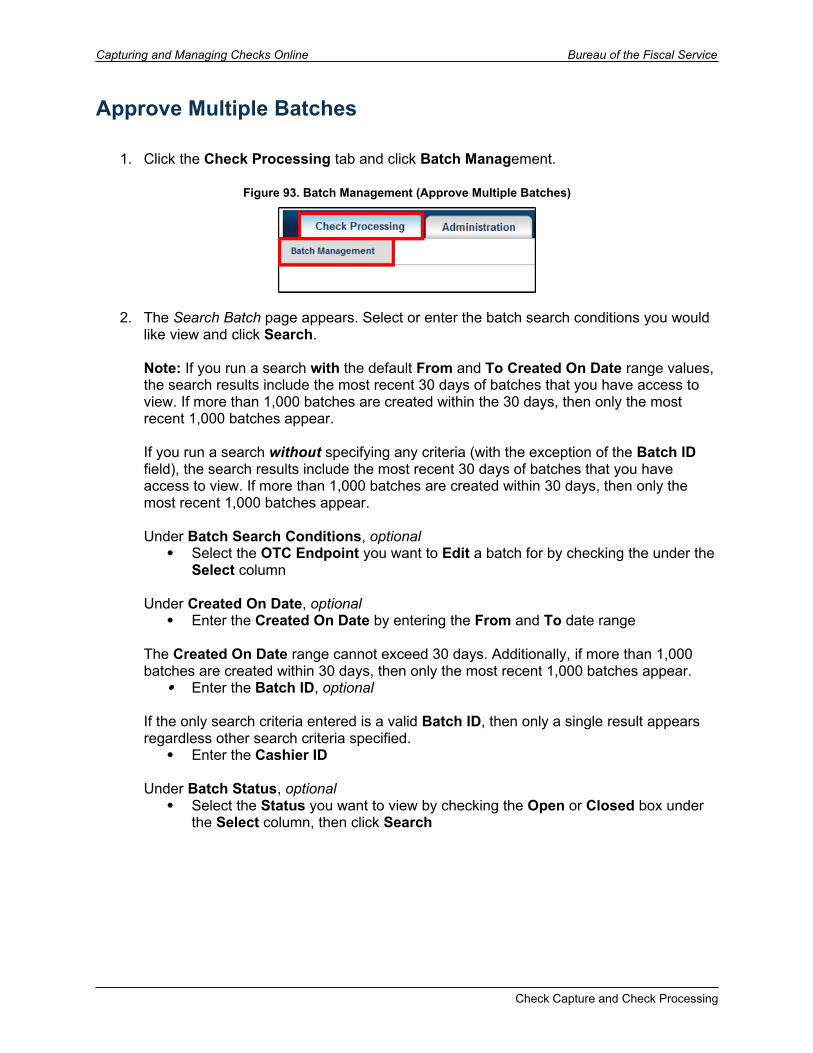
Bureau of the Fiscal Service Capturing and Managing Checks Online
Figure 94. Search Batches (Approve Multiple Batches)
Check Capture and Check Processing 129
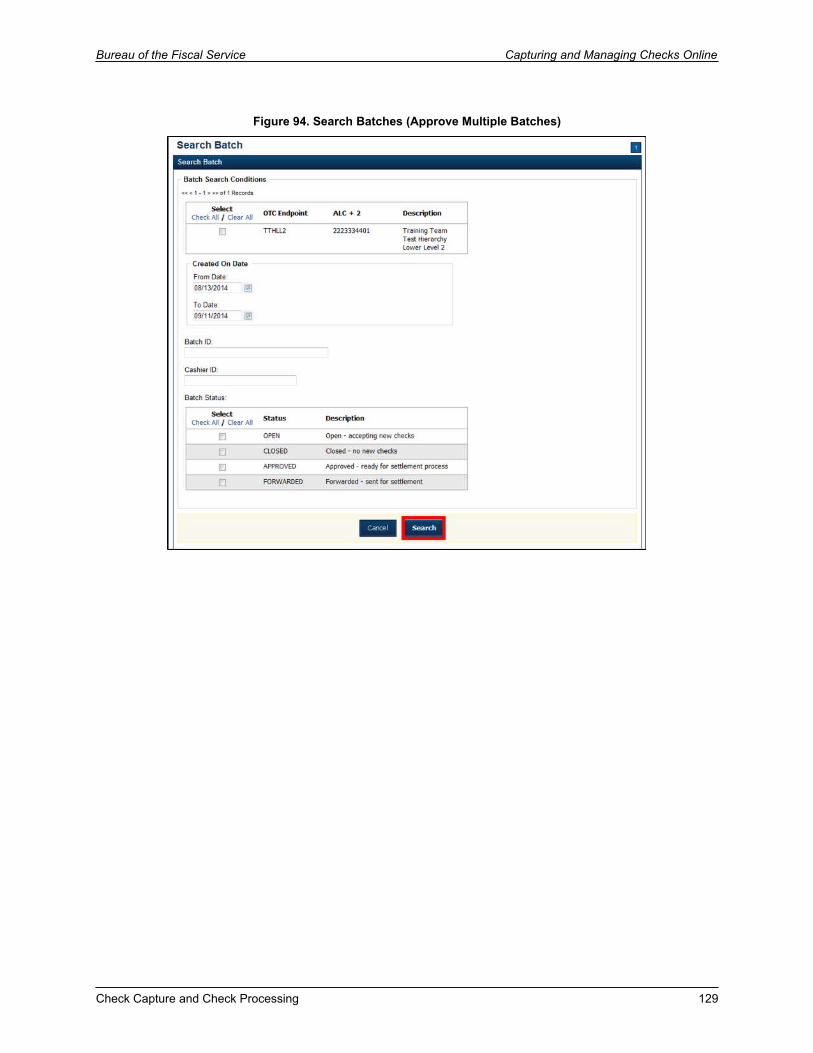
Capturing and Managing Checks Online Bureau of the Fiscal Service
3. The View Batches page appears. Click the Batch ID hyperlinks for each batch you want to Approve. If a batch is in use and another user attempts to access the same batch, a Batch Lock message appears stating the batch is in use and he/she cannot access the batch.
Figure 95. View Batches Page (Approve Multiple Batches)
Additional buttons on the page that help you perform other tasks: Click Cancel to return to the OTCnet Home Page. No data will be saved. Click Previous to return to the previous page. Click Activate/Deactivate to activate or deactivate a batch. Click Close Batches to close a batch. Click <<First to go to the first page. (Only appears if there are several pages
retrieved for the search results.) Click Next> to go to the next page. (Only appears if there are several pages
retrieved for the search results.) Click Last>> to return to the last page. (Only appears if there are several pages
retrieved for the search results.) Click <<Image to return to the previous check. Click >>Image to view the next check. Click Zoom- to reduce the image size. Click Zoom+ to enlarge the image size. Click Rotate Left to turn the image to the left. Click Rotate Right to turn the image to the right. Click Show Item to view and update the check item details. Click Void to void a single check item. Click Receipt to print a receipt. Click Print Item to print a batch list report.
Check Capture and Check Processing

Bureau of the Fiscal Service Capturing and Managing Checks Online
4. The View Checks page appears. Click the Item ID of each scanned check. An image of the check and details of the check appear in the window below. Verify the details are correct and click Previous to return to the View Batches page.
Repeat this step for each batch you intend to approve.
5. Select the batches you want to approve by checking the box to the left of the Batch ID and click Approve.
Figure 96. View Batches (Approve Multiple)
6. The Approve Batch page appears. Verify that you want to approve the batches and click Confirm.
Figure 97. Confirm Batches (Approve Multiple)
Check Capture and Check Processing 131
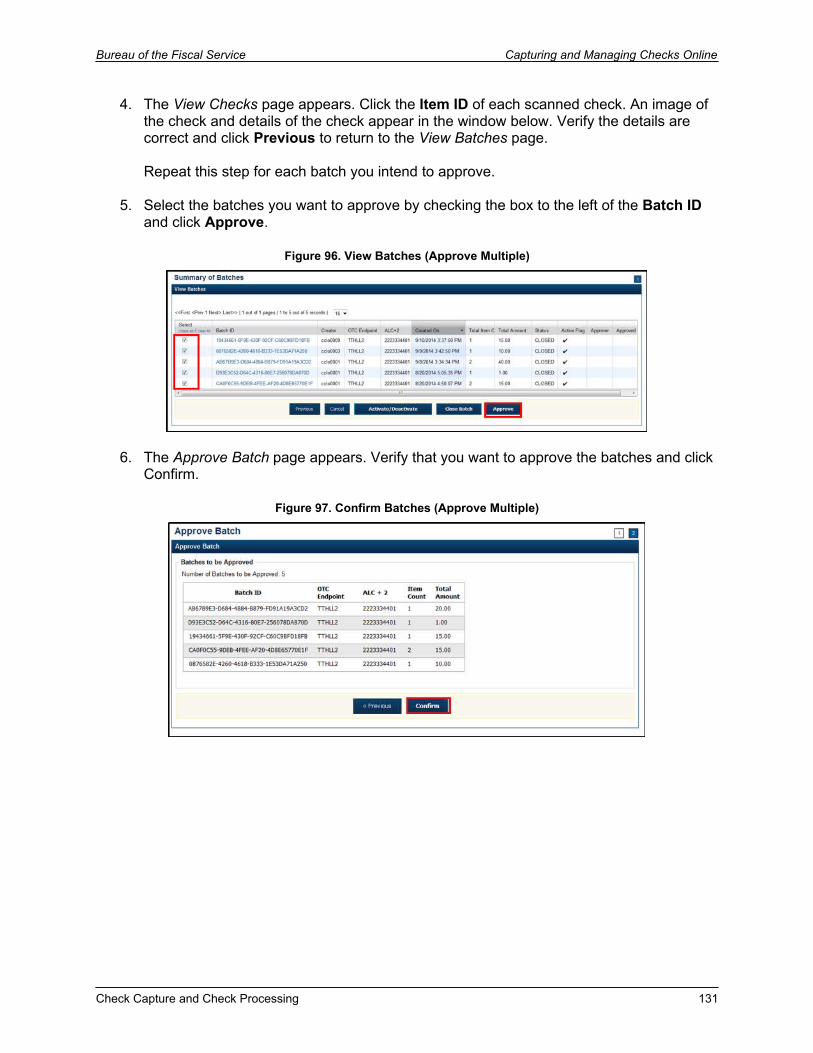
Capturing and Managing Checks Online Bureau of the Fiscal Service
7. The Approve Batch page appears with the batches’ details. Click the Print PDF Report or Export and click Confirm to approve.
After Print PDF Report or Export is clicked, the Confirm button is enabled. The batches are not approved until Confirm is clicked.
Figure 98. Confirm Report to Approve (Approve Multiple)
A user may print the PDF report or export the batch list report, regardless if the Close Batch and/or Approve Batch checkboxes are checked or unchecked. A CCS or CCA
Check Capture and Check Processing

Bureau of the Fiscal Service Capturing and Managing Checks Online
can specify the Batch List Report Print/Export Required During options under Advanced Administration.
8. An Approve Batch page appears verifying the batches have been approved. Click Return to Batch Summary. Verify that you want to approve the batch and click Confirm. After a batch is approved, the Status changes from Closed to Approved and The Approve Batch page appears with the batch details, except under one of these two scenarios. First, if a batch has been designated for summary level classification and the batch classification is not balanced. Second, if a batch is designated to be classified at the summary level and it is a CARS/GWA reporter, and the batch is not classified. Under these two scenarios the batch status is Closed. After the batch is classified and balanced, the batch can be approved.
Figure 99. Approve Batch Confirmation (Approve Multiple)
Check Capture and Check Processing 133
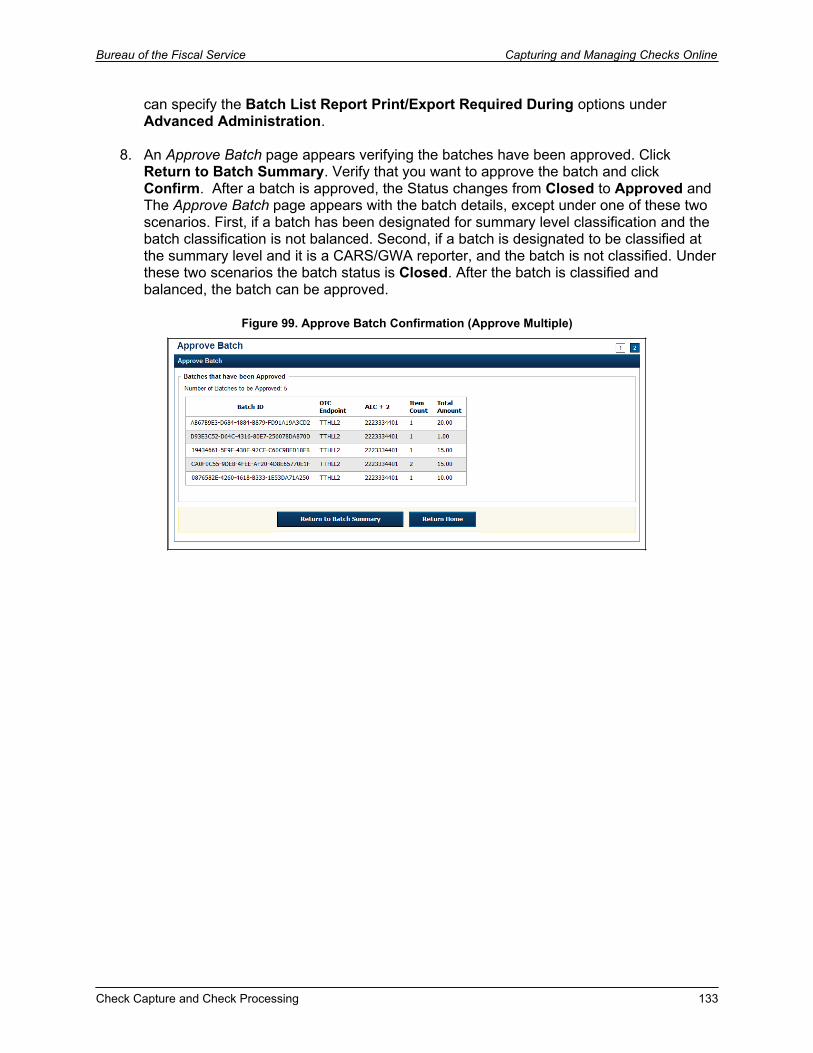
Capturing and Managing Checks Online Bureau of the Fiscal Service
Approve Single or Multiple Batch(es) Online
To approve single or multiple batch(es):
1. Click the Check Processing tab.
2. Click Batch Management. The Search Batch page appears.
3. Select or enter the batch search conditions you would like view.
Under Batch Search Conditions, optional Select the OTC Endpoint you want to Close a batch for by checking the box
under the Select column
Under Created On Date, optional Enter the From and To date range
Application TipThe From and To Created On Date must be entered in MM/DD/YYYY format.
Application TipThe Created On Date range cannot exceed 30 days. Additionally, if more than 1,000 batches are created within 30 days then only the most recent 1,000 batches appear.
Application TipIf you run a search with the default From and To Created On Date range values, the search results include the most recent 30 days of batches that you have access to view. If more than 1,000 batches are created within the 30 days, then only the most recent 1,000 batches appear.
Application TipIf you run a search without specifying any criteria (with the exception of the Batch ID field), the search results include the most recent 30 days of batches that you have access to view. If more than 1,000 batches are created within 30 days, then only the most recent 1,000 batches appear.
Check Capture and Check Processing
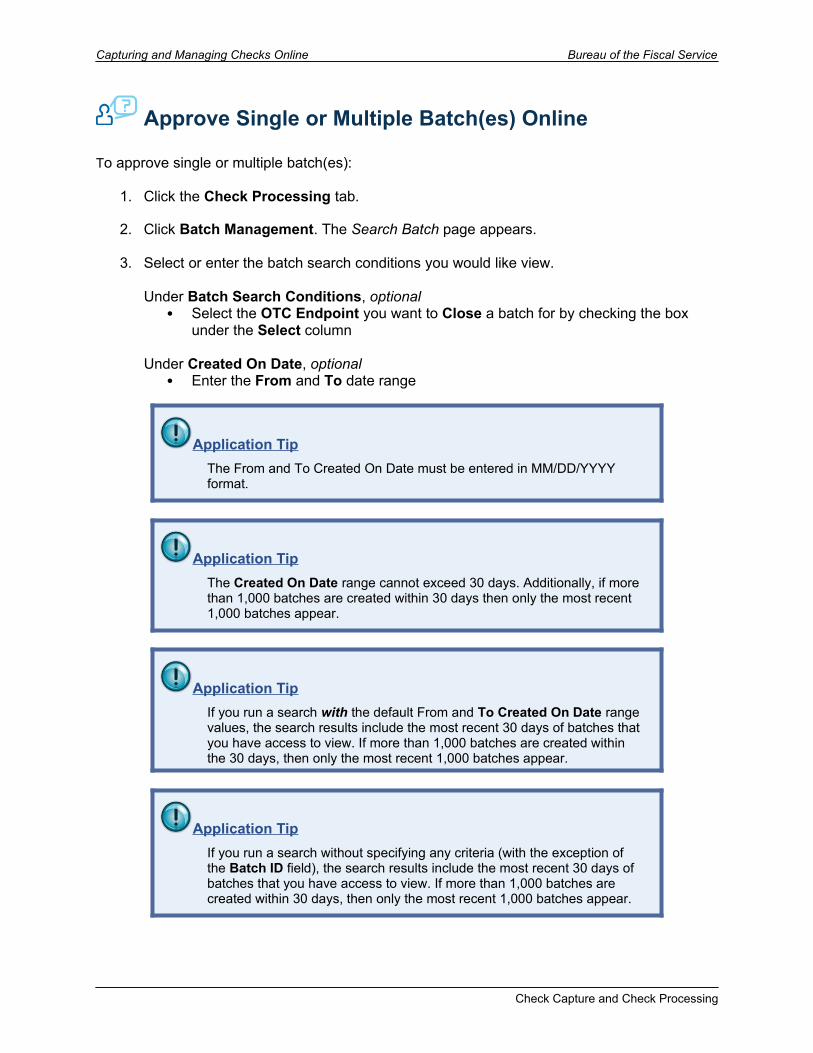
Bureau of the Fiscal Service Capturing and Managing Checks Online
Enter the Batch ID
Application TipIf the only search criterion entered is a valid Batch ID, then only a single result appears, regardless of other search criteria specified.
Enter the Cashier ID
Under Batch Status, Select the Status you want to close by checking the Closed box under the
Select column
4. Click Search. The View Batch page appears.
5. Click the Batch ID hyperlink. The View Checks page appears.
Application TipAdditional buttons on the page that help you perform other tasks:
Click Cancel to return to the OTCnet Home Page. No data will be saved.
Click Previous to return to the previous page. Click Activate/Deactivate to activate or deactivate a batch. Click Close Batches to close a batch. Click <<First to go to the first page. (Only appears if there are
several pages retrieved for the search results.) Click Next> to go to the next page. (Only appears if there are
several pages retrieved for the search results.) Click Last>> to return to the last page. (Only appears if there are
several pages retrieved for the search results.) Click <<Image to return to the previous check. Click >>Image to view the next check. Click Zoom- to reduce the image size. Click Zoom+ to enlarge the image size. Click Rotate Left to turn the image to the left. Click Rotate Right to turn the image to the right. Click Show Item to view and update the check item details. Click Void to void a single check item. Click Receipt to print a receipt. Click Print Item to print a batch list report.
6. Click the Item ID of each scanned check. An image of the check and details of the check appear in the window below.
7. Verify the details are correct and click Previous to return to the View Batch page.
Check Capture and Check Processing 135
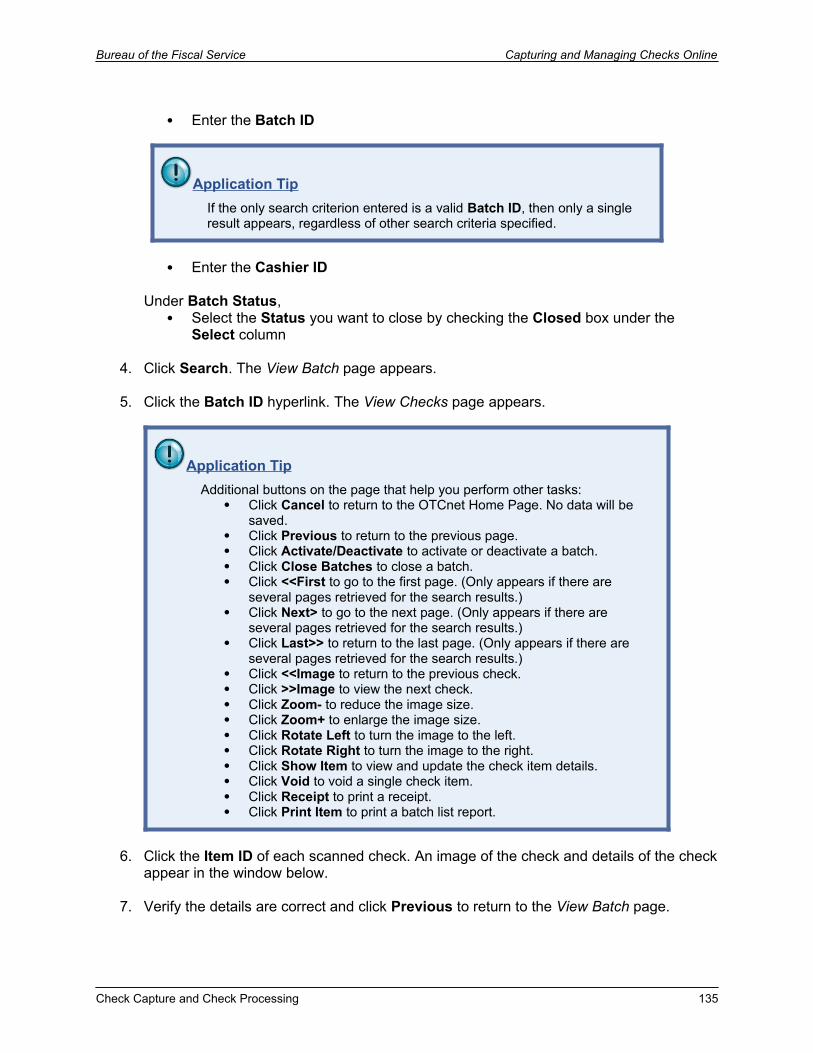
Capturing and Managing Checks Online Bureau of the Fiscal Service
8. Select the batch you want to approve by checking the box to the left of the Batch ID.
9. Click Approve. The Approve Batch page appears.
10. Verify that you want to approve the batch and click Confirm. The Approve Batch page appears with the batch details.
11. Click Print PDF Report or Export and click Confirm to approve the batch.
Application TipAfter Print PDF Report or Export is clicked, the Confirm button is enabled. The batch is not approved until Confirm is clicked.
Application TipIf the CCS or CCA checked the Approve Batch checkbox under Advanced Administration, then the user must print the PDF report or export the batch list report. Afterwards, the user can proceed to approve the batch.
Application TipIf the user is approving multiple batches online and the Approve Batch checkbox is checked at any OTCnet endpoint, then the user must print the PDF reports or export the batch list reports. The batch is not approved until Confirm is clicked, which is enabled when the Print PDF Report or Export is clicked.
If the user is approving multiple batches online and the Approve Batch checkbox is not checked, then the user can approve multiple batches without printing the PDF reports or exporting the batch list reports. Confirm is enabled and the user can click to approve the multiple batches.
Application TipA user may print the PDF report or export the batch list report, regardless if the Close Batch and/or Approve Batch checkboxes are checked or unchecked. A CCS or CCA can specify the Batch List Report Print/Export Required During options under Advanced Administration.
12. An Approve Batch page appears verifying the batch has been approved.
13. Click Return to Batch Summary.
Check Capture and Check Processing
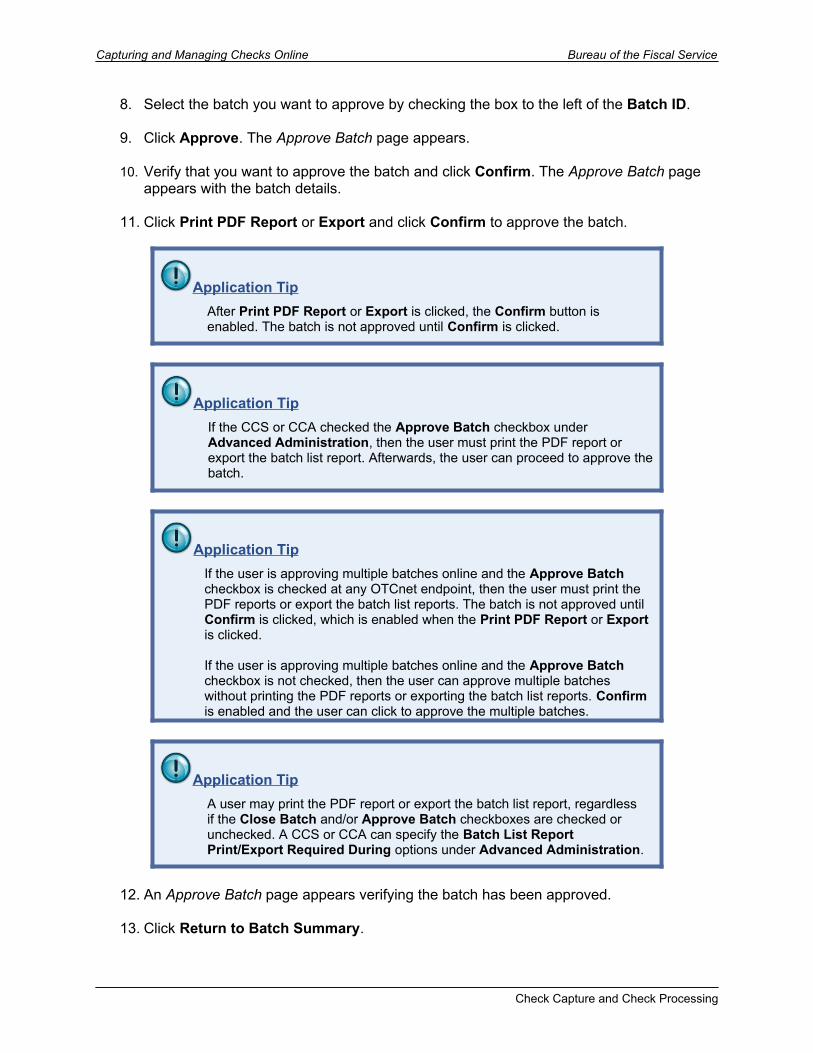
Bureau of the Fiscal Service Capturing and Managing Checks Online
Application TipAfter a batch is approved, its status changes from Closed to Approved, except under one of these two scenarios. First, if a batch has been designated for summary level classification and the batch classification is not balanced. Second, if a batch is designated to be classified at the summary level and it is a CARS/GWA reporter, and the batch is not classified Under these two scenarios the batch status is Closed. After the batch is classified and balanced, the batch can be approved.
Check Capture and Check Processing 137
Capturing and Managing Checks Online Bureau of the Fiscal Service
To approve multiple batches:
1. Click the Check Processing tab.
2. Click Batch Management. The Search Batch page appears.
3. Select or enter the batch search conditions you would like view.
Under Batch Search Conditions, optional Select the OTC Endpoint you want to Close a batch for by checking the box
under the Select column
Under Created On Date, optional Enter the From and To date range
Application TipThe From and To Created On Date must be entered in MM/DD/YYYY format.
Application TipThe Created On Date range cannot exceed 30 days. Additionally, if more than 1,000 batches are created within 30 days, then only the most recent 1,000 batches appear.
Application TipIf you run a search with the default From and To Created On Date range values, the search results include the most recent 30 days of batches that you have access to view. If more than 1,000 batches are created within the 30 days, then only the most recent 1,000 batches appear.
Application TipIf you run a search without specifying any criteria (with the exception of the Batch ID field), the search results include the most recent 30 days of batches that you have access to view. If more than 1,000 batches are created within 30 days, then only the most recent 1,000 batches appear.
Check Capture and Check Processing
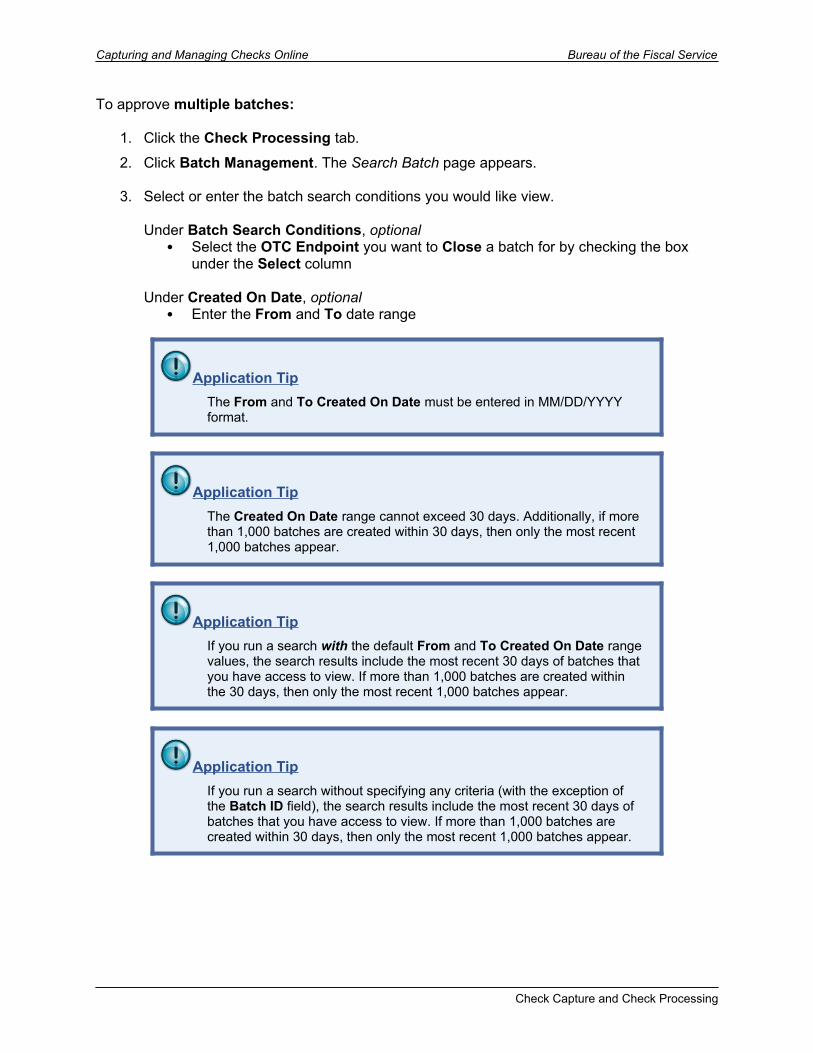
Bureau of the Fiscal Service Capturing and Managing Checks Online
Enter the Batch ID
Application TipIf the only search criteria entered is a valid Batch ID, then only a single result appears regardless of other search criteria specified.
Enter the Cashier ID
Under Batch Status, Select the Status you want to approve by checking the Closed box under the
Select column
4. Click Search. The View Batch page appears.
5. Click the Batch ID hyperlink. The View Checks page appears.
6. Click the Item ID of each scanned check. An image of the check and details of the check appear in the window below.
Application TipAdditional buttons on the page that help you perform other tasks:
Click Cancel to return to the OTCnet Home Page. No data will be saved.
Click Previous to return to the previous page. Click Activate/Deactivate to activate or deactivate a batch. Click Close Batches to close a batch. Click <<First to go to the first page. (Only appears if there are
several pages retrieved for the search results.) Click Next> to go to the next page. (Only appears if there are
several pages retrieved for the search results.) Click Last>> to return to the last page. (Only appears if there are
several pages retrieved for the search results.) Click <<Image to return to the previous check. Click >>Image to view the next check. Click Zoom- to reduce the image size. Click Zoom+ to enlarge the image size. Click Rotate Left to turn the image to the left. Click Rotate Right to turn the image to the right. Click Show Item to view and update the check item details. Click Void to void a single check item. Click Receipt to print a receipt. Click Print Item to print a batch list report.
7. Verify the details are correct and click Previous to return to the View Batch page.
8. Select the batch you want to approve by checking the box to the left of the Batch ID.
Check Capture and Check Processing 139

Capturing and Managing Checks Online Bureau of the Fiscal Service
9. Click Approve. The Approve Batch page appears.
10. Verify that you want to approve the batches and click Confirm. The Approve Batch page appears with the batch details.
11. Click Print PDF Report or Export and click Confirm to approve the batches.
Application TipAfter Print PDF Report or Export is clicked, the Confirm button is enabled. The batches are not approved until Confirm is clicked.
Application TipIf the CCS or CCA checked the Approve Batch checkbox under Advanced Administration, then the user must print the PDF report or export the batch list report. Afterwards, the user can proceed to approve the batch.
Application TipIf the user is approving multiple batches online and the Approve Batch checkbox is checked, then the user must print the PDF reports or export the batch list reports. The batch is not approved until Confirm is clicked, which is enabled when the Print PDF Report or Export is clicked.
If the user is approving multiple batches online and the Approve Batch checkbox is not checked, then the user can approve multiple batches without printing the PDF reports or exporting the batch list reports. Confirm is enabled and the user can click to approve the multiple batches.
Application TipA user may print the PDF report or export the batch list report, regardless if the Close Batch and/or Approve Batch checkboxes are checked or unchecked. A CCS or CCA can specify the Batch List Report Print/Export Required During options under Advanced Administration.
12. An Approve Batch page appears verifying the batches have been approved.
13. Click Return to Batch Summary.
Check Capture and Check Processing
Bureau of the Fiscal Service Capturing and Managing Checks Online
Application TipAfter a batch is approved, its Status changes from Closed to Approved, except under one of these two scenarios. First, if a batch has been designated for summary level classification and the batch classification is not balanced. Second, if a batch is designated to be classified at the summary level and it is a CARS/GWA reporter, and the batch is not classified. Under these two scenarios the batch status is Closed. After the batch is classified and balanced, the batch can be approved.
Check Capture and Check Processing 141

Capturing and Managing Checks Online Bureau of the Fiscal Service
Topic 13. Print a Receipt
Receipts are available for printing if the CCA configures the terminal beforehand in OTCnet. If your Agency requires a specific receipt layout, contact your Deployment Specialist at [email protected] or 703-377-5586. All receipts are printed in PDF format, as well as saved or attached to a new email message.
After the terminal is configured, CCOs, CCLOs, and CCSs can print a receipt in single mode or batch mode through the Check Scan and Batch Management functionality, as well as via the Show Item to print a receipt. Receipts are available for printing in OTCnet after the operators enter and save the pertinent details and can be either handed to or mailed to the customer.
Receipt Printing from Check Scan (Singe/Batch Mode)
1. Scan the check, input, and save the pertinent details.
2. Under Scan Controls, click Receipt. A Printing…Please wait message appears and the receipt prints to the default printer.
You have eight seconds to click the Receipt button. If the Receipt button is not clicked within the allotted time, the button grays out. If a receipt is still needed, access the Batch Management function.
Figure 100. Receipt Print Image (Scan Check)
Check Capture and Check Processing
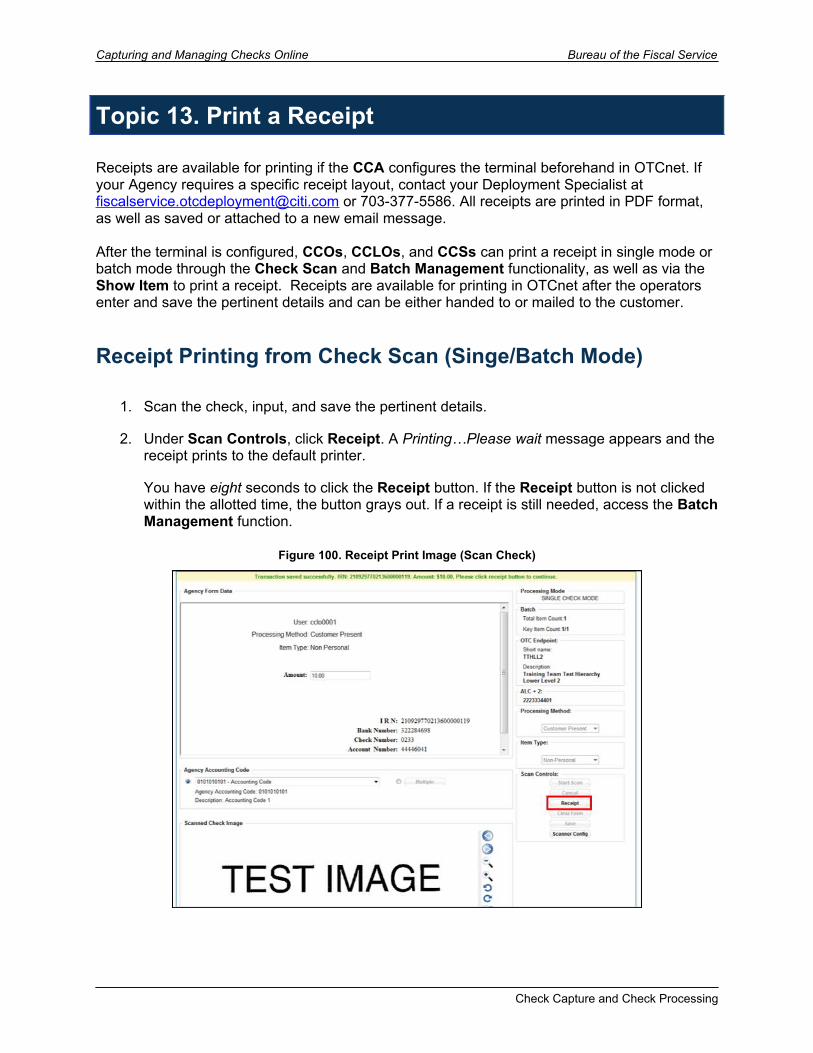
Bureau of the Fiscal Service Capturing and Managing Checks Online
3. The receipt appears. Click Print to print the receipt and close the receipt.
Figure 101. Print Receipt
If you are printing a receipt in batch mode repeat steps 1-5 until finished.
If there are more than five characters in the account number, the system will mask all but the last four. f I there are five characters or less, the system will mask all but the last character.
Check Capture and Check Processing 143

Capturing and Managing Checks Online Bureau of the Fiscal Service
Receipt Printing from Batch Management (Singe/Batch Mode) 1. Click the Check Processing tab and click Batch Management.
Figure 102. Check Processing>Batch Management (Receipt)
2. Select or enter the batch search conditions you would like view and click Search.
If you run a search with the default From and To Created On Date range values, the search results include the most recent 30 days of batches that you have access to view. If more than 1,000 batches are created within the 30 days then only the most recent 1,000 batches appear.
If you run a search without specifying any criteria (with the exception of the Batch ID field), the search results include the most recent 30 days of batches that you have access to view. If more than 1,000 batches are created within 30 days, then only the most recent 1,000 batches appear.
Under Batch Search Conditions, optional Select the OTC Endpoint you want to Edit a batch for by checking the under the
Select column
Under Created On Date, optional Enter the Created On Date by entering the From and To date range
The Created On Date range cannot exceed 30 days. Additionally, if more than 1,000 batches are created within 30 days then only the most recent 1,000 batches appear.
Enter the Batch ID, optional
If the only search criteria entered is a valid Batch ID then only a single result appears regardless other search criteria specified.
Enter the Cashier ID
Under Batch Status, optional Select the Status you want to view by checking the Open or Closed box under
the Select column, then click Search
Check Capture and Check Processing
Bureau of the Fiscal Service Capturing and Managing Checks Online
Figure 103. Search Batch (Receipt)
3. The View Batch page appears. Click the Batch ID hyperlink. If a batch is in use and another user attempts to access the same batch, a Batch Lock message appears stating the batch is in use and he/she cannot access the batch.
Figure 104. View Batches (Receipt)
Check Capture and Check Processing 145
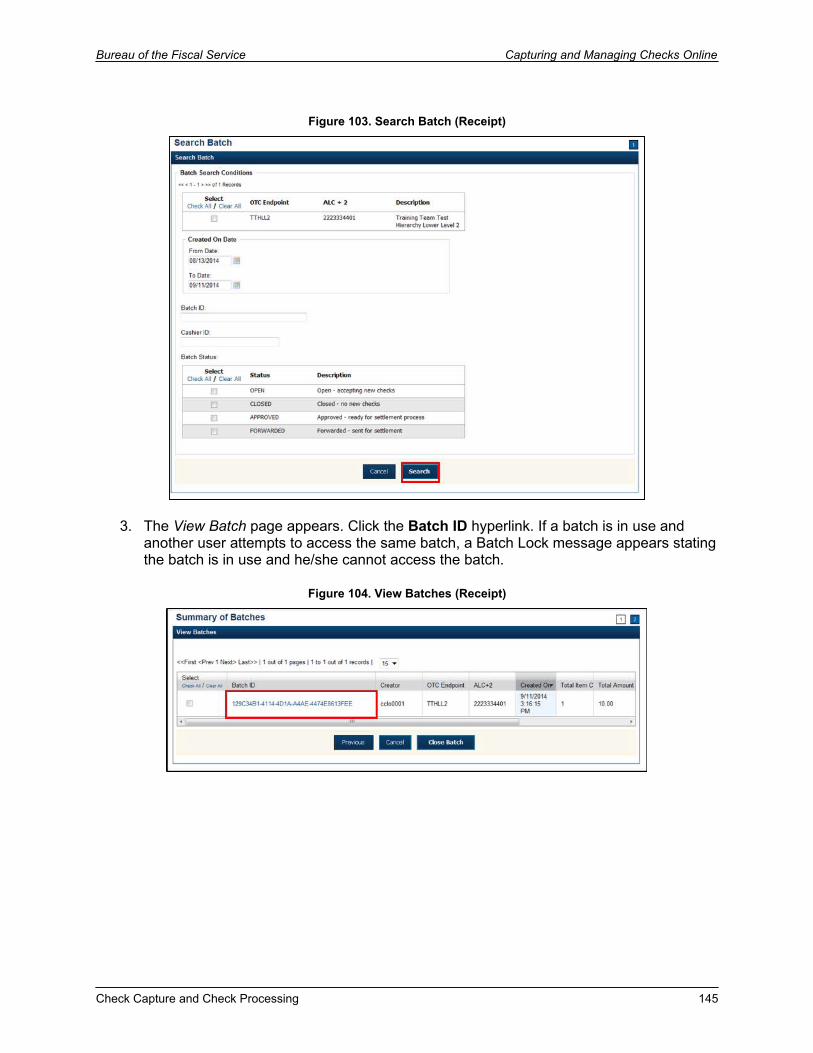
Capturing and Managing Checks Online Bureau of the Fiscal Service
4. The View Checks page appears. Click the Item ID of each scanned check and click Receipt. An image of the check and details of the check appear in the window below.
Figure 105. View Checks Page (Receipt)
To view more details about the check, click Show Item.
5. Click Receipt. The receipt appears. Click Print to print the receipt and close the receipt window.
Figure 106. Print Receipt
If there are more than five characters in the account number, the system will mask all but the last four. If there are five characters or less, the system will mask all but the last character.
Check Capture and Check Processing
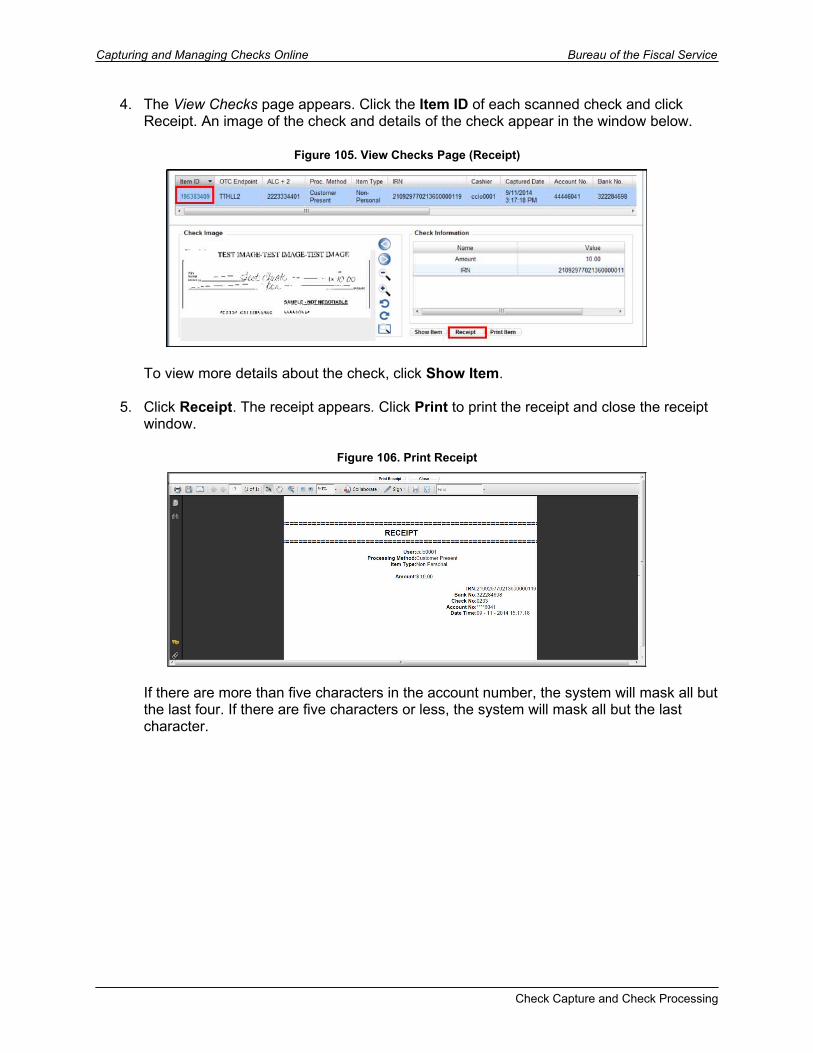
Bureau of the Fiscal Service Capturing and Managing Checks Online
Print a Receipt
To print a receipt from Check Scan functionality: Single Mode
1. Scan the check, input, and save the pertinent details.
2. Under Scan Controls, click Receipt. A Printing…Please wait message appears and the receipt prints to the default printer.
Application TipYou have eight seconds to click the Receipt button. If the Receipt button is not clicked within the allotted time, the button grays out. If a receipt is still needed, access the Batch Management function.
3. Click Receipt. The receipt appears.
4. Click Print to print the receipt.
5. Click Close to close the receipt.
Application TipIf you are printing a receipt in batch mode repeat steps 1-5 until finished.
Check Capture and Check Processing 147
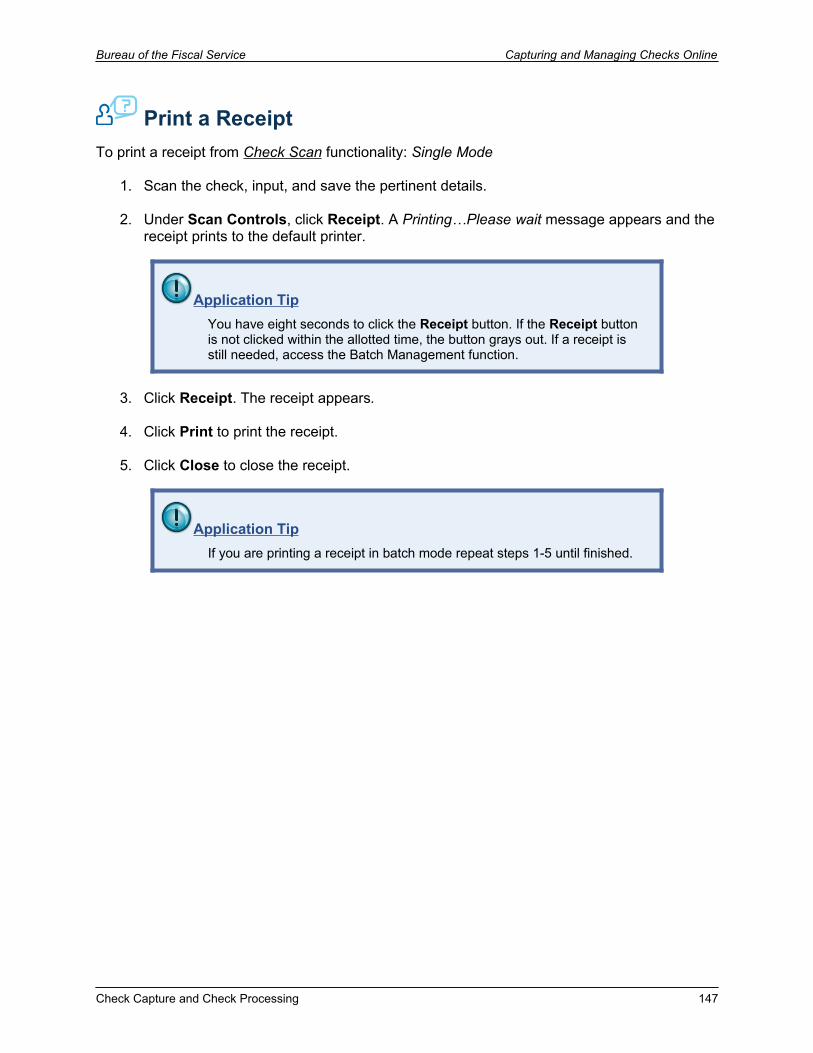
Capturing and Managing Checks Online Bureau of the Fiscal Service
Print a Receipt in Batch Management
To print a receipt using Batch Management:
1. Click the Check Processing tab and click Batch Management.
2. Select or enter the batch search conditions you would like view.
Under Batch Search Conditions, optional Select the OTC Endpoint you want to Edit a batch for by checking the under the
Select column
Under Created On Date, optional Enter the From and To date range
Application TipThe From and To Created On Date must be entered in MM/DD/YYYY format.
Application TipThe Created On Date range cannot exceed 30 days. Additionally, if more than 1,000 batches are created within 30 days then only the most recent 1,000 batches appear.
Application TipIf you run a search with the default From and To Created On Date range values, the search results include the most recent 30 days of batches that you have access to view. If more than 1,000 batches are created within the 30 days then only the most recent 1,000 batches appear.
Application TipIf you run a search without specifying any criteria (with the exception of the Batch ID field), the search results include the most recent 30 days of batches that you have access to view. If more than 1,000 batches are created within 30 days then only the most recent 1,000 batches appear.
Check Capture and Check Processing
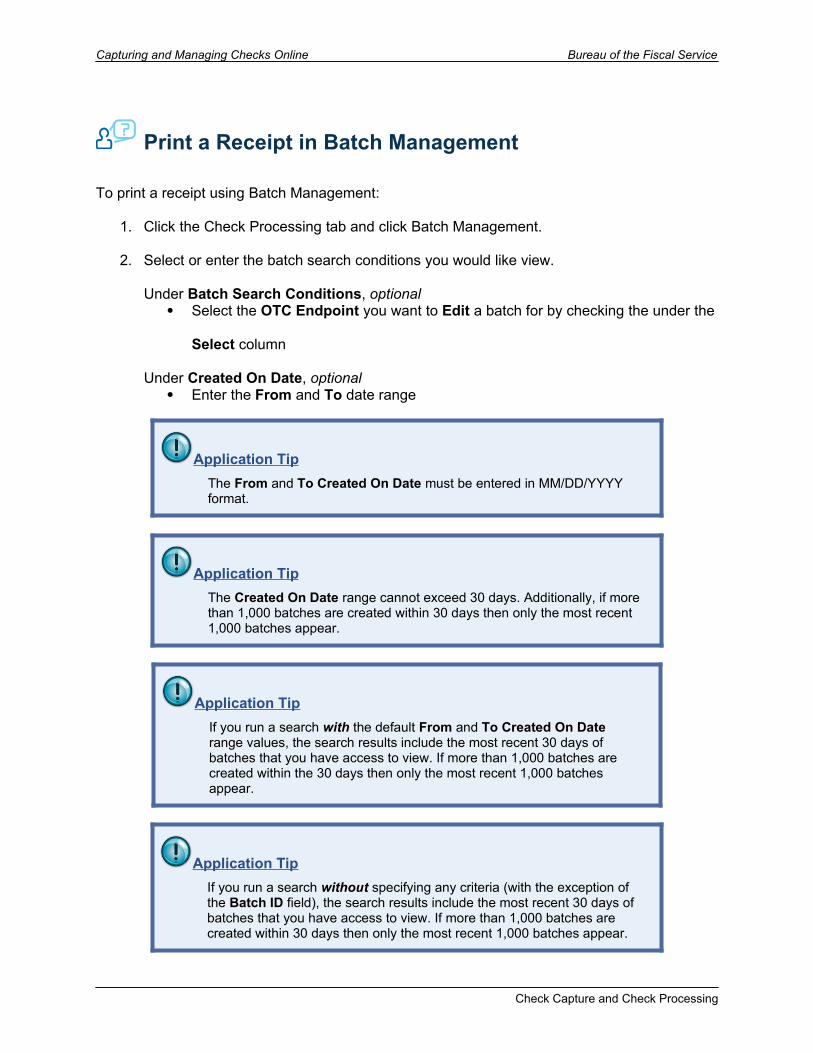
Bureau of the Fiscal Service Capturing and Managing Checks Online
Check Capture and Check Processing 149
Capturing and Managing Checks Online Bureau of the Fiscal Service
Enter the Batch ID, optional
Application TipIf the only search criteria entered is a valid Batch ID then only a single result appears regardless of other search criteria specified.
Enter the Cashier ID, optional
Under Batch Status, optional Select the Status you want to view by checking the Open or Closed box under
the Select column
3. Click Search. The View Batch page appears.
4. Click the Batch ID hyperlink. The View Checks page appears.
Application TipIf a batch is in use and another user attempts to access the same batch, a Batch Lock message appears stating the batch is in use and he/she cannot access the batch.
5. Click the Item ID of each scanned check. An image of the check and details of the check appear in the window below.
6. Click Receipt. The receipt appears.
7. Click Print to print the receipt.
Application TipAccount numbers and User Defined Fields (UDFs) that are marked as Personally Identifiable Information (PII) are masked. If there are more than five characters, OTCnet masks all but the last four characters. If there are five characters or less, the system will mask all but the last character.
8. Click Close to close the receipt.
Application TipClick Show Item to view more details about the check. Under Server Controls, click Receipt to print the receipt.
Check Capture and Check Processing
Bureau of the Fiscal Service Capturing and Managing Checks Online
Summary
This chapter provided information on the following topics:
The purpose of capturing and managing checks online
How to capture a check online
How to manage failed image quality
How to resolve a duplicate check
How to void a check
How to override a Master Verification Record (MVD) Record
How to perform batch control and batch balancing
How to view and print a batch list / item
How to activate/deactivate a batch
How to close a batch
How to approve a batch
How to print a receipt
Check Capture and Check Processing 151
Capturing and Managing Checks Online Bureau of the Fiscal Service
Notes____________________________________________________________________________
____________________________________________________________________________
____________________________________________________________________________
____________________________________________________________________________
____________________________________________________________________________
____________________________________________________________________________
____________________________________________________________________________
____________________________________________________________________________
____________________________________________________________________________
____________________________________________________________________________
____________________________________________________________________________
____________________________________________________________________________
____________________________________________________________________________
____________________________________________________________________________
____________________________________________________________________________
____________________________________________________________________________
____________________________________________________________________________
____________________________________________________________________________
____________________________________________________________________________
____________________________________________________________________________
____________________________________________________________________________
____________________________________________________________________________
____________________________________________________________________________
____________________________________________________________________________
Check Capture and Check Processing
Bureau of the Fiscal Service Capturing and Managing Checks Online
Glossary
AAccounting Code – A unique agency classification code assigned to a transaction, which identifies the FRB Account Key that is used within the Federal Reserve. In check capture, it is a method of grouping individual check transactions into certain classifications. In deposit reporting, the classification is being done at a voucher level, where a voucher is being classified with one or many agency-defined accounting codes or TAS.
Accounting Code Description – A brief explanation that provides further detail about an accounting code.
Accounting Code Name – The title of the accounting code.
Accounting Key – The account number assigned to a deposit when it is submitted to FRB CA$HLINK. The FRB Account Key is used by FRB CASHLINK in combination with the RTN to determine the appropriate CAN. The FRB Account Key is similar to the CAN, but is only used for FRB financial activity.
Accounting Specialist – A user who is an expert on the organizational structure, reporting needs and accounting rules for their agency. This role will establish and maintain the organizational foundation, accounting data and accounting relationships at the highest level of the agency in OTCnet. This role can also establish, maintain, and view processing options that one or more lower level endpoints will use in OTCnet.
Acknowledged Batch Status – Indicates the batch was transmitted and fully processed by the OTCnet server without error.
Acknowledged Error Batch Status – Indicates the acknowledge batch process experienced system errors and the acknowledgment was unsuccessful, or a user selected to cancel the batch acknowledgment which resulted in a batch being updated to Acknowledgment Error.
ACR Activity Report – A check processing business report that allows you to view detailed information about transactions that were adjusted, corrected, or reversed/rescinded. Users can generate a report that covers a maximum period of 45 calendar days.
Activity Type – The parameter indicates if a User Defined Field (UDF) is used for capturing custom agency information for a deposit or during classifying the deposit with accounting codes. OTCnet allows for the creation of three UDFs for the deposit activity, and two UDFs for the deposit accounting subtotals activity.
Adjustment Activity (FI) Report – A business report that allows you to view adjustments made by your financial institution (FI).
Adjustment Historical Report – A deposit processing report that allows you to view historical deposit adjustment and returned item adjustment transaction data.
Check Capture and Check Processing 153
Capturing and Managing Checks Online Bureau of the Fiscal Service
Adjustments by OTC Endpoints Report – A business report that allows you to view adjustments made by Agency Location Code (ALC) and Adjustment Types (Credit, Debit or Return Item Adjustments). An adjustment was created when a deposit ticket has been received by a financial institution and the amount of the deposit does not match the deposit amount reported on the deposit ticket. Agency CIRA Report – A check processing business report that allows you to view the batch level transaction activity for a specified OTC Endpoint. A user can filter the report by Received Date, Capture Date, Batch ID, or Check Capture Operator.
Agency Contact – A person designated by an agency as the primary contact regarding deposit-related matters.
Agency Information – The optional comments or instructions, receipt processing dates, alternate agency contact, and internal control number for your deposit.
Agency Location Code (ALC) – A numeric symbol identifying the agency accounting and/or reporting office.
Agency Location Code plus 2 (ALC+2) – The agency location code plus a unique two-digit number that is used in OTCnet to identify a cashflow at a location within an ALC. This plus two digits accommodates the fact that one ALC can represent many locations, and allows the agency to identify those locations specifically.
Agency Manager – A user that has authorization to view and download CIRA CSV reports and ACR Activity reports, run CIRA queries and view other general reports such as the SF215 Deposit Ticket and 5515 Debit Voucher reports, as well as view and download Historical Reports. The agency user can view if an endpoint is designated for summary level classification, and the agency comments associated to an endpoint.
Alternate Agency Contact – A person designated by an agency as the secondary contact regarding deposit-related matters.
American Bankers Association (ABA) – (also known as Bank Routing Number) A routing transit number (RTN), routing number, or ABA number is a nine-digit bank code, used in the United States, which appears on the bottom of negotiable instruments such as checks identifying the financial institution on which it was drawn.
Approved Batch Status – Indicates that the batch is ready for settlement (online only). Indicates that the batch is ready for upload and settlement (offline only).
Audit Log – A table that records all interactions between the user and OTCnet Deposit Reporting, Check Capture, Check Processing, administrative actions and other processes that take place in the application. Some entries also contain before and after values for actions completed. The audit log is available for download to a comma separated value report (CSV) and opened in a spreadsheet program or available to print in a formatted audit log report.
Automated Clearing House – A computerized network used by member financial institutions to process payment orders in machine readable form. ACH processes both credit and debit transactions between financial institutions in batches. ACH items are settled electronically and do not require an image.
Check Capture and Check Processing
Bureau of the Fiscal Service Capturing and Managing Checks Online
Awaiting Approval (AWAP) – A deposit that is waiting for deposit confirmation by a Deposit Approver.
BBack Office Processing Method – Indicates that a customer presented a check in person, but the check is being scanned in a controlled back-office environment away from the customer.
Batch – A file containing the transaction information and tiff images (collection of scanned checks) of one or more checks, which will be sent for settlement.
Batch Approver – An agency user that has the authorization to approve a batch either prior to batch upload from OTCnet Offline or when a batch is uploaded/submitted to OTCnet Online but not yet approved. The Batch Approver permission must be applied to either a Check Capture Lead Operator or Check Capture Operator roles and allows the operators to approve batches that they have created. This role should be granted in limited cases at sites where there is a need for the operator to perform this function without a Check Capture Supervisor present.
Batch Control/Batch Balancing – An optional feature (which can be configured to be mandatory) that agencies can use as a batch balancing tool to perform checks and balances on the number of checks that have been scanned, and ensure their respective dollar amounts and check number totals have been accurately entered. The functionality is available for both single item mode and batch mode.
Batch ID – The unique number assigned to a batch by OTCnet.
Batch List Report – A report that contains transaction information for each batch item, including the Individual Reference Number (IRN), Item Type, ABA Number, Account Number, Check Number, and Amount.
Batch Status – Reflects the current state of a batch during processing, transmission, and settlement. The batch states for OTCnet Online are Open, Closed, Approved, and Forwarded. The batch states for OTCnet Offline are Open, Closed, Approved, Sending, Sent, Acknowledged, Send Error, and Acknowledgment Error (offline only).
Batch Uploader – An agency user that has the authorization to upload a batch from OTCnet Offline to the online database. The Batch Uploader permission must be applied to either a Check Capture Lead Operator or Check Capture Operator roles and allows the operators to auto-upload the batch upon close (if terminal is configured to do so), or upload approved batches. This role should be granted in limited cases at sites where there is a need for the operator to perform this function without a Check Capture Supervisor present.
Blocked – A customer may no longer present checks for a specific ABA number and account number due to manual entry by authorized persons into the MVD rather than the result of a failed transaction. If desired, an authorized user can edit the transactional record to a clear status.
Check Capture and Check Processing 155
Capturing and Managing Checks Online Bureau of the Fiscal Service
Bureau of the Fiscal Service (FS) – (formerly FMS) The bureau of the United States Department of Treasury that provides central payment services to federal agencies, operates the federal government’s collections and deposit systems, provides government wide accounting and reporting services, and manages the collection of delinquent debt owed to the government.
Business Event Type Code (BETC) – A code used in the CARS/GWA system to indicate the type of activity being reported, such as payments, collections, borrowings, etc. This code must accompany the Treasury Account Symbol (TAS).
CCA$HLINK II – An electronic cash concentration, financial information, and data warehouse system used to manage the collection of U.S. government funds and to provide deposit information to Federal agencies.
CA$HLINK II Account Number (CAN) – The account number assigned to a deposit when it is submitted to CA$HLINK II.
Capture Date – The calendar date and time the payment is processed by the agency.
Cashier ID – The ID of the user that created the transaction.
Central Accounting Reporting System (CARS) – (formerly GWA) The system that addresses the central accounting and reporting functions and processes associated with budget execution, accountability, and cash/other asset management. This includes the collection and dissemination of financial management and accounting information from and to federal program agencies.
Central Image and Research Archive (CIRA) – The Central Image Research Archive (CIRA) is an image archive of all items processed in the OTCnet System.
Characteristics – The properties of a user, organization, deposit, or financial institution.
Check 21 – Provides the legal framework for the creation of substitute checks which can be used in place of the original paper document, without an agreement in place with other financial institutions. A substitute check is a paper reproduction of the original check. Check 21 items require an image before they can settle. Check 21 is also referred to as check truncation.
Check Amount – The dollar amount of the check.
Check Capture – The component of OTCnet used to process scan images of checks and money orders through OTCnet for the electronic deposit of checks and money orders at financial institutions. Check capture can be done online through the internet, or offline through the user’s desktop.
Check Capture and Check Processing
Bureau of the Fiscal Service Capturing and Managing Checks Online
Check Capture Administrator – An agency user that has the authorization to define and modify the check capture sites; to manage accounting codes; to modify endpoint mappings; to configure Check Capture functions and perform upgrades of the application; to create and download user profiles; as well as download software or firmware to the terminal using the Download Check Capture application permission. Furthermore, this user can view checks at the item level or a batch at the summary level classified with multiple accounting codes, view/download CIRA CSV reports and ACR Activity reports, run CIRA queries and view other general reports such as the SF215 Deposit Ticket and 5515 Debit Voucher reports, as well as view and download Historical Reports. The agency user can view if an endpoint is designated for summary level classification, and the agency comments associated to an endpoint. Lastly, this user has the ability to create the CCA offline user logon profile using OTCnet online.
Check Capture Lead Operator – An agency user that has the authorization to in scan checks into a batch, view and classify checks at the item level or batch at the summary level with multiple accounting codes, close a batch, edit a batch, balance check amounts, and enter batch control values during batch closing. Additionally, the user is authorized to accept checks with poor quality, make MICR line corrections, and accept duplicate checks. This user is not authorized; however, to use an out-of-date LVD. This role can also establish, maintain, and view processing options for an endpoint pertaining to summary level classification and agency comments.
Check Capture Offline – A web-based functionality in the offline Check Capture application that resides in the user’s desktop for capturing check images for the electronic deposit of checks and money orders. The check transactions are stored within a local database, and the check information will need to be uploaded to OTCnet server when there is internet connectivity before they can be deposited for settlement.
Check Capture Online – A web-based functionality within OTCnet to allow agencies users to process scanned images of checks and money orders for the electronic deposit of checks and money orders at financial institutions. The check transactions are directly saved to the OTCnet online database, and no upload of batches of checks are needed.
Check Capture Operator – An agency user that has the authorization to perform only very minimal Check Capture activities. This user has authorization to scan checks into a batch view and classify checks at the item level or a batch at the summary level with multiple accounting codes, close a batch, balance check amounts and enter batch control values during batch closing. The agency user can also view is an endpoint is designated for summary level classification, and the agency comments associated to an endpoint. Additionally, the user can enter/apply the Accounting Code at the time of scanning checks is established. This user does not have authorization to accept duplicates, make MICR corrections, authorize the use of out-of-date LVD, or accept checks with poor quality.
Check Capture Supervisor – An agency user that has the authorization to perform almost all the functions on the Check Capture including view and classify checks at the item level or a batch at the summary level with multiple accounting codes, accept duplicates (not recommended), make MICR corrections, authorize the use of out-of-date LVD, and accept checks with poor quality as well as view, modify, import, and modify endpoint mappings. This role can also establish, maintain, and view processing options for an endpoint pertaining to summary level classification and agency comments.
Check Capture and Check Processing 157
Capturing and Managing Checks Online Bureau of the Fiscal Service
Check Image Report – A check processing business report that allows you to view the front and back images of a check for an Individual Reference Number (IRN) that you request.
Check Number – The printed number of the check writer’s check.
CIRA CSV Historical Report – A check processing business report that allows you to query check records that are associated with batches that have been forwarded for settlement more than 18 months ago. The exported comma separated value report (CSV) data can be used to import into other applications within an agency.
CIRA CSV Report – A check processing business report that allows you to export data based on a query to a comma separated value report (CSV). The exported data can be used to import into other applications within an agency.
CIRA Viewer – A user that has authorization to view CIRA records and download CSV files. The agency user can view if an endpoint is designated for summary level classification, and the agency comments associated to an endpoint.
Classification Key (C-Key) – A unique agency accounting code assigned to a transaction. Agencies establish C-Keys in SAM for collection transactions that will be used to derive the appropriate values of TAS-BETC(s).
Clear – Indicates that a customer may present checks for a specific ABA Number and Account Number, because the prior restrictions on the individual's check payments have been removed. Note: Manually cleared items are permanently cleared. If a transaction is cleared in error, manual suspend, block or deny records need to be created in its place to prevent transactions.
Client ID/GCI Number – An ID used by the deposit endpoint when requesting a currency conversion for foreign check to the US dollar Equivalent (USE) with the foreign currency exchange gateway for foreign check items or currency conversion service for foreign currency cash.
Client Order ID – A unique ID assigned by OTCnet to maintain uniqueness while requesting/accepting a foreign currency conversion quote for foreign checks the foreign currency exchange gateway.
Closed Batch Status – Indicates the batch is closed and no new checks may be scanned into that batch.
Collections Information Repository (CIR) – (formerly TRS) A collections reporting tool, supplying the latest information on deposits and detail of collections transactions to federal agencies. The system will allow financial transaction information from all collections systems and settlement mechanisms to be exchanged in a single system.
Comma Separated Values (CSV) – A computer data file used for storage of data structured in a table form. Each line in the CSV file corresponds to a row in the table. Within a line, fields are separated by commas, each field belonging to one table column.
Confirmed – A deposit that has been reviewed and then confirmed by a financial institution or FRB.
Check Capture and Check Processing
Bureau of the Fiscal Service Capturing and Managing Checks Online
Cost Center Work Unit (CCWU) – A Federal Reserve cost center work unit that processing the FRB deposits and adjustments. It is normally abbreviated as CCWU, and provided only on non-commercial (FRB settled) transactions. Debits and credits processed by FRB Cleveland will be noted with the CCWU number 9910 on the daily accounting statement agencies receive from the Federal Reserve Bank.
Custom Label – Text defined by OTCnet that describes a level in the organization hierarchy, the internal control number, or agency accounting code.
Customer Not Present Processing Method – The processing method selected in OTCnet when processing a check that has been presented by a check writer who is not present at the agency location i.e., mail.
Customer Present Processing Method – The processing method used in the OTCnet when the check writer is presenting the check in person.
DDaily Voucher Report – A business report that allows you to view the daily voucher extract.
Data Type – The type of data that should be entered for a user defined field.
Date of Deposit – The date, prior to established cut off times, the user transmits a batch of checks and money orders through check capture, or the date the agency sends the physical negotiable instruments to the financial institution.
Debit Gateway – The financial settlement program that is responsible for the presenting and settling of payment transactions acquired through the OTCnet application. The Debit Gateway receives a transaction file from OTCnet and determines the proper path for settlement of each item. Items are either converted to ACH for direct automated clearing house debit, or are included in an image cash letter, which is sent to the Check 21 system for presentment to paying banks. Once the file is processed, the Debit Gateway sends a Response Processing File (RPF) to OTCnet with the status of each of the items.
Demand Deposit Account (DDA) – The account at a financial institution where an organization deposits collections.
Denied – Indicates that OTCnet system permanently denies an individual from cashing a check through OTCnet based on the combination of ABA number, account number, and User Defined Field 1. User Defined Field 1 is usually the SSN number of an individual.
Deny Date – Indicates when the verification record (MVD/LVD) expires, and OTCnet can start accepting checks that will be presented by a check writer that has previously presented a bad check. The Deny Date is calculated based on suspension periods configured in the Check Cashing policy of an OTC Endpoint.
Deposit – A collection of over-the-counter receipts deposited to a Treasury General Account for credit.
Check Capture and Check Processing 159
Capturing and Managing Checks Online Bureau of the Fiscal Service
Deposit Activity (FI) Report – A business report that allows the financial institution to view deposits submitted to its location.
Deposit Approver – A user who has authorization to review and submit deposits to a financial institution.
Deposit Confirmer – A user at a financial institution that has authorization to verify the accuracy of deposits received from an agency.
Deposit History by Status Report – A business report that allows you to view deposits by status.
Deposit Information – The attributes that define a deposit: deposit status, voucher number, deposit endpoint, ALC, voucher date, deposit total, check/money order subtotal, currency subtotal, and subtotals by accounting code.
Deposit Preparer – A user that has authorization to prepare and save deposits for approval to a Deposit Approver.
Deposit Total – The total amount of over-the-counter receipts included in the deposit.
Deposit Historical Report – A deposit processing report that allows you to view historical deposit transaction data.
Deposits by Accounting Code Report – A business report that allows you to view deposits by accounting code.
Deposits by OTC Endpoint Report – A business report that allows you to view deposits by OTC Endpoint.
Display Order Number – The order in which user defined fields (UDFs) should be displayed.Draft – A deposit that is saved for modification at a later date by a Deposit Preparer.
EExchange Rate – The decimal value used to convert foreign currency to the US dollar Equivalent (USE).
FFailed – The item was unable to be processed and/or settled by Treasury/BFS. These are item that could not be collected such as foreign items or possible duplicate items. These items are not included on your 215 Report.
Federal Program Agency – A permanent or semi-permanent organization of government that is responsible for the oversight and administration of specific functions.
Check Capture and Check Processing
Bureau of the Fiscal Service Capturing and Managing Checks Online
Federal Reserve Bank (FRB) – A Federal Reserve Bank is one of twelve regulatory bodies throughout the United States that make up the Federal Reserve System. Each Bank is given power over commercial and savings banks in its area and is charged with making sure that those banks comply with any and all rules and regulations.
Federal Reserve Bank-Cleveland (FRB-C) – FRB-C serves as the conduit for settlement of transactions originating from the OTCnet application. FRB-C is responsible for receiving the transaction data from OTCnet via forward file, and performing check clearing/transaction settlement as the ‘debit gateway’.
Federal Reserve System's Automated Clearing House (ACH) System – Enables debits and credits to be sent electronically between depository financial institutions.
Financial Institution (FI) – A bank, designated by the Treasury and a Treasury General Account (TGA) of International Treasury General Account (ITGA), which collects funds to be deposited in the Treasury General Account. These banks also include the Federal Reserve Bank (FRB).
Financial Institution Information – The name, address, routing transit number, and the demand deposit account number of a financial institution.
Firmware – A release used for initial download or upgrades to the scanner software that allows a scanner to be used on a terminal. The firmware versions also contains a series of other back-end installation files that should be installed on a terminal to enable it to be used for Check Capture in OTCnet.
Fiscal Year – A 12-month period for which an organization plans the use of its funds.
Forwarded Batch Status – Indicates the batch has been sent to Debit Gateway to initiate the settlement process.
Forwarded File – A term that is assigned to a file that contains the check transactions that is send from channel applications, such as OTCnet or ECP, to Debit Gateway for settlement purposes.
Franker – An internal stamp unit that stamps a check with “Electronically Processed” after the check is processed and scanned. Franker availability is based on the model of your scanner.
Franking – The process of stamping a check processed through Check Capture. The stamp indicates that the check was electronically processed.
HHighest Level Organization – The primary level of the organization hierarchy.
IIBM Security Identity Manager (ISIM) – Refers to Fiscal Service’s Enterprise provisioning tool for user account and identity management.
Check Capture and Check Processing 161
Capturing and Managing Checks Online Bureau of the Fiscal Service
Individual Reference Number (IRN) – The auto-generated unique number used in OTCnet to identify Check Capture transactions.
Input Length Maximum – The maximum number of characters that may be entered in a user defined field.
Input Length Minimum – The minimum number of characters that may be entered in a user defined field.
Internal Control Number – A customizable field for agency use to further describe a deposit.
Item Detail Report – A report that contains the information about an individual item (check) associated with a batch. The report print-out will contain MICR information, data entered about the check, and an image of the check obtained during scanning.
Item Type – Indicates whether the check presented is a personal or business check. This determines whether the check is handled through Check 21 (non-personal) or FedACH (personal).
LLocal Accounting Specialist – A user who is an expert on the organizational structure, reporting needs and accounting rules for their depositing endpoint and its lower level OTC Endpoints. This role will establish, maintain, and view the organizational structure, accounting code mappings to individual endpoints, and the processing options that one or more lower level OTC Endpoints will use in OTCnet.
Local Security Administrator (LSA) – An agency or financial institution/federal reserve bank user who has authorization to maintain user access to an organization, including assigning/removing user roles and assigning/removing organization hierarchy access. This user is also able to request and create users for the organization.
Local Verification Database (LVD) – A database (specific to the endpoint using OTCnet) that is downloaded from OTCnet and stored locally on the agencies network, which replicates the information found in the Master Verification Database (MVD).
Lower Level Organization – Any organization created below the highest level organization.
LVD Contents Report – A check processing business report that allows you to view the contents of a Local Verification Database (LVD) for a given OTC Endpoint.
MMagnetic Ink Character Recognition (MICR) – Digital characters on the bottom edge of a paper check containing the issuing bank's ABA number and account number. The check number may also be included.
Check Capture and Check Processing
Bureau of the Fiscal Service Capturing and Managing Checks Online
Master Verification Database (MVD) – It is an online database specific to the agency that maintains the agency hierarchy check cashing policy, information on bad check writers, and manually entered blocked items based on an agency’s policy. Bad check information is accumulated in the MVD as agencies process checks through Check Capture. The MVD provides downloads of dishonored check information and blocked items via the Local Verification Database (LVD) on a daily basis.
MVD Editor – A user that has the authorization to view, edit, and download CIRA records, view verification records, and read blocked records containing only ABA permissions, view other general reports such as the SF215 Deposit Ticket report,5515 Debit Voucher report, the ACR Activity report as well as view and download Historical Reports. The agency user can view if an endpoint is designated for summary level classification, and the agency comments associated to an endpoint.
MVD Viewer – A user that has the authorization to view and download CIRA records, view verification records, and read blocked records containing only ABA permissions. This role also has the permission to download CSV formatted reports, view other general reports such as the 215 Deposit Ticket report, 5515 Debit Voucher report, the ACR Activity report, as well as view and download Historical Reports. The agency user can view if an endpoint is designated for summary level classification, and the agency comments associated to an endpoint.
NNon-Personal Item Type – Indicates that the name on check is an organization, or the check is a money order, traveler’s check, or third-party check.
Non-Reporting OTC Endpoints Report – A business report that allows you to view OTC Endpoints that have not reported a deposit.
OOpen Batch Status – Indicates the batch is open and accepting new checks.
Organization – The location or level within a Federal Program agency.
Organization Hierarchy – The structure of a Federal Program agency as defined in OTCnet.
Organization Hierarchy Report – A check processing business report that allows you to view the target OTC Endpoint within the context of the current OTC Endpoint.
OTC Collections – Receipts that contain cash, checks, and/or money orders that are collected over-the-counter by organization endpoints in exchange for goods or services.
OTC Endpoint – The endpoint (location) that collects over-the-counter (OTC) receipts and deposits them to the Treasury’s General Account.
OTC Endpoint (CHK) – The endpoint (location) setup in OTCnet to use check capture.
OTC Endpoint (TGA) – The endpoint (location) setup in OTCnet to use Deposit Reporting.
Check Capture and Check Processing 163
Capturing and Managing Checks Online Bureau of the Fiscal Service
OTC Endpoint Mapping – The assignment of accounting codes to an agency’s OTC Endpoint, for which a deposit amount can be allocated.
OTCnet Local Bridge (OLB) Application – Refers to an application installed on a workstation, used to facilitate communication between the browser and the operating system/workstation.
OTCnet Offline – Refers to the over the counter application that provides Check Capture functionality to end users with limited internet connectivity, and provides the capability to upload offline-captured batches to the Online OTCnet application for processing.
OTCnet Online – Refers to the web-based over the counter application that provides Check Capture, Check Processing and Deposit Processing functions to end users (that have constant internet connectivity).
Over the Counter Channel Application (OTCnet) – Refers to the over the counter application that provide Check Capture and Deposit Reporting to end users.
PPersonal Item Type – Indicates that the name on check is an individual’s name, not acting as a business.
Personally Identifiable Information (PII) – It is any piece of information which can potentially be used to uniquely identify, contact, or locate a single person or can be used with other sources to uniquely identify a single individual. Examples of PII include but are not limited to social security numbers, dates and places of birth, mothers’ maiden names, biometric records.
Primary Local Security Administrator (PLSA) – An agency or financial institution/federal reserve bank user who has authorization to maintain user access to an organization, including assigning/removing user roles and assigning/removing organization hierarchy access. This user is also able to request and create users for the organization.
Processing Options – User-defined parameters for the deposit and adjustment processes.
Processing Options by OTC Endpoints Report – A business report that allows you to view processing options defined for endpoints within the organization.
QQueue Interface – Used by military agencies that utilize the Deployable Disbursing System (DDS) database bridge. It provides a single transaction input point, prevents data entry errors, and discrepancy between both systems.
RReceived – The agency has sent this transaction through OTCnet. No settlement has been performed for this transaction yet.
Received Date – The date the check was received by web-based OTCnet.
Check Capture and Check Processing
Bureau of the Fiscal Service Capturing and Managing Checks Online
Rejected – A deposit that is returned by a financial institution or FRB to the Deposit Preparer to create a new deposit.
Represented – This transaction was returned with a reason code that allows for another collection attempt to be made (see Appendix Chapter of the Participant User Guides for Reason Codes). Depending on an agency’s policy, the item is reprocessed in an attempt to collect the funds from the check writer. Items with this status are in-process of collection.
Retired – This transaction was unable to be collected. The agency receives an SF5515 Debit Voucher Report with a debit processed to Debit Gateway, the effective date and debit voucher number. The offset to the agency’s debit is an ACH return or a paper return (Check 21) received from the check writer’s financial institution. This transaction cannot be processed again through OTCnet.
Return Reason Codes – Represent the numeric codes used in the ACH and paper return processing, which specify the reason for the return of the transaction and Check 21 codes.
Return Settlement Date – The effective date of settlement of the returned check item.
Returned Item – A check that was originally part of an OTCnet deposit but returned to the financial institution for non-sufficient funds, closed account, etc.
Routing Transit Number (RTN) – (also known as American Bankers Association (ABA) Number or Bank Routing Number) – The nine-digit number used to identify a financial institution.
SSave as Draft – An option that allows a Deposit Preparer to save a deposit for modification at a later date.
Save for Approval – An option that allows a Deposit Preparer to save a deposit for a Deposit Approver to submit to a financial institution.
Send Error Batch Status – Indicates the batch was transmitted and fully processed by the OTCnet server without error.
Sent Batch Status – Indicates the batch was uploaded online without error.
Separation of Duties – A concept used to ensure there are typically separate personnel with authority to authorize a transaction, process the transaction, and review the transaction.
Settle Best Method – The option that allows OTCnet to decide the best settlement method for personal and non-personal checks.
Settled – This transaction is complete and the funds have been credited to the agency’s Treasury General Account. The effective date of the deposit and the SF215 Deposit Ticket Report deposit ticket number are provided.
Check Capture and Check Processing 165
Capturing and Managing Checks Online Bureau of the Fiscal Service
Settlement Date – The payment date of a check item, which is when the deposit is debited from the check writer’s account.
SF215 Deposit Ticket Report – The report presented to a financial institution by a U.S. government agency with checks and other payment instruments to make a manual deposit. This report is manually generated for Deposit Reporting and auto-generated for Check capture. The report is searchable for a duration of up to 45 days.
SF5515 Debit Voucher Report – The report used to debit the Treasury General Account (TGA) to decrease the amount of a deposit made to that account. This report is manually generated for Deposit Reporting and auto-generated for Check capture. The report is searchable in for a duration of up to 45 days.
Share Accounting Module (SAM) – The application that facilitates the process of validating or deriving Treasury Account Symbol (TAS) and Business Event Type Code (BETC) combinations to assist CARS/GWA in classifying financial transactions as they occur.
Short Name/Code – The user-defined text describing an organization. Short Names/Codes must be unique within an organization hierarchy.
Statistical Report – A check processing administration report that allows you to view statistical details for an OTC Endpoint. The report includes statistical information regarding the total transactions, overall success rate, total returns sent back to the agency, and total returns received. The report is searchable for a duration of up to 15 days.
Submit – An option that allows a Deposit Approver to submit a deposit to a financial institution.
Submitted – A deposit that is submitted and waiting deposit confirmation by a Deposit Confirmer.
Suspend – Indicates that an individual's record is set to a predetermined suspension period. During this time, OTCnet prevents an individual from processing a check through OTCnet. The individual's database record has a Trade Status of Suspend and the expiration date is set until a specific date.
TTerminal ID – The unique number assigned to the workstation where a user performs functions in OTCnet.
Trade Status – Represents the status of the verification records. There are four 4 possible trade statuses in the system: Blocked, Denied, Suspended, and Cleared. The Trade Status D-Suspended or D-Denied is assigned to auto generated Dynamic records.
Transaction History – Defines the time range that a Deposit Confirmer will be able to view the historical deposit transactions for his or her financial institutions. For example, if the transaction history is set at 45 days, the Deposit Confirmer will be able to view all the deposits that he or she has confirmed for the past 45 days.
Check Capture and Check Processing
Bureau of the Fiscal Service Capturing and Managing Checks Online
Transaction Reporting System (TRS) – A collections reporting tool, supplying the latest information on deposits and detail of collections transactions to federal agencies. The system will allow financial transaction information from all collections systems and settlement mechanisms to be exchanged in a single system.
Treasury Account Symbol (TAS) – The receipt, expenditure, appropriation, and other fund account symbols and titles as assigned by Treasury.
UUniversal Serial Bus (USB) – A connection port on a computer that is universally compatible with many types of devices, such as printers, speakers, mouse, flash drives, etc.
US Dollar Equivalent (USE) – The deposit amount, in United States currency, which is equal to the foreign currency for which it is being exchanged.
US Treasury – The executive department and the Treasury of the United States federal government.
User Defined Field (UDF) – A user-defined text that describes deposit activity or deposit accounting activity.
User Information Report – A security report allows that you to view a user’s contact information.
Users by Access Group (FI) Report – A security report that allows you to view users by financial institution.
Users by Access Group (FPA) Report – A security report that allows you to view users by OTC Endpoint.
Users by Role (FI) Report – A security report that allows you to view users by role for your financial institution.
Users by Role (FPA) Report – A security report that allows you to view users by role for your OTC Endpoint.
VView CIR File Status Report – An administration report allows you to view the status of CIR files that have been processed by Collections Information Repository (CIR) or are ready for CIR to process.
View CIR Transmission Status for Check Processing – A check processing administration report that allows you to view the status of CIR files that have been processed by CIR or are ready for CIR processing.
View Vouchers Completed Report – An administration report allows you to view the status of deposit and adjustment vouchers that have completed processing through the FI System To System Interface in the past 36 hours.
Check Capture and Check Processing 167
Capturing and Managing Checks Online Bureau of the Fiscal Service
View Vouchers in Progress Report – An administration report allows you to view the status of deposit and adjustment vouchers in progress.
Viewer – A user who has authorization to view OTCnet information and produce reports from it.
Voucher Date – The day that Debit Gateway receives transactions from OTCnet.
Voucher Number – The number assigned to a deposit by OTCnet.
Check Capture and Check Processing