changing a client invoice -...
TRANSCRIPT
Quick lesson For more information, see Help > Contents > Client invoices.
Goal: Learn how to make changes to a draft client invoice.
Changing a client invoice
In this quick lesson Step 1: Overview of the Client Invoice window 2 Step 2: Use the cutoff date to determine billable time and expense 5 Step 3: Change Time & Expense billing status 6 Step 4: Split a Time & Expense transaction 7 Step 5: Change the project time 8 Step 6: Change the header or footer text 9 Step 7: Change the invoice amounts 10 Step 8: Bill a fee by amount or percent 11
Client invoicing involves many different tasks, some of which are covered in other quick lessons:
Understanding the basics of client invoices: describes how to view, preview, print, finalize, and reprint or reissue client invoices in Ajera.
Understanding the billing review process: describes how to streamline your firm's review process with Ajera's paperless billing review feature.
This quick lesson, Changing a client invoice, describes how to make changes to a draft client invoice.

2
Quick lesson: Changing a client invoice For more information, see Help > Contents > Client invoices.
Step 1: Overview of the Client Invoice window First, let's get a quick overview of the Client Invoice window and the Entries window. In the other steps in this lesson, you will see how to make changes to entries in these windows.
Client Invoice window: main sections 1. Click Manage > Client Invoices. The Client Invoice List appears.
2. Select an invoice and click the Edit button. The Client Invoice window appears. It consists of two main sections:
3. Note these two fields in the general invoice information:
General invoice information
Invoice table
When Ajera first creates the invoice, it assigns it a status of Draft.As billable time and expenses are charged to the project, Ajera automatically adds them to the invoice. You can change the invoice status to Approved, Hold, or Write-off, as needed.
If you leave the invoice number blank, when you print final invoices Ajera assigns the invoice number based on the billing preferences you set up in Company > Preferences.
You could enter a different invoice number here. Ajera would then increment that number for future invoices.
3
Quick lesson: Changing a client invoice For more information, see Help > Contents > Client invoices.
Step 1: Overview of the Client Invoice window (continued)
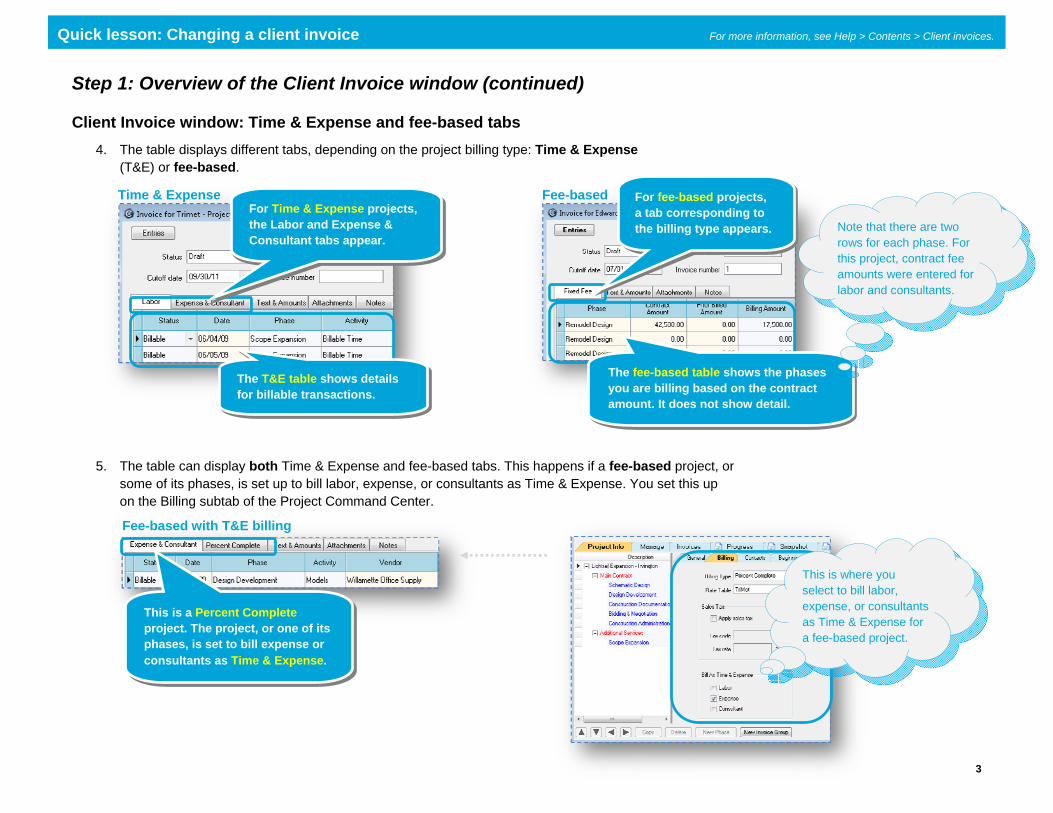
Client Invoice window: Time & Expense and fee-based tabs 4. The table displays different tabs, depending on the project billing type: Time & Expense
(T&E) or fee-based.
5. The table can display both Time & Expense and fee-based tabs. This happens if a fee-based project, or some of its phases, is set up to bill labor, expense, or consultants as Time & Expense. You set this up on the Billing subtab of the Project Command Center.
For Time & Expense projects, the Labor and Expense & Consultant tabs appear.
For fee-based projects,a tab corresponding to the billing type appears.
This is a Percent Complete project. The project, or one of its phases, is set to bill expense or consultants as Time & Expense.
The T&E table shows details for billable transactions.
The fee-based table shows the phases you are billing based on the contract amount. It does not show detail.
This is where you select to bill labor, expense, or consultants as Time & Expense for a fee-based project.
Time & Expense Fee-based
Fee-based with T&E billing
Note that there are two rows for each phase. For this project, contract fee amounts were entered for labor and consultants.
4
Quick lesson: Changing a client invoice For more information, see Help > Contents > Client invoices.
Step 1: Overview of the Client Invoice window (continued)
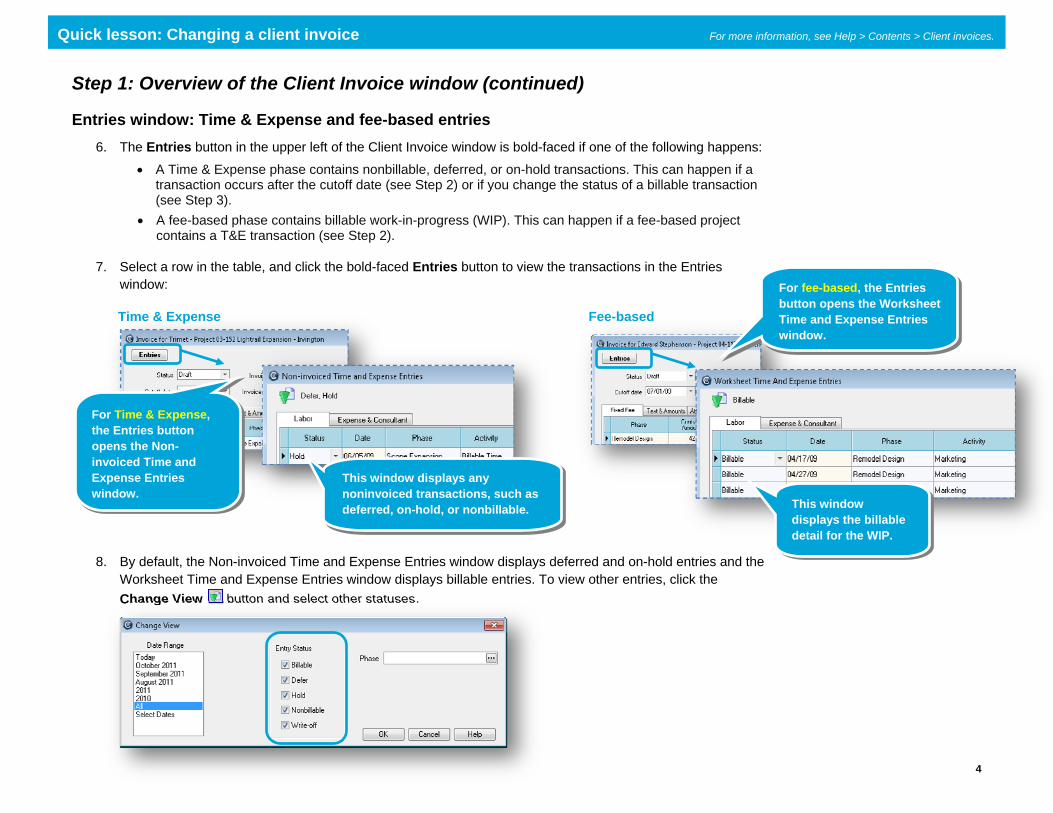
Entries window: Time & Expense and fee-based entries 6. The Entries button in the upper left of the Client Invoice window is bold-faced if one of the following happens:
A Time & Expense phase contains nonbillable, deferred, or on-hold transactions. This can happen if a transaction occurs after the cutoff date (see Step 2) or if you change the status of a billable transaction (see Step 3).
A fee-based phase contains billable work-in-progress (WIP). This can happen if a fee-based project contains a T&E transaction (see Step 2).
7. Select a row in the table, and click the bold-faced Entries button to view the transactions in the Entries window:
8. By default, the Non-invoiced Time and Expense Entries window displays deferred and on-hold entries and the Worksheet Time and Expense Entries window displays billable entries. To view other entries, click the Change View button and select other statuses.
For Time & Expense, the Entries button opens the Non-invoiced Time and Expense Entries window.
For fee-based, the Entries button opens the Worksheet Time and Expense Entries window.
This window displays any noninvoiced transactions, such as deferred, on-hold, or nonbillable. This window
displays the billable detail for the WIP.
Time & Expense Fee-based
5
Quick lesson: Changing a client invoice For more information, see Help > Contents > Client invoices.
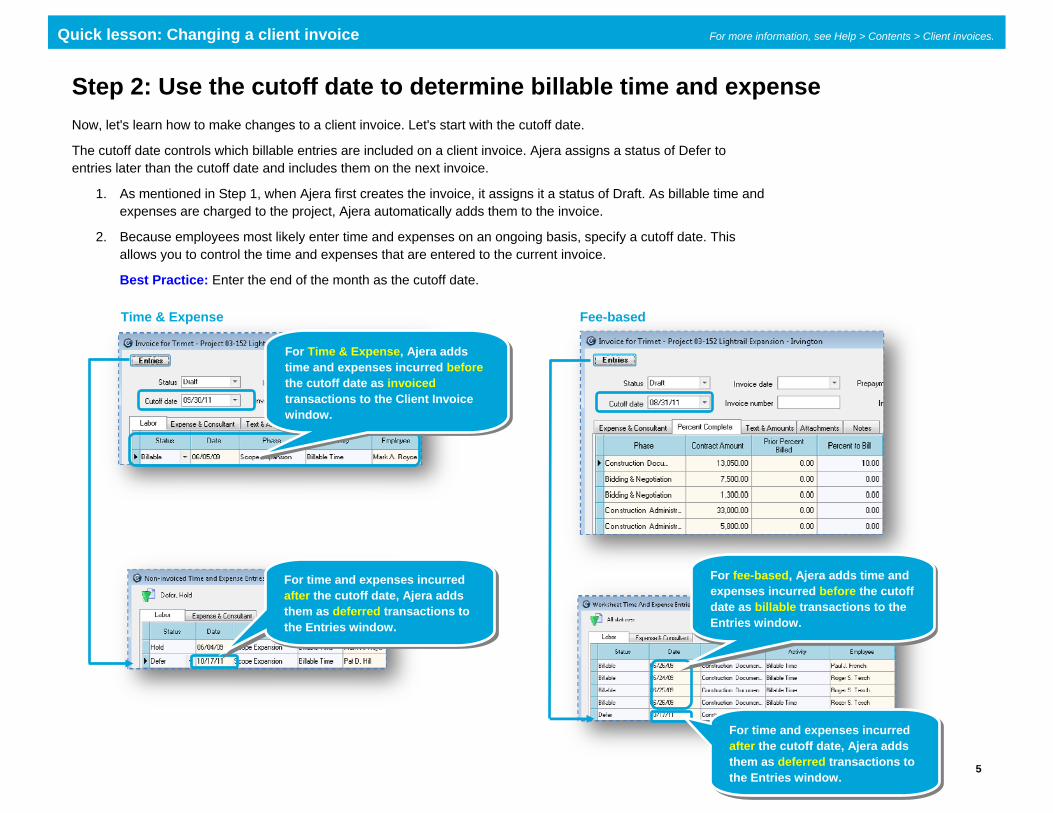
Step 2: Use the cutoff date to determine billable time and expense Now, let's learn how to make changes to a client invoice. Let's start with the cutoff date.
The cutoff date controls which billable entries are included on a client invoice. Ajera assigns a status of Defer to entries later than the cutoff date and includes them on the next invoice.
1. As mentioned in Step 1, when Ajera first creates the invoice, it assigns it a status of Draft. As billable time and expenses are charged to the project, Ajera automatically adds them to the invoice.
2. Because employees most likely enter time and expenses on an ongoing basis, specify a cutoff date. This allows you to control the time and expenses that are entered to the current invoice.
Best Practice: Enter the end of the month as the cutoff date.
Time & Expense Fee-based
For Time & Expense, Ajera adds time and expenses incurred before the cutoff date as invoiced transactions to the Client Invoice window.
For time and expenses incurred after the cutoff date, Ajera adds them as deferred transactions to the Entries window.
For fee-based, Ajera adds time and expenses incurred before the cutoff date as billable transactions to the Entries window.
For time and expenses incurred after the cutoff date, Ajera adds them as deferred transactions to the Entries window.

6
Quick lesson: Changing a client invoice For more information, see Help > Contents > Client invoices.
Step 3: Change Time & Expense billing status Let's now change a billing status. You can change the status of a billable T&E transaction in the Client Invoice window or in the Entries window.
3. You can change the status of a transaction from Billable to Defer, Hold, Nonbillable, or Write-off directly in the tables on the Expense & Consultant and Labor tabs. These transactions are moved to the Entries window.
4. In the Entries window, you can also change the billing status, if needed. If you select Billable, the entry is added back to the table on the Client Invoice window.
. . . and reappears in the Entries window.
Select an option from the Status menu.
When you change the status of a transaction and click out of the row, the entry disappears from the table . . .

7
Quick lesson: Changing a client invoice For more information, see Help > Contents > Client invoices.
Step 4: Split a Time & Expense transaction You can split a T&E transaction in the Client Invoice window or in the Entries window.
1. Right-click a transaction in the Client Invoice window or in the Entries window and select Split Transaction. The Split Transaction window appears.
2. If you split a T&E transaction in the Client Invoice window, the deferred hours are moved to the Entries window. If you split it in the Entries window, it displays in that window as Deferred.
Ajera calculates the amounts for the new deferred transaction by multiplying the units by the rate.
Enter how many units you want to bill now.
This does not affect the hours worked.
8
Quick lesson: Changing a client invoice For more information, see Help > Contents > Client invoices.
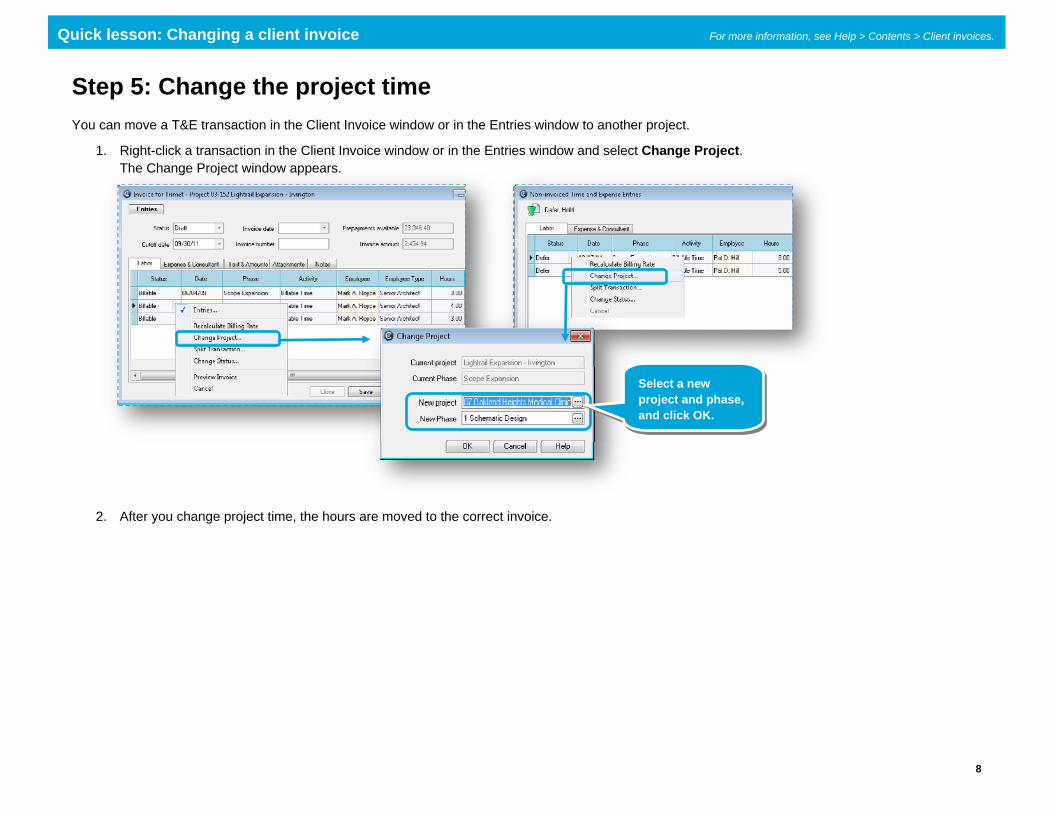
Step 5: Change the project time You can move a T&E transaction in the Client Invoice window or in the Entries window to another project.
1. Right-click a transaction in the Client Invoice window or in the Entries window and select Change Project. The Change Project window appears.
2. After you change project time, the hours are moved to the correct invoice.
Select a new project and phase, and click OK.
9
Quick lesson: Changing a client invoice For more information, see Help > Contents > Client invoices.
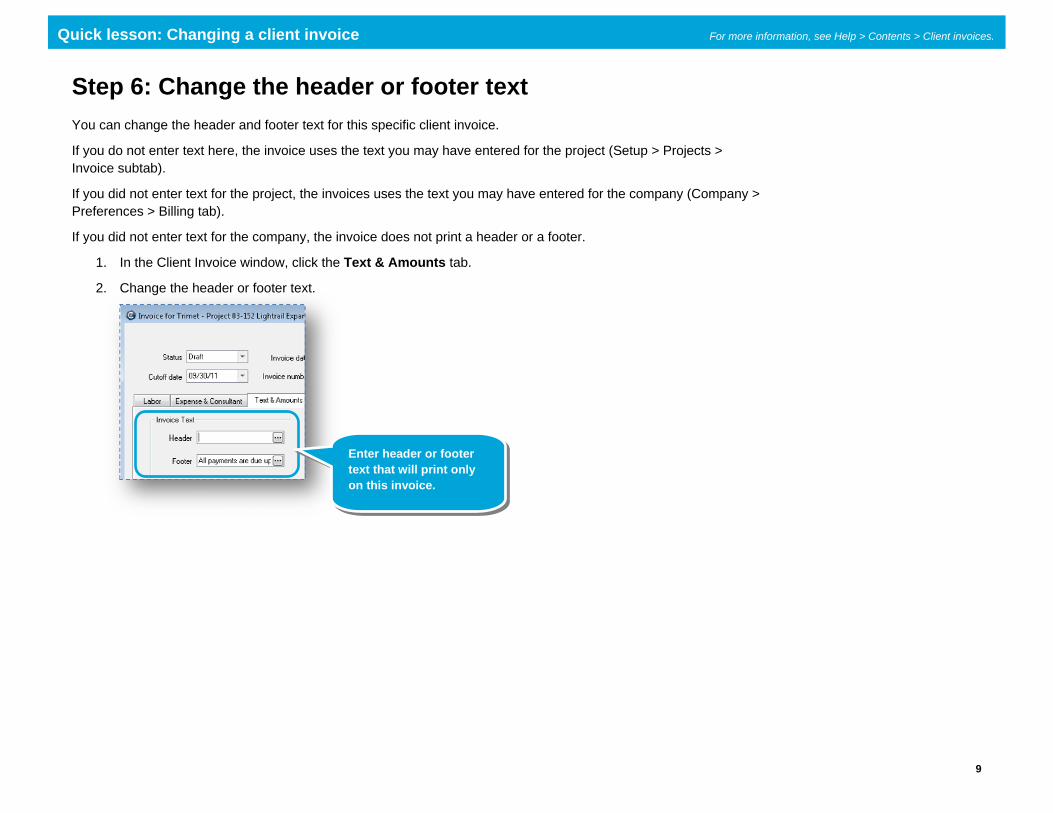
Step 6: Change the header or footer text You can change the header and footer text for this specific client invoice.
If you do not enter text here, the invoice uses the text you may have entered for the project (Setup > Projects > Invoice subtab).
If you did not enter text for the project, the invoices uses the text you may have entered for the company (Company > Preferences > Billing tab).
If you did not enter text for the company, the invoice does not print a header or a footer.
1. In the Client Invoice window, click the Text & Amounts tab.
2. Change the header or footer text.
Enter header or footer text that will print only on this invoice.
10
Quick lesson: Changing a client invoice For more information, see Help > Contents > Client invoices.
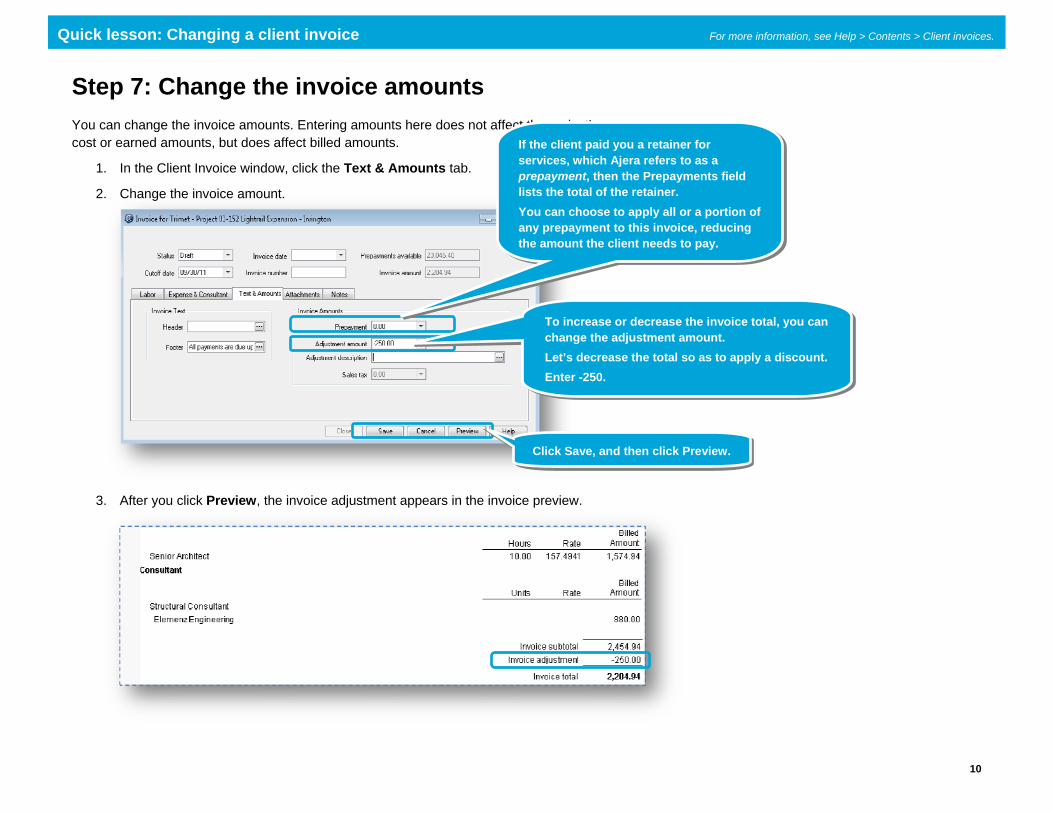
Step 7: Change the invoice amounts You can change the invoice amounts. Entering amounts here does not affect the project’s cost or earned amounts, but does affect billed amounts.
1. In the Client Invoice window, click the Text & Amounts tab.
2. Change the invoice amount.
3. After you click Preview, the invoice adjustment appears in the invoice preview.
If the client paid you a retainer for services, which Ajera refers to as a prepayment, then the Prepayments field lists the total of the retainer. You can choose to apply all or a portion of any prepayment to this invoice, reducing the amount the client needs to pay.
To increase or decrease the invoice total, you can change the adjustment amount. Let’s decrease the total so as to apply a discount. Enter -250.
Click Save, and then click Preview.
11
Quick lesson: Changing a client invoice For more information, see Help > Contents > Client invoices.
Summary This quick lesson has shown you how to change a client invoice.
View these related quick lessons:
Understanding the basics of a client invoice Understanding the billing review process
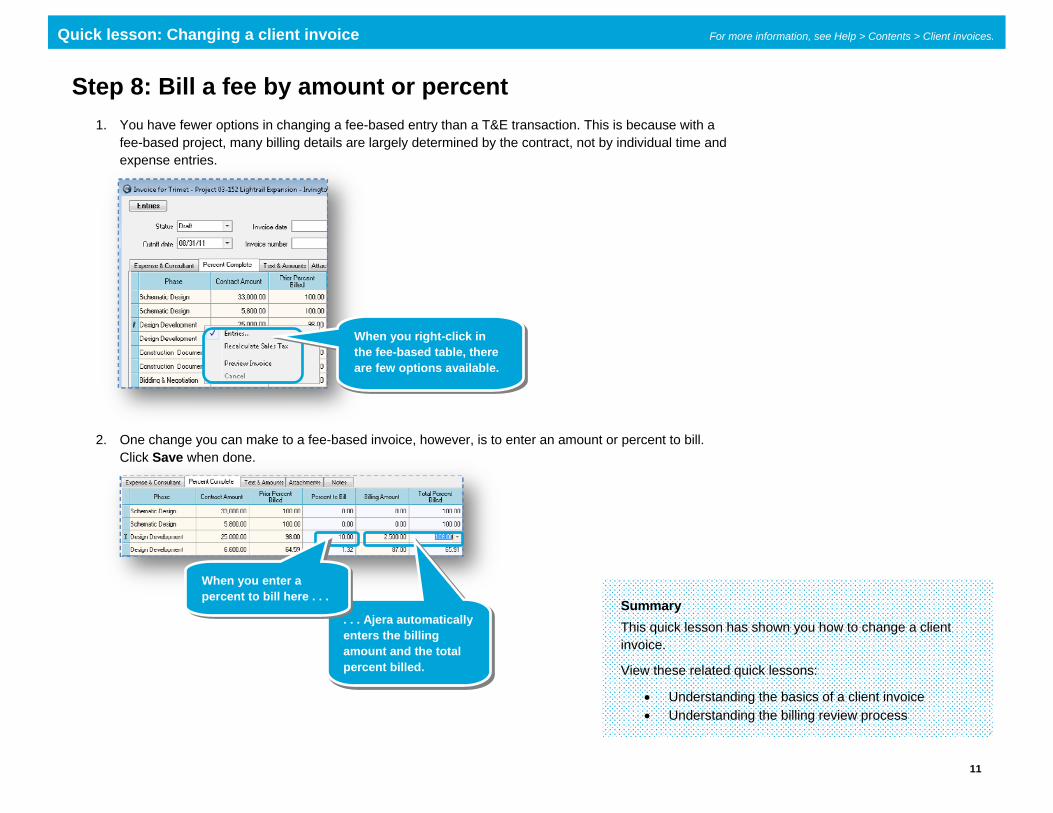
Step 8: Bill a fee by amount or percent 1. You have fewer options in changing a fee-based entry than a T&E transaction. This is because with a
fee-based project, many billing details are largely determined by the contract, not by individual time and expense entries.
2. One change you can make to a fee-based invoice, however, is to enter an amount or percent to bill. Click Save when done.
. . . Ajera automatically enters the billing amount and the total percent billed.
When you enter a percent to bill here . . .
When you right-click in the fee-based table, there are few options available.

12
Quick lesson: Changing a client invoice For more information, see Help > Contents > Client invoices.
Do not print this page
If you select The transaction is
Defer Not included on the current invoice but automatically included on the next invoice.
Hold In a pending state and not included on the current invoice.
Nonbillable Project-related but not being billed. The project still shows the cost amount but no spent amount.
Write-off Reflected on the project and the financials as a write-off. The project still shows the cost and spent amounts.