chap sfl enrollment system -...
TRANSCRIPT

CHAP–SFL ENROLLMENT SYSTEM
USER TRAINING MANUAL
Version 1.3
05/24/2012

CHAP–SFL Enrollment System
Page 2 of 61
VERSION HISTORY
Version #
Implemented
By
Revision
Date
Approved
By
Approval
Date
Reason
1.0 Tom Brown 03/01/2012 Initial draft
1.1 Tom Brown 03/13/2012 Second draft
1.2 Tom Brown 04/27/2012 Third draft
1.3 Tom Brown 05/08/2012 Final

CHAP–SFL Enrollment System
Page 3 of 61
TABLE OF CONTENTS
TABLE OF CONTENTS ........................................................................................................................... 3
FIGURES ..................................................................................................................................................... 5
OVERVIEW ................................................................................................................................................ 7
LOGIN ......................................................................................................................................................... 9
THE MAIN MENU ................................................................................................................................... 12
USER FUNCTIONALITY (“MAIN”) .................................................................................................... 13 View Clients ........................................................................................................................................ 13 Enroll New .......................................................................................................................................... 15 Reenroll Existing ................................................................................................................................. 16 DisEnroll Client .................................................................................................................................. 17 Enrolling or Re-Enrolling a Client ...................................................................................................... 20
Overview .................................................................................................................................... 20 Client Addresses ......................................................................................................................... 20 Race ............................................................................................................................................ 20 Add Household Member ............................................................................................................ 21 MCI Numbers ............................................................................................................................. 21 Deductible ................................................................................................................................... 26 Admitted to Hospital / Hospital Emergency Room .................................................................... 27 Hospitalization Reason ............................................................................................................... 27 Health Problems ......................................................................................................................... 28 Add New Family Health Record ................................................................................................ 28 Medicaid Application Status....................................................................................................... 30 Children Included in Medicaid Application ............................................................................... 30 Income Level .............................................................................................................................. 32 CHAP Enrollment Status ............................................................................................................ 32 Referrals...................................................................................................................................... 32 SFL Enrollment Status ................................................................................................................ 34 SFL Eligibility ............................................................................................................................ 35 Saving an Enrollment or Re-enrollment ..................................................................................... 35 Exit Without Saving the Enrollment ........................................................................................... 36
Case Notes ........................................................................................................................................... 37 Case Notes vs. Comments .......................................................................................................... 38 Writing a Note ............................................................................................................................ 38 Reminders ................................................................................................................................... 38 Differences from SFL ................................................................................................................. 39 Printing Case Notes .................................................................................................................... 39
Printing Reenrollment and Welcome Letters ...................................................................................... 40
ADMINISTRATOR FUNCTIONALITY (“ADMINISTRATION”) ................................................... 41 Overview ............................................................................................................................................. 41 Blood Pressure Responses (Supports Enrollment Question #25) ....................................................... 41 Change Screening Client ID ................................................................................................................ 42 Client De-duplication .......................................................................................................................... 43 CHAP Record Status ........................................................................................................................... 45

CHAP–SFL Enrollment System
Page 4 of 61
Child Enroll Codes .............................................................................................................................. 46 Client History ...................................................................................................................................... 47 Denied Medicaid ................................................................................................................................. 48 Diabetes Response .............................................................................................................................. 49 Health Home ....................................................................................................................................... 50 Health Provider Types......................................................................................................................... 51 Ineligible Reasons ............................................................................................................................... 52 Last Visits ........................................................................................................................................... 53 Limited Medicaid ................................................................................................................................ 54 Medicaid Appl Status .......................................................................................................................... 55 Medicaid Status ................................................................................................................................... 56 No Doctor Reason ............................................................................................................................... 57 Referral Sources .................................................................................................................................. 58 SFL Enrollment Status ........................................................................................................................ 59 Three Pap Rules .................................................................................................................................. 60 VIP Doctors ......................................................................................................................................... 61

CHAP–SFL Enrollment System
Page 5 of 61
FIGURES
Figure 1: Example of a list showing the "Deleted" flag................................................................................................. 7 Figure 2: Example of a grid-based list with sorting and paging controls (Note that the list in the illustration has a
second page, which begins with ID # 11 at the top) ...................................................................................................... 8 Figure 3: Login Dialog .................................................................................................................................................. 9 Figure 4: Change Password Dialog ............................................................................................................................. 10 Figure 5: Top of page showing the “Change Password”(#1) and the "Sign Out"(#2) controls. .................................. 11 Figure 6: The Main Menu ............................................................................................................................................ 12 Figure 7: Viewing Clients: The Search Screen ............................................................................................................ 13 Figure 8: Client Search: The List Tab (Part 1 of 2) ..................................................................................................... 14 Figure 9: Client Search: The List Tab (Part 2 of 2) ..................................................................................................... 15 Figure 10: Client Search When Reenrolling One or More Clients .............................................................................. 16 Figure 11: Client Search When Disenrolling One or More Clients ............................................................................. 17 Figure 12: View / Edit / Enroll / Re-Enroll Client (Client tab) .................................................................................... 19 Figure 13: Popup Dialog to add/edit a member of the client’s household ................................................................... 21 Figure 14: The Results of an MCI Search ................................................................................................................... 22 Figure 15: Top Portion of the Enrollment Screen Showing the MCI Field and Lookup Button ................................. 23 Figure 16: View / Edit / Enroll / Re-Enroll Client (Eligibility tab) ............................................................................. 25 Figure 18: Hospitalization Dialog............................................................................................................................... 27 Figure 19: View / Edit / Enroll / Re-Enroll Client (Health tab) ................................................................................... 28 Figure 20: Popup dialog - Who in the family had cancer ............................................................................................ 29 Figure 22: Popup Child Medicaid Dialog .................................................................................................................... 31 Figure 23: View / Edit / Enroll / Re-Enroll Client (CHAP Information tab) ............................................................... 31 Figure 24: Enrollment Referral Dialog ........................................................................................................................ 33 Figure 25: View / Edit / Enroll / Re-Enroll Client (SFL Information tab)................................................................... 34 Figure 26: Case Management: List All Tab ................................................................................................................. 37 Figure 27: Case Management: Details Tab .................................................................................................................. 38 Figure 28: Sample Case Notes Report for a single client ............................................................................................ 39 Figure 29: Date Range Prompt for Printing Reenrollment Letters .............................................................................. 40 Figure 30: Date Range Prompt for Printing Welcome Letters (Batch Print) ............................................................... 40 Figure 31: Admin - Told Have High Blood Pressure .................................................................................................. 41 Figure 32: Admin - Told Have High Blood Pressure .................................................................................................. 41 Figure 33: Changing the Client ID connected to a Screening Form ............................................................................ 42 Figure 34: Client De-Duplication ................................................................................................................................ 43 Figure 35: Admin - CHAP Record Status ................................................................................................................... 45 Figure 36: Admin - CHAP Record Status ................................................................................................................... 45 Figure 37: Admin - Child Enrollment Codes ............................................................................................................... 46 Figure 38: Admin - Child Enrollment Codes ............................................................................................................... 46 Figure 39: View all Enrollment Records for One Client ............................................................................................. 47 Figure 39: Admin - Denied Medicaid .......................................................................................................................... 48 Figure 40: Admin - Denied Medicaid .......................................................................................................................... 48 Figure 41: Admin - Told Have Diabetes ..................................................................................................................... 49 Figure 42: Admin - Told Have Diabetes ..................................................................................................................... 49 Figure 43: Admin - Health Home ................................................................................................................................ 50 Figure 44: Admin - Health Home ................................................................................................................................ 50 Figure 45: Admin - Health Provider Types ................................................................................................................. 51 Figure 46: Admin - Health Provider Types ................................................................................................................. 51

CHAP–SFL Enrollment System
Page 6 of 61
Figure 47: Admin – Ineligible Reason ......................................................................................................................... 52 Figure 48: Admin – Ineligible Reason ......................................................................................................................... 52 Figure 49: Admin - Last Visit ...................................................................................................................................... 53 Figure 50: Admin - Last Visit ...................................................................................................................................... 53 Figure 51: Admin - Limited Medicaid ......................................................................................................................... 54 Figure 52: Admin - Limited Medicaid ......................................................................................................................... 54 Figure 53: Admin - Medicaid Application Status ........................................................................................................ 55 Figure 54: Admin - Medicaid Application Status ........................................................................................................ 55 Figure 55: Admin - Medicaid Status............................................................................................................................ 56 Figure 56: Admin - Medicaid Status............................................................................................................................ 56 Figure 57: Admin - No Doctor Reason ........................................................................................................................ 57 Figure 58: Admin - No Doctor Reason ........................................................................................................................ 57 Figure 59: Admin - Referral Source ............................................................................................................................ 58 Figure 60: Admin - Referral Source ............................................................................................................................ 58 Figure 61: Admin - SFL Enrollment Status ................................................................................................................. 59 Figure 62: Admin - SFL Enrollment Status ................................................................................................................. 59 Figure 63: Admin - Three Pap Rules ........................................................................................................................... 60 Figure 64: Admin - Three Pap Rules ........................................................................................................................... 60 Figure 65: Admin - VIP Doctors ................................................................................................................................. 61 Figure 66: Admin - VIP Doctors ................................................................................................................................. 61
CHAP–SFL Enrollment System
Page 7 of 61
OVERVIEW
This document describes the new integrated Community Healthcare Access Program (hereafter called “CHAP”) and Screening for Life (hereafter called “SFL”) enrollment application process, which is provided as a Web application.
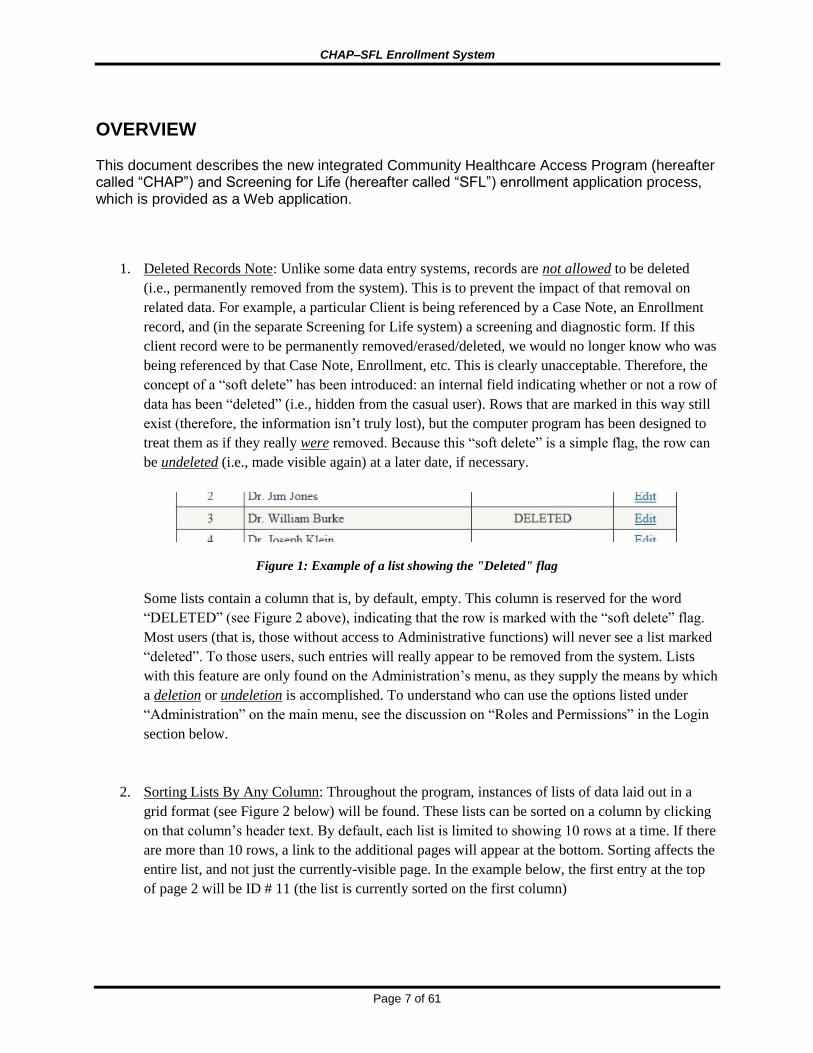
1. Deleted Records Note: Unlike some data entry systems, records are not allowed to be deleted
(i.e., permanently removed from the system). This is to prevent the impact of that removal on
related data. For example, a particular Client is being referenced by a Case Note, an Enrollment
record, and (in the separate Screening for Life system) a screening and diagnostic form. If this
client record were to be permanently removed/erased/deleted, we would no longer know who was
being referenced by that Case Note, Enrollment, etc. This is clearly unacceptable. Therefore, the
concept of a “soft delete” has been introduced: an internal field indicating whether or not a row of
data has been “deleted” (i.e., hidden from the casual user). Rows that are marked in this way still
exist (therefore, the information isn’t truly lost), but the computer program has been designed to
treat them as if they really were removed. Because this “soft delete” is a simple flag, the row can
be undeleted (i.e., made visible again) at a later date, if necessary.
Figure 1: Example of a list showing the "Deleted" flag
Some lists contain a column that is, by default, empty. This column is reserved for the word
“DELETED” (see Figure 2 above), indicating that the row is marked with the “soft delete” flag.
Most users (that is, those without access to Administrative functions) will never see a list marked
“deleted”. To those users, such entries will really appear to be removed from the system. Lists
with this feature are only found on the Administration’s menu, as they supply the means by which
a deletion or undeletion is accomplished. To understand who can use the options listed under
“Administration” on the main menu, see the discussion on “Roles and Permissions” in the Login
section below.
2. Sorting Lists By Any Column: Throughout the program, instances of lists of data laid out in a
grid format (see Figure 2 below) will be found. These lists can be sorted on a column by clicking
on that column’s header text. By default, each list is limited to showing 10 rows at a time. If there
are more than 10 rows, a link to the additional pages will appear at the bottom. Sorting affects the
entire list, and not just the currently-visible page. In the example below, the first entry at the top
of page 2 will be ID # 11 (the list is currently sorted on the first column)

CHAP–SFL Enrollment System
Page 8 of 61
Figure 2: Example of a grid-based list with sorting and paging controls (Note that the list in the illustration has a
second page, which begins with ID # 11 at the top)

CHAP–SFL Enrollment System
Page 9 of 61
LOGIN
Figure 3: Login Dialog
The integrated CHAP-SFL enrollment system maintains its own security. That means a login process
separate from whatever must be done to gain access to the Web application in the first place. It also
means that CHAP/SFL maintains its own role-centric permissions in relation to the user’s login
credentials.
User ID:
To start using the system, the user must first identify himself by typing their full name into the
“Username” box. Note that upper and lower case matters. “Adam”, “ADAM”, and “adam” are all
different names to the system. . At login, the user will also identify their location/site/facility by using the
drop-down list (marked “Site Number”) on the login screen. The Password, like the Username, must be
an exact match with what has been stored in the system. Again, upper and lower case matters.
Roles and Permissions:
The integrated CHAP/SFL Enrollment system restricts what a particular user can do by means of roles.
These Roles are defined in the database as “Account Types” in the “SecAccounts_T1” table. The system
will hide any option the user does not have specific permission to use. The current Roles are listed below:
Admin
Case Mgr
CC Dir
DE Tech
DE Temp
Director
Enr Spec
MA II
NC
Secretary
CHAP
Permissions are menu-centric That is, permission is given (or not given) to see / use / interact with
specific items in the application’s menu. Thus, if a particular Role lacks the permission to access, for
example, the “Enroll New” menu item, then that menu option will not be shown to any user assigned to
that Role.

CHAP–SFL Enrollment System
Page 10 of 61
In general, access to the “Administration” menu items is restricted to the “Admin” role, although it is
possible to assign a subset of those to other (possibly supervisory) Roles.
Change password:
The first time you login to the Web Application, you will be asked to change your password, using the
prompt shown in Figure 4: Change Password Dialog. Passwords must be selected according to certain
rules:
Minimum length: passwords must be at least 8 characters long
Must include certain characters: passwords must include the following character types:
o Lower-case letters (a thru z)
o Upper-case letters (A thru Z)
o Numbers (0 thru 9)
o Special Characters: !@#$%^&*()_-+={[}]|:;<,>.?~`
Special characters cannot be the first or the last one in the password.
Cannot contain three or more consecutive letters (e.g.: abc) or digits (e.g.: 123).
Cannot contain three or more of the same letter (e.g.: bbb) or number (444) in a row.
Passwords expire after 90 days. After that time, they must be changed.
The last 8 previously used passwords cannot be repeated.
This password is separate from, and is unaffected by changes to, any other password. For example, email
and/or network access passwords aren’t used by the integrated CHAP-SFL Enrollment Web Application.
Figure 4: Change Password Dialog
CHAP–SFL Enrollment System
Page 11 of 61
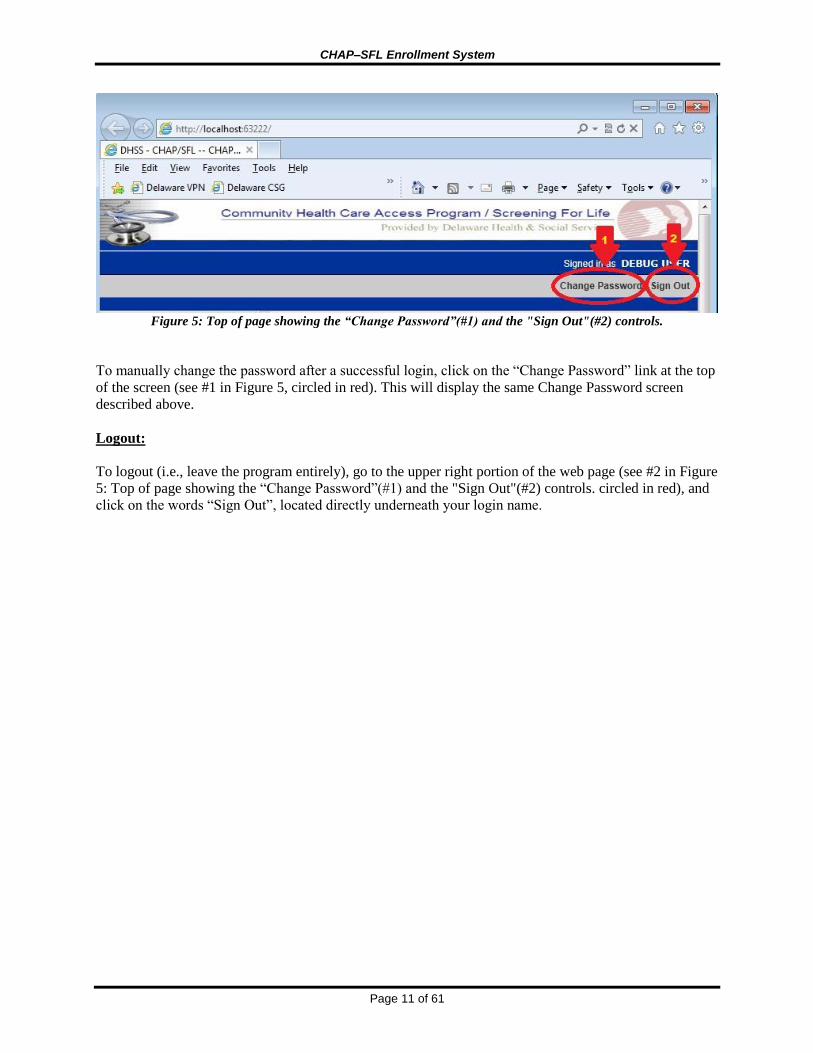
Figure 5: Top of page showing the “Change Password”(#1) and the "Sign Out"(#2) controls.
To manually change the password after a successful login, click on the “Change Password” link at the top
of the screen (see #1 in Figure 5, circled in red). This will display the same Change Password screen
described above.
Logout:
To logout (i.e., leave the program entirely), go to the upper right portion of the web page (see #2 in Figure
5: Top of page showing the “Change Password”(#1) and the "Sign Out"(#2) controls. circled in red), and
click on the words “Sign Out”, located directly underneath your login name.

CHAP–SFL Enrollment System
Page 12 of 61
The Main Menu
The available options on the menu strip (fixed to the left side of the
web page, see Figure 6: The Main Menu) will hide any option not
allowed by the current user’s role. For example, if a user lacks
Administrator rights for the CHAP/SFL system, they may see the
options listed under “Main”, but not the ones under the
“Administration” link (or, indeed, the “Administration” link at al)l.
Each option listed on the menu strip represents an individual web
page. To access that web page, the user merely has to click on the
text (which in the Internet universe is called a “Hypertext Link”, or
merely a “Link”).
Note: the “Welcome Letters” shown on the menu is the equivalent
of the current “Batch Print” function in the legacy Enrollment
portion of Screening for Life, extended to cover both SFL and
CHAP. This menu option will print both the Welcome and Denial
letters, depending upon each Client’s eligibility status.
Figure 6: The Main Menu

CHAP–SFL Enrollment System
Page 13 of 61
USER FUNCTIONALITY (“MAIN”)
Figure 7: Viewing Clients: The Search Screen
VIEW CLIENTS
In order to view a particular client’s enrollment record, the Client Search screen must be used (see Figure
7: Viewing Clients: The Search Screen by clicking on “view clients” from MAIN menu. This screen
consists of two tabs: Search Criteria and the Client List. The Search Criteria tab is where the client (or set
of multiple clients) is identified. Each client has a unique ID number1, which can be searched for directly,
if known. The Client ID is a 5- or 6-digit number that gets assigned to anyone who applies for enrollment,
even if that enrollment is not granted due to ineligibility. Also note that it is possible for an individual to
qualify for CHAP only, SFL only, both CHAP and SFL, or neither.
1 In the legacy CHAP system, this is the equivalent of the “Membership ID” (which is not supported in
the CHAP-SFL Enrollment system).

CHAP–SFL Enrollment System
Page 14 of 61
Not all “Search Criteria” fields need to be filled-in, only the minimum
necessary to find a particular individual! For example: Last Name and Zip
Code.
After entering the desired search criteria into the appropriate fields, clicking the “Find Matching Clients”
button will activate the “Client List” tab, filling that list with the result of the search.
Text can be entered into the search criteria fields in upper case, lower case, or mixed case letters. For the
First name, Last name, Maiden name, and City, you can search on the first couple of letters (e.g., “ca”
will match the last name “Carter” and “dov” matches the city of Dover). For the street address, you can
search on any part (e.g., “ma” will match “1234 Main Street”). This allows you to search for the street
name and ignore the house number.
Be careful using fields such as “Middle Initial” or even “Social Security Number”, as
that information may not have been entered into the database for the target client!
If the search list doesn’t return the desired individual, use different field(s) and try
again. Required data fields that can be depended on are: First Name, Last Name, and
Date of Birth. In addition, City, State, and Zip Code are good search fields, but can
change between enrollments.
Figure 8: Client Search: The List Tab (Part 1 of 2)
If the desired client appears in the list (see Figure 8: Client Search: The List Tab (Part 1 of 2)), click on
the appropriate link to the left of the name.
View: This results in a read-only Enrollment document, which cannot be altered.

CHAP–SFL Enrollment System
Page 15 of 61
Edit: This edits the selected Enrollment record. This link is available only if the user has “Enroll New”
or “Reenroll Existing” permissions.
Print: This prints (or re-prints) the Welcome Letter for the selected Enrollment, performing the same
action as the Batch Print process for a single individual client enrollment. This link is available
only if the user has “Reenrollment Letters”, or “Welcome Letters” permissions.
Note that the Client List columns will resize according to the amount of text within. The Client List
automatically splits into multiple pages if the list is large enough (the current page limit is set to 10 rows).
To sort the Client List by a particular column, simply single click that column’s header text (e.g. clicking
on “Last Name” will sort the entire list by the clients’ last names.
Figure 9: Client Search: The List Tab (Part 2 of 2)
ENROLL NEW
Before a client can be entered into the new enrollment system, it must first be determined whether or not
they currently exist in the CHAP-SFL system. Reminder: an individual may exist in the system and yet be
ineligible for any services. All who apply for CHAP and/or SFL services are permanently recorded in the
system, and given a unique Client ID number, even if they don’t qualify for either CHAP or SFL.
If the client does exist in the system already, then they need to be “re-enrolled”, rather than “enrolled”,
even if they don’t currently qualify for any benefits. This is done by selecting “Reenroll Existing” from
the Main menu then searching for the individual(s) to be reenrolled.
If the Client List doesn’t contain the desired client, and it is determined (e.g., through multiple searches –
click on the “Search Criteria” tab to change what you’re looking for and try again.) that the Individual has
never been a Client, then clicking on the “Add New Client” button will do two things when changes are
saved:
1. Create a new client, assigning the individual a unique Client ID.
2. Create a new Enrollment record for that new Client ID.

CHAP–SFL Enrollment System
Page 16 of 61
The Client Search screen is used in several places in the CHAP-SFL Enrollment
application, so this “Add New Client” button may not always be available, in which case
you’re in a place where creating a new client is either not allowed or not possible.
Information entered as part of the Client Search will be used to fill-in otherwise empty fields on the Client
Enrollment Information screen (see Figure 12: View / Edit / Enroll / Re-Enroll Client (Client tab)). These
fields can then be changed, as desired.
See the discussion below on actually Enrolling clients.
Figure 10: Client Search When Reenrolling One or More Clients
REENROLL EXISTING
If a client already exists in the CHAP-SFL enrollment system, they need to be reenrolled, rather than
enrolled. When the “Reenroll Existing” function is selected from the Main Menu (see Figure 6 ), the
Client Search screen is presented with a few changes from “View Clients”:
1. The “Add New Client” button is not available (see Figure 10: Client Search When Reenrolling
One or More Clients)
2. To the left of the selected entry in the Client List, the “Edit” link is replaced by “Re-Enroll”, and
“Print” is not available.
See the discussion below on actually Re-enrolling clients.

CHAP–SFL Enrollment System
Page 17 of 61
Figure 11: Client Search When Disenrolling One or More Clients
DISENROLL CLIENT
If it becomes necessary to force a client enrollment to expire immediately, the “Disenroll Client” function
is selected from the Main Menu (see Figure 6: The Main Menu). The Client Search screen is presented
with a few changes from “View Clients”:
1. The “Add New Client” button is not available (see Figure 11: Client Search When Disenrolling
One or More ClientsFigure 10: Client Search When Reenrolling One or More Clients)
2. To the left of the selected entry in the Client List, the “Edit” link is replaced by “Dis-Enroll”, and
“Print” is not available.

CHAP–SFL Enrollment System
Page 18 of 61

CHAP–SFL Enrollment System
Page 19 of 61
Figure 12: View / Edit / Enroll / Re-Enroll Client (Client tab)

CHAP–SFL Enrollment System
Page 20 of 61
ENROLLING OR RE-ENROLLING A CLIENT
Overview
The process of enrolling and re-enrolling someone into the CHAP-SFL system is pretty much identical,
the chief difference being that, in a re-enrollment, information on the client already exists and is displayed
on-screen. Client information is entered into the Client Enrollment Information screen (see Figure 12:
View / Edit / Enroll / Re-Enroll Client (Client tab)).
The system automatically calculates the enrollment and expiration dates for new enrollments and re-
enrollments, but not when simply editing an existing enrollment record. The user will be able to edit the
enrollment and/or expiration dates, depending on their permissions. If one of these two fields is disabled,
then that permission has not been given. Permission to change the enrollment date is given separately
from the expiration date. Whenever the Enrollment Date is changed, the Expiration Date will
automatically change as well to a date one year from the new Enrollment Date. However, when the
Expiration Date is manually changed, the Enrollment Date is not affected.
The Client Enrollment Information screen is divided into multiple tabs, keeping the data entry process
organized while at the same time keeping each screen to a reasonable length thus minimizing scrolling.
If at any time during the Enrollment or Re-enrollment process it becomes necessary or
desirable to enter what the legacy CHAP system called a “Comment”, clicking on the
“Case Notes” button will save the Client information entered so far, and display the
separate “Case Notes” screen. See Figure 26: Case Management: List All Tab and the
discussion on Case Management for more information.
Before clicking on the “Lookup MCI#” button at the top of the screen, it is strongly
recommended that the entire Client tab be completed, thus giving that lookup process
enough information on the client to locate them in the state information system if they
exist, or create a new MCI record if they do not.
Client Addresses
Clicking the “Copy Home Address” button copies the “Home Address” fields to the “Mailing Address”
fields, overwriting whatever is present. If, however, the “Mailing Address” fields are left blank when the
enrollment record is saved (using the “Save All” button at the top of the screen), they will be filled-in
automatically from the “Home Address”. The result is that, under normal circumstances, the “Mailing
Address” won’t be left blank.
Race
The available answers in each of the Race drop-down lists on the Client tab are:
White
Black or African American
Asian
Native Hawaiian or Other Pacific Islander

CHAP–SFL Enrollment System
Page 21 of 61
American Indian or Alaskan Native
Unknown
Add Household Member
When adding a new Household Member record to the current enrollment (see Figure 13), the system will
first perform a “Save All” in order to guarantee that a unique Client ID number exists to link that
enrollment record to the new Household Member record(s).
Figure 13: Popup Dialog to add/edit a member of the client’s household
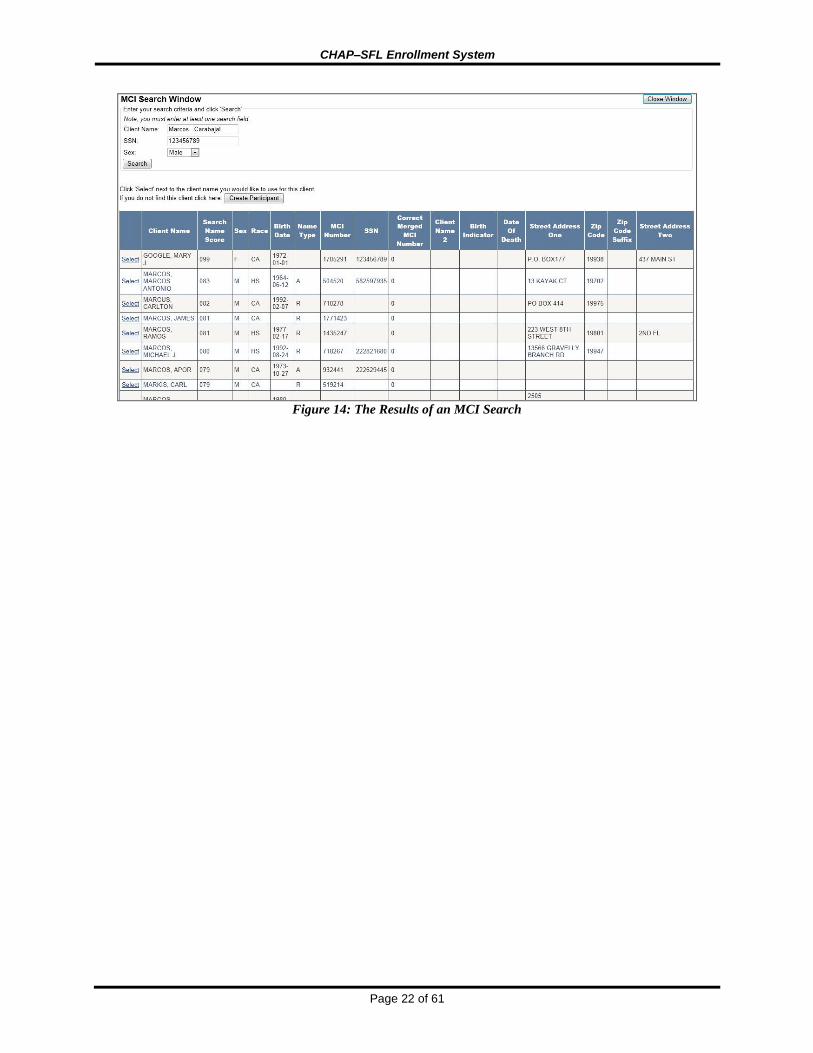
MCI Numbers
The MCI number is used by the State of Delaware to associate the records of a specific individual across
all state information systems, and is required for all CHAP / SFL clients. Clicking the “Lookup MCI #”
button will allow the User to search for the current client in the existing MCI database. If the Client is in
the resulting list (see Figure 14), clicking the word “Select” beside their name will return the Client’s
existing MCI number to the enrollment screen. Or, if that individual doesn’t yet exist in the MCI
database, create a new record for them by clicking the “Create New Participant” button at the top of the
“MCI Client Search” screen (see Figure 14). This will add the Client to MCI, and return their new MCI
number.
CHAP–SFL Enrollment System
Page 22 of 61
Figure 14: The Results of an MCI Search

CHAP–SFL Enrollment System
Page 23 of 61
Once retrieved from the MCI web service, whether by selecting an existing individual or by adding the
current client to the MCI database, the MCI number is displayed in the “MCI#” field, a read-only text box
at the top of the Client Enrollment Information screen (see Figure 12: View / Edit / Enroll / Re-Enroll
Client (Client tab). The only way to change this field is by clicking the “Lookup MCI#” button at the top
of that screen
Figure 15: Top Portion of the Enrollment Screen Showing the MCI Field and Lookup Button
At minimum, the search for an existing MCI client requires either a valid Social Security Number or, if
that isn’t available, the client’s name and sex. An error will be generated if the lookup button is clicked
without this information filled-in. Note: Because it is possible for the MCI database to lack the Social
Security Number for a particular client, the SSN lookup may fail, requiring the system to fall back on the
name and sex search.
Before clicking on the “Lookup MCI#” button, it is strongly recommended that the
entire Client tab be completed, thus giving the lookup process enough information on
the client to locate them in the state information system if they exist, or create a new
MCI record if they do not.
The results of an MCI search will appear in the “MCI Client Search” screen (see Figure 14). Listed will
be all clients (up to a maximum of 100) that match the search criteria. The fields returned are as follows:
Client Name (e.g., Smith, John A Jr). Search Name Score (e.g., 099)
Sex (e.g. M)
Race (e.g. CA)
Birth Date (e.g. 1998-06-08)
Name Type (e.g. R)
MCI Number (e.g. 1016453)
SSN (e.g. 123456789)
Correct Merged MCI Number (e.g. 0) (for duplicate client entries)
Client Name 2 (client maiden name)
Birth Indicator (multiple birth indicator)
Date Of Death
Street Address One (e.g. 2009 MAIN ST)
Zip Code (e.g. 19801)
Zip Code Suffix
Street Address Two
If one of the individuals in that list is the client being interviewed, the “Select” link next to that person
should be clicked. Doing so will return that individual’s MCI number to the Client Enrollment

CHAP–SFL Enrollment System
Page 24 of 61
Information screen. If the client does not appear in the list, then they must be added, using the “Create
New Participant” button.
Note: The “Create New Participant” process requires that the following information be entered into the
Client Enrollment Information screen. These fields in the MCI database will be updated whenever an
enrollment record is saved.
Last Name
First Name
Middle Initial
Sex
Race
Birth Date
Social Security Number
US Citizen
Home Address – Including the Apartment, City, State, Zip, and County fields.
Home Phone Number

CHAP–SFL Enrollment System
Page 25 of 61
Figure 16: View / Edit / Enroll / Re-Enroll Client (Eligibility tab)

CHAP–SFL Enrollment System
Page 26 of 61
Deductible
Question #4 on the eligibility tab will only show one amount line, next to either “Yes” or “No”,
depending on what is selected. These two are actually the same field, so that a dollar amount entered in
one will appear in the other if the user switches between “Yes” and “No”.
Figure 17: View / Edit / Enroll / Re-Enroll Client (Access And Utilization tab)

CHAP–SFL Enrollment System
Page 27 of 61
Admitted to Hospital / Hospital Emergency Room
On both question #15 (When was the last time you went to a hospital Emergency department for care?)
and #16 (When was the last time you were admitted to the hospital?) on the Access tab, the “how many
times” prompt and text box are only visible if the user selects “1-Within the past 6 months (0 to 6
months)” as the answer. The answers offered in the “when was the last time” dropdown for both question
15 and 16 are:
Within the past 6 months (0 to 6 months)
Within the past year (6 to 12 months)
Within the past 2 years (1 to 2 years ago)
Within the past 5 years (2 to 5 years ago)
5 or more years ago
Don't know / Not Sure
Never
Refused
new one
If question #16 is answered “Never”, then all of question #17 (What were the reasons for your last
hospitalization?) is disabled and must be skipped. Otherwise, you have to answer question #17 and
provide the reason for the Client’s most recent stay in the hospital (see Figure 18).
Figure 18: Hospitalization Dialog
Hospitalization Reason
When adding a new Hospitalization Reason record to the current enrollment (from Question #17 on the
Access tab), the system will first perform a “Save All” in order to guarantee that a unique ID number
exists to link that enrollment record to the new Hospitalization record(s) before displaying the “Edit
Hospitalization” screen (see Figure 18). Since there may be more than one reason for the Client’s most
recent stay in the hospital, the “Add New Reason” button on the Access tab (see Figure 17) can be used
multiple times on the same enrollment application to add all the reasons.

CHAP–SFL Enrollment System
Page 28 of 61
Figure 19: View / Edit / Enroll / Re-Enroll Client (Health tab)
Health Problems
If Question #19 is answered “Yes”, then the date and a description of the problem must be answered in
the supplied text boxes. Otherwise, skip to Question #20.
Add New Family Health Record
Question #20 on the Health tab asks for the Cancer history of the client’s immediate family. A family
member (including the Client) should only be added to the list if “Have you or any member of your
immediate family had cancer?” is answered “Yes”. Otherwise, skip to the next question, #21, “Currently,
do you smoke cigarettes, cigars, pipes, or use other tobacco products?” Note that, in the family record list,
columns will resize according to the amount of text within. The list automatically splits into multiple
pages if the list is large enough (the current page limit is set to 10 rows).

CHAP–SFL Enrollment System
Page 29 of 61
When adding a new Family Cancer record to the current enrollment, the system will first perform a “Save
All” in order to guarantee that a unique ID number exists to link that enrollment record to the new Family
Cancer record(s). The new enrollment record will be given a CHAP record status of “1-Interview in
Progress” and an SFL record status of either “5-Enrollment Record in Progress” or “6-Re-Enrollment
Record in Progress”, depending on whether this is an enrollment or reenrollment.
Figure 20: Popup dialog - Who in the family had cancer
Identify the Individual Family Member
If the description of the selected individual (on the Family Cancer screen) is “Other on Father’s side”,
“Other on Mother’s side” or “Other household member”, then the “Specify Other” text box must be filled
in, identifying who that “other” person is in relation to the Client.
The individuals listed in the drop down are:
Self
Brother
Sister
Son
Daughter
Other on Mother's Side (please specify)
Other on Father's side (please specify)
Other Household Member (please specify)
Identify the Cancer Type
If the Cancer Type selected on the Family Cancer screen is “Other”, then the “Specify Other” text box
must be filled in, identifying that “other” cancer type.
The cancer types listed in the drop down are:
Breast Cancer
Cervical Cancer
Ovarian Cancer
Colorectal Cancer
Prostate Cancer
Other (please specify)

CHAP–SFL Enrollment System
Page 30 of 61
Figure 21: View / Edit / Enroll / Re-Enroll Client (Medicaid tab)
Medicaid Application Status
If the reason the Medicaid application was not completed was because of some “Other” reason than the
ones listed in the drop-down list, then that reason must be explained in the “Specify other” text box to the
right of the drop-down. The answers available in the Medicaid Status drop down list are:
Pending Medicaid - income verification
Pending Medicaid - green card verification
Enrolled Full Medicaid
Enrolled Limited Medicaid
Denied Medicaid
Pending Medicaid Review
The answers available in the Limited Medicaid drop down list are:
Family Planning Only
Emergency Services - Labor and Delivery
The answers available in the Medicaid Application Status drop down list are:
has been submitted
has been sent home with patient
was not completed because previously denied MA
was not completed because non citizen status
was not completed because over income for MA
was not completed because other, please specify
If the Medicaid application was, in fact, completed and submitted, then the date of submission must be
entered into the “Date Submitted” text box (underneath the “Medicaid Application Status” drop-down
list). If the application was not, in fact, submitted, then this date field must be left blank.
If the Medicaid submission was submitted, and then denied, then the “Date Denied” text box must be
filled-in with a valid date.
Children Included in Medicaid Application

CHAP–SFL Enrollment System
Page 31 of 61
On the Medicaid tab, the “Add Child” button, as well as the Medicaid Child list itself will only be visible
to the user if the “Children included in Medicaid application” question is answered “Yes”. Note that the
Medicaid child list columns will resize according to the amount of text within.
When adding a new Child Medicaid record to the current enrollment, the system will first perform a
“Save All” in order to guarantee that a unique ID number exists to link that enrollment record to the new
Child Medicaid record(s). The new enrollment record will be given a CHAP record status of “1-Interview
in Progress” and an SFL record status of either “5-Enrollment Record in Progress” or “6-Re-Enrollment
Record in Progress”, depending on whether this is an enrollment or reenrollment.
Figure 22: Popup Child Medicaid Dialog
The choices available in the “Referral” drop down list when adding a child to the Medicaid Application
are:
Medicaid
DHCP
CHAP
NA
Limited Medicaid
Figure 23: View / Edit / Enroll / Re-Enroll Client (CHAP Information tab)

CHAP–SFL Enrollment System
Page 32 of 61
Income Level
The “Income Level” field on the CHAP tab (see Figure 23Figure 23: View / Edit / Enroll / Re-Enroll
Client (CHAP Information tab)) is automatically calculated from income and number of people in the
household, and determine the correct letter-code (A, B, C, D, or E), from the following calculation:
Level A Enrollee has income below 100% of the Federal Poverty Level and would
otherwise be eligible for public coverage were it not for some disqualifier.
Level B Enrollee has income 100 to 124% of the Federal Poverty Level
Level C Enrollee has income 125 to 149% of the Federal Poverty Level
Level D Enrollee has income 150 to 174% of the Federal Poverty Level
Level E Enrollee has income 175 to 200% of the Federal Poverty Level
This field can only be filled-in by the system (i.e., the user cannot enter or change its value).
CHAP Enrollment Status
The default CHAP Enrollment status is automatically calculated by the system based on information
entered into the enrollment form, and displayed as a selection in the “CHAP Enrollment Status” drop-
down list box. The user can manually override this selection by picking a different option in the drop-
down list.
The possible CHAP status codes are as follows:
1 = Interview in progress
2 = Application ready for review
3 = Central Office review
4 = Pending Medicaid review
5 = Pending CHAP - no medical home
6 = Pending CHAP - Medicaid Appl. required
7 = Pending CHAP - Income verification
8 = Enrolled CHAP
9 = Patient Non-response
10 = Referred to VA
11 = Not Eligible for CHAP
12 = Re-determination of eligibility req
13 = CCC Review
14 = Pending Re-Enrollment
Referrals
The enrollment system allows for multiple referrals to be reviewed, edited, and entered from the
Enrollment Application screen.
Note the referral list columns will resize according to the amount of text within. The list automatically
splits into multiple pages if the list is large enough (the current page limit is set to 10 rows).
The available answers in the “Referral” drop down list on the CHAP tab are:
Pharma, Mrf. Patient Assistance
Delaware Prescription Assistance

CHAP–SFL Enrollment System
Page 33 of 61
Community Agency, please specify
State Service Center, please specify
CHC, please specify
Other, please specify
If the Referral text contains the word “other” or “specify”, the Edit Referral screen (see Figure 24) will
cause the “Specify Referral” text box to be visible as a required field. Otherwise, “Specify Referral” will
be hidden, its contents (if any) cleared.
Figure 24: Enrollment Referral Dialog

CHAP–SFL Enrollment System
Page 34 of 61
Figure 25: View / Edit / Enroll / Re-Enroll Client (SFL Information tab)
Note: For illustration purposes only. In actual use, not all cancers will be shown.
SFL Enrollment Status
The SFL Information tab (see Figure 25) contains the SFL Enrollment Status, a value which indicates
whether or not the Client is eligible for SFL services. This is a calculated field that cannot be changed
manually. The data entered elsewhere in the enrollment (especially the client’s date of birth) determines
which status is assigned. The possible status codes are as follows:
0 = None/Undetermined
1 = Active Enrollment
2 = Inactive - Terminated
3 = Inactive - Expired Age < 65
4 = Inactive - Ineligible
5 = Inactive-Expired Age 65+

CHAP–SFL Enrollment System
Page 35 of 61
9 = Previous Enrollment
SFL Eligibility
At the bottom of the SFL Information tab is a section that indicates the eligibility for each type of cancer
service: breast, cervical, colorectal or prostate. If the Client is not eligible for any one of these, then the
reason will be given.
If a Client is not eligible for a particular cancer screening service by reason of
\Gender, then that cancer type will not appear on the screen at all. Only Females are
eligible for Breast and Cervical services, while only Males are eligible for Prostate
services. Colorectal cancer services are available to both Males and Females.
If the client is eligible for a particular Screening for Life cancer screening service, then “Does qualify”
will appear next to the service. Otherwise, “Does not qualify because” will appear followed by a list of
reasons, one of which will be check marked. These checkboxes are calculated by the program and cannot
be changed by the user.
When a client doesn’t qualify for a particular cancer screening service, the user can force qualification by
placing a checkmark in the “Override (force eligibility”) box. The Override can later be reversed by un-
checking the box, making the client ineligible once more. However, this Override checkbox is not
available when the client does qualify for a service. In other words, the system will not allow a client to
be made ineligible by checking this box on an eligible individual.
The three eligibility icons on the left side are used both on this screen and on the Screening Form
Summary in the legacy SFL Windows application as a quick-reference eligibility indicator. Their
meaning is as follows:
Green checkmark: The client is eligible for screening and diagnostic
services for this cancer type.
Yellow checkmark: The client’s eligibility for screening or diagnostic
services has been forced via an override. The client would not
otherwise be eligible for this cancer type.
Red “X”: The client is not eligible for screening or diagnostic
services for this cancer type.
Saving an Enrollment or Re-enrollment
Before saving any newly-added enrollment application user must read the text of the consent form to
the client, and ask for their consent. Checkmark the “client consent” checkbox at the top of the form
once they have agreed.
,
In order to save the enrollment and exit back to the main menu, the “Save All” button is clicked. Once an
Enrollment application has been saved, whether or not a Welcome/Eligibility/Ineligibility status letter can
be printed will be determined largely by the CHAP and SFL enrollment statusEach status (CHAP and
SFL are assigned separately) must be set to eligible or ineligible. If either one has been given a “pending”

CHAP–SFL Enrollment System
Page 36 of 61
or “in progress” status, then the enrollment application, while saved, will be considered incomplete. Only
completed enrollment applications are eligible for Welcome or Denial letters.
Before clicking on the “Save All” button, you should review the entire Enrollment
application to make certain that it is correct and complete.
Exit Without Saving the Enrollment
In order to exit the Enrollment screen without saving the information, the “Cancel” button at the top of
the screen can be clicked. However, be aware that in that case, any changes to the enrollment application
record will be lost..

CHAP–SFL Enrollment System
Page 37 of 61
Figure 26: Case Management: List All Tab
CASE NOTES
While Enrolling, Re-Enrolling, Editing, or Viewing a Client Enrollment record, the option to add a Case
Note (or “Comment” as it was called in the legacy CHAP system) is present. If this is a new client
enrollment or changes have been made to an existing enrollment, the enrollment record will need to be
saved to the system before a Case Note can be added. This intermediate save takes place automatically
when the “Case Notes” button on the enrollment application screen is clicked.
The Case Management Notes screen displays a list of all case notes that have been added to the system
for a specific client. Note that this includes Case Notes that have been added by the legacy SFL Windows
application, as well as any Enrollment ones.
Clicking on a column header on the “List All Notes” page will sort the list by that column.

CHAP–SFL Enrollment System
Page 38 of 61
Case Notes vs. Comments
Multiple individual Case Notes may be added to each client enrollment.
Rather than edit the same Case Note to add information to it, you can (and should)
create a new Case Note for each separate subject matter.
Figure 27: Case Management: Details Tab
Writing a Note
Clicking the “Select” link to the left of a particular Case Note takes the User to the “Single Note Details”
tab (see Figure 26), populating it with the information from that note. Clicking the “Add New Case
Note” button also takes the User to the “Single Note Details” tab, but displays a blank note, with the
exception of the “Edit By” and “Edit Date” fields, which are filled-in by the system with the User’s login
name and the current date. The contents of these two fields cannot be changed. The “Form Number” field
can be skipped, as it refers to an SFL Screening Form Number, which does not apply to an enrollment.
Reminders
Note that the various “Reminder” fields at the bottom of the “Single Note Details” tab are intended for
use by the Screening for Life Windows application, and do nothing in the Enrollment Web Application.

CHAP–SFL Enrollment System
Page 39 of 61
If the “Reminder” box is not check marked, then the whole “Start Reminders” box at the bottom of the
page will be hidden from the user.
Differences from SFL
The legacy SFL system allows the user to add a new “Topic” merely by typing something into the edit
portion of the drop-down box. Unfortunately, this uses a mechanism inappropriate for the Web based
application, so that feature is not available in this version of the program. New topics will need to be
approved and added by Administrative personnel using the SFL Windows application.
Printing Case Notes
Clicking the “Print Report” button results in a report containing all Case Notes for the current client (see
Figure 28).
Figure 28: Sample Case Notes Report for a single client

CHAP–SFL Enrollment System
Page 40 of 61
Figure 29: Date Range Prompt for Printing Reenrollment Letters
Figure 30: Date Range Prompt for Printing Welcome Letters (Batch Print)
PRINTING REENROLLMENT AND WELCOME LETTERS
When it has been determined that an individual is eligible (or ineligible) for CHAP and/or SFL services, a
letter must be printed and mailed out to inform the individual of that fact. Normally, these letters are
printed as a batch (in fact, the legacy SFL application refers to this process as “Batch Print”). There are
two “batch print” commands in the CHAP-SFL enrollment application. The first, “Reenrollment
Letters”(see Figure 29), prints letters targeted specifically at clients who are re-enrolling into CHAP
and/or SFL. The second is “Welcome Letters” (see Figure 30), which targets those clients who are new to
the program. In either case, letters are printed that are split into two sections: SFL, indicating whether the
client is or is not eligible for various services. The second section is similar, but indicates eligibility for
CHAP. The letter will also contain an identification card which will indicate SFL services, if any, along
with the CHAP level (again, if any).
Normally, the Eligibility status letters sent to clients will come from the Central Office. However, because
this function is role-driven, whether a user has the ability to see (and therefore print) these letters will be
determined by the security role their Login ID has been assigned.

CHAP–SFL Enrollment System
Page 41 of 61
ADMINISTRATOR FUNCTIONALITY (“ADMINISTRATION”)
OVERVIEW
The Administrator menu assists Central Office personnel in controlling aspects of the CHAP-SFL
enrollment web application. Most of this functionality involves the editing of the various drop-down lists
seen throughout the program.
Figure 31: Admin - Told Have High Blood Pressure
Figure 32: Admin - Told Have High Blood Pressure
BLOOD PRESSURE RESPONSES (SUPPORTS ENROLLMENT QUESTION #25)
This function controls, and makes changes, to the list of possible responses to Enrollment question #25,
“Has a doctor, nurse, or other health professional ever told you that you have high blood pressure?”

CHAP–SFL Enrollment System
Page 42 of 61
Figure 33: Changing the Client ID connected to a Screening Form
CHANGE SCREENING CLIENT ID
Occasionally, for whatever reason, a set of SFL screening and/or diagnostic records will be assigned to
the wrong Client. When this happens, all of the affected records need to be re-assigned to the correct
Client.
When the Administration Menu option “Change Screening Client ID” is selected, the standard Client
Search screen (see Figure 7) will be displayed. Upon selecting a particular client from the resulting list,
this screen will be shown, allowing the client ID associated with a particular screening form to be
changed, along with all records associated with that screening form number (e.g., all screening and
diagnostic forms).
The following records are updated by this process:
Screening
Colorectal test
Breast Diagnostics
Cervical Diagnostics
Colorectal Diagnostics
Prostate Diagnostics
Screening Alias
Billing Data
Breast Cancer Registry
Cervical Cancer Registry
Colorectal Cancer Registry
Procedural Data
Screening Cycles

CHAP–SFL Enrollment System
Page 43 of 61
Figure 34: Client De-Duplication
CLIENT DE-DUPLICATION
When a Client is accidently added to the System more than once, the duplicate needs to be removed.
However, it isn’t as simple as just deleting (or “soft-deleting”) that duplicate, particularly if the Client ID
has been used to create a screening, diagnostic, billing, or other System record. It requires a global
substitution of the duplicate Client ID with the original one.
When the Administration Menu operation “Client De-Duplication” is selected, the user will first be
presented with the standard Client Search screen (see Figure 7). Upon selecting a particular client from
the resulting list as the “old” or “obsolete” client to be removed from the system (in actuality, this client
record is only hidden, not removed entirely. See the discussion in the Overview on the “soft-delete”), the
screen in Figure 34 will be displayed. The user can then enter a Client ID to replace the obsolete one
everywhere that old Client ID is referenced (Screening forms, Diagnostic forms, Case Notes, etc). The
user will be asked the “are you sure” question after they click on “Save Changes”.
The following actions are performed by the software:
1. The old Client ID record is marked “Deleted” (Note: this is the “Soft-delete” flag mentioned in
the Overview of this Manual).
2. The new Client ID record is marked “Not-Deleted”, reversing the effects of any previous
deletion.
3. All enrollment records for the old Client ID are immediately expired.
4. A new enrollment record is created using the new Client ID
5. All SFL screening and diagnostic forms that currently use the old Client ID are changed to use the
new Client ID
6. The Audit table will be updated to record that this de-duplication was performed and by whom.

CHAP–SFL Enrollment System
Page 44 of 61
7. The new enrollment record, its various fields filled-in with default values, will be displayed in
edit mode, allowing those values to be manually changed. These default values will be drawn
from the old client’s now-expired “current” enrollment record.
The following records are updated by this process:
Client
Enrollment
Case Notes
Screening
Colorectal test
Breast Diagnostics
Cervical Diagnostics
Colorectal Diagnostics
Prostate Diagnostics
Screening Alias
Billing Data
Breast Cancer Registry
Cervical Cancer Registry
Colorectal Cancer Registry
Procedural Data
Screening Cycles

CHAP–SFL Enrollment System
Page 45 of 61
Figure 35: Admin - CHAP Record Status
Figure 36: Admin - CHAP Record Status
CHAP RECORD STATUS
This function controls, and makes changes, to the list of possible CHAP Enrollment record status choices
on the CHAP Information tab of the online Enrollment form (see Figure 23).

CHAP–SFL Enrollment System
Page 46 of 61
Figure 37: Admin - Child Enrollment Codes
Figure 38: Admin - Child Enrollment Codes
CHILD ENROLL CODES
This function controls, and makes changes, to the list of possible child enrollment codes used in the Edit
Medicaid Child Enrollment pop-up dialog box (see Figure 22). This dialog box is displayed from the
“Children included in Medicaid application” question at the bottom of the Medicaid Information tab of
the enrollment application (see Figure 21).

CHAP–SFL Enrollment System
Page 47 of 61
Figure 39: View all Enrollment Records for One Client
CLIENT HISTORY
The Client History screen allows the Administrator to view prior, as well as current, enrollment
application records. This functionality is restricted to the Administrator in order to avoid the confusion of
someone mistaking a prior enrollment for the current one.
When the Administration Menu option “Client History” is selected, the user will first be presented with
the standard Client Search screen (see Figure 7). Upon selecting a particular client from the resulting list,
this screen will be displayed (see Figure 39), allowing the user to select a current or previous enrollment
record to be changed, using the standard Edit Enrollment screen. Permitted changes include enrollment
and expiration dates. Changes will not result, or require, a re-enrollment to be performed. Functionality
connected to enrollment / re-enrollment (e.g., printing welcome packages) and adding Case Notes will be
disabled.

CHAP–SFL Enrollment System
Page 48 of 61
Figure 40: Admin - Denied Medicaid
Figure 41: Admin - Denied Medicaid
DENIED MEDICAID
This operation allows an Administrator to add or edit the reason the client was denied Medicaid coverage
(An answer of “Denied Medicaid” to the Medicaid Status question in Figure 21: View / Edit / Enroll / Re-
Enroll Client (Medicaid tab)). Note: the current version of the Web Application does not make use of this
value.
CHAP–SFL Enrollment System
Page 49 of 61
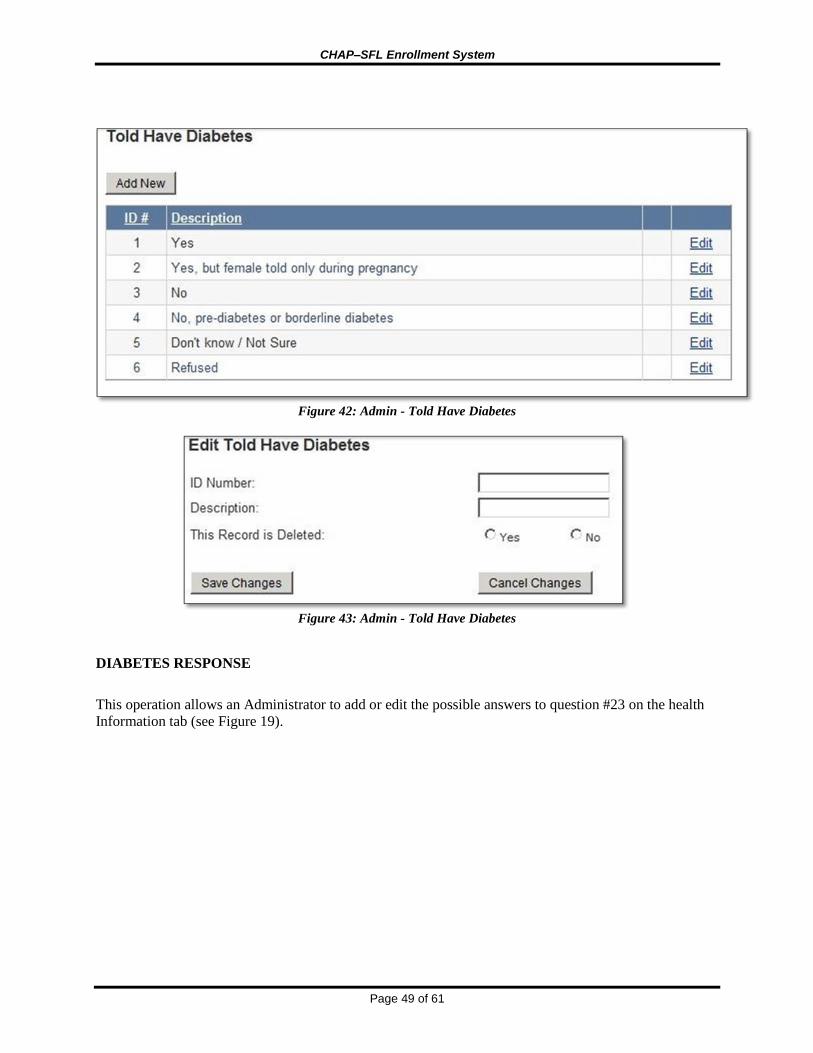
Figure 42: Admin - Told Have Diabetes
Figure 43: Admin - Told Have Diabetes
DIABETES RESPONSE
This operation allows an Administrator to add or edit the possible answers to question #23 on the health
Information tab (see Figure 19).

CHAP–SFL Enrollment System
Page 50 of 61
Figure 44: Admin - Health Home
Figure 45: Admin - Health Home
HEALTH HOME
This operation allows an Administrator to add or edit the possible Health Home answers on the CHAP
Information tab (see Figure 23).

CHAP–SFL Enrollment System
Page 51 of 61
Figure 46: Admin - Health Provider Types
Figure 47: Admin - Health Provider Types
HEALTH PROVIDER TYPES
This operation allows an Administrator to add or edit the possible answers to question #13 on the Access
and Utilization tab (see Figure 17).

CHAP–SFL Enrollment System
Page 52 of 61
Figure 48: Admin – Ineligible Reason
Figure 49: Admin – Ineligible Reason
INELIGIBLE REASONS
This operation allows an Administrator to add or edit the possible reasons the client is ineligible for
CHAP on CHAP Information tab (see Figure 23).
CHAP–SFL Enrollment System
Page 53 of 61
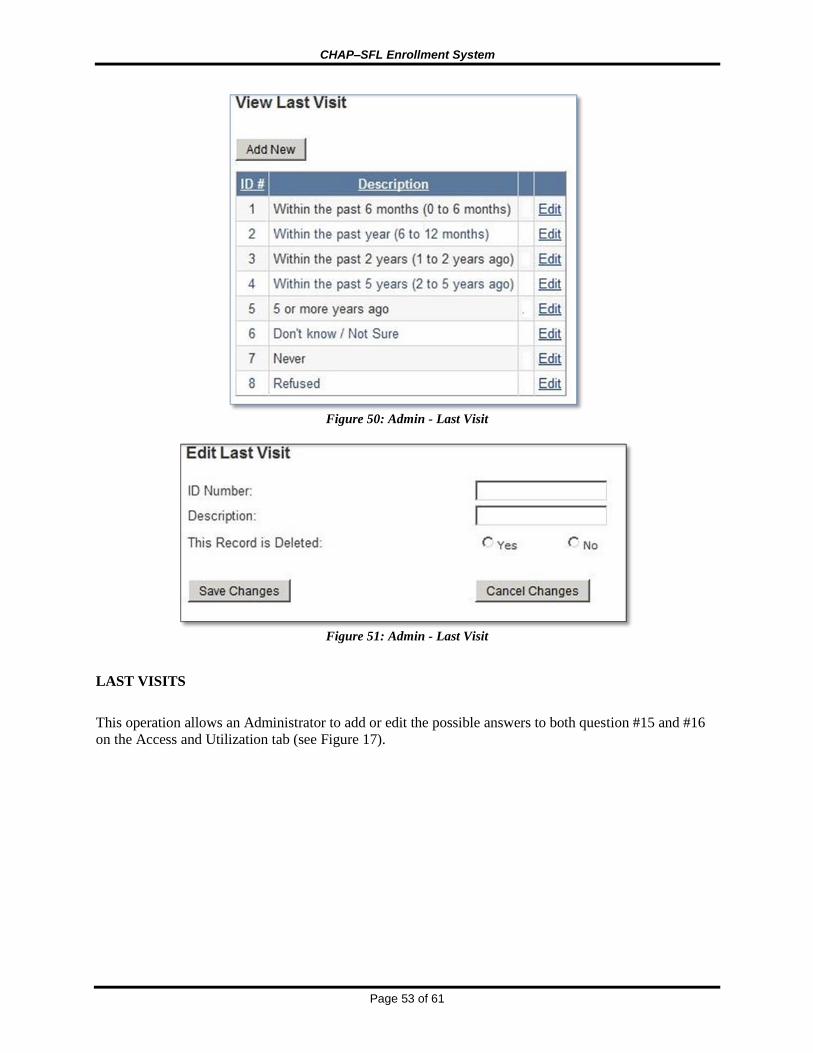
Figure 50: Admin - Last Visit
Figure 51: Admin - Last Visit
LAST VISITS
This operation allows an Administrator to add or edit the possible answers to both question #15 and #16
on the Access and Utilization tab (see Figure 17).

CHAP–SFL Enrollment System
Page 54 of 61
Figure 52: Admin - Limited Medicaid
Figure 53: Admin - Limited Medicaid
LIMITED MEDICAID
This operation allows an Administrator to add or edit the possible answers to the “Limited Medicaid”
question on the Medicaid Information tab (see Figure 21).

CHAP–SFL Enrollment System
Page 55 of 61
Figure 54: Admin - Medicaid Application Status
Figure 55: Admin - Medicaid Application Status
MEDICAID APPL STATUS
This operation allows an Administrator to add or edit the possible answers to the “Medicaid Application
Status” question on the Medicaid Information tab (see Figure 21).
CHAP–SFL Enrollment System
Page 56 of 61
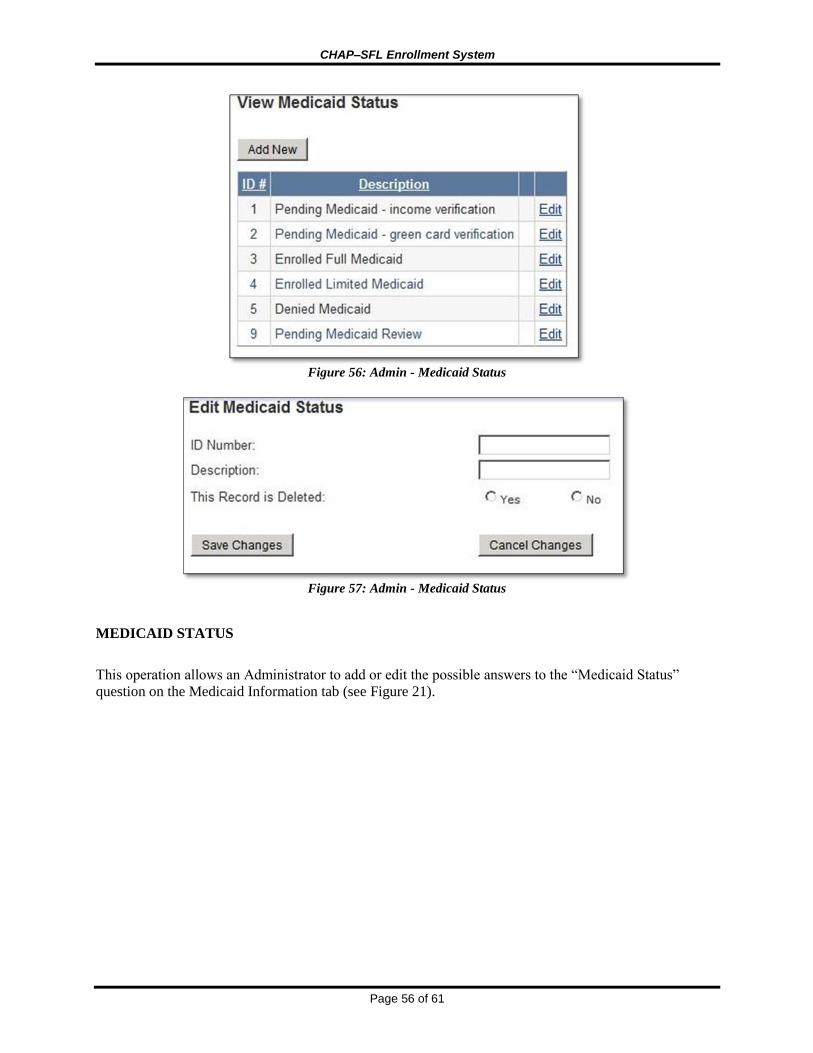
Figure 56: Admin - Medicaid Status
Figure 57: Admin - Medicaid Status
MEDICAID STATUS
This operation allows an Administrator to add or edit the possible answers to the “Medicaid Status”
question on the Medicaid Information tab (see Figure 21).

CHAP–SFL Enrollment System
Page 57 of 61
Figure 58: Admin - No Doctor Reason
Figure 59: Admin - No Doctor Reason
NO DOCTOR REASON
This operation allows an Administrator to add or edit the possible check boxes under question #10 on the
Access and Utilization tab (see Figure 17).
CHAP–SFL Enrollment System
Page 58 of 61
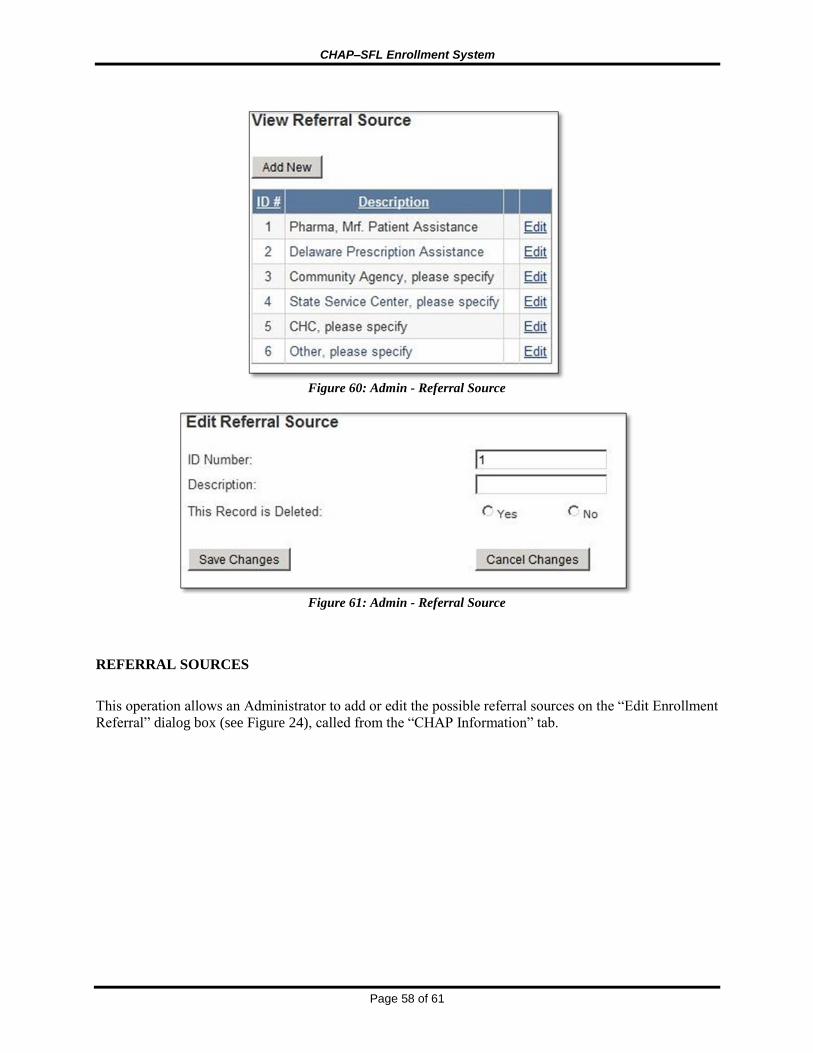
Figure 60: Admin - Referral Source
Figure 61: Admin - Referral Source
REFERRAL SOURCES
This operation allows an Administrator to add or edit the possible referral sources on the “Edit Enrollment
Referral” dialog box (see Figure 24), called from the “CHAP Information” tab.

CHAP–SFL Enrollment System
Page 59 of 61
Figure 62: Admin - SFL Enrollment Status
Figure 63: Admin - SFL Enrollment Status
SFL ENROLLMENT STATUS
This operation allows an Administrator to add or edit the possible SFL Enrollment Status description on
the “SFL Information” tab (see Figure 25Figure 25: View / Edit / Enroll / Re-Enroll Client (SFL
Information tab)).

CHAP–SFL Enrollment System
Page 60 of 61
Figure 64: Admin - Three Pap Rules
Figure 65: Admin - Three Pap Rules
THREE PAP RULES
This operation allows an Administrator to add or edit the possible SFL Three Pap Rule results Enrollment
Status description on the “SFL Information” tab (see Figure 25). Note: the current version of the Web
Application does not make use of this value.

CHAP–SFL Enrollment System
Page 61 of 61
Figure 66: Admin - VIP Doctors
Figure 67: Admin - VIP Doctors
VIP DOCTORS
This operation allows an Administrator to add or edit the available list of VIP doctors for tus description
on the “SFL Information” tab (see Figure 25). Note: the current version of the Web Application does not
make use of this value.