chapter 11. graphical user interfaces - calvin college
TRANSCRIPT

11-1
Chapter 11. Graphical User Interfaces
To this point in the text, our programs have interacted with their users to two ways:
The programs in Chapters 1-5, implemented in Processing, displayed graphical output on a two-
dimensional sketch canvas and accepted limited user input through mouse and key presses. We pre-
configured much of the behavior of these programs using hard-coded values. For example, our
animation programs tended to hard-code their frame rates. Processing provides rich graphical output,
but limited textual and graphical input.
The programs in Chapters 6-10, implemented in Java, interacted entirely through text, displayed on
and read from the system console. These console-based Java applications provided a rich ability to
read data in textual form but provided no graphical input or output of any kind.
While these are both useful interaction paradigms, most modern applications interact with users through
Graphical User Interfaces (GUIs), which combine graphical and textual interaction using canvases,
buttons, sliders, menus and text boxes.
This chapter introduces the development of GUIs in Java and it re-introduces Processing-based
applications in the broader context of these Java GUIs.
11.1. Example: An Animation Controller
This chapter adopts the goal of developing a program that presents
a graphical animation of the sort common in the first half of the text
along with a control panel that allows the user to change the
dynamics of the animation. This application will be based on a
random circle animation that simulates colored raindrops hitting the
ground, such as the one shown on the top of Figure 11-1, along
with a graphical way to control the frame rate and perhaps other
features of the animation, such as the one shown on the bottom of
Figure 11-1. The user should be able to start the application and
change the frame rate interactively.
The graphical components of the animation itself, which include
ellipses, colors, text and backgrounds, along with the ability to
animate the random entrances of the ellipses at a given frame rate,
were common currency in the examples in Chapters 1-5. Processing
supports them naturally. The input component, which prompts for
and reads textual represents of numbers and words was supported
more naturally by the Java applications we built in Chapters 6-10.
Figure 11-1. A sketch of an animation with a
controllable frame rate

11-2
The animated canvas portion of this sketch is similar to the animated programs we’ve implemented since
Chapter 4. The following Processing program will produce the output as shown:
final int SIZE = 300
int rate;
void setup() {
size(SIZE, SIZE);
rate = 60;
frameRate(rate);
}
void draw() {
fill(random(255), random(255),
random(255), random(255));
int diameter = (int)random(SIZE/2);
ellipse(random(SIZE), random(SIZE),
diameter, diameter);
}
void mousePressed() {
background(200);
}
We could extend this application to include interactive code that listens for user keystrokes and
implements buttons, but these are difficult things to program in Processing. Processing does not provide
ready support for the text box that we’d like to have here. Fortunately Java does support such text boxes.
This chapter develops Java-based applications that integrate the graphical output panels common to
Processing and the user interface components common to Java GUIs.
11.2. Java GUIs
Though the console-based, textual interfaces discussed in Chapters 6-10 were once common currency in
programmed applications, they have largely been supplanted by GUI-based applications. In this section,
we will build GUI applications using Swing, Java’s lightweight, platform-independent widget toolkit.
We will start with a simple tip-calculation application as shown in Figure 11-2. Using this graphical
interface, the user would be able to enter the total cost of a bill at a restaurant in the text box on the left,
press enter, and then the program would compute a suggested tip and display it in the text box on the
right.
Figure 11-2. Sketch of a Tip Calculator GUI

11-3
Programming languages support the development of graphical user interfaces such as this one by
providing toolkits of useful interface controls called widgets. Java Swing provides high-level
organizational components that specify the overall layout of a graphical interface, such as the main
window of the example in Figure 11-2, as well as a variety of common interface controls, such as buttons,
sliders, text labels and text input boxes.
This section will implement this application piece by piece, using Figure 11-2 as an initial sketch.
11.2.1. Building Java Frames
Swing builds its applications in windows, called frames, which are implemented by the JFrame class. To
build a Swing interface, we can use the code shown here:
Code: import javax.swing.JFrame;
public class DoNothingController extends JFrame {
public static void main(String[] args) {
DoNothingController frame = new DoNothingController();
frame.pack();
frame.setVisible(true);
}
}
Output:
At this point, the output is an empty window with only the window bar added by the operating system to
the application output, but there are a few things to notice about this program.
First, note that as with all Java applications, the main() method is required. In the case of a GUI
application, the main() method implements the following rather simple algorithm.
Algorithm:
1. Construct an object frame of type DoNothingController;
2. Tell frame to organize its GUI components into a 2-dimensional layout;
3. Tell the frame to make itself visible.
These steps match the three statements shown in the main() method above. The first step constructs an
object of type DoNothingController, which will serve as the main user interface. At this point, the
interface is a default, empty interface, but in the next section we discuss how to populate an interface
frame with a variety of GUI components (e.g., labels, buttons, text input/output boxes). Because the code
shown above doesn’t actually define a default constructor, Java defines one automatically. The second
step tells the new frame to pack itself, which tells the GUI’s window to organize the widgets it contains in
the smallest possible rectangular layout. The third step tells the frame to make itself visible. Java frames
are, by default, hidden.

11-4
It may seem odd that the main() method is this simple. The console-based applications in Chapters 6-10
often built their entire application inside the main method, but in GUI applications, the main() method
simply creates the GUI frame object, packs it, makes it visible and then steps down, allowing the GUI
object to drive the user interaction as specified. In this regard, it may be helpful to think of the main()
method as a kick-starter utility whose only purpose is to construct the GUI frame and then set it loose. All
the application’s behavior will be handled by the GUI widgets and event handlers that we will implement
in the next section.
Second, note that the interface is implemented as a class, here called
DoNothingController, that “extends” the JFrame class. The extends
clause tells Java to implement DoNothingController as a “child” of
JFrame, which allows it to inherit the features of its parent. This extension,
commonly drawn as shown in the figure to the right, is an example of
inheritance, a key principle in object-oriented programming. Inheritance is a
powerful mechanism for designing object-oriented systems that we will
discuss more fully in Chapter 13.
For now, we note that this use of inheritance allows a “child” class (e.g., DoNothingController) to
“inherit” all the data items and behaviors programmed into its “parent” class (e.g., JFrame). This means
that the DoNothingController can actually do things. As seen in the algorithm for the main()
method shown above, the so-called DoNothingClass can construct a frame, format that frame (using
pack()) and display it to the user (using setVisible(true)). There are no implementations of the
constructor or these methods shown here; they are all implemented in the JFrame class and inherited
here free of charge.
11.2.2. Adding GUI Components to a Controller
Java Swing provides a variety of widget classes that GUI programs can use to populate the main GUI
frame.1 For the tip calculator, we need only two:
JLabel(displayString) – Displays a simple text string specified by displayString;
JTextField(fieldWidth) – Provides a single-lined box for text input or output of width
fieldWidth.
To extend the tip calculator to include the bill and tip widgets, we can use the program shown here:
1 For a more complete list, see http://java.sun.com/docs/books/tutorial/ui/features/components.html.

11-5
Code 1
2
3
4
5
6
7
8
9
10
11
12
13
14
15
16
17
18
19
20
21
22
23
24
25
26
27
28
import java.awt.FlowLayout;
import javax.swing.*;
public class TipController extends JFrame {
private JTextField billField, tipField;
public TipController() {
setTitle("Tip Calculator");
setLayout(new FlowLayout());
// The bill label and text input field
add(new JLabel("bill:"));
billField = new JTextField(10);
add(billField);
// The tip label and text output field
add(new JLabel("suggested tip:"));
tipField = new JTextField(10);
add(tipField);
}
public static void main(String[] args) {
TipController controller = new TipController();
controller.pack();
controller.setVisible(true);
}
}
Output:
This code implements a constructor method for the TipController, which configures the GUI frame
and populates it with the GUI widgets first sketched in Figure 11-2. The code declares two text fields,
billField and tipField, so that they can be initialized in the controller (see lines 14 and 19) and
then used to implement the desired interactive behavior (see the next sections). The constructor also adds
unnamed text label objects (see lines 13 and 18); these un-named, or anonymous objects need not be
declared outside of the constructor because they are not interactive components and will thus not need to
be used later when implementing the user interaction. Finally, note that the constructor uses what is called
a flow layout manager to add the GUI components one-at-a-time in the order in which they are to be
displayed on the output panel (i.e., bill label – line 13, bill field – line 15, tip label – line 18, tip field –
line 20). We will discuss these features in more detail in the next section.
11-6
11.2.3. Using Layout Managers
Statement 10 in the program above configures the layout of the GUI interface frame. Java Swing provides
a variety of different layout managers, each useful for different sorts of interfaces, including the following
common choices:2
FlowLayout() – a single row of objects flowing from left to right, top to bottom;
BorderLayout() – a two-dimensional layout with five regions;
GridLayout(r, c) – a two-dimensional grid of r rows and c columns.
This example used the simplest of the layout managers, the FlowLayout:
setLayout(new FlowLayout());
This statement tells Java to use a “flow” layout when packing GUI widgets into this interface frame. The
flow layout simply adds the GUI widgets to the GUI container one at a time, left to right, in the sequence
in which the program adds them. For simple interfaces like this one, the flow layout is generally
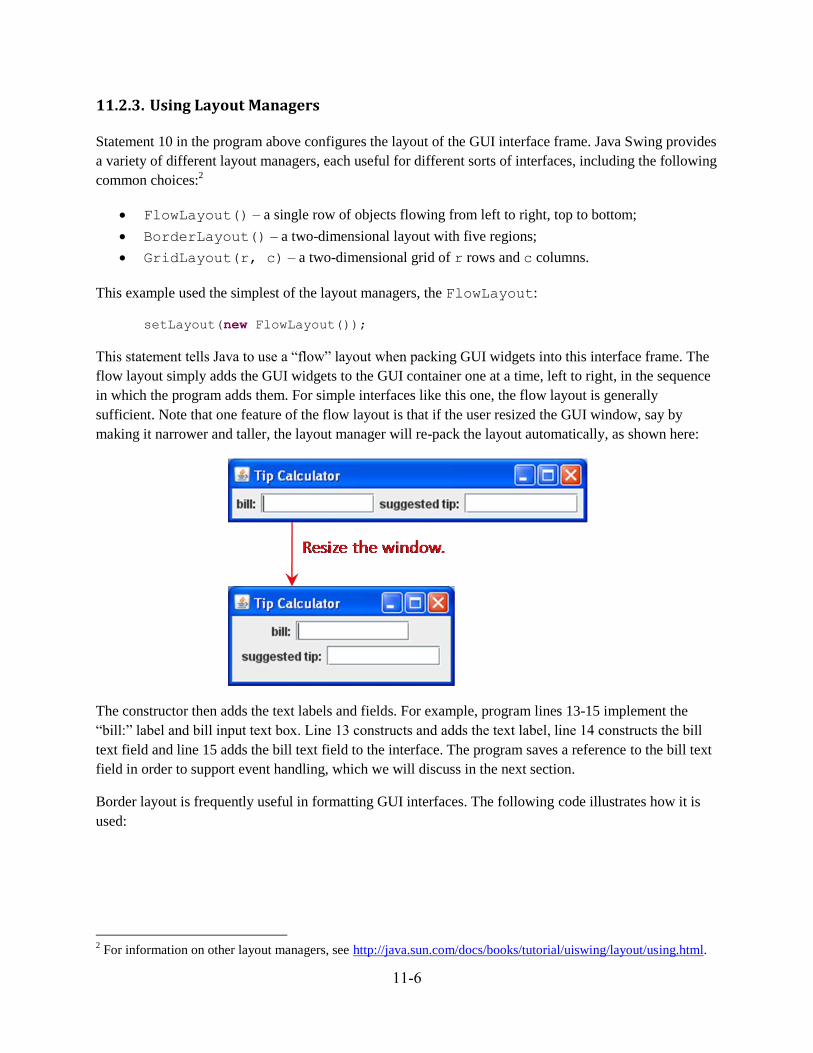
sufficient. Note that one feature of the flow layout is that if the user resized the GUI window, say by
making it narrower and taller, the layout manager will re-pack the layout automatically, as shown here:
The constructor then adds the text labels and fields. For example, program lines 13-15 implement the
“bill:” label and bill input text box. Line 13 constructs and adds the text label, line 14 constructs the bill
text field and line 15 adds the bill text field to the interface. The program saves a reference to the bill text
field in order to support event handling, which we will discuss in the next section.
Border layout is frequently useful in formatting GUI interfaces. The following code illustrates how it is
used:
2 For information on other layout managers, see http://java.sun.com/docs/books/tutorial/uiswing/layout/using.html.

11-7
add(new JButton("NORTH"), BorderLayout.NORTH);
add(new JButton("CENTER"), BorderLayout.CENTER);
add(new JButton("WEST"), BorderLayout.WEST);
add(new JButton("SOUTH"), BorderLayout.SOUTH);
add(new JButton("EAST"), BorderLayout.EAST);
In contrast to the flow layout shown above, the components of a border layout can be added in any order,
provided that the second argument to the add() method specify the appropriate location.
Grid layout is frequently useful in formatting GUI interfaces. The following code illustrates how it is
used:
setLayout(new GridLayout(3,2));
add(new JButton("1"));
add(new JButton("2"));
add(new JButton("3"));
add(new JButton("4"));
add(new JButton("5"));
add(new JButton("6"));
The grid layout can be configured to any dimensions as necessary. The components must be entered in the
desired order.
11.2.4. Handling GUI Events
The GUI built in the previous section matches the initial sketch shown in Figure 11-2 pretty closely. The
only problem is that it doesn’t do anything. The user can enter a dollar value into the “bill” field, but
when they press enter nothing happens.
Users drive GUI applications by interacting with GUI widgets. Each user interaction generates a system
response called an event, which spurs the program to do something. GUI programs configure the system’s
responses to GUI events by programming and registering objects to act as event handlers. A typical GUI
manages a variety of user-driven events. We discuss two common events here.
JFrame Close Events
The first event we’ll discuss is the application “exit” event. When the user clicks on the window close
button, usually an “X” button or red ball on the top of the application window, we would like the GUI
application to close. Java’s default behavior in this case is to render the GUI window invisible but to keep
the application running, so we need to re-configure the default behavior. This desired behavior is common
enough that the JFrame class provides the setDefaultCloseOperation() method, which sets
the default close operation for us, without our having to write an explicit GUI event handler.
setDefaultCloseOperation(EXIT_ON_CLOSE);
This command is issued in the JFrame constructor.

11-8
JTextField Key-Press Events
The second event our program must respond to is the data entry event signaled when the user presses a
keyboard key in a JTextField widget. JTextField objects respond to most user key presses by
automatically displaying the appropriate character in the field; if the user types a ‘k’, the text field
displays a ‘k’ in response. If the user presses the “Enter” key, however, the text field generates an
“action” event. The programmer is allowed to program a response to this event that is appropriate for the
given application. For example, the tip calculator we are working with should respond to the user pressing
“Enter” in the “bill” field by computing an appropriate tip and presenting it in the “suggested tip” field.
To create a JTextField object and configure an appropriate response, we add the following code to the
GUI controller’s constructor:
billField = new JTextField(10);
billField.addActionListener(this);
This code starts by initializing a JTextField object named billField and then uses the
addActionListener() method to tell Java that when the user presses the “Enter” key in this field, it
should notify the object referenced by this that the event has occurred. this references the JFrame
object currently being constructed, that is, the TipController object. Java notifies this object
automatically by calling its actionPerformed() method and passing it a reference to an
ActionEvent object describing the event. Connecting event handlers with events in this manner is
called registering the event handler.
To respond to this event, this JFrame class must implement the ActionListener interface and
define an actionPerformed() method, as shown here:
public class MyGUIController extends JFrame
implements ActionListener {
// The constructor goes here...
public void actionPerformed(ActionEvent event) {
// Get the bill value from the "bill" field.
// Compute an appropriate tip.
// Display the tip in the "suggested tip" field.
}
// The main() method goes here...
}
Implementing the ActionListener interface tells Java that this class should be configured to
respond to ActionEvents; that is, it must define an actionPerformed() method. A Java
interface, not to be confused with a GUI interface, specifies a set of related method declarations. A class

11-9
that implements an interface must provide definitions for all the interface’s methods.3 The
ActionListener interface requires that the actionPerformed() method be public, return void
and receive an ActionEvent, as shown in the example.
This control flow is not what we’re used to given that our code never explicitly calls the
actionPerformed() method. Thus, we must program this method to respond to any ActionEvent
that might prompt Java to generate this event.
The following program implements the tip calculator with proper event handling.
Program 1
2
3
4
5
6
7
8
9
10
11
12
13
14
15
16
17
18
19
20
21
22
23
24
25
26
27
28
29
30
31
32
33
34
35
36
37
38
39
import java.awt.*; //This * is a wildcard that includes all AWT classes.
import javax.swing.*;
public class TipController extends JFrame implements ActionListener {
private static final double TIP_RATE = 0.15;
private JTextField billField, tipField;
public TipController() {
setTitle("Tip Calculator");
setDefaultCloseOperation(EXIT_ON_CLOSE);
setLayout(new FlowLayout());
// The bill label and text input field
add(new JLabel("bill:"));
billField = new JTextField(10);
add(billField);
billField.addActionListener(this);
// The tip label and text output field
add(new JLabel("suggested tip:"));
tipField = new JTextField(10);
add(tipField);
}
public void actionPerformed(ActionEvent event) {
double bill = Double.parseDouble(billField.getText());
double tip = bill * TIP_RATE;
String tipString = new DecimalFormat("$0.00").format(tip);
tipField.setText(tipString);
}
public static void main(String[] args) {
TipController1 controller = new TipController();
controller.pack();
controller.setVisible(true);
}
}
3 More information on Java interfaces can be found at:
http://java.sun.com/docs/books/tutorial/java/concepts/interface.html.

11-10
This program extends the TipController shown earlier to add event handling as follows:
The application “exit” event is configured as described above in line 12;
Because a JLabel object never changes and never generates user events, it needs no event
handling and can be declared and defined anonymously (i.e., by saying new
JLabel("someText") as the argument to the add() method). See lines 16 and 22;
The “bill” field is declared and defined, as discussed above, in lines 17-19. It designates the
current TipController object as its action listener.
The actionPerformed() method, defined in lines 27-32, implements this algorithm:
1. Set bill equal to the double value of the text string currently in billField – Note
that GUI input is always read as a String;
2. Compute the suggested tip;
3. Convert tip’s double value into a string formatted as currency and store the result in
tipString;
4. Tell tipField to display tipString – Note that GUI output is always displayed as a
String.
Because this application only allows one user-generated event (other than the JFrame window
close event), this algorithm assumes that the event that prompted Java to call
actionPerformed() is the enter-pressing event of the bill field. This allows this algorithm to
ignore the event parameter entirely;
The “suggested tip” field (declared and defined in lines 23-24) does not support user-generated
GUI events, so it has no registered action listener. Given that we don’t really expect or even want
the user to interact with this field, we might consider configuring it as a read-only field (done by
saying tipField.setEditable(false)). For now, we’ll leave it as it is.
With this infrastructure in place, the tip calculator GUI behaves as shown here.

11-11
11.2.5. Building Structured GUI Interface Layouts
The tip calculator implemented so far is not very usable. It does its job, but only if the users understand
exactly how to use the interface. If they hit enter on an empty bill field or type “ten dollars” rather than
“10” in the bill field, the system throws an unhandled exception. We’d rather handle these exceptions by
catching them and adding a message field to let the user know what has happened. An enhanced sketch of
the GUI is shown in Figure 11-3.
In this design, we would like the
message field to be at the bottom of
the window regardless how wide
the user makes the output window.
This is not easy to accomplish with
the flow layout manager. The
border layout manager can place
widgets at the bottom, but it would
not easily allow the placement of
all the bill and tip widgets on the
top. In situations like this, it would
be useful to be able to “group” the bill and tip fields along with their labels together into a “controller” of
sorts that the border layout can place in the center of the screen, and add the message field as a separate
group on the bottom of the GUI.
Java Swing provides the JPanel widget for grouping widgets. If JFrame corresponds to a window, then
JPanel corresponds to a window pane. A program can create a JPanel object, add other widgets to
that panel, and then treat those objects as a group. In effect, this allows a program to build hierarchically
structured GUI layouts, as shown in this figure:
Given this structure, the program can use a border layout to put the control panel above the message field
within the main frame and use a flow layout to order the bill and tip widgets within the control panel. The
following code implements this more structured interface:
Figure 11-3. An enhanced sketch of the Tip Calculator GUI

11-12
Program: 1
2
3
4
5
6
7
8
9
10
11
12
13
14
15
16
17
18
19
20
21
22
23
24
25
26
27
28
29
30
31
32
33
34
35
36
37
38
39
40
41
42
43
44
45
46
47
48
49
50
51
52
import java.awt.*;
import javax.swing.*;
public class TipController extends JFrame implements ActionListener {
private static final double TIP_RATE = 0.15;
private JTextField billField, tipField, outputField;
public TipController() {
setTitle("Tip Calculator");
setDefaultCloseOperation(EXIT_ON_CLOSE);
setLayout(new BorderLayout());
// The input panel
JPanel controlPanel = new JPanel(new FlowLayout());
controlPanel.add(new JLabel("bill:"));
billField = new JTextField(10);
controlPanel.add(billField);
billField.addActionListener(this);
controlPanel.add(new JLabel("suggested tip:"));
tipField = new JTextField(10);
controlPanel.add(tipField);
add(controlPanel, BorderLayout.CENTER);
// The output message panel
outputField = new JTextField("Welcome to the TipCalculator!");
outputField.setEditable(false);
add(outputField, BorderLayout.SOUTH);
}
public void actionPerformed(ActionEvent arg0) {
String billFieldString = billField.getText();
try {
double bill = Double.parseDouble(billFieldString);
double tip = bill * TIP_RATE;
String tipString = new DecimalFormat("$0.00").format(tip);
tipField.setText(tipString);
} catch (Exception e) {
outputField.setText("illegal bill value: " + "\"" +
billFieldString + "\"");
}
}
public static void main(String[] args) {
TipController controller = new TipController();
controller.pack();
controller.setVisible(true);
}
}

11-13
Output (when the user presses “Enter” in an empty “bill” field):
This program restructures the output to include the control panel, which is defined and loaded in lines 15-
30. Note that when controlPanel is defined as a JPanel, the program can add GUI widgets to it just
as it would add them to the JFrame, though the target (that is, the panel) must be explicitly noted (i.e.
controlPanel.add() instead of simply add()). Note also that the program specifies the
BorderLayout manager for the main frame in line 13 and specifies the FlowLayout manager for the
control panel in line 16.
11.2.6. Handling Multiple GUI Events
So far in this section, we’ve only needed to respond to a single GUI event, namely that of responding to
the user pressing the enter key in the bill field. This makes the job of the actionPerformed()
method rather simple; it never has to do anything other than compute and display an appropriate tip based
on the value in the bill text field.
As our interfaces become more
sophisticated, we will find the need to
design and build GUI controllers that
handle more than one possible GUI event.
For example, we might want to add a
“clear” button to our interface that allows
the user to clear the bill, tip and message
fields, as shown in Figure 11-4.
Designing this interface requires that we respond to one of two possible GUI events: the user entering text
in the bill text field or the user pressing the “Clear” button. As we saw above, handling events requires
that we register an action listener for each event and we could register the same listener, this, to both
GUI widgets, but this would require that the actionPerformed() method determine which event
lead to it being called. This can be done by looking at the ActionEvent object passed to the method,
but it can lead to tricky code that is hard to understand. Instead, we will adopt the more common practice
of constructing and registering a different listener for each event using the Java mechanism of the inner
class.
Inner Classes
Inner classes are “nested” classes, that is, classes defined inside of other classes. So far, we have defined
all of our classes separately, as shown here:
public class OneClass { }
Figure 11-4. A new version of the tip calculator (with a clear button)

11-14
public class AnotherSeparateClass { }
Java even requires that separate classes be implemented in different files. However, Java also supports the
definition of an inner class within the definition of a containing class, as shown here:
public class OuterClass { public class InnerClass { } }
The syntactic pattern for defining an inner class is the same as it is for any other class except that it is
defined inside another class. Further, inner classes tend to be used to defining utility objects such as event
listeners, which means that they are generally very short, focused classes. Consider the following
program, which uses an inner class to handle button-pushing events.
Program public class ButtonGUI extends JFrame {
public ButtonGUI() {
JButton myButton = new JButton("My Button");
myButton.addActionListener(new ButtonListener());
// Construct the remainder of the GUI.
}
// an inner class defined to handle button-pressing events...
class ButtonListener implements ActionListener {
public void actionPerformed(ActionEvent ae) {
// Handle the button-pressing event appropriately.
}
}
// the main method goes here...
}
This program constructs an interface with one button. When the user presses this button, Java calls the
actionPerformed() method of the object specified as the action listener for the button, which in this
case is an object of the inner class ButtonListener. This inner class is highly specialized. It
implements a single method, actionPerformed(), whose only job is to respond to button-pressing
events on the myButton widget.
Handling Multiple User Events with Inner Classes
When there are multiple user events to handle, multiple inner classes can be defined, one for each event.
The following code implements the upgraded tip calculator interface envisaged in Figure 11-4.

11-15
Program
1
2
3
4
5
6
7
8
9
10
11
12
13
14
15
16
17
18
19
20
21
22
23
24
25
26
27
28
29
30
31
32
33
34
35
36
37
38
39
40
41
42
43
44
45
46
47
48
49
50
public class TipCalculatorGUI extends JFrame {
private static final double TIP_RATE = 0.15;
private JTextField billField, tipField, outputField;
private JButton clearButton;
public TipCalculatorGUI() {
setTitle("Tip Calculator");
setDefaultCloseOperation(EXIT_ON_CLOSE);
setLayout(new BorderLayout());
// The input panel
JPanel controlPanel = new JPanel(new FlowLayout());
controlPanel.add(new JLabel("bill:"));
billField = new JTextField(10);
controlPanel.add(billField);
billField.addActionListener(new BillFieldListener());
controlPanel.add(new JLabel("suggested tip:"));
tipField = new JTextField(10);
controlPanel.add(tipField);
clearButton = new JButton("Clear");
clearButton.addActionListener(new ClearButtonListener());
controlPanel.add(clearButton);
add(controlPanel, BorderLayout.CENTER);
// The output message panel
outputField = new JTextField("Please enter a total bill.");
outputField.setEditable(false);
add(outputField, BorderLayout.SOUTH);
}
class BillFieldListener implements ActionListener {
public void actionPerformed(ActionEvent ae) {
String billFieldString = billField.getText();
try {
double bill = Double.parseDouble(billFieldString);
double tip = bill * TIP_RATE;
String tipString = new
DecimalFormat("$0.00").format(tip);
tipField.setText(tipString);
} catch (Exception e) {
outputField.setText("illegal bill value: " + "\""
+ billFieldString + "\"");
}
}
}

11-16
51
52
53
54
55
56
57
58
59
60
61
class ClearButtonListener implements ActionListener {
public void actionPerformed(ActionEvent ae) {
billField.setText("");
tipField.setText("");
outputField.setText("");
}
}
// The main() method is repeated here. }
Output
This code is largely copied from the previous version, except for these elements:
TipCalculatorGUI no longer implements ActionListener in line 1 because the inner
classes BillFieldListener and ClearButtonListener do this task now.
The constructor specifies individual action listener objects for bill field (line 18) and the clear
button (line 25).
Inner classes for the BillFieldListener (lines 36-50) and the ClearButtonListener
(lines 52-58) are included in the TipCalculatorGUI class. Note that the actual definition of
the action listener for the bill field is the same as it was in the previous definition. The only thing
that has changed is the approach to defining and registering the action listener.
11.2.7. Revisiting the Example
Given the techniques covered in this section, it is possible to create GUI controller portion of the
raindrops application envisaged in Figure 11-1. The following code implements this controller.
Program
1
2
3
4
5
6
7
8
9
10
11
public class RaindropController extends JFrame {
JButton startButton, pauseButton;
JTextField frameRateField;
public RaindropController() {
setTitle("Raindrops");
JPanel controlPanel = new JPanel(new FlowLayout());
startButton = new JButton("Start");
startButton.setEnabled(false);

11-17
12
13
14
15
16
17
18
19
20
21
22
23
24
25
26
27
28
29
30
31
32
33
34
35
36
37
38
39
40
41
42
43
44
45
46
47
48
49
50
51
52
53
54
startButton.addActionListener(new StartButtonListener());
controlPanel.add(startButton);
pauseButton = new JButton("Pause");
pauseButton.setEnabled(true);
pauseButton.addActionListener(new PauseButtonListener());
controlPanel.add(pauseButton);
controlPanel.add(new JLabel("Frame rate:"));
frameRateField = new JTextField(3);
frameRateField.setText("30");
controlPanel.add(frameRateField);
frameRateField.addActionListener(new RateFieldListener());
add(controlPanel, BorderLayout.SOUTH);
}
class StartButtonListener implements ActionListener {
public void actionPerformed(ActionEvent ae) {
// Handle the start operation.
startButton.setEnabled(false);
pauseButton.setEnabled(true);
}
}
class PauseButtonListener implements ActionListener {
public void actionPerformed(ActionEvent ae) {
// Handle the pause operation.
startButton.setEnabled(true);
pauseButton.setEnabled(false);
}
}
class RateFieldListener implements ActionListener {
public void actionPerformed(ActionEvent ae) {
// Handle rate entry.
}
}
public static void main(String[] args) {
RaindropController2 controller = new RaindropController2();
controller.pack();
controller.setVisible(true);
}
}
Output
This application is very similar to the tip calculator we developed incrementally in the previous sections.
The RaindropController class includes:

11-18
A text field for the frame rate – whatever value the user types in this field is given to the
animation panel to use as the frame rate. This field is defined in lines 19-22 and its action event is
handled by the inner class defined in lines 42-46.
Buttons for starting and stopping the animation, only one of which may be enabled at any one
time, are defined in lines 10-17 and their events are handled by the inner classes defined in lines
26-40. Note that the controller uses myButton.setEnabled(booleanValue) to enable
the “Start” button and disable the “Pause” button at the very beginning (see lines 11 and 15) and
then to toggle the buttons whenever one is pressed (see lines 29-30 and 37-38);
11.3. Java and Processing
Processing applications such as the ones considered in Chapters 1-5, can be integrated into Java GUI
applications. This gives us the capability of presenting a Processing animation and controlling that
animation using Java GUI widgets.
This section starts with a simple Processing application, encapsulates that application as a Java class, and
then builds a Java GUI to control that application.
11.3.1. Starting with a Processing Application
We’ll start with a simple Processing application that animates an expanding circle that starts in the middle
of the output panel and grows beyond the boundaries of the output panel.
final int SIZE = 200;
int myX, myY, myDiameter;
color myColor;
void setup() {
size(SIZE, SIZE);
myX = SIZE / 2;
myY = myX;
myDiameter = 0;
myColor = color(125, 125, 175);
smooth();
fill(myColor);
}
void draw() {
myDiameter++;
ellipse(myX, myY, myDiameter, myDiameter);
}
void mousePressed() {
myX = mouseX;
myY = mouseY;
myDiameter = 0;
}
This application animates a simple expanding circle. The circle of diameter 0 starts in the middle of the
screen and starts expanding. If the user clicks on output panel, a new circle starts expanding at that point.
11-19
In this section, we re-implement this Processing application as Java GUI application. This process will
illustrate what the Processing IDE does for us automatically when we run a Processing application.
11.3.2. Encapsulating the Processing Application
To integrate a Processing application into Java, we need to encapsulate it as a Java class. This
encapsulation, one of the three fundamental object-oriented principles, “boxes up” the Processing
application into a Java class that can be constructed and used as a widget in a Java GUI application. To
take advantage of the pre-defined data items and behaviors we have relied on for our Processing
applications, we implement our new class as an extension of the PApplet class, which defines those
data items and behaviors.
1
2
3
4
5
6
7
8
9
10
11
12
13
14
15
16
17
18
19
20
21
22
23
24
25
26
27
28
29
30
31
32
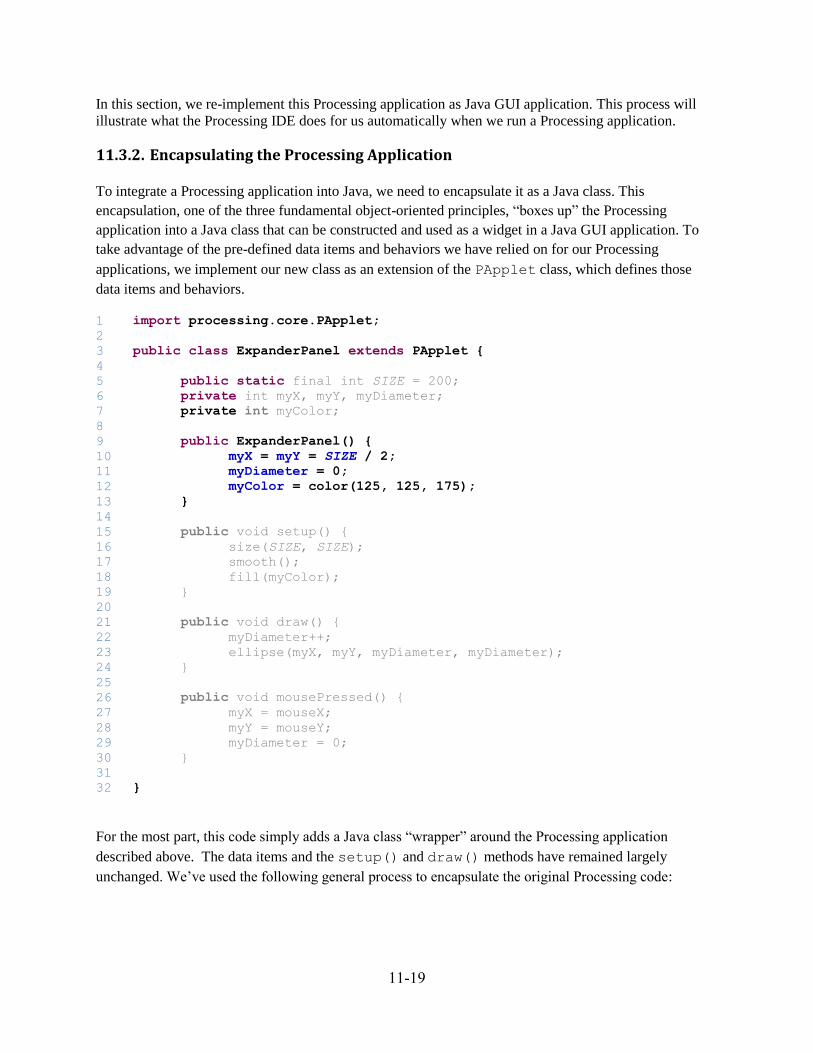
import processing.core.PApplet;
public class ExpanderPanel extends PApplet {
public static final int SIZE = 200;
private int myX, myY, myDiameter;
private int myColor;
public ExpanderPanel() {
myX = myY = SIZE / 2;
myDiameter = 0;
myColor = color(125, 125, 175);
}
public void setup() {
size(SIZE, SIZE);
smooth();
fill(myColor);
}
public void draw() {
myDiameter++;
ellipse(myX, myY, myDiameter, myDiameter);
}
public void mousePressed() {
myX = mouseX;
myY = mouseY;
myDiameter = 0;
}
}
For the most part, this code simply adds a Java class “wrapper” around the Processing application
described above. The data items and the setup() and draw() methods have remained largely
unchanged. We’ve used the following general process to encapsulate the original Processing code:

11-20
1. Create a new class (e.g., ExpanderPanel) that extends PApplet and copy all the Processing
code into a class definition (see lines 1-3 and 32) – Note that we also imported the PApplet
class definition so that this class has access to the features provided by Processing4;
2. Add the private access keyword to the local data items, which follows our practice of
protecting instance variables, and the public access keyword to the setup(), draw() and
keyPressed() methods, which satisfies Java’s requirement that these methods be publicly
accessible;
3. Include a constructor method (see lines 9-13) that constructs an object of the given class and
initializes its variables to default values – Note that both the constructor and the setup()
methods perform what might be called “initializations”; we adopt, as much as possible, the
practice of initializing the class variables in the constructor and initializing the animation in the
setup() method. The former is done when the class is constructed, the latter is done when the
Processing features are initialized (using init()).
4. Add accessor and mutator methods as required – Though we don’t need to add accessors or
mutators for this example, they can be useful for controlling the animation as we see in later
sections.
You can use this general process to encapsulate any Processing application that we built in Chapters 1-5
into a Java GUI component. Note, this panel class is not a complete Java program (for example, it has not
defined a main method), so it is not appropriate to run this class directly. Instead, we will use this panel
as a component of a Java GUI controller.
11.3.3. Building a Java GUI Controller
Now that we’ve seen how to build a simple Java GUI controller and to encapsulate a Processing
application into a simple Java GUI component, we are in a position to integrate these two pieces into a
complete Java GUI application. The class architecture we will use for this application is shown here:
The ExpanderController extends JFrame, just as all the Java GUI application classes did in the
previous section. This allows it to inherit all the Java GUI-building features implement in JFrame. The
ExpanderPanel extends PApplet. This allows it to inherit all the Processing features such as
size(), smooth(), fill() and the use of setup() and draw(). Thus, the
ExpanderController runs the GUI and the ExpanderPanel runs the animation.
4 The PApplet is a child of Applet, which is a child of JPanel. We can place any object of type JPanel or its
children on our Java GUI interfaces.
11-21
Our final task is to integrate the ExpanderPanel into the ExpanderController as denoted by the
horizontal arrow in the figure. To do this, we must upgrade the simple DoNothingController
discussed above to include a constructor method that initializes and adds an active Processing panel
implemented by ExpanderPanel.
Program 1
2
3
4
5
6
7
8
9
10
11
12
13
14
15
16
17
18
19
import javax.swing.JFrame;
public class ExpanderController extends JFrame {
private ExpanderPanel expanderPanel;
public ExpanderController() {
setTitle("Expanding Circle");
expanderPanel = new ExpanderPanel();
expanderPanel.init();
add(expanderPanel);
}
public static void main(String[] args) {
ExpanderController controller = new ExpanderController();
controller.pack();
controller.setVisible(true);
}
}
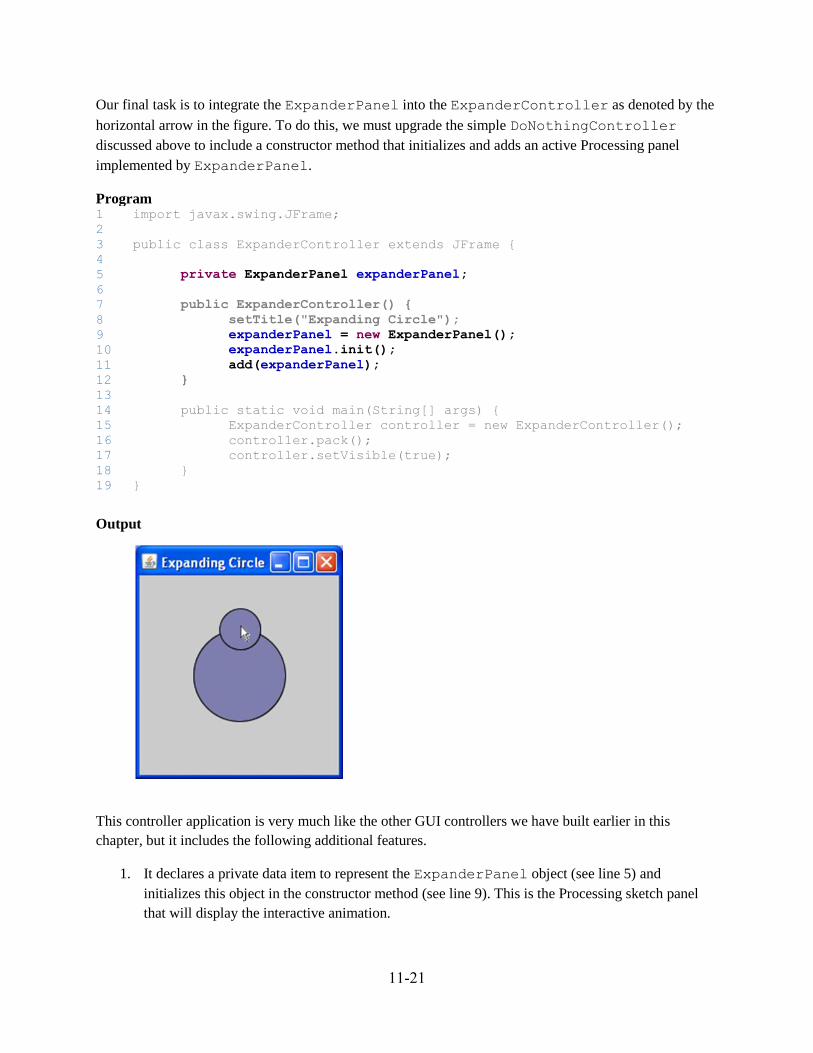
Output
This controller application is very much like the other GUI controllers we have built earlier in this
chapter, but it includes the following additional features.
1. It declares a private data item to represent the ExpanderPanel object (see line 5) and
initializes this object in the constructor method (see line 9). This is the Processing sketch panel
that will display the interactive animation.

11-22
2. Asks the expanderPanel to initialize its Processing-based application (see line 10). This
init() method is inherited from PApplet;
3. Adds the expanderPanel to the ExpanderController output frame in the same way that
all GUI widgets are added to frames.
This complete Java GUI application implements all of the behavior of the original Processing application,
but in the context of a more general Java application. This allows us to add GUI widgets to control the
animation, which is difficult to do in pure Processing applications.
11.3.4. Revisiting the Example
Given the tools provided in previous two sections, we can now integrate the Processing-based elements
shown in Figure 11-1 with the Java GUI controller implemented in Section 11.2.7.
We start with the Processing implementation of a simple raindrops animation shown in Section 11.1 and
encapsulate it as a Java PApplet class as follows:
Encapsulated Raindrops Panel
1
2
3
4
5
6
7
8
9
10
11
12
13
14
15
16
17
18
19
20
21
22
23
24
25
26
27
28
29
30
31
32
public class RaindropPanel extends PApplet {
private static final int SIZE = 300;
private int myFrameRate, myDiameter;
private boolean myRunningStatus;
public RaindropPanel() {
myFrameRate = 30;
myRunningStatus = true;
}
public RaindropPanel(int initialFrameRate) throws Exception {
setFrameRate(initialFrameRate);
myRunningStatus = true;
}
public void setFrameRate(int frameRate) throws Exception {
if (frameRate < 1) {
throw new Exception("Bad framerate: " + frameRate);
}
myFrameRate = frameRate;
}
public void setRunning(boolean running) {
myRunningStatus = running;
}
public void setup() {
size(SIZE, SIZE);
}

11-23
33
34
35
36
37
38
39
40
41
public void draw() {
if (myRunningStatus) {
frameRate(myFrameRate);
fill(random(255), random(255), random(255), random(255));
myDiameter = (int) random(SIZE / 2);
ellipse(random(SIZE), random(SIZE), myDiameter, myDiameter);
}
}
}
This encapsulation does the following:
It adds both default (lines 8-11) and explicit-value (lines 13-16) constructors where the latter
allows the calling program to set the initial frame rate. It throws an error if the frame rate is
negative.
It adds a setRunning() mutator (lines 25-27) to implement a pause function where the calling
program can set the running status to either true or false. When false, the animation stops drawing
new raindrops (see the condition in line 34).
The controller program is based on the controller implemented in Section 11.2.7 with the sole addition of
an output text field identical to the one used in the tip calculator implementation.
GUI Controller Program
1
2
3
4
5
6
7
8
9
10
11
12
13
14
15
16
17
18
19
20
21
22
23
24
25
26
27
28
29
30
public class RaindropController extends JFrame {
private static int DEFAULT_FRAMERATE = 30;
private RaindropPanel raindropPanel;
private JButton startButton, pauseButton;
private JTextField frameRateField, outputField;
public RaindropController() {
setTitle("Raindrops");
setDefaultCloseOperation(EXIT_ON_CLOSE);
// the raindrop animation panel
try {
raindropPanel = new RaindropPanel(DEFAULT_FRAMERATE);
} catch (Exception e) {
// This should never happen.
outputField.setText("Invalid rate: " + DEFAULT_FRAMERATE)
}
raindropPanel.init();
add(raindropPanel, BorderLayout.NORTH);
// a control panel
JPanel controlPanel = new JPanel(new FlowLayout());
startButton = new JButton("Start");
startButton.setEnabled(false);
startButton.addActionListener(new StartButtonListener());
controlPanel.add(startButton);
pauseButton = new JButton("Pause");
pauseButton.setEnabled(true);

11-24
31
32
33
34
35
36
37
38
39
40
41
42
43
44
45
46
50
51
52
53
54
55
56
57
58
59
60
61
62
63
64
65
66
67
68
69
70
71
72
73
74
75
76
77
78
79
80
81
82
83
84
pauseButton.addActionListener(new PauseButtonListener());
controlPanel.add(pauseButton);
controlPanel.add(new JLabel("Frame rate:"));
frameRateField = new JTextField(3);
frameRateField.setText("30");
controlPanel.add(frameRateField);
frameRateField.addActionListener(new RateFieldListener());
add(controlPanel, BorderLayout.CENTER);
outputField = new JTextField("Welcome to the raindrops controller.");
outputField.setEditable(false);
add(outputField, BorderLayout.SOUTH);
}
class StartButtonListener implements ActionListener {
public void actionPerformed(ActionEvent ae) {
// Handle the start operation.
raindropPanel.setRunning(true);
startButton.setEnabled(false);
pauseButton.setEnabled(true);
}
}
class PauseButtonListener implements ActionListener {
public void actionPerformed(ActionEvent ae) {
// Handle the pause operation.
raindropPanel.setRunning(false);
startButton.setEnabled(true);
pauseButton.setEnabled(false);
}
}
class RateFieldListener implements ActionListener {
public void actionPerformed(ActionEvent ae) {
String frameRateString = frameRateField.getText();
try {
int newFrameRate = Integer.parseInt(frameRateString);
raindropPanel.setFrameRate(newFrameRate);
} catch (Exception e) {
outputField.setText("Invalid rate: " + frameRateString);
}
}
}
public static void main(String[] args) {
RaindropController controller = new RaindropController();
controller.pack();
controller.setVisible(true);
}
}
This code is very similar to the controller code implemented in Section 11.2.7, with the following
modifications:

11-25
It adds a RaindropsPanel object to implement the raindrops animation implemented above
(see lines 5 and 14-21).
It handles number parsing errors and frame rate setting errors catching the thrown exceptions and
displaying the messages in the output text field (see lines 14-19 and 69-74).
It allows the user to control the start/pause feature of the animation through the start and pause
buttons (see lines 51 and 60).
The output of this application is shown here.
Output:
11.4. Multiple-Class Processing Applications
The programs implemented in the previous sections consolidated all their Processing drawing functions in
one class, e.g., ExpanderPanel. Because this class extends PApplet, it inherits all the Processing
tools, e.g., ellipse(), fill() and color(). The GUI controller, i.e., ExpanderController,
never needed to access the Processing canvas directly. This is a good separation of responsibilities; the
expander panel handled the Processing graphics and the GUI controller handled the graphical user
interface.
There are cases, however, when we might want to introduce additional classes that need to access the
canvas. For example, if we decided that the expanding circles were complex enough to warrant a class of
their own, then the new expanding circle class would certainly need access to the canvas so that it could
draw itself. This leads to a problem because a program can only have one child of PApplet –

11-26
ExpanderPanel. Thus, if ExpanderPanel runs the animation, the new expander class cannot
inherit the Processing drawing functions needed to draw itself.
One solution to this dilemma is to implement the drawing functions needed for the new expander class in
one method that receives a reference to the PApplet object from its calling program. This can be
implemented as follows:
1
2
3
4
5
6
7
8
9
10
11
12
13
14
15
16
17
18
19
20
21
public class Expander {
private int myX, myY, myDiameter;
int myColor;
public Expander(int x, int y, int diameter, int color) {
myX = x;
myY = y;
myDiameter = diameter;
myColor = color;
}
public void incrementDiameter() {
myDiameter++;
}
public void render(PApplet p) {
p.fill(myColor);
p.ellipse(myX, myY, myDiameter, myDiameter);
}
}
This class is similar to classes we built in Chapter 9. It encapsulates a center point (x, y), diameter and
color along with an explicit-value constructor and an incrementDiameter() mutator. The key
difference with previous classes is that it also includes a render() method that receives a PApplet
object from its calling program.
We see that the only part of this Expander class that uses Processing-specific methods is in its
render() method, which uses fill() and ellipse(). This is no accident. It is, in fact, a result of
careful design of the Expander class to sequester the drawing functionality within a single method, and
to be otherwise independent of the main PApplet class. This helps to separate the private aspects of the
Expander class from the details of the main Processing application. The only elements of coupling in
this case are the parameters received by the Expander class’s methods and the use of Processing
features in the render() method. This general design principle is called de-coupling and is very useful
in designing large systems because it allows us to work on individual components of the system without
seriously affecting other components.5
5 Note that because Processing implements its auxiliary classes as inner classes, it is possible to inadvertently
introduce strong coupling between the main application class and the auxiliary class. We have avoided this
whenever possible in designing classes in this text.

11-27
The Expander class’s render() method is repeated here:
public void render(PApplet p) {
p.fill(myColor);
p.ellipse(myX, myY, myDiameter, myDiameter);
}
This method receives reference to a PApplet object from its calling program which it borrows long
enough to draw itself appropriately. Whatever drawing is done using this reference appears on the main
PApplet canvas for all to see. The code then uses this parameter and the familiar dot notation to access the
fill() and ellipse() methods.
This new Expander class fits into the class architecture shown in Section 11.3.3 as follows:
We see that the ExpanderPanel will create and manage Expander objects, but that these
Expander objects will not inherit from PApplet.
Given this implementation of the Expander class, we can re-implement the ExpanderPanel class more
simply as follows:
1
2
3
4
5
6
7
8
9
10
11
12
13
14
15
16
17
18
19
20
21
22
23
public class ExpanderPanel extends PApplet {
public static final int SIZE = 200;
public int defaultColor = color(125, 125, 175);
private Expander myExpander;
public ExpanderPanel() {
myExpander = new Expander(SIZE / 2, SIZE / 2, 0, defaultColor);
}
public void clear() {
background(255);
}
public void setup() {
size(SIZE, SIZE);
smooth();
}
public void draw() {
myExpander.incrementDiameter();
myExpander.render(this);
}
JFrame PApplet
ExpanderController ExpanderPanel Expander
11-28
24
25
26
27
28
public void mousePressed() {
myExpander = new Expander(mouseX, mouseY, 0, defaultColor);
}
}
This new implementation is similar to the previous implementation, but instead of representing the
expanding circle directly, it defines and manipulates an Expander object instead. When it is time to
draw the expander, the code calls myExpander.render(this) (see line 22), which passes a
reference to this object, i.e., this PApplet object, so that the render() method can draw on the
PApplet canvas.
The techniques in this section are useful when new graphical classes are added to Processing-based Java
GUIs or when we’re attempting to integrate existing Processing sketches that use multiple classes into a
Java GUI.
11.5. Example Revisited
This final version of the raindrops program implements a new Raindrop class similar to the Expander
class developed in the previous section. As one additional enhancement, it would be nice to allow users to
control the frame rate using a slider rather than a text box. The following code implements these changes.
Raindrop Controller Class
1
2
3
4
5
6
7
8
9
10
11
12
13
14
15
16
17
18
19
20
21
22
23
24
25
26
27
28
29
30
import java.awt.*;
import javax.swing.*;
/**
* This controller shows the original raindrops animation and
* provides a slider widget to control the frame rate.
*
* @author kvlinden
* @version Fall, 2009
*/
public class RaindropController extends JFrame
implements ChangeListener {
private final static int INITIAL_FRAME_RATE = 20;
JTextField frameRateField;
private RaindropPanel3 raindropPanel;
public RaindropController() {
setTitle("Raindrops Controller");
setDefaultCloseOperation(EXIT_ON_CLOSE);
setLayout(new BorderLayout());
raindropPanel = new RaindropPanel3(INITIAL_FRAME_RATE);
raindropPanel.init();
add(raindropPanel, BorderLayout.CENTER);
JPanel controller = new JPanel();
controller.setLayout(new FlowLayout());

11-29
31
32
33
34
35
36
37
38
39
40
41
42
43
44
45
46
50
51
52
53
54
55
56
57
58
59
// The slider interface
controller.add(new JLabel("FrameRate: "));
JSlider slider = new JSlider(JSlider.HORIZONTAL, 1, 61,
INITIAL_FRAME_RATE);
slider.setMajorTickSpacing(10);
slider.setPaintTicks(true);
slider.setPaintLabels(true);
slider.addChangeListener(this);
controller.add(slider);
add(controller, BorderLayout.CENTER);
}
public void stateChanged(ChangeEvent e) {
JSlider slider = (JSlider) e.getSource();
int value = slider.getValue();
raindropPanel.setFrameRate(value);
}
public static void main(String[] args) {
RaindropController4 controller = new RaindropController4();
controller.pack();
controller.setVisible(true);
}
}
This application replaces the text field with a JSlider object. In order to do this,
RaindropController implements the ChangeListener interface rather than the
ActionListener interface (see line 12), which requires that it implement the stateChanged()
method (see lines 44-51) rather than an actionPerformed() method.6
Because the slider does not allow negative frame rates, there is no need to handle thrown exceptions or
print messages to the user. Because the slider is the only interface widget that generates user events, there
is no need to implement multiple inner classes to handle user events, so the single stateChanged()
method is all that is needed.
The updated implementation of the raindrop panel class is as follows:
Raindrop Panel Class
1
2
3
4
5
6
7
8
9
10
import processing.core.PApplet;
/**
* RaindropPanel is an enhanced Java encapsulation of the original
raindrops
* animation from Processing. It provides start/pause capability.
*
* @author kvlinden
* @version Fall, 2009
*/
6 You can find more details on using slider interfaces here:
http://java.sun.com/docs/books/tutorial/uiswing/components/slider.html.

11-30
11
12
13
14
15
16
17
18
19
20
21
22
23
24
25
26
27
28
29
30
31
32
33
34
35
36
37
38
39
40
41
42
43
44
45
46
50
51
52
53
54
55
56
57
58
59
60
public class RaindropPanel extends PApplet {
private static final int SIZE = 300;
private int mySize, myFrameRate, myDiameter;
private Raindrop raindrop;
private boolean myRunningStatus;
public RaindropPanel() {
mySize = SIZE;
myFrameRate = 30;
myRunningStatus = true;
}
public RaindropPanel(int initialFrameRate) {
mySize = SIZE;
myFrameRate = initialFrameRate;
myRunningStatus = true;
}
public void setFrameRate(int frameRate) {
if (frameRate < 1) {
System.out.println("illegal frame rate: " + frameRate);
exit();
}
myFrameRate = frameRate;
}
public void setRunning(boolean running) {
myRunningStatus = running;
}
public void setup() {
size(mySize, mySize);
}
public void draw() {
if (myRunningStatus) {
frameRate(myFrameRate);
raindrop = new Raindrop(random(mySize),
random(mySize),
random(mySize / 2),
color(random(255), random(255), random(255), random(255)));
raindrop.render(this);
}
}
}
This Raindrop panel is similar to the original, but it constructs (line 15) and manipulates (lines 53-57)
Raindrop objects in a manner similar to the way in which the previous section constructed and
manipulated Expander objects.
The new Raindrop class is implemented as follows:

11-31
Raindrop Panel Class
1
2
3
4
5
6
7
8
9
10
11
12
13
14
15
16
17
18
19
20
21
22
23
24
25
26
import processing.core.PApplet;
/**
* Raindrop is an encapsulation of a simple raindrop class.
*
* @author kvlinden
* @version Fall, 2009
*/
public class Raindrop {
private float myX, myY, myDiameter;
private int myColor;
public Raindrop(float x, float y, float diameter, int color) {
myX = x;
myY = y;
myDiameter = diameter;
myColor = color;
}
public void render(PApplet p) {
p.fill(myColor);
p.ellipse(myX, myY, myDiameter, myDiameter);
}
}
In this new class, the render() method is implemented in a similar manner to the render() method
for the Expander class in the previous section. This GUI output appears as follows:
Raindrop Controller Output: