chapter 12: search and rescue
TRANSCRIPT

Chapter 12: Search and Rescue 55
Chapter 12: Search and Rescue Matching
1. G (page 447) 2. I (page 438)
3. H (page 431) 4. C (page 431)
5. D (page 449) 6. B (page 431)
7. F (page 431) 8. A (page 447)
9. E (page 440) 10. J (page 437)
Multiple Choice
1. D (page 446) 2. A (page 450) 3. C (page 463) 4. D (pages 466–468) 5. A (page 459)
Vocabulary
6. C (pages 465–466) 7. B (page 447) 8. A (page 463) 9. A (page 435)
10. D (page 435)
11. B (page 437) 12. D (page 462) 13. B (page 435) 14. D (page 438) 15. A (page 433)
16. C (page 441) 17. C (page 438) 18. D (page 453) 19. B (page 461) 20. A (page 456)
1. Exit assist: The simplest rescue if the victim is responsive and able to walk without assistance or with very little assistance. (page 450)
2. Shelter-in-place: When the occupants are sheltered and kept in their present location instead of trying to remove them from a fire building. (pages 449–450)
3. Two-in/two-out rule: The NFPA requirements state that a team of at least two fire fighters must enter together, and at least two other fire fighters must remain outside the danger area, ready to rescue the fire fighters who are inside the building. (page 445)
4. Primary search: A quick attempt to locate any potential victims who are in danger. (page 438) 5. Transitional attack: An offensive fire attack initiated by a quick, indirect, exterior attack into the fire compartment,
followed by a quick transition into an interior attack. (page 331)
Fill-In
1. lives (page 431) 2. crawl (page 438) 3. greater (page 433) 4. risk (page 433) 5. secondary (page 439)
True/False
1. T (page 431)
4. T (page 433)
6. marked (page 443) 7. second (page 435) 8. Sounding f loors (page 437) 9. fire f low path (page 433)
10. standard method (page 441)
7. T (page 431)
9. T (page 443)
2. T (page 436) 3. T (page 449)
5. T (page 449) 6. F (page 435)
8. T (pages 432–434) 10. F (page 440)

A n s w e r K e y 56
Short Answer
1. Benefits of thermal imaging include (Students should include three of the following): (1) Identify the shape of a human body; (2) Show furniture, walls, doorways, and windows; (3) Navigate through the interior of a smoke-filled building; (4) Locate a fire in a smoke-filled building or behind walls or ceilings; (5) Locate the fire source and the direction of fire spread from the exterior; (6) Scanning a door before opening it can indicate whether the room is safe to enter. (page 440)
2. Search and rescue equipment includes (Students should include six of the following): (1) Personal protective equipment (PPE); (2) Portable radio; (3) Hand light or f lashlight; (4) Forcible entry (exit) tools; (5) Hose lines; (6) Thermal imaging devices; (7) Ladders; (8) Long ropes; (9) A piece of tubular webbing or short rope (16 to 24 ft [4.9 to 7.3 m]). (page 437)
3. The six tips fire fighters need to remember during search and rescue operations are: (1) Work from a single plan. (2) Maintain radio contact with the incident commander (IC), both through the chain of command and via portable radios. (3) Monitor fire conditions during the search. (4) Coordinate ventilation operations with search and rescue activities. (5) Adhere to the personal accountability system. (6) Stay with a partner. (page 438)
4. Pieces of valuable information a preincident plan can provide for search and rescue operations include (Students should include five of the following): (1) Corridor layouts; (2) Exit locations; (3) Stairway locations; (4) Apartment layouts; (5) Number of bedrooms in apartments; (6) Locations of handicapped residents’ apartments; (7) Special-function rooms or areas. (page 434)
5. The four simple carries that can be used to move a victim who is conscious and responsive, but incapable of standing or walking are: (1) Two-person extremity carry; (2) Two-person seat carry; (3) Two-person chair carry; (4) Cradle-in-arms carry. (page 452)
6. Considerations for search and rescue size-up include (Students should include four of the following): (1) Occupancy; (2) Size of the building; (3) Construction of the building; (4) Time of day and day of week; (5) Number of occupants; (6) Degree of risk to the occupants presented by the fire; (7) Ability of occupants to exit on their own. (page 435)
Fire Alarms
1. Make sure you have a single communicated plan. Maintain radio contact with the IC using the chain of command, monitor fire conditions during the search, coordinate ventilation with your search and rescue activities, maintain your accountability system, stay with your team, and carry a thermal imaging device if at all possible to speed up the search and help locate exits and hazards. (pages 435–438)
2. The search and rescue needs to be coordinated with suppression and ventilation. Take into account the flow path of the fire. It would also be necessary to position a hose line to protect the entry and exit paths. A marking system should be used to indicate which rooms have been searched. (pages 431–432)
Skill Drills
Skill Drill 12-1: Conducting a Primary Search Using the Standard Search Method Fire Fighter I, NFPA 1001: 4.3.9 Test your knowledge of this skill drill by filling in the correct words in the photo captions.
1. Don your personal protective equipment (PPE), including SCBA, and enter the personnel accountability system.
Bring hand tools, a hand light, a radio, a thermal imaging device, and search ropes if indicated. Notify command that the search is starting, and indicate the area to be searched and the direction of the search. Use hand tools or ground ladders if needed to gain access to the site. Conduct a quick and systematic search by staying on an outside wall and searching from room to room. Maintain contact with an outside wall.
2. Maintain team integrity using visual, voice, or direct contact. Use the most efficient movement based on the hazard encountered: duck walk, crawl, stand only when you can see your feet and it is not hot. Use tools to extend your reach if recommended by your department. Clear each room visually or by touch, and then close the door. Search the area, including stairs up to the landing on the next floor.
3. Periodically listen for victims and sounds of fire. Communicate the locations of doors, windows, and inside corners to other team members. Observe fire, smoke, and heat conditions; update command on this information. Locate and remove victims; notify the IC. When the search is complete, conduct a personnel accountability report. Report the results of the search to your officer. (page 442)

Chapter 12: Search and Rescue 57
© Jon
es & B
artlet
t Lea
rning
. Pho
tograp
hed b
y Glen
E. Ell
man.
© Jon
es & B
artlet
t Lea
rning
. Pho
tograp
hed b
y Glen
E. Ell
man.
© Jon
es & B
artlet
t Lea
rning
. Pho
tograp
hed b
y Glen
E. Ell
man.
© Jon
es & B
artlet
t Lea
rning
. Pho
tograp
hed b
y Glen
E. Ell
man.
© Jon
es & B
artlet
t Lea
rning
. Pho
tograp
hed b
y Glen
E. Ell
man.
Skill Drill 12-2: Conducting a Primary Search Using the Oriented Search Method Fire Fighter I, NFPA 1001: 4.3.9 Test your knowledge of this skill drill by placing the photos below in the correct order. Number the first step with a “1,” the second step with a “2,” and so on.
1. A search team consisting of one officer or team leader and one to three searchers is assembled.
3. The officer notifies the incident commander that search is starting and directs the searchers to the area to be searched.
2. Searchers don their personal protective equipment (PPE), including SCBA and hand tools, and enter the personnel accountability system.
4. The officer remains outside the rooms to be searched to
monitor safety conditions, air supplies, and the status of the fire. The officer maintains a systematic search pattern and coordinates activities with the incident commander.
5. Searchers use a left-handed or a right-handed search pattern and perform two to three side crawls as necessary to extend the search toward the center of the room. Upon completion of the search of each room, the officer directs searchers to the next rooms to be searched and closes the door. If a victim is found, the officer notifies the incident commander and requests a second team to help remove the victim. The search team moves the victim toward the exit and turns over the care and removal of the victim to the second team.

A n s w e r K e y 58
© Jon
es & B
artlet
t Lea
rning
. Pho
tograp
hed b
y Glen
E. Ell
man.
© Jon
es & B
artlet
t Lea
rning
. Pho
tograp
hed b
y Glen
E. Ell
man.
© Jon
es & B
artlet
t Lea
rning
. Pho
tograp
hed b
y Glen
E. Ell
man.
6. The search team then returns to the last location searched and continues the systematic search of the building. When the search is complete, the officer conducts a personnel accountability report. The officer reports the results of the search and the personnel accountability report to the incident commander. (page 443–444)
Skill Drill 12-5: Performing a Two-Person Walking Assist Fire Fighter I, NFPA 1001: 4.3.9 Test your knowledge of this skill drill by filling in the correct words in the photo captions.
1. Two fire fighters stand facing the victim, one on each side of the victim. Both fire fighters assist the victim to a
standing position.
2. Once the victim is fully upright, place the victim’s right arm around the neck of the fire fighter on the right side. Place the victim’s left arm around the neck of the fire fighter on the left side. The victim’s arms should drape over the fire fighter’s shoulders. The fire fighters hold the victim’s wrist in one hand.
3. Both fire fighters put their free arms around the victim’s waist for added support. Both fire fighters slowly assist the victim to walk. Fire fighters must coordinate their movements and move slowly. (page 451)
Skill Drill 12-6: Performing a Two-Person Extremity Carry Fire Fighter I, NFPA 1001: 4.3.9 Test your knowledge of this skill drill by placing the photos below in the correct order. Number the first step with a “1,” the second step with a “2,” and so on.
1. Two fire fighters help the victim to sit up. 2. The first fire fighter kneels behind the victim, reaches under the victim’s arms, and grasps the victim’s wrists.

Chapter 12: Search and Rescue 59
© Jon
es & B
artlet
t Lea
rning
. Pho
tograp
hed b
y Glen
E. Ell
man.
© Jon
es & B
artlet
t Lea
rning
. Pho
tograp
hed b
y Glen
E. Ell
man.
© Jon
es & B
artlet
t Lea
rning
. Pho
tograp
hed b
y Glen
E. Ell
man.
© Jon
es & B
artlet
t Lea
rning
. Pho
tograp
hed b
y Glen
E. Ell
man.
3. The second fire fighter backs in between the victim’s legs, reaches around, and grasps the victim behind the knees.
4. The first fire fighter gives the command to stand and carry the victim away, walking straight ahead. Both fire fighters must coordinate their movements. (page 452)
Skill Drill 12-8: Performing a Two-Person Chair Carry Fire Fighter I, NFPA 1001: 4.3.9 Test your knowledge of this skill drill by filling in the correct words in the photo captions.
1. Tie the victim’s hands together, or have the victim grasp his or her hands together. This prevents the victim from
reaching for a stationary object while you are moving him or her. One fire fighter stands behind the seated victim, reaches down, and grasps the back of the chair.
2. The fire fighter tilts the chair slightly backward on its rear legs so that the second fire fighter can step back between the legs of the chair and grasp the tips of the chair’s front legs. The victim’s legs should be between the legs of the chair.
3. When both fire fighters are correctly positioned, the fire fighter behind the chair gives the command to lift and walk away. Because the chair carry may force the victim’s head forward, watch the victim for airway problems. (page 454)
Skill Drill 12-12: Performing a Standing Drag Fire Fighter I, NFPA 1001: 4.3.9 Test your knowledge of this skill drill by placing the photos below in the correct order. Number the first step with a “1,” the second step with a “2,” and so on.
1. Kneel at the head of the supine victim. 2. Raise the victim’s head and torso by 90 degrees so that the victim is leaning against you.

A n s w e r K e y 60
© Jon
es & B
artlet
t Lea
rning
. Pho
tograp
hed b
y Glen
E. Ell
man.
© Jon
es & B
artlet
t Lea
rning
. Pho
tograp
hed b
y Glen
E. Ell
man.
3. Reach under the victim’s arms, wrap your arms around the victim’s chest, and lock your arms.
4. Stand straight up using your legs. Drag the victim out. (pages 458–459)
Skill Drill 12-16: Rescuing a Conscious Victim from a Window Fire Fighter I, NFPA 1001: 4.3.9 Test your knowledge of this skill drill by filling in the correct words in the photo captions.
1. The rescue team places the ladder into the rescue position, with the tip of the ladder just below the windowsill,
and secures the ladder in place.
2. The first fire fighter climbs the ladder, makes contact with the victim, and climbs inside the window to assist the victim. The fire fighter should make contact as soon as possible to calm the victim and encourage the victim to stay at the window until the rescue can be performed.
3. The second fire fighter climbs up to the window, leaving at least one rung available for the victim. When ready, the fire fighter advises the victim to slowly come out onto the ladder, feet first, and facing the ladder.
4. The second fire fighter forms a semi-circle around the victim, with both hands on the beams of the ladder.
5. The second fire fighter and victim proceed slowly down the ladder, one rung at a time, with the fire fighter always staying one rung below the victim. If the victim slips or loses his or her footing, the fire fighter’s legs should keep the victim from falling. The fire fighter can take control of the victim at any time by leaning in toward the ladder and squeezing the victim against the ladder. The fire fighter should verbalize each step and talk to the person being rescued to help reassure and calm him or her and encourage the person to keep his or her gaze forward. (pages 463–464)

Chapter 12: Search and Rescue 61
© Jon
es & B
artlet
t Lea
rning
. Pho
tograp
hed b
y Glen
E. Ell
man.
© Jon
es & B
artlet
t Lea
rning
. Pho
tograp
hed b
y Glen
E. Ell
man.
© Jon
es & B
artlet
t Lea
rning
. Pho
tograp
hed b
y Glen
E. Ell
man.
Skill Drill 12-17: Rescuing an Unconscious Victim from a Window Fire Fighter I, NFPA 1001: 4.3.9 Test your knowledge of this skill drill by placing the photos below in the correct order. Number the first step with a “1,” the second step with a “2,” and so on.
1. The rescue team sets up and secures the ladder in rescue position with the tip of the ladder just below the windowsill.
2. One fire fighter climbs up the ladder and enters the window to rescue the victim. The second fire fighter climbs up to the window opening and waits for the victim.
3. The second fire fighter places both hands on the rungs of the ladder, with one leg straight and the other horizontal to the ground with the knee at an angle of 90 degrees. The foot of the straight leg should be one rung below the foot of the bent leg. When both fire fighters are ready, the first fire fighter passes the victim out through the window and onto the ladder, keeping the victim’s back toward the ladder.

A n s w e r K e y 62
© Jon
es & B
artlet
t Lea
rning
. Pho
tograp
hed b
y Glen
E. Ell
man.
4. The victim is lowered so that he or she straddles the second fire fighter’s leg. The fire fighter’s arms should be positioned under the victim’s arms, holding on to the rungs. The fire fighter keeps the balls of both feet on the rungs of the ladder to make it easier to move his or her feet. The fire fighter climbs down the ladder slowly, one rung at a time, transferring the victim’s weight from one leg to the other. The victim’s arms can also be secured around the fire fighter’s neck. (pages 465–466)
Skill Drill 12-18: Rescuing an Unconscious Child or a Small Adult from a Window Fire Fighter I, NFPA 1001: 4.3.9 Test your knowledge of this skill drill by filling in the correct words in the photo captions.
1. The rescue team sets up and secures the ladder in rescue position, with the tip below the windowsill.
2. The first fire fighter climbs the ladder and enters the window to assist the victim. The second fire fighter climbs the ladder to the window opening and waits to receive the victim. Both of the second fire fighter’s arms should be level with his or her hands on the beams.
3. When ready, the first fire fighter passes the victim to the second fire fighter so the victim is cradled across the second fire fighter’s arms.
4. The second fire fighter climbs down the ladder slowly, with the victim being held in his or her arms. The fire fighter’s arms should stay level, and his or her hands should slide down the beams. (page 467)

Chapter 12: Search and Rescue 63
© Jon
es & B
artlet
t Lea
rning
. Pho
tograp
hed b
y Glen
E. Ell
man.
© Jon
es & B
artlet
t Lea
rning
. Pho
tograp
hed b
y Glen
E. Ell
man.
© Jon
es & B
artlet
t Lea
rning
. Pho
tograp
hed b
y Glen
E. Ell
man.
© Jon
es & B
artlet
t Lea
rning
. Pho
tograp
hed b
y Glen
E. Ell
man.
Skill Drill 12-19: Rescuing a Large Adult from a Window Fire Fighter I, NFPA 1001: 4.3.9 Test your knowledge of this skill drill by placing the photos below in the correct order. Number the first step with a “1,” the second step with a “2,” and so on.
1. The rescue team places and secures two ladders, side by side, in the rescue position. The tips of the two ladders should be just below the windowsill.
2. Multiple fire fighters may be required to enter the window to assist from the inside.
3. Two fire fighters, one on each ladder, climb up to the window opening and wait to receive the victim.
4. When ready, the victim is lowered down across the arms of the fire fighters, with one fire fighter supporting the victim’s legs and the other supporting the victim’s arms. Once in place, the fire fighters can slowly descend the ladder, using both hands to hold on to the ladder rungs. (page 468)

A n s w e r K e y 64
Chapter 13: Ventilation Matching
1. I (page 500) 2. F (page 498)
Multiple Choice
3. H (page 476) 4. C (page 500)
5. G (page 500) 6. B (page 485)
7. E (page 490) 8. A (page 482)
9. J (page 500) 10. D (page 479)
1. C (page 490) 2. A (page 492) 3. D (page 509) 4. B (page 497) 5. D (page 501) 6. C (page 484)
7. C (page 507) 8. A (page 487) 9. B (page 499)
10. A (page 475) 11. C (page 498) 12. B (page 500)
13. B (page 476) 14. B (page 482) 15. A (page 495) 16. D (page 493) 17. B (page 487) 18. D (page 477)
19. C (page 477) 20. B (page 476) 21. D (page 490) 22. A (page 485) 23. B (page 484) 24. D (page 500)
Vocabulary
1. Smoke inversion: The condition in which smoke hangs low to the ground on a cool, damp day with very little wind.
(page 480) 2. Ventilation: The controlled and coordinated removal of heat and smoke from a structure, replacing the escaping gases
with fresh air. (page 475) 3. Ordinary construction: Buildings whose exterior walls are made of noncombustible or limited-combustible materials
that support the roof and f loor assemblies. The interior walls and f loors are usually wood construction. (page 482) 4. Fire-resistive construction: A building in which all of the structural components are made of noncombustible or
limited-combustible materials. (page 481) 5. Gusset plates: Connecting plates used in trusses, typically made of wood or lightweight metal. (page 499) 6. Vertical ventilation: The vertical venting of structures involving the opening of bulkhead doors, skylights, scuttles,
and roof-cutting operations to release smoke and heat from inside the fire building. (page 495) 7. Stack effect: A response to the differences in temperature inside and outside a building. A cold outer atmosphere
and a heated interior will cause smoke to rise quickly through stairways, elevator shafts, and other vertical openings, filling the upper levels of the building. (page 515)
8. Horizontal ventilation: Using horizontal openings in the structure, such as windows and doors, to allow smoke, heat, and gases to escape horizontally from a building. (page 486)
9. Flow path: The movement of heat and smoke from the higher pressure within the fire area toward the lower pressure areas accessible via doors, window openings, and roof structures. (page 476)
10. Ventilation limited fire: A fire in which the heat release rate and fire growth are regulated by the available oxygen within the space. (page 476)
Fill-In
1. roof collapse (page 496) 2. Trench cut (page 511) 3. Hydraulic (page 495) 4. masonry (page 483) 5. transitional (page 484)
6. Horizontal (page 486) 7. upwind (page 497) 8. bowstring (page 501) 9. high (page 493)
10. Wind (page 478)

Chapter 13:Ventilation 65
True/False
1. T (page 501) 2. T (page 480)
3. F (page 481) 4. F (page 484)
5. T (page 486) 6. T (page 496)
7. T (page 515) 8. F (page 501)
9. T (page 500)
10. T (page 514)
Short Answer
1. Door control limits the air inlet and the fire’s ability to grow. This will slow fire growth until the crew is ready to make access to the building and perform a coordinated fire attack. (page 476)
2. The objective of any roof ventilation operation is simple: to provide the largest opening in the appropriate location, using the least amount of time, and the safest technique. (page 501)
3. Five indicators that it is time for immediate retreat from the roof of a structure are: (1) Any visible indication of sagging roof supports; (2) Any indication that the roof assembly is separating from the walls, such as the appearance of fire or smoke near the roof edges; (3) Any structural failure of any portion of the building, even if it is some distance from the ventilation operation; (4) Any sudden increase in the intensity of the fire from the roof opening; (5) High heat indicators on a thermal imaging camera. (page 498)
4. The three “W’s” of ventilation include: (1) Why am I ventilating—is it for potential occupants or for possible occupants and fire fighters? (2) Where do I want to accomplish the ventilation—horizontal or vertical, and where is the fire in relation to my anticipated vent? (3) When do I want to perform the ventilation—have I coordinated my efforts with the actions of the fire suppression and search and rescue teams? (page 475)
Fire Alarms
1. Locate the roof supports. Make two parallel cuts, perpendicular to the roof supports. Do not cut through the roof supports. Rock the saw over them to avoid damaging the integrity of the roof structure. Make cuts parallel to the supports and between pairs of supports in a rectangular pattern. Strike the nearest side of each section of the roofing material with an axe or maul, pushing it down on one side; use the support at the center of each panel as a fulcrum. This hole should be the same size as the opening made in the roof decking. (page 509)
2. Determine the location of the fire within the building and the direction of attack. Place the fan 4 to 10 ft (1 to 3 m) in front of the opening to be used for attack. Provide an exhaust opening at or near the fire. This opening can be made before starting the fan or when the fan is started. Check for interior openings that could allow the products of combustion to be pushed into unwanted areas. Start the fan and check the cone of air produced. It should completely cover the opening. This can be checked by running a hand around the doorframe to feel the direction of air currents. Allow smoke to clear—usually 30 seconds to 1 minute depending on the size of the area to be ventilated and smoke conditions. (page 494)
Skill Drills
Skill Drill 13-1: Breaking Glass with a Hand Tool Fire Fighter I, NFPA 1001: 4.3.11 Test your knowledge of this skill drill by filling in the correct words in the photo captions.
1. Wear full personal protective equipment (PPE), including eye protection and self-contained breathing apparatus
(SCBA). Select a hand tool, and position yourself to the side of the window.
2. With your back facing the wall, swing backward forcefully with the tip of the tool striking the top one-third of the glass.
3. Clear the remaining glass from the opening with the hand tool. (page 488)
A n s w e r K e y 66
© Jon
es & B
artlet
t Lea
rning
. Pho
tograp
hed b
y Glen
E. Ell
man.
© Jon
es & B
artlet
t Lea
rning
. Pho
tograp
hed b
y Glen
E. Ell
man.
© Jon
es & B
artlet
t Lea
rning
. Pho
tograp
hed b
y Glen
E. Ell
man.
© Jon
es & B
artlet
t Lea
rning
. Pho
tograp
hed b
y Glen
E. Ell
man.
© Jon
es & B
artlet
t Lea
rning
. Pho
tograp
hed b
y Glen
E. Ell
man.
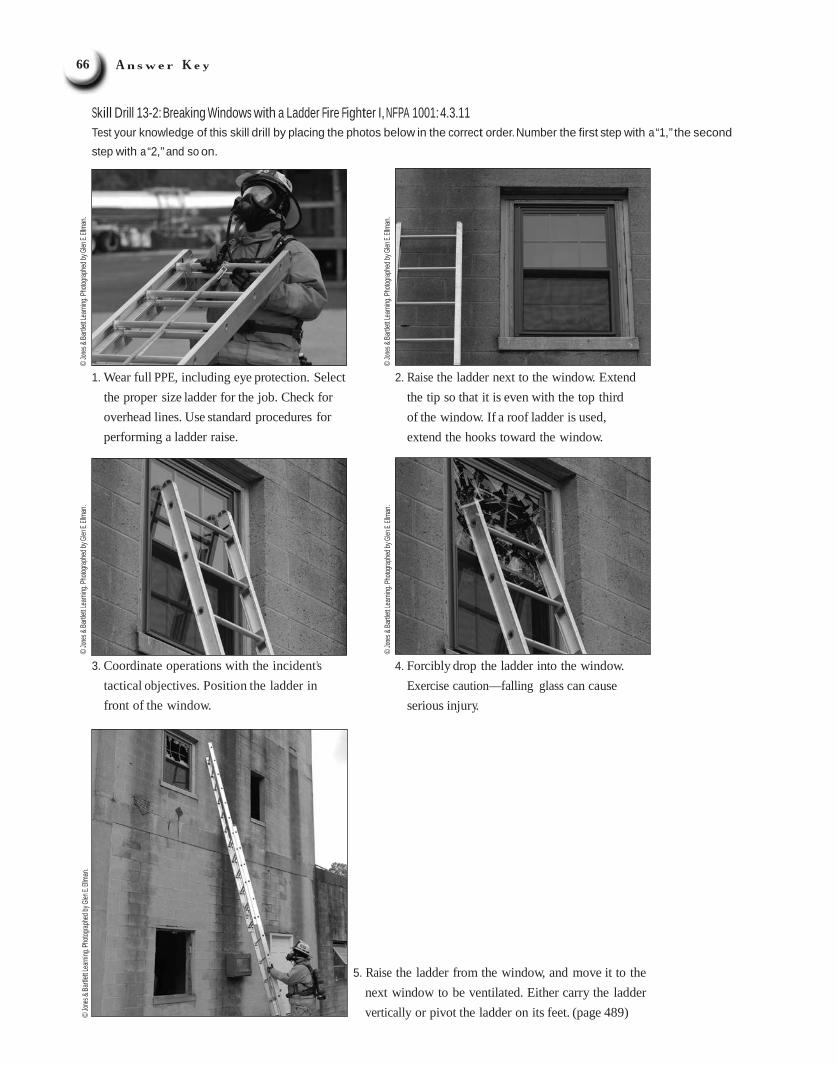
Skill Drill 13-2: Breaking Windows with a Ladder Fire Fighter I, NFPA 1001: 4.3.11 Test your knowledge of this skill drill by placing the photos below in the correct order. Number the first step with a “1,” the second step with a “2,” and so on.
1. Wear full PPE, including eye protection. Select the proper size ladder for the job. Check for overhead lines. Use standard procedures for performing a ladder raise.
3. Coordinate operations with the incident’s tactical objectives. Position the ladder in front of the window.
2. Raise the ladder next to the window. Extend the tip so that it is even with the top third of the window. If a roof ladder is used, extend the hooks toward the window.
4. Forcibly drop the ladder into the window. Exercise caution—falling glass can cause serious injury.
5. Raise the ladder from the window, and move it to the
next window to be ventilated. Either carry the ladder vertically or pivot the ladder on its feet. (page 489)

Chapter 13:Ventilation 67
© Jon
es & B
artlet
t Lea
rning
.
© Jon
es & B
artlet
t Lea
rning
.
© Jon
es & B
artlet
t Lea
rning
.
4'
Skill Drill 13-4: Delivering Positive-Pressure Ventilation Fire Fighter I, NFPA 1001: 4.3.12 Test your knowledge of this skill drill by filling in the correct words in the photo captions.
1. Place the fan in front of the opening to be used for the fire attack. The exact position depends on the size of the opening, the size of the fan, and the direction of the wind.
2. Provide an exhaust opening in the fire room. This opening can be made either before the fan is started or when the fan is started.
3. Start the fan.
4. Check the cone of air produced; it should completely cover the opening. This can be checked by running a hand around the door frame to feel the direction of air currents. Monitor the exhaust opening to ensure there is a unidirectional flow. Allow the smoke to clear. (page 494)
Skill Drill 13-5: Delivering Hydraulic Ventilation Fire Fighter I, NFPA 1001: 4.3.12 Test your knowledge of this skill drill by filling in the correct words in the photo captions.
1. Enter the room, and remain close to the ventilation opening. Place the nozzle through the opening, and open the
nozzle to a narrow fog or broken-pattern spray.
2. Keep directing the stream outside and back into the room until the stream almost fills the opening. The nozzle should be 2 to 4 ft (0.6 to 1.2 m) inside the opening.
3. Stay low, out of the heat and smoke, or to one side to keep from partially obstructing the opening. (page 495)
Skill Drill 13-8: Making a Seven, Nine, Eight (7, 9, 8) Rectangular Cut Fire Fighter I, NFPA 1001: 4.3.12 Test your knowledge of this skill drill by placing the photos below in the correct order. Number the first step with a “1,” the second step with a “2,” and so on.
1–2' 8'
1. Locate the roof supports by sounding. Make the first cut parallel to the roof supports. The cut should be 3.5 to 4 ft (1 to 1.2 m) long.
2. Make the second cut at a 45-degree angle to the first cut. The length of this knock-out cut should be 1 to 2 ft (0.3 to 0.6 m) in length.
3. Make the third cut perpendicular to the first cut from the corner where the knock-out cut was made. This cut should be about 8 ft (2.4 m) long. The three cuts should produce the shape of the number “7”.

A n s w e r K e y 68
© Jon
es & B
artlet
t Lea
rning
. ©
Jones
& Bart
lett L
earni
ng.
© Jon
es & B
artlet
t Lea
rning
.
© Jon
es & B
artlet
t Lea
rning
.
4' 4' 4'
4. Make the fourth cut perpendicular to the first cut on the opposite side of the knock- out cut (the second cut). The cut should be about 4 ft (1.2 m) long.
5. Make the fifth cut parallel to the first cut. Starting on the thirdcut side of the hole, make a cut that connects with the fourth-cut side of the hole. These five cuts should produce the shape of the number “9.”
6. Make the sixth cut perpendicular to the first cut. Extend the fourth cut approximately 4 ft (1.2 m) until it is even with the third cut.
= roof beam
4'
7. Make the seventh cut parallel to the first cut and the fifth cut. Start on the side of the sixth cut, and cut toward the side of the third cut, until the cuts are connected. These seven cuts should produce the shape of the number “8.” (pages 507–508)
Skill Drill 13-9: Making a Louver Cut Fire Fighter I, NFPA 1001: 4.3.12 Test your knowledge of this skill drill by filling in the correct words in the photo captions.
1. Locate the roof supports by sounding.
2. Make two parallel cuts perpendicular to the roof supports.
3. Cut parallel to the supports and between pairs of supports in a rectangular pattern.
4. Tilt the panel to a vertical position. Open the interior ceiling area below the opening by using the butt end of a
pike pole. This hole should be the same size as the opening made in the roof decking. (page 509)
Skill Drill 13-10: Making a Triangular Cut Fire Fighter I, NFPA 1001: 4.3.12 Test your knowledge of this skill drill by filling in the correct words in the photo captions.
1. Locate the roof supports.
2. Make the first cut from just inside a support member in a diagonal direction toward the next support member.
3. Begin the second cut at the same location as the first, and make it in the opposite diagonal direction, forming a
V shape.
4. Make the final cut along the support member to connect the first two cuts. Cutting from this location allows fire fighters the full support of the member directly below them while performing ventilation. (page 510)

Chapter 13:Ventilation 69
© Jon
es & B
artlet
t Lea
rning
. Pho
tograp
hed b
y Glen
E. Ell
man.
© Jon
es & B
artlet
t Lea
rning
. Pho
tograp
hed b
y Glen
E. Ell
man.
© Jon
es & B
artlet
t Lea
rning
. Pho
tograp
hed b
y Glen
E. Ell
man.
© Jon
es & B
artlet
t Lea
rning
. Pho
tograp
hed b
y Glen
E. Ell
man.
Skill Drill 13-11: Making a Peak Cut Fire Fighter I, NFPA 1001: 4.3.12 Test your knowledge of this skill drill by placing the photos below in the correct order. Number the first step with a “1,” the second step with a “2,” and so on.
1. Locate the roof supports.
3. Make the first cut vertically, at the farthest point away. Start at the roof peak in the area between the support members, and cut down to the bottom of the first plywood panel.
2. Clear the roofing materials away from the roof peak. 4. Make parallel downward cuts between supports,
moving horizontally along the roofline to make additional ventilation openings.

A n s w e r K e y 70
© Jon
es & B
artlet
t Lea
rning
. Pho
tograp
hed b
y Glen
E. Ell
man.
© Jon
es & B
artlet
t Lea
rning
. Pho
tograp
hed b
y Glen
E. Ell
man.
© Jon
es & B
artlet
t Lea
rning
. Pho
tograp
hed b
y Glen
E. Ell
man.
© Jon
es & B
artlet
t Lea
rning
. Pho
tograp
hed b
y Glen
E. Ell
man.
5. Strike the nearest side of the roofing material with an axe or maul, pushing it in, using the support located at the center as a fulcrum. This causes one end of the roofing material to go downward into the opening and the other to rise up. If necessary, repeat this process on both sides of the peak, horizontally across the peak, or vertically toward the roof edge.
6. Open the interior ceiling area below the opening by using the butt end of a pike pole. This hole should be the same size as the vent opening made in the roof decking. (pages 511–512)
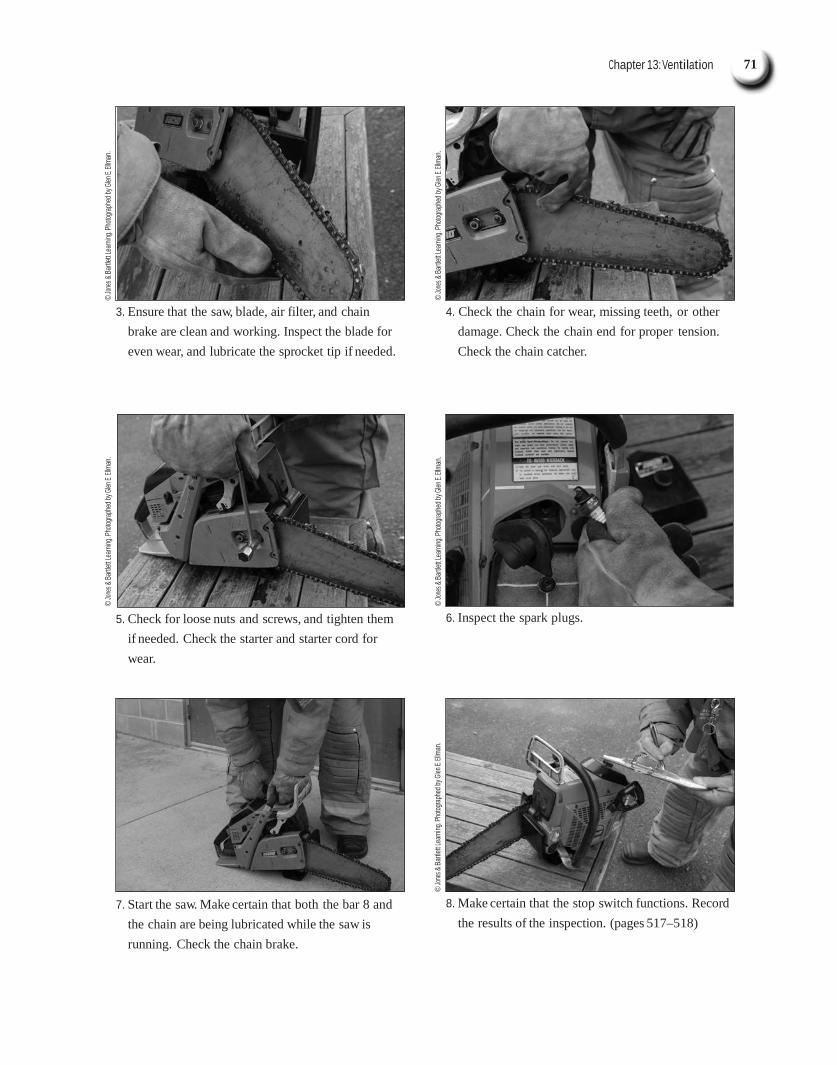
Skill Drill 13-13: Performing a Readiness Check on a Power Saw Fire Fighter I, NFPA 1001: 4.5.1 Test your knowledge of this skill drill by placing the photos below in the correct order. Number the first step with a “1,” the second step with a “2,” and so on.
1. Make certain that the fuel tank is full. Make certain that the bar and chain oil reservoirs are full.
2. Check the throttle trigger for smooth operation.
Chapter 13:Ventilation 71
© Jon
es & B
artlet
t Lea
rning
. Pho
tograp
hed b
y Glen
E. Ell
man.
© Jon
es & B
artlet
t Lea
rning
. Pho
tograp
hed b
y Glen
E. Ell
man.
© Jon
es & B
artlet
t Lea
rning
. Pho
tograp
hed b
y Glen
E. Ell
man.
© Jon
es & B
artlet
t Lea
rning
. Pho
tograp
hed b
y Glen
E. Ell
man.
© Jon
es & B
artlet
t Lea
rning
. Pho
tograp
hed b
y Glen
E. Ell
man.
3. Ensure that the saw, blade, air filter, and chain brake are clean and working. Inspect the blade for even wear, and lubricate the sprocket tip if needed.
5. Check for loose nuts and screws, and tighten them if needed. Check the starter and starter cord for wear.
7. Start the saw. Make certain that both the bar 8 and the chain are being lubricated while the saw is running. Check the chain brake.
4. Check the chain for wear, missing teeth, or other damage. Check the chain end for proper tension. Check the chain catcher.
6. Inspect the spark plugs. 8. Make certain that the stop switch functions. Record
the results of the inspection. (pages 517–518)

A n s w e r K e y 72
© Jon
es & B
artlet
t Lea
rning
. Pho
tograp
hed b
y Glen
E. Ell
man.
© Jon
es & B
artlet
t Lea
rning
. Pho
tograp
hed b
y Glen
E. Ell
man.
© Jon
es & B
artlet
t Lea
rning
. Pho
tograp
hed b
y Glen
E. Ell
man.
© Jon
es & B
artlet
t Lea
rning
. Pho
tograp
hed b
y Glen
E. Ell
man.
© Jon
es & B
artlet
t Lea
rning
. Pho
tograp
hed b
y Glen
E. Ell
man.
Skill Drill 13-14: Maintaining a Power Saw Fire Fighter I, NFPA 1001: 4.5.1 Test your knowledge of this skill drill by placing the photos below in the correct order. Number the first step with a “1,” the second step with a “2,” and so on.
1. Remove, clean, and inspect the clutch cover, bar, and chain for damage and wear. Replace if necessary.
3. Lubricate components as recommended by the manufacturer. Reinstall the bar and chain, flipping the bar over each time to help wear the bar evenly. Replace the clutch cover.
2. Inspect the air filter and clean/replace as needed. 4. Adjust the chain tension (make sure the bar and
chain cool before adjusting).
5. Fill the power saw with fuel. Fill the bar and chain oil reservoirs. (page 519)

Chapter 14:Water Supply Systems 73
Chapter 14: Water Supply Systems Matching
1. E (page 529) 2. J (page 539)
Multiple Choice
3. I (page 527) 4. D (page 529)
5. C (page 539) 6. B (page 529)
7. A (page 530) 8. F (page 548)
9. G (page 539) 10. H (page 539)
1. B (page 528) 2. B (page 530) 3. A (page 537) 4. A (page 546) 5. A (page 528)
6. D (page 541) 7. C (page 539) 8. D (pages 547–548) 9. A (page 527)
10. A (page 529)
11. C (page 529) 12. B (page 548) 13. B (page 541) 14. C (page 527) 15. C (page 540)
16. D (page 540) 17. C (page 529) 18. C (page 537) 19. A (page 530) 20. B (page 539)
Vocabulary
1. Static water sources: Water sources such as a pond, river, stream, or other body of water that is not under pressure. (page 527)
2. Tanker shuttle: A method of transporting water from a source to a fire scene using a number of mobile water supply apparatus. (page 547)
3. Dry-barrel hydrant: A type of hydrant used in areas subject to freezing weather. The valve that allows water to f low into the hydrant is located underground, and the barrel of the hydrant is normally dry. (pages 530–531)
4. Normal operating pressure: The observed static pressure in a water distribution system during a period of normal demand. (page 539)
5. Gravity-feed system: A water distribution system that depends on gravity to provide the required pressure. The system storage is usually located at a higher elevation than the end users. (page 528)
Fill-In
1. barrel (page 530) 2. volume (page 537) 3. gravity (page 528) 4. friction loss (page 539) 5. mobile (page 547) 6. potential (static) (page 539)
True/False
7. water supply (page 526) 8. visibility (page 540) 9. reservoirs (page 527)
10. valves (page 530) 11. fully; fully (page 531) 12. Control (page 530)
1. F (page 537) 2. F (page 528)
3. T (page 542) 4. T (page 526)
5. T (page 539) 6. F (page 528)
7. T (page 540) 8. T (page 527)
9. T (page 530)
10. T (page 531)
Short Answer
1. The duties that need to be included in a hydrant inspection include: (1) The first part of a hydrant inspection involves checking the exterior of the hydrant for signs of damage. Open the steamer port of a dry-barrel hydrant to ensure the barrel is dry and free of debris. Make sure all caps are present and that the outlet hose threads are in good working order. (2) The second part of the inspection ensures that the hydrant works properly. Open the hydrant valve just enough to confirm that water f lows out and f lushes any debris out of the barrel. After f lushing, shut down the hydrant. Leave the cap off dry-barrel hydrants to ensure they drain properly. A properly draining hydrant will create suction against a hand placed over the outlet. When the hydrant is fully drained, replace the cap. (3) If the threads

A n s w e r K e y 74
© Jon
es & B
artlet
t Lea
rning
. Pho
tograp
hed b
y Glen
E. Ell
man.
© Jon
es & B
artlet
t Lea
rning
. Pho
tograp
hed b
y Glen
E. Ell
man.
on the discharge ports need cleaning, use a steel brush and a small triangular file to remove any burrs in the threads. Also check the gaskets in the caps to make sure they are not cracked, broken, or missing. Replace worn gaskets with new ones, which should be carried on each apparatus. Follow the manufacturer’s recommendations for any parts that require lubrication. (pages 540–541)
2. The two water sources fire fighters rely on are: (1) Municipal water systems, which furnish water under pressure through fire hydrants. (2) Rural areas may depend on static water sources such as lakes and streams. (page 526)
3. Wet-barrel hydrants are used in locations where temperatures do not drop below freezing. These hydrants always have water in the barrel and do not have to be drained after each use. Dry-barrel hydrants are used in climates where temperatures can be expected to fall below freezing. The valve that controls the f low of water into the barrel of the hydrant is located at the base, below the frost line, to keep the hydrant from freezing. (pages 530–532)
Fire Alarms
1. The first factors to check when inspecting hydrants are visibility and accessibility. Hydrants should always be visible from every direction, so they can be easily spotted. A hydrant should not be hidden by tall grass, brush, fences, debris, dumpsters, or any other obstruction. The second part of the inspection ensures that the hydrant works properly. Open the hydrant valve just enough to ensure that water f lows out and f lushes any debris out of the barrel. After f lushing, shut down the hydrant. Leave the cap off dry-barrel hydrants to ensure they drain properly. A properly draining hydrant will create suction against a hand placed over the outlet opening. When the hydrant is fully drained, replace the cap. (pages 540–542)
2. Remove the tank from the tender; properly position the tank and expand the tank; assist the pump operator with hooking up the hard suction and strainer; and discharge your tanker water into the tank. (pages 549–550)
Skill Drills
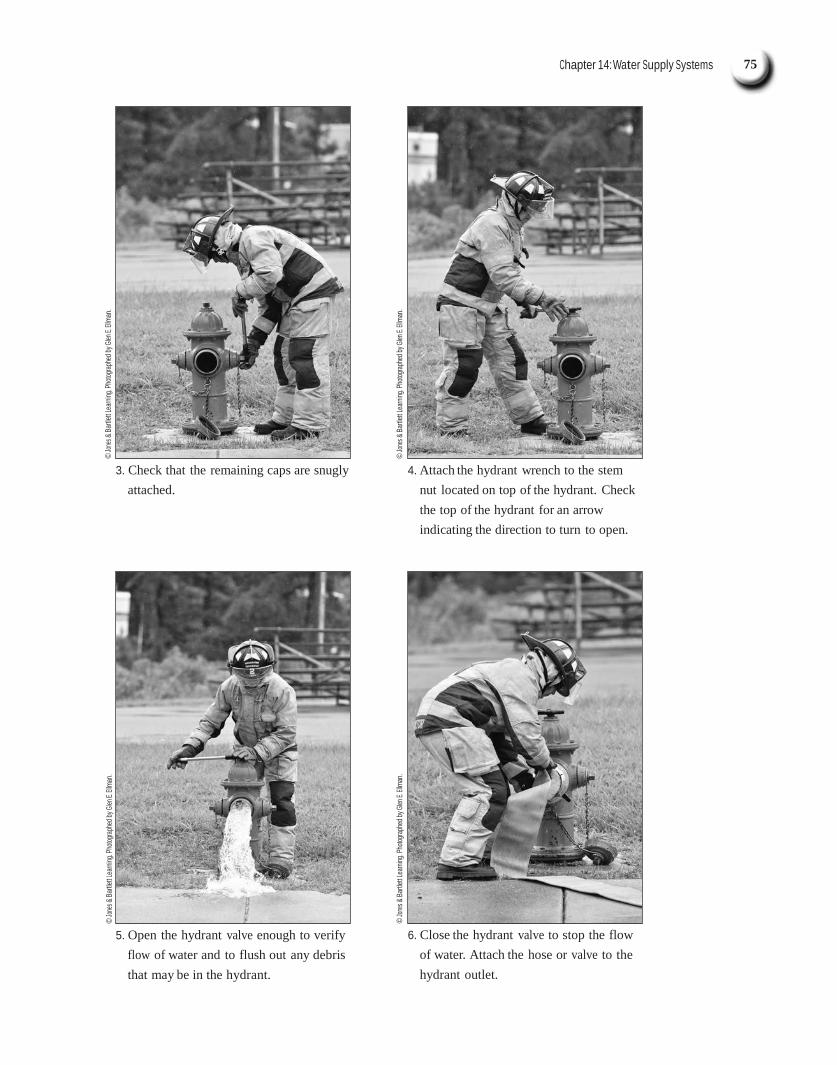
Skill Drill 14-1: Operating a Dry-Barrel Fire Hydrant Fire Fighter I, NFPA 1001: 4.3.15 Test your knowledge of this skill drill by placing the photos below in the correct order. Number the first step with a “1,” the second step with a “2,” and so on.
1. Remove the cap from the outlet you will be using.
2. Look inside the hydrant opening for debris.
Chapter 14:Water Supply Systems 75
© Jon
es & B
artlet
t Lea
rning
. Pho
tograp
hed b
y Glen
E. Ell
man.
© Jon
es & B
artlet
t Lea
rning
. Pho
tograp
hed b
y Glen
E. Ell
man.
© Jon
es & B
artlet
t Lea
rning
. Pho
tograp
hed b
y Glen
E. Ell
man.
© Jon
es & B
artlet
t Lea
rning
. Pho
tograp
hed b
y Glen
E. Ell
man.
3. Check that the remaining caps are snugly attached.
5. Open the hydrant valve enough to verify flow of water and to flush out any debris that may be in the hydrant.
4. Attach the hydrant wrench to the stem nut located on top of the hydrant. Check the top of the hydrant for an arrow indicating the direction to turn to open.
6. Close the hydrant valve to stop the flow
of water. Attach the hose or valve to the hydrant outlet.

A n s w e r K e y 76
© Jon
es & B
artlet
t Lea
rning
. Pho
tograp
hed b
y Glen
E. Ell
man.
© Jon
es & B
artlet
t Lea
rning
. Pho
tograp
hed b
y Glen
E. Ell
man.
7. When instructed to do so by your officer or the pump driver/operator, start the flow of water by turning the hydrant wrench to fully open the valve. This may take 12 or more turns depending on the type of hydrant.
8. Open the hydrant slowly to avoid a pressure surge. Once the flow of water has begun, you can open the hydrant valve more quickly. Make sure that you open the hydrant valve completely. If the valve is not fully opened, the drain hole will remain open. (pages 533–534)
Skill Drill 14-2: Shutting Down a Dry-Barrel Fire Hydrant Fire Fighter I, NFPA 1001: 4.3.15 Test your knowledge of this skill drill by filling in the correct words in the photo captions.
1. Turn the hydrant wrench until the stem valve is closed.
2. Allow the hose to drain by opening a drain valve or disconnecting a hose connection downstream. Slowly disconnect the hose from the hydrant outlet, allowing any remaining pressure to escape.
3. Leave one hydrant outlet open until the hydrant is fully drained.
4. Replace the hydrant cap. Do not leave or replace the caps on a dry-barrel hydrant until you are sure the water has completely drained from the barrel. If you feel suction on your hand when you place it over the opening, the hydrant is still draining. In very cold weather, you may have to use a hydrant pump to remove all of the water and prevent freezing. (page 535)
Skill Drill 14-3: Operating a Wet-Barrel Fire Hydrant Fire Fighter I, NFPA 1001: 4.3.15 Test your knowledge of this skill drill by filling in the correct words in the photo captions.
1. Remove the cap from the outlet you will be using.
2. Look inside the hydrant opening for debris.
3. Check that the remaining caps are snugly attached.
4. Attach the hydrant wrench to the stem nut located behind the outlet you will be using. Check the hydrant for an
arrow indicating the direction to turn to open.
5. Open the hydrant valve enough to verify flow of water and to flush out any debris in the hydrant.
6. Close the hydrant valve to stop the flow of water.
7. Attach the hose or valve to the hydrant outlet.

Chapter 14:Water Supply Systems 77
© Jon
es & B
artlet
t Lea
rning
. Pho
tograp
hed b
y Glen
E. Ell
man.
© Jon
es & B
artlet
t Lea
rning
. Pho
tograp
hed b
y Glen
E. Ell
man.
© Jon
es & B
artlet
t Lea
rning
. Pho
tograp
hed b
y Glen
E. Ell
man.
© Jon
es & B
artlet
t Lea
rning
. Pho
tograp
hed b
y Glen
E. Ell
man.
8. When instructed to do so by your officer or the pump driver/operator, start the flow of water by turning the hydrant wrench to fully open the valve. This may take 12 or more turns, depending on the type of hydrant.
9. Open the hydrant slowly to avoid a pressure surge. Once the flow of water has begun, you can open the hydrant valve more quickly. Make sure you open the hydrant valve completely. (page 536)
Skill Drill 14-4: Shutting Down a Wet-Barrel Fire Hydrant Fire Fighter I, NFPA 1001: 4.3.15 Test your knowledge of this skill drill by filling in the correct words in the photo captions.
1. Turn the hydrant wrench until the valve opposite the outlet you are using is closed.
2. Allow the hose to drain by opening a drain valve or disconnecting a hose connection downstream. Slowly
disconnect the hose from the hydrant outlet, allowing any remaining pressure to escape.
3. Replace the hydrant cap. (page 537)
Skill Drill 14-5: Conducting a Fire Hydrant Flow Test Fire Fighter I Test your knowledge of this skill drill by placing the photos below in the correct order. Number the first step with a “1,” the second step with a “2,” and so on.
1. Remove the cap from the hydrant port, open the hydrant, and allow water to flow until it runs clear. Close the hydrant valve. Place a cap gauge on one of the outlets of the first hydrant.
3. Move to the second hydrant, remove one of the discharge caps, and open the second hydrant.
2. Open the hydrant valve to fill the hydrant barrel. No water should be flowing. Record the initial pressure reading on the gauge. This is the static pressure.
4. Place the Pitot gauge one-half the diameter of the
orifice away from the opening, and record this pressure as the Pitot pressure. At the same time, fire fighters at the first hydrant should record a second pressure reading. This is the residual pressure. Use the recorded pressure readings to calculate or look up the flow rates at 20 psi (138 kPa) residual pressure. Document your findings. (pages 543–544)

A n s w e r K e y 78
© Jon
es & B
artlet
t Lea
rning
. Pho
tograp
hed b
y Glen
E. Ell
man.
© Jon
es & B
artlet
t Lea
rning
. Pho
tograp
hed b
y Glen
E. Ell
man.
© Jon
es & B
artlet
t Lea
rning
. Pho
tograp
hed b
y Glen
E. Ell
man.
© Jon
es & B
artlet
t Lea
rning
. Pho
tograp
hed b
y Glen
E. Ell
man.
© Jon
es & B
artlet
t Lea
rning
. Pho
tograp
hed b
y Glen
E. Ell
man.
Skill Drill 14-6: Assisting the Pump Driver/Operator with Drafting Fire Fighter I, NFPA 1001: 4.3.15 Test your knowledge of this skill drill by placing the photos below in the correct order. Number the first step with a “1,” the second step with a “2,” and so on.
1. After the pump driver/operator has positioned the engine at the draft site, inspect the swivel gaskets on the female coupling for damage or debris.
2. Connect each section of suction hose together, and connect the strainer to the end of the hose that will be placed in the water.
3. Connect the other end of the suction hose to the fire pump.
4. Advance the suction hose assembly into position with the strainer in the water.
5. Ensure that the strainer assembly has at
least 24 in. (0.5 m) of water in all directions around the strainer. (pages 545–546)

Chapter 14:Water Supply Systems 79
© Jon
es & B
artlet
t Lea
rning
. Pho
tograp
hed b
y Glen
E. Ell
man.
© Jon
es & B
artlet
t Lea
rning
. Pho
tograp
hed b
y Glen
E. Ell
man.
© Jon
es & B
artlet
t Lea
rning
. Pho
tograp
hed b
y Glen
E. Ell
man.
© Jon
es & B
artlet
t Lea
rning
. Pho
tograp
hed b
y Glen
E. Ell
man.
Skill Drill 14-7: Setting Up a Portable Tank Fire Fighter I, NFPA 1001: 4.3.15 Test your knowledge of this skill drill by placing the photos below in the correct order. Number the first step with a “1,” the second step with a “2,” and so on.
1. Two fire fighters lift the portable tank off the apparatus. This tank may be mounted on a side rack or on a hydraulic rack that lowers it to the ground. Place the portable tank on as level ground as possible beside the engine. The pump driver/ operator will indicate the best location.
3. One fire fighter helps the pump driver/ operator place the strainer on the end of the suction hose, put the suction hose into the tank, and connect it to the engine.
2. Expand the tank (metal-frame type), or lay it flat (self-expanding type).
4. The second fire fighter helps the tanker driver
discharge water into the portable tank. If the tank is self-expanding, the fire fighters may need to hold the collar until the water level is high enough for the tank to support itself. (pages 549–550)
