chapter 12 selecting, planting, and managing...
TRANSCRIPT

Selecting, Planting, and Managing Woody Ornamental Plants in the Landscape ◆ 287
James F. Hodges, Ellen A. Vincent,and Bob Polomski
Chapter 12Selecting, Planting,
and Managing Woody Landscape
PlantsLearning Objectives
◆ Understand the importance of proper site selection and its role in planting and establishing landscape plants.
◆ Know how to properly plant shrubs and trees.
◆ Understand the objectives for pruning landscape plants.
◆ Become familiar with proper pruning techniques and equipment.
◆ Be familiar with mulches and their application.

Selecting, Planting, and Managing Woody Ornamental Plants in the Landscape ◆ 288
Selecting, Planting, and Managing Woody Landscape Plants
Site AnalysisSeveral factors and considerations contribute
to the creation of an attractive landscape. Chief among them is a keen assessment and understanding of the particular conditions of the site. Among the factors to be taken into account are climate and mi-croclimates, amounts of direct and indirect sunlight received throughout the day, exposure to wind and, in coastal areas, salt spray, and various above-and below-ground features of the landscape.
Thought must also be given to how the plants will relate to one other. A good landscape is both aesthetically and ecologically harmonious, com-bining plants with complementary forms, growth patterns, and survival requirements. Take time to evaluate your landscape site and envision what it will need and how it will look during different stages and seasons.
ClimateThe plants you select should be cold hardy in
your area. The U.S. is divided into a series of cold hardiness zones based on average minimum winter temperatures (Figure 12.1). A plant that is adapted to your hardiness zone can tolerate the lowest aver-age winter temperatures your zone usually experi-ences.
In the Southeast, heat hardiness is an impor-tant trait, since some cold-tolerant plants have been known to succumb to the heat and humidity of our summers. A “Heat-zone Map” produced by the American Horticultural Society establishes a plant’s likelihood to tolerate high temperatures. This 12-zone map indicates the yearly average num-ber of “heat days”--days with temperatures of 86 oF or more--that a given region experiences. South Carolina resides in Zones 3 to 9 (Figure 12.2). This
map does not account for humidity or nighttime temperatures (high nighttime temperatures in sum-mer cause unadapted plants to consume more carbo-hydrates through respiration than can be produced by photosynthesis). Both maps are used as tools to select landscape plants.
In addition to the larger climate that governs the planting site, plants will be affected by little pockets of weather specific to certain parts of your property, which are called microclimates (Figure 12.3). Taller plants will have a totally different microclimate than those at or near ground level. These microclimates may vary by several degrees, a difference that can mean life or death in cold weather.
Microclimates are influenced by sun exposure, existing vegetation, and nearby buildings. Take note of the differences on your site, keeping in mind that, in general, minimum winter temperatures oc-cur on the north side of a house and maximum sum-mer temperatures are reached in unshaded western exposures. Southern exposures will be warmest during the winter. On the southside of a home, temperature fluctuations on a given winter day can be dramatic and may predispose plants to winter damage.
Tree canopies protect neighboring plants by reducing their radiant heat loss. In winter, the mi-croclimate beneath a tree may be several degrees warmer than the surrounding air, and this small increase in temperature could keep some plants alive. Furthermore, the tree’s shade during the early morning slows the rate of thaw and can reduce the amount of cold damage to some species. Building overhangs, arbors, and fences may provide similar kinds of protection.

Selecting, Planting, and Managing Woody Ornamental Plants in the Landscape ◆ 289
lem if roots can grow into the surround-ing area, uninhibited by compacted soil or by structures, such as curbs, sidewalks, patios, buildings, and streets. However, the root systems of plants growing in confined situations, for example, cutouts in city sidewalks, dry-out the soil quickly and become highly vulnerable to wind desiccation. Likewise, plants in very sandy, well-drained soils are in a perilous situation.
Well-managed irrigation can partially overcome these water deficits, but it may be difficult to accomplish in highly ur-banized sites. The best way to manage water loss on a windy site is by selecting drought-tolerant species. If the site is poorly drained, select a species that can tolerate both dry and wet conditions.
SaltAirborne salt affects leaves and
shoots, and after being deposited on the ground, roots. Plants within 1/4 mile of saltwater coastlines should possess some degree of tolerance to salt spray. Those exposed to direct spray along the dunes will need to be highly salt-tolerant. Salt-tolerant plants are often deformed by direct exposure to salty air, but can survive and grow. Salt-sensitive plants grow poorly or die when exposed to salty air.
Overhead Power Lines
Plant trees that attain a small mature height of less than 25 ft. directly under or within 6 ft. of over-head lines. When planting between 6 and 50 ft. of a utility line, size at maturity is still a critical issue. Remember that a tree with a widespreading canopy must be planted further from the wire than a tree with a narrow, more upright canopy. For example, if a planting site is 20 ft. from a power line, the tree selected should be one that at maturity will have a canopy that is less than 40 ft. in diameter.
Existing TreesWhen young trees or shrubs that require full sun
are planted under or near the canopy of established trees, they will bend in the direction of the sunlight and become deformed. Without adequate light reaching a plant from all sides, the tendency is to become one-sided. Although the plant is not neces-sarily damaged by this, it can be unsightly. Shade-
Average Annual Minimum Temperatures
5 to 0 oF10 to 5 oF15 to 10 oF20 to 15 oF
7a7b8a8b
USDA cold hardiness zone map of South Carolina. Figure 12.1
Above-ground Site AnalysisExposure to Sunlight
All plants require some amount of sunlight, but some species need many hours of full sun, while oth-ers do best largely in shade. Before choosing plants for your landscape, observe how many hours of sun and shade various parts of the site receive. Remem-ber to take into account that the angle of the sun changes with the time of year, and that you will probably have more hours of direct sun in summer than in other seasons.
Plants requiring full sun, such as junipers, will need at least 6 hours of direct sun daily. Often they will produce the best form and growth if they re-ceive sun all day. Most large trees grow best in full sun, while some small trees do better in sites that are shaded part of the day.
Plants that can tolerate full sun to partial sun/partial shade will need 3 to 4 hours of direct sun. Shade-loving plants will adapt to sites with less than 2 hours of direct sun or with filtered sun/filtered shade. Some shade-loving plants can tolerate di-rect exposure to early morning sun, but may suffer if directly exposed to 2 or more hours of midday or afternoon sun.
WindWind increases the amount of water loss from a
plant to the atmosphere. This may not be a prob-

Selecting, Planting, and Managing Woody Ornamental Plants in the Landscape ◆ 290
tolerant plants are a better choice for planting in the shade of established trees.
Below-ground Site AnalysisSoil and below-ground characteris-
tics that significantly affect the growth and well-being of plants include soil pH level, drainage capacity, depth of topsoil, salinity, distance to the water table, and rooting-space limitations. Recent surveys show that most people do not take these factors into consideration when selecting plants, and this may explain why so many plantings fail.
Soil of good quality is precious and should not be wasted. When deciding to build on a site, advanced planning (before construction starts) enables you to iden-tify and preserve good soil. Make provi-sions to save and store high quality soil for use when construction is completed. Do not permit this soil to be hauled away or buried. Work with contractors to pre-vent excessive soil compaction in areas where trees will be planted. These areas can be isolated with heavy fences and fines levied for violations.
Often, plants must be selected for a site where construction has already been completed and the soil and terrain has been modified. Equipment opera-
tions may have done damage, such as turning a moderately well-drained clay soil that would have been capable of supporting tree growth into poorly drained pools of mud. Simply layering soil over the
Average Number of DaysPer Year Above 86 oF
American Horticulture Society heat hardiness zone map of South Carolina. Figure 12.2
Zone 3 > 7 to 14
Zone 4 > 14 to 30
Zone 5 > 30 to 45
Zone 6 > 45 to 60
Zone 7 > 60 to 90
Zone 8 > 90 to 120
Zone 9 > 120 to 150
Reproduced with permission from the American Horticultural Society.
Microclimates are modifications of the general climate. They are a result of the structures and plant-ings on your property and those on your neighbor’s property. Corners of buildings often have winds that are much higher than the winds along the sides of the buildings. Your house, garage, fences, and plantings as well as those of your neighbors, direct and change wind patterns, create shade conditions, and increase light and heat by reflection. Corners of buildings and the narrow spaces between buildings and along drives can be wind tunnels.
Microclimates can be created by structures or large plants. Figure 12.3

Selecting, Planting, and Managing Woody Ornamental Plants in the Landscape ◆ 291
compacted soil will not promote good plant growth. Compacted soil needs to be broken up and mixed with loose soil.
Landscapes in highly urbanized areas will need more soil tests and site evaluation than will older or undisturbed sites. Poor quality subsoil is sometimes substituted for topsoil, and rubble or other debris is often mixed with soil. Examine soil throughout the planting site and test each different type you find.
Soil pHSoil pH governs the availability of nutrients to
plants and also affects the activity of soil microor-ganisms. It is the most important component of a soil test, so do not try to guess the level.
Soil tests should be conducted in several areas of the planting site wherever the soil color or texture appears distinctly different from elsewhere on the site. It may be lower or higher next to a building because of the sand or other materials used near the footings. Soil pH may vary too much across the site to permit planting of the same species or cultivar over the entire landscape.
Soil TextureWhile soil texture alone is not a growth-limiting
factor, it does indicate other soil attributes that influence plant growth. For example, the dense tex-ture of clay often drains poorly if the terrain is flat or if the soil has been compacted by heavy equipment. When planting in clayey soil, determine whether drainage is poor or good to select appropriate plants that are adapted to the prevailing moisture level. On the other hand, many sandy soils drain quickly. If irrigation will not be provided on a regular basis after plants are established, choose drought-resistant species for the site.
Nitrogen, potassium, and other essential ele-ments are leached more quickly through sandy soils. These elements can migrate below the root zone, which affect fertilization management. A controlled, slow-release fertilizer is recommended for sandy soil because soluble, fast-release nitrogen fertilizers leach quickly. Also, consider choosing a native or adapted species that may be more tolerant of these infertile soils.
Notes on Trees and Overhead Power Lines
The significance of electrical power loss within the ice belt can not be overstated. Numerous rural and city lines are damaged by falling trees and branches from trees planted too close to those lines (see photos below). Many references are available that provide long lists of small trees suitable for plant-ing beneath power lines. The wise homeowner refrains from planting anything under power lines. Although electric lines may be 20 to 30 ft. above-ground, telephone and cable-TV lines are often no more than 12 to 15 ft. above-ground level. Also, most tables that give mature heights of small trees fail to recognize that “mature” and “maximum” heights are not necessarily the same. Trees receiving excellent care or experiencing optimum growing conditions may grow taller than the average mature height estimates cited by many references.--J. F. Hodges

Selecting, Planting, and Managing Woody Ornamental Plants in the Landscape ◆ 292
Compacted Low-Oxygen SoilsCompacted and poorly drained soils contain
little oxygen, which plant roots need in order to survive and grow. Though some plants tolerate soils with low oxygen, most grow poorly or eventually succumb to disease or insect problems when planted in soil that is too compacted or too wet during cer-tain times of the year. Although any type of soil can become compacted, clay offers plants the most dif-ficult challenge.
To check for compaction and drainage, conduct the percolation test described in Chapter 10, p. 226. Another method for determining if a soil is poorly drained is to smell it. A sour smell and a gray color indicate low oxygen content. Occasionally, the sour smell may be strong enough to detect while standing near a dug hole. More often, a soil clump must be broken open close to your nose to detect the smell.
A site with a high water table or poor soil drain-age can be altered to accommodate plants that are intolerant of wet, waterlogged soils. Create a mound or berm to elevate the plants’ root systems. Although its use may be the only option, making a berm is not an ideal solution because of the various problems it entails. Successful use of this landscap-ing technique requires intelligent advanced plan-ning.
First, the berm should be made from the same
topsoil found in the surrounding landscape. If none is available, an equivalent or better grade of topsoil may be used. The berm must be created with its sides gradu-ally sloping away from the planting(s). If the sides are too steep, irrigation water will run off the soil quickly and could wash it away from the roots, leaving them ex-posed. This could cause plant death.
Compacted and poorly drained soils may be im-proved by tilling. A ripping tool, which is dragged behind a bulldozer, can be used to loosen soil on a large site. An experienced operator is required. Do not use the tiller or ripping tool under the dripline of trees and shrubs or you will cause serious damage to their root sys-tems. Air spades are professional tools that can be used under the canopy of the tree. This tool is used to expose the root system and also loosens compacted soil. Air spade services are available from specialty arboriculture firms.
Subsurface Compacted LayersSoil that has been loosely spread over a compacted
soil creates special challenges. Roots often grow only in the loose soil and fail to penetrate the compacted sub-soil. The resulting shallow root system can create unsta-ble and potentially hazardous large trees. Consequently, only small and medium-sized trees are recommended for planting where less than 2 ft. of loose soil will be spread over compacted subsoil.
In landscapes with subsurface compacted layers, the lowest areas are likely to be wet during certain times of the year. Within a day or two after a significant rainfall, evaluate the site and decide if choosing plants tolerant of wet sites will be necessary. If this kind of evaluation is conducted during a drier time of the year, you may mistakenly conclude that your drainage is fine.
Artificial Soil HorizonsMost soils in urban areas and many in suburban
landscapes have been disturbed by heavy equipment before planting. Poor quality subsoil with a fine texture, high clay content, or high pH is often brought to the surface. Construction debris and other soils from other sites may be layered on top of one another to create an artificial soil profile or horizon. This structure disrupts the flow of water through the soil and can create poorly drained areas. You can suspect a drainage problem if there are abrupt changes in soil color as you dig a hole. If soil is mixed with bricks, concrete, or other construc-tion debris, consider replacing the soil or sifting out the debris.
Notes on Existing Trees and Construction
Many new homes and potential home sites are built on lots that were converted from natural stands of trees. These existing trees may not withstand the change in growing conditions that occur when the new home is built, and they are suddenly thrust into a completely open environment.
Severe construction damage to existing trees during construction is common. It is not wise to retain trees close to buildings that have ex-tensive stem or root damage. Most will even-tually deteriorate further and result in hazard trees which will be quite expensive to take down.
The installation of utility lines on a new home site can be a major source of root damage to existing trees on the site. Work with utility installers to stay as far away from trees as pos-sible, which often means avoiding the “straight line” approach.--J. F. Hodges

Selecting, Planting, and Managing Woody Ornamental Plants in the Landscape ◆ 293
Soil SalinitySome soils in coastal areas have a high salt con-
tent. If you are unfamiliar with the area or suspect that salts could be a problem, have the soil tested.
Be mindful that irrigation water may also be salty. When using well water along the Coast, have
it tested. If good water is not available, choose salt-tolerant plants or those that have been growing well in your area with the same irrigation water.
Soil DepthIn the ideal planting site, the layer of soil above
bedrock is at least 5 or 6 ft. deep. Dig a hole to learn the depth of your soil layer. If bedrock comes close to the surface, or if for other reasons there is little soil, trees that are small to medium-sized at maturity are the best choice for planting. Large-maturing trees planted in shallow soil are likely to form large surface roots that can disrupt foundations, driveways, sidewalks, curbing, and gardens. Fur-thermore, large trees with shallow root systems can topple over in storms.
Distance to the Water TableBelow-ground variations of a planting site and
the surrounding terrain affect the distance between the soil surface and the top of the water table in a given locale. The distance to the water table often varies throughout the year; you may find that the water table that was within inches of the surface in one season has dropped several feet below it during another season. For the purposes of plant selec-tion, sites with water within a foot or two of the soil surface during part of the year should be treated as poorly drained.
To determine the distance to the water table, use a shovel or a four-inch auger to dig several holes 2 to 3 ft. deep around your planting site. Wait for 2 hours. If water appears in the hole, the water table is high, suggesting a need to select plants that toler-ate wet sites. If the distance from the soil surface to the surface of the water is less than 18 inches, only small or medium-sized wet-site trees are recom-mended. Large mature trees will adapt to wet sites by developing shallow root systems, which become unstable in storms. The possible exceptions are trees that grow with submerged root systems, such as baldcypress (Taxodium distichum) and black gum (Nyssa sylvatica). If water does not appear in the hole, you will not have to consider the water table in choosing plants for that site.
Underground UtilitiesBefore digging or planting, determine the loca-
tion of underground electric, telephone, and televi-sion cables, as well as water, sewer, and gas lines. Call 811, a single toll-free telephone number that will notify all companies at once before you dig.
Selecting Wind-resistant Trees
Whenever we create a wish list for the perfect landscape tree, ornamental features always top the list. Gorgeous flowers, colorful fruits and leaves, and brilliant fall color are “gotta have” qualities. However, an often overlooked feature is wind resistance: a tree’s ability to endure and survive high winds.
Some trees are more wind-resistant than others, as some of us have seen firsthand. In Arbori-culture & Urban Forestry (March 2007), Florida researchers categorized trees into four lists that ranged from “highest” to “lowest” wind resis-tance. These lists were compiled from their study of the impacts of 9 hurricanes on urban trees, and included their survey of arborists, scientists, and urban foresters, who ranked trees for wind resistance, and other scientific find-ings.
Trees in the “highest” wind resistance category included flowering dogwood, American holly, yaupon holly, southern magnolia, live oak, crapemyrtle, and cabbage palm. Two conifers in this list are baldcypress and pondcypress.
In the “medium-high” wind resistance list were southern sugar maple, river birch, iron-wood, sweetgum, white ash, Shumard oak, and winged elm.
Trees with the “lowest” wind resistance includ-ed pecan, tulip poplar, Bradford pear, Chinese elm, and Leyland cypress.
Because no tree is wind-proof, the researches offered the following suggestions for establish-ing and maintaining safe and attractive land-scapes:• plant trees in groups or clusters;• match the appropriate tree to the site conditions; and• periodically give your trees a physical:
evaluate their health and remove any that pose a hazard to life or property, especially those with lowest wind resistance.
--B. Polomski

Selecting, Planting, and Managing Woody Ornamental Plants in the Landscape ◆ 294
This needs to be done several days before the dig-ging is to take place. Digging holes without regard for underground utilities risks serious personal injury as well as damage to the lines. The person(s) caus-ing the damage must pay for repairs.
Large, mature trees should be planted at least 12 ft. from major underground utility lines; the rule-of-thumb is to plant them as far away as possible. No tree should be planted directly over a utility line because the tree might be damaged or need to be removed if the line needs to be serviced.
Medium- to large-maturing trees planted near septic tanks and drain fields can cause damage with their roots. Although the roots of small maturing trees and shrubs can also invade septic tanks, they seldom cause extensive problems. To be safe, plant a tree at least as far from a potential underground trouble spot as the diameter of its canopy at ma-turity. For example, a tree expected to produce a canopy 40 ft. in diameter should be planted 40 ft. from a septic tank or drain field.
Site Preparation and Soil AmendmentsMany planting sites need to be prepared before
planting begins. Preparations may include grad-ing, tilling compacted soil, installing irrigation or other utilities, adding gutters to a roof to control runoff during heavy rains, terracing to retain runoff, amending soil, or other projects that will affect the nature or viability of the planting site.
Grading the soil to achieve the aesthetically desired land form is the first step to take in preparing the site. Adequate surface drainage that directs wa-ter flow away from structures and planting beds and into an appropriate water path for the area must also be achieved at this stage.
Compacted soil may be loosened by plowing or tilling, which can dramatically increase the rate of root growth and root penetration into the landscape soil. Establishment time is sped up, reducing the period of the tree’s vulnerability to pests, disease, and drought. Loosen the soil 15 to 20 ft. or more in diameter around the area where the tree will be planted.
If the compacted area is substantial, a ripping tool can be attached to the back of a large tractor or bulldozer and the soil ripped 18 to 36 inches deep. Disk to smooth the soil after it is loosened. Do not cultivate under the canopy of shrubs or trees because serious injury may occur to the root systems which are located within 1 ft. of the soil surface.
Most landscape soils are not modified with soil amendments prior to planting, and the plants grow
well. However, adding organic matter, such as com-post, especially to large planting beds, will improve soil structure and increase fertility. Individual plant-ing holes for trees and shrubs usually do not need amendments.
Plant SelectionYou can exclusively plant native plants or com-
bine them with adapted, nonnative, ornamental plants. Regardless of their origin, it’s most impor-tant that you select plants that are adapted to the environmental conditions in your area and are non-invasive. From an aesthetic viewpoint, select plants that appear to fit comfortably into the surrounding landscape.
In selecting appropriate plants for the landscape, consider: how much maintenance the plant will require and any possible disadvantages, including susceptibility to attack by diseases and insect pests; soft or brittle wood that is easily damaged by wind and ice; fruits and seeds that are large, messy, smelly, or otherwise obnoxious; and abundant shedding of twigs and small branches. Some examples of these conditions are defoliation and dieback of red-tip photinia (Photinia x fraseri) caused by Entomosporium leaf spot; breaking of Bradford pear limbs and trunks by wind and ice; and the production of bad smelling fruit by the female ginkgo tree (Ginkgo biloba). The production of fruit by the mulberry (Morus spp.) can also be an undesirable characteristic. Besides attracting birds, the fruit is soft and decomposes rap-idly when ripe, discoloring walks and attracting flies and other insects.
Select each plant according to its mature size, growth rate, and life span. Choosing a plant on the basis of its mature size, not its size at the time you purchase it, assures that you will have sufficient ground space for the plant, and that its ultimate height will be compatible with buildings and sur-rounding areas. A common mistake is to choose plants that quickly become too large for their loca-tion. The drastic pruning that becomes necessary adds to maintenance costs and may reduce the grace and beauty of the specimen. Overgrown plants left unpruned alter the balance and accent of the design and may partly hide the house they are supposed to complement.
Consider the size of mature trees and shrubs and where they are to be used. Trees that grow tall, such as the live oak (Quercus virginiana), Japanese cryp-

Selecting, Planting, and Managing Woody Ornamental Plants in the Landscape ◆ 295
tomeria (Cryptomeria japonica), and tuliptree (Lirio-dendron tulipifera), are suitable for two-story and larger buildings. They tend to dominate or hide the low flat appearance of one-story buildings. For at-tractive and proper balance with single story build-ings, plant trees that do not grow over about 35 ft. Shrubs that outgrow their spaces can hide windows, block walkways, or crowd out other plants. Shrubs can sometimes be kept small by pruning, but this requires regular maintenance. Careful consideration of mature sizes will reduce the need for pruning.
Overplanting is a common mistake. It is dif-ficult to visualize an 18- to 20-inch evergreen spreading 5 to 6 ft. across at maturity. Learn the mature spread of plants, and then be sure to space each plant at least one-half the total spread of the two plants (Figure 10.31, p. 251). For example, if a plant spreads 4 ft. at maturity, set it at least 4 ft. away from another plant of the same species. The spread of a deciduous shrub should be about two-thirds the height of the shrub or equal to the height of the shrub unless the shrub is columnar in growth habit.
Also consider the plant’s life span. Many plants grow fast but have short lives. If you choose a fast-growing tree because you are desperate for shade, you may solve the shade problem quickly but be faced with replacement in 15 years. Such rapid-growing trees as Siberian elm (Ulmus pumila), often mistak-enly referred to as Chinese elm (U. parvifolia), poplar (Populus spp.), and willow (Salix spp.) are brittle. High winds, ice storms, and other natural events will damage them severely. Other fast-growing trees, such as hackberry (Celtis spp.), tulip-tree (Liriodendron tulipifera), and ash (Fraxinus spp.) do not damage as eas-ily, but long-lived plants offer more lasting benefits.
Choosing the Right Tree SizeTable 12.1 outlines the differenc-
es in culture, cost, and use between small- and large-sized trees. Water must be supplied on a regular basis to newly planted trees; smaller trees will require regular irrigation for several months following planting, larger trees for a much longer period. If you
cannot meet the watering requirements of a given tree, choose it in a smaller size.
Site drainage also affects the size of tree you choose. On poorly drained sites, smaller trees with shallower root balls often do better than larger nursery trees. A nursery tree is considered large if its trunk is more than 2 inches in diameter. The larger root balls of big trees can become submerged in water on a poorly drained site. This will kill the roots at the base of the root ball and stress the tree, slowing the rate of establishment and thus making it more sensitive to pests, disease, and drought injury. If large trees are absolutely necessary for a poorly drained site, select trees especially grown with a shallow root ball or plant in a shallow hole to keep roots above the water level.
Choosing the Right Shrub SizeChoose the appropriate plant size for the site.
Don’t think that just because a shrub looks small in the nursery, it will not rapidly outgrow its allotted area after a few years. Decide what size of plant to purchase by considering its final height and spread as well as how long it will take to reach that size. Often, dwarf cultivars of shrubs are good choices. You don’t need to prune these cultivars frequently. Because they stay small, you won’t have to replace
Large (more than Criteria Small two-inch trunk diameter)
Landscape establishment quick slow period
Irrigation period after brief extended planting Susceptibility to drought for a brief period very sensitive after planting for a long time
Cost of nursery stock inexpensive expensive
Number of trees planted large small per dollars spent
Pruning needs2 high moderate
Suitability for compacted well-suited could be or poorly drained sites poorly-suited
1This table applies regardless of the ultimate (or mature) height of the trees and assumes that good quality trees were purchased.
A comparison of small-sized vs. large-sized nursery trees.1
Table 12.1

Selecting, Planting, and Managing Woody Ornamental Plants in the Landscape ◆ 296
them or cut them back when they become too large.Base the number of plants you need on the
mature spread of the plant, the space to be planted, and the planting density desired. In areas where a mass effect is desired, plant them closely together. In other instances, space plants far enough apart to allow each plant to develop its own natural form or shape.
Methods of Tree ProductionWhen a tree will be planted in a well-drained
site and receive regular irrigation, the production method is of little consequence. However, when watering will be infrequent, the method by which a tree was grown or harvested will affect its chances of surviving transplanting.
Field-grown Trees Trees grown directly in the ground or field-
grown have been properly harvested and hardened-off are strong and sturdy. They are good choices for any kind of site and usually the best choice for sites where watering will be infrequent or irregular. Compared to trees grown by other methods, the root ball of a harvested field-grown tree is larger and ca-pable of more water storage, thus making it slower to dry out. The root balls of field-grown trees are also much heavier than those of container-grown trees, making them significantly harder to handle.
Field-grown trees that receive drip irrigation and fertilization near the base of the trunk during the first several years in the nursery’s field will de-velop fine root growth near the trunk. This denser root system contributes to a healthy root ball.
Field-grown trees should be hardened-off before going to market. By dealing with an established, reliable nursery, you minimize the risk of buying a field-grown tree that has not been hardened off. Hardened-off trees have had their roots pruned sev-eral weeks or months prior to being dug up. In the hardening-off period, the newly harvested tree slows down the growth of its leaf shoots and can even drop leaves. Meanwhile, the root ball is regenerat-ing new roots to replace those severed in pruning, and the tree is undergoing chemical changes that may make it hardier. During this time, the tree needs frequent and carefully managed irrigation, something a good nursery is equipped to handle. Remember, a freshly dug tree which is not hardened-off should not be planted in the landscape unless its special irrigation needs can be met. Certain palms,
such as the cabbage palm, are exceptions to this rule and do not require hardening-off. Once field-grown trees have been hardened-off, they are more tolerant of being transplanted into dry landscape soil than container-grown trees.
When field-grown trees are harvested, their root balls are balled-in-burlap. That is, burlap is wrapped around the root balls and secured with nails, string or wire. The root ball of a balled-in-burlap field-grown tree is fairly durable, but care should be exercised to avoid breaking or crushing roots in transport and handling.
Container-grown Trees and ShrubsContainer-grown trees and shrubs are most
commonly grown in plastic containers that are placed either above-ground or, more recently, below-ground and inside permanently installed con-tainers with specially designed drainage holes. This latter method, known as pot-in-pot, insulates the root system and should produce roots that are more uniformly distributed than those found in above-ground containers. Whether a containerized tree or shrub is grown above- or below ground should not affect how it transplants, but few comparative tests on the subject have been published.
Containers are usually filled with an artificial or soilless growing medium composed of one or more materials like bark, peat moss, compost, and sand. These media are generally coarser than soil, which permits them to drain quickly and which, in turn, helps prevent root rot. Because of this rapid drainage, containerized trees require daily or more frequent irrigation in the summer.
When a container-grown tree or shrub is trans-planted, moisture is drawn out of the container’s growing medium into the more finely textured landscape soil, causing the root ball to dry out even faster than it did in the container. To maintain optimum growth after planting, container-grown plants should be watered at least as often as they were in the nursery. In the summer, daily irrigation on well-drained, sandy soils may be required for a number of weeks or months after planting, especially for trees whose trunks are over 2 inches in diameter. Watering can be tapered off as roots grow out into the landscape soil.
Standard plastic containers have smooth sides and are about as deep as they are wide. Roots of trees in these containers frequently grow along the outside of the root ball and eventually encircle it. At the time of transplanting, all circling roots

Selecting, Planting, and Managing Woody Ornamental Plants in the Landscape ◆ 297
should be separated and straightened or cut. This will prevent the roots from eventually girdling and strangling the trunk of the growing tree.
Low-profile containers are short and wide, cre-ating similarly shaped root balls that are especially well-suited to poorly drained sites and compacted soil. Circling roots pose less of a problem on trees grown in low-profile containers; if such roots do develop, they are far from the trunk. However, cir-cling roots may be present if the tree was grown in a smaller container when it was young.
Air-pruned containers are designed with many holes in the sides and/or bottom of the container. Some are bottomless. Air entering the holes kills root tips growing outward and thus controls the growth of circling roots. Tip growth is forced in-ward, creating a root system that is superior to those on trees grown in standard containers.
Copper-coated containers have their inside surfaces coated with a copper compound that pre-vents the formation of circling roots, which cre-ates a superior root ball. Early tests show that after planting into the landscape, trees grown in copper-coated containers show root elongation and growth of shoots and trunk at rates similar to or slightly greater than those of trees grown in conventional containers.
Bare-root Shrubs and TreesAs the name suggests, bare-root trees are sold
with roots that are not encased in soil. They are field-grown, hardened off trees and are not com-monly found in the market. If their roots are kept shaded, moist and cool until planting, bare root trees should perform as well as container-grown or balled-in-burlap trees.
Checking the Root Ball for DefectsSome root ball defects are obvious, while oth-
ers require careful observation and inspection to discover. Because the health of a plant’s root ball is critical to its ultimate survival, you may want to patronize nurseries that allow you to remove trees or shrubs from their pots (or will remove them for you) in order to examine the root balls. Always ask per-mission before removing plants from their contain-ers. You will also want a nursery that knows what cultivation methods were used to grow their stock. Tree roots deformed within the first several months of propagation in the nursery can doom a tree, but the consequences of such root deformations may not become evident until the trees are older. A thor-
ough inspection before planting will help prevent future disappointment.
One defect of can easily be diagnosed without removing soil or the growing medium from the root ball. Remove any stakes from the tree and simply push the trunk back and forth once or twice while holding the root ball still. The trunk on a tree of good quality will bend along its length but will not move in the soil or medium. The trunk on a tree with a defective root system will pivot at its base before it bends or will appear to be loose in the root ball. A tree with this defect may not develop enough stability to hold itself up.
Next, check for the location of the root flare and the top layer of the tree’s roots, which should be level with the surface of the soil. If the root flare is not visible in the pot, slip your fingers along the trunk and down into the soil until you feel the first root growing from the trunk. If the root flare and topmost roots are below the soil surface, the plant has been planted too deeply. Sometimes trees have been planted too deeply either in the ground or in containers. Sometimes a nursery’s cultivation equip-ment throws soil around the trunks of field-grown trees, raising the soil level. Whatever the cause, the raised soil level can hinder the tree’s establishment in the landscape or can cause its decline several years later. If you purchase a tree with a raised soil
Common Mistakes in Woody Plant Selection
• Choosing a plant based on flower color, texture, form or foliage without thoroughly examining its site or purpose suitability.• Using plants that are not adapted to local climatic conditions.• Using plants that are not adapted to soil, drainage, or moisture conditions of their individual planting spot.• Using plants that quickly overgrow the planting space that is available.•Using too many plants for a given space which results in overcrowding.•Using plants with undesirable characteristics that outweigh their positive attributes.•Using plants that are not adapted to the light (shade vs. sun) conditions.•Using plants that require high maintenance when low maintenance was intended.•Using cultivars of various plant species that are not pest resistant. --J. F. Hodges

Selecting, Planting, and Managing Woody Ornamental Plants in the Landscape ◆ 298
level, remove all soil to expose the root flare and the topmost root in the root ball. Plant the tree so that this root is just below the soil’s surface.
Check the main roots close to the tree’s trunk. Using your fingers or a garden hose, go down about 4 inches and remove the soil or growing medium about 3 inches out all around the base of the trunk. This will not hurt the tree. With one-gallon-sized root balls, you need only remove the media imme-diately adjacent to the base of the trunk. Look for kinked or circling roots close to the trunk and near the soil surface. If circling roots are tight up against the trunk, do not purchase the tree. Circling or kinked roots less than about one-third the trunk diameter can be cut at the point where they begin to circle. This may temporarily slow growth, but it should have a positive impact on future tree survival and growth.
To further inspect the root ball of a container-grown tree, check the bottom of the container for escaping roots. There should be no evidence of es-caping roots larger than about one-fifth the diameter of the trunk of the tree. Smaller escaping roots may be cut off with little harm to the tree. If the larger roots exist and need to be cut to remove the tree from the container, the tree could suffer decline and
leaf drop. If you try to pick up a container-grown plant and find that it is fastened to the ground by es-caping roots, select another plant. Roots should be distributed throughout the container medium. They should not protrude outside the container or pen-etrate the ground. The root ball should be free of weeds, which slow the establishment rate of a plant and may spread into the surrounding landscape.
Once you have checked the container’s bottom, lay the tree on its side. You should be able to simply slide the container off the root ball. If not, gently push the bottom of the container while holding the rim to loosen the root ball from the container. If this does not free the root ball, the tree may be pot-bound.
Once the tree is out of the container, the root ball should stay together but be somewhat pliable. You should be able to pick the root ball up and gently place it back in the container without losing much media. If the root ball falls apart when you remove it, particularly with shrubs, it may have just been “stepped up” to a larger container. You could be buying a large container of potting media with very few roots.
If many roots circle around the outside of the root ball or the root ball is very hard, it is said to be pot-bound or root-bound. A mass of circling roots on the outside of a root ball can act as a physical barrier to root penetration into the landscape soil after planting. The circling roots can also choke and kill the tree as it grows older. Do not purchase pot-bound plants.
Examine the roots on the surface of the root ball. Do not buy a plant with black roots. These roots were probably killed by heat stress, freezing temperatures, or overwatering.
Bare-root trees should have living, small-diame-ter roots growing from the larger roots. The insides of living roots are whitish and moist.
Trunk Form and StructureTrunk Form
Strong trunks are thickest near the ground and taper up. They do not require stakes to support them. Trees that were staked for a long time in the nursery may not develop proper trunk taper and may fall over when stakes are removed. The trunks of these trees are often the same diameter at the ground as they are several feet up the tree. This is a sign that the trunk may be weak.
Selecting Quality Planting Stock
Good quality trees are important in the success of any landscape planting. A savings in cost at the expense of quality can result in poor performance after planting. Quality can be determined by careful inspection of plants at the time of purchase and/or the selection of reputable nurseries that produce high quality plants. Quality factors to evaluate include root ball size or container size as it relates to size of tree. A tree’s structure, trunk form, and branch structure should be considered when select-ing quality plants. Avoid trees that have been sheared with many heavily pruned branches intended to induce them to spread out. Look for evidence of injury, disease, tip die-back, root circling in containers and plants that have their root crown buried below their original levels. Tip dieback often indicates recent water stress caused by many different problems. Poor water maintenance is often to blame. Heavy root circling is evidence of plants that were likely held and grown too long in their present container.--J. F. Hodges
Selecting, Planting, and Managing Woody Ornamental Plants in the Landscape ◆ 299
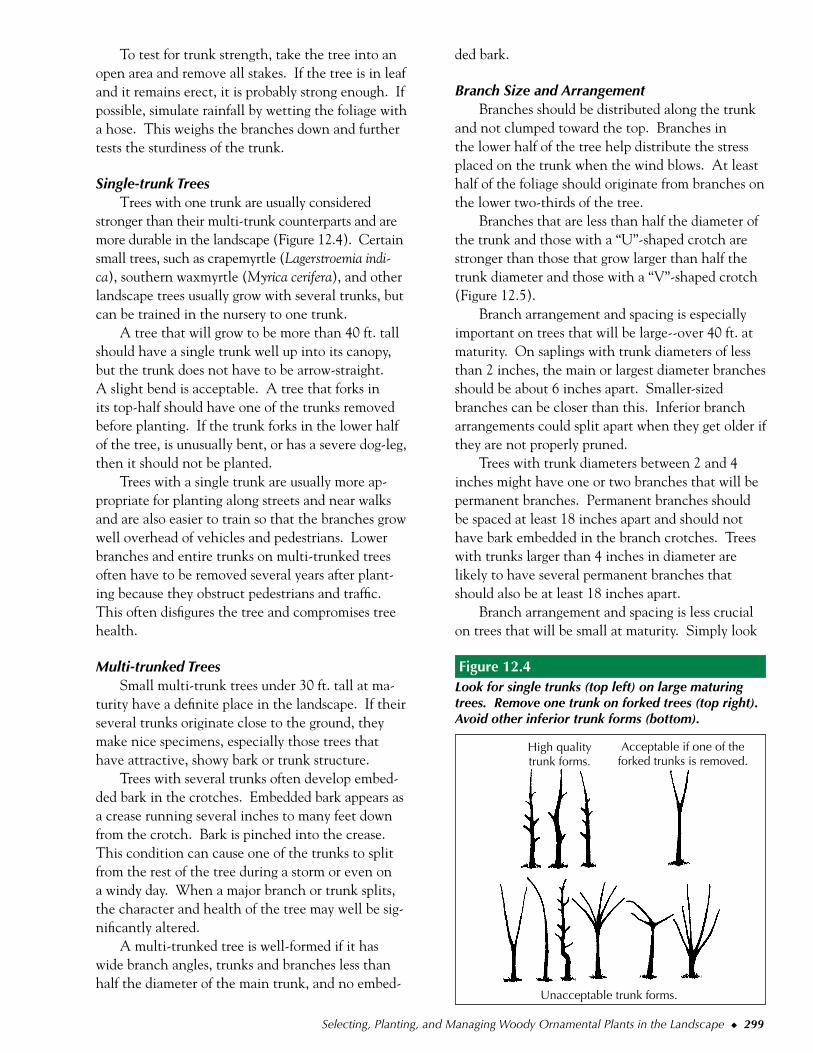
To test for trunk strength, take the tree into an open area and remove all stakes. If the tree is in leaf and it remains erect, it is probably strong enough. If possible, simulate rainfall by wetting the foliage with a hose. This weighs the branches down and further tests the sturdiness of the trunk.
Single-trunk TreesTrees with one trunk are usually considered
stronger than their multi-trunk counterparts and are more durable in the landscape (Figure 12.4). Certain small trees, such as crapemyrtle (Lagerstroemia indi-ca), southern waxmyrtle (Myrica cerifera), and other landscape trees usually grow with several trunks, but can be trained in the nursery to one trunk.
A tree that will grow to be more than 40 ft. tall should have a single trunk well up into its canopy, but the trunk does not have to be arrow-straight. A slight bend is acceptable. A tree that forks in its top-half should have one of the trunks removed before planting. If the trunk forks in the lower half of the tree, is unusually bent, or has a severe dog-leg, then it should not be planted.
Trees with a single trunk are usually more ap-propriate for planting along streets and near walks and are also easier to train so that the branches grow well overhead of vehicles and pedestrians. Lower branches and entire trunks on multi-trunked trees often have to be removed several years after plant-ing because they obstruct pedestrians and traffic. This often disfigures the tree and compromises tree health.
Multi-trunked TreesSmall multi-trunk trees under 30 ft. tall at ma-
turity have a definite place in the landscape. If their several trunks originate close to the ground, they make nice specimens, especially those trees that have attractive, showy bark or trunk structure.
Trees with several trunks often develop embed-ded bark in the crotches. Embedded bark appears as a crease running several inches to many feet down from the crotch. Bark is pinched into the crease. This condition can cause one of the trunks to split from the rest of the tree during a storm or even on a windy day. When a major branch or trunk splits, the character and health of the tree may well be sig-nificantly altered.
A multi-trunked tree is well-formed if it has wide branch angles, trunks and branches less than half the diameter of the main trunk, and no embed-
ded bark.
Branch Size and ArrangementBranches should be distributed along the trunk
and not clumped toward the top. Branches in the lower half of the tree help distribute the stress placed on the trunk when the wind blows. At least half of the foliage should originate from branches on the lower two-thirds of the tree.
Branches that are less than half the diameter of the trunk and those with a “U”-shaped crotch are stronger than those that grow larger than half the trunk diameter and those with a “V”-shaped crotch (Figure 12.5).
Branch arrangement and spacing is especially important on trees that will be large--over 40 ft. at maturity. On saplings with trunk diameters of less than 2 inches, the main or largest diameter branches should be about 6 inches apart. Smaller-sized branches can be closer than this. Inferior branch arrangements could split apart when they get older if they are not properly pruned.
Trees with trunk diameters between 2 and 4 inches might have one or two branches that will be permanent branches. Permanent branches should be spaced at least 18 inches apart and should not have bark embedded in the branch crotches. Trees with trunks larger than 4 inches in diameter are likely to have several permanent branches that should also be at least 18 inches apart.
Branch arrangement and spacing is less crucial on trees that will be small at maturity. Simply look
High quality trunk forms.
Acceptable if one of the forked trunks is removed.
Unacceptable trunk forms.
Look for single trunks (top left) on large maturing trees. Remove one trunk on forked trees (top right). Avoid other inferior trunk forms (bottom).
Figure 12.4

Selecting, Planting, and Managing Woody Ornamental Plants in the Landscape ◆ 300
for those with a pleasing branch arrangement that will fit the needs of the planting site.
Evidence of Pests and DamageExamine a tree’s leaves, trunk, and branches for
evidence of disease, pest infestation, or other injury. Not only do you want to select a tree that is healthy, you also want to avoid exposing the other plants in the landscape to a contaminated specimen.
Many mites and insect pests are tiny and/or well camouflaged. Look carefully at both sides of a tree’s leaves, especially if the foliage is speckled or spotted. Speckling may be the result of a generally harmless leaf spot disease. Spotted foliage may also be an in-dication of sunburn or chemical injury or possibly an infestation of scales, spider mites, lace bugs, or some other pest that sucks sap from the foliage. Such pests may be visible upon close inspection. Do not purchase trees with these pests.
Because their color is often similar to that of twigs and branches, the presence of scale insects is one of the more difficult infestations to detect. Look for raised ridges or bumps on the tree’s twigs. To determine if these are scales or a normal part of the tree, pick several off with your fingernail. If the bump is a normal part of the tree’s bark, you will have exposed the green or white tissue that grows beneath the bark. If, however, the bump was a scale insect, the twig’s bark will have remained more or less intact and no exposed tissue will be evident. Scale insects are easier to see when they are on foli-age because their color is usually quite different from that of the leaves. Do not plant trees with scale in-festations because the stress of defending against the infestation may prove excessive in the vulnerable period following transplanting.
Except in their dormant season, nursery trees should have leaves to the ends of all their branches. Dead tips indicate problems that need further inves-tigation. If the tree is dormant and has no leaves, scrape several of its twigs with your fingernail. If the tissue revealed is greenish or white, the twig is alive. Dry brown tissue indicates that the twig or branch is dead from that part out to the tip. This condition called dieback. As a rule, trees with dieback should not be purchased.
Avoid trees with scars and other open wounds along the trunk. If there is material covering the trunk, ask nursery personnel for permission to re-move this trunk wrap to inspect the trunk, then replace it if needed to help prevent damage dur-
ing shipment to the planting site. Open pruning wounds are fine if they are small, but the presence of large open pruning wounds could indicate a poor or unplanned pruning program at the nursery. Small broken branches should be pruned back to healthy tissue. Trees with large broken branches should usually be left at the nursery. Do not purchase trees with bark stripped down the trunk from an improper pruning cut.
Evaluate old pruning cuts as well. Properly made pruning cuts are round in cross-section while improperly made cuts are often oval. Properly made pruning cuts indicate that the nursery has high pruning standards and is capable of growing high quality trees.
Check for injuries to the trunk from stakes rub-bing against it, and be sure the tree was not harmed in the nursery by stake ties that were left on for too long. By the time of purchase, a tree should usually be able to stand without stakes.
Leaves should be colored like those of other trees of the same type. If leaves are smaller, lighter colored or yellower than others, the tree may lack vigor and grow poorly.
Major branches should not have bark embedded in the crotch. Embedded bark indicates that the branch is not well-attached to the trunk and could separate from the tree as it grows older.
Be sure a tree’s root ball is free of weeds before planting. Weeds will slow the establishment rate of the tree and may spread out into the surrounding landscape.
limbs spaced at least
18” apart
on the trunk
Weak, “V”-shaped branch crotch with bark embed-ded (left) and stronger, U-shaped crotch (right).
Figure 12.5
Selecting, Planting, and Managing Woody Ornamental Plants in the Landscape ◆ 301
Care Before PlantingHow a tree or shrub is handled between the
time it leaves the nursery and the time it is planted will affect its health and even its chances of survival after planting. Before purchasing plants, decide how to provide the appropriate transportation to the planting site and the correct storage if the tree will not be planted as soon as it arrives at the site.
TransportingNever pick up a tree by the trunk; always lift
and carry it by the root ball or container. Never drop a tree as this will disrupt contact between fine roots and soil which must be in intimate contact with each other if the roots are to absorb water.
Root balls in plastic containers or boxes are more resistant to rough handling than those in fab-ric containers or balled-in-burlap. With the latter, be sure that burlap is secured tightly or soil within the root ball could shift, causing cracks in the root ball and root breakage. A cracked root ball dries out quickly. To reduce water loss during shipping, some nurseries shrink-wrap plastic around the root balls of trees that are balled-in-burlap.
When taking a tree or shrub home in a car, don’t let it get wind-whipped by lashing it to the roof or letting foliage hang out the windows or the trunk. Exposure to wind causes rapid moisture loss and may also result in severe damage to the foliage. The tree also needs protection against extreme tem-peratures, so do not leave the car in the sun.
When transporting trees commercially, arrange for the use of a closed truck that can guarantee keeping the trees in temperatures under 100 oF. This will require air conditioning if the truck stands in the sun. Trees that are shipped in open trucks lose more water through their foliage and twigs and can arrive at the planting site in poor condition. Many nursery operators cover trees with a fabric or cloth designed to reduce wind damage to the foliage.
Some nursery operators routinely spray trees that are in leaf with antitranspirants before ship-ping. Antitranspirants or antidesiccant sprays leave a transparent film of wax, plastic, or resin on the leaves that is intended to slow the loss of water through a plant’s pores. These sprays have proved useful in the transplanting of trees in leaf during the summer, with the benefit lasting several weeks.
Storing and Irrigating at the Planting SiteIf trees or shrubs cannot be planted the day they
arrive at the planting site, they will need a hold-ing area that is shaded and screened from the wind. Depending on how the root balls are contained, specific irrigation requirements will need to be met, so establishing the holding area in advance of the arrival of the trees is strongly advised.
After the plants leave the nursery, they should continue to receive the same amount of water at the same frequency the nursery provided. Ask the nurs-ery operator for the applicable irrigation schedule.
Container-grown trees and shrubs dry out very quickly. Even one day without water can cause sig-nificant root death, depriving the tree of vigor and magnifying the stress of the establishment period. Several days without water could mean death. Any plastic coverings used to protect the tree’s foliage or roots during transport should be removed as soon as the tree reaches the holding area. Plastic coverings can allow temperatures to build to lethal levels.
Balled-in-burlap trees and shrubs should have their root balls surrounded by soil, compost, mulch, or sawdust as soon as they arrive in the holding area, especially if they have roots growing through the burlap. This will help prevent the roots from drying out and will also facilitate the absorption of water by the root ball. If the root balls have been enclosed in a layer of plastic, either remove the plastic or provide complete protection from direct sun. Plastic coverings can allow temperatures to build to lethal levels. As with container-grown trees, follow the nursery’s irrigation schedule. Water will roll off the surface of the root ball if it is applied too fast. A drip emitter or other low-volume irrigation head will deliver water slowly enough to permit absorp-tion by the root ball, though large root balls may need more than one emitter for thorough coverage. A hose or sprinkler may also be used as long as a thorough wetting can be achieved. Do not allow root balls to stand in pools of water after they have been saturated.
Keep bare-root trees, especially their roots, cov-ered with moistened burlap and in the shade prior to planting. Fine roots can dry out and die if exposed to direct sun for even a few minutes. Spray roots with water often enough to keep them moist; how often will be determined by the weather and the characteristics of your holding area. Remove dam-aged or broken portions of the roots with a sharp hand pruner.

Selecting, Planting, and Managing Woody Ornamental Plants in the Landscape ◆ 302
Planting TimeIn the professional landscape industry, planting
occurs year-round. Container-grown plants with well-developed root systems can be planted success-fully throughout the year. Balled-in-burlap plants, on the other hand, are best planted during the fall and winter months. Balled-in-burlap trees in full leaf have been transplanted successfully during the spring and summer months, but special care must be taken during establishment. The degree of “trans-plant shock” varies with the species of tree and the care and handling of the tree from the nursery to the landscape.
The very best time of year to plant, in terms of root growth and plant establishment, is during the fall. Unlike the tops of ornamental plants that go dormant and cease growth for the winter, roots of landscape plants in the Southeast continue to grow throughout the winter months. Fall planting allows the carbohydrates produced during the previous growing season to be directed to root growth, since there is little demand from the top. When spring arrives, a well-established root system will be pre-pared to provide the necessary water and nutrients for optimum plant growth.
Soil PreparationWhile shaping the final grade of the planting
beds, remember the importance of good drainage. Poorly drained soils are a leading cause of plant problems in the landscape. Many soils are under-lain with a hardpan layer of impervious clay or rock several inches below the surface that inhibits drainage and causes a high water table. Such soil conditions may not be readily evident during dry weather, but can become a nightmare during rainy periods. Therefore, before placing the first plant in the ground, it is important to take steps to insure adequate drainage. Often a thorough tilling with a cultivator to a depth of 12 to 15 inches is sufficient to loosen hard, compact soils.
If a site is known to be poorly drained, raised beds, in addition to subsoiling, is recommended. Often beds can be elevated 8 to 12 inches above the existing grade by using native soil on site, but sometimes it is necessary to bring in additional well-drained soil. In extreme cases, you may have to in-stall a drain tile to help carry water off the site.
In shaping the final grade, avoid leaving swales or pockets where water is likely to stand. Shape
beds so that excess water will be carried off the site and away from buildings. Water can also be directed to unplanted areas. Few landscape plants, with the exception of aquatic garden plants, can tolerate long periods of standing water. Good drainage is critical for most landscape plants.
If you are planting around new construction, remove any debris left on the site that may cause plant growth difficulties. Chunks of concrete, roof-ing shingles, globs of tar, oil spills, and sheetrock are a few of the hazards of new construction sites. Re-moving them will avoid long-term growth problems.
Soil TestIn addition to examining the physical properties
of the soil and taking corrective measures on poorly drained soils, get a soil test. Take a soil sample sev-eral weeks before planting so you will know how to treat the soil at planting time. However, if new soil is brought onto the site at planting time or if soil is moved around during the final grading, it’s best to wait until all the soil is in place before sampling. You can surface-apply lime and fertilizer at the rec-ommended rates later, after the plants are in place.
A soil test recommendation is only as good as the sample. Take several scoops of soil from dif-ferent spots throughout the landscape, mix them together in a bucket, and remove about a pint of the composite sample for testing. Sample to a depth of at least 6 to 8 inches. Soil can vary tremendously from one spot to another in a landscape, so you may need to take separate samples from each of the major planting beds. See Chapter 1, p. 24 for more information.
The majority of ornamental plants, just like most other horticultural crops, prefer a pH in the range of 5.2 to 6.5 for optimum absorption of nu-trients. Above or below this pH range, nutrient deficiencies often result. To raise the pH level of an acid soil, dolomitic lime is usually added, while the pH level of alkaline soils can be lowered with amendments, such as sulfur or aluminum sulfate. Applying lime to a soil without the benefit of a soil test can result in nutrient deficiencies that are dif-ficult to counteract and correct.
Organic AmendmentsWhether a soil and plant will benefit from the
addition of organic matter must be dealt with on a case-by-case basis. There is no recipe for amending all soils. The type and amount of amendment used

Selecting, Planting, and Managing Woody Ornamental Plants in the Landscape ◆ 303
depends on the structure and texture of the existing soil, soil drainage, and the type of plant to be grown.
Organic amendments such as peat moss, rotted animal manure, or compost are applied to soils to improve the nutrient and water-holding capacity of soils, or, in general terms, to improve soil tilth. When adding organic matter to a soil, research has shown that it is best to incorporate it throughout the rooting zone as opposed to placing it in the planting hole. By incorporating an amendment uni-formly in the soil, the entire rooting area becomes a homogenous growing environment for roots. On the other hand, when a planting hole alone is amended, the structure and texture of the soil in the hole differs from that of the surrounding native soil. This encourages the roots to stay within the con-
fines of the hole and discourages them from explor-ing the surrounding native soil. It also upsets the water equilibrium between the surrounding native soil and the soil in the hole. Fine-textured organic matter, for instance, placed in the planting hole can act like a sponge in a bathtub, holding excess mois-ture after rain or irrigation.
Extensive planting research has determined that organic amendments placed in the planting hole do not result in a larger root system, do not encourage root penetration into the native soil, and, therefore, are not cost-effective. If you choose to add organic matter to the soil, incorporate it uniformly through-out the planting area or projected rooting zone. Organic matter should comprise at least 20% of the total soil volume. For example, preparing a bed 8
Trees have survived transplanting in every season. The question, though, is which time of year is best. Digging up any tree results in the loss of a great deal of the root system. Whether the tree is balled-and-burlapped, or moved bare root, only a small fraction of the original root system makes the move. The ideal time to move a tree, therefore, generally has been timed to coincide with the tree having an op-portunity to begin root regeneration as soon as possible.
In the northern U.S., transplanting has tradi-tionally been delayed until spring in the con-viction that this allows the tree as much time as possible to regenerate roots before the ground freezes solid. In addition certain species, such as many oaks, will not initiate root growth until buds swell in the spring. Northern red oak, in fact, begins root growth only after spring bud-break, which creates an additional demand for water by the newly expanding leaves and shoots, and makes transplanting the trees even more difficult.
On the other hand, some trees, such as hol-lies, magnolias, and elms, have flushes of root growth in midsummer and have been success-fully balled-and-burlapped even in full leaf.
Despite the traditional preference for spring planting, recent research has demonstrated that many trees may better be transplanted in the fall. In one study, October-transplanted sugar maples did better than either November- or March-transplanted trees. The sugar maples
Is there a “best time” for moving or transplanting trees?
produced roots sporadically throughout the winter months. Even in the case of red oaks, the results were similar. The red oaks did not begin root growth until after budbreak in the spring , but the days between budbreak and root growth were fewer for the October-plant-ed than the March-planted specimens.Before we conclude that fall planting is univer-sally superior, it should be noted that this re-search was done in Blacksburg, Virginia, where fall is longer, and winters not as severe as some more northern locales.
Other factors besides timing are also important in how well a tree survives transplanting. These include the tree’s health prior to the move, the size of the root ball, whether their roots were kept moist in transit, and the care the tree receives after transplanting. The greatest hindrance to transplanting success is a lack of water in the plant’s tissues. This water stress, known as “transplant shock,” occurs because of the tree’s inability to absorb soil moisture because of its reduced root system.
Whenever you transplant, water your tree regularly to support the growth of roots in its new location. Depending on the weather and rainfall, water daily for the first few weeks. Af-ter that, start cutting back on watering to every few days or longer, especially with cloudy, rainy, or cool weather. Eventually, water on a weekly or “as needed” basis by testing the soil and root ball for moisture. --B. Polomski.

Selecting, Planting, and Managing Woody Ornamental Plants in the Landscape ◆ 304
inches deep requires the addition of about 2 inches of organic matter, such as compost or shredded leaves. Drainage can be improved in clay soils by subsoiling or deep tilling before adding organic matter.
Do not use uncomposted bark products as amendments. Freshly milled bark, for instance, that has not been composted robs plants of nitrogen when used as an amendment. As microorganisms in the soil feed on bark and decompose it, they use nitrogen in the soil. Also, the pH of the soil often drops dramatically below the desirable range when uncomposted materials are used as amendments. Well-composted organic products have a rich, earthy smell, a crumbly appearance, and the original organic materials are no longer recognizable.
PlantingTrees and shrubs must be planted at the right
depth and receive the right amount of water if they are to establish themselves and flourish. Planting too deeply and under- or overwatering are among the most common and serious planting errors.
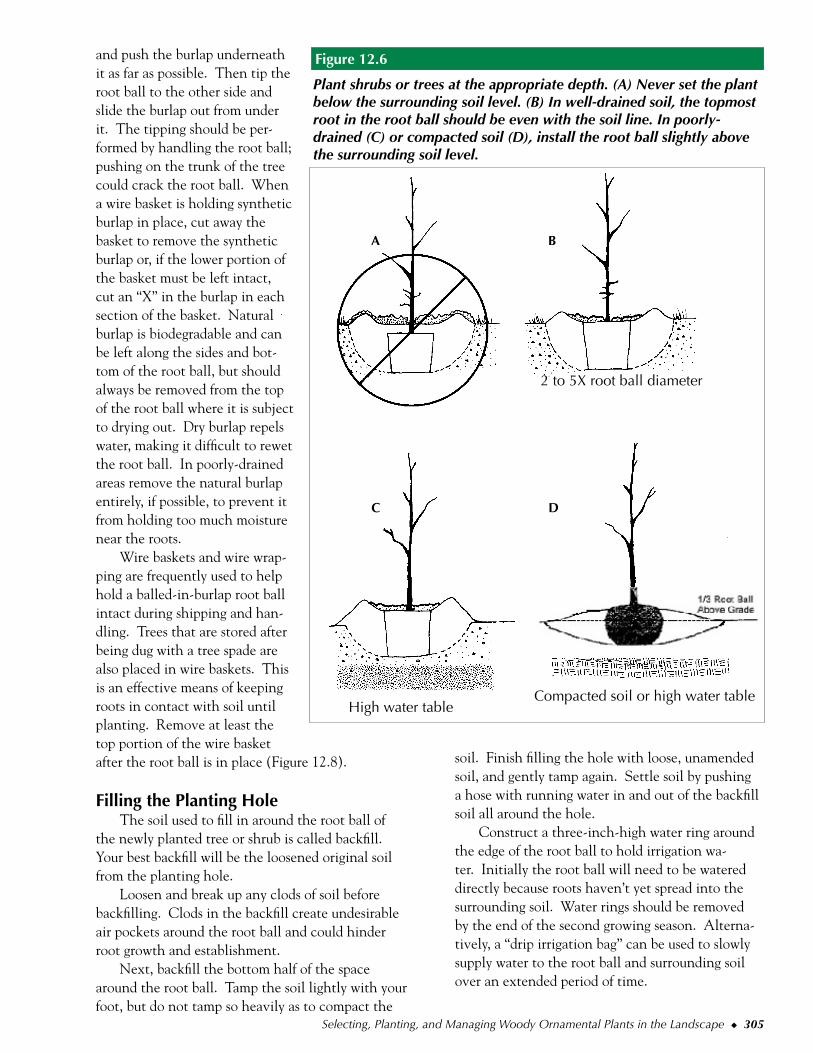
Planting DepthIn well-drained soil, the planting hole should
never be dug any deeper than the height of the root ball (Figure 12.6-A). This means that the soil at the bottom of the hole is left undisturbed. Setting the root ball on loosened soil will cause the tree to settle and sink too deeply into the soil. In well-drained soil, you want to locate the topmost root in the root ball so that it will be level with the soil surface (Fig-ure 12.6-B). Check to be sure that there is not an excess layer of soil (or container media) already cov-ering the root ball. As little as 1/2 inch of excess soil over the root ball can inhibit or prevent water from entering the root ball, especially on trees planted from containers. Only mulch should be placed over the root ball.
In well-drained soil the planting hole should be at least 2 times and preferably 5 times wider than the root ball. Roots will grow more quickly into loosened soil, thus speeding up the tree’s establish-ment time.
In poorly drained or compacted soil, the plant is best placed higher than its original planting depth, about 2 to 4 inches higher than the surrounding soil (Figure 12.6-C and 12.6-D). This will allow oxygen to reach the roots in the upper surface of soil. It will also cause excess water to drain away from the
plant rather than collecting beneath it. Do not dis-turb the soil under the root ball to prevent any later settling, which will move the plant roots deeper into the soil. The top of the root ball may dry out quickly in the summer on some sites, so be prepared to irrigate accordingly.
Preparing and Setting the Root BallTrees and shrubs grown in plastic or other hard-
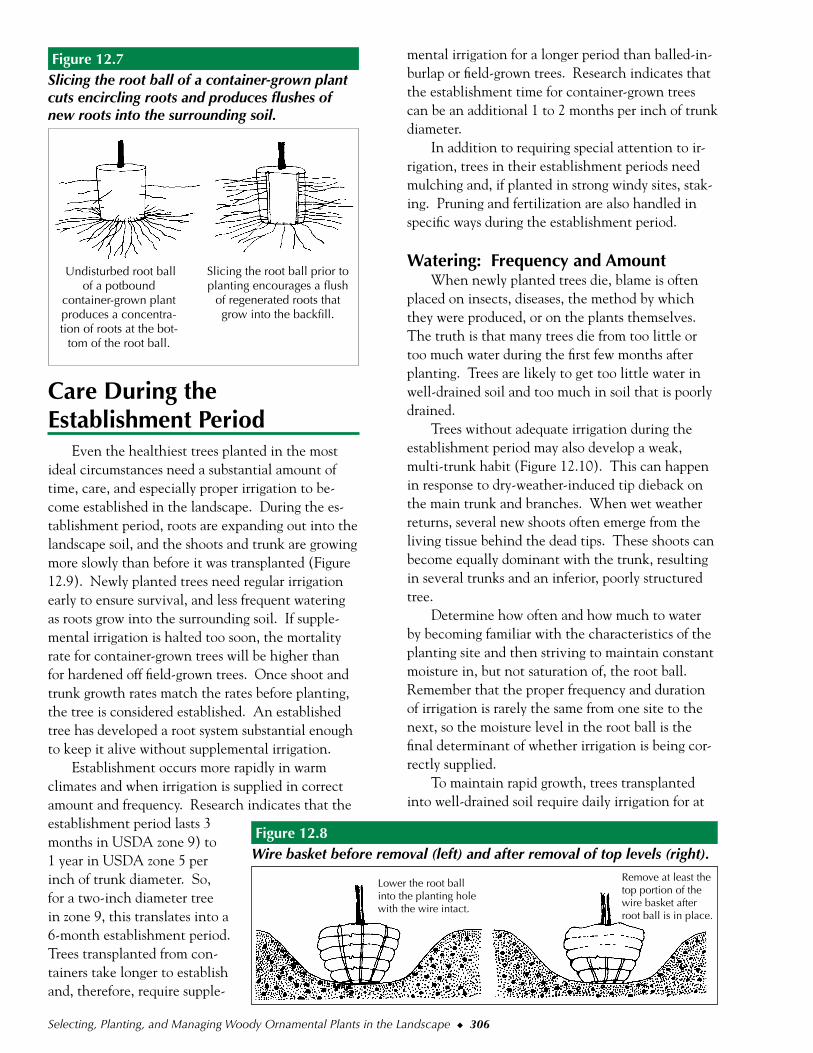
sided containers can be watered, removed from their containers, and then placed directly in the holes prepared for them. However, cut any circling roots so that they will not strangle the tree later on. If you purchased a potbound tree or shrub, use pruning shears or a sharp knife to make slices 1 to 2 inches deep from the top of the root ball to the bottom (Figure 12.7). Make these slices in three or four places around the root ball. Pull the roots growing along the outside of the root ball away from the root ball. Research has shown that although this kind of pruning does not increase root growth after plant-ing, slicing root balls, whether potbound or not, enhances the distribution of regenerated roots in the surrounding landscape soil. Instead of occurring almost exclusively from the bottom of the root ball, root regeneration occurs along the slice from the top to the bottom of the root ball.
When preparing the hole for a bare-root tree, dig it wide enough so that roots can be spread out. Do not cut or break roots or bend them in order to fit the hole. Use a sharp pruning tool to cut or trim any roots that are obviously dead, injured, or dried. Pruning roots indiscriminately at planting will not stimulate root regeneration and is not recommend-ed. Spread the roots out and position the topmost most root just under the soil surface. Shallow roots either may be parallel with the soil surface or angled slightly downwards. Some people spread the roots over a mound of firm soil in the planting hole and carefully place soil between groups of roots; others wash soil between the roots.
Natural or synthetic burlap is used on trees that are balled-in-burlap. To determine which type has been used, hold a match to a small portion of the burlap. As a rule, natural burlap will burn, synthetic will melt.
Synthetic burlap will not decompose in the soil and can cause roots to girdle the tree. Because this could ultimately strangle the tree, remove synthetic burlap entirely. After pulling burlap away from the sides of the root ball, tip the root ball to one side
Selecting, Planting, and Managing Woody Ornamental Plants in the Landscape ◆ 305
and push the burlap underneath it as far as possible. Then tip the root ball to the other side and slide the burlap out from under it. The tipping should be per-formed by handling the root ball; pushing on the trunk of the tree could crack the root ball. When a wire basket is holding synthetic burlap in place, cut away the basket to remove the synthetic burlap or, if the lower portion of the basket must be left intact, cut an “X” in the burlap in each section of the basket. Natural burlap is biodegradable and can be left along the sides and bot-tom of the root ball, but should always be removed from the top of the root ball where it is subject to drying out. Dry burlap repels water, making it difficult to rewet the root ball. In poorly-drained areas remove the natural burlap entirely, if possible, to prevent it from holding too much moisture near the roots.
Wire baskets and wire wrap-ping are frequently used to help hold a balled-in-burlap root ball intact during shipping and han-dling. Trees that are stored after being dug with a tree spade are also placed in wire baskets. This is an effective means of keeping roots in contact with soil until planting. Remove at least the top portion of the wire basket after the root ball is in place (Figure 12.8).
Filling the Planting HoleThe soil used to fill in around the root ball of
the newly planted tree or shrub is called backfill. Your best backfill will be the loosened original soil from the planting hole.
Loosen and break up any clods of soil before backfilling. Clods in the backfill create undesirable air pockets around the root ball and could hinder root growth and establishment.
Next, backfill the bottom half of the space around the root ball. Tamp the soil lightly with your foot, but do not tamp so heavily as to compact the
soil. Finish filling the hole with loose, unamended soil, and gently tamp again. Settle soil by pushing a hose with running water in and out of the backfill soil all around the hole.
Construct a three-inch-high water ring around the edge of the root ball to hold irrigation wa-ter. Initially the root ball will need to be watered directly because roots haven’t yet spread into the surrounding soil. Water rings should be removed by the end of the second growing season. Alterna-tively, a “drip irrigation bag” can be used to slowly supply water to the root ball and surrounding soil over an extended period of time.
A B
C D
Compacted soil or high water tableHigh water table
Plant shrubs or trees at the appropriate depth. (A) Never set the plant below the surrounding soil level. (B) In well-drained soil, the topmost root in the root ball should be even with the soil line. In poorly-drained (C) or compacted soil (D), install the root ball slightly above the surrounding soil level.
Figure 12.6
2 to 5X root ball diameter
Selecting, Planting, and Managing Woody Ornamental Plants in the Landscape ◆ 306
Care During the Establishment Period
Even the healthiest trees planted in the most ideal circumstances need a substantial amount of time, care, and especially proper irrigation to be-come established in the landscape. During the es-tablishment period, roots are expanding out into the landscape soil, and the shoots and trunk are growing more slowly than before it was transplanted (Figure 12.9). Newly planted trees need regular irrigation early to ensure survival, and less frequent watering as roots grow into the surrounding soil. If supple-mental irrigation is halted too soon, the mortality rate for container-grown trees will be higher than for hardened off field-grown trees. Once shoot and trunk growth rates match the rates before planting, the tree is considered established. An established tree has developed a root system substantial enough to keep it alive without supplemental irrigation.
Establishment occurs more rapidly in warm climates and when irrigation is supplied in correct amount and frequency. Research indicates that the establishment period lasts 3 months in USDA zone 9) to 1 year in USDA zone 5 per inch of trunk diameter. So, for a two-inch diameter tree in zone 9, this translates into a 6-month establishment period. Trees transplanted from con-tainers take longer to establish and, therefore, require supple-
mental irrigation for a longer period than balled-in-burlap or field-grown trees. Research indicates that the establishment time for container-grown trees can be an additional 1 to 2 months per inch of trunk diameter.
In addition to requiring special attention to ir-rigation, trees in their establishment periods need mulching and, if planted in strong windy sites, stak-ing. Pruning and fertilization are also handled in specific ways during the establishment period.
Watering: Frequency and AmountWhen newly planted trees die, blame is often
placed on insects, diseases, the method by which they were produced, or on the plants themselves. The truth is that many trees die from too little or too much water during the first few months after planting. Trees are likely to get too little water in well-drained soil and too much in soil that is poorly drained.
Trees without adequate irrigation during the establishment period may also develop a weak, multi-trunk habit (Figure 12.10). This can happen in response to dry-weather-induced tip dieback on the main trunk and branches. When wet weather returns, several new shoots often emerge from the living tissue behind the dead tips. These shoots can become equally dominant with the trunk, resulting in several trunks and an inferior, poorly structured tree.
Determine how often and how much to water by becoming familiar with the characteristics of the planting site and then striving to maintain constant moisture in, but not saturation of, the root ball. Remember that the proper frequency and duration of irrigation is rarely the same from one site to the next, so the moisture level in the root ball is the final determinant of whether irrigation is being cor-rectly supplied.
To maintain rapid growth, trees transplanted into well-drained soil require daily irrigation for at
Lower the root ball into the planting hole with the wire intact.
Remove at least the top portion of the wire basket after root ball is in place.
Wire basket before removal (left) and after removal of top levels (right). Figure 12.8
Undisturbed root ball of a potbound
container-grown plant produces a concentra-tion of roots at the bot-
tom of the root ball.
Slicing the root ball prior to planting encourages a flush
of regenerated roots that grow into the backfill.
Slicing the root ball of a container-grown plant cuts encircling roots and produces flushes of new roots into the surrounding soil.
Figure 12.7
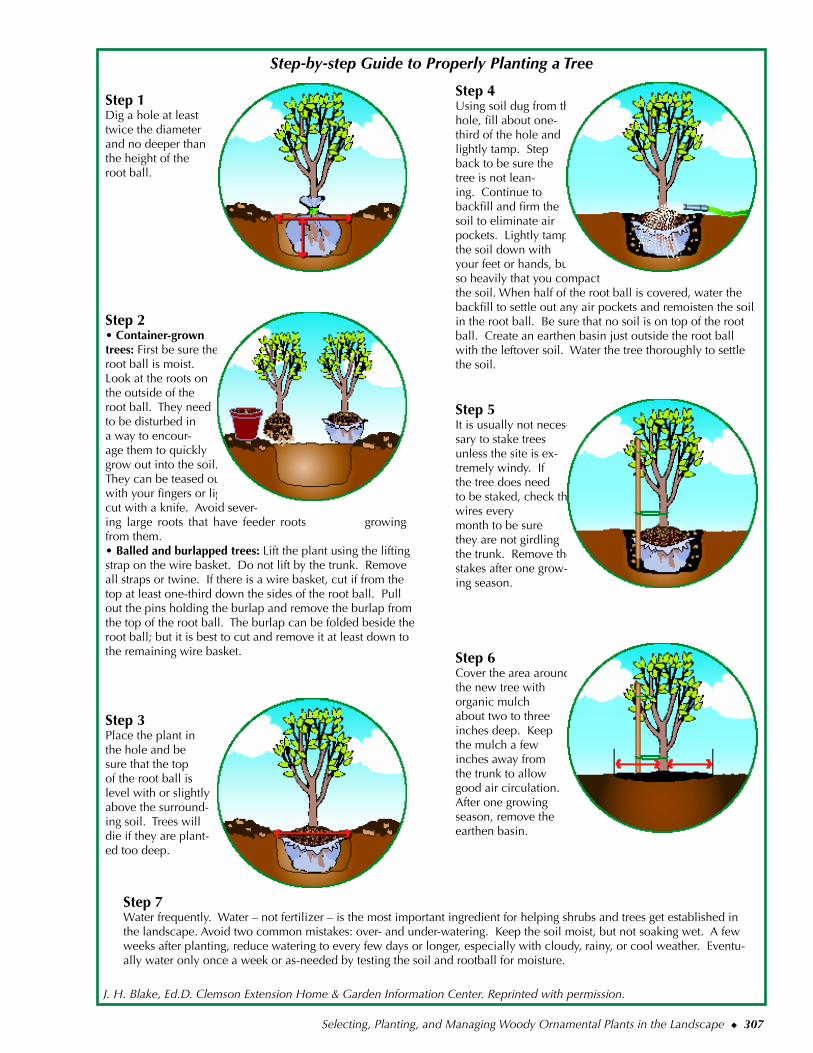
Selecting, Planting, and Managing Woody Ornamental Plants in the Landscape ◆ 307
Step 7 Water frequently. Water – not fertilizer – is the most important ingredient for helping shrubs and trees get established in the landscape. Avoid two common mistakes: over- and under-watering. Keep the soil moist, but not soaking wet. A few weeks after planting, reduce watering to every few days or longer, especially with cloudy, rainy, or cool weather. Eventu-ally water only once a week or as-needed by testing the soil and rootball for moisture.
Step 1 Dig a hole at least twice the diameter and no deeper than the height of the root ball.
Step 3 Place the plant in the hole and be sure that the top of the root ball is level with or slightly above the surround-ing soil. Trees will die if they are plant-ed too deep.
Step 4Using soil dug from the hole, fill about one-third of the hole and lightly tamp. Step back to be sure the tree is not lean-ing. Continue to backfill and firm the soil to eliminate air pockets. Lightly tamp the soil down with your feet or hands, but not so heavily that you compact the soil. When half of the root ball is covered, water the backfill to settle out any air pockets and remoisten the soil in the root ball. Be sure that no soil is on top of the root ball. Create an earthen basin just outside the root ball with the leftover soil. Water the tree thoroughly to settle the soil.
Step 5It is usually not neces-sary to stake trees unless the site is ex-tremely windy. If the tree does need to be staked, check the wires every month to be sure they are not girdling the trunk. Remove the stakes after one grow-ing season.
Step 2 • Container-grown trees: First be sure the root ball is moist. Look at the roots on the outside of the root ball. They need to be disturbed in a way to encour-age them to quickly grow out into the soil. They can be teased out with your fingers or lightly cut with a knife. Avoid sever-ing large roots that have feeder roots growing from them. • Balled and burlapped trees: Lift the plant using the lifting strap on the wire basket. Do not lift by the trunk. Remove all straps or twine. If there is a wire basket, cut if from the top at least one-third down the sides of the root ball. Pull out the pins holding the burlap and remove the burlap from the top of the root ball. The burlap can be folded beside the root ball; but it is best to cut and remove it at least down to the remaining wire basket. Step 6
Cover the area around the new tree with organic mulch about two to three inches deep. Keep the mulch a few inches away from the trunk to allow good air circulation. After one growing season, remove the earthen basin.
Step-by-step Guide to Properly Planting a Tree
J. H. Blake, Ed.D. Clemson Extension Home & Garden Information Center. Reprinted with permission.

Selecting, Planting, and Managing Woody Ornamental Plants in the Landscape ◆ 308
Maintaining adequate moisture in the root ball and surrounding soil allows for faster and more extensive root growth. The more rapid the root growth, the faster the rate of establishment and the sooner the tree develops drought-resistance. Root growth is slow on trees that are not irrigated regular-ly after planting. Such trees will normally stay alive until a drought occurs but can die-back during the drought. Regular irrigation in loose soil promotes the extensive root system that is a tree’s best defense against drought.
In the first few months after planting, do not skip an irrigation because of rainfall, unless it mea-sures over an inch per week. Rainwater should not be counted on to provide any benefit in the first few months after transplanting. Later, normal rainfall should provide enough soil moisture in most years to allow for adequate tree root growth into the soil surrounding the root ball. If the site has no irriga-tion system or if there is a drought, occasionally water the soil surrounding the root ball. If this soil becomes too dry, root growth will be slow. Gradu-ally increase the irrigation area around the tree to accommodate root growth.
Growth in 2nd year
after planting
Growth during
final year tree was in
nursery
1st yearTransplanted here
Twig from a tree not yet established in the land-scape. Growth in the second year was greater than in the first year after transplanting.
Figure 12.9 Transplanting Palms
Palms are best moved in late spring to early summer. They have a simple, fibrous system of primary roots that emerge from a root initiation zone at the base of the trunk. For most species it is sufficient to dig a root ball one foot deep and one foot from the trunk because a majority of the roots even on mature specimens are located within a foot of the trunk. Pindo palm, Chinese fountain palm (Livistonia chinensis), and queen palm are exceptions. They should be dug with a deeper root ball, at least 2 ft. deep.
Because palms are monocotyledonous trees, they do not have a peripheral cambium. Therefore, there is not the danger of girdling the trunk when handling larger specimens. However, neither will gouges to the trunk re-pair themselves, so take care in moving your plants. Once replanted, the severed roots of most palms will branch and regrow. New roots will also emerge from the root initia-tion zone.
Palmetto palm (Sabal palmetto) is an excep-tion. Nearly all severed roots die back to the trunk, necessitating the regeneration of any entirely new root system. While with most palms it is wise to remove dead and older fronds at transplanting, with palmettos, you should cut off all the fronds.
Finally, to prevent wind throw, temporary bracing of taller palms may be necessary until the plant’s roothold is reestablished. This is often done with simple board brac-ing arrayed to support the trunk from three directions.
For more information, refer to “Transplant-ing specimen palms: A review of common practices and research-based information,” Dennis R. Pittenger, Donald R. Hodel, and A. James Downer in HortTechnology (Jan-March 2005, Vol. 15 (1):128-132.--B. Polomski
least the first month. Frequent irrigation benefits the transplanted tree more than large volumes of water infrequently applied. In well-drained soil, ap-ply water to the root ball every day during the first few weeks after planting. At this stage, all of the tree’s roots are still located in the root ball. How-ever, you may wet surrounding soil if it’s dry.

Selecting, Planting, and Managing Woody Ornamental Plants in the Landscape ◆ 309
Problems may arise if newly planted trees are ir-rigated by systems designed to water turfgrass, flower beds, or established plants. In well-drained soils, such systems cannot supply enough water to the new trees without overwatering everything else and wast-ing water. These trees should be watered by hand or with a temporary micro-irrigation system designed specifically for them. “Drip irrigation bags” offer an-
other watering option. Once trees are established, the temporary system can be removed and they can be watered with an irrigation system designed and calibrated to satisfy their needs.
In poorly drained sites, trees planted in or near regularly irrigated turf are especially susceptible to overwatering. Irrigation water and rainfall run over the soil surface and collect in the looser soil of the planting hole, drowning the tree’s roots. For this reason, trees are best located in their own specially irrigated beds. If this is not possible, adjust the turf irrigation system so that the root balls of the newly planted trees do not become saturated. This solu-tion may, however, result in underwatered turf. A third and highly recommended solution is to plant trees slightly higher than surrounding soil. This keeps the top portion of the root ball out of the standing water in the planting hole.
In poorly drained soil a set irrigation schedule may be impractical. Instead, monitor the site for changes in moisture levels caused by rainfall or, pos-sibly, runoff from adjacent irrigation. Essentially, the root balls of newly planted trees must not be allowed to dry out, nor must they be saturated. It is easy to kill trees that have been planted into poorly drained sites.
The best way to determine how much irrigation to apply to container-grown trees and shrubs in the first several weeks after planting into well-drained soil is to ask the nursery operator how much was applied in the nursery just prior to purchase. Ap-ply this amount or slightly more directly to the root ball. There is no need to wet the surrounding soil at this time because it will be wetted by water draining from the container root ball and by rainfall. Con-tainer-grown trees and shrubs planted into poorly drained soil may need a smaller volume of irrigation than they received in the nursery.
As a rule-of-thumb for field-grown trees, 11/2 to 3 gallons of water per inch of trunk diameter applied each time the tree is irrigated during the growing season should be enough to maintain adequate root growth. For example, a tree with a two-inch trunk diameter needs about 3 to 6 gallons each time it is irrigated. Trees planted during the cooler months may need less water, depending on the weather and soil drainage. Those planted in compacted or poorly drained soil with a portion of the root ball above the surrounding soil may need more water because of the drying effect of the mounded planting.
To determine whether the amount of water
A high quality tree that receives adequate irrigation during establishment (A) develops good structure, while trees that are insufficiently watered (B) die-back (as indicated by dotted lines) and can develop multiple trunks or other types of poor form.
A
B
2 years later
2 years later
5 years later
5 years later
A qualitytree is planted.
Most twigs remain alive during and shortly after its establish-ment period.
A tree develops with a well-
defined central trunk.
Main trunk and branches
die-back.
If drought doesn’t kill tree, new growth
emerges from remaining branches.
Tree has poor form and is
smaller than an irrigated tree.
Adequate irrigation during establishment affects a tree’s health, architecture, and longevity.
Figure 12.10
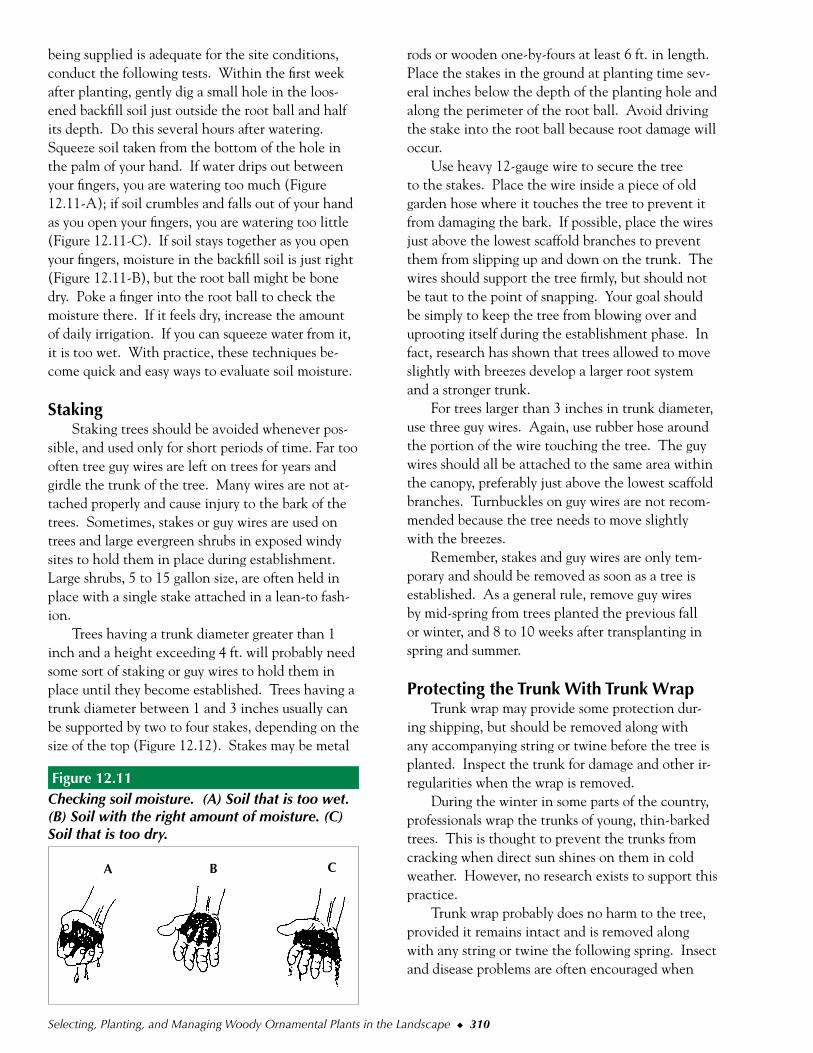
Selecting, Planting, and Managing Woody Ornamental Plants in the Landscape ◆ 310
being supplied is adequate for the site conditions, conduct the following tests. Within the first week after planting, gently dig a small hole in the loos-ened backfill soil just outside the root ball and half its depth. Do this several hours after watering. Squeeze soil taken from the bottom of the hole in the palm of your hand. If water drips out between your fingers, you are watering too much (Figure 12.11-A); if soil crumbles and falls out of your hand as you open your fingers, you are watering too little (Figure 12.11-C). If soil stays together as you open your fingers, moisture in the backfill soil is just right (Figure 12.11-B), but the root ball might be bone dry. Poke a finger into the root ball to check the moisture there. If it feels dry, increase the amount of daily irrigation. If you can squeeze water from it, it is too wet. With practice, these techniques be-come quick and easy ways to evaluate soil moisture.
StakingStaking trees should be avoided whenever pos-
sible, and used only for short periods of time. Far too often tree guy wires are left on trees for years and girdle the trunk of the tree. Many wires are not at-tached properly and cause injury to the bark of the trees. Sometimes, stakes or guy wires are used on trees and large evergreen shrubs in exposed windy sites to hold them in place during establishment. Large shrubs, 5 to 15 gallon size, are often held in place with a single stake attached in a lean-to fash-ion.
Trees having a trunk diameter greater than 1 inch and a height exceeding 4 ft. will probably need some sort of staking or guy wires to hold them in place until they become established. Trees having a trunk diameter between 1 and 3 inches usually can be supported by two to four stakes, depending on the size of the top (Figure 12.12). Stakes may be metal
rods or wooden one-by-fours at least 6 ft. in length. Place the stakes in the ground at planting time sev-eral inches below the depth of the planting hole and along the perimeter of the root ball. Avoid driving the stake into the root ball because root damage will occur.
Use heavy 12-gauge wire to secure the tree to the stakes. Place the wire inside a piece of old garden hose where it touches the tree to prevent it from damaging the bark. If possible, place the wires just above the lowest scaffold branches to prevent them from slipping up and down on the trunk. The wires should support the tree firmly, but should not be taut to the point of snapping. Your goal should be simply to keep the tree from blowing over and uprooting itself during the establishment phase. In fact, research has shown that trees allowed to move slightly with breezes develop a larger root system and a stronger trunk.
For trees larger than 3 inches in trunk diameter, use three guy wires. Again, use rubber hose around the portion of the wire touching the tree. The guy wires should all be attached to the same area within the canopy, preferably just above the lowest scaffold branches. Turnbuckles on guy wires are not recom-mended because the tree needs to move slightly with the breezes.
Remember, stakes and guy wires are only tem-porary and should be removed as soon as a tree is established. As a general rule, remove guy wires by mid-spring from trees planted the previous fall or winter, and 8 to 10 weeks after transplanting in spring and summer.
Protecting the Trunk With Trunk WrapTrunk wrap may provide some protection dur-
ing shipping, but should be removed along with any accompanying string or twine before the tree is planted. Inspect the trunk for damage and other ir-regularities when the wrap is removed.
During the winter in some parts of the country, professionals wrap the trunks of young, thin-barked trees. This is thought to prevent the trunks from cracking when direct sun shines on them in cold weather. However, no research exists to support this practice.
Trunk wrap probably does no harm to the tree, provided it remains intact and is removed along with any string or twine the following spring. Insect and disease problems are often encouraged when
A B C
Checking soil moisture. (A) Soil that is too wet. (B) Soil with the right amount of moisture. (C) Soil that is too dry.
Figure 12.11
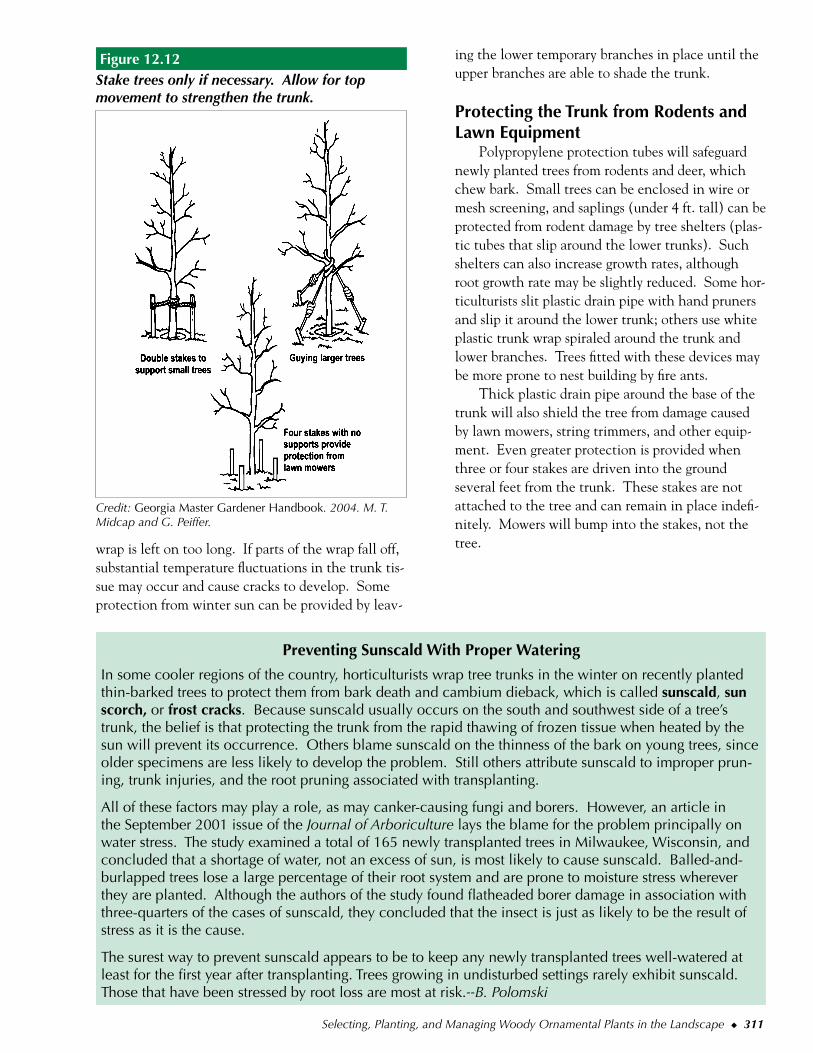
Selecting, Planting, and Managing Woody Ornamental Plants in the Landscape ◆ 311
wrap is left on too long. If parts of the wrap fall off, substantial temperature fluctuations in the trunk tis-sue may occur and cause cracks to develop. Some protection from winter sun can be provided by leav-
ing the lower temporary branches in place until the upper branches are able to shade the trunk.
Protecting the Trunk from Rodents and Lawn Equipment
Polypropylene protection tubes will safeguard newly planted trees from rodents and deer, which chew bark. Small trees can be enclosed in wire or mesh screening, and saplings (under 4 ft. tall) can be protected from rodent damage by tree shelters (plas-tic tubes that slip around the lower trunks). Such shelters can also increase growth rates, although root growth rate may be slightly reduced. Some hor-ticulturists slit plastic drain pipe with hand pruners and slip it around the lower trunk; others use white plastic trunk wrap spiraled around the trunk and lower branches. Trees fitted with these devices may be more prone to nest building by fire ants.
Thick plastic drain pipe around the base of the trunk will also shield the tree from damage caused by lawn mowers, string trimmers, and other equip-ment. Even greater protection is provided when three or four stakes are driven into the ground several feet from the trunk. These stakes are not attached to the tree and can remain in place indefi-nitely. Mowers will bump into the stakes, not the tree.
Stake trees only if necessary. Allow for top movement to strengthen the trunk.
Figure 12.12
Credit: Georgia Master Gardener Handbook. 2004. M. T. Midcap and G. Peiffer.
Preventing Sunscald With Proper Watering
In some cooler regions of the country, horticulturists wrap tree trunks in the winter on recently planted thin-barked trees to protect them from bark death and cambium dieback, which is called sunscald, sun scorch, or frost cracks. Because sunscald usually occurs on the south and southwest side of a tree’s trunk, the belief is that protecting the trunk from the rapid thawing of frozen tissue when heated by the sun will prevent its occurrence. Others blame sunscald on the thinness of the bark on young trees, since older specimens are less likely to develop the problem. Still others attribute sunscald to improper prun-ing, trunk injuries, and the root pruning associated with transplanting.
All of these factors may play a role, as may canker-causing fungi and borers. However, an article in the September 2001 issue of the Journal of Arboriculture lays the blame for the problem principally on water stress. The study examined a total of 165 newly transplanted trees in Milwaukee, Wisconsin, and concluded that a shortage of water, not an excess of sun, is most likely to cause sunscald. Balled-and-burlapped trees lose a large percentage of their root system and are prone to moisture stress wherever they are planted. Although the authors of the study found flatheaded borer damage in association with three-quarters of the cases of sunscald, they concluded that the insect is just as likely to be the result of stress as it is the cause.
The surest way to prevent sunscald appears to be to keep any newly transplanted trees well-watered at least for the first year after transplanting. Trees growing in undisturbed settings rarely exhibit sunscald. Those that have been stressed by root loss are most at risk.--B. Polomski

Selecting, Planting, and Managing Woody Ornamental Plants in the Landscape ◆ 312
MulchingBefore applying mulch, remove any soil that
may have been placed over the root ball. Excess soil over the root ball prevents water from reaching the roots and can cause a tree to die from drought, even when surrounding soil is moist.
Apply mulch 2 to 3 inches deep in a circle at least 2 ft. in diameter for each inch of trunk diam-eter. Ideally, mulch up to the dripline or outermost branches. Increase the size of the circle of mulch as the tree grows until the tree is fully established. This technique will help a tree establish quickly by reducing competition from other plants, especially turfgrass. A mulched soil also encourages root growth in and under the mulch. Keep mulch 3 to 6 inches away from tree trunks to prevent moisture from initiating bark decay and to discourage rodents.
FertilizingResults from the soil samples collected during
your site analysis will indicate if any elements are lacking in the soil. Adding potassium and phospho-rus to the soil will not give a growth response unless the soil is deficient. Nitrogen is the only element that occasionally gives a slight growth benefit on trees. Although a number of products are sold as transplant aids, there is no scientific evidence that either natural or synthetic fertilizers, gels, vitamins, powders or emulsions help trees become established. Proper watering is the best promoter of growth and establishment.
Research indicates that field-grown trees trans-planted to the landscape receive little or no benefit from fertilizing at the time of planting. Healthy field-grown trees are well-fertilized at the nursery and will need no further applications for 4 to 6 weeks after transplanting. Concentrate resources on correct irrigation management. However, if you will be unable to fertilize 4 to 6 weeks after planting, mix a light application of a controlled slow-release fertil-izer into the backfill soil when planting. Follow the manufacturer’s instructions regarding the amount to use.
There is little research on the effects of fertilizing container-grown trees and shrubs at planting. How-ever, much work has underscored the importance of irrigation during their establishment period.
If not applied at planting, give trees a small application of a slow-release fertilizer about 4 to 6 weeks after planting. Broadcast the fertilizer over the surface of the root ball and backfilled area. Use
the amount recommended by the manufacturer.
Pruning During and After EstablishmentWhile pruning at the time of planting appears
to have little, if any, positive impact on post-trans-plant survival and growth, many trees that mature at heights greater than 40 ft. will need regular prun-ing in the first 25 years after planting in order to establish or maintain good structure. If a tree pos-sesses good structure at the time of planting, pruning should not be required for several years after plant-ing. Trees with minor structural problems such as a double leader in the top half can be pruned during the second year of growth to correct the problem. Remove no more than 25% of live tissue each grow-ing season. If poor quality trees were planted, the costs of pruning to develop good structure during the establishment period may outstrip the cost of purchasing and planting good quality trees.
Pruning care in the first 25 years after planting is so important that if you cannot arrange for such care, consider planting fewer trees and using the savings on caring for them. Another option is to plant trees whose natural structures and growth hab-its require less regular pruning.
Landscape Management Practices Fertilizing
Adding minerals to shrubs and trees, otherwise known as fertilizing, is a practice that requires a pur-pose. It may be to help newly planted shrubs estab-lish quickly in the landscape or to help established trees recover from drought. Fertilizing is also prac-ticed to meet the nutritional demands of the plant.
Plants growing in favorable soil conditions may require little or no fertilizer, while certain plants growing in poor, infertile soil with little or no or-ganic matter may need to be fertilized periodically to maintain growth. Keep two points in mind: (1) fertilizing is beneficial when it is needed; and (2) use fertilizer in the right amount, at the right time, and in the right place. Fertilizer should not be considered a cure for ailing plants when unadapted or unhealthy plants are chosen, carelessly planted, or improperly watered. Adding too much fertilizer produces excessive growth in plants. This growth is weak, breaks easily, and is more susceptible to injury from cold, drought, and pests. Sometimes pests are

Selecting, Planting, and Managing Woody Ornamental Plants in the Landscape ◆ 313
encouraged by fertilization or their resistance can be decreased (see the box below). Excessive rates of fertilizer that are not absorbed by the plant may contaminate groundwater and surface water.
Establish a Need for FertilizingConsider the following conditions to help you
decide if you should fertilize your trees and shrubs:Soil Test. Test your soil. Depending on the re-
sults, you may need to add nutrients to make up for any deficiencies in the soil.
Growth. Look at shrubs and trees for signs of poor growth: poorly colored leaves (pale green to yellow); leaf size smaller than normal; earlier than normal fall coloring and leaf drop; little annual twig growth; or twig or branch dieback. These symptoms of poor growth are not always related to low lev-els of nutrients in the soil, nor should you assume that fertilizers would cure these problems. Heavily compacted soil; stresses induced by insects, diseases and weeds; or adverse weather conditions can cause these symptoms. Before fertilizing, determine the cause of the problem and correct it.
Planting Age. Fertilizer applications in the ear-ly years of established, transplanted trees and shrubs can speed up top-growth and help young trees fill their allotted space in the landscape. Slow-release fertilizers are well-suited for recently planted trees and shrubs.
Location. If shrubs or trees are growing in a lawn that is regularly fertilized, there is no need to fertilize them separately. The roots of trees and shrubs will absorb some of the fertilizer applied to the lawn. However, trees and shrubs growing in planting beds may need to be fertilized, especially on sandy soils with little or no organic matter.
Timing of Fertilizer Applications
For shrubs and trees growing in fertilized lawns, apply the fertilizer at the appropriate time and rate for the turfgrass. For woody landscape plants not growing in fertilized lawn areas, time the application when their roots can readily absorb the nutrients. Although nutrient uptake occurs between bud-break in the spring and when the leaves change color in autumn, efficient absorption coincides with intense root growth: when soil temperatures are between 68 and 84 oF and adequate moisture is available. Ideal fertilizer application times are late spring-early sum-mer after new shoot growth has ceased and from late summer to fall when shoot growth has ceased but roots are actively growing. This fall application is very important because research indicates that early spring growth depends almost exclusively on nutrients that were absorbed and stored the previous year. Split applications of fertilizer, where half of the total annual amount is applied during one sea-son and the other half in the other season is recom-mended, especially on sandy soils. Always be sure that adequate moisture (supplied by either rainfall or irrigation) is available for the fertilizer to dissolve in soil solution and be taken up by the roots. Avoid fertilizing trees and shrubs stressed by drought dur-ing the summer months. If water is unavailable, do not fertilize at all because plants will be unable to absorb the nutrients.
Commonly Applied NutrientsThe most commonly applied minerals are nitro-
gen, phosphorus, and potassium. Responses to all three elements were fairly widespread in the past, and it became customary to apply them together. Because of habit, all three are still applied even though there are now many situations where plants do not respond to phosphorus and potassium fertil-ization. Follow the soil test results to apply only the
necessary minerals.Other plant-essential nutri-
ents used in fairly large quantities are calcium, magnesium, and sul-fur. It is usually unnecessary to ap-ply magnesium and sulfur because they are generally sufficient in South Carolina soils. Also, large quantities of calcium and magne-sium are supplied when acidic soil is limed with dolomitic limestone. Sulfur is usually present in suf-ficient quantities from the slow
Pests promoted or plant resistance decreased by fertilization
Spider mites DiseasesInsects pine pitch canker aphids fire blight adelgids Abiotic psyllids herbicides scale whiteflies lacebug some caterpillars --Thomas Smiley, Ph.D., arboricultural researcher at the Bartlett Tree Re-search Laboratories and adjunct professor at Clemson University.

Selecting, Planting, and Managing Woody Ornamental Plants in the Landscape ◆ 314
decomposition of soil organic matter, an important reason for recycling grass clippings and leaves.
Micronutrients such as zinc or iron are added to many fertilizers. If your shrub or tree has a micronu-trient deficiency, either apply the recommended rate of the deficient nutrient or use a fertilizer containing the micronutrient that is deficient in the soil. Re-cycling organic matter by leaving grass clippings on the lawn and by mulching with tree leaves is an ex-cellent way of providing micro- and macronutrients to growing plants.
Fertilizer TypeA complete fertilizer with a ratio of about 3:1:2
or 3:1:3, such as 16-4-8, 12-6-6 or 12-4-8, is gener-ally recommended, unless the soil test reveals that phosphorus and potassium are adequate.
Two kinds of fertilizers are available: fast-release and slow-release. Fast-release or water-soluble fertilizers are less expensive than slow-release products, which release nitrogen over an extended period; however, the nutrients in a fast-release fertil-izer may leach quickly through the soil. In sandy, well-drained soils, the soluble fertilizer may move past the root system after only a few inches of rain-fall or irrigation. In fine-textured clay soils, leaching will be slower, but runoff may be greater.
Slow- or controlled-release fertilizers have extended release periods compared to fast-release fertilizers whose nitrogen is water-soluble and read-ily available to the plants. The nitrogen in slow-release fertilizers may be sulfur-coated or a form such as IBDU or urea-formaldehyde. One-half or more of the total amount of nitrogen in controlled-release fertilizers should be “water insoluble” or slow-release nitrogen. For newly planted shrubs and trees, or in areas where the potential for runoff is very high, such as slopes or compacted soil, slow-release fer-tilizers are a good choice. Since the nutrients are released slowly, the potential for fertilizer damage (“burning”) and water contamination is less.
Natural fertilizers, such as composted sewage sludge, cow manure or complete fertilizer blends, provide nitrogen and other nutrients slowly. An ad-vantage of these natural “nutrient suppliers” is that they provide minor nutrients, such as iron or zinc, that are not usually found in synthetic fertilizers. Natural fertilizers also improve soil structure.
A disadvantage of natural fertilizers is that usu-ally the concentration of nitrogen, phosphorus and potassium are low. Therefore, a greater amount of a
natural fertilizer must be applied to provide the same amount of nutrients that can be obtained with a lesser quantity from a synthetic nutrient source.
Many fertilizers are formulated for use on lawn grasses. Some, known as “weed-and-feed” fertilizers, may contain a herbicide that can damage ground covers, vines, shrubs and trees. Read the labels and carefully follow the directions.
Fertilizer AmountSimilar to lawn fertilizer applications, the rec-
ommended rates for fertilizing woody plants are based on actual pounds of nitrogen. Shrubs and trees can receive 2 to 4 lbs. of actual nitrogen per 1,000 sq. ft. of root zone area per year. Generally, younger shrubs and trees should receive higher rates of nitro-gen than mature plants.
Depending on the formulation, applications exceeding 2 lbs. of actual nitrogen can overstimu-late or burn the turf. If trees or shrubs growing in fertilized lawns show nutrient-deficiency symptoms indicating a need for additional fertilizer, space the fertilizer applications a few months apart, not ex-ceeding the total yearly amount of nitrogen required by your lawn grass (follow the rate and timing for the lawn grass).
Fertilizer PlacementUse a drop-type or cyclone spreader to apply
the fertilizer to the root zone area of the shrub or tree over the mulched and unmulched area. The root zone area is roughly a circular area with the tree in the center (Figure 12.13). The roots occupy this area, which extends beyond the drip line or outermost branches, about 1 1/2 times the area of the crown spread. For example, if you measure the dis-tance from the trunk of a tree to the drip line, which is called the crown radius, and it measures 8 ft., the “feeder” or mineral-absorbing roots can extend an additional 4 ft. beyond the drip line. So, the root zone area can occupy an area up to 12 ft. away from the trunk, which is the area that needs to be fertil-ized.
Tree cultivars that have a narrow canopy, such as Fastigiate English oak (Quercus robur ‘Fastigiata’) or columnar Japanese pagoda tree (Styphnolobium japonicum ‘Columnaris’ syn. Sophora japonica ), trees with small canopies, or trees that were pruned into unusual shapes, have a root zone area that can be much more than the drip line. In these cases, make your fertilizer calculation based on the trunk

Selecting, Planting, and Managing Woody Ornamental Plants in the Landscape ◆ 315
diameter. Measure the diameter in inches at 4.5 ft. above the soil level (diameter at breast height [dbh]) and multiply it by either 1 or 1.5 to get a number expressed in feet. This number will be used as the radius measurement for the fertilization area. For example, the radius of the fertilization area of a 12 inch diameter tree would be 12 to 18 ft., depending on the multiplication factor that was used. To cal-culate root zone spread, see the box on p. 316.
When fertilizing individual shrubs, follow the directions given above for trees to determine their root zone area. When several shrubs or ground covers are grouped together in a bed or natural area, simply measure the area of the entire bed to determine the amount of fertilizer that needs to be applied.
Refer to the fertilizer label to determine the appropriate setting to apply the actual amount of nitrogen you want to apply. If your fertilizer spreader is not listed on the label, you will have to calibrate your lawn spreader to ensure that you’re going to apply an accurate amount (see p. 478). Adding too much fertilizer which can harm the plant and the environment. Excessive fertilizer produces rank, weak growth that breaks easily and is susceptible to injury from cold, drought and pests. Also, fertilizer not absorbed by the plant roots may con-taminate groundwater and surface water.
To obtain the best coverage, split the total amount of fertilizer to be applied in half. Apply one-half of the total amount in one direction and the other half in a direction perpendicular to the first for excellent coverage. When fertilizing over the top of shrubs and groundcovers, make certain the leaves are dry and use a leaf rake or broom to brush fertilizer off the leaves and onto the ground after ap-plication.
Although broadcasting fertilizer is the cheapest and most effective method of directly fertilizing shrubs and trees, there are other techniques. A liquid or dissolved dry formulation of fertilizer can also be applied in the irrigation water. This practice called fertigation applies nutrients to the upper soil surface. Use care to get even coverage and the proper dilution rate.
Fertilizer can also be applied by in-
jection below the soil surface under high pressure. This can be done by commercial arborists. Effective results with subsurface injection can be achieved if the fertilizer is injected 4 to 8 inches in depth where most of the fibrous feeding roots are located. This method aerates at the same time that fertilizing is taking place.
Another kind of subsurface application is to drill 2 inch diameter holes in the ground to a depth of 4 to 12 inches (preferably 4 to 8 inches) and pour fertilizer in each hole with a gap of at least 2 inches between the top of the fertilizer and the soil surface To get effective results, you should develop a grid pattern of holes spaced 1 to 3 ft. apart to get good distribution (Figure 12.14). One drawback to this method is the potential for overstimulating or burn-ing turfgrass near the hole with high concentrations of fertilizer.
Fertilizer spikes are a form of below-ground fertilization favored by some homeowners. These spikes are composed of fertilizer that is compressed and molded into stakes or spikes that can then be
Apply fertilizer to the surface of mulched and unmulched areas extending out from the tree’s trunk no more than 11/2 to 2 times the radius of the crown.
Figure 12.13
Selecting, Planting, and Managing Woody Ornamental Plants in the Landscape ◆ 316
hammered into the ground. These are convenient to use but expensive because of the manufacturing process. When using this method, you should follow a basic grid pattern to ensure good coverage of roots contacting the fertilizer.
When soil applications of fertilizer are impracti-cal or ineffective in meeting fertilization objectives, foliar applications, trunk injections or implants can be considered. Foliar application--the application of a liquid fertilizer to the leaves of shrubs and trees--is commonly used to correct micronutrient defi-ciencies, such as iron chlorosis in azaleas (youngest leaves are yellow [chlorotic] with green veins). Ap-plying fertilizer to the leaves will not cure the real reason for the micronutrient deficiency that may be the result of an improper soil pH or an impaired root system. To find the underlying problem, have the soil tested and examine the results.
Fertilizer can also be injected or implanted into trees by drilling holes in the roots or trunks and either injecting a liquid or placing a solid capsule in the application hole. Just like foliar fertilization, this is only a temporary solution to the problem. It’s
usually performed on trees with micronutrient defi-ciencies that do not respond to soil applications of fertilizer. The merits of injection should be judged by a professional tree specialist. Remember that trees are permanently damaged by trunk injections, so the potential benefits must outweigh this damage. As with all trunk injections, the lower on the trunk or root flare that applications are made, the better the distribution in the tree. Therefore, injections made into buttress roots are preferred over trunk ap-plications.
PruningLandscape plants are pruned for many reasons.
Some plants are pruned routinely to maintain a desired size or shape. Others are pruned to pro-mote healthy vigorous growth, flowering, or fruit-ing. Sometimes it is necessary to prune shrubs that overgrow their sites, crowd other plants, or limit the view from windows. Plants damaged by insects, diseases, or freezing injury may require corrective pruning.
Follow these steps to determine the amount of fertilizer needed to supply 2 pounds of nitrogen per 1,000 square feet of root zone area:
1. Calculate the root zone area of the tree (assume a roughly circular shape) using this formula (Equation 1): Root zone area = π x (radius)2 or 3.14 (root zone radius) x (root zone radius); π = Pi = 3.14 For example, if a tree has a radius of 12 ft., using Eq. 1 (3.14 x 12 ft. x 12 ft.) we determined that the root zone
area is 452 sq. ft.
2. To calculate the amount of fertilizer required per 1,000 sq. ft., use the following equation (2): Desired lbs. N per 1,000 sq. ft. x 100 = Number of pounds of fertilizer required per 1,000 sq. ft. to
%N in bag apply the desired amount of actual nitrogen. Assuming you have a 16-4-8 fertilizer, the equation for this example would look like this: 2 lbs. N x 100 = 12.5 lbs. of 16-4-8 required per 1,000 sq. ft 16
3. Calculate the actual amount of fertilizer to apply using the following equation (3): Root zone area (sq. ft.) x lbs. fertilizer per 1,000 sq. ft. = Amount of fertilizer to apply over the 1,000 sq. ft. root zone area
In our example, we need to calculate the amount of 16-4-8 fertilizer required to apply 2 lbs. of actual nitro-gen over 452 sq. ft. of root zone area:
452 sq, ft. x 12.5 lbs. fertilizer per 1,000 sq. ft. = 5.65 lbs. applied over the root spread area. 1,000 sq. ft. Therefore, to apply 2 lbs. of actual nitrogen to the root spread area of this tree, you will need 5.65 pounds
(about 11 to 12 cups; 2 cups is equivalent to 1 pound) of 16-4-8 fertilizer. If the tree’s root zone area is confined by a sidewalk or driveway, reduce the root zone area accordingly.
[Eq. 2]
[Eq. 1]
[Eq. 3]
How Much Fertilizer Do I Need to Apply?
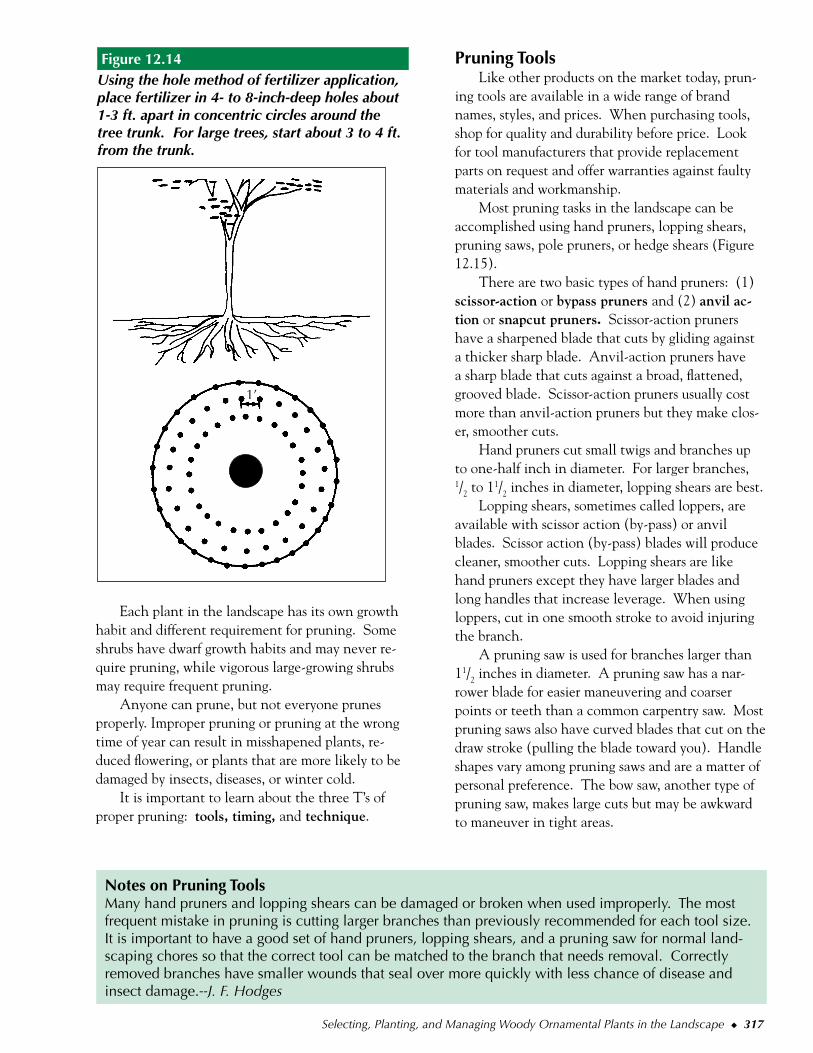
Selecting, Planting, and Managing Woody Ornamental Plants in the Landscape ◆ 317
Each plant in the landscape has its own growth habit and different requirement for pruning. Some shrubs have dwarf growth habits and may never re-quire pruning, while vigorous large-growing shrubs may require frequent pruning.
Anyone can prune, but not everyone prunes properly. Improper pruning or pruning at the wrong time of year can result in misshapened plants, re-duced flowering, or plants that are more likely to be damaged by insects, diseases, or winter cold.
It is important to learn about the three T’s of proper pruning: tools, timing, and technique.
Pruning ToolsLike other products on the market today, prun-
ing tools are available in a wide range of brand names, styles, and prices. When purchasing tools, shop for quality and durability before price. Look for tool manufacturers that provide replacement parts on request and offer warranties against faulty materials and workmanship.
Most pruning tasks in the landscape can be accomplished using hand pruners, lopping shears, pruning saws, pole pruners, or hedge shears (Figure 12.15).
There are two basic types of hand pruners: (1) scissor-action or bypass pruners and (2) anvil ac-tion or snapcut pruners. Scissor-action pruners have a sharpened blade that cuts by gliding against a thicker sharp blade. Anvil-action pruners have a sharp blade that cuts against a broad, flattened, grooved blade. Scissor-action pruners usually cost more than anvil-action pruners but they make clos-er, smoother cuts.
Hand pruners cut small twigs and branches up to one-half inch in diameter. For larger branches,
1/2 to 11/2 inches in diameter, lopping shears are best.Lopping shears, sometimes called loppers, are
available with scissor action (by-pass) or anvil blades. Scissor action (by-pass) blades will produce cleaner, smoother cuts. Lopping shears are like hand pruners except they have larger blades and long handles that increase leverage. When using loppers, cut in one smooth stroke to avoid injuring the branch.
A pruning saw is used for branches larger than 11/2 inches in diameter. A pruning saw has a nar-rower blade for easier maneuvering and coarser points or teeth than a common carpentry saw. Most pruning saws also have curved blades that cut on the draw stroke (pulling the blade toward you). Handle shapes vary among pruning saws and are a matter of personal preference. The bow saw, another type of pruning saw, makes large cuts but may be awkward to maneuver in tight areas.
1’
Using the hole method of fertilizer application, place fertilizer in 4- to 8-inch-deep holes about 1-3 ft. apart in concentric circles around the tree trunk. For large trees, start about 3 to 4 ft. from the trunk.
Figure 12.14
Notes on Pruning ToolsMany hand pruners and lopping shears can be damaged or broken when used improperly. The most frequent mistake in pruning is cutting larger branches than previously recommended for each tool size. It is important to have a good set of hand pruners, lopping shears, and a pruning saw for normal land-scaping chores so that the correct tool can be matched to the branch that needs removal. Correctly removed branches have smaller wounds that seal over more quickly with less chance of disease and insect damage.--J. F. Hodges

Selecting, Planting, and Managing Woody Ornamental Plants in the Landscape ◆ 318
Pole pruners remove branches from trees that cannot be reached from the ground. Most pole pruners have both a cutting blade and a saw. The cutting blade is operated from the ground by a long rope or lanyard that is pulled downward. The pole can be made from aluminum, fiberglass, or plastic. Some poles fit together in three 6-ft.-long sections, while newer models have a telescoping type of ex-tension. Because of the risk of electrocution, avoid using aluminum handled pole pruners near power lines.
Use hedge shears (manual, gasoline-powered, or electric) to shear or clip hedges or other plants when you want a neatly trimmed appearance. Do not attempt to cut large branches with hedge shears.
If you cut into diseased canes, disinfect your
pruning shears with Lysol®, which is less corrosive than the traditional mixture of water and household bleach (sodium hypochlorite; 4 parts water to 1 part bleach). This will prevent diseases from spreading to other canes.
To keep all pruning tools in good shape, sharpen and oil their blades at the end of each heavy use, or, if used lightly, at the end of each season. Dull blades cre-ate jagged cuts which take longer to heal than clean smooth cuts. When sharpening loppers, hedge shears, and scissor-action hand shears, sharpen only the outside surfaces of the blades so the in-side surfaces remain flat and slide smoothly against one another. It is best to have pruning saws sharpened by a professional. Oil blades by wiping them with a cloth saturated in household oil, and treat wooden handles with linseed oil.
Pruning TimeBecause flowering ornamen-
tals form their flower buds at different times of year, pruning times must be adjusted accord-ingly. Many spring-flowering plants such as azalea, dogwood,
forsythia, redbud, and rhododendron set flower buds in the fall, so pruning during the fall and winter months eliminates or decreases their spring flower display. Plants that typically flower during the summer form flower buds on new growth and can be pruned during the winter with no effect on their flowering. Examples of this type of plant are crapemyrtle, hibiscus, and abelia.
As a general rule, plants that flower before June 1 should be pruned after they bloom while those that flower after June 1 are considered summer-flow-ering and can be pruned just prior to spring growth. One exception to this rule is the oakleaf hydrangea, a summer-flowering shrub that forms flower buds the previous season. Late-flowering azalea cultivars that bloom during June or even July are another excep-tion. Prune both the oakleaf hydrangea and the
Bow saw
Pruning saw with D-grip
Pruning saw with crescent grip
Hedge shears
Lopping shears
Combination pole saw-pruner
Folding saw
Saw
Pruner
Bypass or scissor-action pruners
Anvil or snap cut pruners
Select the appropriate tool for the right pruning task. Figure 12.15
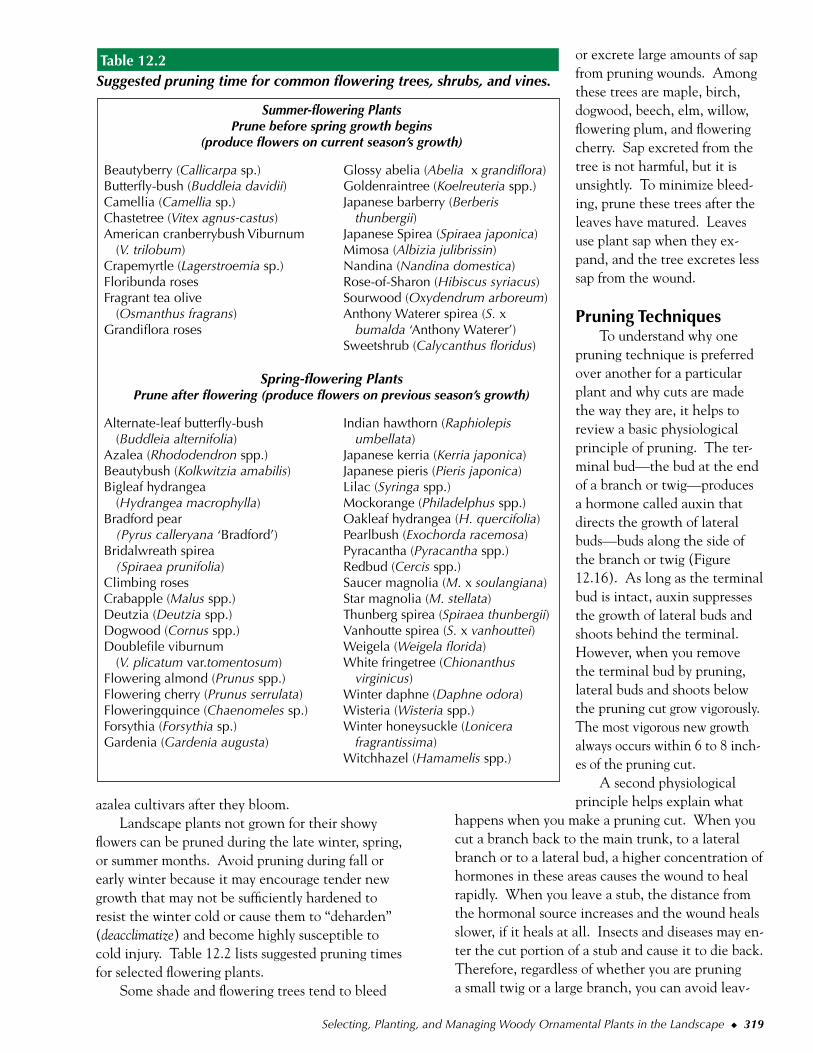
Selecting, Planting, and Managing Woody Ornamental Plants in the Landscape ◆ 319
azalea cultivars after they bloom.Landscape plants not grown for their showy
flowers can be pruned during the late winter, spring, or summer months. Avoid pruning during fall or early winter because it may encourage tender new growth that may not be sufficiently hardened to resist the winter cold or cause them to “deharden” (deacclimatize) and become highly susceptible to cold injury. Table 12.2 lists suggested pruning times for selected flowering plants.
Some shade and flowering trees tend to bleed
or excrete large amounts of sap from pruning wounds. Among these trees are maple, birch, dogwood, beech, elm, willow, flowering plum, and flowering cherry. Sap excreted from the tree is not harmful, but it is unsightly. To minimize bleed-ing, prune these trees after the leaves have matured. Leaves use plant sap when they ex-pand, and the tree excretes less sap from the wound.
Pruning TechniquesTo understand why one
pruning technique is preferred over another for a particular plant and why cuts are made the way they are, it helps to review a basic physiological principle of pruning. The ter-minal bud—the bud at the end of a branch or twig—produces a hormone called auxin that directs the growth of lateral buds—buds along the side of the branch or twig (Figure 12.16). As long as the terminal bud is intact, auxin suppresses the growth of lateral buds and shoots behind the terminal. However, when you remove the terminal bud by pruning, lateral buds and shoots below the pruning cut grow vigorously. The most vigorous new growth always occurs within 6 to 8 inch-es of the pruning cut.
A second physiological principle helps explain what
happens when you make a pruning cut. When you cut a branch back to the main trunk, to a lateral branch or to a lateral bud, a higher concentration of hormones in these areas causes the wound to heal rapidly. When you leave a stub, the distance from the hormonal source increases and the wound heals slower, if it heals at all. Insects and diseases may en-ter the cut portion of a stub and cause it to die back. Therefore, regardless of whether you are pruning a small twig or a large branch, you can avoid leav-
Summer-flowering PlantsPrune before spring growth begins
(produce flowers on current season’s growth)
Beautyberry (Callicarpa sp.) Glossy abelia (Abelia x grandiflora)Butterfly-bush (Buddleia davidii) Goldenraintree (Koelreuteria spp.)Camellia (Camellia sp.) Japanese barberry (Berberis Chastetree (Vitex agnus-castus) thunbergii)American cranberrybush Viburnum Japanese Spirea (Spiraea japonica) (V. trilobum) Mimosa (Albizia julibrissin)Crapemyrtle (Lagerstroemia sp.) Nandina (Nandina domestica) Floribunda roses Rose-of-Sharon (Hibiscus syriacus)Fragrant tea olive Sourwood (Oxydendrum arboreum) (Osmanthus fragrans) Anthony Waterer spirea (S. x Grandiflora roses bumalda ‘Anthony Waterer’) Sweetshrub (Calycanthus floridus)
Spring-flowering PlantsPrune after flowering (produce flowers on previous season’s growth)
Alternate-leaf butterfly-bush Indian hawthorn (Raphiolepis (Buddleia alternifolia) umbellata) Azalea (Rhododendron spp.) Japanese kerria (Kerria japonica)Beautybush (Kolkwitzia amabilis) Japanese pieris (Pieris japonica)Bigleaf hydrangea Lilac (Syringa spp.) (Hydrangea macrophylla) Mockorange (Philadelphus spp.) Bradford pear Oakleaf hydrangea (H. quercifolia) (Pyrus calleryana ‘Bradford’) Pearlbush (Exochorda racemosa)Bridalwreath spirea Pyracantha (Pyracantha spp.) (Spiraea prunifolia) Redbud (Cercis spp.)Climbing roses Saucer magnolia (M. x soulangiana) Crabapple (Malus spp.) Star magnolia (M. stellata) Deutzia (Deutzia spp.) Thunberg spirea (Spiraea thunbergii)Dogwood (Cornus spp.) Vanhoutte spirea (S. x vanhouttei) Doublefile viburnum Weigela (Weigela florida) (V. plicatum var.tomentosum) White fringetree (Chionanthus Flowering almond (Prunus spp.) virginicus) Flowering cherry (Prunus serrulata) Winter daphne (Daphne odora) Floweringquince (Chaenomeles sp.) Wisteria (Wisteria spp.) Forsythia (Forsythia sp.) Winter honeysuckle (Lonicera Gardenia (Gardenia augusta) fragrantissima) Witchhazel (Hamamelis spp.)
Suggested pruning time for common flowering trees, shrubs, and vines. Table 12.2

Selecting, Planting, and Managing Woody Ornamental Plants in the Landscape ◆ 320
ing a stub by always cutting back to a bud, a lateral branch, or the main trunk.
When you prune back to a bud, make the cut at a slight angle just above the bud (Figure 12.17). This allows moisture to flow readily off the wound. A hormonal stimulus from the nearby bud acceler-ates the healing process. However, avoid making the cut at a sharp angle because it will produce a larger wound.
Heading and Thinning CutsWhen shrubs are headed back or sheared rou-
tinely—indiscriminate cutting of the ends of twigs or young branches to a bud or node—a lot of dense, thick, new growth is produced near the outer por-tions of the canopy (Figure 12.18-A). As a result, less light reaches the interior portions of the plant, foliage within the canopy becomes sparse, and the plant appears twiggy and top-heavy. To avoid this problem, head back the shrub’s shoots to several dif-ferent heights. When heading back, make the cut on a slight slant 1/4 inch above a healthy bud (Figure 12.17). The bud should be facing the direction pre-
ferred for new growth.Heading back or stubbing trees is rarely warrant-
ed in landscape sites and often results in undesir-able multiple leaders or trunks. If it’s necessary, for instance, to prune beneath power lines or to clear a tree from interfering with a structure, always prune back to a fork where there is a live branch that is at least one-half the diameter of the limb being re-moved. This technique is called “drop-crotching” (Figure 12.19). Within several months, prune out all sprouts growing in response to the cut. Never “hat-rack” a landscape tree by cutting all of its branches back to an arbitrary length (Figure 12.20). This type of pruning has no place in horticulture.
Thinning (cutting selected branches back to a lateral branch or main trunk) is usually preferred over heading. Thinning encourages new growth within the interior portions of a shrub, reduces size, and provides a fuller, more attractive plant (Figure 12.18-B). Trees can be thinned to increase light penetration (Figure 12.21). First, remove dead, diseased, or dying shoots and branches that are rub-bing or crossing over one other. Removing upright branches creates a more spreading tree while remov-ing horizontal branches results in an upright form. If further thinning is desired, remove branches back to major limbs to create an open crown. This is a specialized technique best performed by a profes-sional arborist. Space remaining branches along the major limbs so that each one has room to develop. Trees with properly thinned crowns resist wind dam-age better than unpruned trees.
Pruning TreesBecome familiar with the characteristic form
of your tree before removing any live branches. In many landscapes, little or no attempt should be
When a terminal bud is removed, auxin flow downward is disrupted and lateral shoot growth occurs. Most of the new growth occurs within 6 to 8 inches of the pruning cut.
Apex(terminal bud)
Auxin, a plant hormone moves downward
Auxin inhibits lateral bud break
Bud scale scar
Auxin inhibits lateral shoot growth
Auxin increases crotch angles
Bud scale scar
Effect of pruning on apical dominance of stems. Figure 12.16
(A) Proper location and angle of pruning cut. (B) Too slanted. (C) Too far from the bud. (D) Too close to the bud.
Heading back to a bud. Figure 12.17

Selecting, Planting, and Managing Woody Ornamental Plants in the Landscape ◆ 321
made to significantly change these characteristic growth habits. Instead, prune in such a way as to enhance and encourage the natural shape of the tree. First remove dead, diseased, or broken twigs and branches. Now study the tree’s form and select the best spaced and positioned permanent branches, removing or shortening the others. To shorten, use thinning cuts. Permanent branches should be spaced 6 to 24 inches apart on the trunk, depending on the ultimate mature size of the tree. On smaller trees like dogwoods, a 6- inch spacing is adequate, whereas spaces of 18 to 24 inches are best for large maturing trees like oaks. Remove fast-growing suck-ers that sprout at the base of and along tree trunks or on large interior limbs.
To prune a young tree to a single leader (the stem that will become the trunk), locate the straightest and best leader to retain. In shaping the tree crown, remove lateral branches that are grow-ing upright. They will compete with the leader and form a weak, multi-leader tree. Most trees can be
grown with a single leader when they are young, but the growth habit of some species will change to a multiple leader spreading form at maturity. There should be no branches leaving the trunk at an acute angle or narrow forks either between branches or between a branch and the trunk. Branches that are less than two-thirds the diameter of the trunk are less likely to split off than larger branches.
When training a young tree, prune back those branches below the lowest permanent branch 8 to 12 inches from the trunk; these are temporary branch-es. Remove any lower branches that are larger than 1/4-inch in diameter. By keeping the smaller-diameter branches on the trunk, the tree will grow faster and develop a thicker trunk. The trunk will also be better protected from sunburn and vandalism or accidental damage. Removing the lower branches too soon will result in a poorer quality plant. When the tree trunk approaches 2 inches in diameter (measured 6 inch-es up from the ground), remove the temporary branches.
Once the framework (trunk and main branches) of the tree is estab-
(B) Thinning reduces the number of new shoots and increases light penetration.
Thinning
Heading
(A) Heading increases the number of new shootsand stiffens the branches.
Heading and thinning cuts produce different responses. Figure 12.18
Drop-crotching is the term for pruning back to a fork with a living branch that is at least one-half the diameter of the limb being removed. This branch will become the new leader.
New leader
--- Pruning cuts
Drop-crotching a large tree to reduce its height. Figure 12.19

Selecting, Planting, and Managing Woody Ornamental Plants in the Landscape ◆ 322
Now that people seem to be getting the word that topping trees is harmful, there is a new epidemic of pruning malpractice. The practice is usually called crown thinning. It’s supposed to open up the crown to let in sunlight and re-duce the “wind sail” effect (whatever that is). It involves removing many smaller branches from the interior of the tree, often leaving tufts of foli-age on the ends of branches (hence the name, “lion’s tailing”). Does crown thinning accom-plish its goal, or is it harmful to the tree? Let’s look at it more closely.
A tree grows leaves in order to trap energy from sunlight through photosynthesis. By removing large amounts of foliage in order to let “sunlight into the tree,” the practitioner is demonstrating a gross ignorance of tree biology. Sunlight pass-ing through a tree might help the lawn or shrubs beneath, but it certainly can’t help the tree. The vigorous growth seen on a tree after a severe crown thinning is a stress response—sprouts from dormant buds (“water sprouts”) seeking to keep the branch alive. The vigorous sprouts soon fill the voids left after the pruning.
Does crown thinning make a tree less likely to break in a wind storm? Trees respond to wind in several ways. They bend and sway, they change shape as the leaves curl in the breeze, and when necessary, they shed parts. In an unpruned tree, wind forces are distributed fairly evenly throughout the crown. Stripping out interior foliage increases the stress on the ends of branches, making them more likely to break. In addition, the water sprouts which result from severe pruning are much more likely to break off, due to their weak attachment to the
PRUNING MALPRACTICE: CROWN THINNINGJimmy Walters, Regional Urban Forester
South Carolina Forestry Commission
branch. Crown thinning does not make a tree more resistant to wind breakage. A tree with a lopsided crown may benefit from pruning to make the crown more symmetrical and prevent twisting and splitting in a strong wind, but this type of pruning bears no resemblance to crown thinning.
While a crown thinning is not as harmful as topping, it has similar effects on the tree. The removal of foliage takes away stored food, growth regulators, and food-making capacity. It also creates numerous wounds to which the tree must respond by reallocating resources. Heavily pruned trees are more susceptible to insect or disease problems, since they have less energy available to fight back. The trees are left in a weakened state, both structurally and physiologically.
Mature trees do not need routine pruning, except to correct problems. The proper practice is called crown cleaning. It involves removing dead branches by cutting back to the branch collar, and also removing broken or diseased branches. All cuts should be done using the proper target pruning technique, cutting at the branch collar or making a proper drop-crotch cut. Removal of live tissue is kept to an abso-lute minimum.
Beware of the “tree expert” who says that a tree needs to be thinned out. Like topping, it leaves the tree less healthy, less sound, and prone to insect and disease problems. The rule for pruning trees is ”don’t.” Like other rules, if you must break it, be sure you have a good reason for doing so!
lished, some annual maintenance pruning is re-quired. Each tree is different in its growth habit, vigor and pruning requirements, but there are some general considerations that may help direct your pruning decisions:
1. A major limb growing at a narrow angle to the main trunk (less than a 45o angle) is likely to develop a weak crotch and may split during heavy winds and ice loads. Remove branches that have narrow crotch angles.
2. Remove branches that grow inward or threaten
to rub against nearby branches.3. Remove branches that grow downward from
the main limbs which may interfere with mow-ing and other maintenance practices.
4. Prune branches damaged by insects, diseases, winter cold, or storms below the damaged area. Prune branches of pear, pyracantha, or loquat damaged by fireblight disease several inches below the infection. To prevent spreading the disease, sterilize pruning tools between cuts by dipping the blades in Lysol® or a solution pre-

Selecting, Planting, and Managing Woody Ornamental Plants in the Landscape ◆ 323
pared from 1 part household bleach to 4 parts water.
5. Trees such as Bradford pear, ornamental cherry, crabapple, and ornamental plum form vigorous shoots or suckers at the base of the trunk and many upright succulent shoots (watersprouts) along the main branches. These shoots starve the tree of valuable nutrients and detract from the tree’s overall appearance. Remove them while they are young.
6. Some trees develop upright shoots that compete
with the main trunk for domi nance. Remove these shoots if you want to maintain a conical or pyramidal growth habit.
Removing Large Tree BranchesLarge branches too heavy to be held by hand
(that is, 11/2 inches or more in diameter) require three separate cuts to prevent trunk bark stripping (Figure 12.23). The first cut is made on the under-side of the branch about 15 inches away from the trunk and as far up through the branch as possible before the branch weight binds the saw. The second cut is made downward from the top of the branch about 18 inches from the main trunk to cause the limb to split cleanly between the two cuts without tearing the bark. The remaining stub can then be supported easily with one hand while it is cut from the tree. This final cut should begin on the outside of the branch bark ridge and end just outside of the branch collar swelling on the lower side of the branch. The branch bark ridge is usually rough, always darker than the surrounding bark, and fairly obvious on most species. The collar is a swollen area at the base of a branch (Figures 12.24 and 12.25). This region between the branch and the trunk acts as a natural barrier to decay-causing or-ganisms. Note that the cut is usually made angling down and outward from the tree. If the cut must be made straight down (parallel to the trunk), do not make it flush with the tree trunk. A flush cut will cause serious injury. Although this was once stan-dard practice, research has conclusively shown that flush cuts cause extensive trunk decay because wood
that is actually part of the trunk gets cut. When the bottom of the branch collar is hard to see, prune as shown in Figure 12.26. In this way, only branch tissue is cut, and there is no damage to the trunk.
Painting wounds with tree wound dressing is no longer recommended. The standard recommendation was to paint wounds with a quality tree wound dressing to protect the cut surface from wood rotting organisms and from cracking upon drying. However, research has shown that wound dressings do not prevent decay. When
Never “hat-rack” a tree. Figure 12.21
A
B
Correctly thinned shrub (A) and tree (B). Figure 12.22
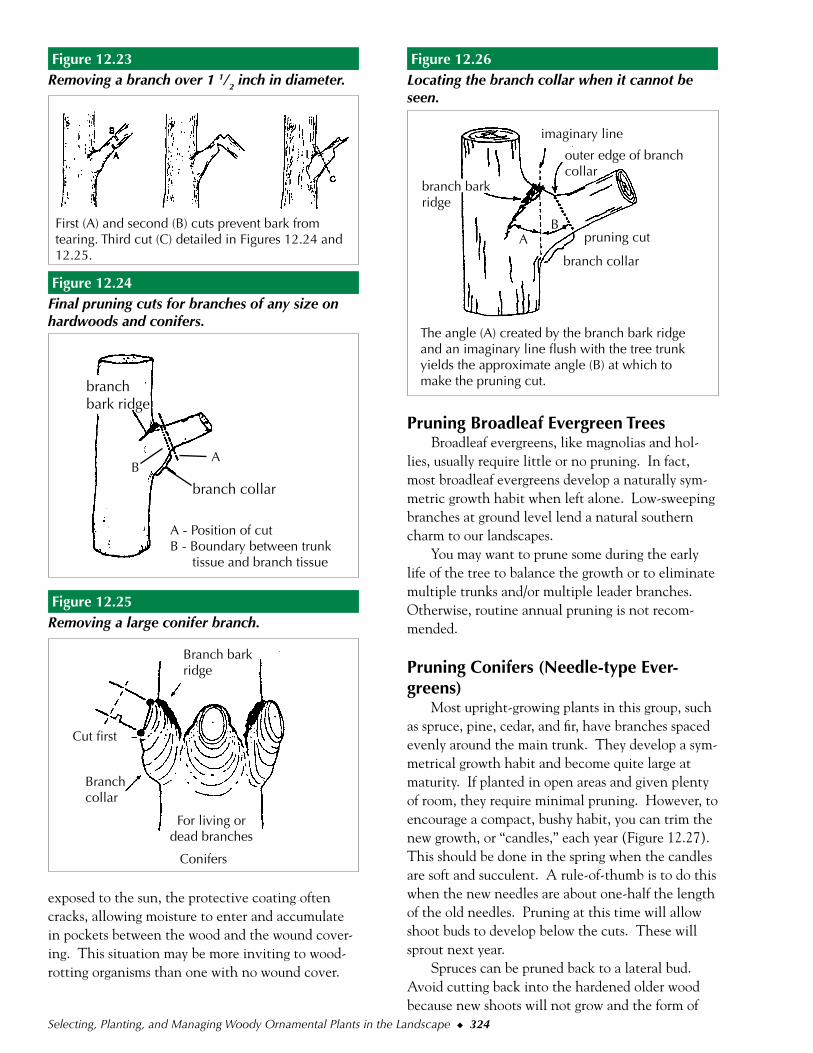
Selecting, Planting, and Managing Woody Ornamental Plants in the Landscape ◆ 324
Pruning Broadleaf Evergreen TreesBroadleaf evergreens, like magnolias and hol-
lies, usually require little or no pruning. In fact, most broadleaf evergreens develop a naturally sym-metric growth habit when left alone. Low-sweeping branches at ground level lend a natural southern charm to our landscapes.
You may want to prune some during the early life of the tree to balance the growth or to eliminate multiple trunks and/or multiple leader branches. Otherwise, routine annual pruning is not recom-mended.
Pruning Conifers (Needle-type Ever-greens)
Most upright-growing plants in this group, such as spruce, pine, cedar, and fir, have branches spaced evenly around the main trunk. They develop a sym-metrical growth habit and become quite large at maturity. If planted in open areas and given plenty of room, they require minimal pruning. However, to encourage a compact, bushy habit, you can trim the new growth, or “candles,” each year (Figure 12.27). This should be done in the spring when the candles are soft and succulent. A rule-of-thumb is to do this when the new needles are about one-half the length of the old needles. Pruning at this time will allow shoot buds to develop below the cuts. These will sprout next year.
Spruces can be pruned back to a lateral bud. Avoid cutting back into the hardened older wood because new shoots will not grow and the form of
First (A) and second (B) cuts prevent bark from tearing. Third cut (C) detailed in Figures 12.24 and 12.25.
Figure 12.23 Removing a branch over 1 1/2 inch in diameter.
branch collar
AB
A - Position of cutB - Boundary between trunk tissue and branch tissue
Figure 12.24 Final pruning cuts for branches of any size on hardwoods and conifers.
Conifers
Branch bark ridge
For living or dead branches
Cut first
Branch collar
Removing a large conifer branch. Figure 12.25
exposed to the sun, the protective coating often cracks, allowing moisture to enter and accumulate in pockets between the wood and the wound cover-ing. This situation may be more inviting to wood-rotting organisms than one with no wound cover.
The angle (A) created by the branch bark ridge and an imaginary line flush with the tree trunk yields the approximate angle (B) at which to make the pruning cut.
imaginary line
outer edge of branch collar
branch collar
branch bark ridge
Locating the branch collar when it cannot be seen.
Figure 12.26
pruning cutAB
branch bark ridge

Selecting, Planting, and Managing Woody Ornamental Plants in the Landscape ◆ 325
Heading back or topping trees is rarely warranted in the landscape and often results in undesirable weak wooded multiple leaders or trunks. The old saying “You can’t fool Mother Nature” applies to the attempts made by tree toppers to make tall skinny tall trees into short fat trees. The basic genetic growth habit cannot be drastically altered by cutting out the top of a tree.
Topping is the term used to describe the practice of indiscriminate removal of a tree’s crown by cut-ting off large branches and the main stem of a tree, leaving large branch stubs. Topping of mature trees produces negative reactions in all cases. A “topped” vigorous hardwood tree will produce nu-merous sprouts below the branch cut. These sprouts (suckers) are weak and susceptible to breakage.
Trees in poor health are often topped to reduce the chances of limb breakage and danger to nearby buildings. Cutting off the last healthy branches of a tree in poor health will only accelerate the de-cline and death of the tree, creating additional hazards.
The photo at the upper left shows an example of two topped trees: one is declining further and the other has regained most of its original height with many weak suckers. One year later, the tree in poor health is dead and is cut down (upper right). This type of pruning has no place in horticulture.
Some pruning practices seen in the landscape are not necessarily good for the plant’s long-term health. These are often based on owner preferences or someone just following the practices that someone else is using. Topping trees, mentioned previously, is an example of a practice that is done to reduce a tree’s size and habit, but it’s detrimental to the structure and strength of the tree (lower left).
Perhaps the most common questionable practice in South Carolina is the radical pruning done to crapemyrtle in order to reduce its size and create many flower clusters. Pruning methods range from lightly pruning the branch tips to cutting off the main stems 1 or 2 ft. above the ground. Heavy top-pruning stimulates many stem, basal and root sprouts in many species, including crapemyrtles (lower right). These sprouts require additional time and work to keep under control.--J. F. Hodges.
Topping Trees: A Surefire Method That Results in Tree Decline

Selecting, Planting, and Managing Woody Ornamental Plants in the Landscape ◆ 326
the plant will be destroyed. Upright and broad-spreading junipers, such
as ‘Torulosa,’ ‘Pfitzeriana,’ and ‘Hetzii,’ sometimes outgrow their sites and must be reduced in size. You can make thinning cuts within the canopy to reduce plant size without destroying the natural shape. You can also shear, but shearing is recommended only when you want to create formal shapes.
Like pines and spruces, junipers do not generate new growth from old wood, so you should never se-verely prune more than one-half of the foliage. You can reduce the length of individual branches by cut-ting them back to a lateral branch. This technique maintains a natural appearance while it decreases the size of the shrub.
Like pines, spruces, and firs, most junipers should not be pruned back to older, bare branches because they will not produce new growth. The needle-less branch usually dies. Cut them back to where there is a green side branch or at least some foliage on the stem. Latent or dormant buds along the length of their needle-bearing branches will grow. Young arborvitae, false cypress (Chamaecyp-aris), Leyland cypress, and yew are exceptions: they can be cut back when they’re dormant to one- or two-year-old wood that lacks foliage because latent buds will sprout and fill in.
Pruning PalmsCare must be taken when pruning palms not
to cut or otherwise injure the terminal bud or the whole tree will die. Old dead leaves on palms should be removed, because they often harbor in-sects and rodents and may become a fire hazard. Remove palm leaves by cutting them from the un-derside to avoid tearing the fibers of the palm’s stem.
Pruning ShrubsA properly pruned shrub is a work of art and
beauty and does not look as if it has been pruned. Pruning cuts should not be visible but located inside the plant where they will be covered by remain-ing foliage. The first step in pruning a shrub is to remove all dead, diseased, or injured branches. Re-move branches that cross or touch each other and those that look out of place. If the shrub is still too dense or large, remove some of the oldest branches. Head back excessively long branches to a bud or lateral branch that is 6 to 12 inches below the de-sirable plant height. Thinning may also be desir-able. Do not use hedge shears. Cut each branch separately to different lengths with hand pruners (Figure 12.28). This will maintain a neat informal shrub with a natural shape. Plants sheared to hard geometric shapes look out of place in a landscape designed to look natural. If you must prune dwarf shrubs, thin their growth instead of shearing it whenever possible.
Pruning and Training HedgesBecause hedges are used primarily as privacy
screens, begin pruning early to encourage a com-pact growth habit. Head back newly planted hedge plants to within 12 inches of ground level and prune new shoot tips during the growing season to encour-age branching. To develop a dense, compact hedge that provides privacy, prune regularly while the plants mature. Figure 12.29 illustrates a three-year pruning sequence in producing a hedge.
Once a hedge reaches the desired height, decide whether to maintain an informal or formal pruning style. An informal style is best for a low-mainte-nance landscape. Informally pruned hedges assume a natural growth habit. Prune only “as needed” to remove dead or diseased wood and head back just enough to maintain a desired height and width.
Formal or clipped hedges require specialized pruning, which may become a continuous job dur-ing the growing season. The desired appearance of a formal hedge is a sharply defined geometric shape. There are two important factors to remem-ber when pruning formal hedges: (1) hedges should be clipped while new growth is green and succulent and (2) plants should be trimmed so the base of the hedge is wider than the top. Hedges pruned with a narrow base will lose lower leaves and branches because shading from the top growth will not permit
Prune pine shoots in the spring before the needles attain their mature length.
Figure 12.27

Selecting, Planting, and Managing Woody Ornamental Plants in the Landscape ◆ 327
Avoid shearing unless you want a high-maintenance topiary.
A multi-trunk tree form can be developed by pruning back to ground level, selecting three to five of the most vigorous new shoots during the grow-ing season to serve as main trunks, and removing all others. You can easily remove undesirable shoots by hand while they are young and succulent in the spring.
It may take 3 to 5 years to shape a tree-form plant, but the interest and accent it lends to the landscape may be worth the extra effort.
Renewal PruningHomeowners and inexperienced landscapers
will sometimes make the mistake of planting large-growing shrubs along the foundation of a building or home. As the plants mature they overgrow the site, crowd other plants, hide windows and appear out of scale with the building. When this occurs, it may be necessary to prune severely, called renewal pruning, to bring the plants within bounds.
Renewal pruning means cutting the plants
Two ways of heading back a shrub. Figure 12.28
(A) Shrub with all shoots headed back to same height. (B) Shrub when shoots have been headed back to different heights.
A
B
sufficient light to penetrate (Figure 12.30). This condition will worsen with age resulting in sparse growth at ground level and an unattractive hedge that does not give desired privacy. Flowering hedges grown formally should be sheared after they have bloomed as more frequent shearing reduces the number of blooms. If the blooms are not very important, prune at any time.
Shaping Tree-form ShrubsCommon landscape shrubs,
like crapemyrtle, yaupon holly, waxmyrtle, and wax-leaf privet are often pruned as tree forms (shrubs shaped like a tree with one or more main trunks). The best time to begin a tree form is in late winter before spring growth begins.
It is easiest to start a tree form from a one-year-old plant, but you can also use older, ma-ture plants. Select 1 to 3 of the most vigorous growing branches (depending on the number of main trunks desired) and prune all other branches to ground level. Remove lateral branches that are less than 4 ft. off the ground along the main trunk and thin the canopy by getting rid of inward growing branches or branches that cross one another.
Year 1 Year 2 Year 3
Developing a hedge over a three-year period. Figure 12.29
getssun
weak growth

Selecting, Planting, and Managing Woody Ornamental Plants in the Landscape ◆ 328
back to within 6 to 12 inches of ground level. In this instance, timing is more important than technique. The best time to prune severely is before spring growth begins. Pruning in late fall or midwinter may encourage new growth which can be in-jured by cold. Renewal pruning results in abundant new growth by midsummer. Once the new shoots are 6 to 12 inches long, prune the tips to encourage lateral branching and a more compact shrub.
Most broadleaf shrubs such as azaleas, camellias, privets, glossy abelia, nandina, and cleyera respond well to renewal pruning. Boxwoods, junipers, pines, cypress, cedar, arborvitae, yews and other narrow-leaf evergreens do not respond when severely pruned and may decline. Transplanting, instead of pruning, may be better for these plants when they overgrow a site.
An alternative to the drastic removal of top-growth on multiple stem shrubs is to cut back all stems at ground level over a period of 3 years (Figure 12.31). At the first pruning, remove one-third of the old, mature stems. The following year, take out one-half of the remaining old stems and head back long shoots growing from the previous pruning cuts. At the third pruning in yet another year, remove the remaining old wood and head back the long new shoots.
Skirting, lifting the canopy by removing low-growing branches and shaping a tree form, is an alternative to renewal pruning. A tree form may adapt well to the landscape scheme and will appear less harsh than a severely pruned shrub.
Pruning Vines and Ground CoversCertain vines in the landscape, such as hon-
eysuckle, English ivy, clematis, wintercreeper eu-onymus and trumpetcreeper, climb trees or other supports and can grow rampant if they are not con-trolled. The amount of pruning these plants need every year depends on their vigor, growth habit and spread. Vines trained to an arbor (to shade a patio or deck) may require only minor thinning or tip pruning to encourage branching, while those grow-ing in trees or competing with other plants may need more severe pruning to control their size.
Pruning time is important for flowering vines.
Prune summer-blooming vines, such as scarlet clem-atis (Clematis texensis) and trumpetcreeper, before new growth begins. Prune spring-blooming vines like wisteria, Japanese honeysuckle, winter jasmine, and periwinkle after they flower.
Ground covers are pruned primarily for three reasons: to thin their canopy when they grow thick and dense; to keep them within bounds; and to re-juvenate their growth after a harsh winter has dam-aged their foliage.
Horizontal junipers, such as ‘Blue Rug,’ ‘Bar Harbor,’ and ‘Prince of Wales,’ tend to form new needles on top of older ones and become thick and dense when their canopies meet. Thinning cuts im-prove air circulation within the canopy and suppress insect and disease problems.
In early spring before growth begins, prune ground covers whose foliage has been damaged by harsh winter temperatures, such as pachysandra, Algerian ivy, and St. Johnswort. Remove the old leaves of liriope in early spring before new growth emerges. You can mow off the foliage of these ground covers with a lawn mower set at the high-est possible cutting height. Be careful not to injure their crowns.
Guidelines for Pruning Selected Woody Ornamentals
Arborvitae: An evergreen, the exterior foliage can be pruned lightly when it needs shaping. Avoid making major cuts.
Azalea: Prune by thinning after bloom because azaleas set their flower buds for the following season during mid to late summer. A light pruning after they bloom encourages branching and increases the number of flower buds the fol-lowing year. However, don’t prune at all if the plant looks good. Old overgrown plants can be renewed by cutting back within 1 ft. of ground
(A) Year 1
Rejuvenating a multi-stemmed shrub. Figure 12.31
(D) Rejuvenated shrub
(C) Year 3(B) Year 2
Selecting, Planting, and Managing Woody Ornamental Plants in the Landscape ◆ 329
process robs the plant of valuable food needed to boost new growth.
Beautyberry: Thin out growth prior to spring growth. Flowers and fruits on new growth.
Birch: Make major cuts when dormant. Light pruning in full- leaf will minimize sap flow (“bleeding”) from the wound.
Boxwood: Prune by thinning or shearing most any time of year. If you shear your boxwoods, it’s important that you thin out some of the interior branches to admit sunlight and air movement. Light encourages growth on the inner stems and air circulation reduces the occurrences of fungal diseases.
Avoid heavy pruning because the plant is slow to recover or may decline. With boxwoods, such drastic corrective pruning is possible, but it must be done over a period of years. Because of their slow growth, boxwoods recover slowly. Some may even die when severely pruned, so you will have to be careful.
The time to begin is just before new growth emerges in the spring. Prune one-third of the tallest branches to the desired height. Make your cuts to outside-growing branches or buds. It is OK to cut back to bare wood. Boxwood, like most broadleaf evergreen plants, will produce growth from hidden, latent buds.
In the second spring, cut back half the remain-ing tall branches, and finish the job in the third spring. You may also decide to remove some of the oldest branches at the base to reduce the plant’s width. Also, thin out some of the inte-rior branches to admit sunlight and air which will reduce the occurrence of fungal diseases.
Camellia, Japanese: Cultivars require little prun-ing. If a plant is misshapen or too large, remove undesirable limbs by cutting them back to a lateral branch or lateral bud inside the canopy. Eliminate suckers that arise from the base of the shrub. Some camellia growers also recommend that you remove small interior foliage that can become a haven for scale insects.
Camellia, Sasanqua: Cultivars may require consid-erable pruning. For a more natural appearance, thin branches instead of shearing the plant. Some camellias bloom during the fall, some dur-ing the winter, and some during the spring. If pruning is needed, it’s best to prune the fall and winter bloomers in early March and the spring bloomers just after they flower.
Knowing When to Prune a ClematisThe key to determining when to prune your clematis is knowing whether your clematis flowers on last year’s wood, this year’s wood, or both. Experts divide the genus into three groups:
Group I are all the early spring-flowering ev-ergreen clematis and early- and mid-flowering species. This group includes Clematis alpina, C. armandii, C. macropetala, and C. montana. These clematis flower on last year’s wood and should be pruned after the flowers fade but no later than July. The only pruning really needed is to remove weak or dead stems and whatever is needed to confine the plant to its allotted space.
Group II consists of clematis that also flower on last year’s growth, but will produce a sec-ond flush of bloom on new growth. Here is included mid-season large-flowered cultivars such as ‘Bees Jubilee,’ C. Henryi, ‘Nelly Moser’, and Vyvyan Pennell’. Remove all dead and weak stems in late winter or early spring, and cut the remaining stems back to a pair of strong buds which will produce the first blooms. Oc-casional pinching after flowering will stimulate branching.
Group III consists of late-flowering cultivars and species that flower on this season’s growth such as C. flammula, C. integrifolia, C. x jackmanii, C. viticella, C. tangutica, C. texensis, and the herbaceous species. These can also be pruned in late winter or early spring. For the first two or three years they may be cut back to a foot from the ground. Later cut them back to two feet. If not cut regularly this group can become very leggy and overgrown.
The boundaries between these three groups are not absolute. Certain Group III clematis, for example, can be treated as Group II to produce early blooms on the previous year’s wood, but they serve as a rough guide to safely keeping your clematis within bounds.--B. Polomski
level in late winter. Certain types of azaleas, such as the southern indica cultivars grow vigor-ously and sometimes outgrow their planting site. You can severely prune them just prior to the spring growing season as described in a previous section on pruning overgrown shrubs, to reduce their size. If you need to prune severely, do so before the plant blooms, because the flowering

Selecting, Planting, and Managing Woody Ornamental Plants in the Landscape ◆ 330
Cherry, Ornamental: Make major cuts in late winter. Use light pruning after bloom to remove suckers or to shape.
Clematis: Some bloom on old wood, and some on new wood, depending on species. It’s best to wait until after bloom to prune this plant. Thin out the old wood. Some vigorous varieties can be pruned within 12 inches of ground level.
Cleyera: Prune by thinning during the growing season to maintain a natural shape.
Cotoneaster: Make thinning cuts to remove old wood and to shape in late winter or early spring.
Crabapple, Flowering: Prune when fully dormant to remove suckers and to produce a desirable shape. Young suckers can be easily removed by hand during the growing season.
Crapemyrtle: Crapemyrtle tolerates all sorts of pruning abuse in the landscape. It can be pruned to a tree form by selective thinning or to a shrub form by pruning it to within a foot of ground level. Crapemyrtle shaped as a tree form often sends up vigorous shoots or suckers from the base that can easily be removed by hand when they are young and succulent. Crape-myrtle is best pruned by selective thinning cuts that will maintain the natural form of the plant (Figure 12.32). Too often homeowners make heading cuts on main branches, leaving nubs that result in a poodle-like growth habit and an unnatural appearance. It is a summer-flowering shrub, so prune it during late winter or early spring. Research has shown that late summer and early fall pruning of crapemyrtle decreases its winter hardiness.
You can encourage a second flush of bloom dur-ing late summer by removing the seed clusters after the flowers fade and thinning some of the new growth.
Detailed instruction information and diagrams, including streaming video and a PowerPoint presentation can be found at the “Crapemyrtle Varieties (www.clemson.edu/crapemyrtle/) web site.
Deutzia: Make thinning cuts after flowering if shaping is necessary.
Dogwood: This tree sets flower buds in late sum-mer. Make major cuts when dormant, even though you may sacrifice some blossoms. Other-wise, prune it after flowering.
Eleagnus: A very vigorous summer grower. It may grow a foot or more a week during the grow-
ing season. Thin out long shoots as necessary. Don’t try to maintain a formal shape.
Euonymus: Growth habit of this plant ranges from upright shrubs to ground covers. Prune by thinning as necessary any time during the grow-ing season.
Fringetree: Prune by thinning to achieve desired shape in late winter. Birds enjoy the late sum-mer fruit, so avoid pruning after flowering.
Goldenraintree: Prune to a tree form in late win-ter.
Hemlock: This plant normally needs no pruning. Light shearing of the outer canopy may be nec-essary to correct form. Avoid major cuts.
Holly: There are many different growth habits and forms. Most are evergreen, but some species are deciduous. If plants are prized for berries, prune them in late winter, before spring flowering. If berries are not a concern, thinning (or shearing of small-leaf types) can be done any time during the growing season.
Honeylocust: Maintain desired shape by thinning in late winter.
Hydrangea (Bigleaf, French, Oakleaf): Flower buds form on old wood. Prune after flowering.
Hydrangea (Panicle, Smooth): Blooms on new wood. Prune when dormant, and remove spent blossoms after flowering.
Jasmine (Winter): Thin out after flowering to maintain a desired shape.
Juniper: Maintain shape or eliminate under-growth of ground cover types by thinning during the growing season. Avoid heavy pruning to old wood because new growth will not occur.
Laurel, English: Prune by thinning as needed dur-ing the growing season.
Liriope: Remove old foliage 4 to 6 weeks before the spring growing season. On level ground, the lawnmower, set to make the highest cut, is an efficient way of pruning this plant.
Magnolia, Japanese: Prune to desired shape after flowering.
Magnolia, Southern: Generally requires little pruning. Shape by thinning during the growing season, preferably after bloom.
Maple: Prune in late winter if major cuts are nec-essary. Light pruning in midsummer can also be done. Avoid early spring pruning because un-sightly sap will flow from the pruning wounds.
Mockorange: Prune after flowering by thinning out old wood. It may be cut back to ground

Selecting, Planting, and Managing Woody Ornamental Plants in the Landscape ◆ 331
level if desired.Mountain-laurel: Prune light-
ly by thinning to desired shape after flowering.
Nandina: To keep foliage near the ground and to prevent it from becoming leggy, prune on a 2- or 3-year cycle. The tallest canes are pruned to stubs 3 to 6 inches above the soil line during the first spring before growth begins. By the second spring, last year’s medium-sized canes have grown to become tall canes and should be cut back to 3-inch stubs. Canes from the first year’s prun-ing have already begun to grow and are 1 to 3 ft. tall by now. In the third spring, the canes which were the shortest in the first spring are now fairly tall and can be cut back.
Oak: Prune to desired shape when dormant.
Oleander: Flowers on new growth, so prune it just pri-or to spring growth. Thin out old wood and head back top for desired shape and height.
Osmanthus: Shape by thin-ning during the growing season. The plant responds well to heavy pruning.
Pear, Ornamental: Make major cuts in late winter (when dormant), even though some blossoms may be sacrificed. Lightly prune after flowering if necessary.
Photinia (Red-tip): Prune any time during the growing season. Early spring and late summer pruning results in new growth that turns brilliant red.
Pine: Prune to desired shape by removing all or a part of the new growth, called “candles” in the spring. Avoid pruning into old wood.
Pittosporum: Prune to desired shape any time dur-ing the growing season.
Pyracantha: Blooms during the spring from buds formed the previous season. Therefore, it’s best to wait until after blooming to prune this plant so that you don’t remove the clusters of berries that provide fall color. Pyracantha forms a lot of lanky growth, so light periodic pruning during the summer season may be necessary to encour-age branching and more compact growth. It can
Improper method of pruning crapemyrtle
Proper method of pruning crapemyrtle
1. Cutting on line shown by dashed line is too often done when pruning shrubs.
1. Shrub before pruning. Remove all weak and dead branches.
2. Same plant after being pruned as indicated above. All sucker growth remains.
2. Same shrub after removal of weak and interfering branches and with base sucker growth removed.
3. Final result: beautiful natural shape of shrub is lost and bloom is sparse and ineffectual.
3. Final result: beautiful natural and distinctive form of plant retained. Vigorous growth and effective flowering.
Properly pruning a crapemyrtle to create a healthy vase-shaped tree that bears a multitude of flowers.
Figure 12.32

Selecting, Planting, and Managing Woody Ornamental Plants in the Landscape ◆ 332
also be trained to grow against a wall, called an espalier, but you will need to prune frequently to maintain its shape. Old overgrown plants can tolerate severe pruning, but expect the berry crop to be light for at least two seasons.
Quince, Flowering: Prune after flowering. Thin out old branches and head back others to de-sired form and size.
Redbud: Make major cuts in late winter. Light pruning can be done after flowering.
Raphiolepis (Indian hawthorn): Flowers in the spring on old growth. Generally requires little pruning. Use directional pruning techniques to create the desired form. Will tolerate heavy pruning. Can be renovated by pruning close to the crown.
Rhododendron: Prune, if necessary, to desired shape and to increase branching after bloom.
Rose: Prune when the buds begin to swell. Hybrid teas and grandifloras are grown for their
magnificent flowers. Hybrid teas produce single flowers on long stems, while grandifloras send up clusters of large flowers on strong, straight stems. Prune both classes to outward facing buds to de-velop an open, bowl-shaped habit.1. Select three to six of the most vigorous,
well-spaced canes (pencil size in diameter or thicker) from hybrid teas, and up to eight from grandifloras.
2. Remove the older canes that are brown or gray at the base.
3. Reduce the length of the canes by one-third or one-half. Generally, do not cut them back lower than 18 inches unless they’ve been damaged by pests or cold. Alternate the height of these final cuts to outward growing buds to give your rose an informal look rather than an unnatural looking “flat-top.”
Floribundas and polyanthas are grown for their grand display flower clusters. They need a lighter-handed approach that will encourage the production of gobs of flowers all season long.1. Lightly head back the canes either just below
where they flowered or down to one-third their length. Cut back twiggy clusters to a strong bud. When grown as a hedge they can be sheared with hedge clippers to remove one-third to one-half of their height.
2. Thin out the twiggy growth on the inside of the plant.
3. Remove a few of the spindly canes at the
base to make room for the remaining canes. Leave more canes than you would for hybrid teas and grandifloras to produce the maxi-mum number of flowers.
Repeat-blooming Old Garden roses, Species, and Shrub roses that flower on current season’s wood should be pruned right before growth begins in late winter or early spring. They can be tip-pruned throughout the growing season to encourage the production of flower-bearing side shoots. Miniature roses are the easiest class to prune. These dense, low-growing roses with small stems, leaves, and flowers range in height from 6 to 18 inches. Use a hedge clipper to trim the tops to about a foot above the soil (height will vary according to variety). Afterwards, use pruning shears to remove any twiggy growth from the center to increase air movement. In many cases ground cover roses are just climbers in disguise. Instead of training them upright they’ve been spread to grow along the ground. The objective is to encourage as much ground-covering growth as possible. Tip-prune the ends of the shoots before new growth begins on everblooming roses and after the major flush of bloom from once-bloomers and most of the old-fashioned roses. Thin out bushy types of ground cover roses to prevent the plant from being choked with branches. The goal for pruning and training climbing roses is to produce a “skeleton” or basic frame-work of upright canes or “trunks” that bear flow-er-bearing side shoots. Create this framework by training the shoots onto a support during the first few years. Keep the shoots or “trunks” spaced far apart to allow for air movement and sunlight penetration. When training a climbing rose onto a sup-port, keep this rule-of-thumb in mind: orient the shoots horizontally so they will produce flowers along their length.Follow these steps when pruning climbers:1. Allow climbers to become established dur-
ing the first few years so they produce long, sturdy canes. Don’t prune them back too heavily or you can cause climbing sports to revert back to their bush form. Secure the canes with soft twine or green tie-tape. Tie the twine into a figure eight to avoid binding the stem.
Selecting, Planting, and Managing Woody Ornamental Plants in the Landscape ◆ 333
2. In early spring before new growth emerges in everblooming climbers, shorten lateral or side shoots to two or three buds.
3. After flowering, examine the framework of vertical canes. Thin out thick, brown woody canes that bear few flowers and have less growth compared to the other canes. Since climbing sports do not produce as much vig-orous growth as bush roses, try not to remove more than one of the skeletal canes a year. In addition to removing a cane at its base, you can cut back one of the oldest canes to a new side branch to encourage further growth from the base. Fill each vacancy with a flex-ible new shoot that’s growing from the crown at or just above the bud union.
4. On once-blooming climbers that produce their heaviest crop of flowers on previous season’s growth, deadhead the faded flower stems to three or four pairs of leaves. Also, remove some of the oldest wood at the base, provided that you have enough younger canes to replace it.
5. To encourage repeat flowering on everbloom-ing climbers, head back the side shoots that have flowered to the lowest pair of five-leaflet leaves close to the main stem.
Rose-of-Sharon: This plant flowers on new growth, so prune it in late winter.
Spirea: Prune by thinning after bloom. Most spe-cies respond well to severe pruning.
Spruce: Prune new growth or “candles” in the spring or cut back to an inner bud.
Trumpetcreeper: Flowers on new growth, so prune it during the dormant season. This plant will tolerate severe pruning.
Viburnum: Prune after flowering or fruit set to thin out oldest, non-fruiting wood and improve shape.
Waxmyrtle: Prune to desired shape during the growing season.
Wisteria: Prune after flowering. This is a very vig-orous vine. It can be heavily pruned.
Witchhazel: Prune by thinning after flowering.
Mulching A mulch is any material applied to the soil
surface for protection or improvement of the area covered. Mulches are usually applied around plants to beautify plant beds, to modify the soil environ-ment, and to enhance plant growth. The mulch material may be organic, such as bark, wood chips, leaves, pine needles, grass clippings, or other organic matter. Inorganic mulches do not decay and include gravel, pebbles, plastic film, and woven landscape fabric.
Benefits of Mulching
Mulch, when correctly applied, has the follow-ing beneficial effects on the soil and plants:
• Mulches can prevent water loss from the soil by evaporation. Moisture moves to the soil surface by capillary action and evaporates if the soil is not covered by a mulch.
• Mulches suppress weeds when the mulch ma-terial itself is weed-free and applied deeply enough to prevent weed germination or to smother existing weeds.
• Mulches can maintain a more uniform soil tem-perature. The mulch acts as an insulator that keeps the soil cool under intense sunlight and warm during cold weather.
• Mulching will prevent crusting of the soil sur-face, thus improving the absorption and move-ment of water into the soil while at the same time reducing erosion.
• Mulching can prevent soil splashing, which not only stops erosion but keeps soilborne diseases from splashing up onto plants.
• Mulches composed of organic materials can im-prove soil structure. Decomposing mulch adds nutrients to the soil.
• Mulches beautify the landscape by providing a cover of uniform color and interesting texture to the surface.
• Mulched plants will produce roots in the mulch that surrounds them. These roots are produced in addition to the roots that a plant produces in the soil. As a result, mulched plants have more roots than unmulched plants.

Selecting, Planting, and Managing Woody Ornamental Plants in the Landscape ◆ 334
Organic Mulching MaterialsPine needles, leaves, grass clippings, and other
yard trimmings can be recycled back into the land-scape as mulch either alone or in combination with each other. Fine-textured mulches do a better job of holding moisture in the soil than large particle mulches. Table 12.3 lists some advantages and dis-advantages of commonly used mulches.
Inorganic mulching materialsGravel, pebbles and crushed stone are perma-
nent, fireproof, and may be colored to blend in with the features of the home, patio, or landscape. When used near a lawn, there is some danger that lawn mowers will pick up and throw the stones. These materials reflect solar radiation and can create a very hot landscape during the summer months. Their use should be limited to small, shaded areas.
The best features of black plastic, and the rea-sons for its continued popularity, are its abilities to suppress weed growth and retain soil moisture. It is commonly used in vegetable and small fruit plant-ings and is often applied as a layer under wood, bark, or mineral chips.
Unfortunately, although black plastic prevents water from exiting the soil, it also prevents water from entering the soil. This is acceptable in crop plantings, where rows covered with black plastic are normally alternated with rows of bare ground, but it is a problem in wide landscape beds.
Geotextiles or landscape fabrics are alterna-tives to black plastic. These woven and nonwoven fabrics of polypropylene or polyester are an improve-ment over traditional black plastic. They not only block weed growth and reduce surface evaporation but also allow water, fertilizer, and oxygen to pen-etrate easily through to the soil.
Used alone as mulches, geotextiles can be de-graded by the ultraviolet rays of the sun. They are used more frequently as mulch underliners, enhanc-ing the weed-suppressing ability of the mulch while separating the mulch and soil.
Nonwoven polyester fabrics generally last longer and have greater resistance to chemical and tem-perature degradation than do polypropylene materi-als. Polyester mulches, however, are usually more expensive.
Polypropylene fabrics are manufactured by either weaving fibers together or bonding short or continuously spun fibers together. The nonwoven fabrics are bonded by needle punching, melting with
chemicals or heat, gluing, or molding.With so many different geotextiles on the mar-
ket, it may be difficult to choose the right fabric. Some factors to consider are ease of applying the material to the landscape; ease with which water penetrates; effectiveness of the material in suppress-ing weed growth; and relative cost.
Before a geotextile is applied, the area to be mulched should be cleared of all weeds. Most manu-facturers direct the applicator to lay down the fabric and cut slits where plants are to be installed. Land-scapers who have worked with geotextiles, however, have found that application is easiest when shrubs are planted in weed-free soil first; then the fabric is laid on top and slits are cut that just allow the fabric to be worked around the base of each plant.
The final step is to apply a layer of mulch on top of the geotextile to hide it, reduce wear, and decrease deterioration by the sun’s rays.
Although geotextiles are a great advance in mulching technology, they don’t prevent all weed growth. Weeds that germinate and grow in a bark or wood-chip top mulch can grow right through the fab-ric. Especially troublesome weeds are grass or grass-like species such as nutsedge and bermudagrass. To maintain a bed mulched with a geotextile effectively, destroy all weeds as soon as they are noticed.
Where to Use MulchMulching is an extremely important practice for
establishing plantings as it helps to conserve moisture in the root ball of the new plant until its roots have grown out into the adjacent landscape soil. Without the competition for water and nutrients from turf and weeds, the growth rate and health of trees and shrubs increases. Mulch also helps to prevent tree trunk in-jury by mowers and line trimmers. Mulch entire beds of shrubs, trees, annuals, herbaceous perennials, and/or ground covers.
In addition to benefiting plants, mulch can be employed as a ground cover for walks, trails, drive-ways, and play and natural areas. This impacts tree roots less than hard concrete surfaces. By allowing for more even water percolation, it is also less dis-ruptive to drainage patterns on a site. Lightweight mulch such as pine straw or grass clippings can be used temporarily to cover low-growing tender plants to protect them from frost injury. Organic mulch can also be composted and used as a soil amendment.

Selecting, Planting, and Managing Woody Ornamental Plants in the Landscape ◆ 335
Mulch Advantages Disadvantages
Pine straw (needles)
Fallen leaves, grassclippings, and prunings
Pine bark
Wood chips
Pecan shells
Gravel, marble chips, volcanic rock
Newspaper
Landscape fabric
Plastic film
Attractive, not easily removed from beds by wind or rain; do not mat down excessively.
Readily available; shredded leaves stay seated better and conserve mois-ture better than unshredded leaves. To shred them, place them in long, narrow rows on the lawn and run over them with the lawn mower set at the highest wheel setting.
Mini-nuggets conserve moisture bet-ter than large nuggets; they also stay seated better on the landscape than large nuggets and last longer than pine straw.
Attractive mulch; tends not to blow away in windy locations.
An acceptable and economical mulch where available.
Long-lasting, attractive mulch that effectively retains moisture.
Placed two sheets thick under organ-ic mulch, newspaper helps conserve moisture while allowing water and nutrients to penetrate.
Helps conserve moisture when installed under organic mulch. Al-lows nutrients and water to penetrate to plant roots. Prevents most weed growth.
None.
Flammable when extremely dry. Fades to a dull gray-brown color with age. Decomposes rather quickly and requires annual top-dressing with ad-ditional pine straw to maintain fresh appearance.
Not as neat and attractive as other commercial mulch materials. (If this is a problem, add a thin layer of a more uniform mulch over the recy-cled materials.) Use a shallow layer (1 to 2 inches) of grass clippings to prevent matting, which can exclude air and water from the root zone; mix with other mulching materials; or, best of all, compost with other yard trimmings. Twigs and small branches should be shred-ded before they are used as a mulch.
None.
Because wood chips contain bark and pieces of wood of various sizes, the wood will decompose more rap-idly than the bark; therefore, it does not last as long as one composed entirely of bark.
Rough-looking. Becomes moldy with age. Attracts wildlife when fresh.
Absorbs and reradiates heat. Un-natural in appearance.
When placed too thick (>2 layers) can serve as a barrier to water and nutrients.
Aggravating to install. Does not prevent nutsedge, bermudagrass, and other persistent weeds from rooting and taking hold.
Prevents oxygen, nutrients, and water from reaching plant roots.
Advantages and disadvantages of commonly used mulches. Table 12.3

Selecting, Planting, and Managing Woody Ornamental Plants in the Landscape ◆ 336
When and How Often to MulchMulch can be applied around established plants
at any time. Newly-set plants should be mulched immediately after they are planted, then thoroughly watered. Fall is an excellent time to collect fallen leaves and pine needles as mulch.
Organic mulches will gradually decompose and need replenishing to function effectively as a mulch. Shallow plant roots grow up and into moist mulch and will die if the mulch is allowed to decay or wash away. How often mulch needs to be replenished will depend on the mulching material. Grass clippings and leaves decompose very rapidly and need to be replenished frequently. Other organic mulches such as pine bark breaks down very slowly and needs only to be replenished to maintain a 2- or 3-inch depth. Once plants in a ground cover or shrub bed have formed a solid mass by touching one another, the mulching requirement is reduced. The plants create their own mulch by dropping leaves, flowers, and fruit. Leaves from surrounding trees also may fall in the beds and provide additional free mulch.
Most organic mulches will change from their original colors to a weathered grey color with age. There are several ways of restoring color to mulches. One approach is to apply a thin (1 inch or less) layer of fresh mulch to the surface of the existing mulch (never exceed 2 to 3 inches total depth). This approach is labor intensive, expensive, and can result in an excessively thick mulch layer. Another approach is to shallow-rake the existing mulch to restore a freshly mulched appearance. Because roots grow up into the mulch, care must be exercised when raking so that roots are not torn up or oth-erwise disturbed. A third choice is to use a mulch colorant. Mulch colorants are dyes that are sprayed on the mulch to restore its color. Manufacturers claim they are harmless to both plants and animals, but applicators should use them cautiously because they can cause skin and eye irritation. Dyes may also stain sidewalks and other surfaces.
Inorganic mulches such as gravel, pebbles, and stones are considered permanent mulches and rarely need replenishing. Still, small particles will eventu-ally move down into the soil and a thin layer of new material may need to be added. To maintain a neat appearance, leaves and other debris should be regu-larly removed from the surface of inorganic mulch.
How to Apply MulchSpread a layer of mulch over the entire plant
bed. When mulching individual trees planted out in lawns, create a circle of mulch about 2 ft. in di-ameter for each inch of trunk diameter. (Measure trunk diameter 6 inches up from the ground.) In-crease the size of the mulched area as the tree grows, extending up to or beyond the dripline on estab-lished plants. This mulched area promotes faster tree establishment by eliminating competition from grass roots for water and nutrients.
Pull mulch 3 to 6 inches away from the stems and trunks of plants. If mulch is placed too close, the high moisture environment it creates will in-crease the chance of stem or trunk rot which can re-sult in plant death. Around the home, keep organic mulches at least 12 away from the foundation.
How Deep to Apply MulchThe amount of mulch to apply will depend on
the texture and density of the mulch. Many wood and bark mulches are composed of fine particles and should not be more than 2 to 3 inches deep after settling. Excessive amounts of these fine-textured mulches around shallow-rooted plants can suffocate their roots causing yellowing of foliage (chlorosis) and poor growth. Coarse-textured mulches such as pine needles and pine bark nuggets allow good air movement through them and can be maintained as deep as 4 inches.
Mulches composed solely of shredded leaves, small leaves (that is, the size of oak leaves) or grass clippings should never be deeper than 2 inches. These materials have flat surfaces and tend to mat together, restricting the water and air supply to plant roots. Rather than raking, which can damage the root systems that have grown into the mulch, punching the mulched area with a pitchfork will counteract the suffocating effects of matted mulch-es. This method should not be used where plastic
How much mulch do you need?Use this formula:Length x Width x Height = Cubic feet(in feet) (in feet) (inches) 12Cubic feet is fine for bagged mulch, but when purchasing it in bulk, convert it to cubic yards. How? It’s simple. Divide by 27 cubic feet to convert cubic feet to cubic yards.

Selecting, Planting, and Managing Woody Ornamental Plants in the Landscape ◆ 337
or woven ground cloth has been laid down under mulch as the holes left by the pitchfork will give weeds a growth path. Instead, rake the surface of the mulch gently to ventilate the mulch.❦
References and Further ReadingTrees for Urban and Suburban Landscapes. 2002. Ed-
ward F. Gilman. Delmar Publishers, Albany, NY.
An Illustrated Guide to Pruning, 2nd ed. 2002. Ed-ward F. Gilman. Delmar Publishers, Albany, NY.
The Pruning Book. 1999. Lee Reich. The Taunton Press, Inc., Newtown, CT.
“Trees,” Ch. 14. 2004. James T. Midcap and Gary Peiffer. Georgia Master Gardener Handbook, 6th ed. Marco T. Fonseca and Kristin L. Slagle, eds. CES Handbook 2. The University of Georgia, Athens, GA.
The Carolina Yardstick Workbook. Clemson Extension (clemson.edu/cyn).
Urban Tree Species Guide: Choosing the right tree for the right place. 2003. E. Vincent, D. L. Ham, and L. Gilland. SC Forestry Commission, Columbia, SC (http://www.state.sc.us/forest/urbsg04.htm).
InternetClemson University Home and Garden Information
Center (HGIC) (http://hgic.clemson.edu/).
Georgia Extension Service Horticulture publica-tions (http://pubs.caes.uga.edu/caespubs/horti-culture/Factsheet.html).
International Society of Arboriculture (www.isa-arbor.com).
National Arbor Day Foundation Website: (http://www.arborday.org/).
SC Forestry Commission Urban Forestry (http://www.state.sc.us/forest/urban.htm).
NC Cooperative Extension Horticulture (http://www.ces.ncsu.edu/LawnGarden publica-tions.php).
University of Florida Landscape Plants (http://hort.ifas.ufl.edu/woody).

Selecting, Planting, and Managing Woody Ornamental Plants in the Landscape ◆ 338
1. List four issues to consider in establishing and maintaining a healthy landscape.2. Identify some of the issues to address in site analysis.3. Besides appearance, cite plant characteristics to consider in selecting (woody) plants for a landscape.4. Justify the statement that fall is the best time for planning woody ornamentals.5. Describe the proper planting technique for woody materials.6. Describe the proper handling and planting treatment of the root ball.7. Explain why mulching is important for woody ornamentals.8. Note under what conditions woody ornamentals should be staked.9. Indicate the best time to fertilize woody plants.10. Cite the typical rate of application for fertilizer, noting where it should be placed.11. Describe some issues to consider when selecting fertilizers.12. Suggest fertilizer formulations for new woody plantings and established plantings.13. Suggest 3 benefits of pruning ornamental plants.14. Describe the physiological effects of removing the tips of limbs/shoots.15. Describe the following types of cuts: • Heading -- • Thinning -- • Hatracking --16. Describe two pruning methods for overgrown, leggy shrubs.17. Describe the recommended steps for removing large limbs. 18. Indicate the proper pruning method for solid hedges.19. Indicate the general cautions involved in pruning evergreens and conifers.20. Describe the steps for properly pruning a crapemyrtle.
Selecting Plants in Landscaping