chapter 13 - corona-norco unified school · web viewthese ants are unusual in that some of the...
TRANSCRIPT

CHAPTER 3-3
FOODAfter water, man’s most urgent
requirement is food. In any survival situation, the mind immediately turns to thoughts of food. Unless the situation occurs in an dry environment, even water, which is more important to maintaining body functions, will almost always follow food in our initial thoughts. The survivor must remember that the three essentials of survival—water, food, and shelter—are placed in order according to the estimate of the actual situation. This estimate must not only be timely but accurate as well. Some situations may well dictate that shelter precede both food and water.
Except for the water they drink and the oxygen they breathe, survivors must meet their body needs through the intake of food. This chapter will explore the relationship of proper nutrition to physical and mental capability. It is very important that survivors maintain a proper diet at all times. A nutritionally sound body stands a much better chance of surviving. Improper diet over a long period of time may lead to a lack of strength, slower reactions, less resistance to illness, and reduced mental alertness, all of which can cost survivors their lives in a survival situation. A knowledge of the body's nutritional requirements will help survivors select foods to supplement their rations.
Nutrition
Although you can live several weeks without food, you need an adequate amount to stay healthy. Without food your mental and physical capabilities will deteriorate quickly, and you will become weak. Food replenishes the substances that your body burns and provides energy. It provides vitamins, minerals, salts, and other elements essential to good health. Possibly more important, it helps morale.
Survivors expend much more energy in survival situations than they would in the
course of their normal everyday jobs and life. Basal metabolism is the amount of energy expended by the body when it is in a resting state. The rate of basal metabolism will vary slightly with regard to the sex, age, weight, height, and race of a person. The basic energy expended, or number of calories consumed by the hour will change as a person’s activity level changes. A person who is simply sitting in a warm shelter, for example, may consume anywhere from 20 to 100 calories an hour, while that same person crashing through thick undergrowth with a heavy pack, would expand a greater amount of energy. Calories are a measure of heat and potential energy. An adequate amount of carbohydrates, fats, and proteins without an adequate calorie intake will lead to starvation and cannibalism of the body’s own tissue for energy. In a survival situation, proper food can make the difference between success and failure.
The three major constituents of foods are carbohydrates, fats, and proteins. Vitamins and minerals are also important as they keep certain essential body processes in good working order. It is also necessary for survivors to maintain proper water and salt levels in their bodies, as they aid in preventing certain heat disorders.
Carbohydrates
Carbohydrates are composed of very simple molecules which are easily digested. Carbohydrates lose little of their energy to the process of digestion and are therefore efficient energy suppliers. Because carbohydrates supply easily used energy, many nutritionists recommend that, if possible, survivors should try to use them for up to half of their calorie intake. Examples of
115
Cannibalism: One who eats the flesh of other human beings.

carbohydrates are starches, sugars, and cellulose. These can be found in fruits, vegetables, candy, milk, cereals, legumes, and baked goods. Cellulose cannot be digested by humans, but it does provide needed roughage for the diet.
Fats
Fats are more complex than carbohydrates. The energy contained in fats is more slowly released than the energy in carbohydrates. Because of this, it is a longer lasting form of energy. Fats supply certain fat-soluble vitamins. Sources of these fats and vitamins are butter, cheese, oils, nuts, egg yolks, margarine, and animal fats. If survivors eat fats before sleeping, they will sleep warmer. If fats aren't included in the diet of survivors, they can become run down and cranky. This can lead to both physical and psychological breakdown.
Protein
The digestive process breaks protein down into various amino acids. These amino acids are formed into new body tissue protein, such as muscles. Some protein gives the body the exact amino acids required to rebuild itself. These proteins are referred to as "complete." Protein that lacks one or more of these essential amino acids is referred to as “incomplete." Incomplete protein examples are cheese, milk, cereal grains, and legumes. Incomplete protein, when eaten in combination with milk and beans for example, can supply an assortment of amino acids needed by the body. Some complete protein is found in fish, meat, poultry, and blood. No matter which type of protein is consumed, it will contain the most complex molecules of any food type listed.
If possible, the recommended daily allowance of 2½ to 3 ounces complete protein should be consumed by each survivor each day. If only the incomplete protein is available, two, three, or even four types of foods may need to be eaten in combination so that enough amino acids are combined to form complete protein.
If amino acids are introduced into the body in great numbers and some of them are not
used for the rebuilding of muscle, they are changed into fuel or stored in the body as fat. Because protein contains the more complex molecules, over fats or carbohydrates, they supply energy after those forms of energy have been used up. A lack of protein causes malnutrition, skin and hair disorders, and muscle atrophy.
Vitamins occur in small quantities in many foods, and are essential for normal growth and health. Their chief function is to regulate the body processes. Vitamins can generally be placed into two groups: fat-soluble and water-soluble. The body only stores slight amounts of the water-soluble type. In a long survival episode where a routinely balanced diet is not available, survivors must overcome food prejudices and eat as much of a variety of vitamin-rich foods as possible. Often one or more of the four basic food groups (meat, fish, poultry, vegetables and fruits, grain and cereal, milk and milk products) are not available in the form of familiar foods, and vitamin deficiencies such as beriberi or scurvy result. If the survivor can overcome his dislikes to local foods high in vitamins, these diseases as well as signs and symptoms such as depression and anger can be warded off.
Adequate minerals can also be provided by a balanced diet. Minerals build and (or) repair the skeletal system and regulate normal body functions. Minerals needed by the body include iodine, calcium, iron, and salt, to name but a few. A lack of minerals can cause problems with muscle coordination, nerves, water retention, and the ability to form or maintain healthy red blood cells.
For survivors to maintain their efficiency, the following number of calories per day is recommended. These figures will change because of individual differences in basal metabolism, weight, etc. The average person need 2,000 calories per day to function at a minimum level. During warm weather survivors should consume anywhere from 3,000 to 5,000 calories per day. In cold
116
Atrophy: A wasting of size or physiological activity of a part of the body because of disease or lack of physical exercise.

weather the calorie intake should rise from 4,000 to 6,000 calories per day. A familiarity with the calorie and fat amounts in foods is important for survivors to meet their nutritional needs. For example, it would take quite a few mussels and dandelion greens to meet those requirements. Survivors should attempt to be familiar enough with foods that they can select or find foods that provide a high calorie intake (fig. 3-87).
Survivors should also be familiar with the number of calories supplied by the food in issued rations. In most situations, rations will have to be added with other foods acquired by survivors. If possible, survivors should limit their activities to save energy. Rationing food is a good idea since survivors never know when their ordeal will end. They should eat when they can, keeping in mind that they should maintain at least a minimum calorie intake to satisfy their basic activity needs.
Calorie and fat values of selected foods are shown in the chart, and unless otherwise specified, the foods listed are raw. Depending on how survivors cook the food, the usable food value can be increased or decreased.
Food Calories Fat
Whole Large Duck Egg 177 12.0Sm or Lg Mouth Bass3 to 4 oz.
109 3.6
Clams - 4 to 5 Large 88 .2Freshwater Crayfish3 to 4 oz.
75 .6
EEL - 3 to 5 oz. 240 20.0Octopus - 3 to 4 oz. 76 .9Atlantic Salmon-4 oz. 220 14.0Rainbow Trout - 4 oz. 200 11.8Banana - 1 small 87 .3Breadfruit - 3 tp 4 oz 105 .5Guava - 1 medium 64 .7Mango - 1 small 68 .5Wild Duck - 4 oz 230 16.0Baked Opossum 235 10.6Wild Rabbit - 4 0z 124 4.0Venison - 4 oz. 128 3.1Dandelion Greens - 1 cup
70 1.4
Potato - 1 medium 78 .2Prickly Pear - 4 oz. 43 .2
Table 3.1
The Hunt
Man as a Predator
To become successful in hunting, the hunter must go through a behavioral change and reorganize personal priorities. This means the one and only goal for the present is to kill an animal to eat. To kill this animal, the hunter must mentally become a predator. The hunter must be prepared to undergo stress in order to hunt down and kill an animal. Because of the type of weapons survivors are likely to have, it will be necessary to get very close to the animal to immobilize or kill it. This is going to require all the sneakiness and skillfulness survivors can gather. In addition to being sneaky and skillful, knowledge of the animal being hunted is very important. If in an unfamiliar area, survivors may learn much about the animal life of the area by studying signs such as trails, droppings, and bedding areas.
Animal Sign
The survivor should establish the general characteristics of the animals. The size of the tracks will give a good idea of the size of the animal. The depth of the tracks will indicate the weight of the animal. The animal dung can tell the hunter much. For example, if it is still warm or slimy, it was made very recently; if there is a large amount scattered around the area, it could well be a feeding or bedding area. The droppings may indicate what the animal feeds upon. Carnivores often have hair and bone in the dung; herbivores have coarse portions of the plants they have eaten. Many animals mark their territory by urinating or scraping areas on the
117
Carnivores: A flesh-eating or predatory organism, as a bird of prey or an insectivorous plant.
Herbivores: An animal that feeds on plants.

ground or trees. These signs could indicate good trap or ambush sites. Following the signs (tracks, droppings, etc.) may reveal the feeding, watering, and resting areas. Well worn trails will often lead to the animal’s watering place. Having made a careful study of all the signs of the animal, the hunter is in a much better position to catch it, whether electing to stalk, trap, or snare it, or lie in wait to shoot it.
Hunting
If survivors elect to hunt, there are some basic techniques which will be helpful and improve chances of success. Wild animals rely entirely upon their senses for their preservation. These senses are smell, vision, and hearing. Humans have lost the keenness of some of their senses like smelling, hearing, etc. To overcome this disadvantage, they have the ability to reason. As an example, some animals have a fantastic sense of smell, but this can be overcome by approaching the prey from a downwind direction. The best times to hunt are at dawn and dusk as animals are either leaving or returning to their bedding areas. Both diurnal and nocturnal animals are active at this time. There are five basic methods of hunting:
1. Still or Stand. This is the best method of inexperienced hunters as it involves less skill. The main principle of this method is to wait in ambush along a well-used game trail, until the quarry approaches within killing range. Morning and evening are usually the best times to still hunt. Care should be taken not to disturb the area; always wait downwind. Patience and self-control are necessary to remain motionless for long periods of time.
2. Stalking. “Stalking” refers to the underhandedly approach toward game. This method is normally used when an animal has been sighted and the hunter then proceeds to close the distance using all available cover. Stalking must be done slowly so that minimum noise is made; quick movement is easily detected by the animal. Always approach from the downwind side and move when the animal's head is down eating, drinking, or looking in another direction. The same techniques are used in blind stalking as
in the regular stalk, the main difference being that the hunter is stalking a position where the
animal is expected to be while the animal is not in sight.
3. Tracking. Tracking is very difficult unless conditions are ideal. This method involves reading all of the signs left behind by the animal, interpreting what the animal is doing, and how it can best be killed. The most common signs are trails, beds, urine, droppings, blood, tracks, and feeding signs.
4. Driving. Some wild animals can be scared or driven in a direction where other hunters or traps have been set. This method is normally used where the game can be funneled; a valley or canyon is a good place to make a drive. More than one person is usually necessary to make a drive.
5. Calling. Small predators may be called in by imitating an injured animal. Ducks and geese can be attracted by imitating their feeding calls. These noises can be made by sucking on the hand, blowing on a blade of grass or paper, sucking the lip, or using specially designed devices. Survivors should not call animals unless they know what they are doing as strange noises may "spook" the animal.
Animals For Food
Unless you have the chance to take large game, concentrate your efforts on the smaller animals, because there are more smaller animals than larger animals. The smaller animal species are also easier to prepare. You must not know all the animal species that are suitable as food. Relatively few are poisonous, and they make a smaller list to remember. What is important is to learn the habits and behavioral pattern of classes of animals. For example, animals that are
118
Diurnal: Active or occurring during the daytime rather than at night, as certain insects and animals.
Nocturnal: Relating to, or taking place at night.
excellent choices for trapping, those that inhabit a particular range and occupy a den or nest, those that have somewhat fixed feeding areas, and those that have trails leading from one area to another. Larger, herding animals, such as elk or deer, roam vast areas and are somewhat more difficult to trap. Also, you must understand the food choices of a particular species.
You can, with relatively few exceptions, eat anything that crawls, swims, walks, or flies. The first obstacle is overcoming food prejudices. Historically, people in starvation situations have resorted to eating everything imaginable for nourishment. A person who ignores an otherwise healthy food source due to a personal bias, or because he feels it is unappetizing, is risking his own survival. Although it may prove difficult at first a survivor must eat what is available to maintain
Survivors should be able to find something to eat wherever they are. One of the best places to find food is along the seacoast, between the high and low watermark. Other likely spots are the areas between the beach and a coral reef; the marshes, mud flats, or mangrove swamps where a river flows into the ocean or into a larger river; riverbanks, inland waterholes, shores of ponds and lakes, margins of forests, natural meadows, protected mountain slopes, and abandoned cultivated fields.
Rations placed in survival kits have been developed especially to provide some of the proper sustenance needed during survival emergencies. When eaten as directed on the package, it will keep the survivor relatively efficient. If enough other food can be found, rations should be conserved for emergency use.
Consideration must be given to available food and water and how long the survival episode may last. Environmental conditions must also be considered. If a survivor is in a cold environment, more of the proper food will be required to provide necessary body heat. Rescue may vary from a few hours to several months, depending on the environment, operational commitments, and availability of rescue resources in that area. Available food must be rationed based on the estimated time which will elapse before being
able to supplement issued rations with natural foods. If it is decided that some of the survivors should go for help, each traveler
should be given twice as much food as those remaining behind. In this way, the survivors resting at the camp and those walking out will stay in about the same physical condition for about the same length of time.
If available water is less than a quart a day, avoid dry, starchy, and highly seasoned foods and meat. Keep in mind that eating increases thirst. For water conservation, the best foods to eat are those with high carbohydrate content, such as hard candy and fruit. All work requires additional food and water. When work is being performed, the survivor must increase food and water consumption to maintain physical efficiency. If food is available, it is alright to nibble throughout the day. It is preferable though to have at least two meals a day, with one being hot. Cooking usually makes food safer, more digestible, and tasty. The time spent cooking will provide a good rest period. On the other hand, some food such as sapodilla, star apple, and soursop, are not good unless eaten raw.
Learn to overcome food prejudices. Foods that may not look good to the survivor are often a part of the natives regular diet. Wild foods are high in mineral and vitamin content. With a few exceptions, all animals are edible when freshly killed. With knowledge and the ability to overcome food prejudices, a survivor can eat and sustain life in strange or hostile environment.
Insects
The most abundant life-form on earth, insects are easily caught. Insects provide 65 to 80 percent protein compared to 20 percent for beef. This fact makes insects an important, if not overly appetizing, food source. Insects to avoid include all adults that sting or bite, hairy or brightly colored insects, and caterpillars and insects that have a sharp odor.
119
Sapodilla: A tropical evergreen tree with hard reddish wood and a rough-skinned brownish edible fruit.

Also avoid spiders and common disease carriers such as ticks, flies, and mosquitoes.
Rotting logs lying on the ground are excellent places to look for a variety of insects including ants, termites, beetles, and grubs, which are beetle larvae. Do not overlook insect nests on or in the ground. Grassy areas, such as fields, are good areas to search because the insects are easily seen. Stones, boards, or other materials lying on the ground provide the insects with good nesting sites. Check these sites. Insect larvae are also edible. Insects such as beetles and grasshoppers that have a hard outer shell will have parasites. Cook them before eating. Remove any wings and barbed legs also. You can eat most insects raw. The taste varies from one species to another. Wood grubs are tasteless, while some species of ants store honey in their bodies, giving them a sweet taste.
You can grind a collection of insects into a paste. You can mix them with edible vegetation. You can cook them to improve their taste.
If there ever is a time when food prejudices must be overcome, it is when survivors turn to insects as a food source.
Primitive people eat insects and consider them great delicacies. When food is limited and insects are available, they can become a valuable food source. In some places, locusts and grasshoppers, cicadas, and crickets are eaten regularly; occasionally termites, ants, and a few species of stonefly larvae are consumed. Big beetles such as the Goliath Beetle of Africa, the Giant Water Beetles, and the big Long Horns are liked the world over. Clusters, like those of the Snipefly Atherix (that overhang the water), and the windrows of Brinefly puparia are eaten. Aquatic water bugs of Mexico are grown especially for food. All stages of growth can be eaten, including the eggs but, the large insects must be cooked to kill internal parasites.
Termites and white ants are also an important food source. Strangely enough, these are closely related to cockroaches. The reason they are eaten so extensively in Africa is the fact that they occur in enormous numbers and are easily collected both from their nests and during flight. They are sometimes attracted to light in unbelievable
numbers and the natives become greatly excited when the large species appear.
Many American Indian tribes made a habit of eating large carpenter ants that are sometimes pests in houses. These were eaten
both raw and cooked. Even today the practice of eating them has not entirely disappeared, although they do not form an essential part of the diet of any of the inhabitants of this country (fig. 3-88).
It is not at all unnatural that the American Indians liked the honey ants in all parts of the continent where they occur. These ants are unusual in that some of the workers become real storehouses for honey, their abdomens become more or less spherical and so greatly enlarged that they are scarcely able to move. They cluster on the ceilings and walls of their nests and spit out part of their stored food to other inhabitants. The Indians discovered the sweetness stored in these insects and made full use of it. At first they ate the ants alive, later gathering them in quantity and crushing them so that they formed an tempting dish -- one which was considered a delicacy and served to guests of distinction as a special favor. The next step in the use of the honey ant was the extraction of the pure honey by crushing the insects and straining the juices. After the honey was extracted, it was allowed to ferment, forming what is said to be a highly flavored wine.
Indians of the American tropics, with a much larger ant environment from which to choose, select the queens of the famous leafcutting or so-called umbrella ants upon which to feed, eating only the abdomens, either raw or cooked.
It is natural that caterpillars, the larvae of moths and butterflies, should form a very considerable part of the food of primitive people because these are often of large size or occur in great abundance. In Africa, many tribes consider caterpillars choice morsels of food, and much time is spent in collecting
120
Larvae: The wingless, often wormlike form of a newly hatched insect before metamorphosis.
Cicada: Any of various insects of the family Cicadidae, with a stout body, wide blunt head, and large transparent wings.

them. Some of the natives tribes recognize 20 or more different kinds of caterpillars that are edible, and are well acquainted with the life history of the insects to know the plants upon which they feed and the time of year when they have reached the proper stage of development for collecting. Caterpillars with hairs should be avoided. If eaten, the hairs may be lodged in the throat causing irritation or infection. Today it is know that insects have nutrition or medicine value. The praying mantis, for example, contains 58 percent protein, 12 percent fat, 3 percent ash, vitamin B complex, and vitamin A. The insect's outer skeleton is an interesting compound of sugar and amino acids.
Bee larvae were eaten by the ancient Chinese. Some Chinese today eat locusts, dragonflies, and bumblebees. Cockroaches and locusts are a favorite dish in Szechuan. In Kwangtun, grasshoppers, golden June beetles, crickets, wasp larvae, and silkworm larvae are used for food.
As can be seen, insects have been used as a food source for thousands of years and will undoubtedly continue to be used. If survivors cannot overcome their prejudices to insects as a food source, they will miss out on a valuable and plentiful supply of food.
Worms
Worms (Annelidea) are an excellent protein source. Dig for them in damp humus soil or watch for them on the ground after a rain. After capturing them, drop them into clean, potable water for a few minutes. The worms will naturally purge or wash themselves out, after which you can eat them raw.
Crustaceans
Freshwater shrimp range in size from 0.25 centimeter up to 2.5 centimeters. They can form rather large colonies in mats of floating algae or in mud bottoms of ponds and lakes.
Shrimp live on or near the sea bottom and may be scraped up. They may be lured to the surface with light at night. A hand net made from parachute cloth or other material is
excellent for catching shrimp. Lobsters are creeping crustaceans found on or near the sea bottom. A lobster trap, jig, baited hook, or dip net can be used to catch lobster. Crabs will creep, climb, and burrow and are easily caught in shallow water with a dip net or in traps baited with fish heads or animal internal organs.
Crayfish are similar to marine lobsters and crabs. You can distinguish them by their had exoskeleton and five pairs of legs, the front pair having oversized pincers. Crayfish are active at night, but you can locate them in the daytime by looking under and around stones in streams. You can also find them by looking in the soft mud near the chimneylike breathing holes of their nests. You can catch crayfish by typing bits of trash or internal organs to a string. When the crayfish grabs the bait, pull it to shore before it has a chance to release the bait.
You find saltwater lobsters, crabs, and shrimp from the surf’s edge out to water 10 meters deep. Shrimp may come to a light at night where you can scoop them up with a net. You can catch lobsters and crabs with a baited trap or a baited hook. Crabs will come to bait placed at the edge of the surf, where you can trap or net them. Lobsters and crabs are nocturnal and caught best at night.
Mollusks
This class include octopuses and freshwater and saltwater shellfish such as snails, clams, mussels, bivalves, barnacles, periwinkles, chitons, and sea urchins (fig. 3-89). You find bivalves similar to our freshwater mussel and terrestrial and aquatic snails worldwide under all water conditions.
River snails or freshwater periwinkles are plentiful in rivers, streams, and lakes of northern coniferous forests. These snails may be pencil point or globular in shape.
In fresh water, look for mollusks in the shallows, especially in water with a sandy or muddy bottom. Look for the narrow trails they leave in the mud or for the dark oval-shaped slit of their open valves.
Near the sea, look in the tidal pools and the wet sand. Rocks along beaches or extending
121
as reefs into deeper water often bear clinging shellfish. Snails and limpets cling to rocks and seaweed from the low water mark upward. Large snails, called chitons, adhere tightly to rock above the surf line.
Mussels usually form dense colonies in rock pools, on logs, or at the base of boulders.
Steam, boil, or bake mollusks in the shell. They make excellent stews in combination with greens and tubers.
Fish
Fish represent a good source of protein and fat. They offer some distinct advantages to the survivor or evader. They are usually more abundant than mammal wildlife, and the ways to get them are silent. To be successful at catching fish, you must know their habits. For instance, fish tend to feed heavily before a storm. Fish are not likely to feed after a storm when the water is muddy and swollen. Light often attracts fish at night. When there is a heavy current, fish will rest in places where there is an eddy, such as near rocks. Fish will also gather where there are deep pools, under overhanging brush, and in and around submerged foliage, logs, or other objects that offer them shelter.
There are no poisonous freshwater fish. However, the catfish species have sharp, needlelike protrusions on its dorsal fins and barbels. These can inflict painful puncture wounds that quickly become infected.
Cook all freshwater fish to kill parasites. Also cook saltwater fish caught within a reef or within the influence of a freshwater source as a precaution. Any marine life obtained farther out in the sea will not contain parasites because of the saltwater environment. You can eat these raw.
Certain saltwater species of fish have poisonous flesh. In some species the poison occurs seasonally; in others, it is permanent. Examples of poisonous saltwater fish are the
porcupine fish, triggerfish, cowfish, thorn fish, oilfish, red snapper, jack, and puffer (fig. 3-90). The barracuda, while not actually poisonous itself, may transmit fish poisoning if eaten raw.
Amphibians
Frogs and salamanders are easily found around bodies of fresh water. Frogs seldom move from the safety of the water’s edge. After the first sign of danger, they plunge into the water and bury themselves in the mud and debris. There are few poisonous species of frogs. Avoid any brightly colored frog or one that has a distinct “X” mark on its back. Do not confuse toads with frogs. You normally find toads in drier environments. Several species of toads discharge a poisonous substance through their skin as a defense against attack. Therefore to avoid poisoning, do not handle or eat toads.
Salamanders are nocturnal. The best time to catch them is at night using a light. They can range in size from a few centimeters to well over 60 centimeters in length. Look in water around rocks and mud banks for salamanders.
Reptiles
Reptiles are a good protein source and relatively easy to catch. You should cook them, but in an emergency, you can eat them raw. Their raw flesh may transmit parasites, but because reptiles are cold-blooded, they do not carry the blood diseases of the warm-blooded animals.
The box turtle is a commonly encountered turtle that you should not eat. It feeds on
CAUTION Mussels may be poisonous in tropical zones during the summer!
CAUTION Do not each shellfish that are not covered by water at high tide!
122
Protrude: To push or thrust outward.
Protrusion: An act of protruding or the state of being protruded.

poisonous mushrooms and may build up a highly toxic poison in its flesh. Cooking does not destroy this toxin. Avoid the hawks-bill turtle, found in the Atlantic Ocean, because of its poisonous thorax gland. Poisonous snakes, alligators, crocodiles, and large sea turtles present obvious hazards to the survivor.
Birds
All species of birds are edible, although the flavor will vary considerably. You may skin fish-eating birds to improve their taste. As with any wild animal, you must understand birds to improve their taste. As with any wild animal, you must understand birds’ common habits to have a realistic chance of capturing them. You can take pigeons, as well as some other species, from their roost at night by hand. During the nesting season, some species will not leave the nest even when approached. Knowing where and when the birds nest makes catching them easier (fig. 3-91). Birds tend to have regular flyways going from the roost to a feeding area, to water, and so forth. Careful observation should reveal where these flyways are and indicate good areas for catching birds in nets stretched across the flyways (fig. 3-92). Roosting sites and waterholes are some of the most promising areas for trapping or snaring.
Nesting birds present another food source—eggs. Remove all but two or three eggs from the clutch, marking the ones that you leave. The bird will continue to lay more eggs to fill the clutch. Continue removing the fresh eggs, leaving the ones you marked.
Mammals
Mammals are excellent protein sources and, for Americans, the most tasty food source. There are some drawbacks to obtaining mammals. In a hostile environment, the enemy may detect any traps or snares placed on land. The amount of injury an animal can inflict is in direct proportion to its size. All mammals have teeth and nearly all will bite in self-defense. Even a squirrel can inflict a serious wound and any bite presents a
serious risk of infection. Also, a mother can be extremely aggressive in defense of her young. Any animal with no route of escape will fight when cornered.
Killing Implements
It is difficult to kill animals of any size without using some type of tool or weapon. As our technology has increased in complexity, so have our killing tools. If a firearm is available, a basic knowledge of shooting and hunting techniques is necessary.
Learning to become skilled with primitive weapons is important. Many primitive tribes of the world are still effectively using spears, clubs, bows and arrows, slingshots, etc., to provide food for their families. One of the limiting factors in the use of firearms is the amount of ammunition on hand. Therefore, a survivor cannot afford to waste ammunition on moving game or game which is beyond the effective range of the firearm being used. Wait for a pause in the animal's motions. The shot must be placed in a vital area with any firearm. Aim for the brain, spine, lungs, or heart (fig. 3-93). A hit in these areas is usually fatal.
A full-jacketed bullet often won't immediately down a larger animal hit in a vital area such as the lungs or heart. The alternative to losing the animal is tracking it to where it falls. Often it's better to wait awhile before pursuing the animal. If not pursued, it may lay down and stiffen or perhaps bleed to death. Follow the blood trail to where the game has gone down and kill it if it is still alive. Even though ammunition might be limited, small game may be more productive than large game. Although they present smaller targets and have less meat, they are less alert, more numerous, and travel less distance to escape if wounded. A large amount of edible meat on small game can be destroyed from a bullet wound. On rodents, most of the meat is on the hindquarters and frontquarters. On birds, it is the breast and legs. The survivor should try to hit a vital spot that spoils the least meat.
Night hunting is usually best, since most animals move at night. A flashlight or torch may be used to shine in the animal's eyes. It will be partly blinded by the light and a survivor can get much closer than in the daytime. If no gun is available, the animal can
123

be killed with a club or a sharpened stick used as a spear.
Remember that large animals, when wounded, cornered, or with their young, can be dangerous. Be sure the animal is dead, not just wounded, unconscious, or playing "possum." Animals usually die with their eyes open and glazed-over. Poke all "dead" animals in the eye with a long sharp stick before approaching them.
Small freshwater turtles can often be found sunning themselves along rivers and lakeshores. If they dash into shallow water, they can still be procured with nets, clubs, etc.; watch out for mouth and claws. Frogs and snakes also sun and feed along streams. Use both hands to catch a frog—one to attract it and keep it busy while grabbing it with the other. Bright cloth on a fishhook also works. All snakes are good eating and can be killed with a long stick. Both marine and dry-land lizards are edible. A noose, small fishhook baited with a bright cloth lure, slingshot, or club can be used. A slingshot can be made with a forked stick and the elastic from the parachute pack or surgical tubing found in some survival kits (fig. 3-94). With practice, the slingshot can be very effective for killing small animals.
Traps and Snares
For an unarmed survivor or evader, or when the sound of a rifle shot could be a problem, trapping or snaring wild game is a good alternative. Several well-placed traps have the potential to catch much more game than a man with a rifle is likely to shoot. To be effective with any type of trap or snare, you must:
· Be familiar with the species of animal you intend to catch.
· Be capable of constructing a proper trap.· Not alarm the prey by leaving signs of
your presence.
Using traps and snares are more advantageous than going out on foot and physically hunting the animal. The most important advantage being that traps work 24 hours a day with no assistance from the hunter. A large area can be effectively
strapped with the possibility of catching many animals within the same period of time. Survivors (generally) use less energy maintaining a trapline than is used by hunting. This means less food is required because less energy is used.
There are no catchall traps you can set for all animals. You must determine what species are in a given area and set your traps specifically with those animals in mind. Look for the following:
· Runs and trails.· Tracks.· Droppings.· Chewed or rubbed vegetation.· Nesting or roosting sites.· Feeding and watering areas.
The traps and snares should be set in areas where there is proof that animals pass through. You must determine if it is a “run” or a “trail.” A trail will show signs of use by several species and will be rather distinct. A run is usually smaller and less distinct and will only contain signs of one species. You may construct a perfect snare, but it will not catch anything if haphazardly placed in the woods. Animals have bedding areas, waterholes, and feeding area with trails leading from one to another. You must place snares and traps around these areas to be effective.
For an evader in a hostile environment, hiding a trap and snare is important. It is equally important, however, not to create a disturbance that will alarm the animal and cause it to avoid the trap. Therefore, if you must dig, remove all fresh dirt from the area. Most animals will naturally avoid a pitfall-type trap. Prepare the various parts of a trap or snare away from the site, carry them in, and set them up. Such actions make it easier to avoid disturbing the natural surroundings, thereby alerting the prey. Do not use freshly cut, live vegetation. to construct a trap or snare. Freshly cut vegetation will “bleed” sap that has an odor the prey will be able to smell. It is an alarm signal to the animal.
124

You must remove or mask the human scent on and around the trap you set. Although birds do not have a developed sense of smell, nearly all mammals depend on smell even more than on sight. Even the slightest human scent on a trap will alarm the prey and cause it to avoid the area. Actually removing the scent from a trap is difficult but masking it is relatively easy. Use the fluid from the gall and urine bladders of previous kills. Do not use human urine. Mud, particularly from an area with plenty of rotting vegetation, is also good. Use it to coat your hands when handling the trap and to coat the trap when setting it. In nearly all parts of the world, animals know the smell of burned vegetation and smoke. It is only when a fire is actually burning that they become alarmed. Therefore, smoking the traps parts is an effective means to mask your scent. If one of the above techniques is not practical, and if time permits, allow a trap to weather for a few days and then set it. Do not handle a trap while it is weathering. When you position the trap, camouflage it as naturally as possible to prevent detection by the enemy and to avoid alarming the prey.
Traps or snares placed on a trail or run should be channeled. To build a channel, construct a funnel-shaped barrier extending from the sides of the trail toward the trap, with the narrowest part nearest the trap (fig. 3-95). The channel should be hardly noticeable to avoid alerting the prey. As the animal gets to the trap, it cannot turn left or right and continues into the trap. Few wild animals will back up, preferring to face the direction of travel. The channel does not have to be an impassable barrier. You only have to make it difficult for the animal to go over or through the barrier. For best effect, the channel should reduce the trail’s width to just slightly wider than the targeted animal’s body. Maintain this constriction at least as far back from the trap as the animal’s body length, the begin the widening toward the mouth of the funnel.
Snares may also be set over holes or burrows. All snares and traps should be
set during midday because most animals are nocturnal in nature. Check snares and traps twice daily. If possible, check after sunup and before sunset. The checks should be made from a distance so any animals moving at the time of checking will not be disturbed or frightened away.
Three are three ways to immobilize or trap animals.
· Strangle. This is done by simply using a free-sliding noose which, when tightened around the neck, will restrict circulation of air and blood. The materials should be strong enough to hold the animal, for example, suspension line, string, wire, cable, or rawhide.
· Mangle. Mangle traps use a weight which is suspended over the animal’s trail or over bait. When the animal trips the trigger, the weight (log) will come down and mangle the animal (fig. 3-96).
· Hold. Any means of blocking the animal and delaying its progress would be considered a hold-type trap.
Methods of Fishing
A number of methods can be used for catching fish.
Gill Net. The most effective fishing method is a net because it will catch fish without having to be attended (figs. 3-97 and 3-98). If a gill net is used, stones can be used for anchors and wood for floats. The net should be set at a slight angle to the current to clear itself of any floating refuse that comes down the stream. The net should be checked at least twice daily (fig. 3-99). A net with poles attached to each end works effectively if moved up or down a stream as rapidly as possible while moving stones and threshing the bottom or edges of the streambanks. The net should be checked every few moments so the fish cannot escape.
125

If a gill net is not available, you can make one using parachute suspension line or similar material (fig. 3-100). Remove the core lines from the suspension line and tie the casing between two trees. Attach several core lines to the casing by doubling them over and tying them with prusik knots or girth hitches. The length of the desired net and the size of the nest determine the number of core lines used and the space between them. Starting at one end of the casing, tie the second and the third core lines together using an overhand knot. Then tie the fourth and fifth, sixth and seventh, and so on, until you reach the last core line You should now have all core lines tied in pairs with a single core line hanging at each end. Start the second row with the first core line, tie it to the second, the third to the fourth, and so on.
To keep the rows even and to regulate the size of the enmesh, tie a guideline to the trees. Position the guideline on the opposite side of the net you are working on. Move the guideline down after completing each row. The lines will always hang in pairs and you always tie a cord from one pair to a cord from an adjoining pair. Continue tying rows until the net is the desired width. Thread a suspension line casing along the bottom of the net to strengthen it. Use the gill net as shown in figure 3-101.
Hook-and-Line Fishing. This type of fishing on a rocky coast requires a lot of care to keep the line from becoming entangled or cut on sharp edges. Most shallow-water fish are nibblers. Unless the bait is well placed and hooked and the barb of the hook offset by bending, the bait may be lost without catching a fish. Use hermit crabs, snails, or the tough muscle of a shellfish as bait. Take the cracked shells and any other animal remains and drop them into the area to be fished. This brings the fish to the area and provides a better chance to catching it. Examine stomach contents of the first fish caught to determine what the fish are feeding on.
Jigging. A baited or spooned hook dipped repeatedly beneath the surface of the water is sometimes effective. This method may be used at night.
Spearing. This method is difficult except when the stream is small and the fish are large and numerous during the spawning season, or when the fish congregate in pools. Make a spear by sharpening a long piece of wood, lashing two long thorns on a stick, or fashioning a bone spear point, and take position on a rock over a fish run (fig. 3-102). Wait patiently and quietly for a fish to swim by.
Do not try to lift the fish with the spear, as it will probably slip off and you will lose it; hold the spear with one hand and grab and hold the fish with the other. Do not throw the spear, especially if the point is a knife. You cannot afford to lose a knife in a survival situation. Be alert to the problems caused by light refraction when looking at objects in the water.
Chop Fishing. Chop fishing is effective at night during low tide. This method requires a torch and a machete. The fish are attracted by the light of the torch, and then they may be stunned by slashing at them with the back of the machete blade. Care should be taken when swinging the machete (fig. 3-103).
Fish Poison. Throughout the warm regions of the world, there are various plants which the natives use for poisoning fish. The active poison in these plants is harmful only to cold-blooded animals. Survivors can eat fish killed by this poison without ill effects.
In Southeast Asia, the derris plant is widely used as a source of fish poison. The derris plant, a large woody vine, is also used to produce a commercial fish poison called rotenone. Commercial rotenone can be used in the same manner as crushed derris roots; it causes respiratory failure in fish, but has no ill effects on humans. However, rotenone has no effect if dusted over the surface of a pond. It should be mixed to a malted-milk
126

consistency with a little water, and then distributed in the water. If the concentration is strong, it takes effect within 2 minutes in warm water, or it may take an hour in colder water. Fish sick enough to turn over on their backs will eventually die. An ounce of 12 percent rotenone can kill every fish for a half mile down a slow-moving stream that is about 25 feet wide. A few facts to remember about the use of rotenone are:
· It is very swift acting in warm water at 70ºF and above.
· It works more slowly in cold water and is not practical in water below 55ºF.
· It is best applied in small ponds, streams, or tidal pools.
· Excess usage will be wasted. However, too little will not be effective.
A small container of 12 percent rotenone (one-half ounce) is a valuable addition to any emergency kit. Do not expose it unnecessarily to air or light; it retains its toxicity best if kept in a dark-colored vial. Lime thrown in a small pond or tidal pool will kill fish in the pool. Lime can be obtained by burning coral and seashells.
The most common method of using fish-poison plants is to crush the plant parts (most often the roots) and mix them with water. Drop large quantities of the crushed plant into pools or the headwaters of small streams containing fish. Within a short time, the fish will rise in a helpless state to the surface. After putting in the poison, follow slowly down stream and pick up the fish as they come to the surface, sink to the bottom, or swim crazily to the bank. A stick dam or obstruction will aid in collecting fish as they float downstream. The husk of "green" black walnuts can be crushed and sprinkled into small sluggish streams and pools to act as a fish agent. In the southwest Pacific, the seeds and bark from the barringtonia tree (fig. 3-104) are commonly used as a source of fish poison. The barringtonia tree usually grows along the seashore.
Tickling can be effective in small streams with undercut banks or in shallow ponds left by receding flood waters. Place hands in the water and reach under the bank slowly, keeping the hands close to the bottom if possible. Move the fingers slightly until they make contact with a fish. Then work hands gently along its belly until reaching its gills. Grasp the fish firmly just behind the gills and scoop it onto land. In the tropics, this type of fishing can be dangerous due to hazardous marine life in the water such as piranhas, eels, and snakes.
Improvised Fishhooks
You can make field-expedient fishhooks from pins, needles, wire, small nails, or any piece of metal. You can also use wood, bone, coconut shell, thorns, flint, seashell, or tortoise shell. You can also make fishhooks from any combination of these items (fig. 3-105).
To make a wooden hook, cut a piece of hardwood about 2.5 centimeters long and about 6 millimeters in diameter to form the shank. Cut a notch in one end in which to place the point. Place the point (piece of bone, wire, nail) in the notch. Hold the point in the notch and tie securely so make smaller hooks, use smaller material.
Fish Poisoning Plants
Anamirta cocculus (Fig. 8-23). This woody vine grows in southern Asia and on islands of the South Pacific. Crush the bean-shaped seeds and throw them in the water. Croton tiglium. This shrub or small tree grows in waste areas on islands of the South Pacific. It bears seeds in three angled capsules. Crush the seeds and throw them into the water. Barringtonia. These large trees grow near the sea in Malaya and parts of Polynesia. They bear a fleshy one-seeded fruit. Crush the seeds and bark and throw into the water.
127

Derris eliptica. This large genus of tropical shrubs and woody vines is the main source of commercially produced rotenone. Grind the roots into a powder and mix with water. Throw a large quantity of the mixture into the water. Duboisia. This shrub grows in Australia and bears white clusters of flowers and berrylike fruit. Crush the plants and throw them into the water. Tephrosia. This species of small shrubs, which bears beanlike pods, grows throughout the tropics. Crush or bruise bundles of leaves and stems and throw them into the water. Lime. You can get lime from commercial sources and in agricultural areas that use large quantities of it. You may produce your own by burning coral or seashells. Throw the lime into the water. Nut husks. Crush green husks from butternuts or black walnuts. Throw the husks into the water.
Table 3.2
A gorge is a small shaft of wood, bone, metal, or other material. It is sharp on both ends and notched in the middle where you tie cordage. Bait the gorge by placing a piece of bait on it lengthwise. When the fish swallows the bait, it also swallows the gorge.Stakeout
A stakeout is a fishing device you can use in a hostile environment (fig. 3-106). To construct a stakeout, drive two supple saplings into the bottom of the lake, pond, or stream with their tops just below the water surface. Tie a cord between them and slightly below the surface. Tie two short cords with hooks or gorges to this cord, ensuring that they cannot wrap around the poles or each other. They should also not slip along the long cord. Bait the hooks or gorges.
Use of Bait
Baiting a trap or snare increases your chances of catching an animal. When catching fish, you must bait nearly all the devices. Success with an unbaited trap depends on its placement in a good location. A baited trap can actually draw animals to it. The bait should be something the animal knows. This bait, however, should not be so readily available in the immediate area that the animal can get it close by. For example, baiting a trap with corn in the middle of a corn field would not be likely to work. Likewise, if corn is not grown in the region, a corn-baited trap may arouse an animal’s curiosity and keep it alerted while it ponders the strange food. Under such circumstances it may not go for the bait. One bait that works well on small mammals is the peanut butter. Salt is also a good bait. When using such baits, scatter bits of it around the trap to give the prey a chance to sample it and develop a craving for it. The animal will then overcome some of its caution before it gets to the trap.
If you set and bait a trap for one species but another species takes the bait without being caught, try to determine what the animal was. Then set a proper trap for that animal, using the same bait.
Note: Once you have successfully trapped an animal, you will not only gain confidence in your ability, you also will have resupplied yourself with bait for several more traps.
Trap and Snare Construction
Traps and snares crush, choke, hang, or entangle the prey. A single trap or snare will commonly incorporate two or more of these principles. The mechanisms that provide power to the trap are almost always very simple. The struggling victim, the force of gravity, or a bend sapling’s tension provides the power.
The heart of any trap or snare is the trigger. When planning a trap or snare, ask yourself how it should affect the prey,
128

what is the source of power, and what will be the most efficient trigger. Your answers will help you devise a specific trap for a specific species. Traps are designed to catch and hold or to catch and kill. Snares are traps that incorporate a noose to accomplish either function.
Triggers
Triggers may be used with traps. The purpose of the trigger is to set the device in motion, which will eventually strangle, mangle, or hold the animal. There are many triggers. Some of the more common ones are:
· Two-pin toggle with a counterweight for small to medium animals which are lifted out of the reach of predators (fig. 3-107).
· Figure “H” with wire snare for small mammals and rodents (fig. 3-108).
· Canadian ace for predators such as bobcat, coyote, etc., (fig. 3-109).
· Three-pin toggle with deadfall for medium to large animals (fig. 3-110). Medium and large animals can be captured using deadfalls, but this type of trap is recommended only when big game exists in large quantities to justify the great expense of time and effort spent in constructing the trap.
Apache Foot Snare
The Apache foot snare is an example of hold-type trap. It used for large browsers and grazers like deer (fig. 3-111). It should be located along game trails where an obstruction, such as a log, blocks the trail. When animals jump over this obstruction, a very shallow depression is formed where their hooves land. The Apache foot snare should be placed at this depression. The box trap for birds is another example of hold-type traps (fig. 3-112).
Simple Snare
A simple snare (fig. 3-113) consists of a noose placed over a trail or den hole and attached to a firmly planted stake. If the noose is some type of cordage placed upright on a game trail, use small twigs or blades of grass to hold it up. Filaments from spider webs are excellent holding nooses open. Make sure the noose is large enough to pass freely over the animal’s head. As the animal continues to move, the noose tightens around its neck. The more the animal struggles, the tighter the noose gets. This type of snare usually does not kill the animal. If you use cordage, it may loosen enough to slip off the animal’s neck. Wire is therefore the best choice for a simple snare.
The simple snare is the quickest snare to construct. All snares and traps should be simple in construction with as few moving parts as possible. This loop can be constructed from any type of bare wire, suspension line, inner core, vines, long strips of green bark, clothing strips or belt, and any other material that will not break under the strain of holding the animal. If wire is being used for snares, a figure “8” or locking loop should be used (fig. 3-113). Once tightened around the animal, the wire is locked into place by the figure “8” which prevents the loop from opening again. A simple loop snare is generally placed in the opening of a den, with the end of the snare anchored to a stake or similar object.
Drag Noose
Use a drag noose on an animal run (fig. 3-114). Place forked sticks on either side of the run and lay a sturdy crossmember across them. Tie the noose to the crossmember and hang it at a height above the animal’s head. (Nooses designed to catch by the head should never be low enough for the prey to step into with a foot.) As the noose tightens around the animal’s neck, the animal pulls the cross member from the forked sticks and drags it along. The surrounding vegetation quickly catches the
129

crossmember and the animal becomes entangled.
Twitch-up
A twitch-up is a flexible sapling, which, when bent over and secured with a triggering device, will provide power to a variety of snares. Select a hardwood sapling along the trail. A twitch-up will work much faster and with more force if you remove all the branches and foliage.
Twitch-up Snare
A simple twitch-up snare uses two forked sticks, each with a long and short leg (fig. 3-115). Bend the twitch-up and mark the trail below it. Drive the long leg of one forked stick firmly into the ground at that point. Ensure the cut on the short leg of this stick is parallel to the ground. Tie the long leg of the remaining forked stick to a piece of cordage secured to the twitch-up. Cut the short leg so that it catches on the short leg of the other forked stick. Extend a noose over the trail. Set the trap by bending the twitch-up and engaging the short legs of the forked sticks. When an animal catches its head in the noose, it pulls the forked sticks apart, allowing the twitch-up to spring up and hang the prey. This type of snare will not work well in cold climates, since the bent sapling will freeze in position and not spring up when released.
Note: Do not use green sticks for the trigger. The sap that oozes out could glue them together.
Squirrel Pole
A squirrel pole is a long pole placed against a tree in an area showing a lot of squirrel activity (fig. 3-116). Place several wire nooses along the top and sides of the pole so that a squirrel trying to go up or down the pole will have to pass through one or more of t hem. Position the nooses (5 to 6 centimeters in diameter) about 2.5 centimeters off the pole. Place the top and bottom wire nooses 45 centimeters from
the top and bottom of the pole to prevent the squirrel from getting its feet on solid surface. If this happens, the squirrel will chew through the wire. Squirrels are naturally curious. After an initial period of caution, they will try to go up or down the pole and will get caught in a noose. The struggling animal will soon fall from the pole and strangle. Other squirrels will follow and, in this way, you can catch several squirrels. You can place multiple poles to increase the catch.
The simple loop snare can also be used when making a squirrel pole or with some types of trigger devices.
Ojibwa Bird Pole
An Ojibwa bird pole is a snare used by native Americans for centuries (fig. 3-117). To be effective, place it in a relatively open area away from tall trees. For best results, pick a spot near feeding areas, dusting areas, or watering holes. Cut a pole 1.8 to 2.1 meters long and trim away all limbs and foliage. Do not use resinous wood such as pine. Sharpen the upper end to a point, then drill a small diameter hole 5 to 7.5 centimeters down from the top. Cut a small stick 10 to 15 centimeters long and shape one end so that it will almost fit into the hole. This is the perch. Plant the long pole in the ground with the pointed end up. Tie a small weight, about equal to the weight of the targeted species, to a length of cordage. Pass the free end of the cordage through the hole, and tie a slip noose that covers the perch. Tie a single overhand knot in the cordage and place the perch against the hole. Allow the cordage to slip through the hole until the overhand know rests against the pole and the top of the perch. The tension of the overhand knot against the pole and perch will hold the perch in position. Spread the noose over the perch, ensuring it covers the perch and drapes over on both sides. Most birds prefer to rest on something above ground and will land on the perch. As soon as the bird lands, the perch will fall, releasing the overhand knot and allowing the weight to drop. The noose will tighten
130
around the bird’s feet, capturing it. If the weight is too heavy, it will cut the bird’s feet off, allowing it to escape.
Other Bird Snares
Birds can be caught with a gill net. The net should be set up at night vertically to the ground in some natural flyway, such as an opening in dense foliage. A small gill net on a wooden frame with a disjointed stick for a trigger can also be used. A gill net can be made by using inner core from parachute suspension line.
Birds can be caught on baited fishhooks (fig. 3-118) or simple slipping loop snares. Bird's nest can be a source of food. All bird eggs are edible when fresh. Large wading birds such as cranes and herons often nest in mangrove swamps or in high trees near water.
During molting season, birds cannot fly because of the loss of their "flight" feathers; they can be caught by clubbing or netting.
When many birds frequent a particular type of bush, some simple loop snares may be set up throughout the bush. Make the snares as large as necessary for the particular type of birds that come to perch, feed, or roost there (fig. 3-119).
In wild, wooded areas, many larger species of birds such as spruce grouse and ptarmigan may be approached. The spruce grouse, which has merited the name of "fools hen," can be approached and killed with a stick with little trouble. It often sits on the lower branches of trees and can be easily caught with a long stick with a loop at the end (fig. 3-120).
Ground feeding birds (Quail, Hungarian Partridge, Chukar) can be trapped in a trench dug into the ground. The trench should be just wide enough for the bird to walk into, so survivors must first observe the type of ground feeding birds in the area. The trench should be 2 to 3 feet long and about 10 to 12 inches deep at the deep end. The other end of the trench should be ramped down from the surface level. Bait is scattered along the surface into the pit, and after having
pecked the last piece of bait the bird will not be able to get out of the pit because it can't fly out or climb out, its feathers keep it from backing out, and it can't turn around to walk out.
Perching birds may be captured by using bird lime. Bird lime is a term applied to any sticky or gluey substance which is rubbed on a branch to prevent the flight of a bird which has landed on it or has flapped a wing against it. Bird lime is usually made from the sap of plants in the Euphorbia family. The common names of some of these plants are spotted spurge, cypress spurge, snow-on-the-mountains, and poinsettias. The Euphorbias have a wide range in North and Central America. The milky sap is poisonous and may cause blisters on the skin and should be handled with care. Bird lime is most effective in the desert and jungle, but it will not work in cold weather. Dust will make bird lime ineffective, so it should be used in spots where dust is not prevalent. The sap of the breadfruit tree makes excellent bird lime as it swells and become sticky upon contact with air.
Noosing Wand
A noose stick or “noosing wand” is useful for capturing roosting birds or small mammals (fig. 3-120). It requires a patient operator. This want is more a weapon than a trap. It consists of a pole (as long as you can effectively handle) with a slip noose of wire or stiff cordage at the small end. To catch an animal, you slip the noose over the neck of a roosting bird and pull it tight. You can also place it over a den hole and hide in a nearby blind. When the animal emerges from the den, you jerk the pole to tighten the noose and thus capture the animal. Carry a stout club to kill the prey.
A long forked stick can be used as a twist stick to catch ground squirrels, rabbits, etc. A den that has signs of activity must be located. Using the long forked stick, the survivor probes the hole with the forked end until something soft is felt then twisting the stick will entangle
131
the animal's hide in the stick and the animal can be removed (fig. 3-120).
Treadle Spring Snare
Use a treadle snare against small game on a trail (fig. 3-121). Dig a shallow hole in the trail. Then drive a forked stick (fork down) into the ground on each side of the hole on the same side of the trail. Select two fairly straight sticks that span the two forks. Position these two stick so that their ends engage the forks. Place several sticks over the hole in the trail by positioning one end over the lower horizontal stick and the other on the ground on the other side of the hole. Cover the hole with enough sticks so that the prey must step on at least one of them to set off the snare. Tie one end of a piece of cordage to a twitch-up or to a weight suspended over a tree limb. Bend the twitch-up or raise the suspended weight to determine where you will tie a 5 centimeter or so long trigger. Form a noose with the other end of the cordage. Route and spread the noose over the top of the sticks over the hole. Place the trigger stick against the horizontal sticks and route the cordage behind the sticks so that the tension of the power source will hold it in place. Adjust the bottom horizontal stick so that it will barely hold against the trigger. As the animal places its foot on a stick across the hole, the bottom horizontal stick moves down, releasing the trigger and allowing the noose to catch the animal by the foot. Because of the disturbance on the trail, an animal will be wary. You must therefore use a channel.
Figure 4 Deadfall
The figure 4 is a trigger used to drop a weight onto a prey and crush it (fig. 3-122). The type of weight used may vary, but it should be heavy enough to kill the prey immediately. Construct the figure 4 using three notched sticks. These notches hold the sticks together in a figure 4 pattern when under tension. Practice making this trigger beforehand; it requires
close tolerances and precise angles in its construction.
Paiute Deadfall
The Paiute deadfall is similar to the figure 4 but uses a piece of cordage and a catch stick (fig. 3-123). It has the advantage of being easier to set than the figure 4. Tie one end of a piece of cordage to the lower end of the diagonal stick. Tie the other end of the cordage to another stick about 5 centimeters long. This 5-centimeter stick is the catch stick. Bring the cord halfway around the vertical stick with the catch stick at a 90-degree angle. Place the bait stick with one end against the drop weight, or a peg driven into the ground, and the other against the catch stick. When a prey disturbs the bait stick, it falls free, releasing the catch stick. As the diagonal stick flies up, the weight falls, crushing the prey.
Bow Trap
A bow trap is one of the deadliest traps. It is dangerous to man as well as animals (fig. 3-124). To construct this trap, build a bow and anchor it to the ground with pegs. Adjust the aiming point as you anchor the bow. Lash a toggle stick to the trigger stick. Two upright sticks driven into the ground hold the trigger stick in place at a point where the toggle stick will engage the pulled bow string. Place a catch stick between the toggle stick and a stake driven into the ground. Tie a trip wire or cordage to the catch stick and route it around stakes and across the game trail where you tie it off. When the prey trip the trip wire, the bow looses an arrow into it. A notch in the bow serves to help aim the arrow.
Pig Spear Shaft
132
WARNING
This is a lethal trap. Approach it with caution and from the rear only!

To construct the pig spear shaft, select a stout pole about 2.5 meters long (fig. 3-125). At the smaller end, firmly lash several small stakes. Lash the large end tightly to a tree along the game trail. Tie a length of cordage to another tree across the trail. Tie a sturdy, smooth stick to the other end of the cord. From the first tree, tie a trip wire or cord low to the ground, stretch it across the trail, and tie it to a catch stick. Make a slip ring from vines or other suitable material. Encircle the trip wire and the smooth stick with the slip ring. Place one end of another smooth stick within the slip ring and its other end against the second tree. Pull the smaller end of the spear shaft across the trail and position it between the short cord and the smooth stick. As the
animal trips the trip wire, the catch stick pulls the slip ring off the smooth sticks, releasing the spear shaft that springs across the trail and traps the prey against the tree.
Bottle Trap
A bottle trap is a simple trap for mice and voles (fig. 3-126). Dig a hole 30 to 45 centimeters deep that is wider at the bottom than at the top. Make the top of the hole as small as possible. Place a piece of bark or wood over the hole with small stones under it to hold it up 2.5 to 5 centimeters off the ground. Mice or voles will hide under the cover to escape danger and fall into the hole. They cannot climb out because of the wall’s backward slope. Use caution when checking this trap; it is an excellent hiding place for snakes.
Fish Traps
Fishing is one way to get food throughout the year wherever water is found. There are many ways to catch fish which include hook and line, gill nets, poisons, traps, and spearing.
If an emergency fishing kit is available, there will be a hook and line in it, but if a kit is not available a hook and line will have to acquired elsewhere or improvised. Hooks can be made from wire or carved from bone or wood. The line can be made by unraveling parachute suspension line or by twisting threads from clothing or plant fibers. A piece of wire between the fishing line and the hook will help prevent the fish from biting through the line. Insects, smaller fish, shellfish, worms, or meat can be used as bait. Bait can be selected by observing what the fish are eating. Artificial lures can be made from pieces of brightly colored cloth, feathers, or bits of bright metal or foil tied to a hook. If the fish will not take the bait, try to snag or hook them in any part of the body as they swim by. In freshwater, the deepest water is usually the best place to fish. In shallow streams, the best places are pools below falls, at the foot of rapids, or behind rocks. The best time to fish is usually early morning or late evening (fig. 3-127). Sometimes fishing is best at night, especially in moonlight or if a light is available to attract the fish. The survivor should be patient and fish at different depths in all kinds of water. Fishing at different times of the day and changing bait often is rewarding.
Fishtraps (fig. 3-128) are very useful for catching both freshwater and saltwater fish, especially those that move in schools. In lakes or large streams, fish tend to approach the banks and shallows in the morning and evening. Sea fish, traveling in large schools, regularly approach the shore with the incoming tide, often moving parallel to the shore guided by obstruction in the water.
A fishtrap is basically an enclosure with a blind opening where two fence-like walls extend out, like a funnel, from the entrance. The time and effort put into building a fishtrap should depend on the need for food and the length of time survivors plan to stay in one spot.
The trap location should be selected at high tide and the trap built at low tide. One to 2 hours of work should do the job.
133
Voles: Any of various short-tailed rodents similar to rats or mice.

Consider the location, and try to adapt natural features to reduce the labors. The best fishing off sandy beaches is the lee side of offshore sandbars. By watching the swimming habits of fish, a simple dam can be built which extends out into the water forming an angle with the shore. This will trap fish as they swim in their natural path. When planning a more complex brush dam, select protected bays or inlets using the narrowest area and extending one arm almost to the shore.
In small, shallow streams, the fishtraps can be made with stakes or brush set into the stream bottom or weighted down with stones so that the stream is blocked except for a small narrow opening into a stone or brush pen or shallow water. Wade into the stream, herding the fish into the trap, and catch or club them when they get in shallow water. Mud-bottom streams can be trampled until cloudy and then netted. The fish are blinded and cannot avoid the nets. Freshwater crawfish and snails can be found under rocks, logs, overhanging bushes, or in mud bottoms.
Fish may be confined in properly built enclosures and kept for days. In many cases, it may be advantageous to keep them alive until needed and thus ensure there is a fresh supply without danger of spoilage. Mangrove swamps are often good fishing grounds. At low tide, clusters of oysters and mussels are exposed on the mangrove knees" or lower branches. Clams can be found in the mud at the base of trees. Crabs are very active among branches or roots and in the mud. Fish can be caught at high tide. Snails are found on mud and clinging to roots. Shellfish which are not covered at high tide or those from a colony containing diseased members should not be eaten. Some indications of diseased shellfish are shells gaping open at low tide, foul odor, and (or) milky juice.
Preparing Animal Food
Survivors must know how to use the meat of game and fish to their advantage
and how to do this with the least effort and physical exertion. Many people have died from starvation because they had failed to take full advantage of a game carcass. They abandoned the carcass on the mistaken theory that they could get more game when needed.
If the animal is large, the first impulse is usually to pack the meat to camp. In some cases, it might be easier to move the camp to the meat. A procedure often advocated for transporting the kill is to use the skin as a sled for dragging the meat. When the entire animal is dragged, this method may prove satisfactory only on frozen lakes or rivers or over very smooth snow-covered terrain. In rough or brush-covered country, however, it is generally more difficult to use this method, although it will work. Large mountain animals can sometimes be dragged down a snow-filled gully to the base of the mountain. If meat is the only consideration, and the survivors do not care about the condition of the skin, mountain game can sometimes be rolled for long distances. Before transporting a whole animal, it should be gutted and the incision closed. Once the bottom of the hill is reached, almost invariably the method is either to backpack the meat to camp, making several trips if no other survivors are present, or to pack the camp to the animal. Under survival conditions, home is on the back. When the weight of the meat proves excessive and moving the camp is not practical, some of the meat could be eaten at the scene. The heart, liver, and kidneys should be eaten as soon as possible to avoid spoilage.
Under survival conditions, skinning and butchering must be done carefully so that all edible meat can be saved. When the decision is made to discard the skin, a rough job can be done. However, considerations should be given to possible uses of the skin. A square of fresh skin, long enough to reach from the head to the knees, will not weigh much less when it is dried, and is an excellent ground cloth for use under a sleeping bag on frozen ground or snow. The best time to skin and butcher an animal is immediately after the kill. However, if an animal is killed late in the day, it can be gutted immediately and the
134

other work done the next morning. An effort to keep the carcass secure from predators should be made.
When preparing meat under survival conditions, all edible fat should be saved. This is especially important in cold climates, as the diet may consist almost entirely of lean meat. Fat must be eaten in order to provide a complete diet. Rabbits lack fat, and the fact that a person will die after an extended diet consisting only of rabbit meat indicates the importance of fat in a primitive diet. The same is true of birds, such as the ptarmigan.
Birds should be handled in the same manner as other animals. They should be cleaned after killing and protected from flies. Birds, with the exception of sea birds, should be plucked and cooked with the skin on. Carrion-eating birds, such as vultures, must be boiled for at least 20 minutes to kill parasites before further cooking and eating. Fish-eating birds have a strong, fish-oil flavor. This may be lessened by baking them in mud or by skinning them before cooking.There are two general ways to skin animals depending upon the size: the big game method, or the glove skinning method.
Survivors should use the big game method when skinning and butchering large game.
1. The first step in skinning is to turn the animal on its back and with a sharp knife, cut through the skin on a straight line from the tail bone to a point under its neck as illustrated in figure 3-129. In making this cut, pass around the anus and, with great care, press the skin open until the first two fingers can be inserted between the skin and the thin membrane enclosing the entrails. When the fingers can be forced forward, place the blade of the knife between the fingers, blade up, with knife held firmly. While forcing the fingers forward, palm upward, follow with the knife blade, cutting the skin but not cutting the membrane.2. If the animal is a male, cut the skin parallel to, but not touching the penis. If the tube leading from the bladder is accidentally cut, a messy job and unclean meat will result. If the gall or urine
bladders are broken, washing will help clean the meat. Otherwise, it is best not to wash the meat but to allow it to form a protective glaze.
3. On reaching the ribs, it is no longer possible to force the fingers forward, because the skin adheres more strongly to flesh and bone. Furthermore, care is no longer necessary. The cut to point C can be quickly completed by alternately forcing the knife under the skin and lifting it. With the central cut completed, make side cuts consisting of incisions through the skin, running from the central cut (A-C) up the inside of each leg to the knee and hock joints. Then make cuts around the front legs just above the knees and around the hind legs above the hocks. Make the final cross cut at point C, and then cut completely around the neck and in back of the ears. Now is the time to begin skinning.
4. On a small or medium-sized animal, one person can skin on each side. The easiest method is to begin at the corners where the cuts meet. When the animal is large, three people can skin at the same time. However, one should remember that when it is getting dark and hands are clumsy because of the cold, a sharp skinning knife can make a deep wound. After skinning down the animal's side as far as possible, roll the carcass on its side to skin the back. Then spread out the loose skin to prevent the meat from touching the ground and turn the animal on the skinned side. Follow the same procedure on the opposite side until the skin is free.
5. In opening the membrane which encloses the entrails, follow the same procedure used in cutting the skin by using the fingers of one hand as a guard for the knife and separating the intestines from membrane. This thin membrane along the ribs and sides can be cut away in order to see better. Be careful to avoid cutting the intestines or bladder. The large intestine passes through an aperture in the pelvis. This tube must be separated from the bone surrounding it with a knife. Tie a knot in the bladder tube to prevent the
135

escape of urine. With these steps completed, the entrails can be easily disengaged from the back and removed from the carcass. Another method of gutting or field dressing is shown in figure 3-130. After gutting is completed, it may be advisable to hang the animal. Figure 3-131 shows two methods. (Note: If it is hot, gut the animal before skinning it.)
6. The intestines of a well-conditioned animal are covered with a lace-like layer of fat which can be lifted off and placed on nearby bushes to dry for later use. The gall bladder which is attached to the liver of some animals should be carefully removed. If it should happen to rupture, the bile will taint anything it touches. Be sure to clean the knife if necessary. The kidneys are imbedded in the back, forward of the pelvis, and are covered with fat. Running forward from the kidneys on each side of the backbone are two long strips of chop-meat or muscle called tenderloin or backstrap. Eat this after the liver, heart, and kidneys as it is usually very tender. Edible meat can also be removed from the head, brisket, ribs, backbone, and pelvis.
7. Large animals should be quartered. To do this, cut down between the first and second rib and then sever the backbone with an ax or machete. Cut through the brisket of the front half and then chop lengthwise through the backbone to produce the front quarters. On the rear half, cut through the pelvic bone and lengthwise through the backbone. To make the load lighter and easier to transport, a knife could be used to bone the animal, thereby eliminating the weight of the bones. Butchering is the final step and is simplified for survival purposes. The main purpose is to cut the meat in manageable size portions (fig. 3-132).
Glove skinning is usually performed on small game (fig. 3-133).
The initial cuts are made down the insides of the back legs. The skin is then peeled back so that the hindquarters are bare and the tail is severed. To remove the remaining skin, pull it down over the body in much the same way a pullover
sweater is removed. The head and front feet are severed to remove the skin from the body. For one-cut skinning of small game, cut across the lower back and insert two fingers under each side of the slit. By pulling quickly in opposite directions, the hide will be easily removed (fig. 3-134).
To remove the internal organs, a cut should be made into the abdominal cavity without puncturing the organs. This cut must run from the anus to the neck. There are muscles which connect the internal organs to the trunk and they must be severed to allow the viscera to be removed. A rabbit may be gutted by using a knifeless method with no mess and little time lost. Squeeze the entrails toward the rear resulting in a tight bulging abdomen. Raise the rabbit over the head and sling it down hard striking the forearms against the thighs. The momentum will expel the entrails through a tear in the vent (fig. 3-135). Save the internal organs such as heart, liver, and kidneys, as they are nutritious. The liver should be checked for any white blotches and discarded if affected as these indicate tularemia (also known as rabbit fever). The disease is transmitted by rodents but also infects humans.
Cold-blooded animals are generally easy to clean and prepare.
Snakes and lizards. Very similar in taste and they have similar skin. Like he mammals, the skin and viscera should be removed. The easiest way to do this is to sever he head and/or legs. In the case of a lizard, peel back enough skin so that it may be grasped securely and simply pull it down the length of the body turning the skin inside out as it goes. If the skin does not come away easily, a cut down the length of the animal can be made. This will allow the skin to part from the body more easily. The entrails are then removed and the animal is ready to cook.
Bullfrogs. Except for the larger amphibians such as the bullfrog, the hind legs are the largest portion of the animal worth saving. To remove the hindquarters, simply cut through the backbone with a knife, leaving the abdomen and upper
136

body. Pull the skin from the legs and they are ready to cook. With the bullfrogs and larger amphibians, the whole body can be eaten. The head, the skin, and viscera should be removed and discarded (use as bait to catch something else).
Fish. Most fish need little preparation before they are eaten. Scaling the fish before cooking is not necessary. A cut from the anus to the gills will expose the internal organs which should be removed. The gills should also be removed before cooking. The black line along the inside of the backbone is the kidney and should be removed by running a thumbnail from the tail to the head. There is some meat on the head and should not be discarded. See figure 3-136 for one method of filleting a fish.
Birds. All birds have feathers which can be removed in two ways: by plucking or pulling out the feathers, and by skinning. The gizzard, heart, and liver should be retained. The gizzard should be split open as it contains partially digested food and stones which must be discarded before being eaten.
Insects. An excellent food source and they require little or no preparation. The main point to remember is to remove all hard portions such as the hind legs of a grasshopper and the hard wing covers of beetles. The rest is edible.
Cooking
All wild game, large insects (grasshoppers), freshwater fish, clams, mussels, snails, and crawfish must be thoroughly cooked to kill internal parasites. Mussels and large snails may have to be minced to make them tender.Boiling is the most nutritious, simplest, and safest method of cooking. Numerous containers can be used for boiling; for example, a metal container suspended above, or set beside, a heat source to boil foods. Green bamboo makes an excellent cooking container. Stone boiling is a method of boiling using super-heated rocks and a container that holds water but cannot be suspended over an open flame.
Example of containers are survival kit containers, flying helmet, a hole in the ground lined with waterproof material, or a hollow log. The container is filled with food and water and then heated with super-hot stones until the water boils. Stones from a stream or damp area should not be used. The moisture in the stones may turn to steam and cause the stone to explode while the stones are being heated in the fire. The container should be covered and new stones added as the water stops boiling. The rocks can be removed with the aid of a wire secured to the rock before being put into the container or two sticks used in a chopstick fashion.Baking is a good method of cooking as it is slow and is usually done by putting food into a container and cooking it slowly. Baking is often used with various types of ovens. Foods may be wrapped in wet leaves (avoid using a type of plant that will give an unpleasant flavor to what is being cooked), placed inside a metal container, or they may be packed with mud or clay and placed directly on the coals. Fish and birds packed in mud and baked must not be skinned because the scales, skin, or feathers will come off the animal when the mud or clay is removed. Clambake-style baking is done by heating a number of stones in a fire and allowing the fire to burn down to coals. A layer of wet seaweed or leaves is then placed over the hot rocks. Food such as mussels and clams in their shells are placed on the wet seaweed and/or leaves. More wet seaweed and/or leaves and soil is used as a cover. When thoroughly steamed in their own juices, clam, oyster, and mussel shells will open and may be eaten without further preparation.
Any type of food can be cooked in the ground in a rock oven. First, a hole is dug about 2 feet deep and 2 or 3 feet square, depending on the amount of food to be cooked. The sides and bottom are then lined with rock. Next, procure several green trees about 6 inches in diameter and long enough to bridge the hole. Firewood and grass or leaves for insulation should also be gathered. A fire is staried in the hole. Two or three green trees are placed over the hole and several rocks are placed
137
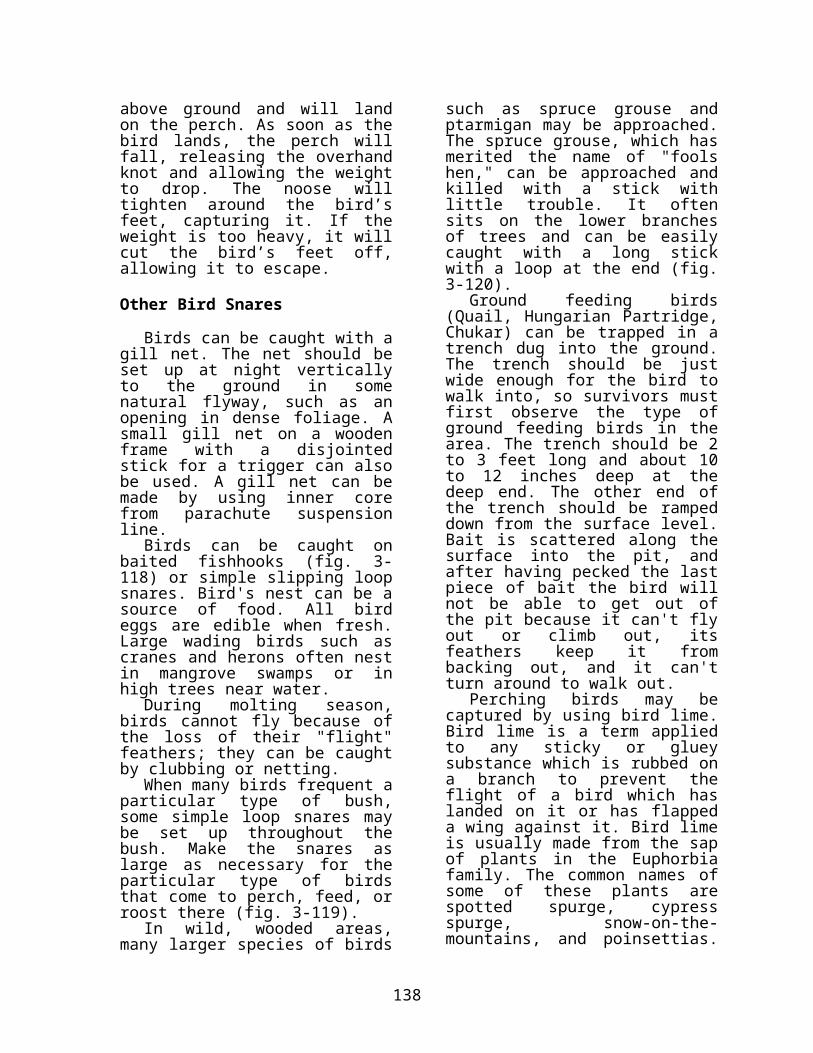
on the trees. The fire must be maintained until the green trees burn through. This indicates the fire has burned long enough to thoroughly heat the rocks and the oven is ready. The fallen rocks, fire, and ash are removed from the hole and a thin layer of dirt is spread over the bottom. The insulating material (grass, leaves, moss, etc.) is placed over the soil, then the food more insulating material on top and around the food, another thin layer of soil, and the extra hot rocks are placed on top. The hole is then filled with soil up to ground level. Small pieces of meat (steaks, chops, etc.) cook in ½ to 2 hours and large pieces take 5 to 6 hours.Roasting is less desirable as it involves exposing the food to direct heat which quickly destroys the nutritional properties. Putting a piece of meat on a stick and holding it over the fire is considered roasting.Broiling is the quickest way to prepare fish. A rock broiler may be made by placing a layer of small stones on top of hot coals, and laying the fish on the top. Scaling the fish before cooking is not necessary, and small fish need not be cleaned. Cooked in this manner, fish have a moist and delicious flavor. Crabs and lobsters may also be placed on the stones and broiled.Meat may be cooked by laying it on a flat board or stone (planking) which is propped up close to the fire. The meat will have to be turned over at least once to allow thorough cooking. The cooking time depends on how close the meat is to the fire.Frying is by far the least favorable method of preparing food. It tends to make the meat tough because most all of the natural juices are cooked out of the meat. Some of the nutritional value of the meat will also be destroyed. Frying can be done on any nonporous surface which can be heated. Examples are unpainted aircraft parts, turtle shells, large seashells, flat rocks, and some survival kit parts.
Preserving Food
Finding natural foods is an uncertain aspect of survival. The survivor must make the best use of the available food,
especially meat, has a tendency to spoil within a short period of time unless it is preserved. There are many ways to preserve food; some of the most common are cooking, refrigeration, freezing, and dehydration.Cooking will slow down the decomposition of food but will not eliminate it. This is because many bacteria are present which work to break it down. Cooking methods which are best for immediate consumption, such as boiling, are the least effective for preserving food. Food should be recooked every day until all is consumed.Cooling is an effective method of storing food for short periods of time. Heat tends to accelerate the decomposition process where cooling retards decomposition. The colder food becomes, the less the likelihood of deterioration until freezing eliminates decomposition. Cooling devices available to a survivor are:
· Food items buried in snow will maintain a temperature of approximately 32ºF.
· Food wrapped in waterproof material and placed in streams will remain cool in summer months. Care should be taken to ensure food is secured.
· Earth, below the surface, particularly in shady areas or along streams, remains cooler than the surface. A hole may be dug, lined with grass, and covered to form an effective cool storage area much the same as a root celler.
· When water evaporates, it tends to cool down the surrounding area. Using this fact, articles of food may be wrapped in an absorbent material such as cotton or burlap and rewetted as the water evaporates.
Once food is frozen, it will not decompose. Food should be frozen in meal-size portions so refreezing is avoided.Drying removes all moisture and preserves the food. Drying is done by sunning, smoking, or buying it in hot sand.For sun-drying, the food should be sliced very thin and placed in direct sunlight. Meat should be cut across the grain to improve tenderness and decrease drying
138

time. If salt is available, it should be added to improve flavor and accelerate the drying process.Smoking is a process done through the use of nonresinous wood such as willow or aspen and is used to produce smoke which adds flavor and dries the meat. A smoke rack is also necessary to contain the smoke (fig. 3-137). The following are the procedures for drying meat using smoke:
· Cut meat very thin and across the grain. If the meat is warm and difficult to slice thin, cut the meat in 1 or 2-inch cubes and beat it thin with a clean wooden mallet (improvised).
· Remove fat.· Hang the meat on a rack so each piece is
separate.· Elevate meat no less than 2 feet above
coals.· Coals are placed in the bottom of a smoke
rack with green woodchips on top to produce smoke.
The method used to preserve fish through warm weather is similar to that used in preserving meat (fig. 3-138 ). When there is no danger of predatory animals disturbing the fish, the fish should be placed on available fabric and allowed to cool during the night. Early the next morning, before the air gets warm, the fish should be rolled in moist fabric (and leaves). This bundle can be placed inside the survivor’s pack. During the rest periods, or when the pack is removed, it should be placed in a cool location out of the Sun’s rays.
Fish may be dried in the same manner described for smoking meat. To prepare fish for smoking, the heads and backbone are removed and the fish are spread flat on a grill. Thin willow branches with bark removed make skewers.Fish may also be dried in the Sun. they can be suspended from branches or spread on hot rocks. When the meat has dried, sea water or salt should be used on the outside, if available.In survival environments, there are many animals and insects that will devour a survivor’s food if it is not correctly stored. protecting food from insects and birds is done by wrapping it in parachute material, wrapping and tying brush around the bundle, and finally, wrapping it with another layer of material. This creates “dead air” space making it more difficult for insects and birds to get to the food. If the outer layer is wetted, evaporation will also cool the food to some degree. In most cases, if the food is stored several feet off the ground, it will be out of reach of most animals. This can be done by hanging the food or putting it into a “cache”. If the food is dehydrated, the container must be completely waterproof to prevent reabsorption. Frozen food will remain frozen only if the outside temperature remains below freezing. Burying food is a good way to store as long as scavengers are not in the area to uncover it. Insects and small animals should also be remembered when burying the food. Food should never be stored in the shelter as this may attract wild animals and could be hazardous to the survivors.
139

· CHAPTER 3-4
Survival Use of Plants
Plants For Food
After having solved the problems of finding water, shelter, and animal food, you will have to consider the use of plants you can eat. In a survival situation you should always be on the lookout for familiar wild foods and live off the land whenever possible.
You must not count on being able to go for days without food as some sources would suggest. Even in the most static survival situation, maintaining health through a complete and nutritious diet is essential to maintaining strength and peace of mind.
Nature can provide you with food that will let you survive any ordeal, if you don’t eat the wrong plant. You must therefore learn as much as possible beforehand about the flora of the region where you will be operating. Plants can provide you with medicines in a survival situation. Plants can supply you with weapons and raw materials to construct shelters and build fires. Plants can even provide you with chemicals for poisoning fish, preserving animal hides, and for camouflaging yourself and your equipment.
Plant Identification
You identify plants, other than by memorizing particular varieties through familiarity, by using such factors as leaf shape and margin, leaf arrangements, and root structure.
The basic leaf margins (fig. 3-139) are toothed, lobed, and toothless or smooth.
These leaves may be lance-shaped, elliptical, egg-shaped, oblong, wedge-shaped, triangular, long-pointed, or top-shaped (fig. 3-140). The basic type of leaf arrangements (fig. 3-141) are
opposite, alternate, compound, simple, and basal rosette.
The basic types of root structures (fig. 3-142) are the bulb, clove, taproot, tuber, rhizome, corm, and crown. Bulbs are familiar to us as onions and, when sliced in half, will show center rings. Cloves are those bulblike structures that remind us of garlic and will separate into small pieces when broken apart. This characteristic separates wild onion from wild garlic. Taproots feature carrots and may be single-rooted or branched, but usually only one plant stalk arises from each root. Tubers are like potatoes and daylilies and you will find these structures either on strings or in clusters underneath the parent plants. Rhizomes are large creeping rootstocks or underground stems and many plants arise from the “eyes” of these roots. Corms are similar to bulbs but are solid when cut rather than possessing rings. A crown is the type of root structure found on plants such as asparagus and looks much like a mophead under the soil’s surface.
Learn as much as possible about plants you intend to use for food and their unique characteristics. Some plants have both edible and poisonous parts. Many are edible only at certain times of the year. Others may have poisonous relatives that look very similar to the ones you can eat or use for medicine.
Edibility of Plants
Plants are valuable sources of food because they are widely available, easily gathered, and, in the proper combinations, can meet all your nutritional needs.
The thought of having a diet consisting only of plant food is often distressing to stranded survivors. This is not the case if the survival episode is
140
entered into with the confidence and intelligence based on knowledge or experience. If the survivors know what to look for, can identify it, and know how to prepare it properly for eating, there is no reason why they can’t find food. In many isolated regions, survivors who have had some previous training in plant identification can enjoy wild plant food.Plants provide carbohydrates, which provide body energy and calories. Carbohydrates keep weight and energy up, and include important starches and sugars.A documented and authoritative example of the value of a strictly plant diet in survival can be cited in the case of a Chinese botanist who had been drafted into the Japanese Army during World War II. Isolated with his company in a remote section of the Philippines, the Chinese botanist kept 60 of his fellow soldiers alive for 16 months by finding wild plants and preparing them properly. He selected six men to assist him, and then found 25 examples of edible plants in the vicinity of their camp. He acquainted the men with these samples, showing them what parts of the plants could be used for food. He then sent the men out to look for similar plants and had them separate the new plants according to the original examples to avoid any poisonous plant mingling with the edible ones. The result of this effort was impressive. Though all the men had a natural desire for ordinary food, none suffered physically from the plant food diet. The report was especially valuable because the botanist kept a careful record of all the food used, the results, and the comments of the men. This case history reflects the same opinions as those found in questionnaires directed to American survivors during World War II.Another advantage of a plant diet is availability. In many instances, a situation may present itself in which gathering animal food is out of the question because of injury, being unarmed, being in enemy
territory, exhaustion, or being in an area which lacks wildlife. If convinced that vegetation can be depended upon for daily food needs, the next question is “where to get what and how.”
Universal Edibility Test
There are many plants throughout the world. Experts estimate there are about 300,000 classified plants growing on the surface of the Earth, including many which thrive on mountain tops and on the floors of the oceans. There are two considerations that survivors must keep in mind when gathering plant foods. The first consideration, of course, is the plant be edible, and preferably, tasty. Tasting or swallowing even a small portion of some can cause severe discomfort, extreme internal disorders, and even death. If it includes an inedible or poisonous variety in its family, the edible plant must be distinguishable to the average eye from the poisonous one. Therefore, if you have the slightest doubt about a plant’s edibility, apply the Universal Edibility Test (fig. 3-143) before eating any portion of it. Usually a plant is selected because one special part is edible, such as the stalk, the fruit, or the nut.
Before testing a plant for edibility, make sure there are enough plants to make the testing worth your time and effort. Each part of a plant (roots, leaves, flowers, and so on) requires more than 24 hours to test. Do not waster time testing a plant that is not relatively abundant in the area. In selecting plant foods, the following should be considered. Select plants resembling those grown by people. It is risky to rely upon a plant (or parts thereof) being edible for human consumption simply because animals have been seen eating it (for example, horses eat leaves from poison ivy; some rodents eat poisonous mushroom). Monkeys will
141

put poisonous plants and fruits in pouches of their mouths and spit them out later.
When selecting an unknown plant as a possible food source, apply the following general rules:
· Mushrooms and fungi should not be selected. Fungi have toxic peptides, a protein-base poison which has no taste. There is no field test other than eating to determine whether an unknown mushroom is edible. Anyone gathering wild mushrooms for eating must be absolutely certain of the identity of every specimen picked. Some species of wild mushrooms are difficult for an expert to identify. Because of the potential for poisoning, relying on mushrooms as a viable food source is not worth the risk.
· Plants with umbrella-shaped flowers are to be completely avoided, although carrots, celery, dill, and parsley are members of this family. One of the most poisonous plants, poison water hemlock, is also a member of this family (fig. 3-144).
· All of the legume family should be avoided (beans and peas). They absorb minerals from the soil and cause problems. The most common mineral absorbed is selenium. Selenium is what has given locoweed its fame. (Locoweed is a vetch).
· As a general rule, all bulbs should be avoided. Examples of poisonous bulbs are tulips and death camas.
· White and yellow berries are to be avoided as they are almost always
poisonous. Approximately one-half of all red berries are poisonous. Blue and black berries are generally safe for consumption.
· Aggregated fruits and berries are always edible (for example, thimbleberry, raspberry, salmon-berry, and blackberry).
· Single fruits on a stem are generally considered safe to eat.
· Plants with shiny leaves are considered to be poisonous and caution should be used.
· Plants that are irritants to the skin should not be eaten, such as poison ivy.
· A plant that grows in sufficient quantity within the local area should be selected to justify the edibility test and provide a
lasting source of food if the plant proves edible.
· Plants growing in the water or moist soil are often the most tasty.
· Plants are less bitter when growing in shaded areas.
The previously mentioned information concerning plants is general. There are exceptions to every rule, but when selecting unknown plants for consumption, plants with these characteristics should be avoided. Plants that do not have these characteristics should be considered as possible food sources. Apply the edibility test to only one plant at a time so if some abnormality
142
WARNINGDo not eat mushroom in a survival situation! The only way to tell if a mushroom is edible is by positive identification. There is no room for experimentation. Symptoms of the most dangerous mushrooms affecting the central nervous system may show up after several days have passed when it is too late to reverse their effects.

does occur, it will be obvious which plant caused the problem. Once a plant has been selected for the edibility test, proceed as follows:
· Crush or break part of the plant to determine the color of its sap. If the sap is clear, proceed to the next step.
· Touch the plant’s sap or juice to the inner forearm or tip of the tongue. (A small taste of a poisonous plant will not do serious harm.) If there are no ill effects, such as a rash or burning sensation to the skin, bitterness to the taste, or numbing sensation of the tongue or lips, then proceed with the rest of the steps.
Note: Sometimes heavy smokers are unable to taste various poisons, such as alkaloids.
· Prepare the plant or plant part for consumption by boiling in two changes of water. The toxic properties of many plants are water soluble or destroyed by heat; cooking and discarding in two changes of water lessens the amount of poisonous material or removes it completely. Parboiling is a process of boiling the individual plant parts in repeated changes of water to remove bitter elements. This boiling period should last about 5 minutes.
· Place about 1 teaspoonful of the prepared plant food in the mouth for 5 minutes and chew but do not swallow it. A burning, nauseating, or bitter taste is a warning of possible danger. If any of these ill effects occur, remove the material from the mouth at once and discard that plant as a food source. However, if no burning sensation or other unpleasant effect occurs, swallow the plant material and wait 8 hours.
· If after this 8 hours there are no ill effects, such as nausea, cramps, or diarrhea,
eat about 2 tablespoonfuls and wait an additional 8 hours.
· If no ill effects occur at the end of this 8-hour period, the plant may be considered edible.
· Keep in mind that any new or strange food should be eaten with restraint until the body system has become accustomed to it. The plant may be slightly toxic and harmful when large quantities are eaten.
If cooking facilities are not available, survivors will not be able to boil the plant before consumption. In this case, plant food may be prepared as follows:
· Leach the plant by crushing the plant material and placing it in a container. Pour large quantities of cold water over it (rinse the plant parts). Leaching removes some of the bitter elements of non-toxic plants.
· If leaching is not possible, survivors should follow the steps they can in the edibility test.
To avoid potentially poisonous plants, stay away from any wild or unknown plants that have:
· Milky or discolored sap.· Beans, bulbs, or seeds inside pods.· Bitter or soapy taste.· Spines, fine hairs, or thorns.· Dill, carrot, parsnip, or parsleylike
foliage.· “Almond” scent in woody parts and
leaves.· Grain heads with pink, purplish, or black
spurs.· Three-leaved growth pattern.
Using the above criteria as eliminators when choosing plants for the Universal Edibility Test will cause you to avoid some
143
Selenium: A nonmetallic element similar to sulfur, used as a semiconductor and in xerography; atomic number 34; atomic weight 78.96.
Vetch: Any of various climbing or twining plants of the genus Vicia, bearing pinnate leaves and small, usually purplish flowers.

edible plants. More important, these criteria will often help you avoid plants that are potentially toxic to eat or touch.
Learn as much as possible about the plant life of the areas where you train regularly and where you expect to be traveling or working.
The survivor will find some plants which are completely edible, but many plants which they may find will have only one or more identifiable parts having food and thirst-quenching value. The variety of plant component parts which might contain substance of food value is shown in figure 3-145.
Underground Parts
Tubers. The potato is an example of an edible tuber. Many other kinds of plants produce tubers such as the tropical yam, the Eskimo potato, and tropical water lilies. Tubers are usually found below the ground. Tubers are rich in starch and should be cooked by roasting in an earth oven or by boiling to break down the starch for ease in digestion.
The following are some of the plants with edible tubers.
1. Arrowroot, East Indian2. Taro3. Cassava (Tapioca)4. Bean, Yam5. Chufa (Nut Grass)6. Water Lily (Tropical)7. Sweet Potato (Kamote)8. Yam Tropical
Roots and Rootstalks. Many plants produce roots which may be eaten. Edible roots are often several feet in length. In comparison, edible rootstalks are underground portions of the plant which have become thickened, and are relatively short and jointed. Both true roots and rootstalks are storage organs rich in stored starch. The following are some of the plants with edible roots or rootstalks (rhizomes):
1. Baobab 11. Rush, flowering2. Pine, Screw 12. Cattail
3. Bean, Goa 13. Spinach, Ceylon4. Plantain, Water 14. Chicory5. Bracken 15. Ti Plant6. Reindeer Moss 16. Horseradish7. Calla, Wild 17. Tree Fern (Water Arum) 18. Lotus Lily8. Rock Tripe 19. Water Lily9. Pollypody (Temperate Zone)10. Canna Lily 20. Manioc
Bulbs. The most common edible bulb is the wild onion, which can easily be detected by its characteristic odor. Wild onions may be eaten uncooked, but other kinds of bulbs are more tasty if cooked. In Turkey and Central Asia, the bulb of the wild tulip may be eaten. All bulbs contain a high percentage of starch. (Some bulbs are poisonous, such as the death camas which has white or yellow flowers.) The following are some of the plants with edible bulbs:
1. Lily 4. Blue Camas2. Tulip 5. Tiger Lily3. Onion
Shoots and Leaves
Shoots (Stems). All edible shoots grow in much the same fashion as asparagus. The young shoots of ferns (fiddleheads) and especially those of bamboo and numerous kinds of palms are desirable for food. Some kinds of shoots may be eaten raw, but most are better if first boiled for 5 to 10 minutes, the water drained off, and the shoots reboiled until they are sufficiently cooked for eating (parboiled). (See fig. 3-146.)
1. Agave (Century 15. Rock Tripe Plant) 16. Colocynth
2. Palm, Coconut 17. Palm, Sugar3. Purslane 18. Papaya4. Reindeer Moss 19. Sugar Cane5. Bamboo 20. Lotus Lily6. Palm, Fishtail 21. Pokeweed (poisonous7. Bean, Goa roots)8. Palm, Nipa 22. Sweet Potato9. Bracken (Kamote)10. Palm, Rattan 23. Luffa Sponge11. Rhubarb 24. Water Lily (Tropical)12. Cattail 25. Polypody13. Palm, Sago 26. Palm, Buri
144
Leach: To remove from an object by the action of a percolating liquid. To flow or leak out slowly.

14. Spinach, Ceylon 27. Willow, Arctic
Leaves. The leaves of spinach-type plants (potherbs), such as wild mustard, wild lettuce, and lamb quarters, may be eaten either raw or cooked. Prolonged cooking, however, destroys most of the vitamins. Plants which produce edible leaves are perhaps the most numerous of all edible plants. The young tender leaves of nearly all nonpoisonous plants are edible. The following are only some of the plants with edible leaves:
1. Amaranth 17. Plaintain2. Luffa Sponge 18. Pokeweed (poisonous3. Rock Tripe roots)4. Avocado 19. Sweet Potato5. Mango (Kamote)6. Sorrel, Wild 20. Tamarind7. Baobab 21. Horseradish8. Orach, Sea 22. Prickly Pear9. Bean, Goa 23. Taro (only after10. Papaya cooking)11. Spinach, Ceylon 24. Lettuce, Water12. Cassava 25. Purslane13. Chickory 26. Ti Plant14. Pine, Screw 27. Willow, Arctic15. Spreading Wood 28. Lotus Lily
Fern 29. Reindeer Moss16. Dock
Pith. Some plants have an edible pith in the center of the stem. The pith of some kinds of tropical plants is quite large. Pith of the sago palm is particularly valuable because of its high food value. The following are some of the palms with edible pitch (starch):
1. Buri 4. Coconut2. Fishtail 5. Rattan3. Sago 6. Sugar
Bark. The inner bark of a tree—the layer next to the wood—may be eaten raw or cooked. It is possible in northern areas to make flour from the inner bark of such trees as the cottonwood, aspen, birch, willow, and pine. The outer bark should be avoided in all cases because this part contains large amounts of a bitter substance (tannin). Pine bark is high in vitamin C. The outer bark of pines can be cut away and the inner bark stripped from the trunk and eaten fresh, dried, or cooked, or
it may be grinded into flour. Bark is most tasty when newly formed in spring. As food, bark is most useful in the arctic regions, where plant food is often scarce.
Flower Parts
Flowers and Buds. Fresh flowers may be eaten as part of a salad or to supplement a stew. The hibiscus flower is commonly eaten throughout the southwest Pacific area. In South America, the people of the Andes eat nasturtium flowers. In India, it is common to eat the flowers of many kinds of plants as part of a vegetable curry. Flowers of desert plants may also be eaten. The following are plants with edible flowers:
1. Abal 5. Horseradish2. Colocynth 6. Caper3. Papaya 7. Luffa Sponge4. Banana
Pollen. Pollen looks like yellow dust. All pollen is high in food value and in some plants, especially the cattail. Quantities of pollen may easily be collected and eaten as a kind of gruel.
Fruits
Edible fruits can be divided into sweet and nonsweet (vegetable) types. Both are the seed
145
Hibiscus: A particularly tropical plant, shrub, or tree bearing large, different colored flowers.
Nasturtium: Any of various plants, having flowers with five broad petals that are usually yellow, orange, or red.
Ragweed: A weed whose airborne pollen is one of the principal causes of hay fever.
Amaranth: A weedy plant with small greenish or purplish flower clusters.
Goose-foot: Any of various usually weedy plants bearing small green flowers.
Millet: A grass grown in Eurasia for its seed and in North America for hay.

bearing parts of the plant. Sweet fruits are often plentiful in all areas of the world where plants grow. For instance, in the far north, there are blueberries and crowberries; in the temperate zones, cherries, plums, and apples; and in the American deserts, fleshy cactus fruits. Tropical areas have more kinds of edible fruit than other areas, and a list would be endless. Sweet fruits may be cooked, or for maximum vitamin content, left uncooked. Common vegetable fruits include the tomato, cucumber, and pepper.
Fleshy Fruits (Sweet). The following are plants with edible fruits:
1. Apple 13. Jackfruit2. Bael Fruit 14. Jujube, Common3. Banana 15. Mango4. Bignay 16. Mulberry5. Blueberry 17. Papaya6. Bullocks Heart 18. Plum, Batako7. Cloudberry 19. Pokeberry8. Crabapple 20. Prickly Pear9. Cranberry 21. Rose Apple10. Fig 22. Soursop11. Grape 23. Sweetsop12. Huckleberry
Fleshy Fruits (Vegetables). The following are plants with edible fruits (vegetables):
1. Breadfruit 4. Caper2. Horseradish 5. Luffa Sponge3. Plaintain
Seeds and Grains
Seeds of many plants, such as buckwheat, ragweed, amaranth, and goose-foot, contain oils and are rich in protein. The grains of all cereals and many other grasses, including millet, are also extremely valuable sources of plant protein.
They may either be ground between stones, mixed with water and cooked to make porridge, parched or roasted over hot stones. In this state, they are still wholesome and may be kept for long periods without further preparation (fig. 3-147). The following are
some of the plants with edible seeds and grains:
1. Amaranth 11. Sterculia2. Millet, Italian 12. Baobab3. Rice 13. Orach, Sea4. Bamboo 14. St. John’s Bread5. Millet, Pearl 15. Bean Goa6. Palm, Nipa 16. Lotus Lily7. Tamarind 17. Purslane8. Pine, Screw 18. Water Lily9. Coloynth (Temperate)10. Water Lily 19. Luffa Sponge (Tropical)
Nuts. Nuts are among the most nutritious of all raw plant foods and contain an abundance of valuable protein. Plants bearing edible nuts occur in all the climatic zones of the world and in all continents except in the arctic regions. Inhabitants of the temperate zones are familiar with walnuts, filberts, almonds, hickory nuts, acorns, hazelnuts, beechnuts, and pine nuts, to mention just a few. Tropical zones produce coconuts and other palm nuts, brazil nuts, cashew nuts, and macadamia nuts (fig. 3-148). Most nuts can be eaten raw but some such as acorns, are better when cooked. The following are some of the plants with edible nuts.:
1. Almond 8. Filbert (Hazelnut)2. Chestnut, Water 9. Palm, Fishtail
(Trapa Nut) 10. Jackfruit Seeds3. Palm, Buri 11. Oak, English (Acorn)4. Almond, Indian or 12. Palm, Sago
Tropical 13. Palm, Sugar5. Chesnut, Mountain 14. Pine6. Palm, Coconut 15. Pistachio, Wild7. Beechnut 16. Walnut
Pulps. The pulp around the seeds of many fruits is the only part that can be eaten. Some fruits produce sweet pulp; others have a tasteless or even bitter pulp. Plants that produce edible pulp include the custard apple, inga pod, breadfruit, and tamarind. The pulp of breadfruit must be cooked, whereas in other plants, the pulp may be eaten uncooked. Use the edibility rules in all cases of doubt.
Gums and Resins
146

Gum and resin are sap that collects and hardens on the outside surface of the plant. It is called gum if it is soft and soluble, and resin if it is hard and not soluble. Most people are familiar with the gum which exudes from cherry trees and the resin which seeps from the pine trees. These plant by products are edible and are a good source of nutritious food which should not be overlooked.
Saps. Vines or other plant parts may be tapped as potential sources of usable liquid. The liquid is obtained by cutting the flower stalk and letting the fluid drain into some sort of container such as a bamboo section. Palm sap with its high-sugar content is highly nutritious. The following are some plants with edible sap and drinking water:
1. Acacia, Sweet 8. Palm, Nipa (sap) (water) 9. Palm, Rattan (water)2. Colocynth (water) 10. Cactus (water)3. Palm, Coconut (sap) 11. Grape (water)4. Palm, Fishtail (sap) 12. Banana (water)5. Agave (water) 13. Palm, Sago (sap)6. Cuipo Tree (water) 14. Palm, Sugar (sap)7. Saxual (water) 15. Palm, Buri (sap)
Food in Tropical Climates
A survivor in search of plant food should apply some basic principles to the search. A survivor is lucky to find a plant that can readily be identified as edible. If a plant resembles a known plant, it is very likely to be of the same family and can be used. If a plant cannot be identified, the edibility test should be applied. A survivor will find many edible plants in the tropical forest, but chances of finding them in abundance are better in an area that has been growned in the past (secondary growth).
Some Plants a Survivor Might Find
Citrus fruit trees may be found in uncultivated areas, but are primarily limited to areas of secondary growth. The many varieties of citrus fruit trees and shrubs have leaves 2 to 4 inches long alternately arranged. The leaves are leathery, shiny, and evergreen. The leaf stem is often winged. Small (usually
green) spines are often present by the side of the bud. The flowers are small and white to purple in color. The fruit has a leathery rind with numerous glands and is round and fleshy with several cells (fruit sections or slices) and many seeds. The great number of wild and cultivated fruits (oranges, limes, lemons, etc.) native to the tropics are eaten raw or used in beverages.
Taro can be found in both secondary growth and in virgin areas. It is usually found in the damp, swampy areas in the wild, but certain varieties can be found in the forest. It can be identified by its large heart-shaped or arrowhead-shaped leaves growing at the top of a vertical stem. The stem and leaves are usually green and rise a foot or more from a tuber at the base of the stem. Taro leaf tips point down; poisonous elephant ear points up. All varieties of taro must be cooked to break down the irritating crystals in the plant.
Wild pineapple can be found in the wild, and common pineapples may be found in secondary growth areas. The wild pineapple is a coarse plant with long clustered, sword-shaped leaves with saw-toothed edges. The leaves are spirally arranged in a rosette. Flowers are violet or reddish. The wild pineapple fruit will not be as fully developed in the wild state as when cultivated. The seeds from the flower of the plant are edible as well as the fruit. The ripe fruit may be eaten raw, but the green fruit must be cooked to avoid irritation. (The leaf fibers make excellent lashing material and ropes can be manufactured from it.)
Yams may be found cultivated or wild. There are many varieties of yam, but the most common has a vine with square-shaped cross section and two rows of heart-shaped leaves growing on opposite sides of the vine. The vine can be followed to the ground to locate the tuber. The tubers should be cooked to destroy the poisonous properties of the plant (fig. 3-149).
Ginger grows in the tropical forest and is a good source of flavoring for food. It is found in shaded areas of the primary forest. The ginger plant grows 5 to 6 feet high. It has seasonal white snapdragon-type flowers, some variations have red flowers. The leaves when crushed produce a very sweet odor and
147

are used for seasoning or tea. The tea is used by primitive people to treat colds and fever.
The coconut palm is found wild on the seacoast and in farmed areas inland. It is a tree 50 to 100 feet high, either straight or curved, marked with ringlike leaf scars. The base of the tree is swollen and surrounded by a mass of rootlets. The leaves are leathery and reach a length of 15 to 20 feet. (The leaves make excellent sheathing for shelter.) The fruit grows in clusters at the top of the tree. Each nut is covered with a fibered hard shell. The “heart” of the coconut palm is edible and is found at the top. (The new leaves grow out of the heart.) Cut the tree down and remove the leaves to gain access to the heart. The flower of the coconut tree is also edible and is best used as a cooked vegetable. The fruit bearing nut is filled with a meat that can be eaten raw or cooked. There are many other varieties of palm found in the tropics which have edible hearts and fruits (fig. 3-150).
The papaya is an excellent source of food and can be found in secondary growth areas. The tree grows to a height of 6 to 20 feet. The large dark green, many fingered, rough-edged leaves are clustered at the top of the plant. The fruit grows on the stem clustered under the leaves. The fruit is small in the wild state, but cultivated varieties may grow to 15 pounds. The peeled fruit can be eaten raw or cooked. The peeling should never be eaten. The green fruit is usually cooked. The milky sap of the green fruit is used as a meat tenderizer; care should be taken not to get it in the eyes. Always wash the hands after handling fresh green papayas. If some of the sap does get in the eyes, they should be washed immediately (fig. 3-151).
Cassava (tapioca) can be found in secondary growth areas. It can be identified by its stalk-like leaves which are deeply divided into numerous pointed sections or fingers. The woody (red) stem of the plant is slender and at points appears to be sectioned. When found growing wild in secondary growth areas, pull the trunks to find where a root grows. When one is found, a tuber can be dug. Tubers have been found growing around a portion of the stem that was covered with vegetation. The brown tuber of the plant is white inside and must be boiled or roasted. The tuber must also be peeled before boiling.
(The green-stemmed species of cassava is poisonous and must be cooked in several changes of water before eating it.)
Ferns can be found in the virgin tropical forest or in secondary growth areas. The new leaves (fiddle heads) at the top are the edible parts. They are covered with fuzzy hair which is easily removed by rubbing or washing. Some can be eaten raw, but as a rule, should be cooked as a vegetable (fig. 3-152).
Sweet sops can be found in the tropical forest. It is a small tree with simple, oblong leaves. The fruit is shaped like a blunt pine cone with thick gray-green or yellow, brittle spines. The fruit is easily split or broken when ripe, exposing numerous dark brown seeds imbedded in the cream colored, very sweet pulp.
The star apple is common in the tropical forests. The tree grows up to a height of 60 feet and can be identified by the leaves which have shiny, silky, brown hairs on the bottom. The fruit looks like a small apple or plum with a smooth greenish or purple skin. The meat is greenish in color and milky in texture. When cut through the center, the brown, elongated seeds make a figure like a 6- or 10-pointed star. The fruit is sweet and eaten only when fresh. When cut, the rind will, like other parts of the tree, emit a white sticky juice or latex which is not poisonous (an exception to the milky sap rule).
Of the 300,000 different kinds of wild plants in the world, a large number of them are found in the tropics and many of them are potentially edible. Very few are deadly when eaten in small quantities. Those which are poisonous may be detected by using the edibility rules. Only a small number of jungle plants have been discussed. It would be of great benefit to anyone flying over or passing through a tropical environment to study the plant foods available in this type of environment.
Food in Dry Climates
Although not as readily available as in the tropical climate, food is available and obtainable.
Plant life in the desert is varied due to the different geographical areas. It must be remembered, therefore, that available plants
148

will depend on the actual desert, the time of year, and if there has been any recent rainfall. The aircrew member should be familiar with plants in the area to be flown over.
Date palms are located in most deserts and are cultivated by the native people around oases and irrigation ditches. They bear a nutritious, oblong, black fruit (when ripe).
Fig trees are normally located in tropical and subtropical zones; however, a few species can be found in the deserts of Syria and Europe. Many kinds are cultivated. The fruit can be eaten when ripe. Most figs resemble a top or a small pear somewhat squashed in shape. Ripe figs vary greatly as to palatability. Many are hard, woody, covered with irritating hairs, and worthless as survival food. The edible varieties are soft, delectable, and almost hairless. They are green, red, or black when ripe.
Millet, a grain bearing plant, is grown by natives around oases and other water sources in the Middle East deserts.
The fruit of all cacti are edible. Some fruits are red, some yellow, but all are soft when ripe. Any of the flat leaf variety, such as the prickly pear, can be boiled and eaten as greens (like spinach) if the spines are first removed. During severe droughts, cattlemen burn off the spines and use the thick leaves for fodder. Although the cactus originates in the American deserts, the prickly pear has been introduced to the desert edges in Asia, the Near East, and Australia, where it grows profusely. Natives eat the fruit as fast as it ripens.
There are two types of onions in the Gobi desert. A hot, strong, scallion-type grows in the late summer. It will improve the taste of food, but should not be used as a primary food. The highland onions grow 2 to 2.5 inches in diameter. These can be eaten like apples and the greens can also be eaten raw or cooked.
All desert flowers can be eaten except those with milky or colored sap.
All grasses are edible. Usually the best part is the whitish tender end that shows when the grass stalk is pulled from the ground. All grass seeds are edible.
Food in Snow and Ice Climates
The plant life of the arctic regions is generally small and stunted due to the effects of permafrost, low mean temperatures, and a short growing season.
On the barren tundra areas, a wide variety of small edible plants and shrubs exist. During the short summer months on the tundra, Labrador tea, fire-weed, coltsfoot, dwarf arctic birch, willow, and numerous other plants and berries can be found. During the winter, roots, rootstalks, and frozen berries can be found beneath the snow. Lichens and mosses are abundant but should be selected carefully as some species are poisonous.
In bog or swamp areas, many types of water sedge, cattail, dwarf birch, and berries are available. During spring and summer, many young shoots from these plants are easily collected.
The wooded areas of the arctic contain a variety of trees (birch, spruce, poplar, aspen, and others). Many berry-producing plants can be found, such as blueberries, cranberries, raspberries, cloud berries, and crow berries. Wild rose hips, Labrador tea, alder, and other shrubs are very abundant. Many wild edible plants are highly nutritious. Greens are particularly rich in carotene (vitamin A). Leafy greens, many berries, and rose hips are all rich in ascorbic acid (vitamin C). Many roots and rootstalks contain starch and can be used as a potato substitute in stews and soups.
Although there are several types of edible mushrooms, fungi, and puff-balls in the arctic, a person should avoid ingesting them because it is difficult to identify the poisonous and nonpoisonous species. During the growing season, the physical characteristics can change considerably making positive identification even more difficult.
There are many poisonous plants and a few poisonous berries in the arctic. Very few cause death; many will cause extreme nausea, dizziness, abdominal pain, and diarrhea. Contact poisonous plants, such as poison ivy, are not found in the arctic. The more common poisonous plants are shown in figures 3-153 through 3-160.
When selecting edible plants, select young shoots when possible as these will be the most tender. Plants should be eaten raw to obtain
149

the most nutritive value. Some of the more common edible plants are:
Dandelions generally grow with grasses but may be scattered over rather barren areas. Both leaves and roots are edible raw or cooked. The young leaves make good greens; the roots (when roasted) are used as a substitute for coffee.
Black and white spruce are generally the northern most evergreens. These trees have short, stiff needles that grow singularly rather than in clusters like pine needles. The cones are small and have thin scales. Although the buds, needles, and stems have a strong resinous flavor, they provide essential vitamin C by chewing them raw. In spring and early summer, the inner bark can be used for food.
The dwarf arctic birch is a shrub with thin tooth-edged leaves and bark which peels off in sheets. The fresh green leaves and buds are rich in vitamin C. The inner bark may also be eaten.
There are many different species of willow in the arctic. Young tender shoots may be eaten as greens and the bark of the roots is also edible. They have a decidedly sour taste but contain a large amount of vitamin C (fig. 3-161).
Lichens are abundant and widespread in the far North and can be used as a source of emergency food. Many species are edible and rich in starch-like substances, including Iceland moss, peat moss and reindeer lichen. Beard lichen growing on trees has been used as food by Indians. However, some of it contains a bitter acid which causes irritation of the digestive tract. If lichens are boiled, dried, and powdered, this acid is removed and the powder can then be used as flour or made into a thick soup.
Food on Open Seas
Most seaweeds are edible and are a good source of food, especially for vitamins and minerals. Some seaweeds contain as much as 25 percent protein, while others are composed of over 50 percent carbohydrates. At least 75 different species are used for food by seacoast residents around the world. For many people, especially the Japanese, seaweeds are an essential part of the diet, and the most popular varieties have been successfully farmed for
hundreds of years. The high cellulose content may require gradual adaptation because of their laxative quality if they comprise a large part of the diet. As with vegetables, some species are more flavorful than others. Generally, leafy green, brown, or red seaweeds can be washed and eaten raw or dried. The following list of edible seaweeds gives a description of the plant, tells where it may be found, and in many cases, suggests a method of preparation:
Common green seaweeds (fig. 3-162), often called sea lettuce (Ulva lactuca), are in abundance on both sides of the Pacific and North Atlantic oceans. After washing it in clean water, it can be used as a garden lettuce.
The most common edible brown seaweeds are the sugar wrack, kelp, and Irish moss (fig. 3-163).
The young stalks of the sugar wrack are sweet to taste. This seaweed is found on both sides of the Atlantic and on the coasts of China and Japan.
Edible kelp has a short cylindrical stem and thin, wavy olive-green or brown fronds one to several feet in length. It is found in the Atlantic and Pacific oceans, usually below the high-tide line on submerged ledges and rocky bottoms. Kelp should be boiled before eating. It can be mixed with vegetables or soup.
Irish moss, a variety of brown seaweed, is quite edible, and is often sold in market places. It is found on both sides of the Atlantic Ocean and can be identified by its tough, elastic, and leathery texture; however, when dried, it becomes crisp and shrunken. It should be boiled before eating. It can be found at or just below the high-tide line. It is sometimes found cast upon the shore.
Red seaweeds can usually be identified by their characteristic reddish tint, especially the edible varieties. The most common and edible red seaweeds include the dulse, laver, and other warm-water varieties (fig. 3-164).
Dulse has a very short stem which quickly broadens into a thin, broad, fan-shaped expanse which is dark red and divided by several clefts into short, round-tipped lobes. The entire plant is from a few inches to a foot in length. It is found attached to rocks or coarser seaweeds, usually at the low-tide level, on both sides of the Atlantic Ocean and in the Mediterranean. Dulse is leathery in
150

consistency and is sweet to the taste. If dried and rolled, it can be used as a substitute for tobacco.
Laver is usually red, dark purple, or purplish-brown, and has a satiny sheen or filmy luster. Common to both the Atlantic and Pacific oceans, it has been used as food for centuries. This seaweed is used as a relish, or is cleaned and then boiled gently until tender. It can also be pulverized and added to crushed grains and fried in the form of flatcakes. During World War II, laver was chewed for its thirst-quenching value by New Zealand troops. Laver is usually found on the beach at the low-tide level.
A great variety of red, warm-water seaweed is found in the South Pacific area. This seaweed accounts for a large portion of the native diet. When found on the open sea, bits of floating seaweed may not only be edible but often contains tiny animals that can be used for food. The small fish and crabs can be dislodged by shaking the clump of seaweed over a container.
Plankton includes both minute plants and animals that drift about or swim weakly in the ocean. These basic organisms in the marine food chain are generally more common near land since their occurrence depends upon the nutrients dissolved in the water. Plankton can be caught by dragging a net through the water. The taste of the plankton will depend upon the types of organisms predominant in the area. If the population is mostly fish larvae, the plankton will taste like fish. If the population is mostly crab or shellfish larvae, the plankton will taste like crab or shellfish. Plankton contains valuable protein, carbohydrates and fats. Because of its high chiton and cellulose content, however, plankton cannot be immediately digested in large quantities. Therefore, anyone subsisting primarily on a plankton diet must gradually increase the quantities consumed. Most of the planktonic algae (phytoplankton) are smaller than the planktonic animals (zooplankton) and, although edible, are less tasty. Some plankton algae, for example, those dinoflagellates that cause “red tides” and paralytic shellfish poisoning, are toxic to humans.
If a survivor is going to use plankton as a food source, there must be a sufficient supply
of freshwater for drinking. Each plankton catch should be examined to remove all stinging tentacles broken from jellyfish or Portuguese man-of-war. The primarily gelatinous species may also be selectively discarded since their tissues are predominately composed of saltwater. When the plankton is found in subtropical waters during the summer months, and the presence of poisonous dinoflagellates is suspected (due to discoloration or high luminescence of the ocean), the edibility test should be applied before eating.
The final precaution which a survivor may wish to take before ingesting plankton is to feel or touch the plankton to check for species that are especially spiney. The catch should be sorted (visually) or dried and crushed before eating if it contains large numbers of these spiney species.
Preparing Plant Food
Preparing plant foods can be more involved than preparing animal life.
Some plant foods, such as acorns and tree bark may be bitter because of tannin. These plants will require leaching by chopping up the plant parts, and pouring several changes of fresh water over them. This will help wash out the tannin, making the plant more tasty. Other plants such as cassava and green papaya must be cooked before eating to break down the harmful enzymes and chemical crystals within them and make them safe to eat. Plants such as skunk cabbage must undergo this cooking process several times before it is safe to eat.
All starchy foods must be cooked since raw starch is difficult to digest. They are boiled, steamed, roasted, or fried and are eaten plain, or mixed with other wild foods. The manioc (cassava) is best cooked, because the bitter form (green stem) is poisonous when eaten raw. Starch is removed from sago palm, cycads, and other starch-producing trunks by splitting the trunk and pounding the soft, whitish inner parts with a pointed club. This pulp is washed with water and the white sago (pure starch) is drained into a container. It is washed a second time, and then it may be used directly as a flour. One trunk of the sago
151

palm will supply a survivor's starch needs for many weeks.
The fiddle-heads of all ferns are the curled, young tasty fronds which have the same food value as cabbage or asparagus. Practically all types of fiddle-heads are covered with hair which makes them bitter. The hair can be removed by washing the fiddleheads in water If fiddleheads are especially bitter, they should be boiled for 10 minutes and then reboiled in fresh water for 30 to 40 minutes. Wild bird eggs or meat may be cooked with the fiddleheads to form a stew.
Wild grasses have an abundance of seeds, which may be eaten boiled or roasted afire separating the chaff from the seeds by rubbing. No known grass is poisonous. If the kernels are still soft and do not have large stiff barbs attached, they may be used for porridge. If brown or black rust is present, the seeds should not be eaten (Ergot Poisoning). To gather grass seeds, a cloth is placed on the ground and the grass heads beaten with sticks.
Plants that grow in wet places along margins of rivers, lakes, and ponds, and those growing directly in water are of potential value as survival food. The succulent underground parts and stems are most frequently eaten. Poisonous water plants are rare. In temperate climates, the water hemlock is the most poisonous plant found around marshes and ponds. In the tropics, the various members of the Calla lily family often grow in very wet places. The leaves of the Calla lily look like arrowheads. Jack-in-the-pulpit, Calla lily, and sweet flag are members of the Arum family. To be eaten, the members of this plant family must be cooked in frequent changes of water to destroy the irritant crystals in the stems. Two kinds of marsh and water plants are the cattail and the water lily.
The cattail (Typha) is found worldwide except in tundra regions of the far north (fig. 3-165). Cat-tails can be found in the more moist places in desert areas of all continents as well as in the moist tropic and temperate zones of both hemispheres. The young shoots taste like asparagus. The spikes can be boiled or steamed when green and then eaten. The rootstalks, without the outer covering, are eaten boiled or raw. Cattail roots can be cut
into thin strips, dried, and then ground into flour. They are 46 percent starch, 11 percent sugar, and the rest is fiber. While the plant is in flower, the yellow pollen is very abundant; this may be mixed with water and made into small cakes and steamed as a substitute for bread.
Water lilies (Nymphaea and Nuphar) occur on all the continents, but principally in southern Asia, Africa, North America, and South America (fig. 3-166). Two main types are:
1. Temperate water lilies produce enormous rootstalks and yellow or white flowers which float on the water.
2. Tropical water lilies produce large edible tubers and flowers which are elevated above the water surface.
Rootstalks or tubers may be difficult to obtain because of deep water They are starchy and high in food value. They can be eaten either raw or boiled. Stems may be cooked in a stew. Young seed pods may be sliced and eaten as a vegetable. Seeds may be bitter, but are very nourishing. They may be parched and rubbed between stones as flour. The water lily is considered an important food source by native peoples in many parts of the world.
Nuts are very high in nutritional value and usually can be eaten raw. Nuts may be roasted in the fire or roasted by shaking them in a container with hot coals from the fire. They may then be ground to make a flour. If a survivor does not wish to eat a plant or plant part raw, it can be cooked using the same methods used in cooking meat—by boiling, roasting, baking, broiling, or frying.
If survivors have been able to procure more plant foods than can be eaten, the excess can be preserved in the same manner as animal foods. Plant foods can be dried by wind, air, sun, or fire, with or without smoke. A combination of these methods can be used. The main object is to remove the moisture. Most wild fruits can be dried. If the plant part is large, such as some tubers, it should be sliced, and then dried. Some type of protection may be necessary to prevent
152

consumption and/or contamination by insects. Extra fruits or berries can be carried with the survivor by wrapping them in leaves or moss.
153

154

CHAPTER 3-5
WaterWater is one of your most urgent needs in
a survival situation. You can’t live long without it, especially in hot areas where you lose water rapidly through sweat. Even in cold areas, you need a minimum of 2 liters of water each day to maintain efficiency.
More than three-fourths of your body is composed of fluids. Your body loses fluid as a result of heat, cold, stress, and exercise. To function clearly, you must replace the fluid your body loses. So, one of your first goals is to obtain an adequate supply of water.
Nearly every survival account details the need survivors had for water. Many creative methods of locating, gathering, purifying, and storing water are included in the recorded experiences of downed survivors. If survivors are located in temperate, tropic, or dry climates, water may be their first and most important need. The priority of finding water over that of obtaining food must be emphasized to potential survivors. An individual may be able to live for weeks without food, depending on the temperature and amount of energy being used. A person who has no water can be expected to die within days. Even in cold climate areas or places where water is abundant, survivors should attempt to keep their body fluids at a level that will maintain them in the best possible state of health. Even in relatively cold climates, the body needs 2 quarts of water per day to remain efficient (fig. 3-167).
Water Requirements
Normally, with atmospheric temperature of about 68ºF, the average adult requires 2 to 3 quarts of water daily.
This water is necessary to replace that lost daily in the following ways:
· Urine. Approximately 1.4 quart of water is lost in the urine.
· Sweat. About 0.1 quart of water is lost in the sweat.
· Feces. Approximately 0.2 quart of water is lost in the feces.
· Insensible Water Loss. When the individual is unaware water loss is actually occurring, it is referred to as insensible water loss.
Insensible water loss occurs by the following mechanisms:
Diffusion through the skin. Water loss through the skin occurs as a result of the actual diffusion of water molecules through the cells of the skin. The average loss of water in this manner is approximately 0.3 to 0.4 quart. Fortunately, loss of greater quantities of water by diffusion is prevented by the outermost layer of the skin, the epidermis, which acts as a barrier to this type of water loss.
Evaporation through the lungs. Inhaled air initially contains very little water vapor. However, as soon as it enters the respiratory passages, the air is exposed to the fluids covering the respiratory surfaces. By the time this air enters the lungs, it has become totally saturated with moisture from these surfaces. When the air is exhaled, it is still saturated with moisture and water is lost from the body.
Larger quantities of water are required when water loss is increased in any one of the following circumstances:
Heat Exposure. When an individual is exposed to very high temperatures, water lost in the sweat can be increased to as much as 3.5 quarts an hour. Water loss at this increased rate can deplete the body fluids in a short time.
155

Exercise. Physical activity increases the loss of water in two ways. The increased respiration rate causes increased water loss by evaporation through the lungs; and the increased body heat causes excessive sweating.
Cold Exposure. As the temperature decreases, the amount of water vapor in the air also decreases. Therefore, breathing cold air results in increased water loss by evaporation from the lungs.
High Altitude. At high altitudes, increased water loss by evaporation through the lungs occurs not only as a result of breathing cooler air but also as a result of the increased respiratory efforts required.
Burns. After extensive burns, the outermost layer of the skin is destroyed. When this layer is gone, there is no longer a barrier to water loss by diffusion, and the rate of water loss in this manner can increase up to 5 quarts each day.
Illness. Severe vomiting or prolonged diarrhea can lead to serious water depletion.
Dehydration (body fluid depletion) can occur when required body fluids are not replaced. Dehydration is accompanied by the following symptoms:
· Thirst.· Weakness.· Fatigue.· Dizziness.· Headache.· Fever.· Inelastic abdominal skin.· Dry mucous membranes, that is, dry
mouth and nasal passages.· Infrequent urination and reduced
volume. The urine is concentrated so that it is very dark in color. In severe cases, urination may be quite painful.
Companions will observe the following behavioral changes in individuals suffering from dehydration:
· Loss of appetite.· Lagging pace.· Impatience.· Sleepiness.· Apathy· Emotional instability.· Indistinct speech.· Mental confusion.
Dehydration is a complication which causes decreased efficiency in the performance of even the simplest task. It also predisposes survivors to the development of severe shock following minor injuries. Constriction of blood vessels in the skin as a result of dehydration increases the danger of cold injury during cold exposure. Failure to replace body fluids ultimately results in death.
Proper treatment for dehydration is to replace lost body fluids. The oral intake of water is the most readily available means of correcting this deficiency. A severely dehydrated person will have little appetite. This person must be encouraged to drink small quantities of water at frequent intervals to replenish the body's fluid volume. Cold water should be warmed so the system will accept it easier.
To prevent dehydration, water loss must be replaced by periodic intake of small quantities of water throughout the day. As activities or conditions intensify, the water intake should be increased accordingly. Water intake should be sufficient to maintain a minimum urinary output of 1 pint every 24 hours. Thirst is not an adequate stimulus for water intake, and a person often dehydrates when water is available. Therefore, water intake should be encouraged when the person is not thirsty. Humans cannot adjust to decreased water intake for prolonged periods of time. When water is in short supply, any available water should be consumed sensibly. If sugar is available, it should be mixed with the water, and
156

efforts should be made to find a local water source. Until a suitable water source is located, individual water losses should be limited in the following ways:
Physical activity should be limited to the absolute minimum required for survival activities. All tasks should be performed slowly and deliberately with minimal expenditure of energy. Frequent rest periods should be included in the daily schedule.
In hot climates, essential activity should be conducted at night or during the cooler part of the day.
In hot climates, clothing should be worn at all times because it reduces the quantity of water loss by sweating. Sweat is absorbed into the clothing evaporated from its surface in the same manner it evaporates from the body. This evaporation cools the air trapped between the clothing and the skin, causing a decrease in the activity of the sweat glands and a subsequent reduction in water loss.
In hot weather, light-colored clothing should be worn rather than dark-colored clothing. Dark-colored clothing absorbs the Sun's light rays and converts them into heat. This heat causes an increase in body temperatures which activates the sweat glands and increases water loss through sweating. Light-colored clothing, however, reflects the Sun's light rays, minimizing the increase in body temperature and subsequent water loss.
Water Sources
Survivors should be aware of both the water sources available to them and there sources at their disposal for producing water.Survivors may obtain water from solar
stills, desalter kits, or canned water packed in various survival kits. It would be wise for personnel, who may one day have to use these methods of getting water, to be knowledgeable of their operating instructions and the amount of water they produce.
· Canned water provides 10 ounces per can.
· Desalter kits are limited to 1 pint per chemical bar—kits contain eight chemical bars.
· A “sea solar still” can produce as much as 2½ pints per day.
· “Land solar stills” produce varied amounts of water. This amount is equal to the amount of water available in the soil or placed into the still (vegetation, entrails, contaminated water, etc.), and the current temperature.
Survivors would be wise to carry water during their missions. Besides the fact that the initial shock of the survival experience sometimes produces feelings of thirst, having an additional water container can benefit survivors. The issued items (canned water,
desalter kits, and solar stills) should be kept by survivors for times when no natural sources of freshwater are available.Naturally occurring indicators of water are:
· Surface water, including streams, lakes, springs, ice, and snow.
· Precipitation, such as rain, snow, dew, sleet, etc.
· Subsurface water, which may not be as readily accessible as wells, cisterns, and underground springs and streams, can be difficult for survivors to locate and use.
Several indicators of possible water are:
· Presence of abundant vegetation of a different variety, such as deciduous growth in a coniferous area.
· Drainages and low-lying areas.· Large clumps of plush grass.
157
Nonporous: Not possessing or full of pores or small openings.

· Animal trails which may lead to water. The “V” formed by intersecting trails often point toward water sources.
Survivors may locate and obtain water as follows:
Precipitation may be obtained by laying a piece of nonporous material such as a poncho, piece of canvas, plastic, or metal material on the ground. If rain or snow is being collected, it may be more efficient to create a bag or funnel shape with the material so the water can be easily gathered. Heavy dew can provide water. Tie rags or bunches of fine grass around your ankles and walk through dew-covered grass before sunrise. As the rags or grass bunches absorb the dew, twist the water into a container. Repeat the process until you have a supply of water or until the dew is gone (fig. 3-168). Consideration should be given to the possibility of contaminating the water with dyes, preservatives, or oils on the surfaces of the objects used to collect the precipitation.
Several things may help survivors locate ground water, such as rivers, lakes, and streams. The presence of swarming insects indicates water is near. In some places, survivors should look for signs of animal presence. For example, in damp places, animals may have scratched depressions into the ground to obtain water; insects may also hover over these areas.
In the Libyan Sahara, donut-shaped mounds of camel dung often surround wells or other water sources. Bird flights can indicate direction to or from water. Pigeons and doves make their way to water regularly. They fly from water in the morning and to it in the evening. Large flocks of birds may also congregate around or at areas of water.
The presence of people will indicate water. The location of this water can take many forms—stored water in containers that are carried with people who are traveling, wells, irrigation systems, pools, etc. Survivors who are evaders should be
extremely cautious when approaching any water source, especially if they are in dry areas; these places may be guarded or inhabited.
When no surface water is available, survivors may have to tap the Earth’s supply of ground water. Access to this depends upon the type of ground-rock or loose material, clay, gravel, or sand.
In rocky ground, survivors should look for springs and seepages. Limestone and lava rocks will have more and larger springs than any other rocks. Most lava rocks contain millions of bubble holes; ground water may seep through them. Survivors can also look for springs along the walls of valleys that cross a lava flow. Some flows will have no bubbles but do have “organ pipe” joints-vertical cracks that part the rocks into columns a foot or more thick and 20 feet or more high. At the foot of these joints, survivors may find water creeping out as seepage, or pouring out in springs.
Most common rocks, like granite, contain water only in irregular cracks. A crack in a rock with bird dung around the outside may indicate a water source that can be reached by a piece of surgical hose used as a straw.
Water is more abundant and easier to find in loose sediments than in rocks. Springs are sometimes found along valley floors or down
along their sloping sides. The flat benches or terraces of land above river valleys usually yield springs or seepages along their bases, even when the stream is dry. Survivors shouldn’t waste time digging for water unless there are signs that water is available. Digging in the floor of a valley under a steep slope, especially if the bluff is cut in a terrace, can produce a water source. A lush green spot where a spring has been during the wet season is a good place to dig for water. Water moves slowly through clay, but many clays contain strips of sand which may yield springs. Survivors should look for a wet
158
Seepage: A process of seeping, flowing or passing through fine pores or small openings.
place on the surface of clay bluffs and try digging it out.
Along coasts, water may be found by digging beach wells (fig. 3-169). Locate the wells behind the first or second pressure ridge. Wells can be dug 3 to 5 feet deep and should be lined with driftwood to prevent sand from refilling the hole. Rocks should be used to line the bottom of the well to prevent stirring up sand when gathering the water. The average well may take as long as 2 hours to produce 4 to 5 gallons of water. (Do not be discouraged if the first try is unsuccessful—dig another.)
Water in Snow and Ice Areas
Due to the extreme cold of arctic areas, water requirements are greatly increased. Increased body metabolism, respiration of cold air, and extremely low humidity play important roles in reducing the body's water content. The processes of heat production and digestion in the body also increase the need for water in colder climatic zones. The constructing of shelters and signals and the obtaining of firewood are extremely demanding tasks for survivors. Physical exercise and heat production in extreme cold, place the water requirements of a survivor close to 5 or 6 quarts per day to maintain proper hydration levels. The diet of survivors will often be dehydrated rations and high protein food sources. For the body to digest and use these food sources effectively, increased water intake is essential.
Obtaining water need not be a serious problem in the arctic because an abundant supply of water is available from streams, lakes, ponds, snow, and ice. All surface water should be purified by some means. In the summer, surface water may be discolored but is drinkable when purified. Water obtained from glacier-fed rivers and streams may contain high concentrations of dirt or sand. By letting the water stand for a period of time, most of the sand will settle to the bottom; the remaining water can be strained through porous material for further filtration.
A “water machine” can be constructed which will produce water while the survivors are doing other tasks. It can be made by placing snow on any porous material (such as parachute or cotton), gathering up the edges, and suspending the “bag” of snow from any support near the fire. Radiant heat will melt the snow and the water will drip from the lowest point on the bag. A container should be placed below this point to catch the water (fig. 3-170).In some arctic areas, there may be little
or no fuel supply with which to melt ice and snow for water. In this case, body heat can be used to do the job. The ice or snow can be placed in a waterproof container like a waterbag and placed between clothing layers next to the body. This cold substance should not be placed directly next to the skin; it causes chilling and lowering of the body temperature.Ice will yield more water per given
volume than snow and requires less heat to do so. If the Sun is shining, snow or ice may be placed on a dark surface to melt (dark surfaces absorb heat, whereas light surfaces reflect heat). Ice can be found in the form of icicles on plants and trees, sheet ice on rivers, ponds, and lakes, or sea ice. If snow must be used, survivors should use snow closest to the ground. This snow is packed and will provide more water for the amount of snow than will the upper layers. When snow is to be melted for water, place a small amount of snow in the bottom of the container being used and place it over or near a fire. Snow can be added a little at a time. Survivors should allow water in the container bottom to become warm so that when more snow is added, the mixture remains slushy. This will prevent burning the
bottom out of the container. Snow absorbs water, and if packed, forms an insulating airspace at the bottom of the container. When this happens, the bottom may burn out.
159

Since icebergs are composed of freshwater, they can be readily available source of drinking water. Survivors should use extreme caution when trying to obtain water from this source. Even large icebergs can suddenly roll over and dump survivors into the frigid seawater. If sea ice is the primary source of water, survivors should recall that like seawater itself, saltwater ice should never be ingested. To obtain water in polar regions or sea ice areas, survivors should select old sea ice, a bluish or blackish ice which shatters easily and generally has rounded corners. This ice will be almost saltfree. New sea ice is milky or gray colored with sharp edges and angles. This type of ice will not shatter or break easily. Snow and ice may be saturated with salt from blowing spray; if it tastes salty, survivors should select different snow or ice sources.The consuming of unmelted snow or ice
is not recommended. Eating snow or ice lowers the body’s temperature, induces dehydration, and causes minor cold injury to lips and mouth membranes. Water consumed in cold areas should be in the form of warm or hot fluids. The ingestion of cold fluids or foods increases the body’s need for water and requires more body heat to warm the substance.
Water on the Open Seas
The lack of drinkable water could be a major problem on the open seas. Seawater should never be ingested in its natural state. It will cause an individual to become violently ill in a very short period of time. When water is limited and cannot be replaced by chemical or mechanical means, it must be used efficiently. As in the desert, conserving sweat not water, is the rule. Survivors should keep in the shade as much as possible and dampen clothing with seawater to keep cool. They should not over exert but relax and sleep as much as possible.If it rains, survivors can collect rainwater
in available containers and store it for later use. Storage containers could be cans, plastic bags, or the bladder of a life
preserver. Drinking as much rainwater as possible while it is raining is advisable. If the freshwater should become contaminated with small amounts of seawater or salt spray, it will remain safe for drinking (fig. 3-171). At night and on foggy days, survivors should try to collect dew for drinking water by using a sponge, handkerchief, etc.Solar stills will provide a drinkable
source of water. Survivors should read the instructions immediately and set them up, using as many stills as available. (Be sure to attach them to the raft.) Desalter kits, if available, should probably be saved for the time when no other means of obtaining drinking water is available. Instructions on how to use the desalter kit are on the container.
Only water in its standard sense should be consumed. The so-called “water substitutes” do little for the survivor, and may do much more harm than not consuming any water at all. There is no substitute for water. Fish juices and other animal fluids are of doubtful value in preventing dehydration. Fish juices contain protein which requires large amounts of water to be digested and the waste products must be excreted in the urine which increases water loss. Survivors should never drink urine--urine is body waste material and only serves to concentrate waste materials in the body and require more water to eliminate the additional waste.
Water in Tropical Areas
Depending on the time of the year and type of jungle, water in the tropical climates can be plentiful; however, it is necessary to know where to look and procure it. Surface water is normally available in the form of streams, ponds, rivers, and swamps. In the savannas during the dry season, it may be necessary for the survivor to resort to digging for water in the places previously mentioned. Water obtained from these sources may need filtration and should be purified. Jungle plants can also provide survivors with water.
160
Porous: Possessing or full of pores or small openings.

Many plants have hollow portions which can collect rainfall, dew, etc. (fig. 3-172). Since there is no absolute way to tell whether this water is pure, it should be purified. The stems or the leaves of some plants have a hollow section where the stem meets the trunk. Look for water collected here. This includes any Y-shaped plants (palms or air plants). The branches of large trees often support air plants (relatives of the pineapple) whose overlapping, thickly growing leaves may hold a considerable amount of rainwater. Trees may also catch and store rainwater in natural containers such a cracks or hollows.
Pure freshwater needing no purification can be obtained from numerous plant sources. There are many varieties of vines which are potential water sources. The vines are from 50 feet to several hundred feet in length and 1 to 6 inches in diameter. They also grow like a hose along the ground and up into the trees. The leaf structure of the vine is generally high in the trees. Water vines are usually soft and easily cut. The smaller species may be twisted or bent easily and are usually heavy because of the water content. The water from these vines should be tested to make sure it’s fit for drinking. The first step in testing the water from vines is for survivors to nick the vine and watch for sap running from the cut. If milky sap is seen, the vine should be discarded; if no milky sap is observed, the vine may be a safe water vine. Survivors should cut out a section of the vine, hold that piece vertically, and observe the liquid as it flows out. If it is clear and colorless, it may be a drinkable source. If it is cloudy or milky-colored, they should discard the vine. They should let some of the liquid flow into the palm of the hand and observe it. If the liquid does not change color, they can now taste it. If it tastes like water or has a woody or sweet taste, it should be safe for drinking. Liquid with a sour or bitter taste should be avoided. Water trapped within a vine is easily obtained by cutting out a section of the vine. The vine should first be cut high above the ground and then near the
ground. This will provide a long length of vine and, in addition, will tend to hide evidence of the cuts if the survivors are in an evasion situation. When drinking from the vine, it should not touch the mouth as the bark may contain materials which could affect the lips and mouth (fig. 3-173A). The pores in the upper end of the section of vine may reclose, stopping the flow of water. If this occurs, survivors should cut off the end of the vine opposite the drinking end. This will reopen the pores allowing the water to flow.Water from the rattan palm and spiny
bamboo may be obtained in the same manner as from vines. It is not necessary to test the water if positive identification of the plant can be made. The slender stem (runner) of the rattan palm is an excellent water source. The joints are overlapping in appearance, as if one section is fitted inside the next.
Water may be trapped within sections of green bamboo. To determine if water is trapped within a section of bamboo, it should be shaken. If it contains water, a sloshing sound can be heard. An opening may be made in the section by making two 45 degree angle cuts, both on the same side of the section, and prying loose a piece of the section wall. The end of the section may be cut off and the water drunk or poured from the open end. The inside of the bamboo should be examined before consuming the water. If the inside walls are clean and white, the water will be safe to drink. If there are brown or black spots, fungus growth, or any discoloration, the water should be purified before drinking. Sometimes water can also be obtained by cutting the top off certain types of green bamboo, bending it over, and staking it to the ground (fig. 3-173B). A water container should be placed under it to catch the dripping water. This method has also proven effective on some vines and the rattan palm.Water can also be obtained from banana plants in a couple of different ways, neither of which is satisfactory in a tactical situation. First, survivors should cut a banana plant down, then a long
161

section should be cut off which can be easily handled. The section is taken apart by slitting from one end to the other and pulling off the layers one at a time. A strip 3 inches wide, the length of the section, and just deep enough to expose the cells should be removed from the convex side. This section is folded toward the convex side to force the water from the cells of the plant. The layer must be squeezed gently to avoid
forcing out any tannin into the water. Another technique for obtaining water from the banana plant is by making a “banana-well.” This is done by making a bowl out of the plant stump, fairly close to the ground, by cutting out and removing the inner section of the stump (fig. 3-174). The first three fillings of water that enter the bowl will be bitter, but the other fillings will be drinkable. The stump will supply water for up to 4 days. A leaf from the banana plant or other plant should be placed over the bowl while it is filling to prevent contamination by insects, etc.
Water trees can also be a valuable source of water in some jungles. They can be identified by their blotched bark which is fairly thin and smooth. The leaves are large, leathery, fuzzy, and evergreen, and may grow as large as 8 or 9 inches. The trunks may have short outgrowths with fig-like fruit on them or long branches with round fruit comprised of corn kernel-shaped nuggets. In a nontactical situation, the tree can be tapped in the same manner as a rubber tree, with either a diagonal slash or a “V.” When the bark is cut into, it will discharge or ooze a white sap which if ingested causes temporary irritation of the urinary tract. This sap dries up quite rapidly and can easily be removed. The cut should be continued into the tree with a spigot (bamboo, knife, etc.) at the bottom of the tap to direct the water into a container. The water flows from the leaves back into the roots after sundown, so water can be procured from
this source only after sundown or on overcast (cloudy) days. If survivors are in a tactical situation, they can obtain water from the tree and still conceal the location. If the long branches are growing thickly, they can be separated and a hole bored into the tree. The white sap should be scraped off and a spigot placed below the tap with a water container to catch the water. Moving the branches back into place will conceal the container. Instead of boring into the tree, a couple of branches can be cut off or snapped off if no knife is available. The white sap should be allowed to dry and then be removed. The ends of the branches should be placed in a water container and the container concealed.Coconuts contain a refreshing fluid. Where coconuts are available, they may be used as a water source. The fluid from a mature coconut contains oil, which when consumed in excess can cause diarrhea. There is little problem if used in moderation or with a meal and not on an empty stomach. Green unripe coconuts about the size of a grapefruit are the best for use because the fluid can be taken in large quantities without harmful effects. There is more fluid and less oils so there is less possibility of diarrhea.
Water can also be obtained from liquid mud. Mud can be filtered through a piece of cloth. Water taken by this method must be purified. Rainwater can be collected from a tree by wrapping a cloth around a slanted tree and arranging the bottom end of the cloth to drip into a container (fig. 3-175).
In the American tropics you may find large trees whose branches support air plants. These air plants may hold a considerable amount of rainwater in their overlapping, thickly growing leaves. Strain the water through a cloth to remove insects and debris.
You can get water from plants with moist pulpy centers. Cut off a section of the plant and squeeze or smash the pulp so that the moisture runs out. Catch the liquid in a container.
Plant roots may provide water. Dig or pry the roots out of the ground, cut them
162
Rattan: An Asian climbing palm with long tough flexible stems, which are used to make wickerwork.

into short pieces, and smash the pulp so that the moisture runs out. Catch the liquid in a container.
Fleshy leaves, stems, or stalks, such as bamboo, contain water. Cut or notch the stalks at the base of joint to drain out the liquid.
The following trees can also provide water:
· Palms. Palms, such as the Buri, coconut, sugar, rattan, and nipa, contain liquid. Bruise a lower frond and pull it down so the tree will “bleed” at the injury.
· Traveler’s tree. Found in Madagascar, this tree has cuplike sheath at the base of its leaves in which water collects.
· Umbrella tree. The leaf bases and roots of this tree of western tropical Africa can provide water.
· Baobab tree. This tree of the sandy plains of northern Australia and Africa collects water in its bottlelike trunk during the wet season. Frequently, you can find clear, fresh water in these trees after weeks of dry weather.
Water in Dry Areas
Locating and procuring water in a dry environment can be a formidable task. Some of the ways to find water in this environment have been explored, such as locating a concave bend in a dry riverbed and digging for water (fig. 3-176). If there is any water within a few feet of the surface, the sand will become slightly damp. Dig until water is obtained.Some deserts become humid at night.
The humidity may be collected in the form of dew. This dew can be collected by digging a shallow basin in the ground about 3 feet in diameter and lining it with
a piece of canvas, plastic, or other suitable material. A pyramid of stones taken from a minimum of 1 foot below the surface should then be built in this basin. Dew will collect on and between the stones and trickle down onto the lining material where it can be collected and placed in a container.
Plants and trees having roots near the surface may be a source of water in dry areas. Water trees of dry Australia are a source of water, as their roots run out 40 to 80 feet at a depth of 2 to 9 inches under the surface. Survivors may obtain water from these roots by locating a root 4 to 5 feet from the trunk and cutting the root into 2- or 3-foot lengths. The bark can then be peeled off and the liquid from each section of root drained into a container. The liquid can also be sucked out. The trees growing in hollows or depressions will have the most water in their roots. Roots that are 1 to 2 inches thick are an ideal size. Water can be carried in these roots by plugging one end with clay.
Cactus-like or plants full of juice may be sources of water for survivors, but they should recall that no plants should be used for obtaining water which have a milky sap. The barrel cactus of the United States provides a water source. To obtain it, survivors should first cut off the top of the plant. The pulpy inside portions of the plant should then be mashed to form a watery pulp. Water may ooze out and collect in the bowl; if not, the pulp may be squeezed through a cloth directly into the mouth.
The solar still is a method of obtaining water that uses both vegetation and ground moisture to produce water (fig. 3-177). A solar still can be made from a sheet of clear plastic stretched over a hole in the ground. The moisture in the soil and from plant parts (fleshy stems and leaves) will be extracted and collected by this emergency device. Obviously, where the soil is extremely dry and no fleshy plants are available, little, if any, water can be obtained from the still. The still may also be used to purify polluted water.
163
CAUTIONDo not keep the sap from plants longer than 24 hours. It will sour, becoming dangerous as a water source.

The parts for the still are a piece of plastic about 6 feet square, a water collector-container or any waterproof material from which a collector-container can be fashioned, and a piece of plastic tubing about one-fourth inch in diameter and 4 to 6 feet long. The tubing is not absolutely essential but makes the still easier to use. A container can be made from such materials as plastic, aluminum foil, poncho, emergency ration tins, or a flight helmet. The tubing, when available, is fastened to the bottom of the inside of the container and used to remove drinking water from the container without disturbing the plastic. Some plastics work better than others, although any clear plastic should work if it is strong.If plants are available or if polluted water
is to be purified, the still can be constructed in any convenient spot where it will receive direct sunlight throughout the day. Ease of digging will be the main consideration. If soil moisture is to be the only source of water, some sites will be better than others. Although sand generally does not retain as much moisture as clay, a wet sand will work very well. Along the seacoast or in any inland areas where polluted water is available, any wet soil, even sand, produces usable amounts of water. On cloudy days, the yield will be reduced because direct sunlight is necessary if the still is to operate at full efficiency.Certain precautions must be kept in
mind. If polluted water is used, survivors should make sure that none is spilled near the rim of the hole where the plastic touches the soil and that none comes in contact with the container to prevent the freshly distilled water becoming contaminated. Survivors should not disturb the plastic sheet during daylight “working hours” unless it is absolutely necessary. If a plastic drinking tube is not available, raise the plastic sheet and remove the container as few times as possible during daylight hours. It takes one-half hour for the air in the still to become resaturated and the collection of water to begin after the plastic has been disturbed. Even when placed on fairly
damp soil and in an area where 8 hours of light per day is directed on the solar still, the average yield is only about 1 cup per day per still. Due to the low yields obtained from this device, survivors must give consideration to the possible danger of excessive dehydration brought about be constructing the solar still. In certain circumstances, solar still returns, even over 2- or 3-day periods, will not equal the amount of body fluid lost in construction and will actually hasten dehydration.Steps survivors should follow when
constructing a solar still are: Dig a bowl-shaped hole in the soil about 40 inches in diameter and 20 inches deep. Add a smaller, deeper sump in the center bottom of the hole to accommodate the container. If polluted waters are to be purified, a small trough can be dug around the side of the hole about halfway down from the top. The trough ensures that the soil wetted by the polluted water will be exposed to the sunlight and at the same time that the polluted water is prevented from running into the container. If the plant material is used, line the sides of the hole with pieces of plant or its fleshy stems and leaves. Place the plastic over the hole and put soil on the edges to hold it in place. Place a rock no larger than a plum in the center of the plastic until it is about 15 inches below ground level. The plastic will now have the shape of a cone. Put more soil on the plastic around the rim of the hole to hold the cone securely in place and to prevent water-vapor loss. Straighten the plastic to form a neat cone with an angle of about 30 degrees so the water drops will run down and fall into the container. It takes about 1 hour for the air to become saturated and start condensing on the underside of the plastic cone.
The vegetation bag is a simpler method of obtaining water. This method involves cutting foliage from trees or herbaceous plants, sealing it in a large clear plastic bag, and allowing the heat of the Sun to extract the fluids contained within. A large, heavy-duty clear plastic bag should be used. The bag should be
164
filled with about 1 cubic yard of foliage, sealed, and exposed to the Sun. The average yield for one bag tested was 320 ml/bag 5-hour day. This method is simple to set up. The vegetation bag method of obtaining water does have one primary drawback. The water produced is normally bitter to taste, caused by biological breakdown of the leaves as they lay in the water produced and superheated in the moist “hot-house” environment. This method can be readily used in a survival situation, but before the water produced by certain vegetation is consumed, it should undergo the taste test. This is to guard against ingestion of cyanide-producing substances and other harmful toxins, such as plant alkaloids. (fig. 3-178) is the water transpiration bag, a method that is simple to use and has great potential for enhancing survival. This method is the vegetation bag process taken one step further. A large plastic bag is placed over a living limb or a medium-size tree or large shrub. The bag opening is sealed at the branch, and the limb is then tied down to allow collected water to flow to the corner of the bag. For a diagram of the water transpiration method, see figure 3-179.The amount of water yielded by this
method will depend on the species of trees and shrubs available. During one test of this method, a transpiration bag produced approximately a gallon per day for 3 days with a plastic bag on the same limb, and with no major decaying of the branch. Other branches yielded the same amount. Transpired
water has a variety of tastes depending on whether or not the vegetation species is allowed to contact the water.The effort used in setting up water
transpiration collectors is minimal. It takes about 5 minutes of work and requires no special skills once the method has been described or demonstrated. Collecting the water in a survival situation
would require survivors to take down the plastic bag at the end of the day, draining the contents and setting it up again the following day. The same branch may be reused (in some cases with almost similar yields); however, as a general rule, when vegetation abounds, a new branch should be used each day.
Without a doubt, the water transpiration bag method surpasses other methods (solar stills, vegetation bag, cutting roots, barrel cactus) in yield, ease of assembly, and in most cases, taste. The benefits of having a simple plastic bag can't be over-emphasized. As a water collector, in dry, semi-dry, or desert environments where low woodlands dominate, it can be used as a water transpirator; in scrubland, steppes, or treeless plains, as a vegetation bag; in sandy areas without vegetation, it can be cut up and improvised into solar stills. Up to three large, heavy-duty bags may be needed to sustain one survivor in certain situations.
Water Purification
The following are ways survivors can possibly determine the presence of harmful agents in the water:
· Strong odors, foam, or bubbles in the water.
· Discoloration or turbid (muddy with sediment).
· Water from lakes found in desert areas are sometimes salty because they have been without an outlet for extended periods of time. Magnesium or alkali salts may produce a laxative effect; if not too strong it is drinkable.
· If the water gags survivors or causes gastric disturbances, drinking should be discontinued.
· The lack of healthy green plants growing around any water source.
Because of survivors’ potential prejudices to water from natural sources, it should be made as drinkable as possible through filtration. Filtration only removes the solid particles from water—it does not
165
Herbaceous: Relating to or having the characte- ristics of an herb.

purify it. One simple and quick way of filtering is to dig a hole or seepage basin along a water source and allow the soil to filter the water (fig. 3-180). The seepage hole should be covered while not in use. Another way is to construct a filter-layers of parachute material stretched across a tripod (fig. 3-181). Charcoal is used to eliminate bad odors and foreign materials from the water. Activated charcoal (obtained from freshly burned wood is used to filter the water). If a solid container is available for making a filter, use layers of fine-to-coarse sand and gravel along with charcoal and grass.
Purification of water may be done a variety of ways. The method used will be dictated by the situation (such as tactical or nontactical).
· Boil the water for at least 10 minutes.
· To use purification tablets survivors should follow instructions on the bottle. One tablet per quart of clear water; two tablets if water is cloudy. Let water stand for 5 minutes (allowing the tablet time to dissolve), then shake and allow to stand for 15 minutes. Survivors should remember to turn the canteen over and allow a small amount of water to seep out and cover the neck part of the canteen.
· Eight drops of 2¼-percent iodine per quart—stir or shake and let stand for at least 10 minutes.
After water is found and purified, survivors may wish to store it for later
consumption. The following make good containers:
· Waterbag.· Canteen.· Segment of bamboo.· Birch bark and pitch canteen.· LPU bladden· Hood from antiexposure suit.
By drinking contaminated water you may contract diseases or swallow organisms that can harm you. Examples of such diseases or organisms are:
· Dysentery. Severe, prolonged diarrhea with bloody stools, fever, and weakness.
· Cholera and typhoid. You may be receptive to these diseases regardless of vaccinations.
· Flukes. Dirty, polluted water—especially in tropical areas—often contains blood flukes. If you swallow flukes, they will make their way into the bloodstream, live as parasites, and cause disease.
· Leeches. If you swallow a leech, it can hook onto the throat passage or inside the nose. It will suck blood, create a wound, and move to another area. Each bleeding wound may become infected.
166
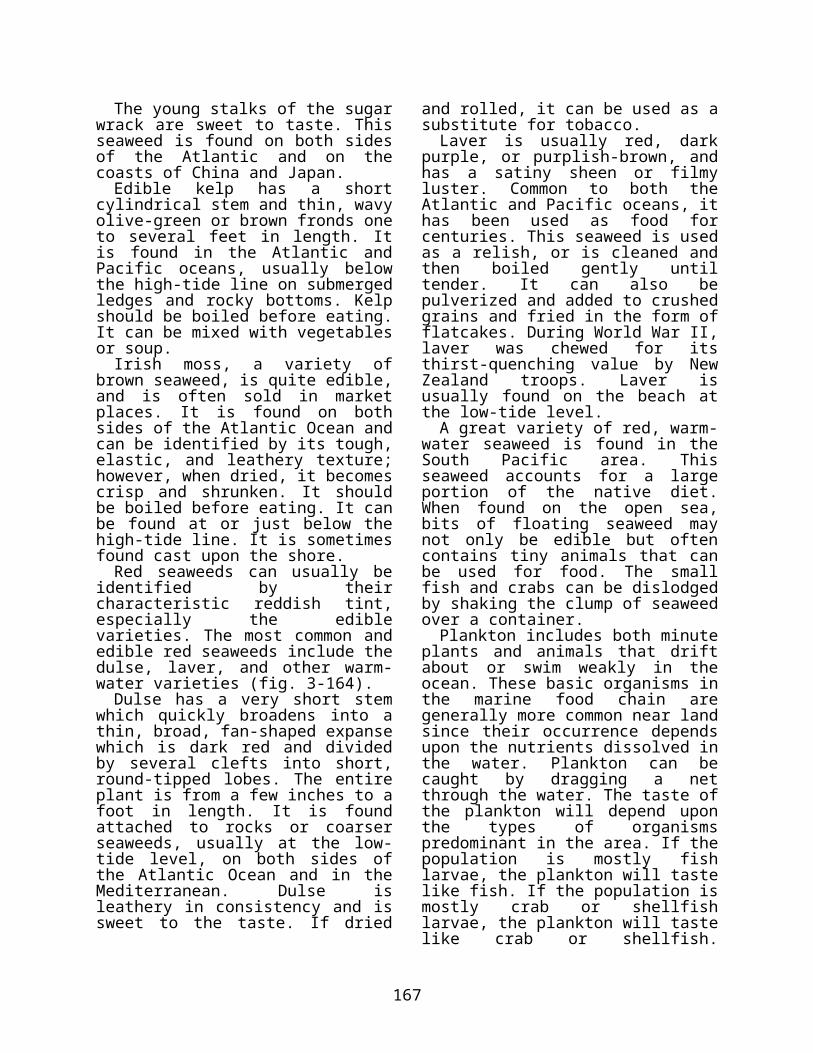
167