chapter 13 module administration
TRANSCRIPT
Chapter 13 - Page 1 of 11 Alaska DOT&PF AWP Precon User Guide revised 2/20
Chapter 13 – Module Administration
Contents
13.1 Adding / Modifying AWP User Accounts ...................................................................................... 2
13.2 Adding Consultants to AWP ......................................................................................................... 6
13.3 Adding Items ................................................................................................................................ 8
13.4 Adding Funds ............................................................................................................................. 10

Chapter 13 - Page 2 of 11 Alaska DOT&PF AWP Precon User Guide revised 2/20
13.1 Adding / Modifying AWP User Accounts
For adding and maintaining/modifying DOT employee AWP accounts, you will access to areas of the
System Admin component: Persons and Users.
NOTE: Before adding consultants to AWP, they must be in the LDAP system.
To create a new account:
1. Log into AWP.
2. Make sure you are in the Module Admin role.
3. Select Persons.
4. Expand the Person Overview component action menu and select Add.
5. Verify the employees LDAP username by going to this site:
https://dsgw.state.ak.us/dsgwcmd/lang?context=dsgw&file =auth.html
6. In the Person ID field, enter the employee’s LDAP username.
7. In the Last Name field, enter the employee’s last name.
8. In the First Name field, enter the employee’s first name.
9. Click <Save>.

Chapter 13 - Page 3 of 11 Alaska DOT&PF AWP Precon User Guide revised 2/20
10. Expand the component action menu and select Associate Person to a Domain.
11. Search for and select the username of the person. A green checkmark will appear next to the
name selected.
12. Click the <Associate> button.
13. Click the User quick link.

Chapter 13 - Page 4 of 11 Alaska DOT&PF AWP Precon User Guide revised 2/20
14. Select the User Roles tab.
15. Click the <Select Roles> button.
NOTE: Consultants are considered Agency Users, so the Agency User box should be checked
for all DOT and consultants. Construction contractors are considered non-agency users.
16. Select the roles to add to the user. A green checkmark will appear next to the selected roles.
17. Click the <Add to User> button.
18. Click <Save>.

Chapter 13 - Page 5 of 11 Alaska DOT&PF AWP Precon User Guide revised 2/20
19. In the Effective Date field(s), click the calendar icon and select the correct date.
20. From the Status dropdown, select Active.
21. Click <Save>.
NOTE: If you are adding several roles to a user, you can enter the effective date and status for
the first role and then range fill the rest if the same effective date and status apply.
Chapter 13 - Page 6 of 11 Alaska DOT&PF AWP Precon User Guide revised 2/20
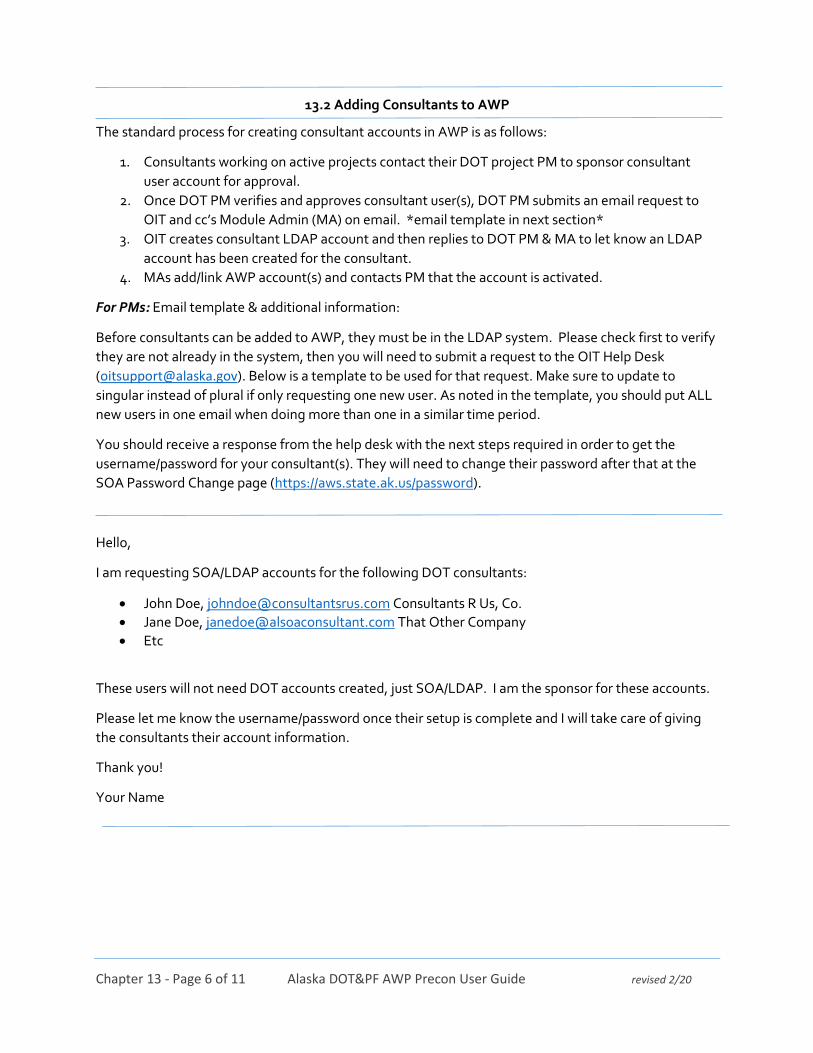
13.2 Adding Consultants to AWP
The standard process for creating consultant accounts in AWP is as follows:
1. Consultants working on active projects contact their DOT project PM to sponsor consultant
user account for approval.
2. Once DOT PM verifies and approves consultant user(s), DOT PM submits an email request to
OIT and cc’s Module Admin (MA) on email. *email template in next section*
3. OIT creates consultant LDAP account and then replies to DOT PM & MA to let know an LDAP
account has been created for the consultant.
4. MAs add/link AWP account(s) and contacts PM that the account is activated.
For PMs: Email template & additional information:
Before consultants can be added to AWP, they must be in the LDAP system. Please check first to verify
they are not already in the system, then you will need to submit a request to the OIT Help Desk
([email protected]). Below is a template to be used for that request. Make sure to update to
singular instead of plural if only requesting one new user. As noted in the template, you should put ALL
new users in one email when doing more than one in a similar time period.
You should receive a response from the help desk with the next steps required in order to get the
username/password for your consultant(s). They will need to change their password after that at the
SOA Password Change page (https://aws.state.ak.us/password).
Hello,
I am requesting SOA/LDAP accounts for the following DOT consultants:
John Doe, [email protected] Consultants R Us, Co.
Jane Doe, [email protected] That Other Company
Etc
These users will not need DOT accounts created, just SOA/LDAP. I am the sponsor for these accounts.
Please let me know the username/password once their setup is complete and I will take care of giving
the consultants their account information.
Thank you!
Your Name

Chapter 13 - Page 7 of 11 Alaska DOT&PF AWP Precon User Guide revised 2/20
For MAs: Once the consultant’s LDAP account is ready, create their AWP account by using the steps in
the previous section (Adding / Modifying AWP User Accounts).
One additional step is necessary:
1. In the consultant’s User Summary component, in the Consultant Access field, search for and
select the name of the consultant company the individual works.
2. Click <Save>.

Chapter 13 - Page 8 of 11 Alaska DOT&PF AWP Precon User Guide revised 2/20
13.3 Adding Items
To create a new item:
1. Log into AWP.
2. Make sure you are in as the Items Admin role.
3. Select the Items link.
4. Expand the Item Overview component action menu and select Add.
NOTE: If adding a regional special item, look up the last regional special number used in the
section to identify the next available regional special number.
5. Item number formats:
a. For Highways, Marine
Facilities, and Public
Facilities included in
the Highways item
list, the number
format is:
NOTE: Marine Facilities has MF
followed by a sequential number
in the middle sequence (i.e.
504.MF06.0000)
b. For Aviation and Public Facilities
included in the Aviation item list
the number format is:
c. For Public Facilities in the Public Facilities list: 001 and up (sequential)
d. For AMHS – Vessels: 000001 and up (sequential)
Indicates dimension, size, or
type breakout for data
mining
603.0001.0012
Spec book section
Designates Standard Item
(0001-1999) or Regional
Special Items (2000-8999)
Indicates dimension, size, or
type breakout for data
mining
701D.010.0012
Spec section
Sequential number
assigned (mostly
increments of 10)

Chapter 13 - Page 9 of 11 Alaska DOT&PF AWP Precon User Guide revised 2/20
6. In the Item ID field, enter the appropriate item number.
7. In the Item Description field, enter the item name/description.
8. If you are creating ‘generic’ item that the designer will need to add an extra descriptor for,
check the Supplemental Required checkbox. (i.e. Abutment Lifting, Abutment _______ ) and
add instructions to the Supp Desc Instructions field.
9. If the item you are creating is a furnished material (i.e. state-furnished material), check the
Furnished Material (on bid) box. These are not placement or installation items that contractors
bid on.
NOTE: Checking the Furnished Material box excludes the item from CENG calculations.
10. From the Item List dropdown, select the item list the new item should be added to.
a. Highways (add highways, facilities and marine highway terminals items to this list).
b. Aviation (add aviation and facilities items to this list).
c. AMHS Vessels (add AMHS Vessels items only to this list).
d. Public Facilities (add items for standalone PF projects to this list).
11. Check the OJT Item box if the item is a ‘labor’ item. (Relevant for all items being added to the
highways item list only – includes MH Terminals items and facilities items)
NOTES:
A ‘labor’ item is something that requires labor to install. For example, Furnish
Structural Steel Piles is not a ‘labor’ item, but Drive Structural Steel Piles is a ‘labor’
item.
Other items that are considered not to be ‘labor’ items are:
o Section 640 items
o Section 641 items
o Section 644 items
o Section 645 items
o Section 646 items
o All contingent sum items
12. In the Unit of Measure dropdown, select the unit of measure for the new item.
13. Click <Save>.
NOTES:
If you made an error when creating an item and need it removed from the item list,
contact a System Administrator.
If a Regional Special item needs to be obsoleted because it is being turned into a
Standard item, contact a System Administrator.
If you need an item modified (number/description/unit of measure), follow these steps:
o Check to see if the item has been used on a project (run the Item Usage report).
o If the item has not been used, look up the item in the Items area and see who
created the item.
o Email the item creator to see if the change is okay.
o Email a SysAdmin with the change and cc all the MA/Ts.

Chapter 13 - Page 10 of 11 Alaska DOT&PF AWP Precon User Guide revised 2/20
13.4 Adding Funds
Unlike Fund Packages that can be created from scratch, Funds that need to be added to the Fund
Packages on a project must be added to the Fund reference data. Don’t delete funds unless you just
created it and made an error. You don’t want to delete any funds that may have been used on a
project.
1. Log into AWP.
2. Make sure you are in as the Module Admin role.
3. Select the Funds link.
4. Expand the Fund Overview component action menu and select Add.

Chapter 13 - Page 11 of 11 Alaska DOT&PF AWP Precon User Guide revised 2/20
**You may want to check out the existing list of funds to get an idea of what to put in each of the fields.
5. Click the <New> button.
6. In the Fund ID field, enter a description or short description of the funding source.
7. In the Fund Description field, enter the description of the funding source (will be same as Fund
ID nearly always).
8. In the Fund Type dropdown, select the type of fund.
9. In the Percentage field, enter 100.
10. Click <Save>.
If you need to delete a fund you just created in error. NOTE: You cannot delete a fund that has been
used on a project. AWP will give you a red error message.
1. Click the Previous button (or dropdown arrow) and return to the Fund Overview component.
2. Search for the fund you want to delete.
3. Expand the row actions menu on the right side and select Delete. The fund record is marked
for deletion and users may “undo” the action until the user clicks <Save>.