chapter 3 - photoshop® elements
DESCRIPTION
Chapter 3 - Photoshop® Elements. Outline 3.1 Introduction 3.2 Image Basics 3.3 Vector and Raster Graphics 3.4 Toolbox 3.4.1 Selection Tools 3.4.2 Painting Tools 3.4.3 Shape Tools 3.5 Layers 3.6 Screen Capturing 3.7 File Formats: GIF and JPEG. 3.1 Introduction. - PowerPoint PPT PresentationTRANSCRIPT

2001 Prentice Hall, Inc. All rights reserved.
1
Chapter 3 - Photoshop® Elements
Outline3.1 Introduction3.2 Image Basics3.3 Vector and Raster Graphics3.4 Toolbox
3.4.1 Selection Tools3.4.2 Painting Tools3.4.3 Shape Tools
3.5 Layers3.6 Screen Capturing3.7 File Formats: GIF and JPEG

2001 Prentice Hall, Inc. All rights reserved.
2
3.1 Introduction
• Graphics– Use to create successful Web pages– Enhance user experience– Free graphics on the Web– Create original graphics
• Photoshop Elements– Use to create graphics
• Title images• Banners• Buttons• Advanced photographic effects
– 30 day trial download• www.adobe.com

2001 Prentice Hall, Inc. All rights reserved.
3
3.2 Image Basics
• Creating original images– Hands-on examples
• Photoshop Elements application– Quick Start menu
• File options– Open existing file– Create new file– Acquiring an image
• Scanner• Digital camera
• Window > Show Quick Start

2001 Prentice Hall, Inc. All rights reserved.
4
3.2 Image BasicsFig. 3.1 Photoshop Elements Quick Start menu. (Adobe and Photoshop are either registered
trademarks of Adobe Systems Incorporated in the United States and/or other countries.)
2001 Prentice Hall, Inc. All rights reserved.
5
3.2 Image Basics
• New dialog– Image settings
• Height• Width• Measurement increments
– pixels• Resolution
– dpi/ppi

2001 Prentice Hall, Inc. All rights reserved.
6
3.2 Image Basics
• New dialog, cont.– Image settings, cont.
• Color mode– RGB– Grayscale– Bitmap
• Background color– Foreground color– Background color– Transparent
• File name
2001 Prentice Hall, Inc. All rights reserved.
7
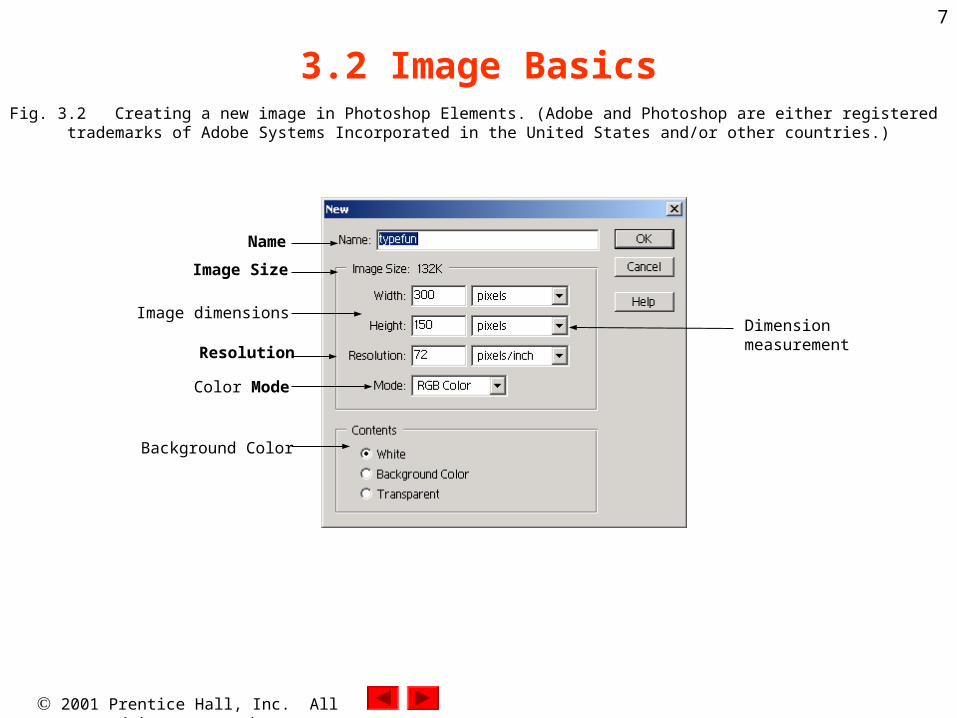
3.2 Image BasicsFig. 3.2 Creating a new image in Photoshop Elements. (Adobe and Photoshop are either registered
trademarks of Adobe Systems Incorporated in the United States and/or other countries.)
Name
Resolution
Background Color
Dimension measurement
Color Mode
Image Size
Image dimensions
2001 Prentice Hall, Inc. All rights reserved.
8
3.2 Image Basics
• Development Environment– Image window
• Title bar– Toolbox– Palette well– Palettes– Customizing development environment
• Move palettes– Drag and drop from palette well
• Windows > Reset Palette Locations

2001 Prentice Hall, Inc. All rights reserved.
9
3.2 Image BasicsFig. 3.3 Photoshop Elements development environment. (Adobe and Photoshop are either registered
trademarks of Adobe Systems Incorporated in the United States and/or other countries.)
Zoom factor
Backgroundcolor
Imagedimensions
Developmentenvironment
Status bar
Foregroundcolor swatch
Image window
Toolbox
Active tooloptions bar
Title bar
Main menu bar Palette well Hints palette
Active tool

2001 Prentice Hall, Inc. All rights reserved.
10
3.2 Image Basics
• Toolbox– Tool types
• Selection• Editing• Painting• Type
– Active tool• One tool at a time
– Tool information• Hints palette• Status bar
2001 Prentice Hall, Inc. All rights reserved.
11
3.2 Image Basics
• Toolbox, cont.– Active colors
• Foreground color• Background color• Double-click to select
2001 Prentice Hall, Inc. All rights reserved.
12
3.2 Image Basics
• Color selection– Select with Color Picker dialog
• Color models– HSB
• Hue• Saturation• Brightness
– RGB– 16.7 million colors
• Web-safe palette– Hexadecimal notation

2001 Prentice Hall, Inc. All rights reserved.
13
3.2 Image BasicsFig. 3.4 Selecting a color using the Color Picker dialog. (Adobe and Photoshop are either registered
trademarks of Adobe Systems Incorporated in the United States and/or other countries.)
Color selection
Color slider (Hue)
Only Web Colors
New colorPrevious colorCosest Web-safe color
SaturationHue
BrightnessRedGreenBlue
Hexadecimal

2001 Prentice Hall, Inc. All rights reserved.
14
3.2 Image Basics
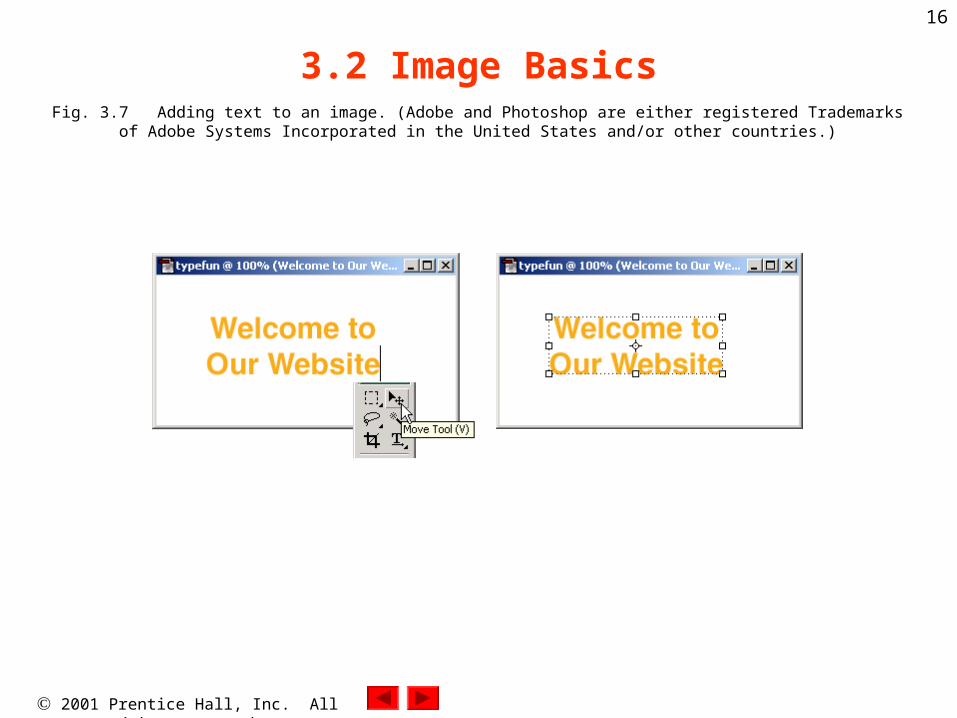
• Adding text to an image – Type tool
• Active tool options bar (type options)– Font face– Font weight– Alignment– Font color– Antialiasing

2001 Prentice Hall, Inc. All rights reserved.
15
3.2 Image BasicsFig. 3.5 Type options bar. (Adobe and Photoshop are either registered trademarks of
Adobe Systems Incorporated in the United States and/or other countries.)
Fig. 3.6 Example of anti-aliasing. (Adobe and Photoshop are either registered Trademarks of Adobe Systems Incorporated in the United States and/or other countries.)
Default settings Font face Font weight Anti-aliased Type direction
Select mode Font size Alignment Warped text
Type color
Type mode
Non-anti-aliased type Anit-aliased type
Anit-aliasing
2001 Prentice Hall, Inc. All rights reserved.
16
3.2 Image BasicsFig. 3.7 Adding text to an image. (Adobe and Photoshop are either registered Trademarks
of Adobe Systems Incorporated in the United States and/or other countries.)

2001 Prentice Hall, Inc. All rights reserved.
17
3.2 Image Basics
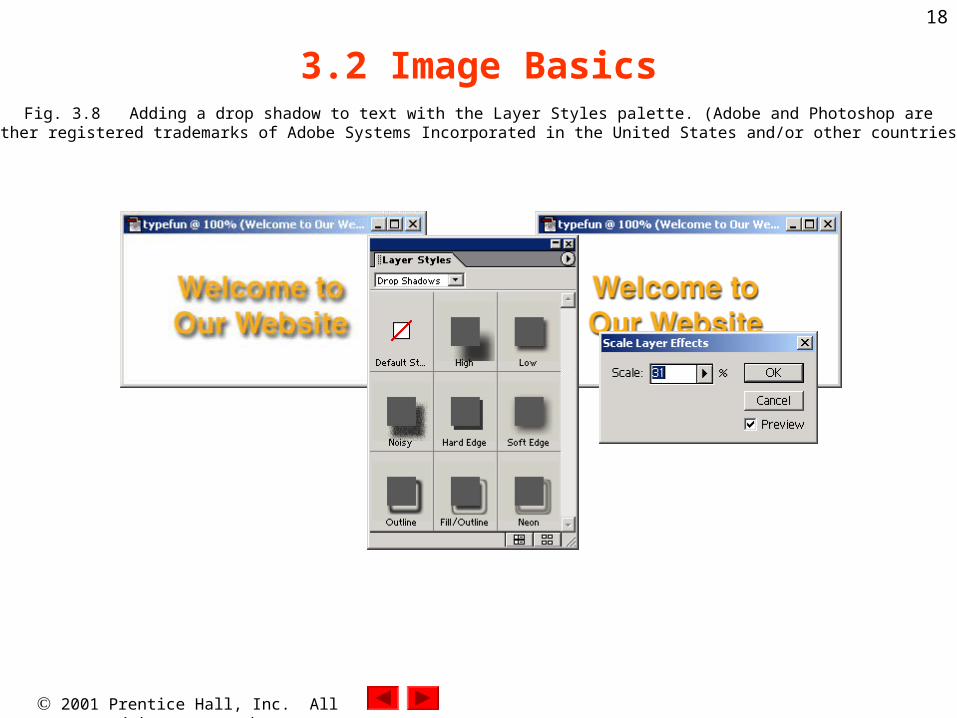
• Special effects– Layer Styles palette
• Drop-shadows• Bevels• Default style
– Editing layer styles• Layer > Layer Style > Scale Effects…
2001 Prentice Hall, Inc. All rights reserved.
18
3.2 Image BasicsFig. 3.8 Adding a drop shadow to text with the Layer Styles palette. (Adobe and Photoshop are
either registered trademarks of Adobe Systems Incorporated in the United States and/or other countries.)

2001 Prentice Hall, Inc. All rights reserved.
19
3.2 Image Basics
• Layers – Layers palette
• Type layer• Style Settings dialog
– Lighting angle– Shadow distance

2001 Prentice Hall, Inc. All rights reserved.
20
3.2 Image BasicsFig. 3.9 Customizing layer effects. (Adobe and Photoshop are either registered trademarks
of Adobe Systems Incorporated in the United States and/or other countries.)
Layers palette Layer effects Shadow Distance
Type layer
Lighting Angle
Active layer
Background layer

2001 Prentice Hall, Inc. All rights reserved.
21
3.2 Image Basics
• Warp text– Type option– Warp text dialog
• Styles• Bend
– Horizontal and vertical distortion• Apply in real-time

2001 Prentice Hall, Inc. All rights reserved.
22
3.2 Image BasicsFig. 3.10 Warped Text dialog. (Adobe and Photoshop are either registered trademarks
of Adobe Systems Incorporated in the United States and/or other countries.)

2001 Prentice Hall, Inc. All rights reserved.
23
3.2 Image Basics
• Transparency– Web page color shows through in transparent areas– Creating transparency
• Delete background layer– Select background layer in Layers palette
• Press Delete key or click trashcan button• Set background to transparent when opening file

2001 Prentice Hall, Inc. All rights reserved.
24
3.2 Image BasicsFig. 3.11 Deleting a layer using the Layers palette. (Adobe and Photoshop are either registered
trademarks of Adobe Systems Incorporated in the United States and/or other countries.)
Type layer
Backgroundlayer
Delete layerNew layerResulting transparent image after
deleting the background layer

2001 Prentice Hall, Inc. All rights reserved.
25
3.2 Image Basics
• Saving an image for the Web– File > Save for Web…
• Save for Web dialog– Optimize settings for Web and target audience
• Number of colors• File format• File size• Compression quality• Transparency
– Matte• Helps transparent image blend with background color
– Browser preview

2001 Prentice Hall, Inc. All rights reserved.
26
3.2 Image BasicsFig. 3.12 Adding a matte color to a transparent GIF in the Save for Web dialog. (Adobe and Photoshop
are either registered trademarks of Adobe Systems Incorporated in the United States and/or other countries.)
PanZoom
Original image Optimized image
Transparency
File type
Number of colors
File info Applied matte Zoom
Matte
Browser preview
Settings

2001 Prentice Hall, Inc. All rights reserved.
27
3.3 Vector and Raster Graphics
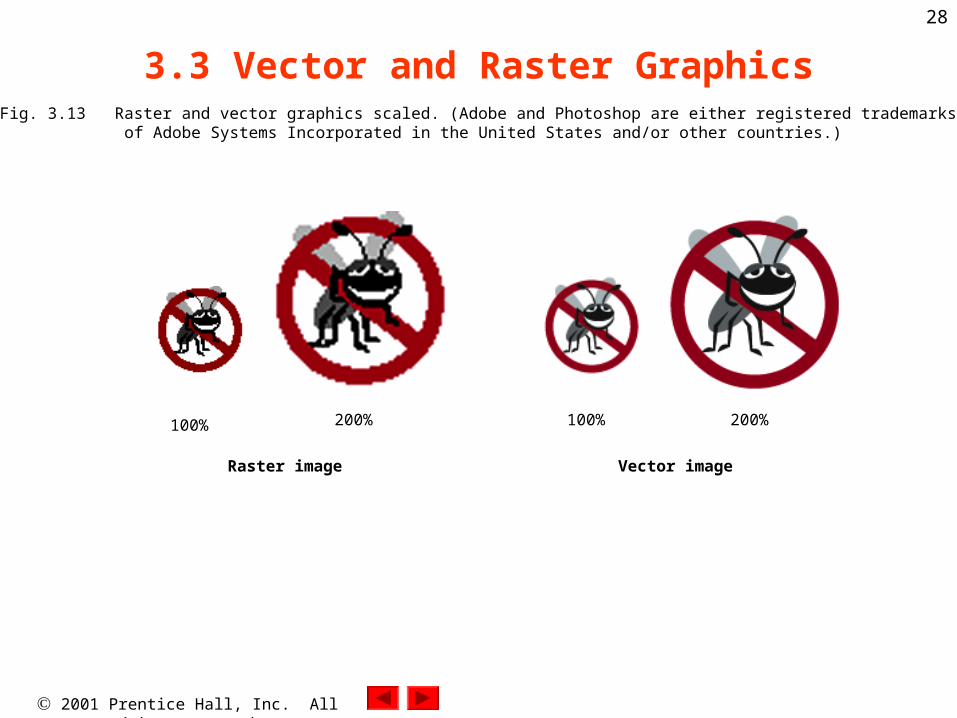
• Two graphic types– Vector
• Uses vector equations to define graphic properties– Shape, size, color
• Resolution independent– Resize without image quality loss
• Ideal for solid areas of color– Handles complex color poorly
– Raster• Graphics defined by colored areas of pixels• Resolution dependent
– Image quality is lost when image is resized• Interpolation
• Ideal for images with complex color, i.e., photographs, artwork
2001 Prentice Hall, Inc. All rights reserved.
28
3.3 Vector and Raster GraphicsFig. 3.13 Raster and vector graphics scaled. (Adobe and Photoshop are either registered trademarks
of Adobe Systems Incorporated in the United States and/or other countries.)
100% 200% 100% 200%
Raster image Vector image

2001 Prentice Hall, Inc. All rights reserved.
29
3.4 Toolbox
• Toolbox– Contains tools that simplify image editing and creation– Groups tools by function
• Navigation tools– Magnifying glass– Hand tool
• Hidden tools– Beneath tools in toolbox

2001 Prentice Hall, Inc. All rights reserved.
30
3.4 ToolboxFig. 3.14 Photoshop Elements Toolbox. (Adobe and Photoshop are either registered trademarks
of Adobe Systems Incorporated in the United States and/or other countries.)
MarqueeLassoCrop
ShapeAirbrush
EraserPaint bucket
BlurSponge
Red eye brush
Rubber stampHand
Foreground color swatch
Black and white
MoveMagic wandType
GradientPaintbrushPencil
Impressionist brushSharpenSmudgeDodgeEyedropperMagnifying glass
Switch foreground and background colorsBackground color swatch
2001 Prentice Hall, Inc. All rights reserved.
31
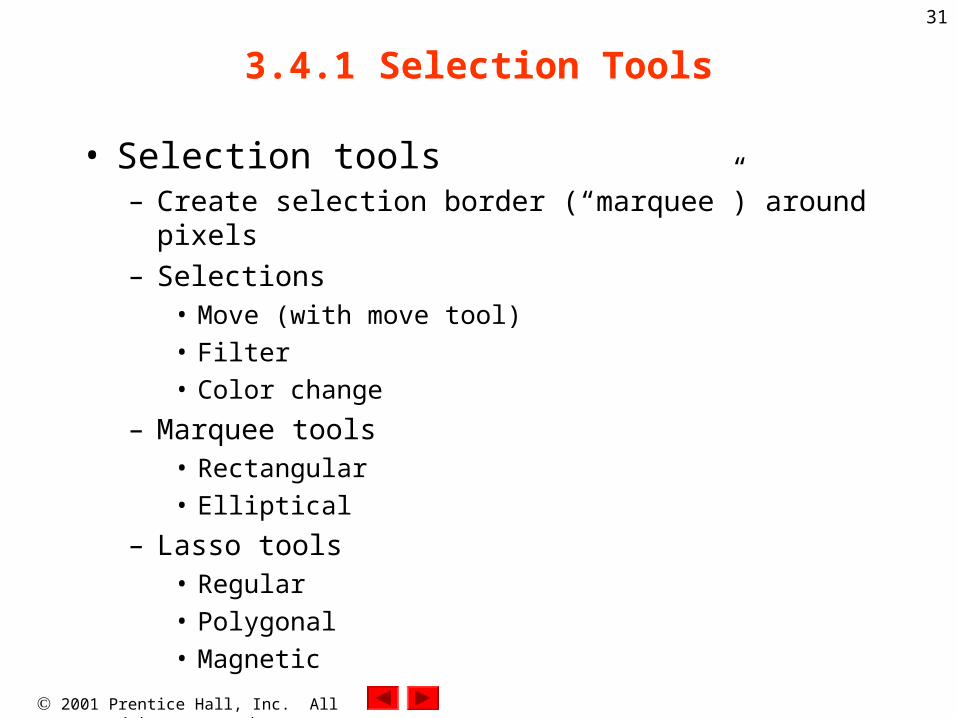
3.4.1 Selection Tools
• Selection tools– Create selection border (“marquee”) around pixels– Selections
• Move (with move tool)• Filter• Color change
– Marquee tools• Rectangular• Elliptical
– Lasso tools• Regular• Polygonal• Magnetic

2001 Prentice Hall, Inc. All rights reserved.
32
3.4.1 Selection ToolsFig. 3.15 Moving a selection with the move tool. (Adobe and Photoshop are either registered
trademarks of Adobe Systems Incorporated in the United States and/or other countries.)

2001 Prentice Hall, Inc. All rights reserved.
33
3.4.1 Selection ToolsFig. 3.16 Drawing selection areas with the lasso tools. (Adobe and Photoshop are either registered
trademarks of Adobe Systems Incorporated in the United States and/or other countries.)
Selection with the regular lasso Selection with the magnetic lasso

2001 Prentice Hall, Inc. All rights reserved.
34
3.4.1 Selection Tools
• Selection tools, cont.– Magic wand tool
• Tolerance– Selection tool options bars
• Customize selection areas– Add to selection– Subtract from selection– Intersect selection

2001 Prentice Hall, Inc. All rights reserved.
35
3.4.1 Selection ToolsFig. 3.17 Changing the magic wand tolerance to affect the size of a selection. (Adobe and Photoshop are either registered trademarks of Adobe Systems Incorporated in the United States and/or other countries.)
Tolerance set to 15 Tolerance set to 50

2001 Prentice Hall, Inc. All rights reserved.
36
3.4.1 Selection ToolsFig. 3.18 Making multiple selections using the selection tool options bar. (Adobe and Photoshop are
either registered trademarks of Adobe Systems Incorporated in the United States and/or other countries.)
HeightWidth StyleFeather Selectionmodes
Default toolsettings
Subtract from selection
Intersect selections
Anti-aliased
Add to selection
Single selection

2001 Prentice Hall, Inc. All rights reserved.
37
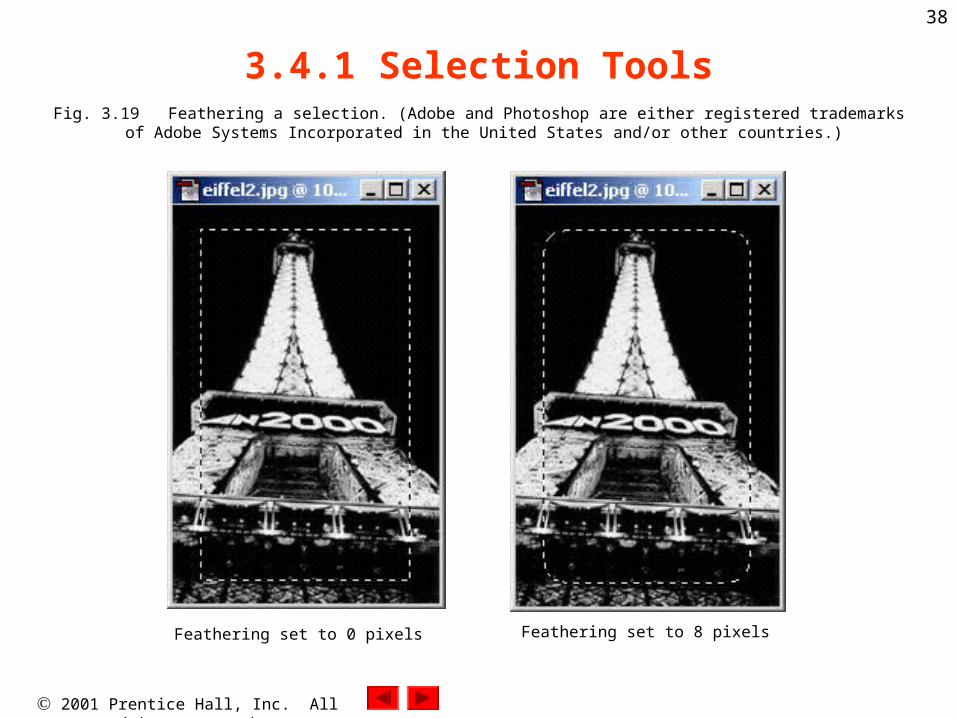
3.4.1 Selection tools
• Creating a blurred frame around an image– Rectangular marquee tool
• Feathering– Blurs edges to blend– Set to 8 px in Marquee tool options bar
2001 Prentice Hall, Inc. All rights reserved.
38
3.4.1 Selection ToolsFig. 3.19 Feathering a selection. (Adobe and Photoshop are either registered trademarks
of Adobe Systems Incorporated in the United States and/or other countries.)
Feathering set to 8 pixelsFeathering set to 0 pixels

2001 Prentice Hall, Inc. All rights reserved.
39
3.4.1 Selection Tools
• Creating a blurred frame around an image, cont.– Draw marquee
• Click and drag with rectangular marquee tool– Invert selection
• Select pixels outside current selection• Ctrl+Shift+I or Select > Inverse
– Fill selection• Alt+Backspace (fill selection with foreground color)• Ctrl+Backspace (fill selection with background color)• Edit > Fill
– Fill dialog• Blending modes

2001 Prentice Hall, Inc. All rights reserved.
40
3.4.1 Selection ToolsFig. 3.20 Filling a selection with color. (Adobe and Photoshop are either registered
trademarks of Adobe Systems Incorporated in the United States and/or other countries.)
Blending mode Opacity
Fill contents
Fill the feathered selection

2001 Prentice Hall, Inc. All rights reserved.
41
3.4.1 Selection Tools
• Creating a blurred frame around an image, cont.– Deselect
• Ctrl+D or click outside selection– Save for Web
• JPEG– Supports millions of colors– Ideal for photographic images

2001 Prentice Hall, Inc. All rights reserved.
42
3.4.1 Selection ToolsFig. 3.21 Previewing the feathered image in a Web browser. (Adobe and Photoshop are either
registered trademarks of Adobe Systems Incorporated in the United States and/or other countries.)

2001 Prentice Hall, Inc. All rights reserved.
43
3.4.2 Painting Tools
• Painting tools– Apply color to image
• Simulate brush strokes or draws constrained shapes– Paintbrush and airbrush tools
• Raster tools• Simulate brush strokes
– Brush selection– Paintbucket tool
• Fills area with foreground color (selects pixels same as magic wand)
– Gradient tool• Fills area with gradual color progression• Gradient options

2001 Prentice Hall, Inc. All rights reserved.
44
3.4.2 Painting ToolsFig. 3.22 Using the gradient tool. (Adobe and Photoshop are either registered trademarks
of Adobe Systems Incorporated in the United States and/or other countries.)
Gradient picker
Default tool settings
Edit gradientcolors
Gradient pattern Color blend Mode Opacity Dither
Reversegradient colors
PreserveTransparency

2001 Prentice Hall, Inc. All rights reserved.
45
3.4.2 Painting Tools
• Creating a title image– Fill with color– Paint on image with contrasting color
• Paintbrush options bar– Brush size

2001 Prentice Hall, Inc. All rights reserved.
46
3.4.2 Painting ToolsFig. 3.23 Brush options. (Adobe and Photoshop are either registered trademarks
of Adobe Systems Incorporated in the United States and/or other countries.)
Default settings
Current brush
Brush menu
Brush sizesBrush options
Brush menu display
Brush menus
Blending Mode
2001 Prentice Hall, Inc. All rights reserved.
47
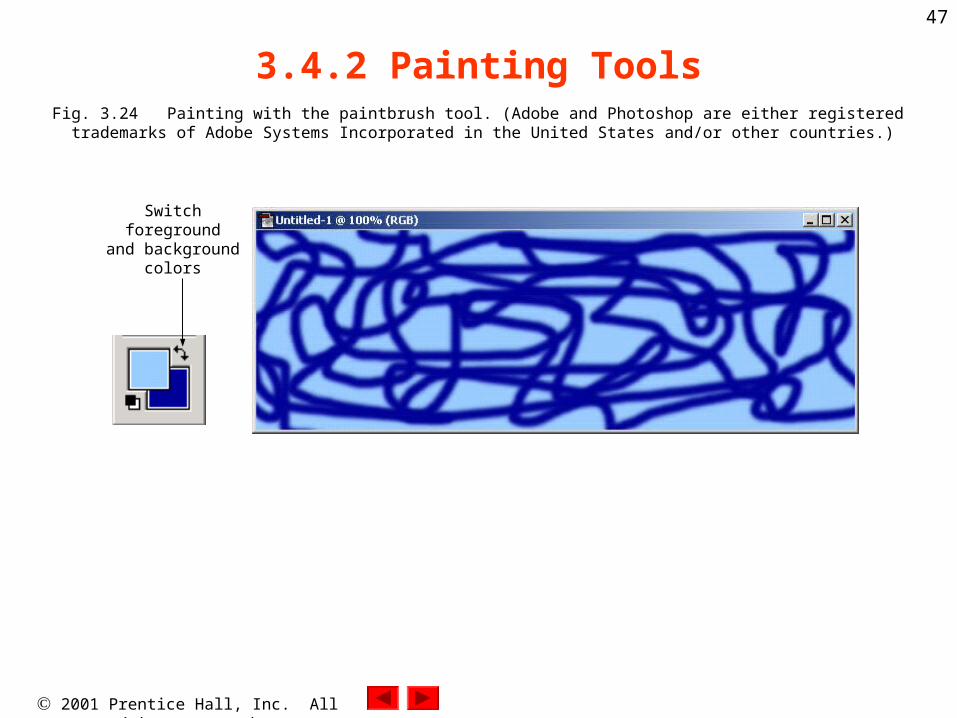
3.4.2 Painting Tools
Switch foreground
and background colors
Fig. 3.24 Painting with the paintbrush tool. (Adobe and Photoshop are either registered trademarks of Adobe Systems Incorporated in the United States and/or other countries.)

2001 Prentice Hall, Inc. All rights reserved.
48
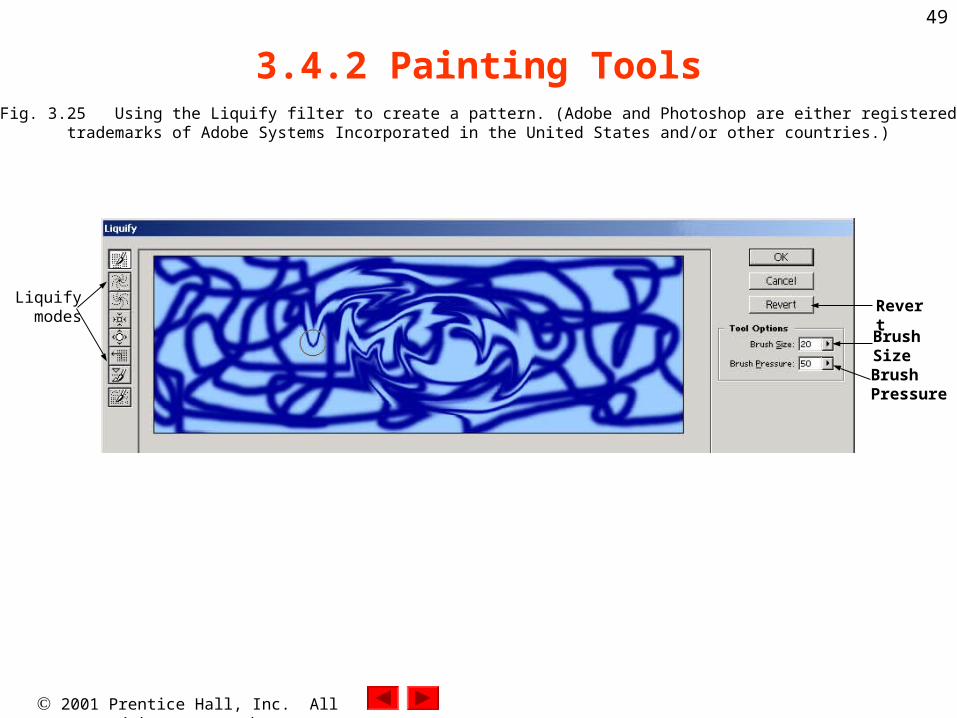
3.4.2 Painting Tools
• Creating a title image, cont.– Apply Liquify filter
• Liquify modes• Create pattern
2001 Prentice Hall, Inc. All rights reserved.
49
3.4.2 Painting Tools
Liquifymodes
Brush Pressure
Revert
Brush Size
Fig. 3.25 Using the Liquify filter to create a pattern. (Adobe and Photoshop are either registeredtrademarks of Adobe Systems Incorporated in the United States and/or other countries.)

2001 Prentice Hall, Inc. All rights reserved.
50
3.4.2 Painting Tools
• Creating a title image, cont.– Create text with type selection tool

2001 Prentice Hall, Inc. All rights reserved.
51
3.4.2 Painting Tools
Selection area
Regular type tool
Type selection tool
Fig. 3.26 Using the type selection tool to create a title image. (Adobe and Photoshop are eitherregistered trademarks of Adobe Systems Incorporated in the United States and/or other countries.)

2001 Prentice Hall, Inc. All rights reserved.
52
3.4.2 Painting Tools
• Creating a title image, cont.– Choose other tool to apply selection– Copy selection to new layer
• Layer > New > Layer via Copy or Ctrl+J– Turn pattern layer visibility to view copied text

2001 Prentice Hall, Inc. All rights reserved.
53
3.4.2 Painting ToolsFig. 3.27 Turning off layer visibility in the Layers palette. (Adobe and Photoshop are either registered
trademarks of Adobe Systems Incorporated in the United States and/or other countries.)

2001 Prentice Hall, Inc. All rights reserved.
54
3.4.2 Painting Tools
• Creating a title image, cont.– Crop image using crop tool
• Eliminate unnecessary background area

2001 Prentice Hall, Inc. All rights reserved.
55
3.4.2 Painting ToolsFig. 3.28 Using the crop tool to eliminate excess image area. (Adobe and Photoshop are either
registered trademarks of Adobe Systems Incorporated in the United States and/or other countries.)
2001 Prentice Hall, Inc. All rights reserved.
56
3.4.2 Painting Tools
• Creating a title image, cont.– Select area around text
• Magic wand tool• Add to selection
– Areas inside letters– Select inverse (recreate text selection)

2001 Prentice Hall, Inc. All rights reserved.
57
• Creating a title image, cont.– Stroke selection
• Edit > Stroke– Stroke dialog
• Stroke location• Stroke weight• Stroke color• Preserve transparency
– Add layer styles• bevel

2001 Prentice Hall, Inc. All rights reserved.
58
3.4.2 Painting ToolsFig. 3.29 Applying a simple inner bevel and a stroke selection. (Adobe and Photoshop are either
registered trademarks of Adobe Systems Incorporated in the United States and/or other countries.)
Stroke Width
Stroke Color
Stroke Location
Blending Mode
OpacityPreserve
Transparency

2001 Prentice Hall, Inc. All rights reserved.
59
3.4.3 Shape Tools
• Shape tool– Draws vector shapes filled with color– Edit independently– Vector shape layer
• Contain vector shapes• Cannot contain raster graphics
– Default setting• Rectangle tool• Change to ellipse, polygon, line, custom shape• Options change for each

2001 Prentice Hall, Inc. All rights reserved.
60
3.4.3 Shape Tools
• Creating a navigation bar– Turn on grid
• View > Show Grid– Change grid settings
• Grid Preferences dialog• Edit > Preferences > Grid…
– Set grid line spacing and line color– Draw button shape
• Rectangle tool

2001 Prentice Hall, Inc. All rights reserved.
61
3.4.3 Shape ToolsFig. 3.30 Custom shape options bar. (Adobe and Photoshop are either registered
Trademarks of Adobe Systems Incorporated in the United States and/or other countries.)
Fig. 3.31 Creating a rectangle with the shape tool. (Adobe and Photoshop are either registeredtrademarks of Adobe Systems Incorporated in the United States and/or other countries.)
Shape select tool
Custom shape selector
Layer Style Shape Color

2001 Prentice Hall, Inc. All rights reserved.
62
3.4.3 Shape Tools
• Creating a navigation bar, cont.– Duplicate rectangle three times
• Select rectangle with shape select tool• Copy and paste (Ctrl+C, Ctrl+V)
– Space buttons evenly– Undo
• Edit > Undo or Ctrl +Z • History palette
– Trashcan button

2001 Prentice Hall, Inc. All rights reserved.
63
3.4.3 Shape ToolsFig. 3.32 Using the main menu bar to copy and paste. (Adobe and Photoshop are either registered
trademarks of Adobe Systems Incorporated in the United States and/or other countries.)
Fig. 3.33 Creating multiple rectangles with the move shape tool. (Adobe and Photoshop are eitherregistered trademarks of Adobe Systems Incorporated in the United States and/or other countries.)
New
Open
Print preview
Step back
Step forwardSave
Save for Web
Cut
Copy
Paste
Ruler
Help
2001 Prentice Hall, Inc. All rights reserved.
64
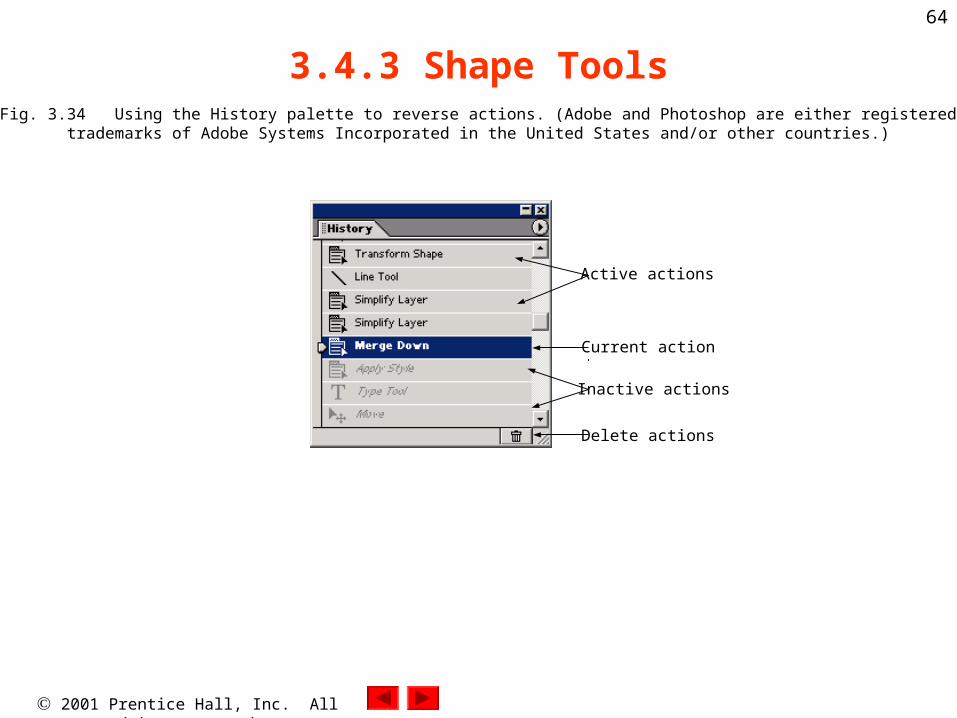
3.4.3 Shape ToolsFig. 3.34 Using the History palette to reverse actions. (Adobe and Photoshop are either registered
trademarks of Adobe Systems Incorporated in the United States and/or other countries.)
Active actions
Inactive actions
Delete actions
Current action

2001 Prentice Hall, Inc. All rights reserved.
65
3.4.3 Shape Tools
• Creating a navigation bar, cont.– Transform shapes
• Select all• Skew
– Image > Transform Shape > Skew– Tilt on horizontal or vertical axis using anchors– Press Enter to apply
– Connect buttons with line • Line tool
– Set line weight using line tool options bar– Click and drag to draw
2001 Prentice Hall, Inc. All rights reserved.
66
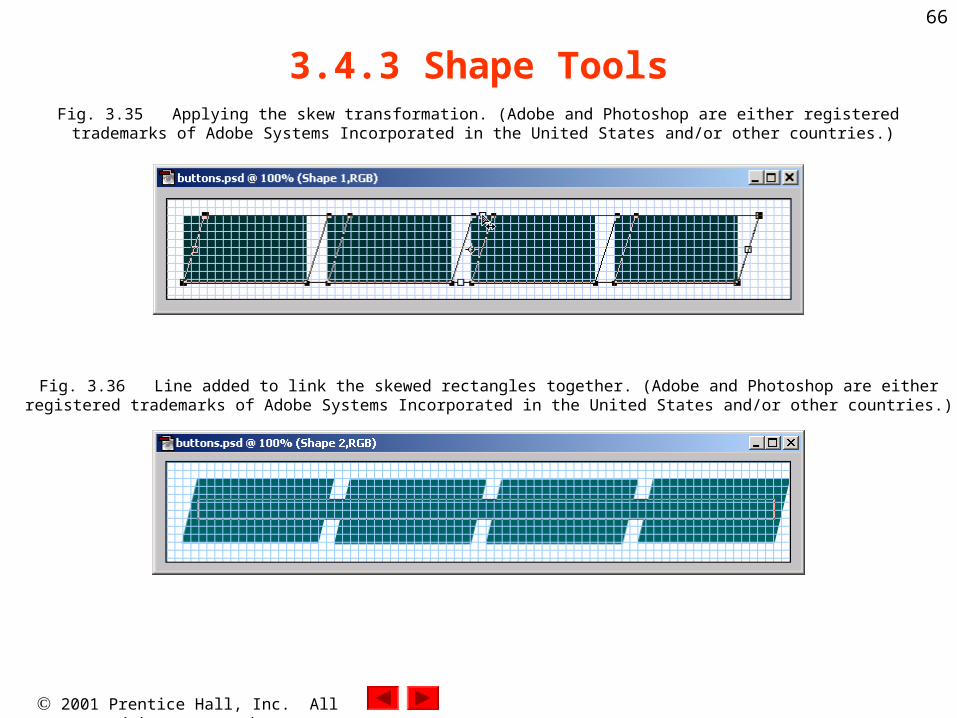
3.4.3 Shape ToolsFig. 3.35 Applying the skew transformation. (Adobe and Photoshop are either registered trademarks of Adobe Systems Incorporated in the United States and/or other countries.)
Fig. 3.36 Line added to link the skewed rectangles together. (Adobe and Photoshop are eitherregistered trademarks of Adobe Systems Incorporated in the United States and/or other countries.)

2001 Prentice Hall, Inc. All rights reserved.
67
3.4.3 Shape Tools
• Creating a navigation bar, cont.– Combine line and rectangle areas
• Convert line and rectangle layers to regular raster layers– Layers palette
• Layer options menu– Simplify Layer
– Layer styles• Bevel
– Button titles• Type tool

2001 Prentice Hall, Inc. All rights reserved.
68
3.4.3 Shape Tools
Press to access layer options menu
Button layerLine layer
Fig. 3.37 Simplifying a shape layer using the Layers palette. (Adobe and Photoshop are eitherregistered trademarks of Adobe Systems Incorporated in the United States and/or other countries.)

2001 Prentice Hall, Inc. All rights reserved.
69
3.4.3 Shape ToolsFig. 3.38 Navigation bar. (Adobe and Photoshop are either registered trademarks
of Adobe Systems Incorporated in the United States and/or other countries.)
2001 Prentice Hall, Inc. All rights reserved.
70
3.4.3 Shape Tools
• Creating a navigation bar, cont.– Implement on Web
• Image slicing– Select each button with rectangular marquee tool– Copy and paste each selection into new image

2001 Prentice Hall, Inc. All rights reserved.
71
3.4.3 Shape Tools Fig. 3.39 Slicing an image with the rectangular marquee tool. (Adobe and Photoshop are either
registered trademarks of Adobe Systems Incorporated in the United States and/or other countries.)
Fig. 3.40 Sliced image as individual buttons. (Adobe and Photoshop are either registeredtrademarks of Adobe Systems Incorporated in the United States and/or other countries.)

2001 Prentice Hall, Inc. All rights reserved.
72
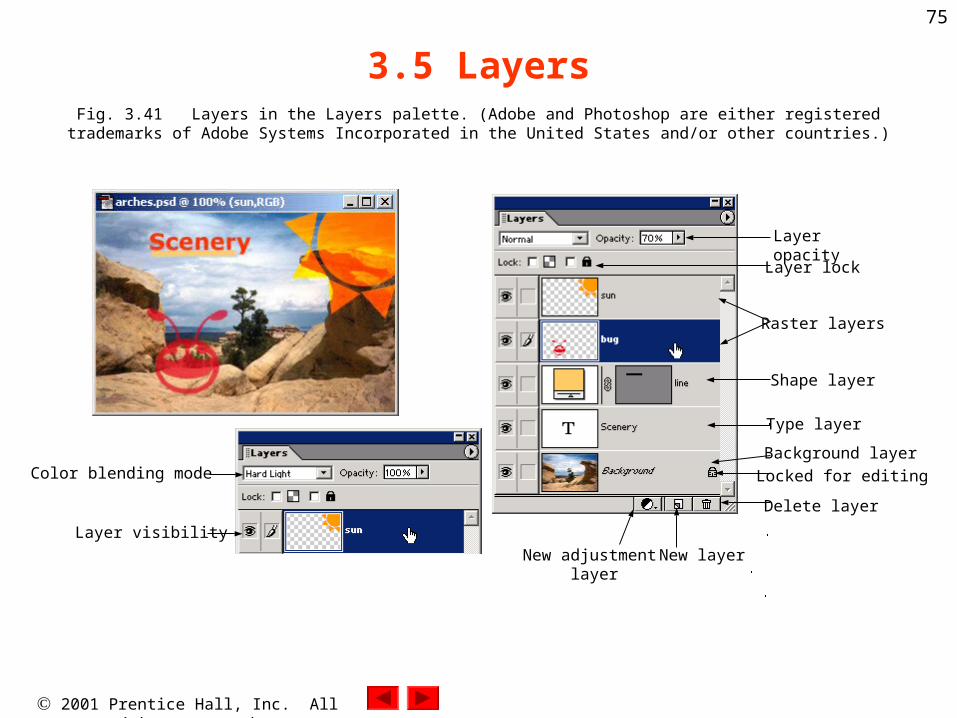
3.5 Layers
• Layers– Organize image elements so they may be edited separately– May have unique attributes– Vector layers
• Contain vevtor shapes or text– Raster layers
• Contain raster shapes– Adjustment layers
• Apply color adjustments to layers beneath

2001 Prentice Hall, Inc. All rights reserved.
73
3.5 Layers
• Layers, cont.– Creating new layers
• Raster– New layer button
• Adjustment– New Adjustment layer button
• Shape– Use shape tool or type tool
– Arranging layers• Layers > Arrange• Drag up or down in Layers palette

2001 Prentice Hall, Inc. All rights reserved.
74
3.5 Layers
• Layers, cont.– Background layer
• Anchored to bottom of image• Must re-name to convert to regular raster layer
– Blending modes• How layer is affected by applied color
2001 Prentice Hall, Inc. All rights reserved.
75
3.5 LayersFig. 3.41 Layers in the Layers palette. (Adobe and Photoshop are either registered
trademarks of Adobe Systems Incorporated in the United States and/or other countries.)
Color blending mode
Layer visibilityNew adjustment
layerNew layer
Delete layerLocked for editing Background layer Type layer
Shape layer
Raster layers
Layer lockLayer opacity

2001 Prentice Hall, Inc. All rights reserved.
76
3.5 LayersFig. 3.42 Adjusting the hue and saturation using an adjustment layer. (Adobe and Photoshop are either
registered trademarks of Adobe Systems Incorporated in the United States and/or other countries.)

2001 Prentice Hall, Inc. All rights reserved.
77
3.6 Screen Capturing
• Screen Capturing– “capture” image that appears on screen– Works like copy and paste– Press Print Screen button to copy screen contents– Paste into new image– Press alt+Print Screen to capture active window
2001 Prentice Hall, Inc. All rights reserved.
78
3.7 File Formats: GIF and JPEG
• File fomats– Different formats are ideal for different types of images– GIF (Graphics Interchange Format)
• Ideal for:– screen captures, line drawings, sharp-edged graphics and
images with transparency• Not good for:
– Photographic images, artwork with complex colors• Supports 256 colors• Lossless format
– Quality is not reduced by compression process

2001 Prentice Hall, Inc. All rights reserved.
79
3.7 File Formats: GIF and JPEG
• File fomats, cont.– JPEG (Joint Photographic Experts Group)
• Ideal for: – Photographic images, images with rich color transitions
• Not good for:– Images with sharp edges, text, transparency
• Supports millions of colors• Lossy format
– Image quality is reduced by compression process• Scalable compression
– Adjust image compression

2001 Prentice Hall, Inc. All rights reserved.
80
3.7 File Formats: GIF and JPEG
• File fomats, cont.– PNG (Portable Network Graphics)
• Newer format recommended by W3C– www.w3.org/Graphics/PNG
• Ideal for: – Both color complex-images and images with transparency
• Supports millions of colors• Lossless format• Good alternative for both GIF and JPEG