chapter 4 getting started with writer - libreoffice · word and character count the word and...
TRANSCRIPT
Getting Started Guide
Chapter 4 Getting Started with WriterWord Processing with LibreOffice

Copyright
This document is Copyright © 2010–2016 by the LibreOffice Documentation Team. Contributors are listed below. You may distribute it and/or modify it under the terms of either the GNU General Public License (http://www.gnu.org/licenses/gpl.html), version 3 or later, or the Creative Commons Attribution License (http://creativecommons.org/licenses/by/4.0/), version 4.0 or later.
All trademarks within this guide belong to their legitimate owners.
Contributors
John A Smith Jean Hollis Weber Hazel RussmanOlivier Hallot Ron Faile Jr.
FeedbackPlease direct any comments or suggestions about this document to the Documentation Team’s mailing list: [email protected]
Note: Everything you send to a mailing list, including your email address and any other personal information that is written in the message, is publicly archived and cannot be deleted.
AcknowledgmentsThis chapter is adapted and updated from Chapter 4 of Getting Started with OpenOffice.org 3.x. The contributors to that chapter were:
Jean Hollis Weber Michele Zarri Agnes BelzunceDaniel Carrera Spencer E. Harpe Peter Hillier-BrookPeter Kupfer Gary Schnabl Janet SwisherLinda Worthington
Publication date and software versionPublished 24 May 2016. Based on LibreOffice 5.1.
Note for Mac usersSome keystrokes and menu items are different on a Mac from those used in Windows and Linux. The table below gives some common substitutions for the instructions in this chapter. For a more detailed list, see the application Help.
Windows or Linux Mac equivalent Effect
Tools > Options menuselection
LibreOffice > Preferences Access setup options
Right-click Control+click or right-click depending on computer setup
Opens a context menu
Ctrl (Control) ⌘ (Command) Used with other keys
F5 Shift+⌘+F5 Open the Navigator
F11 ⌘+T Open the Styles and Formatting window
Documentation for LibreOffice is available at http://www.libreoffice.org/get-help/documentation
Contents
Copyright.............................................................................................................................. 2Contributors................................................................................................................................. 2
Feedback..................................................................................................................................... 2
Acknowledgments........................................................................................................................ 2
Publication date and software version......................................................................................... 2
Note for Mac users...................................................................................................................... 2
What is Writer?.....................................................................................................................5
The Writer interface............................................................................................................. 5Status Bar.................................................................................................................................... 6
Sidebar........................................................................................................................................ 8
Changing document views............................................................................................... 10
Moving quickly through a document............................................................................... 10
Working with documents...................................................................................................11Saving as a Microsoft Word file.................................................................................................. 11
Working with text............................................................................................................... 12Selecting items that are not consecutive.................................................................................... 12
Selecting a vertical block of text................................................................................................. 13
Cutting, copying, and pasting text.............................................................................................. 14
Finding and replacing text and formatting.................................................................................. 14Using the Find toolbar........................................................................................................... 15Using the Find & Replace dialog........................................................................................... 15
Inserting special characters....................................................................................................... 16
Inserting dashes and non-breaking spaces and hyphens.......................................................... 17
Setting tab stops and indents..................................................................................................... 17
Changing the default tab stop interval........................................................................................ 18
Checking spelling and grammar.................................................................................................18
Using built-in language tools...................................................................................................... 19
Using AutoCorrect...................................................................................................................... 20
Using word completion...............................................................................................................20
Using AutoText........................................................................................................................... 21Creating AutoText.................................................................................................................. 21Inserting AutoText..................................................................................................................21
Formatting text................................................................................................................... 21Using styles is recommended.................................................................................................... 21
Formatting paragraphs...............................................................................................................22
Formatting characters................................................................................................................ 22
Autoformatting........................................................................................................................... 23
Creating numbered or bulleted lists........................................................................................... 23Using the Bullets and Numbering toolbar.............................................................................. 23Using the Sidebar for Bullets and Numbering........................................................................24
Hyphenating words.................................................................................................................... 24Automatic hyphenation.......................................................................................................... 24
Chapter 4 Getting Started with Writer | 3

Manual hyphenation.............................................................................................................. 25
Formatting pages............................................................................................................... 26Which layout method to choose?............................................................................................... 26
Creating headers and footers.................................................................................................... 27Inserting a header or footer................................................................................................... 27Inserting header and footer contents..................................................................................... 28
Numbering pages...................................................................................................................... 28Displaying the page number..................................................................................................28Including the total number of pages...................................................................................... 29Restarting page numbering................................................................................................... 29
Changing page margins............................................................................................................. 30
Adding comments to a document....................................................................................31
Creating a table of contents..............................................................................................32
Creating indexes and bibliographies...............................................................................33
Working with graphics.......................................................................................................33
Printing................................................................................................................................33
Using mail merge............................................................................................................... 33
Tracking changes to a document.....................................................................................33
Using fields.........................................................................................................................34
Linking to another part of a document............................................................................ 34Using hyperlinks........................................................................................................................ 35
Using cross-references.............................................................................................................. 35
Using bookmarks....................................................................................................................... 36
Using master documents.................................................................................................. 37
Creating fill-in forms..........................................................................................................37
4| Chapter 4 Getting Started with Writer

What is Writer?
Writer is the word processor component of LibreOffice. In addition to the usual features of a word processor (spelling check, thesaurus, hyphenation, autocorrect, find and replace, automatic generation of tables of contents and indexes, mail merge and others), Writer provides theseimportant features:
• Templates and styles (see Chapter 3)
• Page layout methods, including frames, columns, and tables
• Automated tables of contents and indexes
• Embedding or linking of graphics, spreadsheets, and other objects
• Built-in drawing tools
• Master documents—to group a collection of documents into a single document
• Change tracking during revisions
• Database integration, including a bibliography database
• Mail merge
• Export to PDF, including bookmarks (see Chapter 10)
• Document digital signature
• Form design and filling
• And many more
These features are covered in detail in the Writer Guide.
The Writer interface
The main Writer workspace is shown in Figure 1. The menus and toolbars are described in Chapter 1, Introducing LibreOffice. Some other features of the Writer interface are covered in this chapter.
Title bar Menu bar Standard toolbar Formatting toolbar
Status barSidebar
Figure 1: The main Writer workspace
The Writer interface | 5

Status BarThe Writer Status Bar provides information about the document and convenient ways to change some document features quickly.
Figure 2: Left end of Status Bar
Figure 3: Right end of Status Bar
Page numberShows the current page number, the sequence number of the current page (if different), and the total number of pages in the document. For example, if you restarted page numbering at 1 on the third page, its page number is 1 and its sequence number is 3.
If any bookmarks have been defined in the document, a right-click on this field pops up a list of bookmarks; click on the required one.
To jump to a specific page in the document, double-click on this field. The Navigator opens. Click in the Page Number field and type the sequence number of the required page and press Enter.
Word and character count The word and character count of the document is shown in the Status Bar, and is kept up to date as you edit. Any text selected in the document will be counted and this count will replacethe displayed count.
To display extended statistics such as character counts excluding spaces, double-click the word count in the Status Bar, or choose Tools > Word Count.
Page styleShows the style of the current page. To change the page style, right-click on this field. A list ofpage styles pops up; choose a different style by clicking on it.
To edit the current page style, double-click on this field. The Page Style dialog opens.
LanguageShows the language at the cursor position, or for the selected text, that is used for checking spelling and for hyphenation and thesaurus.
Click to open a menu where you can choose another language for the selected text or for theparagraph where the cursor is located. You can also choose None (Do not check spelling) to exclude the text from a spelling check or choose More to open the Character dialog. Any directly formatted language settings can be reset to the default language from this menu.
6 | Chapter 4 Getting Started with Writer
Insert modeThis area is blank when in Insert mode. Double-click to change to Overwrite mode; single-click to return to Insert mode. In Insert mode, any text after the cursor position moves forwardto make room for the text you type; in Overwrite mode, text after the cursor position is replaced by the text you type. This feature is disabled when in Edit > Changes > Record mode.
Selection modeClick to choose different selection modes. The icon does not change, but when you hover themouse pointer over this field, a tooltip indicates which mode is active.
When you click in the field, a context menu displays the available options.
Mode Effect
Standard selection Click in the text where you want to position the cursor; click in a cell to make it the active cell. Any other selection is deselected.
Extending selection (F8) Clicking in the text extends or crops the current selection.
Adding selection (Shift+F8) A new selection is added to an existing selection. The result is a multiple selection.
Block selection (Ctrl+Shift+F8) A block of text can be selected.
On Windows systems, you can hold down the Alt key while dragging to select a block of text. You do not need to enter the block selection mode.
Document changes status
The icon that is displayed here changes from this one ( ) if the document has no unsaved
changes, to this one ( ) if it has been edited and the changes have not been saved. Click on the unsaved changes icon to save the document.
Digital signature
If the document has been digitally signed, this icon ( ) is displayed here; otherwise, it is blank. To view the certificate, double-click the icon.
Section or object informationWhen the cursor is on a section, heading, or list item, or when an object (such as a picture ortable) is selected, information about that item appears in this field. Double-clicking in this area opens a relevant dialog. For details, consult the Help or the Writer Guide.
View layoutClick an icon to change between single page, side-by-side, and book layout views. The effectvaries with the combination of window width and zoom factor in use. You can edit the document in any view. See Figure 4.
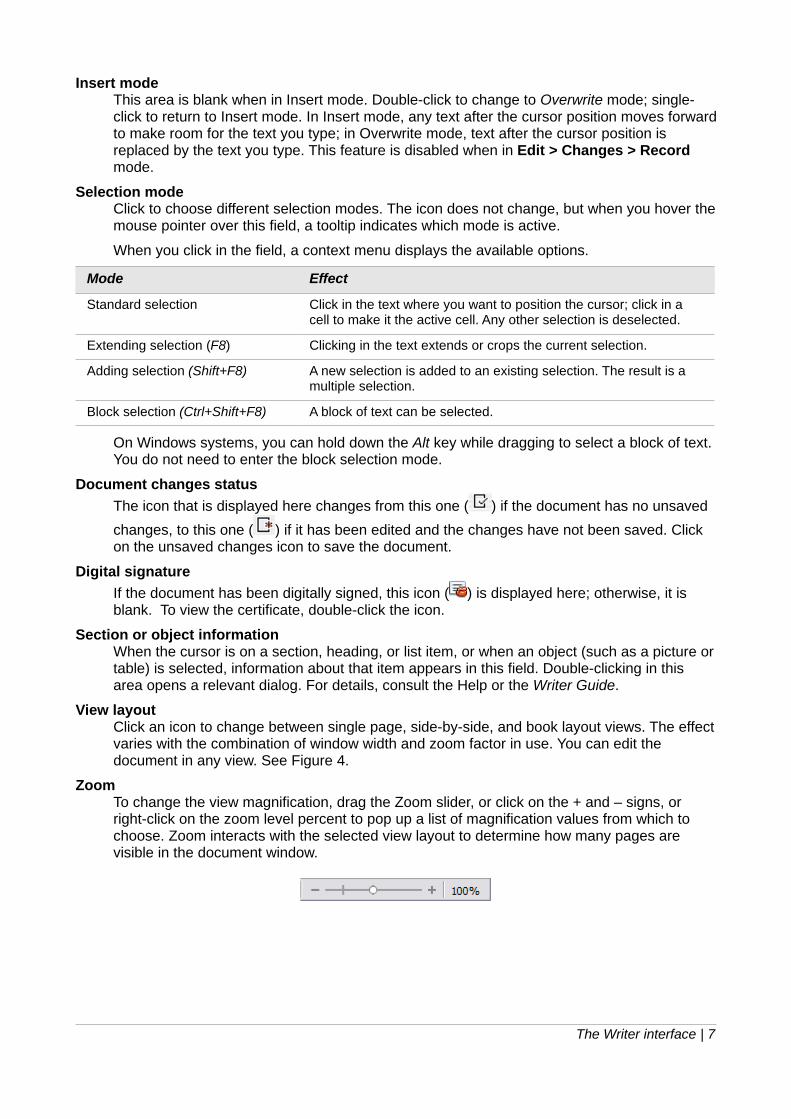
ZoomTo change the view magnification, drag the Zoom slider, or click on the + and – signs, or right-click on the zoom level percent to pop up a list of magnification values from which to choose. Zoom interacts with the selected view layout to determine how many pages are visible in the document window.
The Writer interface | 7

Figure 4: View layouts: single, side-by-side, book.
SidebarThe Writer sidebar (View > Sidebar), shown in Figure 5, is located on the right side of the edit view. It is a mixture of toolbar and dialog and consists of five decks: Properties, Styles and Formatting, Gallery, Navigator, and Manage Changes. Each deck has a corresponding icon on theTab panel to the right of the sidebar, allowing you to switch between them.
Figure 5: Sidebar Properties deck and text content panels
8 | Chapter 4 Getting Started with Writer
Sidebar settings
Title bar
Tabs
Panel title
Deck
Panel contents
More Options button

Each deck consists of a title bar and one or more content panels. Toolbars and sidebar panels share many functions. For example, the buttons for making text bold or italic exist in both the Formatting toolbar and the Character panel of the Properties deck.
Some panels contain a More Options button ( ) which when clicked opens a dialog to give
greater choice of editing controls. The dialog that opens locks the document for editing until the dialog is closed.
The decks are described below.
• Properties: Contains tools for direct formatting within the document. By default, the tools are separated into the following four panels for text editing:
– Styles: Display or apply a paragraph style at the cursor position. Create or update a style.
– Character: Modify text by the font type, size, color, weight, style and spacing.
– Paragraph: Style the paragraph by alignment, lists or bullets, background color, indent, and spacing.
– Page: Format the page by orientation, margin, size, and number of columns.
If a graphic is selected, then the following panels open:
– Area: Modify the graphic background area fill mode and transparency.
– Graphic: Modify the graphic’s brightness, contrast, color mode and transparency.
– Position: Modifications to width and height.
– Wrap: Permits wrap modifications where these are available.
If a drawing object is selected, then the following panels are available:
– Area: Fill and transparency edits are available.
– Line: Permits edits to the line style, width, color, arrows, corners and cap styles.
– Position and Size: Enables edits to width, height, rotation and flip attributes.
If a frame is selected, then the wrap panel opens but may be grayed-out if frame wrap is not available.
CautionBe aware that by changing the options on the Page panel, you will change the page style in use, modifying not only the current page but all pages using the same page style.
• Styles and Formatting: Manage the styles used in the document, apply existing styles, create new ones or modify them. This deck is also a floating toolbar that can be opened from Format > Styles and Formatting on the Menu bar.
• Gallery: Add images and diagrams included in the Gallery themes. The Gallery displays as two sections; the first lists the themes by name (Arrows, Background, Diagrams, etc.) and the second displays the images in the selected category. Select the New Theme button to create new categories. To insert an image into a file, or add a new image to the new category, just drag and drop the selected image using the file manager. This deck is also a docked toolbar that can be opened from Tools > Gallery or the Gallery button on the Standard Toolbar.
• Navigator: Browse the document and reorganize its content by selecting different content categories, such as headings, tables, frames, graphics, etc. This deck is similar to the
The Writer interface | 9

floating toolbar that can be opened from View > Navigator on the Menu bar or the Navigator button on the Standard Toolbar. However, the Sidebar Navigator does not contain a List Box On/Off button.
• Manage Changes: Lists all changes done in the document since the Track Changes mode was activated. This deck is an alternate view of the Manage Changes dialog that can be opened from Edit > Track Changes > Manage Changes on the Menu bar. This tab is available only when Enable experimental features has been selected in Tools > Options > LibreOffice > Advanced.
Changing document views
Writer has several ways to view a document: Print Layout, Web Layout, and Full Screen. To accessthese and other choices, go to the View menu and click on the required view. (When in Full Screenview, press the Esc key to return to either Print or Web Layout view.)
Print Layout is the default view in Writer. In this view, you can use the Zoom slider and the View Layout icons on the Status Bar to change the magnification.
You can also choose View > Zoom > Zoom from the menu bar to display the Zoom & View Layoutdialog, where you can set the same options as on the Status Bar. In Web Layout view, most of the choices are not available.
Figure 6: Choosing Zoom and View Layout options.
Moving quickly through a document
In addition to the navigation features of the Status Bar (described above), you can use the Navigator window and the Navigation toolbar, either from the Standard toolbar or from the Sidebar, as described in Chapter 1, Introducing LibreOffice.
The Navigation toolbar (Figure 7) shows buttons for all the object types shown in the Navigator, plus some extras (for example, the Find command).
Figure 7: Navigation toolbar
10 | Chapter 4 Getting Started with Writer
Click a button to select that object type. Now all the Previous and Next button presses (in the Navigator itself, in the Navigation Toolbar, and on the scroll bar) will jump to the next object of the selected type. This is particularly helpful for finding items like index entries, which can be difficult tosee in the text. The names of the buttons (shown in the tooltips) change to match the selected category; for example, Next Graphic, Next Bookmark, or Continue search forward.
For more uses of the Navigator in Writer, see the Writer Guide.
Working with documents
Chapter 1, Introducing LibreOffice, includes instructions on starting new documents, opening existing documents, saving documents, and password-protecting documents. Chapter 3, Using Styles and Templates, covers how to create a document from a template.
By default, LibreOffice loads and saves files in the OpenDocument file format (ODF), a standardized file format (ISO-IEC 26300) used by many software applications.
Tip Wherever choice of the document file format is possible, choose the default ODF format when working with LibreOffice.
Saving as a Microsoft Word fileIf you need to exchange documents with users of Microsoft Word who are unwilling or unable to receive ODT files, you can open, edit, and save documents in Microsoft Word formats.
You can also create and edit ODT files and then save them as DOC or DOCX files. To do this:
1) Important—First save your document in the file format used by LibreOffice Writer (ODT). If you do not, any changes you made since the last time you saved will appear only in the Microsoft Word version of the document.
2) Then choose File > Save As. On the Save As dialog (Figure 8), in the File type (or Save as type) drop-down menu, select the type of Word format you need. Files cannot be saved to the Word version 6.0/95 file format. Click Save.
From this point on, all changes you make to the document will occur only in the new document. You have changed the name and file type of your document. If you want to go back to working withthe ODT version of your document, you must open it again.
TipSaving in ODF format gives you the option to redo the document if the recipient of your document experiences trouble with the Microsoft format.
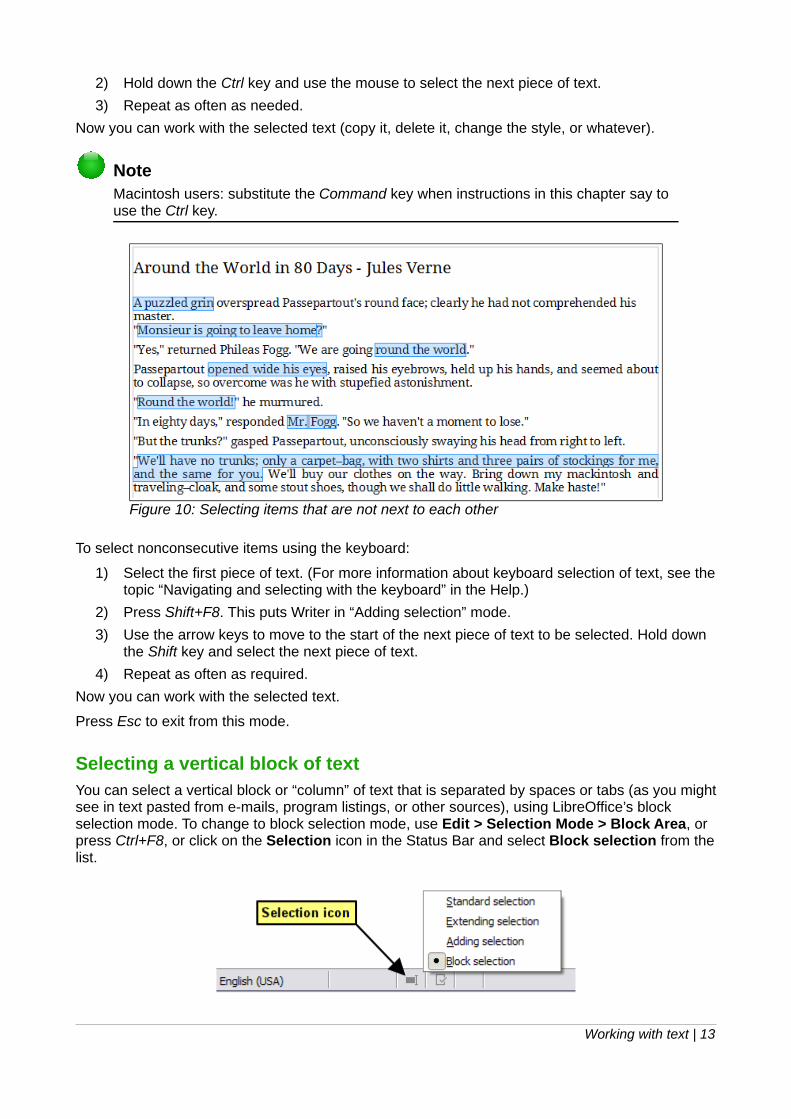
TipTo have Writer save documents by default in the Microsoft Word file format, go to Tools> Options > Load/Save > General. In the section named Default file format and ODF settings, under Document type, select Text document, then under Always save as, select your preferred file format. See Figure 9.
Working with documents | 11
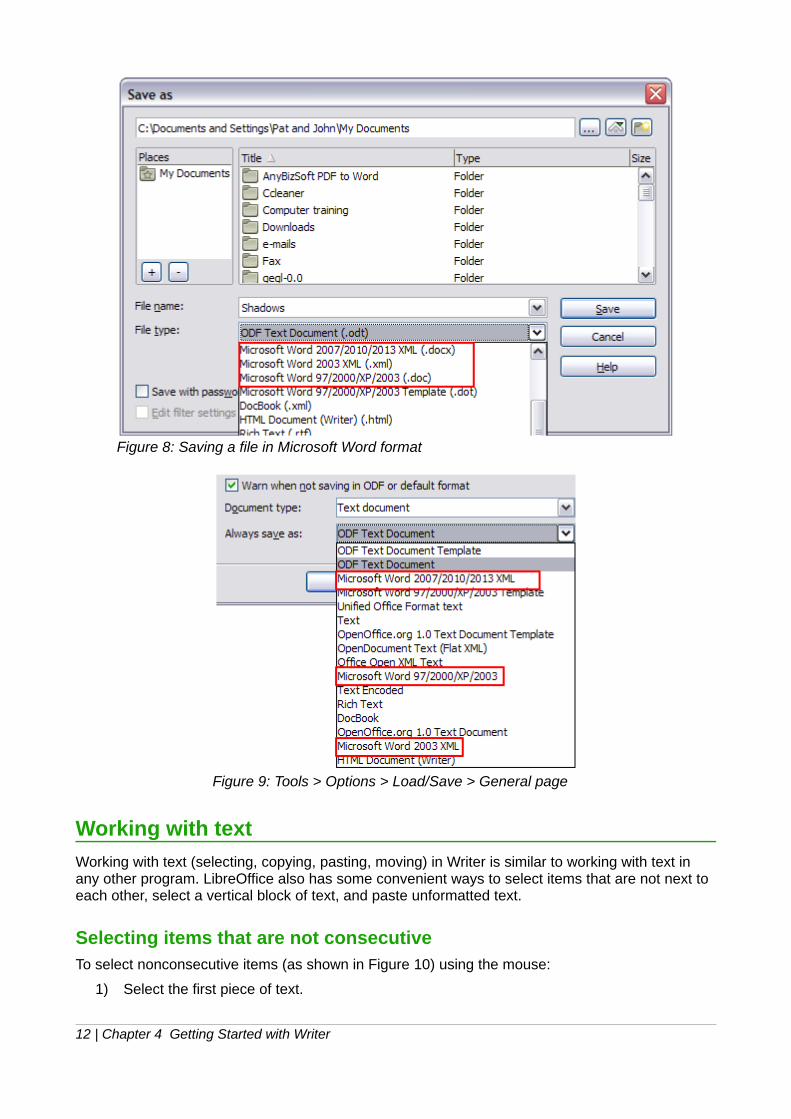
Figure 8: Saving a file in Microsoft Word format
Figure 9: Tools > Options > Load/Save > General page
Working with text
Working with text (selecting, copying, pasting, moving) in Writer is similar to working with text in any other program. LibreOffice also has some convenient ways to select items that are not next to each other, select a vertical block of text, and paste unformatted text.
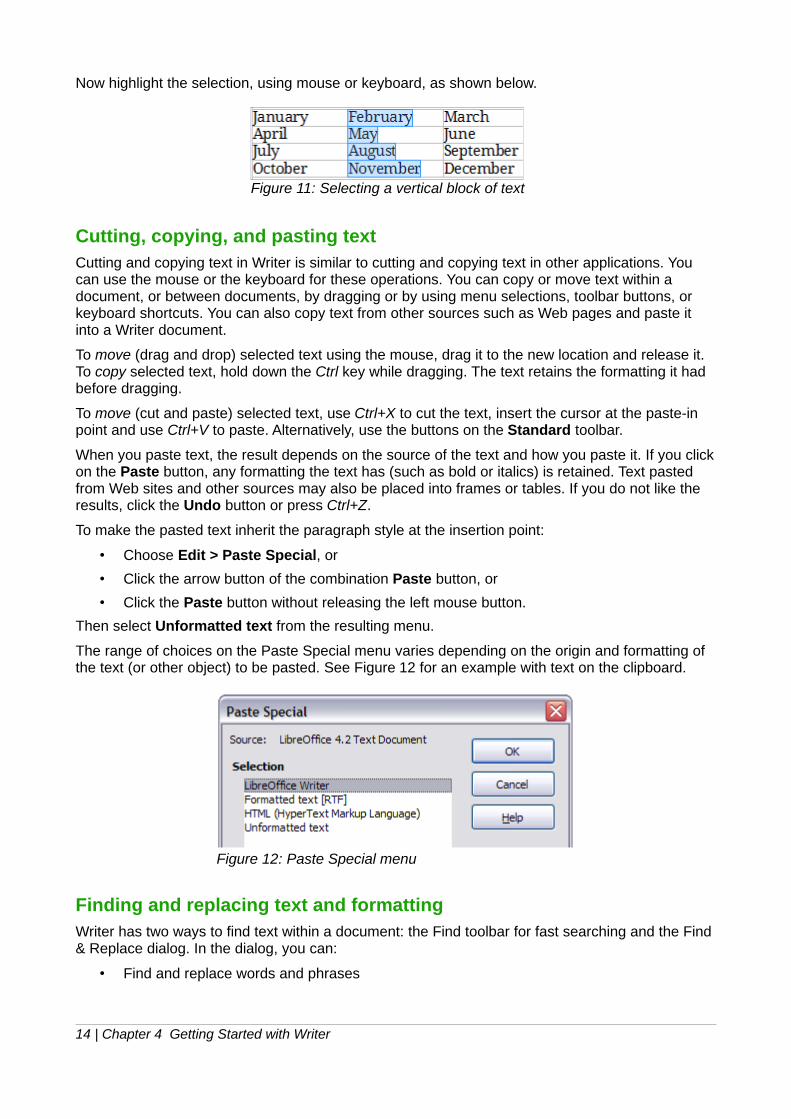
Selecting items that are not consecutiveTo select nonconsecutive items (as shown in Figure 10) using the mouse:
1) Select the first piece of text.
12 | Chapter 4 Getting Started with Writer
2) Hold down the Ctrl key and use the mouse to select the next piece of text.
3) Repeat as often as needed.
Now you can work with the selected text (copy it, delete it, change the style, or whatever).
NoteMacintosh users: substitute the Command key when instructions in this chapter say to use the Ctrl key.
Figure 10: Selecting items that are not next to each other
To select nonconsecutive items using the keyboard:
1) Select the first piece of text. (For more information about keyboard selection of text, see thetopic “Navigating and selecting with the keyboard” in the Help.)
2) Press Shift+F8. This puts Writer in “Adding selection” mode.
3) Use the arrow keys to move to the start of the next piece of text to be selected. Hold down the Shift key and select the next piece of text.
4) Repeat as often as required.
Now you can work with the selected text.
Press Esc to exit from this mode.
Selecting a vertical block of textYou can select a vertical block or “column” of text that is separated by spaces or tabs (as you mightsee in text pasted from e-mails, program listings, or other sources), using LibreOffice’s block selection mode. To change to block selection mode, use Edit > Selection Mode > Block Area, or press Ctrl+F8, or click on the Selection icon in the Status Bar and select Block selection from thelist.
Working with text | 13
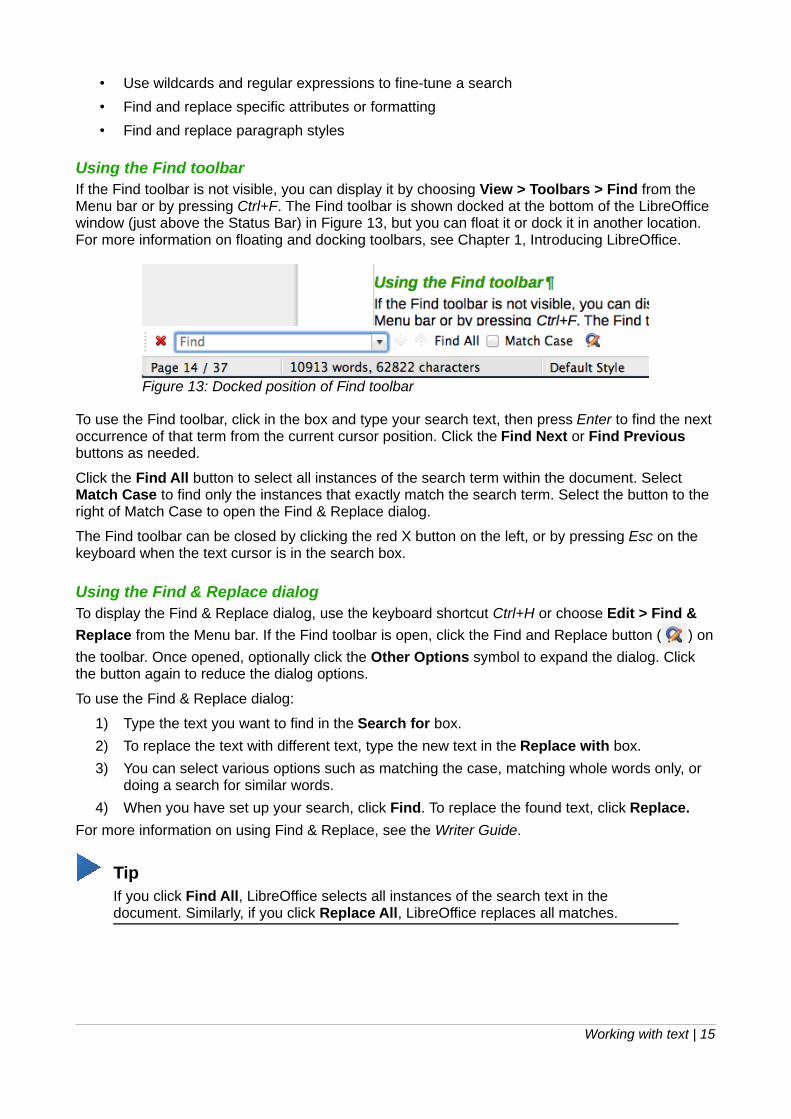
Now highlight the selection, using mouse or keyboard, as shown below.
Figure 11: Selecting a vertical block of text
Cutting, copying, and pasting textCutting and copying text in Writer is similar to cutting and copying text in other applications. You can use the mouse or the keyboard for these operations. You can copy or move text within a document, or between documents, by dragging or by using menu selections, toolbar buttons, or keyboard shortcuts. You can also copy text from other sources such as Web pages and paste it into a Writer document.
To move (drag and drop) selected text using the mouse, drag it to the new location and release it. To copy selected text, hold down the Ctrl key while dragging. The text retains the formatting it had before dragging.
To move (cut and paste) selected text, use Ctrl+X to cut the text, insert the cursor at the paste-in point and use Ctrl+V to paste. Alternatively, use the buttons on the Standard toolbar.
When you paste text, the result depends on the source of the text and how you paste it. If you clickon the Paste button, any formatting the text has (such as bold or italics) is retained. Text pasted from Web sites and other sources may also be placed into frames or tables. If you do not like the results, click the Undo button or press Ctrl+Z.
To make the pasted text inherit the paragraph style at the insertion point:
• Choose Edit > Paste Special, or
• Click the arrow button of the combination Paste button, or
• Click the Paste button without releasing the left mouse button.
Then select Unformatted text from the resulting menu.
The range of choices on the Paste Special menu varies depending on the origin and formatting of the text (or other object) to be pasted. See Figure 12 for an example with text on the clipboard.
Figure 12: Paste Special menu
Finding and replacing text and formattingWriter has two ways to find text within a document: the Find toolbar for fast searching and the Find & Replace dialog. In the dialog, you can:
• Find and replace words and phrases
14 | Chapter 4 Getting Started with Writer
• Use wildcards and regular expressions to fine-tune a search
• Find and replace specific attributes or formatting
• Find and replace paragraph styles
Using the Find toolbarIf the Find toolbar is not visible, you can display it by choosing View > Toolbars > Find from the Menu bar or by pressing Ctrl+F. The Find toolbar is shown docked at the bottom of the LibreOffice window (just above the Status Bar) in Figure 13, but you can float it or dock it in another location. For more information on floating and docking toolbars, see Chapter 1, Introducing LibreOffice.
Figure 13: Docked position of Find toolbar
To use the Find toolbar, click in the box and type your search text, then press Enter to find the next occurrence of that term from the current cursor position. Click the Find Next or Find Previous buttons as needed.
Click the Find All button to select all instances of the search term within the document. Select Match Case to find only the instances that exactly match the search term. Select the button to the right of Match Case to open the Find & Replace dialog.
The Find toolbar can be closed by clicking the red X button on the left, or by pressing Esc on the keyboard when the text cursor is in the search box.
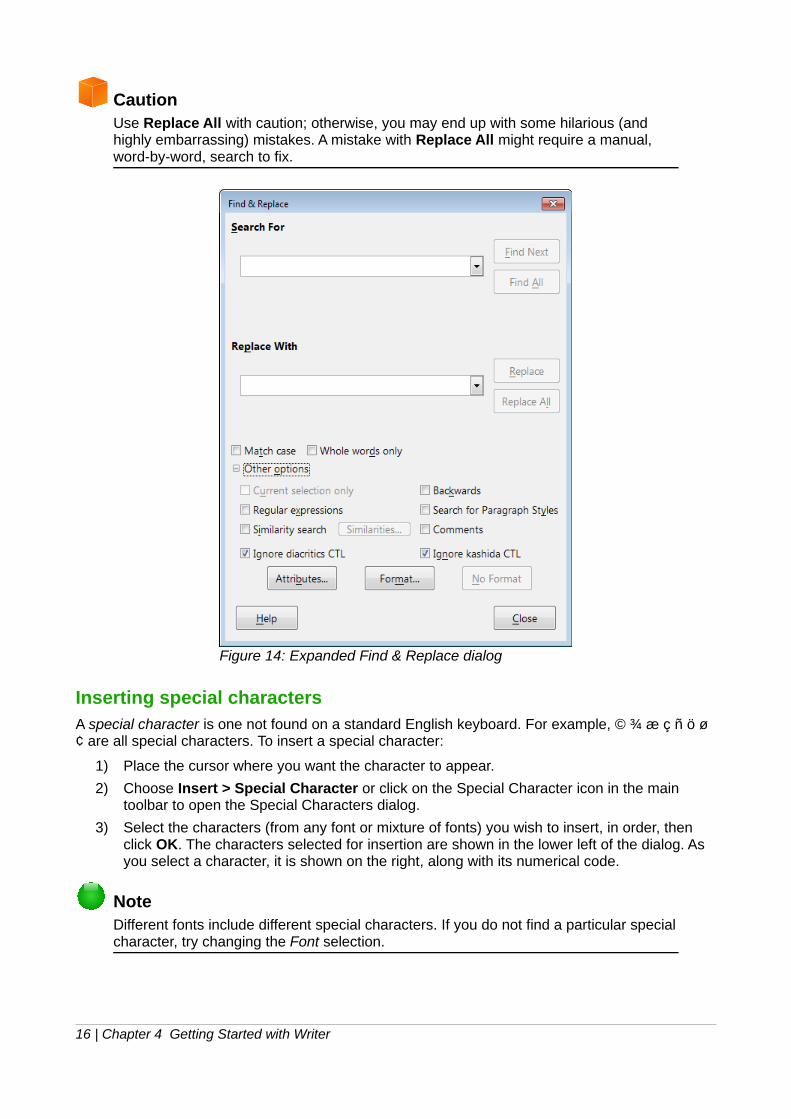
Using the Find & Replace dialogTo display the Find & Replace dialog, use the keyboard shortcut Ctrl+H or choose Edit > Find &
Replace from the Menu bar. If the Find toolbar is open, click the Find and Replace button ( ) on
the toolbar. Once opened, optionally click the Other Options symbol to expand the dialog. Click the button again to reduce the dialog options.
To use the Find & Replace dialog:
1) Type the text you want to find in the Search for box.
2) To replace the text with different text, type the new text in the Replace with box.
3) You can select various options such as matching the case, matching whole words only, or doing a search for similar words.
4) When you have set up your search, click Find. To replace the found text, click Replace.
For more information on using Find & Replace, see the Writer Guide.
TipIf you click Find All, LibreOffice selects all instances of the search text in the document. Similarly, if you click Replace All, LibreOffice replaces all matches.
Working with text | 15
CautionUse Replace All with caution; otherwise, you may end up with some hilarious (and highly embarrassing) mistakes. A mistake with Replace All might require a manual, word-by-word, search to fix.
Figure 14: Expanded Find & Replace dialog
Inserting special charactersA special character is one not found on a standard English keyboard. For example, © ¾ æ ç ñ ö ø ¢ are all special characters. To insert a special character:
1) Place the cursor where you want the character to appear.
2) Choose Insert > Special Character or click on the Special Character icon in the main toolbar to open the Special Characters dialog.
3) Select the characters (from any font or mixture of fonts) you wish to insert, in order, then click OK. The characters selected for insertion are shown in the lower left of the dialog. As you select a character, it is shown on the right, along with its numerical code.
NoteDifferent fonts include different special characters. If you do not find a particular specialcharacter, try changing the Font selection.
16 | Chapter 4 Getting Started with Writer
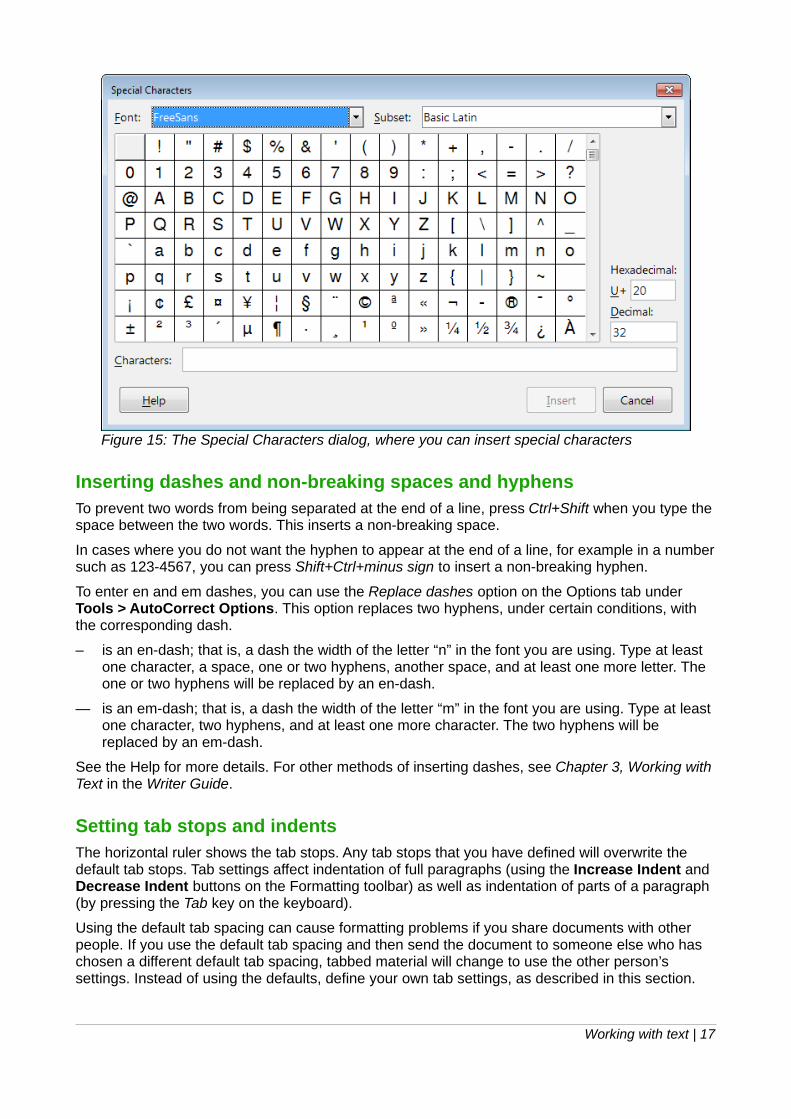
Figure 15: The Special Characters dialog, where you can insert special characters
Inserting dashes and non-breaking spaces and hyphensTo prevent two words from being separated at the end of a line, press Ctrl+Shift when you type the space between the two words. This inserts a non-breaking space.
In cases where you do not want the hyphen to appear at the end of a line, for example in a numbersuch as 123-4567, you can press Shift+Ctrl+minus sign to insert a non-breaking hyphen.
To enter en and em dashes, you can use the Replace dashes option on the Options tab under Tools > AutoCorrect Options. This option replaces two hyphens, under certain conditions, with the corresponding dash.
– is an en-dash; that is, a dash the width of the letter “n” in the font you are using. Type at least one character, a space, one or two hyphens, another space, and at least one more letter. The one or two hyphens will be replaced by an en-dash.
— is an em-dash; that is, a dash the width of the letter “m” in the font you are using. Type at least one character, two hyphens, and at least one more character. The two hyphens will be replaced by an em-dash.
See the Help for more details. For other methods of inserting dashes, see Chapter 3, Working withText in the Writer Guide.
Setting tab stops and indentsThe horizontal ruler shows the tab stops. Any tab stops that you have defined will overwrite the default tab stops. Tab settings affect indentation of full paragraphs (using the Increase Indent and Decrease Indent buttons on the Formatting toolbar) as well as indentation of parts of a paragraph (by pressing the Tab key on the keyboard).
Using the default tab spacing can cause formatting problems if you share documents with other people. If you use the default tab spacing and then send the document to someone else who has chosen a different default tab spacing, tabbed material will change to use the other person’s settings. Instead of using the defaults, define your own tab settings, as described in this section.
Working with text | 17

To define indents and tab settings for one or more selected paragraphs, double-click on a part of the ruler that is not between the left and right indent icons to open the Indents & Spacing page of the Paragraph dialog. Double-click anywhere between the left and right indent icons on the ruler to open the Tabs page of the Paragraph dialog.
A better strategy is to define tabs for the paragraph style. See Chapters 6 and 7 in the Writer Guide for more information.
TipUsing tabs to space out material on a page is not recommended. Depending on what you are trying to accomplish, a table is usually a better choice.
Changing the default tab stop interval
CautionAny changes to the default tab setting will affect the existing default tab stops in any document you open afterward, as well as tab stops you insert after making the change.
To set the measurement unit and the spacing of default tab stop intervals, go to Tools > Options >LibreOffice Writer > General.
Figure 16: Selecting a default tab stop interval
You can also set or change the measurement unit for rulers in the current document by right-clicking on the ruler to open a list of units. Click on one of them to change the ruler to that unit. Theselected setting applies only to that ruler.
Figure 17: Changing the measurement unit for a ruler
Checking spelling and grammarWriter provides a spelling checker, which can be used in two ways.
Automatic Spell Check checks each word as it is typed and displays a wavy red line under any unrecognized words. When the word is corrected, the line disappears.
18 | Chapter 4 Getting Started with Writer

To perform a combined spelling and grammar check on the document (or a text selection) click the Spelling and Grammar button. This checks the document or selection and opens the Spelling and Grammar dialog if any unrecognized words are found. In order to use this, the appropriate dictionaries must be installed. By default, four dictionaries are installed: a spelling checker, a grammar checker, a hyphenation dictionary, and a thesaurus.
Here are some more features of the spelling checker:
• You can right-click on a word with a wavy underline to open a context menu. If you select from the suggested words on the menu, the selection will replace the unrecognized word inyour text. Other menu options are discussed below.
• You can change the dictionary language (for example, Spanish, French or German) on the Spelling and Grammar dialog.
• You can add a word to the dictionary. Click Add to Dictionary in the Spelling and Grammardialog or in the context menu.
• Click the Options button on the Spelling and Grammar dialog to open a dialog similar to the one in Tools > Options > Language Settings > Writing Aids described in Chapter 2. There you can choose whether to check uppercase words and words with numbers, and you can manage custom dictionaries, that is, add or delete dictionaries and add or delete words in a dictionary.
• There are a number of different methods by which you can set paragraphs to be checked ina specific language (different from the rest of the document). For example by clicking on the Language button on the Status Bar. See Chapter 7, Working with Styles, in the Writer Guide for more information.
See Chapter 3, Working with Text, in the Writer Guide, for a detailed explanation of the spelling and grammar checking facility.
Using built-in language toolsWriter provides some tools that make your work easier if you mix multiple languages within the same document or if you write documents in various languages.
The main advantage of changing the language for a text selection is that you can then use the correct dictionaries to check spelling and apply the localized versions of Autocorrect replacement tables, thesaurus, grammar, and hyphenation rules.
You can also set the language for a paragraph or a group of characters as None (Do not check spelling). This option is especially useful when you insert text such as web addresses or programming language snippets that you do not want to check for spelling.
Specifying the language in character and paragraph styles can be problematic unless you use a particular style for a different language. Changing the Language on the Font tab of the Paragraph Styles dialog, will change the language for all paragraphs that use that paragraph style. You can set certain paragraphs be checked in a language that is different from the language of the rest of the document by putting the cursor in the paragraph and changing the language on the Status Bar. See Chapter 7, Working with Styles, in the Writer Guide for information on how to manage the language settings of a style.
You can also set the language for the whole document, for individual paragraphs, or even for individual words and characters, from Tools > Language on the Menu bar.
Another way to change the language of a whole document is to use Tools > Options > Language Settings > Languages. In the Default languages for documents section, you can choose a different language for all the text that is not explicitly marked as a different language.
Working with text | 19

The spelling checker works only for those languages in the list that have the symbol ( ) next to them. If you do not see the symbol next to your preferred language, you can install the additional dictionary using Tools > Language > More Dictionaries Online.
The language used for checking spelling is also shown in the Status Bar, next to the page style in use.
Using AutoCorrectWriter’s AutoCorrect function has a long list of common misspellings and typing errors, which it corrects automatically. For example, “hte” will be changed to “the”.
AutoCorrect is turned on when Writer is installed. To turn it off, uncheck Tools > AutoCorrect > While Typing.
Choose Tools > AutoCorrect > AutoCorrect Options to open the AutoCorrect dialog. There you can define which strings of text are corrected and how. In most cases, the defaults are fine.
To stop Writer replacing a specific spelling, go to the Replace tab, highlight the word pair, and clickDelete.
To add a new spelling to the list, type it into the Replace and With boxes on the Replace tab, and click New.
See the different tabs of the dialog for the wide variety of other options available to fine-tune AutoCorrect.
TipAutoCorrect can be used as a quick way to insert special characters. For example, (c) will be changed to ©. You can add your own special characters.
LibreOffice has an extensive list of special characters accessible with AutoCorrect. For example, type :smiling: and AutoCorrect will replace it by ☺.
Using word completionIf Word Completion is enabled, Writer tries to guess which word you are typing and offers to complete the word for you. To accept the suggestion, press Enter. Otherwise, continue typing.
To turn off Word Completion, select Tools > AutoCorrect > AutoCorrect Options > Word Completion and deselect Enable word completion.
You can customize word completion from the Word Completion page of the AutoCorrect dialog:
• Add (append) a space automatically after an accepted word
• Show the suggested word as a tip (hovering over the word) rather than completing the text as you type
• Collect words when working on a document, and then either save them for later use in other documents or select the option to remove them from the list when closing the document.
• Change the maximum number of words remembered for word completion and the length of the smallest words to be remembered
• Delete specific entries from the word completion list
• Change the key that accepts a suggested entry—the options are Right arrow, End key, Return (Enter), and Space bar
20 | Chapter 4 Getting Started with Writer
NoteAutomatic word completion only occurs after you type a word for the second time in a document.
Using AutoTextUse AutoText to store text, tables, graphics and other items for reuse and assign them to a key combination for easy retrieval. For example, rather than typing “Senior Management” every time you use that phrase, you can set up an AutoText entry to insert those words when you type “sm” and press F3.
AutoText is especially powerful when assigned to fields. See Chapter 14, Working with Fields, in the Writer Guide for more information.
Creating AutoTextTo store some text as AutoText:
1) Type the text into your document.
2) Select the text.
3) Choose Tools > AutoText (or press Ctrl+F3).
4) In the AutoText dialog, type a name for the AutoText in the Name box. Writer will suggest a one-letter shortcut, which you can change.
5) In the large box to the left, choose the category for the AutoText entry, for example My AutoText.
6) Click the AutoText button on the right and select New (text only) from the menu.
7) Click Close to return to your document.
TipIf the only option under the AutoText button is Import, either you have not entered a name for your AutoText or there is no text selected in the document.
Inserting AutoTextTo insert AutoText, type the shortcut and press F3.
Formatting text
Using styles is recommendedStyles are central to using Writer. Styles enable you to easily format your document consistently, and to change the format with minimal effort. A style is a named set of formatting options. When you apply a style, you apply a whole group of formats at the same time. In addition, styles are usedby LibreOffice for many processes, even if you are not aware of them. For example, Writer relies on heading styles (or other styles you specify) when it compiles a table of contents.
CautionManual formatting (also called direct formatting) overrides styles, and you cannot get rid of the manual formatting by applying a style to it.
Formatting text | 21
TipTo remove manual formatting, select the text and choose Format > Clear Direct Formatting from the Menu bar, or right-click and choose Clear Direct Formatting from the context menu, or click the Clear Direct Formatting button on the Formatting toolbar, or use Ctrl+M from the keyboard.
NoteWhen clearing direct formatting, the text formatting will return to the applied paragraph style and not the default paragraph style.
Writer defines several types of styles, for different types of elements: characters, paragraphs, pages, frames, and lists. See Chapter 3, Using Styles and Templates, in this book and Chapters 6 and 7 in the Writer Guide.
Formatting paragraphsYou can apply many formats to paragraphs using the buttons on the Formatting toolbar and by using the Paragraph panel of the Sidebar’s Properties deck. Not all buttons are visible in a standard installation, but you can customize the toolbar to include those you use regularly. These buttons and formats include:
• Apply Style
• Bullets On/Off (with a palette of bullet styles)
• Numbering On/Off (with a palette of numbering styles)
• Align Left, Center Horizontally, Align Right, or Justified
• Align Top, Center Vertically, Align Bottom
• Line Spacing (choose from 1, 1.15, 1.5, 2, or custom spacing
• Increase Paragraph Spacing, Decrease Paragraph Spacing
• Increase Indent, Decrease Indent
• Paragraph (to open the Paragraph dialog)
Formatting charactersYou can apply many formats to characters using the buttons on the Formatting toolbar and by using the Character panel of the Sidebar’s Properties deck. Not all buttons are visible in a standardinstallation, but you can customize the toolbar to include those you use regularly. These buttons and formats include:
• Font Name, Font Size
• Bold, Italic, Underline, Double Underline, Overline, Strikethrough, Outline
• Superscript, Subscript
• Uppercase, Lowercase
• Increase Font Size, Decrease Font Size
• Font Color (with a palette of colors)
• Background Color (with a palette of colors)
• Highlighting (with a palette of colors)
• Character (to open the Character dialog)
22 | Chapter 4 Getting Started with Writer

AutoformattingYou can set Writer to format parts of a document automatically according to the choices made on the Options page of the AutoCorrect dialog (Tools > AutoCorrect > AutoCorrect Options).
TipIf you notice unexpected formatting changes occurring in your document, this is the firstplace to look for the cause. In most cases Undo (Ctrl+Z) fixes the issue.
The Help describes each of these choices and how to activate the autoformats. Some common unwanted or unexpected formatting changes include:
• Horizontal lines. If you type three or more hyphens (---), underscores (___) or equal signs (===) on a line and then press Enter, the paragraph is replaced by a horizontal line as wide as the page. The line is actually the lower border of the preceding paragraph.
• Bulleted and numbered lists. A bulleted list is created when you type a hyphen (-), star (*), or plus sign (+), followed by a space or tab at the beginning of a paragraph. A numbered listis created when you type a number followed by a period (.), followed by a space or tab at the beginning of a paragraph. Automatic numbering is only applied to paragraphs formattedwith the Default, Text body or Text body indent paragraph styles.
To turn autoformatting on or off, choose Format > AutoCorrect and select or deselect the items onthe list.
Creating numbered or bulleted listsThere are several ways to create numbered or bulleted lists:
• Use autoformatting, as described above.
• Use list (numbering) styles, as described in Chapter 6, Introduction to Styles, and Chapter 7, Working with Styles, in the Writer Guide.
• Use the Numbering and Bullets buttons on the Formatting toolbar or on the Paragraph panel of the Sidebar’s Properties deck: select the paragraphs for the list, and then click the appropriate button on the toolbar or in the Sidebar.
NoteIt is a matter of personal preference whether you type your information first, then apply numbering/bullets, or apply them as you type.
Using the Bullets and Numbering toolbarYou can create nested lists (where one or more list items has a sub-list under it, as in an outline) by using the buttons on the Bullets and Numbering toolbar (Figure 18). You can move items up or down the list, create sub-points, change the style of bullets, and access the Bullets and Numberingdialog, which contains more detailed controls. Use View > Toolbars > Bullets and Numbering to see the toolbar.
NoteIf numbering or bullets are being applied automatically in a way that you find inappropriate, you can switch them off temporarily by unchecking Format > AutoCorrect > While Typing.
Formatting text | 23

Using the Sidebar for Bullets and NumberingThe Bullets and Numbering features (drop-down palettes of tools) on the Paragraph panel on the Properties deck of the Sidebar can also be used to create nested lists and access the Bullets and Numbering dialog. However, the Sidebar does not include tools for promoting and demoting items in the list, as found on the Bullets and Numbering toolbar.
1 Promote One Level 5 Insert Unnumbered Entry
8 Move Up with Subpoints
2 Demote One Level 9 Move Down with Subpoints
3 Promote One Level with Subpoints
6 Move Up 10 Restart Numbering
4 Demote One Level with Subpoints
7 Move Down 11 Bullets and Numbering
Figure 18: Bullets and Numbering toolbar
Hyphenating wordsYou have several choices regarding hyphenation: let Writer do it automatically (using its hyphenation dictionaries), insert conditional hyphens manually where necessary, or don’t hyphenate at all.
Automatic hyphenationTo turn automatic hyphenation of words on or off:
1) Press F11 (⌘+T on Mac) to open the Styles and Formatting window, or, if the Sidebar is open, click on the Styles and Formatting tab to open the Styles and Formatting deck.
2) On the Paragraph Styles page (Figure 19), right-click on Default Style and select Modify.
Figure 19: Modifying a style
3) On the Paragraph Style dialog (Figure 20), go to the Text Flow page.
4) Under Hyphenation, select or deselect the Automatically option. Click OK to save.
24 | Chapter 4 Getting Started with Writer

NoteTurning on hyphenation for paragraph Default Style affects all other paragraph styles that are based on Default Style. You can individually change other styles so that hyphenation is not active; for example, you might not want headings to be hyphenated. Any styles that are not based on Default Style are not affected. See Chapter 3, Using Styles and Templates, for more about styles based on other styles.
Figure 20: Turning on automatic hyphenation
You can also set hyphenation choices through Tools > Options > Language Settings > Writing Aids. In Options, near the bottom of the dialog, scroll down to find the hyphenation settings.
Figure 21: Setting hyphenation options
To change the minimum number of characters for hyphenation, the minimum number of characters before a line break, or the minimum number of characters after a line break, select the item, and then click the Edit button in the Options section.
Hyphenation options set on the Writing Aids dialog are effective only if hyphenation is turned on through paragraph styles.
Manual hyphenationTo manually hyphenate words, do not use a normal hyphen, which will remain visible even if the word is no longer at the end of a line when you add or delete text or change margins or font size. Instead, use a conditional hyphen, which is visible only when required.
To insert a conditional hyphen inside a word, click where you want the hyphen to appear and pressCtrl+hyphen. The word will be hyphenated at this position when it is at the end of the line, even if automatic hyphenation for this paragraph is switched off.
Formatting text | 25
Formatting pages
Writer provides several ways for you to control page layouts: page styles, columns, frames, tables, and sections. For more information, see Chapter 4, Formatting Pages, in the Writer Guide.
TipPage layout is usually easier if you show text, object, table, and section boundaries in Tools > Options > LibreOffice > Appearance, and paragraph end, tabs, breaks, and other items in Tools > Options > LibreOffice Writer > Formatting Aids.
Which layout method to choose?The best layout method depends on what the final document should look like and what sort of information will be in the document. Here are some examples.
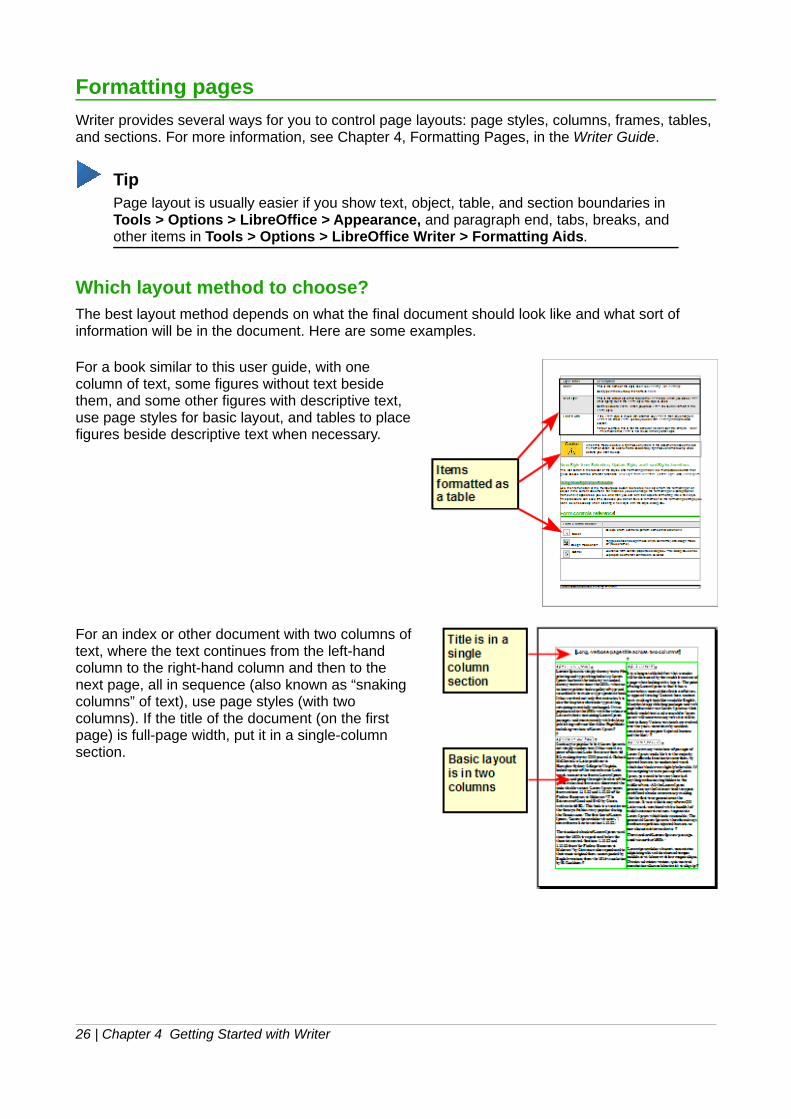
For a book similar to this user guide, with one column of text, some figures without text beside them, and some other figures with descriptive text, use page styles for basic layout, and tables to place figures beside descriptive text when necessary.
For an index or other document with two columns of text, where the text continues from the left-hand column to the right-hand column and then to the next page, all in sequence (also known as “snaking columns” of text), use page styles (with two columns). If the title of the document (on the first page) is full-page width, put it in a single-column section.
26 | Chapter 4 Getting Started with Writer
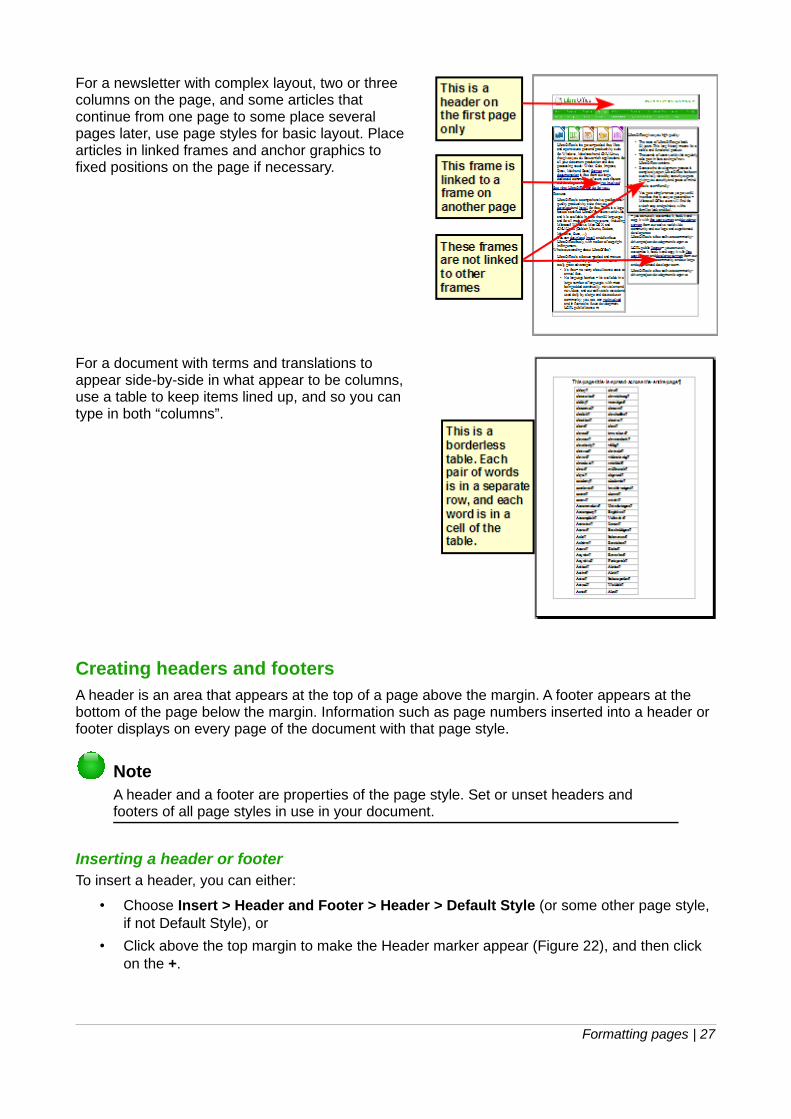
For a newsletter with complex layout, two or three columns on the page, and some articles that continue from one page to some place several pages later, use page styles for basic layout. Place articles in linked frames and anchor graphics to fixed positions on the page if necessary.
For a document with terms and translations to appear side-by-side in what appear to be columns, use a table to keep items lined up, and so you can type in both “columns”.
Creating headers and footersA header is an area that appears at the top of a page above the margin. A footer appears at the bottom of the page below the margin. Information such as page numbers inserted into a header or footer displays on every page of the document with that page style.
NoteA header and a footer are properties of the page style. Set or unset headers and footers of all page styles in use in your document.
Inserting a header or footerTo insert a header, you can either:
• Choose Insert > Header and Footer > Header > Default Style (or some other page style, if not Default Style), or
• Click above the top margin to make the Header marker appear (Figure 22), and then click on the +.
Formatting pages | 27
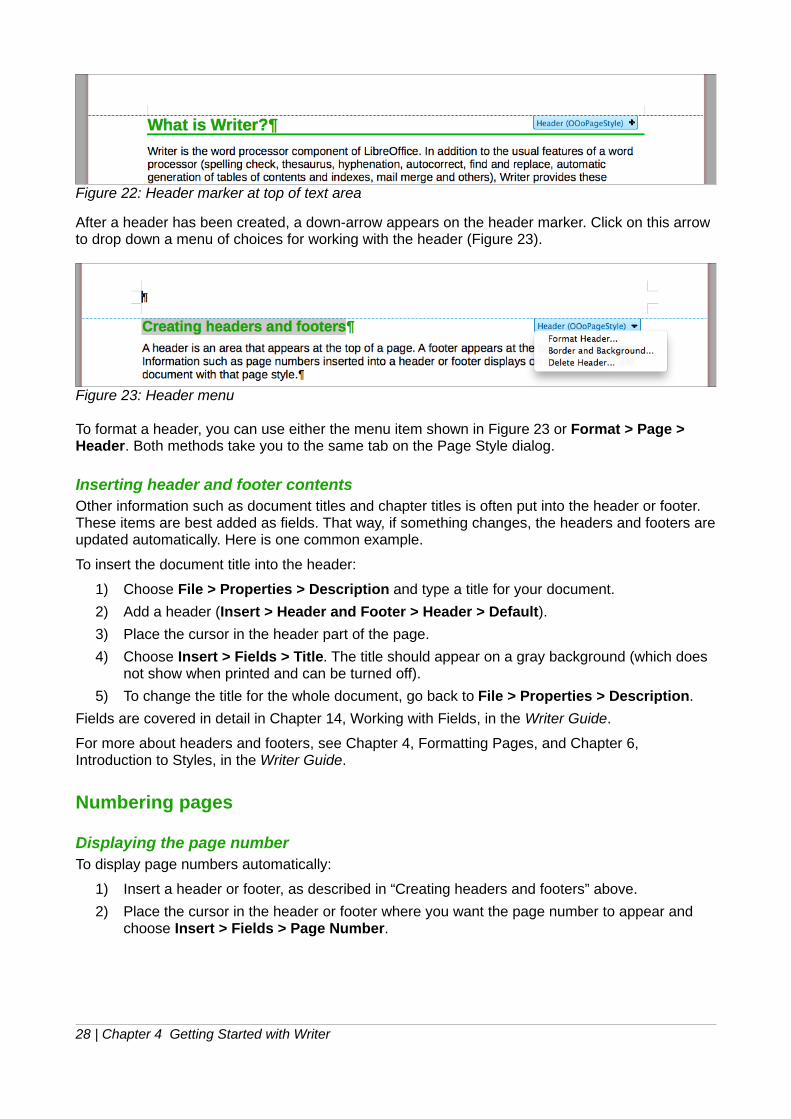
Figure 22: Header marker at top of text area
After a header has been created, a down-arrow appears on the header marker. Click on this arrow to drop down a menu of choices for working with the header (Figure 23).
Figure 23: Header menu
To format a header, you can use either the menu item shown in Figure 23 or Format > Page > Header. Both methods take you to the same tab on the Page Style dialog.
Inserting header and footer contentsOther information such as document titles and chapter titles is often put into the header or footer. These items are best added as fields. That way, if something changes, the headers and footers areupdated automatically. Here is one common example.
To insert the document title into the header:
1) Choose File > Properties > Description and type a title for your document.
2) Add a header (Insert > Header and Footer > Header > Default).
3) Place the cursor in the header part of the page.
4) Choose Insert > Fields > Title. The title should appear on a gray background (which does not show when printed and can be turned off).
5) To change the title for the whole document, go back to File > Properties > Description.
Fields are covered in detail in Chapter 14, Working with Fields, in the Writer Guide.
For more about headers and footers, see Chapter 4, Formatting Pages, and Chapter 6, Introduction to Styles, in the Writer Guide.
Numbering pages
Displaying the page numberTo display page numbers automatically:
1) Insert a header or footer, as described in “Creating headers and footers” above.
2) Place the cursor in the header or footer where you want the page number to appear and choose Insert > Fields > Page Number.
28 | Chapter 4 Getting Started with Writer

Including the total number of pagesTo include the total number of pages (as in “page 1 of 12”):
1) Type the word “page” and a space, then insert the page number as above.
2) Press the space bar once, type the word “of” and a space, then choose Insert > Fields > Page Count.
NoteThe Page Count field inserts the total number of pages in the document, as shown on the Statistics tab of the document’s Properties window (File > Properties). If you restart page numbering anywhere in the document, then the total page count may not be what you want. See Chapter 4, Formatting Pages, in the Writer Guide for more information.
Restarting page numberingOften you will want to restart the page numbering at 1, for example on the page following a title page or a table of contents. In addition, many documents have the “front matter” (such as the table of contents) numbered with Roman numerals and the main body of the document numbered in Arabic numerals, starting with 1.
You can restart page numbering in two ways.
Method 1:
1) Place the cursor in the first paragraph of the new page.
2) Choose Format > Paragraph.
3) On the Text Flow tab of the Paragraph dialog (Figure 20 on page 25), select Breaks.
4) Select Insert and then With Page Style and specify the page style to use.
5) Specify the page number to start from, and then click OK.
TipMethod 1 is also useful for numbering the first page of a document with a page numbergreater than 1. For example, you may be writing a book, with each chapter in a separate file. Chapter 1 may start with page 1, but Chapter 2 could begin with page 25 and Chapter 3 with page 51.
Method 2:
1) Insert > Manual break.
2) By default, Page break is selected on the Insert Break dialog (Figure 24).
3) Choose the required page Style.
4) Select Change page number.
5) Specify the page number to start from, and then click OK.
Formatting pages | 29
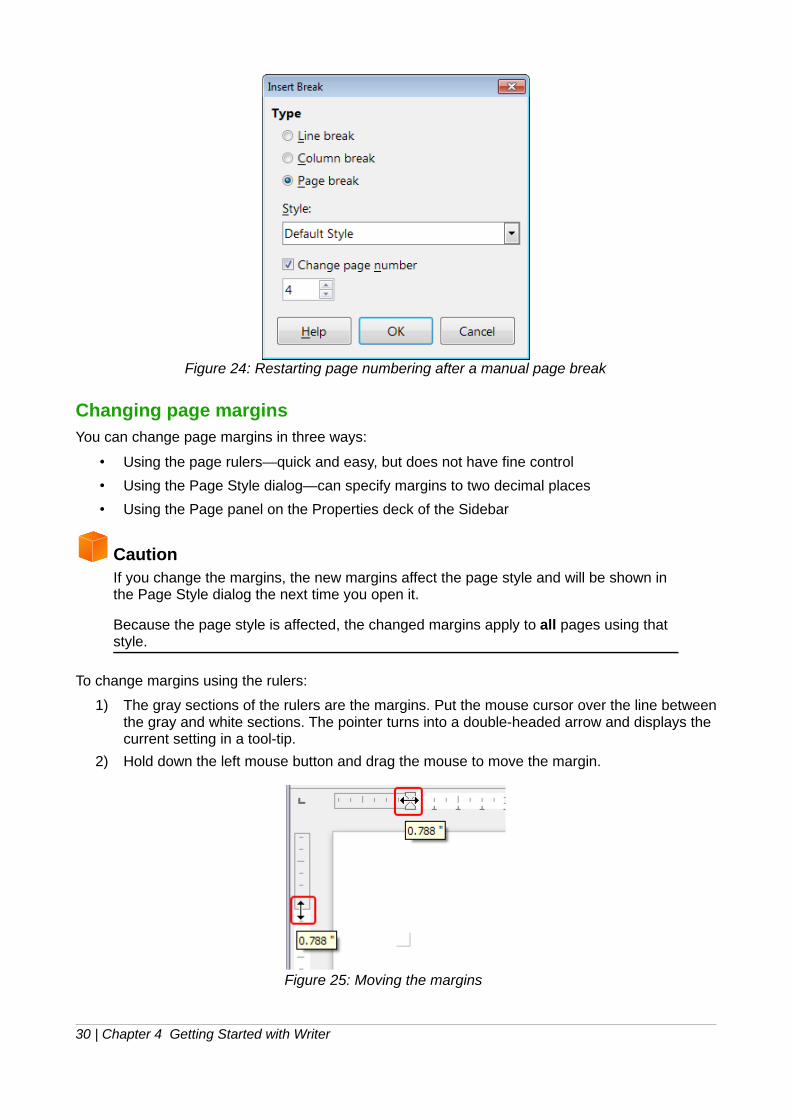
Figure 24: Restarting page numbering after a manual page break
Changing page marginsYou can change page margins in three ways:
• Using the page rulers—quick and easy, but does not have fine control
• Using the Page Style dialog—can specify margins to two decimal places
• Using the Page panel on the Properties deck of the Sidebar
CautionIf you change the margins, the new margins affect the page style and will be shown in the Page Style dialog the next time you open it.
Because the page style is affected, the changed margins apply to all pages using that style.
To change margins using the rulers:
1) The gray sections of the rulers are the margins. Put the mouse cursor over the line betweenthe gray and white sections. The pointer turns into a double-headed arrow and displays the current setting in a tool-tip.
2) Hold down the left mouse button and drag the mouse to move the margin.
Figure 25: Moving the margins
30 | Chapter 4 Getting Started with Writer

CautionThe small arrowheads (gray triangles) on the ruler are used for indenting paragraphs. They are often in the same place as the page margins, so you need to be careful to move the margin marker, not the arrows. The double-headed arrows shown in Figure25 are mouse cursors shown in the correct position for moving the margin markers.
To change margins using the Page Style dialog:
1) Right-click anywhere in the text area on the page and select Page from the context menu.
2) On the Page tab of the dialog, type the required distances in the Margins boxes.
To change margins using the Page panel of the Properties deck of the Sidebar:
1) On the open Sidebar (View > Sidebar) select the Properties tab.
2) Open the Page panel if is not open by clicking the plus (+) symbol in the panel title
3) Click the Margin button to open the sub-panel and enter the required dimensions in the Custom size boxes (clicking the More Options button will open the Page Style dialog).
Adding comments to a document
Authors and reviewers often use comments to exchange ideas, ask for suggestions, or mark items needing attention.
You can select a contiguous block of text, which may be multiple paragraphs, for a comment; or you can select a single point at which the comment will be inserted.
To insert a comment, select the text, or place the cursor in the place the comment refers to, and choose Insert > Comment or press Ctrl+Alt+C. The anchor point of the comment is connected by a dotted line to a box on the right-hand side of the page where you can type the text of the comment. A Comments button is also added to the right of the horizontal ruler; you can click this button to toggle the display of the comments.
Writer automatically adds at the bottom of the comment the author’s name and a time stamp indicating when the comment was created. Figure 26 shows an example of text with comments from two different authors.
Figure 26: Example of comments
Choose Tools > Options > LibreOffice > User Data to configure the name you want to appear in the Author field of the comment, or to change it.
If more than one person edits the document, each author is automatically allocated a different background color.
Adding comments to a document | 31

Right-click on a comment to open a context menu where you can delete the current comment, all the comments from the same author, or all the comments in the document. From this menu, you can also open a dialog to apply some basic formatting to the text of comments. You can paste saved text using the Paste button in the menu. You can also change the font type, size, and alignment in the usual editing manner.
To navigate from one comment to another, open the Navigator (F5), expand the Comments section, and click on the comment text to move the cursor to the anchor point of the comment in the document. Right-click on the comment to quickly edit or delete it.
You can also navigate through the comments using the keyboard. Use Ctrl+Alt+Page Down to move to the next comment and Ctrl+Alt+Page Up to move to the previous comment.
Comments can be printed next to the text in the right margin as they appear on screen. Each page is scaled down in order to make space for the comments to fit on the underlying paper size.
Creating a table of contents
Writer’s table of contents feature lets you build an automated table of contents from the headings in your document. Before you start, make sure that the headings are styled consistently. For example, you can use the Heading 1 style for chapter titles and the Heading 2 and Heading 3 styles for chapter subheadings.
Although tables of contents can be customized extensively in Writer, often the default settings are all you need. Creating a quick table of contents is simple:
1) When you create your document, use the following paragraph styles for different heading levels (such as chapter and section headings): Heading 1, Heading 2, Heading 3, and so on. These are what will appear in your table of contents.
2) Place the cursor where you want the table of contents to appear.
3) Choose Insert > Table of Contents and Index > Table of contents, Index or Bibliography.
4) Change nothing in the Insert Index/Table dialog. Click OK.
If you add or delete text (so that headings move to different pages) or you add, delete, or change headings, you need to update the table of contents.
To do this:
1) Place the cursor within the table of contents.
2) Right-click and choose Update Index or Table of Contents from the context menu.
NoteIf you cannot place the cursor in the table of contents, choose Tools > Options > LibreOffice Writer > Formatting Aids, and then select Enable in the Cursor in protected areas section.
You can customize an existing table of contents at any time. Right-click anywhere in it and choose Edit Index or Table of Contents from the context menu. Chapter 12, Creating Tables of Contents,Indexes and Bibliographies, of the Writer Guide describes in detail all the customizations you can choose.
32 | Chapter 4 Getting Started with Writer

Creating indexes and bibliographies
Indexes and bibliographies work in a similar way to tables of contents. Chapter 12, Creating Tablesof Contents, Indexes, and Bibliographies, in the Writer Guide describes the process in detail.
In addition to alphabetical indexes, other types of indexes supplied with Writer include those for illustrations, tables, and objects, and you can even create a user-defined index. For example, you might want an index containing only the scientific names of species mentioned in the text, and a separate index containing only the common names of species. Before creating some types of indexes, you first need to create index entries embedded in your Writer document.
Working with graphics
Graphics in Writer are of three basic types:
• Image files, including photos, drawings, scanned images, and others
• Diagrams created using LibreOffice’s drawing tools
• Charts created using LibreOffice’s Chart component
See Chapter 11, Graphics, the Gallery, and Fontwork, in this book and Chapter 8, Working with Graphics, in the Writer Guide.
Printing
See Chapter 10, Printing, Exporting, and E-mailing, in this book and Chapter 5, Printing, Exporting,Faxing, and E-mailing, in the Writer Guide for details on previewing pages before printing, selectingprint options, printing in black and white on a color printer, printing brochures, and other printing features.
Using mail merge
Writer provides very useful features to create and print:
• Multiple copies of a document to send to a list of different recipients (form letters)
• Mailing labels
• Envelopes
All these facilities use a registered data source (a spreadsheet or database containing the name and address records and other information). Chapter 11, Using Mail Merge, in the Writer Guide describes the process.
Tracking changes to a document
You can use several methods to keep track of changes made to a document.
1) Make your changes to a copy of the document (stored in a different folder, or under a different name, or both), then use Writer to combine the two files and show the differences. Choose Edit > Track Changes > Compare Document. This technique is particularly useful if you are the only person working on the document, as it avoids the increase in file size and complexity caused by the other methods.
2) Save versions that are stored as part of the original file. However, this method can cause problems with documents of non-trivial size or complexity, especially if you save a lot of versions. Avoid this method if you can.
Tracking changes to a document | 33

3) Use Writer’s change marks (often called “redlines” or “revision marks”) to show where you have added or deleted material, or changed formatting. Choose Edit > Track Changes > Record Changes before starting to edit. Later, you or another person can review and accept or reject each change. Choose Edit > Track Changes > Show Changes. Right-click on an individual change and choose Accept Change or Reject Change from the context menu, or choose Edit > Track Changes > Manage Changes to view the list of changes and accept or reject them. Details are in the Writer Guide.
TipNot all changes are recorded. For example, changing a tab stop from align left to align right, and changes in formulas (equations) or linked graphics are not recorded.
CautionA document with active track changes and changes hidden carries the document editing history that may not be noticed by the current user. Contents deleted or modified can be recovered. While this is a feature, it is also a security exposure of the document history.
Using fields
Fields are extremely useful features of Writer. They are used for data that changes in a document (such as the current date or the total number of pages) and for inserting document properties such as name, author, and date of last update. Fields are the basis of cross-referencing (see below); automatic numbering of figures, tables, headings, and other elements; and a wide range of other functions—far too many to describe here. See Chapter 14, Working with Fields, in the Writer Guidefor details.
Linking to another part of a document
If you type in cross-references to other parts of a document, those references can easily get out of date if you reorganize the order of topics, add or remove material, or reword a heading. Writer provides two ways to ensure that your references are up to date, by inserting links to other parts of the same document or to a different document: hyperlinks and cross-references.
The two methods have the same result if you Ctrl+click the link when the document is open in Writer: you are taken directly to the cross-referenced item. However, they also have major differences:
• The text in a hyperlink does not automatically update if you change the text of the linked item (although you can change it manually), but changed text does automatically update in a cross-reference.
• When using a hyperlink, you do not have a choice of the content of the link (for example text or page number), but when using a cross-reference, you have several choices, including bookmarks.
• To hyperlink to an object such as a graphic, and have the hyperlink show useful text such as Figure 6, you need to give such an object a useful name (instead of a default name like Graphics6), or use the Hyperlink dialog to modify the visible text. In contrast, cross-references to figures with captions automatically show useful text, and you have a choice ofseveral variations of the name.
34 | Chapter 4 Getting Started with Writer
• If you save a Writer document to HTML, hyperlinks remain active but cross-references do not. (Both remain active when the document is exported to PDF.)
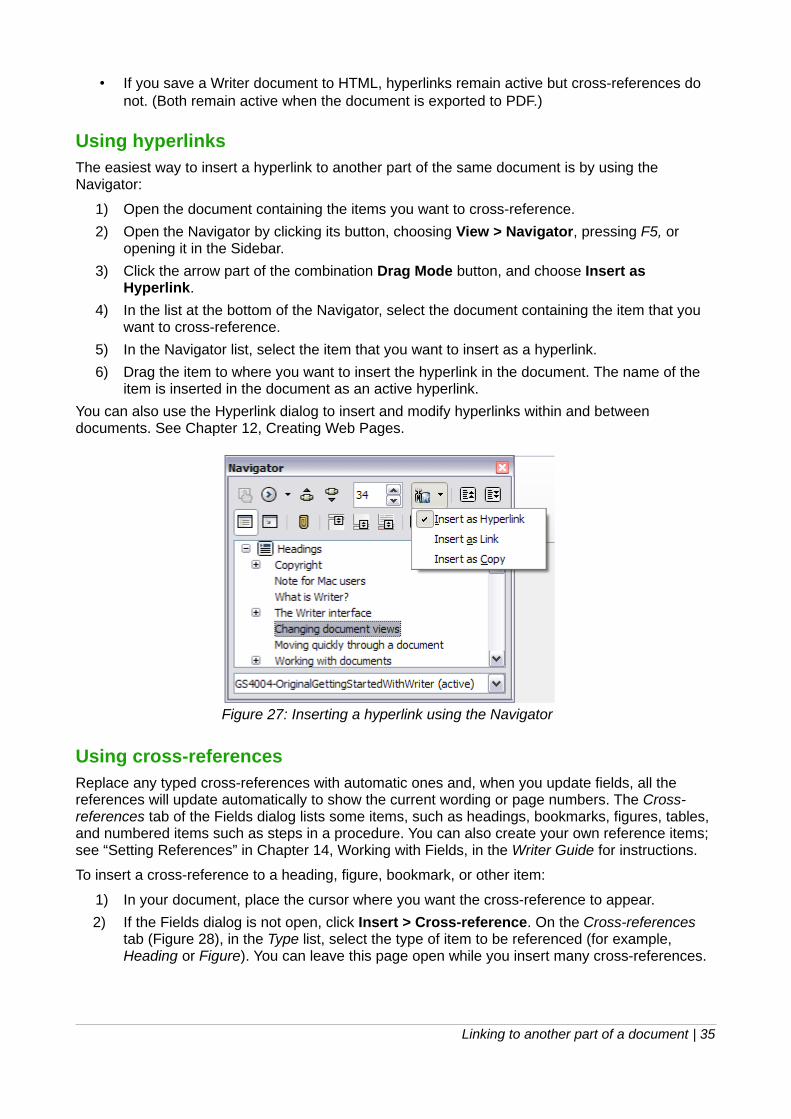
Using hyperlinksThe easiest way to insert a hyperlink to another part of the same document is by using the Navigator:
1) Open the document containing the items you want to cross-reference.
2) Open the Navigator by clicking its button, choosing View > Navigator, pressing F5, or opening it in the Sidebar.
3) Click the arrow part of the combination Drag Mode button, and choose Insert as Hyperlink.
4) In the list at the bottom of the Navigator, select the document containing the item that you want to cross-reference.
5) In the Navigator list, select the item that you want to insert as a hyperlink.
6) Drag the item to where you want to insert the hyperlink in the document. The name of the item is inserted in the document as an active hyperlink.
You can also use the Hyperlink dialog to insert and modify hyperlinks within and between documents. See Chapter 12, Creating Web Pages.
Figure 27: Inserting a hyperlink using the Navigator
Using cross-referencesReplace any typed cross-references with automatic ones and, when you update fields, all the references will update automatically to show the current wording or page numbers. The Cross-references tab of the Fields dialog lists some items, such as headings, bookmarks, figures, tables, and numbered items such as steps in a procedure. You can also create your own reference items; see “Setting References” in Chapter 14, Working with Fields, in the Writer Guide for instructions.
To insert a cross-reference to a heading, figure, bookmark, or other item:
1) In your document, place the cursor where you want the cross-reference to appear.
2) If the Fields dialog is not open, click Insert > Cross-reference. On the Cross-references tab (Figure 28), in the Type list, select the type of item to be referenced (for example, Heading or Figure). You can leave this page open while you insert many cross-references.
Linking to another part of a document | 35

3) Click on the required item in the Selection list, which shows all the items of the selected type. In the Insert reference to list, choose the format required. The list varies according to the Type. The most commonly used options are Reference (to insert the full text of a heading or caption), Category and Number (to insert a figure number preceded by the word Figure or Table, but without the caption text), Numbering (to insert only the figure or table number, without the word “Figure” or “Table”), or Page (to insert the number of the page the referenced text is on). Click Insert.
Figure 28: The Cross-references tab of the Fields dialog
Using bookmarksBookmarks are listed in the Navigator and can be accessed directly from there with a single mouseclick. You can cross-reference to bookmarks and create hyperlinks to bookmarks, as described above.
1) Select the text you want to bookmark. Click Insert > Bookmark.
2) On the Insert Bookmark dialog, the larger box lists any previously defined bookmarks. Typea name for this bookmark in the top box, and then click OK.
36 | Chapter 4 Getting Started with Writer

Figure 29: Inserting a bookmark
Using master documents
Master documents are typically used for producing long documents such as a book, a thesis, or a long report; or when different people are writing different chapters or other parts of the full document, so you don’t need to share files. A master document joins separate text documents into one larger document, and unifies the formatting, table of contents (TOC), bibliography, index, and other tables or lists.
Since LibreOffice version 4.4, Master Document Templates can be added to the Template Managerand creating a new document based on a Master Document Template creates a Master Document with the same initial content as the template it is based upon. See Chapter 3, Styles and Templates, for more about creating and using templates.
Yes, master documents do work in Writer. However, until you become familiar with them, you may think that master documents are unreliable or difficult to use. See Chapter 13, Working with MasterDocuments, in the Writer Guide.
Creating fill-in forms
A standard text document displays information: a letter, report, or brochure, for example. Typically the reader may either edit everything or nothing in any way. A form has sections that are not to be edited, and other sections that are designed for the reader to make changes. For example, a questionnaire has an introduction and questions (which do not change) and spaces for the reader to enter answers.
Forms are used in three ways:
• To create a simple document for the recipient to complete, such as a questionnaire sent outto a group of people who fill it in and return it.
• To link into a database or data source and allow the user to enter information. Someone taking orders might enter the information for each order into a database using a form.
• To view information held in a database or data source. A librarian might call up information about books.
Writer offers several ways to fill information into a form, including check boxes, option buttons, text boxes, pull-down lists, and spinners. See Chapter 15, Using Forms in Writer, in the Writer Guide.
Creating fill-in forms | 37