chapter 5: case viewer - mpog · chapter 5: case viewer case viewer overview the mpog case viewer...
TRANSCRIPT

Last Updated: 11/1/2019 Page 1 of 16 Please contact: [email protected]
Module 5: Case Viewer
Case Viewer Overview The MPOG Case Viewer application displays individual case data just as an anesthesia information management system (AIMS) would display. Intraoperative notes are visible on the left side of the screen, physiologic data shows both as a graphic and in grid form. Medications, fluids, laboratory values are all displayed in grid form underneath the physiologic data. The familiar format assists MPOG users in reviewing cases efficiently. Case Viewer can be filtered to display only for the intraoperative period or to include both preoperative and postoperative data as well. 1. Open the MPOG Application Suite.
2. Click on “Case Viewer.”

Last Updated: 11/1/2019 Page 2 of 16 Please contact: [email protected]
3. The Case Viewer will open. Because you have not selected a case yet, the screen will not populate with any patient information but should look as follows:
4. Select “File” in the upper left corner of the screen.
5. You will need either some case information or a specific case type you would like to review before selecting the “Case Search” option from the File dropdown menu.

Last Updated: 11/1/2019 Page 3 of 16 Please contact: [email protected]
6. The ‘Open Case’ form will look as follows. If you have a specific patient or case that you would like to review, type or copy and paste the ID in the top row. If you prefer to search for cases by institution, service, time period or procedure, populate the sections below and leave the Patient Case ID row blank.

Last Updated: 11/1/2019 Page 4 of 16 Please contact: [email protected]
7. For the purpose of this training, PHI has been removed & filters have been applied for: - University of Michigan Health System - Cardiac Service cases only. - Date of operation: 3/1/2016.
Cardiac cases will populate the bottom section of the screen, scroll until you find the case you plan to review. Click on the case row so it is highlighted, then click “Get Selected Case.”

Last Updated: 11/1/2019 Page 5 of 16 Please contact: [email protected]
8. The Case Viewer will open with the case information for the case selected. PHI has been removed and labels replaced to indicate the type of information available in the Case Viewer header.
a. The light blue banner at the top of the screen provides basic demographic
information: 1) Institution Name 2) Patient Name 3) Age, Ht, Wt 4) Race 5) MPOG Case ID 6) Date/Time/Duration of case 7) Location 8) ASA status. 9) Procedure 10) Diagnosis
b. The left side of the screen is the Intraoperative Notes section of Case Viewer and displays case events and the associated times for these events. Row colors indicate different data types: 1) Blue: MPOG Concept that the AIMS Intraoperative Note was mapped to 2) Orange: MPOG Concept mapped unexpectedly (potentially incorrect mapping-
investigate). i.e.: ASA status is mapped as intraop note instead of pre-op. 3) Black: Variable not mapped. 4) Red: Deleted note (Will not see this unless you change the default in preferences
to “Show audit trail/deleted documentation.”)
Last Updated: 11/1/2019 Page 6 of 16 Please contact: [email protected]
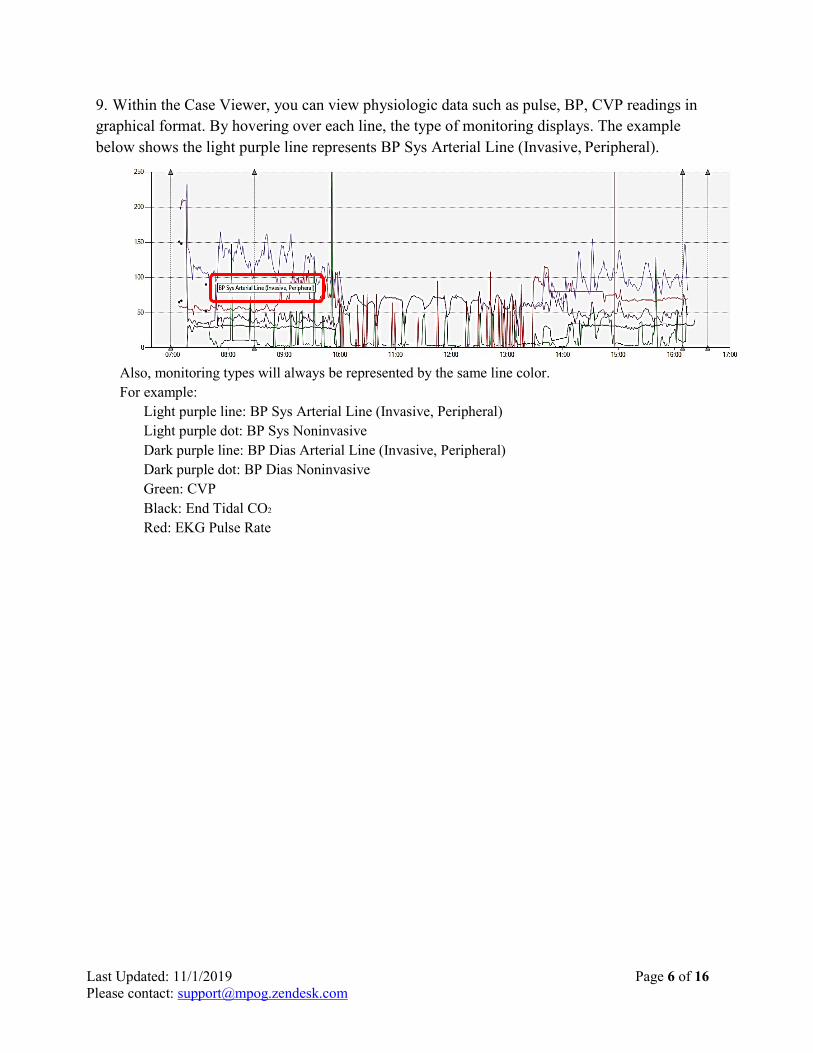
9. Within the Case Viewer, you can view physiologic data such as pulse, BP, CVP readings in graphical format. By hovering over each line, the type of monitoring displays. The example below shows the light purple line represents BP Sys Arterial Line (Invasive, Peripheral).
Also, monitoring types will always be represented by the same line color. For example:
Light purple line: BP Sys Arterial Line (Invasive, Peripheral) Light purple dot: BP Sys Noninvasive Dark purple line: BP Dias Arterial Line (Invasive, Peripheral) Dark purple dot: BP Dias Noninvasive Green: CVP Black: End Tidal CO2
Red: EKG Pulse Rate

Last Updated: 11/1/2019 Page 7 of 16 Please contact: [email protected]
10. To view individual physiologic readings at specific times during the case, clicking on the “Monitor” section below the graph will open all physiologic readings during the case on the hour.
11. Double-clicking on the specific monitor type will open up a separate window to view all recorded readings for that monitor type. Scroll to find the specific value or time period for review.
Last Updated: 11/1/2019 Page 8 of 16 Please contact: [email protected]
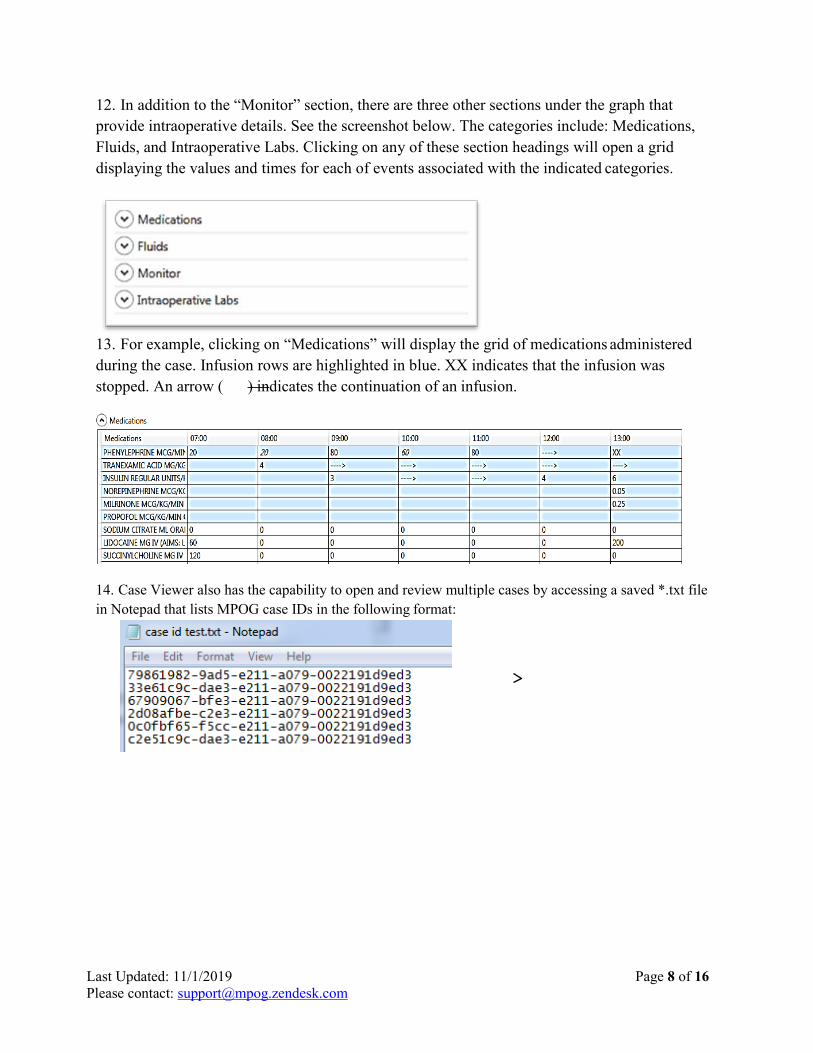
12. In addition to the “Monitor” section, there are three other sections under the graph that provide intraoperative details. See the screenshot below. The categories include: Medications, Fluids, and Intraoperative Labs. Clicking on any of these section headings will open a grid displaying the values and times for each of events associated with the indicated categories.
13. For example, clicking on “Medications” will display the grid of medications administered during the case. Infusion rows are highlighted in blue. XX indicates that the infusion was stopped. An arrow ( ) indicates the continuation of an infusion.
14. Case Viewer also has the capability to open and review multiple cases by accessing a saved *.txt file in Notepad that lists MPOG case IDs in the following format:

Last Updated: 11/1/2019 Page 9 of 16 Please contact: [email protected]
15. To open the list and begin case review, click on “File” and then click on “Open Case List.”
16. Select the file containing the MPOG Case IDs for review. Click “Open.”
17. The Case Viewer will open to the first case listed in the file automatically. To move to the next case, select “Next Case” from the dropdown File menu:

Last Updated: 11/1/2019 Page 10 of 16 Please contact: [email protected]
18. Continue reviewing cases from the list in the saved file using the “Next Case” option in the File menu. When you have reached the last case from the list in the file, “Next Case” will be grayed out. You can either move to a previous case on the list or simply conclude your review and close Case Viewer.
19. Under Tools, the “Text Search” option allows you to look for a specific word or phrase within the Case Viewer.
20. A text box will open allowing you to type the specific word or phrase you are seeking to find. Clicking on “Search Options” will list options for filtering or expanding your search.

Last Updated: 11/1/2019 Page 11 of 16 Please contact: [email protected]
21. After typing in the selected word or phrase and applying necessary filters, click “Find Next” on the right side of the display box.
22. Case Viewer will now highlight in yellow the area(s) where the word or phrase is found. If the word does not exist within the page, nothing will be highlighted and a text box stating “End of results reached” will present.
23. To modify your default display settings within Case Viewer, click on “Tools” and select “Preferences.”

Last Updated: 11/1/2019 Page 12 of 16 Please contact: [email protected]
24. The ‘Preferences’ form will display options for Case Viewer. Most common option is the “Display Patient PHI.” When this option is NOT selected (default), PHI will be hidden in Case Viewer. This is important when sharing screens via webinar or when giving a presentation. You will need to select “Display Patient PHI” when doing Case Validation and using the Case Viewer. Click “Okay” after completing selections.
25. The next tab within Case Viewer is “Case Details.” This tab allows you to view more specific case information related to billing, case demographics, IV sites/staff, Preop, Outcomes, Lab values, and Medication Totals.

Last Updated: 11/1/2019 Page 13 of 16 Please contact: [email protected]
26. Returning to the Case Details dropdown menu, selecting “Billing” from the dropdown menu displays procedure and diagnosis codes as well as hospital discharge information. If your site has not yet loaded billing data, this form will be incomplete.
27. Returning to the Case Details dropdown menu, selecting “Case and Patient Info” from the dropdown list displays demographic information specific to the patient and case. PHI is hidden for this purpose of this training.

Last Updated: 11/1/2019 Page 14 of 16 Please contact: [email protected]
28. Returning to the Case Details dropdown menu, selecting “IV sites and staff” from the list displays all IV sites documented intraoperatively and all staff who signed into the case.
29. Returning to the Case Details dropdown menu, selecting “Preoperative” from the list displays all categories for the preoperative information present in the MPOG database. History and Physical, the Anesthesia Assessment and Plan will populate here. Click on any of the categories to display specific patient information.
30. Returning to the Case Details dropdown menu, selecting “Outcomes” will display postoperative information, if present in the MPOG database.

Last Updated: 11/1/2019 Page 15 of 16 Please contact: [email protected]
31. Returning to the Case Details dropdown menu, selecting “Laboratory Values” displays a grid listing all preop and postop lab results available via the MPOG suite.
32. Returning to the Case Details dropdown menu, selecting “Medication Totals” displays a grid listing all medication totals for the case.

Last Updated: 11/1/2019 Page 16 of 16 Please contact: [email protected]
33. The final tab in Case Viewer allows for changing the view mode of the Case Viewer. The Case Viewer displays only Intraoperative notes by default but by changing the mode, one can view only data documented in PACU or all data available, regardless of time period.