chapter 5: interactions and document …bcinc.net/js/na40_enus_rm_04.pdf · chapter 4: interactions...
TRANSCRIPT

Microsoft Official Training Materials for Microsoft Dynamics ™ Your use of this content is subject to your current services agreement
Chapter 4: Interactions and Document Management
CHAPTER 4: INTERACTIONS AND DOCUMENT MANAGEMENT
This chapter contains the following sections:
• Introduction • Setting Up Interactions • Using the Create Interaction Wizard • Phone Calls • E-Mails • Automatically Recorded Interactions • Canceling and Deleting Interaction Log Entries • Interaction Statistics • Exercises
Page 83

Microsoft Official Training Materials for Microsoft Dynamics ™ Your use of this content is subject to your current services agreement
Microsoft Navision Relationship Management
Introduction In the Sales & Marketing application area, you can record all the types of communications you have with your contacts, for example, correspondence, meetings, sales and purchase documents, and so on. This enables you to effectively keep track of the sales and marketing efforts that you direct at your contacts, and thus improve the quality of your business interactions. In Microsoft® Business Solutions–Navision®, interactions are all the types of communications between your company and your contacts, such as letters, faxes, e-mails, invoices, telephone calls, and meetings. You can create interactions using the Create Interaction wizard. There are several ways of recording your interactions:
• You can create interactions linked to a single contact using the Create Interaction wizard.
• You can create and log interactions linked to several contacts from the Segment window.
• You can have the program automatically record interactions when you perform specific actions in Microsoft Navision.
Setting up Interactions You can use interaction groups to store the interaction templates that you use to create interactions. For example, you can create an interaction group to store all your letters, another one for your price lists, and so on. Interaction groups are mainly used to view statistics for a group of interaction templates. For example, you can see how many times you have used a particular interaction template or interaction group to create interactions.
Setting up Interaction Groups You can set up interaction groups in the Interaction Groups window. To open the Interaction Groups window, click SALES & MARKETING→SETUP→INTERACTION→ GROUPS.
Page 84
Microsoft Official Training Materials for Microsoft Dynamics ™ Your use of this content is subject to your current services agreement
Chapter 4: Interactions and Document Management
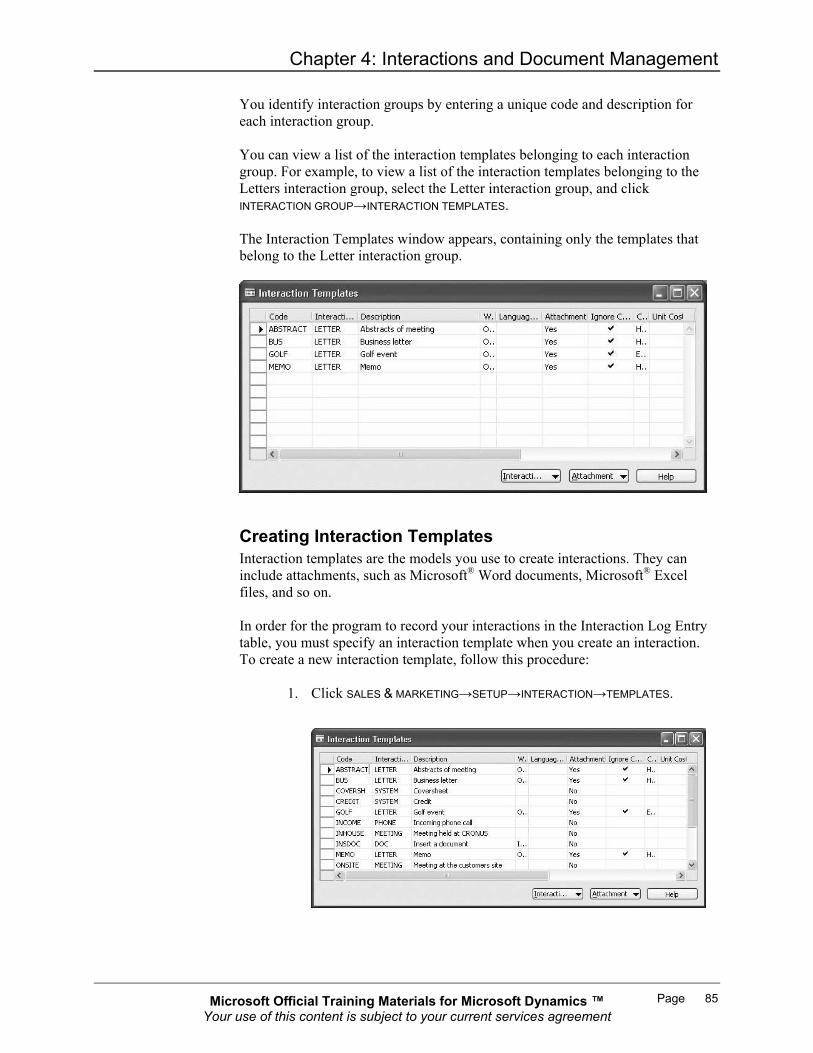
You identify interaction groups by entering a unique code and description for each interaction group. You can view a list of the interaction templates belonging to each interaction group. For example, to view a list of the interaction templates belonging to the Letters interaction group, select the Letter interaction group, and click INTERACTION GROUP→INTERACTION TEMPLATES. The Interaction Templates window appears, containing only the templates that belong to the Letter interaction group.
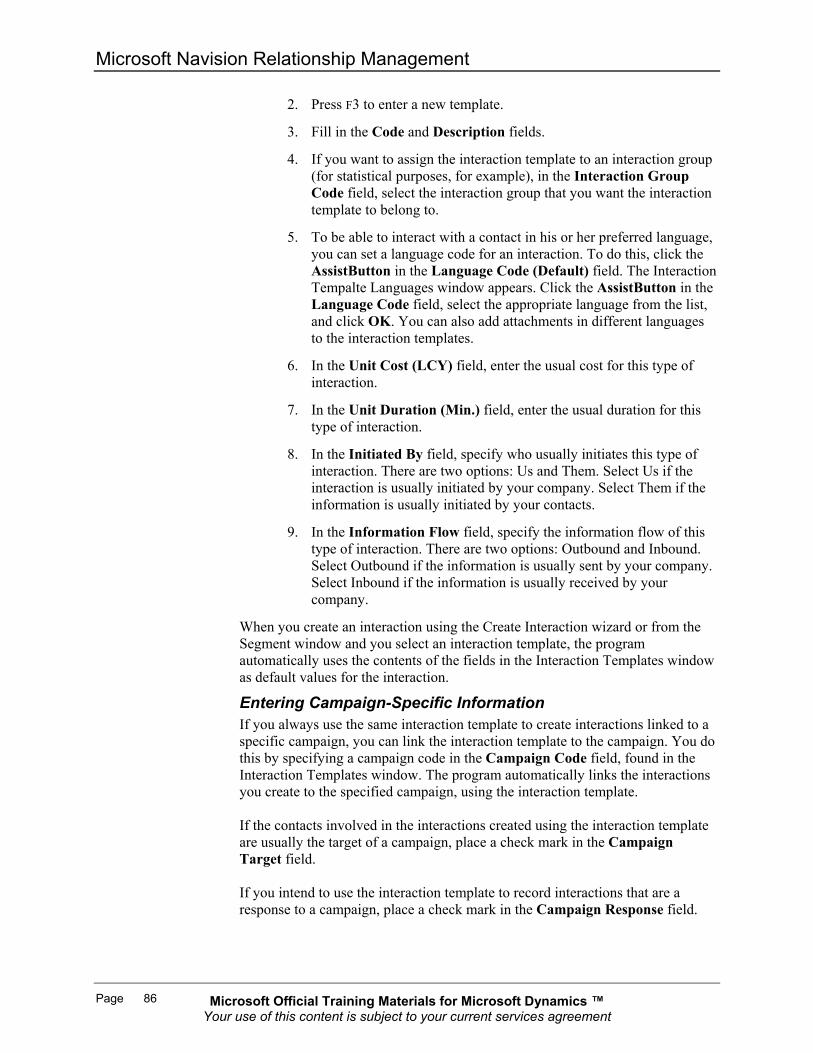
Creating Interaction Templates Interaction templates are the models you use to create interactions. They can include attachments, such as Microsoft® Word documents, Microsoft® Excel files, and so on. In order for the program to record your interactions in the Interaction Log Entry table, you must specify an interaction template when you create an interaction. To create a new interaction template, follow this procedure:
1. Click SALES & MARKETING→SETUP→INTERACTION→TEMPLATES.
Page 85
Microsoft Official Training Materials for Microsoft Dynamics ™ Your use of this content is subject to your current services agreement
Microsoft Navision Relationship Management
2. Press F3 to enter a new template.
3. Fill in the Code and Description fields.
4. If you want to assign the interaction template to an interaction group (for statistical purposes, for example), in the Interaction Group Code field, select the interaction group that you want the interaction template to belong to.
5. To be able to interact with a contact in his or her preferred language, you can set a language code for an interaction. To do this, click the AssistButton in the Language Code (Default) field. The Interaction Tempalte Languages window appears. Click the AssistButton in the Language Code field, select the appropriate language from the list, and click OK. You can also add attachments in different languages to the interaction templates.
6. In the Unit Cost (LCY) field, enter the usual cost for this type of interaction.
7. In the Unit Duration (Min.) field, enter the usual duration for this type of interaction.
8. In the Initiated By field, specify who usually initiates this type of interaction. There are two options: Us and Them. Select Us if the interaction is usually initiated by your company. Select Them if the information is usually initiated by your contacts.
9. In the Information Flow field, specify the information flow of this type of interaction. There are two options: Outbound and Inbound. Select Outbound if the information is usually sent by your company. Select Inbound if the information is usually received by your company.
When you create an interaction using the Create Interaction wizard or from the Segment window and you select an interaction template, the program automatically uses the contents of the fields in the Interaction Templates window as default values for the interaction.
Entering Campaign-Specific Information If you always use the same interaction template to create interactions linked to a specific campaign, you can link the interaction template to the campaign. You do this by specifying a campaign code in the Campaign Code field, found in the Interaction Templates window. The program automatically links the interactions you create to the specified campaign, using the interaction template. If the contacts involved in the interactions created using the interaction template are usually the target of a campaign, place a check mark in the Campaign Target field. If you intend to use the interaction template to record interactions that are a response to a campaign, place a check mark in the Campaign Response field.
Page 86
Microsoft Official Training Materials for Microsoft Dynamics ™ Your use of this content is subject to your current services agreement
Chapter 4: Interactions and Document Management
Assigning Attachments to Interaction Templates You can insert attachments in the interaction templates. Attachments can be all types of documents, for example, Microsoft Word documents, Microsoft Excel files, text files, and so on. However, Microsoft Navision is only fully integrated with Microsoft Word. This means that you can only create Microsoft Word documents from within Microsoft Navision; you cannot create Microsoft Excel files or other types of attachments directly from within Microsoft Navision. There are several ways of assigning attachments to interaction templates. You can:
• Create Microsoft Word documents. • Import all types of documents. • Copy already existing attachments from other interaction templates.
Creating Microsoft Word Documents If you have Microsoft Word 2002 or Microsoft Word 2003 installed, you can create attachments (Microsoft Word documents only) from the Interaction Templates window. To create a standard letter, follow this procedure:
1. In the Interaction Templates window, select the interaction you want to create an attachment for, and click ATTACHMENT→CREATE.
The program automatically launches Microsoft Word and opens a new document.
When you create Microsoft Word documents as attachments from within Microsoft Navision, the new document that appears contains mail merge fields from the program, such as the contact number, name, address, and so on. You can select these fields from the Merge Fields field in the Microsoft Word window, and insert them at the relevant place in the document.
In the new Microsoft Word document, enter the main text of your documents, and select the relevant merge fields.
2. Close the document. A dialog box appears in which you must click Yes to confirm.
3. Only the Microsoft Word document that you have opened from within Microsoft Navision is linked to the program. If you create a new Microsoft Word document from within Microsoft Word, then even if you open it from the document linked to Microsoft Navision, the new document is not linked to Microsoft Navision. If you want to link this new document to an interaction template or an interaction in the program, you must import the new document.
Page 87

Microsoft Official Training Materials for Microsoft Dynamics ™ Your use of this content is subject to your current services agreement
Microsoft Navision Relationship Management
NOTE: You can insert only one attachment in each interaction template. Consequently, you cannot create an attachment for an interaction template already containing an attachment. If the interaction template contains an attachment, when you click the AssistButton to the right of the Attachment field, the program opens the assigned attachment.
Closing Microsoft Word The documents that you open from Microsoft Navision are independent from the other Microsoft Word documents that you have opened before or while the document linked to the application is open. This means that if you close Microsoft Word from a document that is not linked to Microsoft Navision, the program will not close the open Microsoft Word document linked to Microsoft Navision. When you close Microsoft Word from the document linked to Microsoft Navision, a dialog box appears where you are asked if you want to save the changes made in the document and import the document again into the program.
NOTE: When you are working in a Microsoft Word document opened from within Microsoft Navision, you cannot return to work in the program before you have closed Microsoft Word.
Saving Microsoft Word Documents If you save the Microsoft Word document linked to Microsoft Navision, the program records the changes in the document. However, when you close Microsoft Word, you will be asked again if you want to save the changes and import the document into the program. This means that you can open a Microsoft Word document (attachment) from within Microsoft Navision, make changes in the document, save it on a disk file, and import the document again into the application with the changes made. If you do not import the document into Microsoft Navision again, the changes you have made will not be saved in the attachment.
NOTE: When working in the Interaction Templates window, if two or more users open and modify an interaction template attachment (Microsoft Word document) at the same time, the program will only save the changes made by the first user to import the document into Microsoft Navision again. The changes made by the other user(s) will not be recorded.
Page 88

Microsoft Official Training Materials for Microsoft Dynamics ™ Your use of this content is subject to your current services agreement
Chapter 4: Interactions and Document Management
Test Your Skills – Create an Interaction Template with an Attachment
Scenario: The interaction template belongs to the Letter interaction group. The attachment is a Microsoft Word document. Create it and include the following merge fields: the contact’s name and e-mail address and the salesperson’s name and telephone number.
1. Create an interaction template for the follow-up letters that you send after your first meeting with a contact.
Additional information:
Code: FOLLOWUP Unit Cost: 10 LCY Unit duration: 10 min You usually send this letter by e-mail.
Page 89
Microsoft Official Training Materials for Microsoft Dynamics ™ Your use of this content is subject to your current services agreement
Microsoft Navision Relationship Management
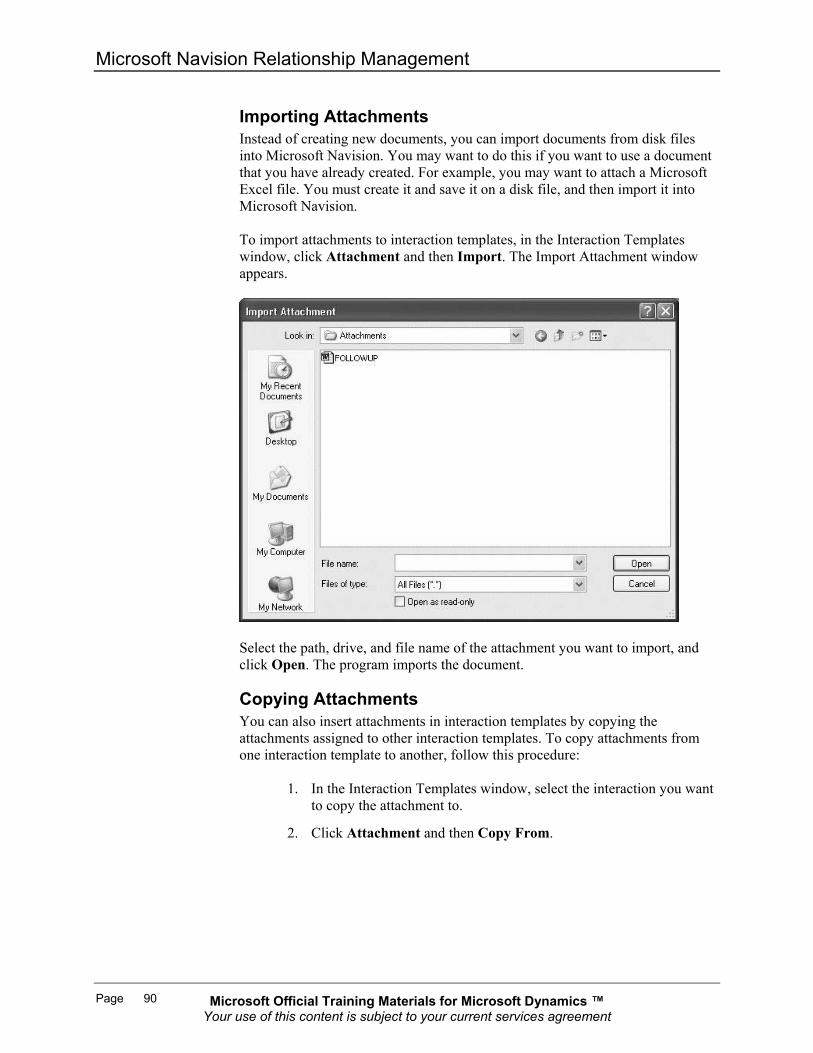
Importing Attachments Instead of creating new documents, you can import documents from disk files into Microsoft Navision. You may want to do this if you want to use a document that you have already created. For example, you may want to attach a Microsoft Excel file. You must create it and save it on a disk file, and then import it into Microsoft Navision. To import attachments to interaction templates, in the Interaction Templates window, click Attachment and then Import. The Import Attachment window appears.
Select the path, drive, and file name of the attachment you want to import, and click Open. The program imports the document.
Copying Attachments You can also insert attachments in interaction templates by copying the attachments assigned to other interaction templates. To copy attachments from one interaction template to another, follow this procedure:
1. In the Interaction Templates window, select the interaction you want to copy the attachment to.
2. Click Attachment and then Copy From.
Page 90

Microsoft Official Training Materials for Microsoft Dynamics ™ Your use of this content is subject to your current services agreement
Chapter 4: Interactions and Document Management
3. The Interact. Templ. Languages window appears, showing a list of all the interaction templates in different languages that contain attachments.
4. Select the interaction template containing the attachment that you want to copy, and then click OK.
Attachment-Specific Information in the Interaction Templates Window When an interaction template contains an attachment, the Attachment field contains Yes. The Attachment field is not editable. If the Attachment field contains Yes, when you click the AssistButton to the right of the field, the program opens the document. In the Correspondence Type field, you can specify how the attachment contained in the interaction template is usually communicated to contacts. There are three options: Fax, E-Mail, and Hard Copy. If you have filled in this field, the program automatically fills in the Correspondence Type field in the Create Interaction wizard or in the Segment window when you create an interaction. In the Wizard Action field, you can specify the action that you want the program to perform when you click Next in the first window of the Create Interaction wizard. There are three options:
• Blank: If you select this option, the program immediately displays the second window of the wizard when you click Next.
• Open: If you select this option, the program will open the attachment when you click Next.
• Import: If you select this option, the program will import the attachment when you click Next.
Page 91

Microsoft Official Training Materials for Microsoft Dynamics ™ Your use of this content is subject to your current services agreement
Microsoft Navision Relationship Management
Removing Attachments from Interaction Templates You can remove attachments assigned to interaction templates. You would do this, for example, if the document is not used anymore, and you would like to replace it. To remove attachments from interaction templates, follow this procedure:
1. Click SALES & MARKETING→SETUP→INTERACTION→TEMPLATES. The Interaction Templates window appears.
2. Find the interaction template containing the attachment that you want to delete, and click Attachment and then Remove.
3. Confirm the subsequent message.
The program removes the attachment.
NOTE: Removing the attachment from an interaction template does not affect the attachments included in the interaction log entries that you have created using the template. You can still open these attachments from the Interaction Log Entries window.
Exporting Attachments You can export the attachments contained in interaction templates to a disk file. You would do this, for example, if the attachment is a Microsoft® PowerPoint presentation that you would like to have on a disk. To export an attachment, follow this procedure:
1. In the Interaction Templates window, select the interaction template containing the attachment you want to export.
Page 92

Microsoft Official Training Materials for Microsoft Dynamics ™ Your use of this content is subject to your current services agreement
Chapter 4: Interactions and Document Management
2. Click Attachment and then Export. The Export Attachment window appears:
3. Select the drive, path, and file where you want to export the attachment to, and then click OK.
The program exports the attachment.
Using the Create Interaction Wizard You can create interactions involving single contacts using the Create Interaction wizard.
Page 93
Microsoft Official Training Materials for Microsoft Dynamics ™ Your use of this content is subject to your current services agreement
Microsoft Navision Relationship Management
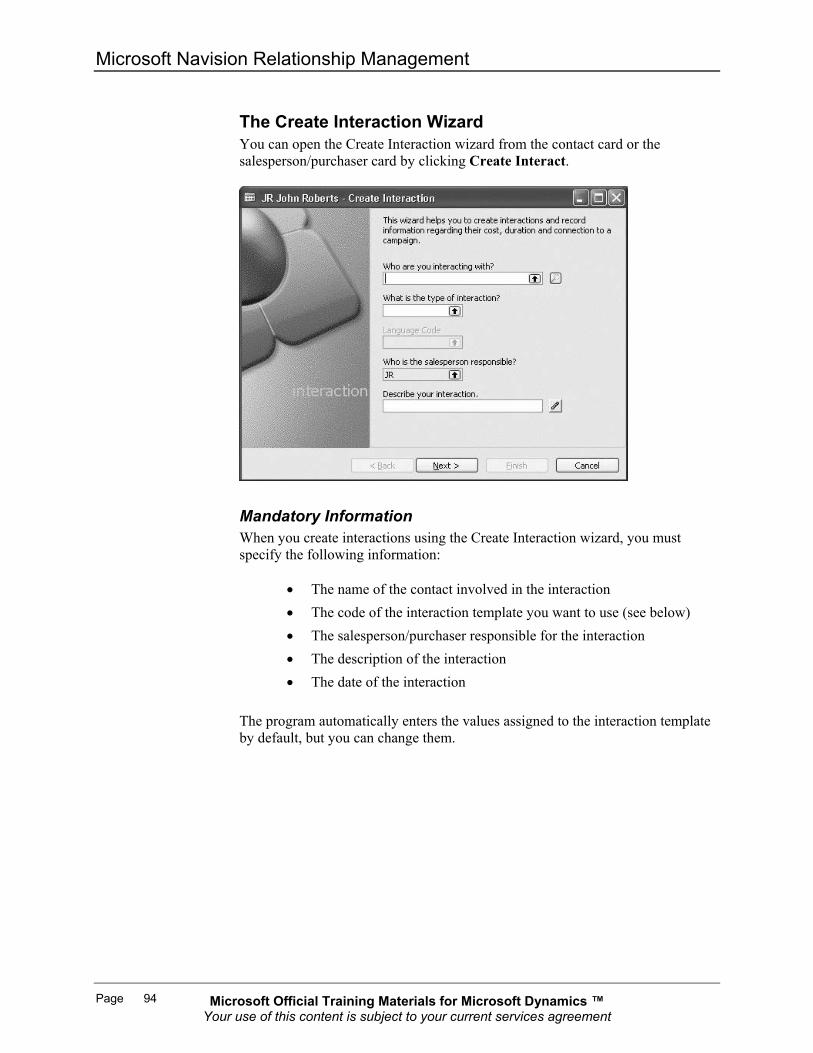
The Create Interaction Wizard You can open the Create Interaction wizard from the contact card or the salesperson/purchaser card by clicking Create Interact.
Mandatory Information When you create interactions using the Create Interaction wizard, you must specify the following information:
• The name of the contact involved in the interaction • The code of the interaction template you want to use (see below) • The salesperson/purchaser responsible for the interaction • The description of the interaction • The date of the interaction
The program automatically enters the values assigned to the interaction template by default, but you can change them.
Page 94

Microsoft Official Training Materials for Microsoft Dynamics ™ Your use of this content is subject to your current services agreement
Chapter 4: Interactions and Document Management
Optional Information
• Correspondence type – if the interaction contains an attachment, you can enter a correspondence type in this field. There are four options: <blank>, Hard Copy, E-Mail, and Fax. If you select Hard Copy, when you click Finish, the program automatically prints the attachment. If you select E-Mail, when you click Finish, the program automatically sends the attachment by e-mail. If you select Fax, and if your program is integrated with a fax, the program automatically sends the attachment by fax. If you leave this field blank, the program will not send or print the attachment. You can use this option, for example, if you have already printed or sent the attachment before you recorded the interaction.
• Campaign number – you can link the interaction to a campaign and when you click Finish, the program automatically records the interaction as a campaign entry for the specified campaign.
• Opportunity number – you can link the interaction to an opportunity. You can view the number and list of interactions linked to the opportunity from the Opportunity Statistics window (for more information, see "Opportunity Management").
Importing Attachments If you have chosen an interaction template that does not include an attachment, but for which the option Import has been selected in the Wizard Action field, found in the Interaction Templates window, then when you click Next in the first window of the wizard, a dialog box appears. Here you can select the drive and path to the attachment that you want to import.
Page 95
Microsoft Official Training Materials for Microsoft Dynamics ™ Your use of this content is subject to your current services agreement
Microsoft Navision Relationship Management
This enables you, for example, to record received letters as interactions. To do this, you must scan the letter you have received, and then import it from the Create Interaction wizard. After having recorded the interaction, you can find the scanned letter as the attachment for that interaction in the Interaction Log Entries window.
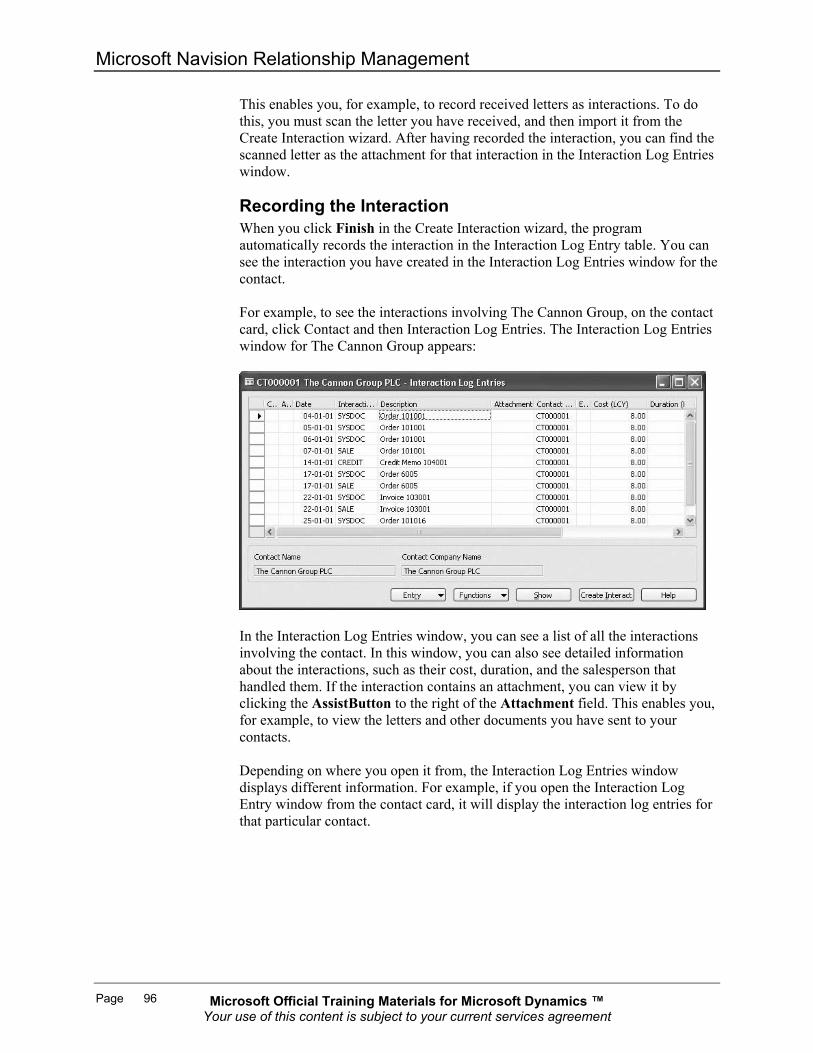
Recording the Interaction When you click Finish in the Create Interaction wizard, the program automatically records the interaction in the Interaction Log Entry table. You can see the interaction you have created in the Interaction Log Entries window for the contact. For example, to see the interactions involving The Cannon Group, on the contact card, click Contact and then Interaction Log Entries. The Interaction Log Entries window for The Cannon Group appears:
In the Interaction Log Entries window, you can see a list of all the interactions involving the contact. In this window, you can also see detailed information about the interactions, such as their cost, duration, and the salesperson that handled them. If the interaction contains an attachment, you can view it by clicking the AssistButton to the right of the Attachment field. This enables you, for example, to view the letters and other documents you have sent to your contacts. Depending on where you open it from, the Interaction Log Entries window displays different information. For example, if you open the Interaction Log Entry window from the contact card, it will display the interaction log entries for that particular contact.
Page 96

Microsoft Official Training Materials for Microsoft Dynamics ™ Your use of this content is subject to your current services agreement
Chapter 4: Interactions and Document Management
Postponing the Interaction If you close the wizard by clicking the Close button, Cancel or by pressing the ESC key, a message appears asking whether you want to finish this interaction later. Click Yes if you want to postpone the creation of this interaction and finish it later – for example, if you need to perform another task in Microsoft Navision before finishing the interaction. When you click Yes, the program automatically stores the newly created interaction in the Interaction Log Entry table. If you have linked the interaction to a campaign, the program does not insert a new entry in the Campaign Entry table yet. It will be inserted when the interaction is logged in the Interaction Log Entries. If a postponed interaction contains an attachment, it is stored in Microsoft Navision. To view the attachment, open the Postponed Interactions window, select the interaction with the attachment you want to view, and click Show. You can continue editing the attachment only on the Create Interaction Wizard when you resume the interaction.
Finishing and Deleting Postponed Interactions You can finish or delete a postponed interaction from any location where you can create an interaction. To finish a postponed interaction:
1. Click SALES & MARKETING→SALES→SALESPEOPLE. Go to Salesperson, Postponed Interactions.
2. Select the interaction you want to finish, and click Resume.
3. Fill in the remaining fields of the wizard and modify the attachment, if necessary.
4. Click Finish. Now the interaction is logged to the Interaction Log Entries, and if you have linked the interaction to a campaign, the program automatically inserts a new entry in the Campaign Entry table.
NOTE: You can postpone and resume creation of interaction as many times as you want. To delete a postponed interaction:
1. Click SALES & MARKETING→SALES→SALESPEOPLE. Go to Salesperson,
Postponed Interactions.
2. Select the interaction you want to delete, and click FUNCTIONS→DELETE.
3. To confirm the deletion, click Yes in the message box that appears.
In order to select several postponed interactions, you may select the interactions you would like to be deleted and click FUNCTIONS→DELETE.
Page 97

Microsoft Official Training Materials for Microsoft Dynamics ™ Your use of this content is subject to your current services agreement
Microsoft Navision Relationship Management
Test Your Skills – Recording Interactions Scenario: You have just come back from a meeting with John Smith at MultiSport, where you presented your new line of bicycles to him. The meeting went well.
1. Record the interaction using the ONSITE interaction template, and include your evaluation of the meeting.
One week after the meeting, you decide to send a follow-up letter to John Smith to ask him whether he would like to receive further information concerning the line of bicycles.
2. Use the interaction template called Business Letter to have the program automatically print the letter and record the interaction.
You have received a letter from John Smith asking you to send him a sales quote for 50 bicycles. It is a company policy at Cronus to record all interactions that you have with your contacts. Consequently, you would like to import the letter you have received from John Smith and record it as an interaction.
3. In Microsoft Word, write a fictitious letter, and save it on your disk drive. Use the Received Letter interaction template.
Page 98

Microsoft Official Training Materials for Microsoft Dynamics ™ Your use of this content is subject to your current services agreement
Chapter 4: Interactions and Document Management
Phone Calls You can also record phone calls as interactions in the program.
Making Phone Calls Before you can record phone calls as interactions in the program, you must ensure that the interaction template code for outgoing phone calls has been selected in the Outgoing Calls field on the Interactions tab of the Sales & Marketing Setup window. Then follow this procedure:
1. Click SALES & MARKETING→MARKETING→CONTACTS.
2. Browse to the relevant contact card for the contact, and click the Communication tab.
3. Click the Telephone icon to the right of the Phone No. field. The Make Phone Call wizard appears:
4. Enter a description of the call.
5. Click Next.
A dialog box appears, indicating that the program is currently dialing the contact’s number. If you cannot reach the contact, (for example, if the line is busy), click Hang Up.
6. When the phone conversation is over, click Hang Up.
If you are not able to get through to the contact, then in the second window of the wizard, click to remove the check mark in the The attempt was successful field.
Page 99

Microsoft Official Training Materials for Microsoft Dynamics ™ Your use of this content is subject to your current services agreement
Microsoft Navision Relationship Management
In the third window of the wizard, you can specify the campaign and the opportunity that the interaction is linked to. In this window you can also specify if this contact is being targeted as part of a campaign or is a response to a campaign, by selecting the appropriate check boxes.
NOTE: If you go back to the first window of the wizard (by clicking Back in the second window), the program automatically removes the check mark in the Dial Contact on Next field, so that it does not dial the contact’s number once again when you click Next. However, if you want to call the contact again, click the field to insert a check mark.
7. Click Finish.
When you click Finish, the program records this interaction in the Interaction Log Entry table.
NOTE: It is not possible to postpone the creation of this interaction.
Page 100

Microsoft Official Training Materials for Microsoft Dynamics ™ Your use of this content is subject to your current services agreement
Chapter 4: Interactions and Document Management
Test Your Skills – Making a Phone Call Scenario: The warehouse manager has just informed you that due to a low level of stock, the delivery of the bicycles ordered by MultiSport will be delayed by two weeks.
1. Call John Smith to let him know.John Smith is not in his office. You leave a message with his secretary.
2. Record the interaction.
Page 101

Microsoft Official Training Materials for Microsoft Dynamics ™ Your use of this content is subject to your current services agreement
Microsoft Navision Relationship Management
E-Mails Exchanging e-mails with your business contacts is probably an important part of your daily tasks. If you have Microsoft® Outlook® installed, you can send your e-mails from Microsoft Navision through Outlook. This is an easy and quick way to communicate with your contacts (customers, vendors, and so on). You can have all your e-mails logged as interactions in the interaction log and thereby share knowledge with your colleagues about any e-mail correspondence going on with your external contacts. This allows other members of the organization to follow up on e-mail correspondence. From the Interaction Log Entries window, you can open mails and view their contents if you click Show.
Before you can log e-mails, certain parameters must be set up correctly (see "E-Mail Logging"). This section describes how you send and receive e-mails and have them logged in Microsoft Navision.
Sending E-Mails There are two ways of sending e-mails to your contacts from Microsoft Navision: you can click the envelope icon to the right of the E-Mail field on the Communication tab on the contact card, and then go through the Create Mail wizard. Or you can use the Create Interaction wizard, and select E-Mail in the Correspondence Type field.
Page 102

Microsoft Official Training Materials for Microsoft Dynamics ™ Your use of this content is subject to your current services agreement
Chapter 4: Interactions and Document Management
When you send e-mails, the e-mail becomes the attachment in the Interaction Log Entries window, and the description you entered on the first page of the wizard becomes the subject of the e-mail. If you want the e-mail to be logged in the interaction log, you must set up rules in Outlook that define which e-mails will be stored in the Navision Queue folder you specified in the Queue Folder Name field (Sales & Marketing Setup, the E-Mail Logging tab).
Receiving E-Mails Incoming e-mails are received in your Outlook Inbox and, depending on the rules you have set up for received e-mails, they will be copied to the queue folder you specified in the Queue Folder Name field (Sales & Marketing Setup, the E-Mail Logging tab). To have your e-mails logged in the Interaction Log, you must specify a queue folder name and set up the rules that Outlook should apply to have the e-mails copied to the Navision Queue folder. (For further details, refer to the section “E-Mail Logging for MS Exchange Server” in the Sales & Marketing–Navision Technical White Paper.) If you want to see the contents of the mail, click Show in the Interaction Entries Log window.
Page 103
Microsoft Official Training Materials for Microsoft Dynamics ™ Your use of this content is subject to your current services agreement
Microsoft Navision Relationship Management
Test Your Skills – Sending an E-Mail Scenario: As you were unable to talk to John, you decide to send him an e-mail. You find the e-mail address on the contact card (Communication tab) for John Smith: [email protected].
1. Create an e-mail to send to him, informing him of the delayed delivery:
Subject: Delayed delivery of ordered bikes. Dear John, Due to stock problems, the delivery of the bikes you have ordered
will be delayed by two weeks. Best regards,
Page 104

Microsoft Official Training Materials for Microsoft Dynamics ™ Your use of this content is subject to your current services agreement
Chapter 4: Interactions and Document Management
Automatically Recorded Interactions You can have the program automatically record the sales, purchase, and service documents that you print for your contacts as interactions. You can do this only if the contact is also recorded in the program as a customer, vendor, or bank. For example, if a contact is also recorded as a customer, you can create a sales quote from the contact’s customer card, and you can have the program automatically record an interaction when you print the sales quote. When you perform certain sales, purchase, and service actions in Microsoft Navision for a customer or vendor that is also recorded as a contact, the program automatically records the action as an interaction for the contact in the Sales & Marketing application area. The program records interactions when you do the following:
• Print sales and purchase quotes • Print sales and purchase orders • Print sales and purchase invoices • Print sales and purchase blanket orders • Print sales reminders • Print sales statements • Print sales and purchase credit memos • Print sales shipment notes • Print purchase receipts • Create sales service orders • Post sales service orders • Print sales return orders and return receipts • Print sales finance charge memos • Print purchase return shipments and return order confirmations • Print service contracts, contract quotes, and quotes
You can see the interactions that the program has automatically created for a contact in the contact’s Interaction Log Entries window.
Example: Creating Sales Quotes for Customers You can create sales documents for contacts that are also recorded in the program as customers.
Page 105
Microsoft Official Training Materials for Microsoft Dynamics ™ Your use of this content is subject to your current services agreement
Microsoft Navision Relationship Management
1. To open the customer card, click SALES & MARKETING→ MARKETING→CONTACTS, and browse to the relevant contact card. Click Contact and then Customer/Vendor/Bank Acc. The customer card appears.
Before you can create a sales quote for a customer, you must ensure that posting groups have been specified. To do this, on the Invoicing tab, in the Gen. Bus. Posting Group, Gen. VAT Posting Group, and Customer Posting Group fields, select the appropriate posting groups.
2. Click SALES→QUOTES. The Sales Quote window appears.
3. In the No. field, press ENTER to have the program automatically enter the next available sales quote number.
4. Fill in the lines with the item and quantity.
5. Click Print to print the sales quote. The Quote window appears.
6. Fill in any filters on the Sales Quote tab and the number of copies you want printed on the Options tab.
7. Click Print.
When you click Print in the Quote window, the program automatically records the sales quote as an interaction for the contact. You can view it in the Interaction Log Entries window for the contact by selecting the line with the quote and clicking Show.
Printing a Contact Cover Sheet The program also automatically records interactions when you print cover sheets for your contacts.
1. On the contact card for your contact person, click Functions, and then click Print Cover Sheet. The Contact - Cover Sheet window appears.
Page 106

Microsoft Official Training Materials for Microsoft Dynamics ™ Your use of this content is subject to your current services agreement
Chapter 4: Interactions and Document Management
2. Click the Options tab.
3. Fill in the Text and Remarks fields as desired.
4. Click Print.
When you click Print, the program automatically records a new interaction for the contact person. You can view it in the Interaction Log Entries window for the contact. If you do not want to log an interaction when printing a cover sheet, clear the Log Interaction check box on the Options tab in the Contact - Cover Sheet window.
Page 107

Microsoft Official Training Materials for Microsoft Dynamics ™ Your use of this content is subject to your current services agreement
Microsoft Navision Relationship Management
Test Your Skills – Creating Automatically Recorded Interaction
Scenario: In his letter, John Smith asked you to send him a sales quote for 50 bicycles (item number 1000). Set up the customer card for Multisport so that you can create the quote, and then create a sales quote, print it, and view the interaction created. Use the following information:
Gen. Bus. Posting Group: EUGen. VAT Posting Group: EUCustomer Posting Group: Domestic
Four days later, John Smith informs you that he would like to order the 50 bicycles. Create a sales order for this.
Page 108

Microsoft Official Training Materials for Microsoft Dynamics ™ Your use of this content is subject to your current services agreement
Chapter 4: Interactions and Document Management
Canceling and Deleting Interaction Log Entries Canceling Interaction Log Entries You can cancel interaction log entries, for example, if they record interactions that have not been performed. To cancel interaction log entries, open the Interaction Log Entries window, and select the interaction log entry you want to cancel. Click FUNCTIONS→SWITCH CHECKMARK IN CANCELED. Confirm the subsequent message.
Deleting Interaction Log Entries Only canceled interaction log entries can be deleted. To delete canceled interaction log entries, follow this procedure:
1. Click ADMINISTRATION→IT ADMINISTRATION→DATA DELETION→DELETE CANCELED INTERACTION LOG ENTRIES. The Delete Interaction Log Entries window appears.
2. In the Entry No. field, click the AssistButton to the right of the Filter field, and select the interaction log entry that you want to delete.
3. Click OK.
4. In the Delete Interaction Log Entries window, click OK.
Interaction Statistics You can view statistics about your interactions in the Interaction Tmpl. Statistics window and the Interaction Group Statistics window.
Page 109

Microsoft Official Training Materials for Microsoft Dynamics ™ Your use of this content is subject to your current services agreement
Microsoft Navision Relationship Management
Interaction Templates Statistics In the Interaction Tmpl. Statistics window, you can view information about the interaction templates, such as the number of interactions created using the interaction templates, the total cost and total duration of these interactions. To open the Interaction Tmpl. Statistics window, found in the Interaction Templates window, select the interaction template that you want to view statistics for, and then click INTERACTION TEMPLATE→STATISTICS. To see the details about the interactions created using the interaction template, in the Interaction Tmpl. Statistics window, click the AssistButton to the right of the No. of Interactions, Cost (LCY), or Duration (Min.) fields.
Interaction Group Statistics In the Interaction Group Statistics window, you can view information about interaction groups. This window enables you to see statistics for a group of interaction templates. For example, for all the letters, you can see how many interactions were created using interaction templates from this group, and their total cost and duration. To open the Interaction Group Statistics window, in the Interaction Group window, select the interaction group that you want to view statistics for, and then click INTERACTION GROUP→STATISTICS. To see details about the interactions created using interaction templates from the interaction group, in the Interaction Group Statistics window, click the AssistButton to the right of the No. of Interactions, Cost (LCY), or Duration (Min.) fields.
Page 110

Microsoft Official Training Materials for Microsoft Dynamics ™ Your use of this content is subject to your current services agreement
Chapter 4: Interactions and Document Management
Test Your Skills – Creating a Sales Quote and an Order for the Interaction Log
1. Create a letter to Eric Davis from Rent-a-Bike to propose a meeting where you will present your new range of tires and bells to him.
2. Eric is considering purchasing 20 tires and 50 bells. Create a sales quote for Rent-a-Bike.
Additional information: Posting groups for Rent-a-Bike
General business posting group: EU General VAT business posting group: EU General customer posting group: Domestic Tire Item No.: 1160 Bell Item No.: 1600
3. Print the sales quote, and check that it has been recorded as an
interaction.
4. Finally, Eric decides to purchase 25 tires and 25 bells. Create the sales order and print it.
5. Open the Interaction Log Entries for Rent-a-Bike, and check that it contains all the interactions you have recorded.
Page 111

Microsoft Official Training Materials for Microsoft Dynamics ™ Your use of this content is subject to your current services agreement
Microsoft Navision Relationship Management
Quick Interaction: Lessons Learned Take a moment to write down three Key Points you have learned from this chapter: 1.
2.
3.
Page 112