chapter 5 x-link & robot 5 x-link & robot 5 xlink t4c... · x-link & robot 6 5.4 reset...
TRANSCRIPT

X-Link & Robot 1
CHAPTER 5 X-LINK & Robot
5 X-Link & Robot

X-Link & Robot 2
CONTENTS
5 X-Link & Robot ..................................... ....................................................
5.1 Show Reports on X-Link ............................. .........................................................3
5.2 Calibration feeders ................................ ...............................................................4
5.3 First time milking new cow ......................... .........................................................5
5.4 Reset procedure robot .............................. ...........................................................6
5.5 Reset attention replacement milk liners ............ .................................................7
5.6 Sampling procedures ................................ ...........................................................8 5.6.1 Set sampling method T4C ......................................................................................... 8 5.6.2 Activate sampling T4C............................................................................................... 8 5.6.3 Activate sampling robot (X-Link) ................................................................................ 9 5.6.4 Exchange Sample rack (on X-Link).......................................................................... 10 5.6.5 Finish sampling........................................................................................................ 11 5.6.6 Prepare and export Sample report ........................................................................... 11 5.6.7 Save and send a Sampling report to file .................................................................. 13
5.7 Set Robot out of operation......................... ........................................................14
X-Link & Robot 3
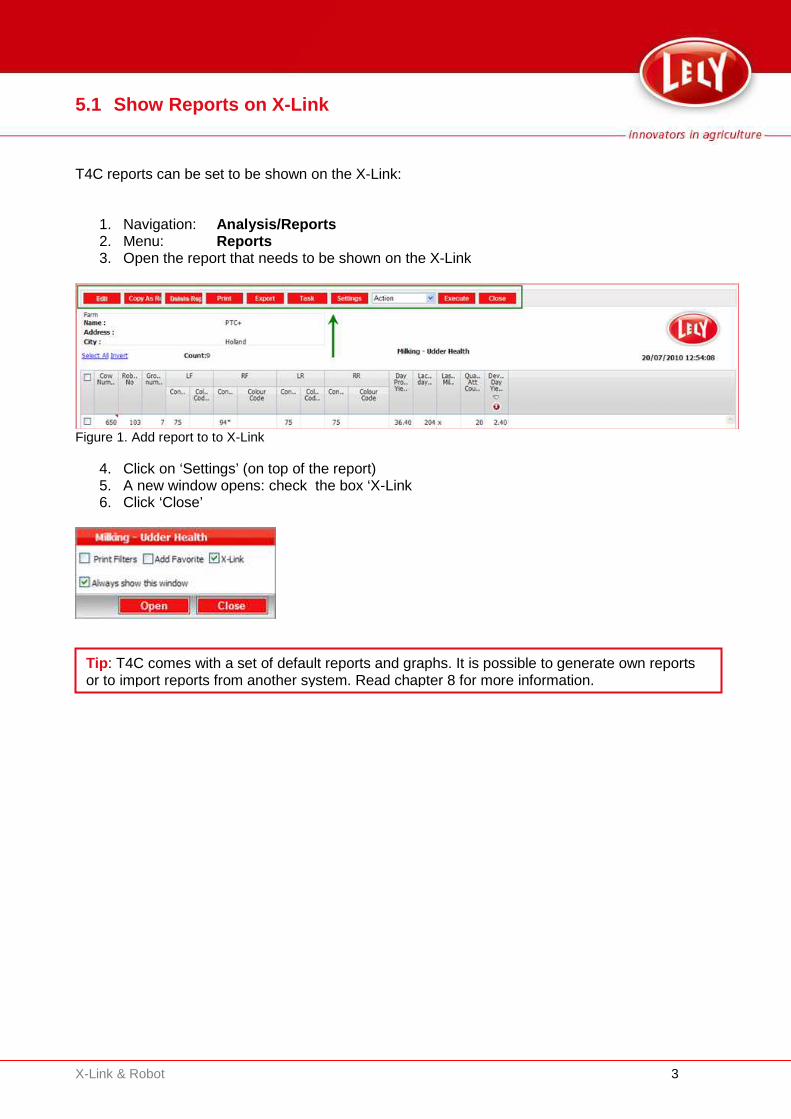
5.1 Show Reports on X-Link T4C reports can be set to be shown on the X-Link:
1. Navigation: Analysis/Reports 2. Menu: Reports 3. Open the report that needs to be shown on the X-Link
Figure 1. Add report to to X-Link
4. Click on ‘Settings’ (on top of the report) 5. A new window opens: check the box ‘X-Link 6. Click ‘Close’
Tip : T4C comes with a set of default reports and graphs. It is possible to generate own reports or to import reports from another system. Read chapter 8 for more information.

X-Link & Robot 4
5.2 Calibration feeders Feeder calibration should be done regularly and at least whenever a new batch of feed is used. The calibration procedure can be done at the X-Link. Make sure that the manger pan and feeder outlet are clean and empty before the calibration is done. 0. Set robot Out of operation 1. Select tab Test 2. Expand Calibrate by clicking ‘+’ 3. Select Feed portion 4. Optional: set Exit gate to open (for easy access feeder) 5. Enter Select feed type to calibrate 6. Click Start Dose to dispense 10 feed portions
Weigh the total amount of dispensed feed on a scale 7. Enter the weighed amount in Enter Quantity then the calibration is automatically adjusted. 8. The total amount will be divided by 10 and shown at Calculated 9. Check and Save the new values

X-Link & Robot 5
5.3 First time milking new cow When a cow enters the robot for the first time (or when teat coordinates are reset), the robot will call for assistance by displaying: “Supervision needed” This message will stay on the X-Link for a couple of minutes. If nobody appears, the cow will be released to milk another cow. If the message Start Milking is there, the operator has to: 1. Click OK 2. Select the teats to be milked 3. Select whether teats have exceptional
positions, normal click: No 4. Select OK to confirm settings 5. Select Swing in to position the arm under the cow (1) 6. Use the arrow buttons to position the robot arm (2).
Make sure the robot arm and the laser are positioned as shown in the figure � a. The red and green arrows move the robot arm to the left or right of the
cow. b. The blue arrows move the robot arm up and down. c. The yellow arrows move the robot arm forwards and backwards. d. The single arrow buttons move the robot arm in small steps. e. The double arrow buttons move the
robot arm in larger steps
7. If the robot arm is in the correct position,
select Start connection (3)

X-Link & Robot 6
5.4 Reset procedure robot Follow the next steps to reset the complete robot system: Robot
Remove the two top covers and open the cabinet. Switch the main power OFF.
Disconnect all power by disconnecting the bottom connector of the battery. (Low voltage). CRS+
Open the CRS+ cabinet. Unplug the two connectors in the left hand top corner of the large board (connectors with white/brown and red/black wires.) Robot Connect the robot battery again en move the main power switch to ON (See photo1 and 2). Wait until the X-Link is rebooted, so do not operate the buttons of the X-Link.
CRS+ Power up the CRS+ by reconnecting the two connectors (White/Brown is top connector), see photo 3. Wait until the CRS+ display shows the main menu. The top line should show: Destination milk: Sewer or Tank. Robot Start the robot using the following steps:
• Click Change View (1) • Click Reset all (2) • Wait at least 20 seconds. • Click Start (3) • The X-Link will ask whether the boiler needs to be
emptied. Click Empty boiler and OK. • Select Calibrate robot arm and click Start . • Wait until the arm has reached its maximum
position (out – up – near X-Link) and click Accept • The arm moves to its position under the jetters.
Select tab Process and click Start . Check the CRS+ menu Cleaning system whether the option Cluster shows ‘In operation’ !!!
(1)
(2)
(3)
X-Link & Robot 7
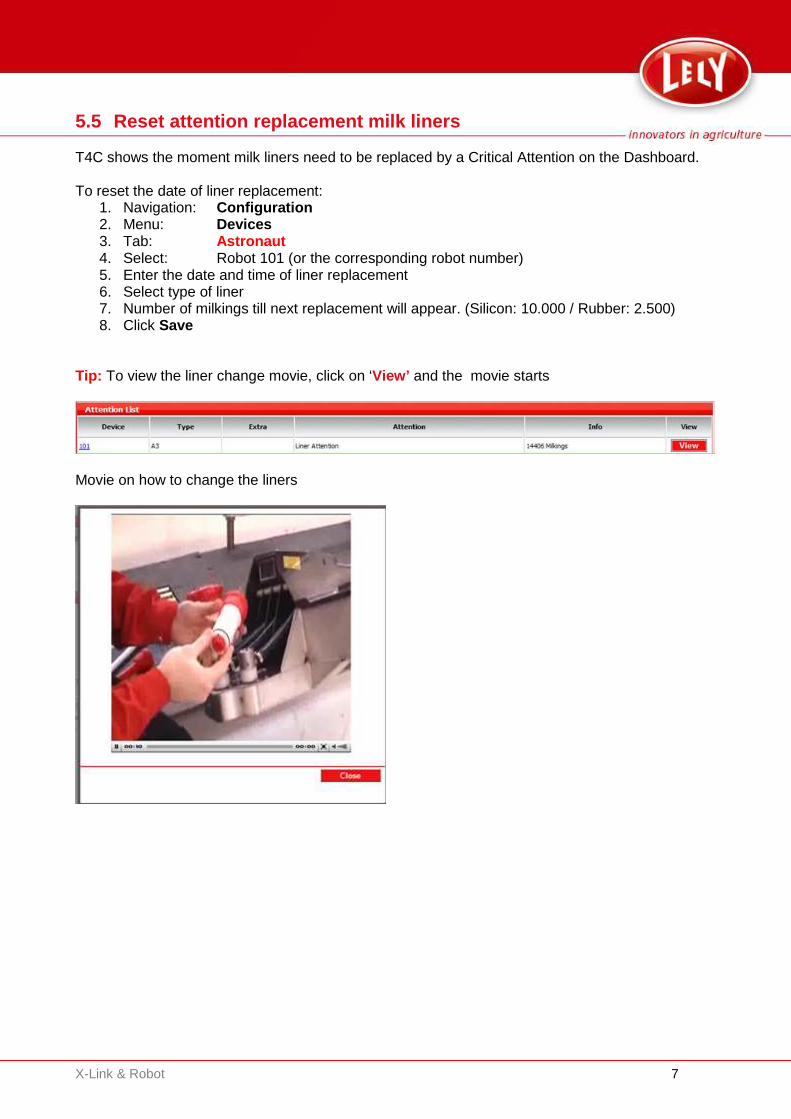
5.5 Reset attention replacement milk liners T4C shows the moment milk liners need to be replaced by a Critical Attention on the Dashboard. To reset the date of liner replacement:
1. Navigation: Configuration 2. Menu: Devices 3. Tab: Astronaut 4. Select: Robot 101 (or the corresponding robot number) 5. Enter the date and time of liner replacement 6. Select type of liner 7. Number of milkings till next replacement will appear. (Silicon: 10.000 / Rubber: 2.500) 8. Click Save
Tip: To view the liner change movie, click on ‘View’ and the movie starts
Movie on how to change the liners
X-Link & Robot 8
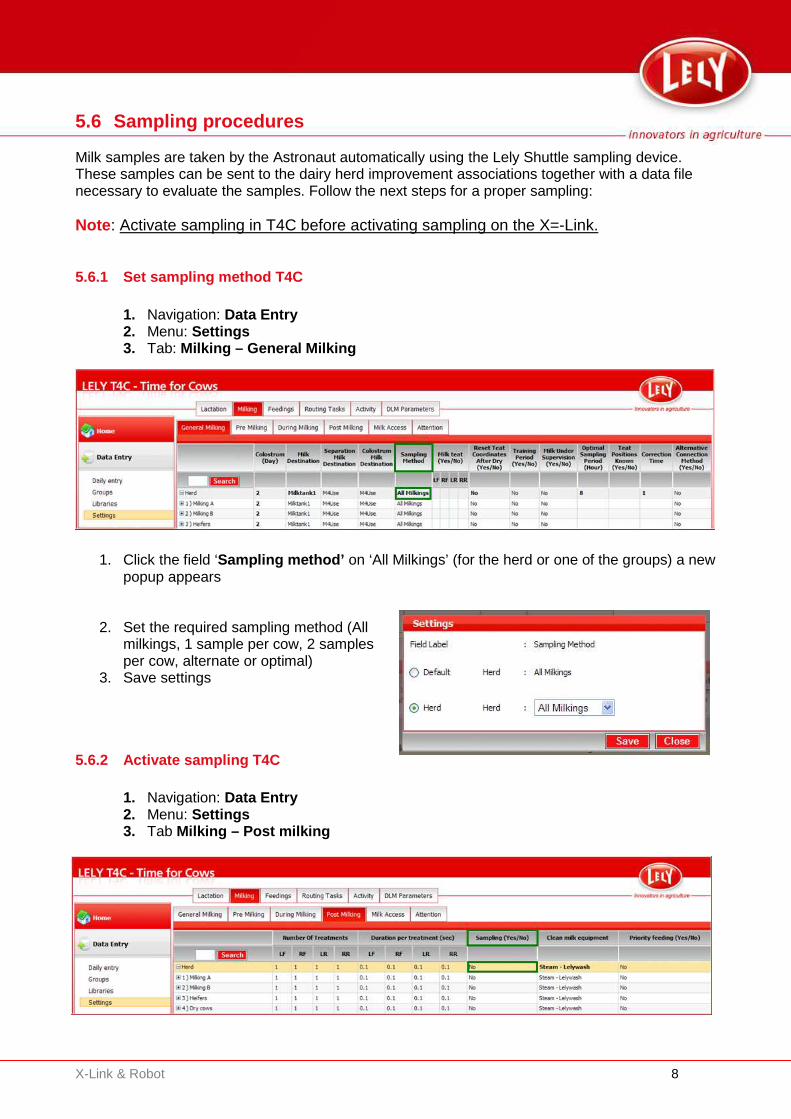
5.6 Sampling procedures Milk samples are taken by the Astronaut automatically using the Lely Shuttle sampling device. These samples can be sent to the dairy herd improvement associations together with a data file necessary to evaluate the samples. Follow the next steps for a proper sampling: Note : Activate sampling in T4C before activating sampling on the X=-Link.
5.6.1 Set sampling method T4C
1. Navigation: Data Entry 2. Menu: Settings 3. Tab: Milking – General Milking
1. Click the field ‘Sampling method’ on ‘All Milkings’ (for the herd or one of the groups) a new popup appears
2. Set the required sampling method (All milkings, 1 sample per cow, 2 samples per cow, alternate or optimal)
3. Save settings
5.6.2 Activate sampling T4C
1. Navigation: Data Entry 2. Menu: Settings 3. Tab Milking – Post milking

X-Link & Robot 9
1. Click in the column ‘Sampling’ on the corresponding record (for the herd or the group)
2. Set Herd (or Group) to ‘Yes’ 3. Click Save
5.6.3 Activate sampling robot (X-Link) 1. Click � in the right hand bottom 2. Click � 3. Click sampling button: An extra tab page will appear on the screen where the sampling progress can be monitored. During sampling other tab pages can still be opened. For instance Process (progress current milking), T4C (to check an attention list) or Sampling (check sampling status, replace bottle rack and finish sampling).
Note : The red numbers in front of the following steps are linked to the numbers in the screenshots 4. Set Use Shuttle to Yes 5. Click Next (bottom right) 6. Set Valve sampling to: Open Connect the sampling tube to the robot a) Guide tube through opening (5) b) Connect the tube to nipple (3)

X-Link & Robot 10
7. Set Valve sampling to: Close c) Remove plug (1) from knee (2)
d) Insert nipple (3) with tube (4) in the hole of knee (2)
8. Click Next 9. Click Change behind ‘Current rack no’
(1 Astronaut: 1st rack is 1, 2nd rack is 2) (2 Astronauts: 1st two racks are 1+2) 2nd two racks are no. 3+4 etc.)
10. Click Change behind ‘Start Position ’ Set Valve position to: 1; Bottle no. 12 11. Click Change behind ‘End position’ Set Spoon position to 96 12. Set No. Of empty bottle alarm to 3 13. Set Fill time sample bottle to 12 sec 14. Click Next 15. Message ‘Shuttle in operation ’ appears Activation of the sampling at the robot is now done. The X-Link tab Sampling can be used to monitor the sampling status and progress. In the mean time also the other X-Link tab pages can be used.
5.6.4 Exchange Sample rack (on X-Link) To replace a sample rack with all bottles filled: 28. Select Tab Sampling on the X-Link 29. Click Change Rack Move the spoon in the Shuttle to position 1 30. Click Change and enter the new rack no (in sequence, e.g. rack no. 2) 31. Set the proper spoon position and bottle no.: Spoon position 1 Bottle number 12 32. Click OK

X-Link & Robot 11
5.6.5 Finish sampling It is not necessary to switch the sampling off in T4C. To switch sampling off in the tab Sampling at the X-Link: 33. Click Turn sampling off 34. Confirm end of sampling by clicking Stop 35. Set Valve Sample to Close 36. Select Close
5.6.6 Prepare and export Sample report When sampling is finished reports can be generated and exported containing all sample data including rack and bottle numbers for the herd improvement association. 1. Navigation: Data Export 2. Menu: Milksampling Export 3. Select: Export Type
X-Link & Robot 12
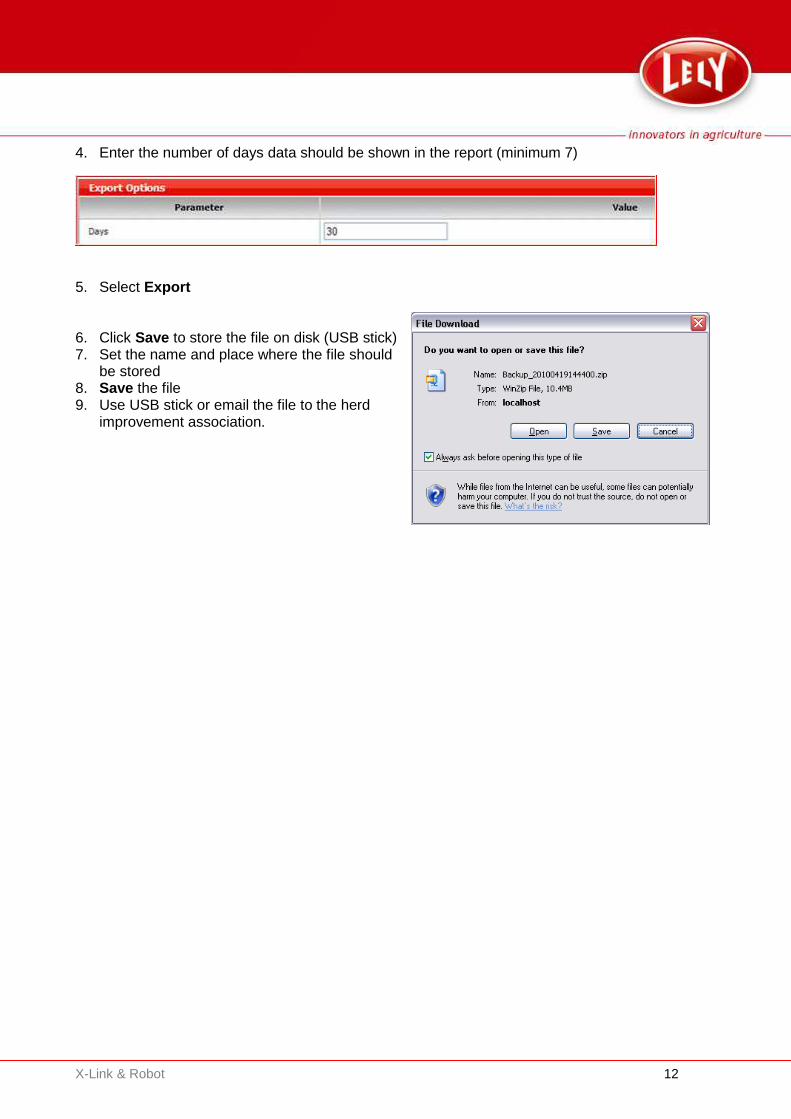
4. Enter the number of days data should be shown in the report (minimum 7)
5. Select Export 6. Click Save to store the file on disk (USB stick) 7. Set the name and place where the file should
be stored 8. Save the file 9. Use USB stick or email the file to the herd
improvement association.

X-Link & Robot 13
5.6.7 Save and send a Sampling report to file
1. Navigation: Analysis/Reports 2. Menu: Reports 3. Report: Milking-Milk Sampling 4. Click button ‘Print All’ 5. Click Export
6. Select file type (PDF or Excel) 7. Click Export 8. Change name and place where the
report should be stored 9. Click Save

X-Link & Robot 14
5.7 Set Robot out of operation The robot can be set in or out of operation on the X-Link. Select tab Process and click the button in the right hand top (Triangle with hour glass indicates robot switching on or off).