chapter 7 what can students do
TRANSCRIPT

1

2
Chapter 7: What can Students do?
Contents
Chapter 7: What can Students do? ........................................................................................... 1
How Students Complete an Assignment ................................................................................ 1
Completing a Text Activity ..................................................................................................... 3
Completing a File Drop Activity .............................................................................................. 5
Completing a SCORM Activity ................................................................................................ 7
Completing a Quiz Activity ..................................................................................................... 7
Sending a Message to a Teacher ............................................................................................ 8
Submitting an Assignment ..................................................................................................... 8
How Students Personalise their Dashboard ........................................................................ 10
Changing the Dashboard Settings ........................................................................................ 11
Changing the Dashboard Layout .......................................................................................... 12
Adding a Media Widget to your Dashboard ........................................................................ 12
Adding a Calendar Widget to your Dashboard .................................................................... 16
Adding a Notes Widget to your Dashboard ......................................................................... 18
Adding an External Link Widget to your Dashboard ............................................................ 19
Co-curricular Sites ................................................................................................................ 22
Creating and Sharing Co-curricular Sites .............................................................................. 23
1
Chapter 7: What can Students do?
Students are important to the overall success of the Frog VLE. Students do not have access
to as many features of Frog as teachers or admin users. For example, a student cannot
create a new Site, he or she will have to ask a teacher or admin user to create a Site
initially and then the teacher or admin user will have to share that Site with them. Students
cannot edit/create users or groups. Students do not have access to the Booking Calendar,
Community Site, and Lesson Resources.
One of the most useful features of your Frog VLE is the Assignments feature. An
assignment is initially created by the teacher and then distributed to the student using the
assign function. Students will receive a Notification when an assignment is sent to them.
The student then has a set amount of time to complete and return the assignment back to
the teacher for marking.
Remember! Only users logged in as a student can complete an assignment.
How Students Complete an Assignment
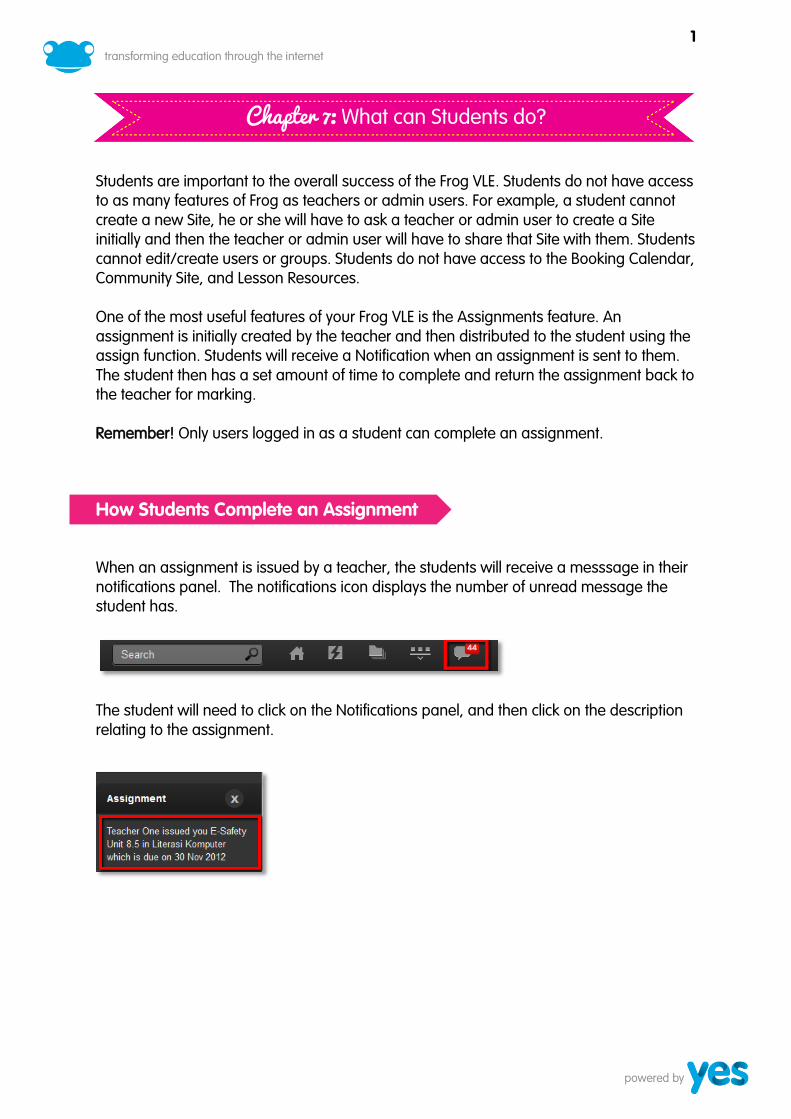
When an assignment is issued by a teacher, the students will receive a messsage in their
notifications panel. The notifications icon displays the number of unread message the
student has.
The student will need to click on the Notifications panel, and then click on the description
relating to the assignment.

2
The student will then be directed to the Assignments application window.
All open assignments will be listed here, so the student may have to click the Next button
to find the one refered to in the notification. The date in the Issue column indicates the
date the teacher sent the assignment. The date in the Due column indicates to the student
when the assignment is due. They can submit it before that date, however, the date will
turn red if it becomes overdue and the student will no longer be able to complete/submit
the assignment.
Moving the cursor over the assignment title will display the instructions for the
assignment.
Assignments that have been submitted (complete) have a green tick next to them and can
no longer be amended.
To open an assignment, click on the assignment name.

3
The student will now see the Site that the teacher used for the assignment. If the
assignment task does not appear upon opening they may need to click on the tabs at the
top on the page.
Completing a Text Activity
The Text Activity is a large textbox that displays the instructions in the panel above. The
student has to enter their answers directly into the text box.

4
The student needs to read the question at the top of the Text Activity window. Then enter
their text into the text box below.
Once the student has entered all the information into the text box, it is important to click
on the Save Activity button located underneather the text box. At this point the
teacher will be able to see that they have started the Text Activity section of the
assignment.

5
Completing a File Drop Activity
The File Drop activity allows the student to upload files back to the teacher. Depending on
the settings set by the teacher students can view their own uploads or the files uploaded
by their group. Students can also be permitted to delete their own files once uploaded.
Students should read the question above the File Drop window.
They should prepare their document and click on the Upload button. This will launch the
File Uploader.
Students then need to click on the blue Choose Files button to select a file from their
computer to upload.
6
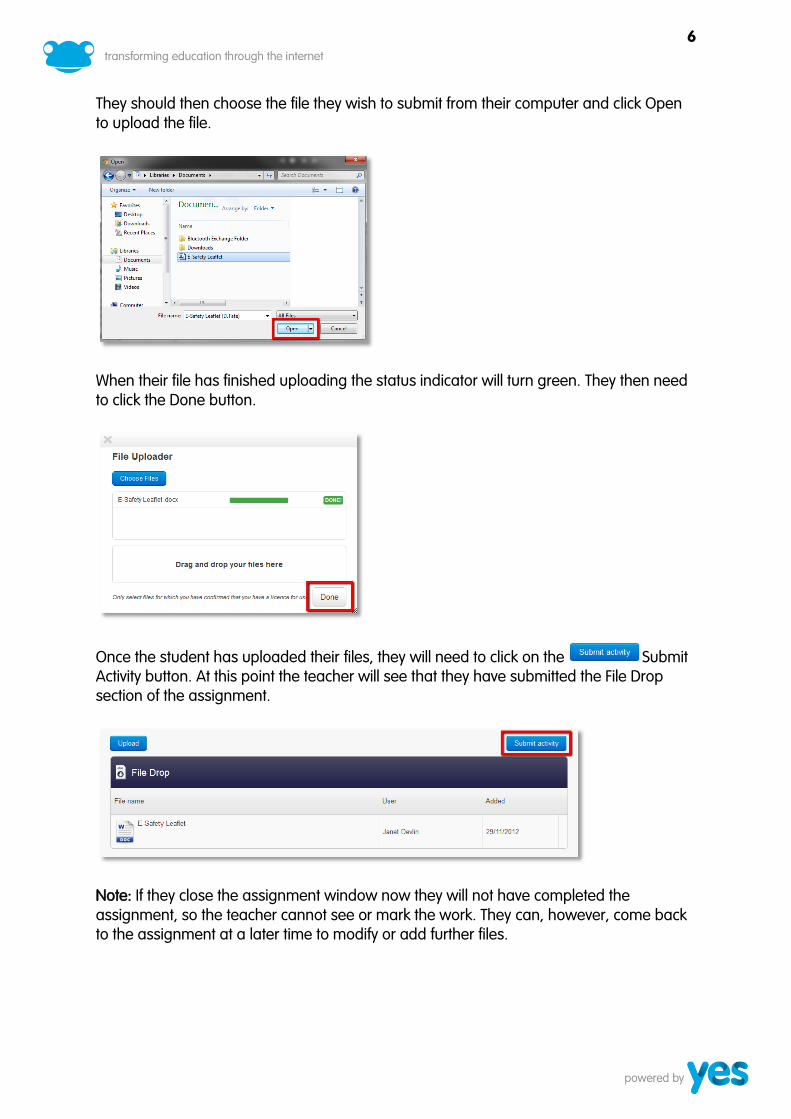
They should then choose the file they wish to submit from their computer and click Open
to upload the file.
When their file has finished uploading the status indicator will turn green. They then need
to click the Done button.
Once the student has uploaded their files, they will need to click on the Submit
Activity button. At this point the teacher will see that they have submitted the File Drop
section of the assignment.
Note: If they close the assignment window now they will not have completed the
assignment, so the teacher cannot see or mark the work. They can, however, come back
to the assignment at a later time to modify or add further files.

7
Completing a SCORM Activity
To launch the SCORM activity click on the SCORM widget on the page. The SCORM Player
will play in a new browser window.
Once the SCORM activity is complete, it will be necessary to click on the Frog VLE browser
tab to return to the Frog VLE.
Completing a Quiz Activity
The run the Quiz, click on the Launch Quiz button on the page.

8
Sending a Message to a Teacher
Should the student need to contact the teacher about the assignment, for example, for
further clarity on the task or perhaps to request an extension on the due date, they can
post a message on the teacher’s wall. The number displayed on the icon represents the
total number of messages posted on the wall so far, that relates to that assignment. If the
number in the icon has increased, then there is a message waiting to be read.
Students click the message wall icon next to the assignment name to view the message
wall.
To add a message to the wall click the Post button. All posts made by both the student
and the teacher will be displayed here on the same wall.
Submitting an Assignment
When a student is confident that all their work is complete, they need to click on the
Complete Assignment button in the Frog Bar.

9
If requested they must complete the Self Evaluation to assess their understanding of the
task or question that has been given.
They may also choose to write comments in support of their self-evaluation. The
comments should be typed into the Your Comments box.
Finally, they need to click on the Complete button to send their work. The work will be sent
to the teacher for marking and they can no longer make any further changes. The
assignment has now been Submitted.

10
How Students Personalise their Dashboard
Your Dashboard is the first page that appears when students log into the VLE. It can be
customised to display the school calendar, RSS Feeds, or notifications. They can also add
personal items such as photos, videos or links to their favorite websites. Different Themes
can be choosen to change the look and feel of their Dashboard to inspire and motivate
them for the day ahead.
To edit the Dashboard, they must click on the Edit button on the left side of the screen. This
will display the Content Panel.
The Content Panel contains three options:
Layout – This will change the number and position of
the layout boxes on the Dashboard.
Settings – This allows the student to change the Name
and Theme of their Dashboard.
Widgets – Widgets can be dragged onto the page to
add content such as text, video and pictures.

11
Changing the Dashboard Settings
To change the name on the Dashboard, click on the
Settings tab.
Enter the name into the Name box of Site. It will
automatically update on the name section on the
Dashboard.
To change the Theme of the Dashboard, click on the
small arrow on the right and select a new theme.
Scroll down the menu, and click on the theme
required. This automatically switches to the
Dashboard theme chosen.
Note: The Theme is not to be confused with the
Background found in the Preferences area. The theme
selected will always be displayed on top of the
background image unless the Transparent theme is
chosen.
Click the Save Changes button to save your changes.

12
Changing the Dashboard Layout
In the Content Panel, click on the Layout Tab.
From the numbered buttons, students should select
the number of layout boxes they want on a page.
They can select between one to four layout boxes on
a page.
Here, students can choose how the contents of the
layout boxes will be displayed on their dashboard.
When they click on a particular layout, the page will
automatically be updated with the new layout.
Adding a Media Widget to your Dashboard
In the Content Panel, click on Widgets.
They will now see all of the Widgets that are available
to them. Each Widget is identified by its unique name
and icon. A Widget is an application that allows
content to be displayed to the viewer. This is achieved
by simply dragging each Widget into an layout box on
a page and configuring its settings.

13
Students should click on a Widget and drag it into a layout box on the Dashboard. Make
sure a blue box appears underneath the Widget icon before releasing the mouse button.
Widgets can only be positioned inside layout boxes (a rectangular box with a dashed line
surround).
Double clicking on the icon displays the settings for the Widget.
Note: Some Widgets may not display any settings when double clicked. This is because
there are no user settings available for the Widget.
In the case of the Media Widget, they can select a file to upload onto the page. They will
need to have the file located somewhere on their computer. i.e. on the hard disc, memory
stick or SD card.
Note: We recommend that the file size of images used should not exceed 2MB as this will
result in excessive refresh times when loading the page. Often pictures taken from digital
cameras can be large. Setting cameras to take small picture sizes suitable for the internet
or resample the image to make it smaller first in a suitable graphics package would be
ideal.

14
Students now need to click on the Upload
button in the Choose Media section to launch
the File Uploader.
Then click on the Choose Files button to access
files on their computer. Choose a file to be
uploaded.
Select the image file then click on the Open
button.
Once uploading is complete the status bar will
turn green. Click on the Done Button to finish.
15
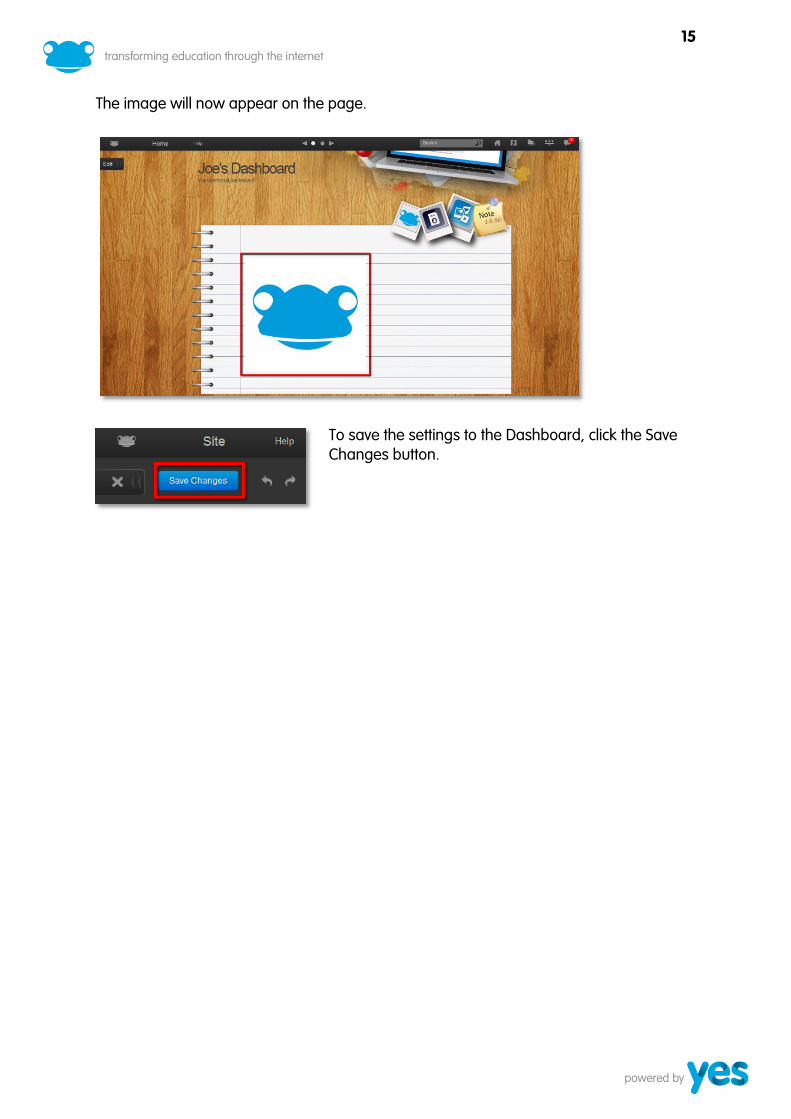
The image will now appear on the page.
To save the settings to the Dashboard, click the Save
Changes button.

16
Adding a Calendar Widget to your Dashboard
Students may find it useful to have their calendar displayed on their Dashboard. The
Calendar Widget is a simplified version of the calendar application found in quick launch
and is great for displaying important events and activities at a glance on the Dashboard.
Select the Calendar Widget and drag it onto the page. Make sure that the layout box turns
blue before releasing the Widget.
Now they need to double click on the Calendar in the
layout box. On the Content Panel, students should
choose their own personal calendar from the
Calendar to display drop down menu.
Students should now select the number of events /
activities to be displayed in the calendar by selecting
5, 10, 15 from the Max Events to Display drop down
menu.
Note: They will need to save the Dashboard and exit out of Edit mode before any calendar
events are displayed.
To save the settings to the Dashboard, click the Save
Changes button.

17
Click on the X to exit Edit mode.
If there are up-and-coming events in their calendar, they will now appear on their
dashboard.
Now they can click on the Edit button on the left to continue editing the
Dashboard.

18
Adding a Notes Widget to your Dashboard
The Notes Widget allows students to add notes to their dashboard such as reminders,
lists, email addresses etc.
Select the Notes Widget and drag it onto their page. Make sure that the layout box turns
blue before releasing the Widget.
Double clicking on the layout box displays a Notes text box in the Content Panel.
Any text typed here will be instantly displayed in the
notes Widget. The formatting icons underneath the
text box allow students to change the colour, format
and style of text.

19
The Notes Widget will now display the text they have entered.
Save changes by clicking on the Save Changes button.
Adding an External Link Widget to your Dashboard
Adding an External Link Widget to their dashboard allows students to open up their
favourite website with just a single click. Multiple links can be added to the Dashboard to
make finding them quicker and easier.
Select the External Link Widget and drag it to onto the page, ensuring that the blue box
appears before releasing the Widget.

20
Double clicking on the layout box displays the options
for the Text Activity Widget in the Content Panel.
Enter the name and URL of the website.
Note: If the students find the link does not work, check
that the prefix http:// or https:// has been included
with the full web address.
Students have the option to display an icon with their link.
If they would like to display an icon, they have three options on locating an image;
1. Students can use the upload button to locate an
image on their computer’s hard disc or USB stick.
2. They can use the Import Resource button to locate
an image that has been previously uploaded into the
Resource Manager within the VLE.
3. They can use the Search to find a suitable image
located on Pin-Point. Type the search text in the box
and then click the Pin-Point button.

21
Students should select the image to use from those displayed in Pin-Point and click on
Use. This will add the image to their link icon.
They can also enter a brief description for the Site.
They can use the description to remind them of what
the Site contains.
Students should remember to save changes to their
Site by clicking on the Save Changes button.
Click the X button to close their Dashboard.
The external link will now be placed on their dashboard with their selected icon. Clicking
on the icon will open the link in a new browser window.

22
Co-curricular Sites
To enhance and promote student engagement students can be tasked with the
responsibility of building co-curricular sites such as clubs and societies. Allowing students
to create co-curricular sites has many benefits for both the student and the teacher;
encouraging VLE usage, cutting down the teacher’s workload and motivating them to
source, verify and create content for their site.
You may want to discuss the initial layout with the site with the student(s) in advance.
Have them submit mock-up pages, ideas, photographs etc. A great idea is to assemble a
team of students, assigned to each site. In the team can be photographers, writers, proof
readers and an overall editor, similar to how a newspaper is created. Weekly editorial
meetings can be held to ensure the site is kept up to date.
As a security measure students cannot create their own sites; a teacher must create one
for them thereby giving the teacher overall control. This guide will take you through the
setup process of creating and sharing a site with a student.
A typical site created by the teacher may look something like this. At this stage the site will
not contain any content. This will be for the students to add after it has been shared.

23
Creating and Sharing Co-curricular Sites
To create a site, click on the Quick Launch icon in the Frog Bar and click Sites.
The Sites area in the Resource Manager will open. Check to make sure My Sites is
selected.
Click on the New Site button.

24
Type in the name of the site, and then add a brief description of the site underneath. (The
students can edit this later if necessary)
Click the Next button.
Select a Theme and an Icon for the site.
Click Next to continue.

25
This section allows you to add tags to the site.
Select Co-curricular from the drop down menu. This will place the site in the Co-curricular
section of Sites in the Resource Manager.
Click the Add button to Tag your selection.
Select an appropriate Co-curricular group.

26
Click the Add button to Tag your selection.
Now select a Form Group from the list.
Click the Add button to Tag your selection.

27
In the keywords box, type in a word that you think someone would enter into a search
box when trying to find the site.
Next, click the Add button to Tag your selection.
Note: Tags can be added later as content and pages are added. For example, if a
Manchester United fan page is added then a Manchester United Tag can be applied to
the site.
Click on the Create Site button to create the new site.

28
The new site will appear in the Resource Manager in My Sites. Click on the Co-curricular
Sites section on the left to check that it appears in that section also.
Click on the category icon.
Double click on the site to open it.

29
Click the Share button on the Frog Bar.
In the Share or Assign window click on the Share option.
If you want to make any changes to the Tags for the site you can do it here, otherwise
click the Next button to continue.

30
Type in the name of the person or group you are allowing to edit the site.
Once they appear in the list, click on the name to select it and then click the Add button to
add them to the list.
From the drop down list located to the right of the individual user or group, select the
option Can edit & manage. Selecting this option means that the student will be able to:
Have full editing access - add Widgets, add/delete content, add/remove pages, rename
the site, change the Tagging settings and re-share the site to other users on the VLE.

31
Click on the Public button to allow other users in the school to view the site.
Ensure that the Public drop down menu is set to Can Contribute. This allows all users to
use interactive elements such as forums, walls and file drops.
Click on the blue Share button to begin sharing your Site.
Your site will now be visible to everyone and will appear in the Co-curricular Sites section
of the Resource Manager. Only the students named can edit the site.

32