chapter4: html table and script page, html5 new forms -...
TRANSCRIPT

Chapter4: HTML Table and Script page,
HTML5 new forms Asst. Prof. Dr. Supakit Nootyaskool
Information Technology, KMITL

Objective
• To know HTML5 creating a new style form.
• To understand HTML table benefits
• To build a table design and show on web page
• To add image, hyperlinks or text on the table cell

Topics
• Sketching table • Table components • Adding borders • CSS border
properties • Adjust height and
width • Padding and spacing • Adding span • Row spans • Nest table
Scripting web page
Browser windows
Solicit and verify user input
Server side script
Including Script
Same script on multiple page

4.63 New style forms in HTML5
When we want to get input data from user, we will use <input>..</input> by typing in <form> ..<form>
• Example
<form>
<input type=“xxx” value=“yyy”>
</input>
</form>

4.63 New style forms in HTML5
When we want to get input data from user, we will use <input>..</input> by typing in <form> ..<form>
• Example
<form>
<input type=“xxx” value=“yyy”>
</input>
</form>
Type of input data • Button • Checkbox • File • Hidden • Image • Password • Ratio • Reset • Submit • Text • textarea
Display text on webpage

Check code <!DOCTYPE HTML>
<html>
<head>
<meta charset='utf-8'>
</head>
<body>
<form>
<input type='button' value='true'> กดปุ่ มสิ <br/>
<input type='checkbox' value='1'> เลือกสิ <br/>
<input type='file' value='หาไฟล์'> ไฟล์ไหน <br/>
<input type='hidden' value='ซ่อนไว้'> ซ้อนอยู่ในcode
<br/>
</form>
</body>
Don’t forget save as UTF-8

Test button <!DOCTYPE HTML> <html> <head> <meta charset='utf-8'> </head> <body> <form> <input type = 'button' onclick = "alert('hello world');" value = ‘Say alert'> กดปุ่ มส ิ <br/>
</form> </body>

JS command

Submit to another page
<!DOCTYPE HTML>
<html>
<head>
<meta charset='utf-8'>
</head>
<body>
<form action="receiver.html" method="get">
<input type = 'submit'
value = 'Say alert'> กดปุ่ มสิ <br/>
</form>
</body>

method get No data

Submit to another page
<!DOCTYPE HTML>
<html>
<head>
<meta charset='utf-8'>
</head>
<body>
<form action="receiver.html" method="get">
<input type = 'submit'
name = ‘message’
value = 'Say alert'> กดปุ่ มสิ <br/>
</form>
</body>

method get data
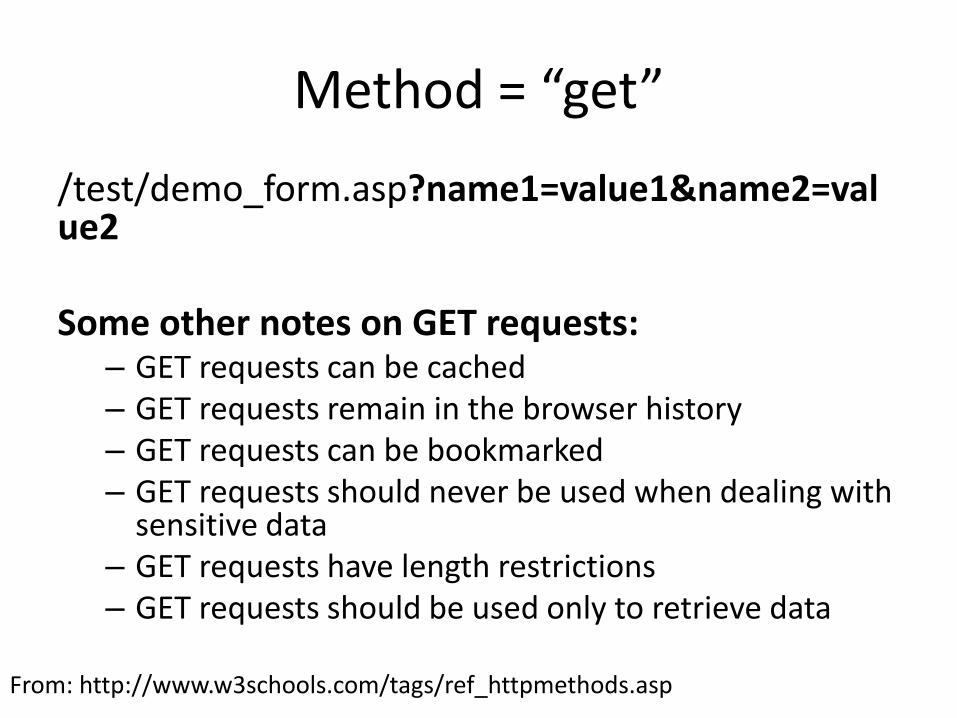
Method = “get”
/test/demo_form.asp?name1=value1&name2=value2 Some other notes on GET requests:
– GET requests can be cached – GET requests remain in the browser history – GET requests can be bookmarked – GET requests should never be used when dealing with
sensitive data – GET requests have length restrictions – GET requests should be used only to retrieve data
From: http://www.w3schools.com/tags/ref_httpmethods.asp

<!DOCTYPE HTML>
<html>
<head>
<meta charset='utf-8'>
</head>
<body>
<form action="receiver.php"
method="get">
<input type = 'submit'
name = 'message'
value = 'Say alert'> กดปุ่ มสิ <br/>
</form>
</body>
<?php
$m = $_GET["message"];
?>
<!DOCTYPE HTML>
<html>
<head>
<meta charset='utf-8'>
</head>
<body>
<?php
echo "Your message:". $m;
?>
</body>
Lec4.html receiver.php


iCounter
We will show communication concept of client-server by iCounter.
Value = 1
Html value=2 php
Html
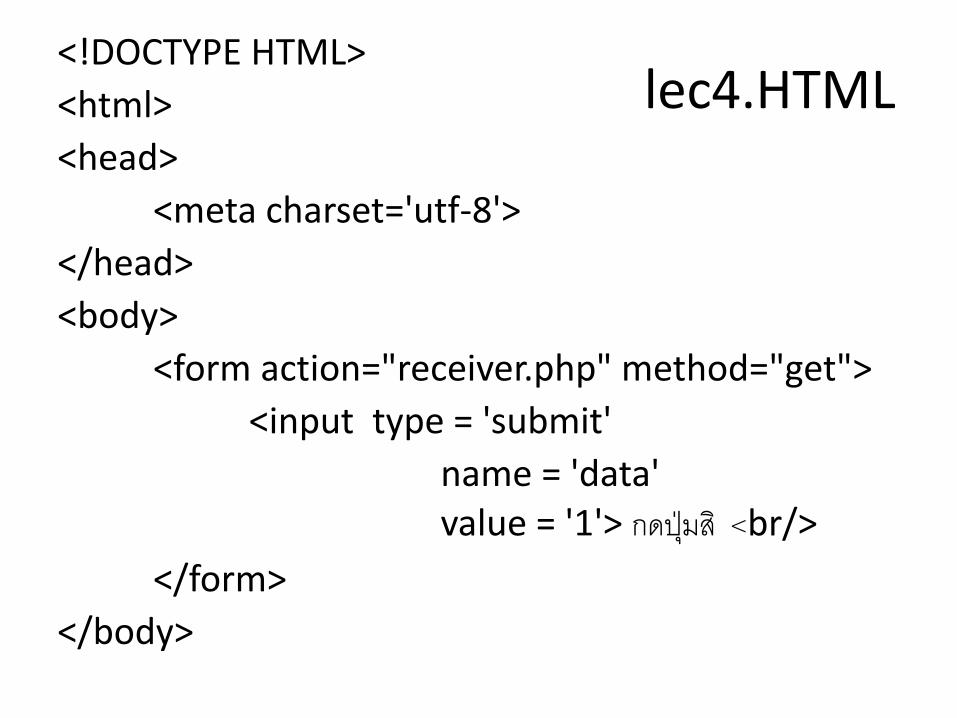
lec4.HTML <!DOCTYPE HTML>
<html>
<head>
<meta charset='utf-8'>
</head>
<body>
<form action="receiver.php" method="get">
<input type = 'submit'
name = 'data' value = '1'> กดปุ่ มส ิ <br/>
</form>
</body>

receiver.php <?php $i = $_GET["data"]; ?> <!DOCTYPE HTML> <html> <head> <meta charset='utf-8'> </head> <body> <form action="receiver.php" method="get"> <input type = 'submit' name = 'data' <?php $i=$i+1; echo "value = ".$i; ?> > กดปุ่ มสิ <br/>
</form> </body>

Change data = 4 Press enter

4.0 Specific of Tables
• Benefit of table – Using tables to arrange items on your web page. – Turning border off, users can’t see these tables
• A couple of way to create table – Traditional (ho-hum) method
• Table doesn’t resize when user resize their browser windows • Fixed size
– Presentation-focus(wow) method • Table resize itself when users resize their browser • Percentage size
P176

4.0 Specific of tables
• A table generally consists in three basic elements
– Borders
– Cell
– Cell span (Combine or merge cell)

4.1 Sketching your table
1. Grab a sheet of paper and a pencil so you can sketch out your idea
2. Evaluate what to include in your web and decide on the overall layout
1. How many column and row you need?
2. The width of the table and cells
3. Weather to make any cell span rows or columns
3. Draw it on a paper
P179

4.2 Constructing basic tables • Component
Table: <table>
attribute border=“0|1”, bgcolor=“black”
Table row: <tr>
Table data cell: <td> data </td>
Table header: <th> text </th>
CSS control <div class = “name”>
• STEP1: start table <table>
….
</table>
• STEP2: how many rows: two? <table border = “1”>
<tr> … </tr>
<tr> … </tr>
<\table> P181


<table border = "1" bgcolor = "green"> <tr> <td> contents </td> </tr> <tr> <td> contents </td> <td> contents </td> </tr> </table> <table border = "1" bgcolor = "green"> <tr> <td colspan="2"> contents </td> </tr> <tr> <td> contents </td> <td> contents </td> </tr> </table>

4.3 Adjusting height and width
• Most browsers determine the width of cell by looking the content of the cell. – If you set width-limited at 100pixels and the picture size is
200pixels, the browser will expand as far as picture size.
– Text may expand and distort the layout
• Attribute of width and height can be used in <table> and <td> – Width width = “value”
– Height height =“value”
– The value is number of the pixel.
P189


4.4 Shifting alignment
• The table or image will be controlled their placement in the browser windows by using alignment commands
• Horizontal alignment – align = “right|left|center|justify|char”
– Cellpadding expands cell cellpadding = “value”
• Vertical alignment – valign = “top|bottom|middle|baseline”
P195

<table border = "1" >
<tr>
<td colspan="2" align="justify"> this is the first table. it is easy to plan and write the code. the_table_contains_a lot_of_information to support user.</td>
</tr>
<tr>
<td width="200"> contents </td>
<td width = "200"> contents </td>
</tr>
</table>

<table border = "1" cellpadding="20" >
<tr>
<td colspan="2" align="char"> this is the first table. it is easy to plan and write the code. the_table_contains_a lot_of_information to support user.</td>
</tr>
<tr>
<td width="200" > contents </td>
<td width = "200"> contents </td>
</tr>
</table>

<html>
<body>
<table border=”border”>
<tr>
<th>Alignment</th>
<th>Top</th>
<th>Baseline</th>
<th>Not align</th>
<th>Center</th>
<th>Bottom</th>
</tr>
<tr align=”center”>
<th><h1>Baseline_ _<br />Another line</h1></th>
<td valign="top">AAyy</td>
<td valign="baseline">_AAyy_</td>
<td>_AAyy_</td>
<td valign="center">AAyy</td>
<td valign="bottom">AAyy</td>
</tr>
</table>
</body>
</html>

4.5 Adding spans
• Spanning table is the arrangement element of table shown on the web.
• The extend horizontally cell
colspan = “value”
• The extending vertically cell
rowspan = “value”
P198


4.6 Nesting table
• To nest a table, simply add the <table> element within a <td> element.
• Draw the table from the code on right hand side


SCRIPT WEB PAGE


4.7 Script webpage
• Script language – The script language changes from static web page into dynamic
web page that can solicit and respond to user input.
• Script? – Scripts are mini-program that is create to check or support a
small solution. The script is usually interpreter (not change the source to byte code), for example language, • JavaScript • VB script • Unix shell script • Windows batch file • Apple script • Etc..

4.7 Script webpage (2) • JavaScript is not Java
– Java is descendent of the C and C++ programming language. Java developed by Sun Microsystems.
– The JavaScript programming language, developed by Netscape, Inc., is not part of the Java platform.
– JavaScript, does not create applets or stand-alone applications. In its most common form today, JavaScript resides inside HTML documents, and can provide levels of interactivity to web pages that are not achievable with simple HTML.
– Listed are key differences between the Java and JavaScript. • Java is an OOP programming language while Java Script is an OOP
scripting language. • Java creates applications that run in a virtual machine or browser while
JavaScript code is run on a browser only. • Java code needs to be compiled while JavaScript code are all in text. • They require different plug-ins.
Reference:
http://www.java.com/en/download/faq/java_javascript.xml

4.8 Work with browser windows
• JavaScript can tell your browser to open and close windows.
• Command
<script language = “javascript” type=“text/javascript”>
function newWindows() { myvar = window.open(“image.jpg”, “picname”,
“width=300,height=250”) } P218


4.9 Solicit and verify user input
• A common use for JavaScript is to verify that user have filled out all the require field in a form before the browser actually submits the form to the form-processing program.


LAB3 CHECK STUDENT ID

Lab3.1 Enter student id • Open text edit and write code (below) • Save the code to /lab3/lab3_1.html • Check your code, open browser and type http://localhost/lab3/lab3_1.html <html> <body> <form method="GET" action="lab3_2.html" <p> Student ID <input type="text" name="id" /> <br/> Name <input type="text" name="name" /> <br/> <input type="button" value="Say hi"/> <input type="submit" value="Submit to the action file"/> </p> </form> </body> </html>

Check Lab3.1
• Push button “Say hi”
• Push button “Submit to the action file”
No response!!

Lab3.2 • Modify lab3.1 by adding more code (below) <html> <body> <script language="javascript" type="text/javascript"> function sayHello(message) { alert(message) } </script> <form method="GET" action="lab3_3.html" <p> Student ID <input type="text" name="id" /> <br/> Name <input type="text" name="name" /> <br/> <input type="button" value="Say hi" onclick="sayHello('Hi
myfriend')"/> <input type="submit" value="Submit to the action file"/> </p> </form> </body> </html>

Check Lab3.2
• Push button “Say hi”
• Push button “Submit to the action file”

Lab3.3 • Write code (below) and check output <html>
<body>
<script type="text/javascript">
document.write("<p>" + Date() + "</p>");
document.write(“Hello JavaScript</p> This is the first program");
</script>
</body>
</html>

Lab3.4 • Write code (below) and check output <HTML> <HEAD> <TITLE> New Document </TITLE> <script type="text/javascript"> function answer(){ var textBox = document.getElementById('myText'); if(textBox.value != "") alert("Your name: " + textBox.value) else alert("You don't type login name") } </script> </HEAD> <BODY> Login name:<input type='text' id='myText'/> <br/> <input type='button' onclick='answer()' value='check login' /> </BODY> </HTML>