check package contents 2 register - optinet hawaii...
TRANSCRIPT
Quick Start Guide
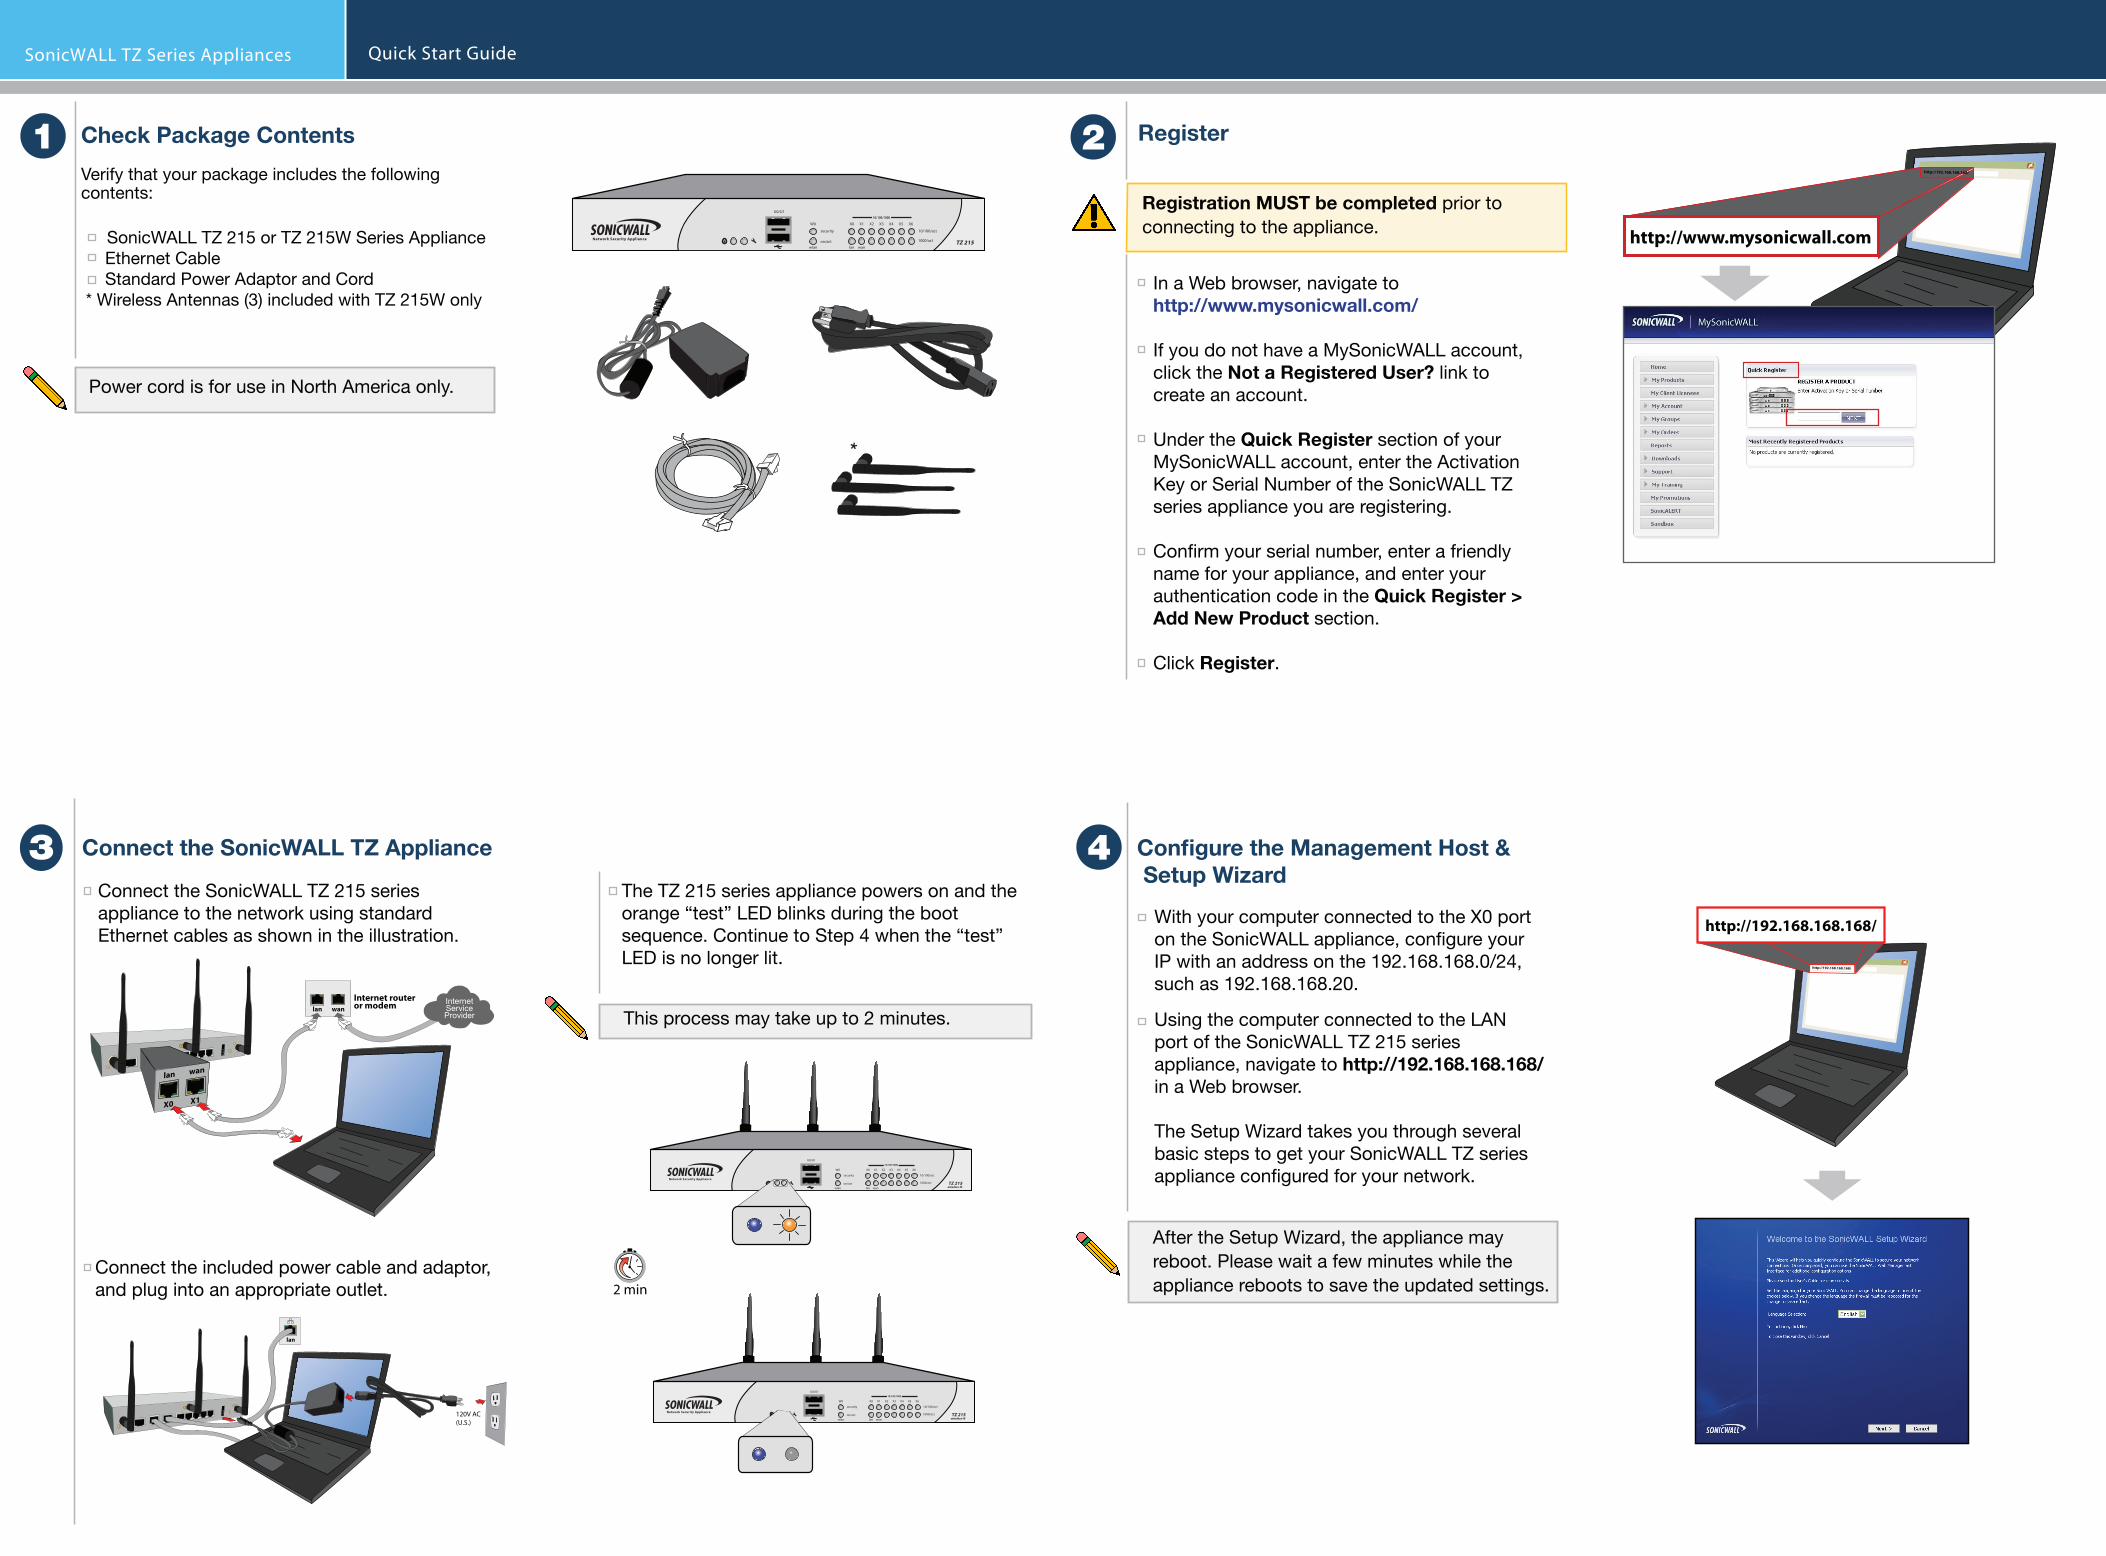
Check Package Contents
Verify that your package includes the following contents: SonicWALL TZ 215 or TZ 215W Series Appliance Ethernet Cable Standard Power Adaptor and Cord * Wireless Antennas (3) included with TZ 215W only
3Connect the SonicWALL TZ 215 series appliance to the network using standard Ethernet cables as shown in the illustration.
4
In a Web browser, navigate to http://www.mysonicwall.com/
If you do not have a MySonicWALL account, click the Not a Registered User? link to create an account.
Under the Quick Register section of your MySonicWALL account, enter the Activation Key or Serial Number of the SonicWALL TZ series appliance you are registering.
Con�rm your serial number, enter a friendly name for your appliance, and enter your authentication code in the Quick Register > Add New Product section. Click Register.
2
Using the computer connected to the LAN port of the SonicWALL TZ 215 series appliance, navigate to http://192.168.168.168/in a Web browser.
The Setup Wizard takes you through several basic steps to get your SonicWALL TZ series appliance con�gured for your network.
Power cord is for use in North America only.
1
Connect the SonicWALL TZ Appliance
Register
Configure the Management Host & Setup Wizard
SonicWALL TZ Series Appliances
Registration MUST be completed prior to connecting to the appliance. http://www.mysonicwall.com
http://192.168.168.168/
After the Setup Wizard, the appliance may reboot. Please wait a few minutes while the appliance reboots to save the updated settings.
*
wan
X1
lan
X0
lan wan
Internet routeror modem Internet
ServiceProvider
Connect the included power cable and adaptor, and plug into an appropriate outlet.
lan
120V AC (U.S.)
The TZ 215 series appliance powers on and the orange “test” LED blinks during the boot sequence. Continue to Step 4 when the “test” LED is no longer lit.
This process may take up to 2 minutes.
2 min
http://192.168.168.168/
http://192.168.168.168/
With your computer connected to the X0 port on the SonicWALL appliance, con�gure your IP with an address on the 192.168.168.0/24, such as 192.168.168.20.
security
on/actwlan
10/100/act
1000/act
lan wan
X3 X4 X5 X6X2X1X0W0
U0/U1
Network Security Appliance
10/100/1000
TZ 215
security
on/actwlan
10/100/act
1000/act
lan wan
X3 X4 X5 X6X2X1X0W0
U0/U110/100/1000
TZ 215 wireless-N
Network Security Appliance
security
on/actwlan
10/100/act
1000/act
lan wan
X3 X4 X5 X6X2X1X0W0
U0/U110/100/1000
TZ 215 wireless-N
Network Security Appliance

Network Security Series
5
Navigate to http://www.mysonicwall.com in your Web browser and login.
Click Downloads. From the Download Center, select “SonicWALL TZ 215 Firmware” from the Software Type list.
Click the Add To My Downloads button of the �rmware you wish to install for your SonicWALL TZ 215 series appliance.
Choose Save File to save the �le locally, then click OK.
Log into the SonicWALL TZ series appliance, and navigate to the System > Settings page.
Click the Upload New Firmware button.
Click the Choose File button to select the �rmware you just downloaded. Then, click Upload.
The SonicWALL Product Support online library is located at: http://www.sonicwall.com/us/support/3653.html
Quick Start Guide
Get the Latest Firmware Related Technical Documentation
SonicWALL TZ 215 / 215W Series
Quick Start Guide SonicWALL TZ Series Appliances
A valid support contract is required to download the latest firmware. SonicOS Administrator’s Guide
SonicOS Route Based VPN Feature Guide SonicOS WAN Acceleration Feature GuideSonicOS Application Control Feature GuideSonicOS Global Bandwidth Management Feature GuideSonicOS Log Event Reference GuideSonicOS Release Notes
http://www.mysonicwall.com
http://www.mysonicwall.com
Copyright Notice© 2011 SonicWALL, Inc.All rights reserved.
Under the copyright laws, this manual or the software described within cannot be copied, in whole or part, without the written consent of the manufacturer, except in the normal use of the software to make a backup copy. The same proprietary and copyright notices must be af�xed to any permitted copies as were af�xed to the original. This exception does not allow copies to be made for others, whether or not sold, but all of the material purchased (with all backup copies) can be sold, given, or loaned to another person. Under the law, copying includes translating into another language or format.
Safety Information / Sicherheit Informationen Regulatory Model/Type Product NameAPL24-08E TZ 215APL24-08F TZ 215W Mounting the SonicWALL- Mount in a location away from direct sunlight and sources of heat. A maximum ambient temperature of 104º F (40º C) is recommended.- Route cables away from power lines, fluorescent lighting fixtures, and sources of noise such as radios, transmitters, and broadband amplifiers.- The included power cord is intended for use in North America only. For European Union (EU) customers, a power cord is not included.- Ensure that no water or excessive moisture can enter the unit.- Allow unrestricted airflow around the unit and through the vents on the side of the unit. A minimum of 1 inch (25.44mm) clearance is recommended.- Consideration must be given to the connection of the equipment to the supply circuit. The effect of overloading the circuits has minimal impact on overcurrent protection and supply wiring. Appropriate consider-ation of equipment nameplate ratings must be used when addressing this concern.
Lithium Battery WarningThe Lithium Battery used in the SonicWALL security appliance may not be replaced by the user. Return the SonicWALL security appliance to a SonicWALL-authorized service center for replacement with the same or equivalent type recommended by the manufacturer. If, for any reason, the battery or SonicWALL security appliance must be disposed of, do so following the battery manufacturer's instructions.
Cable ConnectionsAll Ethernet and RS232 (Console) cables are designed for intra-building connection to other equipment. Do not connect these ports directly to communication wiring or other wiring that exits the building where the SonicWALL is located.
Power Supply Information If the power supply is missing from your SonicWALL product package, please contact SonicWALL Technical Support at 408-752-7819 for a replacement. This product should only be used with a UL listed power supply marked “I.T.E. LPS” with an output rated 12V DC, minimum 3.0 A, Tma: minimum 40 degree C.
Weitere Hinweise zur Montage- Wählen Sie für die Montage einen Ort, der keinem direkten Sonnenlicht ausgesetzt ist und sich nicht in der Nähe von Wärmequellen befindet. Die Umgebungstemperatur darf nicht mehr als 40 °C betragen.- Achten Sie darauf, das sich die Netzwerkkabel nicht in der unmittelbaren Nähe von Stromleitungen, Leuchtstoffröhren und Störquellen wie Funksendern oder Breitbandverstärkern befinden. - Das beigefügte Netzkabel ist nur für den Gebrauch in Nordamerikas und Japan Vorgesehen. Für Kunden in der Europaïschen Union (EU) ist ein Netzkabel nicht im Lieferumfang enthalten.- Stellen Sie sicher, dass das Gerät vor Wasser und hoher Luftfeuchtigkeit geschützt ist.- Stellen Sie sicher, dass die Luft um das Gerät herum zirkulieren kann und die Lüftungsschlitze an der Seite des Gehäuses frei sind. Hier ist ein Belüftungsabstand von mindestens 26 mm einzuhalten.- Prüfen Sie den Anschluss des Geräts an die Stromversorgung, damit der Überstromschutz sowie die elektrische Leitung nicht von einer eventuellen Überlastung der Stromversorgung beeinflusst werden. Prüfen Sie dabei sorgfältig die Angaben auf dem Aufkleber des Geräts.
Hinweis zur LithiumbatterieDie in der Internet Security Appliance von SonicWALL verwendete Lithiumbatterie darf nicht vom Benutzer ausgetauscht werden. Zum Austauschen der Batterie muss die SonicWALL in ein von SonicWALL autorisi-ertes Service-Center gebracht werden. Dort wird die Batterie durch denselben oder entsprechenden, vom Hersteller empfohlenen Batterietyp ersetzt. Beachten Sie bei einer Entsorgung der Batterie oder der SonicWALL Internet Security Appliance die diesbezüglichen Anweisungen des Herstellers.
KabelverbindungenAlle Ethernet- und RS232-C-Kabel eignen sich für die Verbindung von Geräten in Innenräumen. Schließen Sie an die Anschlüsse der SonicWALL keine Kabel an, die aus dem Gebäude in dem sich das Gerät befindet, herausgeführt werden.
PN 232-002037-51 Rev. A 11/11
Informationen zur StromversorgungWenn das Netzteil nicht im Lieferumfang des SonicWALL Produkts enthalten ist, wenden Sie sich bitte an denTechnischen SonicWALL Support unter +1-408-752-7819 für einen Ersatz. Dieses Produkt sollte nur mit einem UL-konformen Netzteil mit dem Logo "I.T.E. LPS" und einer Ausgangsleistung von12 VDC, mind. 3,0 A, Tma: mind. 40 Grad C.
Regulatory and ComplianceFor complete regulatory compliance instructions and declaration of conformities, refer to the SonicWALL TZ Series Safety & Product Regulatory Guide found on the SonicWALL support Web site: http://www.sonicwall.com/us/support.html
Model APL24-08E only Complies with EN55022 Class B and CISOR22 Class A.
Canadian Radio Frequency Emissions StatementThis Class A digital apparatus complies with Canadian ICES-003.Cet appareil numérique de la classe A est conforme à la norme NMB-003 du Canada.
Model APL24-08F only Any changes or modifications not expressly approved by the party responsible for compliance could void the user’s authority to operate this equipment.
Country and channel selection is made in software. Follow user documentation to make country and channel setting.
Land und Kanalauswahl sind in Software gemacht. Folgen Sie Verbraucherdokumentation, um Land un Kanal zu machen, setzed.
La sélection de pay et canal est faite dans le logiciel. Suivez la documntation d’utilisateur pour faire le pays es la canal sélection.
For detailed con�guration information, refer to the following technical documents:
10/100/act
1000/act
lan wan
X3 X4 X5 X6X2X1X0
U0/U1
Network Security Appliance
10/100/1000
TZ 215
security
on/actwlan
10/100/act
1000/act
lan wan
X3 X4 X5 X6X2X1X0W0
U0/U1
Network Security Appliance
10/100/1000
TZ 215 wireless-N