christmas cookies - disney home · remove the cookies from the freezer and place in the oven for 6...
TRANSCRIPT

©DISNEY
DIYCHRISTMAS C O O K I E S
©DISNEYDIY T H U M B P R I N T M I C KEY

©DISNEY
For the cookie:
• 3/4 cup butter
• 1/2 cup white sugar
• 2 cups all purpose flour
• Jam of your choice
• 1/2 tsp salt
• 1/4 tsp almond extract
Tools:
• Mixing bowl
• Small bowl
• Small spoon or squeeze bottle
• Cookie pan
• Parchment paper
• Fondant ball tool or a large and small rounded object to indent the cookie
YOU WILL NEED:

A
B
©DISNEY
STEP 1 : MIX TOGETHER THE INGREDIENTS
Preheat the oven to 350°.
A. Combine all ingredients into the mixing bowl to create the cookie dough.
B. Work the dough into 1 1/2” sized balls - roll until you have a smooth surface with no cracks.
Once the balls are formed, spread evenly on a cookie pan with parchment paper.

A
B C
©DISNEY
STEP 2 : FORM THE MICKEY
A. Use the larger end of the fondant ball tool to press a large indent* into the center of the cookie dough.
B. Form the two Mickey ears using the smaller end of the tool. Use your fingers to fix any cracks that form.
C. Once the Mickeys are done, gently roll the cookies in a small bowl of white sugar.
Place the cookies into the freezer for 10 minutes.
*Don’t press all the way through the cookie into the pan.

©DISNEY
STEP 3 : BAKE & FILL with jam
Remove the cookies from the freezer and place in the oven for 6 minutes.
Take the cookies out of the oven and use a small spoon or squeeze bottle to carefully fill your Mickey indent to the brim with jam.
Place back into the oven for an additional 8 minutes or until the cookies turn a light brown around the edges.
Cool on a wire rack and enjoy!

©DISNEYDIY M I C K E Y H O L LY C O O K I E S

©DISNEY
For the cookies:• 4 cups all purpose flour• 2 butter sticks, cubed• 1 tsp vanilla extract• 1 cup white sugar• 3 tsp of egg replacer mixed with
4 tbsp warm water• 3/4 cup cornstarch• Pinch of salt
For the royal icing:• Gel-based food coloring• 3 cups powdered sugar• 2 tbsp meringue powder• 5 tbsp water
Tools:• Stand-up mixer• Cookie pan & parchment paper• Piping bags; #1 & #2 piping tips• Rolling pin• Toothpicks• Square cookie cutter
YOU WILL NEED:

A
B
©DISNEY
STEP 1 : MIX TOGETHER THE COOKIE DOUGH
Preheat the oven to 350°.
A. Using a paddle attachment for your mixer (or mix with a spatula) cream together the butter, sugar, and egg replacer.
Add in the dry ingredients and mix on a medium speed. Once mixed, add the vanilla extract to the dough.
B. Prep an area with parchment paper and use the rolling pin to evenly spread out the dough to 1/4” thickness.

©DISNEY
STEP 2 : CUT & BAKE THE COOKIES
Use the square cookie cutters to carefully cut out the cookies.
Once cut, evenly lay out the cookies onto a parchment paper covered cookie pan.
Bake for 8-12 minutes.

©DISNEY
STEP 3: CREATE THE ICING
While the cookies cool, create your royal icing.
The icing must start off with a lot of air bubbles, so use your mixer to combine the water and meringue powder and whisk the two until light and frothy.
Gently fold the powdered sugar into the mixture to stop the powder from flying out, then mix on a medium-high setting.
The icing should stiffen and form peaks. If too stiff, mix in 1/4 tsp of water at a time until the consistency is the same as shown. Once ready, separate evenly into two bowls.

©DISNEY
STEP 4 : Add color to the icing
Use a toothpick to add moss green gel food coloring to one bowl of icing. Add in small amounts, cleaning the toothpick each time, until you get your desired green.
Take half of the green icing and place in another bowl. In this new bowl, add a tablespoon or two of water until you get a smoother consistency. This will be your green flood icing.
Split the bowl of white icing in two and create white flood icing as well.
Fill 4 piping bags with the icing, use #1 piping tips for the stiff icing and #2 for flood icing.
A B
C
©DISNEY
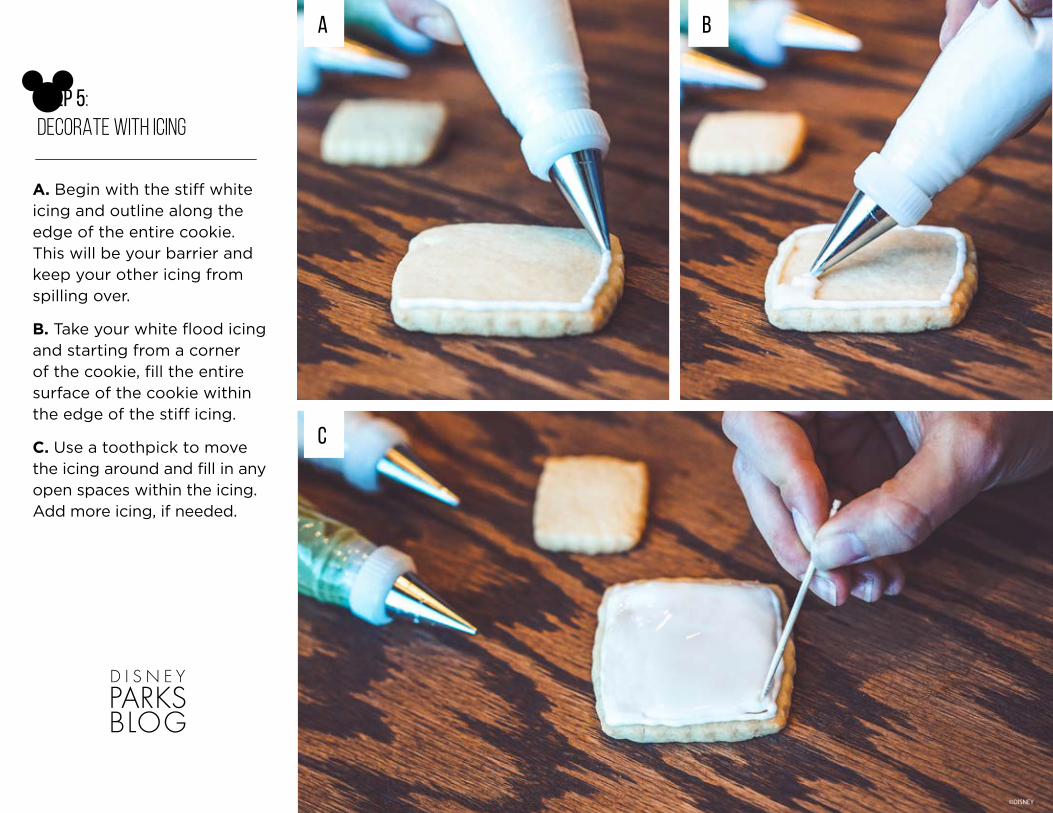
STEP 5: DECORATE WITH ICING
A. Begin with the stiff white icing and outline along the edge of the entire cookie. This will be your barrier and keep your other icing from spilling over.
B. Take your white flood icing and starting from a corner of the cookie, fill the entire surface of the cookie within the edge of the stiff icing.
C. Use a toothpick to move the icing around and fill in any open spaces within the icing. Add more icing, if needed.
©DISNEY
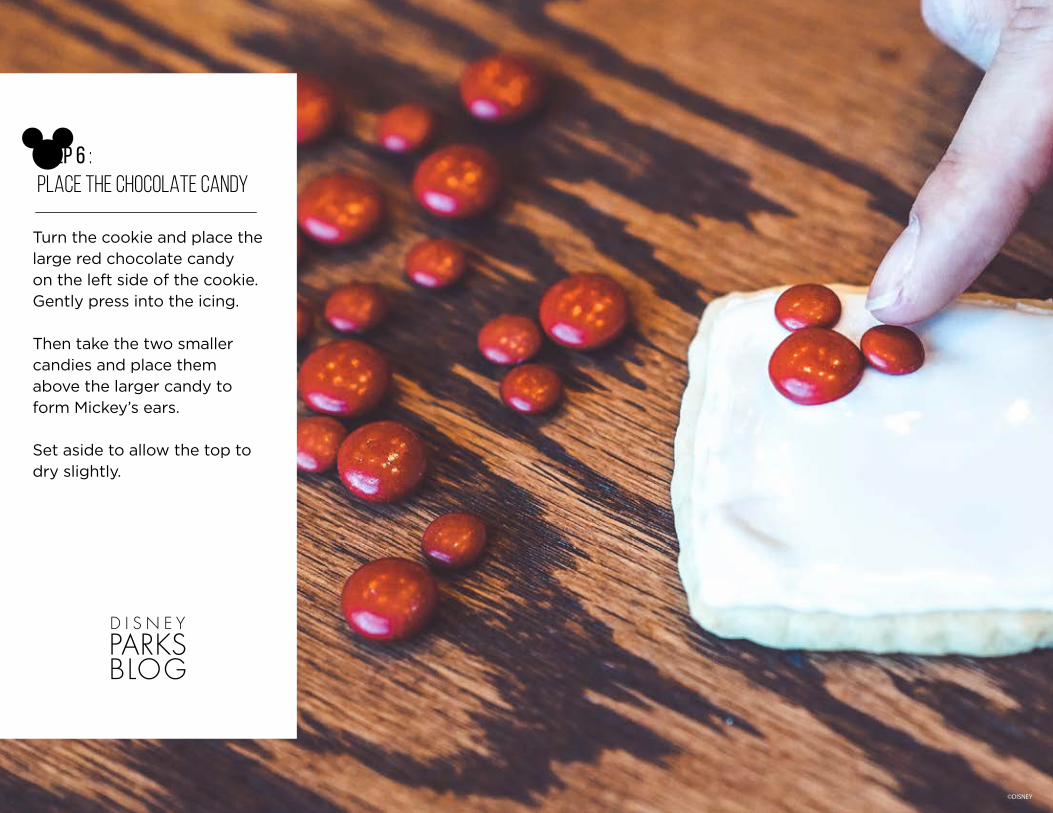
Step 6 : PLACE THE CHOCOLATE CANDY
Turn the cookie and place the large red chocolate candy on the left side of the cookie. Gently press into the icing.
Then take the two smaller candies and place them above the larger candy to form Mickey’s ears.
Set aside to allow the top to dry slightly.

A
B C
©DISNEY
Step 7 : ADD THE DETAILS
A. Once the first layer has firmed up create the holly leaves using the stiff green icing. Start from the corner to the right of the Mickey and draw C sideways, facing up three times.
B. Repeat by drawing C three times facing downwards. Be sure to connect to the ends of the upper line. Draw an oval in the middle of the leaf and fill in the edges.
Repeat and create a second smaller leaf below the first.
C. Use the stiff white icing to draw a border of evenly spaced dots all around the edge of the cookie.

©DISNEY
FINAL TIPS:
Set the cookies aside to allow the icing to dry and harden for a few hours. You may need to allow for more time depending on the temperature and humidity of your kitchen.
E N J O Y !