cifs features
DESCRIPTION
dfTRANSCRIPT

Copyright © 2006 EMC Corporation. Do not Copy - All Rights Reserved.
CIFS Features - 1
© 2006 EMC Corporation. All rights reserved. CIFS Features - 1
CIFS FeaturesUpon completion of this module, you will be able to:
Audit CIFS
Configure EMC Celerra for Home Directory support
Explain how the ADS feature works
Explain Celerra AntiVirus Agent (CAVA) functionality
Describe Microsoft Group Policy Object (GPO) support on the Celerra
Configure File Extension Filtering
Explain how Dfs works
The objectives for this module are shown here. Please take a moment to read them.

Copyright © 2006 EMC Corporation. Do not Copy - All Rights Reserved.
CIFS Features - 2
© 2006 EMC Corporation. All rights reserved. CIFS Features - 2
Features in a CIFS-only vs. Mixed Environment
SecuritySecuritySecurity
AvailabilityAvailabilityAvailability
PermissionsPermissionsPermissions
FeaturesFeaturesFeatures
CIFS onlyCIFS onlyCIFS only CIFS & NFSCIFS & NFSCIFS & NFS
UsermapperUsermapperUsermapper OtherOtherOther
SameSameSame SameSameSame
Like WindowsLike WindowsLike Windows Like UNIXLike UNIXLike UNIX
SameSameSame SameSameSame
The EMC Celerra CIFS features discussed in this module apply to both the CIFS-only and the CIFS/NFS environments.

Copyright © 2006 EMC Corporation. Do not Copy - All Rights Reserved.
CIFS Features - 3
© 2006 EMC Corporation. All rights reserved. CIFS Features - 3
Lesson 1: Auditing CIFSUpon completion of this lesson, you will be able to:
Audit CIFS
Configure an audit policy
View audited events
The objectives for this lesson are shown here. Please take a moment to read them.

Copyright © 2006 EMC Corporation. Do not Copy - All Rights Reserved.
CIFS Features - 4
© 2006 EMC Corporation. All rights reserved. CIFS Features - 4
Auditing CIFS
Auditing CIFS connections
Tracking user activity
SecuritySecurity AvailabilityAvailability
PermissionsPermissions
FeaturesFeatures
AuditingAuditing
HomedirHomedir
ConnectionsConnections
ActivityActivity
ADSADS
CAVACAVA
GPOGPO
File Ext. Filtering
File Ext. Filtering
There are two perspectives from which CIFS can be audited on a Celerra File Server:1. Active CIFS connections to a Data Mover2. Selected user activities in relation to a Data Mover’s CIFS server
Copyright © 2006 EMC Corporation. Do not Copy - All Rights Reserved.
CIFS Features - 5
© 2006 EMC Corporation. All rights reserved. CIFS Features - 5
Auditing CIFS Connections (CLI)
Audit live CIFS Connections via the Control Stationserver_cifs server_2 -o audit
AuditingAuditing
HomedirHomedirConnectionsConnections
ActivityActivityADSADS
CAVACAVA
GPOGPO
File Ext. Filtering
File Ext. Filtering
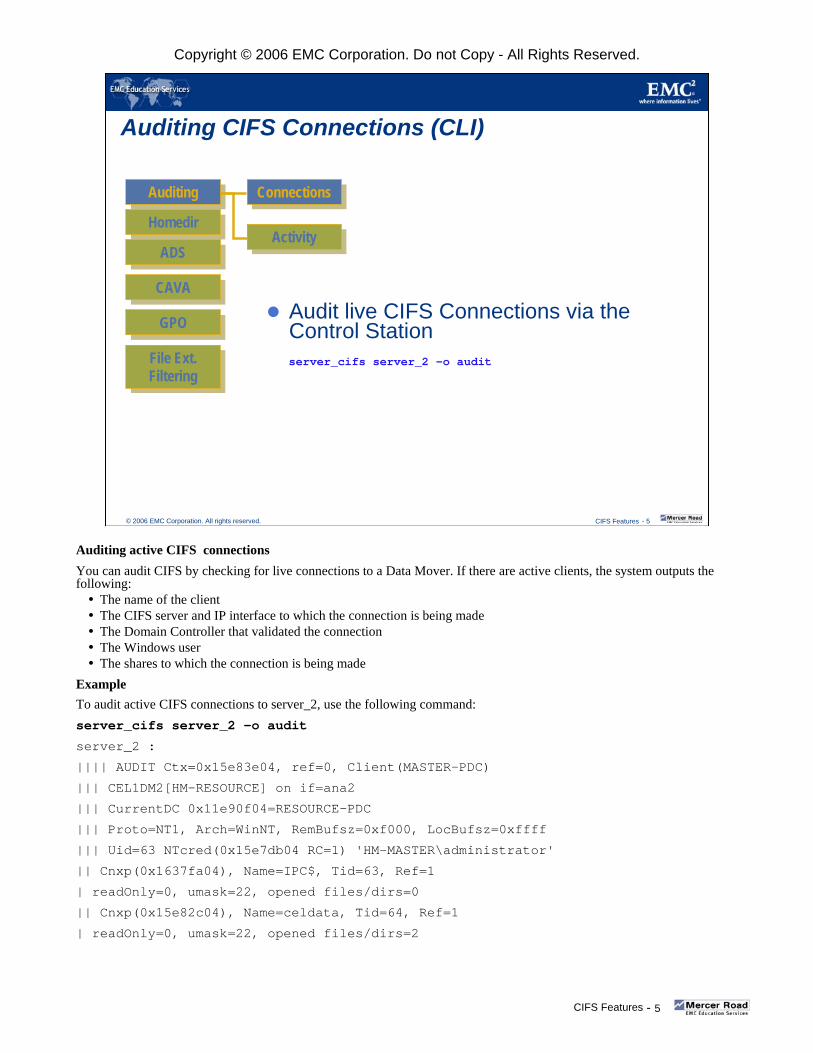
Auditing active CIFS connectionsYou can audit CIFS by checking for live connections to a Data Mover. If there are active clients, the system outputs the following:
The name of the clientThe CIFS server and IP interface to which the connection is being madeThe Domain Controller that validated the connectionThe Windows userThe shares to which the connection is being made
ExampleTo audit active CIFS connections to server_2, use the following command:server_cifs server_2 -o audit
server_2 :
|||| AUDIT Ctx=0x15e83e04, ref=0, Client(MASTER-PDC)
||| CEL1DM2[HM-RESOURCE] on if=ana2
||| CurrentDC 0x11e90f04=RESOURCE-PDC
||| Proto=NT1, Arch=WinNT, RemBufsz=0xf000, LocBufsz=0xffff
||| Uid=63 NTcred(0x15e7db04 RC=1) 'HM-MASTER\administrator'
|| Cnxp(0x1637fa04), Name=IPC$, Tid=63, Ref=1
| readOnly=0, umask=22, opened files/dirs=0
|| Cnxp(0x15e82c04), Name=celdata, Tid=64, Ref=1
| readOnly=0, umask=22, opened files/dirs=2

Copyright © 2006 EMC Corporation. Do not Copy - All Rights Reserved.
CIFS Features - 6
© 2006 EMC Corporation. All rights reserved. CIFS Features - 6
Auditing CIFS Connections (Celerra Manager)
Right Click on CIFS > Left click on Statistics
CIFS connection statistics can be viewed using Celerra Manager as shown here.

Copyright © 2006 EMC Corporation. Do not Copy - All Rights Reserved.
CIFS Features - 7
© 2006 EMC Corporation. All rights reserved. CIFS Features - 7
Auditing CIFS User Activities via Windows 2000
AuditingAuditing
HomedirHomedir
ConnectionsConnections
ActivityActivity
ADSADS
CAVACAVAAdmin Audits User Activity– CIFS server on a Data Mover– Object (Share, directory, file)
Procedure– Enable and define Audit Policy per CIFS
server– Select audit items per object– View audited events in Event Viewer
Enable/Define policyEnable/Define policy
Select audit itemsSelect audit items
View w/Event ViewerView w/Event Viewer
GPOGPO
File Ext. Filtering
File Ext. Filtering
The Celerra administrator can audit certain user activities per a Data Mover’s CIFS server and per object (e.g. shares, directories, files).
To configure this type of auditing, the administrator must enable and define the Audit Policy per CIFS server. Also, the individual success and/or failure audits need to be selected at the object level. Finally the logged audits can be viewed via Event Viewer in Windows.

Copyright © 2006 EMC Corporation. Do not Copy - All Rights Reserved.
CIFS Features - 8
© 2006 EMC Corporation. All rights reserved. CIFS Features - 8
Enable and Define Audit Policy per CIFS Server
From Windows 2000, open Celerra Management MMC snap-in– Available from Celerra application CD-ROM
Right-click Audit Policy, choose Enable.Set Success/Failure on desired policies.
Enable/Define policyEnable/Define policy
Select audit itemsSelect audit items
View w/Event ViewerView w/Event Viewer
Enable and Define Audit Policy per CIFS Server
To configure auditing of user activities, first enable and define the Audit Policy per CIFS server. This is done from a Windows 2000 computer using the Celerra Management MMC snap-in (available on the Celerra application CD-ROM).
Right-click on the Audit Policy object and choose Enable. (This object is disabled by default.) Then open the desired policy and choose Success and/or Failure.

Copyright © 2006 EMC Corporation. Do not Copy - All Rights Reserved.
CIFS Features - 9
© 2006 EMC Corporation. All rights reserved. CIFS Features - 9
Access the Auditing Entry dialog box for the desired object– Object properties– Security tab– Advanced button– Auditing tab– Add button
Set Success/Failure on desired events
Enable/Define policyEnable/Define policy
Select audit itemsSelect audit items
View w/Event ViewerView w/Event Viewer
Select the Users and Events to Audit
Select the users and activities you wish to audit.
Access the Auditing Entries dialog box for the desire object (e.g. a folder) from its Properties dialog box.
Object PropertiesSecurity tabAdvanced buttonAuditing tabAdd button
Select a user or group to audit, then choose the desired events.

Copyright © 2006 EMC Corporation. Do not Copy - All Rights Reserved.
CIFS Features - 10
© 2006 EMC Corporation. All rights reserved. CIFS Features - 10
Viewing Activity
Events stored in Security log
View with Event Viewer
Performance degrades
AuditingAuditing
HomedirHomedir
ConnectionsConnections
ActivityActivity
ADSADS
CAVACAVA
GPOGPO
File Ext. Filtering
File Ext. Filtering
When events are audited, they are stored in the security log and can be viewed using Event Viewer. Excessive auditing degrades performance. Therefore, limit how many items are audited and choose the items carefully.

Copyright © 2006 EMC Corporation. Do not Copy - All Rights Reserved.
CIFS Features - 11
© 2006 EMC Corporation. All rights reserved. CIFS Features - 11
Open the Computer Management console and connect to your Data Mover’s CIFS server– Start > Programs > Administrative Tools >
Computer Management– Right-click on Computer Management (local)
and choose Connect to another computer
To view the Security Event Log– System Tools > Event Viewer > Security
Enable/Define policyEnable/Define policy
Select audit itemsSelect audit items
View w/Event ViewerView w/Event Viewer
View Logged Audits via Event Viewer
Use Event Viewer to View Logged Audits
To view the logged audits for a Data Mover’s CIFS:1. Open the Computer Management console and connect to your Data Mover’s CIFS server.2. Start > Programs > Administrative Tools > Computer Management3. Right-click on Computer Management (local) and choose Connect to another computer.
To view the Security Event Log:
System Tools > Event Viewer > Security
Copyright © 2006 EMC Corporation. Do not Copy - All Rights Reserved.
CIFS Features - 12
© 2006 EMC Corporation. All rights reserved. CIFS Features - 12
Lesson 2: Home Directory SupportUpon completion of this lesson, you will be able to:
Describe Home Directory features
Create Home Directory map file
Create user’s Home Directory
Edit user profiles
The objectives for this lesson are shown here. Please take a moment to read them.

Copyright © 2006 EMC Corporation. Do not Copy - All Rights Reserved.
CIFS Features - 13
© 2006 EMC Corporation. All rights reserved. CIFS Features - 13
Preconditions for Managing Home Directories with the Snap-in
Pre-existing mounted file system
Sufficient permissions– Administration– User access
homedir file on Data Mover
UIDs mapped for the user in Active Directory
Before the Celerra Management MMC Snap-in for Home Directories feature can be employed successfully, certain preconditions must exist.
The mounted file system for each user’s home directory configuration must exist on the Data MoverSufficient permission must be in place for administration and for user accessThe homedir file must exist in /.etc of the Data MoverActive Directory must have a UID mapped for the user (or some other user ID option can be in place, such as Usermapper)

Copyright © 2006 EMC Corporation. Do not Copy - All Rights Reserved.
CIFS Features - 14
© 2006 EMC Corporation. All rights reserved. CIFS Features - 14
Home Directory Feature
Provides each user with their own share via a mapped drivePrerequisites
– CIFS must be configured and started– User/Group mapping must be functioning properly (e.g. Usermapper)
Simplifies administering and connecting personal sharesRestrictions
– “NT” security only– Share name HOME is reserved and cannot be used in whole or in part in any
other share name, directory, mountpoint, or file system
SecuritySecurity
AvailabilityAvailability
PermissionsPermissions
FeaturesFeatures
AuditingAuditing
HomedirHomedir
ADSADS
CAVACAVAExp. Adm. ShareExp. Adm. Share
Config map fileConfig map file
Enable HomedirEnable Homedir
Create user dirsCreate user dirs
Edit user profilesEdit user profiles
GPOGPO
File Ext. Filtering
File Ext. Filtering
Home Directory feature
The home directory feature enables you to associate users to a directory stored on a server that is regarded as the user’s home directory. This directory would commonly be the default location for saving new files. So, when Etta Place creates a new engineering document, the default location to save the file would no longer be My Documents, but rather her personal directory on the Data Mover.
Mapping to a home directory
Additionally, the user could have a mapped network drive associated to their own home directory. When this feature is deployed, Etta Place, for example, could logon to a Microsoft Workstation and her H: drive would connect directly to her directory on a server. If Sarah Emm then logs on to the same workstation, the H: drive would connect to her directory.
Prerequisite
To enable the home directory feature for a Data Mover, you must have configured and started CIFS on the Data Mover. User/Group ID mapping (e.g. Usermapper, NTMigrate) must also be functioning properly.
Restrictions
A special share name, HOME, is reserved for the home directory feature. Because of this limitation, the following restrictions apply:
The home directory feature is not available on CIFS servers configured with SHARE level security.Not available for UNIX security.If you have created a share called HOME, you cannot enable the home directory feature.If you have enabled the home directory feature, you cannot create a share called HOME.
The home directory feature simplifies the administration of personal shares and the process of connecting to them as well as backing them up.

Copyright © 2006 EMC Corporation. Do not Copy - All Rights Reserved.
CIFS Features - 15
© 2006 EMC Corporation. All rights reserved. CIFS Features - 15
Create the map file
Enable Home directory support
Export an administrative share
Create home directories
Edit users’ profiles
Config map fileConfig map file
Enable HomedirEnable Homedir
Exp. Adm. ShareExp. Adm. Share
Create user dirsCreate user dirs
Edit user profilesEdit user profiles
Home Directory Procedure
To enable the home directory feature for a Data Mover, you must have created the CIFS service and then complete the following steps:
1. Create the map file (/.etc/homedir on the Data Mover)2. Enable home directories on the Data Mover
Note: The home directory feature is disabled by default3. Export an administrative share for creation of users’ directories4. Create the users’ home directories5. Add home directories to users’ profiles

Copyright © 2006 EMC Corporation. Do not Copy - All Rights Reserved.
CIFS Features - 16
© 2006 EMC Corporation. All rights reserved. CIFS Features - 16
Format of homedir file– domain:username:/path– Wildcards are allowed (see examples below)
homedir file location– Must be in /.etc on DM– Use server_file
Config map fileConfig map file
Enable HomedirEnable Homedir
Exp. Adm. ShareExp. Adm. Share
Create user dirsCreate user dirs
Edit user profilesEdit user profiles
Create the homedir Map File
To configure EMC Celerra for home directory support, the administrator must create each user’s directory, and create a map file that contains a mapping of each domain user to the home directory location on the Data Mover. The map file is /.etc/homedir (the file does not exist by default) and is a series of text lines in the following format:domain:username:/pathThe following examples are methods of configuring the homedir file.Example 1: Specify all variables
corp:eplace:/userdata1corp:semm:/userdata1hmarine:administrator:/userdata2Result: each user is mapped to the path specified.
Example 2: Specify domain and path, and use a wildcard to define userscorp:*:/userdata1hmarine:*:/userdata2Result: All users from corp will be mapped to their own directory in /userdata1. All users from hmarine will be mapped to their own directory in /userdata2.
Example 3: Specify the paths only, and use a wildcard to define domains and users*:*:/userdataResult: All users from all domains will be mapped to their own directory in /userdata.
After the homedir file is created, FTP it to the Data Mover /.etc directory using the server_file commandExample:server_file server_2 –put homedir homedir
NOTE: Optionally, the homedir file can be created/edited from Windows 2000 using the Celerra Management MMC snap-in.

Copyright © 2006 EMC Corporation. Do not Copy - All Rights Reserved.
CIFS Features - 17
© 2006 EMC Corporation. All rights reserved. CIFS Features - 17
Enable the home directory feature on DM
server_cifs server_2 -option homedir
Verify enabled/disabled homedir status
server_cifs server_2
server_2 :
32 Cifs threads started
Security mode = NT
Max protocol = NT1
I18N mode = UNICODE
Home Directory Shares ENABLED, map=/.etc/homedir
Config map fileConfig map file
Enable HomedirEnable Homedir
Exp. Adm. ShareExp. Adm. Share
Create user dirsCreate user dirs
Edit user profilesEdit user profiles
Enable Home Directory on Data Mover
Enable Home Directories on the Data MoverAfter you create the map file, you must enable home support on the Data Mover by typing:server_cifs server_2 -option homedirTo verify if the homedir option is currently enabled or disabled on a Data Mover use the server_cifs command:server_cifs server_2server_2 :32 Cifs threads startedSecurity mode = NTMax protocol = NT1I18N mode = UNICODE
Home Directory Shares ENABLED, map=/.etc/homedirEnabled interfaces: (All interfaces are enabled)Disabled interfaces: (No interface disabled)DOMAIN CORP FQDN=corp.hmarine.comSID=S-1-5-15-404237fd-4d08e33d-28a68b82-ffffffff>DC=HM-DC2A(10.127.23.70) ref=5 time=1 msCIFS Server (Default) CEL1DM2[CORP]Full computer name=cel1dm2.corp.hmarine.com realm=CORP.HMARINE.COMComment='EMC-SNAS:T5.1.18.8'if=ana0 l=10.127.23.84 b=10.127.23.127 mac=0:0:d1:20:1b:a6FQDN=cel1dm2.corp.hmarine.com (Updated to DNS)
Note: Celerra automatically exports the path in the homedir file with the share name “home”
CAUTION: The share name “home” is reserved for the home directory feature. Do not use the word “home” in any other file system configurations (such as file systems, mountpoints, etc.).

Copyright © 2006 EMC Corporation. Do not Copy - All Rights Reserved.
CIFS Features - 18
© 2006 EMC Corporation. All rights reserved. CIFS Features - 18
Share used for creating and managing users’directories
Can be unexported when not in use.
Can be exported as hidden share
Example:server_export server_2 –P cifs –n user$ /userdata
Config map fileConfig map file
Enable HomedirEnable Homedir
Exp. Adm. ShareExp. Adm. Share
Create user dirsCreate user dirs
Edit user profilesEdit user profiles
Export an Administrative Share
Export an Administrative Share
Export the path for the home directories as a share for the administration of the users’ directories. This share will be used for administrative functions such as creation on each user’s directory, and setting permissions (if desired).
This path can be exported as a hidden share to prohibit users from browsing to it. It can also be unexported when not needed for administrative functions.
Example:
To export /userdata on server_2 as a hidden share named user$, type:
server_export server_2 –P cifs –n user$ /userdata

Copyright © 2006 EMC Corporation. Do not Copy - All Rights Reserved.
CIFS Features - 19
© 2006 EMC Corporation. All rights reserved. CIFS Features - 19
Create each user’s directory individually– Connect to administrative share as domain
admin.– Create each directory to match user’s
username
Optional permissions configuration– Remove Everyone– Assign Full Control to user and administrator
Config map fileConfig map file
Enable HomedirEnable Homedir
Exp. Adm. ShareExp. Adm. Share
Create user dirsCreate user dirs
Edit user profilesEdit user profiles
Create Each User’s Home Directory
Create Each User’s Home Directory
Unlike Windows file server, which will automatically create the user’s home directory the first time the user logs on, home directories on a Celerra must be manually created by the administrator.
To create each user’s home directory log onto Windows as the Domain administrator and connect to the administrative share using the UNC path.
Example:
Start > Run > type \\cel1dm2\user$
After connecting to the administrative share, create a directory for each user. The name of each user’s directory must match exactly the user’s username in the Windows domain.
Optional Permissions Configuration
By default the Everyone group will have full control of the directories created. Optionally, the administrator may choose to remove the Everyone group and assign only the individual user and the domain administrator full control of the user’s home directory.

Copyright © 2006 EMC Corporation. Do not Copy - All Rights Reserved.
CIFS Features - 20
© 2006 EMC Corporation. All rights reserved. CIFS Features - 20
Edit Users’ Profiles to Add Home Directory Path
From a Windows Domain Controller– Active Directory Users and Computers– User’s properties– “Profile” tab
From any Windows host use net usercommand
– net user username /domain /homedir:path
Example– net user esele /domain /homedir:\\cel1dm2\HOME
Config map fileConfig map file
Enable HomedirEnable Homedir
Exp. Adm. ShareExp. Adm. Share
Create user dirsCreate user dirs
Edit user profilesEdit user profiles
Each user must have the path to their home directory added to their profile.
There are two methods to do this:1. Log onto a Windows Domain Controller as the domain Administrator and use Active Directory
Users and Computers. Open each user’s properties page and select the Profile tab to enter the path for the home directory.
2. Log on to any Windows client as the domain Administrator and use the net user command as follows:net user username /domain /homedir:path
Example:To edit Ellen Sele’s profile by adding the path to the HOME share on Data Mover cel1dm2 type:net user esele /domain /homedir:\\cel1dm2\HOME

Copyright © 2006 EMC Corporation. Do not Copy - All Rights Reserved.
CIFS Features - 21
© 2006 EMC Corporation. All rights reserved. CIFS Features - 21
From a Windows Domain Controller
Config map fileConfig map file
Enable HomedirEnable Homedir
Exp. Adm. ShareExp. Adm. Share
Create user dirsCreate user dirs
Edit user profilesEdit user profilesHome
Directory Feature
Log in to a Windows server from a domain administrator account.
Click Start and select Programs, Administrative Tools, Active Directory Users and Computers.
Click Users to display the users in the right pane.
Right-click a user and select Properties from the shortcut menu. The user’s property sheet appears.
Click the Profile tab and under Home folder:
1. Select Connect.
2. Select the drive letter you want to map to the home directory.
3. Enter the following in the To field:
\\<cifs_server>\HOME
where: <cifs_server> = IP address, computer name, or NetBIOS name of the CIFS server.

Copyright © 2006 EMC Corporation. Do not Copy - All Rights Reserved.
CIFS Features - 22
© 2006 EMC Corporation. All rights reserved. CIFS Features - 22
Enabling Home Directories with MMC Snap-in
With Windows 2000/2003, you can enable and manage home directories through the Celerra Home Directory Management snap-in for MMC. The required pre-conditions for this are listed on the following slide.
Additionally, the snap-in can also manage the homedir file and the directory structure for the home directories. To add a home directory entry, right-click on HomeDir and select Home directory entry.
Enter the name of the domain, the user name (or an “*” for all users from that domain), and the Path.
Alternatively, you can use the Browse button to select an existing directory, or create new directories.
Note: Each user’s home directory must be manually created, named in lower-case, and be assigned appropriate permissions.

Copyright © 2006 EMC Corporation. Do not Copy - All Rights Reserved.
CIFS Features - 23
© 2006 EMC Corporation. All rights reserved. CIFS Features - 23
Viewing the Home Directory Configuration
New Home Directory configuration added
See online help for further info
Online HelpOnline Help
New Home Directory configurationNew Home Directory configuration
After completing the configuration, the new Home Directory should now be visible in the right window pane. For further discussion of the Home Directory feature of the Celerra Management MMC, read the online help.

Copyright © 2006 EMC Corporation. Do not Copy - All Rights Reserved.
CIFS Features - 24
© 2006 EMC Corporation. All rights reserved. CIFS Features - 24
Using the Home Directory MMC Extension
The above slide display a sample screen shot of using the home directory Microsoft Management Extension (MMC).
“Auto Create”: automatically create the target directory if it does not exist.
“Reg. Exp.”: the domain and user fields should be treated as regular expressions.
An output of the /.etc/homedir looks like:
# This comment carries with the COMMODORES:.* entry
COMMODORES:.*:/topteams/<d>/<u>:regex:000
^WILD[BC].*S:.*:/topteams/<d>/<u>:regex:create:033
WILDCATS:tubby:/topteams/wildcats/tubby
WILDCATS:padgett:/topteams/wildcats/padgett:create:022
CARDS:pitino:/topteams/cards/pitino:create:ro
(WIN.*){2}:*:/homedirs-S3/<d>/<u>:regex:create:033
SOUTHPARK:*:/home/<d>/<u>:create
SOUTHPARK:kenny:/home/<d>/rip/kenny
COOLDUDES:Beavis:/cooldudes/<d>/<u>:create
COOLDUDES:.*(t){2}head:/cooldudes/<d>/<u>:regex:create

Copyright © 2006 EMC Corporation. Do not Copy - All Rights Reserved.
CIFS Features - 25
© 2006 EMC Corporation. All rights reserved. CIFS Features - 25
Using the Home Directory MMC Extension (cont.)Properties Page
Checkboxes for Boolean options
Friendlier-than-octal umask format
The browse button opens a file navigation dialog at the root of the data mover. The “Browse…” button below the path already exists in the current MMC snap-in. When it is clicked, we display a file browser rooted at the path \\mover\c$ that allows the user to navigate to the desired directory and select it using the GUI. We then populate the text box with the path that they selected. By clicking on the Modify button, you get the Modify Umask dialog box as shown on the next slide.

Copyright © 2006 EMC Corporation. Do not Copy - All Rights Reserved.
CIFS Features - 26
© 2006 EMC Corporation. All rights reserved. CIFS Features - 26
Using the Home Directory MMC Extension (cont.)Modify Umask Dialog
Choose default or override
Checkboxes correspond to octal bits in high-to-low order
If any of these fields from the previous dialog box as shown on the previous slide is found to violate a syntax validation rule when the “OK” or “Apply” button is clicked on the homedir entry properties page or new homedir entry page, then an error message will be displayed telling the user which field is not valid. The user will then have the option of correcting the error or canceling the operation.

Copyright © 2006 EMC Corporation. Do not Copy - All Rights Reserved.
CIFS Features - 27
© 2006 EMC Corporation. All rights reserved. CIFS Features - 27
Benefits . . . Ease of administration– Has a single share name for all users’ home directories on a given
data mover or virtual data mover– Multiple users can be mapped with just a single database entry– Regular expressions allow extremely powerful and flexible mapping
Scalability– Accommodates a single user or up to thousands of users– Users within a single domain can be spread over multiple file
systems
Integration with Microsoft Windows– Management is performed through snap-in to Microsoft Management
Console (MMC)– CIFS login information used to search map database
In v5.4, the Home directory feature provides support for extended regular expressions (ERE) for the /.etc/homedir configuration file. This allows users to dramatically decrease the configuration file size in each server. It also provides a more flexible mapping of the users. A user or a group of users having common characteristics in their names and domain names can be mapped with a single line. During parsing, more than one line may be matched, but only the latest line matched is used for mapping. The following special characters found anywhere outside bracket expressions are supported: ^ . [ $ ( ) | * + ?{ \.
The benefits to the customer from these enhancements include:
Ease of administrationHas a single share name for all users’ home directories on a given data mover or virtual data moverMultiple users can be mapped with just a single database entryRegular expressions allow extremely powerful and flexible mapping
ScalabilityAccommodates a single user or up to thousands of usersUsers within a single domain can be spread over multiple file systems
Integration with Microsoft WindowsManagement is performed through snap-in to Microsoft Management Console (MMC)CIFS login information used to search map database

Copyright © 2006 EMC Corporation. Do not Copy - All Rights Reserved.
CIFS Features - 28
© 2006 EMC Corporation. All rights reserved. CIFS Features - 28
Lesson 3: Alternate Data StreamsUpon completion of this lesson, you will be able to:
Describe Data Stream
Identify ADS limitations
The objectives for this lesson are shown here. Please take a moment to read them.

Copyright © 2006 EMC Corporation. Do not Copy - All Rights Reserved.
CIFS Features - 29
© 2006 EMC Corporation. All rights reserved. CIFS Features - 29
ADS
Alternate Data Streams/ Multiple Data Streams
Native Feature of NTFS
SecuritySecurity
AvailabilityAvailability
PermissionsPermissions
FeaturesFeatures
AuditingAuditing
HomedirHomedir
ADSADS
CAVACAVA
File Ext. Filtering
File Ext. Filtering
GPOGPO
ADS (Alternate Data Streams) is a native feature of NTFS (NT File System), whereby each file can support several streams of data within a file. Data streams are independent resources that store a file’s data and also store information about the file. Unlike the FAT file system in which a file consists of only one data stream, NTFS uses different data streams to store the file and the file’s metadata (such as file access rights, encryption, date and time information, graphic information, etc.). NTFS files contain one primary data stream and, optionally, one or more alternate data streams.
EMC Celerra supports ADS for both files and directories.

Copyright © 2006 EMC Corporation. Do not Copy - All Rights Reserved.
CIFS Features - 30
© 2006 EMC Corporation. All rights reserved. CIFS Features - 30
ADS on the Celerra
Directory streams supported on mount points
Limit of 64,000 streams per file or directory
Controlled by shadow stream system parameter – Enabled by default
Directory streams are supported on mount points. If a file system is mounted on a mount point, only the directory streams of the mounted file system’s root directory are visible. If no file system is mounted, the streams of the mount point are visible.
There is a limit of 64,000 streams per file or directory. This is several times the limit seen experimentally on a Windows NTFS file system.
Multiple data stream support is controlled by the shadow stream system parameter and is enabled by default. EMC generally recommends that you leave ADS support enabled.

Copyright © 2006 EMC Corporation. Do not Copy - All Rights Reserved.
CIFS Features - 31
© 2006 EMC Corporation. All rights reserved. CIFS Features - 31
Lesson 4: Celerra AntiVirus Agent (CAVA)Upon completion of this lesson, you will be able to:
List components of EMC CAVA
Identify CAVA requirements
Explain the viruschecker.conf file
Describe scanning methodology
Identify CAVA considerations
The objectives for this lesson are shown here. Please take a moment to read them.

Copyright © 2006 EMC Corporation. Do not Copy - All Rights Reserved.
CIFS Features - 32
© 2006 EMC Corporation. All rights reserved. CIFS Features - 32
Celerra AntiVirus Agent
AntiVirus solution for Data Mover(s) providing CIFS accessIdentifies and eliminates known viruses in client filesEmploys 3 key components
– Software on DM (VC Client)– Software on Windows AV server
(CAVA)– 3rd party AntiVirus engine on
Windows server
Susceptibility– DART is not susceptible– CAVA protects client files
SecuritySecurity
AvailabilityAvailability
PermissionsPermissions
FeaturesFeatures
AuditingAuditing
HomedirHomedir
ADSADS
CAVACAVA
File Ext. Filtering
File Ext. Filtering
GPOGPO
CAVA
EMC’s Celerra AntiVirus Agent (CAVA) provides an AntiVirus solution to clients of an EMC Celerra Network Server using industry-standard (Common Internet File System) protocols, in a MicrosoftWindows 2000/2003 or Windows NT domain. CAVA uses third-party AntiVirus software (AntiVirus engine) to identify and eliminate known viruses before they infect file(s) on the backend storage.
The Celerra File Server setup is resistant to the invasion of viruses because of its architecture. Each Data Mover runs DART software, a real-time, embedded operating system. The Data Mover is resistant to viruses because its APIs are not published, third parties are unable to run programs containing a virus on a Data Mover. Although the Data Mover is resistant to viruses, if a Windows client attempts to store an infected file on the storage system, the Windows client must be protected against the effects of the virus should the infected file be opened.
The AntiVirus solution
The Celerra AntiVirus solution uses a combination of the Celerra File Server Data Mover, CAVA, and a third-party AntiVirus engine. The CAVA and a third-party AV engine must be installed on a Windows 2000/2003/NT server(s) in the domain.

Copyright © 2006 EMC Corporation. Do not Copy - All Rights Reserved.
CIFS Features - 33
© 2006 EMC Corporation. All rights reserved. CIFS Features - 33
Celerra Anti-Virus Solution
Virus Checking Server
2
Celerra File Server
Storage
1
1. Client writes to a file and saves to Celerra cache
Client
3
4
2. Celerra sends UNC path name to the Windows Server running anti-virus software
3. The Anti-Virus agent takes corrective action on the file 4. The file is saved to Storage
Each time the Celerra receives a file, it locks it for read access and then sends a request to the anti-virus scanning server, or servers, to examine the file. The Celerra will send the UNC path name to the Windows server to determine whether appropriate action needs to take place. The Celerra may have to wait for verification that the file is not infected before making the file available for user access. The Celerra anti-virus solution is made possible through the use of the EMC Celerra Anti-virus Agent (CAVA) in a Windows NT or Windows 2000/2003 domain with CIFS access. Both the AV Engine from an EMC partner and the Celerra Anti-virus Agent (CAVA) run on the anti-virus scanning server.
Specific triggers were setup at the DART level to signal the CAVA whenever the Celerra receives a file, so that the UNC path name is sent to the AV scanning server.

Copyright © 2006 EMC Corporation. Do not Copy - All Rights Reserved.
CIFS Features - 34
© 2006 EMC Corporation. All rights reserved. CIFS Features - 34
Triggering a ScanIn general, CAVA scans files:
On first read of a file since– CAVA install– Update of virus definitions
When creating, moving, modifying a file
When restoring files from a backup
When renaming– Based on masks and excl in viruschecker.conf
When administrator performs a full file system scan– server_viruschk {<movername>|ALL} –fsscan <fsname>-create
CAVA maintains a table of events that trigger a scan of a file for a virus. For a complete, up-to-date list of these events, see Using Celerra AntiVirus Agent. In general, CAVA scans in the following instances;
1. Scan on first read. CAVA will scan files for viruses the first time that a file is read subsequent to: a) the implementation of CAVA b) an update to virus definitions (This feature has certain configurable aspects.)
2. Creating, modifying, or moving a file.3. When restoring files from a backup4. Renaming a file from a non-triggerable file name to a triggerable file name, based on masks and excl
in viruschecker.conf5. An administrator can perform a full scan of a file system using the server_viruschk –fsscan
command. The administrator can query the state of the scan while it is running, and can stop the scan if necessary.
When a new virus is released, it takes some time for AV vendors to recognize the virus, add it to their virus definitions, and then have the new definitions implemented on actual system. The causes a window of vulnerability in which an infected file could be scanned and found to be clean, when, in fact, it is not. If the AV software does not scan on any reads, then a client could later read the infected file and infect their system.
CAVA allows the Celerra administrator to address this issue. When the updated virus definition is made available by the AV vendor, the administrator can set a particular date in the viruschecker.conf file as the “access time”. When users reads a given file, this “access time” is compared to the time that the file was last opened. If the “access time” specified in viruschecker.conf is more recent, then the file will be scanned for know viruses.

Copyright © 2006 EMC Corporation. Do not Copy - All Rights Reserved.
CIFS Features - 35
© 2006 EMC Corporation. All rights reserved. CIFS Features - 35
The viruschecker.conf FileHolds settings/options for each Data Mover– Masks define file extensions that will be scanned
For example, to scan all .exe, .com, .doc, and .ppt filesmasks=*.exe:*.com:*.doc:*.ppt
– Excl defines files or file extensions to exclude from scanningFor example, to exclude all .tmp files
excl=*.tmp
– Addr defines the IP address(es) of the AV server(s)For example, to configure two AV servers
Addr=10.127.50.161:10.127.50.162
Check Using Celerra AntiVirus Agent for additional options
The configuration file, /.etc/viruschecker.conf, defines virus checking settings and options that must be in place for each Data Mover that will utilize virus checking. A sample of this file resides in /nas/sysand can be copied and modified to suit particular needs. The viruschecker.conf file is created and/or modified from the Celerra Control Station using the vi editor. Once the viruschecker.conf is completed, it can be copied to/from the Data Movers /.etc directory using the server_file command.
Examples
server_file server_2 –get viruschecker.conf viruschecker.conf
server_file server_2 –put viruschecker.conf viruschecker.conf
Mandatory settings
masks= sets the list of file masks that need to be checked.
masks=*.EXE:*.COM:*.DOC:*.DOT:*.XL?:*.MD?
excl= sets the lists of filenames or file masks that do not need to be checked.
excl=*.TMP
addr= sets the IP addresses of the VC Servers that you wish to connect to.
addr=10.127.50.161:10.127.23.162

Copyright © 2006 EMC Corporation. Do not Copy - All Rights Reserved.
CIFS Features - 36
© 2006 EMC Corporation. All rights reserved. CIFS Features - 36
CAVA FeaturesAutomatic Virus Definition Update- Automated incremental virus definition file updates
CAVA Calculator
- Sizing tool to aid in estimating the number of CAVAs
User Notification on Virus Detection- Administrator can now control and enable user notification
Other Features- Scan on read (off by default)- Event reporting and configuration- Automatic notification of virus detection
Automatic Virus Definition Update
CAVA is aware when the third-party antivirus engine has acquired a new virus definition file and notifies the CAVA administrator. Files that were previously scanned are automatically scanned with the updated virus definition when they are next opened, even if no modifications were made to the file since the last scan.
CAVA Calculator
The CAVA Calculator is a sizing tool that can estimate the number of CAVAs required to provide a user-defined level of performance in a CAVA pool, based upon user information. The tool can be run at any time, even if there is no CAVA present. You install CAVA Calculator from the CAVA software distribution CD. For more information about the CAVA Calculator, refer to its online help and the Using Celerra Antivirus Agent technical module.
User Notification on Virus Detection
An administrator can specify where virus notification is sent, and upon what kind of action the notification is sent. Notification can be sent to both the client in the form of a Windows message and to the Control Station event log, or to only the client or the Control Station. Actions that trigger the notification include a file being deleted, modified or quarantined. The notification text can also be customized.

Copyright © 2006 EMC Corporation. Do not Copy - All Rights Reserved.
CIFS Features - 37
© 2006 EMC Corporation. All rights reserved. CIFS Features - 37
CAVA ConsiderationsShare Security not supported with CAVA
NFS is not supported
Database scanning not recommended
EMC recommends a minimum of two AV Servers
Always consult with the product guide and release notes
CAVA does not support a Data Mover CIFS Server using Share Level Access or stand-alone Windows server environment.
CAVA does not support NFS. If NFS or FTP protocols are used to move or modify files, the files are not scanned for viruses.
Database scanning is not recommended. Accessing a database usually triggers a high number of scans, which in turn can cause an increased lag when accessing data.
Always consult the CAVA product guide as well as the Release Notes for your version of EMCNAS for:
Compatibility with 3rd party softwareCompatibility with other Celerra featuresNew or modified aspects of CAVAAdditional known issues
EMC recommends that if fault tolerance is a concern, you should configure a minimum of two AV servers in your network. If one of your AVservers goes offline or cannot be reached by the Celerra Network Server, having two AV servers ensures file scanning capability is maintained.
The NAS Interoperability Matrix and the Using Celerra Anti Virus Agent v5.5 provides the latest list of supported AV engines and versions.

Copyright © 2006 EMC Corporation. Do not Copy - All Rights Reserved.
CIFS Features - 38
© 2006 EMC Corporation. All rights reserved. CIFS Features - 38
Celerra AntiVirus Management Snap-in
Provides CAVA management via MMC
You can use the Celerra AnitVirus Management snap-in to manage the virus-checking parameters (viruschecker.conf file) used with Celerra AntiVirus Agent (CAVA) and third-party AntiVirus programs. The Celerra AntiVirus Agent and a third-party AntiVirus program must be installed on the Windows NT/2000/2003 server.

Copyright © 2006 EMC Corporation. Do not Copy - All Rights Reserved.
CIFS Features - 39
© 2006 EMC Corporation. All rights reserved. CIFS Features - 39
Lesson 5: Microsoft Group Policy ObjectsCelerra SupportUpon completion of this lesson, you will be able to:
Group Policy Objects (GPO)
Describe the effect of GPOs on the Celerra
Describe the GPO Operation
Identify GPO settings
Resolve GPO settings
Describe the GPO Update interval
The objectives for this lesson are shown here. Please take a moment to read them.
Copyright © 2006 EMC Corporation. Do not Copy - All Rights Reserved.
CIFS Features - 40
© 2006 EMC Corporation. All rights reserved. CIFS Features - 40
Windows Group Policy Object OverviewWhat are GPOs (Group Policy Objects)?
Microsoft concept for applying security (policy) for a set of associated host or users
Allows for centralized management of user accounts and security policies using MMC (Microsoft Management Console)
GPO policy can be set for domain, site, and/or Organizational Unit within the Windows Domain
GPOs are cumulative (top down)
Supported with Windows 2000/2003/XP
In Windows 2000 and 2003, group policy allows administrators to manage desktop environments by applying configuration settings to computer and user accounts. Group policy offers the ability to define and enforce policy settings for the following:
Scripts – including computer startup/shutdown and user logon/logoffSecurity – local computer, domain, and network security settingsFolder redirection – direct and store users’ folders on the networkRegistry-based – for the operating system, its components, and applicationsSoftware installation and maintenance – centrally manage installation, updates and removal of software
GPO is managed through the MMC (Microsoft Management Console). GPO policy is administratively set and applied to the entire domain, to a site, or to an organizational unit. Any GPOs that affect a user are applied at logon time, for example, applications, configuration, or folder redirection. Any GPOs that affect the computer are applied at system startup time. Some examples are disk quotas, auditing, and event logs. All policies are updated periodically, the frequency depending on how it was configured.
GPOs are not applied individually to users or computers. GPOs can be set at multiple levels. As they are applied at the Domain down to the organizational unit, the settings are cumulative.
GPOs are supported with Windows 2000/2003/XP.

Copyright © 2006 EMC Corporation. Do not Copy - All Rights Reserved.
CIFS Features - 41
© 2006 EMC Corporation. All rights reserved. CIFS Features - 41
Affect of GPOs on the CelerraData Movers (DART) retrieve and maintain security settings from GPOs for each CIFS server joined to the Windows 2000/2003 Domain
GPOs affect these Data Mover operations– Kerberos– Auditing– SMB signing– Event logs– User rights
Celerra Management snap-ins are used to display the settings for Audit and User rights
Celerra Data Movers that are joined to a Windows 2000/2003 domain support and retrieve certain GPO settings. When participating in Windows 2000/2003 domains, as a member server, the Data Mover is affected by many Windows mechanisms including Kerberos, Auditing, SMB signing, event logs, and user rights. A goal of the Celerra Data Mover is to participate, and act as, a Windows member server to the domain.
EMC offers MMC snap-ins to be used by administrators to display the “effective” settings for the auditing policy and user right assignment.

Copyright © 2006 EMC Corporation. Do not Copy - All Rights Reserved.
CIFS Features - 42
© 2006 EMC Corporation. All rights reserved. CIFS Features - 42
GPO OperationGPO Daemon– DART thread which controls GPO updates– One per Data Mover– Starts/stops/restarts with server_setup CIFS command– On GPO daemon startup, reads in GPO cache then retrieves latest
settings for each joined CIFS server
GPO cache– Latest retrieved GPO settings stored in (root) .etc/gpo.cache
Not a user-editable file
Control Station CLI – server_security command
GPO configuration parameters to enable/disable
The GPO daemon is the DART thread which controls GPO updates. There is one GPO daemon running per Data Mover. The daemon starts/stops/restarts with the server_setup cifs start/stop command.
On GPO daemon startup, it reads in GPO cache, then retrieves the latest settings for each joined CIFS Server. Each CIFS server may be in a different organizational unit in the domain, therefore, each can have different GPO settings.
The latest retrieved GPO settings for each joined CIFS server are stored in the root file system under /.etc/gpo.cache. This is not a user editable configuration file.
Cached settings are read in when the GPO daemon starts up. The GPO settings are available as soon as possible, so there is no need to wait for setting retrieval. Settings are available even if the Domain Controller cannot be reached.
The server_security Celerra CLI command can be used to query or update the security policy settings on a Data Mover. Using this command, the administrator can force an update of a security policy setting, or query security policy settings.
You can use CIFS parameters to enable or disable GPO, GPO cache, and GPO log messages.
Copyright © 2006 EMC Corporation. Do not Copy - All Rights Reserved.
CIFS Features - 43
© 2006 EMC Corporation. All rights reserved. CIFS Features - 43
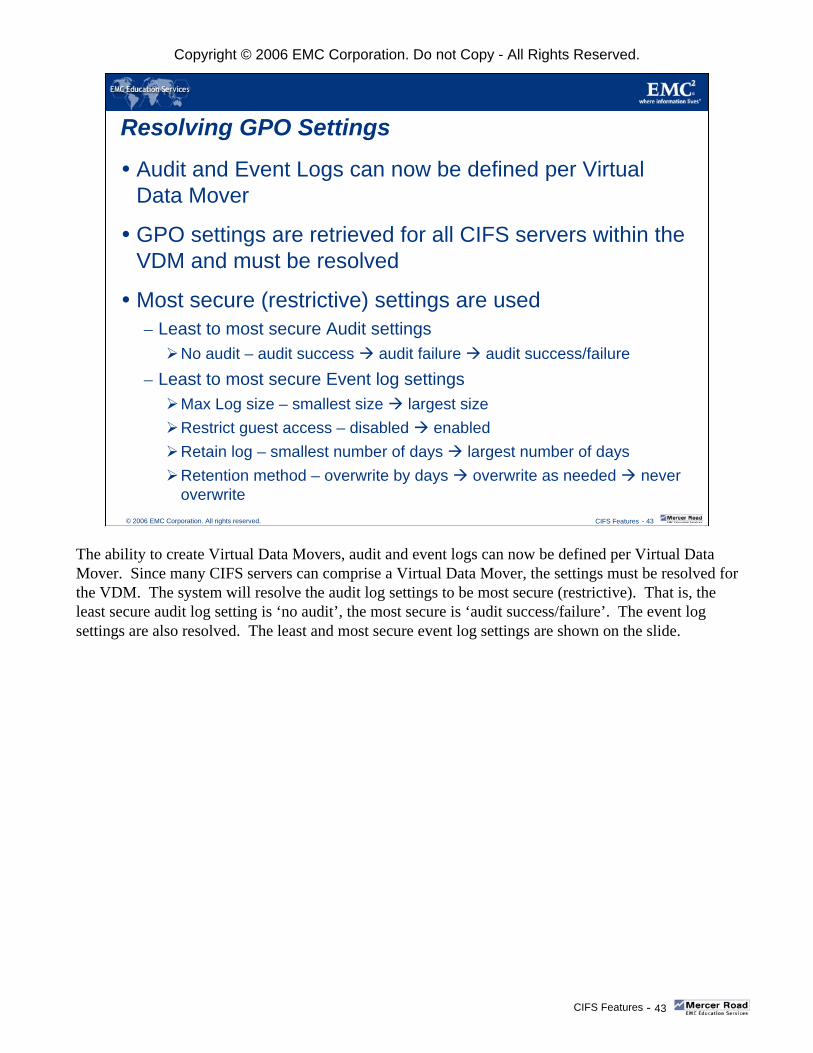
Resolving GPO SettingsAudit and Event Logs can now be defined per Virtual Data Mover
GPO settings are retrieved for all CIFS servers within the VDM and must be resolved
Most secure (restrictive) settings are used– Least to most secure Audit settings
No audit – audit success audit failure audit success/failure– Least to most secure Event log settings
Max Log size – smallest size largest sizeRestrict guest access – disabled enabledRetain log – smallest number of days largest number of daysRetention method – overwrite by days overwrite as needed never overwrite
The ability to create Virtual Data Movers, audit and event logs can now be defined per Virtual Data Mover. Since many CIFS servers can comprise a Virtual Data Mover, the settings must be resolved for the VDM. The system will resolve the audit log settings to be most secure (restrictive). That is, the least secure audit log setting is ‘no audit’, the most secure is ‘audit success/failure’. The event log settings are also resolved. The least and most secure event log settings are shown on the slide.

Copyright © 2006 EMC Corporation. Do not Copy - All Rights Reserved.
CIFS Features - 44
© 2006 EMC Corporation. All rights reserved. CIFS Features - 44
GPO Update IntervalInterval is defined by the Domain
If ‘GPO refresh’ is disabled at the Domain, use server_security to force an update
An update interval of 90 minutes is used for the Data Mover if none is defined in the Domain
Before NAS 5.2, the GPO settings were automatically refreshed by the Data Mover every 90 minutes. The data Mover now uses the update interval as defined by the Windows Domain.
If the GPO refresh policy is disabled at the Domain level, the Celerra Administrator must issue the server_security command to manually refresh the GPO policy settings. If no refresh policy is defined at the Domain level, the Data Mover will use an update interval of 90 minutes.

Copyright © 2006 EMC Corporation. Do not Copy - All Rights Reserved.
CIFS Features - 45
© 2006 EMC Corporation. All rights reserved. CIFS Features - 45
Lesson 6: File Extension FilteringUpon completion of this lesson, you will be able to:
Describe what a file extension filters
Configure file extension filtering
The objectives for this lesson are shown here. Please take a moment to read them.

Copyright © 2006 EMC Corporation. Do not Copy - All Rights Reserved.
CIFS Features - 46
© 2006 EMC Corporation. All rights reserved. CIFS Features - 46
Celerra File Extension FilteringFiltering based on file extension not file contents
Uses a file’s extension and ACL to allow or disallow access to files with certain file extensions
Why filter by file extension– Prevent certain types of files from being saved on a share– Prevent a particular user or group from accessing a certain type of
file on a share– Allow only certain types of files to be saved to a share
File extension filtering enables you to store specific file types on a CIFS share or Data Mover. This filtering is based on the file extensions and not on the actual contents of the file. The file extension filtering mechanism uses a combination of a file’s extension and ACLs to allow or disallow access to files with certain file extensions.
File extension filtering on the Celerra allows you to prevent certain types of files from being saved on a share. For example, if you do not want any video files stored on a share, configure file extension filtering to block .mpg, .avi, and .mp2 files from the share.
With file extension filtering, you can also prevent a particular user or group from accessing a certain type of file on a share. For example, to prevent contractors from viewing confidential Word files that your employees can view, configure file extension filtering to allow everyone but the Contractors group to view .doc files on the share.
You can allow only certain types of files to be saved to a share using file extension filtering. For example, you create a share and want to reserve it for Word and PowerPoint files. You configure file extension filtering to allow only .doc and .ppt files to be saved to the share. In addition, if you do not want files deleted from the share, you can also configure file extension filtering to prevent that action.

Copyright © 2006 EMC Corporation. Do not Copy - All Rights Reserved.
CIFS Features - 47
© 2006 EMC Corporation. All rights reserved. CIFS Features - 47
File Extension Filtering - How Does it Work?Filtering done at the Data Mover or CIFS share level– Filtering policy does not change at nested share boundaries
File extension filtering uses two components– A set of filter files stored in the \.filefilter directory on the Data
Mover– The ACL set on the filter file
File extension filtering occurs at the Data Mover or CIFS share level and cannot be done at the folder level within a share. If a file system contains nested shares, the share name used to map the network drive determines what filtering policy is in effect and does not change at nested share boundaries.
File extension filtering uses two components:
• A set of filter files named with a special naming convention that includes the name of the extension and share that you want filtered. You need to store these files in the \.filefilter directory on the Data Mover. If there are no filter files in the \.filefilter directory, filtering does not occur.
• The ACL set on the filter file. You can use the ACL to set exceptions to the filter policy. The ACL lets you limit file extension filtering on a user.

Copyright © 2006 EMC Corporation. Do not Copy - All Rights Reserved.
CIFS Features - 48
© 2006 EMC Corporation. All rights reserved. CIFS Features - 48
Creating Filter FilesSpecial filter files are created in the \.filefilter directory on the root share (C$) of the Data Mover– Create one file for every extension/share combination to filter– Can be created with any text editor
Filter file naming convention<extension_name>[@<sharename>][@<netbios_name>]
To restrict files of certain types, create filter files in the \.filefilter directory on the root share (C$) of the Data Mover. You must create one file for every extension/share combination that you want to filter. Filter files can be created using any text editor.
The following filter file naming convention must be used:<extension_name>[@<sharename>][@<netbios_name>]<extension_name> = the file extension that you want to filter <sharename> = the name of the share to which you want to apply the filter. If you do not
include a sharename, the filter is applied to all shares on the Data Mover.<netbios_name> = the Netbios name to which you want to limit the filtering. If the share is
available on multiple Netbios names, this name element limits the filtering to a particular Netbios name.

Copyright © 2006 EMC Corporation. Do not Copy - All Rights Reserved.
CIFS Features - 49
© 2006 EMC Corporation. All rights reserved. CIFS Features - 49
Creating Filter Files
Map a drive to the root file system of the Data Mover – \\<computername>\C$
Navigate to the \.filefilter directory and use Notepad to create an empty file with the name
– <extension_name>[@<sharename>][@<netbios_name>]
To create a filefilter file, navigate to the ./filefilter directory on the root of the Data Mover share. Create a file with the appropriate naming convention as shown on the slide.
For example, to create a filter file for all PowerPoint files on the training share, a file called ppt@training is created.
Copyright © 2006 EMC Corporation. Do not Copy - All Rights Reserved.
CIFS Features - 50
© 2006 EMC Corporation. All rights reserved. CIFS Features - 50
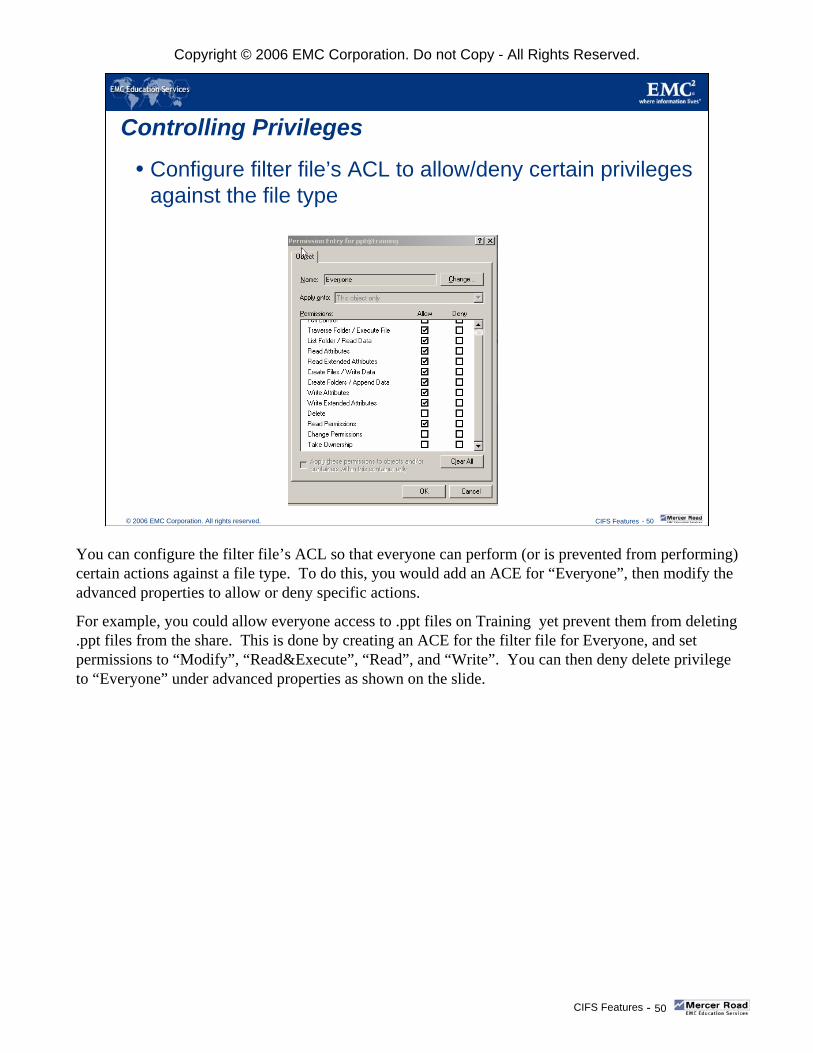
Controlling PrivilegesConfigure filter file’s ACL to allow/deny certain privileges against the file type
You can configure the filter file’s ACL so that everyone can perform (or is prevented from performing) certain actions against a file type. To do this, you would add an ACE for “Everyone”, then modify the advanced properties to allow or deny specific actions.
For example, you could allow everyone access to .ppt files on Training yet prevent them from deleting .ppt files from the share. This is done by creating an ACE for the filter file for Everyone, and set permissions to “Modify”, “Read&Execute”, “Read”, and “Write”. You can then deny delete privilege to “Everyone” under advanced properties as shown on the slide.

Copyright © 2006 EMC Corporation. Do not Copy - All Rights Reserved.
CIFS Features - 51
© 2006 EMC Corporation. All rights reserved. CIFS Features - 51
Reserve a Share for a Specific File TypeA share can be reserved for a specific file type
Special filter files are required– allfiles[@<sharename>][@<netbios_name>]
Prohibits all file types from the share– noext[@<sharename>][@<netbios_name>]
Prohibits files with no extension from the share– <extension_name>[@<sharename>]
[@<netbios_name>]
Identifies what file types are allowed on the share
You can configure file extension filtering so that a share is reserved for a specific file type. Instead of prohibiting a file type from a share, you can allow only a specific file type on the share. The following filter files are used to accomplish this.
allfiles[@<sharename>][@<netbios_name>] – This filter file prohibits all file types from the share. File types that are exceptions to this blanket restriction are identified by regular filter files.
noext[@<sharename>][@<netbios_name>] – This filter file prohibits files with no extensions from the share. This prevents users from saving files with no filename extension.
<extension_name>[@<sharename>][@<netbios_name>] – This filter file identifies what file types are allowed on the share. You must configure the ACLs to identify users/groups that can create files on the share. File types specified by regular filter files are the exceptions to the allfiles restriction.

Copyright © 2006 EMC Corporation. Do not Copy - All Rights Reserved.
CIFS Features - 52
© 2006 EMC Corporation. All rights reserved. CIFS Features - 52
Lesson 7: DfsUpon completion of this lesson, you will be able to:
Describe Dfs
Explain the value of Dfs
The objectives for this lesson are shown here. Please take a moment to read them.

Copyright © 2006 EMC Corporation. Do not Copy - All Rights Reserved.
CIFS Features - 53
© 2006 EMC Corporation. All rights reserved. CIFS Features - 53
Using the Data Mover as a Standalone Dfs ServerMicrosoft’s Dfs (Distributed file system) allows administrators to group shared folders located on different servers into a logical Dfs namespace
A Dfs namespace is a virtual view of these shared folders shown in a directory tree structure
By using Dfs, administrators can select which shared folders to view in the namespace, assign names to these folders, and design the tree hierarchy in which the folders appear
Microsoft’s Dfs (Distributed File System) allows administrators to group shared folders located on different servers into a logical Dfs namespace. A Dfs namespace is a virtual view of these shared folders shown in a directory tree structure. By using Dfs, administrators can select which shared folders to view in the namespace, assign names to these folders, and design the tree hierarchy in which the folders appear. Users can navigate through the namespace without needing to know the server names or the actual shared folders hosting the data.
Each Dfs tree structure has a root target that is the host server running the Dfs service and hosting the namespace. A Dfs root contains Dfs links pointing to the shared folders (a share itself and any directory below it) on the network. These folders are called Dfs targets.

Copyright © 2006 EMC Corporation. Do not Copy - All Rights Reserved.
CIFS Features - 54
© 2006 EMC Corporation. All rights reserved. CIFS Features - 54
Types of Dfs Root ServersDomain Dfs root server
Stores the Dfs hierarchy in Active Directory
Standalone Dfs root server
Stores the Dfs hierarchy locally
For more information, Go to www.Microsoft.com and search for Dfs
Microsoft offers two types of Dfs root servers, the domain Dfs root server and the standalone Dfs root server. The domain Dfs server stores the Dfs hierarchy in the Active Directory. The standalone Dfs root server stores the Dfs hierarchy locally and can have only one root target.
Prior to 5.4 you could not do this as root.
For a detailed description of Dfs, visit the Microsoft website at http://www.microsoft.com.

Copyright © 2006 EMC Corporation. Do not Copy - All Rights Reserved.
CIFS Features - 55
© 2006 EMC Corporation. All rights reserved. CIFS Features - 55
Dfs Root Support on CelerraA Celerra CIFS server provides the same functionality as a Windows 2000 or Windows Server 2003 standalone Dfs root server
See notes section for more information
Review the following before configuring a Dfs root.You create a Dfs root on a share.You can only establish a Dfs root on a global share from a Windows Server 2003 or a Windows XP machine.With a Windows 2000 server, you can create only one Dfs root per CIFS server; creating a Dfs root on a global share is not allowed. You cannot manage multiple Dfs roots on a CIFS server using a Windows 2000 server.A Dfs root on a global share can be viewed from any CIFS server on the Data Mover.Before removing a share on which you have established a Dfs root, you must first delete the Dfs root.

Copyright © 2006 EMC Corporation. Do not Copy - All Rights Reserved.
CIFS Features - 56
© 2006 EMC Corporation. All rights reserved. CIFS Features - 56
Configuring and Administering Dfs SupportTo configure a share as a Dfs root, use one of the following:– The Microsoft MMC Distributed File System tool, which provides a
New Dfs Root Wizard with comprehensive help– The Microsoft command-line tool called dfsutil.exe which uses the
optional flag to work with the API instead of the Registry We recommend using the Windows Server 2003 version since it is capable of managing multiple Dfs roots on the same server
The Microsoft dfscmd.exe tool enables you to administer the Dfs root content (for example, creating and deleting links. You cannot delete a Dfs tree structure using this command.
The dfsutil.exe and dfscmd.exe tools are included with the Windows 2000 or Windows Server 2003 Support Tools.

Copyright © 2006 EMC Corporation. Do not Copy - All Rights Reserved.
CIFS Features - 57
© 2006 EMC Corporation. All rights reserved. CIFS Features - 57
Module SummaryKey points covered in this module:
Active CIFS connections to a Data Mover and selected user activities can be audited on the CelerraAudit policies are defined within Windows and logged events can be viewed using Windows Event ViewerCelerra home directory support allows a user to have a default “file save”location on the CelerraCelerra AntiVirus Agent (CAVA) provides an AntiVirus solution for Celerra Windows clientsCAVA uses third-party Anti-Virus software (an Anti-Virus engine) to identify and eliminate known viruses before they infect files(s) on the back-end storageMany Microsoft Group Policy Objects are supported on the CelerraCelerra supports file extension filtering in a CIFS environmentCelerra supports use of Microsoft’s Dfs on a Data Mover’s CIFS server
The key points covered in this module are shown here. Please take a moment to review them.

Copyright © 2006 EMC Corporation. Do not Copy - All Rights Reserved.
CIFS Features - 58