cisco callmanager configuration for blu-103… · • add device information to the cucm manager...
TRANSCRIPT

Cisco CallManager configuration for BLU-103
10653 South River Front Pkwy, Suite 300South Jordan, Utah 84095
(801) 566-8800www.bssaudio.com
This document details the steps required to configure a Cisco CallManager VoIP system to work with a BLU-103 VoIP interface.
CISCO CALLMANAGER CONFIGURATION FOR BLU-103 2
Introduction
Preliminary steps
The BLU-103 VoIP interface allows making and receiving phone calls over any Voiceover-IP (VoIP) system that adheres to the SIP (Session Initiation Protocol) standard. This document details the steps required to configure a Cisco CallManager VoIP system to work with a BLU-103 VoIP interface.
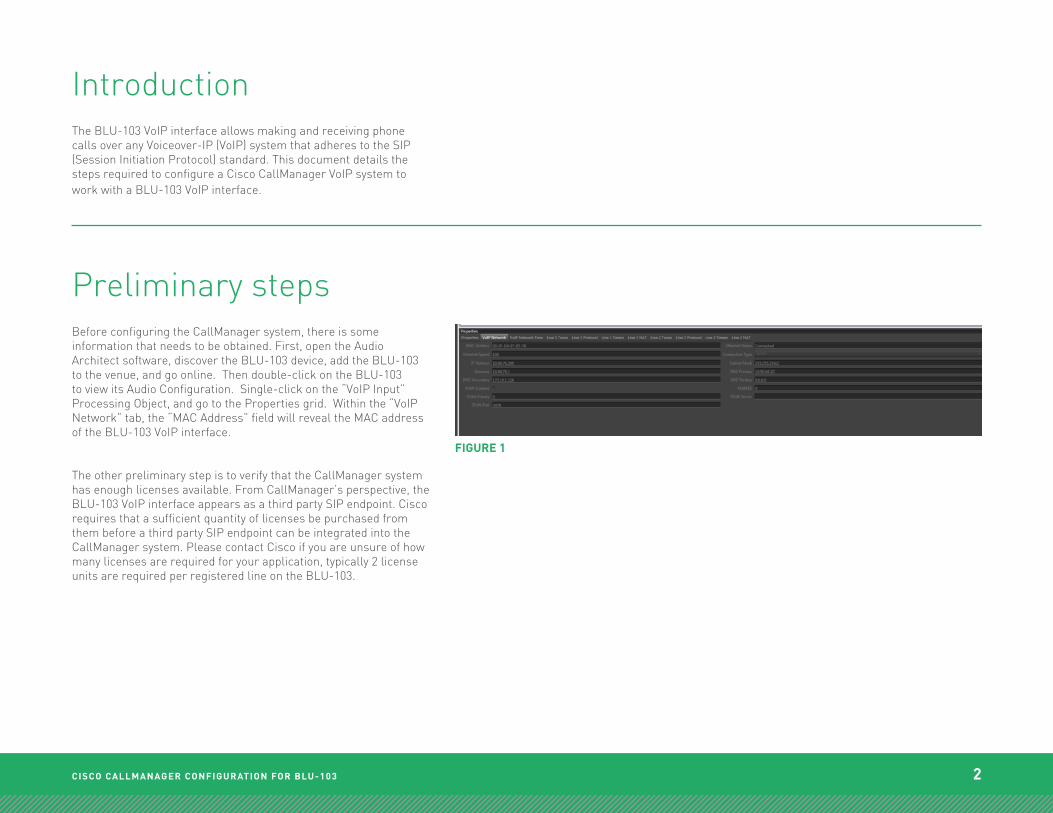
Before configuring the CallManager system, there is some information that needs to be obtained. First, open the Audio Architect software, discover the BLU-103 device, add the BLU-103 to the venue, and go online. Then double-click on the BLU-103 to view its Audio Configuration. Single-click on the “VoIP Input” Processing Object, and go to the Properties grid. Within the “VoIP Network” tab, the “MAC Address” field will reveal the MAC address of the BLU-103 VoIP interface.
The other preliminary step is to verify that the CallManager system has enough licenses available. From CallManager’s perspective, the BLU-103 VoIP interface appears as a third party SIP endpoint. Cisco requires that a sufficient quantity of licenses be purchased from them before a third party SIP endpoint can be integrated into the CallManager system. Please contact Cisco if you are unsure of how many licenses are required for your application, typically 2 license units are required per registered line on the BLU-103.
FIGURE 1
CISCO CALLMANAGER CONFIGURATION FOR BLU-103 3
Cisco configuration:
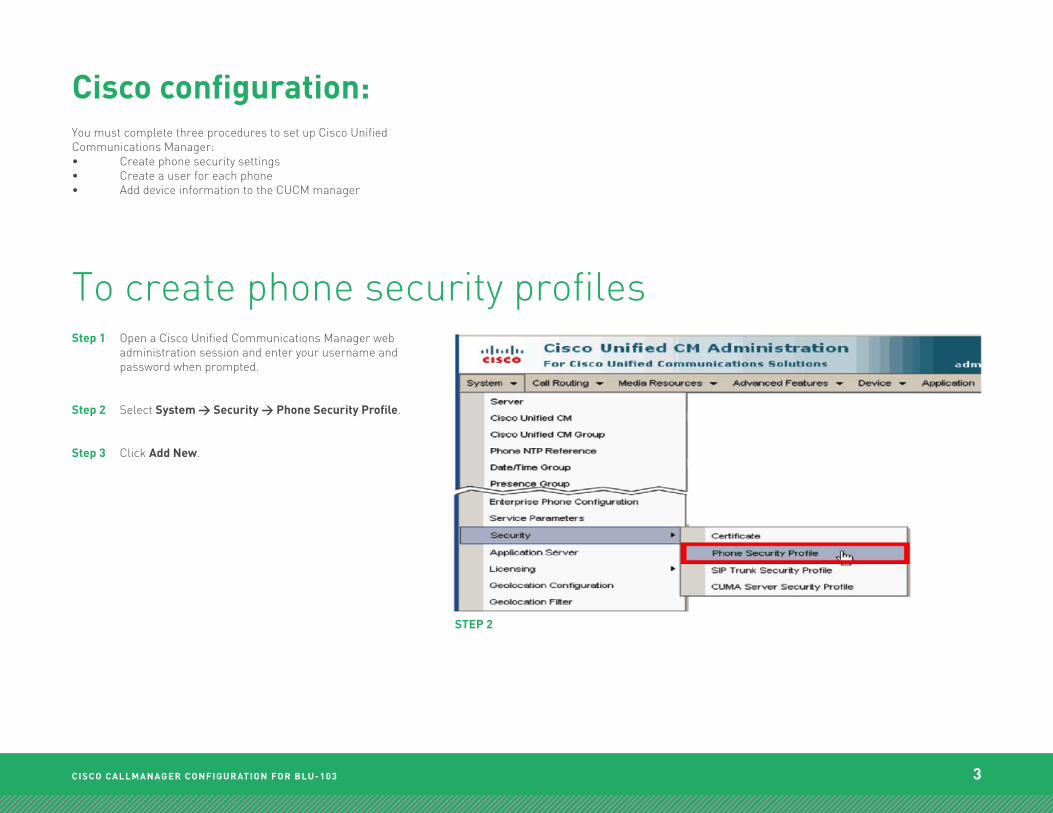
You must complete three procedures to set up Cisco Unified Communications Manager:• Create phone security settings• Create a user for each phone• Add device information to the CUCM manager
Step 1 Open a Cisco Unified Communications Manager web administration session and enter your username and password when prompted.
Step 2 Select System > Security > Phone Security Profile.
Step 3 Click Add New.
To create phone security profiles
STEP 2
CISCO CALLMANAGER CONFIGURATION FOR BLU-103 4
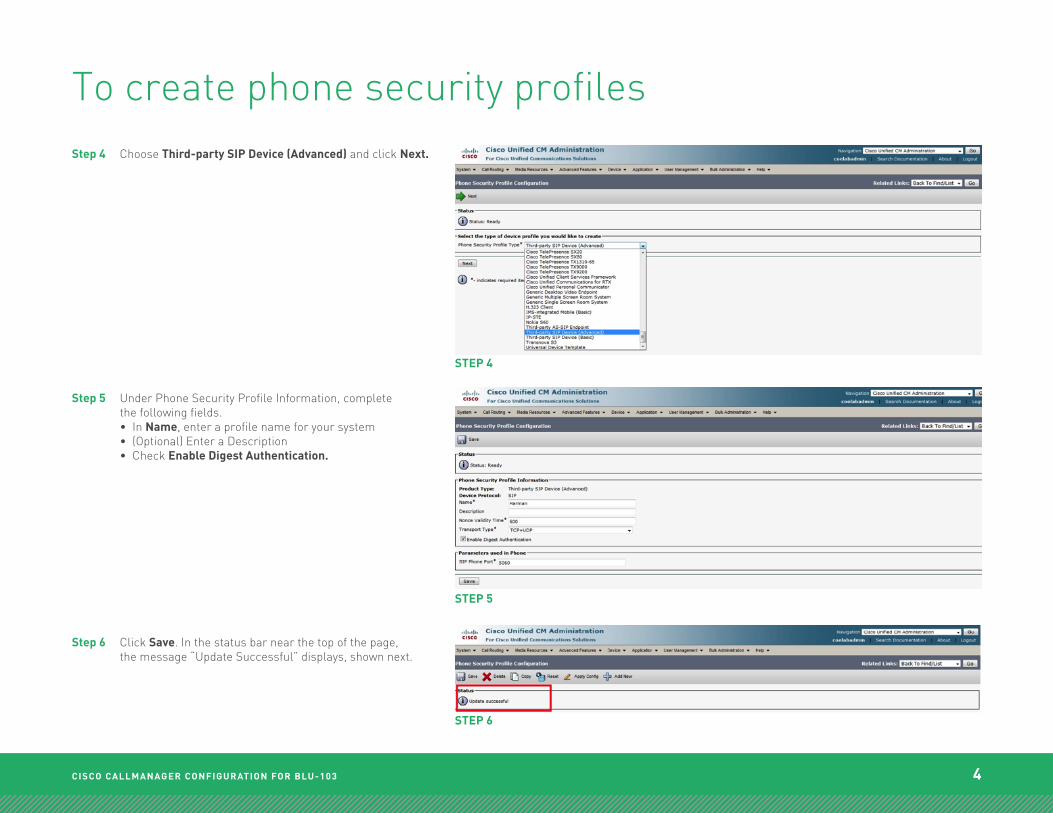
To create phone security profilesStep 4 Choose Third-party SIP Device (Advanced) and click Next.
Step 5 Under Phone Security Profile Information, complete the following fields. • In Name, enter a profile name for your system • (Optional) Enter a Description • Check Enable Digest Authentication.
Step 6 Click Save. In the status bar near the top of the page, the message “Update Successful” displays, shown next.
STEP 4
STEP 5
STEP 6
CISCO CALLMANAGER CONFIGURATION FOR BLU-103 5
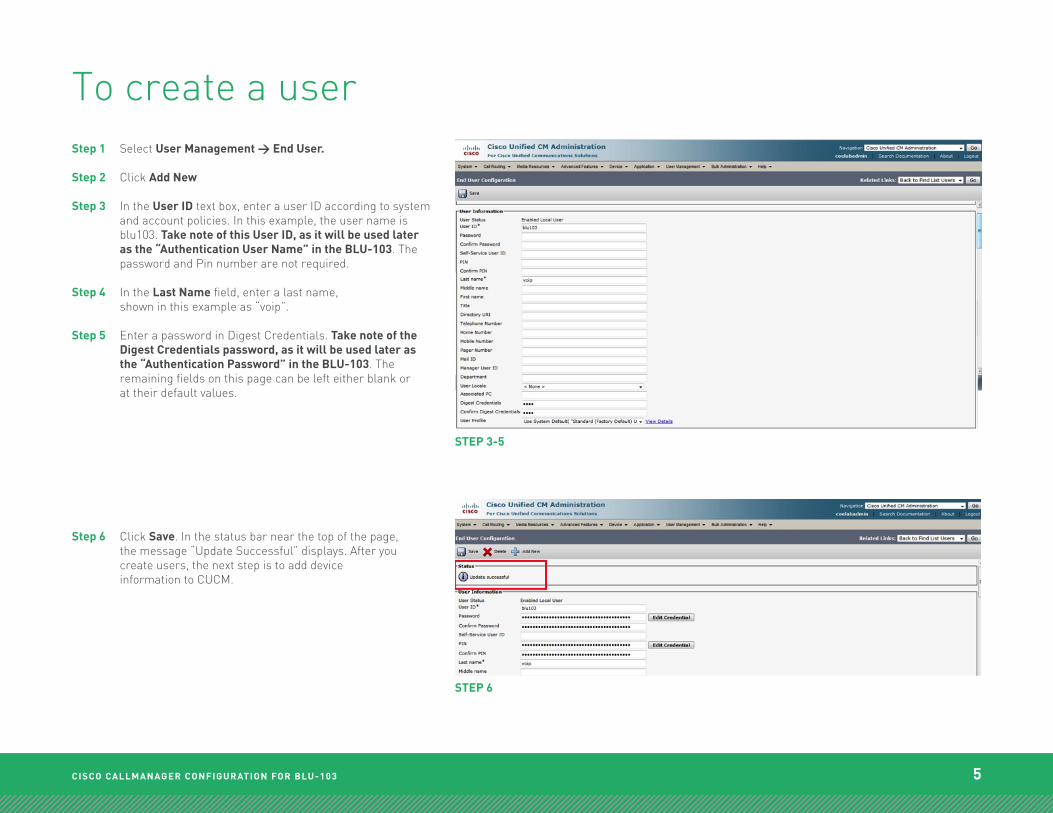
To create a userStep 1 Select User Management > End User.
Step 2 Click Add New
Step 3 In the User ID text box, enter a user ID according to system and account policies. In this example, the user name is blu103. Take note of this User ID, as it will be used later as the “Authentication User Name” in the BLU-103. The password and Pin number are not required.
Step 4 In the Last Name field, enter a last name, shown in this example as “voip”.
Step 5 Enter a password in Digest Credentials. Take note of the Digest Credentials password, as it will be used later as the “Authentication Password” in the BLU-103. The remaining fields on this page can be left either blank or at their default values.
Step 6 Click Save. In the status bar near the top of the page, the message “Update Successful” displays. After you create users, the next step is to add device information to CUCM.
STEP 3-5
STEP 6
CISCO CALLMANAGER CONFIGURATION FOR BLU-103 6
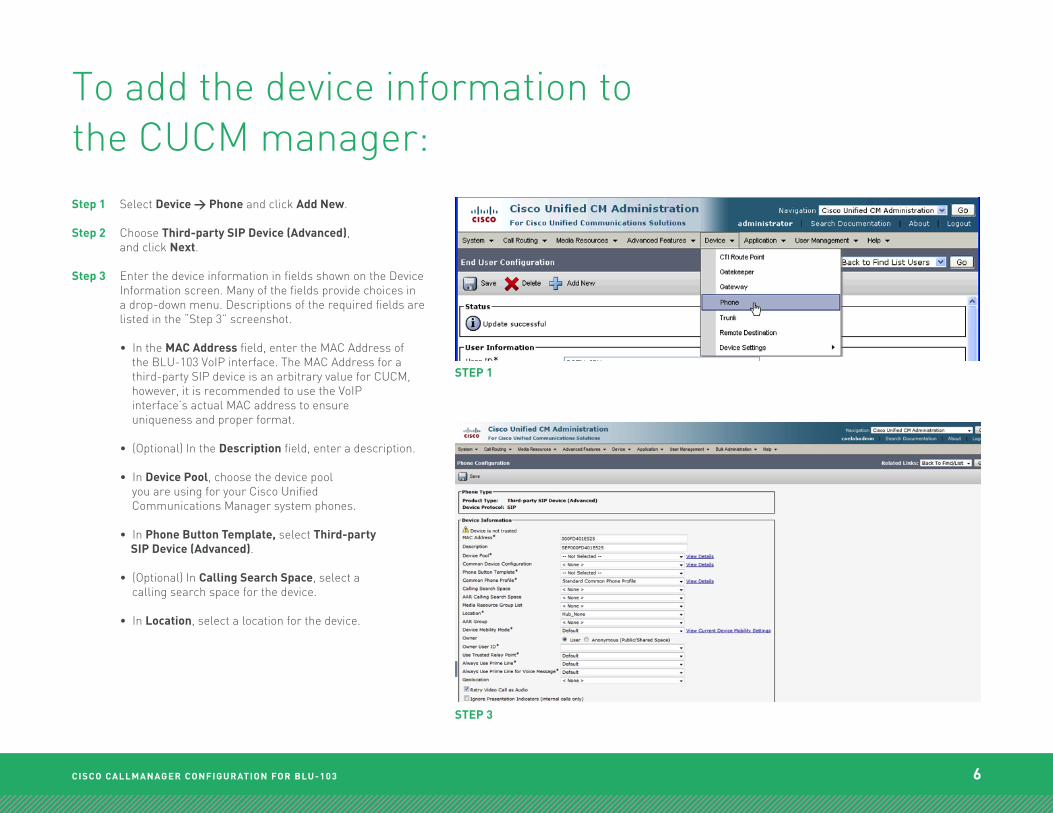
To add the device information to the CUCM manager:Step 1 Select Device > Phone and click Add New.
Step 2 Choose Third-party SIP Device (Advanced), and click Next.
Step 3 Enter the device information in fields shown on the Device Information screen. Many of the fields provide choices in a drop-down menu. Descriptions of the required fields are listed in the “Step 3” screenshot.
• In the MAC Address field, enter the MAC Address of the BLU-103 VoIP interface. The MAC Address for a third-party SIP device is an arbitrary value for CUCM, however, it is recommended to use the VoIP interface’s actual MAC address to ensure uniqueness and proper format.
• (Optional) In the Description field, enter a description.
• In Device Pool, choose the device pool you are using for your Cisco Unified Communications Manager system phones.
• In Phone Button Template, select Third-party SIP Device (Advanced).
• (Optional) In Calling Search Space, select a calling search space for the device.
• In Location, select a location for the device.
STEP 1
STEP 3
CISCO CALLMANAGER CONFIGURATION FOR BLU-103 7
Step 4 Configure the following settings in Protocol Specific Information.
• In Device Security Profile, select the profile you created for your phone security settings in step 5 of the section “To create phone security profiles.”
• In Rerouting Calling Search Space, choose an option to enable call forwarding.
• In SIP Profile, enter the SIP profile you want to use.
• In Digest User, select the user you created in step 2 of the section “To Create a User”. In this example, the user is “blu103”.
Step 5 Click Save. In the status bar near the top of the page, the message “Update Successful” displays.
Step 6 Click Apply Configuration.
Step 7 Click OK to continue.
Step 8 In the Association Information area on the left side of the window, add a new directory number (DN) by clicking on the Line [1] — Add a new DN link.
Step 9 The Directory Number Information screen displays.
To add the device information to the CUCM manager:
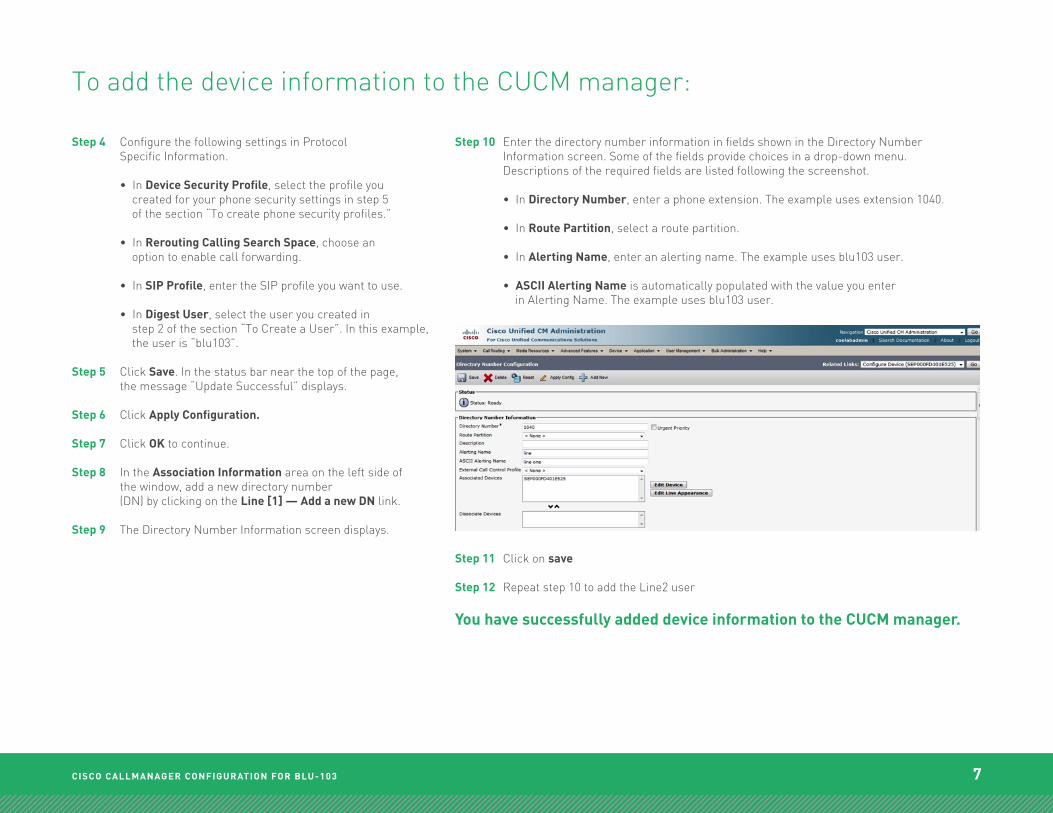
Step 10 Enter the directory number information in fields shown in the Directory Number Information screen. Some of the fields provide choices in a drop-down menu. Descriptions of the required fields are listed following the screenshot.
• In Directory Number, enter a phone extension. The example uses extension 1040.
• In Route Partition, select a route partition.
• In Alerting Name, enter an alerting name. The example uses blu103 user.
• ASCII Alerting Name is automatically populated with the value you enter in Alerting Name. The example uses blu103 user.
Step 11 Click on save
Step 12 Repeat step 10 to add the Line2 user
You have successfully added device information to the CUCM manager.

CISCO CALLMANAGER CONFIGURATION FOR BLU-103 8
BLU-103 ConfigurationNext, we’ll focus on setting up the BLU-103 configuration to match the settings that were used in CallManager.
Step 1 Open the Audio Architect software and discover the BLU-103 device
Step 2 Add the discovered BLU-103 to the venue
Step 3 Double-click on the device to view its internal audio configuration. Single-click on the “VoIP Input” Processing Object. Go to the properties grid.
Step 4 Under the “VoIP Network” category in the Properties select “DHCP”, the VoIP interface will obtain an IP address automatically from a DHCP server. Otherwise, set “static” and manually enter an appropriate static IP Address, Subnet Mask, DNS and Gateway for the VoIP interface.
Step 5 In the same tab, set “VLAN enabled ” to “ Checked ”, if your VoIP network uses a tagged VLAN. If the network uses an untagged VLAN or no VLAN, leave this value as “Disabled”. If VLAN is enabled, enter the correct VLAN ID
FIGURE 4

CISCO CALLMANAGER CONFIGURATION FOR BLU-103 9
Step 6 Under properties go to “Line 1 Protocol” tab • Enter the User Name and Authentication Name assigned to you when signing up for VoIP service • Enter the password to get authenticated to the VoIP service • Enter the Display Name in the field provided. This is also known as Caller ID. • Enter VoIP server address (i.e., Cisco CallManager’s address) in the “Domain Name” field. • STUN and SRTP is disabled by default • Default Transport is Auto which uses UDP
Step 7 To register the Line 2 go to “Line 2 Protocol” and repeat the above step 6
Step 8 Go online in Audio Architect
Step 9 The “Account Status” will be “Proxy Registered” once the registration is successful
Step 10 If the registration is unsuccessful it will display messages such as “Not configured”, “AUTHENTICATION_FAILURE” ….
BLU-103 ConfigurationThis section focuses on setting up the BLU-103 configuration to match the settings that were used in CallManager.
FIGURE 7

CISCO CALLMANAGER CONFIGURATION FOR BLU-103 10
Making calls from BLU-103 Follow the below steps to make a call
Placing a call from the DUT/AA is performed only if the user is registered to the network [Check the “account status” field]. Once the user is registered, follow the below steps to make a call.
Step 1 Double-click on the “VoIP Input” Processing Object to open its default panel.
Step 2 Enter the registered number you wish to dial either from Line 1 or Line 2. (use the tabs at the top of the panel to switch between the two lines)
Step 3 Click on the call button [Visible in green]
Step 4 Once the conversation is done press the disconnect button [Visible in red]