cisco imc management pack user guide, release 1 · pdf filecisco imc management pack user...
TRANSCRIPT

Cisco IMC Management Pack User Guide, Release 1.xFor Microsoft System Center 2012, 2012 SP1 and 2012 R2 - Operations Manager
March 2015
Americas HeadquartersCisco Systems, Inc.170 West Tasman DriveSan Jose, CA 95134-1706 USAhttp://www.cisco.comTel: 408 526-4000
800 553-NETS (6387)Fax: 408 527-0883
Text Part Number:

THE SPECIFICATIONS AND INFORMATION REGARDING THE PRODUCTS IN THIS MANUAL ARE SUBJECT TO CHANGE WITHOUT NOTICE. ALL STATEMENTS, INFORMATION, AND RECOMMENDATIONS IN THIS MANUAL ARE BELIEVED TO BE ACCURATE BUT ARE PRESENTED WITHOUT WARRANTY OF ANY KIND, EXPRESS OR IMPLIED. USERS MUST TAKE FULL RESPONSIBILITY FOR THEIR APPLICATION OF ANY PRODUCTS.
THE SOFTWARE LICENSE AND LIMITED WARRANTY FOR THE ACCOMPANYING PRODUCT ARE SET FORTH IN THE INFORMATION PACKET THAT SHIPPED WITH THE PRODUCT AND ARE INCORPORATED HEREIN BY THIS REFERENCE. IF YOU ARE UNABLE TO LOCATE THE SOFTWARE LICENSE OR LIMITED WARRANTY, CONTACT YOUR CISCO REPRESENTATIVE FOR A COPY.
The Cisco implementation of TCP header compression is an adaptation of a program developed by the University of California, Berkeley (UCB) as part of UCB’s public domain version of the UNIX operating system. All rights reserved. Copyright © 1981, Regents of the University of California.
NOTWITHSTANDING ANY OTHER WARRANTY HEREIN, ALL DOCUMENT FILES AND SOFTWARE OF THESE SUPPLIERS ARE PROVIDED “AS IS” WITH ALL FAULTS. CISCO AND THE ABOVE-NAMED SUPPLIERS DISCLAIM ALL WARRANTIES, EXPRESSED OR IMPLIED, INCLUDING, WITHOUT LIMITATION, THOSE OF MERCHANTABILITY, FITNESS FOR A PARTICULAR PURPOSE AND NONINFRINGEMENT OR ARISING FROM A COURSE OF DEALING, USAGE, OR TRADE PRACTICE.
IN NO EVENT SHALL CISCO OR ITS SUPPLIERS BE LIABLE FOR ANY INDIRECT, SPECIAL, CONSEQUENTIAL, OR INCIDENTAL DAMAGES, INCLUDING, WITHOUT LIMITATION, LOST PROFITS OR LOSS OR DAMAGE TO DATA ARISING OUT OF THE USE OR INABILITY TO USE THIS MANUAL, EVEN IF CISCO OR ITS SUPPLIERS HAVE BEEN ADVISED OF THE POSSIBILITY OF SUCH DAMAGES.
Cisco and the Cisco logo are trademarks or registered trademarks of Cisco and/or its affiliates in the U.S. and other countries. To view a list of Cisco trademarks, go to this URL: www.cisco.com/go/trademarks. Third-party trademarks mentioned are the property of their respective owners. The use of the word partner does not imply a partnership relationship between Cisco and any other company. (1110R)
Any Internet Protocol (IP) addresses and phone numbers used in this document are not intended to be actual addresses and phone numbers. Any examples, command display output, network topology diagrams, and other figures included in the document are shown for illustrative purposes only. Any use of actual IP addresses or phone numbers in illustrative content is unintentional and coincidental.
Cisco IMC Management Pack User Guide, Release 1.x© 2015 Cisco Systems, Inc. All rights reserved.

C O N T E N T S
Preface 1
Objectives 1
Audience 1
Command Syntax Conventions 1
Overview 1-1
About Cisco IMC Management Pack 1-1
System Requirements 1-1
Hardware 1-1
Operating System 1-2
Software 1-2
Supported Cisco IMC Management Pack Versions 1-2
Introduction 2-1
Knowledge Articles 2-1
Group UCS Servers for Monitoring 2-1
Dedicated Service Machine for Cisco IMC Group Monitoring 2-1
PowerShell Cmdlets 2-2
Installing and Configuring the Cisco IMC Management Pack 3-3
Installing the Management Pack 3-3
Silent Installation 3-4
Installing Cisco IMC Management Service 3-5
Adding the Firewall Exception 3-5
Upgrading the Management Pack 3-5
Upgrading the Management Pack to Release 1.2.1 3-5
Adding a Cisco IMC Group 3-6
Adding or updating Cisco IMC Groups using PowerShell Cmdlets 3-7
Creating an Account 3-7
Associating an Account to a Run-As Profile 3-8
Uninstalling the Management Pack 3-8
Monitoring Cisco IMC using SCOM 4-11
Accessing the Monitoring Pane 4-11
IMC Group State View 4-11
iiiCisco IMC Management Pack User Guide, Release 1.x

Contents
Manually Loading Cisco IMC Inventory Data 4-12
Manually Loading Cisco IMC Fault Data 4-12
Cisco IMC Management Service 4-12
IMC Server Group(s) 4-12
IMC Server Views 4-13
Launching the CIMC Web Interface on a Cisco UCS Server 4-13
Launching the KVM Console on a Cisco UCS Server 4-13
Adjusting the Object Discovery Interval 4-14
PowerShell Cmdlets for Cisco IMC Management Pack 5-1
Importing Cmdlets from the PowerShell Module 5-1
Adding or Updating Cisco IMC Groups 5-1
Retrieving, enabling, or disabling Cisco IMC Management Pack Rules 5-4
Troubleshooting 6-17
Adjusting the Fault Polling Interval 6-17
Remapping the Severity 6-18
Cisco IMC Management Service Log 6-18
Logging Levels 6-19
Changing the Logging Levels 6-19
Back Up Log Files 6-19
Purge Log Files 6-19
Generating Cisco IMC Technical Support File 6-19
ivCisco IMC Management Pack User Guide, Release 1.x

Preface
This chapter includes the following sections:
• Objectives, page 1
• Audience, page 1
• Command Syntax Conventions, page 1
ObjectivesThis user guide describes the procedure for installing and configuring the Cisco IMC Management Pack, and settings for registration and monitoring Cisco UCS Server.
Note In this document, Cisco UCS Servers can be read as Cisco UCS C-Series or Cisco UCS E-Series Servers.
AudienceThis user guide is intended primarily for data center administrators with responsibilities and expertise in one or more of the following:
• Server administration
• Storage administration
• Network administration
• Network security
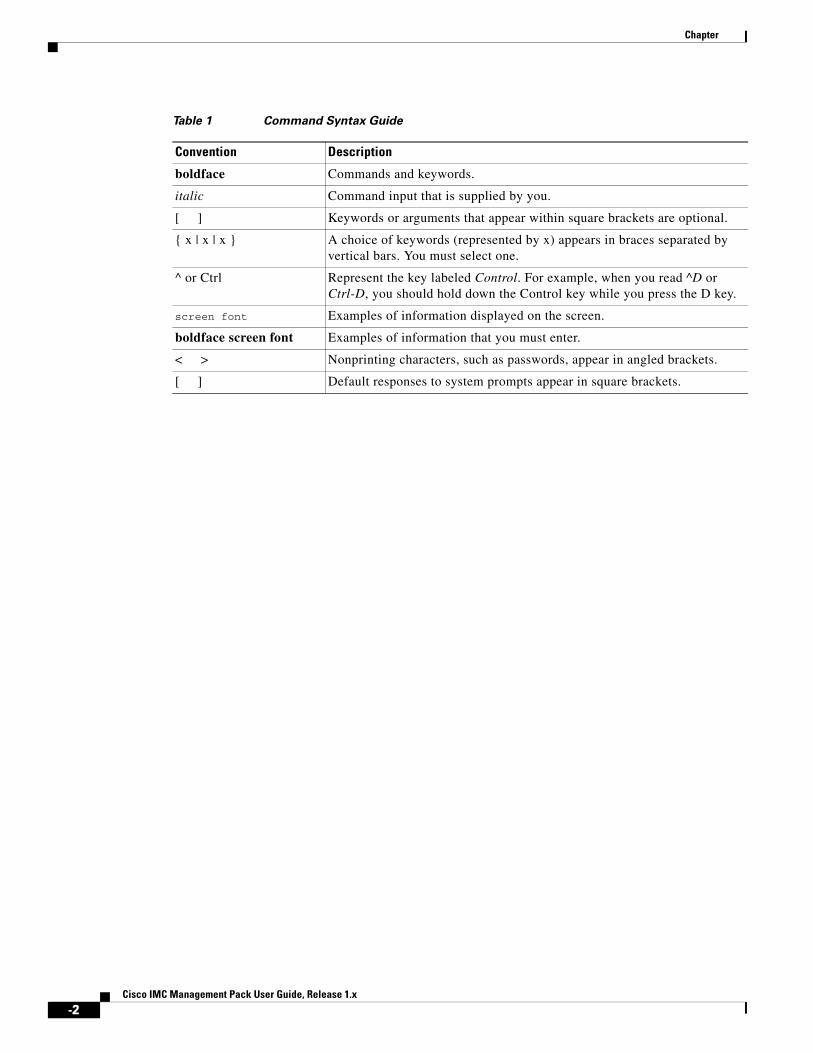
Command Syntax ConventionsTable 1 describes the syntax used with the commands in this document.
-1Cisco IMC Management Pack User Guide, Release 1.x
Chapter
Table 1 Command Syntax Guide
Convention Description
boldface Commands and keywords.
italic Command input that is supplied by you.
[ ] Keywords or arguments that appear within square brackets are optional.
{ x | x | x } A choice of keywords (represented by x) appears in braces separated by vertical bars. You must select one.
^ or Ctrl Represent the key labeled Control. For example, when you read ^D or Ctrl-D, you should hold down the Control key while you press the D key.
screen font Examples of information displayed on the screen.
boldface screen font Examples of information that you must enter.
< > Nonprinting characters, such as passwords, appear in angled brackets.
[ ] Default responses to system prompts appear in square brackets.
-2Cisco IMC Management Pack User Guide, Release 1.x

Cis
C H A P T E R 1
OverviewThis chapter contains the following sections:
• About Cisco IMC Management Pack, page 1-1
• System Requirements, page 1-1
About Cisco IMC Management PackMicrosoft System Center Operations Manager (SCOM) 2012 provides infrastructure monitoring that’s flexible and cost-effective, helps ensure the predictable performance and availability of vital applications, and offers comprehensive monitoring for your data center and cloud, both private and public.
The Cisco IMC Management Pack is a definition file that contains predefined monitoring settings that enables an agent to monitor a group of Cisco Integrated Management Controllers of standalone Cisco UCS C-series and E-series servers. It contains object discoveries for discovering the UCS servers and contains rules to monitor the server health as well as raise alerts for the faults occurring on these servers.
System RequirementsThis section describes the system requirements to install and configure the Cisco IMC Management Pack.
Hardware Ensure that the following hardware requirements are met:
• Processor Architecture—64-bit dual-core processor or above
• Memory—8 GB or higher
• Disk space—25 MB
• Network connection—1 MBps or faster
1-1co IMC Management Pack User Guide, Release 1.x

Chapter 1 OverviewSystem Requirements
Operating SystemEnsure that the 64-bit version of the following operating systems are installed with the latest service packs:
• Windows Server 2008 R2
• Windows Server 2012
• Windows Server 2012 R2.
SoftwareEnsure that the following software versions are installed on the server:
• Windows PowerShell 3.0 or above
• .NET Framework 4 or above
• System Center 2012 or 2012 SP1 or 2012 R2, Operations Manager management server and operations console
Supported Cisco IMC Management Pack VersionsThe following table shows the Cisco IMC Management Pack versions for the corresponding Cisco IMC Management Pack releases:
Cisco IMC Release Cisco IMC Management Pack Version
Release 1.0.1 For C-Series Servers: Cisco IMC version 1.5(1f) or higher
Release 1.1.1 • For C-Series Servers: Cisco IMC version 1.5(4) or higher
• For E-Series Servers: Cisco IMC version 2.2(1) or higher
Release 1.2.1 • For C-Series Servers: Cisco IMC version 1.5(4) or higher
• For E-Series Servers: Cisco IMC version 2.2(1) or higher
1-2Cisco IMC Management Pack User Guide, Release 1.x
Cis
C H A P T E R 2
IntroductionThe Cisco IMC Management Pack comprises key features, listed here briefly. The subsequent chapters in this document elaborate these features further.
This chapter contains the following sections:
• Knowledge Articles, page 2-1
• Group UCS Servers for Monitoring, page 2-1
• Dedicated Service Machine for Cisco IMC Group Monitoring, page 2-1
• PowerShell Cmdlets, page 2-2
Knowledge ArticlesIt addition, the management pack also consists of a knowledge articles that contains error and troubleshooting information, alerts, and reports to help you correct the problems detected by the Cisco Integrated Management Controllers running on the UCS servers.
Group UCS Servers for MonitoringThe management pack allows you visibility into the health, performance and availability of standalone Cisco Servers through a single, familiar, and easy-to- use-interface. This management pack allows you to group a set of Cisco UCS Servers and monitor them as a single entity. The Cluster View allows you to see the overall health state of all the groups that you monitor. The management pack contains rules that monitor Cisco UCS servers.
Dedicated Service Machine for Cisco IMC Group MonitoringEffective with release 1.2.1, when you choose a service machine while adding an IMC group in the Add Monitoring Wizard, it means all the monitors, object discoveries, and rules required to monitor an IMC group execute on the Service Machine dedicatedly and do not use the resources on any other computer for monitoring this particular IMC group. The Management Servers however, will continue to analyze the return data from the Service Machine and store them in the database. A single Service Machine can also monitor multiple IMC groups.
2-1co IMC Management Pack User Guide, Release 1.x

Chapter 2 IntroductionPowerShell Cmdlets
PowerShell CmdletsEffective with release 1.2.1, Cisco IMC Management Pack supports the use of cmdlets that can be imported from a PowerShell Module. You can use these cmdlets to perform actions such as adding a new IMC group to the Operations Manager group, updating an existing group, or disabling/enabling existing rules for a group.
2-2Cisco IMC Management Pack User Guide, Release 1.x
Cis
C H A P T E R 3
Installing and Configuring the Cisco IMC Management PackThis chapter contains the following sections:
• Installing the Management Pack, page 3-3
• Installing Cisco IMC Management Service, page 3-5
• Adding the Firewall Exception, page 3-5
• Upgrading the Management Pack, page 3-5
• Adding a Cisco IMC Group, page 3-6
• Creating an Account, page 3-7
• Associating an Account to a Run-As Profile, page 3-8
• Uninstalling the Management Pack, page 3-8
Installing the Management Pack
Step 1 Launch the Cisco IMC Management Pack Installer.
Note If the Operations Manager console is open and you launch the installer a corresponding error message displays asking you to close the console.
Step 2 In the Setup Wizard page, click Next.
Step 3 In the License Agreement page, do the following steps:
a. Review the End User License Agreement.
b. Click the I accept the terms in the License Agreement radio button.
c. Click Next.
Step 4 In the Product Registration page, do the following steps:
a. In the Username field, enter your username.
b. (Optional) In the Organization field, enter the name of the company.
c. Click Next.
Step 5 In the Setup Type page, choose one of the following options and then click Next:
3-3co IMC Management Pack User Guide, Release 1.1

Chapter 3 Installing and Configuring the Cisco IMC Management PackInstalling the Management Pack
• Custom—This option allows you to choose the components that you want to install. After completing the option go to Step 6.
• Complete—This option allows you to install all the components of the Cisco IMC Management Pack. After completing the option go to Step 7.
Step 6 In the Features to Install page, select the required components from the options displayed. The options displayed are:
• Cisco IMC Management Pack—Contains the management pack and its related components.
• Cisco IMC Management Service—Provides a bridge between SCOM and the Cisco server. This Proxy Agent connects to the server and provides the server data to the management pack.
Note You can import Cisco IMC Management Pack on any management server in the management group.
Note If you decided to install only Cisco IMC Management Service you need to first install the Cisco IMC Management Pack.
Note You must import Cisco IMC Management Pack in the management group in order to install the Cisco IMC Management Service on other management servers.
Step 7 In the Select Installation Folder page, click Browse and navigate to the installation folder.
Step 8 Click Next.
Step 9 Click Install to start the installation.
Step 10 In the Installation Complete page, click Finish to exit.
Note The Update existing IMC instances check box on the Installation Complete page is checked by default. If you wish to update the instances later, uncheck the check box and run the Update-ImcScomAllGroups cmdlet whenever you wish to update the instances. For more details see the Adding or updating Cisco IMC Groups using PowerShell Cmdlets section.
Note In order to monitor all IMC server faults, we recommend you to update the existing Cisco IMC instances.
Silent InstallationEffective with Release 1.1.1, Cisco IMC Management Pack can be installed in a non interactive manner.
Step 1 Run command prompt with Administrative privilege.
Step 2 Navigate to the directory where the installer is present.
Step 3 To perform a silent installation of Cisco IMC Management Pack Release 1.1.1, run the command Cisco.IMC.MP.Setup.v1.1.1.0-x64.msi /quiet.
3-4Cisco IMC Management Pack User Guide, Release 1.1
Chapter 3 Installing and Configuring the Cisco IMC Management PackInstalling Cisco IMC Management Service
Installing Cisco IMC Management Service
Step 1 Launch the Cisco IMC Management Pack Installer.
Step 2 In the Setup Wizard page, click Next.
Step 3 In the License Agreement page, do the following:
a. Review the End User License Agreement.
b. Click the I accept the terms in the License Agreement radio button.
c. Click Next.
Step 4 In the Product Registration page, do the following:
a. In the Username field, enter your username.
b. (Optional) In the Organization field, enter the name of the company.
c. Click Next.
Step 5 In the Features to Install page, choose the Install Cisco IMC Management Service option and click Next to proceed.
Note The option for importing the management pack is disabled if the management pack has already been installed.
Step 6 In the Select Installation Folder page, browse to the new folder location to install the management service.
Step 7 Click Install to start the installation.
Step 8 In the Installation Complete page, click Finish to exit.
Adding the Firewall ExceptionBefore you start monitoring your Cisco UCS domain, enable the following inbound rules in the Windows Firewall with Advanced Security on the computer where you run the Cisco IMC Management Service:
• File and Printer Sharing:
– Echo-Request—ICMPv4-In
– Echo-Request—ICMPv6-In
• Remote Service Management (RPC)
Upgrading the Management Pack
Upgrading the Management Pack to Release 1.2.1To upgrade Cisco UCS C-Series Management Pack Release 1.0.1 and 1.1.1 to the latest Management Pack, follow these steps:
3-5Cisco IMC Management Pack User Guide, Release 1.1

Chapter 3 Installing and Configuring the Cisco IMC Management PackAdding a Cisco IMC Group
Step 1 Run the installer of Cisco IMC Management Pack Release 1.2.1 on the Management Server where the previous release was installed.
Step 2 When previous installation is detected, click Upgrade. Management pack will be upgraded to Cisco IMC Management Pack Release 1.2.1.
Step 3 Once the installation is complete, check the Update existing IMC instances check box and click Finish.
Step 4 Run the management pack installer 1.2.1 on each management server where Cisco UCS C-Series Management Service or Cisco IMC Management Service is installed.
Note The Update existing IMC instances check box is checked by default. Upon completing installation, the PowerShell window is displayed where the existing IMC instances in the Cisco IMC Management Pack are updated.
Adding a Cisco IMC Group
Step 1 In the Operations console, click the Go tab.
Step 2 From the drop-down list, choose Authoring.
Step 3 In the Authoring column, choose Management Pack Templates > Cisco IMC.
Step 4 In the Tasks pane, click the Add Monitoring Wizard. The Add Monitoring Wizard page opens.
Step 5 In the Select Monitoring Type page, select Cisco IMC as the monitoring type.
Step 6 Click Next.
Step 7 In the Discovery Methods page, define the Cisco IMC Discovery rule as follows:
a. Discover by IP Combinations—Specify a range of IP addresses range (add hyphen) and multiple single IP address (separated by comma).
Example: 10.105.219.15-10.105.219.129,10.104.200.35,10.104.100.133,10.106.233.136-10.106.233.200
Note You can enter 254 IP addresses in this page.
b. Discover by IP Range—Specify starting and ending IP address.
c. Discover via Subnet mask—Specify the network address and subnet mask.
d. Click Next.
Step 8 In the Discovery Results page, unselect the individual IP addresses to be excluded.
Step 9 Click Next.
Step 10 In the Connection Parameters page, verify (modify if required) the following:
a. Connection parameters—Port number and connection mode
b. Proxy server details
c. Service machine
d. Click Next.
Step 11 In the Group Name page, specify a name for the group of the standalone Cisco IMC Servers.
3-6Cisco IMC Management Pack User Guide, Release 1.1

Chapter 3 Installing and Configuring the Cisco IMC Management PackCreating an Account
Step 12 (Optional) In the Description field, enter the description for the group.
Step 13 To add an account, click Run As Account.
a. From the Add Run As Account dialog choose Run As Account from the drop-drop list.
Or
b. Click New button.
c. Once the Create Run As Account dialogs opens enter the following: Display Name, Description (optional), Account Name, Password and Confirm Password to create a new Run As Account.
Step 14 Click Next.
Note In Management Pack section of Group Name Page, check the Use existing management pack or create new checkbox to save the current Cisco IMC group in a different management pack.
Note The Default Management Pack is the first management pack that appears in the list when you are creating an Override. Do not save anything in the Default Management Pack.
Step 15 Review the properties that are displayed in the summary page, and click Create.
Note If the Run-As Account is not associated while creating the Cisco IMC Group, then you must associate it manually to the Run As Profile created by this management pack. For more information, see Associating an Account to a Run-As Profile, page 3-8.
Adding or updating Cisco IMC Groups using PowerShell CmdletsYou can add a new IMC group or update existing group(s) using PowerShell cmdlets. For more details see Adding or Updating Cisco IMC Groups, page 5-1
Creating an AccountYou need to configure a Cisco IMC Group account if you did not associate a Run-As Account with the IMC Group while adding the template in the Add Monitoring Wizard, or if you wished to modify the current account association for the IMC Group.
To create an account for the Cisco IMC group, create a Run-As Account with the Cisco IMC username and password, to be used by the management pack.
See https://technet.microsoft.com/en-us/library/hh321655.aspx for detailed instructions on how to create a Run-As account.
Note On the General Properties page, make sure to select Simple Authentication as the Run-As Account Type.
3-7Cisco IMC Management Pack User Guide, Release 1.1

Chapter 3 Installing and Configuring the Cisco IMC Management PackAssociating an Account to a Run-As Profile
Note If the Cisco IMC is configured for domain authentication, enter the account name on the Credentials page in the format <username@domainname> where domainname is the LDAP domain name configured in Cisco IMC.
Note A Cisco IMC user account with read-only privileges can discover and monitor Cisco IMC from the Operations Manager console.
Associating an Account to a Run-As ProfileAfter you create an account, you need to associate the account with the IMC Group’s Run-As Profile. A Run-As Profile is created with the same name as the IMC Group name in Operations Manager.
See https://technet.microsoft.com/en-us/library/hh212825.aspx for detailed instructions on how to associate an account with a Run-As Profile.
Note An account associated with the IMC Group Run-As Profile is used to establish a connection with all the Cisco IMC Internet protocols within the IMC Group.
Uninstalling the Management Pack
Step 1 In the Operations console, click the Go tab.
Step 2 From the drop-down list, choose Administration.
Step 3 In the Administration column, click Management Packs.
A list of management packs appear in the right panel.
Step 4 Choose Cisco IMC Management Pack and right-click Properties.
Step 5 Click the Dependencies tab.
Step 6 Make a list of all the entries under Management Packs that depend on this management pack.
Step 7 Click Cancel.
Step 8 In the SCOM Operations Manager page, choose the management pack and click Delete to delete all the dependent management packs individually.
Step 9 Open Control Panel. Select Program and Features.
Step 10 Remove Cisco IMC Management Pack.
Note Step 9 through Step 10 should be performed on all the Management Servers where the Management Service was installed.
Alternatively, you could complete the following steps to remove the Cisco IMC Management Service:
Step 11 Run the installer a second time.
3-8Cisco IMC Management Pack User Guide, Release 1.1

Chapter 3 Installing and Configuring the Cisco IMC Management PackUninstalling the Management Pack
Step 12 Click Next.
The Maintenance page appears.
Step 13 Click Remove.
The Ready to Remove page appears.
Step 14 Click Remove to completely remove the Cisco IMC management service.
Note The installer tries to remove the management pack from the management group, even if only service is installed on that machine. In case you were unable to remove the management pack, the installer continues to uninstall the components, but you need to manually remove the management pack from the SCOM Console.
3-9Cisco IMC Management Pack User Guide, Release 1.1

Chapter 3 Installing and Configuring the Cisco IMC Management PackUninstalling the Management Pack
3-10Cisco IMC Management Pack User Guide, Release 1.1
Cis
C H A P T E R 4
Monitoring Cisco IMC using SCOMThis chapter contains the following sections:
• Accessing the Monitoring Pane, page 4-11
• IMC Group State View, page 4-11
• Cisco IMC Management Service, page 4-12
• IMC Server Group(s), page 4-12
• IMC Server Views, page 4-13
• Launching the CIMC Web Interface on a Cisco UCS Server, page 4-13
• Launching the KVM Console on a Cisco UCS Server, page 4-13
• Adjusting the Object Discovery Interval, page 4-14
Accessing the Monitoring PaneAfter installing and configuring Cisco IMC Management Pack, you can use the Monitoring pane in SCOM to view the summary and the components of the Cisco UCS Server.
Step 1 In the Operations console, click the Go tab.
Step 2 From the drop-down menu, choose Monitoring.
Step 3 Expand the Cisco IMC folder.
IMC Group State ViewYou can use the IMC Group State View to provide a consolidated view of all the groups of Cisco IMC that are monitored by this management pack. This view also provides information about the service machine where the agent is hosted for the group. The State column in the IMC Group State View signifies the health of that group, and the following are the available states:
• Critical—Indicates that the health of one or more Cisco UCS Servers within that group is critical.
• Warning—Indicates that the health of one or more Cisco UCS servers within that group is unhealthily and requires attention.
4-11co IMC Management Pack User Guide, Release 1.x

Chapter 4 Monitoring Cisco IMC using SCOMIMC Server Group(s)
• Healthy—Indicates that all the Cisco UCS servers in that group are healthy.
Manually Loading Cisco IMC Inventory Data
Step 1 In the Operations console, choose Cisco IMC> IMC Group State View.
Step 2 Choose the group for which the Cisco UCS Server data must be loaded.
Step 3 In the Tasks pane, choose Cisco IMC Servers (<Group>) Tasks.
Step 4 Click Load Cisco IMC Inventory Data to launch the task and run it.
Manually Loading Cisco IMC Fault Data
Step 1 In the Operations console, choose Cisco IMC> IMC Group State View.
Step 2 Choose the group for which the Cisco UCS server data must be loaded.
Step 3 In the Tasks pane, choose Cisco IMC Servers (<Group>) Tasks.
Step 4 Click Load Cisco IMC Fault Data to launch the task and run it.
Cisco IMC Management ServiceThe Cisco IMC Management Service folder provides the following views:
• Alert View—Displays the alerts that are generated if any faults or service disruptions occur in any of the Cisco IMC Management Services.
• Performance View—Displays the performance of a Cisco IMC Management Service that is based on various counters such as processor time, user time, and threads.
Note The Performance View does not show the performance of the Cisco IMC.
• State View—Displays the health of the Cisco IMC Management Services.
Note You can start or stop the services monitored from the Cisco IMC NT Service Tasks section.
IMC Server Group(s)The IMC Server Group(s) folder contains a list of all the IMC servers groups that are monitored by this management pack. Each group listed in this section has the following views:
• Alert View—Displays the alerts that are related to all the Cisco UCS Servers in a group. Various alert parameters such as the icon, source, name, description, and custom fields provide more information about the fault.
4-12Cisco IMC Management Pack User Guide, Release 1.x

Chapter 4 Monitoring Cisco IMC using SCOMIMC Server Views
Note The Knowledge section of the alert provides information about the resolution of the fault.
• Miscellaneous Alert View—Displays all the alerts encountered during discovery of Cisco UCS Servers in the group. The types of alerts are:
• Ping Failure—Displays all the IPs for which the ping has failed.
Note The Ping Failure function is not applicable to Cisco IMC Release 1.2.1.
• Login Failure—Displays all the IPs for which the login has failed.
• Unsupported IMC Server Model—Displays all the Cisco IMC IP addresses whose model is not supported.
• Unsupported IMC Version—Displays all the IPs which does not have the supported Cisco IMC version.
• State View—Displays all the Cisco UCS Servers. The Details View pane displays the Cisco UCS server details such as the model, serial number, available memory, IP address, and Cisco UCS Server name.
IMC Server ViewsThe IMC Server Views are specific to a particular Cisco UCS server in a group.
The following views are available and can be launched for each Cisco UCS server:
• Diagram View—Displays the health and detailed information about the Cisco UCS server.
• Alert View—Displays the alerts for a specific Cisco UCS Server. The Knowledge section of Alert Details provides information about the fault summary, fault code, fault description, and how to resolve the fault.
Launching the CIMC Web Interface on a Cisco UCS Server
Step 1 In the Operations console, choose IMC server group(s) > IMC Group > State View.
Step 2 Choose the target Cisco UCS Server on which the CIMC web interface must be launched.
Step 3 In the Tasks pane, choose IMC Server Tasks.
Step 4 Click Launch CIMC to launch the CIMC web interface.
Launching the KVM Console on a Cisco UCS Server
Note The KVM console requires Java Version 1.6 Update (14) or higher.
4-13Cisco IMC Management Pack User Guide, Release 1.x
Chapter 4 Monitoring Cisco IMC using SCOMAdjusting the Object Discovery Interval
Note To launch the KVM console, you must have valid Cisco IMC user credentials with administrator or user role privileges and must be associated with a group profile.
Step 1 In the Operations console, choose IMC Server group(s) > IMC Group > State View.
Step 2 Choose the target Cisco UCS server on which the KVM console must be launched.
Step 3 In the Tasks pane, choose IMC Server Tasks.
Step 4 Click Launch KVM to launch the KVM console.
Note When prompted, we recommend you to set the PowerShell execution policy to AllSigned or RemoteSigned. The user can then choose either [R] Run once or [A] Always run option to set the execution policy.
Note The KVM console cannot be launched on a Cisco UCS server, if the connection to the Cisco IMC is established using a proxy server.
Adjusting the Object Discovery IntervalThe discovery interval is the specified time interval for polling the details of Cisco IMC in a group. This section describes the steps required to change the polling intervals for the objects.
Table 4-1 details the default discovery interval for the various Cisco IMC objects.
Step 1 In the Operations console, click the Go tab.
Step 2 From the drop-down list, choose Authoring.
Step 3 In the Authoring column, choose Authoring > Management Pack templates > Cisco IMC.
Step 4 Choose the template pack and right-click to choose View Management Pack Objects > Object Discoveries.
Step 5 In the Object Discovery page, choose the object and right-click Override.
Step 6 Choose Override > Override the Object Discovery > For All Objects of Class.
Step 7 In the Override Properties page, do the following:
a. Check the Override checkbox in the Interval seconds parameter option.
b. Modify the Override value.
Table 4-1 Default Discovery Interval for Cisco IMC Objects
Serial Number Object NameDefault Discovery Interval (seconds)
1 IMC Servers (Group) Discovery 14400
2 IMC Server Discovery 21600
4-14Cisco IMC Management Pack User Guide, Release 1.x

Chapter 4 Monitoring Cisco IMC using SCOMAdjusting the Object Discovery Interval
c. Click OK.
The IMC Server Discovery and IMC server Group (<Group Name>) Discovery interval values can be overridden by any value. However, it is not recommended to have interval values lower than 720 and 600 seconds for the IMC Server Discovery and IMC Group (<Group Name>) Discovery objects respectively.
4-15Cisco IMC Management Pack User Guide, Release 1.x

Chapter 4 Monitoring Cisco IMC using SCOMAdjusting the Object Discovery Interval
4-16Cisco IMC Management Pack User Guide, Release 1.x

Cis
C H A P T E R 5
PowerShell Cmdlets for Cisco IMC Management PackCisco IMC Management Pack supports the use of cmdlets that can be imported from a PowerShell Module. These cmdlets are used to perform functions such as adding a new Cisco IMC server group to the SCOM management group, updating an existing group or altering existing rules for a Cisco IMC server group. Previously, these actions had to be performed manually.
This chapter includes the following sections:
• Importing Cmdlets from the PowerShell Module
• Adding or Updating Cisco IMC Groups
• Retrieving, enabling, or disabling Cisco IMC Management Pack Rules
Importing Cmdlets from the PowerShell ModuleComplete the following steps to import cmdlets to the PowerShell session.
Step 1 On the management server where the IMC Management Pack PowerShell Module is installed, open Operations Manager Shell.
Step 2 Import the CiscoImcScomPs module. All the cmdlets would then be available in the session.
Step 3 To see all cmdlets in CiscoUcsScomPs module, use the Get-Command -Module CiscoImcScomPs command in the PowerShell window.
Note In case you are using another PowerShell session, import the OperationsManager module before importing the CiscoImcScomPs module.
Adding or Updating Cisco IMC Groups
Add-ImcScomGroup
Adds a new IMC Group to the SCOM Management Group. IMC Group can contain multiple IMC IP addresses via IP address range, subnet mask or comma separated values. You may specify the proxy details used to connect to these IMC. If the port is not specified, the default port (80/443) will be used. You need not specify the Run-As-Account details if you intend to manually create or assign it later.
5-1co IMC Management Pack User Guide, Release 1.x

Chapter 5 PowerShell Cmdlets for Cisco IMC Management Pack
Syntax:Add-ImcScomGroup -GroupName <string> -NetworkAddress <string> -SubnetMask <string> -MachineName <string> -RunAsAccount <string> -RunAsCredential <pscredential> [-GroupDescription <string>] [-NoSsl] [-Port <int>] [-ProxyHost <string>] [-ProxyPort <int>] [-ProxyUsername <string>] [-ProxyPassword <string>]Add-ImcScomGroup -GroupName <string> -NetworkAddress <string> -SubnetMask <string> -MachineName <string> [-GroupDescription <string>] [-NoSsl] [-Port <int>] [-ProxyHost <string>] [-ProxyPort <int>] [-ProxyUsername <string>] [-ProxyPassword <string>] [-ExistingRunAsAccount <string>]Add-ImcScomGroup -GroupName <string> -IpRangeStartAddress <string> -IpRangeEndAddress <string> -MachineName <string> -RunAsAccount <string> -RunAsCredential <pscredential> [-GroupDescription <string>] [-ExcludeIpList <string>] [-NoSsl] [-Port <int>] [-ProxyHost <string>] [-ProxyPort <int>] [-ProxyUsername <string>] [-ProxyPassword <string>]Add-ImcScomGroup -GroupName <string> -IpRangeStartAddress <string> -IpRangeEndAddress <string> -MachineName <string> [-GroupDescription <string>] [-ExcludeIpList <string>] [-NoSsl] [-Port <int>] [-ProxyHost <string>] [-ProxyPort <int>] [-ProxyUsername <string>] [-ProxyPassword <string>] [-ExistingRunAsAccount <string>]Add-ImcScomGroup -GroupName <string> -MultiIpAddressRange <string> -MachineName <string> -RunAsAccount <string> -RunAsCredential <pscredential> [-GroupDescription <string>] [-ExcludeIpList <string>] [-NoSsl] [-Port <int>] [-ProxyHost <string>] [-ProxyPort <int>] [-ProxyUsername <string>] [-ProxyPassword <string>]Add-ImcScomGroup -GroupName <string> -MultiIpAddressRange <string> -MachineName <string> [-GroupDescription <string>] [-ExcludeIpList <string>] [-NoSsl] [-Port <int>] [-ProxyHost <string>] [-ProxyPort <int>] [-ProxyUsername <string>] [-ProxyPassword <string>] [-ExistingRunAsAccount <string>]
Parameters
• GroupName – Name to be given to this IMC Group
• MachineName – FQDN of the machine on which this group will be registered
• (all scripts related to this IMC Group MP will be run on this machine)
• GroupDescription – Optional description string for this IMC Group MP
• NetworkAddress – Network address to be used in conjunction with subnet mask
• SubnetMask – Subnet mask specifying the IMC servers to consider. e.g. ‘255.255.255.128’
• IpRangeStartAddress – Starting IP address of IP address range for IMC servers
• IpRangeEndAddress – Ending IP address of IP address range for IMC servers
• ExcludeIpList – Comma separated list of IP addresses to be excluded
• MultiIpAddressRange – Comma separated list of IP addresses or IP address ranges. e.g. “192.168.1.1,192.168.1.10-192.168.1.30,192.168.1.45”
• NoSsl – Switch parameter to specify non-secure (http) connectivity with IMC
• Port – Optional port to be used for connecting to IMC. If not specified, default port (80/443) will be used.
• ProxyHost – IP address or hostname of proxy server to be used for communication with IMC
• ProxyPort – Port of proxy server to be used
• ProxyUsername – Proxy server username
• ProxyPassword – Proxy server password
• ExistingRunAsAccount – Name of the existing RunAs account to be used for this IMC Group
• RunAsAccount – Name of new RunAs account to be created for this IMC Group
• RunAsCredential – Credentials for the new RunAs account to be created (credentials of IMC)
5-2Cisco IMC Management Pack User Guide, Release 1.x

Chapter 5 PowerShell Cmdlets for Cisco IMC Management Pack
Examples:$secureString = ConvertTo-SecureString "PASSWORD" -AsPlainText -Force$credentials = New-Object System.Management.Automation.PSCredential ("USERNAME",$secureString)
Add-ImcScomGroup -GroupName 'IMC_Group_A' -NetworkAddress 192.168.1.1 -SubnetMask 255.255.255.128 -MachineName scomms1.devdomain.cisco.com -RunAsAccount GroupA -RunAsCredential $credentials -GroupDescription 'Group A Servers' –ProxyHost ’10.10.10.2’ –ProxyPort 58
Add-ImcScomGroup -GroupName 'IMC_Group_B' -IpRangeStartAddress 192.168.1.1 -IpRangeEndAddress 192.168.1.40 –ExcludeIpList ‘192.168.1.10,192.168.1.20’ -MachineName scomms1.devdomain.cisco.com -ExistingRunAsAccount GroupA -GroupDescription 'Group B Servers' –ProxyHost 10.10.10.2 –ProxyPort 58 –ProxyUsername USERNAME –ProxyPassword PASSWORD
Add-ImcScomGroup -GroupName 'IMC_Group_C' -MultiIpAddressRange ‘192.168.1.1,192.168.1.10-192.168.1.30,192.168.1.45’ -MachineName scomms2.devdomain.cisco.com -GroupDescription 'Group C Servers' –NoSsl –Port 81
Update-ImcScomGroup
Updates the required properties for an existing template (IMC Group). You may specify the new values for any parameter or parameters you intend to modify. For the remaining parameters, existing values are used.
Syntax:Update-ImcScomGroup -GroupName <string> [-GroupDescription <string>] [-ExcludeIpList <string>] [-Secure <bool>] [-Port <int>] [-MachineName <string>] [-ProxyHost <string>] [-ProxyPort <int>] [-ProxyUsername <string>] [-ProxyPassword <string>]Update-ImcScomGroup -GroupName <string> -NetworkAddress <string> -SubnetMask <string> [-GroupDescription <string>] [-ExcludeIpList <string>] [-Secure <bool>] [-Port <int>] [-MachineName <string>] [-ProxyHost <string>] [-ProxyPort <int>] [-ProxyUsername <string>] [-ProxyPassword <string>] Update-ImcScomGroup -GroupName <string> -IpRangeStartAddress <string> -IpRangeEndAddress <string> [-GroupDescription <string>] [-ExcludeIpList <string>] [-Secure <bool>] [-Port <int>] [-MachineName <string>] [-ProxyHost <string>] [-ProxyPort <int>] [-ProxyUsername <string>] [-ProxyPassword <string>]Update-ImcScomGroup -GroupName <string> -MultiIpAddressRange <string> [-GroupDescription <string>] [-ExcludeIpList <string>] [-Secure <bool>] [-Port <int>] [-MachineName <string>] [-ProxyHost <string>] [-ProxyPort <int>] [-ProxyUsername <string>] [-ProxyPassword <string>]
Parameters
• GroupName – Name of the IMC Group to be updated
• MachineName – FQDN of new machine (all scripts related to this IMC Group MP will be run on this machine)
• GroupDescription – New description string for this IMC Group MP
• NetworkAddress – Network address to be used in conjunction with subnet mask
• SubnetMask – Subnet mask specifying the IMC servers to consider. e.g. ‘255.255.255.128’
• IpRangeStartAddress – Starting IP address of IP address range for IMC servers
• IpRangeEndAddress – Ending IP address of IP address range for IMC servers
• ExcludeIpList – Comma separated list of IP addresses to be excluded
5-3Cisco IMC Management Pack User Guide, Release 1.x

Chapter 5 PowerShell Cmdlets for Cisco IMC Management Pack
• MultiIpAddressRange – Comma separated list of IP addresses or IP address ranges. e.g. “192.168.1.1,192.168.1.10-192.168.1.30,192.168.1.45”
• Secure – Boolean value to either set or reset secure connection option
• Port – New port number to be used.
• ProxyHost – IP address or hostname of new proxy server to be used for communication with IMC
• ProxyPort – New port number for proxy server
• ProxyUsername – New username for Proxy server
• ProxyPassword – New password for Proxy server
ExamplesUpdate-ImcScomGroup -GroupName ‘IMC_Group_A’ –MachineName ‘scomms2.devdomain.cisco.com’ -MultiIpAddressRange ‘192.168.1.1,192.168.1.10-192.168.1.30,192.168.1.45’ –Secure $false –GroupDescription ‘New Group Description’
Update-ImcScomAllGroups
Updates all the existing IMC Groups after upgrade from previous version. This is helpful when you upgrade the Management Pack using the silent installation.
Retrieving, enabling, or disabling Cisco IMC Management Pack Rules
Get-ImcScomRule
Gets all the rules as per the specified criteria. You need to specify the Management Pack, along with optional severity or fault ID.
Syntax:Get-ImcScomRule -ManagementPack <string> [-Severity <string[]> {0 | 1 | 2}]Get-ImcScomRule -ManagementPack <string> -FaultID <string[]>
Parameters:
• ManagementPack – Display name of management pack in SCOM
• Severity – Array of severity values to consider
• FaultID – Array of fault IDs for which corresponding rules will be returned
Examples:Get-ImcScomRule –ManagementPack ‘IMC_Group_A’Get-ImcScomRule –ManagementPack ‘IMC_Group_A’ –Severity 0,1Get-ImcScomRule –ManagementPack ‘IMC_Group_A’ –FaultID F0178,F0424,F0409
Enable-ImcScomRule
Enables all Operations Manager rules provided as input. You may pipe the output of Get-ImcScomRule cmdlet or provide it as an array of rules.
Syntax:Enable-ImcScomRule [-Rule] <ManagementPackRule[]>
5-4Cisco IMC Management Pack User Guide, Release 1.x

Chapter 5 PowerShell Cmdlets for Cisco IMC Management Pack
Parameter:
Rule – Array of Operations Manager rules retrieved using Get-ImcScomRule cmdlet
Examples:Get-ImcScomRule –ManagementPack ‘IMC_Group_A’ –Severity 0,1| Enable-ImcScomRule
Disable-ImcScomRule
Disables all Operations Manager rules provided as input. You may pipe the output of Get-ImcScomRule cmdlet or provide it as an array of rules.
Syntax:Disable-ImcScomRule [-Rule] <ManagementPackRule[]>
Parameter:
Rule – Array of Operations Manager rules retrieved using Get-ImcScomRule cmdlet
Examples:Get-ImcScomRule –ManagementPack ‘IMC_Group_A’ –FaultID F0178,F0424,F0409 | Disable-ImcScomRule
5-5Cisco IMC Management Pack User Guide, Release 1.x

Chapter 5 PowerShell Cmdlets for Cisco IMC Management Pack
5-6Cisco IMC Management Pack User Guide, Release 1.x

Cis
C H A P T E R 6
TroubleshootingThis chapter contains the following sections:
• Adjusting the Fault Polling Interval, page 6-17
• Remapping the Severity, page 6-18
• Cisco IMC Management Service Log, page 6-18
• Logging Levels, page 6-19
• Generating Cisco IMC Technical Support File, page 6-19
Adjusting the Fault Polling IntervalThe Fault Polling Interval is used to poll the faults from the Cisco IMC.
Table 6-1 shows the default polling interval setting.
Table 6-1 Fault Polling Interval in Cisco IMC
Step 1 In the SCOM application menu bar, click the Go tab.
Step 2 From the drop-down list, choose Authoring.
Step 3 In the Authoring column, choose Authoring > Management Pack templates > Cisco IMC.
Step 4 Right-click the template pack and choose View Management Pack Objects > Rules.
Step 5 In the Rules page, choose the Load Fault Rule and choose Overrides > Override the Rule > For All Objects of Class.
Step 6 In the Override Properties page, do the following:
a. In the Interval Seconds row, check the Override checkbox.
b. In the Interval Seconds row, modify the value in the Override Value column.
c. Click OK.
Rule Name Polling Interval
Load Fault 720 seconds
6-17co IMC Management Pack User Guide, Release 1.x

Chapter 6 TroubleshootingRemapping the Severity
Remapping the Severity This section describes how to modify the fault rule properties in the Cisco IMC.
Table 6-2 shows the default severity mapping between Cisco IMC and SCOM.
Table 6-2 Severity Mapping Values
Step 1 In the SCOM application, launch the Fault Rule Properties page for the specific fault in one of the following ways:
• From the Alerts View page, do the following:
1. In the Alert View page, choose the fault.
2. Identify the Alert Rule and click the link to launch the Fault Properties page.
• From the fault group template, do the following:
1. In the SCOM application menu bar, click the Go tab.
2. From the drop-down menu, choose Authoring.
3. In the Authoring column, choose Authoring > Management Pack templates > Cisco IMC.
4. Right-click the template pack and choose View Management Pack Objects > Rules.
5. In the Rules page, right-click a rule and choose Properties.
Step 2 In the Rule Properties page, check the Enable checkbox to enable the rule.
Step 3 Click the Overrides tab, and check the Enabled checkbox in the Override column.
Note Repeat all the steps for every object of the class.
Tip You can also set the priority and severity of the fault by checking the override checkbox.
Cisco IMC Management Service LogThis version of Management Pack supports Cisco IMC Management Service Level logging. After upgrading to 1.1(1), error logging will automatically start on all the Cisco IMC Groups, either existed before or newly added after the upgrade. For each Cisco IMC Group, logging will continue until the servers are monitored in SCOM.
Logs are present at:
“%PROGRAMDATA%\Cisco\IMCServer\log”
Cisco IMC SCOM
Critical, Major Critical
Minor, Warning Warning
Info, Cleared Information
6-18Cisco IMC Management Pack User Guide, Release 1.x

Chapter 6 TroubleshootingLogging Levels
Under the above location there are separate logs for each Cisco IMC Group being monitored.
By default following informational messages will always be logged:
• Windows version
• SCOM Version
• Management Pack Version.
• Details about the Cisco IMC template created by the user.
Logging LevelsException: Logs any Exceptions occurred during request processing to the log file.
Error: Logs any Errors or Exceptions occurred during request processing to the log file.
Information: Logs Errors, Exceptions and informational messages to the log file.
Note Default logging level is set to: Error.
Changing the Logging Levels
Step 1 Open PowerShell window.
Step 2 Enter $imcWcf = New-WebServiceProxy -Uri http://localhost:8733/CSeriesAgent?WSDL -Namespace "Cisco.IMC.Agent" command to connect to the agent.
Step 3 To get the current log, enter execute : $imcWcf.GetLoggingType()
Step 4 To change logging, enter (Information, Error, Exception), execute: $imcWcf.UpdateLoggingType("Information").
Back Up Log FilesCisco IMC Management Service will back up logs files greater than 10 MB; once a log file size reaches 10 MB Management Service will stop writing to that file and will create a new file. If the Management Service is re-started then it will check the size of the existing active file and if it is less than 10 MB it will start appending to that file itself.
Purge Log FilesAny file whose last modified date and time is greater than 30 days will be purged automatically; currently this duration of 30 days is not configurable.
Generating Cisco IMC Technical Support File
Step 1 Launch a command prompt.
6-19Cisco IMC Management Pack User Guide, Release 1.x

Chapter 6 TroubleshootingGenerating Cisco IMC Technical Support File
Step 2 Change the directory to IMC management pack installation folder (default location :- C:\Program Files\Cisco\Cisco IMC Management Pack\IMCService).
Step 3 Verify that file “Cisco.IMC.TechSupport.exe” is available.
Step 4 Now use the following syntax to generate tech support zip file.
a. Generate at default location (C:\ProgramData\Cisco\IMCServer)
b. Run Cisco.IMC.TechSupport.exe without any parameter.
c. Generate at different location
d. Run Cisco.IMC.TechSupport.exe <FolderName>
6-20Cisco IMC Management Pack User Guide, Release 1.x