cisco nss4000 and nss6000 series network storage … · getting started guide linksys business...
TRANSCRIPT

GET
TIN
G S
TART
ED G
UID
E
Linksys Business Series Network Storage System Models NSS4000 and NSS6000 Series
Linksys Business Series Network Storage System Getting Started Guide

© 2007-2008 Copyright 2007-2008, Cisco Systems, Inc.
Specifications are subject to change without notice.
Linksys, the Cisco Systems logo, the Linksys Logo, and the Linksys One logo are registered trademarks of Cisco Systems, Inc. All other trademarks mentioned in this document are the property of their respective owners.

Linksys Business Series Network Storage System Administrator Guide
Contents
ContentsChapter 1: Introduction . . . . . . . . . . . . . . . . . . 3
Benefits 3About this Guide... 3
Recommended Installation Sequence 4
Chapter 2: Part A: Set up the Hardware . . . . . . . . . . . . 7Step 1: Install the Disk Drives 7
Approved Vendor List for Drives 9Step 2: Install the Ethernet Links 9Step 3: Install the Power 10
NSS-supported UPS Product Families 11
Chapter 3: Part B: Configure the Network Storage System (NSS) . . . 13Step 1: Access the NSS when there is no DHCP Server Present on your Network 14Step 2: Log into the Configuration Interface 15
Option A: Linksys One Environment Login Steps 15Option B: Standalone Environment Login Steps 17
Step 3: Configure the Timing Settings 18Step 4: Create a RAID Array 19Step 5: Create a Volume 21Step 6: Virtualize Storage within your Network 23
Exporting Storage to your Network 23Creating Virtualized Storage 24
Step 7: Configure the NSS Network Identification 25Step 8: Configure the User/Group Ranges and Home Directory Location 28Step 9: Create any Locally Defined Users and Groups 29
Creating a User Profile 29Creating a Group 31
Step 10: Create a Share 32Adding a DFS Shared Folder 35Restrictions using Microsoft DFS from the NSS 38
Step 11: Create a Snapshot for a Volume 38Step 12: Create a Scheduled Backup for a Share 40Step 13: Complete the Configuration 42Step 14: Save the Current Configuration 43
Chapter 4: Part C: Instruct Your Users How to Access the NSS Storage . 45Windows Users: Accessing the NSS Storage using CIFS/SMB 45Windows Users: Accessing the NSS Storage through FTP 46UNIX/Linux Users: Accessing Storage through NFS 46UNIX/Linux Users: Accessing Storage through FTP 47
1Contents

Linksys Business Series Network Storage System Administrator Guide
Contents
Mac Users: Accessing Storage through CIFS/SMB 47Mac Users: Accessing Storage through FTP 48
Chapter 5: LEDs & Buttons . . . . . . . . . . . . . . . . . 49Power LED (Front Panel) 49System LED (Front Panel) 50Reset Button (Front Panel) 50LAN LEDs (Front Panel) 51Hard Disk Drive LEDs (Front Panel) 51USB LED (Front Panel) 52UPS LED (Back Panel) 52
Linksys One Contact Information 53
2 Contents

Getting Started Guide
Chapter
1
IntroductionThank you for choosing the Linksys Business Series Network Storage System (NSS).Administering a network can be a difficult job. Finding low-cost ways to simplify your data-management tasks means that you have more resources to dedicate elsewhere. The NSS is a Network Attached Storage (NAS) unit that appears as a native file server for the various clients within your network, including Windows, Apple Macintosh, UNIX, and Linux platforms. The biggest benefit to your users is that they can now access data that might be stored across different physical platforms as simply as if it were on their own computers. The NSS provides a single repository that is completely dedicated to storage, ensuring the integrity, reliability, and accessibility of your data for a relatively low cost.
The NSS lets you install up to four physical disk drives as well as virtualize your storage into one or more logical, redundant storage units or RAID arrays. The NSS uses the most common file-based protocols such as NFS, CIFS, and FTP for file sharing.
Benefits
The NSS offers the following main advantages to your business:
• Cross-platform File Sharing: Share files easily and inexpensively across heterogeneous platforms over a cost-effective Ethernet and IP network.
• Easy Installation and Administration: With a basic understanding of networking, the NSS is easily configured, managed, and made available to all of your networked users.
• Data Consolidation: Centralize data to reduce management costs and maximize your investment in existing hardware. This also means better data security.
About this Guide...
The Getting Started Guide contains the step-by-step details for getting your NSS up and running for the first time---from hooking up the hardware to doing the basic configuration steps to get the NSS running. Users are shown how to log into the NSS to access storage.
3Chapter 1: Introduction

4
Getting Sarted Guide
Chapter
1
Recommended Installation SequenceFollow the NSS installation steps to set up and configure the device. They provide out-of-the-box instructions. You can find detailed instructions for each step in the remaining sections of this guide.• Part A: Set up the hardware:
- Step 1: Install the disk drives. Skip this step if you have an NSS4100 or NSS6100 as they are already equipped with disk drives.
- Step 2: Connect the Ethernet cable(s).
- Step 3: Connect the power.
• Part B: Configure the NSS:
- Step 1: Configure the Network Settings IF a DHCP server is not present. (If there is a DHCP server, skip this step.)
- Step 2: Log into the Configuration Interface
- Step 3: Configure the Time setting (options include NTP or manual).
- Step 4: Configure the RAID(s). You can choose to skip this step if you have an NSS4100 or NSS6100 as it is preconfigured with a RAID5 array.
- Step 5: Create the volume(s).
- Step 6: If you have multiple NSS units (one of which is a NSS6000 series unit), and you want to virtualize your storage, set up the export/import of the virtualized RAID arrays.
- Step 7: Set up the User and Group ID ranges and the users’ home directory location (this enables the import of groups/users from Domain Controllers and to create local users and groups).
- Step 8: Configure the Network Domain Identification (NT4, Active Directory, NIS, etc.) to join the NSS to a domain.
- Step 9: Add any locally defined groups or users. (Optional)
- Step 10: Create share(s) and enable access to these shares (i.e., CIFS, NFS, FTP). You can also define the DFS access.
- Step 11: If you have an NSS6000 series unit, configure the volume snapshots. (Optional)
- Step 12: Configure the share backups. (Optional)
Chapter 1: IntroductionRecommended Installation Sequence
Getting Started Guide
Chapter
1
- Step 13: Go through the rest of the configuration options to set up quotas, edit groups, setup email and SNMP alerts, and so on. For more detailed information, refer to the Online Help from the Configuration Manager, or the Linksys Business Series Network Storage System Administrator Guide available from the Linksys website at www.linksys.com
- Step 14: After you configure the NSS, save a copy of the configuration file to a location on the NSS and to a USB key.
• Part C: Instruct your users how to access the NSS.
5Chapter 1: IntroductionRecommended Installation Sequence

6
Getting Sarted Guide
Chapter
1
Chapter 1: IntroductionRecommended Installation Sequence

Getting Started Guide
Chapter
2
Part A: Set up the HardwareThis chapter provides details for installing the NSS hardware. The installation is broken down into the following steps:1. Step 1: Install the Disk Drives: If your NSS does not have disk drives already installed, follow the steps in this section to insert disk drives into the NSS chassis.
2. Step 2: Connect the Ethernet Cable(s): Connect up to two Ethernet links from the NSS to your network.
3. Step 3: Connect the Power: Ensure you have connected the power cable from the NSS to the applicable power source (UPS or mains).
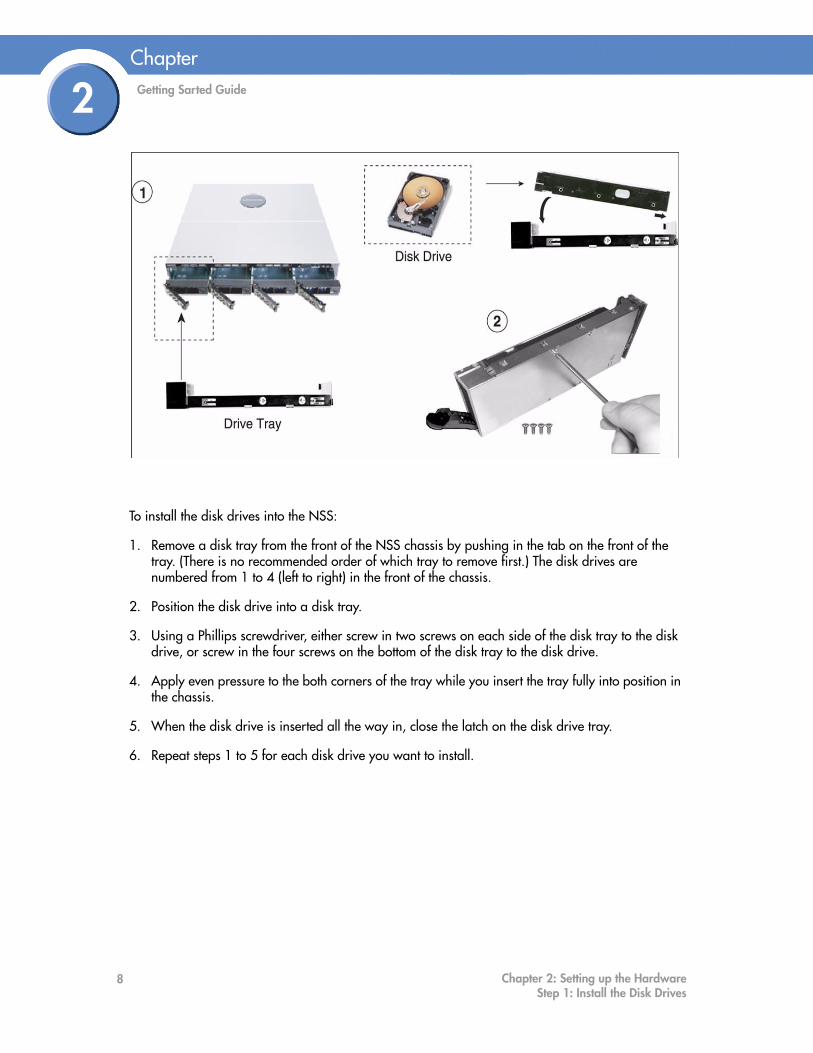
Step 1: Install the Disk DrivesAfter you remove the NSS from the packaging, you are ready to set up the hardware. For the NSS6100 or NSS4100, skip this step and go to Step 2 to install the Ethernet cable(s).
7Chapter 2: Setting up the HardwareStep 1: Install the Disk Drives
8
Getting Sarted Guide
Chapter
2
To install the disk drives into the NSS:
1. Remove a disk tray from the front of the NSS chassis by pushing in the tab on the front of the tray. (There is no recommended order of which tray to remove first.) The disk drives are numbered from 1 to 4 (left to right) in the front of the chassis.
2. Position the disk drive into a disk tray.
3. Using a Phillips screwdriver, either screw in two screws on each side of the disk tray to the disk drive, or screw in the four screws on the bottom of the disk tray to the disk drive.
4. Apply even pressure to the both corners of the tray while you insert the tray fully into position in the chassis.
5. When the disk drive is inserted all the way in, close the latch on the disk drive tray.
6. Repeat steps 1 to 5 for each disk drive you want to install.
Chapter 2: Setting up the HardwareStep 1: Install the Disk Drives

Getting Started Guide
Chapter
2
7. If the NSS is rack mounted, attach the mounting ears to both sides of the NSS. Attach themounting ears to either side of the rack.
8. Continue with Step 2 to install the Ethernet cable(s).
Approved Vendor List for Drives
If you are purchasing disk drives to install in the NSS, refer to the product support information offered on the Linksys website (www.linksys.com) for a list of recommended disk drives.
When you select a disk drive, consider the type of RAID levels required to service your business needs. For example, if you are creating a RAID (versus a JBOD), make sure that each of the disks used in the array have the same disk capacity. The RAID is built using the capacity of the smallest disk in the array.
Step 2: Install the Ethernet LinksAfter the disk drives are installed in the chassis, you are ready to connect the Ethernet cables. You can connect up to two Ethernet links to the NSS. If you have a second Ethernet link, ensure that both links are connected to your network. The default network setting for your Ethernet link(s) is Active Backup. This means that if you have two links, one link is available should the other link become unusable due to a link failure. You can change the default configuration setting to use link aggregation if desired (for help on this topic, from the Manager Menu on the configuration interface, click Network, and then Properties. Click the Help button in the upper-right corner of the Network Properties page.
9Chapter 2: Setting up the HardwareStep 2: Install the Ethernet Links

1
Getting Sarted Guide
Chapter
2
To connect the Ethernet cable(s) to the NSS:
1. Install the Ethernet cable to the Ethernet port at the back of the NSS chassis. If you have a second Ethernet cable, connect it to the second Ethernet port.
2. Connect the Ethernet cable to your network. If you are connecting the NSS within the Linksys One environment, connect the cable to the ports on the SVR series router.
Make sure all the connections are secure! You are now ready to continue with Step 3 to install the power.
Step 3: Install the PowerAfter you connect the Ethernet cable(s), you are ready to power up the NSS. There are several possible power configurations. We should suggest that a UPS or RPSU be used since a sudden loss of power can cause RAID corruption and possible data loss. The following procedure provides details for each of these options.
To connect the power to the NSS:
1. Depending on your power configuration, do one of the following:
• UPS: Connect the power cable to the Power port on the NSS and to an available port on the UPS. You then need to connect the USB signal cable from the UPS to the UPS port on the NSS. For more information about choosing a UPS, refer to the list of supported UPS product families.
• Mains: Connect the power cable to the Power port on the NSS and to the mains power.
2. If you have an RPSU, connect the RPSU cable to the RPS port on the NSS and to an available port on the RPSU. For more details about your RPSU device, refer to the RPSU documentation.
3. Make sure the Power LED on the front of the NSS chassis is on.
Congratulations! You have successfully set up the NSS hardware. You are now ready to configure the NSS for your unique business storage needs.
NOTE: If you are hotplugging an Ethernet cable to the NSS after the initial installation, ensure you wait 15 seconds between the time you unplug the cable and plug it back in. Within 10 seconds the newly connected link should appear with the correct IP and link rate in the configuration interface.
0 Chapter 2: Setting up the HardwareStep 3: Install the Power

Getting Started Guide
Chapter
2
NSS-supported UPS Product FamiliesThe NSS supports the following UPS product families:
• APC Back-UPS Pro USB
• APC Back-UPS RS USB
• APC Back-UPS USB
• APC Back-UPS LS USB
• APC Back-UPS ES/CyberFort 350
• APC Smart-UPS USB
11Chapter 2: Setting up the HardwareStep 3: Install the Power

1
Getting Sarted Guide
Chapter
2
2 Chapter 2: Setting up the HardwareStep 3: Install the Power

Getting Started Guide
Chapter
3
Part B: Configure the Network Storage System (NSS)There are a variety of ways to configure the NSS, depending on your specific storage needs and your unique networking environment. This section covers the steps you need to follow to get the NSS configured so that you can start using its storage. For a more detailed description of the configuration options available, refer to the topics in the pdf version of the Linksys Business Series Network Storage System Administrator Guide available from the Linksys website (www.linksys.com) or from the Online Help available from the Help menu on the NSS configuration interface. You can display page-specific help by clicking the Help button (question mark) in the upper-right corner of any configuration page.Go through the steps in this section (in the recommended order) to configure the NSS.
• Step 1 – Access the NSS when a DHCP server is not present: If a DHCP server is not present when you install the NSS, follow the details in this step to manually configure the network settings so that you can access the Configuration Interface. (If a DHCP server is installed, skip this step.)
• Step 2 – Log into the NSS Configuration Interface: Log into the Configuration Interface as an administrator.
• Step 3 – Set up or Verify the Time: You can set up the NSS timing using NTP or as a manual setting.
• Step 4 – Configure a RAID Array: Before you can create a volume, you must configure at least one RAID array. Note: If you have an NSS4100 or NSS6100 a RAID5 is preconfigured. You can skip this step.
• Step 5 – Create a Volume(s): After you create a RAID array and before you can set up your local users and shares, you must create at least one volume.
• Step 6 – Virtualize your Storage: If you have multiple NSS units (one of which is a NSS6000 series unit), and you want to virtualize your storage, set up the export/import of the virtualized RAID arrays. If you are not using virtualized storage, skip this step.
• Step 7– Set up the User and Group ID Ranges & the Users’ Home Directory Location: Enable the import of groups and users from Domain Controllers on your network. Set up the home directory location for any users created locally.
• Step 8 – Configure the Network Domain Identification: Set up the network identity of the NSS, including the hostname and domain membership.
13Chapter 3: Configuring the Network Storage System (NSS)

1
Getting Sarted Guide
Chapter
3
• Step 9 – Add any Locally Defined Users and Groups: You can create and maintain a list ofusers and groups from the NSS.
• Step 10 – Create Shares: After you create a volume, you can create the shares and set up access privileges to those shares for the users and groups. You can also define the DFS access.
• Step 11 – Create the Volume Snapshots: If you have an NSS6000 series unit, you can configure snapshots for each volume.
• Step 12 – Set up the Share Backups: Set up a backup to run at a regular interval for the configured shares.
• Step 13 – Complete the Configuration: Go through the rest of the configuration options to set up quotas, edit groups, set up email and SNMP alerts, and so on. For detailed information, refer to the Online Help from the Configuration Manager, or the Linksys Business Series Network Storage System Administrator Guide available from the Linksys website (www.linksys.com).
• Step 14 – Save a Copy of the Configuration: After you configure the NSS, save a copy of the configuration to a location on the NSS and to a USB key.
Step 1: Access the NSS when there is no DHCP Server Present on your NetworkThis step depends on whether there is a DHCP server on the network to which you are connecting the NSS (this could be the router). The NSS ships with a default configuration such that its network interfaces are DHCP configured. For your computer to communicate with the NSS when no DHCP server is present, you must manually configure the computer’s network settings.
NOTE: The configuration for your computer is only temporary. After you initially open the configuration interface, you can configure the static IP address for the NSS accordingly and then restore your computer’s network settings to their previous values. For help setting the IP configuration on the NSS, refer to the online help available with the NSS configuration interface.
4 Chapter 3: Configuring the Network Storage System (NSS)Step 1: Access the NSS when there is no DHCP Server Present on your Network

Getting Started Guide
Chapter
3
To set up your computer to communicate with the NSS:1. Set your computer’s network settings to the following:
• IP Address: 169.254.x.y (where x and y can be any number between 1 and 254). For example, 169.254.1.2.
• Subnet Mast (Netmask): 255.255.0.0.
After you configure your computer, you can log into the NSS configuration interface. You can configure the NSS network IP settings as required.
Step 2: Log into the Configuration InterfaceThis step depends on whether your NSS is set up within the Linksys One environment or if it is in a standalone environment. The only differences to note in terms of the configuration steps is that the log in steps are different and that if you are logging into the Linksys One environment, the configuration pages appear within the Linksys One window (window-in-window). There is no difference in the actual details within the configuration pages.
Option A: Linksys One Environment Login Steps
To log into the configuration interface when the NSS is installed in a Linksys One Environment:
1. Login to the SVR.
2. Click the L1 Devices tab.
The NSS appears in the list of devices. Note that you can change your administrator password and the NSS hostname from this window.
3. Click Show Details.
15Chapter 3: Configuring the Network Storage System (NSS)

1
Getting Sarted Guide
Chapter
3
A new tab appears with the hostname of the NSS.4. Click the NSS tab.
The NSS device is automatically assigned an IP address from the DHCP server in the SVR series router. The NSS device configuration interface appears, with the System Status page open:
5. It is a good idea to do a quick check of the information on the System Status page to ensure that your hardware installation was successful and that this system is not reporting any errors. For example, the Ethernet link(s) are up and in good condition, the right number of disk drives installed appear, and so on. For a detailed description of the information on the System Status page, click the Help button in the upper-right corner of the page.
6 Chapter 3: Configuring the Network Storage System (NSS)Step 2: Log into the Configuration Interface

Getting Started Guide
Chapter
3
Option B: Standalone Environment Login StepsTo log into the configuration interface:
1. If you are logging into the NSS for the first time, write down the MAC address located on the sticker attached to the bottom of the chassis. You need the MAC address as this is part of the default hostname. Otherwise, skip this step.
2. There are a variety of ways to display the NSS Login window.
• Open the Web browser on your computer: In the Address field, enter “http://NAS<MAC address>” (For example, “http://NAS0018F804E44C”.)
• Browse for the NSS from the My Network Places window.
• Select the NSS to a network drive from a mapped network drive.
The NSS Login window appears:
3. Enter the administrator login information. When you first log into the configuration interface or if you reset the factory defaults, both the username and password are set to “admin”.
4. Click OK.
17Chapter 3: Configuring the Network Storage System (NSS)

1
Getting Sarted Guide
Chapter
3
The NSS configuration interface appears, with the System Status page open:5. It is a good idea to do a quick check of the information on the System Status page to ensure that your hardware installation was successful and that this system is not reporting any errors. For example, the Ethernet link(s) are up and in good condition, the right number of disk drives installed appear, and so on. For a detailed description of the information on the System Status page, click the Help button in the upper-right corner.
Step 3: Configure the Timing SettingsIf you are installing the NSS within the Linksys One environment, the NSS time is automatically set via the Linksys NTP server.
When you first configure the NSS, ensure that the NSS has successfully synchronized the time with the NTP server. When the NSS is synchronizing with the NTP time server, the “Synchronizing time with NTP server” message appears and the Update button is grayed out. After the synchronization is complete, you can manually refresh the page by reselecting the NTP Configuration page from the Manager Menu. If the synchronization failed, the following occurs:
• An error message stating “Could not synchronize with NTP server(s)” appears in the NTP Configuration page.
• The system alert message “Could not synchronize with NTP server(s)” appears in the System Status page.
• If the SNMP traps are configured, an SNMP trap message is sent.
8 Chapter 3: Configuring the Network Storage System (NSS)Step 3: Configure the Timing Settings

Getting Started Guide
Chapter
3
To configure the time settings for the NSS:1. From the Manager Menu, click Admin Time.
The NTP Configuration page appears.
2. To use an NTP server to maintain the NSS time, click Automatically (via NTP). To assign the time manually, skip to step 4.
3. If your DHCP server is configured to provide NTP settings, select “Assign automatically via DHCP”. If not, manually configure the NTP settings. In the NTP Server fields, enter the IP address or hostname for the NTP servers you wish to synchronize. Note that the settings in these fields are also used as a fallback if you chose to get NTP settings from your DHCP server. The NTP servers can be located on your network or can be public NTP servers located on the Internet. Skip to step 6.
4. Click Manually.
5. Enter the date and time in the Date and Time fields.
6. Select your time zone from the Time Zone drop-down menu.
7. Click Update.
Step 4: Create a RAID ArrayAfter you install the physical disks, you can create the RAID arrays. Before you create a RAID array, either for the first time, or when you are rebuilding it as a result of failed disks in the array, it is a good idea to set the Rebuild Priority to determine how you want to allocate the system resources for the rebuild.
19Chapter 3: Configuring the Network Storage System (NSS)

2
Getting Sarted Guide
Chapter
3
To create an array:
1. From the Manager Menu, click Storage RAID.
The RAID page appears:
2. The available disks appear in the New RAID Device table. Select each disk that you want to include in the array.
NOTE: When adding disks to an array, we recommend you use the same model of disk with the same capacity. With the exception of a JBOD, RAIDs are configured to use the maximum of the smallest disk capacity in the array for each additional disk in the array. For example, if you install two, 250 GB disks and one 500 GB disk in a RAID0 array, the total capacity is only 750 GB. It takes approximately 1.6GB/min (NSS4000) and 2.6GB/min (NSS6000) to build a RAID5 array.
0 Chapter 3: Configuring the Network Storage System (NSS)Step 4: Create a RAID Array

Getting Started Guide
Chapter
3
3. From the RAID Level drop-down menu, click the RAID level of the RAID array you want to create.4. Click Add.
The RAID creation can take some time to complete (depending on the size of the disks and the selected RAID level). You can monitor the progress of the RAID build from the Storage Status page. When the build is finished, the array appears in the RAID Arrays table. The disks used in the array are no longer available for creating additional arrays.
Step 5: Create a VolumeAfter you define at least one RAID array, you can create a volume. You need to create at least one volume before you can create users, groups, or shares.
To create a volume:
1. From the Manager Menu, click Storage Volumes.
The Storage Volumes page appears.
2. From the New Volume area, set up the following fields:
• Array: Click the drop-down menu to select the array on which you want to create the volume.
• Name: Enter the name you want to give the volume. The volume name must consist of at least one alphanumeric character, must begin with a letter, but cannot contain any spaces.
21Chapter 3: Configuring the Network Storage System (NSS)

2
Getting Sarted Guide
Chapter
3
• Size: Enter the size for the volume, and then select the unit from the drop-down menu. Thefinal size of the shared volume is less than the size you enter in this field due to filesystem overhead. The minimum volume size is 32 MB. Volume sizes are rounded down to the nearest 32 MB increment.
• To encrypt the volume, select Encrypted. To create an unencrypted volume, go to step 6.
3. Enter a password in the Password field using a minimum of eight alphanumeric characters. The password must consist of at least three of the following: lower-case character, upper-case character, number (0-9), or a special character (such as #@*&^). The password must be entered to unlock an encrypted volume when the NSS is started up following a power interruption, shutdown, or rebooted, or, if the volume was manually locked through the NSS configuration interface.
4. Re-enter the password in the Confirm Password field.
5. Click Add.
NOTE: Once the volume is created, you can expand the volume but you cannot reduce its size.
NOTE: You can encrypt the volume only when the volume is first created. After a volume is created, you cannot change whether it is encrypted or unencrypted. File transfer performance to encrypted volumes is generally lower than to non-encrypted volumes.
CAUTION: Because you need the password to decrypt a locked volume, keep a secure backup of the password to ensure that it is accessible when required. There is no way to unlock the volume without the password. (If the password is forgotten, the only way to retrieve the password is if the password was saved in a configuration file. See Chapter 7, “Working With the Administrator Options,” in the Linksys Business Series Network Storage System Administrator Guide for help on this.)
2 Chapter 3: Configuring the Network Storage System (NSS)Step 5: Create a Volume
Getting Started Guide
Chapter
3
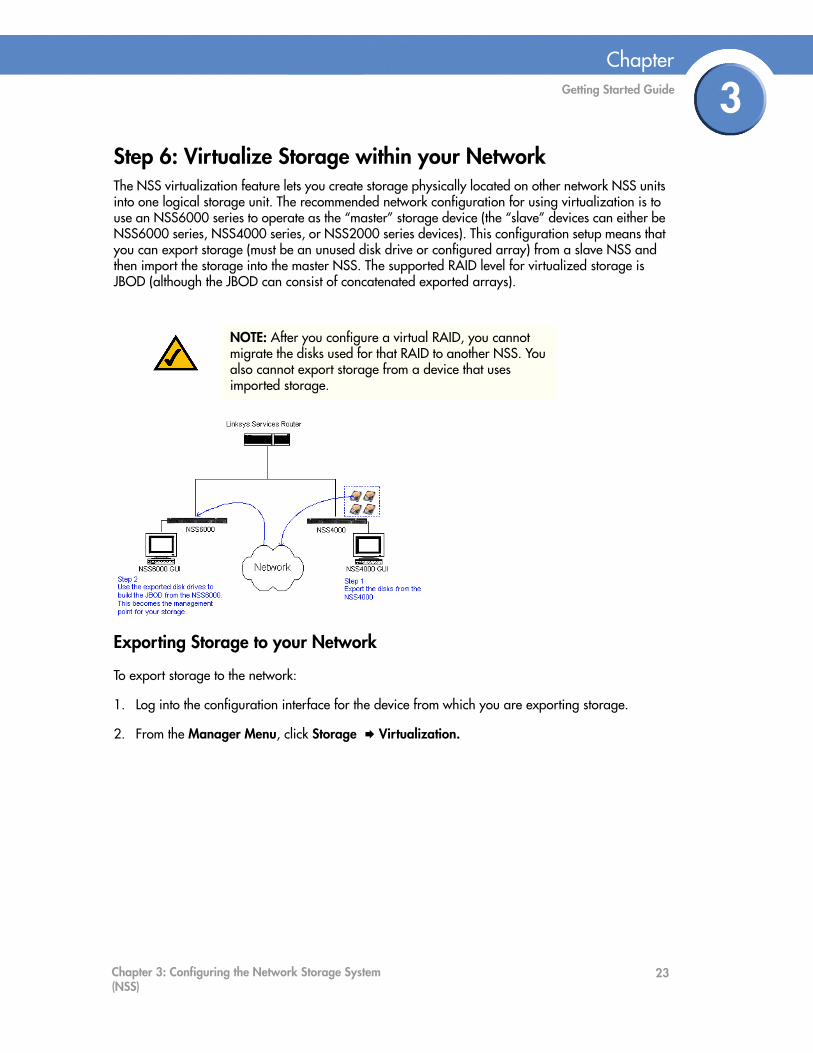
Step 6: Virtualize Storage within your NetworkThe NSS virtualization feature lets you create storage physically located on other network NSS units into one logical storage unit. The recommended network configuration for using virtualization is to use an NSS6000 series to operate as the “master” storage device (the “slave” devices can either be NSS6000 series, NSS4000 series, or NSS2000 series devices). This configuration setup means that you can export storage (must be an unused disk drive or configured array) from a slave NSS and then import the storage into the master NSS. The supported RAID level for virtualized storage is JBOD (although the JBOD can consist of concatenated exported arrays).Exporting Storage to your Network
To export storage to the network:
1. Log into the configuration interface for the device from which you are exporting storage.
2. From the Manager Menu, click Storage Virtualization.
NOTE: After you configure a virtual RAID, you cannot migrate the disks used for that RAID to another NSS. You also cannot export storage from a device that uses imported storage.
23Chapter 3: Configuring the Network Storage System (NSS)

2
Getting Sarted Guide
Chapter
3
The Storage Virtualization page appears.3. From the Export a device area, select each device that you want to export from the list of available devices.
4. From the Link field, select the physical link that you want to use to export the storage.
5. Click Export.
The selected disk(s) disappear from the available list of arrays and appear in the Currently Exported Storage table at the top of the page. Follow the steps to create a JBOD from virtualized storage to use the exported storage.
Creating Virtualized Storage
To create a JBOD with exported disks:
1. Log in to the configuration interface from the master unit.
2. From the Manager Menu, click Storage RAID.
4 Chapter 3: Configuring the Network Storage System (NSS)Step 6: Virtualize Storage within your Network

Getting Started Guide
Chapter
3
The RAID page appears.Exported disks from other NSS units in the network appear in the New RAID Device table.
3. From the New RAID Device table, click the disks or arrays that you want to include in the JBOD.
4. Select JBOD as the RAID level.
5. Click Add.
The JBOD appears in the RAID Arrays listing. You can now create volumes from the virtualized JBOD.
Step 7: Configure the NSS Network IdentificationTo configure the NSS network identity:
1. From the Manager Menu, click Network Identification.
25Chapter 3: Configuring the Network Storage System (NSS)

2
Getting Sarted Guide
Chapter
3
The Network Identification page appears.2. In the Hostname field, enter the name you want to use for the NSS. Note any special naming restrictions or conventions enforced by the domain(s) into which the NSS is being joined.
Caution: If you change the hostname, any current CIFS connections to shares on the NSS are disconnected.
3. To assign the hostname for the NSS using the DHCP server, select Assign automatically via DHCP. If the DHCP server is not available or if it is not configured to supply a hostname, the NSS hostname is assigned using the information entered in the Hostname field.
4. In the Description field, enter the textual description for the NSS as you want it to appear in the file manager window for your users.
6 Chapter 3: Configuring the Network Storage System (NSS)Step 7: Configure the NSS Network Identification

Getting Started Guide
Chapter
3
5. Select the type of network into which you are making the NSS a member from the followingoptions:
• Workgroup: Make the NSS part of a peer-to-peer network.
• NTv4 Domain: Make the NSS a part of a pre-Windows 2000 domain. If you select this option, set up the following fields:
- NTv4 Domain: Enter the domain name.
- Domain Controller: Enter the hostname or IP address of the domain controller.
- Username: Enter the username of an account that has administrator privileges for this domain. Note: The username cannot contain the “%” character.
- Password: Enter the password for the administrator account. This password is cleared each time you click Update. You must re-enter the password each time you edit the fields on this page to ensure the rejoin of the domain is successful.
• Member of Active Directory domain: Make the NSS part of an Active Directory (ADS) domain. If you select this option, set up the following fields:
- Active Directory Domain: Enter the domain name. Note that you might have to use the DNS fully qualified domain name. For example, “domain.com” versus just “domain.”
- Domain Controller: Enter the hostname or IP address of the domain controller.
- Kerberos Realm: Enter the name of your Kerberos realm. If you are not sure what to enter here, enter the domain name. In most standard Windows domain installations, this is the correct value. Note that you might have to use the fully qualified domain name for the Kerberos Realm fields. For example, “domain.com” versus just “domain.”
- Username: Enter the username of an account that has administrator privileges for this domain. Note: The username cannot contain the “%” character.
- Password: Enter the password for the administrator account. This password is cleared each time you click Update. You must re-enter the domain password each time you edit fields on this page to ensure the rejoin of the domain is successful.
6. Click Update.
If you configured the NSS to join a domain, when you click Update, the domain join occurs. The NSS configuration interface displays the status of the domain join (that is, successful or not successful).Note: If you are joined to a domain and make changes to the fields on this page, make sure you re-enter the domain password as the NSS automatically rejoins the domain when you click Update.
27Chapter 3: Configuring the Network Storage System (NSS)

2
Getting Sarted Guide
Chapter
3
Step 8: Configure the User/Group Ranges and Home Direc-tory LocationTo avoid conflicts between your user and group IDs, it is important to set up the ranges for the various types of users and groups (i.e., local, NIS domain, and Windows domain). The ID range should be set up before you create any local users or join a NIS, NTv4, or ADS domain as you should not change the range after the domain has been joined. In addition to setting the ID ranges, you also need to define which volume you are using to store your users’ home directories.To set up the ID ranges and home directory location:
1. From the Manager Menu, click Access Options.
The User/Group Settings page appears.
2. Set up the following ID Ranges:
• Local Users and Groups ID Range: This ID range applies to any users or groups created from the NSS configuration interface. When you create a user or group, the ID assigned is in this range. Make sure the range you set does not conflict with the NIS or Windows domain ranges.
• NIS Domain Users and Groups ID Range: This ID range should match the range of IDs defined in your NIS domain and not conflict with the local or Windows ID range. Set this range before you join the NSS to the NIS domain.
• Windows Domain Users and Groups ID Range: This ID range must be at least 10,000 in size. Users and groups from your NTv4 and ADS domain are mapped to local user or group IDs within this range. It is important to set this range before you join the NTv4 or ADS domain. After you join the NTv4 or ADS domain, the ID range should not change.
3. Set the volume that you want to assign as the home directory location for your users via the Home Directory Location field.
4. Click Update.
8 Chapter 3: Configuring the Network Storage System (NSS)Step 8: Configure the User/Group Ranges and Home Directory Location

Getting Started Guide
Chapter
3
Step 9: Create any Locally Defined Users and GroupsYou can create, view, and maintain the list of users who can access the NSS. The Configured Users page displays the Configured Users table. This table lists each defined user whether the user was created locally via the NSS configuration interface or imported from an NTv4, Active Directory, or NIS domain. Note that users not created locally via the NSS are read-only. Once a user profile is created, you cannot rename the username. To rename an existing user profile, delete the user profile and then create a new one. User profiles are maintained by the administrator. Users cannot make changes to their passwords.Groups are an easy way to manage users with the same storage needs and privileges. A group consists of one or more users. You can add or remove users from a group at any time. The user's primary group (the group to which quota charges for storage usage are applied) is set up in the Primary Group field of the user's profile. A group called “nasusers” is automatically created when you first install the NSS. This group is the default primary group when you create new users.
Creating a User Profile
Depending on your network setup, you might administer users and groups locally or via the domain controller. The NSS configuration interface gives you read-only access to users and groups provided by NTv4, Active Directory, or NIS domains. You can also create and manage local users from the NSS configuration interface. Before you can create a user profile, you must configure the volume you want to use as the home directory location for your users on the Access Options page (from the Manager Menu, click Access Options).
To add a local user:
1. From the Manager Menu, click Access Users.
The Configured Users page appears. Users created from the NSS configuration interface and provided by the ADS, NTv4, or NIS domain appear in the Configured Users table.
2. Click Add to create a user.
29Chapter 3: Configuring the Network Storage System (NSS)

3
Getting Sarted Guide
Chapter
3
The New User page appears.3. In the Username field, type the username. The name must be made up of alphanumeric characters (that is, a-z, 0-9), any case, to a maximum of 32 characters. This field is required.
4. Select the group you want to assign as the user’s primary group from the Primary Group field. If there are no groups configured, the only available choice is the default group “nasusers”. This field is required.
5. Assign a password by entering any valid (ASCII table) characters in the Password field. The password is required. To verify the password, re-enter it in the Confirm Password field.
6. To record the user’s full name, enter it in the Real Name field. This field is optional. Note that you cannot enter the “/” character in this field.
NOTE: Although you can assign the user to multiple groups (through the Add Group or Edit Group page), the primary group is the group against which quota charges for the user’s storage usage are made and is the group that defines the group ownership for all files created by the user. The primary group applies to users set up locally on the NSS. A domain user’s primary group is set up from the domain and is not derived from the Primary Group field in the NSS user profile.
NOTE: All password changes to end-user accounts set up through the NSS configuration pages must be made by the administrator.
0 Chapter 3: Configuring the Network Storage System (NSS)Step 9: Create any Locally Defined Users and Groups

Getting Started Guide
Chapter
3
7. To record the user’s email address, enter it in the Email Address field. This field is optional.8. Click OK to create the user and exit the New User page. Click Apply to create the user and then add another new user.
Creating a Group
Groups let you specify the share access privileges for a set of users. After you create a group, you can define the group’s access privileges on a per-share basis. You can add or remove users to and from the group at any time. Note that users are assigned a primary group within their user profile. When users create a file, the group ownership is automatically set to their primary group. The storage usage is charged to their primary group for the purposes of volume quota accounting. Group membership, other than the primary group, is defined in either the Add Group or Edit Group page and is used only to control access to shares and files.
To create a group:
1. From the Manager Menu, click Access Groups.
The Configured Groups page appears.
2. Click Add.
NOTE: You cannot grant security privileges to a group for a CIFS share through ACL.
31Chapter 3: Configuring the Network Storage System (NSS)

3
Getting Sarted Guide
Chapter
3
The New Group page appears.3. In the Group Name field, type the name you want to assign to the group. The name can only contain lower-case alphanumeric characters and underscores (i.e., a-z, 0-9, _) to a maximum of 32 characters.
4. Move the users you want to assign to the group from the Users Available list to the Users in Group list. Note that a user can be assigned to multiple groups. (The single angled bracket “<“ or “>” moves the selection in the direction of the bracket. The double angled bracket “<<“ or “>>” moves the entire list in the direction of the bracket.)
5. Click OK to save the current group and display the Configured Groups page. Click Apply to save the current group and remain in the New Group page to add another group.
Step 10: Create a Share After you define at least one volume, you can create the shares that can be accessed by your users when they log into the NSS. There is a limit of 21 users and groups (the combined total) that you can assign access privileges to a share. If you have a number of users that exceeds the limitation, assign the applicable users to a group or groups and then assign the group to the share. There is no limit to the number of users that you can assign to an individual group.
To add a share:
1. From the Manager Menu, click Shares Shares.
2. Click Create Share.
NOTE: You cannot create a share on a locked volume. If the volume is locked, go to the Volume page, and unlock the volume.
2 Chapter 3: Configuring the Network Storage System (NSS)Step 10: Create a Share

Getting Started Guide
Chapter
3
The New Share page appears.3. In the Share field, enter a name for the share.
4. From the Location field, select the volume on which you want to configure the share.
5. Add a description or comment about the share in the Comment field. This comment appears when you browse the NSS from My Network Places (as the tooltip when you hover over the share, or if you select the Details viewing mode). This field is optional.
6. Click the Share Attributes options to configure the share as public and if public, read-only. (These settings are optional.)
• Public: Enable all users to access the share. To make an NFS share world readable/writable, select this checkbox, and ensure the Read-Only checkbox is also deselected. To make an NFS share world readable, select this checkbox, and ensure the Read-Only checkbox is also selected.
• Read-Only: If the share is configured as a public share, allow the users read-only access to the share. Users can access and view the share but cannot write to the share. (For NFS shares, refer to the information stated in the Public field.)
33Chapter 3: Configuring the Network Storage System (NSS)

3
Getting Sarted Guide
Chapter
3
• DFS Root: Set the share to be a Microsoft DFS root.7. Set the Allow users to delete or rename other users’ files and folders field as required. This field determines whether users who are assigned to a share can delete or rename files or folders within that share that they do not own. It is important to consider interoperability with applications such as MS Word 2007 and Photoshop. For example, if this field is not selected and you gave a user write permissions to a file and that user tried to open, edit, and save the file, the save would fail due to the fact that Word sets up a temporary file and then attempts to delete it and replace it with the new version. Not all applications work this way. It is important to consider the applications used by your users to determine how you want to set this field.
• Select this field: By selecting this field, users with write permissions can rename or delete files or folders within the assigned share even though they are not the owners of the files or folders.
• Deselect this field: Users cannot rename or delete a file or folder within the assigned share unless they are the owners of the file or folder.
8. Set up the defaults for how file permissions are set when a file is created using CIFS via the following CIFS File Creation Attributes checkboxes:
• Group Readable: Members of the group assigned to the file have read permission. The group is assigned during file creation. For files created via NFS, the owner can manually set the group permissions when the file is created and can edit them at a later time. For files created via CIFS, the group is automatically assigned as the owner’s default group. This group cannot be edited at a later time.
• Group Writable: Members of the group assigned to the file have write permission. The group is assigned during file creation. For files created via NFS, the owner can manually set the group permissions when the file is created and can edit them at a later time. For files create via CIFS, the group is automatically assigned as the owner’s default group. This group cannot be edited at a later time.
NOTE: The share must be set as a DFS root when it is created. You cannot set it as a DFS root after it is created or revert a DFS root share to be a regular share. When you set this option, the CIFS Default File Creation Attributes and Protocol checkboxes are greyed out as they are not relevant. Follow the steps in Chapter 6, “Adding a DFS Shared Folder,” in the Linksys Business Series Network Storage System Administrator Guide to add shared folder links to the root.
NOTE: Any subfolders created via CIFS behave according to the current setting of the Allow users to delete or rename other users’ files or folders field. If a subfolder is created via NFS or FTP, it behaves as though this field is selected until this field is changed. These subfolders then behave according to the current setting.
4 Chapter 3: Configuring the Network Storage System (NSS)Step 10: Create a Share

Getting Started Guide
Chapter
3
• Everyone Readable: All authenticated users can view the file.• Everyone Writable: All authenticated users have write permission to the file.
9. From the Protocol field, click the checkboxes to select the protocols that can be used to access the share:
• CIFS: Enable CIFS access to the share.
• NFS: Enable NFS access to the share. (Note: To allow NFS access to the share, the NSS must also be configured to allow NFS access.)
• FTP: Enable FTP access to the share. (Note: To allow FTP access to the share, the NSS must also be configured to allow FTP access.)
10. To assign users access to the share, move the users into one of the following boxes. (The single angled bracket “<“ or “>” moves the selection in the direction of the bracket. The double angled bracket “<<“ or “>>” moves the entire list in the direction of the bracket.)
• Read-Only Users: These users have read-only access to the share.
• Read-Write Users: These users have full read-write access to the share.
11. To assign a group access to the share, move the users into one of the following boxes. (The single angled bracket “<“ or “>” moves the selection in the direction of the bracket. The double angled bracket “<<“ or “>>” moves the entire list in the direction of the bracket.)
• Read-Only Groups: These groups have read-only access to the share.
• Read-Write Groups: These groups have full read-write access to the share.
12. Click OK.
Adding a DFS Shared Folder
Microsoft DFS lets users within your network easily access data stored on multiple remote computers. Through DFS, your users can view and access shares through a familiar, unified folder hierarchy, even when those resources are located on different servers. The NSS can act as a DFS root or leaf. When acting as a root, the share on the NSS contains subfolders that link to the various shares on remote systems, referred to as “DFS shared folders”. When you create a DFS shared folder from a share, note that the user must have privileges set up to access that share on the remote system. After the user accesses the DFS shared folder through the NSS DFS root share, the user’s rights to the DFS shared folder are those assigned to the corresponding target share on the remote system.
To add a DFS root directory to a share on the NSS:
1. From the Manager Menu, click Shares Shares.
NOTE: Setting individual user and group permissions on NFS shares only works when joined to an NIS domain.
35Chapter 3: Configuring the Network Storage System (NSS)

3
Getting Sarted Guide
Chapter
3
The File Shares page appears.2. Click Edit for the share to which you want to add a folder.
The Edit Share page appears.
3. Click Add Shared Folder.
6 Chapter 3: Configuring the Network Storage System (NSS)Step 10: Create a Share

Getting Started Guide
Chapter
3
The Add Folder page appears.4. Select one of the following:
• Add a Folder to DFS: Select this option to create a single DFS shared folder. Fill in the following fields from the Add DFS Shared Folder table:
- Link Name: This is the name of the link that appears as a folder within the share. When users click this link, they are redirected to the target share on the remote server. Enter any name of up to 255 characters.
- Server Name: Enter the name of the remote server on which the target share is located.
- Share: Enter the name of the target share.
• Import an Entire Remote Server: Select this option to automatically create links for all shares on the remote server. Fill in the following fields from the Import Remote Server table:
- Server Name: Enter the name of the remote server.
- Username: Enter the username of the account with access to the server.
- Password: Enter the password for the above account.
5. If you are adding a folder to DFS, click OK. If you are importing a remote server, click Import.
NOTE: Make sure you review the restrictions and recommendations for using Microsoft DFS from the NSS.
37Chapter 3: Configuring the Network Storage System (NSS)

3
Getting Sarted Guide
Chapter
3
Restrictions using Microsoft DFS from the NSSTo use DFS folders from the NSS, it is important to understand the limitations or restrictions involved and how to best configure your system:
• User Credentials must be Recognized by the Remote Server: Re-direction to a remote file-server is only successful if the current user credentials (i.e., the user’s NSS username and password) are recognized by the remote server. Microsoft DFS (MSDFS) operates optimally if the PC-user’s login username and password are recognized as valid on all file servers being accessed. Otherwise, an authentication error occurs and the user may not be able to re-authenticate with different user credentials. As a workaround in a non-domain (workgroup) environment, pre-map a file-share to each file server that needs special user credentials (other than the logged-in username and password). In this case, the MSDFS redirect proceeds smoothly because the PC-client already has an established session with the target file-server. When the user’s login is different on the DFS leaf than the DFS root, they can pre-login to the leaf. When they then login to the root, they can access the linked DFS share.
• Windows Operating System Version: MSDFS is not supported by Windows 98 clients.
• Windows Clients must be Restarted: After you set up a DFS root, any Windows clients that were connected must be restarted.
Step 11: Create a Snapshot for a VolumeAs part of your backup strategy, you can configure the NSS6000 series NAS to capture snapshots of the data stored on a volume. You can define a snapshot to occur at various frequencies (such as hourly, daily, weekly, and so on). Individual snapshots are overwritten by the subsequent snapshot for the same interval. For example, if you set up an hourly snapshot, the 10:00 a.m. snapshot is replaced by the 11:00 a.m. snapshot (and so on). You can also configure multiple snapshots for the same volume. For example, you might set up an hourly snapshot, another snapshot to occur every four hours, and a daily snapshot. Each of these three snapshots is maintained separately and is only overwritten by the subsequent snapshot of its own frequency type. The snapshot(s) reside in the reserve area allocated for each snapshot. When a snapshot is created, the end user can access it by logging into the NSS with their username and password. Each snapshot appears as a copy of the share accessible by the end user.
The snapshot reserve is the amount of space that you want to allocate on the array to the snapshot. Once set, this space is not available for other storage use. The recommended amount of a reserve is generally between 10 to 20% of the total volume size. Note that if the period of time between
8 Chapter 3: Configuring the Network Storage System (NSS)Step 11: Create a Snapshot for a Volume

Getting Started Guide
Chapter
3
snapshots is greater, the amount of the reserve should be greater. Or, if there is a heavy amount of activity on the volume, set a higher reserve.To create a snapshot for a volume:
1. From the Manager Menu, click Storage Snapshots.
The Storage Snapshots page appears.
2. From the New Snapshot table, click the volume for which you are creating the snapshot.
3. Depending on the frequency, use the first part of the Every field to enter a unit of time. Tab to the second part of the Every field, and then click the snapshot frequency (that is, hours or days). For example, set the first part of the field to “7”, and the second part to “Days” to take a snapshot once every week.
4. Use the At: fields to set up the timing for the snapshot. For example, if the frequency is set to Days, set the hour and minute of the day at which you want the snapshot to be taken. Note: When entering the hour, use the 24-hour clock. For example, 3 p.m. should be entered as 15:00. When the frequency is set to Hours, you can only edit the minutes part of the At: field.
NOTE: This feature is only available on NSS6000 series NAS units.
39Chapter 3: Configuring the Network Storage System (NSS)
4
Getting Sarted Guide
Chapter
3
5. In the Reserve Size field, enter the amount of space that you want to allocate to the snapshot,and then select the unit from the drop-down menu. This space becomes unavailable for any other storage on the array. Note that you must enter a minimum of 32 MB in this field.
6. Click Add to save the snapshot. Clicking Add saves the first snapshot. Each subsequent snapshot occurs based on the defined schedule.
The snapshot details appear in the Currently Active Snapshots area at the top of the page.
Step 12: Create a Scheduled Backup for a ShareYou can quickly configure a backup to run at a scheduled time interval for a share or group of shares. The backup can be saved to a remote CIFS server or to another share on the NSS.
To set up a scheduled backup:
1. From the Manager Menu, click Shares Backup.
2. Click Schedule Backup.
NOTE: The snapshot is built at the array level. The Volume column currently shows the amount of space left on the array on which the volume is located. To calculate the reserve size, refer to the applicable volume size as listed on the Volume page.
0 Chapter 3: Configuring the Network Storage System (NSS)Step 12: Create a Scheduled Backup for a Share

Getting Started Guide
Chapter
3
The Scheduled Backups page appears.3. Move the shares you want to include in the backup from the Available Shares list to the Shares to Backup list. (The single angled bracket “<“ or “>” moves the selection in the direction of the bracket. The double angled bracket “<<“ or “>>” moves the entire list in the direction of the bracket.)
4. Click one of the following to determine the destination for the backup:
• Remote CIFS Filer: To save the backup on a remote CIFS server, click this option and then configure the hostname of the remote server, the remote share, as well as the login credentials to that share.
• Local File System: Select the share on which you want to store the backup.
5. To create a compressed backup, check Compress backup image.
Note: Compressed backup images are smaller than non-compressed images but take longer to create.
6. Click Next.
41Chapter 3: Configuring the Network Storage System (NSS)

4
Getting Sarted Guide
Chapter
3
The Select Backup Schedule page appears.7. Select the backup frequency as one of the following:
• Daily: Select each day on which you want the backup to occur.
• Weekly: Select the day of the week on which you want the backup to occur.
• Monthly: Select the day of the month on which you want the backup to occur. Make sure you select a day that is 28 or less. If you select the 29th, 30th or 31st day, the backup does not run during months that do not contain that day.
8. In the Run Backup at field, set up the specific time (hour:minute) at which time the backup occurs. When setting the hour, use the 24-hour clock.
9. To set up a backup that backs up just the changes made to the share since the last backup, click Incremental Backups. Leave it unchecked to take a full backup of the share each time the backup is run.
10. Click OK.
Step 13: Complete the ConfigurationThere are a number of configuration options not listed in this guide (for example, you can set up Email Alerts, SNMP alerts, VLANs, and so on). You can find the full details in the Administrator Guide which you can access either through the Online Help. The Online Help is part of the Configuration Manager or you can download the pdf version of the Administrator Guide from the Linksys website (www.linksys.com).
2 Chapter 3: Configuring the Network Storage System (NSS)Step 13: Complete the Configuration

Getting Started Guide
Chapter
3
Step 14: Save the Current ConfigurationYou can save a copy of the NSS configuration that can be used should you need to restore the settings at a later time. When you save the configuration file, it saves a date-stamped version of the current configuration settings to the specified volume on the NSS. You can choose to save the current configuration settings to a specified volume on the NSS or you can save the file to a USB flash device inserted into the AUX-1 port.To save the current configuration:
1. If you are saving the configuration file to a USB flash device, insert a USB flash device into the AUX-1 port on the NSS chassis.
2. From the Manager Menu, click Admin Configuration.
The Configuration Manager page appears.
3. Select the location where the backup is saved from the Stored Configuration Location drop-down menu. To save the configuration file to a USB flash device, select the AUX-1port as the location. You can then copy the configuration file from the USB flash device to another location on your network.
4. Click Update.
5. Click Save to save the configuration settings. If the configuration file does not successfully save to the specified volume, check the volume to ensure that it is not locked.
NOTE: If you restore a configuration file that was saved in an older version of the NSS firmware than the current version, check the settings after you restore the file to ensure they were updated correctly.
43Chapter 3: Configuring the Network Storage System (NSS)

4
Getting Sarted Guide
Chapter
3
6. If you saved the file to the USB flash device, display the Storage Status page.7. Click Unmount.
8. When the AUX-1 LED on the front of the chassis is off, you can safely remove the unmounted USB flash device from the AUX-1 port.
NOTE: Removing the USB flash device in a mounted state means that you risk causing file or filesystem corruption.
4 Chapter 3: Configuring the Network Storage System (NSS)Step 14: Save the Current Configuration

Getting Started Guide
Chapter
4
Part C: Instruct Your Users How to Access the NSS StorageEnd users, using a Windows, UNIX, Linux, or Mac computer can easily access NSS storage. Once the end user logs into the NSS using their username and password, the shares to which the end user has read or read-write privileges appear. The NSS supports three file-sharing protocols: CIFS, NFS, and FTP. The steps to access the NSS storage depend on which file-sharing protocol the end user chooses to use: CIFS, NFS, or FTP as well as the end user’s operating system.Windows Users: Accessing the NSS Storage using CIFS/SMBWindows users who have a user profile set up can access any shares to which they have privileges on the NSS storage using CIFS/SMB.
To access the NSS storage using CIFS/SMB:
1. There are a variety of ways to access the NSS:
• From the My Computer window, type \\<hostname> or \\<IP address> in the Address bar. (Where the <hostname> refers to your NSS hostname and <IP address> refers to your NSS IP address. For example, “\\NAS0123456789ab or \\192.168.1.2”.)
• Browse for the NSS from the My Network Places window.
• Map the NSS to a network drive.
The Login window appears.
2. If your user profile is set up locally (that is, through the NSS configuration interface), in the User name field, enter the following: <NSS hostname>\<username>. If your user profile is set up through the domain, you do not need to enter the NSS hostname before your user name. (Just enter your user name and then your password.)
3. Click OK.
The Windows Explorer window opens with a directory listing of the available shares.
4. Depending on your privileges to the share, you can begin using the NSS storage.
45Chapter 4: Accessing Network StorageWindows Users: Accessing the NSS Storage using
4
Getting Sarted Guide
Chapter
4
Windows Users: Accessing the NSS Storage through FTPWindows users who have a user profile set up can access any shares to which they have privileges on the NSS storage using CIFS/SMB or FTP.To access the NSS storage using FTP:
1. From your FTP client application, connect to the NSS. Enter the IP address or hostname of the NSS. For more information about using your FTP client application, refer to its documentation.
2. Enter your DOMAINNAME\username and password when prompted by your FTP client.
When your FTP client has logged in, a list of accessible shares appears as individual directories.
3. Depending on your privileges to the share, you can begin using the NSS storage.
UNIX/Linux Users: Accessing Storage through NFSUNIX and Linux users can access shares on the NSS via NFS. Due to the way that the NSS implements NFS file access privileges, only NFSv3 is supported. In order for NFS access privileges to work correctly, you must have the NSS joined to an NIS domain.
1. Log into the client system as root.
2. Create a mount point directory for the mount if you do not already have one (e.g., mkdir /mnt/nas_share1).
3. Mount the NFS share by typing “mount -t nfs -o nfsvers=3 <IP address/hostname>:<mount point path on NSS> <mount point path on client>”. The mount point path on the NSS appears in the Shares page.
4. Log out of the root account.
5. Log into the user account on the client system.
You should now have access to the share via the mount point directory on your client. You have the privileges to the share as are defined for the NSS.
NOTE: Before your end users can access the shares on the NSS using FTP, the NSS must have FTP access enabled and the individual share must be set up to allow FTP access.
NOTE: You must have root privileges to your client system to create an NFS mount.
6 Chapter 4: Accessing Network StorageWindows Users: Accessing the NSS Storage through FTP

Getting Started Guide
Chapter
4
UNIX/Linux Users: Accessing Storage through FTPUNIX and Linux users who have a user profile set up can access any shares to which they have privileges on the NSS storage using NFS or FTP.To access the NSS storage using FTP:
1. Open your FTP client application.
2. Enter the NSS hostname/IP address.
3. Enter any other required settings. If using FPS, ensure that the client is set to use Explicit FTPS. For more help using the FTP client, refer to the FTP client documentation.
4. Enter your DOMAINNAME\username and password when prompted by the FTP client.
5. Depending on your privileges to the share, you can begin using the NSS storage.
Mac Users: Accessing Storage through CIFS/SMBMac users who have a user profile can access any shares to which they have privileges on the NSS storage using CIFS/SMB.
To access the NSS storage via CIFS/SMB:
1. From the Finder’s Go menu, click Connect to Server.
2. Enter “smb://<hostname or IP address of the NSS>/<sharename>. (Where the information in the brackets is meant to be replaced with the applicable information. Do not type the brackets.)
Click the “+” sign to save the NSS address to the Favorite Servers list so that the next time you log in you just need to select the address from the list.
3. Click Connect.
4. When the Login window appears, enter your username and password. If your user profile is set up locally (that is, through the NSS configuration interface and not through the ADS or NTv4 domain), you need to enter the following: <NSS hostname>\<user name>.
5. Depending on your privileges to the share, you can begin using the NSS storage.
NOTE: Before your end users can access the shares on the NSS using FTP, the NSS network filters must be set up to allow FTP access. The individual share must be also be set up to allow FTP access.
47Chapter 4: Accessing Network StorageUNIX/Linux Users: Accessing Storage through FTP

4
Getting Sarted Guide
Chapter
4
Mac Users: Accessing Storage through FTPMac users who have a user profile can access any shares to which they have privileges on the NSS storage using FTP.To access the NSS storage using FTP:
1. Open your FTP client application.
2. Click Connect.
3. From your FTP client application, connect to the NSS. Enter the IP address or hostname of the NSS. For more information about using your FTP client application, refer to its documentation.
4. Enter your DOMAINNAME\username and password when prompted by your FTP client.
When your FTP client has logged in, a list of accessible shares appears as individual directories.
5. Depending on your privileges to the share, you can begin using the NSS storage.
NOTE: Before your end users can access the shares on the NSS using FTP, the NSS must have FTP access enabled and the individual share must be set up to allow FTP access.
8 Chapter 4: Accessing Network StorageMac Users: Accessing Storage through FTP

Getting Started Guide
Chapter
5
LEDs & ButtonsThe LEDs on the front and back of the NSS chassis help you troubleshoot a variety of conditions on the NSS---from normal operating conditions, alerts, to serious error conditions. The Reset button lets you restore the network defaults in situations where you can no longer log into the configuration interface.Power LED (Front Panel)
The Power LED can be in any of the following states, depending on the current state of the NSS:
• Solid Yellow: The NSS is powered on and the boot loader is currently running. The boot loader runs for approximately 10 seconds at the beginning of the startup of the NSS, after which the LED goes to a blinking green. This condition also occurs if the upgrade of firmware process fails (although in this case, the LED remains in a solid yellow condition until the user clicks OK from the System Details page following an unsuccessful upload. After the user clicks OK, the system reboots using the current version of the firmware.)
• Blinking Yellow: The network configuration factory defaults are being reset. When resetting the network defaults, hold down the Reset button until you see the Power LED flash yellow rapidly.
• Solid Green: The NSS is powered up and finished booting.
• Blinking Green: The NSS is either booting up or shutting down.
• Alternating Yellow & Green: The firmware update is currently in progress.
• Off: The NSS is either disconnected from a power source or has finished the shutdown process and can be safely disconnected from a power source.
49Chapter 5: LEDs

5
Getting Sarted Guide
Chapter
5
System LED (Front Panel)The System LED can be in any of the following conditions, depending on the current type of system error on the NSS:
• Solid Yellow: The administrator needs to look into the exact error condition through the configuration interface as one of the following has occurred:
- A volume is more than 90% full.
- A disk drive has failed or is about to fail.
- A fan has stalled.
- The system temperature is above the maximum threshold.
- The temperature of a disk drive is above the maximum threshold.
- A voltage rail is above or below specification.
- The NSS is running on UPS due to a mains power failure.
- The NSS is running on RPSU due to an internal power supply failure.
• Solid Red: There is a critical system failure. The upgrade of the firmware was not successful for any of the following reasons:
- The firmware being loaded is not compatible with the NSS platform.
- The firmware image is corrupt.
- The firmware image is a previous version to the one currently installed. Downgrades are not supported.
• Off: There are no system-related problems.
Reset Button (Front Panel)
The Reset button lets you restore the network setting system defaults or reset the box.
• To restore the network setting system defaults: You need to do this if the configuration interface becomes inaccessible. To reset the network setting system defaults, shut down the NSS, power it off, hold down the Reset button, and then power up the NSS. When you see the Power LED blink yellow rapidly, release the Reset button. The network settings are restored to factory defaults.
• To reset the box: Press and hold the Reset button while the system is running until the Power LED begins to blink green. Release the Reset button.
0 Chapter 5: LEDs

Getting Started Guide
Chapter
5
LAN LEDs (Front Panel)Solid Green: The LAN link is up and running at 1000 link speed, but is currently idle.
Blinking Green: The LAN link is up and running at 1000 link speed and is currently active. The LED flickers off with activity.
Solid Yellow: The LAN link is up and running at 10/100 link speed, but is currently idle.
Blinking Yellow: The LAN link is up and running at 10/100 link speed and is currently active. The LED flickers off with activity.
Off: No LAN link is detected.
Hard Disk Drive LEDs (Front Panel)
The LEDs associated with each of the installed disk drives indicate disk-drive activity, an error condition, and locate state.
The various states of the green LED indicates the drive activity:
• Solid Green: The disk drive is configured but is currently idle.
• Flicker Green: The disk drive is configured, active, and not rebuilding. Flickers off with activity.
• Blinking Green: The disk drive is configured and a RAID array is currently rebuilding to the disk drive.
• Off: The disk drive is not configured (not part of a RAID or JBOD array and not exported).
The various states of the red LED indicate that the disk drive is in an error condition:
• Solid Red: The disk drive is in a failed state.
• Blinking Red: The disk drive is predicated to fail (via S.M.A.R.T.). We recommend that you replace the disk drive to avoid the loss of data.
• Off: The drive is OK.
The various states of the white LED indicate that there is a locate request currently on the disk drive:
• Blinking White: There is a locate request currently on the disk drive (from the Storage Status page on the configuration interface).
• Off: The disk drive is not marked by a locate request.
NOTE: There can only be one locate request set for a disk drive at one time.
51Chapter 5: LEDs

5
Getting Sarted Guide
Chapter
5
USB LED (Front Panel)Solid Green: The USB hard/flash drive is connected and is not safe to remove.
Blinking Green: The USB hard/flash drive is connected and is being mounted or unmounted.
Off: There is either no USB hard/flash drive connected to the NSS, or, if connected, the USB hard/flash drive is safe to remove.
UPS LED (Back Panel)
Off: There is either no UPS attached to the NSS or the UPS function has been disabled in the System Power page in the configuration interface.
On: A UPS is attached to the NSS and the UPS function is enabled in the System Power page in the configuration interface.
2 Chapter 5: LEDs

53Appendix A Linksys One Contact Information
Network Storage System (NSS) Getting Started Guide
Appendix
A
Support Contact InformationLinksys One Contact InformationVisit Linksys online for information on the latest products and product updates at:
http://www.linksys.com
Can't find information about a product you want to buy on the web? Do you want to know more about networking with Linksys One products? For pre-sales product questions call:
800-487-2409
If you experience problems with any Linksys One product at any time, contact your Value Added Reseller (VAR). If you are a VAR, contact Linksys Technical Support:
866-870-5826.
For customers outside the U.S., you can find technical support contact information for your location by going to http://www.linksys.com and choosing your country.