cisco telepresence management suite · size of the video network being managed. using a server...
TRANSCRIPT
Cisco TelePresenceManagement Suite
Installation Guide
Software version 14.1
D14389.12
December 2012
Contents
Introduction 4After installation 4
Prerequisites 5Server requirements for installing Cisco TMS 5
Hardware 5Operating system and software 5Access requirements 6Date and time 6Database server requirements 6
Client software requirements 8Server network dependencies 8
Ports used by Cisco TMS 9Compatibility with extensions 9Upgrade requirements and recommendations 10
Cisco TMS Agent Legacy provisioning 10Versions earlier than 13.2 10
Installing or upgrading Cisco TMS 12Initial installation 12Complete installation 12
Installing a new database 13Upgrading an existing database 13Activating and pre-configuring the installation 13
Custom installation 18Selecting components and database options 18Activating and pre-configuring the installation 20
Accessing Cisco TMS for the first time 25
Setting up Cisco TelePresence Management Server 27Operator safety summary 27
Equipment markings 27Warnings 27
Installation precautions and hardware compliances 28Installing the server 29
Unpacking 29Installation site preparations 29Rack mounting 29Connecting the cables 30
Configuring the server 30Using the LCD panel 30Configuring the IP Address setting 31Configuring the server operating system 31Shutting down 33
Operating, maintaining, and upgrading the server 33Starting and stopping the server 33Performing database backups 34Operating system updates 34Software installation and upgrades on the Cisco TelePresence Management Server 34
Cisco TelePresence Management Suite Installation Guide (14.1) Page 2 of 42
Troubleshooting 36Installation times out 36
Appendices 37Appendix 1. Restricting IIS 7 modules to minimal required 37Appendix 2. Uninstalling Cisco TMS 38
Removing all Cisco TMS information from a server 38
Bibliography 41
Cisco TelePresence Management Suite Installation Guide (14.1) Page 3 of 42
IntroductionCisco TelePresence Management Suite (Cisco TMS) is a portal for managing and monitoring your videoconferencing network from a single, structured interface. Cisco TMS provides centralized control for on-site and remote video systems, and a deployment and scheduling system for your entire video network.
Cisco TMS automates system configuration for a basic telepresence network, operating right out of the box. You can tune Cisco TMS behavior to suit your organization's needs, set up user permissions, and configure your network model so that all of Cisco TMS call handling functionalities are available.
This document provides information for new installations and for upgrading and uninstalling an existing version. Instructions are also provided for the legacy Cisco TelePresence Management Server.
Note: When using Cisco TMS, do not use any other telepresence management system, including Cisco TelePresence Manager, on your telepresence network.
After installationAfter installing Cisco TMS, see Cisco TelePresence Management Suite Administrator Guide or the built-in web help.
Tip: Click the question mark icon (?) in the top-right corner of any Cisco TMS page to access the web help.
Cisco TelePresence Management Suite Installation Guide (14.1) Page 4 of 42
IntroductionAfter installation
PrerequisitesThis section covers hardware and software requirements, and other considerations and dependencies that must be reviewed before installing or upgrading Cisco TelePresence Management Suite and Cisco TelePresence Management Server.
Server requirements for installing Cisco TMSThe requirements below are specific to installing Cisco TMS on your own server.
Hardware
Pentium-compatible processor
2.6 GHz or more is recommended.
Memory 4 GB RAM or more is recommended. A warning will be displayed during installation if less than 4GB is detected.
Disk Space n 4 GB for installation and application footprint. n Additional space is required if you are installing the SQL Server locally–see
Database server requirements [p.6].
Shared and virtual servers
Cisco TMS is resource intensive with specific server requirements that increase with the activity level and size of the video network being managed. Using a server hosting other applications or websites for hosting Cisco TMS is therefore not supported, with the exception of certain Cisco TMS extensions. See the installation guide for the specific extension product for requirements and best practices for installation.
Cisco TMS can be installed in a virtualized server environment as long as the virtual machine is allocated sufficient dedicated resources to meet the server and hardware requirements for installation. The resources allocated to the Cisco TMS server instance must be dedicated, and not shared with other server instances.
Operating system and software
Product Version Additional notes
Windows Server
n Windows Server 2003 SP1 or later, 32 bit
n Windows Server 2003 R2 SP1 or later, 32 bit
n Windows Server 2008 Standard 32 bit and 64 bit
n Windows Server 2008 R2 Standard 64 bit
n The server operating system must be English, Japanese, or Chinese.
n Standard/Enterprise/DataCenter editions all supported on both Windows Server 2003 and R2.
n Using the latest service pack is recommended for all versions.
n We recommend that new installations use Windows Server 2008 R2 Standard 64 bit.
.NET Framework
4.0 Must be installed prior to running the Cisco TMS installer.
Windows SNMP Services
Checked for and usually installed automatically if not present. Depending on your type of installation, the Windows installation CD may be required.
Cisco TelePresence Management Suite Installation Guide (14.1) Page 5 of 42
PrerequisitesServer requirements for installing Cisco TMS
Microsoft IIS n For Windows Server 2008 R2: IIS 7.5
n For Windows Server 2008: IIS 7
n For Windows Server 2003: IIS 6
The Microsoft IIS (Internet Information Services) web server will be installed automatically by the Cisco TMS installer unless already present on the system.
Windows Installer
4.5 If not present on the system, the Cisco TMS installer will inform you that the installation is needed before continuing, and the installation package is provided for you.
Windows Updates
Enable and apply Windows Updates according to the network policy of your organization.
Access requirementsAdministrator access to the Windows server and database is required.
If an existing database server is to be used, you must have the login information to be used as the Cisco TMS service account (see Database server requirements [p.6]).
Date and timeNTP server recommended
The time setting on the Windows server must be correct for Cisco TMS to function correctly. We therefore strongly recommend setting the server up to use an NTP (Network Time Protocol) server. For instructions, see the Microsoft support article How to configure an authoritative time server in Windows Server.
Time zone
Do not change the time zone of the Windows server running Cisco TMS after installing the application. If the server time zone is changed at a later date, new conferences will use the new time zone, while existing conferences at the time of the time zone change will keep the old time zone.
Database server requirementsCisco TMS stores all its customer data in its SQL database named tmsng. This self-contained storage allows for convenient backup and recovery of customer information. For new installations, the installer creates tmsng using the SQL server defaults. Upgrades will reuse an existing Cisco TMS database.
Disk space
Required database disk space depends on the size, auditing, and activity level of the video network. In order to control the growth of the database, purge plans for logs and events can be set in the Administrative Tools > Cisco TMS Server Maintenance page. Most installations require at least 1-4 GB to allow for database growth. To see the options available for ongoing Cisco TMS database information and maintenance tasks, go to the Administrative Tools menu.
SQL server version
One of the following is required:
Cisco TelePresence Management Suite Installation Guide (14.1) Page 6 of 42
PrerequisitesServer requirements for installing Cisco TMS

Product Version Additional notes
Microsoft SQL Server 2008 R2
All versions, 32 bit or 64
If there is not an SQL database present on the server when installing Cisco TMS, Microsoft SQL Server 2008 Express 32 bit will be installed.
Note that all Express editions of SQL Server have a database size limit:
n Microsoft SQL Server 2008 and 2005 Express have a 4 GB limit. n Microsoft SQL Server 2008 R2 Express has a 10 GB limit.
Large deployments with databases that can be expected to grow larger than 4 GB or 10 GB respectively must therefore use the full edition.
We recommend using Microsoft SQL Server 2008 R2 for new installations.
Microsoft SQL Server 2008
All versions, 32 bit or 64
Microsoft SQL Server 2005
All 32-bit versions
Local or remote server
If no existing SQL installation is found on the Cisco TMS server by the installer, SQL Server 2008 Express can be installed locally on the Cisco TMS server as part of the installation, or you can opt to use an external standalone SQL server instead. The compatibility level will be set automatically by the installer; 100 for SQL Server 2008 and 90 for SQL Server 2005.
Running SQL on a separate server is strongly recommended for large (100+ system) or high-usage video networks because there are performance benefits due to the high memory and disk I/O load associated with running an SQL Server. Hosting the database server separately from the Cisco TMS server frees up memory and disk resources, improving Cisco TMS performance.
Note:
n The database name must still be tmsng when the database is on a separate server. n When using a named instance on a separate server for the database, SQL Server Browser must be
running.
Database language requirements
For Cisco TMS to function correctly, the default SQL language must be set to English.
Database permission requirements
For installation and upgrading, SQL Server and Windows Authentication mode (mixed mode) must be enabled on the database server. After installation is completed, mixed mode can be disabled and Windows Authentication enabled until the subsequent upgrade.
See the TMS Tools chapter of Cisco TelePresence Management Suite Administrator Guide or the web help for instructions on changing authentication modes.
When installing or upgrading Cisco TMS and using an existing SQL Server, the installer prompts for a SQL user and password. The default is to enter the server sa (system administrator) username and password. If the sa account is not available, use one of the following:
n Automatic setup, but with security limited role. Ask your SQL server administrator to create an SQL user and login that has the dbcreator and securityadmin server roles. This account will be the service account for Cisco TMS. When prompted for SQL Server credentials during installation, enter the username and password for that account. Cisco TMS will create the tmsng database automatically using the server defaults, assign itself as the owner and continue to use the supplied account to access the database after installation.
Cisco TelePresence Management Suite Installation Guide (14.1) Page 7 of 42
PrerequisitesServer requirements for installing Cisco TMS
n Manual database creation, max security limited role. Ask your SQL server administrator to create: l A database named tmsng with the appropriate options. The database collation must be Latin1 General
CI (case insensitive) and AI (accent insensitive). (Latin1_General_CI_AI) l An SQL user and login to use for the Cisco TMS Service account and grant the user the dbowner role for
the tmsng database.
Note: For Cisco TMS to function properly, the SQL user supplied must always have dbowner permission on the tmsng database, even after installation.
Client software requirementsAll users including administrators access Cisco TMS using the web interface.
A Windows username and password to the Cisco TMS server is required to sign in. Use either a domain account, if the server is joined to a domain, or a local machine account.
Web browser
Cisco TMS is tested with:
n Microsoft Internet Explorer versions 8 and 9. n Firefox versions 15 and 16.
Java Runtime Environment (JRE)
n Version 1.5 required n Version 1.6.0 or later recommended
JRE is required for using the Monitoring pages in Cisco TMS. If it is not installed, most browsers will prompt you to download and install the browser plug-in automatically. If this is not possible due to security restrictions, install it manually on the client computer from the JRE installation file which can be downloaded from http://www.java.com.
Server network dependenciesThe following network dependencies must be considered before installing Cisco TMS:
n Domain membership preferred: Each user logging into Cisco TMS needs a Windows User Login to authenticate to the web site. Users must have either a local account on the Cisco TMS Windows Server or a Domain account that the server trusts through Active Directory. By making the server a member of the domain, all trusted domain users can automatically use their existing Windows credentials to log into Cisco TMS. You can still limit what users can do after they have logged into Cisco TMS using Cisco TMS permissions. Active Directory membership is the recommended deployment for most installations because it avoids creating local Windows accounts for each user.
n Cisco TMS website accessible by IP and Hostname: not all devices support DNS hostnames or Port Numbers, the Cisco TMS web site must therefore be accessible by an IP Address on port 80. Some functionality requires Cisco TMS to be reachable by hostname; therefore Cisco TMS should also be accessible by a fully qualified domain name.
n Mail server access: Cisco TMS requires access to an SMTP server to be able to send email. Your company's existing mail servers can be used for this. Note that Cisco TMS supports SMTP AUTH login for authentication if required.
n Network access to managed devices:Cisco TMS needs specific protocols and access to manage devices. Any network firewalls or NAT routers must allow traffic to flow to and from Cisco TMS.
n Microsoft IIS components ASP.NET and ASP must be enabled.
Cisco TelePresence Management Suite Installation Guide (14.1) Page 8 of 42
PrerequisitesClient software requirements
n Windows Server 2008 only: the Windows Firewall feature is enabled by default and controls both inbound and outbound ports. For information on which ports must be opened if Windows Firewall is enabled, see Ports used by Cisco TMS [p.9].
n Make sure anti-virus programs or other security measures are not blocking applications from sending mail directly using the SMTP port.
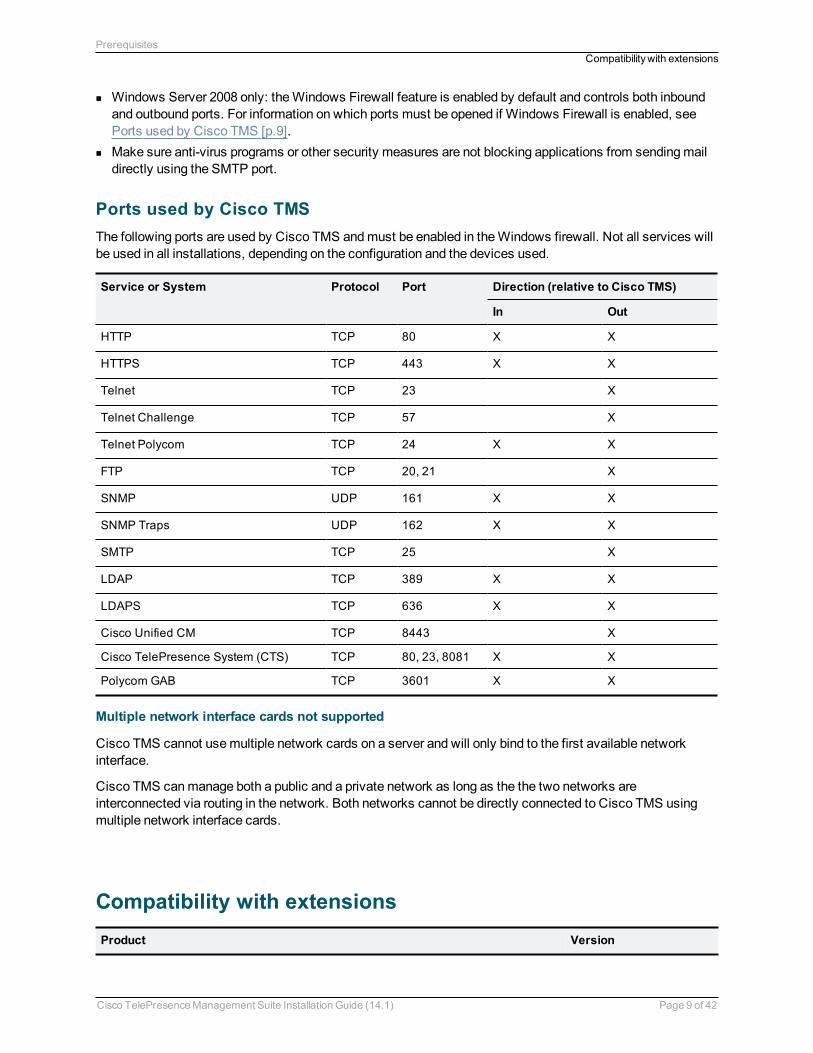
Ports used by Cisco TMSThe following ports are used by Cisco TMS and must be enabled in the Windows firewall. Not all services will be used in all installations, depending on the configuration and the devices used.
Service or System Protocol Port Direction (relative to Cisco TMS)
In Out
HTTP TCP 80 X X
HTTPS TCP 443 X X
Telnet TCP 23 X
Telnet Challenge TCP 57 X
Telnet Polycom TCP 24 X X
FTP TCP 20, 21 X
SNMP UDP 161 X X
SNMP Traps UDP 162 X X
SMTP TCP 25 X
LDAP TCP 389 X X
LDAPS TCP 636 X X
Cisco Unified CM TCP 8443 X
Cisco TelePresence System (CTS) TCP 80, 23, 8081 X X
Polycom GAB TCP 3601 X X
Multiple network interface cards not supported
Cisco TMS cannot use multiple network cards on a server and will only bind to the first available network interface.
Cisco TMS can manage both a public and a private network as long as the the two networks are interconnected via routing in the network. Both networks cannot be directly connected to Cisco TMS using multiple network interface cards.
Compatibility with extensionsProduct Version
Cisco TelePresence Management Suite Installation Guide (14.1) Page 9 of 42
PrerequisitesCompatibility with extensions
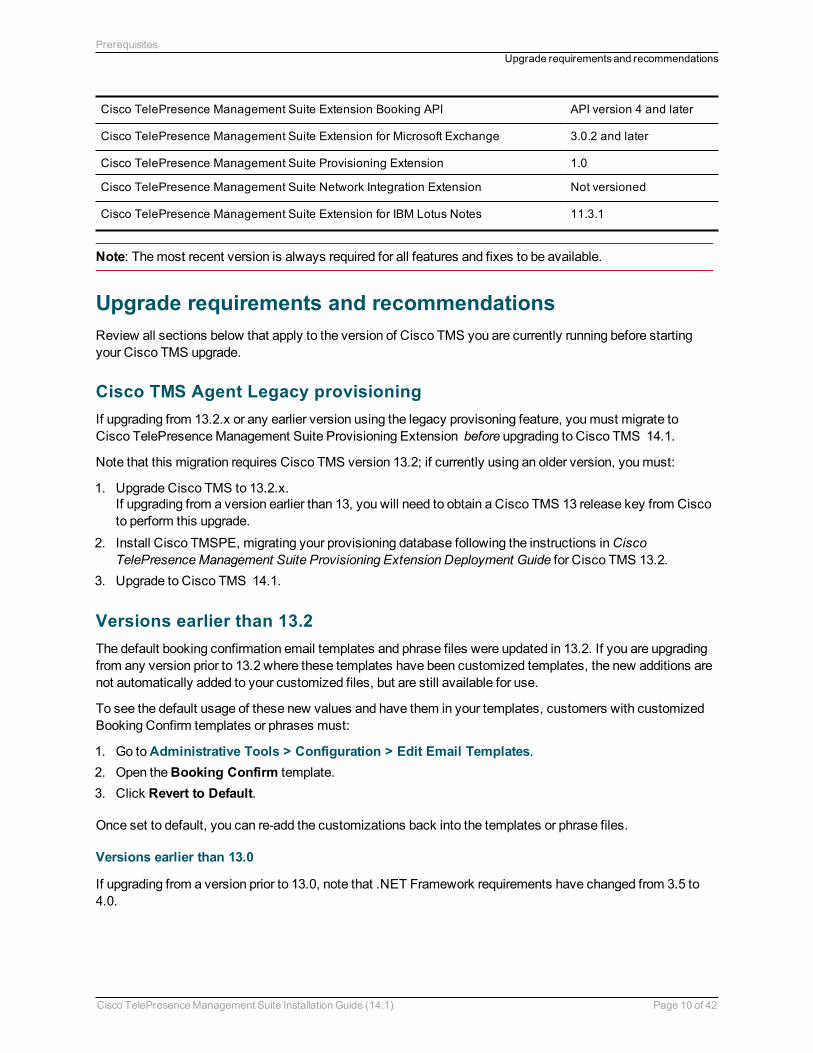
Cisco TelePresence Management Suite Extension Booking API API version 4 and later
Cisco TelePresence Management Suite Extension for Microsoft Exchange 3.0.2 and later
Cisco TelePresence Management Suite Provisioning Extension 1.0
Cisco TelePresence Management Suite Network Integration Extension Not versioned
Cisco TelePresence Management Suite Extension for IBM Lotus Notes 11.3.1
Note: The most recent version is always required for all features and fixes to be available.
Upgrade requirements and recommendationsReview all sections below that apply to the version of Cisco TMS you are currently running before starting your Cisco TMS upgrade.
Cisco TMS Agent Legacy provisioningIf upgrading from 13.2.x or any earlier version using the legacy provisoning feature, you must migrate to Cisco TelePresence Management Suite Provisioning Extension before upgrading to Cisco TMS 14.1.
Note that this migration requires Cisco TMS version 13.2; if currently using an older version, you must:
1. Upgrade Cisco TMS to 13.2.x.If upgrading from a version earlier than 13, you will need to obtain a Cisco TMS 13 release key from Cisco to perform this upgrade.
2. Install Cisco TMSPE, migrating your provisioning database following the instructions in Cisco TelePresence Management Suite Provisioning Extension Deployment Guide for Cisco TMS 13.2.
3. Upgrade to Cisco TMS 14.1.
Versions earlier than 13.2The default booking confirmation email templates and phrase files were updated in 13.2. If you are upgrading from any version prior to 13.2 where these templates have been customized templates, the new additions are not automatically added to your customized files, but are still available for use.
To see the default usage of these new values and have them in your templates, customers with customized Booking Confirm templates or phrases must:
1. Go to Administrative Tools > Configuration > Edit Email Templates. 2. Open the Booking Confirm template. 3. Click Revert to Default.
Once set to default, you can re-add the customizations back into the templates or phrase files.
Versions earlier than 13.0
If upgrading from a version prior to 13.0, note that .NET Framework requirements have changed from 3.5 to 4.0.
Cisco TelePresence Management Suite Installation Guide (14.1) Page 10 of 42
PrerequisitesUpgrade requirements and recommendations
Version 12.5 and earlier
Upgrades back to and including version 12.6 are tested and supported for Cisco TMS 14.1. For earlier versions, we recommend performing a new installation rather than an upgrade, as changes to the database and backend have been substantial.
Cisco TelePresence Management Suite Installation Guide (14.1) Page 11 of 42
PrerequisitesUpgrade requirements and recommendations
Installing or upgrading Cisco TMSBefore you start the installation make sure that you have:
n software downloaded from Cisco.com n release and option keys ready n considered all relevant prerequisites for an installation in your environment
If you are upgrading rather than installing for the first time, also perform any necessary operations described in the section Upgrade requirements and recommendations [p.10].
The installation/upgrade process has two parts. After completing an initial setup process, the next process will depend on whether you choose a complete or custom installation.
Note: You may be prompted to reboot the server more than once during installation. The installer automatically resumes after the server reboots.
Initial installationNote that depending on Windows components needing to be added, you may be prompted to reboot the server more than once during installation. The installer automatically resumes after the server reboots.
1. Close all open applications and disable virus-scanning software. 2. Extract the Cisco TMS .zip archive to a folder. 3. Run the Cisco TMS executable as Local Administrator. 4. Select the language to use for the installer and click OK. Note that this language choice does not affect
Cisco TMS after the installation. 5. The installer now checks the hardware and software configuration of the server. A warning or error
message may be displayed depending on your server's configuration. Follow the prompts and install any missing components.
6. If an earlier version of Cisco TMS is currently installed, you are prompted to upgrade. l Click Yes to continue. Upgrading removes the old version and upgrades the existing Cisco TMS
database. l Click No to abort the installation and leave the current installation untouched.
7. A welcome window is displayed. Click Next to continue. 8. Click Yes to accept the license agreement. 9. Select Complete or Custom and click Next.
l Complete uses the default settings. It can be used for upgrades of existing installations with both local and remote SQL installations, and is the recommended choice for performing upgrades. Proceed to the section Complete installation [p.12] below.
l Custom allows you to specify all the options such as the installation path and SQL server choices. Proceed to the section Custom installation [p.18] below.
Complete installationFollow the steps in this section if you selected the Complete installation option.
The installer now searches for an existing SQL Server and Cisco TMS database.
Cisco TelePresence Management Suite Installation Guide (14.1) Page 12 of 42
Installing or upgrading Cisco TMSInitial installation
Installing a new databaseIf no existing Cisco TMS database connection is found, the installer looks for an SQL installation on the local server:
n If an SQL installation is found, enter a user name and password to connect to that server so that the installer can create a new Cisco TMS database.
n If no local SQL server is found, a local copy of SQL Server 2008 Express Edition will be installed and a new Cisco TMS database is created: a. When prompted, enter a password to set for the sa-account (administrator) for the new SQL Server
installation. You must use a strong password for the SQL installation. b. Be sure to make a note of the sa password somewhere secure because it is required for future
upgrades and Cisco TMS maintenance. c. Click Next to proceed with the installation.
Upgrading an existing databaseIf an existing database connection is found, the specified SQL Server is used. When prompted, enter the username and password to connect to that SQL server and click Next. n Click Yes to upgrade the existing database to the current version and retain the existing information.
We recommend that you back up the database before it is upgraded. To perform the backup: a. Enter a path for the backup file and filename, or click Browse to navigate to a folder. The backup is
done on the SQL Server itself, so these values are local to the SQL Server. b. Click Backup to start the backup. c. When the backup is complete (this may take several minutes), click Next. To skip the optional backup, click Next.
n Click No to stop the installer and manually remove the database from the SQL server if you wish to use that SQL Server and install a new Cisco TMS database.
Activating and pre-configuring the installation 1. The Release and Option Keys dialog is now displayed and any existing keys are shown if upgrading.
Enter the key(s) to enable additional systems, extensions, or features. A new release key is also required when upgrading to a new major release. The release key must be entered before adding option keys, which are validated as they are added.
Cisco TelePresence Management Suite Installation Guide (14.1) Page 13 of 42
Installing or upgrading Cisco TMSComplete installation

a. To add an option key, enter the key then click Add Option. Option keys can also be added post installation by going to Administrative Tools > Configuration > General Settings.
b. Click Next.If no release key is entered, an evaluation version of Cisco TMS will be installed. This includes support for three systems, and Cisco TMS Scheduler . For questions regarding release or option keys, contact your Cisco Reseller or Cisco Support.
2. You can now pre-configure default settings to allow Cisco TMS to immediately start working with a basic network configuration (these settings can be changed after installation).
If upgrading, values from the existing database are displayed.
Cisco TelePresence Management Suite Installation Guide (14.1) Page 14 of 42
Installing or upgrading Cisco TMSComplete installation
Field label Description
TMS Server IPv4 Address
The IPv4 address of the local server.
TMS Server IPv6 Address
The IPv6 address of the local server. If IPv6 is not enabled on the Windows Server, this field can be left blank.
IP Broadcast/Multicast Addresses […]
The broadcast address(es) for the networks that Cisco TMS is to automatically search for devices. (Systems that Cisco TMS discovers can be automatically added to Cisco TMS with their management settings added.) Multiple broadcast addresses can be entered separated by commas. Cisco TMS will search networks by sending a SNMP Discovery packet to the supplied addresses. The default value will be the broadcast address of the Cisco TMS server’s network.
Enable automatic registration of systems in TMS
If enabled, systems Cisco TMS discovers on the network will automatically be added into a folder in Cisco TMS and have their management settings configured. This setting is disabled by default.
Sender E-mail Address
The email address you wish to appear in the From field of messages sent by Cisco TMS. Example: [email protected].
SMTP Server Address
The network address of the SMTP server Cisco TMS will use to send email. Additional authentication configuration settings can be set up post installation as needed.
Click Next when done modifying the settings. Cisco TMS then contacts the supplied SMTP server to verify the settings and warns you if it was not able to contact the server.
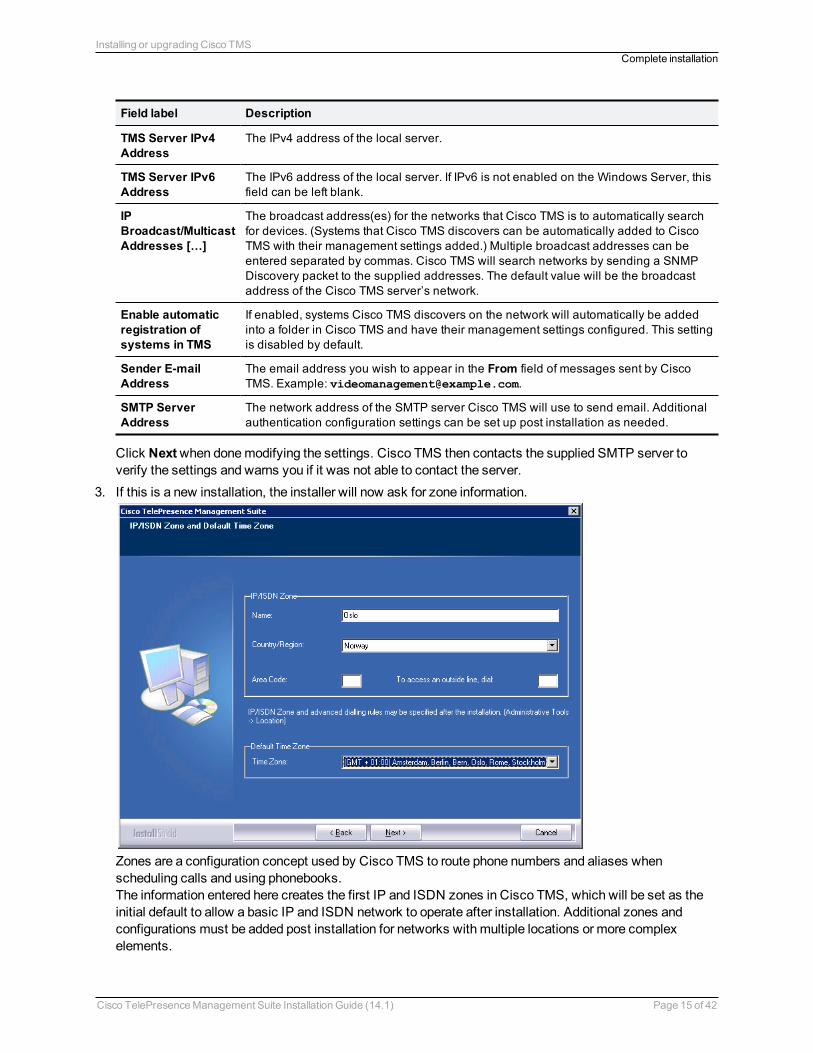
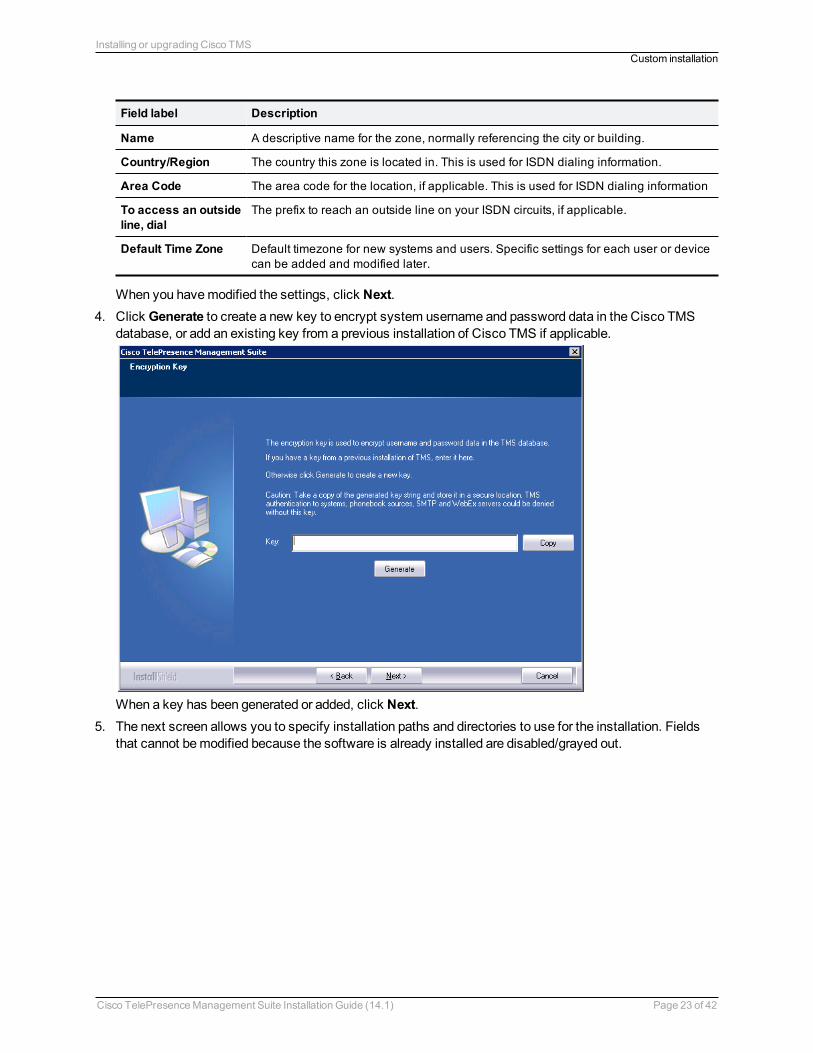
3. If this is a new installation, the installer will now ask for zone information.
Zones are a configuration concept used by Cisco TMS to route phone numbers and aliases when scheduling calls and using phonebooks. The information entered here creates the first IP and ISDN zones in Cisco TMS, which will be set as the initial default to allow a basic IP and ISDN network to operate after installation. Additional zones and configurations must be added post installation for networks with multiple locations or more complex elements.
Cisco TelePresence Management Suite Installation Guide (14.1) Page 15 of 42
Installing or upgrading Cisco TMSComplete installation
Field label Description
Name A descriptive name for the zone, normally referencing the city or building.
Country/Region The country this zone is located in. This is used for ISDN dialing information.
Area Code The area code for the location, if applicable. This is used for ISDN dialing information
To access an outside line, dial
The prefix to reach an outside line on your ISDN circuits, if applicable.
Default Time Zone Default timezone for new systems and users. Specific settings for each user or device can be added and modified later.
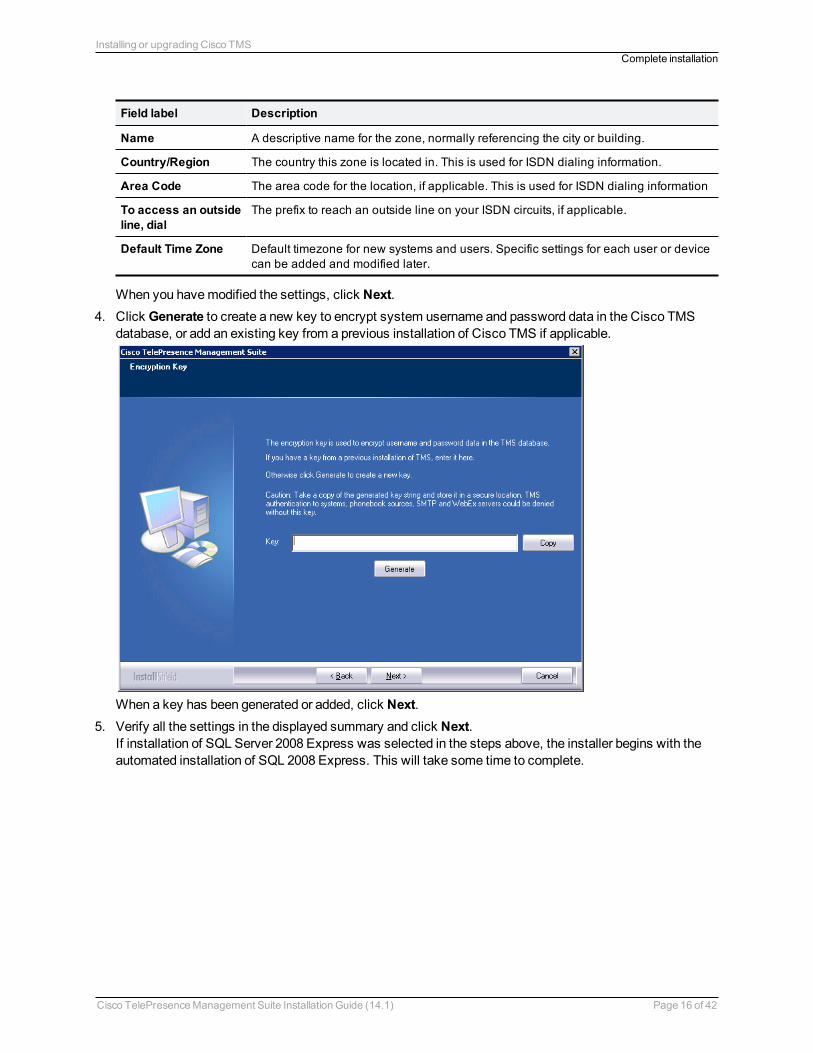
When you have modified the settings, click Next. 4. Click Generate to create a new key to encrypt system username and password data in the Cisco TMS
database, or add an existing key from a previous installation of Cisco TMS if applicable.
When a key has been generated or added, click Next. 5. Verify all the settings in the displayed summary and click Next.
If installation of SQL Server 2008 Express was selected in the steps above, the installer begins with the automated installation of SQL 2008 Express. This will take some time to complete.
Cisco TelePresence Management Suite Installation Guide (14.1) Page 16 of 42
Installing or upgrading Cisco TMSComplete installation
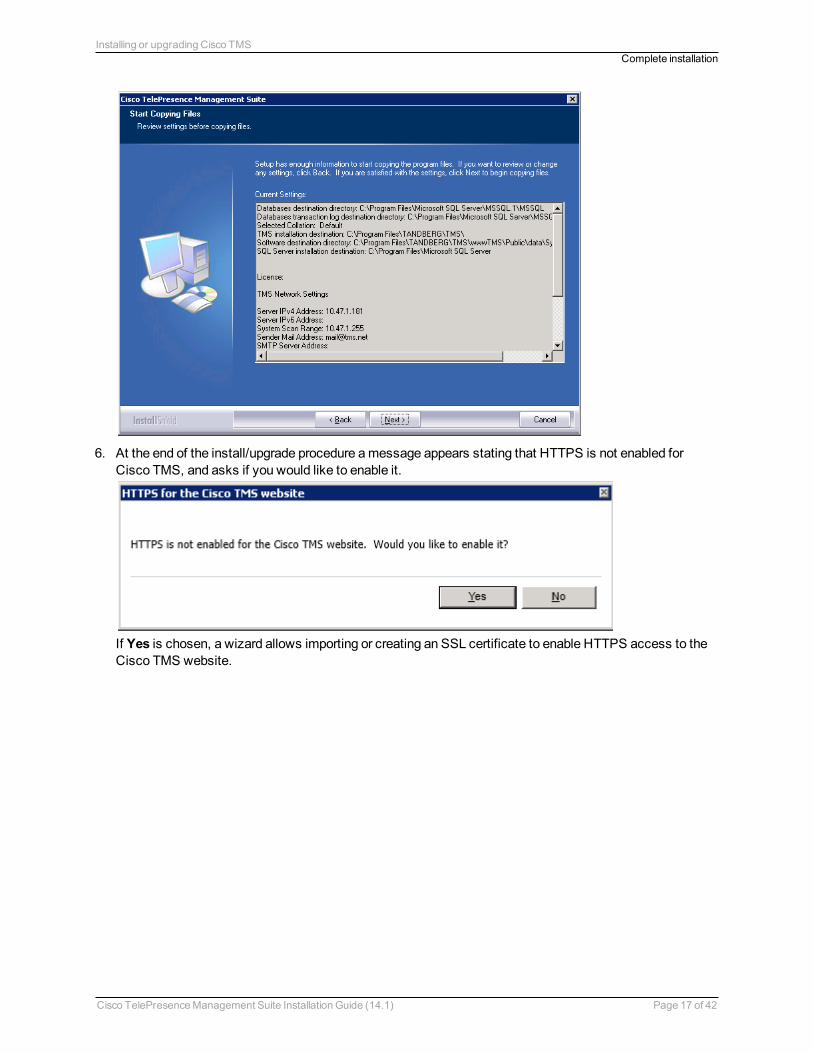
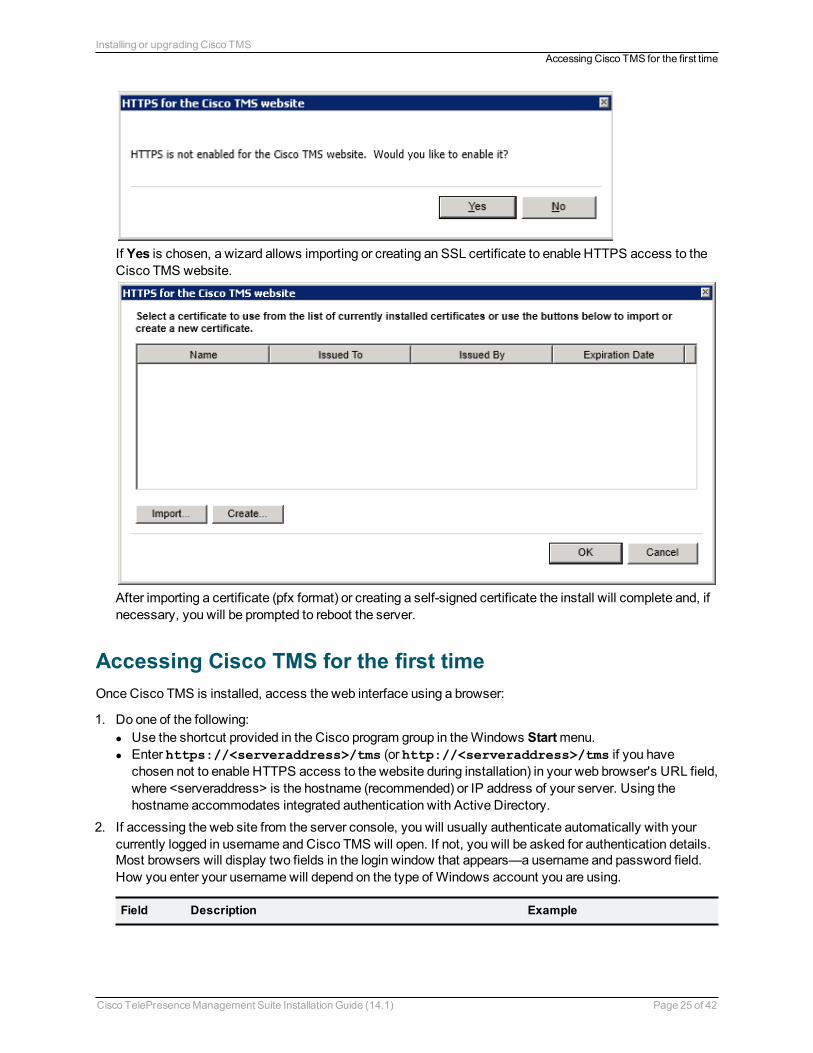
6. At the end of the install/upgrade procedure a message appears stating that HTTPS is not enabled for Cisco TMS, and asks if you would like to enable it.
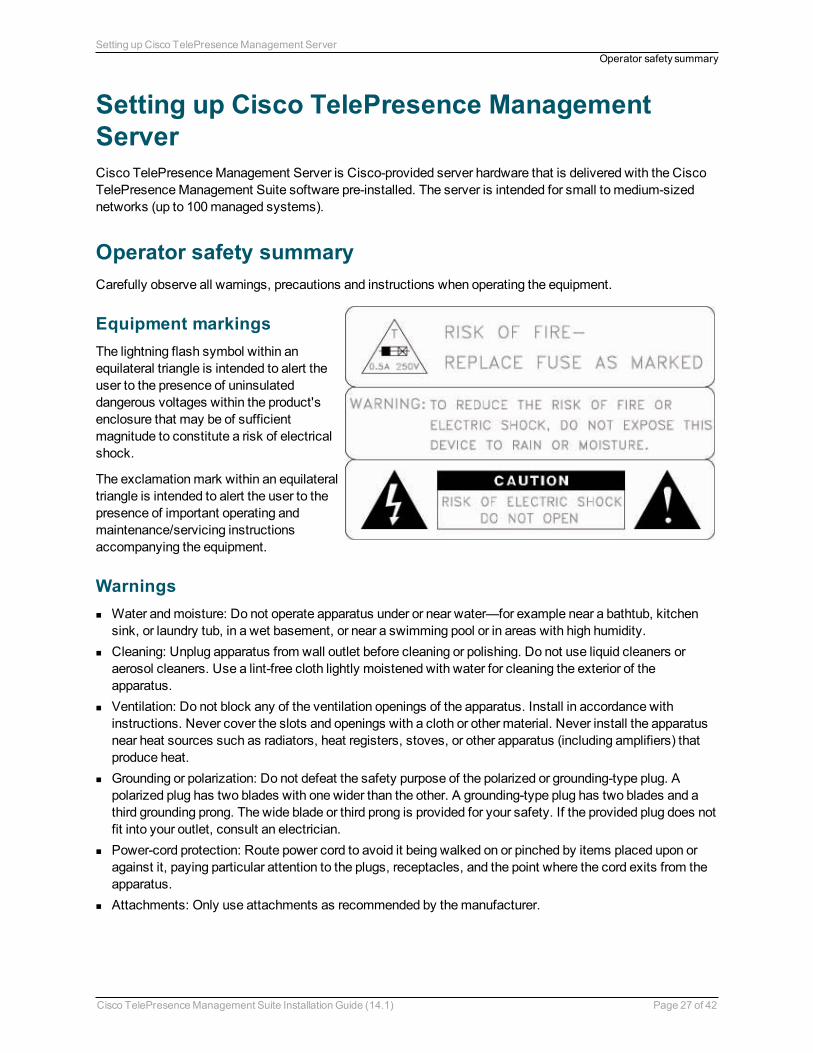
If Yes is chosen, a wizard allows importing or creating an SSL certificate to enable HTTPS access to the Cisco TMS website.
Cisco TelePresence Management Suite Installation Guide (14.1) Page 17 of 42
Installing or upgrading Cisco TMSComplete installation
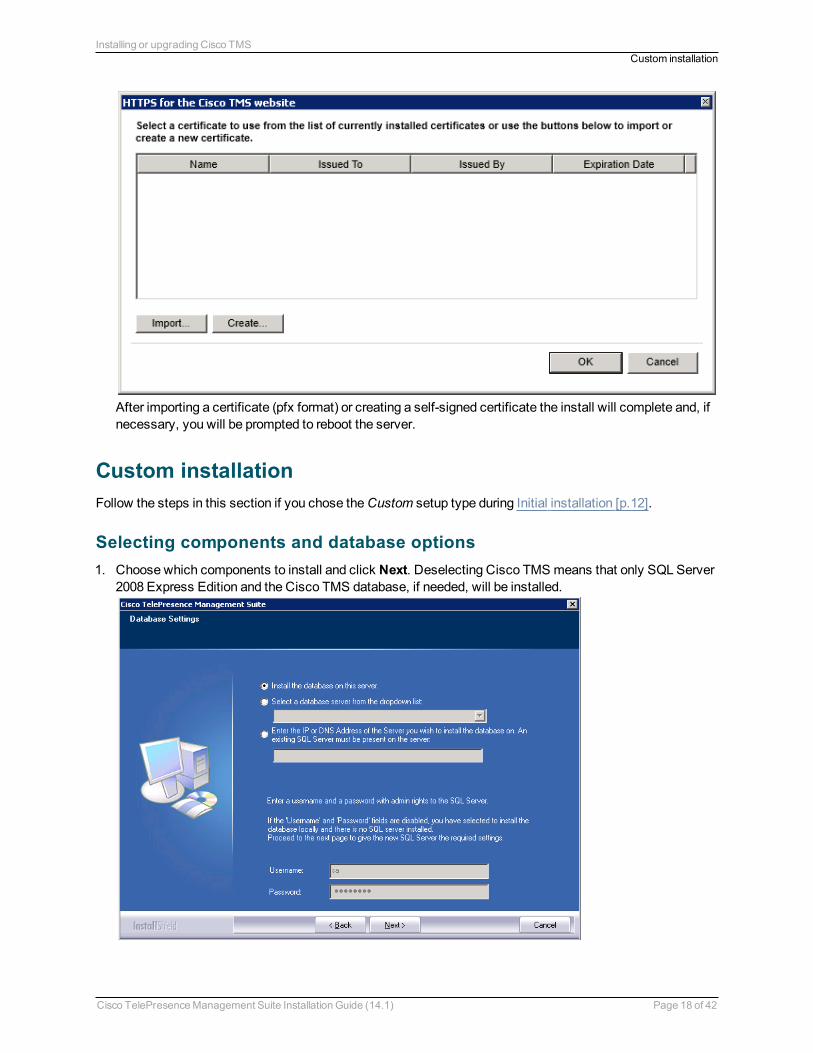
After importing a certificate (pfx format) or creating a self-signed certificate the install will complete and, if necessary, you will be prompted to reboot the server.
Custom installationFollow the steps in this section if you chose the Custom setup type during Initial installation [p.12].
Selecting components and database options 1. Choose which components to install and click Next. Deselecting Cisco TMS means that only SQL Server
2008 Express Edition and the Cisco TMS database, if needed, will be installed.
Cisco TelePresence Management Suite Installation Guide (14.1) Page 18 of 42
Installing or upgrading Cisco TMSCustom installation
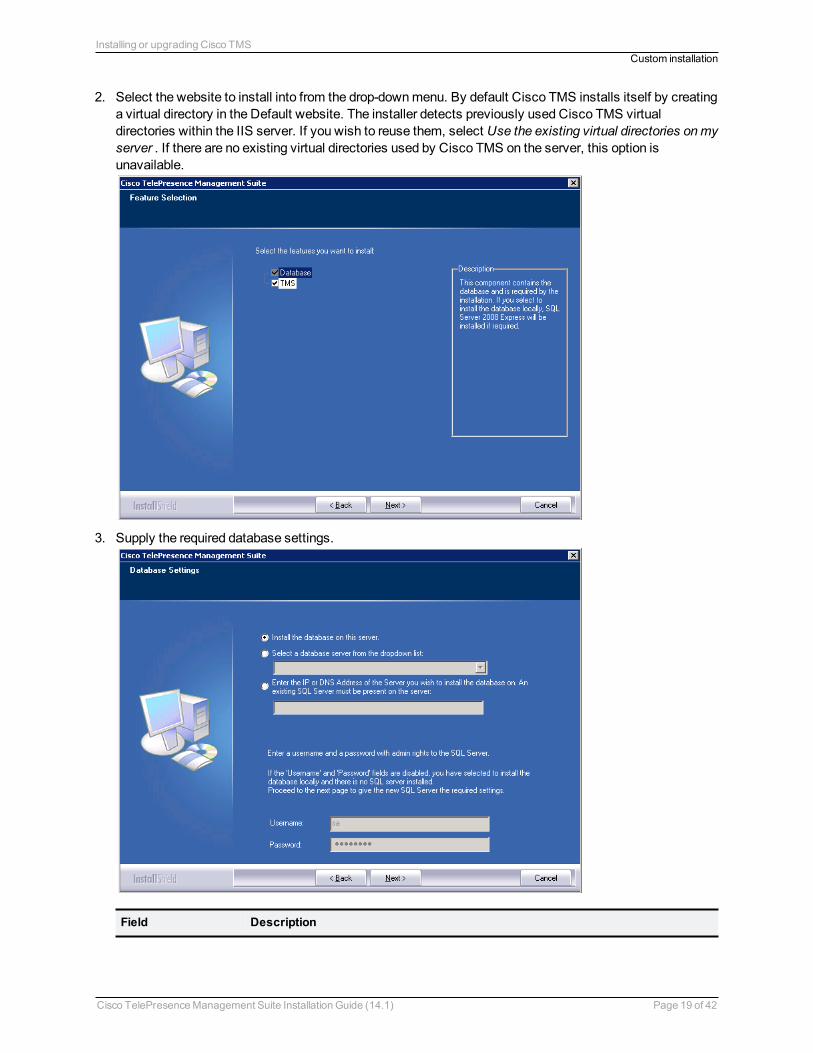
2. Select the website to install into from the drop-down menu. By default Cisco TMS installs itself by creating a virtual directory in the Default website. The installer detects previously used Cisco TMS virtual directories within the IIS server. If you wish to reuse them, select Use the existing virtual directories on my server . If there are no existing virtual directories used by Cisco TMS on the server, this option is unavailable.
3. Supply the required database settings.
Field Description
Cisco TelePresence Management Suite Installation Guide (14.1) Page 19 of 42
Installing or upgrading Cisco TMSCustom installation
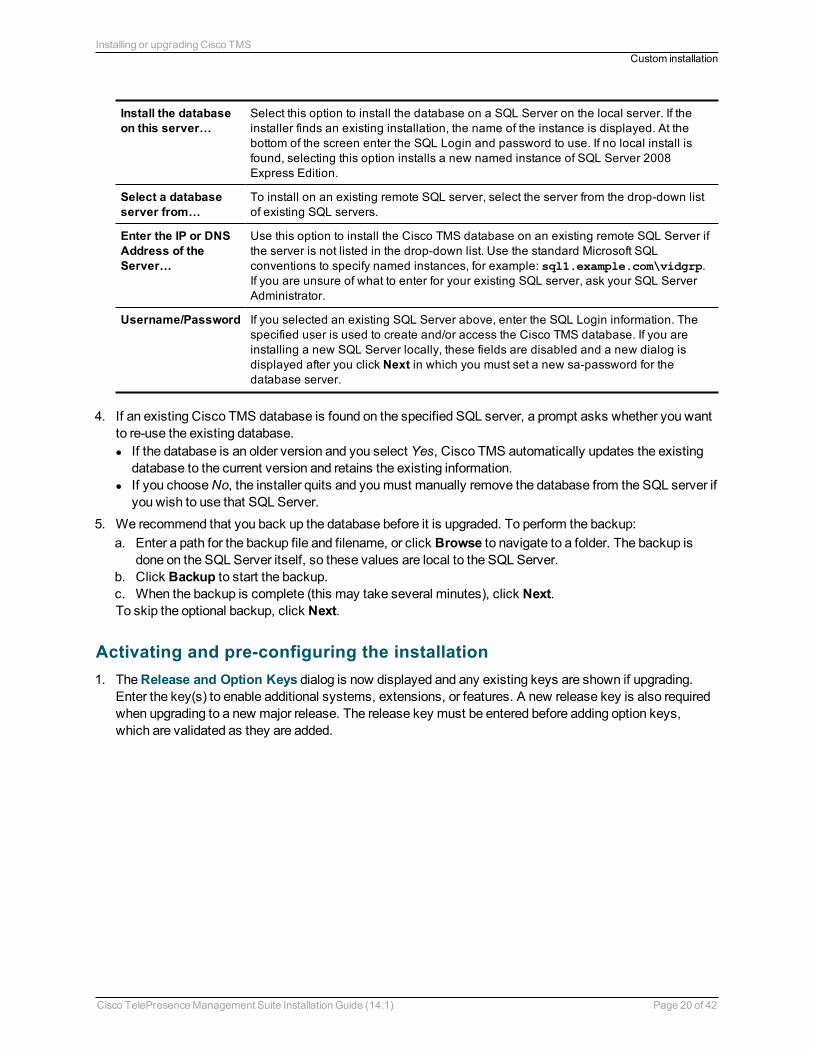
Install the database on this server…
Select this option to install the database on a SQL Server on the local server. If the installer finds an existing installation, the name of the instance is displayed. At the bottom of the screen enter the SQL Login and password to use. If no local install is found, selecting this option installs a new named instance of SQL Server 2008 Express Edition.
Select a database server from…
To install on an existing remote SQL server, select the server from the drop-down list of existing SQL servers.
Enter the IP or DNS Address of the Server…
Use this option to install the Cisco TMS database on an existing remote SQL Server if the server is not listed in the drop-down list. Use the standard Microsoft SQL conventions to specify named instances, for example: sql1.example.com\vidgrp. If you are unsure of what to enter for your existing SQL server, ask your SQL Server Administrator.
Username/Password If you selected an existing SQL Server above, enter the SQL Login information. The specified user is used to create and/or access the Cisco TMS database. If you are installing a new SQL Server locally, these fields are disabled and a new dialog is displayed after you click Next in which you must set a new sa-password for the database server.
4. If an existing Cisco TMS database is found on the specified SQL server, a prompt asks whether you want to re-use the existing database. l If the database is an older version and you select Yes, Cisco TMS automatically updates the existing
database to the current version and retains the existing information. l If you choose No, the installer quits and you must manually remove the database from the SQL server if
you wish to use that SQL Server. 5. We recommend that you back up the database before it is upgraded. To perform the backup:
a. Enter a path for the backup file and filename, or click Browse to navigate to a folder. The backup is done on the SQL Server itself, so these values are local to the SQL Server.
b. Click Backup to start the backup. c. When the backup is complete (this may take several minutes), click Next. To skip the optional backup, click Next.
Activating and pre-configuring the installation 1. The Release and Option Keys dialog is now displayed and any existing keys are shown if upgrading.
Enter the key(s) to enable additional systems, extensions, or features. A new release key is also required when upgrading to a new major release. The release key must be entered before adding option keys, which are validated as they are added.
Cisco TelePresence Management Suite Installation Guide (14.1) Page 20 of 42
Installing or upgrading Cisco TMSCustom installation
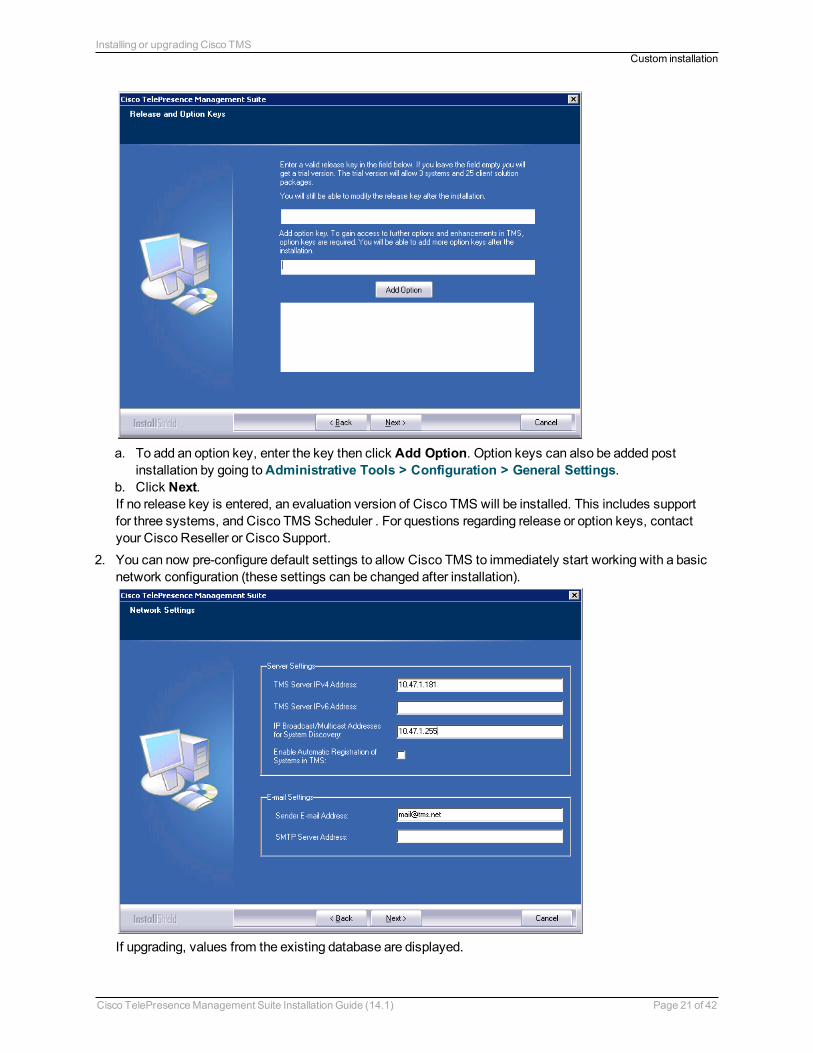
a. To add an option key, enter the key then click Add Option. Option keys can also be added post installation by going to Administrative Tools > Configuration > General Settings.
b. Click Next.If no release key is entered, an evaluation version of Cisco TMS will be installed. This includes support for three systems, and Cisco TMS Scheduler . For questions regarding release or option keys, contact your Cisco Reseller or Cisco Support.
2. You can now pre-configure default settings to allow Cisco TMS to immediately start working with a basic network configuration (these settings can be changed after installation).
If upgrading, values from the existing database are displayed.
Cisco TelePresence Management Suite Installation Guide (14.1) Page 21 of 42
Installing or upgrading Cisco TMSCustom installation

Field label Description
TMS Server IPv4 Address
The IPv4 address of the local server.
TMS Server IPv6 Address
The IPv6 address of the local server. If IPv6 is not enabled on the Windows Server, this field can be left blank.
IP Broadcast/Multicast Addresses […]
The broadcast address(es) for the networks that Cisco TMS is to automatically search for devices. (Systems that Cisco TMS discovers can be automatically added to Cisco TMS with their management settings added.) Multiple broadcast addresses can be entered separated by commas. Cisco TMS will search networks by sending a SNMP Discovery packet to the supplied addresses. The default value will be the broadcast address of the Cisco TMS server’s network.
Enable automatic registration of systems in TMS
If enabled, systems Cisco TMS discovers on the network will automatically be added into a folder in Cisco TMS and have their management settings configured. This setting is disabled by default.
Sender E-mail Address
The email address you wish to appear in the From field of messages sent by Cisco TMS. Example: [email protected].
SMTP Server Address
The network address of the SMTP server Cisco TMS will use to send email. Additional authentication configuration settings can be set up post installation as needed.
Click Next when done modifying the settings. Cisco TMS then contacts the supplied SMTP server to verify the settings and warns you if it was not able to contact the server.
3. If this is a new installation, the installer will now ask for zone information.
Zones are a configuration concept used by Cisco TMS to route phone numbers and aliases when scheduling calls and using phonebooks. The information entered here creates the first IP and ISDN zones in Cisco TMS, which will be set as the initial default to allow a basic IP and ISDN network to operate after installation. Additional zones and configurations must be added post installation for networks with multiple locations or more complex elements.
Cisco TelePresence Management Suite Installation Guide (14.1) Page 22 of 42
Installing or upgrading Cisco TMSCustom installation
Field label Description
Name A descriptive name for the zone, normally referencing the city or building.
Country/Region The country this zone is located in. This is used for ISDN dialing information.
Area Code The area code for the location, if applicable. This is used for ISDN dialing information
To access an outside line, dial
The prefix to reach an outside line on your ISDN circuits, if applicable.
Default Time Zone Default timezone for new systems and users. Specific settings for each user or device can be added and modified later.
When you have modified the settings, click Next. 4. Click Generate to create a new key to encrypt system username and password data in the Cisco TMS
database, or add an existing key from a previous installation of Cisco TMS if applicable.
When a key has been generated or added, click Next. 5. The next screen allows you to specify installation paths and directories to use for the installation. Fields
that cannot be modified because the software is already installed are disabled/grayed out.
Cisco TelePresence Management Suite Installation Guide (14.1) Page 23 of 42
Installing or upgrading Cisco TMSCustom installation

6. Verify all the settings in the displayed summary and click Next. If installation of SQL Server 2008 Express was selected in the steps above, the installer begins with the automated installation of SQL 2008 Express. This will take some time to complete.
7. At the end of the install/upgrade procedure a message appears stating that HTTPS is not enabled for Cisco TMS, and asks if you would like to enable it.
Cisco TelePresence Management Suite Installation Guide (14.1) Page 24 of 42
Installing or upgrading Cisco TMSCustom installation
If Yes is chosen, a wizard allows importing or creating an SSL certificate to enable HTTPS access to the Cisco TMS website.
After importing a certificate (pfx format) or creating a self-signed certificate the install will complete and, if necessary, you will be prompted to reboot the server.
Accessing Cisco TMS for the first timeOnce Cisco TMS is installed, access the web interface using a browser:
1. Do one of the following: l Use the shortcut provided in the Cisco program group in the Windows Start menu. l Enter https://<serveraddress>/tms (or http://<serveraddress>/tms if you have
chosen not to enable HTTPS access to the website during installation) in your web browser's URL field, where <serveraddress> is the hostname (recommended) or IP address of your server. Using the hostname accommodates integrated authentication with Active Directory.
2. If accessing the web site from the server console, you will usually authenticate automatically with your currently logged in username and Cisco TMS will open. If not, you will be asked for authentication details. Most browsers will display two fields in the login window that appears—a username and password field. How you enter your username will depend on the type of Windows account you are using.
Field Description Example
Cisco TelePresence Management Suite Installation Guide (14.1) Page 25 of 42
Installing or upgrading Cisco TMSAccessing Cisco TMS for the first time

Domain Users
Username should be entered as domain\username. The username@<Domain DNS name> format is also suitable, but less commonly used.
corp\firstname.lastname
Local Windows Accounts
Username should be entered as machinename\username tms-2\administrator
3. A user profile window will pop up after you successfully authenticate. If not, look for pop-up blocking alerts from your browser, and disable pop-up blocking for Cisco TMS.
4. Fill in the details of the user profile and click Update Your Personal Information.
Cisco TelePresence Management Suite Installation Guide (14.1) Page 26 of 42
Installing or upgrading Cisco TMSAccessing Cisco TMS for the first time
Setting up Cisco TelePresence Management ServerCisco TelePresence Management Server is Cisco-provided server hardware that is delivered with the Cisco TelePresence Management Suite software pre-installed. The server is intended for small to medium-sized networks (up to 100 managed systems).
Operator safety summaryCarefully observe all warnings, precautions and instructions when operating the equipment.
Equipment markingsThe lightning flash symbol within an equilateral triangle is intended to alert the user to the presence of uninsulated dangerous voltages within the product's enclosure that may be of sufficient magnitude to constitute a risk of electrical shock.
The exclamation mark within an equilateral triangle is intended to alert the user to the presence of important operating and maintenance/servicing instructions accompanying the equipment.
Warnings n Water and moisture: Do not operate apparatus under or near water—for example near a bathtub, kitchen
sink, or laundry tub, in a wet basement, or near a swimming pool or in areas with high humidity. n Cleaning: Unplug apparatus from wall outlet before cleaning or polishing. Do not use liquid cleaners or
aerosol cleaners. Use a lint-free cloth lightly moistened with water for cleaning the exterior of the apparatus.
n Ventilation: Do not block any of the ventilation openings of the apparatus. Install in accordance with instructions. Never cover the slots and openings with a cloth or other material. Never install the apparatus near heat sources such as radiators, heat registers, stoves, or other apparatus (including amplifiers) that produce heat.
n Grounding or polarization: Do not defeat the safety purpose of the polarized or grounding-type plug. A polarized plug has two blades with one wider than the other. A grounding-type plug has two blades and a third grounding prong. The wide blade or third prong is provided for your safety. If the provided plug does not fit into your outlet, consult an electrician.
n Power-cord protection: Route power cord to avoid it being walked on or pinched by items placed upon or against it, paying particular attention to the plugs, receptacles, and the point where the cord exits from the apparatus.
n Attachments: Only use attachments as recommended by the manufacturer.
Cisco TelePresence Management Suite Installation Guide (14.1) Page 27 of 42
Setting up Cisco TelePresence Management ServerOperator safety summary
n Accessories: Most systems should only be used with a cart, stand, tripod, bracket, or table specified by the manufacturer, or sold with the apparatus. When a cart is used, use caution when moving cart/apparatus combination to avoid injury from tip-over.
n Lightning: Unplug apparatus during lightning storms or when unused for long periods of time. n Servicing: Do not attempt to service the apparatus yourself as opening or removing covers may expose
you to dangerous voltages or other hazards, and will void the warranty. Refer all servicing to qualified service personnel.
n Damaged equipment: Unplug apparatus from outlet and refer servicing to qualified personnel under the following conditions: l when power cord or plug is damaged or frayed l if liquid has been spilled or objects have fallen into the apparatus l if apparatus has been exposed to rain or moisture l if apparatus has been dropped and subjected to excessive shock, or cabinet has been damaged l if apparatus fails to operate in accordance with the operating instructions
Installation precautions and hardware compliancesSafety precautions:
n Never install communication wiring during a lightning storm. n Never install jacks for communication cables in wet locations unless the jack is specifically designed for
wet locations. n Never touch uninstalled communication wires or terminals unless the communication line has been
disconnected at the network interface. n Use caution when installing or modifying communication lines. n Avoid using communication equipment (other than a cordless type) during an electrical storm. There may
be a remote risk of electrical shock from lightning. n Do not use the communication equipment to report a gas leak in the vicinity of the leak. n Always connect the product to an earthed socket outlet. n The socket outlet must be installed near to the equipment and be easily accessible. n Switch the power OFF before installing cables.
This product complies with the following directives:
n LVD 73/23/EC, EMC 89/366/EEC, R&TTE 99/5/EEC, n Directive 73/23/EEC (Low Voltage Directive) n Standard EN 60950-1 n Directive 89/336/EEC (EMC Directive) n Standard EN 55022, Class A n Standard EN 55024 n Standard EN 61000-3-2/-3-3 n Approved according to UL 60950-1 and CAN/CSA C22.2 No. 60950-1-03 n Complies with FCC15B Class A
Cisco TelePresence Management Suite Installation Guide (14.1) Page 28 of 42
Setting up Cisco TelePresence Management ServerInstallation precautions and hardware compliances
Installing the server
UnpackingTo avoid damage to the unit during transportation, Cisco TelePresence Management Server is delivered in a special shipping box, which contains the following components:
n Rack-ears, screws and screwdriver. n Cables:
l Power cable l Ethernet cable
n Cisco TelePresence Management Server
Installation site preparations n Make sure that Cisco TelePresence Management Server is accessible and that all cables can be easily
connected. n For ventilation leave a space of at least 10 cm (4 inches) behind the rear panel and 10 cm (4 inches) in front
of the front panel. n The room in which you install Cisco TelePresence Management Server should have an ambient
temperature between 0ºC and 35ºC (32ºF and 95ºF) and between 10% and 90% non-condensing relative humidity.
n Do not place heavy objects directly on top of the server. n Do not place hot objects directly on top, or directly beneath the server. n Use a grounded AC power outlet.
Rack mounting
Note: The following procedure is optional.
Cisco TelePresence Management Server comes with rubber feet for standalone installation and brackets for mounting in standard 19” racks.
Before starting the rack mounting, ensure that Cisco TelePresence Management Server is placed securely on a hard flat surface.
1. Disconnect the AC power cable. 2. Set up the mounting space in accordance with the site preparations described above. 3. Attach the brackets to Cisco TelePresence Management Server on both sides of the unit using the 8
screws that are provided.
Cisco TelePresence Management Suite Installation Guide (14.1) Page 29 of 42
Setting up Cisco TelePresence Management ServerInstalling the server
4. Insert Cisco TelePresence Management Server into a 19” rack, and secure it at the front using four screws.
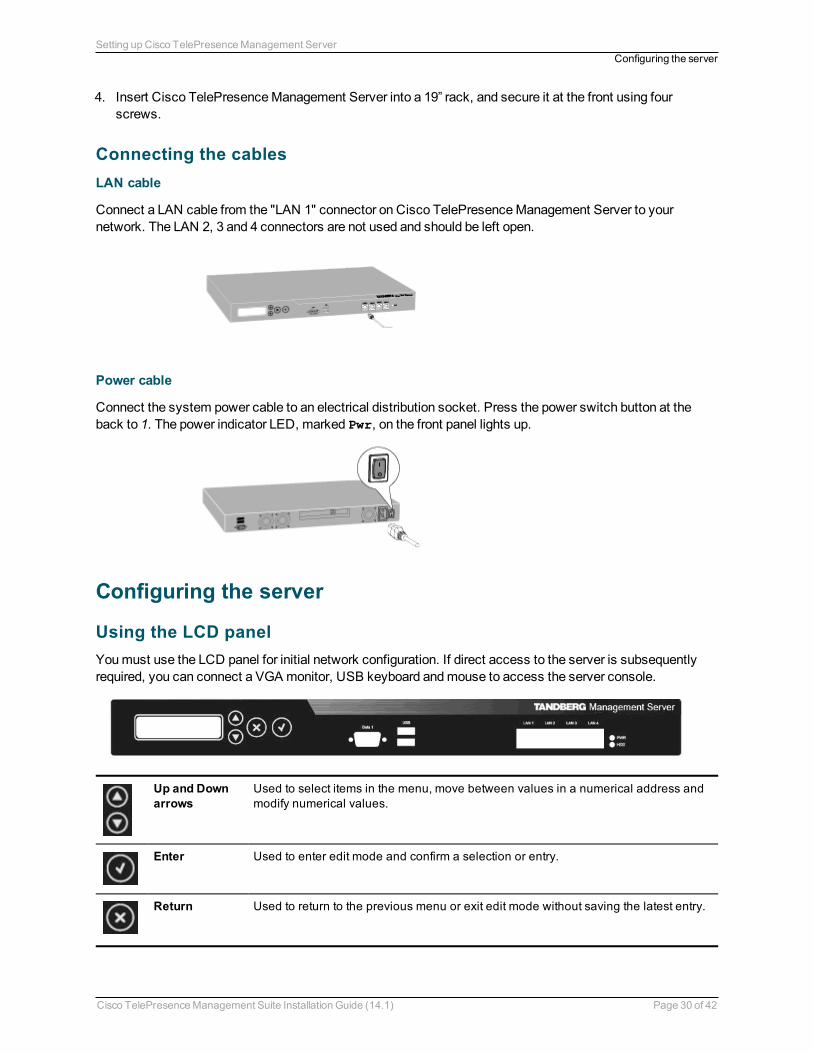
Connecting the cablesLAN cable
Connect a LAN cable from the "LAN 1" connector on Cisco TelePresence Management Server to your network. The LAN 2, 3 and 4 connectors are not used and should be left open.
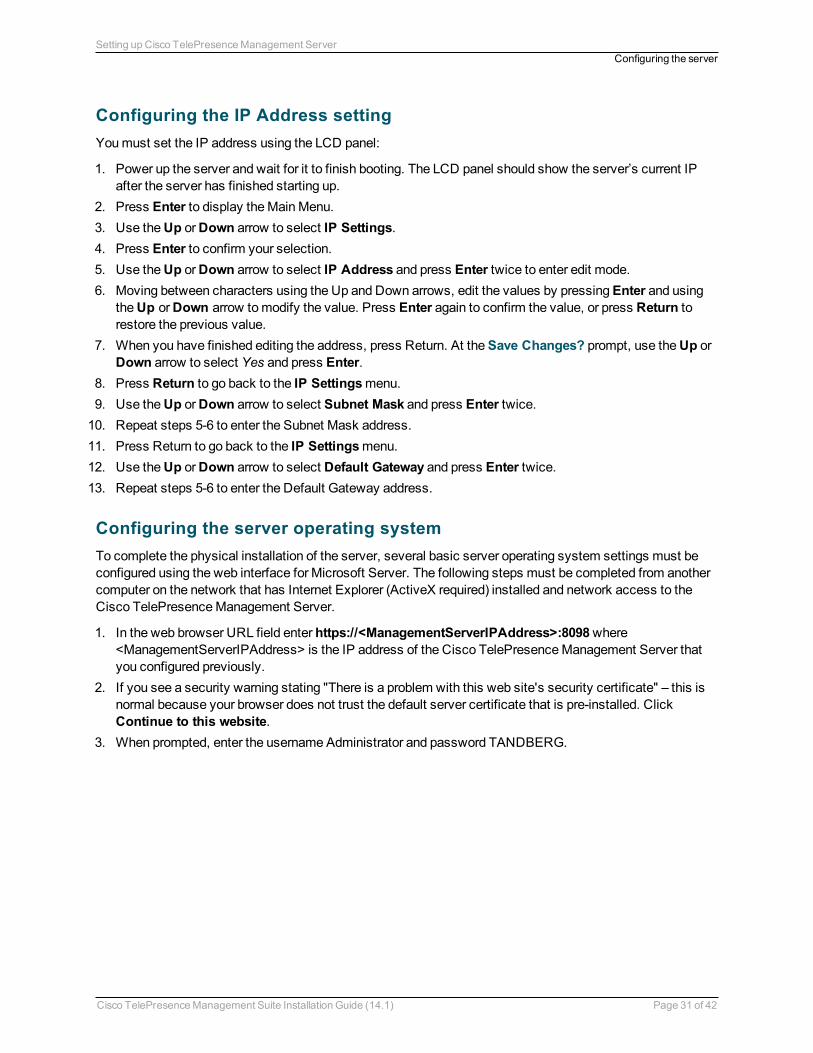
Power cable
Connect the system power cable to an electrical distribution socket. Press the power switch button at the back to 1. The power indicator LED, marked Pwr, on the front panel lights up.
Configuring the server
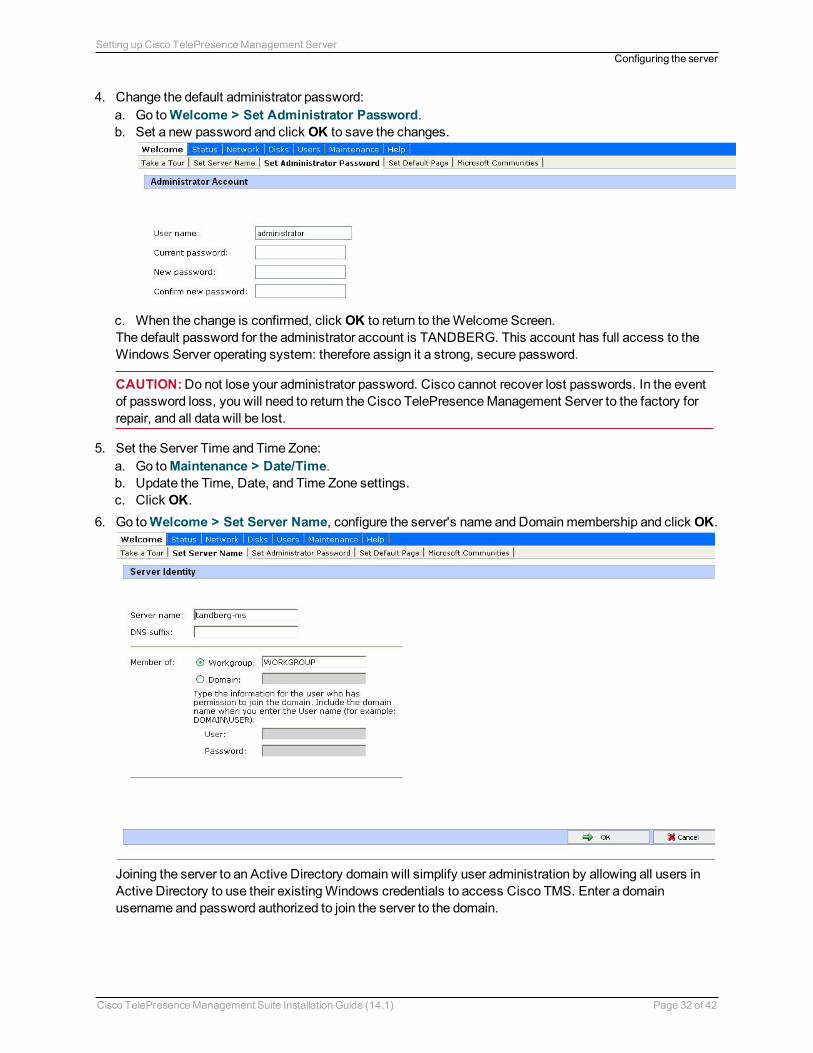
Using the LCD panel You must use the LCD panel for initial network configuration. If direct access to the server is subsequently required, you can connect a VGA monitor, USB keyboard and mouse to access the server console.
Up and Down arrows
Used to select items in the menu, move between values in a numerical address and modify numerical values.
Enter Used to enter edit mode and confirm a selection or entry.
Return Used to return to the previous menu or exit edit mode without saving the latest entry.
Cisco TelePresence Management Suite Installation Guide (14.1) Page 30 of 42
Setting up Cisco TelePresence Management ServerConfiguring the server
Configuring the IP Address settingYou must set the IP address using the LCD panel:
1. Power up the server and wait for it to finish booting. The LCD panel should show the server’s current IP after the server has finished starting up.
2. Press Enter to display the Main Menu. 3. Use the Up or Down arrow to select IP Settings. 4. Press Enter to confirm your selection. 5. Use the Up or Down arrow to select IP Address and press Enter twice to enter edit mode. 6. Moving between characters using the Up and Down arrows, edit the values by pressing Enter and using
the Up or Down arrow to modify the value. Press Enter again to confirm the value, or press Return to restore the previous value.
7. When you have finished editing the address, press Return. At the Save Changes? prompt, use the Up or Down arrow to select Yes and press Enter.
8. Press Return to go back to the IP Settings menu. 9. Use the Up or Down arrow to select Subnet Mask and press Enter twice.
10. Repeat steps 5-6 to enter the Subnet Mask address. 11. Press Return to go back to the IP Settings menu. 12. Use the Up or Down arrow to select Default Gateway and press Enter twice. 13. Repeat steps 5-6 to enter the Default Gateway address.
Configuring the server operating systemTo complete the physical installation of the server, several basic server operating system settings must be configured using the web interface for Microsoft Server. The following steps must be completed from another computer on the network that has Internet Explorer (ActiveX required) installed and network access to the Cisco TelePresence Management Server.
1. In the web browser URL field enter https://<ManagementServerIPAddress>:8098 where <ManagementServerIPAddress> is the IP address of the Cisco TelePresence Management Server that you configured previously.
2. If you see a security warning stating "There is a problem with this web site's security certificate" – this is normal because your browser does not trust the default server certificate that is pre-installed. Click Continue to this website.
3. When prompted, enter the username Administrator and password TANDBERG.
Cisco TelePresence Management Suite Installation Guide (14.1) Page 31 of 42
Setting up Cisco TelePresence Management ServerConfiguring the server
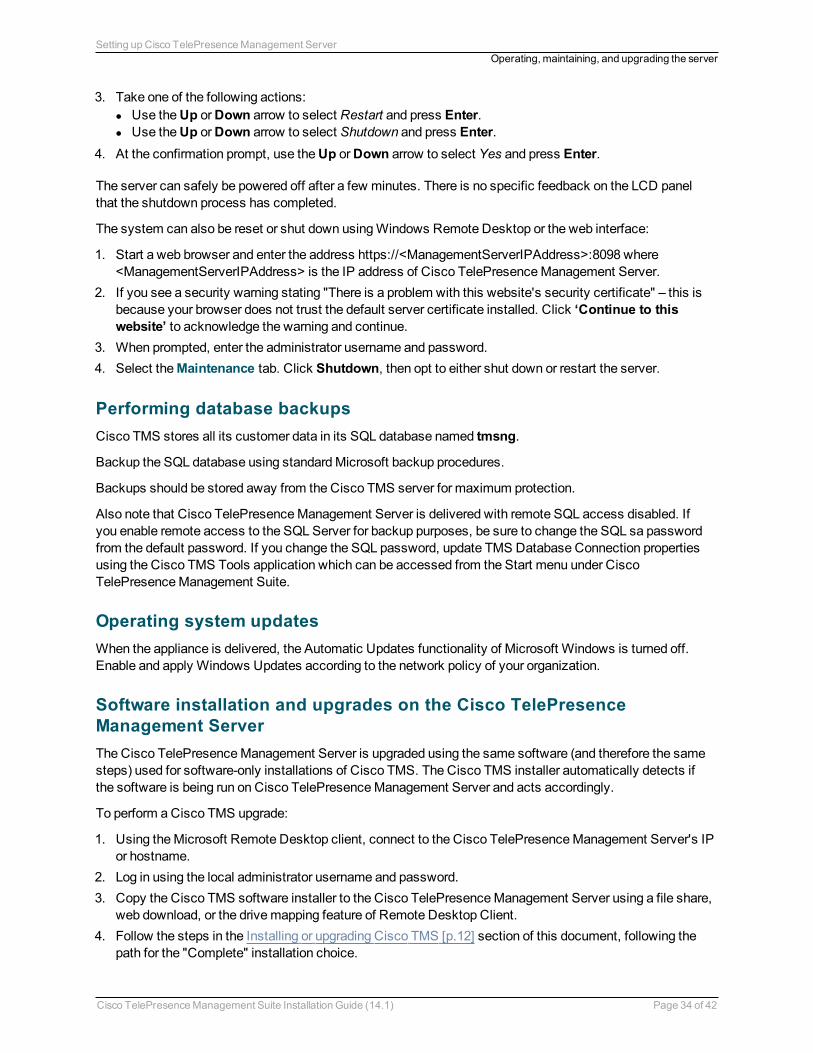
4. Change the default administrator password: a. Go to Welcome > Set Administrator Password. b. Set a new password and click OK to save the changes.
c. When the change is confirmed, click OK to return to the Welcome Screen.The default password for the administrator account is TANDBERG. This account has full access to the Windows Server operating system: therefore assign it a strong, secure password.
CAUTION: Do not lose your administrator password. Cisco cannot recover lost passwords. In the event of password loss, you will need to return the Cisco TelePresence Management Server to the factory for repair, and all data will be lost.
5. Set the Server Time and Time Zone: a. Go to Maintenance > Date/Time. b. Update the Time, Date, and Time Zone settings. c. Click OK.
6. Go to Welcome > Set Server Name, configure the server's name and Domain membership and click OK.
Joining the server to an Active Directory domain will simplify user administration by allowing all users in Active Directory to use their existing Windows credentials to access Cisco TMS. Enter a domain username and password authorized to join the server to the domain.
Cisco TelePresence Management Suite Installation Guide (14.1) Page 32 of 42
Setting up Cisco TelePresence Management ServerConfiguring the server

Caution: Be aware of any group policies that your Active Directory may automatically apply to servers joined to its domains. High security policies that interfere with web server operations may interfere with Cisco TMS operation.
7. Restart the server to complete any changes to the computer name or domain membership. 8. Ensure that any available security updates are installed (see Operating, maintaining, and upgrading the
server [p.33] ).
Shutting downCisco TelePresence Management Server must be shut down using the front LCD panel or from the Windows interface before powering the unit off.
Operating, maintaining, and upgrading the serverCisco TelePresence Management Server is a Cisco-maintained "black-box" server designed to be operated using the LCD panel or web interface, while operation and management of the Cisco TMS software application is performed solely using the Cisco TMS web interface. Access to the server's operating system is available via local console connections or Microsoft Remote Desktop Client, but it is not required for normal operations.
As with all servers, the server hardware should be housed in a secure space and not be accessible to non-administrators. The server should remain on at all times for normal operation.
When delivered, the operating system is "locked down" and hardened following Microsoft's security recommendations for a server of this type. The server does not allow any remote connections except where necessary for Cisco TMS communication with users and the devices that it manages. The SQL database and other internal components are not accessible remotely. Cisco recommends that you do not modify any of the operating system’s underlying settings.
We recommend enabling Windows Updates on the server.
Starting and stopping the serverCisco TelePresence Management Server can be restarted and shut down via the LCD panel. As with all servers, it should not be powered off abruptly and restarts/shutdowns should always be performed via the software controls rather than the power switch - unless the server itself and the LCD panel are unresponsive. After a full shutdown, it is safe to turn off the power switch.
To start up the Cisco TelePresence Management Server:
1. Connect the power. 2. Turn the power switch to 1 (on).
When the start up process nears completion, the LCD panel will show the server's current IP address .
To restart or shut down from the LCD panel:
1. Press Enter to display the Main Menu. 2. Use the Up or Down arrow to select Commands and press Enter .
Cisco TelePresence Management Suite Installation Guide (14.1) Page 33 of 42
Setting up Cisco TelePresence Management ServerOperating, maintaining, and upgrading the server
3. Take one of the following actions: l Use the Up or Down arrow to select Restart and press Enter. l Use the Up or Down arrow to select Shutdown and press Enter.
4. At the confirmation prompt, use the Up or Down arrow to select Yes and press Enter.
The server can safely be powered off after a few minutes. There is no specific feedback on the LCD panel that the shutdown process has completed.
The system can also be reset or shut down using Windows Remote Desktop or the web interface:
1. Start a web browser and enter the address https://<ManagementServerIPAddress>:8098 where <ManagementServerIPAddress> is the IP address of Cisco TelePresence Management Server.
2. If you see a security warning stating "There is a problem with this website's security certificate" – this is because your browser does not trust the default server certificate installed. Click ‘Continue to this website’ to acknowledge the warning and continue.
3. When prompted, enter the administrator username and password. 4. Select the Maintenance tab. Click Shutdown, then opt to either shut down or restart the server.
Performing database backupsCisco TMS stores all its customer data in its SQL database named tmsng.
Backup the SQL database using standard Microsoft backup procedures.
Backups should be stored away from the Cisco TMS server for maximum protection.
Also note that Cisco TelePresence Management Server is delivered with remote SQL access disabled. If you enable remote access to the SQL Server for backup purposes, be sure to change the SQL sa password from the default password. If you change the SQL password, update TMS Database Connection properties using the Cisco TMS Tools application which can be accessed from the Start menu under Cisco TelePresence Management Suite.
Operating system updatesWhen the appliance is delivered, the Automatic Updates functionality of Microsoft Windows is turned off. Enable and apply Windows Updates according to the network policy of your organization.
Software installation and upgrades on the Cisco TelePresence Management ServerThe Cisco TelePresence Management Server is upgraded using the same software (and therefore the same steps) used for software-only installations of Cisco TMS. The Cisco TMS installer automatically detects if the software is being run on Cisco TelePresence Management Server and acts accordingly.
To perform a Cisco TMS upgrade:
1. Using the Microsoft Remote Desktop client, connect to the Cisco TelePresence Management Server's IP or hostname.
2. Log in using the local administrator username and password. 3. Copy the Cisco TMS software installer to the Cisco TelePresence Management Server using a file share,
web download, or the drive mapping feature of Remote Desktop Client. 4. Follow the steps in the Installing or upgrading Cisco TMS [p.12] section of this document, following the
path for the "Complete" installation choice.
Cisco TelePresence Management Suite Installation Guide (14.1) Page 34 of 42
Setting up Cisco TelePresence Management ServerOperating, maintaining, and upgrading the server
Note:: The SQL Server sa login information needed during the upgrade the default for the SQL Login is username: sa and password: TANDBERG.
Security policy
The Cisco TelePresence Management Server’s security policy is updated and maintained by the Cisco TMS installer. If an administrator makes changes to negate any of these security lockdown steps, the security policy will be re-applied automatically the next time the Cisco TMS software installer runs.
Cisco TelePresence Management Suite Installation Guide (14.1) Page 35 of 42
Setting up Cisco TelePresence Management ServerOperating, maintaining, and upgrading the server

Troubleshooting
Installation times outThe default database timeout value when upgrading Cisco TMS is 30 minutes. This value applies to each of the installer’s internal database operations. For big deployments with years of call history and/or system data, some of the operations may need more than 30 minutes to complete.
This timeout value is configurable using a command line option. To use a timeout value of 60 minutes, run the installer from the command line as follows:
TMS14.1.exe /z"sqltimeout 60"
Substitute 60 with a higher value if needed.
We recommend using the default value of 30 minutes, and only increasing the timeout value if the initial upgrade attempt is failing.
Cisco TelePresence Management Suite Installation Guide (14.1) Page 36 of 42
TroubleshootingInstallation times out

Appendices
Appendix 1. Restricting IIS 7 modules to minimal requiredIIS 7 offers a modular system that allows an administrator to fine tune what components are installed and enabled on their server for the greatest security. To assist administrators who wish to further restrict their servers, the following list documents which modules are required for Cisco TMS. Modules may be controlled at either the site or server level (some are server level only) . The steps below assume that you are making changes at the server level.
Before removing modules, we recommend backing up your IIS configuration by using the command %windir%\system32\inetsrv\appcmd.exe add backup "TMS".
To restore the backup later if needed, use the command %windir%\system32\inetsrv\appcmd.exe restore backup "TMS"
To modify which modules are enabled in IIS 7:
1. Open the Internet Information Services (IIS) Manager from Start Menu > Administrative Tools > Internet Information Services (IIS) Manager.
2. From the tree in the left section, click on your server’s name. 3. In the center section, under IIS, double-click Modules.
The list of installed Managed and Native Modules is displayed. Modules that are not needed can be removed by clicking on them, and then clicking Remove from the Action Panel on the right.
The following modules are required for Cisco TMS and must not be removed:
n AnonymousAuthenticationModule n BasicAuthenticationModule n DefaultDocumentModule n DefaultAuthentication n DigestAuthenticationModule n HttpCacheModule n HttpLoggingModule (recommended) n HttprRedirectionModule n IsapiFilterModule n ProtocolSupportModule n RequestFilteringModule n Session n StaticCompressionModule n StaticFileModule n WindowsAuthentication n WindowsAuthenticationModule
Cisco TelePresence Management Suite Installation Guide (14.1) Page 37 of 42
AppendicesAppendix 1. Restricting IIS 7 modules to minimal required
Appendix 2. Uninstalling Cisco TMSThis section tells you how to remove the Cisco TMS application: this is not necessary under normal conditions because older versions of Cisco TMS are removed automatically by the Cisco TMS installer. This information is provided for reference and for advanced troubleshooting.
Uninstalling Cisco TMS removes the Cisco TMS application, web site, and services. It leaves customer data, logs, databases and database servers intact for use in future upgrades. The uninstall wizard does not modify the SQL server in any way see the next section if you want to completely remove all Cisco TMS information from the server, including the database servers.
To remove the Cisco TMS application:
1. Select ‘Uninstall Cisco TMS’ from the Cisco program group in the Start Menu or use Add/Remove Programs in the Windows Control Panel.
2. A welcome window explains that the uninstallation script removes Cisco TMS, but the database and database server must be removed separately. Click Next. The wizard removes the Cisco TMS services, website, and application data.
3. When prompted to restart your computer, select Restart now and click Finish.
Removal of the Cisco TMS application is complete.
Removing all Cisco TMS information from a serverThe uninstall wizard only removes the Cisco TMS application from the server so that Cisco TMS can easily be reinstalled or upgraded in the future.
CAUTION:
n These steps assume that the SQL server was installed by Cisco TMS, is not being used by any other applications, and is safe to remove. Do not remove the SQL server or its program folder if the SQL server is used by any other application.
n Do not perform these steps on a Cisco TelePresence Management Server. If you remove Microsoft SQL from the Management Server, you will not be able to reinstall it as the server runs a locked-down version of Microsoft Windows with reduced write permissions.
n Following these steps will delete all Cisco TMS data. Do not proceed if you intend to save any information from your Cisco TMS installation.
To completely remove Cisco TMS and all of its data from your server, follow these instructions:
1. Run the Cisco TMS uninstall wizard using the instructions in the previous section. 2. If Cisco TMSPE is installed, uninstall according to the instructions in Cisco TelePresence Management
Suite Provisioning Extension Deployment Guide. 3. Delete the program folder used by the Cisco TMS installation. The default location is C:\Program
Files\TANDBERG\TMS. 4. Open the Windows registry editor: from the Start menu, select ‘Run..’ and enter ‘regedit’ and click OK. 5. Expand the tree on the left using the plus icons to find the Hive (folder) HKEY_LOCAL_
MACHINE\SOFTWARE\Tandberg\TANDBERG Management Suite.
Cisco TelePresence Management Suite Installation Guide (14.1) Page 38 of 42
AppendicesAppendix 2. Uninstalling Cisco TMS
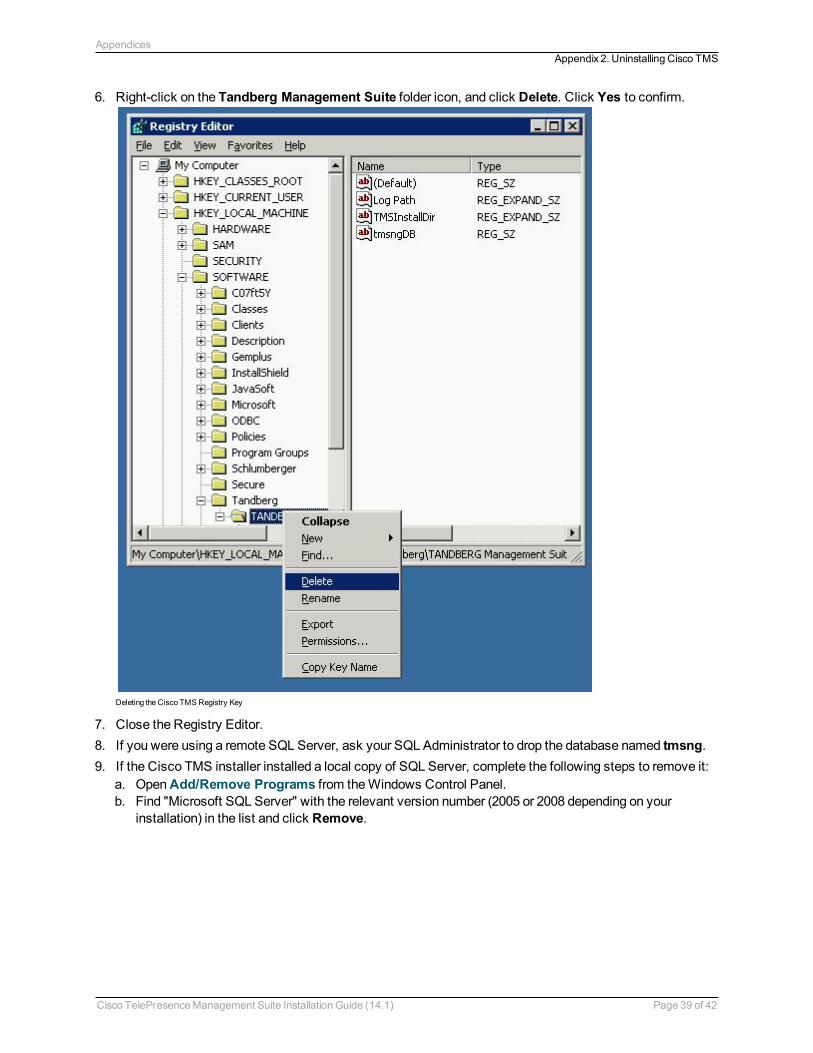
6. Right-click on the Tandberg Management Suite folder icon, and click Delete. Click Yes to confirm.
Deleting the Cisco TMS Registry Key
7. Close the Registry Editor. 8. If you were using a remote SQL Server, ask your SQL Administrator to drop the database named tmsng. 9. If the Cisco TMS installer installed a local copy of SQL Server, complete the following steps to remove it:
a. Open Add/Remove Programs from the Windows Control Panel. b. Find "Microsoft SQL Server" with the relevant version number (2005 or 2008 depending on your
installation) in the list and click Remove.
Cisco TelePresence Management Suite Installation Guide (14.1) Page 39 of 42
AppendicesAppendix 2. Uninstalling Cisco TMS
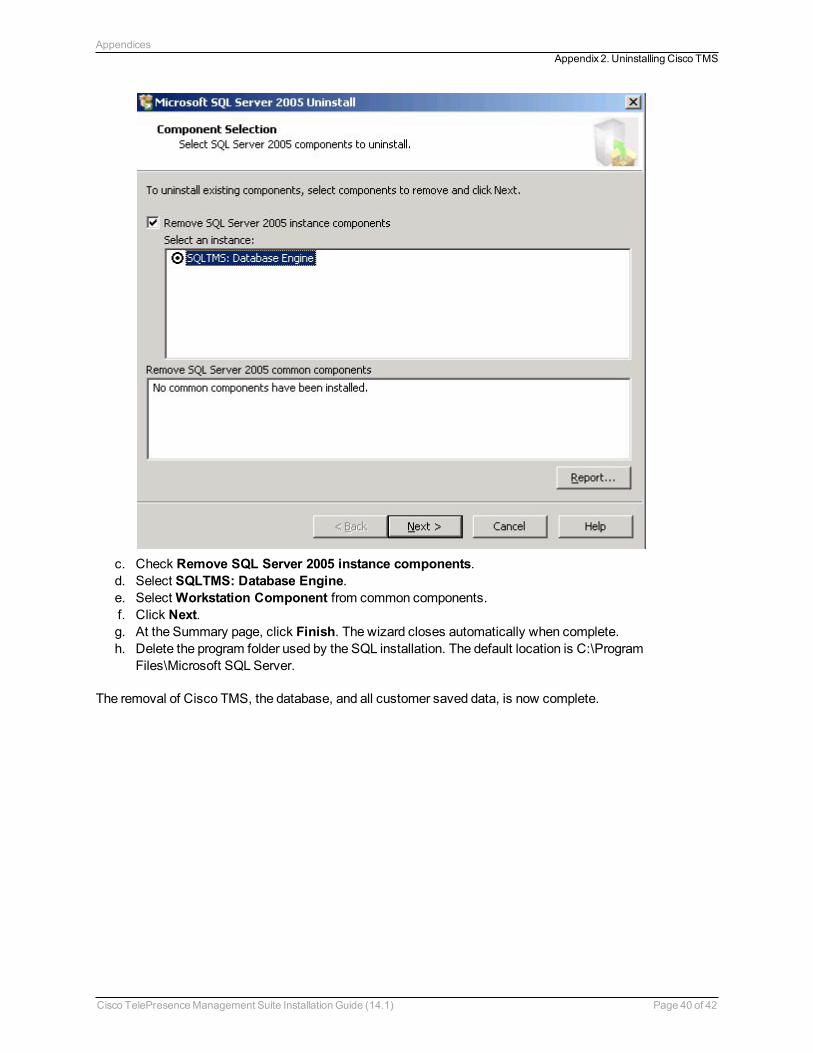
c. Check Remove SQL Server 2005 instance components. d. Select SQLTMS: Database Engine. e. Select Workstation Component from common components. f. Click Next. g. At the Summary page, click Finish. The wizard closes automatically when complete. h. Delete the program folder used by the SQL installation. The default location is C:\Program
Files\Microsoft SQL Server.
The removal of Cisco TMS, the database, and all customer saved data, is now complete.
Cisco TelePresence Management Suite Installation Guide (14.1) Page 40 of 42
AppendicesAppendix 2. Uninstalling Cisco TMS
BibliographyAll documentation for the latest version of Cisco TMS can be found at http://www.cisco.com/en/US/products/ps11338/tsd_products_support_series_home.html.
Title Reference URL
Cisco TelePresence Management Suite Release Notes D14991 http://cisco.com
Installing licenses; release and options keys for the Cisco TelePresence Management Suite
78-19878-01
http://cisco.com
Cisco TelePresence Management Suite Administrator Guide D13741 http://cisco.com
Cisco TelePresence Management Suite Provisioning Extension Deployment Guide D14941 http://cisco.com
Cisco TelePresence Video Communication Server Cluster Creation and Maintenance Deployment Guide
D14367 http://cisco.com
Cisco TelePresence Management Suite Installation Guide (14.1) Page 41 of 42
BibliographyAppendix 2. Uninstalling Cisco TMS
THE SPECIFICATIONS AND INFORMATION REGARDING THE PRODUCTS IN THIS MANUAL ARE SUBJECT TO CHANGE WITHOUT NOTICE. ALL STATEMENTS, INFORMATION, AND RECOMMENDATIONS IN THIS MANUAL ARE BELIEVED TO BE ACCURATE BUT ARE PRESENTED WITHOUT WARRANTY OF ANY KIND, EXPRESS OR IMPLIED. USERS MUST TAKE FULL RESPONSIBILITY FOR THEIR APPLICATION OF ANY PRODUCTS.
THE SOFTWARE LICENSE AND LIMITED WARRANTY FOR THE ACCOMPANYING PRODUCT ARE SET FORTH IN THE INFORMATION PACKET THAT SHIPPED WITH THE PRODUCT AND ARE INCORPORATED HEREIN BY THIS REFERENCE. IF YOU ARE UNABLE TO LOCATE THE SOFTWARE LICENSE OR LIMITED WARRANTY, CONTACT YOUR CISCO REPRESENTATIVE FOR A COPY.
The Cisco implementation of TCP header compression is an adaptation of a program developed by the University of California, Berkeley (UCB) as part of UCB's public domain version of the UNIX operating system. All rights reserved. Copyright © 1981, Regents of the University of California.
NOTWITHSTANDING ANY OTHER WARRANTY HEREIN, ALL DOCUMENT FILES AND SOFTWARE OF THESE SUPPLIERS ARE PROVIDED "AS IS" WITH ALL FAULTS. CISCO AND THE ABOVE-NAMED SUPPLIERS DISCLAIM ALL WARRANTIES, EXPRESSED OR IMPLIED, INCLUDING, WITHOUT LIMITATION, THOSE OF MERCHANTABILITY, FITNESS FOR A PARTICULAR PURPOSE AND NONINFRINGEMENT OR ARISING FROM A COURSE OF DEALING, USAGE, OR TRADE PRACTICE.
IN NO EVENT SHALL CISCO OR ITS SUPPLIERS BE LIABLE FOR ANY INDIRECT, SPECIAL, CONSEQUENTIAL, OR INCIDENTAL DAMAGES, INCLUDING, WITHOUT LIMITATION, LOST PROFITS OR LOSS OR DAMAGE TO DATA ARISING OUT OF THE USE OR INABILITY TO USE THIS MANUAL, EVEN IF CISCO OR ITS SUPPLIERS HAVE BEEN ADVISED OF THE POSSIBILITY OF SUCH DAMAGES.
Cisco and the Cisco Logo are trademarks of Cisco Systems, Inc. and/or its affiliates in the U.S. and other countries. A listing of Cisco's trademarks can be found at www.cisco.com/go/trademarks. Third party trademarks mentioned are the property of their respective owners. The use of the word partner does not imply a partnership relationship between Cisco and any other company. (1005R)
Any Internet Protocol (IP) addresses and phone numbers used in this document are not intended to be actual addresses and phone numbers. Any examples, command display output, network topology diagrams, and other figures included in the document are shown for illustrative purposes only. Any use of actual IP addresses or phone numbers in illustrative content is unintentional and coincidental.
© 2012 Cisco Systems, Inc. All rights reserved.
Cisco TelePresence Management Suite Installation Guide (14.1) Page 42 of 42
BibliographyAppendix 2. Uninstalling Cisco TMS