cisco telepresence server on virtual machine 3.1 installation guide · : d n a mm o c e h t e p y3t...
TRANSCRIPT

Cisco TelePresence Serveron Virtual Machine
Installation Guide
Release 3.1x
OL-30233-01August 2013
installation guide 310.book Page 1 Wednesday, October 2, 2013 5:08 PM

Contents
2
ContentsContents ....................................................................................................................................... 2General information ................................................................................................................ 3
About Cisco TelePresence Server on Virtual Machine ................................... 3Licensing ........................................................................................................................ 3
Installing ...................................................................................................................................... 6Recommended Platform .......................................................................................... 6Specifications-based System – Minimum Specification ............................... 6Co-residency Support ................................................................................................ 7Before Installing TelePresence Server on Virtual Machine .......................... 7Installation Process ..................................................................................................... 7Configuring the VM Guest .....................................................................................18
Configuring ...............................................................................................................................20Requirements .............................................................................................................20Log into the TelePresence Server .......................................................................20Add License Keys for Each Feature .....................................................................20Configure SIP Settings .............................................................................................21Configure TelePresence Conductor Administration ....................................21Configure DNS Settings (Optional) .....................................................................21
Upgrading .................................................................................................................................23Checking for Updates and Downloading Software ......................................23Upgrading the Software .........................................................................................23Changing the Virtual Machine CPU from 10 cores to 8 cores ...................24
Troubleshooting .....................................................................................................................26Using the Event Log to Help Solve a Problem ................................................26Getting Help ...............................................................................................................26Checking VMware Compatibility .........................................................................26VMware Checklist ......................................................................................................27Isolating a Possible Root Cause ...........................................................................28Possible Issues ............................................................................................................29Analyzing the Cause of VMware Issues .............................................................29Restoring Default Configuration (Factory Reset) ..........................................30
Disclaimers ................................................................................................................................31
installation guide 310.book Page 2 Wednesday, October 2, 2013 5:08 PM

General information
installation guide 310.book Page 3 Wednesday, October 2, 2013 5:08 PM
General information
About Cisco TelePresence Server on Virtual Machine The Cisco TelePresence Server on Virtual Machine is a technologically advanced media processing platform. With a supported hardware platform and the software application, provides ActivePresence high-definition video conferencing and the highest possible voice quality.
LicensingFor software licensing information, refer to the Cisco TelePresence on Virtual Machine datasheet, available from Cisco.
For information on the open source software used in Cisco TelePresence on Virtual Machine, refer to: Cisco TelePresence Server on Virtual Machine 3.1 Open Source Documentation.
Table 1: Screen Licenses per Participant
Call type description
Screen licenses required per call
Maximum calls by core size (with licenses providing 100% of capacity)
Main video Audio Content8-core Virtual Machine
10-core Virtual Machine
4 screen licenses
6 screen licenses
- Mono - 1/52 104* 104*
360p30† Mono In main video
1/8 33 49
480p30 Mono In main video
1/4 16 24
480p30 Stereo 720p5 1/3 12 18
3
General information
installation guide 310.book Page 4 Wednesday, October 2, 2013 5:08 PM
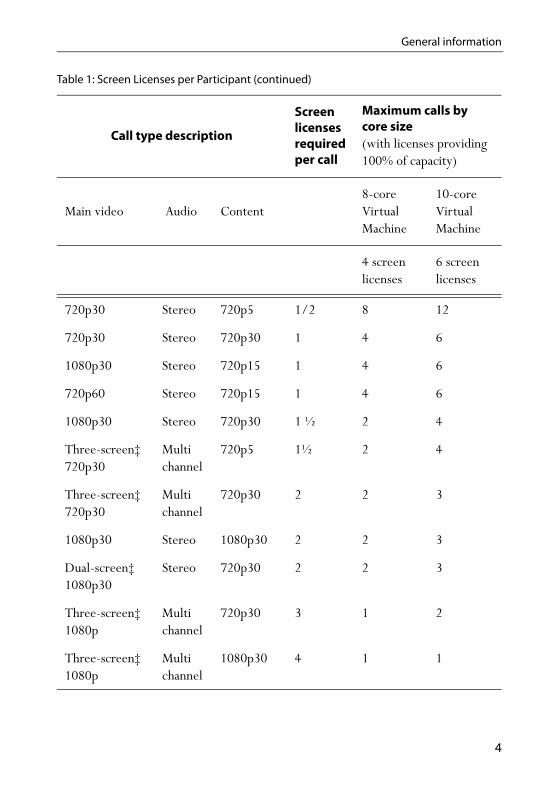
720p30 Stereo 720p5 1/2 8 12
720p30 Stereo 720p30 1 4 6
1080p30 Stereo 720p15 1 4 6
720p60 Stereo 720p15 1 4 6
1080p30 Stereo 720p30 1 ½ 2 4
Three-screen‡ 720p30
Multichannel
720p5 1½ 2 4
Three-screen‡ 720p30
Multichannel
720p30 2 2 3
1080p30 Stereo 1080p30 2 2 3
Dual-screen‡ 1080p30
Stereo 720p30 2 2 3
Three-screen‡ 1080p
Multichannel
720p30 3 1 2
Three-screen‡ 1080p
Multichannel
1080p30 4 1 1
Table 1: Screen Licenses per Participant (continued)
Call type description
Screen licenses required per call
Maximum calls by core size (with licenses providing 100% of capacity)
Main video Audio Content8-core Virtual Machine
10-core Virtual Machine
4 screen licenses
6 screen licenses
4

General information
installation guide 310.book Page 5 Wednesday, October 2, 2013 5:08 PM
* 104 is the maximum number of calls that is possible on a TelePresence Server.
‡ The TelePresence Server needs the Third Party Interop feature key to host conferences with multi-screen endpoints that are not third party interoperable. This includes all multi-screen endpoints except the Cisco TelePresence System T3 and TIP-compatible endpoints.
† Requires TelePresence Conductor XC2.2 or later.
Four-screen‡ 1080p
Stereo 1080p30 4 1 1
The table above assumes that calls of one type are being used to reach these maximum values. To calculate the total number of licenses required for a variety of concurrent calls, sum the screen licenses required for each concurrent call.
Table 1: Screen Licenses per Participant (continued)
Call type description
Screen licenses required per call
Maximum calls by core size (with licenses providing 100% of capacity)
Main video Audio Content8-core Virtual Machine
10-core Virtual Machine
4 screen licenses
6 screen licenses
i
5
Installing
installation guide 310.book Page 6 Wednesday, October 2, 2013 5:08 PM
Installing
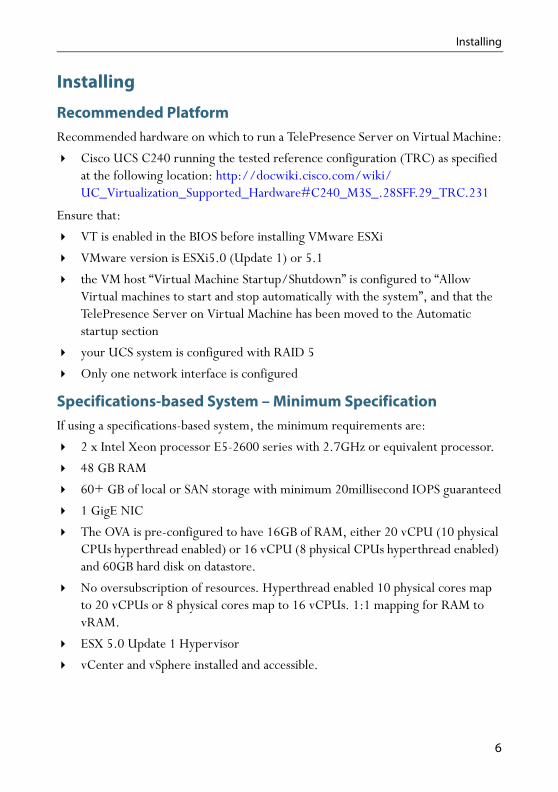
Recommended PlatformRecommended hardware on which to run a TelePresence Server on Virtual Machine:
Cisco UCS C240 running the tested reference configuration (TRC) as specified at the following location: http://docwiki.cisco.com/wiki/UC_Virtualization_Supported_Hardware#C240_M3S_.28SFF.29_TRC.231
Ensure that:
VT is enabled in the BIOS before installing VMware ESXi
VMware version is ESXi5.0 (Update 1) or 5.1
the VM host “Virtual Machine Startup/Shutdown” is configured to “Allow Virtual machines to start and stop automatically with the system”, and that the TelePresence Server on Virtual Machine has been moved to the Automatic startup section
your UCS system is configured with RAID 5
Only one network interface is configured
Specifications-based System – Minimum SpecificationIf using a specifications-based system, the minimum requirements are:
2 x Intel Xeon processor E5-2600 series with 2.7GHz or equivalent processor.
48 GB RAM
60+ GB of local or SAN storage with minimum 20millisecond IOPS guaranteed
1 GigE NIC
The OVA is pre-configured to have 16GB of RAM, either 20 vCPU (10 physical CPUs hyperthread enabled) or 16 vCPU (8 physical CPUs hyperthread enabled) and 60GB hard disk on datastore.
No oversubscription of resources. Hyperthread enabled 10 physical cores map to 20 vCPUs or 8 physical cores map to 16 vCPUs. 1:1 mapping for RAM to vRAM.
ESX 5.0 Update 1 Hypervisor
vCenter and vSphere installed and accessible.
6

Installing
installation guide 310.book Page 7 Wednesday, October 2, 2013 5:08 PM
Co-residency SupportThe TelePresence Server on Virtual Machine can co-reside with applications (any other VMs occupying same host) subject to the following conditions:
no oversubscription of CPU: 1:1 allocation of vCPU to physical cores must be used (2 cores required per TelePresence Server on Virtual Machine)
no oversubscription of RAM: 1:1 allocation of vRAM to physical memory
sharing disk storage subsystem is supported subject to correct performance (latency, BW) characteristics
Co-residency with Cisco TelePresence Conductor is supported
Before Installing TelePresence Server on Virtual MachineBefore deploying the TelePresence Server on Virtual Machine OVA, make sure your environment meets the following conditions:
Your server is powered up
Your server is connected to the network
VMware is installed and running on your server
Cisco_ts_VirtualMachine_<version>.ova is downloaded
Installation ProcessThis process guides you through installing the virtual machine (VM); it assumes that you are using vSphere.
Configuring the VM HostEnsure that the VM host is configured with a valid NTP server – the same NTP server that will be specified in the TelePresence Server on Virtual Machine.
In order to the scale of 1.2 HD/720p ports per physical CPU core, the current release has limited co-residency support with other Unified Communications applications. Future releases will provide ways of removing this limitation for customers seeking to deploy the application co-resident with other applications. For more information about Unified Communications virtualization guidelines, refer to the Cisco Unified Communications in a Virtualized Environment wiki site.
i
7

Installing
installation guide 310.book Page 8 Wednesday, October 2, 2013 5:08 PM
1 Select the host.2 Go to the Configuration tab.3 Select Time configuration.4 Select Properties.
If the date and time were red on the previous page, then set the date and time manually to the current time.
5 Click Options.6 Select NTP Settings.7 Click Add.8 Enter the IP address of the NTP server.9 Click OK.10 Select the Restart NTP service to apply changes check box.11 Click OK.12 Click OK.
Deploying OVA to HostThese instructions represent a typical installation. The Deploy OVF Template wizard dynamically changes to reflect host configuration.
8-core and 10-core DeploymentsThe process of deploying the 8-core and 10-core virtual machines is indentical, except for the option selected on the Deployment Configuration screen, which is noted in step 7 of the following section.
i
8

Installing
installation guide 310.book Page 9 Wednesday, October 2, 2013 5:08 PM
1 Log in to vSphere to access the ESXi Host.2 Select File > Deploy OVF Template.
3 Click Browse, find the location of the .ova file, click Open and then click Next.
9

Installing
installation guide 310.book Page 10 Wednesday, October 2, 2013 5:08 PM
4 On the OVF Template Details page click Next.
5 If an End User License Agreement page appears, read the EULA, click Accept then Next.
10

Installing
installation guide 310.book Page 11 Wednesday, October 2, 2013 5:08 PM
6 On the Name and Location page, enter a Name for this TelePresence Server on Virtual Machine guest, for example “Cisco_ts_VirtualMachine” and the Inventory Location where the virtual machine will reside.
11

Installing
installation guide 310.book Page 12 Wednesday, October 2, 2013 5:08 PM
7 On the Deployment Configuration page, for a 10-core CPU virtual machine, select Cisco_ts_VirtualMachine Hyperthread 20 Core OVA or for an 8-core virtual machine, select Cisco_ts_VirtualMachine Hyperthread 16 Core OVA and then click Next.
12

Installing
installation guide 310.book Page 13 Wednesday, October 2, 2013 5:08 PM
8 On the Host / Cluster page, select the host or cluster you want to run the deployed virtual machine and click Next.
13

Installing
installation guide 310.book Page 14 Wednesday, October 2, 2013 5:08 PM
9 On the Resource Pool page, select the resource pool with which you want to run the deployed virtual machine and click Next.
14

Installing
installation guide 310.book Page 15 Wednesday, October 2, 2013 5:08 PM
10 On the Storage page, select the datastore onto which the TelePresence Server Virtual Machine Guest will be deployed and then click Next.
15

Installing
installation guide 310.book Page 16 Wednesday, October 2, 2013 5:08 PM
11 On the Disk Format page, ensure that the default disk format of Thick Provision Lazy Zeroed is selected and then click Next.
Note that Thin Provision is not supported as VM performance may degrade during resizing of a partition.
16
Installing
installation guide 310.book Page 17 Wednesday, October 2, 2013 5:08 PM
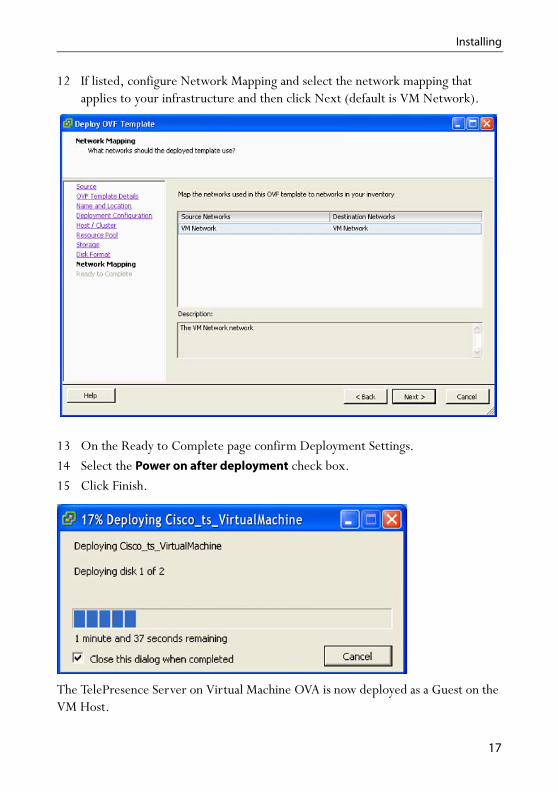
12 If listed, configure Network Mapping and select the network mapping that applies to your infrastructure and then click Next (default is VM Network).
13 On the Ready to Complete page confirm Deployment Settings.14 Select the Power on after deployment check box.15 Click Finish.
The TelePresence Server on Virtual Machine OVA is now deployed as a Guest on the VM Host.
17

Installing
installation guide 310.book Page 18 Wednesday, October 2, 2013 5:08 PM
Configuring the VM Guest1 Either:
Select the VM guest and then select the ‘Console’ tab, or Right-click on the VM guest and select ‘Open Console’.
2 The VM guest will take some time to boot, create its second hard disk partition and then reboot and the console of the Cisco Telepresence Server Virtual Machine is displayed.
When the TS: prompt appears, the TelePresence Server on virtual machine is ready for initial configuration.
3 Type the command: help static and press Enter.The three methods of configuring IP address are displayed on screen. Decide which one you want to use.
4 Configure a static IP address following the format shown in the console and press Enter.
18

Installing
installation guide 310.book Page 19 Wednesday, October 2, 2013 5:08 PM
For example, if you configure IPv4 with subnet mask, it would look like this: static 192.168.1.2 255.255.255.1 192.168.1.1
Complete the rest of the configuration by going to “Configuring TelePresence Server on Virtual Machine,” page 16.
The above IP address is just an example. Make sure the IP address, default gateway, subnet mask or prefix length information you enter is correct for your network.
i
19
Configuring
installation guide 310.book Page 20 Wednesday, October 2, 2013 5:08 PM
Configuring
RequirementsThe Cisco TelePresence Server on Virtual Machine application must operate in remotely managed mode. It must be administered through the Cisco TelePresence Conductor XC2.2 (or later), or a similar system, or through the TelePresence Server API. For more information about the TelePresence Server API, refer to the Cisco TelePresence Server API 3.0 Reference Guide.
Log into the TelePresence ServerTo log in to the web interface of your TelePresence Server, do the following:
1 Use your browser to navigate to the IP address or host name of the device.2 Click Log in and enter the user name admin with no password.
The Login information page is displayed.
Add License Keys for Each FeatureContact Cisco to get license keys for the features you have purchased.
To add license keys to your TelePresence Server do the following:
1 Go to Configuration > Upgrade.2 In the Feature Management section, in the Activation Code field enter the
activation code for a feature license and click Update features.The feature name and license key appears under License keys.
3 Repeat step 2 for each additional feature license.
TelePresence Conductor must be configured to run in Back-to-Back User Agent (B2BUA) mode, or policy server mode if SIP is configured. TelePresence Server cannot be used in an H.323-capable policy server Conductor deployment.
Cisco recommends that you change the admin account to use a password as soon as possible. To do that, click Change password on the Login information page or go to Users, click the admin link, and provide the required user information.
i
i
20

Configuring
installation guide 310.book Page 21 Wednesday, October 2, 2013 5:08 PM
Configure SIP SettingsTo configure SIP settings, do the following:
1 Go to Configure > SIP settings
2 In the Outbound Call Configuration menu, select Use trunk. 3 In the Outbound Address field, enter the IP address of the Cisco TelePresence
Conductor. 4 (Optional) For Outbound domain, enter domain name of Conductor, if used.5 For Outbound transport, select TLS.
Configure TelePresence Conductor AdministrationIn order for the TelePresence Server on Virtual Machine to be administered through TelePresence Conductor, you need to:
Create a user that TelePresence Conductor will use to administer the device.
Configure the device so that it can be administered by TelePresence Conductor.
For information on creating the user for TelePresence Conductor, and configuring the device to enable TelePresence Conductor to administer the device, refer to the steps provided in the appropriate TelePresence Conductor deployment guide.
In networks where Conductor is trunked to Cisco Unified CM refer to:
Cisco TelePresence Conductor with Cisco Unified Communications Manager Deployment Guide, XC2.0, Unified CM 8.6.2 and 9.x, D14998.03.
TelePresence Server on Virtual Machine requires Unified CM 8.6(2x) or 9.1 or later.
In networks where Conductor is trunked to Cisco VCS refer to:
Cisco TelePresence Conductor with Cisco TelePresence Video Communication Server Deployment Guide, XC2.0, X6.0 and later, D14827.03.
TelePresence Server on Virtual Machine requires VCS X7.2.2 or later.
Configure DNS Settings (Optional)To configure DNS settings, do the following:
An encryption key is required to use TLS.i
21

Configuring
installation guide 310.book Page 22 Wednesday, October 2, 2013 5:08 PM
1 Go to Network > DNS
2 Add a Host Name and Name Server (if used) and then click Update DNS configuration.
22

Upgrading
installation guide 310.book Page 23 Wednesday, October 2, 2013 5:08 PM
Upgrading
Checking for Updates and Downloading SoftwareIt is a good idea to regularly check for updates to the main software image on the Cisco web site. This section describes how to upgrade the device using the web.
To check for, and download, updates:
1 Log in to the web interface and go to Status > Status.2 Make a note of the software version that is currently installed.3 Go to the support section of Cisco.com and check if a more recent release is
available.4 If a more recent release is available, download it and save it locally.
Upgrading the SoftwareIt is a good idea to regularly check for updates to the main software image on the Cisco web site. This section describes how to upgrade the device using the web.
To upgrade the software:
1 Unzip the software release file that you downloaded.2 Log in to the web interface and go to Configuration > Upgrade.3 In the Main software image section, click Browse and locate the unzipped file.4 Click Upload software image.
The browser begins uploading the file to the device, and a new browser window opens to indicate the progress of the upload. When finished, the browser window refreshes and indicates that the software upgrade is complete.
5 Go to Configuration > Shutdown to shutdown and restart the device.
The process for upgrading 8-core and 10-core CPU deployments is the same.
Shutting down the device will disconnect all participants.
i
!
23

Upgrading
installation guide 310.book Page 24 Wednesday, October 2, 2013 5:08 PM
Changing the Virtual Machine CPU from 10 cores to 8 coresTo change the Cisco TelePresence Server on Virtual Machine CPU from 10 cores to 8 cores, perform the following steps:
1 Open the VMware vSphere Client and log in to your ESXi host.2 Right-click the TelePresence Server virtual machine and select Power > Power
Off.
3 Right-click the TelePresence Server virtual machine and select Edit Settings….4 In the Hardware list, click CPUs.
24

Upgrading
installation guide 310.book Page 25 Wednesday, October 2, 2013 5:08 PM
5 From the Number of cores per socket list, select 16 and click OK.
6 Right-click the TelePresence Server virtual machine and select Power > Power On.
Choosing 16 cores will map to 8 physical cores since hyperthreading is enabled.i
25

Troubleshooting
installation guide 310.book Page 26 Wednesday, October 2, 2013 5:08 PM
Troubleshooting
Using the Event Log to Help Solve a ProblemYou can use the event log to produce debugging information to assist technical support in solving any problems. Event logging capture filter topics are set by default to Errors, warnings and information. Do not change the capture filter topic level without the guidance of technical support.
Getting HelpIf you experience any problems when configuring or using the product, consult the online help available from the user interface. The online help explains how the individual features and settings work.
If you cannot find the answer you need, check the web site at
http://www.cisco.com/cisco/web/support/index.html where you will be able to:
Make sure that you are running the most up-to-date software.
Find further relevant documentation, for example product user guides, printable versions of the online help, reference guides, and articles that cover many frequently asked questions.
You or your reseller can get help from our support team by raising a case. Make sure you have the following information ready before raising a case: The serial number and product model number of the unit (if applicable). The software build number which can be found on the product user
interface (if applicable). Your contact email address or telephone number. A full description of the problem.
Checking VMware CompatibilityIf you are using third party hardware for hosting the TelePresence Server on Virtual Machine application, check the hardware compatibility. This can be done using the VMware compatibility guide tool available from
http://www.vmware.com/resources/compatibility/search.php.
26

Troubleshooting
installation guide 310.book Page 27 Wednesday, October 2, 2013 5:08 PM
VMware Checklist1 Check the accessibility to the VM host server (by ping, physical console access,
ssh remote access, KVM-over-IP console, and so on).2 Check the network connectivity of the VMkernel (by executing the vmkping
command using Tech Support Mode to verify network connectivity from the VMkernel NIC level).
3 If you are having problems connecting to the vSphere Client management console, execute the command /sbin/services.sh from an SSH session to restart the ESXi management agent.
4 Check the utilization of the VM host server (CPU utilization, memory utilization, disk access speed, storage access speed, network access status, power utilization, and so on). If any specific application causes high utilization, stop or restart this application to isolate the overall VM host performance level. Alternatively execute the command esxtop from Tech Support Mode to list all system processes running on the ESXi host application.
5 Check the ESXi server file log (hostd.logs) under the folder /var/log/vmware. This log contains common error logs such as iSCI naming error, authentication error, host convertibility error, and so on.
Verify that there is adequate disk space available on the volume that is storing the database files to ensure correct operation of the database.If there is not adequate space available on the physical volume that stores the database files, free up disk space.Validate the authentication to the vCenter Server database. The vCenter Server service may not be able to authenticate with the database if:i There are permission issues with the database when importing from one
instance to another.ii The password on the account you are using to authenticate to the database
has changed but the password in the registry has not changed as well.iii The vCenter Server database user is not granted correct permissions.
27

Troubleshooting
installation guide 310.book Page 28 Wednesday, October 2, 2013 5:08 PM
Isolating a Possible Root Cause
Table 2: VMware Issues and Possible Root Causes
Potential Issue Area What to Look For
Storage Look for the VM store application image stored either on the local drive, SAN or NFS.VMs often freeze or hang up if the application failed to access the storage.
Possible error messages are:
• vCenter Server does not start
• vCenter Server is slow to respond
• vCenter Server fails after an indefinite amount of time
Network Any network failure or locking causes a connection failure between the VM and the virtual network. Also, if using NFS or iSCSI, storage may cause application failures because the application cannot access the file system.
DNS DNS server failures or communication failures between DNS and the VM server may cause theVMware application or the TelePresence Server on Virtual Machine application to fail.
vCenter Server If vCenter is not operating properly, even though the TelePresence Server on Virtual Machine application is still up and running, you may lose connection to the TelePresence Server on Virtual Machine application from the network.
Host application Check any critical alarms on the VM application for events on the host or application level (check the event information from vSphere Client).
28
Troubleshooting
installation guide 310.book Page 29 Wednesday, October 2, 2013 5:08 PM
Possible IssuesThe following section contains some common causes of issues using VMware.
VM Image Fails to BootIf the VM image fails to boot, check the VT (Virtualization Technology) setting in BIOS. This needs to be enabled for hosting VMs. If it is not set, set it and re-install ESXi then load the .ova file.
Guest console in vSphere 5 fails to run on some Microsoft platformsWhen attempting to open a console screen from vSphere for the VM:
Error message: “The VMRC console has disconnected...attempting to reconnect.”
Screen remains black
The following operating systems are at risk:
Windows 7 64 bit – reported on VMware forum (http://communities.vmware.com/thread/333026)
Windows Server 2008 R2 (64-bit) – found by use
Raid Controller SynchronizationIf the VMware system is synchronizing its RAID disks, disk performance is seriously degraded. It is strongly recommended that TelePresence Server on Virtual Machine is not installed or run on VM platforms where RAID disks are in a degraded or synchronizing state.
TelePresence Server Displays Different Serial Number/MAC address on RebootThis situation can occur if multiple network interfaces are configured. Only one network interface is supported.
Analyzing the Cause of VMware IssuesIf VMware is causing problems on a TelePresence Server on Virtual Machine host, you are initially recommended to collect logs from the host for analysis:
29

Troubleshooting
installation guide 310.book Page 30 Wednesday, October 2, 2013 5:08 PM
1 Using the vSphere client (or the vCenter Server managing this ESXi host) connect to the ESXi host on which the TelePresence Server on Virtual Machine is running.
2 Go to File > Export > Export System logs, choose the appropriate ESXi host and go with the default settings.
After you have downloaded the logs analyze them, or have them analyzed to determine the issue.
More information on exporting logs can be found at:
http://kb.vmware.com/selfservice/microsites/search.do?language=en_US&cmd=displayKC&externalId=653.
Restoring Default Configuration (Factory Reset)Very rarely, it may become necessary to run the “reset_config” script on a TelePresence Server. This resets the configuration of the TelePresence Server to its original default settings.
Performing a Reset to Default ConfigurationThe following procedure must be performed from the serial console within the first 30 seconds after reboot. This command removes the IP address and other network configurations, the installed licenses and the configured users.
To perform a reset of TelePresence Server, do the following:
1 Reboot the TelePresence Server virtual machine.2 From the console, within 30 seconds after reboot, type reset_config.
The configuration reset is complete.
30

Disclaimers
installation guide 310.book Page 31 Wednesday, October 2, 2013 5:08 PM
DisclaimersTHE SPECIFICATIONS AND INFORMATION REGARDING THE PRODUCTS IN THIS MANUAL ARE SUBJECT TO CHANGE WITHOUT NOTICE. ALL STATEMENTS, INFORMATION, AND RECOMMENDATIONS IN THIS MANUAL ARE BELIEVED TO BE ACCURATE BUT ARE PRESENTED WITHOUT WARRANTY OF ANY KIND, EXPRESS OR IMPLIED. USERS MUST TAKE FULL RESPONSIBILITY FOR THEIR APPLICATION OF ANY PRODUCTS.
THE SOFTWARE LICENSE AND LIMITED WARRANTY FOR THE ACCOMPANYING PRODUCT ARE SET FORTH IN THE INFORMATION PACKET THAT SHIPPED WITH THE PRODUCT AND ARE INCORPORATED HEREIN BY THIS REFERENCE. IF YOU ARE UNABLE TO LOCATE THE SOFTWARE LICENSE OR LIMITED WARRANTY, CONTACT YOUR CISCO REPRESENTATIVE FOR A COPY.
The Cisco implementation of TCP header compression is an adaptation of a program developed by the University of California, Berkeley (UCB) as part of UCB's public domain version of the UNIX operating system. All rights reserved. Copyright © 1981, Regents of the University of California.
NOTWITHSTANDING ANY OTHER WARRANTY HEREIN, ALL DOCUMENT FILES AND SOFTWARE OF THESE SUPPLIERS ARE PROVIDED “AS IS” WITH ALL FAULTS. CISCO AND THE ABOVE-NAMED SUPPLIERS DISCLAIM ALL WARRANTIES, EXPRESSED OR IMPLIED, INCLUDING, WITHOUT LIMITATION, THOSE OF MERCHANTABILITY, FITNESS FOR A PARTICULAR PURPOSE AND NONINFRINGEMENT OR ARISING FROM A COURSE OF DEALING, USAGE, OR TRADE PRACTICE.
IN NO EVENT SHALL CISCO OR ITS SUPPLIERS BE LIABLE FOR ANY INDIRECT, SPECIAL, CONSEQUENTIAL, OR INCIDENTAL DAMAGES, INCLUDING, WITHOUT LIMITATION, LOST PROFITS OR LOSS OR DAMAGE TO DATA ARISING OUT OF THE USE OR INABILITY TO USE THIS MANUAL, EVEN IF CISCO OR ITS SUPPLIERS HAVE BEEN ADVISED OF THE POSSIBILITY OF SUCH DAMAGES.
Cisco and the Cisco Logo are trademarks of Cisco Systems, Inc. and/or its affiliates in the U.S. and other countries. A listing of Cisco's trademarks can be found at www.cisco.com/go/trademarks. Third party trademarks mentioned are the property of their respective owners. The use of the word partner does not imply a partnership relationship between Cisco and any other company. (1005R)
Any Internet Protocol (IP) addresses and phone numbers used in this document are not intended to be actual addresses and phone numbers. Any examples, command display output, network topology diagrams, and other figures included in the document are shown for illustrative purposes only. Any use of actual IP addresses or phone numbers in illustrative content is unintentional and coincidental.
© May 2013, Cisco Systems, Inc. All rights reserved.
31