cisco unified contact center express getting started with ......chapter 5 advanced scripting...
TRANSCRIPT

Cisco Unified Contact Center Express Getting Started with Scripts, Release 11.0(1)Cisco Unified Contact Center Express Scripting and Development Series: Volume 1-3 First Published: August 27, 2015
Americas HeadquartersCisco Systems, Inc.170 West Tasman DriveSan Jose, CA 95134-1706 USAhttp://www.cisco.comTel: 408 526-4000
800 553-NETS (6387)Fax: 408 527-0883
Text Part Number:

THE SPECIFICATIONS AND INFORMATION REGARDING THE PRODUCTS IN THIS MANUAL ARE SUBJECT TO CHANGE WITHOUT NOTICE. ALL STATEMENTS, INFORMATION, AND RECOMMENDATIONS IN THIS MANUAL ARE BELIEVED TO BE ACCURATE BUT ARE PRESENTED WITHOUT WARRANTY OF ANY KIND, EXPRESS OR IMPLIED. USERS MUST TAKE FULL RESPONSIBILITY FOR THEIR APPLICATION OF ANY PRODUCTS.
THE SOFTWARE LICENSE AND LIMITED WARRANTY FOR THE ACCOMPANYING PRODUCT ARE SET FORTH IN THE INFORMATION PACKET THAT SHIPPED WITH THE PRODUCT AND ARE INCORPORATED HEREIN BY THIS REFERENCE. IF YOU ARE UNABLE TO LOCATE THE SOFTWARE LICENSE OR LIMITED WARRANTY, CONTACT YOUR CISCO REPRESENTATIVE FOR A COPY.
The Cisco implementation of TCP header compression is an adaptation of a program developed by the University of California, Berkeley (UCB) as part of UCB’s public domain version of the UNIX operating system. All rights reserved. Copyright © 1981, Regents of the University of California.
NOTWITHSTANDING ANY OTHER WARRANTY HEREIN, ALL DOCUMENT FILES AND SOFTWARE OF THESE SUPPLIERS ARE PROVIDED “AS IS” WITH ALL FAULTS. CISCO AND THE ABOVE-NAMED SUPPLIERS DISCLAIM ALL WARRANTIES, EXPRESSED OR IMPLIED, INCLUDING, WITHOUT LIMITATION, THOSE OF MERCHANTABILITY, FITNESS FOR A PARTICULAR PURPOSE AND NONINFRINGEMENT OR ARISING FROM A COURSE OF DEALING, USAGE, OR TRADE PRACTICE.
IN NO EVENT SHALL CISCO OR ITS SUPPLIERS BE LIABLE FOR ANY INDIRECT, SPECIAL, CONSEQUENTIAL, OR INCIDENTAL DAMAGES, INCLUDING, WITHOUT LIMITATION, LOST PROFITS OR LOSS OR DAMAGE TO DATA ARISING OUT OF THE USE OR INABILITY TO USE THIS MANUAL, EVEN IF CISCO OR ITS SUPPLIERS HAVE BEEN ADVISED OF THE POSSIBILITY OF SUCH DAMAGES.
Cisco and the Cisco logo are trademarks or registered trademarks of Cisco and/or its affiliates in the U.S. and other countries. To view a list of Cisco trademarks, go to this URL: www.cisco.com/go/trademarks. Third-party trademarks mentioned are the property of their respective owners. The use of the word partner does not imply a partnership relationship between Cisco and any other company. (1110R)
Cisco Unified Contact Center Express Scripting and Development Series Vol 1 - Getting Started with Scripts Release 11.0(1) Copyright © 2015 Cisco Systems, Inc. All rights reserved

Cisco Unified Contact
C O N T E N T S
Preface i
Audience iiOrganization iiRelated Documentation vGlossary vi
Conventions vii
Obtaining Documentation, Obtaining Support, and Security Guidelines viii
Documentation Feedback viii
C H A P T E R 1 Installing and Starting the Cisco Unified CCX Editor 1-1
Starting the Cisco Unified CCX Editor 1-1
Prerequisites for a Separate Installation 1-3
Downloading the Cisco Unified CCX Editor for a Separate Installation 1-3
Installing the Cisco Unified CCX Editor 1-4
C H A P T E R 2 How To Use the Cisco Unified CCX Editor 2-1
About the Cisco Unified CCX Editor 2-2
An Example Cisco Unified CCX Editor Window 2-2
Cisco Unified CCX Editor Window with a Sample Script 2-4
About the Cisco Unified CCX Editor Status Bar 2-5
i Center Express Getting Started with Scripts, Release 11.0(1)

Contents
Menu Bar Function Descriptions 2-7
The File Menu 2-8
The Edit Menu 2-9
The Tools Menu 2-10
The Debug Menu 2-10
The Window Menu 2-11
The Settings Menu 2-11
The Help Menu 2-15
Tool Bar Function Descriptions 2-16
About the Cisco Unified CCX Editor Step Palettes 2-18
The Editor Palettes Available in Each Cisco Unified CCX Product 2-19
The Steps in Each Cisco Unified CCX Editor Palette 2-21
How To Use the Cisco Unified CCX Editor Palettes 2-24
How to Create and Customize a Cisco Unified CCX Editor Script 2-25
Creating a Script 2-25
Customizing a Step 2-28
Defining, Using, and Updating Script Variables 2-31
How to Reorganize the Display of Script Variables in the Editor 2-32
How To Define Local Script Variables in the Cisco Unified CCX Editor 2-32
How To Map a Script Variable to a Subscript Variable 2-34
Using Enterprise Expanded Call Context (ECC) Variables 2-35
How To Define ECC Variables in the Cisco Unified CCX Editor 2-35
The Types of Local Variables Available in the Cisco Unified CCX Editor 2-37
How and Why To Export Variables 2-43
How and When To Configure the Encoding and Decoding of Variable Types 2-44
Using Multiple Values in a Variable 2-47
iiCisco Unified Contact Center Express Getting Started with Scripts, Release 11.0(1)
Contents
Validating and Debugging Your Script 2-48
How to Validate Your Script 2-48
How to Debug Your Script 2-48
Using BreakPoints 2-48
Using Reactive and Active Debugging 2-49
Using Reactive Debugging 2-49
Using Non-Reactive Debugging 2-52
How To Handle Basic Script Errors 2-53
Using the “Continue on Prompt Errors” Option 2-53
Enabling the ”Continue On Prompt Errors“ Option 2-54
Script Execution When Enabling the ”Continue On Prompt Errors“ Option 2-55
Script Execution When Disabling the ”Continue On Prompt Errors“ Option 2-55
Using Error Output Branches 2-55
How and Why To Use the CRTP Protocol 2-56
CRTP URI Protocol Syntax 2-57
Example CRTP URI Specifications 2-61
How To Use Cisco Unified CCX Script Templates 2-63
The Script Templates Installed with the Cisco Unified CCX Editor 2-63
How do I find the script templates installed with the Cisco Unified CCX Editor? 2-64
Default Script Template Descriptions 2-65
How to Create Your Own Script Template 2-67
How to Create Your Own Script Template Directory 2-68
Where Sample Prompts for Your Scripts Are Stored 2-68
The Cisco Unified CCX Edition Script Web Repository 2-69
The Cisco Unified CCX Script Web Repository Location 2-69
How do I add my favorite Cisco Unified CCX script to the Web repository? 2-70
iiiCisco Unified Contact Center Express Getting Started with Scripts, Release 11.0(1)

Contents
Obtaining Technical Assistance 2-70
C H A P T E R 3 Using Expressions and the Expression Editor 3-1
How to Access the Cisco Unified CCX Expression Editor 3-1
How to Use the Expression Editor 3-2
How To Enter Expressions in the Expression Editor 3-2
About the Expression Editor Toolbar 3-4
Toolbar Tabs 3-5
A Pop-Up Menu 3-7
Showing or Hiding the Expression Editor Toolbar 3-8
About the Expression Editor Syntax Buttons 3-9
About Expression and Java Licensing 3-9
C H A P T E R 4 Localizing Cisco Unified CCX Scripts 4-1
Installing Language Groups 4-1
When Do You Need a Language Group? 4-2
Changing a Cisco Unified CCX Installed Language 4-4
Language Restrictions 4-4
Creating a Custom Country-Specific Language 4-4
Using VXML to Implement a Language Not Available in Cisco Unified CCX 4-5
C H A P T E R 5 Advanced Scripting Techniques 5-1
Managing Contacts in Your Scripts 5-1
Managing Sessions in Your Scripts 5-3
Using Mapping Identifiers 5-3
Using Session Objects 5-4
Using Grammars in Your Scripts 5-4
ivCisco Unified Contact Center Express Getting Started with Scripts, Release 11.0(1)

Contents
About Grammars 5-5
Grammar Search Algorithm 5-6
File Grammar Formats 5-7
The SRGS File Grammar Format 5-7
The Digit File Grammar Format 5-7
The GSL File Grammar Format (deprecated) 5-8
Automatic Conversion 5-8
Passing Grammars to Steps 5-9
Grammar Template 5-9
Compound Grammar 5-10
Compound Grammar Indexing 5-10
Using Prompts in your Scripts 5-11
About Prompts 5-11
Prompt Types You Can Create 5-13
The Prompt Search Algorithm 5-13
About Prompt Templates 5-14
How To Create or Customize a Prompt 5-15
Recording the Welcome Prompt 5-15
Configuring the Welcome Prompt 5-16
Uploading a Spoken Name 5-18
Advanced Error Handling 5-18
Using the On Exception Goto Step 5-19
Using Default Scripts 5-19
About Script Interruption 5-22
Using Different Media in your Scripts 5-24
About Media 5-25
Media-Less Calls 5-25
Media Neutrality 5-26
Media Steps 5-26
Name To User Step 5-27
vCisco Unified Contact Center Express Getting Started with Scripts, Release 11.0(1)
Contents
Recording Step 5-27
Explicit Confirmation Step 5-27
Implicit Confirmation Step 5-28
Simple Recognition Step 5-28
Using a Voice Browser in Your Scripts 5-28
Understanding VoiceXML 5-29
Voice Browser Architecture 5-30
Voice Browser Development Tools 5-32
A Script for Incrementing the Current Date 5-34
A Script Example Showing Timeout or Retry Logic 5-35
C H A P T E R 6 The Basic Cisco Unified CCX Script 6-1
The Example Cisco Unified CCX Basic Script Template 6-2
The Start Step (Creating a Script) 6-2
Script Variables for icd.aef 6-3
The Accept Step 6-5
The Play Prompt Step 6-6
The Select Resource Step 6-7
The Connected Output Branch 6-10
The Queued Output Branch 6-10
The Label Step 6-10
The Play Prompt Step 6-11
The Delay Step 6-12
The Goto Step 6-14
The End Step 6-14
C H A P T E R 7 Designing a Basic Script 7-1
An Example Basic Script 7-2
viCisco Unified Contact Center Express Getting Started with Scripts, Release 11.0(1)

Contents
The Start Step (Creating a Script) 7-4
SNU Script Template Variables 7-4
The Accept Step 7-7
The Play Prompt Step 7-8
The Label Step (GetUser) 7-11
The Name To User Step 7-11
The Successful Output Branch 7-14
The Get User Info Step 7-16
The If Step 7-17
The Label Step (GetPin) 7-23
The Timeout Output Branch 7-24
The Unsuccessful Output Branch 7-25
The Get Digit String Step 7-25
Configuring the Get Digit String Step 7-26
The Successful Output Branch 7-28
The Timeout Output Branch 7-28
The True Output Branch 7-30
The False Output Branch 7-31
The Unsuccessful Output Branch 7-31
The Authenticate User Step 7-32
The Success Output Branch 7-33
The Unsuccessful Output Branch 7-35
The True Output Branch 7-36
The False Output Branch 7-36
The Recording Step 7-37
The Successful Output Branch 7-39
The Unsuccessful Output Branch 7-39
The Menu Step 7-40
The Key 1 Output Branch 7-42
viiCisco Unified Contact Center Express Getting Started with Scripts, Release 11.0(1)

Contents
The Key 2 Output Branch 7-44
The True Output Branch 7-45
The False Output Branch 7-45
The Timeout and Unsuccessful Output Branches 7-46
The Closing Steps of the SNU.aef Script 7-47
The Set Contact Info Step 7-48
The Set Step 7-49
.The Play Prompt Step 7-49
The Terminate Step 7-49
.The End Step 7-49
C H A P T E R 8 Working with Multiple Contacts 8-1
An Example Script Template with Multiple Contacts 8-2
The Start Step (Creating a Script) 8-3
Script Variables for broadcast.aef 8-4
The Annotate Step 8-6
The Accept Step 8-7
The Get Contact Info Step 8-8
The Recording Step 8-8
The Successful Output Branch 8-10
The Unsuccessful Output Branch 8-10
The Play Prompt Step 8-11
The Terminate Step 8-11
The End Step 8-11
The Play Prompt Step 8-11
The Set numbersToCall Step 8-12
The Call Subflow Step 8-13
The Set numCalls Step 8-15
viiiCisco Unified Contact Center Express Getting Started with Scripts, Release 11.0(1)
Contents
The Label Step (Call Loop) 8-15
The If Step 8-15
If True Output Branch 8-16
If False Output Branch 8-17
The Set Steps 8-17
The First Set Step 8-17
The Second Set Step 8-18
The Play Prompt Step 8-19
The Call Hold Step 8-20
The Place Call Step 8-21
The Successful Output Branch 8-24
The On Exception Goto Step 8-24
The Set Contact Info Step 8-24
The Play Prompt Step 8-25
The Terminate Step 8-25
The Set Contact Info Set 8-25
The Label Step (LABEL0) 8-25
The On Exception Goto Step (Clear Exception) 8-25
The Call Unhold Step 8-26
The Play Prompt Step 8-26
The Other Output Branches 8-26
The Increment Step (i) 8-27
The Goto Step (Call Loop) 8-27
The Terminate Step 8-27
The Set Contact Info Step 8-27
The End Step 8-28
C H A P T E R 9 Designing a Web-Enabled Script 9-1
An Example Web-Enabled Script Template 9-1
ixCisco Unified Contact Center Express Getting Started with Scripts, Release 11.0(1)

Contents
Creating Server Script Web Pages 9-3
Creating a Static Web Page 9-3
Creating a Dynamic Web Page 9-4
Creating the hello.aef Script 9-5
The Start Step 9-5
Web-enabled Script Variables 9-6
The Get Http Contact Info Step 9-8
The Create File Document Step 9-10
The Keyword Transform Document Step 9-11
The Send Http Response Step 9-14
The End Step 9-16
Managing the hello.aef Script 9-16
Uploading the hello.aef Script 9-17
Creating the Application for hello.aef Script 9-17
Creating the HTTP Trigger 9-17
Testing the script 9-18
C H A P T E R 10 Designing a Web-Enabled Client Script 10-1
Example Web-Enabled Client Script Template 10-2
Analyzing the Data Source 10-3
Creating the getQuoteClient.aef Script 10-4
The Start Step (Creating a Script) 10-5
Defining the Client Script Variables 10-5
The Accept Step 10-6
The Create URL Document Step 10-7
The Create XML Document Step 10-8
The Get XML Document Data Step 10-10
The Create Generated Prompt Step 10-12
Create Container Prompt Step 10-15
xCisco Unified Contact Center Express Getting Started with Scripts, Release 11.0(1)

Contents
The Play Prompt Step 10-17
The Terminate Step 10-18
The End Step 10-18
C H A P T E R 11 Designing a Database Script 11-1
An Example Database Script Template 11-2
The Start Step (Creating a Script) 11-3
Database Script Variables 11-3
The Accept Step 11-5
The Play Prompt Step 11-5
The DB Read Step 11-6
The Successful Output Branch 11-8
The Connection Not Available Output Branch 11-9
The SQL Error Output Branch 11-9
The Label Step (Physician Loop) 11-9
The DB Get Step 11-9
The Successful Output Branch 11-11
The Play Prompt Step 11-12
The Goto Step (Physician Loop) 11-13
The No Data Output Branch 11-13
The DB Write Step 11-13
The DB Release Step 11-16
The Terminate Step 11-16
The End Step 11-17
The SQL Error Output Branch 11-17
The End Step 11-17
C H A P T E R 12 Designing a Cisco Unified IP IVR Script 12-1
The Sample AutoAttendant (aa.aef) Script Template 12-2
xiCisco Unified Contact Center Express Getting Started with Scripts, Release 11.0(1)
Contents
The Start Step (Creating a Script) 12-5
The aa.aef Script Variables 12-6
The Getting the Contact Information and Setting Up the Prompts 12-10
Accept 12-10
Get Contact Info 12-11
The First Create Conditional Prompt Step 12-12
The Second Create Conditional Prompt Step 12-13
The First Create Container Prompt Step 12-14
The Third Create Conditional Prompt Step 12-16
The Play Prompt Step 12-16
The Label Step (MainMenu) 12-18
Determining if the System is ASR Enabled 12-19
If ASR 12-19
The True Output Branch 12-20
The False Output Branch 12-20
The Switch Step 12-21
Creating and Setting an Error Message Prompt 12-22
The Second Create Container Prompt Step 12-23
The Set Step 12-23
Recognizing Input 12-24
The DialByExtn Output Branch of the Simple Recognition Step 12-27
The Label Step 12-28
The Create Container Prompt Step 12-28
The Set Step 12-29
The Get Digit String Step 12-29
The Successful Output Branch (of Get Digit String) 12-30
Transferring the Call if Recognition Is Successful 12-32
The True Recognition Branch 12-32
Setting the Retry Message 12-32
xiiCisco Unified Contact Center Express Getting Started with Scripts, Release 11.0(1)

Contents
Configuring the Number of Retries 12-33
The Retry Branch 12-33
The False Recognition Branch 12-34
Confirming the Caller Input 12-35
Localizing the Prompt Language 12-36
Completing the Input Confirmation 12-38
The Caller Does Not Give Confirmation 12-39
Configuring the Retries 12-39
The Caller With Retries Gives Confirmation 12-40
The Play Prompt Step 12-40
The Increment Step 12-40
The Caller Does Not Give Confirmation 12-41
The Extension is Confirmed as Correct 12-41
Transferring the Call 12-41
Successfully Transferring the Call 12-42
The Set Contact Info Step 12-43
The End Step 12-43
Receiving a Busy Signal 12-43
Registering an Invalid Transfer Extension 12-44
Unsuccessfully Transferring the Call 12-44
The If Step 12-45
The True Output Branch 12-45
The False Output Branch 12-46
The DialByName Output Branch of the Simple Recognition Step 12-46
The Label Step 12-47
The Create Container Prompt Step 12-48
The Set Step 12-48
The Name To User Step 12-48
The Successfully Receiving Caller Input 12-51
The Get User Info Step 12-53
xiiiCisco Unified Contact Center Express Getting Started with Scripts, Release 11.0(1)
Contents
The If Step 12-54
The Implicit Confirmation Step 12-54
The No Output Branch of the Simple Recognition Step 12-55
Get User Info Step 12-57
The First Create Generated Prompt Step 12-57
The Second Create Generated Prompt Step 12-58
The First Create Conditional Prompt Step 12-59
The If Step 12-60
True Branch—Create Language Prompt 12-60
False Branch—Set Prompt 12-61
The Create Container Prompt Step 12-61
The Set Step 12-62
The Explicit Confirmation Step 12-62
The If Step 12-65
The True Output Branch 12-65
The False Output Branch 12-66
The Yes Output Branch 12-66
The Label Step 12-68
The First If Step 12-68
The Call Redirect Step 12-69
The Successful Output Branch 12-69
The Busy Output Branch 12-70
The Invalid Output Branch 12-71
The Unsuccessful Output Branch 12-71
The Second If Step 12-72
The Operator Output Branch of the Simple Recognition Step 12-73
The Label Step (Xfer Operator) 12-74
The Call Redirect Step 12-75
The Successful Output Branch 12-75
The Busy Output Branch 12-76
xivCisco Unified Contact Center Express Getting Started with Scripts, Release 11.0(1)
Contents
The Invalid Output Branch 12-76
The Unsuccessful Output Branch 12-77
The If Step 12-77
The True Output Branch 12-78
The False Output Branch 12-78
The Concluding Steps of the Script 12-78
The Play Prompt Step 12-79
The Call Redirect Step 12-80
The If Step 12-81
The Play Prompt Step 12-81
The Terminate Step 12-81
The End Step 12-81
C H A P T E R 13 Designing Contact-Neutral Scripts 13-1
An Example Contact Neutral (Phone or HTTP) Script Template 13-2
The Start Step (Creating a Script) 13-3
Contact-Neutral Script Variables 13-4
The Accept Step 13-7
The Get Contact Info Step 13-7
The Switch Step 13-8
The HttpContact Output Branch of the Switch Step 13-10
The Get Http Contact Info Step 13-11
The Place Call Step 13-11
The Successful Output Branch 13-13
The Other Output Branches 13-17
The CallContact Branch of the Switch Step 13-19
The Get Trigger Info Step 13-20
The Default Branch of the Switch Step 13-22
The End Step 13-22
xvCisco Unified Contact Center Express Getting Started with Scripts, Release 11.0(1)

Contents
C H A P T E R 14 Designing a Script with Text-To-Speech (TTS) 14-1
An Example Text-To-Speech (TTS) Script 14-2
The Start Step (Creating a Script) 14-3
TTS Script Variables 14-3
The Accept Step 14-4
The Set Contact Info Step 14-4
The First Create TTS Prompt Step 14-5
The Play Prompt Step 14-7
The Create File Document Step 14-8
The Second Create TTS Prompt Step 14-9
The Annotate Step 14-10
The Menu Step 14-11
The Terminate Step 14-15
The End Step 14-15
C H A P T E R 15 Designing Cisco Unified CCX VoiceXML Applications 15-1
Understanding the Terminology 15-2
A Prerequisite and a Recommendation 15-3
Updating CRS 3.x VoiceXML Applications 15-3
Converting Documents from VoiceXML 1.0 to VoiceXML 2.0 15-3
Converting VoiceXML CRS 3.x Scripts to CRS 4.x Scripts 15-4
Converting VoiceXML CRS 3.x or 4.x Scripts to CRS 5.x Scripts 15-5
Designing Cisco Unified CCX VoiceXML Applications 15-6
Creating VoiceXML Documents 15-6
Related Documentation 15-7
A Sample VoiceXML Document 15-8
Using Document Type Definitions 15-9
xviCisco Unified Contact Center Express Getting Started with Scripts, Release 11.0(1)

Contents
Using SRGS Grammar Expressions 15-10
Using Speech Recognition Input 15-10
Using DTMF Input 15-11
Using DTMF for Menu Navigation 15-12
Receiving Digit String Input 15-13
Using DTMF Grammar 15-14
Using Text to Speech Output 15-15
Understanding Provider Fallback for TTS 15-15
Understanding Where TTS Prompts are Played 15-16
Understanding Gender Fallback for MRCP TTS 15-17
Using The CRTP Protocol 15-18
Using the Voice Browser Cache 15-18
Creating Cisco Unified CCX Scripts that Run VoiceXML Documents 15-20
Related Documentation 15-20
A Sample Voicebrower.aef Script 15-20
Creating a Script that Runs a VoiceXML Document 15-22
Step 1: The Start Step (Creating a Script) 15-22
Step 2: Create Two Voicebrowser Script Variables 15-23
Step 2: Enter the Start Step 15-23
Step 3: Enter the Accept Step 15-24
Step 4: Enter the Create URL Document Step 15-24
Step 5: Enter the Voice Browser Step 15-25
Step 6: Enter the Terminate Step 15-28
Step 7: Enter The End Step 15-28
Specifying TTS Providers in a Cisco Unified CCX Script 15-28
Designing International Cisco Unified CCX VoiceXML Applications 15-29
Cisco Unified CCX VoiceXML Application Troubleshooting Tips 15-32
xviiCisco Unified Contact Center Express Getting Started with Scripts, Release 11.0(1)

Contents
C H A P T E R 16 Designing Scripts for Cisco Unified IP IVR 16-1
The Service Control Interface 16-1
Call Variables 16-3
Using Call Variables 16-3
Using Expanded Call Variables 16-3
Using Error Variables 16-4
Using the Parameter Separator 16-4
Configuring Encoding and Decoding Types 16-5
ICM Script Types 16-7
Initial Scripts 16-8
Default Scripts 16-8
VRU Scripts 16-9
Sample VRU Script Templates 16-10
Basic Queuing (BasicQ.aef) 16-10
Visible Queuing (VisibleQ.aef) 16-11
Collect Digits (CollectDigits.aef) 16-12
C H A P T E R 17 Designing Cisco Unified CCX Scripts 17-1
A Sample Cisco Unified CCX Script Template 17-2
The Start Step (Creating a Script) 17-2
Cisco Unified CCX Script Variables 17-3
The Accept Step 17-6
The Get Contact Info Step 17-6
The Get Session Info Step 17-6
The If Steps 17-7
The First If Step 17-9
The Second If Step 17-9
The Third If Step 17-9
The Fourth If Step 17-10
xviiiCisco Unified Contact Center Express Getting Started with Scripts, Release 11.0(1)
Contents
The Play Prompt Step 17-11
The Get Digit String Step 17-11
The Session Steps 17-14
Choosing a Language 17-21
Recording a Name 17-24
The Select Resource Step 17-26
The Connected Output Branch 17-28
The Queued Output Branch 17-30
Using Default Scripts 17-32
Variables for a Default Cisco Unified CCX Script 17-32
Writing a Default Script 17-34
C H A P T E R 18 Designing Cisco Unified Gateway Scripts 18-1
Scripting on a Cisco Unified Gateway System 18-2
Using Variables 18-3
Defining Local Cisco Unified CCX Script Variables 18-3
Using Cisco Pre-Defined Enterprise Call Variables 18-4
Using Enterprise Expanded Call Context (ECC) Variables 18-5
Defining ECC Variables in the Cisco Finesse Administration 18-5
Defining ECC Variables in the Cisco Unified CCX Editor 18-5
Configuring ECC Variables in a Cisco Unified CCX Script 18-7
Defining ECC Variables for a Post Call Treatment Script 18-7
Using Variables Multiple Times 18-8
Example Cisco Unified Gateway Post-Routing Scripts 18-9
A Sample Cisco Unified CCX Script that Selects a CSQ 18-11
Script Variables Used in the PostRouteSelectCSQ.aef Script 18-12
Script Flow for the PostRouteSelectCSQ.aef Script 18-13
A Sample Cisco Unified CCX Script that Selects an Agent 18-17
xixCisco Unified Contact Center Express Getting Started with Scripts, Release 11.0(1)

Contents
Script Variables Used in the PostRouteSelectAgent.aef Script 18-18
Script Flow for the PostRouteSelectAgent.aef Script 18-19
A Sample Cisco Unified CCX Script that Selects a Route Point 18-24
Script Variables Used in the PostRouteSimple.aef Script 18-25
Script Flow for the PostRouteSimple.aef Script 18-26
A Summary Process for Defining Enterprise Variables 18-31
C H A P T E R 19 Designing a Generic Recognition Script 19-1
About the Generic Recognition Steps 19-1
N-Best Recognition and Multiple Interpretations 19-2
N-Best Recognition 19-2
Multiple Interpretations 19-3
The Script Flow for a Generic Recognition Script 19-3
An Example Grammar Used With Generic Recognition 19-4
An Example Script Algorithm Used With Generic Recognition 19-5
An Example Script, GenericRecoExample.aef 19-7
Script Variables Used in the Example Generic Recognition Script 19-8
Getting a Collection of Results 19-9
Getting All the Information for All the Results 19-12
Getting Interpretations for Each Result and Prompting with Each 19-13
C H A P T E R 20 Uninstallation of Unified CCX Editor 20-1
A P P E N D I X A A Sample VoiceXML Log File A-1
A Brief Description of a VoiceXML Log File A-1
Excerpts from the Sample VoiceXML Log File A-2
xxCisco Unified Contact Center Express Getting Started with Scripts, Release 11.0(1)

Contents
Sample VoiceXML Log File Selection A-3
A P P E N D I X B VoiceXML Implementation for Cisco Voice Browser B-1
VoiceXML 2.0 Element Implementation B-2
VoiceXML Properties Implementation B-10
Standard Session Variables Implementation B-11
Built-in Type Implementation B-12
The <value> Data Format B-14
I N D E X
xxiCisco Unified Contact Center Express Getting Started with Scripts, Release 11.0(1)

Contents
xxiiCisco Unified Contact Center Express Getting Started with Scripts, Release 11.0(1)
Preface
The Cisco Unified Contact Center Express Scripting and Development Series contains three volumes and provides information about how to use the Cisco Unified Contact Center Express (Cisco Unified CCX) Editor to develop a wide variety of interactive scripts:
• Volume 1, Getting Started with Scripts (this book), provides an overview of the Cisco Unified CCX and the Cisco Unified CCX Editor web interface.
• Volume 2, Editor Step Reference, describes each individual step in the Cisco Unified CCX Editor palettes.
• Volume 3, Expression Language Reference, provides details on working with the Cisco Unified CCX Expression Editor
The information in all three volumes is included in the Cisco Unified CCX Step Editor online help. This means by searching in one location, the Cisco Unified CCX Step Editor help, you should be able to find any information contained in all three volumes.
This book is Volume 1 and it describes how to:
• Install the Cisco Unified CCX Editor
• Navigate the Cisco Unified CCX Editor interface
• Make use of key features of the Cisco Unified CCX development environment
• Create scripts that perform a wide variety of tasks
iCisco Unified Contact Center Express Getting Started with Scripts, Release 11.0(1)
Preface
Note For an overview of the Cisco Unified CCX, see the Cisco Unified Contact Center Express Administration Guide, which includes information about configuring the Cisco Unified CallManager, the Cisco Unified CCX Server, and other subsystems of the Cisco Unified CCX Engine.
AudienceThe Cisco Unified Contact Center Express Getting Started with Scripts, Release 11.0(1) is written for application developers who will use the Cisco Unified CCX Editor to create and modify Cisco Unified CCX scripts. This guide targets developers who have the IP telephony knowledge required to create useful applications and who also have some background in programming or scripting. While readers of this guide do not need experience or training with Java, such training is useful to fully utilize the capabilities of the Cisco Unified CCX system.
OrganizationThis guide contains the following chapters.
Chapter Title Description
Chapter 1 Installing and Starting the Cisco Unified CCX Editor
Describes how to install and start the Cisco Unified CCX Editor on your computer.
Chapter 2 How To Use the Cisco Unified CCX Editor
Provides a high-level overview of the Cisco Unified CCX Editor and its components.
Chapter 3 Using Expressions and the Expression Editor
Describes how to use the Expression Editor.
Chapter 4 Localizing Cisco Unified CCX Scripts
Describes how to localize your Cisco Unified CCX scripts to use prompts in the language your customers use.
iiCisco Unified Contact Center Express Getting Started with Scripts, Release 11.0(1)

Preface
Chapter 5 Advanced Scripting Techniques
Describes advanced features of the Cisco Unified CCX development environment.
Chapter 6 Designing a Basic Script Uses the sample script SNU.aef to demonstrate how to use Cisco Unified CCX Editor steps to design a basic script.
Chapter 7 The Basic Cisco Unified CCX Script
Uses the sample script icd.aef to demonstrate how to use Cisco Unified CCX Editor steps to provide an Cisco Unified CCX solution to queue calls and connect them to available resources.
Chapter 8 Working with Multiple Contacts
Uses the sample script broadcast.aef to demonstrate how to use Cisco Unified CCX Editor steps to design scripts that handle multiple contacts within the same script.
This chapter also provides a good example of handling outbound calls and using subflows.
Chapter 9 Designing a Web-Enabled Script
Demonstrates how to use Cisco Unified CCX Editor steps to create scripts that take advantage of web server applications.
Chapter 10 Designing a Web-Enabled Client Script
Demonstrates how to use Cisco Unified CCX Editor steps to create a web-enabled client script.
Chapter 11 Designing a Database Script
Demonstrates how to use Cisco Unified CCX Editor steps to design a simple script that automatically provides callers with access to information in a database.
Chapter Title Description
iiiCisco Unified Contact Center Express Getting Started with Scripts, Release 11.0(1)

Preface
Chapter 12 Designing a Cisco Unified IP IVR Script
Uses the sample script aa.aef to demonstrate how to use Cisco Unified CCX Editor steps to design a basic IVR script.
This chapter also provides examples demonstrating how to design a multi-lingual and/or media-neutral script.
Chapter 13 Designing Contact-Neutral Scripts
Demonstrates how to use Cisco Unified CCX Editor steps to create a contact-neutral script that accepts either a phone call or an HTTP request as the triggering contact.
Chapter 14 Designing a Script with Text-To-Speech (TTS)
Uses the sample script TTSsample.aef to demonstrate how to use Cisco Unified CCX Editor steps to design a script that takes advantage of TTS capability.
Chapter 15 Designing Cisco Unified CCX VoiceXML Applications
Contains information about Cisco Unified CCX support for VoiceXML standards and other information useful in developing applications that take advantage of VoiceXML-enabled web pages.
Chapter 16 Designing Scripts for Cisco Unified IP IVR
Demonstrates how to use Cisco Unified CCX Editor steps in the Cisco Unified ICME palette to design VRU scripts for use with Cisco Unified IP IVR.
Chapter Title Description
ivCisco Unified Contact Center Express Getting Started with Scripts, Release 11.0(1)

Preface
Related DocumentationSee the following documents for further information about Cisco Unified CCX applications and products:
• Cisco Unified Contact Center Express Scripting and Development Series: Volume 2, Editor Step Reference
• Cisco Unfied Contact Center Express Scripting and Development Series: Volume 3, Expression Language Reference
• Cisco Unified Contact Center Express Administration Guide
Chapter 17 Designing Cisco Unified CCX Scripts
Demonstrates how to use Cisco Unified CCX Editor steps in the ACD palette to design scripts for use with Cisco Unified CCX.
This chapter also demonstrates how to use Session steps for session management and how to use a default script.
Chapter 18 Designing Cisco Unified Gateway Scripts
Describes how to design Cisco Unified CCX scripts to interact with Cisco Unified ICME scripts in an Cisco Unified CCX system integrated with a Cisco Unified ICME system through the Cisco Unified Gateway.
Chapter 19 Uninstallation of Unified CCX Editor
Describes the steps to uninstall the Cisco Unified CCX Editor.
Appendix A VoiceXML Implementation for Cisco Voice Browser
Provides VoiceXML information for implementing the Voice Browser feature of the Cisco Unified CCX Engine.
Appendix B A Sample VoiceXML Log File
A sample voiceXML log file with SS_VB debug turned on.
Chapter Title Description
vCisco Unified Contact Center Express Getting Started with Scripts, Release 11.0(1)

Preface
• Cisco Unified Contact Center Express Installation and Upgrade Guide
• Cisco Unified Contact Center Express Servicing and Troubleshooting Guide
• Cisco Unified Communications Manager Administration Guide
• Cisco Unified Communications Manager Extended Services Administrator Guide
• Cisco Unified Communications Manager System Guide
• Cisco Unified Contact Center Express Design Guide
GlossaryFor the complete list of terms used in Cisco Unified CCX and Cisco Unified IP IVR, see
http://www.cisco.com/en/US/products/sw/custcosw/ps1846/prod_technical_reference_list.html
viCisco Unified Contact Center Express Getting Started with Scripts, Release 11.0(1)

Preface
ConventionsThis manual uses the following conventions.
Convention Description
boldface font Boldface font is used to indicate commands, such as user entries, keys, buttons, and folder and submenu names. For example:
• Choose Edit > Find.
• Click Finish.
italic font Italic font is used to indicate the following:
• To introduce a new term. Example: A skill group is a collection of agents who share similar skills.
• For emphasis. Example: Do not use the numerical naming convention.
• An argument for which you must supply values. Example: IF (condition, true-value, false-value)
• A book title. Example: See the Cisco Unified Contact Center Express Installation Guide.
window font Window font, such as Courier, is used for the following:
• Text as it appears in code or information that the system displays. Example: <html><title>Cisco Systems,Inc. </title></html>
• File names. Example: tserver.properties.
• Directory paths. Example: C:\Program Files\Adobe
string Nonquoted sets of characters (strings) appear in regular font. Do not use quotation marks around a string or the string will include the quotation marks.
[ ] Optional elements appear in square brackets.
viiCisco Unified Contact Center Express Getting Started with Scripts, Release 11.0(1)

Preface
Obtaining Documentation, Obtaining Support, and Security Guidelines
For information on obtaining documentation, obtaining support, security guidelines, and also recommended aliases and general Cisco documents, see the monthly What’s New in Cisco Product Documentation, which also lists all new and revised Cisco technical documentation, at:
http://www.cisco.com/en/US/docs/general/whatsnew/whatsnew.html
Documentation FeedbackYou can provide comments about this document by sending email to the following address:
We appreciate your comments.
{ x | y | z } Alternative keywords are grouped in braces and separated by vertical bars.
[ x | y | z ] Optional alternative keywords are grouped in brackets and separated by vertical bars.
< > Angle brackets are used to indicate the following:
• For arguments where the context does not allow italic, such as ASCII output.
• A character string that the user enters but that does not appear on the window such as a password.
^ The key labeled Control is represented in screen displays by the symbol ^. For example, the screen instruction to hold down the Control key while you press the D key appears as ^D.
Convention Description
viiiCisco Unified Contact Center Express Getting Started with Scripts, Release 11.0(1)

Preface
ixCisco Unified Contact Center Express Getting Started with Scripts, Release 11.0(1)

Preface
xCisco Unified Contact Center Express Getting Started with Scripts, Release 11.0(1)

Cisco Unified Contact Center Express Getting Sta
C H A P T E R 1
Installing and Starting the Cisco Unified CCX EditorThe Cisco Unified CCX Editor is a visual programming environment for creating, modifying, validating, and debugging telephony and multimedia application scripts in a Cisco Unified CCX system.
On installing the Cisco Unified CCX Editor:
• Using a web browser, you can download and install the Cisco Unified CCX Editor on any computer (not in the Cisco Unified CCX cluster) that can access the Cisco Unified CCX Administration web page.
This chapter includes the following topics:
• Starting the Cisco Unified CCX Editor, page 1-1
• Prerequisites for a Separate Installation, page 1-3
• Downloading the Cisco Unified CCX Editor for a Separate Installation, page 1-3
• Installing the Cisco Unified CCX Editor, page 1-4
Starting the Cisco Unified CCX EditorTo start the Cisco Unified CCX Editor, do the following:
1-1rted with Scripts, Release 11.0(1)

Chapter 1 Installing and Starting the Cisco Unified CCX Editor Starting the Cisco Unified CCX Editor
Procedure
Step 1 Select Start > Programs > Cisco Unified CCX Administration > Cisco Unified CCX Editor.
The Editor Login dialog box appears.
Step 2 Enter a valid Name, Password, and IP address or host name of a node in the Cisco Unified CCX cluster and click Logon.
The Name and Password value for the Cisco Unified CCX Editor must be the same as your Cisco Unified CCX Administration Name and Password value.
Note • Only users with Administrative rights to the machine on which the Cisco Unified CCX Editor is installed are able to launch the Cisco Unified CCX Editor. Non-administrator users are not able to launch the Editor. This is true for Windows XP, Windows 7 32-bit Ultimate, and Windows 7 64-bit systems.
• After you download and launch the Cisco Unified CCX Editor for the first time, you can select the Log On Anonymously button to run the Cisco Unified CCX Editor without specifying a Name and Password. However, in Anonymous mode, you cannot save scripts to the Repository.
The Cisco Unified CCX Server information can be any IP address or hostname of a valid node in the Cisco Unified CCX cluster. For a local Cisco Unified CCX Editor running in a Cisco Unified CCX cluster, this field is automatically pre-filled with the local host IP address. For a remote Cisco Unified CCX Editor, you must manually enter the Cisco Unified CCX Server ID.
Caution You must supply a Cisco Unified CCX Server IP address the first time you launch the Cisco Unified CCX Editor so that the Cisco Unified CCX Editor can download additional information from the Cisco Unified CCX Cluster that it needs to become fully functional. In subsequent launches, the Cisco Unified CCX Editor uses the IP address to properly authenticate the user and download updated configuration information. If no IP address is supplied, or if the Cisco Unified CCX Editor is unable to connect to the cluster, the Cisco Unified CCX Editor starts up with the last known IP address and configuration.
First, a window displays the logon progress; then the Cisco Unified CCX Editor window appears.
1-2Cisco Unified Contact Center Express Getting Started with Scripts, Release 11.0(1)

Chapter 1 Installing and Starting the Cisco Unified CCX EditorPrerequisites for a Separate Installation
Prerequisites for a Separate Installation To install the Cisco Unified CCX Editor independently of a Cisco Unified CCX server, you need to install one of the following operating systems:
• Windows XP Professional
• Windows 7 32-bit Ultimate
• Windows 7 64-bit
Note You must use Internet Explorer version 9.x or later as your web browser for the Cisco Unified CCX family of products.
Downloading the Cisco Unified CCX Editor for a Separate Installation
To download the Cisco Unified CCX Editor from the Cisco Unified CCX Administration web interface onto a computer not included in the Cisco Unified CCX cluster, do the following:
Procedure
Step 1 From the Cisco Unified CCX Administration menu bar, choose Tools > Plug-ins.
The Plug-ins web page appears.
Note For instructions on accessing the Cisco Unified CCX Administration web interface, see the Cisco Unified Contact Center Express Administration Guide.
Step 2 Click the Cisco Unified CCX Editor hyperlink.
The Download Cisco Unified CCX Editor web page appears.
Step 3 Click Download and execute the Cisco Unified CCX Editor installer.
Depending on your browser and its configuration, either a File Download dialog box or a Save As dialog box appears.
1-3Cisco Unified Contact Center Express Getting Started with Scripts, Release 11.0(1)
Chapter 1 Installing and Starting the Cisco Unified CCX Editor Installing the Cisco Unified CCX Editor
Step 4 Using either the File Download dialog box or the Save As dialog box, choose a directory in which to store the executable file that contains the Cisco Unified CCX Editor.
Step 5 Click Save.
The Cisco Unified CCX Editor executable file begins downloading.
When the file has completely downloaded, you are ready to install the Cisco Unified CCX Editor.
Follow the procedure in the “Installing the Cisco Unified CCX Editor” section on page 1-4.
Installing the Cisco Unified CCX EditorTo install the Cisco Unified CCX Editor on your computer, do the following:
Procedure
Step 1 In the directory where you stored the downloaded Cisco Unified CCX Editor executable file, double-click Cisco Unified CCX Editor.exe.
The default directory for Windows XP is C:\Program Files\wfavvid_1001 and for, Windows 7 is C:\Program Files (x86)\wfavvid_1001.
The InstallAnywhere Wizard appears and begins extracting files for the installation. (This process may take a few minutes.)
Step 2 At the Welcome prompt, click Next.
The Software License Agreements dialog box appears.
Step 3 Read the software license agreements, then click Yes.
The Choose Destination Location dialog box appears.
Step 4 Perform one of the following actions:
• Click Next to accept the default directory option, C:\Program Files\wfavvid_1001 for Windows XP and C:\Program Files (x86)\wfavvid_1001 for Windows 7.
The Select Components dialog box appears.
1-4Cisco Unified Contact Center Express Getting Started with Scripts, Release 11.0(1)

Chapter 1 Installing and Starting the Cisco Unified CCX EditorInstalling the Cisco Unified CCX Editor
• Perform the following procedure to choose a different destination:
– Click Browse.
The Choose Folder dialog box appears.
– Browse to the desired location, and then click OK.
The Choose Folder dialog box closes, and the destination appears in the Choose Destination Location dialog box.
– Click Next.
The Select Components dialog box appears.
Step 5 In the Select Components dialog box, make sure that Cisco Unified CCX Editor check box (the only option) is checked, and click Next.
The Select Program Folder dialog box appears.
Step 6 In the Select Program Folder dialog box, accept the default location to add program icons to the program folder, or take one of the following actions:
• Type the name of the new folder.
• From the list of folders, choose the folder in which you want to store the program icons.
Click Next.
The Start Copying Files dialog box appears.
Step 7 In the Start Copying Files dialog box, take one of the following actions:
• To change any of your previous choices, click Back, make the desired changes, and then return to the Start Copying Files dialog box and click Finish.
• If you accept all your choices, click Finish.
The InstallAnywhere Wizard closes, and the Cisco Unified CCX Editor is installed at the indicated destination.
Step 8 Restart the system.
Step 9 Start up Cisco Unified CCX Editor by doing the following:
a. Select Start > Programs > Cisco Unified CCX Administration > Cisco Unified CCX Editor.
The Editor Login dialog box appears.
1-5Cisco Unified Contact Center Express Getting Started with Scripts, Release 11.0(1)

Chapter 1 Installing and Starting the Cisco Unified CCX Editor Installing the Cisco Unified CCX Editor
b. Enter a valid Name, Password, and Cisco Unified CCX Server ID for a Cisco Unified CCX cluster and click Logon.
The Name and Password value for the Cisco Unified CCX Editor is the same your Cisco Unified CCX Administration Name and Password value.
Note You must start the Cisco Unified CCX Editor and Logon immediately after installation, while the system where it is installed can still reach the Cisco Unified CCX cluster from which it was downloaded. This step is necessary so that you can specify the IP address of the Cisco Unified CCX Server so that the Cisco Unified CCX Editor can download additional required information from the Cisco Unified CCX cluster. When you logon for the first time, you also must logon as a named user with a password. You should not attempt to logon anonymously for the first logon.
1-6Cisco Unified Contact Center Express Getting Started with Scripts, Release 11.0(1)
Cisco Unified Contact Center Express Getting Star
C H A P T E R 2
How To Use the Cisco Unified CCX EditorThe Cisco Unified CCX Editor (referred to in this documentation as the “Cisco Unified CCX Editor”) is a visual programming environment for creating telephony and multimedia application scripts. You can use the Cisco Unified CCX Editor on any computer that has access to the Cisco Unified CCX server.
This introduction to the Cisco Unified CCX Editor contains the following topics:
• About the Cisco Unified CCX Editor, page 2-2
• An Example Cisco Unified CCX Editor Window, page 2-2
• About the Cisco Unified CCX Editor Status Bar, page 2-5
• Menu Bar Function Descriptions, page 2-7
• Tool Bar Function Descriptions, page 2-16
• About the Cisco Unified CCX Editor Step Palettes, page 2-18
• How to Create and Customize a Cisco Unified CCX Editor Script, page 2-25
• Defining, Using, and Updating Script Variables, page 2-31
• Validating and Debugging Your Script, page 2-47
• How To Handle Basic Script Errors, page 2-52
• How and Why To Use the CRTP Protocol, page 2-55
• The Script Templates Installed with the Cisco Unified CCX Editor, page 2-62
• The Cisco Unified CCX Edition Script Web Repository, page 2-67
2-1ted with Scripts, Release 11.0(1)

Chapter 2 How To Use the Cisco Unified CCX Editor About the Cisco Unified CCX Editor
Within the Cisco Unified CCX Editor, you can also use the Cisco Unified CCX Expression Editor to enter or modify expressions in a Cisco Unified CCX script. For instructions on how to use the Cisco Unified CCX Expression Editor, see Using Expressions and the Expression Editor.
About the Cisco Unified CCX EditorThe Cisco Cisco Unified CCX Editor enables you to develop a wide variety of interactive scripts.
The Cisco Unified CCX Editor simplifies script development by providing blocks of contact-processing logic in easy-to-use Java-based steps. Each step has its own unique capabilities, from simple increment to generating and playing out prompts, obtaining user input, queueing calls, or performing complex database operations.
Although the steps are written in Java, you do not need to understand Java programming to build a Cisco Unified CCX script. You can assemble a script by dragging step icons from a palette on the left pane of the workspace to the design area on the right pane of the workspace.
The Cisco Unified CCX Editor supplies the code required to connect the steps; you provide the variable definitions and other parameters. You can validate and debug the completed script directly in the Cisco Unified CCX Editor.
Note • The support for Remote Monitoring feature has been ended from Unified CCX 11.0(1) release onward. While upgrading to Unified CCX 11.0, if the Remote Monitoring feature was enabled, it will not function as before after the upgrade is complete.
• If there was any custom script created earlier with the RMON steps, the script will ignore the RMON related steps and continue with the next steps of the script after the upgrade is complete.
An Example Cisco Unified CCX Editor WindowThis section includes the following topics:
• Cisco Unified CCX Editor Window with a Sample Script, page 2-4
2-2Cisco Unified Contact Center Express Getting Started with Scripts, Release 11.0(1)

Chapter 2 How To Use the Cisco Unified CCX EditorAn Example Cisco Unified CCX Editor Window
• About the Cisco Unified CCX Editor Status Bar, page 2-5
• Menu Bar Function Descriptions, page 2-7
• Tool Bar Function Descriptions, page 2-16
See also:
• About the Cisco Unified CCX Editor Step Palettes, page 2-18
• How to Create and Customize a Cisco Unified CCX Editor Script, page 2-25
• Defining, Using, and Updating Script Variables, page 2-31
• Validating and Debugging Your Script, page 2-47
2-3Cisco Unified Contact Center Express Getting Started with Scripts, Release 11.0(1)

Chapter 2 How To Use the Cisco Unified CCX Editor An Example Cisco Unified CCX Editor Window
Cisco Unified CCX Editor Window with a Sample Script
Figure 2-1 Cisco Unified CCX Editor Window
2-4Cisco Unified Contact Center Express Getting Started with Scripts, Release 11.0(1)

Chapter 2 How To Use the Cisco Unified CCX EditorAbout the Cisco Unified CCX Editor Status Bar
The preceding example is of a Cisco Unified CCX Editor window with an example Cisco Unified CCX script opened in it. The following table describes the four panes of the Cisco Unified CCX Editor window.
1 Palette pane Use the Palette pane to choose the steps you need to create your script.
2 Design pane Use the Design pane to create your script.
3 Message pane Use the Message pane to view messages when you are validating or debugging a script.
4 Variable pane Use the Variable pane to create, modify, and view variables for your script.
About the Cisco Unified CCX Editor Status BarFigure 2-2 is an example of the Cisco Unified CCX Editor status bar.
Figure 2-2 Cisco Unified CCX Editor Status Bar
• Step number: The first section displays the step number currently selected (step/connection) out of how many steps defined in the script. Step numbers correspond to the order in which they were added to the script and as such do not increment necessarily when you scroll down the list of steps in the script.
• Line number: The second section displays the line number of the currently selected step or connection out of how many lines are currently displayed in the script. Expanding a step will increase the total number of lines being displayed.
• Script status: The third section displays the script status. The snapshot above shows nothing as the script was not modified.
2-5Cisco Unified Contact Center Express Getting Started with Scripts, Release 11.0(1)

Chapter 2 How To Use the Cisco Unified CCX Editor About the Cisco Unified CCX Editor Status Bar
Script Status Image Indicates
The script has been modified and needs to be saved.
The script is being debugged.
Script debugging is temporarily paused.
• Cluster status: The fourth section displays the cluster status. The text displayed is the name of the cluster to which the Editor is connected or Unknown if the Editor was started without information about a cluster.
Cluster Status Image Indicates
The Editor is connected to a cluster allowing it to debug scripts.
The Editor is not connected to a cluster because all its engines are down so no debugging is possible.
The Editor was started without information about a cluster.
• User name: The fifth section displays information about the logged in user. The text displayed is the name of the user or Anonymous when the user logs into the Editor anonymously.
User Status IndicatesThe Editor user is logged in by name.
The Editor user is logged in anonymously.
2-6Cisco Unified Contact Center Express Getting Started with Scripts, Release 11.0(1)

Chapter 2 How To Use the Cisco Unified CCX EditorMenu Bar Function Descriptions
• Available memory: The sixth section displays a progress bar with the total available memory for the Editor and the amount of memory currently in use.
This is meant as a gauge for the user to identify when the Editor will have an out-of-memory condition because either too many scripts are opened or because the script being edited is too big. The progress bar changes to red when there is about 10 MB of memory left before reaching the out-of-memory condition.
• Button for freeing memory: The final section is a button that can be used or not to free up memory not yet recollected by the Java VM. You do not need to use this button since the Java Virtual Memory (JVM) automatically frees up memory when it can be freed.
See also:
• Menu Bar Function Descriptions, page 2-7
• Tool Bar Function Descriptions, page 2-16
Menu Bar Function DescriptionsThis section describes how to use the menu bar options in the Cisco Unified CCX Editor window:
• The File Menu, page 2-8
• The Edit Menu, page 2-9
• The Tools Menu, page 2-10
• The Debug Menu, page 2-10
• The Window Menu, page 2-11
• The Settings Menu, page 2-11
• The Help Menu, page 2-15
2-7Cisco Unified Contact Center Express Getting Started with Scripts, Release 11.0(1)

Chapter 2 How To Use the Cisco Unified CCX Editor Menu Bar Function Descriptions
The File MenuUse File menu options to perform a variety of tasks with files.
Table 2-1 File Menu Options
Option Description
New Opens the script template window from which you select a template and click OK. Then creates a new script based on the selected template and places a Start step and End step (and other steps, depending on the template, in the Design pane.
(The Start step is the first step of every new script and the End step is the concluding step in a script.)
Open Displays a standard Open window that allows you to choose and open an existing script (.aef) file.
Note The default location for user scripts are: C:\ProgramFiles\wfavvid_1001\Scripts\User\Default for Windows XP and C:\ProgramFiles(x86)\wfavvid_1001\Scripts\User \Default for Windows 7. When connected to a cluster, this option allows you to browse all scripts uploaded to the cluster's script repository and load one directly from there.
Use the Open option to access and modify an existing user script.
Note Never use File > Open to load a Cisco Unified CCX Cisco-supplied system script. Doing so will only work on servers and not remote editors and overwriting that file corrupts the installation making the script not loadable, as the system responds with a license violation if a system script is modified. The only course of action after having corrupted an installation is to use the recover option of the Cisco Unified CCX installer to get the original system script re-installed properly.
Close Closes the current script file.
2-8Cisco Unified Contact Center Express Getting Started with Scripts, Release 11.0(1)

Chapter 2 How To Use the Cisco Unified CCX EditorMenu Bar Function Descriptions
The Edit MenuUse Edit menu options to perform various editing tasks.
Table 2-2 Edit Menu Options
Option Description
Undo Undoes last action.
Redo Redoes last action.
Cut Cuts selected items.
Copy Copies selected items.
Paste Pastes selected items.
Delete Deletes selected items.
Find Displays a window you can use to search for specific text.
Find Label Displays a window you can use to search for a specific label.
Find Next Searches for another occurrence of text entered in the Find window.
Expand All Displays all branches in the steps in the Design pane.
Save Saves the current script file.
Save As Opens a standard Save As window that you can use to save your current script by entering a filename with an .aef extension.
Print Prints the current file.
Properties Provides two tabs:
• General—Describes the type, location, and size of the opened file.
• Summary—Provides fields you can use to enter descriptive information about the opened file.
Table 2-1 File Menu Options (continued)
Option Description
2-9Cisco Unified Contact Center Express Getting Started with Scripts, Release 11.0(1)
Chapter 2 How To Use the Cisco Unified CCX Editor Menu Bar Function Descriptions
The Tools MenuThe only Tools menu option is Validate.
Use the Validate menu option to check that your script sequence and your step properties usage conform to the general syntax that the Cisco Unified CCX Engine requires.
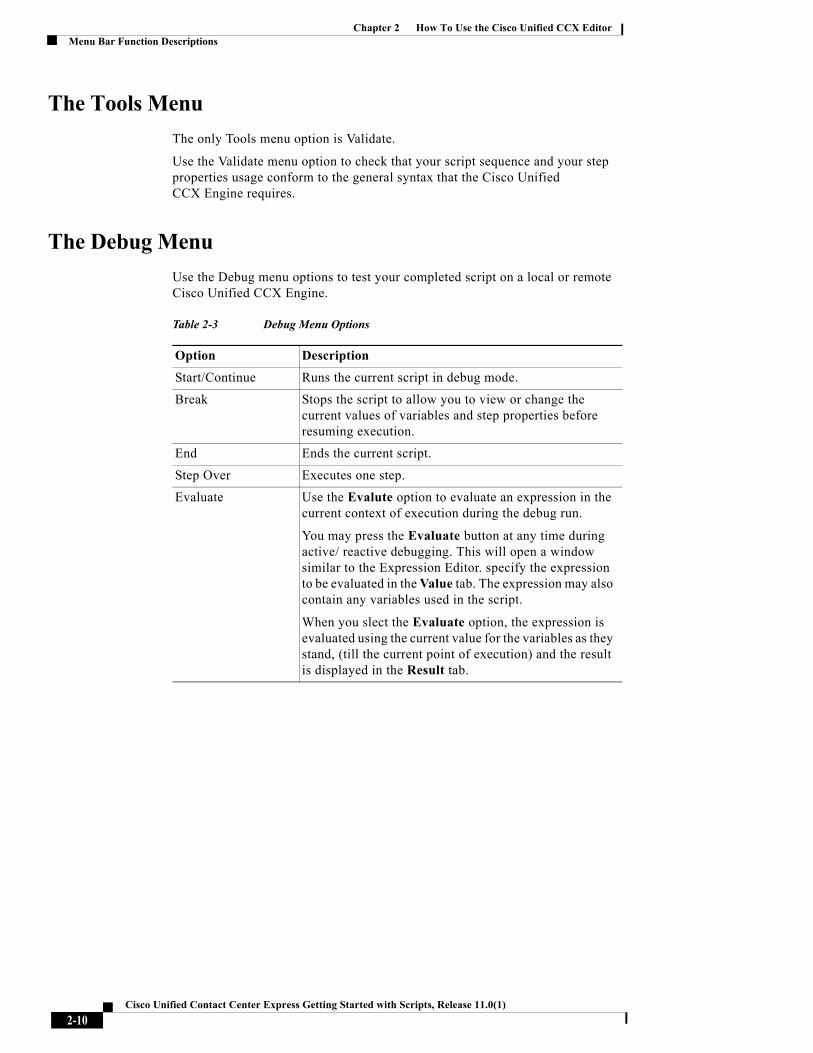
The Debug MenuUse the Debug menu options to test your completed script on a local or remote Cisco Unified CCX Engine.
Table 2-3 Debug Menu Options
Option Description
Start/Continue Runs the current script in debug mode.
Break Stops the script to allow you to view or change the current values of variables and step properties before resuming execution.
End Ends the current script.
Step Over Executes one step.
Evaluate Use the Evalute option to evaluate an expression in the current context of execution during the debug run.
You may press the Evaluate button at any time during active/ reactive debugging. This will open a window similar to the Expression Editor. specify the expression to be evaluated in the Value tab. The expression may also contain any variables used in the script.
When you slect the Evaluate option, the expression is evaluated using the current value for the variables as they stand, (till the current point of execution) and the result is displayed in the Result tab.
2-10Cisco Unified Contact Center Express Getting Started with Scripts, Release 11.0(1)

Chapter 2 How To Use the Cisco Unified CCX EditorMenu Bar Function Descriptions
The Window MenuUse the Window menu options to control how multiple files appear in the Design pane.
Table 2-4 Window Menu Options
Option Description
Cascade Displays files as stacked windows.
Tile Horizontally Displays files as equal windows tiled horizontally.
Tile Vertically Displays files as equal windows tiled vertically.
The Settings MenuUse the Settings menu options to customize the Cisco Unified CCX Editor and to define expanded call-context variables.
Insert/Remove Breakpoint
Inserts a breakpoint at the currently selected step. This insertion causes the script to halt whenever it runs in debug mode, but it does not affect the run-time version of the script.
Enable/Disable Breakpoint
Toggles the selected breakpoint on or off.
Clear All Breakpoints
Removes all breakpoints from the script.
Reactive Script Prompts for the name and timeout setting of the event-triggered script to be debugged.
Pending Response Displays a list of all reactive scripts that have been registered but not yet started. (This allows you to see what reactive debugging requests are still pending.)
Table 2-3 Debug Menu Options (continued)
Option Description
2-11Cisco Unified Contact Center Express Getting Started with Scripts, Release 11.0(1)

Chapter 2 How To Use the Cisco Unified CCX Editor Menu Bar Function Descriptions
Table 2-5 Settings Menu — Editor Options
Editor Options Description
View tab Formatting Options
Allow you to format Cisco Unified CCX script Annotations, Labels, Names, Descriptions, and Connections according to your color choice, italics, bolding, and or underlining.
2-12Cisco Unified Contact Center Express Getting Started with Scripts, Release 11.0(1)

Chapter 2 How To Use the Cisco Unified CCX EditorMenu Bar Function Descriptions
General options tab
Confirm conversion at Open
Whenever you open a Cisco Unified CCX script created in a lower version of the Cisco Unified CCX Editor than the one currently open, the script is automatically converted to the current Cisco Unified CCX version and opens successfully.
Selecting this option enables the display of a confirmation message of that conversion.
Auto-maximize frame at Open
Selecting this option means that the Cisco Unified CCX Editor will always open in a maximized (full) window.
Recently used file list
Enables you to select the number of most recently opened Editor files that you want listed in the File menu display.
Double-click to open customizers
Enables the display of the customizer window for any step when you double click on it.
Otherwise, you need to right click on the desired step and then select the Properties option from the pop-up menu list.
Table 2-5 Settings Menu — Editor Options (continued)
Editor Options Description
2-13Cisco Unified Contact Center Express Getting Started with Scripts, Release 11.0(1)

Chapter 2 How To Use the Cisco Unified CCX Editor Menu Bar Function Descriptions
Palettes tab
Palette selection boxes and buttons
Allow you to customize which steps appear in the Cisco Unified CCX Editor palettes.
Beginning with CRS 4.0, the CRS Editor no longer enforces CRS licensing; instead, the Cisco CRS Engine enforces licensing at runtime. This means that you can add any step to any script regardless of what licenses you have purchased. However, if a script contains unlicensed steps, the Cisco CRS Engine will reject the script at runtime with a license violation.
The Synchronize License button can let you hide steps that you have not purchased. The Synchronize License button is available to communicate with the Cisco Unified CCX cluster and automatically show or hide palette steps according to the currently installed licenses.
If you request license synchronization when the Cisco Unified CCX Editor cannot access the latest license on the cluster or when the Cisco Unified CCX server is down, then the Cisco Unified CCX Editor will synchronize the licensed Cisco Unified CCX Editor palettes with the ones listed in the local license on your machine, if it exists.
Note The Cisco Unified CCX editor has to synchronize the license on the user's local machine with its license on the server at least once in order for it to copy that license from the server and store it on the user's local disk.
Table 2-5 Settings Menu — Editor Options (continued)
Editor Options Description
2-14Cisco Unified Contact Center Express Getting Started with Scripts, Release 11.0(1)

Chapter 2 How To Use the Cisco Unified CCX EditorMenu Bar Function Descriptions
Table 2-6 Settings Menu — Expanded Call Variables
Menu Selection Description
Expanded Call Variables
Enables you to define the expanded call variables used by the Get Enterprise Call Info and Set Enterprise Call Info steps.
Note If you are using Cisco Unified IP IVR, you must define expanded call variables before using them in the Enterprise Call Info steps.
The Help MenuThe only Help menu option is Help.
Use the Help menu option to search the contents of the Help file.
2-15Cisco Unified Contact Center Express Getting Started with Scripts, Release 11.0(1)

Chapter 2 How To Use the Cisco Unified CCX Editor Tool Bar Function Descriptions
Tool Bar Function DescriptionsThe Cisco Unified CCX Editor tool bar provides icons you click to choose some of the same Cisco Unified CCX Editor options that you access from the menu bar. Depending on the work you are doing in a script, some of these icons are greyed out, not allowing those specific options.
Figure 2-3 Cisco Unified CCX Editor Toolbar
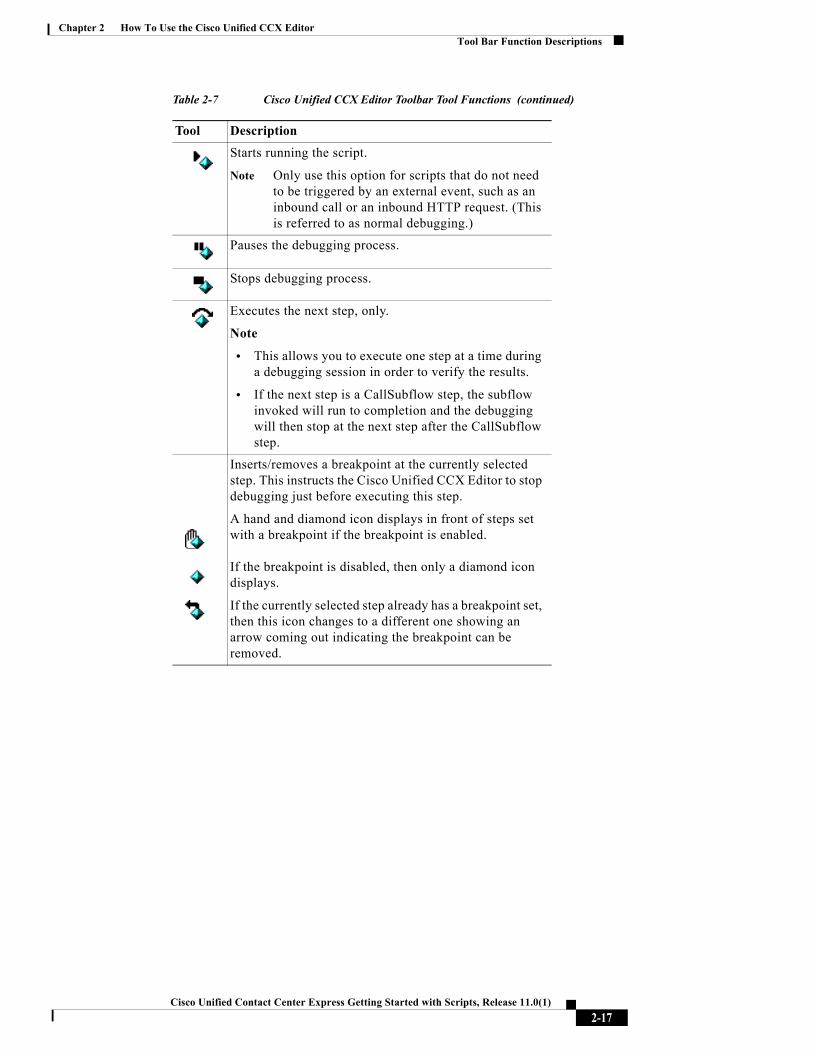
Table 2-7 Cisco Unified CCX Editor Toolbar Tool Functions
Tool Description
Creates a new script.
Opens a script.
Saves a script.
Prints selected file.
Cuts selected item.
Copies selected item.
Pastes selected item.
Undoes previous command.
Redoes previous command.
2-16Cisco Unified Contact Center Express Getting Started with Scripts, Release 11.0(1)
Chapter 2 How To Use the Cisco Unified CCX EditorTool Bar Function Descriptions
Starts running the script.
Note Only use this option for scripts that do not need to be triggered by an external event, such as an inbound call or an inbound HTTP request. (This is referred to as normal debugging.)
Pauses the debugging process.
Stops debugging process.
Executes the next step, only.
Note
• This allows you to execute one step at a time during a debugging session in order to verify the results.
• If the next step is a CallSubflow step, the subflow invoked will run to completion and the debugging will then stop at the next step after the CallSubflow step.
Inserts/removes a breakpoint at the currently selected step. This instructs the Cisco Unified CCX Editor to stop debugging just before executing this step.
A hand and diamond icon displays in front of steps set with a breakpoint if the breakpoint is enabled. If the breakpoint is disabled, then only a diamond icon displays.
If the currently selected step already has a breakpoint set, then this icon changes to a different one showing an arrow coming out indicating the breakpoint can be removed.
Table 2-7 Cisco Unified CCX Editor Toolbar Tool Functions (continued)
Tool Description
2-17Cisco Unified Contact Center Express Getting Started with Scripts, Release 11.0(1)

Chapter 2 How To Use the Cisco Unified CCX Editor About the Cisco Unified CCX Editor Step Palettes
About the Cisco Unified CCX Editor Step PalettesThe Palette pane of the Cisco Unified CCX Editor contains all the steps available for developing scripts. The steps are organized into general categories in a tree hierarchy.
Figure 2-4 Cisco Unified CCX Editor Palette Pane
This section contains the following topics:
• The Editor Palettes Available in Each Cisco Unified CCX Product, page 2-19
• The Steps in Each Cisco Unified CCX Editor Palette
Enables/disables a breakpoint on a step.
Click the diamond icon to enable a breakpoint.
Click the hand with the diamond icon to disable a breakpoint.
Clears all breakpoints in debugging process
Table 2-7 Cisco Unified CCX Editor Toolbar Tool Functions (continued)
Tool Description
2-18Cisco Unified Contact Center Express Getting Started with Scripts, Release 11.0(1)

Chapter 2 How To Use the Cisco Unified CCX EditorAbout the Cisco Unified CCX Editor Step Palettes
• How To Use the Cisco Unified CCX Editor Palettes, page 2-24
• How to Create and Customize a Cisco Unified CCX Editor Script, page 2-25
The Editor Palettes Available in Each Cisco Unified CCX Product
Table 2-8 lists the Cisco Unified CCX Editor step palettes available for each license option.
Note All the palettes listed in the following table are displayed in the Cisco Unified CCX Editor by default. However, the Cisco Unified CCX Engine enforces licensing at run time; if a script uses a step for which your system is not licensed, the Cisco Unified CCX Engine prevents the script from being loaded.
Table 2-8 Step Palette Availability with Unified CCX License Options
Cisco Unified IP IVR
Cisco Unified CCX Standard
Cisco Unified CCX Enhanced
Cisco Unified CCX Premium
General1 X X X XSession X X X XContact X X X XCall Contact X X X XEmail Contact
X X
HTTP Contact
X X
Media 2 X X X XUser X X X XPrompt3 X X X XGrammar X X X X
2-19Cisco Unified Contact Center Express Getting Started with Scripts, Release 11.0(1)

Chapter 2 How To Use the Cisco Unified CCX Editor About the Cisco Unified CCX Editor Step Palettes
Doc X X X XDB X XACD X4 X5 XICM XJava6 X X X
1. The ‘Get Reporting Statistic’ step is only available with the Cisco Unified CCX packages.
2. The ‘Voice Browser’ step is only available with the Cisco Unified IP IVR or Cisco Unified CCX Premium packages.
3. The ‘Create TTS Prompt’ step is only available with the Cisco Unified IP IVR or Cisco Unified CCX Premium packages.
4. The ‘Set Priority,’ and ‘CreateCSQSpokenNamePromptStep’ steps are not available with Cisco Unified CCX Standard
5. The ‘Set Priority,’ and ‘CreateCSQSpokenNamePromptStep’ steps are only available with Cisco Unified CCX Enhanced or Cisco Unified CCX Premium.
6. When the step in the Java palette is enabled, the Java functionality of the expression language is also enabled.
Table 2-8 Step Palette Availability with Unified CCX License Options (continued)
Cisco Unified IP IVR
Cisco Unified CCX Standard
Cisco Unified CCX Enhanced
Cisco Unified CCX Premium
2-20Cisco Unified Contact Center Express Getting Started with Scripts, Release 11.0(1)

Chapter 2 How To Use the Cisco Unified CCX EditorAbout the Cisco Unified CCX Editor Step Palettes
The Steps in Each Cisco Unified CCX Editor PaletteTable 2-9 lists the steps in each Cisco Unified CCX Editor palette.
Table 2-9 The Cisco Unified CCX Editor Palettes
Palette StepsGeneral
Session
Contact
2-21Cisco Unified Contact Center Express Getting Started with Scripts, Release 11.0(1)

Chapter 2 How To Use the Cisco Unified CCX Editor About the Cisco Unified CCX Editor Step Palettes
Call Contact
Email Contact
HTTP Contact
Media
Table 2-9 The Cisco Unified CCX Editor Palettes (continued)
Palette Steps
2-22Cisco Unified Contact Center Express Getting Started with Scripts, Release 11.0(1)

Chapter 2 How To Use the Cisco Unified CCX EditorAbout the Cisco Unified CCX Editor Step Palettes
User
Prompt
Grammar
Document
Database
Table 2-9 The Cisco Unified CCX Editor Palettes (continued)
Palette Steps
2-23Cisco Unified Contact Center Express Getting Started with Scripts, Release 11.0(1)

Chapter 2 How To Use the Cisco Unified CCX Editor About the Cisco Unified CCX Editor Step Palettes
Note For complete descriptions of the steps in every Cisco Unified CCX Editor palette, see the Cisco Unified Contact Center Express Scripting and Development Series: Volume 2, Editor Step Reference Guide.
How To Use the Cisco Unified CCX Editor Palettes • To display the contents of a palette:
Click the plus sign (+) to the left of the palette icon in the Palette pane tree.
• To create your script: Drag the steps you want from the Palette pane and drop them, in their desired order, into the Design pane.
ACD
ICM
Java
Table 2-9 The Cisco Unified CCX Editor Palettes (continued)
Palette Steps
2-24Cisco Unified Contact Center Express Getting Started with Scripts, Release 11.0(1)

Chapter 2 How To Use the Cisco Unified CCX EditorHow to Create and Customize a Cisco Unified CCX Editor Script
Each step performs a specific function and creates a portion of the underlying programming. You can customize all of the steps once you have placed them in the Design pane.
Your cursor displays the international prohibited sign until you move a step into a location that the Cisco Unified CCX Editor allows. In addition, the step or branch under which the step would be inserted is also highlighted.
Here are some tips about dragging steps:
• Before you drag a step to the Design pane, close any open customizer window(s). (If you try to drag a step to the Design pane when a customizer window is open, the Design pane does not accept the step.)
• While dragging a step, move the cursor close to any edge of the script window to scroll the script in that direction in order to drop the step in the desired location.
• While dragging a step, the collapsed steps do not immediately expand. To expand a collapsed step, move the cursor over the collapsed step for two seconds; the step or connection then expands.
Note Custom steps are not supported in Cisco Unified CCX.
How to Create and Customize a Cisco Unified CCX Editor Script
This section contains the following topics:
• Creating a Script, page 2-25
• Customizing a Step, page 2-28
Creating a Script • To begin a new script, select the blank script button in the Cisco Unified
CCX Editor tool bar. The blank script template opens in the Design pane with the Start and End steps providing you with the starting and end points of your script.
2-25Cisco Unified Contact Center Express Getting Started with Scripts, Release 11.0(1)
Chapter 2 How To Use the Cisco Unified CCX Editor How to Create and Customize a Cisco Unified CCX Editor Script
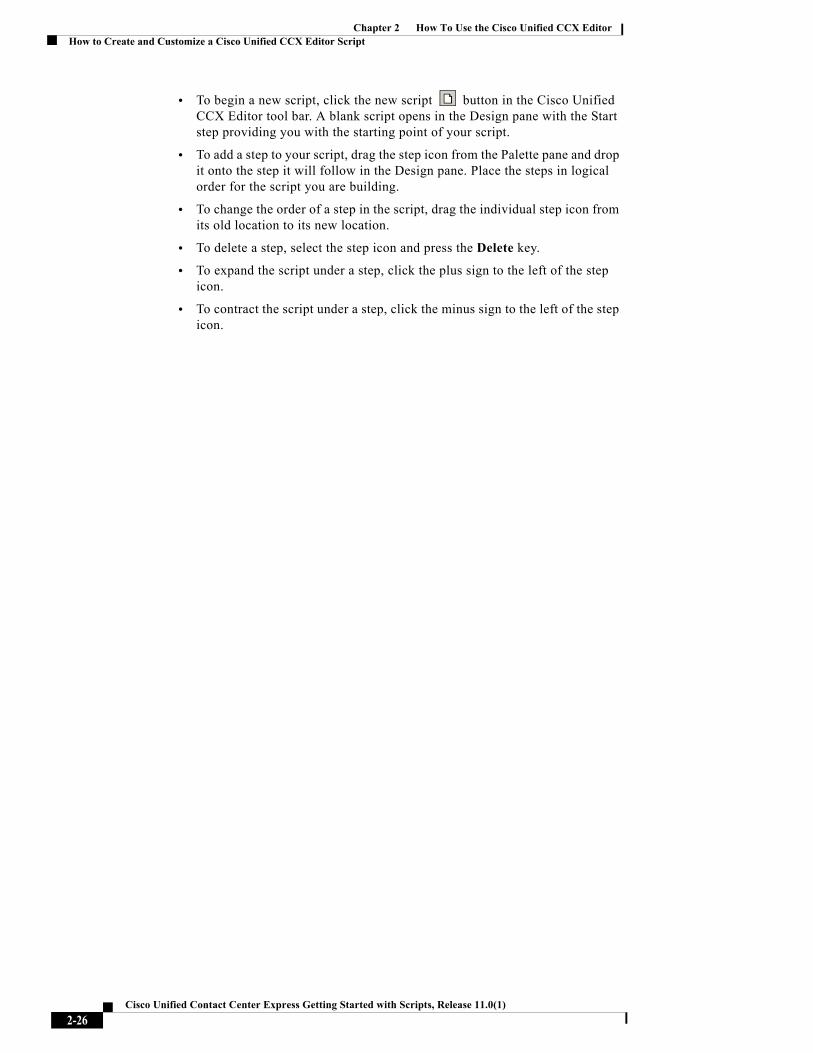
• To begin a new script, click the new script button in the Cisco Unified CCX Editor tool bar. A blank script opens in the Design pane with the Start step providing you with the starting point of your script.
• To add a step to your script, drag the step icon from the Palette pane and drop it onto the step it will follow in the Design pane. Place the steps in logical order for the script you are building.
• To change the order of a step in the script, drag the individual step icon from its old location to its new location.
• To delete a step, select the step icon and press the Delete key.
• To expand the script under a step, click the plus sign to the left of the step icon.
• To contract the script under a step, click the minus sign to the left of the step icon.
2-26Cisco Unified Contact Center Express Getting Started with Scripts, Release 11.0(1)

Chapter 2 How To Use the Cisco Unified CCX EditorHow to Create and Customize a Cisco Unified CCX Editor Script
Figure 2-5 shows an example of how a script displays in the Cisco Unified CCX Editor Design pane.
Figure 2-5 Script Example in the Design Pane
Many steps have output branches under which you add steps to provide desired script logic based on the exit condition of the step.
For example, in Figure 2-5, the Place Call step shown has six output branches:
• Successful
• NoAnswer
2-27Cisco Unified Contact Center Express Getting Started with Scripts, Release 11.0(1)

Chapter 2 How To Use the Cisco Unified CCX Editor How to Create and Customize a Cisco Unified CCX Editor Script
• Busy
• Invalid
• NoResource
• Unsuccessful
Output branches often contain steps and other output branches. In Figure 2-5, the Successful output branch contains three steps below it.
At run time, each script follows a hierarchical sequence, as indicated by the vertical lines connecting steps.
In Figure 2-5:
• If the script reaches the NoAnswer or Busy output branch of the Place Call step, it will fall through to the End step.
• If the script reaches the Invalid, NoResource, or Unsuccessful branch of the Place Call step, it will fall through to the next step in the flow, which—in this example—is the Terminate step.
Customizing a StepYou can customize all of the steps in the Cisco Unified CCX Editor by opening windows called customizer windows. A customizer window contains fields you can configure to meet the needs of your script. The configuration fields on the customizer windows are called properties.
To display the customizer window for a Cisco Unified CCX Editor step, do the following.
Step 1 In the tool bar, select the blank script button.
The Start icon and End icons appear in the Design pane.
Step 2 In the Editor palette, select Contact > Accept and drag the Accept icon from the palette into the Design pane under the Start icon.
Step 3 Right-click the Accept icon.
The Properties popup menu appears.
2-28Cisco Unified Contact Center Express Getting Started with Scripts, Release 11.0(1)
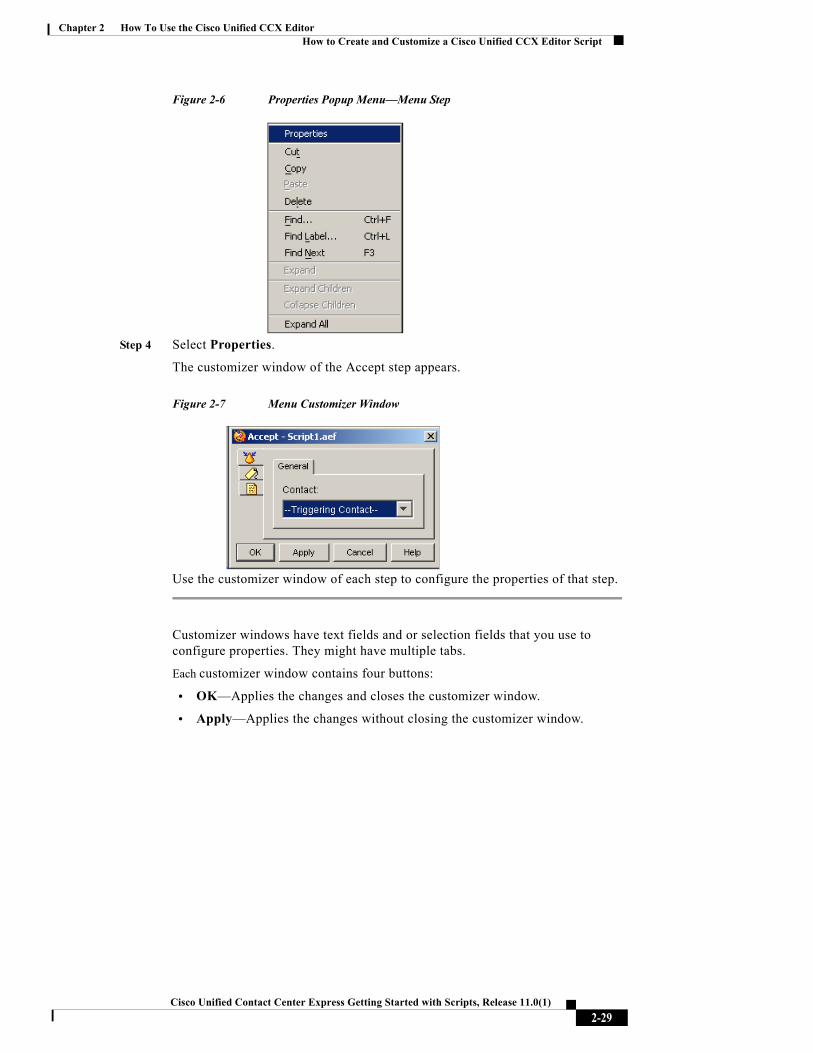
Chapter 2 How To Use the Cisco Unified CCX EditorHow to Create and Customize a Cisco Unified CCX Editor Script
Figure 2-6 Properties Popup Menu—Menu Step
Step 4 Select Properties.
The customizer window of the Accept step appears.
Figure 2-7 Menu Customizer Window
Use the customizer window of each step to configure the properties of that step.
Customizer windows have text fields and or selection fields that you use to configure properties. They might have multiple tabs.
Each customizer window contains four buttons:
• OK—Applies the changes and closes the customizer window.
• Apply—Applies the changes without closing the customizer window.
2-29Cisco Unified Contact Center Express Getting Started with Scripts, Release 11.0(1)

Chapter 2 How To Use the Cisco Unified CCX Editor How to Create and Customize a Cisco Unified CCX Editor Script
• Cancel—Closes the customizer window without applying any changes.
• Help—Displays context-sensitive help for this step.
Customizer windows might also have additional buttons that you can use to modify and display various properties within a step.
In addition, customizer windows typically display three tabs with icons at the top left corner of the window.
Table 2-10 Step Editor Customizer Window Tabs
Tab Icon DescriptionTop Tab The step’s icon, allowing you to customize the
specific properties of the selected step, if any. This icon always corresponds to the icon associated with the current step. The example step icon illustrated here is that of the Get Session step.
Middle Tab The Label icon, allowing you to assign a label to the step.
Bottom Tab The Annotate icon, allowing you to enter comments regarding the step.
Note The following are the exceptions to the previous tab convention:
• The Label step, which displays only two tabs (Label and Annotate); and the Annotate step, which displays only two tabs (Annotate and Label). This is because these steps are actually doing nothing else then providing a label or an annotation which can now be done by all other steps.
• The OnExceptionGoto and the Goto steps also display only two tabs: their properties tab and the annotate tab. They do not display a label tab because these two steps are used as branching steps.
2-30Cisco Unified Contact Center Express Getting Started with Scripts, Release 11.0(1)

Chapter 2 How To Use the Cisco Unified CCX EditorDefining, Using, and Updating Script Variables
Defining, Using, and Updating Script VariablesAny step in your script can use variables once you define them in the Variable pane of the Cisco Unified CCX Editor window. A script variables store data while a script executes and the value of the variable can change during script execution.
This section includes the following topics:
• How to Reorganize the Display of Script Variables in the Editor, page 2-32
• How To Define Local Script Variables in the Cisco Unified CCX Editor, page 2-32
• How To Map a Script Variable to a Subscript Variable, page 2-34
• Using Enterprise Expanded Call Context (ECC) Variables, page 2-35
• How To Define ECC Variables in the Cisco Unified CCX Editor, page 2-35
• The Types of Local Variables Available in the Cisco Unified CCX Editor, page 2-37
• How and Why To Export Variables, page 2-43
• How and When To Configure the Encoding and Decoding of Variable Types, page 2-44
• Using Multiple Values in a Variable, page 2-46
2-31Cisco Unified Contact Center Express Getting Started with Scripts, Release 11.0(1)

Chapter 2 How To Use the Cisco Unified CCX Editor Defining, Using, and Updating Script Variables
How to Reorganize the Display of Script Variables in the Editor
By clicking one of the headers in the Cisco Unified CCX Editor Variable pane, you can reorganize a script’s variable list display according to the header.
How To Define Local Script Variables in the Cisco Unified CCX Editor
This section describes how to define a local script variable, a variable created in a script and specific only to that script.
Note In addition to defining local script variables, you can also define expanded call variables for use with the Enterprise Call Info steps. See How To Define ECC Variables in the Cisco Unified CCX Editor, page 2-35 for how to do this.
To define a new local script variable, click the New Variable icon at the top left corner of the Variable pane of the Cisco Unified CCX Editor window.
The New Variable dialog box appears.
Figure 2-8 New Variable Dialog Box
2-32Cisco Unified Contact Center Express Getting Started with Scripts, Release 11.0(1)
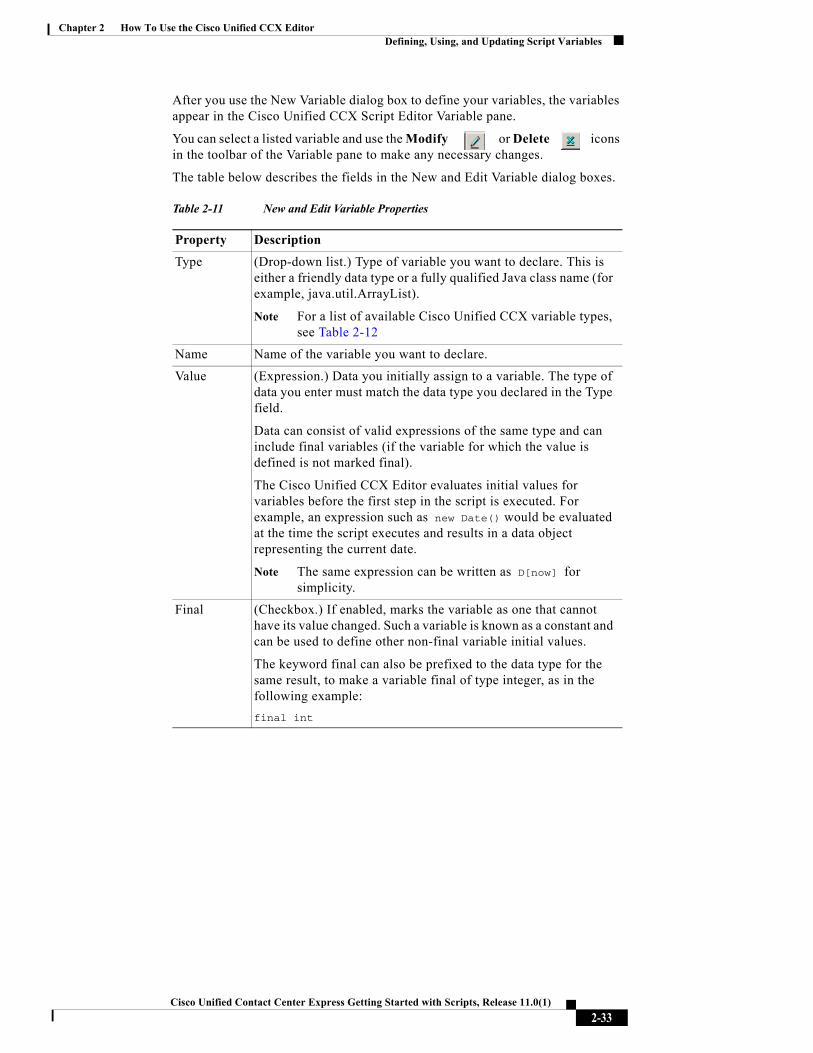
Chapter 2 How To Use the Cisco Unified CCX EditorDefining, Using, and Updating Script Variables
After you use the New Variable dialog box to define your variables, the variables appear in the Cisco Unified CCX Script Editor Variable pane.
You can select a listed variable and use the Modify or Delete icons in the toolbar of the Variable pane to make any necessary changes.
The table below describes the fields in the New and Edit Variable dialog boxes.
Table 2-11 New and Edit Variable Properties
Property Description
Type (Drop-down list.) Type of variable you want to declare. This is either a friendly data type or a fully qualified Java class name (for example, java.util.ArrayList).
Note For a list of available Cisco Unified CCX variable types, see Table 2-12
Name Name of the variable you want to declare.
Value (Expression.) Data you initially assign to a variable. The type of data you enter must match the data type you declared in the Type field.
Data can consist of valid expressions of the same type and can include final variables (if the variable for which the value is defined is not marked final).
The Cisco Unified CCX Editor evaluates initial values for variables before the first step in the script is executed. For example, an expression such as new Date() would be evaluated at the time the script executes and results in a data object representing the current date.
Note The same expression can be written as D[now] for simplicity.
Final (Checkbox.) If enabled, marks the variable as one that cannot have its value changed. Such a variable is known as a constant and can be used to define other non-final variable initial values.
The keyword final can also be prefixed to the data type for the same result, to make a variable final of type integer, as in the following example:final int
2-33Cisco Unified Contact Center Express Getting Started with Scripts, Release 11.0(1)

Chapter 2 How To Use the Cisco Unified CCX Editor Defining, Using, and Updating Script Variables
How To Map a Script Variable to a Subscript VariableYou can also map variables you define for your script to variables you define in a subflow. A subflow can use and manipulate a variable, then return the data that is stored in the variable to the primary script.
Scripts cannot share variables with other scripts, except in the case of default scripts, in which the primary script automatically transfers the values of its variables to a default script. (See Using Default Scripts, page 5-19.)
You can also map a local variable to a Web cookie, an environment variable, and HTTP header, a keyword, or a Cisco Unified CCX application parameter. See the description of the Keyword Transform Document step for how to map a variable to a keyword. See the description of the of the Set Http Contact Info step for how to map a Web cookie, and see the description of the Get Http Contact Info step for how to map an environment variable, an HTTP header, and a Cisco Unified CCX application parameter.
Note For complete details on using variables in scripts, see the Cisco Unified CCX Scripting and Development Series: Volume 3, Expression Language Reference.
Parameter (Checkbox.) If enabled, sets the value for this parameter in the Cisco Unified CCX Administration web interface when you provision applications that use this script.
Array (Checkbox.) If enabled, defines the variable as an array (seen by, or entered by, the ending [] on the variable type).
Dimensions (Checkbox.) If enabled, allows you to use the drop-down list to define the dimensions of an array variable:
• If set at 0, then the variable is not defined as an array.
• If set to 1, it defines the variable as an array of dimension 1; if set to 2, an array of dimension 2, and so on.
Note You can also simply type ending brackets ([]) to the variable type to indicate to the Cisco Unified CCX Editor that an array is being created.
Table 2-11 New and Edit Variable Properties (continued)
Property Description
2-34Cisco Unified Contact Center Express Getting Started with Scripts, Release 11.0(1)

Chapter 2 How To Use the Cisco Unified CCX EditorDefining, Using, and Updating Script Variables
Using Enterprise Expanded Call Context (ECC) Variables Enterprise Expanded Call Context (ECC) data fields are used by all applications in the Cisco Unified CCX Cluster. There can be as many as 200 user-defined fields defined in the Field List (index numbers 0-199) of expanded call variables. These field values do not appear in the ContactCallDetail records as there are no fields reserved for them.
The Cisco Unified CCX system, and the Cisco Finesse Desktop can pass ECC variables to each other.
Cisco Unified CCX has some pre-defined ECC variables. For a list of the Cisco Unified CCX system default ECC variables, see Cisco Unified Contact Center Express Scripting and Development Series: Volume 2, Editor Step Reference Guide.
The Cisco Unified CCX Editor Set and Get Call Info steps are specifically designed to use enterprise call variables. For how to use ECC variables with these steps, see the individual step descriptions.
How To Define ECC Variables in the Cisco Unified CCX Editor
Note Every Enterprise ECC variable must be separately defined on all parts of the system that sends and receives the variable data: the Cisco Unified CCX Editor in Cisco Unified CCX, and the Cisco Finesse Desktop. This procedure deals only with the Cisco Unified CCX Editor. For further information, see Designing Cisco Unified Gateway Scripts, page 18-1.
To define an ECC variable in the Cisco Unified CCX Editor, do the following.
Step 1 From the Cisco Unified CCX Editor menu bar, choose Settings > Expanded Call Variables.
The Expanded Call Variables window appears.
2-35Cisco Unified Contact Center Express Getting Started with Scripts, Release 11.0(1)

Chapter 2 How To Use the Cisco Unified CCX Editor Defining, Using, and Updating Script Variables
Figure 2-9 Expanded Call Variables Window
Step 2 In the tool bar, click the Add New Variable icon.
The Edit Expanded Call Variable dialog box appears.
Figure 2-10 Edit Expanded Call Variable Dialog Box
Step 3 In the Name text field, enter the ECC variable name as defined in the Cisco Unified ICME configuration (or the Cisco Finesse Administration using Cisco Unified CCX).
Note All user-defined ECC variable names should begin with "user."
Step 4 In the Type drop-down menu, choose the type of expanded call variable (scalar or array).
Step 5 In the Description text field, enter a description of the variable.
Step 6 Click OK.
2-36Cisco Unified Contact Center Express Getting Started with Scripts, Release 11.0(1)

Chapter 2 How To Use the Cisco Unified CCX EditorDefining, Using, and Updating Script Variables
The Edit Expanded Call Variable dialog box closes, and the variable name, type, and description appear under their respective columns in the Cisco Unified ICME Expanded Call Variables window (or the Cisco Finesse Administration using Cisco Unified CCX).
Step 7 Click the dialog box’s Close (X) button.
The Expanded Call Variables window closes, and the ECC variable is now available to your script. It will be listed in the Enterprise Call Info step’s drop-down list as ---name--, where name is the value you entered in the Variable Name field.
The Types of Local Variables Available in the Cisco Unified CCX Editor
Table 2-12 describes the types of local variables available in the Cisco Unified CCX Editor.
Note This table provide brief descriptions and examples of each of the built-in variable types available to Cisco Unified CCX. For complete details on using each variable, see Cisco Unified CCX Scripting and Development Series: Volume 3, Expression Language Reference and the Cisco Unified Contact Center Express Scripting and Development Series: Volume 2, Editor Step Reference Guide.
2-37Cisco Unified Contact Center Express Getting Started with Scripts, Release 11.0(1)

Chapter 2 How To Use the Cisco Unified CCX Editor Defining, Using, and Updating Script Variables
Table 2-12 Available Cisco Unified CCX Variable Types
Variable Name Description
Byte A Byte variable represents an integer value with a value range from -128 to +127.
Examples:
• (byte)23
• (byte)-45
Contact A contact variable represents an internal contact created as a result of an external event, such as an incoming call, e-mail message or HTTP request. It can also represent an outbound contact, such as an outbound call or an outbound email. A variable of this type references the resources related to the contact and lets you indicate which contacts a step should act upon.
You cannot manually enter a contact as a variable value. Contact variables result only from the Create eMail step (from the eMail palette), the Place Call step (Call Contact palette), and/or the Get Trigger Info step (Contact palette).
Short A Short variable represents an integer value with a value range of -32768 to +32767.
Examples:
• (short)3456
• (short)7239
User A User variable represents a configured Cisco Unified CallManager User. A user variable can be returned by steps such as Name To User, Get User, or Select Resource step, and is used in other steps to extract information from the variable.
2-38Cisco Unified Contact Center Express Getting Started with Scripts, Release 11.0(1)

Chapter 2 How To Use the Cisco Unified CCX EditorDefining, Using, and Updating Script Variables
Session A Session variable tracks contacts across the system. As the contact moves from one place to another, information can be tagged along and retrieved by a script. A Session variable can be thought of as a “shopping cart” in a web application.
You cannot manually give a Session variable a value. Session variables can only be returned from the Get Contact Info step (Contact palette) and/or the Get Session step (Session palette).
Prompt A Prompt variable contains information about what to play to a caller when a call is passed to a Media step. It can reference audio files in the prompt repository or on disk, concatenation of multiple prompts, or more complicated types of prompts
Examples:
• P[] or SP[]—An empty prompt. (No prompt gets played back.)
• P[AA\AAWelcome.wav]—A user-defined prompt located in the User Prompts directory.
Grammar The Grammar variable represents different options that can be selected by a caller using a Media input step (such as the Menu step). A grammar variable can represent grammars uploaded to the grammar repository or created using some of the existing steps.
Examples:
• G[], SG[]—An empty grammar. (No value gets recognized.)
• G[grammar.grxml]—A user-defined grammar located in the User Grammars directory.
Table 2-12 Available Cisco Unified CCX Variable Types (continued)
Variable Name Description
2-39Cisco Unified Contact Center Express Getting Started with Scripts, Release 11.0(1)

Chapter 2 How To Use the Cisco Unified CCX Editor Defining, Using, and Updating Script Variables
Language A Language variable is used to localize a particular resource in the system. It can be associated with a contact to customize what prompts and grammars should be retrieved from the repository when required.
Examples:
• L[en_US]
• L[fr_CA]
Currency The Currency variable is used to identify a given currency, such as the American Dollar (USD), and is useful when creating generated currency prompts that need to be tailored based on a given currency.
Examples:
• C[USD]
• C[CAD]
Iterator The Iterator variable corresponds to the Java java.util.Iterator class.
boolean A Boolean variable can be either true or false, and is primarily used by the If step in the General palette of the Cisco Unified CCX Editor.
char A Character variable consists of characters, such as the letters in an alphabet.
Examples:
• ‘a’, ‘1’, ‘Z’
• Any escape sequence: ‘\t’, ‘\r’, ‘\0’, ‘\n’, ‘\f’, ‘\\’, ‘\’
Table 2-12 Available Cisco Unified CCX Variable Types (continued)
Variable Name Description
2-40Cisco Unified Contact Center Express Getting Started with Scripts, Release 11.0(1)

Chapter 2 How To Use the Cisco Unified CCX EditorDefining, Using, and Updating Script Variables
Document A Document variable can be any type of document, such as a file, a URL, or a recording.
Examples:
• FILE[C:\Documents\mydoc.txt]
• URL[http://evbuweb/mydoc.asp?number=23]
• TEXT[Some text to be stored in document]
float A Float variable consists of decimal numbers.
Examples:
• 3.14159
• 2E-12
• -100
int An Integer variable consists of whole numbers, from -2147483648 to 2147483647, inclusive.
Examples:
• 234556789
• 0
• -23
String A String variable consists of a set of Unicode characters, from “\u0000” to “\uffff” inclusive.
Examples:
• “Hello”, “C:\WINNT\win.ini”—Supports any escape characters or Unicode characters.
• u“\”This is a quoted string\””, u“\tHello”, u“\u2222\u0065”, u“C:\\WINNT\\win.ini”—Supports he same escape sequences or Unicode characters described for the Character type.
Table 2-12 Available Cisco Unified CCX Variable Types (continued)
Variable Name Description
2-41Cisco Unified Contact Center Express Getting Started with Scripts, Release 11.0(1)
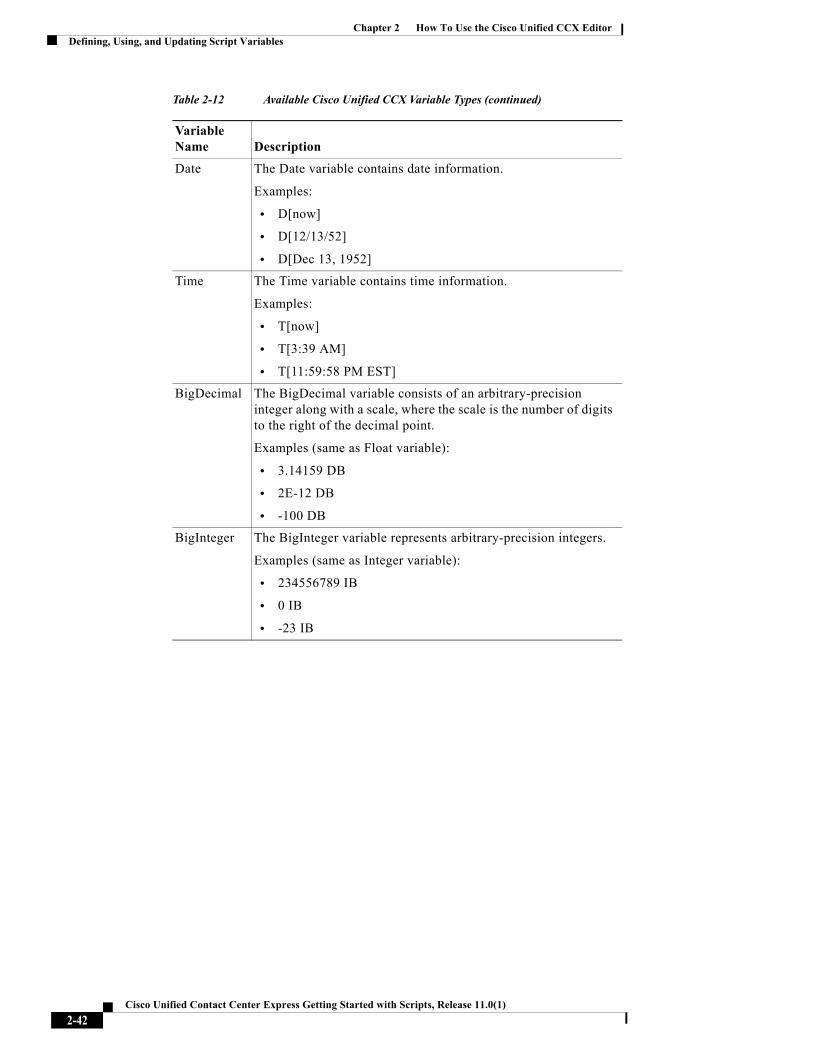
Chapter 2 How To Use the Cisco Unified CCX Editor Defining, Using, and Updating Script Variables
Date The Date variable contains date information.
Examples:
• D[now]
• D[12/13/52]
• D[Dec 13, 1952]
Time The Time variable contains time information.
Examples:
• T[now]
• T[3:39 AM]
• T[11:59:58 PM EST]
BigDecimal The BigDecimal variable consists of an arbitrary-precision integer along with a scale, where the scale is the number of digits to the right of the decimal point.
Examples (same as Float variable):
• 3.14159 DB
• 2E-12 DB
• -100 DB
BigInteger The BigInteger variable represents arbitrary-precision integers.
Examples (same as Integer variable):
• 234556789 IB
• 0 IB
• -23 IB
Table 2-12 Available Cisco Unified CCX Variable Types (continued)
Variable Name Description
2-42Cisco Unified Contact Center Express Getting Started with Scripts, Release 11.0(1)

Chapter 2 How To Use the Cisco Unified CCX EditorDefining, Using, and Updating Script Variables
How and Why To Export VariablesYou can declare variables as parameters by checking the Parameter check box in the New or Edit Variables dialog box.
This feature allows you to set the value for a parameter in the Cisco Unified CCX Administration web interface. Because the value is initialized at configuration time for the script that uses it, you can change the value without having to edit the script in the Cisco Unified CCX Step Editor. Such a variable is called an exported variable.
For example, when you create an application of type “Cisco Script Application,” you can choose either a script or a default script. The system then refreshes the web page and provides a list of the parameters with their default or current values. You can modify the values in this list.
Note The Cisco Unified CCX Step Editor supports all variable types as parameters.
double The Double variable represents an expanded Float variable.
Examples:
• 3.14159 D
• 2E-12 D
• -100 D
long The Long variable is an expanded Integer variable.
Examples (same as Integer variable):
• 234556789 L
• 0 L
• -23 L
Table 2-12 Available Cisco Unified CCX Variable Types (continued)
Variable Name Description
2-43Cisco Unified Contact Center Express Getting Started with Scripts, Release 11.0(1)

Chapter 2 How To Use the Cisco Unified CCX Editor Defining, Using, and Updating Script Variables
How and When To Configure the Encoding and Decoding of Variable Types
When the Cisco Unified CCX system receives variables from the Cisco Unified ICME Server, the variables do not have an associated type (such as Integer or Float). To use these variables in the Cisco VRU or Cisco Unified CCX scripts, the Cisco Unified CCX system first decodes them to one of the available types. When the script sends variables back to the Cisco Unified ICME Server, the Cisco Unified CCX system then encodes them into a form that is a string that the Cisco Unified ICME Server can use, depending on the type of the local Cisco Unified CCX script variable.
This type of encoding is used in all steps that support automatic conversion to and from String. Among these steps are the Get and Set EnterpriseInfo, Set, VoiceBrowser, and Keyword Transform Document steps.
The conversion also does not need to be specified by the script designer unless there are multiple choices like in the case of Date and Time. In these cases you can use the Expression Editor panel in the Step customizer window to enter the correct values. The following two examples of the expression panel are from the GetEnterpriseInfo step using the Expression Editor
Figure 2-11 Example Expression panel without a value
In the Expression Panel, you can either type an expression directly into the input text field, or select from a list of choices, or click the Expression Editor (...) button to open the Expression Editor and create a new expression. The following example expression panel contains user input and a list of choices.
Figure 2-12 Example Expression panel with user input
2-44Cisco Unified Contact Center Express Getting Started with Scripts, Release 11.0(1)

Chapter 2 How To Use the Cisco Unified CCX EditorDefining, Using, and Updating Script Variables
The second drop down list that appears, provides encoding options whereas the first text box is the area where the expression value is entered.
Table 2-13 lists many of the encoding types that the Cisco Unified CCX system supports.
Note The Input format is the data decoded from the Cisco Unified ICME Server variables to the Cisco Unified CCX script local variables. The Output format is the data encoded from the Cisco Unified CCX script local variables to the Cisco Unified ICME Server variables.
Table 2-13 Encoding Types That Cisco Unified CCX Supports
Encoding Type Input Format Example Input Output Format
Integer—32-bit signed integer
The Cisco Unified CCX Editor supports three formats:
• Decimal—a sequence of digits without a leading 0. Digits can range from 0 to 9.
• Hexadecimal—in the form 0xDigits, where Digits can range from 0 to 9, a to f, and A to F.
• Octal—in the form 0Digits, where Digits can range from 0 to 7.
Decimal:
• 25
• -34
• 900
Hexadecimal:
• 0x1e
• 0x8A5
• 0x33b
Octal:
• 033
• 0177
Decimal digits from 0 to 9 with no leading 0
Long—64-bit signed integer.
2-45Cisco Unified Contact Center Express Getting Started with Scripts, Release 11.0(1)

Chapter 2 How To Use the Cisco Unified CCX Editor Defining, Using, and Updating Script Variables
Using Multiple Values in a VariableYou can send multiple values—or tokens—within one variable, so you can avoid using many variables at the same time. For how to do this, see the Cisco Unified Contact Center Express Scripting and Development Series: Volume 2, Editor Step Reference Guide.
Float—32-bit floating number
[-]Digits.DigitsExponentTrailer
where:
• Digits are digits from 0 to 9.
• Exponent is an optional exponent with a leading e or E.
• Trailer is one of f, F, d, or D to specify a float or a double. The trailer is optional.
3.1415927f 6.02e23F 25 -4.2323E5f
Same as input
Double—64-bit floating number
0.843 1.871E3d .23e-123 -3.4e34
Same as input
Boolean To designate this non-case-sensitive type:
• True—Use 1, t, y, true, or yes.
• False—Use 0, f, n, false, or no.
Yes F 0 n
Either true or false
String Type requires no conversion. Hello world Same as input
Date Use the format mm/dd/yyyy where mm is the month, dd is the day, and yyyy is the year.
10/22/1999 3/30/2000
Same as input
Time Use the format Hh:MmTod
where Hh is the hour, Mm is the minute, and Tod is am or pm. This type is not case-sensitive.
12:20am 09:05PM
Same as input
Table 2-13 Encoding Types That Cisco Unified CCX Supports (continued)
Encoding Type Input Format Example Input Output Format
2-46Cisco Unified Contact Center Express Getting Started with Scripts, Release 11.0(1)

Chapter 2 How To Use the Cisco Unified CCX EditorValidating and Debugging Your Script
Validating and Debugging Your ScriptOnce you complete your script and are ready to validate it and debug it.
You can debug it in two ways depending on the type of script.
This section covers the following topics:
• How to Validate Your Script, page 2-47
• How to Debug Your Script, page 2-47
How to Validate Your ScriptTo validate your script, once you have finished it and with the script open, in the Cisco Unified CCX Editor menu bar, select Tools > Validate:
• If all steps have been properly customized and all execution paths terminate with an End step, then you will get a Validation Ok message.
• If there are errors, they are displayed in the Cisco Unified CCX Editor message windows. To get to the location of an error in the script, click on the error message in the Cisco Unified CCX Editor message window.
How to Debug Your ScriptThis section includes the following topics:
• Using BreakPoints, page 2-47
• Using Reactive and Active Debugging, page 2-48
• Using Non-Reactive Debugging, page 2-51
Using BreakPointsWhen you debug a script, you can insert, delete, enable, and disable breakpoints in the script by selecting those functions from the Cisco Unified CCX Editor menu bar.
2-47Cisco Unified Contact Center Express Getting Started with Scripts, Release 11.0(1)
Chapter 2 How To Use the Cisco Unified CCX Editor Validating and Debugging Your Script
You can insert a breakpoint at a step to stop the debug process at that step.
You can continue the process by choosing one of the following two debug menu options from the Cisco Unified CCX Editor menu bar:
• Debug > Continue
• Debug > Step Over
When you choose Debug > Step Over, the debug process proceeds one step at a time, then halts. You must therefore continue to choose Debug > Step Over, or press the F10 function key, until you reach the end of the script. You can also remove the breakpoint by choosing Debug > Remove Breakpoint.
Using Reactive and Active Debugging
Use the Reactive Debugging procedure to debug scripts that depend on external events for their execution. For example, the Cisco Unified CCX script aa.aef depends on an external call event (an incoming call) to trigger its execution.
Use active debugging in the case where the script does not depend on any external events for its execution.
When a script is debugged, the execution of the script happens on the Cisco Unified CCX Engine.
You need to login to the Cisco Unified Editor for doing either type of debugging. Both the Cisco Unified Editor and the Cisco Unified Engine need to be aware of one another before beginning the debug session.
Using Reactive Debugging
This procedure is also the only way you can debug Voice Response Unit (VRU) scripts, by registering for the script filename. When the call starts, the Cisco Unified CCX Engine runs the associated scripts normally until the system reaches the one for which you registered a reactive debugging session. The system starts debugging the script at that point.
Note The Cisco Unified CCX Editor can save script information directly to the Script Repository. However, before the Cisco Unified CCX Engine can use a script for call processing, you must refresh the application that uses the script through the Cisco Unified CCX Administration web interface. In addition, every time you edit
2-48Cisco Unified Contact Center Express Getting Started with Scripts, Release 11.0(1)

Chapter 2 How To Use the Cisco Unified CCX EditorValidating and Debugging Your Script
a script, you must refresh the version of the script on the Cisco Unified CCX Engine. To upload and refresh a script, you must use the Cisco Unified CCX Administration Script Management web page. For more information, see the Cisco Unified Contact Center Express Administration Guide.
To debug a reactive script, do the following.
Step 1 From the Cisco Unified CCX Editor menu bar, choose Debug > Reactive Script.
The Reactive Debugging Script dialog box appears.
Step 2 In the Script File Name text field, enter the expression of the script you want to debug just as you entered in the Cisco Unified CCX Administration on the Application Configuration web page, or use the drop-down menu to choose the desired script.
You can specify a script as a string (for example: “aa.aef”) or a script object for the subflow. The following is the format for specifying a Cisco Unified CCX Editor script object in the dialog box.
2-49Cisco Unified Contact Center Express Getting Started with Scripts, Release 11.0(1)

Chapter 2 How To Use the Cisco Unified CCX Editor Validating and Debugging Your Script
Table 2-1 The Format for Specifying Script Objects in a Script
Format for Specifying a Script Of this typeSCRIPT[filename.aef]For example: SCRIPT[myscript.aef]
User script in the script repository
SSCRIPT[filename.aef]For example: SSCRIPT[aa.aef]
System script
Note System scripts should not be edited by a user and are not listed in the drop-down menu.
SCRIPT[FILE[drive:\\directory location\filename.aef]]For example:SCRIPT[FILE[C:\\Windows\aa.aef]]
User File script in the specified location
SCRIPT[URL[http://UrlAddress/ filename.aef]]For example:SCRIPT[URL[http://localhost/aa.aef]]
User URL script at the specified URL
Step 1 From the Cisco Unified CCX Editor menu bar, choose Debug > Reactive Script.
The Reactive Debugging Script dialog box appears.
Step 2 In the Script File Name text field, enter the file name of the script you want to debug or use the drop-down menu to choose the desired script.
2-50Cisco Unified Contact Center Express Getting Started with Scripts, Release 11.0(1)

Chapter 2 How To Use the Cisco Unified CCX EditorValidating and Debugging Your Script
Note The script name must exactly match the one you supply when configuring the script in the application configuration web page or in the VRU script configuration page on the Cisco Unified CCX Administration web interface.
Step 3 In the Wait Time (Secs) text field, enter the amount of time you want the Cisco Unified CCX Engine to wait for the result of a triggering event or to wait for a Run VRU Script request to be received from Cisco Unified ICME software.
The Cisco Unified CCX Engine must be running, and the computer you are using must have a connection to the Cisco Unified CCX server.
Step 4 Click OK.
How the event is invoked depends on the type of event required. For example, for the Cisco Unified IP IVR (Interactive Voice Response) script aa.aef, the system makes a call to the required number and the script window appears in the Design pane of the Cisco Unified CCX Editor.
Step 5 Choose Debug > Continue to allow the system to continue debugging, or Debug > Step Over to debug one step at a time.
Step 6 Correct any errors flagged by the system prompt in the Cisco Unified CCX Editor.
Using Non-Reactive Debugging
You can develop scripts and debug them when connected to the Cisco Unified CCX server and once the script is working, you can upload it and create an application for using it.
Use the following procedure to debug scripts that do not require external events for their execution. This procedure is also useful for debugging script segments or subflows.
Tip You can create a script that first uses the Place Call step to place an outbound call, and then continues the script using that outbound call. This procedure makes it easy to debug a script that is triggered by calls, without the complexity of uploading the script to the script Repository every time you want to debug and test it. All Media and Call Control steps need to use the call object that the Place Call step returns instead of the default “-- Triggering Contact --”.
2-51Cisco Unified Contact Center Express Getting Started with Scripts, Release 11.0(1)

Chapter 2 How To Use the Cisco Unified CCX Editor How To Handle Basic Script Errors
Note If you are using subflows, the debug process does not enter and debug the subflows. The debug process executes the subflow without providing debug controls while executing it. (This process is exactly like stepping over the Call Subflow step.)
To debug a non-reactive script, do the following.
Step 1 With an existing or new script open in the Cisco Unified CCX Editor Design pane, choose Debug > Start from the Cisco Unified CCX Editor menu bar.
The Cisco Unified CCX Editor debugs the script and flags any errors.
Step 2 In the Cisco Unified CCX Editor, correct any errors flagged by system prompts.
Step 3 Continue to use the Debug command until you have cleared all error flags (messages).
How To Handle Basic Script ErrorsThe Cisco Unified CCX Editor allows you to provide scripts with a variety of ways to handle errors.
This section describes the two basic ways that scripts can handle errors:
• Using the “Continue on Prompt Errors” Option, page 2-52
• Using Error Output Branches, page 2-54
Note For information about advanced error handling, see Advanced Error Handling, page 5-18.
Using the “Continue on Prompt Errors” OptionThe Continue on Prompt Errors option allows the script to continue to execute when the script receives invalid input (for example, Invalid Audio Format or File Not Found).
2-52Cisco Unified Contact Center Express Getting Started with Scripts, Release 11.0(1)

Chapter 2 How To Use the Cisco Unified CCX EditorHow To Handle Basic Script Errors
This section covers the following topics:
• Enabling the ”Continue On Prompt Errors“ Option, page 2-53
• Script Execution When Enabling the ”Continue On Prompt Errors“ Option, page 2-54
• Script Execution When Disabling the ”Continue On Prompt Errors“ Option, page 2-54
Enabling the ”Continue On Prompt Errors“ Option
To enable this option, select “Continue on Prompt Errors” in the customizer windows of steps in the Media palette. (The figure below shows this option on the Prompt tab of the Get Digit String customizer window.)
Figure 2-13 Continue on Prompt Errors Option—Prompt Tab of the Get Digit String Customizer Window
2-53Cisco Unified Contact Center Express Getting Started with Scripts, Release 11.0(1)

Chapter 2 How To Use the Cisco Unified CCX Editor How To Handle Basic Script Errors
Script Execution When Enabling the ”Continue On Prompt Errors“ Option
When enabled, the step continues with the next prompt in the list of prompts to be played back, or, if it is the last step in the list, it waits for caller input.
When you enable Continue on Prompt Errors, you instruct the script to ignore prompt errors and continue as if the playback of a particular prompt was successful.
For example, in a sequence of prompts “1 + 2 + 3:”
• If prompt #1 fails, the step continues with prompt #2.
• If prompt #3 fails, the step continues, waiting for caller input as if prompt #3 had been properly played back.
Script Execution When Disabling the ”Continue On Prompt Errors“ OptionWhen you disable Continue on Prompt Errors, the media steps generate an exception, which can then be handled in the script.
Prompt exceptions are as follows:
• PromptException
• UndefinedPromptGenerator
• TTSPromptProviderException
• UndefinedPrompt Exception
• InvalidPromptArgumentException
• UnsupportedPromptExpression
Using Error Output BranchesUse Error output branches to provide instructions on what to do when typical errors occur.
Figure 2-14 shows error output branches under a Call Redirect step in a script.
2-54Cisco Unified Contact Center Express Getting Started with Scripts, Release 11.0(1)

Chapter 2 How To Use the Cisco Unified CCX EditorHow and Why To Use the CRTP Protocol
Figure 2-14 Error Output Branches—Call Redirect Step
In this example, the Call Redirect step includes logic for both an invalid extension and an out-of-service extension.
Note The script provides error branches only for expected error conditions, not for system errors.
How and Why To Use the CRTP ProtocolYou can use Cisco Unified CCX repositories to store and manage documents, prompts, grammars and scripts.
To fetch data in a Cisco Unified CCX repository for a Cisco Unified CCX script or a for VoiceXML document, you need to specify a Unifiorm Resource Identifier (URI) using the the Cisco Repository Transfer Protocol (CRTP). This is a protocol used only by the Cisco Unified CCX system and allows access to the resources in the various Cisco Unified CCX repositories without having to specify on which server they physically reside.
This is a Cisco proprietary protocol, and so no "non-Cisco" user agents are expected to recognize it. If you are in a script or a VoiceXML document and you must pass a CRTP URI to a non-Cisco user agent, first convert the URI, while it is in the Cisco Unified CCX system, to its HTTP protocol equivalent. You should do the conversion immediately before (and not sooner than) the resource is needed to be fetched, as the conversion depends on the context at the time of the fetch.
A URI (Universal Resource Identifier) is an Internet protocol element, defined by a W3 standard, consisting of a short string of characters that contain a name or address that can be used to reference a resource.
Examples of different types of URIs are:
2-55Cisco Unified Contact Center Express Getting Started with Scripts, Release 11.0(1)

Chapter 2 How To Use the Cisco Unified CCX Editor How and Why To Use the CRTP Protocol
• URL for specifying addresses on the web. For example: http://www.ietf.org/rfc/rfc2396.txt.
• Mailto for enabling e-mails to be sent from a Web page. For example: mailto:[email protected]
• FTP (File Transfer Protocol) for sending files over the web. For example: ftp://ftp.is.co.za/rfc/rfc1808.txt
• Telnet for remotely logging into a computer. For example: telnet://192.0.2.16:80/
A CRTP URI can be used in most places that an HTTP URL can be used within the Cisco Unified CCX system.
The CRTP protocol is similar to HTTP. However, in place of the Hostname and port number, the CRTP protocol contains a repository identifier and a language specifier.
CRTP URI Protocol SyntaxThe CRTP protocol references files uploaded in the Cisco Unified CCX repositories. In the syntax:
• Angle brackets indicate appropriate content to be specified in place of the syntax example word.
• Square brackets indicate an argument is optional:
The syntax for specifying the CRTP URI protocol is as follows:crtp:/<repository>[/<languages>]/<path>[?<params>][#<ref>]
where:
2-56Cisco Unified Contact Center Express Getting Started with Scripts, Release 11.0(1)

Chapter 2 How To Use the Cisco Unified CCX EditorHow and Why To Use the CRTP Protocol
Command Argument Specifies<repositor> The name of the Cisco Unified CCX repository from which you
want to get a resource. The current Cisco Unified CCX repositories are of two types:
• System repositories only contain resources that are preloaded and used by the system. They cannot be modified. The system repositories are:
– SPrompts – SGrammars – SDocuments – SScripts
• User repositories are not preloaded and can be modified by the user. The user repositories are:
– Prompts – Grammars – Documents – Scripts
Note In CRS 4.0, you cannot access scripts with the CRTP protocol.
2-57Cisco Unified Contact Center Express Getting Started with Scripts, Release 11.0(1)

Chapter 2 How To Use the Cisco Unified CCX Editor How and Why To Use the CRTP Protocol
<languages>
Optional. A priority ordered list of languages, each separated by a “,” (comma).
Languages specified here have priority over the system default locale language. If no languages are specified here, then the system configured default language is used for the search.
Each accepted language is defined as a locale string composed of a 2-letter ISO 639 code representing the locale's language. For example, “en” is for English.
If you specify a language region or country after the language, then you need to add a dash (“-”) after the locale, and follow it with the 2-letter ISO 3166 code representing the locale's region or country. For example “en-US” for English in the United States.
In the CRTP specification, you must replace any underscore “_” used in a Cisco Unified CCX repository name with a dash (“-”). This is defined by the RFC 1766 standard.
Optionally, following the region specification is another dash and variant code, if there is such. For example: “en-US-NY” for New York English.
The list of languages must be prefixed with the string "lang," For example: "lang,en-US,en-GB"
Command Argument Specifies
2-58Cisco Unified Contact Center Express Getting Started with Scripts, Release 11.0(1)

Chapter 2 How To Use the Cisco Unified CCX EditorHow and Why To Use the CRTP Protocol
<path> Any valid path to a file within a Cisco Unified CCX repository as defined in the Cisco Unified CCX Expression Editor syntax.
Enter a path just like you would specify a subdirectory in a URL in HTML.
Note In an HTTP URL and in a CRTP URL, a path does not include the computer disk drive.
For example: if the file “grammar.grxml” exists in the User grammar repository under a folder named myApp, the CRTP URI would be as follows:
crtp:/grammar/myApp/grammar.grxml
Note In Cisco Unified CCX 4.0, Only the script repository does not support directories. All other repositories do support directories.
<params> Two optional query parameters:
• accept Specifies the data at the end of the path when it is other than a file.
Format: [?]accept=query
Where
? specifies the start of the query part of the URL.
query specifies a value of mime type or a comma separated mime list.
Mime (Multipurpose Internet Mail Extensions) is a standard for multi-part, multimedia (non-textual data, such as graphics and audio) electronic mail messages and World Wide Web hypertext documents on the Internet.
Command Argument Specifies
2-59Cisco Unified Contact Center Express Getting Started with Scripts, Release 11.0(1)

Chapter 2 How To Use the Cisco Unified CCX Editor How and Why To Use the CRTP Protocol
Example CRTP URI SpecificationsThe following are example CRTP protocol URIs:
• crtp:/Prompts/AA/Welcome
• crtp:/SPrompts/lang,en-US,fr-FR-EURO/gen/number/one.wav
• crtp:/Documents/lang,en-GB/VXML/main_menu.vxml
• index Returns the grammar specified in the index of a compound grammar. The index is 0 based. A compound grammar is similar to an array of grammars indexed from 0 to n.
Format: &Index=x[,n]
where:
& separates the index string from the rest of the query string preceding the ampersand.
x is an index entry number. There can be more than one.
n is the last index entry number. Multiple index entries are separated by commas and are used to recursively access a grammar in a compound grammar.
You can dereference (access the indexed grammar in) a recursive compound grammar (a compound grammar defined within another compound grammar) by supplying multiple indexes, each separated by commas. For example: &index=0,2,1
<ref> Optional. An anchor reference, beginning with the pound sign (#), linking to a section within a file.
Command Argument Specifies
2-60Cisco Unified Contact Center Express Getting Started with Scripts, Release 11.0(1)

Chapter 2 How To Use the Cisco Unified CCX EditorHow and Why To Use the CRTP Protocol
• crtp:/SGrammars/lang,en-US-NY/AA/main_menu.tgl?accept=application/srgs+xml,text/uri-list&index=0,2,1
In the last, most complex example:
– The main_menu.tgl system grammar file is referenced in the AA directory, located by searching the language context defined by the language named “en-US-NY.”
– The grammar requested in the main_menu.tgl system grammar file is a SRGS and XML grammar or a text grammar from a URI-list of sub-grammars.
– The uri-list of sub-grammars in this case is a compound grammar that contains compound grammars.
– The requested grammar is accessed from the list of compound grammars through the index pointers, starting with #0.
– Index #0 indicates the first grammar in the compound grammar at the first level. Index #2 indicates the third grammar in the compound grammar in the second level, pointed to by index #0 in the first level. Index #1 is the second grammar in the compound grammar in the third level, pointed to by index #2 in the second level.
2-61Cisco Unified Contact Center Express Getting Started with Scripts, Release 11.0(1)

Chapter 2 How To Use the Cisco Unified CCX Editor How To Use Cisco Unified CCX Script Templates
How To Use Cisco Unified CCX Script TemplatesYou can access Cisco Unified CCX script templates from both the Cisco Unified CCX server and from the Cisco.com web site. This section covers the following topics:
• The Script Templates Installed with the Cisco Unified CCX Editor, page 2-62
• The Cisco Unified CCX Edition Script Web Repository, page 2-67
• Obtaining Technical Assistance, page 2-69
The Script Templates Installed with the Cisco Unified CCX Editor
Your Cisco Cisco Unified CCX system includes script templates stored as .aef files. These scripts have been built using Cisco Cisco Unified CCX Editor steps, including prerecorded prompts. You can use these scripts to create applications without performing any script development, or you can use these scripts as models for your own customized scripts.
Note The included script templates are bundled with the Cisco Unified CCX system solely as samples, and are not supported by Cisco Systems.
This section includes the following topics:
• How do I find the script templates installed with the Cisco Unified CCX Editor?, page 2-63
• Default Script Template Descriptions, page 2-64
• How to Create Your Own Script Template, page 2-66
• How to Create Your Own Script Template Directory, page 2-66
• Where Sample Prompts for Your Scripts Are Stored, page 2-67
2-62Cisco Unified Contact Center Express Getting Started with Scripts, Release 11.0(1)

Chapter 2 How To Use the Cisco Unified CCX EditorHow To Use Cisco Unified CCX Script Templates
How do I find the script templates installed with the Cisco Unified CCX Editor?
The script templates are listed in the Cisco Unified CCX Templates window displayed when you select File > New from the Cisco Unified CCX Editor.
To access the script templates on your system:
Step 1 Open the Cisco Unified CCX Editor. Select Start > Programs > Cisco Unified CCX Developer > Cisco Unified CCX Editor and at the prompt, log on.
Step 2 In the Cisco Unified CCX Editor menu bar, select File > New. The Templates dialog box displays.
Step 3 In the Templates dialog box, select the script template that you want to open in the Cisco Unified CCX Editor, and click OK.
When you have finished editing your new script, select File > Save as and save the script with the file name of your choosing. The file extension is automatically named .aef.
2-63Cisco Unified Contact Center Express Getting Started with Scripts, Release 11.0(1)

Chapter 2 How To Use the Cisco Unified CCX Editor How To Use Cisco Unified CCX Script Templates
Default Script Template Descriptions
The following tables describe the Cisco Unified CCX script templates automatically included with your Cisco Unified CCX system.
Note Every Cisco Unified CCX product includes every Cisco Unified CCX Editor step and all the Cisco Unified CCX script templates. However, you can only run those scripts for the product for which you are licensed.s
Table 2-14 General Script Template
Script Template DescriptionBlank Script Contains only the Start and End tag. Use this script
template to create your script if the other templates are inappropriate for your needs. Clicking the New Script button in the toolbar, opens the blank script template.
Table 2-15 IP IVR Script Templates
Script Templates Description
Auto Attendant Allows a caller to call an agent by entering an extension number or the first few characters of an associated username. If ASR is enabled, the caller might simply speak the extension or the user name. Previously named “:aa.aef.”
Spoken Name Upload Enables Cisco Unified CallManager users to call in, authenticate their identities, and replace their spoken names with newly recorded announcements on their telephones. Previously named “snu.aef.”
2-64Cisco Unified Contact Center Express Getting Started with Scripts, Release 11.0(1)

Chapter 2 How To Use the Cisco Unified CCX EditorHow To Use Cisco Unified CCX Script Templates
Table 2-16 Queuing Script Templates
Sample Script Templates Description
Simple Queuing This basic Cisco Unified CCX script establishes a simple call queue and routes callers to a group of agents as the agents become available. Previously named “icd.aef.”
Table 2-17 VRU Script Templates
Sample Script Templates Description
Basic Queuing Greets a caller and puts the call on hold while waiting for an available agent. Previously named “BasicQ.aef.”
Collect Digits Acquires an account number (or other numbers) from a caller. Previously named “CollectDigits.aef.”
Visible Queuing Greets a caller, provides feedback about the estimated time until the caller will be connected, and puts the call on hold while waiting for an available agent. Previously named “VisibleQ.aef.”
Table 2-18 Sample Voice Browser Script Templates
Sample Script Template Description
Outbound Voice Browser Gets a phone number to call from a VoiceXML-enabled web site, places the call, and responds in various ways depending on how the call is answered or not answered. Previously named “OutboundVoiceBrowser.aef.”
Voice Browser Uses ASR functionality to allow a caller to access information from VoiceXML-enabled web sites. Previously named “VoiceBrowser.aef.”
2-65Cisco Unified Contact Center Express Getting Started with Scripts, Release 11.0(1)
Chapter 2 How To Use the Cisco Unified CCX Editor How To Use Cisco Unified CCX Script Templates
How to Create Your Own Script Template
To create you own script template, do the following.
Step 1 Open your script in the Cisco Unified CCX Editor.
Step 2 From the menu bar, choose File > Save As.
Step 3 In the Save Script As dialog box, browse to the directory where you installed the Cisco Unified CCX Editor.
Step 4 From the directory list, select the Scripts main directory.
Step 5 From the Scripts directory list, select the Templates subdirectory.
Step 6 From the Templates subdirectory, select the directory where you want to save the file.
Step 7 Click Save.
When you choose File > New again, the template dialog box includes the file you saved in the template directory. You can create a new script using the file as a script template.
How to Create Your Own Script Template Directory
To create you own script template directory, do the following.
Step 1 Open in the Cisco Unified CCX Editor a script that you want to be in a new script template directory.
It is possible to save a user-defined template with the same name as a system-defined template. The user-defined template will take priority in such a case and be opened instead of the system-defined template.
User-defined templates are only accessible when the editor is connected to a cluster.
Note You must have a script file opened in order to create a new template subdirectory.
Step 2 From the menu bar, choose File > Save As.
2-66Cisco Unified Contact Center Express Getting Started with Scripts, Release 11.0(1)
Chapter 2 How To Use the Cisco Unified CCX EditorHow To Use Cisco Unified CCX Script Templates
Step 3 In the Save Script As dialog box, browse to the directory where you installed the Cisco Unified CCX Editor.
Step 4 From the directory list, select the Scripts main directory.
Step 5 From the Scripts directory list, select the Templates subdirectory.
Step 6 Click the Create New Folder button (next to the directory selection box).
Step 7 In the Save as dialog box, enter the folder name.
Open the new folder in the Save as dialog box to save your opened template file and click Save.
When you choose File > New again, the template dialog box includes the file you saved in the template directory. You can create a new script using the file as a script template.
Where Sample Prompts for Your Scripts Are Stored
Prior to Cisco CRS release 4.0(1), during installation, there were prompts that were installed in the prompts\User folder. These prompts were intended to be used by some of the system sample scripts (for example, aa.aef and basicQ.aef).
With Cisco CRS release 4.0(1) and after, these prompts are now installed in the prompt\system folders as System prompts.
If a system is upgraded from 3.x to 4.x, the system will migrate all of the prompts in the prompts\user folder. However, if a 3.x script is used on a 4.x system without going through the upgrade process, you must manually upload them using CRS Administration’s Prompt Management web page and ensure that they are in the appropriate location.
If a 3.x script is used on a 4.5 system, you must manually upload the script using the CRS Administration’s Prompt Management web page and ensure that it is in the appropriate location.
The Cisco Unified CCX Edition Script Web RepositoryThis collection of scripts are tested examples of product functionality and common business scenarios developed by Cisco experts for easy download and use by Cisco Unified CCX users.
2-67Cisco Unified Contact Center Express Getting Started with Scripts, Release 11.0(1)

Chapter 2 How To Use the Cisco Unified CCX Editor How To Use Cisco Unified CCX Script Templates
In addition to the scripts that are already provided as examples, Cisco wants to hear from Cisco representatives in the field, partners and customers. If you have a helpful script that you use often please submit it for inclusion in the Cisco Unified CCX script repository. This repository is designed to be a dynamic resource for all Cisco Unified CCX users to take advantage of as well as to help it grow — adding to its usefulness as a resource.
This section includes the following topics:
• The Cisco Unified CCX Script Web Repository Location, page 2-68
• How do I add my favorite Cisco Unified CCX script to the Web repository?, page 2-68
The Cisco Unified CCX Script Web Repository Location
The Cisco Unified CCX script Web repository is located on Cisco.com in a .zip file at http://www.cisco.com/en/US/products/sw/custcosw/ps1846/products_implementation_design_guides_list.html. Before using the scripts please take time to review the Script Repository Read Me file, which describes the structure and intended use or uses of the accompanying scripts. Also, each script comes with a read me document which provides an introduction and details regarding the script. These are important to review to be sure the script meets your specific needs before implementing it.
Note The Cisco Unified CCX script repository will be updated on an as-needed basis with new scripts as they are received and approved. To receive these new scripts it will be necessary to re-download the repository. A notification will be sent to the field as the Cisco Unified CCX script repository is updated.
How do I add my favorite Cisco Unified CCX script to the Web repository?
If you have a script that you find particularly useful and would like to share it with the Cisco Unified CCX user community feel free to submit it for consideration to be added to the script repository. To submit a script, complete the Cisco Unified CCX Script Submission Template at the script repository web site and e-mail to Cisco Unified [email protected].
2-68Cisco Unified Contact Center Express Getting Started with Scripts, Release 11.0(1)

Chapter 2 How To Use the Cisco Unified CCX EditorHow To Use Cisco Unified CCX Script Templates
Obtaining Technical AssistanceTechnical assistance is not available for the sample scripts. They are intended to be samples that can be easily modified to suit a particular need, as well as provide a visual "how to" for Cisco Unified CCX Application developers.
Should you require assistance in the development of your own script, there are several avenues available to you. First, you might solicit aid from the Cisco Unified CCX support mailer alias, [email protected].
If the issue is with your Cisco Unified CCX system as a whole (that is: Subsystems out of service, Cisco Unified CCX installation issues, and so on) and you have a valid support contract, please open a TAC case by calling 800-553-2447. For faster assistance, please open a case on the web at http://tools.cisco.com/ServiceRequestTool/create/launch.do by clicking the "Create a new TAC Service Request" link.
2-69Cisco Unified Contact Center Express Getting Started with Scripts, Release 11.0(1)

Chapter 2 How To Use the Cisco Unified CCX Editor How To Use Cisco Unified CCX Script Templates
2-70Cisco Unified Contact Center Express Getting Started with Scripts, Release 11.0(1)

Cisco Unified Contact Center Express Getting Sta
C H A P T E R 3
Using Expressions and the Expression EditorThis chapter covers the following topics:
• How to Access the Cisco Unified CCX Expression Editor, page 3-1
• How to Use the Expression Editor, page 3-2
• About the Expression Editor Toolbar, page 3-4
• About the Expression Editor Syntax Buttons, page 3-9
• About Expression and Java Licensing, page 3-9
For an explanation of each toolbar on each Expression Editor tab, see Using Expressions and the Expression Editor, page 3-1.
How to Access the Cisco Unified CCX Expression Editor
Whenever you see this 3-dot button in a Cisco Unified CCX Editor step properties window, you can click on it to open the Expression Editor to edit the value of the field to the left of the button. The following figure shows the Expression Editor button in the Set step properties window.
3-1rted with Scripts, Release 11.0(1)

Chapter 3 Using Expressions and the Expression Editor How to Use the Expression Editor
How to Use the Expression EditorUse the Expression Editor to enter or modify expressions in a Cisco Unified CCX script.
This section includes the following topics:
• How To Enter Expressions in the Expression Editor, page 3-2
• About the Expression Editor Toolbar, page 3-4
• About the Expression Editor Syntax Buttons, page 3-9
• About Expression and Java Licensing, page 3-9
How To Enter Expressions in the Expression EditorExpressions are useful if you do not know an exact value at design time and instead need to enter a formula that can be evaluated at run time.
3-2Cisco Unified Contact Center Express Getting Started with Scripts, Release 11.0(1)

Chapter 3 Using Expressions and the Expression EditorHow to Use the Expression Editor
Note The resulting type of expression must match the expected input type or types (which you check at design time).
In the Expression Editor window, you can enter or edit an expression in the Value input text box and you can use the All Variables selection box to get quick access to a variable you have previously defined in the script to paste it into the expression.
When you choose a variable from the All Variables selection box, the variable name appears in the Value input text box.
After you enter the expression, click OK and the Expression Editor closes.
3-3Cisco Unified Contact Center Express Getting Started with Scripts, Release 11.0(1)
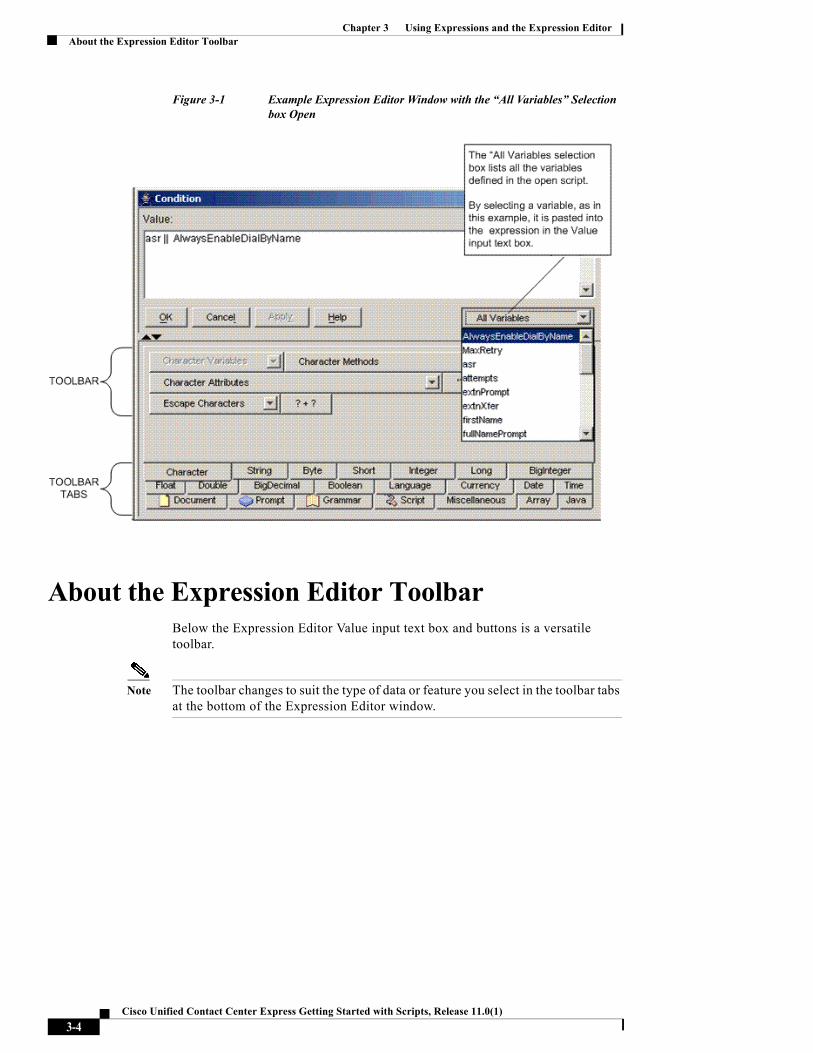
Chapter 3 Using Expressions and the Expression Editor About the Expression Editor Toolbar
Figure 3-1 Example Expression Editor Window with the “All Variables” Selection box Open
About the Expression Editor ToolbarBelow the Expression Editor Value input text box and buttons is a versatile toolbar.
Note The toolbar changes to suit the type of data or feature you select in the toolbar tabs at the bottom of the Expression Editor window.
3-4Cisco Unified Contact Center Express Getting Started with Scripts, Release 11.0(1)

Chapter 3 Using Expressions and the Expression EditorAbout the Expression Editor Toolbar
This section includes the following topics:
• Toolbar Tabs, page 3-5
• A Pop-Up Menu, page 3-7
• Showing or Hiding the Expression Editor Toolbar, page 3-8
Toolbar TabsBy clicking on the appropriate tab below the toolbar, the toolbar changes to include the tools useful for editing the selected type of data indicated by the selected tab. For example, in Figure 3-2, the Character toolbar is selected and so tools appropriate for editing or entering character data are displayed.
The toolbar scripting tools (or aids) include:
• Variables: A selection box listing all the variables of the toolbar type selected (for example, character) currently contained in the open script.
• Constructors. A selection list of the public Java constructors available for creating and initializing new objects of the selected data type.
• Methods. A selection list of public Java methods for all the operations you can perform on the selected data type. A method has four basic parts:
– The method name
– The type of object the method returns
– A list of parameters
– The body of the method
• Attributes. A selection list of all the public Java attributes available for the selected data type. These are the things that differentiate one object from another in the selected data type. For example, color or size.
• Constants and Keywords. In some cases, constants and keywords for the selected data type or object are included.
• Syntax button. Buttons for quickly entering data of the selected type with the correct syntax. The question marks on the buttons indicate command parameters which you need to supply.
• Easy access to Prompts, grammars, documents, and scripts stored inside the Cisco Unified CCX repository.
3-5Cisco Unified Contact Center Express Getting Started with Scripts, Release 11.0(1)

Chapter 3 Using Expressions and the Expression Editor About the Expression Editor Toolbar
When you click a button or select an item from a list, the Cisco Unified CCX Editor inserts the selected expression text at the cursor position in the text input field.
For example, if you are creating an expression that accesses the current time, on the Time tab, click the now button, and the Cisco Unified CCX Editor will insert the Java code that retrieves the current time when the script runs.
Note The Java tab contains a selection list of the constructors, methods, attributes, and syntax buttons of the selected Java object within the open script. Therefore, the contents of this tab will vary. The Java tab allows you to enter a class name of your own in order to have its set of constructors, methods or attributes listed in the selection boxes. This enables an easy lookup of what is available so you can paste it into the expression directly. The Java toolbar is populated with the constructors, methods or attributes of the class you enter. A selection box drop-down arrow is disabled if the class entered is invalid or does not have any constructors, methods or attributes.
3-6Cisco Unified Contact Center Express Getting Started with Scripts, Release 11.0(1)

Chapter 3 Using Expressions and the Expression EditorAbout the Expression Editor Toolbar
Figure 3-2 Example Expression Editor Window with the Language Toolbar Selected
A Pop-Up Menu Right click in the Expression Editor window to access the pop-up menu. This enables you to accesses editing functions such as Undo, Cut, and Paste. See Figure 3-3.
The popup menu also provides two special functions:
• One allows you to parse an expression immediately in order to pinpoint errors
• The other allows you to automatically reduce the expression to a smaller and yet equivalent expression (for example 3 + 2 would be reduced to 5).
3-7Cisco Unified Contact Center Express Getting Started with Scripts, Release 11.0(1)
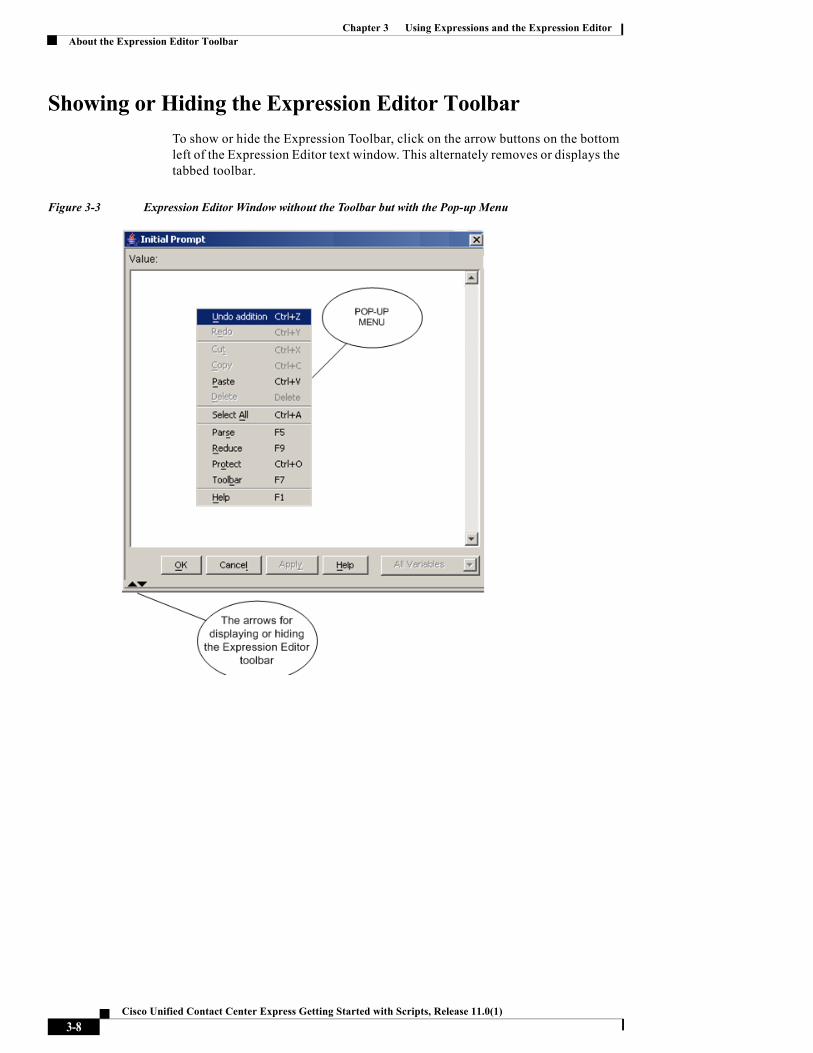
Chapter 3 Using Expressions and the Expression Editor About the Expression Editor Toolbar
Showing or Hiding the Expression Editor ToolbarTo show or hide the Expression Toolbar, click on the arrow buttons on the bottom left of the Expression Editor text window. This alternately removes or displays the tabbed toolbar.
Figure 3-3 Expression Editor Window without the Toolbar but with the Pop-up Menu
3-8Cisco Unified Contact Center Express Getting Started with Scripts, Release 11.0(1)

Chapter 3 Using Expressions and the Expression EditorAbout the Expression Editor Syntax Buttons
About the Expression Editor Syntax ButtonsThe toolbar syntax buttons indicate the different ways you can operate on a data type. This syntax is the same as the Java language syntax plus additional syntax aids for handling prompts and documents.
About Expression and Java LicensingBeginning with Cisco CRS 4.x, expressions are validated against installed licenses to make sure that they do not violate license agreements. This validation is performed by the Cisco CRS Engine whenever a script is loaded or whenever a prompt template or grammar template is accessed and evaluated.
For script expressions containing TTS or Java features to work during runtime, you must have either a Cisco Unified IP IVR, a Cisco Unified CCX Enhanced, or a Cisco Unified CCX Premium license.
Note In Cisco Unified CCX Standard, you can enter only simple expressions unless you also have a Java license. You automatically have a Java license with the other four Cisco Unified CCX products.
An example of a TTS feature is a TTS prompt complex literal. A Java feature is a complex expression block, a Java-like statement, method, constructor invocation expression, or a field access expression.
Any license violation will be recorded in the logs and prevent the scripts from being loaded in memory.
3-9Cisco Unified Contact Center Express Getting Started with Scripts, Release 11.0(1)

Chapter 3 Using Expressions and the Expression Editor About Expression and Java Licensing
3-10Cisco Unified Contact Center Express Getting Started with Scripts, Release 11.0(1)

Cisco Unified Contact Center Express Getting S
C H A P T E R 4
Localizing Cisco Unified CCX ScriptsYou can localize your Cisco Unified CCX scripts to use prompts in the language your customers use.
This chapter covers the following topics:
• Installing Language Groups, page 4-1
• When Do You Need a Language Group?, page 4-2
• Changing a Cisco Unified CCX Installed Language, page 4-4
• Language Restrictions, page 4-4
• Creating a Custom Country-Specific Language, page 4-4
• Using VXML to Implement a Language Not Available in Cisco Unified CCX, page 4-5
Installing Language GroupsWhen you install a Cisco Unified CCX application, you are prompted to install the language used for prompts. Since the same language can vary from place to place, you first select a language group and then the country where the language is spoken. The default language group and country is US English.
4-1tarted with Scripts, Release 11.0(1)

Chapter 4 Localizing Cisco Unified CCX Scripts When Do You Need a Language Group?
The language groups that you can install at installation time consist of a set of system prompts. These prompts are used internally by some script steps and by the Cisco Unified CCX prompt generator rules that decide how to combine prompt input to form a number (for example, a social security number or a telephone number) or to spell out a string.
However, you are not restricted to using only the languages available with Cisco Unified CCX 4.0. Prompts and rules are accessible to your Cisco Unified CCX scripts either in the language that you install or in the language that you provide in your own prompts through the Cisco Unified CCX Administration Prompt Management or by using VXML.
When Do You Need a Language Group?The language group (also called “pack”) is needed in the following three situations:
• In only two types of steps: The Media steps and the Create Generated prompt step require a language group. The other Cisco Unified CCX script steps are not affected by the language you are running or have installed.
The Play prompt, the Extended Play prompt, the Voice Browser step, and the Recording step, these four script features are not affected by the language group since they do not need data from the language group.
Note If you are not going to use the Media steps or the Create Generated prompt step, then you do not need a language group and you can upload your own prompts into the scripts in your own language rather than installing a language group at installation time.
• For system default treatment prompts when there is an error in your script: For example, if there is a script error, the system might play in the language corresponding to the call: “We are currently experiencing system difficulties, please call back later.”
When you configure an application in the Cisco Unified CCX Administration web page, you have the ability to configure your own script to act as a default treatment script. But if your default treatment script has an error, then the system falls back on the system default treatment script.
4-2Cisco Unified Contact Center Express Getting Started with Scripts, Release 11.0(1)

Chapter 4 Localizing Cisco Unified CCX ScriptsWhen Do You Need a Language Group?
Store your default treatment prompt with the name unrecov_error in the user repository under the language you wish.
Note All calls defined with that language for all applications will use the system error prompt you created for the system default treatment.
• For system retry prompts when there is a user-input error: During a retry attempt, some system prompts are played back. For example, if you entered invalid digits or are timed out, the prompt will tell you that and ask you to retry. The Cisco Unified CCX script steps get these prompts from the installed language group. If you do not have a language group installed, then the script plays the prompt in US English.
You can circumvent this behavior in an application by configuring those steps to not do the system retry but rather do a retry that you yourself create. That is one way you can customize your application to work without a language group.
For example, take the Get Digit string where you want to collect a social security number. If you configure the Get Digit string to do a retry, for example to do two attempts and after two attempts fail, when it fails, the application will prompt you with whatever prompt you create to re-enter your social security number.
To disable the default retry script, you can set the MAX retry in the script to zero. In that case, the application will ask you the question only once, and if it fails, it will go into an error right away and implement your own retry by looping back to whatever prompt you have selected.
Note The Name to User step is the one step that does not have the capability of circumventing the default retry behavior. That step requires a language group.
4-3Cisco Unified Contact Center Express Getting Started with Scripts, Release 11.0(1)

Chapter 4 Localizing Cisco Unified CCX Scripts Changing a Cisco Unified CCX Installed Language
Changing a Cisco Unified CCX Installed Language
Once you have installed Cisco Unified CCX, the only way you can install another Cisco Unified CCX language available in the Cisco Unified CCX installable language packs, is to reinstall Cisco Unified CCX.
Language RestrictionsIf you use VXML, you can provision additional language grammars by using the grammar management facility. This can be found at Applications > Grammar Management in the Cisco Unified CCX Applications Administration window. But:
• If you are using ASR-enabled Cisco Unified CCX scripts, you are restricted to the languages available and installed for the installed ASR vendor(s) and for which Cisco Unified CCX has localized grammars.
• If you are using TTS-enabled scripts, you are restricted to the languages available and installed for the installed TTS vendor(s).
Creating a Custom Country-Specific LanguageIf you want to create a custom country-specific language, at installation time, in the Language Installation window, select not only the Language Group but also the Group Default for that language. If you install a language as a Group Default, you can take advantage of that base to build your own customized language for system prompts. For example, say you speak New Zealand English, but it is not available as a selection. In that case, you would select English as the Language Group and you might select the United Kingdom as the Group Default.
If there is an error in your customized script prompt, the script falls back on the group default language. If the group default language is not installed, the script falls back on the group parent language. If that is not available, then the script falls back on US English.
4-4Cisco Unified Contact Center Express Getting Started with Scripts, Release 11.0(1)

Chapter 4 Localizing Cisco Unified CCX ScriptsUsing VXML to Implement a Language Not Available in Cisco Unified CCX
Using VXML to Implement a Language Not Available in Cisco Unified CCX
MRCP (Media Resource Control Protocol) is an application-level protocol that enables client devices requiring audio/video stream processing to control media service resources like Speech Synthesizers (TTS), Speech Recognizers (ASR), Signal Generators, Signal Detectors, Fax Servers, and so on over a network.
To implement an MRCP ASR and TTS-enabled script for a language outside the set available with Cisco Unified CCX (but within the set available from an MRCP vendor) using VXML, you must do the following:
Step 1 Install and configure the appropriate MRCP ASR and/or TTS language pack(s). See your MRCP vendor documentation for ASR/TTS language pack installation/configuration instructions.
Step 2 If your VXML script uses prompts, then you need to record suitable G711 u-Law encoded prompts and store them on a server that is accessible to the running VXML script. Only G711 prompts are supported by MRCP.
Note When generating a wav file prompt specifically for Nuance, you must take into account where the prompt is to be played. If the prompt is to be played by the Nuance Speech Server, then the wav file needs a “Sphere” (SPeech HEader REsources) header. If it is to be played by the Cisco Unified CCX server, it needs a normal “RIFF” (Resource Interchange File Format) header. Nuance provides a tool to convert wav files from “RIFF” to “Sphere” header files. ScanSoft uses "RIFF" headers.
Step 3 Provide a VXML script, referencing the recorded prompts (if used) and using any necessary built-in grammars provided by the vendor or script-writer provided grammars which are specified either in the VXML script or a location specified by the "src" attribute of the grammar element.
Step 4 Provide localized prompts for default event handlers and system-level errors. Cisco Unified CCX does not completely implement the notion of platform-specific audio, as defined by World Wide Web Consortium (W3C), see http://www.w3.org/, since system prompts are played instead. A default script is
4-5Cisco Unified Contact Center Express Getting Started with Scripts, Release 11.0(1)

Chapter 4 Localizing Cisco Unified CCX Scripts Using VXML to Implement a Language Not Available in Cisco Unified CCX
provided with Cisco Unified CCX which you can associate with the script's trigger to localize default event handlers (See When Do You Need a Language Group?, page 4-2).
4-6Cisco Unified Contact Center Express Getting Started with Scripts, Release 11.0(1)

Cisco Unified Contact Center Express Getting St
C H A P T E R 5
Advanced Scripting TechniquesThis chapter describes advanced techniques you can use when designing custom scripts in the Cisco Unified CCX Step Editor.
This section contains the following topics:
• Managing Contacts in Your Scripts, page 5-1
• Managing Sessions in Your Scripts, page 5-3
• Using Grammars in Your Scripts, page 5-4
• Using Prompts in your Scripts, page 5-11
• Advanced Error Handling, page 5-18
• About Script Interruption, page 5-22
• Using Different Media in your Scripts, page 5-24
• Using a Voice Browser in Your Scripts, page 5-28
Managing Contacts in Your ScriptsThe key element in a Cisco Unified CCX script is a contact, which represents one form of connection with a remote customer. A contact can be a telephone call, an e-mail message, or an HTTP request.
Scripts use contacts to track connections through the system. The contact is established when the connection is made. The contact lasts until the connection is terminated, as when the script transfers or disconnects a telephone call, responds to an HTTP request, or sends an e-mail message.
5-1arted with Scripts, Release 11.0(1)

Chapter 5 Advanced Scripting Techniques Managing Contacts in Your Scripts
The script performs actions on contacts through one or more of the following types of channels:
• CTI port
• CMT dialog channel
• HTTP control channel
• Cisco Unified ICME channel
• MRCP dialog channel
• E-mail control channel
• Cisco Unified CCX channel
You can write scripts to use generic contacts, which are independent of the contact type. This allows you to create subflows that are independent of the way in which the call has originated (without regard, for example, to whether the call originated as an inbound or outbound call).
You can configure each step that acts on contacts to accept the implicit contact (by choosing the “-- Triggering Contact --” default) or to use a variable that can hold the handle to this contact. With the Get Trigger Info step of the Contact palette, the script can receive a handle to the implicit contact and save it as a Contact variable that the script can use later in steps or subflows.
You can use also use the Set Contact Info step of the Contact palette to mark the contact as Handled, which is important for reporting purposes.
Note If you do not use the Set Contact Info step to mark contacts as Handled, real-time and historical reports may not show that the contact was successfully handled.
Using the functionality of the concept of a contact, you can design contact-neutral scripts that can contain small logic sections that can be independent of the type of contact.
Because you can keep a handle to a contact inside the script, you can design a script that manages more than one of these contacts at the same time. A single script can now be triggered in one way, create outbound calls, and then play prompts on each call individually. This feature offers a new range of possibilities. For an example of a script that handles multiple contacts, see Working with Multiple Contacts.
5-2Cisco Unified Contact Center Express Getting Started with Scripts, Release 11.0(1)

Chapter 5 Advanced Scripting TechniquesManaging Sessions in Your Scripts
Managing Sessions in Your ScriptsA session provides script designers with an easy way to associate information with a customer (caller) as the call moves through the system (similar to an in-memory database or a shopping cart on the web).
The script automatically associates a call contact with a session object when the contact is received (inbound) or initiated (outbound). You can also create sessions manually, using the Get Session step of the Session palette; this feature may be useful when you want to use sessions for HTTP or e-mail contacts.
Customer information stored in a session object can persist for a specified length of time after the contact ends and be made available to a subsequent contact. This feature can save customers the need to re-enter information such as credit card account digits.
You can store any type of information in these session objects, and retrieve the information with the Set Session Info and Get Session Info steps of the Session palette.
Note A session is maintained on a single Cisco Unified CCX server only; for example, information entered on Cisco Unified CCX Server #1 will not be available if the call arrives at or is transferred to Cisco Unified CCX Server #2.
Using Mapping IdentifiersA Cisco Unified CCX script uses one or more mapping identifiers to identify sessions. These mapping identifiers allow a script to tag a given session with customer-specific information that the script then retrieves on a subsequent call or HTTP request. You can use any kind of information that can be received by the script as a mapping identifier.
For example, suppose a caller places a call and enters information, including an account number that the system uses as a mapping identifier. If the caller places a second call relatively soon after the first call, and re-enters the account number, the script retrieves the earlier session that contains all the previously entered information.
In this case, the script re-assigns the original session object to the call to replace the one that was created when the caller placed the second call.
5-3Cisco Unified Contact Center Express Getting Started with Scripts, Release 11.0(1)

Chapter 5 Advanced Scripting Techniques Using Grammars in Your Scripts
A session for which a mapping identifier has been added by a script will typically persist in memory for 30 minutes after the contact has ended. You can configure this value in the System Parameters section of the Cisco Unified CCX Applications Administration web interface.
Tip If you need to lessen session impact on the memory consumption of the Cisco Unified CCX server, lessen the length of time that sessions persist in memory.
Using Session ObjectsSession palette steps can be useful in many situations. Some examples:
• The script transfers a call contact back to a Cisco Unified IP IVR application, or redirects the call contact from one application to another application on the same Cisco Unified CCX server—This feature makes information about the original caller available to the script.
• You want general information to be accessible by multiple scripts independently of contacts or customers—If you create and identify a session with a hard-coded mapping identifier, all scripts can access this session and access or alter information kept there.
Note The created session, if not associated with a contact, is subject to deletion after the system default session timeout. However, each time the Get Session step retrieves the session, the timeout is reset.
• You want to access real-time information using the real-time reporting client—This feature lets you see all sessions in the system and their associated values.
For an example that shows the use of Session palette steps, see Chapter 15, “Designing Cisco Unified CCX Scripts.” For an example that shows the use of Session palette steps, see Chapter 17, “Designing Cisco Unified CCX Scripts.”
Using Grammars in Your ScriptsThis section includes the following topics:
5-4Cisco Unified Contact Center Express Getting Started with Scripts, Release 11.0(1)

Chapter 5 Advanced Scripting TechniquesUsing Grammars in Your Scripts
• About Grammars, page 5-5
• File Grammar Formats, page 5-7
• Automatic Conversion, page 5-8
• Passing Grammars to Steps, page 5-9
• Grammar Template, page 5-9
• Compound Grammar, page 5-10
• Compound Grammar Indexing, page 5-10
About GrammarsIn a Cisco Unified IP IVR script, you use grammars to specify a set of all possible spoken phrases and/or DTMF digits that the system can recognize and act upon during run time.
The Cisco Unified CCX Engine uses two types of grammars:
• System grammars—Used internally by Cisco modules and Cisco sample scripts.
Note System grammars are provided by Cisco. Cisco makes no guarantees about the continued availability of system grammars in future releases.
• User grammars—Configured by the user, and manageable by the administrator by means of the Cisco Unified CCX Applications Administration web interface.
The system retrieves grammars from the Grammar Repository, which you configure from the System Parameters configuration web page of the Cisco Unified CCX Administration web interface.
The Cisco Unified CCX Script Editor contains a Grammar palette with the following three steps:
• Create Language Grammar step—Chooses a set of grammars based on the language context of the call.
• Create Menu Grammar step—Creates spoken word and/or DTMF menus.
5-5Cisco Unified Contact Center Express Getting Started with Scripts, Release 11.0(1)
Chapter 5 Advanced Scripting Techniques Using Grammars in Your Scripts
• Upload Grammar step—Stores grammars in the Grammar repository, where they are made accessible to all Cisco Unified CCX servers in the cluster.
For more information on using these steps, see the Cisco Unified Contact Center Express Scripting and Development Series: Volume 2, Editor Step Reference Guide.
Grammar Search AlgorithmThe script locates grammars by means of a standard language search algorithm based on the language context of the call.
For example, assuming a language context of {L[fr_FR_Judy], L[en_GB]}, a search will return the first grammar defined for the following directories:
• ...\fr_FR_Judy
• ...\fr_FR
• ...\fr
• ...\en_GB
• ...\en
• ...\default
This type of algorithm allows you to place grammars that are common to all languages in the “default” directory, or grammars that are common to all French languages in the “fr” directory. You can override these common grammars by placing a grammar with the same filename under a different directory, such as “fr_FR”.
Cisco Cisco Unified CCX supports the following file extensions:
• .grxml—for MRCP grammars
Note The Nuance Grammar language format extension, .gsl, is no longer supported.
• .digit—for digit grammars
• .jrx—for regex grammars used by the DTMF voice browser only
• .tgl—for template grammars
5-6Cisco Unified Contact Center Express Getting Started with Scripts, Release 11.0(1)

Chapter 5 Advanced Scripting TechniquesUsing Grammars in Your Scripts
Note For more information on grammars algorithms and files, see the Cisco Unified Contact Center Express Scripting and Development Series: Volume 3, Expression Language Reference Guide.
If you do not provide an extension, the script locates the grammar file based on the media type of the call when referenced as a user grammar in a Cisco Unified CCX script:
• All the supported extensions listed above.
• The type of media supported by the call; if MRCP ASR is supported, the search starts with .grxml. Otherwise, the search starts with .digit.
File Grammar FormatsCisco Cisco Unified CCX supports the following file grammar formats:
• The SRGS File Grammar Format, page 5-7
• The Digit File Grammar Format, page 5-7
Cisco Unified CCX no longer supports The GSL File Grammar Format (deprecated), page 5-8
The SRGS File Grammar FormatFor an example of SRGS grammar format, see “Using the SRGS Grammar Format” in the Cisco Unified Contact Center Express Scripting and Development Series: Volume 2, Editor Step Reference Guide.
The Digit File Grammar Format
The Digit file grammar format (“.digit”) is based on Java Properties File, in which a key is defined as “dtmf-x”, where “x” is from the set “0123456789*#ABCD” and its value is the corresponding tag to be returned when a key is pressed or recognized.
You can use an optional entry defined as “word=true” to specify that the word representation of each DTMF digit should be automatically included during a recognition; for example:
5-7Cisco Unified Contact Center Express Getting Started with Scripts, Release 11.0(1)

Chapter 5 Advanced Scripting Techniques Using Grammars in Your Scripts
word=truedtmf-star=byedtmf-4=4
For an example of Digit File grammar format, see “Using the Digit File Grammar Format” in the Cisco Unified Contact Center Express Scripting and Development Series: Volume 2, Editor Step Reference Guide.
The GSL File Grammar Format (deprecated)The GSL file grammar format (“.gsl”) supports full Nuance Grammar Specification Language format.
You must define the grammar with a single main rule (prefixed with “.”).
You must have a slot named “tag” if you use the grammar as a main grammar in a recognition; for example:.Main [
hi {<tag hi>}dtmf-star {<tag bye>}dtmf-4 {<tag 4>}joy {<tag lg>}
]
Automatic Conversion The script uses grammars independently from the following types of supported media:
• Cisco Media Termination (CMT)—DTMF digits
• Automatic Speech Recognition (ASR)—Speech
The script automatically converts grammars from one type to the other, based on the media type of the call.
If the call uses a CMT Dialog channel and you have specified a SRGS (.grxml) grammar, the script automatically analyzes the grammar and extracts all defined digits to create a corresponding digit grammar.
5-8Cisco Unified Contact Center Express Getting Started with Scripts, Release 11.0(1)

Chapter 5 Advanced Scripting TechniquesUsing Grammars in Your Scripts
If the call uses an ASR Dialog channel and you have specified a digit grammar, the script automatically converts the grammar to a corresponding SRGS (.grxml) grammar. If the grammar is marked with “word=true”, the script includes the spoken representation of the digit, in the current language of the call, in the SRGS grammar.
Passing Grammars to StepsYou can pass grammars to the following steps in a script:
• Simple Recognition step—Use the Simple Recognition step customizer window to specify all tags in the grammar. A tag is a grammar element.
• Explicit Confirmation step—Use the Explicit Confirmation step customizer window to associate the tags with the value “yes” to represent a successful confirmation, or “no” for a negative confirmation.
Note Tags for grammars are case-sensitive.
Grammar Template Cisco Unified CCX 4.0 and after adds support for a new type of grammar file to the user and system grammars already available. This file has the filename extension.tgl and can be referenced in a script just like other grammar files.
In addition, not related to the expression, Cisco Unified CCX 4.0 and after adds support for one new grammar file extension:.grxml. Files ending with this extension are expected to be text files written as SRGS (Speech Recognition Grammar Specification) grammars. Effective with Cisco Unified CCX 3.0, when referencing a user or system prompt, the extension of the file was optional and a search among valid extensions was performed to locate a file in the grammar repository. Effective with Cisco Unified CCX 4.0, the search order is:.grxml,.gsl,.digit and .tgl.
5-9Cisco Unified Contact Center Express Getting Started with Scripts, Release 11.0(1)

Chapter 5 Advanced Scripting Techniques Using Grammars in Your Scripts
When a user or system grammar with the.tgl extension is located, it is loaded as a text file and parsed, and the result is a grammar object. The expression specified in the text file does not have access to script variables. However, if defined using a complex block expression, the block can be parameterized like a method declaration, allowing for scripts to customize the evaluation of the expression. This is similar in concept to the prompt template file described in About Prompt Templates, page 5-14.
Compound GrammarA compound grammar combines multiple grammars together. All grammars combined together are activated at the same time when a recognition or an acquisition is performed. Priority is always given to the grammar that comes to the right of another. So if an additional grammar is combined with a first one and it defines the same choices, it will be the one taking precedence in the recognition. Compound grammars may have some special treatment based on the media chosen. For Cisco Media Termination (CMT) media termination, all Dual Tone Multi-Frequencies (DTMFs) are combined together to form a single grammar to be used when acquiring DTMF digits from a caller.
For example, the grammar expression:
G[G1] || G[G2] || GG[Hello|dtmf-2]
represents a compound grammar that activates the grammars G[G1], G[G2] and GG[Hello|dtmf-2] together with priority to GG[Hello|dtmf-2]over G[G1]and G[G2], and priority to G[G2] over G[G1].
Compound Grammar Indexing It is possible to index a compound grammar like an array in order to reference a single grammar contained in the compound grammar. This is done using the [] operator as when indexing an array, whether the
5-10Cisco Unified Contact Center Express Getting Started with Scripts, Release 11.0(1)

Chapter 5 Advanced Scripting TechniquesUsing Prompts in your Scripts
compound grammar is represented with the || operator (see Compound Grammar, page 5-10) or the grammar is from the grammar repository that results in a compound grammar.
If the supplied index is out of bounds, a parse time or an evaluation time ExpressionArrayIndexOutOfBoundsException might be thrown as a result. If the grammar being indexed does not represent a compound grammar, then an ExpressionClassCastException is thrown.
Examples of compound grammar indexing expressions that all result in grammar expressions are shown in Table 5-1.
Table 5-1 Compound Grammar Indexing Examples
1 G[grammar.tgl][1]
2 (G[grammar1.digit] || G[grammar2.grxml])[0]
3 ((DG[dtmf-1|word=true] || G[grammar.tgl) || GG[hello|dtmf-3])[0][1]
Using Prompts in your ScriptsThis topic covers the following topics:
• About Prompts, page 5-11
• Prompt Types You Can Create, page 5-13
• The Prompt Search Algorithm, page 5-13
• About Prompt Templates, page 5-14
• How To Create or Customize a Prompt, page 5-15
5-11Cisco Unified Contact Center Express Getting Started with Scripts, Release 11.0(1)

Chapter 5 Advanced Scripting Techniques Using Prompts in your Scripts
About PromptsThe Cisco Unified CCX Editor uses the following two kinds of prompts:
• System prompts—Used internally by Cisco modules and Cisco sample scripts.
Note System prompts are used internally by the system. Cisco makes no guarantees about the continued availability of any system prompt in future releases.
• User prompts—Defined by the user, and manageable by the administrator by means of the Prompt Management configuration web page of the Cisco Unified CCX Administration web interface.
Note For complete details on creating complex prompts in scripts, see the Cisco Unified Contact Center Express Scripting and Development Series: Volume 3, Expression Language Reference Guide.
All Media and Prompt steps support prompts specified in the following three ways:
• String expression—User-defined prompts located in the User Prompts directory of the Cisco Unified CCX Administration web interface.
• Document expression—Recorded audio streams.
Document objects are returned by the Recording step (Media palette), Get User Info step (User palette), DB Get step (Database palette), the Create File Document step and Create URL Document steps of the Document palette, or any valid document expressions.
• Prompt expression—Dynamically created at run time.
Note You must define all prompts played back and recorded with a RIFF header of type WAVE and G711 u-law format.
5-12Cisco Unified Contact Center Express Getting Started with Scripts, Release 11.0(1)

Chapter 5 Advanced Scripting TechniquesUsing Prompts in your Scripts
The script retrieves both user and system prompts from the Prompt Repository. You can manage these prompts from the Prompt Management Configuration web page of the Cisco Unified CCX Administration web interface. (For more information on configuring the Prompt Management Configuration web page, see the Cisco Unified Contact Center Express Administration Guide.)
Prompt Types You Can CreateYou can use the steps in the Prompt palette of the Cisco Unified CCX Script Editor to create the following prompts:
• Conditional Prompt—Creates one of two specified prompts, based on the result of evaluating a specified Boolean expression
• Container Prompt—Creates one of the three prompts:
– Concatenated Prompt—Creates a prompt that combines multiple prompt phrases into one prompt.
– Escalating Prompt—Creates a prompt that plays back one prompt phrase at a time, starting with the first in a series and moving to the next one on each retry within a Media step.
– Random Prompt—Creates a prompt that plays back one phrase from the supplied list in a random order.
• Generated Prompt—Generates a prompt using generators that act on variables (currency, date, digit, string, and time).
• Language Prompt—Selects a prompt from the set of prompts specified based on the language context of the call at run time.
• TTS Prompt—Creates a prompt based on the text from a string expression or a document expression to be played back as speech, using the system default TTS provider.
Note For scripts running with ASR, you cannot use multiple Play Prompt steps to concatenate prompts together if you expect the prompts to be interrupted by speech (that is, when barge-in is enabled), because speech cannot be buffered (like DTMF) on the first step and then used on the last step for recognition. You must prepare a grammar to be ready to perform the recognition if the prompts are interrupted by a caller barge-in.
5-13Cisco Unified Contact Center Express Getting Started with Scripts, Release 11.0(1)

Chapter 5 Advanced Scripting Techniques Using Prompts in your Scripts
The Prompt Search AlgorithmSimilar to the way it handles grammars, the script locates prompts by means of a standard language search algorithm based on the language context of the call.
For example, assuming a language context of {L[fr_FR_Judy], L[en_GB]}, a search returns the first prompt defined for the following directories:
• ...\fr_FR_Judy
• ...\fr_FR
• ...\fr
• ...\en_GB
• ...\en
• ...\default
Note If no extension is provided, the system searches for files with the following extensions: .wav, .ssml, .tts, and .tpl (in that order).
This type of algorithm allows you to place prompts that are common to all languages in the “default” directory, or place prompts that are common to all French languages in the “fr” directory. You can override these common prompts by placing a prompt with the same filename under a different directory, such as “fr_FR”.
About Prompt TemplatesA prompt template is a prompt represented as an expression and evaluated at the time it is queued up for playback.
Cisco Unified CCX 4.0 and after adds support for a new type of prompt file to the user and system prompts already available. This new file has the filename extension.tpl and can be referenced in a script just like the other.wav prompt files could.
5-14Cisco Unified Contact Center Express Getting Started with Scripts, Release 11.0(1)
Chapter 5 Advanced Scripting TechniquesUsing Prompts in your Scripts
In addition, not related to the expression, Cisco Unified CCX 4.0 and after adds support for two new prompt file extensions:.tts and.ssml. Files ending with these extensions are expected to be text files containing the text to be rendered as audio using a configured TTS server.
For descriptions of the currently available prompt templates and the various ways of entering prompts in scripts, see Cisco Unified CCX Scripting and Development Series: Volume 3, Expression Language Reference.
How To Create or Customize a PromptThrough Cisco Unified CCX Administration Media Configuration, you can create and modify the prompts that your scripts use. You can also upload spoken names for each person in the organization, so callers receive spoken names rather than spelled-out names when the automated attendant is asking the caller to confirm which party they want.
These topics describe how to customize these features:
• Recording the Welcome Prompt, page 5-15
• Configuring the Welcome Prompt, page 5-16
• Uploading a Spoken Name, page 5-18
Recording the Welcome Prompt
This section uses the Cisco AutoAttendant as an example situation where you might want to record your own prompt.
The Cisco AutoAttendant comes with a prerecorded, generic welcome prompt. You should record your own welcome prompt to customize your automated attendant for the specific role that it is to fulfill for your organization.
You can use any sound recording software to record the welcome prompt if the software can save the prompt in the required file format. You can record a different welcome prompt for each instance of Cisco AutoAttendant that you create.
This section describes how to record the welcome prompt by using Microsoft Sound Recorder. Save the prompt as a .wav file in CCITT (u-law) 8-kHz, 8-bit, mono format.
5-15Cisco Unified Contact Center Express Getting Started with Scripts, Release 11.0(1)

Chapter 5 Advanced Scripting Techniques Using Prompts in your Scripts
Mu-Law is the standard codec (compression/decompression) algorithm for pulse code modulation (PCM) from the Consultative Committee for International Telephone and Telegraph (CCITT).
You must have a microphone and speakers on your system to use the software.
Procedure
Step 1 Start the Sound Recorder software; for example, by choosing
Start>Programs>Accessories>Entertainment>Sound Recorder.
Step 2 Click the Record button and say your greeting into the microphone.
Step 3 When you finish the greeting, click the Stop button.
Step 4 To check your greeting:
a. Click the Rewind button (also called “Seek to Start”) or drag the slider back to the beginning of the recording.
b. To play the recording, click the Play button. Rerecord your greeting until you are satisfied.
Step 5 When you are satisfied with your greeting, save the recording:
a. Choose File> Save As.
b. To set the recording options, click Change. (You can also do this by choosing Properties from the Sound Recorder File menu). Choose these options:
• Name—Choose [untitled].
• Format—Choose CCITT u-law.
• Attributes—Choose 8.000 kHz, 8 Bit, Mono 7 kb/sec.
You can save these settings to reuse later by clicking Save As and entering a name for the format.
c. To close the Sound Selection window, click OK.
d. Browse to the directory where you want to save the file, enter a file name, and click Save. Use the .wav file extension.
5-16Cisco Unified Contact Center Express Getting Started with Scripts, Release 11.0(1)

Chapter 5 Advanced Scripting TechniquesUsing Prompts in your Scripts
Configuring the Welcome Prompt
Cisco AutoAttendant can only use welcome prompts that are stored on the Cisco Unified CCX Engine. To configure your automated attendant to use a customized welcome prompt, you must upload it to the server and configure the appropriate Cisco AutoAttendant instance.
Tip To start Cisco Unified CCX Administration, open http://servername/AppAdmin in your web browser, where servername is the DNS name or IP address of the application server. Click Help for detailed information on using the interface.
Procedure
Step 1 From the Cisco Unified CCX Administration main menu, choose Applications > Prompt Management.
The Prompt Management window displays.
Step 2 From the Language Directory drop-down menu, choose the specific language and directory where the prompt should be uploaded.
Step 3 To add a new prompt
a. Click the Add a new prompt hyperlink.
The Prompt File Name dialog box displays.
b. To open the Choose file dialog box, click Browse.
c. Navigate to the source .wav file folder and double-click the .wav file that you want to upload to the Cisco Unified CCX Engine.
d. Confirm your choice in the Destination File Name field by clicking in the field.
e. To upload the .wav file, click Upload.
The system displays a message that the upload was successful.
f. Click the Return to Prompt Management hyperlink.
The window refreshes, and the file displays in the Prompt Management window.
5-17Cisco Unified Contact Center Express Getting Started with Scripts, Release 11.0(1)

Chapter 5 Advanced Scripting Techniques Using Prompts in your Scripts
Step 4 To replace an existing prompt with a new .wav file
a. Click the arrow in the Upload column for the prompt that you want to modify.
The Choose file dialog box opens.
b. Enter the name of the .wav file that you want to use to replace the existing prompt.
c. When you have provided the .wav file and prompt name information, click Upload.
Uploading a Spoken Name
By default, the Cisco AutoAttendant spells out the names of parties when it asks a caller to choose between more than one matching name or to confirm that the user wants to connect to the party. You can upload spoken names to the system, so your automated attendant plays spoken names rather than spelling them out.
To upload Cisco Spoken Names in your users’ voices, upload the corresponding .wav files into the directory by performing the following steps:
Procedure
Step 1 Ask users to record their names in the manner that is described in the Recording the Welcome Prompt, page 5-15, and to save their files as userId.wav, where userId is their user name.
Step 2 Connect to Cisco Unified CCX Administration and click Tools > User Management. The User Management window displays.
Step 3 From the menu on the left, click the Spoken Name Upload link.
The Spoken Name Prompt Upload window displays. In the User ID field, enter a unique identifier of the user for which the spoken name is to be uploaded.
Step 4 In the Codec field, the codec chosen during installation for this Cisco Unified CCX server is automatically displayed.
Step 5 In the Spoken Name (.wav) field, browse to the .wav file you wish to upload. Click it and then click Open.
Step 6 From the Spoken Name Prompt Upload page, click Upload.
5-18Cisco Unified Contact Center Express Getting Started with Scripts, Release 11.0(1)

Chapter 5 Advanced Scripting TechniquesAdvanced Error Handling
Advanced Error HandlingThe Cisco Unified CCX Script Editor allows you to provide scripts with two advanced ways to handle errors.
The following sections describe these two advanced error handling techniques:
• Using the On Exception Goto Step, page 5-19
• Using Default Scripts, page 5-19
Using the On Exception Goto StepThe On Exception Goto step of the General palette of the Cisco Unified CCX Editor sends the execution to a specified place in the script when an exception is generated, which allows you to provide logic in the script for handling exceptions.
Note You must check the engine log file, present in [Cisco Unified CCX Install Directory]/log/MIVR directory, corresponding to the time of exception to recognize the specific exception that has occurred. For example: com.cisco.wf.subsystem.obj.WFInvalidStateException.
By using the On Exception Goto step for a specific exception in a script, you can register a new handler for a given exception or override a previously existing one.
The registration process is for the complete script, so it does not matter where the exception occurs (before, during, or after the given step). Once the step executes, the handler is registered until either a new one is re-registered or the exception is cleared with the On Exception Clear step of the General palette.
If an exception results in a subflow, the script first consults the exception handlers of the subflows. If none are defined for the given exception, the exception aborts the subflow and the Cisco Unified CCX Engine looks for exception handlers in the parent script and so on until either an exception handler is found or the script aborts completely.
If no exception handlers are registered, the script aborts and error handling falls back to the last level of error handling, which is the default script.
5-19Cisco Unified Contact Center Express Getting Started with Scripts, Release 11.0(1)

Chapter 5 Advanced Scripting Techniques Advanced Error Handling
Using Default ScriptsThe default script is the last level of user-defined error handling before the system kicks in and applies a default system treatment to all active contacts.
You can also configure a separate, default script when you provision a Cisco script application. The system invokes this default script under the following conditions:
• When the main script aborts, either because of an uncaught exception or because the Cisco Unified CCX server is unable to invoke the primary script because it has not been properly validated.
Note The default script can access the exception reason for why the main script aborted. You do this by using the GetTriggerInfo step to extract the exception value into a script variable.
• When an incoming call must be aborted because the Cisco Unified CCX server has reached its limit for the number of simultaneous sessions for the application.
• When the Cisco Unified CCX Engine is currently out of available tasks to run the script for an incoming call.
In each of these scenarios, the script marks all active contacts as aborting before the default script is executed. The final state of these contacts will be ABORTED even if they are transferred or redirected as a result of the execution of the default script.
Note Remember that the purpose of the default script is to gracefully terminate the call when the main script fails, not to have a fall back to provide the original services intended by the primary script. This distinction is important because using system resources to execute this default script may impair system performance. If the primary script fails too often, then you should fix the primary script rather than providing another script to attempt the same task.
The default script performs the following tasks:
• Redirects the call to an operator or to another extension for further processing
• Provides a customized error message to an HTTP request
5-20Cisco Unified Contact Center Express Getting Started with Scripts, Release 11.0(1)

Chapter 5 Advanced Scripting TechniquesAdvanced Error Handling
• Plays back a graceful excuse to the caller for the system problems before hanging up
You can transfer the state of the primary script to the default script before the primary script starts. To do this, define variables in the default script with exactly the same name and type as the variables in the main script. The variables in the default script are then automatically populated with the last values that were held by the corresponding variables in the primary script.
By doing so, you may, for example, be able to tell how many calls were active and terminate all of them gracefully, or you may be able to gain access to information about the caller and use it in your customized message.
Just as in the primary script, you can configure the default script at provisioning time by defining variables as parameters.
For Cisco Unified ICME scripts, the default script executes if the Cisco Unified ICME script issues a request for connecting to the default treatment. The default script, however, can execute only once, so if it has already executed because of a Cisco Unified ICME connect request to a default treatment, it will not be re-executed if the default script fails.
The default script does not execute if the primary script ends normally, even if contacts are still active. In this case, it is considered to be a design problem for the primary script. In such a case, all active contacts not marked as handled abort, and all active contacts marked as handled are simply terminated.
Note Remember that the default script provides only a final feedback to the contact regarding the system problem and does not continue the service or restart the service. You should therefore make the default script short and to the point.
The default treatments that the system applies if the contact is still active after the system executes the default script (if any) are:
• CallContact—Plays back the prompt, “We are currently experiencing system problems, please call back later” as an announcement, followed by a fast busy signal.
• HTTP Contact—Returns an INTERNAL SERVER ERROR (code 500).
• eMail Contact—There is no system default treatment for an e-mail contact.
5-21Cisco Unified Contact Center Express Getting Started with Scripts, Release 11.0(1)

Chapter 5 Advanced Scripting Techniques About Script Interruption
About Script InterruptionScript interruption is a feature that allows external events to interrupt the current processing of a script in order to return to another part of the script or stop the execution of the script.
Script interruption is typically used in the following situations:
• The script plays in an ACD environment in which it provides features such as service-on-hold or music-on-hold to a caller waiting in a queue for the system to transfer the call to an available agent.
• The script needs to be notified that one of its contacts has been remotely terminated, as when, for example, the caller hangs up.
• You are using the Cisco Unified CCX Script Editor to debug a script and the Cisco Unified CCX Script Editor makes a request to end the debugging session in the middle of that script.
Note In every case, any event that triggers the need to interrupt the script can occur at any time while the script executes other steps. In previous Cisco Unified CCX releases, script interruption could happen only for some of these events and only in some of the steps.
By default, scripts are automatically interruptible before any step is executed. Should any external event (such as those described above) interrupt the script, it will continue processing based on the proper handling for the particular event before it begins to execute the next step.
If you want two consecutive steps to execute without the possibility of interruption, you must move these two steps to a subflow where you can disable interruptions completely while the script processes that subflow.
Some steps contain an “interruptible” option, which allows you to indicate whether or not the script can interrupt the step from within when an external event occurs.
Note For Media steps, the old “interruptible” option that allowed a caller to stop the playback of the prompts using either DTMF or voice, as in case of ASR calls, now called “barge-in” calls.
5-22Cisco Unified Contact Center Express Getting Started with Scripts, Release 11.0(1)

Chapter 5 Advanced Scripting TechniquesAbout Script Interruption
The following paragraphs describe in more detail the external events that can cause interruptions and the default processing associated with them:
• A contact is remotely terminated.
When a caller hangs up, the script will be interrupted (if possible) and a ContactInactiveException will be generated. This exception can then be caught with the OnExceptionGoto step of the General palette and properly handled.
If a caller hangs up and you have not provided any exception handling logic, the script immediately aborts.
When managing multiple contacts, the OnExceptionGoto step cannot differentiate which contact was remotely terminated. Instead, it must specify a Label to which it can loop through all known contact variables and use the Get Contact Info step of the Contact palette to search for an Active flag
• A debugging session is terminated.
When you click the End button on the toolbar of the Cisco Unified CCX Editor, the script is interrupted and aborts without the possibility of catching or handling this case.
• A Cisco Unified CCX agent becomes available.
This event occurs only if the script has previously executed a Select Resource step from the ACD palette. When an agent becomes available, the script is interrupted and control is returned to the Select Resource step, exiting through either the Selected or Connected branches depending on the configuration.
• A Cisco Unified ICME agent becomes available.
The script is automatically interrupted without the possibility of catching or handling this case.
If an interrupting event happens when the script is not currently interruptible, the script is automatically interrupted whenever it becomes interruptible again. For example, although a script is not interruptible when it is running a subflow marked to disable interruptions, it will process the interruption as soon as the subflow terminates and control is returned to the parent (if that primary script is interruptible).
5-23Cisco Unified Contact Center Express Getting Started with Scripts, Release 11.0(1)

Chapter 5 Advanced Scripting Techniques Using Different Media in your Scripts
As another example, although a script is not interruptible while waiting for the results of a database fetch, it will process the interruption as soon as the results return and before the script executes the next step (unless the interruptible option has been disabled).
Figure 5-1 shows the Disable Interruptions option in the General tab of the Call Subflow customizer window.
Figure 5-1 Disable Interruptions Option—Call Subflow Step (General Tab)
Using Different Media in your ScriptsThis section covers the following topics:
• About Media, page 5-25
• Media-Less Calls, page 5-25
• Media Neutrality, page 5-26
• Media Steps, page 5-26
5-24Cisco Unified Contact Center Express Getting Started with Scripts, Release 11.0(1)

Chapter 5 Advanced Scripting TechniquesUsing Different Media in your Scripts
About MediaYou can configure the type of media that you want to associate with each trigger. The following three media types are available:
• Cisco Media Termination (CMT)
• MRCP Automatic Speech Recognition (ASR)
• None (for calls without media)
All calls you configure to use media are counted toward the number of licensed IVR ports.
All calls you configure to use ASR are counted toward the number of licensed ASR ports.
To allow for better provisioning, you can configure more CTI ports than the number of licensed IVR ports and more ASR channels than the number of licensed ASR ports.
At run time, the system will automatically reject a call received that requires media if accepting it would exceed the number of licensed Cisco Unified IP IVR ports.
The system will also automatically reject a call that requires ASR if accepting it would exceed the number of licensed ASR ports. In this case, the system will not fall back to the secondary dialog group if an ASR channel was available in the primary dialog group.
Media-Less CallsYou use a media-less call when you expect no media interactions with the caller (interactions such as prompting, getting DTMF digits, or speech recognition).
Examples of applications that require no media are e.911 redirect and simple queuing.
Note You can generate Music on Hold to a caller for a media-less call, because this function is not controlled by the Cisco Unified CCX Engine. This type of call uses fewer CPU resources on the Cisco Unified CCX server than other types of calls, which may allow you to increase the capacity of the Cisco Unified CCX Engine.
5-25Cisco Unified Contact Center Express Getting Started with Scripts, Release 11.0(1)

Chapter 5 Advanced Scripting Techniques Using Different Media in your Scripts
Media NeutralityAll Media palette steps of the Cisco Unified CCX Editor are designed to work on both types of media (DTMF and ASR), with the exception of the Voice Browser step, which can work only with ASR.
You can query the Get Contact Info step of the Contact palette to check if ASR is supported for a given call, and you can create conditional prompts to play different prompts (if required) based on the result of the query.
The system automatically converts grammars from one format to the other based on the current media type of a call.
Note For scripts running with ASR, you cannot use multiple Play Prompt steps to concatenate prompts together if you expect the prompts to be interrupted by speech (that is, when barge-in is enabled), because speech cannot be buffered (like DTMF) on the first step and then used on the last step for recognition. You must prepare a grammar to be ready to perform the recognition if the prompts are interrupted by a caller barge-in.
Media StepsThe following sections describe some of the steps that take advantage of the media capabilities of the Cisco Unified CCX Editor:
• Name To User Step, page 5-27
• Recording Step, page 5-27
• Explicit Confirmation Step, page 5-27
• Implicit Confirmation Step, page 5-28
• Simple Recognition Step, page 5-28
5-26Cisco Unified Contact Center Express Getting Started with Scripts, Release 11.0(1)

Chapter 5 Advanced Scripting TechniquesUsing Different Media in your Scripts
Name To User Step
The Name To User step is a modified version of the Name To Address step in previous releases.
The step now returns a User object that you can later query with the Get User Info step to retrieve the user’s extension, e-mail address, and spoken name.
If you request the operator option, the Name To User step returns control through a new Operator output branch.
The system can match only user names that are defined with characters from the English alphabet (unless the step is used with an ASR channel).
Recording Step
The Recording step allows you to record an audio segment from the caller and return it as a Document object that can, for example, be uploaded as a spoken name, saved to disk or to a database, or e-mailed.
The system defines all recordings as Document objects with a RIFF header of type WAVE and encoded using G711 u-law format.
Explicit Confirmation Step
The Explicit Confirmation step provides a simple building block for confirming a question, and is a limited version of a Menu or Simple Recognition step.
You define the Explicit Confirmation step with a default grammar that accepts the following input:
• CMT—1 for yes and 2 for no
• ASR—typical yes/no grammar in proper language
You can also override the default grammar with a user-defined grammar.
See Using Grammars in Your Scripts, page 5-4 for more information on defining and using grammars.
5-27Cisco Unified Contact Center Express Getting Started with Scripts, Release 11.0(1)

Chapter 5 Advanced Scripting Techniques Using a Voice Browser in Your Scripts
Implicit Confirmation Step
You typically use the Implicit Confirmation step in speech-enabled applications in order to provide the caller with a way to confirm an action without having to ask a question.
The script plays back a prompt explaining the action to be taken and then waits a configured number of seconds for any input from the caller.
If the caller presses any DTMF digits or speaks before the end of the prompt or the configured timeout, the confirmation is considered to have failed.
An implicit confirmation executed over a CMT dialog channel will ignore speech; only DTMF digits pressed by the caller will fail the confirmation.
Simple Recognition Step
The Simple Recognition step is an extension to the original Menu step that allows the designer to pass any user-defined grammar to be used for matching user input.
The Simple Recognition step works over CMT. Only DTMF digits can be matched against the specified grammar.
Using a Voice Browser in Your ScriptsThe Voice Browser feature allows you to design voice-enabled applications using standard VoiceXML . The Voice Browser currently supports VoiceXML 2.0 elements.
This section includes the following topics:
• Understanding VoiceXML, page 5-29
• Voice Browser Architecture, page 5-30
• Voice Browser Development Tools, page 5-32
For more information on developing voice-enabled applications, see Chapter 15, “Designing Cisco Unified CCX VoiceXML Applications.”
For more information on using the Voice Browser step in the Cisco Unified CCX Editor, see the Cisco Unified CCX Scripting and Development Series: Volume 2, Editor Step Reference.
5-28Cisco Unified Contact Center Express Getting Started with Scripts, Release 11.0(1)

Chapter 5 Advanced Scripting TechniquesUsing a Voice Browser in Your Scripts
For more information on developing voice-enabled applications, see Designing Cisco Unified CCX VoiceXML Applications.
Understanding VoiceXMLVoiceXML is designed for creating audio dialogs that feature synthesized speech, digitized audio, recognition of spoken and DTMF key input, recording of spoken input, telephony, and mixed-initiative conversations.
The main goal of VoiceXML is to bring the full power of web development and content delivery to voice response applications, and to free the authors of such applications from low-level programming and resource management. VoiceXML enables integration of voice services with data services that use the familiar client-server paradigm. A voice service is viewed as a sequence of interaction dialogs between a user and an implementation platform.
Document servers, which may be external to the implementation platform, provide the dialogs. Document servers maintain overall service logic, perform database and legacy system operations, and produce dialogs. A VoiceXML document specifies each interaction dialog to be conducted by a VoiceXML interpreter. User input affects dialog interpretation and is collected into requests submitted to a document server. The document server may reply with another VoiceXML document to continue the user session with other dialogs.
VoiceXML is a markup language that performs the following tasks:
• Minimizes client/server interactions by specifying multiple interactions per document
• Shields application authors from low-level and platform-specific details
• Separates user interaction code (in VoiceXML) from service logic (CGI scripts)
• Promotes service portability across implementation platforms; VoiceXML is a common language for content providers, tool providers, and platform providers
• Provides an easy programming language to use for simple interactions, and yet provides language features to support complex dialogs
The VoiceXML language describes the human-machine interaction provided by voice response systems, which include the following:
• Output of synthesized speech (Text-To-Speech, or TTS)
5-29Cisco Unified Contact Center Express Getting Started with Scripts, Release 11.0(1)
Chapter 5 Advanced Scripting Techniques Using a Voice Browser in Your Scripts
• Output of audio files
• Recognition of spoken input
• Recognition of DTMF input
• Recording of spoken input
• Provision of telephony features such as call transfer and disconnect
VoiceXML provides the means for collecting character and/or spoken input, for assigning the input to document-defined request variables, and for making decisions that affect the interpretation of documents written in the language. You can use URLs to hyperlink a document to other documents.
Voice Browser ArchitectureVoice Browser consists of the following three components:
• Document server—Processes requests from the VoiceXML interpreter. The server produces VoiceXML documents in reply.
• VoiceXML Interpreter—Processes the document. The VoiceXML interpreter executes the VoiceXML application, doing prompting and voice recognition via the Cisco Unified CCX Engine. The VoiceXML interpreter processes the input and may then branch or submit information to the document server according to the application logic.
The Voice Browser interprets VoiceXML documents and performs the dialog with the user. The web application model is a client server model. The role of the Voice Browser is that of a web client, fetching documents from a web server.
• Implementation Platform—Detects and answers incoming calls and responds to other telephony events. It is also responsible for prompting and receiving user input. The VoiceXML interpreter controls the Cisco Unified CCX implementation platform.
5-30Cisco Unified Contact Center Express Getting Started with Scripts, Release 11.0(1)

Chapter 5 Advanced Scripting TechniquesUsing a Voice Browser in Your Scripts
Figure 5-2 shows the architecture for the Voice Browser system. See the steps below the figure for an explanation of the process that the diagram illustrates.
Figure 5-2 Voice Browser Architecture
The following is an example of a VoiceXML process flow:
1. The user makes a call to a phone number.
2. The Cisco Unified CCX system answers the call and invokes the VoiceXML interpreter to perform the dialog.
3. The VoiceXML interpreter makes a request “http://abc/HelpDesk.vxml”.
4. The document server receives the request. It processes, formats, and returns the document.
5. The VoiceXML interpreter interprets the document.
6. The interpreter performs prompting and voice recognition through the Cisco Unified CCX Engine.
7. Based on user input, the application continues. For example, it may loop back to Step 3 to make another request with information gathered to the document server.
5-31Cisco Unified Contact Center Express Getting Started with Scripts, Release 11.0(1)

Chapter 5 Advanced Scripting Techniques Using a Voice Browser in Your Scripts
Voice Browser Development ToolsYou can use VoiceXML and the following tools to develop voice applications:
• Voice Browser
• Web application server
• VoiceXML development tool (optional)
The Voice Browser interprets the VoiceXML documents and executes dialogs with the user. The role of the Voice Browser is as a web client, fetching documents from a web server.
For information on configuring VoiceXML applications using the Voice Browser, see the Cisco Unified Contact Center Express Administration Guide.
For information on the Cisco implementation of VoiceXML, see Appendix B, “VoiceXML Implementation for Cisco Voice Browser.”
You can use any web application server for deploying VoiceXML applications that use Voice Browser. In addition to acting as a document repository and server, the web application server often supports server-side scripts for generating dynamic documents. Some examples are J2EE (Java 2 Platform Enterprise Edition) technologies such as servlets and JSP (Java Server Pages), .NET technologies, and Perl scripts. The web application server often provides backend integration, security and XML/XSLT presentation support.
Users already running a web server for HTML-based applications can leverage the existing infrastructure to serve voice applications. This functionality also means you can use a single model for developing HTML and voice applications.
Note You can also use the file system or anonymous FTP server as the document server. Further, you can obtain documents, prompts and grammars from the repository by specifying a CRTP URL. See How and Why To Use the CRTP Protocol, page 2-56, for more details on using CRTP URLs. In these cases you can deploy only static VoiceXML documents. This functionality is useful for running simple applications with minimal setup and system requirements.
5-32Cisco Unified Contact Center Express Getting Started with Scripts, Release 11.0(1)

Chapter 5 Advanced Scripting TechniquesUsing a Voice Browser in Your Scripts
The Voice Browser does not require or provide any VoiceXML editor or Integrated Development Environment (IDE). Since VoiceXML is a text-based XML document, you can use numerous authoring tools, including simple text editors, server scripting languages, and third-party VoiceXML editors.
5-33Cisco Unified Contact Center Express Getting Started with Scripts, Release 11.0(1)

Chapter 5 Advanced Scripting Techniques A Script for Incrementing the Current Date
A Script for Incrementing the Current DateThe following example script, GetFutureDate.aef, (see Figure 5-3) shows you how to increment the current date by x number of days. For example, you might want to do this to calculate a due date.
Figure 5-3 Example GetFutureDate.aef Script
5-34Cisco Unified Contact Center Express Getting Started with Scripts, Release 11.0(1)

Chapter 5 Advanced Scripting TechniquesA Script Example Showing Timeout or Retry Logic
A Script Example Showing Timeout or Retry Logic
You can create a Cisco Unified IP IVR script that hangs up after a certain period of inactivity.
Figure 5-4 shows how you can include timeout or retry logic in your Cisco Unified IP IVR scripts so that if the caller fails to reply after so many times or after a certain amount of time, then the script releases the call. This causes the GW port to go on hook and the Cisco Unified IP IVR port to be freed to handle another call.
Remember that if the caller is still ther, then a “GOTO” back to the queue is required to stop the caller from being disconnected.
Figure 5-4 Example AreYouThere.aef Script
5-35Cisco Unified Contact Center Express Getting Started with Scripts, Release 11.0(1)

Chapter 5 Advanced Scripting Techniques A Script Example Showing Timeout or Retry Logic
5-36Cisco Unified Contact Center Express Getting Started with Scripts, Release 11.0(1)
Cisco Unified Contact Center Express Getting Star
C H A P T E R 6
The Basic Cisco Unified CCX ScriptCisco Unified Contact Center Express provides contact center solutions for automatic call distribution (ACD) and other call center requirements.
You can use the Cisco Unified CCX Editor to create any number of Cisco Unified CCX scripts that provides a way to use Cisco Unified CCX to queue telephone calls and connect them to available resources.
This chapter describes the design of such an Cisco Unified CCX script, icd.aef, which is included as a script template with the Cisco Unified CCX Editor.
This section contains the following topics:
• The Example Cisco Unified CCX Basic Script Template, page 6-2
• The Start Step (Creating a Script), page 6-2
• Script Variables for icd.aef, page 6-3
• The Accept Step, page 6-5
• The Play Prompt Step, page 6-6
• The Select Resource Step, page 6-7
• The End Step, page 6-14
6-1ted with Scripts, Release 11.0(1)

Chapter 6 The Basic Cisco Unified CCX Script The Example Cisco Unified CCX Basic Script Template
The Example Cisco Unified CCX Basic Script Template
The icd.aef script template accepts a call, plays a welcoming prompt, and then either connects the caller to an available resource or queues the call until a resource becomes available. While queued, the caller periodically hears a prompt explaining that the call is still in the queue and still waiting for an available resource. When the resource becomes available, the script connects the call.
Figure 6-1 shows the icd.aef script as it appears in the Design pane of the Cisco Unified CCX Editor window.
Figure 6-1 icd.aef Script
The Start Step (Creating a Script)Begin to build the sample script by choosing File > New from the Cisco Unified CCX Editor menu bar. The Templates folder displays. Select the blank script and click OK.
A blank script containing a Start and End step opens in the Design pane of the Cisco Unified CCX Editor window.
Begin to build the sample script by choosing File > New from the Cisco Unified CCX Editor menu bar. The Cisco Unified CCX Editor places a Start step in the Design pane of the Cisco Unified CCX Editor window.
6-2Cisco Unified Contact Center Express Getting Started with Scripts, Release 11.0(1)

Chapter 6 The Basic Cisco Unified CCX ScriptScript Variables for icd.aef
The Start step needs no configuration and has no customizer window. At this time, you might also want to give your new script a name and save it by selecting File > Save from the menu bar.
Our example script is called icd.aef.
Script Variables for icd.aefBegin the icd.aef script design process by using the Variable pane of the Cisco Unified CCX Editor to define script variables.
Note For more information about defining variables, see the “Defining, Using, and Updating Script Variables” section on page 2-31.
Figure 6-2 shows the variables of the icd.aef script as they appear in the Variable pane of the Cisco Unified CCX Editor window.
Figure 6-2 Variable Pane of the icd.aef Script
6-3Cisco Unified Contact Center Express Getting Started with Scripts, Release 11.0(1)
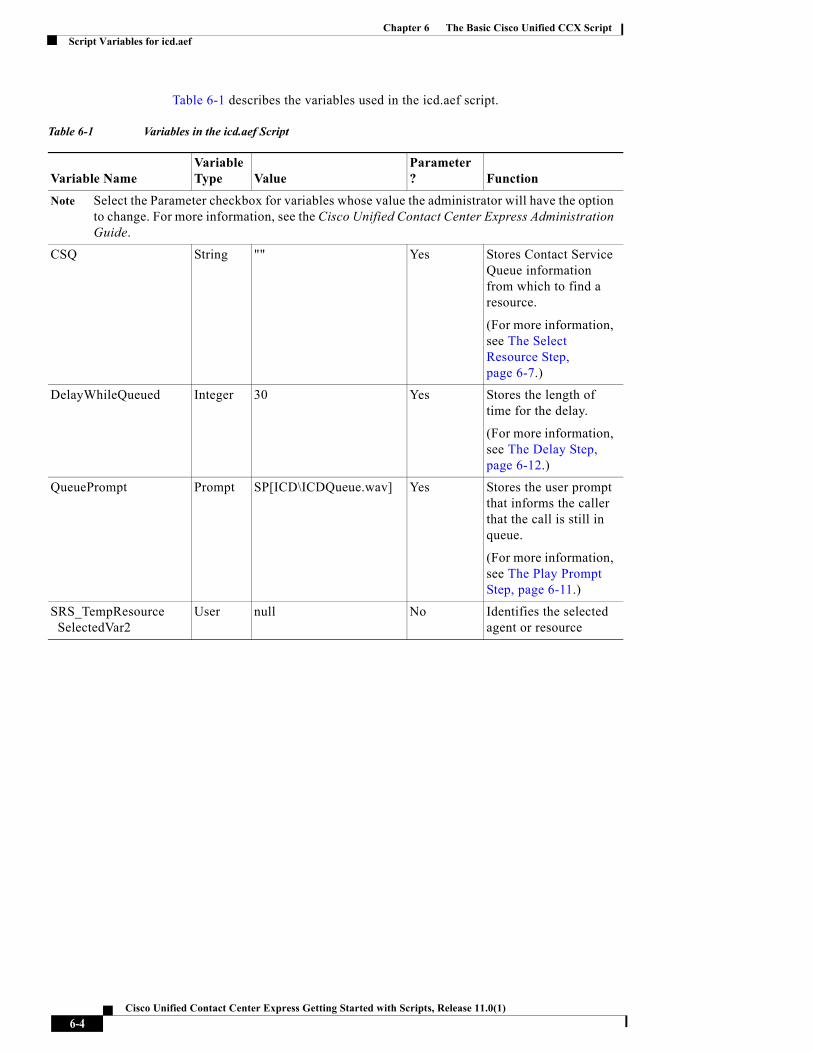
Chapter 6 The Basic Cisco Unified CCX Script Script Variables for icd.aef
Table 6-1 describes the variables used in the icd.aef script.
Table 6-1 Variables in the icd.aef Script
Variable NameVariable Type Value
Parameter? Function
Note Select the Parameter checkbox for variables whose value the administrator will have the option to change. For more information, see the Cisco Unified Contact Center Express Administration Guide.
CSQ String "" Yes Stores Contact Service Queue information from which to find a resource.
(For more information, see The Select Resource Step, page 6-7.)
DelayWhileQueued Integer 30 Yes Stores the length of time for the delay.
(For more information, see The Delay Step, page 6-12.)
QueuePrompt Prompt SP[ICD\ICDQueue.wav] Yes Stores the user prompt that informs the caller that the call is still in queue.
(For more information, see The Play Prompt Step, page 6-11.)
SRS_TempResource SelectedVar2
User null No Identifies the selected agent or resource
6-4Cisco Unified Contact Center Express Getting Started with Scripts, Release 11.0(1)

Chapter 6 The Basic Cisco Unified CCX ScriptThe Accept Step
The Accept StepContinue the icd.aef script by dragging an Accept step from the Contact palette (in the Palette pane) to the Design pane of the Cisco Unified CCX Editor window.
A script uses an Accept step to accept a contact. (A contact can be a telephone call, an e-mail message, or an HTTP request. In the icd.aef script, the contact is a call.)
The default Contact is “--Triggering Contact--”, which simply means that whichever contact triggers the execution of the script is the triggering contact for this step.
For more information on configuring the Accept step, see the Cisco Unified Contact Center Express Scripting and Development Series: Volume 1I, Script Reference Guide.
WelcomePrompt Prompt SP[ICD\ICDWelcome.wav]
Yes Stores the user prompt that welcomes the caller.
(For more information, see The Play Prompt Step, page 6-6.)
resourceID String "" No Stores the Resource ID of the chosen agent.
(For more information, see The Select Resource Step, page 6-7.)
Table 6-1 Variables in the icd.aef Script (continued)
Variable NameVariable Type Value
Parameter? Function
6-5Cisco Unified Contact Center Express Getting Started with Scripts, Release 11.0(1)

Chapter 6 The Basic Cisco Unified CCX Script The Play Prompt Step
The Play Prompt StepContinue the icd.aef script by dragging a Play Prompt step from the Media palette to the Design pane.
Next, configure this Play Prompt step to play a welcoming prompt to the caller.
Note When developing scripts that prompt callers, remember to accommodate the needs of hearing-impaired customers. To make your application fully accessible to these callers, set up scripts to interact with devices such as a Telecommunications Relay Service (TRS) or Telecommunications Device for the Deaf (TTY/TDD).
Figure 6-3 shows the configured Prompt tab of the Play Prompt customizer window.
Figure 6-3 Play Prompt Customizer Window—Configured Prompt Tab
Configure the Play Prompt step as follows:
• General tab:
– Contact—Triggering Contact
The step operates on the contact that triggers the execution of the script.
– Interruptible—Yes
External events can interrupt the playing of the prompt. (At this point the script has not yet queued the call, so this configuration has no effect.)
6-6Cisco Unified Contact Center Express Getting Started with Scripts, Release 11.0(1)

Chapter 6 The Basic Cisco Unified CCX ScriptThe Select Resource Step
• Prompt tab:
– Prompt—WelcomePrompt
WelcomePrompt is the prompt that the Play Prompt step plays back to welcome the caller.
– Barge in—Yes
The caller can interrupt the prompt playback.
– Continue on Prompt Errors—Yes
In the event of a prompt error, the script continues to play back the next prompt in the sequence or waits for caller input.
• Input tab:
– Flush Input Buffer—No
The system does not erase previously entered input before capturing new caller input.
The Select Resource StepContinue the icd.aef script by dragging a Select Resource step from the ACD palette to the Design pane.
Next, configure the Select Resource step to connect a call or to queue it to a specific set of agents configured in the Cisco Unified CCX Administration web interface.
Note For more information on configuring agents, see the Cisco Unified Contact Center Express Administration Guide.
6-7Cisco Unified Contact Center Express Getting Started with Scripts, Release 11.0(1)

Chapter 6 The Basic Cisco Unified CCX Script The Select Resource Step
Figure 6-4 shows the configured Select Resource customizer window.
Figure 6-4 Configured Select Resource Customizer Window
Configure the Select Resource customizer window as follows:
• Contact—Triggering Contact
The call that triggered the contact is the one that the step connects to the resource.
• Routing Target Type—Contact Service Queue
Variable indicating the routing method. One of the following:
– Contact Service Queue - Call will be routed to an available agent in the specified CSQ.
– Resource - Call will be routed to the specified agent. Select this option for Agent Based Routing feature.
Note If you set this field to Resource, the CSQ Target field is renamed to Resource Target. Resource Routing Target Type is only available for Cisco Unified CCX Enhanced Edition. If you use Resource Routing Target Type with Cisco Unified CCX Standard edition, Cisco Unified CCX Engine will be unable to load the script.
6-8Cisco Unified Contact Center Express Getting Started with Scripts, Release 11.0(1)

Chapter 6 The Basic Cisco Unified CCX ScriptThe Select Resource Step
• CSQ Target—CSQ
The CSQ variable stores Contact Service Queue information from which to find a resource.
• Connect—Yes
The step automatically connects the call to the available resource the instant the resource becomes available.
Note If you choose the No option, the step chooses the resource, if available, but does not yet connect the call. You can choose this configuration if you want to add additional Cisco Unified CCX Editor steps to the Selected output branch before using a Connect step to connect the call to the resource. (If the resource is unavailable, the step queues the call.)
• Timeout—12
The value 12 seconds is the length of time before the step retrieves the contact back into the queue.
• Resource Selected—SRS_TempResourceSelectedVar2
The SRS_TempResourceSelectedVar2 user variable identifies the selected agent or Resource.
The Select Resource step contains two output branches, Connected and Queued:
• Connected—If a resource is available, the Connected output branch executes, and the Select Resource step connects the call.
• Queued—If a resource is not available, the Queued output branch executes, and the call is placed in a queue.
The following sections describe the two output branches of the Select Resource step:
• The Connected Output Branch, page 6-10
• The Queued Output Branch, page 6-10
6-9Cisco Unified Contact Center Express Getting Started with Scripts, Release 11.0(1)
Chapter 6 The Basic Cisco Unified CCX Script The Select Resource Step
The Connected Output BranchIf the Select Resource step locates an available resource, the script executes the Connected output branch, and Select Resource step connects the call to the available resource according to the configured information in the Select Resource customizer window.
The script falls through to the End step, which ends the script.
The Queued Output BranchIf the Select Resource step fails to locate an available resource, the script executes the Queued output branch.
Configure the Queued output branch of the Select Resource step to set up a loop that plays a prompt, waits for a certain length of time, and then plays the prompt again, until a resource becomes available.
When the resource does become available, the Select Resource step connects the call, and then continues to the End step, which ends the script.
The queue loop contains the following steps:
• The Label Step, page 6-10
• The Play Prompt Step, page 6-11
• The Delay Step, page 6-12
• The Goto Step, page 6-14
The Label Step
Begin to build the Queued output branch of the Select Resource step by dragging a Label step from the General palette into the Design pane and dropping it into the Queued icon under the Select Resource step.
Next, configure the Label step (which is the beginning of the loop) to provide a target for the subsequent Goto step.
Note For more information about configuring the Label step, see the Cisco Unified Contact Center Express Editor Step Reference Guide.
6-10Cisco Unified Contact Center Express Getting Started with Scripts, Release 11.0(1)

Chapter 6 The Basic Cisco Unified CCX ScriptThe Select Resource Step
Figure 6-5 shows the configured Label customizer window.
Figure 6-5 Configured Label Customizer Window
Configure the Label customizer window by entering the name queueLoop in the Enter Label Name text field, and then clicking OK.
Next configure the subsequent Goto step to send the script to the Label with this name.
The Play Prompt Step
Continue building the Queued output branch of the Select Resource step by dragging a Play Prompt step from the Media palette in the Design pane and dropping it into the Queued icon under the Select Resource step.
Next, configure the Play Prompt step to play back a prompt informing the caller that the call is still in queue and awaiting an available resource.
6-11Cisco Unified Contact Center Express Getting Started with Scripts, Release 11.0(1)

Chapter 6 The Basic Cisco Unified CCX Script The Select Resource Step
Figure 6-6 shows the configured Prompt tab of the Play Prompt customizer window.
Figure 6-6 Play Prompt Customizer Window—Configured Prompt Tab
Configure this Play Prompt customizer window with the same properties as in the first Play Prompt step of the icd.aef script (see The Play Prompt Step, page 6-6), with one exception:
• Prompt tab
– Prompt—QueuePrompt
QueuePrompt is the prompt variable that stores the .wav file that informs the caller that the call is still in queue.
Because you enable the Interruptible option, a newly available resource interrupts the Play Prompt step and the Select Resource step connects the call.
The Delay Step
Continue building the Queued output branch of the Select Resource step by dragging a Delay step from the General palette into the Design pane and dropping it into the Queued icon under the Select Resource step.
Next, configure the Delay step to set the length of time, in seconds, before the subsequent Goto step sends the call back to the beginning of the queue loop.
6-12Cisco Unified Contact Center Express Getting Started with Scripts, Release 11.0(1)

Chapter 6 The Basic Cisco Unified CCX ScriptThe Select Resource Step
Figure 6-7 shows the configured Delay customizer window.
Figure 6-7 Configured Delay Customizer Window
Configure the Delay step as follows:
• Delay time—DelayWhileQueued
This variable stores the length of time for the delay.
• Interruptible—Yes
An available resource interrupts the Delay step and the Select Resource step connects the call.
The caller hears nothing while the Delay step is waiting for the specified amount of time to elapse.
Tip If the administrator has configured a Music On Hold server in Cisco Unified CallManager, you can place a Call Hold step just before the Delay step and a Call Unhold step just after the Delay step to play music to the caller while on hold. (You use the Call Unhold step to retrieve the call so that the script plays QueuePrompt before placing the call on hold again.) This option does not increase the CPU usage of the Cisco Unified CCX server, because the music streaming is performed by the Music On Hold server and not by the Cisco Unified CCX server. You can also replace the Delay step with a Play Prompt step that plays a prompt recorded with the same amount of music as required by the original Delay step. However, this option increases CPU usage because the Cisco Unified CCX server streams this recorded music prompt to all callers in queue.
6-13Cisco Unified Contact Center Express Getting Started with Scripts, Release 11.0(1)

Chapter 6 The Basic Cisco Unified CCX Script The End Step
The Goto StepEnd the Queued output branch of the Select Resource step by dragging a Goto step from the General palette into the Design pane and dropping it into the Queued icon under the Select Resource step.
Next, configure the Goto step to provide the name of the Label step to which the script returns to begin the queue loop again.
Figure 6-8 shows the configured Goto customizer window.
Figure 6-8 Configured Goto Customizer Window
Configure the Goto customizer window by choosing queueLoop from the Select a Label drop-down menu. This variable is the name you assigned in the previous Label step to indicate the beginning of the queue loop.
The End StepUse the End step at the end of a script to complete processing and free all allocated resources.
This step has no properties and does not require a customizer.
6-14Cisco Unified Contact Center Express Getting Started with Scripts, Release 11.0(1)
Cisco Unified Contact Center Express Getting St
C H A P T E R 7
Designing a Basic ScriptYou can use the Cisco Unified CCX Editor to create a number of basic scripts.
This chapter describes the steps used to create a Spoken Name Upload (SNU) script, SNU.aef, which is included as a script template with the Cisco Unified CCX Editor.
This section contains the following topics:
• An Example Basic Script, page 7-2
• The Start Step (Creating a Script), page 7-4
• SNU Script Template Variables, page 7-4
• The Accept Step, page 7-7
• The Accept Step, page 7-7
• The Play Prompt Step, page 7-8
• The Label Step (GetUser), page 7-11
• The Name To User Step, page 7-11
• The Get Digit String Step, page 7-25
• The Authenticate User Step, page 7-32
• The Recording Step, page 7-37
• The Menu Step, page 7-40
• The Closing Steps of the SNU.aef Script, page 7-47
7-1arted with Scripts, Release 11.0(1)

Chapter 7 Designing a Basic Script An Example Basic Script
An Example Basic ScriptThe SNU.aef script template allows users to record their names over the phone so that the script can play back their spoken names to prospective callers.
This script contains good examples of the use of steps in the Contact, Prompt, and User palettes. It also demonstrates the use of the If and Set steps from the General palette.
Figure 7-1 shows how the SNU.aef script template appears in the Design pane of the Cisco Unified CCX Editor window.
7-2Cisco Unified Contact Center Express Getting Started with Scripts, Release 11.0(1)
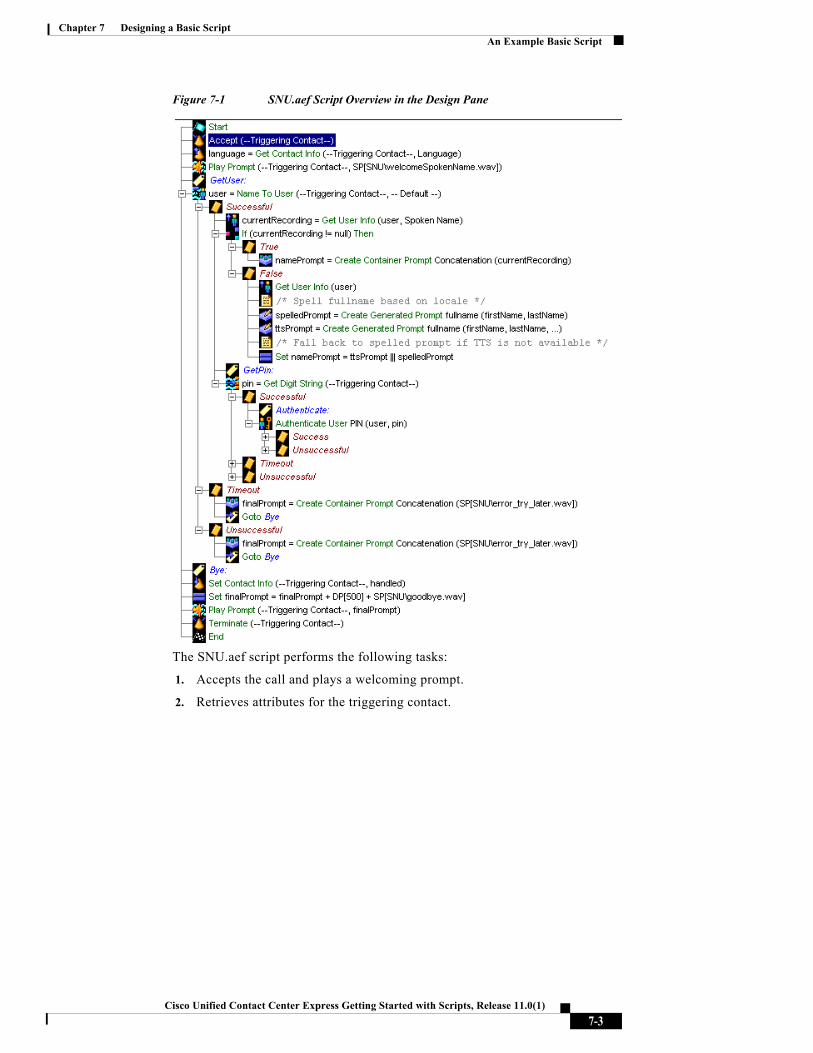
Chapter 7 Designing a Basic ScriptAn Example Basic Script
Figure 7-1 SNU.aef Script Overview in the Design Pane
The SNU.aef script performs the following tasks:
1. Accepts the call and plays a welcoming prompt.
2. Retrieves attributes for the triggering contact.
7-3Cisco Unified Contact Center Express Getting Started with Scripts, Release 11.0(1)
Chapter 7 Designing a Basic Script The Start Step (Creating a Script)
3. Prompts the caller to enter a name, using either Dual Tone Multi-Frequency (DTMF) digits or speech.
4. Compares the caller input to names in a directory.
5. If a match is found, prompts the caller to enter a Personal Identification Number (PIN).
6. Authenticates the user using the PIN.
7. Records the name of the caller.
8. Allows the caller to confirm the recording, or to try again.
9. Plays a final prompt to say good-bye to the caller, and then terminates the call.
Note In designing scripts, remember that any step that requires caller input can fail to receive an acceptable response, which is why even a simple script often requires a number of steps and output branches to handle errors and failures.
The Start Step (Creating a Script)Begin to build the sample script by choosing File > New from the Cisco Unified CCX Editor menu bar. The Templates folder displays. Select the blank script and click OK.
A blank script containing a Start and End step opens in the Design pane of the Cisco Unified CCX Editor window.
The Start step needs no configuration and has no customizer window. At this time, you might also want to give your new script a name and save it by selecting File > Save from the menu bar.
Our example script is called snu.aef.
SNU Script Template VariablesBegin the SNU.aef script design process by using the Variable pane of the Cisco Unified CCX Editor to define script variables.
7-4Cisco Unified Contact Center Express Getting Started with Scripts, Release 11.0(1)

Chapter 7 Designing a Basic ScriptSNU Script Template Variables
Note For more information about defining variables, see the “Defining, Using, and Updating Script Variables” section on page 2-31.
Figure 7-2 shows the variables of the SNU.aef script template as they appear in the Variable pane of the Cisco Unified CCX Editor window.
Figure 7-2 Variables Listed in the Variable Pane
7-5Cisco Unified Contact Center Express Getting Started with Scripts, Release 11.0(1)

Chapter 7 Designing a Basic Script SNU Script Template Variables
Table 7-1 describes the variables used in the SNU.aef script template.
Table 7-1 Variable Descriptions
Variable Name Variable Type Value Function
currentRecording Document null Stores a recorded name.
(See The Get User Info Step, page 7-16.)
finalPrompt Prompt — Prompt played back to the caller at the conclusion of the call. The value is dynamically assigned by various steps in the script.
(See The Timeout Output Branch, page 7-24, and The Unsuccessful Output Branch, page 7-31.)
fullName String "" Stores the full name of the user. Used by the Create Generated Prompt step.
(See The If Step, page 7-17.)
pin String "" Stores PIN digits entered by the user in the Get Digit String step. Used by the Authenticate User step to authenticate user.
(See The Get Digit String Step, page 7-25 and The Authenticate User Step, page 7-32.)
recording Document null Stores the audio file recorded by the caller.
(See The Recording Step, page 7-37.)
spelledPrompt Prompt — Stores the name of the user, as created by the Create Container Prompt step.
(See The If Step, page 7-17 and The Get Digit String Step, page 7-25.)
triesAuthentication Integer 0 Stores the number of times authentication has been attempted.
(See The Unsuccessful Output Branch, page 7-35.)
7-6Cisco Unified Contact Center Express Getting Started with Scripts, Release 11.0(1)

Chapter 7 Designing a Basic ScriptThe Accept Step
The Accept StepContinue the SNU.aef script by dragging an Accept step from the Contact palette into the Design pane of the Cisco Unified CCX Editor window.
triesGetDigit Integer 0 Stores the number of times the script has attempted to get PIN digits.
(See The True Output Branch, page 7-30.)
triesMaxAuthentication Integer 3 Stores the maximum number of attempts the script will make to authenticate the caller.
(See The Unsuccessful Output Branch, page 7-35.)
triesMaxGetDigit Integer 3 Stores the maximum number of retries the script attempts to get PIN digits.
(See The True Output Branch, page 7-30.)
triesMaxRecord Integer 3 Stores the maximum number of attempts the script will make to record the name of the caller.
(See The Key 2 Output Branch, page 7-44.)
triesRecord Integer 0 Stores the number of times that recording has been attempted.
(See The Key 2 Output Branch, page 7-44.)
user User null Stores the values associated with this particular user. First assigned a value by the Name To User step, and used by various other steps.
(See The Name To User Step, page 7-11, and The Authenticate User Step, page 7-32.)
Table 7-1 Variable Descriptions (continued)
Variable Name Variable Type Value Function
7-7Cisco Unified Contact Center Express Getting Started with Scripts, Release 11.0(1)

Chapter 7 Designing a Basic Script The Play Prompt Step
A script uses an Accept step to accept a contact. (A contact can be a telephone call, an e-mail message, or an HTTP request. In the SNU.aef script, the contact is a call.)
Figure 7-3 shows the customizer window for the Accept step.
Figure 7-3 Accept Customizer Window
To use the Accept customizer window to configure the Accept step, select a Contact from the drop-down list and click OK.
The Accept customizer window closes, and the name of the Contact variable appears next to the Accept step icon in the Design pane of the Cisco Unified CCX Editor.
The default Contact is “--Triggering Contact--”, which simply means that whichever contact triggers the execution of the script is the triggering contact for this step.
The Play Prompt StepContinue the SNU.aef script by dragging a Play Prompt step from the Media palette to the Design pane.
Next, configure this Play Prompt step to play back to the caller the system prompt SP[SNU\welcomeSpokenName.wav], which plays “Welcome to the Cisco Spoken Name Upload Application.”
Figure 7-4 shows the configured Prompt tab of the Play Prompt customizer window.
7-8Cisco Unified Contact Center Express Getting Started with Scripts, Release 11.0(1)
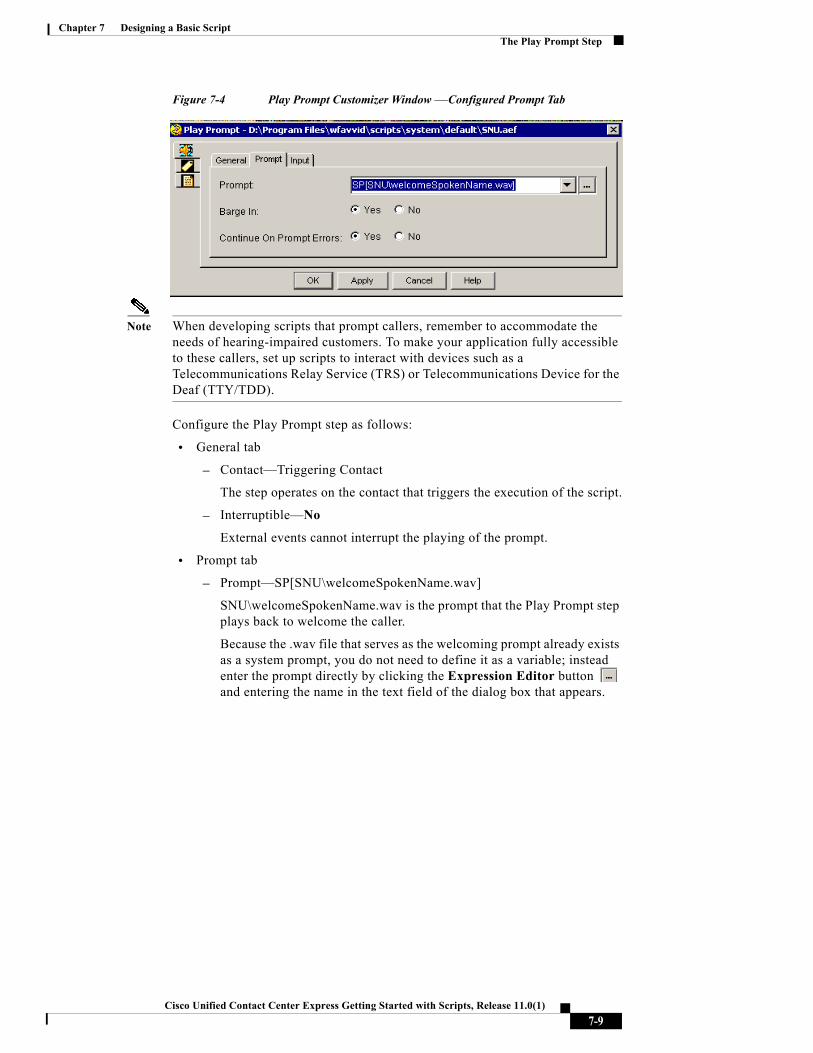
Chapter 7 Designing a Basic ScriptThe Play Prompt Step
Figure 7-4 Play Prompt Customizer Window —Configured Prompt Tab
Note When developing scripts that prompt callers, remember to accommodate the needs of hearing-impaired customers. To make your application fully accessible to these callers, set up scripts to interact with devices such as a Telecommunications Relay Service (TRS) or Telecommunications Device for the Deaf (TTY/TDD).
Configure the Play Prompt step as follows:
• General tab
– Contact—Triggering Contact
The step operates on the contact that triggers the execution of the script.
– Interruptible—No
External events cannot interrupt the playing of the prompt.
• Prompt tab
– Prompt—SP[SNU\welcomeSpokenName.wav]
SNU\welcomeSpokenName.wav is the prompt that the Play Prompt step plays back to welcome the caller.
Because the .wav file that serves as the welcoming prompt already exists as a system prompt, you do not need to define it as a variable; instead enter the prompt directly by clicking the Expression Editor button and entering the name in the text field of the dialog box that appears.
7-9Cisco Unified Contact Center Express Getting Started with Scripts, Release 11.0(1)

Chapter 7 Designing a Basic Script The Play Prompt Step
Figure 7-5 Prompt Address Dialog Box (accessed by Expression Editor button)
Note For more information about using the Expression Editor, see Chapter 2, “How To Use the Cisco Unified CCX Editor.”.
– Barge in—Yes
The caller can interrupt the prompt playback.
– Continue on Prompt Errors—Yes
In the event of a prompt error, the script continues to play back the next prompt in the sequence or waits for caller input.
• Input tab
– Flush Input Buffer—Yes
7-10Cisco Unified Contact Center Express Getting Started with Scripts, Release 11.0(1)

Chapter 7 Designing a Basic ScriptThe Label Step (GetUser)
The system erases previously entered input before capturing new caller input.
Note For more information about configuring the Play Prompt step, see the Cisco Unified Contact Center Express Scripting and Development Series: Volume 2, Editor Step Reference Guide.
The Label Step (GetUser)Continue the SNU.aef script by dragging a Label step from the General palette to the Design pane.
Configure the Label step to provide a target for subsequent steps if it becomes necessary to send the caller back for further attempts to successfully execute the Name To User step.
Configure the Label customizer window by entering the name GetUser in the Enter Label Name text field and then clicking OK.
Configure the subsequent Name To User step to send the script to the Label with this name, if necessary.
Note For more information about configuring the Label step, see the Cisco Unified Contact Center Express Editor Step Reference Guide.
The Name To User StepContinue the SNU.aef script by dragging a Name To User step from the Media palette to the Design pane.
Next, configure the Name To User step to prompt the caller to enter a name and then compare the name received with a directory of names to find out if the name given by the caller exists in the directory.
Configure the three tabs of the Name To User customizer window as follows:
• General tab
7-11Cisco Unified Contact Center Express Getting Started with Scripts, Release 11.0(1)

Chapter 7 Designing a Basic Script The Name To User Step
– Result User—user
The user variable stores the values associated with this particular user. (The subsequent Get User Info step under the Successful output branch uses the user variable to find out whether or not a current recording exists for this name.)
– Announce When Number of Matches Less Than—4
If the number of matches is less than 4, the script prompts the user to choose the correct entry from the list of matches. If the number of matches is greater than or equal to 4, the script prompts the user to enter additional letters to reduce the number of matches.
Note This property applies only if the caller is inputting DTMF digits and is not using an Automatic Speech Recognition (ASR) channel.
– Operator—No
The caller does not have the choice to ask to speak to an operator, and therefore the Operator output branch of the Name To User step does not appear in the script.
– Interruptible—No
No external event is allowed to interrupt the execution of the Name To User step.
• Prompt tab
– Prompt—Default Prompt
The script plays back to the caller the default prompt included with the Name To User step. The default prompt plays a prompt that starts “Spell the last name followed by the first name. . . .” (You can also choose a customized prompt or choose no prompt playback.)
– Barge In—Yes
The caller is allowed to enter a name without having to listen to the entire playback of the prompt.
– Continue on Prompt Errors—Yes
In the event of a prompt error, the script continues to play back the next prompt in the sequence or simply waits for input from the caller.
7-12Cisco Unified Contact Center Express Getting Started with Scripts, Release 11.0(1)

Chapter 7 Designing a Basic ScriptThe Name To User Step
• Input tab
– Input Length—10
The value 10 is the minimum number of digits required before the step automatically checks for a user match. (This property applies only to non-ASR channels.)
– Terminating Key—#
The caller can press the “#” key to indicate completion of input.
– Cancel Key—*
The caller can press the “*” key to start over. (The cancel key works only until the number of maximum retries is reached.)
– Maximum Retries—3
The step makes three attempts to receive valid input before executing the Unsuccessful output branch.
– Initial Timeout (in sec)—5
The system waits 5 seconds for initial input from the caller before executing the Unsuccessful output branch.
– Interdigit Timeout (in sec)—3
The system waits 3 seconds after receiving initial input from the caller for the caller to enter the next digit, before executing the Unsuccessful output branch. (This property does not apply for ASR channels.)
– Flush Input Buffer—Yes
The system erases previously entered input before capturing new caller input.
Note For more details on configuring the Name To User step, see the Cisco Unified Contact Center Express Scripting and Development Series: Volume 2, Editor Step Reference Guide.
The Name To User step in this script has three output branches:
• Successful—Executes when the step makes a successful match between the name entered by the caller and a name in the directory.
7-13Cisco Unified Contact Center Express Getting Started with Scripts, Release 11.0(1)

Chapter 7 Designing a Basic Script The Name To User Step
• Timeout—Executes when the step reaches the maximum number of retries and the last attempt times out while waiting for input from the caller.
• Unsuccessful—Executes when the step does not make a successful match between the name entered by the caller and a name in the directory, or because the last attempt failed because the caller pressed the cancel key.
Figure 7-6 Name To User Step Output Branches
The following sections describe the three output branches of the Name To User step:
• The Successful Output Branch, page 7-14
• The Timeout Output Branch, page 7-24
• The Unsuccessful Output Branch, page 7-25
The Successful Output BranchIf the Name To User step makes a successful match between the name entered by the caller and a name in the user directory, the script executes the Successful output branch of the Name To User step.
Figure 7-7 shows the Successful output branch of the Name to User step.
7-14Cisco Unified Contact Center Express Getting Started with Scripts, Release 11.0(1)
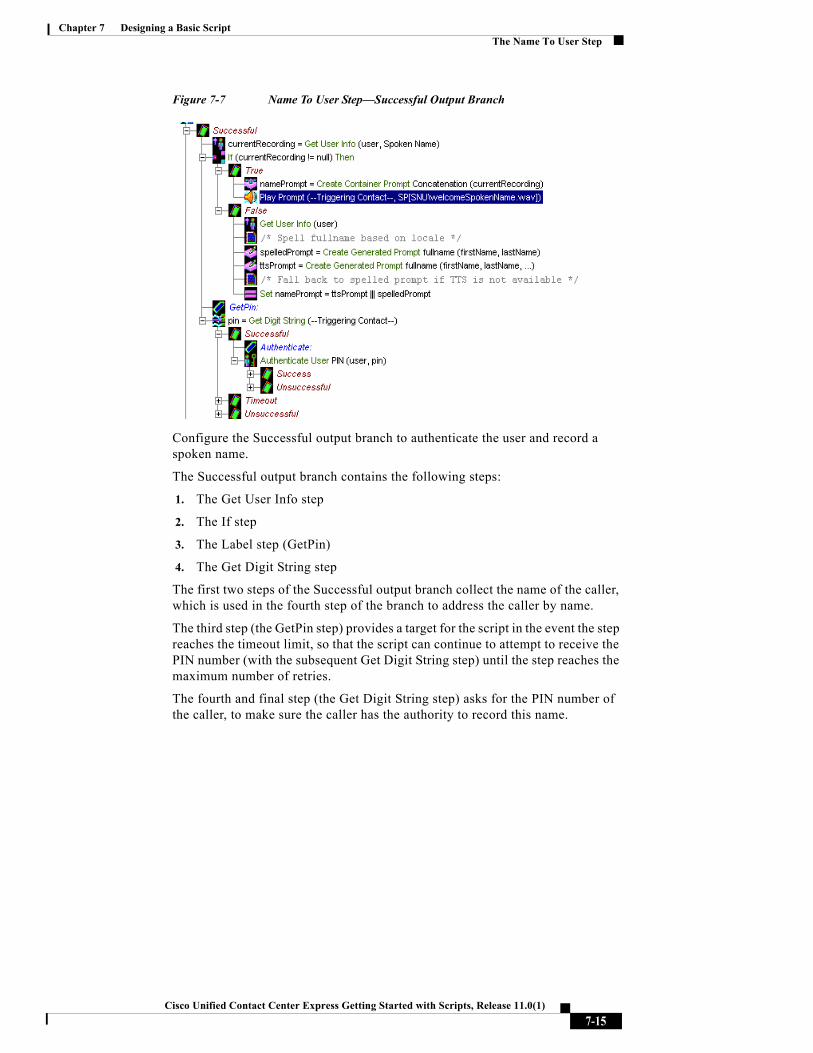
Chapter 7 Designing a Basic ScriptThe Name To User Step
Figure 7-7 Name To User Step—Successful Output Branch
Configure the Successful output branch to authenticate the user and record a spoken name.
The Successful output branch contains the following steps:
1. The Get User Info step
2. The If step
3. The Label step (GetPin)
4. The Get Digit String step
The first two steps of the Successful output branch collect the name of the caller, which is used in the fourth step of the branch to address the caller by name.
The third step (the GetPin step) provides a target for the script in the event the step reaches the timeout limit, so that the script can continue to attempt to receive the PIN number (with the subsequent Get Digit String step) until the step reaches the maximum number of retries.
The fourth and final step (the Get Digit String step) asks for the PIN number of the caller, to make sure the caller has the authority to record this name.
7-15Cisco Unified Contact Center Express Getting Started with Scripts, Release 11.0(1)

Chapter 7 Designing a Basic Script The Name To User Step
This section that follows contains the following topics:
• The Get User Info Step, page 7-16
• The If Step, page 7-17
• The Label Step (GetPin), page 7-23
Note Because of its multiple output branches, the Get Digit String step is discussed in a separate section, The Get Digit String Step, page 7-25.
The Get User Info Step
Begin to build the Successful output branch of the Name To User step by dragging a Get User Info step from the User palette and dropping it into the Successful icon under the Name To User step in the Design pane.
Next, configure the Get User Info step to retrieve the information stored in the user variable (associated with this contact by the previous Name To User step) to be used by the If step to determine which branch of the If step to execute.
Figure 7-8 shows the configured Get User Info customizer window.
Figure 7-8 Configured Get User Info Customizer Window
7-16Cisco Unified Contact Center Express Getting Started with Scripts, Release 11.0(1)

Chapter 7 Designing a Basic ScriptThe Name To User Step
Configure the Get User Info customizer window to retrieve the information stored in the currentRecording variable, which is a Document variable that holds a recorded name.
To configure the Get User Info customizer window, highlight the Spoken Name attribute and click Set. Then, in the Get User dialog box that appears, choose the currentRecording variable from the drop-down menu and click OK. The Get User dialog box closes, and currentRecording appears next to the Spoken Name attribute in the list box of the Get User Info customizer window.
Note For more information about configuring the Get User Info step, see the Cisco Unified Contact Center Express Scripting and Development Series: Volume 2, Editor Step Reference Guide.
The If Step
Because you cannot know in advance whether a recording of the spoken name of any particular caller exists at the time of any particular call, use the If step to provide script logic for each of the two possibilities: that a recording of the spoken name exists, and that a recording of the spoken name does not exist.
Continue building the Successful output branch of the Name To User step by dragging an If step from the General palette and dropping it into the Successful icon under the Name To User step in the Design pane.
Configure the If step to evaluate the value of the currentRecording variable (supplied by the previous Get User Info step).
Figure 7-9 shows the configured If customizer window.
Figure 7-9 Configured If Customizer Window
7-17Cisco Unified Contact Center Express Getting Started with Scripts, Release 11.0(1)

Chapter 7 Designing a Basic Script The Name To User Step
Note For more information about configuring the If step, see the Cisco Unified Contact Center Express Scripting and Development Series: Volume 2, Editor Step Reference Guide.
The If step evaluates the Boolean expression “currentRecording!= null”, which means that the currentRecording variable is not null.
• If the Boolean expression “currentRecording!= null” is true, the name of the caller is available for use by the Get Digit String step. In this case, the True output branch of the If step executes.
• If the Boolean expression “currentRecording!= null” is false, the name of the caller is not available for use by the Get Digit String step. In this case, the False output branch of the If step executes.
The True Output Branch
If the If step locates a spoken recording of the name of the caller, the script executes the True output branch.
Configure the True output branch of the If step to create a prompt that uses the recording of the spoken name.
Use a Create Container Prompt step to create a concatenated prompt that includes the currentRecording variable.
Figure 7-10 shows the configured Create Container Prompt customizer window.
7-18Cisco Unified Contact Center Express Getting Started with Scripts, Release 11.0(1)

Chapter 7 Designing a Basic ScriptThe Name To User Step
Figure 7-10 First Configured Create Container Prompt Customizer Window
Configure the Create Container Prompt customizer window as follows:
• Output Prompt—spelledPrompt
This prompt will contain the recorded name of the caller as stored in the currentRecording variable.
• Prompt Container Type—Concatenated Prompt
This step creates a concatenated prompt containing the prompts listed int he Prompts list box.
• Prompts—currentRecording
The currentRecording variable stores the recorded name of the caller.
• Override Language—(blank)
Do not choose to override the language context of the call.
7-19Cisco Unified Contact Center Express Getting Started with Scripts, Release 11.0(1)

Chapter 7 Designing a Basic Script The Name To User Step
The False Output Branch
If the If step cannot locate a spoken recording of the name of the caller, the script executes the False output branch.
Configure the False output branch of the If step to generate the name, using the spelling generator of the Create Generated Prompt steps.
First, configure a Get User Info step to retrieve the information contained in the firstName, fullName, and lastName variables, in order to make this information available to the Create Generated Prompt steps.
Figure 7-11 shows the configured Get User Info customizer window.
Figure 7-11 Configured Get User Info Customizer Window
7-20Cisco Unified Contact Center Express Getting Started with Scripts, Release 11.0(1)

Chapter 7 Designing a Basic ScriptThe Name To User Step
Figure 7-12 shows the first configured Create Generated Prompt customizer window in the False branch.
Figure 7-12 Configured Create Generated Prompt Customizer Window— spelled Prompt
Configure the Create Generated Prompt customizer window as follows:
• Generator Type—fullname
This step uses the fullname generator type to properly concatenate the last name and the first name of the user based on the country/language settings associated with the call.
• Constructor Type—(firstname,lastname)
This drop-down list contains the available constructors for a given generator. In this case, the constructor specifies that two input parameters are required: the first name followed by the last name.
• Override Language—(blank)
Do not choose to override the language context of the call.
7-21Cisco Unified Contact Center Express Getting Started with Scripts, Release 11.0(1)

Chapter 7 Designing a Basic Script The Name To User Step
• Output Prompt—spelledPrompt
This is the prompt that the script will play back to the caller, containing the name of the caller as generated by this step.
Figure 7-13 shows the second configured Create Generated Prompt customizer window in the False branch.
Figure 7-13 Configured Create Generated Prompt Customizer Window—tts Prompt
Configure the Create Generated Prompt customizer window for the TTS prompt in a similar way to Figure 7-13.
Finally, insert a Set step to revert to the spelled prompt if TTS is not available.
Figure 7-14 shows the Set step customizer window in the False branch.
7-22Cisco Unified Contact Center Express Getting Started with Scripts, Release 11.0(1)

Chapter 7 Designing a Basic ScriptThe Name To User Step
Figure 7-14 Set Name Customizer Window— namePrompt
Configure the Set customizer window as follows:
• Variable—namePrompt
This is the name of the variable where the result of evaluating the given expressions will be stored.
• Assign—Use the Expression Editor to specify ttsPrompt ||| spelledPrompt
This prompt expression defines a prompt which will attempt to play the first prompt (that is, ttsPrompt) and—if it fails—then the second prompt (that is, spelledPrompt).
This provides a mechanism for the script to adapt itself to the system where it is executed. If the system is configured with TTS, then the script will attempt to use TTS to playback the name of the user. If TTS is not available and attempting to play such a prompt would cause an error to occur, the system falls back to the second prompt and plays that. (In this case, the second prompt does not rely on TTS services.)
The Label Step (GetPin)
Continue building the Successful output branch of the Name To User step by dragging a Label step from the General palette and dropping it into the Successful icon under the Name To User step in the Design pane.
This Label step provides a target for a subsequent Goto step, in order to give callers more attempts at successfully entering digits by using the Get Digit String step that follows this label step.
Configure the Label customizer window by entering the name GetPin in the Enter Label Name text field, and then clicking OK.
7-23Cisco Unified Contact Center Express Getting Started with Scripts, Release 11.0(1)

Chapter 7 Designing a Basic Script The Name To User Step
Note For more information about configuring the Label step, see the Cisco Unified Contact Center Express Editor Step Reference Guide.
If the script reaches this Label step, the Get Digit String executes. (See The Get Digit String Step, page 7-25.)
The Timeout Output BranchIf the Name To User step does not receive caller input before reaching the timeout limit, the script executes the Timeout output branch of the Name To User step, as shown in Figure 7-15.
Figure 7-15 Name To User Step—Timeout and Unsuccessful Output Branches
Configure the Timeout output branch to play back a prompt that informs the caller that the call was unsuccessful. The script plays a good-bye prompt, and then terminates the call.
As shown in Figure 7-1, use the Create Container Prompt step to create a prompt called finalPrompt that the Play Prompt step plays at the end of the script, after which a Terminate step terminates the call.
Configure the Create Container Prompt step in similar fashion to the previous Create Container Prompt step (see The True Output Branch, page 7-18), with the exception that you choose finalPrompt as the output prompt of the Create Container Prompt step.
The Goto step, named Bye, sends the script to the Label step named Bye, under which the final sequence of steps conclude the call. (See The Closing Steps of the SNU.aef Script, page 7-47.)
7-24Cisco Unified Contact Center Express Getting Started with Scripts, Release 11.0(1)

Chapter 7 Designing a Basic ScriptThe Get Digit String Step
The Unsuccessful Output BranchIf the Name To User step does not make a successful match between the name entered by the caller and a name in the user directory, the script executes the Unsuccessful output branch of the Name To User step, as shown in Figure 7-15.
Just as with the Timeout output branch, configure the Unsuccessful output branch to play back a prompt that informs the caller that the call was unsuccessful. The script plays a good-bye prompt, and then terminates the call.
Use the Create Container Prompt step to create a prompt called finalPrompt that the Play Prompt step plays at the end of the script, after which a Terminate step terminates the call.
Configure the Create Container Prompt step in similar fashion to the previous Create Container Prompt step (see The True Output Branch, page 7-18), with the exception that you choose finalPrompt as the output prompt of the Create Container Prompt step.
The Goto step, named Bye, sends the script to the Label step named Bye, under which the final sequence of steps conclude the call. (See The Closing Steps of the SNU.aef Script, page 7-47.)
The Get Digit String StepFinish building the Successful output branch of the Name To User step by dragging a Get Digit String step from the Media palette and dropping it into the Successful icon under the Name To User step in the Design pane.
This section contains the following topics:
• Configuring the Get Digit String Step, page 7-26
• The Successful Output Branch, page 7-28
• The Timeout Output Branch, page 7-28
• The Unsuccessful Output Branch, page 7-31
7-25Cisco Unified Contact Center Express Getting Started with Scripts, Release 11.0(1)

Chapter 7 Designing a Basic Script The Get Digit String Step
Configuring the Get Digit String StepConfigure the Get Digit String step to authenticate the caller before allowing the caller to record a name.
The Get Digit String step asks for the PIN number of the caller (to make sure the caller has the authority to record this name), using a concatenated prompt that addresses the caller by name and then asks the caller to enter a PIN number.
After adding the Get Digit String step to the Design pane of the Cisco Unified CCX Editor, configure properties in the four tabs of the Get Digit String customizer window as follows:
• General tab
– Contact—Triggering Contact
The Get Digit String step operates on the contact that triggered this script.
– Result Digit String—pin
The pin variable stores the digits entered by this caller. (The subsequent Authenticate User step uses this pin variable.)
– Interruptible—Yes
External events can interrupt the execution of this step.
• Prompt tab
– Prompt—namePrompt + DP[150] + SP[SNU\enter_pin.wav]
This expression is the prompt that the Get Digit String step plays back. (This prompt plays back the name of the caller, a silence of 150 milliseconds, and the system prompt, which plays “please enter your PIN”.
– Barge In—Yes
The caller can enter a PIN without first having to listen to the playback of the entire prompt.
– Continue on Prompt Errors—Yes
In the event of a prompt error, the script continues to play back the next prompt in the sequence or waits for input from the caller.
• Input tab
7-26Cisco Unified Contact Center Express Getting Started with Scripts, Release 11.0(1)

Chapter 7 Designing a Basic ScriptThe Get Digit String Step
– Input Length—25
The value 25 is the minimum number of digits required before the step automatically checks for a user match. (This property applies only to non-ASR channels.)
– Terminating Key—#
The caller can use the “#” key to indicate completion of input.
– Cancel Key—*
The caller can use the “*” key to cancel and to start over. (The cancel key works only until the script reaches the number of maximum retries.)
– Maximum Retries—0
The number of times the step retries to receive valid input before executing the Unsuccessful output branch is 0.
– Initial Timeout (in sec)—5
The system waits 5 seconds for initial input from the caller before executing the Unsuccessful output branch.
– Interdigit Timeout (in sec)—3
The system waits 3 seconds after receiving initial input for the caller to enter the next digit, before executing the Unsuccessful output branch. (This property does not apply for ASR channels.)
– Flush Input Buffer—Yes
The script erases previously entered input before capturing new caller input.
– DTMF Buffer on Retry—Yes
The script clears the DTMF buffer and erases previously-entered digits when the step retries to get input from the caller. (However, because you configured this step for 0 retries, this attribute has no effect on the execution of the step.)
• Filter tab
– All options are checked except “*” and “#”
The script considers numbers from 0 to 9 to be valid entries, and does not consider the cancel key “*” and the terminating key “#” to be valid digits to collect.
7-27Cisco Unified Contact Center Express Getting Started with Scripts, Release 11.0(1)

Chapter 7 Designing a Basic Script The Get Digit String Step
Note For more information about configuring the Get Digit String step, see the Cisco Unified Contact Center Express Editor Step Reference Guide.
Figure 7-16 shows the three output branches under the Get Digit String step.
Figure 7-16 Get Digit String Step—Output Branches
The Successful Output BranchIf the Get Digit String step successfully receives a PIN number, the script executes the Successful output branch.
Configure the Successful output branch of the Get Digit String step to attempt to authenticate the user. If this process is successful, the caller is then given the chance to record a name.
For a description of the steps under the Successful output branch of the Get Digit String step, see The Authenticate User Step, page 7-32.
The Timeout Output BranchIf the Get Digit String step reaches the timeout limit before receiving input from the caller, the script executes the Timeout output branch.
Configure the Timeout output branch of the Get Digit String step to give the caller further chances to enter a valid PIN number, until the script reaches the maximum number of retries, after which the Unsuccessful output branch executes.
7-28Cisco Unified Contact Center Express Getting Started with Scripts, Release 11.0(1)

Chapter 7 Designing a Basic ScriptThe Get Digit String Step
Figure 7-17 shows the scripting under the Timeout output branch of the Get Digit String step.
Figure 7-17 Get Digit String Step—Timeout Output Branch
Use the first If step to evaluate the expression pin==“ ”.
Note For details on configuring the If step, see “The If Step” section on page 7-17.
If the expression is true, and the pin variable is empty, this means that the Get Digit String step has timed out without the caller having entered PIN information. In this case, the True output branch under this If step executes.
If the expression is false, the pin variable does contain PIN information, which means that the caller has already entered PIN information.
In this case, the False output branch executes, and a Goto step sends the script to the Label step named Authenticate, which is located directly above the Authenticate User step, as shown in Figure 7-17.
7-29Cisco Unified Contact Center Express Getting Started with Scripts, Release 11.0(1)

Chapter 7 Designing a Basic Script The Get Digit String Step
Tip Using the If step in this way is a trick that you can use to allow the caller to enter the PIN without a terminating key and wait for the timeout to let the system deal with the digits collected so far. This trick works well only if the maximum number of retries is set to 0, as it is in this example.
Use the first If step under the Timeout output branch of the Get Digit String step to determine whether or not PIN information exists.
If no PIN information exists, then the True output branch executes, and you then use a second If step to determine whether or not the script has reached the maximum number of retries in the attempt to obtain PIN input information from the caller.
The following sections describe the scripting under the True and False output branches of this second If step:
• The True Output Branch, page 7-30
• The False Output Branch, page 7-31
The True Output Branch
If the first If step determines that the caller has not entered PIN information, the script executes the True output branch.
Configure the True output branch of the first If step to give the caller more opportunities to enter PIN information, until the maximum number of retries limit is reached.
Use a second If step, placed under the True output branch of the first If step, to evaluate the expression “triesGetDigit < triesMaxGetDigit”; or, the value of triesGetDigit is less than triesMaxGetDigit.
The triesGetDigit variable is an Integer variable that has an initial value of 0. The triesMaxGetDigit variable is an Integer variable with a value of 3.
The following steps execute under the True output branch, as shown in Figure 7-17):
• The Set step—Adds 1 to the value of triesGetDigit.
Configure the Set customizer window by first choosing the triesGetDigit variable from the Variable drop-down menu. Then in the Assign text field, you enter the expression triesGetDigit + 1.
7-30Cisco Unified Contact Center Express Getting Started with Scripts, Release 11.0(1)

Chapter 7 Designing a Basic ScriptThe Get Digit String Step
This means that each time the script reaches this Set step, the value of the triesGetDigit variable is increased by 1. After three attempts, the value of triesGetDigit is 3, which is equal to the value of triesMaxGetDigit, so the False output branch of this If step executes.
• The Play Prompt step—Plays the system prompt, SP[SNU\still_there.wav], which asks if the caller is still connected, followed by a silence of 500 milliseconds.
• The Goto step—Sends the script to the Label named GetPin, above the Get Digit String step (see Figure 7-17), in order to give the caller more attempts at entering a PIN number. (See The Label Step (GetPin), page 7-23.)
The False Output BranchIf the second If step reaches the maximum number of retries, the script executes the False output branch.
Configure the False output branch of the second If step to create a final prompt to play back to the caller before ending the call.
Use a Create Container Prompt step to create a prompt named finalPrompt that contains the system prompt, SP[SNU\error_try_later.wav], which informs the caller that an error has occurred and asks the caller to call back later.
Next, a Goto step sends the script to the Label named Bye, located above the closing steps of the script (see The Closing Steps of the SNU.aef Script, page 7-47 below), where a Play Prompt step plasy finalPrompt before the script terminates the contact.
The Unsuccessful Output BranchIf the Get Digit String step does not receive valid input, the script executes the Unsuccessful output branch.
Configure the Unsuccessful output branch of the Get Digit String step to provide a prompt that informs the caller that the call was unsuccessful, and the script moves to the final steps that terminate the contact.
7-31Cisco Unified Contact Center Express Getting Started with Scripts, Release 11.0(1)

Chapter 7 Designing a Basic Script The Authenticate User Step
Figure 7-18 shows the scripting under the Unsuccessful output branch of the Get Digit String step.
Figure 7-18 Get Digit String Step—Unsuccessful Output Branch
Use the Create Container Prompt step to specify that the prompt finalPrompt contains the system prompt, SP[SNU\error_try_later.wav], which informs the caller that an error has occurred and asks the caller to call back later.
Next, a Goto step sends the script to the Label named Bye, located above the closing steps of the script (see The Closing Steps of the SNU.aef Script, page 7-47 below), where a Play Prompt step plays finalPrompt before the script terminates the contact.
The functionality in this branch of the Get Digit String step is the same as the Create Container Prompt step and the Goto step under the False output branch of the If step. (See The False Output Branch, page 7-31.)
The Authenticate User StepPlace a Label step under the Successful output branch of the Get Digit String step. This Label step, named Authenticate, will serve as a target for the subsequent Goto step under the Timeout output branch of the Get Digit String step. (See The Timeout Output Branch, page 7-28.), and provides callers with another opportunity to be authenticated after having already entered PIN information.
Finish building the Successful output branch of the Get Digit String step by dragging an Authenticate User step from the User palette and dropping it onto the Label step (Authenticate) under the Get Digit String step in the Design pane.
Configure the Authenticate User step to authenticate the user, based on the PIN information entered by the caller.
7-32Cisco Unified Contact Center Express Getting Started with Scripts, Release 11.0(1)
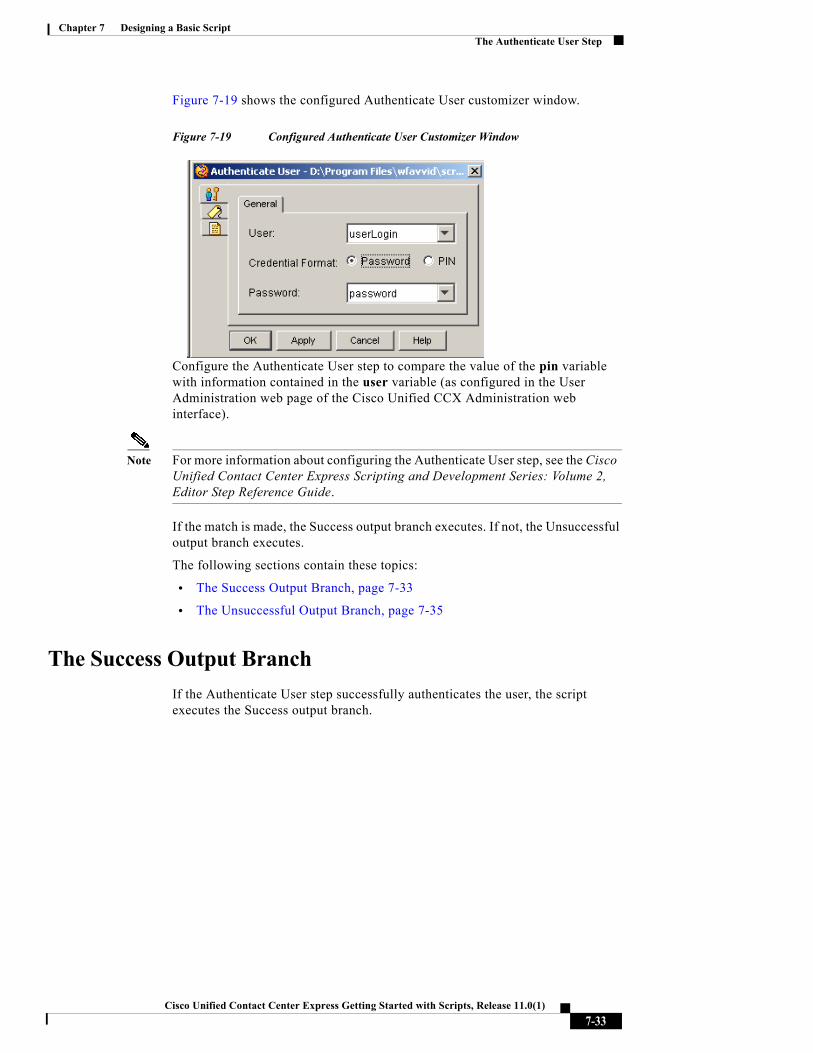
Chapter 7 Designing a Basic ScriptThe Authenticate User Step
Figure 7-19 shows the configured Authenticate User customizer window.
Figure 7-19 Configured Authenticate User Customizer Window
Configure the Authenticate User step to compare the value of the pin variable with information contained in the user variable (as configured in the User Administration web page of the Cisco Unified CCX Administration web interface).
Note For more information about configuring the Authenticate User step, see the Cisco Unified Contact Center Express Scripting and Development Series: Volume 2, Editor Step Reference Guide.
If the match is made, the Success output branch executes. If not, the Unsuccessful output branch executes.
The following sections contain these topics:
• The Success Output Branch, page 7-33
• The Unsuccessful Output Branch, page 7-35
The Success Output BranchIf the Authenticate User step successfully authenticates the user, the script executes the Success output branch.
7-33Cisco Unified Contact Center Express Getting Started with Scripts, Release 11.0(1)

Chapter 7 Designing a Basic Script The Authenticate User Step
Configure the Success output branch of the Authenticate User step to offer the caller the opportunity to record a name.
Figure 7-20 shows the scripting under the Success output branch of the Authenticate User step.
Figure 7-20 Authenticate User Step—Success Output Branch
First, insert a Create Generated Prompt step and configure the Create Generated Prompt customizer window as follows:
• Output Prompt—pound
The name of the variable where the newly created prompt will be stored.
• Generator Type—telephone.number
This step uses the telephone.number generator type, which provides logic on how to play back a telephone number according to the preferences associated with the country/language of the call.
• Constructor Type—(number)
This step uses the number contructor type. (A constructor lists the possible arguments that can be passed in a given generator.)
Continue configuring the Success branch of the Authenticate User step by following the instructions in The Recording Step, page 7-37.
7-34Cisco Unified Contact Center Express Getting Started with Scripts, Release 11.0(1)

Chapter 7 Designing a Basic ScriptThe Authenticate User Step
The Unsuccessful Output BranchIf the Authenticate User step does not successfully authenticate the user, the script executes the Unsuccessful output branch.
Configure the Unsuccessful output branch of the Authenticate User step to allow the caller to retry entering a valid PIN number until the script reaches the maximum number of retries.
Figure 7-21 shows the scripting under the Unsuccessful output branch of the Authenticate User step.
Figure 7-21 Authenticate User Step—Unsuccessful Output Branch
As in the scripting under the Timeout output branch of the Get Digit String step (see The Timeout Output Branch, page 7-28), use an If step to determine whether or not the script has reached the maximum number of retries.
In this case, the If step evaluates the expression “triesAuthentication < triesMaxAuthentication”; or the value of triesAuthentication is less than triesMaxAuthentication.
The triesAuthentication variable is an Integer variable that has an initial value of 0. The triesMaxAuthentication variable is an Integer variable with a value of 3.
This If step has two output branches:
• The True Output Branch, page 7-36
• The False Output Branch, page 7-36
7-35Cisco Unified Contact Center Express Getting Started with Scripts, Release 11.0(1)

Chapter 7 Designing a Basic Script The Authenticate User Step
The True Output Branch
If the maximum number of retries has not been reached, the script executes the True output branch.
Configure the True output branch of the If step to provide the caller with more opportunities to be authenticated.
The following steps execute under the True output branch of the If step, as shown in Figure 7-21:
• The Play Prompt step—Plays the system prompt, SP[SNU\error_auth.wav], which informs the caller that the authentication failed, followed by a silence of 500 milliseconds.
• The Set step—Adds 1 to the value of triesAuthentication. After three attempts, the value of triesAuthentication is 3, which is equal to the value of triesMaxAuthentication, so the False output branch of this If step executes.
• Goto—Sends the script to the Label named Get User above the Name to User step, as shown in Figure 7-17, in order to give the caller another chance to enter a name. (See The Label Step (GetUser), page 7-11.)
The False Output Branch
If the script has reached the maximum number of retries, the script executes the False output branch.
Configure the False output branch of the If step to create a final prompt to be played back to the caller, and then to send the script to the closing steps.
The following steps execute under the False output branch of the If step, as shown in Figure 7-21:
• The Create Container Prompt step—Creates a concatenated prompt named finalPrompt that contains the two system prompts, SP[SNU\error_auth.wav] and SP[SNU\error_try_later.wav], which inform the caller that authentication failed, and ask the caller to call back later.
• The Goto step—Sends the script to the Label named Bye, located above the closing steps of the script (see The Closing Steps of the SNU.aef Script, page 7-47), where a Play Prompt step plays finalPrompt before the script terminates the contact.
7-36Cisco Unified Contact Center Express Getting Started with Scripts, Release 11.0(1)
Chapter 7 Designing a Basic ScriptThe Recording Step
The Recording StepIn the recording step, you should localize according to your language. For information on localizing scripts, see Chapter 4, “Localizing Cisco Unified CCX Scripts.”
First, place a Label step, named Record, under the Success output branch of the Authenticate User step. This Label step will provide a target for the scripting under the Key 2 output branch of the subsequent Menu step (see The Menu Step, page 7-40) to give callers another opportunity to record a name.
Then continue the SNU.aef script, once the caller has been authenticated, by dragging a Recording step from the Media palette and dropping it on the Success output branch of the Authenticate User step.
Next, configure the Recording step to offer the caller the opportunity to record a name using the three tabs of the Recording customizer window as follows:
• General tab
– Contact—Triggering Contact
The step operates on the contact that triggered the execution of the script.
– Result Document—recording
The recording variable stores the audio file recorded by this caller.
– Media Type—Voice (uncompressed)
The type of media to be recorded is uncompressed voice.
Note Cisco Unified CCX currently supports only uncompressed voice.
– Recording Duration—10
The script gives the caller 10 seconds to record a name.
– Interruptible—No
External events cannot interrupt the execution of this step.
• Prompt tab
– Prompt—Customize prompt
The step plays back a customized prompt to the caller.
7-37Cisco Unified Contact Center Express Getting Started with Scripts, Release 11.0(1)

Chapter 7 Designing a Basic Script The Recording Step
The box underneath the Prompt box indicates that the prompt is a concatenation of a system prompt, SP[SNU\rec_name.wav], and a language prompt, instructPrompt.
– Start Tone—Default Prompt
The script plays back a system prompt providing a default start tone to alert the caller that the recording is about to begin.
– Barge In—Yes
The caller is allowed to respond without first having to listen to the entire playback of the prompt.
– Continue on Prompt Errors—Yes
In the event of a prompt error, the script continues to play back the next prompt in the sequence or waits for input from the caller.
• Input tab
– Maximum Retries—0
The number of times the step retries to receive valid input before executing the Unsuccessful output branch is 0.
– Flush Input Buffer—Yes
The system erases previously entered input before capturing new caller input.
• Filter tab
– Duration—10
– Terminating Key—#
The caller can use the “#” key to indicate completion of input.
– Cancel Key—*
The caller can use the “*” key to cancel and start over. (The cancel key works only until the script reaches the maximum number of retries.)
Note For more information about configuring the Recording step, see the Cisco Unified Contact Center Express Scripting and Development Series: Volume 2, Editor Step Reference Guide.
7-38Cisco Unified Contact Center Express Getting Started with Scripts, Release 11.0(1)

Chapter 7 Designing a Basic ScriptThe Recording Step
The Recording step has two output branches, Successful and Unsuccessful, described in the following sections:
• The Successful Output Branch, page 7-39
• The Unsuccessful Output Branch, page 7-39
The Successful Output BranchIf the Recording step successfully records the spoken name of the caller, the script executes the Successful output branch.
Configure the Successful output branch of the Recording step to play the recording back to the caller.
Figure 7-22 shows the scripting under the Successful output branch of the Recording step.
Figure 7-22 Recording Step—Successful Output Branch
Use a Play Prompt step to play the recording back to the caller. To accomplish this, configure the Play Prompt step to play a system prompt combined with the value of the recording variable, which stores the recording that results from the Recording step.
The Menu step then offers the caller the choice of approving the current recording or making another recording attempt. (For a description of the scripting under the Menu step, see The Menu Step, page 7-40.)
The Unsuccessful Output BranchIf the Recording step does not successfully record the spoken name, the script executes the Unsuccessful output branch.
Configure the Unsuccessful output branch of the Recording step to create the final prompt that is played back to the caller, and to move the script to the closing steps.
7-39Cisco Unified Contact Center Express Getting Started with Scripts, Release 11.0(1)

Chapter 7 Designing a Basic Script The Menu Step
Figure 7-23 shows the scripting under the Unsuccessful output branch of the Recording step.
Figure 7-23 Recording Step—Unsuccessful Output Branch
As in previous Unsuccessful output branches (see, for example, The Unsuccessful Output Branch, page 7-31), use a Create Container Prompt step to create a prompt named finalPrompt that contains two system prompts, SP[SNU\error_rec.wav] + SP[SNU\error_try_later.wav], which inform the caller that an error in recording has occurred, and ask the caller to call back later.
Next, a Goto step sends the script to the Label named Bye, located above the closing steps of the script (see The Closing Steps of the SNU.aef Script, page 7-47 below), where a Play Prompt step plays finalPrompt before the script terminates the contact.
The Menu StepContinue the SNU.aef script by dragging a Menu step from the Media palette and dropping it on the Play Prompt step under the Successful output branch of the Recording step.
Next, configure the Menu step to give callers the option to re-record a name.
Configure properties in the three tabs of the Menu customizer window as follows:
• General tab
– Contact—Triggering Contact
The step operates on the contact that triggered the execution of the script.
– Options—Key 1 and Key 2
Create two branches under the Menu step, providing the caller the choice to approve the recording or re-record a name.
7-40Cisco Unified Contact Center Express Getting Started with Scripts, Release 11.0(1)

Chapter 7 Designing a Basic ScriptThe Menu Step
– Interruptible—Yes
External events can interrupt the execution of this step.
• Prompt tab
– Prompt—SP[SNU\menu_re_rec.wav]
This system prompt offers the caller the choice to re-record a name.
– Barge In—Yes
The caller can respond without first having to listen to the entire playback of the prompt.
– Continue on Prompt Errors—Yes
In the event of a prompt error, the script continues to play back the next prompt in the sequence or waits for caller input.
• Input tab
– Timeout (in sec)—3
The script executes the Timeout output branch if the script receives no input within 3 seconds.
– Maximum Retries—3
The step attempts 3 times to receive valid input before executing the Unsuccessful output branch.
– Flush Input Buffer—Yes
The script erases previously entered input before capturing new user input.
Note For more information about configuring the Menu step, see the Cisco Unified Contact Center Express Scripting and Development Series: Volume 2, Editor Step Reference Guide.
The Menu step in this script has the following output branches (see Figure 7-24):
• Key 1—Executes if the caller accepts the recording.
• Key 2—Executes if the caller does not accept the recording.
• Timeout—Executes if the step reaches the timeout limit without receiving input.
7-41Cisco Unified Contact Center Express Getting Started with Scripts, Release 11.0(1)

Chapter 7 Designing a Basic Script The Menu Step
• Unsuccessful—Executes if the step receives invalid input
Figure 7-24 Menu Step—Output Branches
The following sections describe the scripting under each of these output branches:
• The Key 1 Output Branch, page 7-42
• The Key 2 Output Branch, page 7-44
• The Timeout and Unsuccessful Output Branches, page 7-46
The Key 1 Output BranchIf the caller decides to accept the recording, the script executes the Key 1 output branch.
Configure the Key 1 output branch of the Menu step to store the new recorded name of the caller in the system, and then to move the script to the closing steps.
7-42Cisco Unified Contact Center Express Getting Started with Scripts, Release 11.0(1)

Chapter 7 Designing a Basic ScriptThe Menu Step
Figure 7-25 shows the scripting under the Key 1 output branch of the Menu step.
Figure 7-25 Menu Step—Key 1 Branch
Use the Set User Info step to associate the value of the variable recording (as created by the Recording step) with the Spoken Name attribute of the user variable.
Figure 7-26 shows the configured Set User Info customizer window.
Figure 7-26 Configured Set User Info Customizer Window
The Set User Info step has the following two output branches (see Figure 7-25):
• Success—If the Set User Step succeeds, a Create Container Prompt step creates a prompt finalPrompt, which plays the system prompt SP[SNU\store_success.wav], informing the caller that the recording has been successfully stored.
A Goto step then sends the script to the Label named Bye, which executes the closing steps of the script.
7-43Cisco Unified Contact Center Express Getting Started with Scripts, Release 11.0(1)

Chapter 7 Designing a Basic Script The Menu Step
• Unsuccessful—If the Set User Step fails, a Create Container Prompt step creates a prompt finalPrompt, which plays two system prompts SP[SNU\error_general.wav] + SP[SNU\error_try_later], which inform the caller that an error has occurred and ask the caller to call back later.
A Goto step then sends the script to the Label named Bye, which executes the closing steps of the script.
The Key 2 Output BranchIf the caller decides to re-record a name, the script executes the Key 2 output branch.
Configure the Key 2 output branch of the Menu step to provide the caller with more opportunities to record a name.
Figure 7-27 shows the scripting under the Key 2 output branch of the Menu step.
Figure 7-27 Menu Step—Key 2 Branch
As in previous sections of the script, use an If step to give the caller multiple chances to record a name, until the script reaches the maximum number of retries. (For examples of the use of the If step, see The Timeout Output Branch, page 7-28 and The Unsuccessful Output Branch, page 7-35.)
In this case, the If step evaluates the expression “triesRecord < triesMaxRecord”; or the value of the triesRecord variable is less than the triesMaxRecord variable.
The triesRecord variable is an Integer variable that has an initial value of 0. The triesMaxRecord variable is an Integer variable with a value of 3.
This If step has the following two output branches:
7-44Cisco Unified Contact Center Express Getting Started with Scripts, Release 11.0(1)

Chapter 7 Designing a Basic ScriptThe Menu Step
• The True Output Branch, page 7-45
• The False Output Branch, page 7-45
The True Output Branch
If the caller has not reached the maximum number of retries in the attempt to record a name, the script executes the True output branch of the Key 2 output branch of the Menu step.
Configure the True output branch to give the caller more opportunities to record a name, until the maximum number of retries limit is reached.
The following steps execute under the True output branch of the If step (see Figure 7-27):
• The Set step—Adds 1 to the value of triesRecord. After three attempts, the value of triesRecord is 3, which is equal to the value of triesMaxRecord, so the False output branch of this If step executes.
• The Goto step—Sends the script to the Label named Record (see Figure 7-22), in order to give the caller further chances to record. (See The Recording Step, page 7-37.)
The False Output Branch
If the caller has reached the maximum number of retries and has not recorded a name, the script executes the False output branch of the Key 2 output branch of the Menu step.
Configure the False output branch to create a final prompt that will be played back to the caller, and then moves the script to the closing steps.
The following steps execute under the False output branch of the If step (see Figure 7-27):
• The Create Container Prompt step—Creates a prompt finalPrompt, which plays the system prompts SP[SNU\error_try_later], asking the caller to try again later.
• The Goto step—Sends the script to the Label named Bye, which executes the closing steps of the script.
7-45Cisco Unified Contact Center Express Getting Started with Scripts, Release 11.0(1)
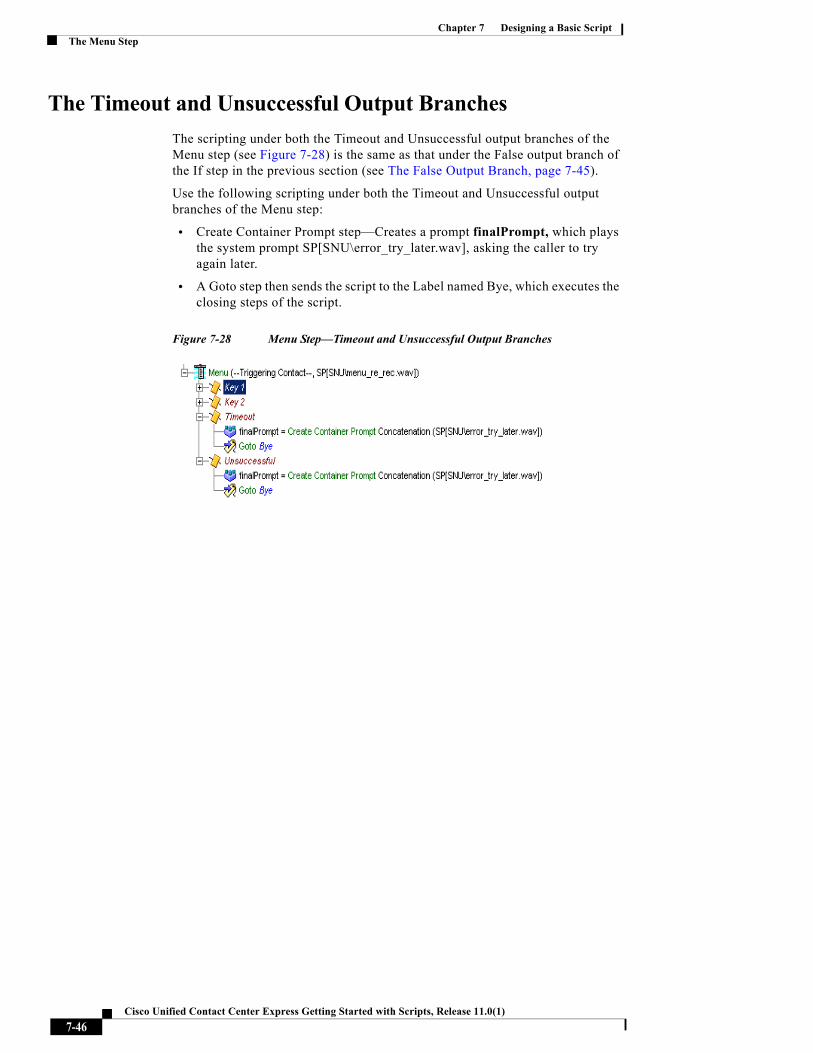
Chapter 7 Designing a Basic Script The Menu Step
The Timeout and Unsuccessful Output BranchesThe scripting under both the Timeout and Unsuccessful output branches of the Menu step (see Figure 7-28) is the same as that under the False output branch of the If step in the previous section (see The False Output Branch, page 7-45).
Use the following scripting under both the Timeout and Unsuccessful output branches of the Menu step:
• Create Container Prompt step—Creates a prompt finalPrompt, which plays the system prompt SP[SNU\error_try_later.wav], asking the caller to try again later.
• A Goto step then sends the script to the Label named Bye, which executes the closing steps of the script.
Figure 7-28 Menu Step—Timeout and Unsuccessful Output Branches
7-46Cisco Unified Contact Center Express Getting Started with Scripts, Release 11.0(1)

Chapter 7 Designing a Basic ScriptThe Closing Steps of the SNU.aef Script
The Closing Steps of the SNU.aef ScriptClose the SNU.aef script by using steps that mark the contact as handled, play back a final prompt to the caller, terminate the connection, and end the script.
Figure 7-29 shows the steps used to close the script.
Figure 7-29 Closing Steps of the SNU.aef Script
Use the following steps to close the script:
• The Set Contact Info Step, page 7-48
• The Set Step, page 7-49
• .The Play Prompt Step, page 7-49
• The Terminate Step, page 7-49
• .The End Step, page 7-49
7-47Cisco Unified Contact Center Express Getting Started with Scripts, Release 11.0(1)
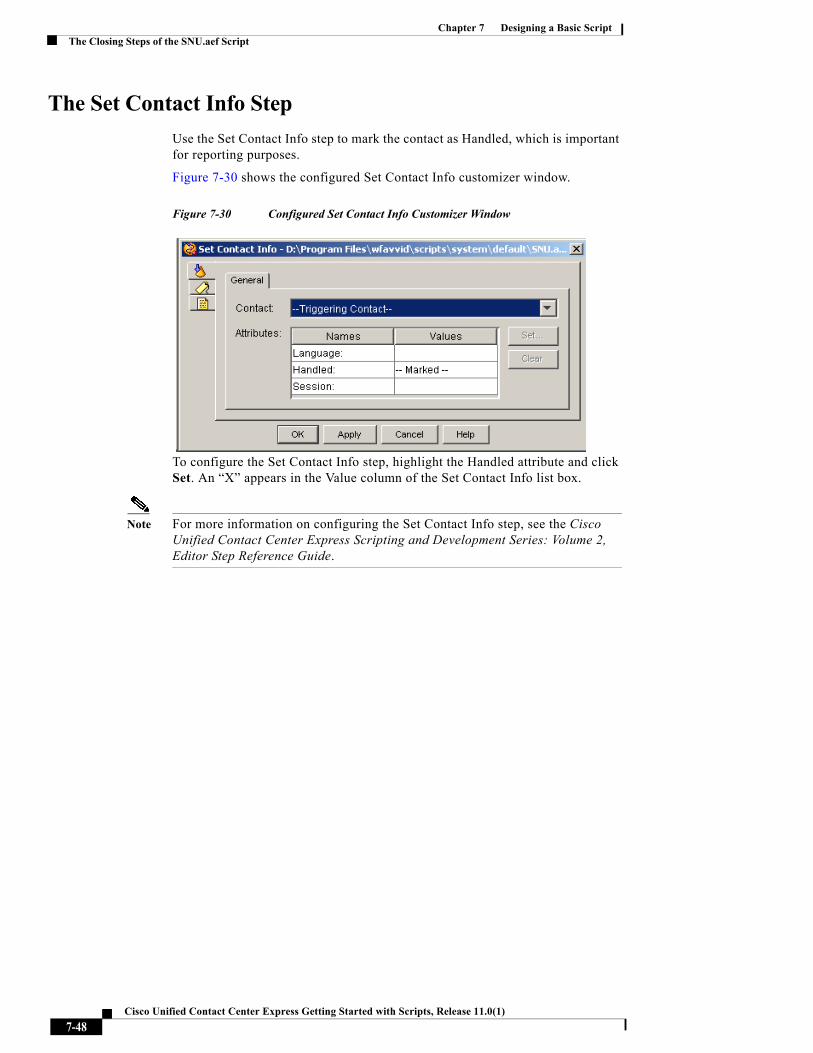
Chapter 7 Designing a Basic Script The Closing Steps of the SNU.aef Script
The Set Contact Info StepUse the Set Contact Info step to mark the contact as Handled, which is important for reporting purposes.
Figure 7-30 shows the configured Set Contact Info customizer window.
Figure 7-30 Configured Set Contact Info Customizer Window
To configure the Set Contact Info step, highlight the Handled attribute and click Set. An “X” appears in the Value column of the Set Contact Info list box.
Note For more information on configuring the Set Contact Info step, see the Cisco Unified Contact Center Express Scripting and Development Series: Volume 2, Editor Step Reference Guide.
7-48Cisco Unified Contact Center Express Getting Started with Scripts, Release 11.0(1)

Chapter 7 Designing a Basic ScriptThe Closing Steps of the SNU.aef Script
The Set StepUse the Set step to set the value of finalPrompt (to be played by the subsequent Play Prompt step) to combine the previous value of the finalPrompt variable with SNU\goodbye.wav], which tells the caller good-bye.
Note For more information on configuring the Set step, see the Cisco Unified Contact Center Express Editor Step Reference Guide.
.The Play Prompt StepConfigure the Play Prompt step to play finalPrompt back to the caller.
Note For an example of configuring the Play Prompt step, see The Play Prompt Step, page 7-8.
The Terminate StepUse the Terminate step to terminate the contact by disconnecting the call.
Note For more information on configuring the Terminate step, see theCisco Unified Contact Center Express Editor Step Reference Guide.
.The End StepUse the End step to complete processing and free all allocated resources.
This step has no properties and does not require a customizer.
7-49Cisco Unified Contact Center Express Getting Started with Scripts, Release 11.0(1)

Chapter 7 Designing a Basic Script The Closing Steps of the SNU.aef Script
7-50Cisco Unified Contact Center Express Getting Started with Scripts, Release 11.0(1)

Cisco Unified Contact Center Express Getting Sta
C H A P T E R 8
Working with Multiple ContactsThe key element in a Cisco Unified CCX script is a contact, which represents one form of connection with a remote customer. A contact can be a telephone call, an e-mail message, or an HTTP request.
Scripts use contacts to track connections through the system. The contact is established when the connection is made. The contact lasts until the connection is terminated, as when the script transfers or disconnects a telephone call, responds to an HTTP request, or sends an e-mail message.
You can use the steps of the Cisco Unified CCX Editor to design scripts that handle multiple contacts within the same script.
This chapter describes the design of such a script, the broadcast.aef script example.
This script also demonstrates the use of the Place Call step, the Call Subflow step, steps from the Java palette, and annotations to explain various sections of the script.
This section contains the following topics:
• An Example Script Template with Multiple Contacts, page 8-2
• The Start Step (Creating a Script), page 8-3
• Script Variables for broadcast.aef, page 8-4
• The Annotate Step, page 8-6
• The Accept Step, page 8-7
• The Get Contact Info Step, page 8-8
• The Recording Step, page 8-8
8-1rted with Scripts, Release 11.0(1)

Chapter 8 Working with Multiple Contacts An Example Script Template with Multiple Contacts
• The Play Prompt Step, page 8-11
• The Set numbersToCall Step, page 8-12
• The Call Subflow Step, page 8-13
• The Set numCalls Step, page 8-15
• The Label Step (Call Loop), page 8-15
• The If Step, page 8-15
• The Set Steps, page 8-17
• The Play Prompt Step, page 8-19
• The Call Hold Step, page 8-20
• The Place Call Step, page 8-21
• The Increment Step (i), page 8-27
• The Goto Step (Call Loop), page 8-27
• The Terminate Step, page 8-27
• The Set Contact Info Step, page 8-27
• The End Step, page 8-28
An Example Script Template with Multiple Contacts
The broadcast.aef script example records a message from a caller and then broadcasts it to a list of extensions by placing multiple outbound calls. If the caller who triggers this script hangs up, the script aborts.
8-2Cisco Unified Contact Center Express Getting Started with Scripts, Release 11.0(1)
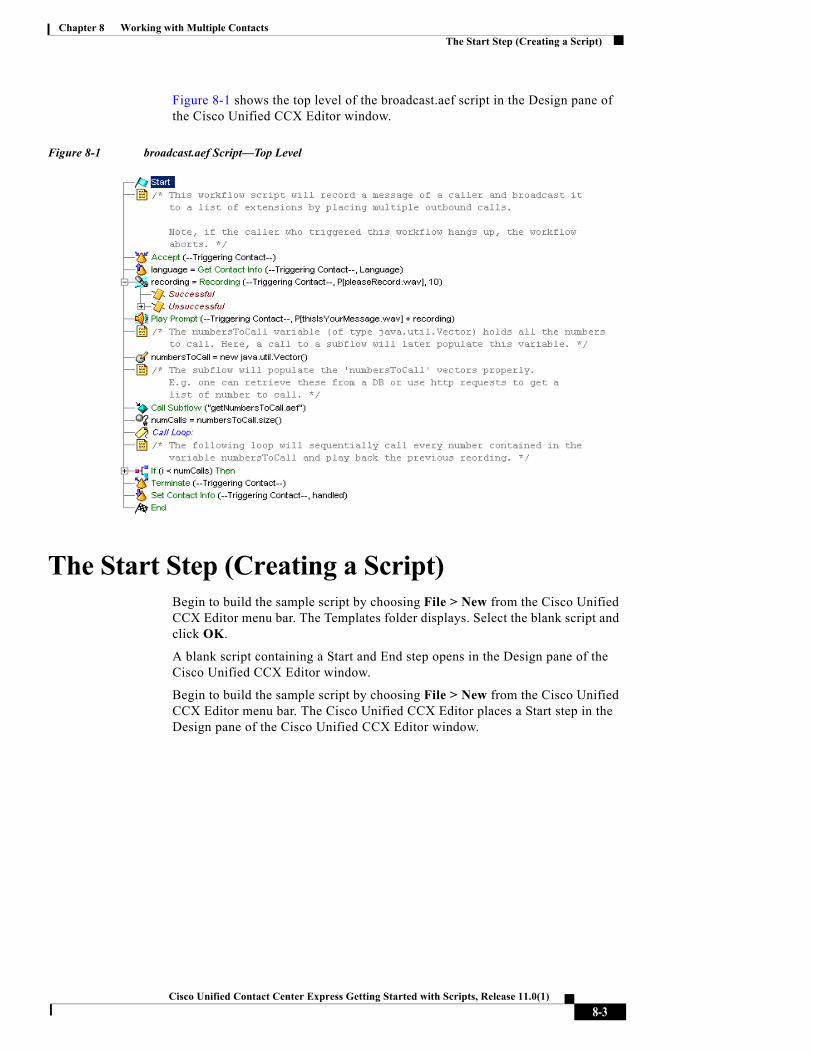
Chapter 8 Working with Multiple ContactsThe Start Step (Creating a Script)
Figure 8-1 shows the top level of the broadcast.aef script in the Design pane of the Cisco Unified CCX Editor window.
Figure 8-1 broadcast.aef Script—Top Level
The Start Step (Creating a Script)Begin to build the sample script by choosing File > New from the Cisco Unified CCX Editor menu bar. The Templates folder displays. Select the blank script and click OK.
A blank script containing a Start and End step opens in the Design pane of the Cisco Unified CCX Editor window.
Begin to build the sample script by choosing File > New from the Cisco Unified CCX Editor menu bar. The Cisco Unified CCX Editor places a Start step in the Design pane of the Cisco Unified CCX Editor window.
8-3Cisco Unified Contact Center Express Getting Started with Scripts, Release 11.0(1)

Chapter 8 Working with Multiple Contacts Script Variables for broadcast.aef
The Start step needs no configuration and has no customizer window. At this time, you might also want to give your new script a name and save it by selecting File > Save from the menu bar.
Our example script is called broadcast.aef.
Script Variables for broadcast.aefBegin the broadcast.aef script design process by using the Variable pane of the Cisco Unified CCX Editor to define script variables.
Note For more information about defining variables, see the “Defining, Using, and Updating Script Variables” section on page 2-31.
Figure 8-2 shows the variables of the broadcast.aef script as they appear in the Variable pane of the Cisco Unified CCX Editor window.
Figure 8-2 Variable Pane of the broadcast.aef Script
8-4Cisco Unified Contact Center Express Getting Started with Scripts, Release 11.0(1)

Chapter 8 Working with Multiple ContactsScript Variables for broadcast.aef
Table 8-1 describes the variables used in the broadcast.aef script.
Table 8-1 Variables in the broadcast.aef Script
Variable Name Variable Type Value Function
dest String "" Stores the current destination number to call as the script loops.
(See The Call Subflow Step, page 8-13.)
groupCallControl Integer 0 ID of the Call Control Group with which the outbound call is associated.
(See The Place Call Step, page 8-21.)
Mark this variable as a parameter to allow the administrator the option to change the value of this variable.
For more information, see the Cisco Unified Contact Center Express Administrator Guide.
groupDialog Integer 0 Identifies the ID of the primary dialog group for handling the outbound call.
(See The Place Call Step, page 8-21.)
Mark this variable as a parameter to allow the administrator the option to change the value of this variable.
For more information, see the Cisco Unified Contact Center Express Administrator Guide.
i Integer 0 Stores the current index of the number to call.
(See The If Step, page 8-15.)
Language language L[en_US] Sores the value of the local language used for prompts.
numCalls Integer 0 Stores the number of calls to be made.
(See The Set numCalls Step, page 8-15.)
numbersToCall Java Type null Stores all the numbers to call.
(See The Set numbersToCall Step, page 8-12.)
8-5Cisco Unified Contact Center Express Getting Started with Scripts, Release 11.0(1)

Chapter 8 Working with Multiple Contacts The Annotate Step
The Annotate StepContinue to build the broadcast.aef script by dragging an Annotate step from the General palette (in the Palette pane of the Cisco Unified CCX Editor window) to the Design pane, as shown in Figure 8-1.
Configure this Annotate step to contain notes describing the function of this script. (This step has no impact on script functionality.)
obj Java Type null Holds the current destination object as it loops through. This object is then typecast to a string that represents the number to call (outCall).
(See The Set Steps, page 8-17)
outCall Contact null Stores the contact information returned when the Place Call step succeeds.
(See The Place Call Step, page 8-21.)
recording Document null Stores the audio document that the caller records.
(See The Recording Step, page 8-8.)
Table 8-1 Variables in the broadcast.aef Script (continued)
Variable Name Variable Type Value Function
8-6Cisco Unified Contact Center Express Getting Started with Scripts, Release 11.0(1)

Chapter 8 Working with Multiple ContactsThe Accept Step
Figure 8-3 shows the configured Annotate step customizer window.
Figure 8-3 Configured Annotate Customizer Window—Notes for the broadcast.aef Script
Configure the Annotate customizer window by entering notes in the Enter Comments text field, and then clicking OK.
Note This script contains four top-level instances of the Annotate step.
Tip Notes you add about the script are useful to remind yourself of the functions of the script and its various sections. Notes also communicate information about the script to future designers who may need to revise or debug it.
The Accept StepContinue to build the broadcast.aef script by dragging an Accept step from the Contact palette (in the Palette pane of the Cisco Unified CCX Editor window) to the Design pane.
Because you intend to accept the default contact, no configuration is necessary.
8-7Cisco Unified Contact Center Express Getting Started with Scripts, Release 11.0(1)

Chapter 8 Working with Multiple Contacts The Get Contact Info Step
Note For more information about using the Accept step, see “The Accept Step” section on page 7-7.
The Get Contact Info StepDrag a Get Contact Info step from the Contact palette and drop it on the Design pane. Then in the customizer window, set the Language name to the Language variable.
The Recording StepContinue to build the broadcast.aef script by dragging a Recording step from the Media palette to the Design pane.
Then configure the Recording step to attempt to record the message the caller wants to broadcast.
Note For another example of configuration of the Recording step, see “The Recording Step” section on page 7-37.
Configure the Recording step as follows:
• General tab
– Contact—Triggering Contact
This step operates on the contact that triggered the script.
– Interruptible—No
External events cannot interrupt the execution of this step.
– Result Document—recording
The recording variable stores the audio document recorded by this caller.
• Prompt tab
– Prompt—Customized prompt
8-8Cisco Unified Contact Center Express Getting Started with Scripts, Release 11.0(1)

Chapter 8 Working with Multiple ContactsThe Recording Step
The step uses a customized prompt.
The text box under the Prompt text box indicates that the prompt is the customized prompt P[pleaseRecord.wav], which asks the caller to please record a message.
– Start Tone—Default Prompt
A system prompt providing a default start tone plays back to alert the caller that the recording is about to begin.
– Barge In—Yes
The caller can respond without first having to listen to the playback of the entire prompt.
– Continue on Prompt Errors—Yes
The step continues with the next prompt in the list if an error occurs in a prompt, or if this prompt was the last in the list, awaits caller input.
• Input tab
– Maximum Retries—3
The script makes 3 retries to receive valid input before executing the Unsuccessful output branch.
– Flush Input Buffer—Yes
The system erases previously entered input before capturing new user input.
• Filter tab
– Duration—10
The caller can record a message of up to 10 seconds.
– Terminating Digit—#
The caller can use the “#” key to indicate completion of input.
– Cancel Digit—*
The caller can use the “*” key to start over.
(The cancel key works only until the script reaches the maximum number of retries.)
8-9Cisco Unified Contact Center Express Getting Started with Scripts, Release 11.0(1)

Chapter 8 Working with Multiple Contacts The Recording Step
Note For another example of the use of the Recording step, see The Recording Step, page 7-37 of Chapter 7, “Designing a Basic Script.”
The Recording step has two output branches, Successful and Unsuccessful. (See Figure 8-4.)
Figure 8-4 Recording Step Output Branches
These output branches are described in the following sections:
• The Successful Output Branch, page 8-10
• The Unsuccessful Output Branch, page 8-10
The Successful Output BranchIf the Recording step successfully records the desired message from the caller, the script executes the Successful output branch, and the scripts fall through to the Play Prompt step, as shown in Figure 8-1, and discussed in The Play Prompt Step, page 8-11.
The Unsuccessful Output BranchIf the Recording step does not successfully record the desired message from the caller, the script executes the unsuccessful output branch.
Configure the Unsuccessful output branch of the Recording step to play back a prompt informing the caller that the recording was unsuccessful; then a Terminate step ends the call, and an End step ends the script and releases all system resources.
8-10Cisco Unified Contact Center Express Getting Started with Scripts, Release 11.0(1)

Chapter 8 Working with Multiple ContactsThe Play Prompt Step
The Play Prompt Step
Begin the Unsuccessful output branch of the Recording step by dragging a Play Prompt step from the Media palette to the Recording step icon in the Design pane.
Then configure the Play Prompt step to play back a prompt that informs the caller that the recording was unsuccessful.
For an example of the configuration of the Play Prompt step, see “The Play Prompt Step” section on page 7-8.
The Terminate Step
Continue the Unsuccessful output branch of the Recording step by dragging a Terminate step from the Contact palette to the Recording step icon in the Design pane.
The Terminate step terminates the connection. Allow the default contact (the Triggering Contact) to be the contact that is terminated.
The End Step
End the Unsuccessful output branch of the Recording step by dragging an End step from the General palette to the Recording step icon in the Design pane.
The End step ends the script and releases all resources. The End step requires no configuration and has no customizer.
The Play Prompt StepContinue the broadcast.aef script by dragging a Play Prompt step from the Media palette to the Design pane.
Next, configure the Play Prompt step to play back to the caller a prompt that combines the prompt P[thisIsYourMessage.wav] and message recorded by the caller that is stored in the recording variable. The script then moves to the Create Java Object step. (See The Set numbersToCall Step, page 8-12.)
8-11Cisco Unified Contact Center Express Getting Started with Scripts, Release 11.0(1)
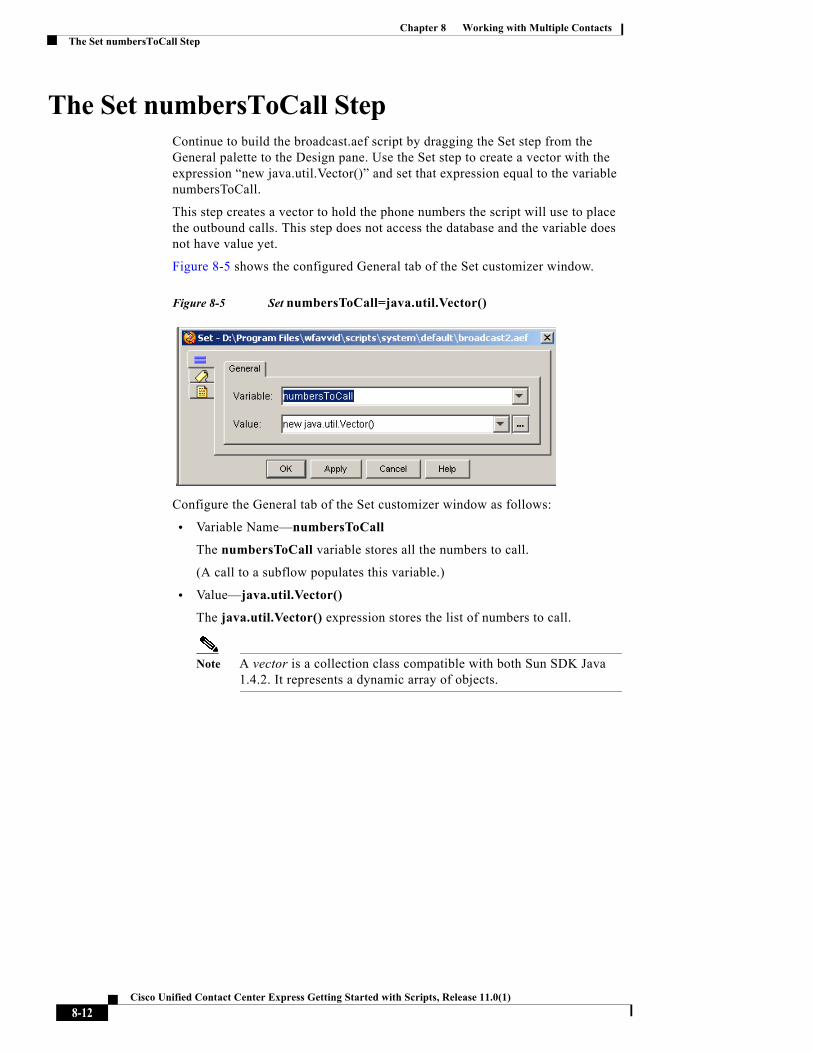
Chapter 8 Working with Multiple Contacts The Set numbersToCall Step
The Set numbersToCall StepContinue to build the broadcast.aef script by dragging the Set step from the General palette to the Design pane. Use the Set step to create a vector with the expression “new java.util.Vector()” and set that expression equal to the variable numbersToCall.
This step creates a vector to hold the phone numbers the script will use to place the outbound calls. This step does not access the database and the variable does not have value yet.
Figure 8-5 shows the configured General tab of the Set customizer window.
Figure 8-5 Set numbersToCall=java.util.Vector()
Configure the General tab of the Set customizer window as follows:
• Variable Name—numbersToCall
The numbersToCall variable stores all the numbers to call.
(A call to a subflow populates this variable.)
• Value—java.util.Vector()
The java.util.Vector() expression stores the list of numbers to call.
Note A vector is a collection class compatible with both Sun SDK Java 1.4.2. It represents a dynamic array of objects.
8-12Cisco Unified Contact Center Express Getting Started with Scripts, Release 11.0(1)

Chapter 8 Working with Multiple ContactsThe Call Subflow Step
The Call Subflow StepContinue to build the broadcast.aef script by dragging a Call Subflow step from the JAVA palette to the Design pane.
Then configure the Call Subflow step to call a subflow that populates the numbersToCall variable. (See The Set numbersToCall Step, page 8-12).
Figure 8-6 shows the configured General tab of the Call Subflow customizer window.
Figure 8-6 Call Subflow Customizer Window—Configured General Tab
Configure the General tab of the Call Subflow customizer window to call the getNumbersToCall.aef script, which contains the scripting necessary to access the directory of numbers and populate the numbersToCall variable in the primary script. Select No for Disable Interruptions.
8-13Cisco Unified Contact Center Express Getting Started with Scripts, Release 11.0(1)
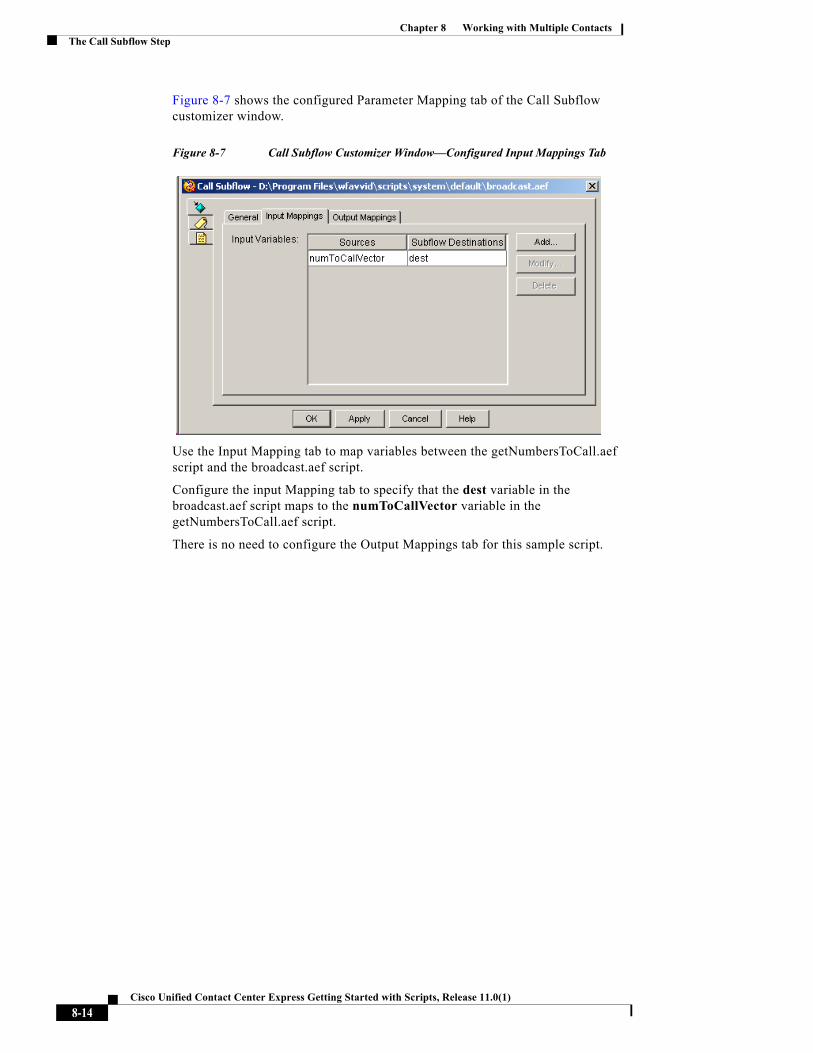
Chapter 8 Working with Multiple Contacts The Call Subflow Step
Figure 8-7 shows the configured Parameter Mapping tab of the Call Subflow customizer window.
Figure 8-7 Call Subflow Customizer Window—Configured Input Mappings Tab
Use the Input Mapping tab to map variables between the getNumbersToCall.aef script and the broadcast.aef script.
Configure the input Mapping tab to specify that the dest variable in the broadcast.aef script maps to the numToCallVector variable in the getNumbersToCall.aef script.
There is no need to configure the Output Mappings tab for this sample script.
8-14Cisco Unified Contact Center Express Getting Started with Scripts, Release 11.0(1)

Chapter 8 Working with Multiple ContactsThe Set numCalls Step
The Set numCalls StepContinue to build the broadcast.aef script by dragging a Set step from the General palette to the Design pane.
This step assigns an integer value from the numbersToCall.size() expression to the numCalls variable.
Figure 8-8 shows the configured General tab of the Set customizer window.
Figure 8-8 Set Customizer Window—Set numCalls
The Label Step (Call Loop)Continue to build the broadcast.aef script by dragging a Label step from the General palette to the Design pane. Then configure the Label step (named Call Loop), to provide a target for the beginning of the loop. The loop repeats until all the destination numbers have been called.
The If StepContinue to build the broadcast.aef script by dragging an If step from the General palette to the Design pane. Then configure the If step to compare the number of calls the script has placed to the total number of calls to be made, and to end the script when this number is equal.
8-15Cisco Unified Contact Center Express Getting Started with Scripts, Release 11.0(1)

Chapter 8 Working with Multiple Contacts The If Step
The If step evaluates the expression “i < numCalls” (“the value of the i Integer variable is less than the value of the numCalls Integer variable”). The value of the i variable increases by 1 every time the script uses a subsequent Increment step to place a call. The If step has two output branches, True and False. (See Figure 8-9.)
Figure 8-9 If Customizer Window—Output Branches
The following sections describe the two output branches of the If step:
• If True Output Branch, page 8-16
• If False Output Branch, page 8-17
If True Output BranchIf the If step determines that the number of calls made is less than the total number of calls to make, the script executes the True output branch.
Configure the True output branch of the If step to begin (or continue) to execute the steps used to place the outbound calls.
The True output branch contains the following steps, each of which is discussed in its own section:
• The Set Steps, page 8-17
8-16Cisco Unified Contact Center Express Getting Started with Scripts, Release 11.0(1)

Chapter 8 Working with Multiple ContactsThe Set Steps
• The Play Prompt Step, page 8-19
• The Call Hold Step, page 8-20
• The Place Call Step, page 8-21
• The Increment Step (i), page 8-27
• The Goto Step (Call Loop), page 8-27
If False Output BranchIf the If step completes its task, the script executes the False output branch, and the script falls through to the Terminate step. (See “The Terminate Step” section on page 8-27.)
The Set StepsBegin the True output branch of the If step by dragging two Set steps from the General palette to the True icon under the If step in the Design pane.
Then configure the Set steps under the True output branch of the If step to extract the phone number stored at position i inside the vector. Because the vector is a dynamic array that is populated with all the numbers to call, use this method to invoke a method of the vector to return a specific element of the array at the specified index.
This section contains the following steps:
• The First Set Step, page 8-17
• The Second Set Step, page 8-18
The First Set StepConfigure the General tab of the first Step customizer window to specify that the method executes on the numbersToCall variable.
8-17Cisco Unified Contact Center Express Getting Started with Scripts, Release 11.0(1)

Chapter 8 Working with Multiple Contacts The Set Steps
Figure 8-10 shows the configured Explore Class Information tab of the Execute Java Method customizer window.
Figure 8-10 Set Obj= numbersToCall.elementAt(i)
Configure the General tab of the Set customizer window as follows:
• Variable—obj
The obj Java Type variable holds the next number to call from the vector of numbers.
• Value
The expression numbersToCall.elementAt(i) which gets the next number to call from the vector of numbers.
The Second Set StepConfigure the General tab of the second Set customizer window to convert the number retrieved from the vector to a String variable so that the Place Call step can use it as the number to dial.
8-18Cisco Unified Contact Center Express Getting Started with Scripts, Release 11.0(1)

Chapter 8 Working with Multiple ContactsThe Play Prompt Step
Figure 8-11 shows the configured General tab of the second Set customizer window.
Figure 8-11 Set dest=dest.valueOf(obj)
Configure the General tab of the Set customizer window as follows:
• Variable—dest
• Value—dest.valueOf(Obj)
The step uses the expression dest.valueOf(Obj) to convert the number stored in the OBJ variable to a string and to assign it to the dest String variable.
The Play Prompt StepContinue the True output branch of the If step by dragging a Play Prompt step from the Media palette to the True icon under the If step in the Design pane.
Then configure the Play Prompt step to play back the prompt P[calling] + S[dest]. This prompt plays back a message announcing the number of the destination phone call to the original caller.
8-19Cisco Unified Contact Center Express Getting Started with Scripts, Release 11.0(1)

Chapter 8 Working with Multiple Contacts The Call Hold Step
Figure 8-12 shows the configured Prompt tab of the Play Prompt customizer window.
Figure 8-12 Play Prompt Customizer Window—Configured Prompt Tab
• In the General tab:
– Set the contact to the triggering contact
– Set Interruptible to No
• In the Prompt tab:
– Set the prompt to P[calling] + S[dest]
– Set Barge In to No
– Set Continue on Prompt Errors to Yes
• In the Input tab:
– Set Flush Input Buffer to Yes
The Call Hold StepContinue the True output branch of the If step by dragging a Call Hold step from the Call Contact palette to the True icon under the If step in the Design pane.
Then configure the Call Hold step to put the incoming call that triggered the script on hold while the outbound calls are made.
8-20Cisco Unified Contact Center Express Getting Started with Scripts, Release 11.0(1)

Chapter 8 Working with Multiple ContactsThe Place Call Step
The Place Call StepContinue the True output branch of the If step by dragging a Place Call step from the Call Contact palette to the True icon under the If step in the Design pane.
Then configure the Place Call step to place the outbound calls to the numbers stored in the dest variable.
Figure 8-13 shows the configured Place Call customizer window.
Figure 8-13 Configured Place Call Customizer Window
Configure the Place Call customizer window as follows:
• Destination—dest
The dest variable stores the destination phone numbers placed there by the Set step (see The Second Set Step, page 8-18).
8-21Cisco Unified Contact Center Express Getting Started with Scripts, Release 11.0(1)
Chapter 8 Working with Multiple Contacts The Place Call Step
• Timeout (sec)—30
The script waits for 30 seconds before a Ring No Answer condition causes the script to execute the RingNoAnswer output branch of the Place Call step.
• CallControlGroupId—groupCallControl
The variable groupCallControl stores the call control group with which the outbound call is associated.
Define this property as a parameter in order to enable the administrator to properly configure the application with the CTI port group to use for placing the call.
• Dialog Groups—groupDialog
The variable groupDialog stores the identifying number of the primary dialog group for handling the outbound call.
Define this property as a parameter in order to allow the administrator to configure the dialog group ID that will be used when provisioning an application.
• Call Contact—outCall
The variable outCall is where the script returns a handle to the created call when the step succeeds.
The Place Call step has the following six output branches:
• Successful—The step successfully places the call.
• NoAnswer—The step successfully makes the call but the RNA Timeout limit is reached.
• Busy— The step successfully places the call but the line is busy.
• Invalid—The step tries to place the call but the extension is invalid.
• NoResource—The step cannot place the call because no resource is available to make the call.
• Unsuccessful—The step does not place the call because of an internal system error.
8-22Cisco Unified Contact Center Express Getting Started with Scripts, Release 11.0(1)

Chapter 8 Working with Multiple ContactsThe Place Call Step
Note If the RNA timeout in the script is longer than the CFNA timer of Cisco Unified Communications Manager, the agent phone goes to Not Ready state after a ring-no-answer. To resolve this issue, change the timeout value in the script to a lower than the CFNA in Cisco Unified Communications Manager.
Figure 8-14 shows the scripting under the six output branches of the Place Call step.
Figure 8-14 Place Call Customizer Window—Output Branches
The following sections describe the six output branches of the Place Call step in the True output branch of the If step:
• The Successful Output Branch, page 8-24
• The Other Output Branches, page 8-26
8-23Cisco Unified Contact Center Express Getting Started with Scripts, Release 11.0(1)

Chapter 8 Working with Multiple Contacts The Place Call Step
The Successful Output BranchIf the Place Call step in the True output branch of the If step successfully places a call, the script executes the Successful output branch.
The Successful output branch of the Place Call step in the True output branch of the If step contains the following steps:
• The On Exception Goto Step, page 8-24
• The Set Contact Info Step, page 8-24
• The Play Prompt Step, page 8-25
• The Terminate Step, page 8-25
• The Set Contact Info Set, page 8-25
• The Label Step (LABEL0), page 8-25
• The On Exception Goto Step (Clear Exception), page 8-25
• The Call Unhold Step, page 8-26
• The Play Prompt Step, page 8-26
The On Exception Goto Step
Begin the Successful output branch of the Place Call step by dragging an On Exception Goto step from the General palette to the Successful icon under the Place Call step under the True icon under the If step in the Design pane.
Then configure the On Exception Goto step to send the script to the Label named LABEL0 if the script generates a ContactInactiveException.
The script throws this exception if the Contact becomes inactive. In this event, the script skips the Play Prompt step and the Terminate step, and goes to the Clear Exception Step described below.
The Set Contact Info StepDragging a Set Contact Info step from the Contact palette to the Successful icon under the Place Call step under the On Exception step in the Design pane.
Then configure the Set Contact Info step to set outcall language name to language.
8-24Cisco Unified Contact Center Express Getting Started with Scripts, Release 11.0(1)

Chapter 8 Working with Multiple ContactsThe Place Call Step
The Play Prompt Step
Continue the Successful output branch of the Place Call step by dragging a Play Prompt step from the Media palette to the Successful icon under the Place Call step under the True icon under the If step in the Design pane.
Then configure the Play Prompt step to play the prompt recording, created by the Recording step earlier in the script, to the outbound call.
The Terminate StepContinue the Successful output branch of the Place Call step by dragging a Terminate step from the Contact palette to the Successful icon under the Place Call step under the True icon under the If step in the Design pane.
Then configure the Terminate step to terminate the outgoing call.
The Set Contact Info Set
Dragging a Set Contact Info step from the Contact palette to the Successful icon under the Place Call step under the Terminate step in the Design pane.
Then configure the Set Contact Info step to set the Handled attribute of the outCall contact to marked.
The Label Step (LABEL0)
Continue the Successful output branch of the Place Call step by dragging a Label step from the General palette to the Successful icon under the Place Call step under the True icon under the If step in the Design pane.
Then configure the Label step to provide a target for the On Exception Goto step above.
The On Exception Goto Step (Clear Exception)Continue the Successful output branch of the Place Call step by dragging another On Exception Goto step from the General palette to the Successful icon under the Place Call step under the True icon under the If step in the Design pane.
Then configure the On Exception Goto step to clear any exceptions.
8-25Cisco Unified Contact Center Express Getting Started with Scripts, Release 11.0(1)

Chapter 8 Working with Multiple Contacts The Place Call Step
The Call Unhold Step
Continue the Successful output branch of the Place Call step by dragging a Call Unhold step from the Call Contact palette to the Successful icon under the Place Call step under the True icon under the If step in the Design pane.
Then configure the Call Unhold step to take the original call off hold, so that the subsequent Play Prompt step can play back a prompt to the original caller.
The Play Prompt StepContinue the Successful output branch of the Place Call step by dragging a Play Prompt step from the Media palette to the Successful icon under the Place Call step under the True icon under the If step in the Design pane.
Then configure the On Exception Goto step to play back a prompt informing the original caller that the outgoing call was a success.
The Increment step then increments the value of the i variable by 1, after which a Goto step sends the script back to the Label named Call Loop, located above the If step (see Figure 8-9).
The script loops in this way until the value of the i variable is equal to the value of the numCalls variable, after which the False output branch of the If step executes, the Terminate step terminates the call, and an End step ends the script. (See The If Step, page 8-15.)
The Other Output BranchesIf the Place Call step in the True output branch of the If step does not successfully place the call, the script executes the one of the other five output branches:
Configure each of the other five output branches of the Place Call step to play a specific prompt (different for each output branch) that informs the original caller that the call was not placed.
The script then falls through to the Increment step (see The Increment Step (i), page 8-27), and loops back through the steps under the If step until the value of the i variable is equal to the value of the numCalls variable, after which the False output branch of the If step executes, the Terminate step terminates the call, and an End step ends the script.
8-26Cisco Unified Contact Center Express Getting Started with Scripts, Release 11.0(1)

Chapter 8 Working with Multiple ContactsThe Increment Step (i)
The Increment Step (i)Continue the True output branch of the If step by dragging an Increment step from the General palette to the True icon under the If step in the Design pane.
Then configure the Increment step to increase the value of the i variable by one.
The Goto Step (Call Loop)Conclude the True output branch of the If step by dragging a GoTo step from the General palette to the True icon under the If step in the Design pane.
Then configure the Goto step to move the script back to the Label step named Call Loop.
The Terminate StepDrag a Terminate step from the Contact palette to the Design pane and place it on the Goto step.
Then configure the Terminate step to terminate the connection.
The Set Contact Info StepDrag a Set Contact Info step from the Contact palette to the Design pane and place it on the Terminate step. Then configure the value of Handled to Marked.
8-27Cisco Unified Contact Center Express Getting Started with Scripts, Release 11.0(1)
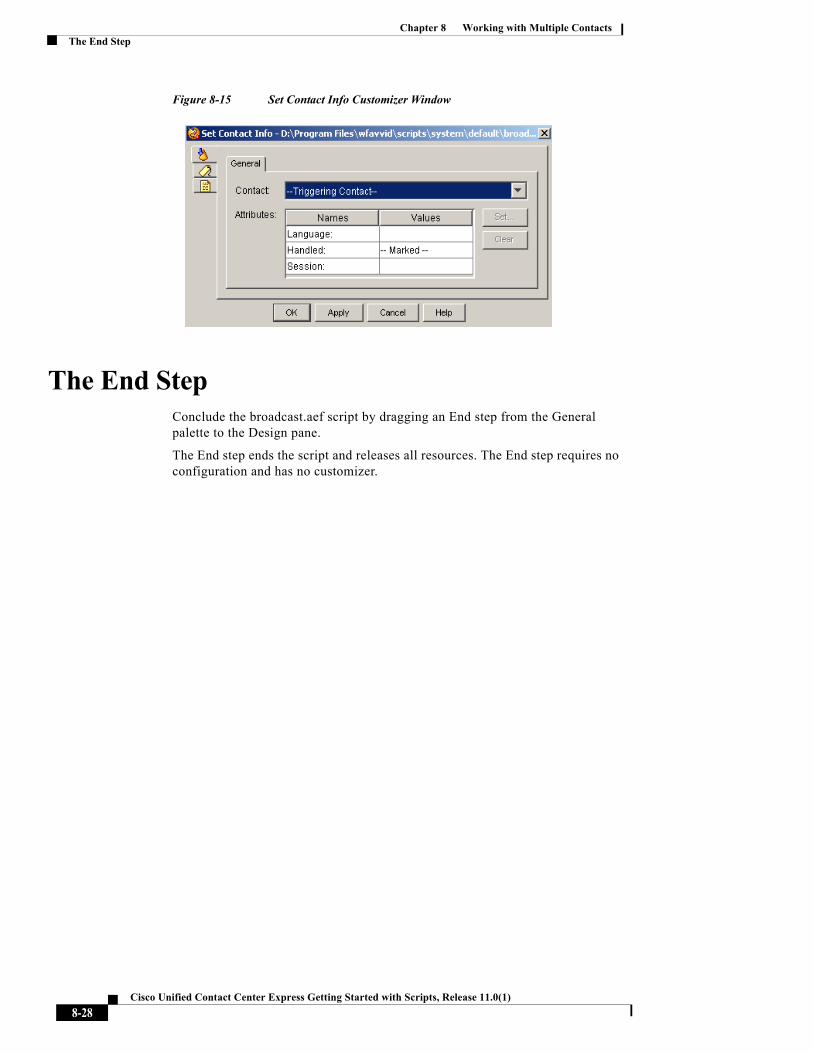
Chapter 8 Working with Multiple Contacts The End Step
Figure 8-15 Set Contact Info Customizer Window
The End StepConclude the broadcast.aef script by dragging an End step from the General palette to the Design pane.
The End step ends the script and releases all resources. The End step requires no configuration and has no customizer.
8-28Cisco Unified Contact Center Express Getting Started with Scripts, Release 11.0(1)

Cisco Unified Contact Center Express Getting Star
C H A P T E R 9
Designing a Web-Enabled ScriptYou can use the Cisco Unified CCX Editor to design web-enabled scripts that interact with application servers. A web-enabled script is a script that obtains information from web servers on the Internet or an intranet.
This section describes the design of such a script, hello.aef. This simple “sayhello” server application demonstrates the procedures required to create and implement any server application script.
Note In Unified CCX 10.0(1), you must use “http://<ipaddress>:9080/<filename>” to access the web pages uploaded in Applications > Document Management > Default > webapps > ROOT.
This chapter contains the following topics:
• An Example Web-Enabled Script Template, page 9-1
• Creating Server Script Web Pages, page 9-3
• Creating the hello.aef Script, page 9-5
An Example Web-Enabled Script TemplateThe hello.aef sample script template uses a static web page that prompts the user for a name and a dynamic web page that provides a template with an embedded keyword that is substituted dynamically by the script when it runs.
9-1ted with Scripts, Release 11.0(1)

Chapter 9 Designing a Web-Enabled Script An Example Web-Enabled Script Template
Figure 9-1 shows the hello.aef script template as it appears in the Design pane of the Cisco Unified CCX Editor window.
Figure 9-1 Completed Server Script
The hello.aef script prompts the user for a name, and the application server responds with a “Hello” to the name given.
When the user opens the welcome.html web page, types a name, and clicks Submit, the following code in welcome.html sends the HTTP request “greeting” to the Cisco Unified CCX Engine:<form action="/greeting" method=GET>
This trigger (/greeting) runs the hello.aef script, which performs the following actions:
1. A Create File Document step references the response template document.
2. A Get Http Contact Info step reads the parameter “name” included with the HTTP request.
3. A Get Http Contact Info step updates the local variable mapped to the “name” parameter.
4. A Keyword Transform Document step replaces the keyword %name% in the template file (sayhello.html), and then writes the result to the local variable, doc.
5. A Send Http Response step sends the document in the doc variable to the user’s browser.
After the Cisco Unified CCX server sends the document, the phrase “Hello yourname” appears in the browser window of the user.
This example web-enabled script provides a starting point from which you can develop the kind of application scripts you need.
9-2Cisco Unified Contact Center Express Getting Started with Scripts, Release 11.0(1)

Chapter 9 Designing a Web-Enabled ScriptCreating Server Script Web Pages
Creating Server Script Web PagesCreate the following two web pages to use with the sample hello.aef server script:
• Static page (welcome.html)—Prompts the user for a name.
• Dynamic page (sayhello.html)—Provides a template with an embedded keyword that is substituted dynamically by the script when it runs. In this sample script, this page also displays the results to the user.
This section contains these topics:
• Creating a Static Web Page, page 9-3
• Creating a Dynamic Web Page, page 9-4
Creating a Static Web Page
Note In your development or production environment, place your static HTML pages in a location where they can be read by the HTTP server process and where they are secure from unauthorized access.
To create the sample static web page for your hello.aef script, do the following:
Procedure
Step 1 Use a text or web-page editor to enter the following HTML source code:<html><body><form action="/greeting" method=GET>What is your name <input type="text" name="name"><input type="submit"></form></body></html>
Step 2 Save the file as welcome.html and upload it to the Document Management using Unified CCX Web Administration by choosing Applications > Document Management > Default > webapps > ROOT. This location with respect to installationdirectory is /webapps/ROOT.
9-3Cisco Unified Contact Center Express Getting Started with Scripts, Release 11.0(1)

Chapter 9 Designing a Web-Enabled Script Creating Server Script Web Pages
Step 3 Test the HTML page by accessing it as http://<ipaddress>:9080/welocme.html in different web browsers.
This sample HTML code generates the web page as shown below, which prompts a user for a name.
Figure 9-2 Static HTML Page with User Prompt
You are now ready to create a dynamic web page.
Creating a Dynamic Web PageTo create the dynamic web page for your hello.aef script, do the following:
Procedure
Step 1 Use a text editor or web-page editor to create a template document, entering the following HTML source code:<html><body>Hello %name%</body></html>
Step 2 Use the following format to identify the variables you will use when you write the hello.aef script:
%keyword%
In this example, keyword represents a keyword to be replaced with some textual representation as specified by the Keyword Transform Document step.
Step 3 Use the Keyword Transform Document step in the Cisco Unified CCX Editor to identify the location of the text substitution template.
When you run the hello.aef script, the Keyword Transform Document step replaces each keyword with the data you specify for that keyword.
9-4Cisco Unified Contact Center Express Getting Started with Scripts, Release 11.0(1)
Chapter 9 Designing a Web-Enabled ScriptCreating the hello.aef Script
Step 4 After you complete the template file, save the template file as sayhello.html.
Step 5 Create a folder called “template” in Document Management and upload the template file in this folder. To access Document Management, choose Applications > Document Management > Default > webapps > ROOT on the Unified CCX Web Administration.
You are now ready to write the hello.aef script.
Creating the hello.aef ScriptThis section demonstrates the process of writing the hello.aef script, a Cisco Unified CCX Editor script that responds to an HTTP request from a web browser.
This section contains the following topics:
• The Start Step, page 9-5
• Web-enabled Script Variables, page 9-6
• The Get Http Contact Info Step, page 9-8
• The Create File Document Step, page 9-10
• The Keyword Transform Document Step, page 9-11
• The Send Http Response Step, page 9-14
• The End Step, page 9-16
The Start StepBegin to build the sample script by choosing File > New from the Cisco Unified CCX Editor menu bar. The Templates folder displays. Select the blank script and click OK.
A blank script containing a Start and End step opens in the Design pane of the Cisco Unified CCX Editor window.
Begin to build the sample script by choosing File > New from the Cisco Unified CCX Editor menu bar. The Cisco Unified CCX Editor places a Start step in the Design pane of the Cisco Unified CCX Editor window.
9-5Cisco Unified Contact Center Express Getting Started with Scripts, Release 11.0(1)

Chapter 9 Designing a Web-Enabled Script Creating the hello.aef Script
The Start step needs no configuration and has no customizer window. At this time, you might also want to give your new script a name and save it by selecting File > Save from the menu bar.
Our example script is called Hello.aef.
Web-enabled Script VariablesBegin the process of designing the hello.aef script by defining script variables.
Use the Variable pane of the Cisco Unified CCX Editor to define two variables for the hello.aef script, as shown in Table 9-1:
Table 9-1 Variables in the hello.aef Script
Variable NameVariable Type Function
name String Contains the value entered by the user.
See The Get Http Contact Info Step, page 9-8.
doc Document Contains the document to be sent in response to the user.
See The Create File Document Step, page 9-10.
To define the two variables for the hello.aef script, do the following:
ProcedureStep 6 With the Hello.aef file open in the Cisco Unified CCX Editor window, click the
New Variable icon in the Variable pane toolbar.
The New Variable dialog box appears.
9-6Cisco Unified Contact Center Express Getting Started with Scripts, Release 11.0(1)

Chapter 9 Designing a Web-Enabled ScriptCreating the hello.aef Script
Figure 9-3 New Variable Dialog Box
Step 7 From the Type drop-down menu, choose String.
This automatically enters quotation marks in the value field since the value will be enclosed in quotations.
Step 8 In the Name field, enter name.
This will be the variable that will hold the name entered by the user.
Step 9 Click OK.
The New Variable dialog box closes, and the name of the first variable appears in the Variable pane of the Cisco Unified CCX Editor.
Step 10 To define the second variable, doc, click the New Variable icon in the Variable pane toolbar.
The New Variable dialog box appears, as shown in Figure 9-3.
Step 11 From the Type drop-down menu, choose Document.
DOC[] appears automatically in the value field.
Step 12 In the Name field, enter doc.
This variable will contain the document to be sent in response to the user.
Step 13 Click OK.
The New Variable dialog box closes, and the name of the second variable appears in alphabetical order with the first variable in the Variable pane of the Cisco Unified CCX Editor.
9-7Cisco Unified Contact Center Express Getting Started with Scripts, Release 11.0(1)
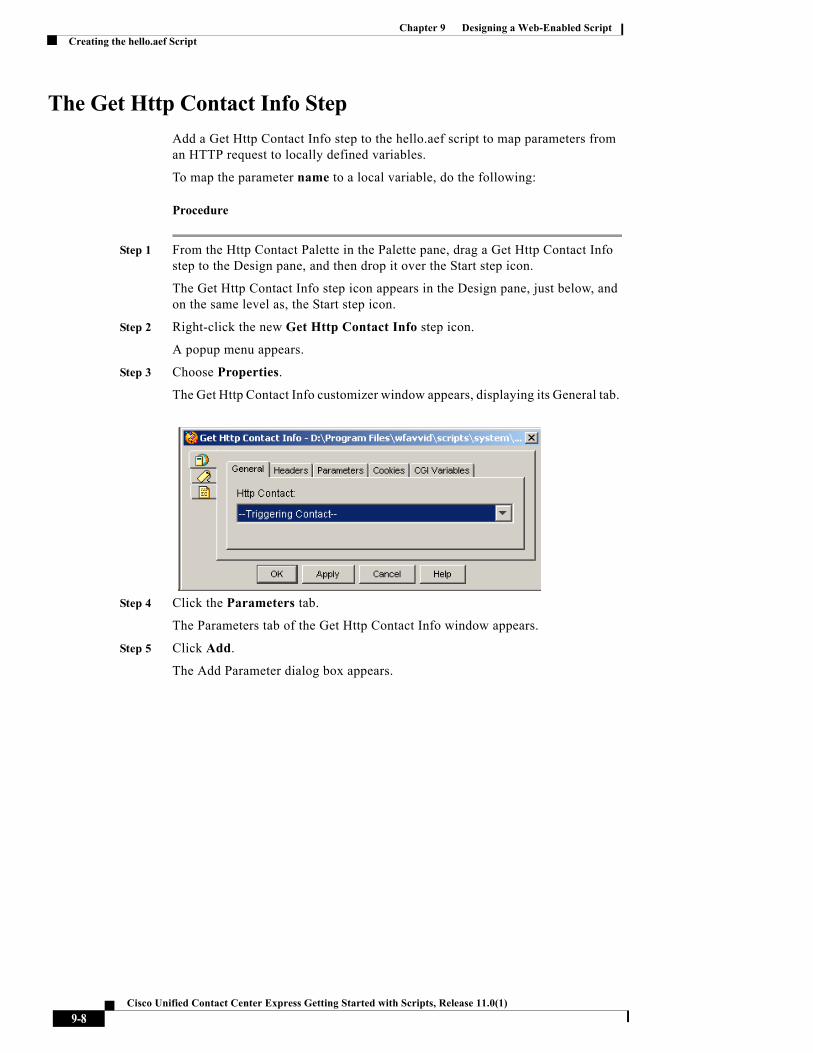
Chapter 9 Designing a Web-Enabled Script Creating the hello.aef Script
The Get Http Contact Info StepAdd a Get Http Contact Info step to the hello.aef script to map parameters from an HTTP request to locally defined variables.
To map the parameter name to a local variable, do the following:
Procedure
Step 1 From the Http Contact Palette in the Palette pane, drag a Get Http Contact Info step to the Design pane, and then drop it over the Start step icon.
The Get Http Contact Info step icon appears in the Design pane, just below, and on the same level as, the Start step icon.
Step 2 Right-click the new Get Http Contact Info step icon.
A popup menu appears.
Step 3 Choose Properties.
The Get Http Contact Info customizer window appears, displaying its General tab.
Step 4 Click the Parameters tab.
The Parameters tab of the Get Http Contact Info window appears.
Step 5 Click Add.
The Add Parameter dialog box appears.
9-8Cisco Unified Contact Center Express Getting Started with Scripts, Release 11.0(1)

Chapter 9 Designing a Web-Enabled ScriptCreating the hello.aef Script
Step 6 In the Name text field, enter "name".
Note You need quotation marks around your text since this is a string variable.
Step 7 In the Variable drop-down menu, choose name.
Step 8 Click OK.
The Add Parameter dialog box closes, and the added values appear under the Parameters section of the Parameters tab of the Get Http Contact Info customizer window.
Figure 9-4 shows the configured Parameters tab of the Get Http Contact Info customizer window.
Figure 9-4 Get Http Contact Info Customizer Window—Parameters Tab
Step 9 Click OK.
The Get Http Contact Info customizer window closes.
9-9Cisco Unified Contact Center Express Getting Started with Scripts, Release 11.0(1)

Chapter 9 Designing a Web-Enabled Script Creating the hello.aef Script
You are now ready to add the next step to the hello.aef script in the Design pane of the Cisco Unified CCX Editor.
The Create File Document StepAdd a Create File Document step to the hello.aef script to create a file document that represents the HTML template sayhello.html. You will then use this file document in the Keyword Transform Document step.
To create this file document, do the following:
Procedure
Step 1 From the Document palette in the Palette pane, drag a Create File Document step to the Design pane, and then drop it over the Get Http Contact Info step icon.
The Create File Document step icon appears in the Design pane, just below, and on the same level as, the Get Http Contact Info step icon.
Step 2 Right-click the new Create File Document step icon.
A popup menu appears.
Step 3 Choose Properties.
The Create File Document customizer window appears.
Figure 9-5 Configured Create File Document Customizer Window
9-10Cisco Unified Contact Center Express Getting Started with Scripts, Release 11.0(1)

Chapter 9 Designing a Web-Enabled ScriptCreating the hello.aef Script
Step 4 In the Filename text field, enter the following file name, as shown in Figure 9-5:
“template\sayhello.html”
This pathname is a relative pathname that uses a predefined subdirectory within the installationdirectory. When you implement a real application in a production environment, make sure that the file and pathname work on the production server.
Step 5 From the Document drop-down menu, choose the variable doc, as shown in Figure 9-5.
This variable contains the document to be sent in response to the user.
Step 6 Click OK.
The Create File Document customizer window closes.
You are now ready to add the next step to the hello.aef script in the Design pane of the Cisco Unified CCX Editor.
Note You must create a file document in the Unified CCX customer folder only. You can access the Unified CCX customer folder using the following syntax: System.getProperty(“uccx.customer.dir”) For more information on how to retrieve information from the customer folder using CLI commands, refer to the Command Line Interface Reference Guide for Cisco Unified CCX and Cisco Unified IP IVR available here: http://www.cisco.com/en/US/products/sw/custcosw/ps1846/products_installation_and_configuration_guides_list.html
The Keyword Transform Document StepAdd a Keyword Transform Document step to the hello.aef script to specify keywords in the file document that will be replaced with text in the dynamic web page by performing the following procedure.
Procedure
Step 1 From the Document palette, drag a Keyword Transform Document step to the Design pane, and then drop it over the Create File Document step icon.
9-11Cisco Unified Contact Center Express Getting Started with Scripts, Release 11.0(1)

Chapter 9 Designing a Web-Enabled Script Creating the hello.aef Script
The Keyword Transform Document step icon appears in the Design pane.
Step 2 Right-click the new Keyword Transform Document step icon.
A popup menu appears.
Step 3 In the popup menu, choose Properties.
The Keyword Transform Document customizer window appears.
Figure 9-6 Keyword Transform Document Customizer Window
Step 4 From the Keyword Template drop-down menu, choose doc.
This variable represents the sayhello.html template document, which contains the embedded keyword to be replaced.
Step 5 From the Document drop-down menu, choose doc.
This choice specifies that the completed document is stored back in the same variable.
Step 6 Click Add.
The Add Keyword dialog box appears.
9-12Cisco Unified Contact Center Express Getting Started with Scripts, Release 11.0(1)

Chapter 9 Designing a Web-Enabled ScriptCreating the hello.aef Script
Figure 9-7 Configured Add Keyword Dialog Box
Step 7 In the Name text field, enter “name”, as shown in Figure 9-7.
Step 8 From the Local Variable drop-down menu, choose name, as shown in Figure 9-7.
This choice specifies that the system supplies the correct String data type.
Note You need to enter quotes since this is a string variable.
This choice specifies that name is the name of the keyword in the sayhello.html template, as shown below:<html><body>Hello %name%</body></html>
Step 9 Click OK.
9-13Cisco Unified Contact Center Express Getting Started with Scripts, Release 11.0(1)

Chapter 9 Designing a Web-Enabled Script Creating the hello.aef Script
The Add Keyword dialog box closes, and appears in the Keyword Transform Document customizer window, as shown in Figure 9-8.
Figure 9-8 Configured Keyword Transform Document Customizer Window
Step 10 Click OK.
The Keyword Transform Document customizer window closes, and the name of the source document variable appears next to the Keyword Transform Document step icon in the Design pane of the Cisco Unified CCX Editor.
You are now ready to add the next step to the hello.aef script in the Design pane of the Cisco Unified CCX Editor.
The Send Http Response StepAdd a Send Http Response step to the hello.aef script to send back the completed document, in which the value of the name parameter has been substituted for a keyword embedded in the sayhello.html template.
9-14Cisco Unified Contact Center Express Getting Started with Scripts, Release 11.0(1)

Chapter 9 Designing a Web-Enabled ScriptCreating the hello.aef Script
Procedure
Step 1 From the Http Contact palette, drag the Send Http Response step to the Design pane, and then drop it over the Text Substitution for Keywords step icon in the Design pane.
The Send Http Response step icon appears in the Design pane, just below, and on the same level as, the Keyword Transform Document step icon.
Step 2 Right-click the new Send Http Response step icon.
A popup menu appears.
Step 3 Choose Properties.
Step 4 The Send Http Response customizer window appears.
Figure 9-9 Configured Send Http Response Customizer Window
Step 5 From the HTTP Contact drop-down menu, choose Triggering Contact, as shown in Figure 9-9.
This allows the contact that triggers the script to trigger the execution of this step.
Step 6 From the Document drop-down menu, choose the doc variable, as shown in Figure 9-9.
This variable stores the document that is sent to the browser.
Step 7 Click OK.
The Send Http Response customizer window closes, and the name of the Http Contact and the Document variable appear next to the Send Http Response step icon in the Design pane of the Cisco Unified CCX Editor.
9-15Cisco Unified Contact Center Express Getting Started with Scripts, Release 11.0(1)

Chapter 9 Designing a Web-Enabled Script Managing the hello.aef Script
You are now ready to add the next step to the hello.aef script in the Design pane of the Cisco Unified CCX Editor.
The End StepUse the End step to complete each script you create with the Cisco Unified CCX Editor. The End step needs no configuration and has no customizer window.
To end the hello.aef script, follow this procedure:
Procedure
Step 1 From the General palette, drag the End step to the Design pane, and then drop it over the Send Http Response step icon in the Design pane.
The End step icon appears in the Design pane, just below, and on the same level as, the Send Http Response step icon.
Step 2 Save the file as hello.aef.
Managing the hello.aef ScriptThis section demonstrates the process of managing the hello.aef script, a Cisco Unified CCX Editor script that responds to an HTTP request from a web browser.
This section contains the following topics:
• Uploading the hello.aef Script, page 9-17
• Creating the Application for hello.aef Script, page 9-17
• Creating the HTTP Trigger, page 9-17
• Testing the script, page 9-18
9-16Cisco Unified Contact Center Express Getting Started with Scripts, Release 11.0(1)

Chapter 9 Designing a Web-Enabled ScriptManaging the hello.aef Script
Uploading the hello.aef ScriptTo upload the script, do the following:
Step 1 Navigate to Applications > Script Management > Upload scripts.
Step 2 Browse to locate the script you want to upload.
Step 3 Click Upload.
Now you can view the uploaded script file listed on the Script Management page.
Creating the Application for hello.aef ScriptTo create the application for hello.aef, do the following:
Step 1 Browse to Applications > Application Management > Add New.
Step 2 Select Application type as Cisco Script Application and click Next.
Step 3 Provide a name for the Application as sayhello.
Step 4 For the Script field, select SCRIPT[hello.aef] from the drop-down list.
Step 5 Click Add. This saves the application.
Creating the HTTP TriggerTo create a HTTP trigger to use with this hello.aef application, do the following:
Step 1 Create a Trigger by following either of the steps:
• From the Unified CCX Web Administration, browse to Applications > Application Management and then select the sayhello application that you created and then click Add New Trigger.
• Browse to Subsystems > HTTP and then click Add New.
9-17Cisco Unified Contact Center Express Getting Started with Scripts, Release 11.0(1)
Chapter 9 Designing a Web-Enabled Script Managing the hello.aef Script
Step 2 In the URL field, provide a value greeting, which is the trigger you have configured in the welcome.html page.
Step 3 In the Application Name field, select the Application name as sayhello.
Step 4 Select Enable and click Add. The trigger is saved as /greeting.
Testing the scriptTo test the script, do the following:
Step 1 In a web browser, type http:// <ipaddress>:9080/welcome.html.
Step 2 In the What is your name field, enter your name and click Submit Query. Then verify that the HTML page displays “Hello <your name>”.
9-18Cisco Unified Contact Center Express Getting Started with Scripts, Release 11.0(1)

Cisco Unified Contact Center Express Getting St
C H A P T E R 10
Designing a Web-Enabled Client ScriptA web-enabled script is a script that obtains information from web servers on the Internet or an intranet. A client script is a script that can retrieve information from a server.
After the client script receives and extracts the desired information, you can use steps from the other palettes to make this information available to users or other scripts. A web-enabled client script may be an Interactive Voice Response (IVR) script or any other user script that makes a web request.
You can use the Cisco Unified CCX Editor to design a sample web-enabled client script, getQuoteClient.aef, that gets an XML (eXtensible Markup Language) file containing stock quotes from a web server, extracts the stock quote, and outputs the price to the user.
This chapter contains the following topics:
• Example Web-Enabled Client Script Template, page 10-2
• Analyzing the Data Source, page 10-3
• Creating the getQuoteClient.aef Script, page 10-4
– The Start Step (Creating a Script), page 10-5
– Defining the Client Script Variables, page 10-5
– The Accept Step, page 10-6
– The Create URL Document Step, page 10-7
– The Create XML Document Step, page 10-8
– The Get XML Document Data Step, page 10-10
10-1arted with Scripts, Release 11.0(1)

Chapter 10 Designing a Web-Enabled Client Script Example Web-Enabled Client Script Template
– The Create Generated Prompt Step, page 10-12
– Create Container Prompt Step, page 10-15
– The Play Prompt Step, page 10-17
– The Terminate Step, page 10-18
– The End Step, page 10-18
Example Web-Enabled Client Script TemplateThis sample script template uses a static XML page that you store on the local HTTP subsystem web server and a simple server script that sends the XML page in response to the client request.
Note While this sample script uses a static XML file, you can apply the same steps to handle dynamic XML output directly from any web server.
Figure 10-1 shows the getQuoteClient.aef script tempplate as it appears in the Design pane of the Cisco Unified CCX Editor window.
Figure 10-1 Completed Client Script
10-2Cisco Unified Contact Center Express Getting Started with Scripts, Release 11.0(1)

Chapter 10 Designing a Web-Enabled Client ScriptAnalyzing the Data Source
Analyzing the Data SourceBegin the process of building the getQuoteClient.aef script by first analyzing the structure of the data the server obtains. To do this, you need to to identify the data you want to extract from the XML file. This is found in the XML data path in the file.
To determine the XML data path in the file, do the following.
Procedure
Step 1 Access the web server XML file that is to supply data for your client script by entering the following URL in your web browser:
http://127.0.0.1:8080/getQuote.xml
In this example, the getQuote.xml file is on the local web server included in the HTTP subsystem on the Cisco Unified CCX Engine.
The getQuote.xml file contains the following:<?xml version="1.0" standalone="yes"?><STOCKLIST> <STOCK symbol="ABC" error="0"> <HIGH>58.0625</HIGH> <PCT_CHANGE>0.67114094</PCT_CHANGE> <LOW>55.1875</LOW> <LAST>56.25</LAST> <CHANGE>0.375</CHANGE> <VOLUME>31,973,600</VOLUME> <REC_STATUS>0</REC_STATUS> <DATE>02/21/2001</DATE> <TIME>15:52</TIME> </STOCK></STOCKLIST>
Step 2 Identify the path in the XML file of the information you want to extract from the file.
In the preceding example, the XML path to the stock quote for the ABC Company is as follows:"/descendant::STOCKLIST/child::STOCK[attribute::symbol= 'ABC'] /child::LAST"
10-3Cisco Unified Contact Center Express Getting Started with Scripts, Release 11.0(1)

Chapter 10 Designing a Web-Enabled Client Script Creating the getQuoteClient.aef Script
You will use this XML path to identify the data you want to extract from the XML file.
You are now ready to define the variables you will use to build the getQuoteClient.aef script in the Design pane of the Cisco Unified CCX Editor.
Creating the getQuoteClient.aef ScriptThis section demonstrates the process of writing the getQuoteClient.aef script, a Cisco Unified CCX Editor script that gets an XML file containing stock quotes from a web server, extracts the stock quote, and outputs the price to the user.
This section contains the following steps:
• The Start Step (Creating a Script), page 10-5
• Defining the Client Script Variables, page 10-5
• The Create URL Document Step, page 10-7
• The Create XML Document Step, page 10-8
• The Terminate Step, page 10-18
• The End Step, page 10-18
10-4Cisco Unified Contact Center Express Getting Started with Scripts, Release 11.0(1)

Chapter 10 Designing a Web-Enabled Client ScriptCreating the getQuoteClient.aef Script
The Start Step (Creating a Script)Begin to build the sample script by choosing File > New from the Cisco Unified CCX Editor menu bar. The Templates folder displays. Select the blank script and click OK.
A blank script containing a Start and End step opens in the Design pane of the Cisco Unified CCX Editor window.
The Start step needs no configuration and has no customizer window. At this time, you might also want to give your new script a name and save it by selecting File > Save from the menu bar.
Our example script is called getQuoteClient.aef.
Defining the Client Script VariablesBegin the process of designing the getQuoteClient.aef script by defining script variables.
Use the Variable pane of the Cisco Unified CCX Editor to define five variables, as shown in Table 10-1:
Table 10-1 Variables in the Web-Enabled Client Script
Variable Name Type Value Description
doc Document DOC[] Contains the URL for the client request to the local web server.
result Float 0.0F Contains the value obtained by the client script.
stockprice Prompt P[stockprice.wav] Contains the StockPrice.wav file that plays back the sentence, “The stock price of the selected company is.”
resultPrompt Prompt P[] Contains the information in the result variable.
outputPrompt Prompt P[stockprice.wav] Contains the resultPrompt and stockprice prompts.
10-5Cisco Unified Contact Center Express Getting Started with Scripts, Release 11.0(1)

Chapter 10 Designing a Web-Enabled Client Script Creating the getQuoteClient.aef Script
To define the five variables for the getQuoteClient.aef script, do the following:
Procedure
Step 1 In the Cisco Unified CCX Editor window, click the New Variable icon in the Variable pane toolbar.
Step 2 In the Name field, enter doc.
This variable will contain the URL for the client request to the local web server.
Step 3 From the Type drop-down menu, choose Document.
DOC[] appears automatically in the value field. This field will contain the name of the document when the script is run.
Step 4 Click OK.
The New Variable dialog box closes, and the name of the variable appears in the Variable pane of the Cisco Unified CCX Editor.
Step 5 For each of the other four variables, repeat Steps 3 to 5, using the information shown in Table 10-1.
You are now ready to create the getQuoteClient.aef script in the Design pane of the Cisco Unified CCX Editor.
The Accept StepAdd an Accept step to the getQuoteClient.aef script to accept the contact.
To add an Accept step, drag an Accept step from the Contact palette in the Palette pane to the Design pane, and then drop it over the Start step icon. The Accept step icon appears in the Design pane, just below, and on the same level as, the Start step icon. You do not need to configure this step because you can simply use the default contact as the triggering contact for the step.
You are now ready to add the next step to the getQuoteClient.aef script in the Design pane of the Cisco Unified CCX Editor.
10-6Cisco Unified Contact Center Express Getting Started with Scripts, Release 11.0(1)

Chapter 10 Designing a Web-Enabled Client ScriptCreating the getQuoteClient.aef Script
The Create URL Document StepAdd a Create URL Document step to the getQuoteClient.aef script to enter the URL that contains the stock price information.
To configure the Create URL Document customizer window, do the following:
Procedure
Step 1 From the Document Palette in the Palette pane, drag a Create URL Document step to the Design pane, and then drop it over the Accept step icon.
The Create URL Document step icon appears in the Design pane, just below, and on the same level as, the Accept step icon.
Step 2 Right-click the new Create URL Document step icon.
A popup menu appears.
Step 3 Choose Properties.
The Create URL Document customizer window appears.
Figure 10-2 Create URL Document Customizer Window
10-7Cisco Unified Contact Center Express Getting Started with Scripts, Release 11.0(1)

Chapter 10 Designing a Web-Enabled Client Script Creating the getQuoteClient.aef Script
Step 4 In the URL text field, enter the following URL:“http://127.0.0.1:8080/getquote”
This URL is composed of the following three parts:
• The IP address of the web server—This example uses the special IP address assigned to the local host. When an HTTP request uses this address, the request is directed to the web server running on the same machine as the client that issued the request.
• The port number of the web server—This example uses the default port number used by the HTTP subsystem web server. If the web server uses the standard HTTP port (port 80), you can omit this part of the URL.
• The HTTP script—In this example, the string “getquote” invokes the server script described in the previous section.
Step 5 From the Document drop-down menu, choose doc.
This choice defines the document that contains the information found in the URL.
Step 6 Click OK.
The Create URL Document customizer window closes.
You are now ready to add the next step to the getQuoteClient.aef script in the Design pane of the Cisco Unified CCX Editor.
The Create XML Document StepAdd a Create XML Document step to the getQuoteClient.aef script to create an XML document out of the document created in the previous procedure (in order to make the information in the URL document available to the script).
To configure the Create XML Document customizer window, do the following:
Procedure
Step 1 From the Document Palette in the Palette pane, drag a Create XML Document step to the Design pane, and then drop it over the Create URL Document step icon.
10-8Cisco Unified Contact Center Express Getting Started with Scripts, Release 11.0(1)

Chapter 10 Designing a Web-Enabled Client ScriptCreating the getQuoteClient.aef Script
The Create XML Document step appears in the Design pane, just below, and on the same level as, the Create URL Document step icon.
Step 2 Right-click the new Create XML Document step icon.
A popup menu appears.
Step 3 Choose Properties.
The Create XML Document customizer window appears.
Step 4 From the Source Document drop-down menu, choose doc.
You used the Create URL Document step in the last procedure to define this variable to store the URL for making the request.
Step 5 From the Document drop-down menu, choose doc.
This variable stores the results of the HTTP request, issued when the Create XML Document step executes. You use the same variable as for the source document.
If you want to reuse the URL in the source document in a subsequent step, use a separate document variable to store the results of that HTTP request.
Figure 10-3 Create XML Document Customizer Window
Step 6 Click OK.
The Create XML Document customizer window closes, and the names of the chosen variables appear next to the Create XML Document icon in the Design pane.
10-9Cisco Unified Contact Center Express Getting Started with Scripts, Release 11.0(1)

Chapter 10 Designing a Web-Enabled Client Script Creating the getQuoteClient.aef Script
Figure 10-4 Create XML Document Step in the Design Pane
Note The source document variable name appears in parentheses after the step name next to the step name icon in the Design pane.
Step 7 You are now ready to add the next step to the getQuoteClient.aef script in the Design pane of the Cisco Unified CCX Editor.
The Get XML Document Data StepAdd an Get XML Document Data step to the getQuoteClient.aef script to extract the specified information from the XML document you created in the preceding procedure and store it in a variable.
To configure the Get XML Document Data customizer window, do the following:
Procedure
Step 1 From the Document Palette in the Palette pane, drag an Get XML Document Data step to the Design pane, and then drop it over the Create XML Document step icon.
The Get XML Document Data step icon appears in the Design pane, just below, and on the same level as, the Create XML Document step icon.
Step 2 Right-click the new Get XML Document Data step icon.
A popup menu appears.
Step 3 Choose Properties.
The Get XML Document Data customizer window appears.
10-10Cisco Unified Contact Center Express Getting Started with Scripts, Release 11.0(1)

Chapter 10 Designing a Web-Enabled Client ScriptCreating the getQuoteClient.aef Script
Figure 10-5 Get XML Document Data Customizer Window
Step 4 From the Document drop-down menu, choose doc.
This variable contains the XML document data stored by the Create XML Document step.
Step 5 In the XML Path text field, click the Expression Editor (...) button.
The Expression Editor dialog box appears.
Figure 10-6 Expression Editor Dialog Box
10-11Cisco Unified Contact Center Express Getting Started with Scripts, Release 11.0(1)

Chapter 10 Designing a Web-Enabled Client Script Creating the getQuoteClient.aef Script
Step 6 In the Expression Editor text field, enter the following expression:"/descendant::STOCKLIST/child::STOCK[attribute::symbol='ABC'] /child::LAST”
This means that the data to be extracted is from the XML element named LAST, contained in the XML element named STOCKLIST, identified by the symbol ABC.
Step 7 Click OK.
The Expression Editor dialog box closes, and the expression appears in the XML path text field of the Get XML Document Data customizer window.
Step 8 From the Result Data drop-down menu, choose result.
This variable stores the data extracted from the XML document when the Get XML Document step executes.
If you want to reuse the data in the source document to extract other values, use a separate document variable to store the extracted value.
Step 9 Click OK.
The Get XML Document Data customizer window closes, and the variables you chose appear next to the Get XML Document Data step icon in the Design pane of the Cisco Unified CCX Editor.
You are now ready to add the next step to the getQuoteClient.aef script in the Design pane of the Cisco Unified CCX Editor.
The Create Generated Prompt StepAdd a Create Generated Prompt step to the getQuoteClient.aef script to create the prompt that combines the audio file introducing the information and the information itself.
To configure the Create Generated Prompt customizer window, do the following:
Procedure
Step 1 From the Prompt Palette in the Palette pane, drag a Create Generated Prompt step to the Design pane, and then drop it over the Get XML Document Data step icon.
10-12Cisco Unified Contact Center Express Getting Started with Scripts, Release 11.0(1)

Chapter 10 Designing a Web-Enabled Client ScriptCreating the getQuoteClient.aef Script
The Create Generated Prompt step icon appears in the Design pane, just below, and on the same level as, the Get XML Document Data step icon.
Step 2 Right-click the new Create Generated Prompt step icon.
A popup menu appears.
Step 3 Choose Properties.
The Create Generated Prompt customizer window appears.
Step 4 From the Output Prompt drop-down menu, choose stockprice.
The stockprice variable contains the StockPrice.wav file that plays back the following phrase: “The stock price of the selected company is.” (See The Create URL Document Step, page 10-7).
Step 5 From the Generator Type drop-down menu, choose currency.
The Constructor type text field automatically displays “(amount)”.
Step 6 In the Argument Information text box, double-click amount.
The Set Amount dialog box appears.
Figure 10-7 Set Amount Dialog Box
Step 7 From the variable drop-down menu, choose result.
The result variable contains the value obtained by the client script.
Step 8 Click OK.
The Set Amount dialog box closes, and “result” appears under the Value column in the Argument text field.
10-13Cisco Unified Contact Center Express Getting Started with Scripts, Release 11.0(1)

Chapter 10 Designing a Web-Enabled Client Script Creating the getQuoteClient.aef Script
Figure 10-8 Create Generated Prompt Customizer Window
Step 9 Click OK.
The Create Generated Prompt customizer window closes, and the generator type and the output prompt variable appear next to the Create Generated Prompt step icon in the Design pane of the Cisco Unified CCX Editor.
You are now ready to add the next step to the getQuoteClient.aef script in the Design pane of the Cisco Unified CCX Editor.
10-14Cisco Unified Contact Center Express Getting Started with Scripts, Release 11.0(1)

Chapter 10 Designing a Web-Enabled Client ScriptCreating the getQuoteClient.aef Script
Create Container Prompt StepAdd a Create Container Prompt step to the getQuoteClient.aef script to create the concatenated prompt that combines the stockprice.wav file with the result variable.
To configure the Create Container Prompt customizer window, do the following:
Procedure
Step 1 From the Prompt Palette in the Palette pane, drag a Create Container Prompt step to the Design pane, and then drop it over the Create Generated Prompt step icon.
The Create Container Prompt step icon appears in the Design pane, just below, and on the same level as, the Create Generated Prompt step icon.
Step 2 Right-click the new Create Container Prompt step icon.
A popup menu appears.
Step 3 Choose Properties.
The Create Container Prompt customizer window appears.
Figure 10-9 Configured Create Container Prompt Customizer Window
10-15Cisco Unified Contact Center Express Getting Started with Scripts, Release 11.0(1)

Chapter 10 Designing a Web-Enabled Client Script Creating the getQuoteClient.aef Script
Step 4 From the Output Prompt drop-down menu, choose outputPrompt, as shown in Figure 10-9.
This variable stores the prompt that is played back to the caller.
Step 5 From the Prompt Container Type drop-down menu, choose Concatenation, as shown in Figure 10-9.
For more information on concatenated prompts, which are prompts that combine other prompts, see the Cisco Unified Contact Center Express Editor Step Reference Guide.
Step 6 To specify the prompts to be concatenated into outputPrompt, click the Add button.
The Add Prompt dialog box appears.
Figure 10-10 Configured Add Prompt Dialog Box
Step 7 From the Prompt drop-down menu, choose stockprice, and then click OK, as shown in Figure 10-10.
The Add Prompt dialog box closes, and stockprice appears in the Prompts text box, as shown in Figure 10-9.
Step 8 Repeat Steps 6 to 7 to add the resultPrompt variable to the Prompts text field, as shown in Figure 10-9.
Step 9 You are now ready to add the next step to the getQuoteClient.aef script in the Design pane of the Cisco Unified CCX Editor.
10-16Cisco Unified Contact Center Express Getting Started with Scripts, Release 11.0(1)
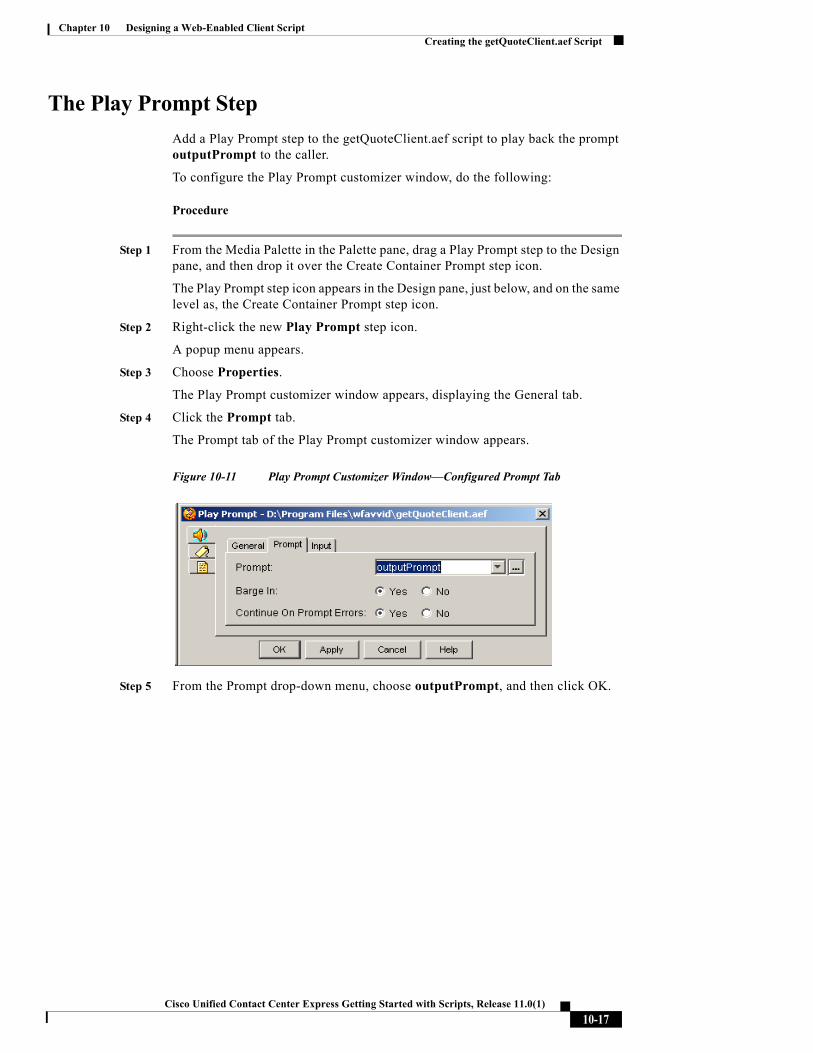
Chapter 10 Designing a Web-Enabled Client ScriptCreating the getQuoteClient.aef Script
The Play Prompt StepAdd a Play Prompt step to the getQuoteClient.aef script to play back the prompt outputPrompt to the caller.
To configure the Play Prompt customizer window, do the following:
Procedure
Step 1 From the Media Palette in the Palette pane, drag a Play Prompt step to the Design pane, and then drop it over the Create Container Prompt step icon.
The Play Prompt step icon appears in the Design pane, just below, and on the same level as, the Create Container Prompt step icon.
Step 2 Right-click the new Play Prompt step icon.
A popup menu appears.
Step 3 Choose Properties.
The Play Prompt customizer window appears, displaying the General tab.
Step 4 Click the Prompt tab.
The Prompt tab of the Play Prompt customizer window appears.
Figure 10-11 Play Prompt Customizer Window—Configured Prompt Tab
Step 5 From the Prompt drop-down menu, choose outputPrompt, and then click OK.
10-17Cisco Unified Contact Center Express Getting Started with Scripts, Release 11.0(1)
Chapter 10 Designing a Web-Enabled Client Script Creating the getQuoteClient.aef Script
The Play Prompt customizer window closes, and the name of the prompt variable appears next to the Play Prompt step in the Design pane of the Cisco Unified CCX Editor.
You are now ready to add the next step to the getQuoteClient.aef script in the Design pane of the Cisco Unified CCX Editor.
The Terminate StepAdd the Terminate step to the getQuoteClient.aef script to terminate the connection.
To add a Terminate step, drag an Terminate step from the Contact palette in the Palette pane to the Design pane, and then drop it over the Play Prompt step icon. The Terminate step icon appears in the Design pane, just below, and on the same level as, the Play Prompt step icon. You do not need to configure this step because you do not need to change the default contact choice.
You are now ready to end the getQuoteClient.aef script in the Design pane of the Cisco Unified CCX Editor.
The End StepUse the End step to complete each script you create with the Cisco Unified CCX Editor. The End step needs no configuration and has no customizer window.
To end the getQuoteClient.aef script, follow this procedure:
Procedure
Step 1 From the General palette, drag the End step to the Design pane, and then drop it over the Terminate step icon in the Design pane.
The End step icon appears in the Design pane, just below, and on the same level as, the Terminate step icon.
Step 2 Save the client script as getQuoteClient.aef.
10-18Cisco Unified Contact Center Express Getting Started with Scripts, Release 11.0(1)

Chapter 10 Designing a Web-Enabled Client ScriptCreating the getQuoteClient.aef Script
10-19Cisco Unified Contact Center Express Getting Started with Scripts, Release 11.0(1)

Chapter 10 Designing a Web-Enabled Client Script Creating the getQuoteClient.aef Script
10-20Cisco Unified Contact Center Express Getting Started with Scripts, Release 11.0(1)

Cisco Unified Contact Center Express Getting Sta
C H A P T E R 11
Designing a Database ScriptYou can use the Cisco Unified CCX Editor to design scripts that can access information from a specified database.
This section describes the design of a script that can access information in a database. This simple script template, database.aef, uses steps from the Database palette to automatically provide callers with contact information for local physicians.
This chapter contains the following topics:
• An Example Database Script Template, page 11-2
• The Start Step (Creating a Script), page 11-3
• Database Script Variables, page 11-3
• The Accept Step, page 11-5
• The Play Prompt Step, page 11-5
• The DB Read Step, page 11-6
• The Label Step (Physician Loop), page 11-9
• The DB Get Step, page 11-9
• The End Step, page 11-17
11-1rted with Scripts, Release 11.0(1)

Chapter 11 Designing a Database Script An Example Database Script Template
An Example Database Script TemplateIn this sample script template, the script reads all the data from a database table named physician_locator and plays back output one row at a time, looping back and repeating this process until there is no more data.
Figure 11-1 shows the database.aef script template as it appears in the Design pane of the Cisco Unified CCX Editor window.
Figure 11-1 database.aef Script
Table 11-1 shows the physician_locator database table.
Table 11-1 Physician_Locator Database Table
ZIP_CODE
CATEGORY NAME
SPOKEN_NAME ADDRESS PHONE
11111 chiropractor john doe (audio document) 222 main st. bedrock ca 5551112222
22222 podiatrist jane wong (audio document) 333 oak st. bubble city ny 5552344343
11-2Cisco Unified Contact Center Express Getting Started with Scripts, Release 11.0(1)

Chapter 11 Designing a Database ScriptThe Start Step (Creating a Script)
The Start Step (Creating a Script)Begin to build the sample script by choosing File > New from the Cisco Unified CCX Editor menu bar. The Templates folder displays. Select the blank script and click OK.
A blank script containing a Start and End step opens in the Design pane of the Cisco Unified CCX Editor window.
The Start step needs no configuration and has no customizer window. At this time, you might also want to give your new script a name and save it by selecting File > Save from the menu bar.
Our example script is called database.aef.
Database Script VariablesBegin the database.aef script design process by using the Variable pane of the Cisco Unified CCX Editor to define script variables.
33333 dentist jim smith (audio document) 435 state st. oakwood tn 5556458978
99999 general tia gomez (audio document) 382 first st. river city ia 5557674444
Table 11-1 Physician_Locator Database Table (continued)
ZIP_CODE
CATEGORY NAME
SPOKEN_NAME ADDRESS PHONE
11-3Cisco Unified Contact Center Express Getting Started with Scripts, Release 11.0(1)
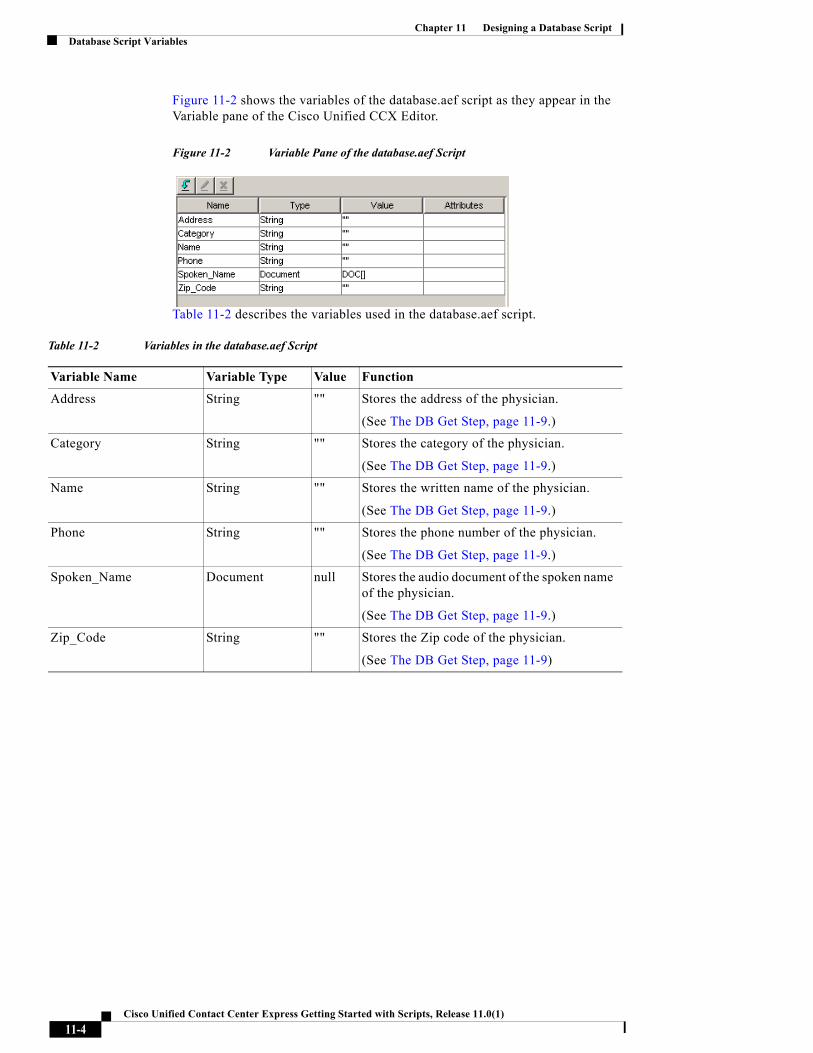
Chapter 11 Designing a Database Script Database Script Variables
Figure 11-2 shows the variables of the database.aef script as they appear in the Variable pane of the Cisco Unified CCX Editor.
Figure 11-2 Variable Pane of the database.aef Script
Table 11-2 describes the variables used in the database.aef script.
Table 11-2 Variables in the database.aef Script
Variable Name Variable Type Value Function
Address String "" Stores the address of the physician.
(See The DB Get Step, page 11-9.)
Category String "" Stores the category of the physician.
(See The DB Get Step, page 11-9.)
Name String "" Stores the written name of the physician.
(See The DB Get Step, page 11-9.)
Phone String "" Stores the phone number of the physician.
(See The DB Get Step, page 11-9.)
Spoken_Name Document null Stores the audio document of the spoken name of the physician.
(See The DB Get Step, page 11-9.)
Zip_Code String "" Stores the Zip code of the physician.
(See The DB Get Step, page 11-9)
11-4Cisco Unified Contact Center Express Getting Started with Scripts, Release 11.0(1)

Chapter 11 Designing a Database ScriptThe Accept Step
The Accept StepContinue the database.aef script by dragging an Accept step from the Contact palette (in the Palette pane of the Cisco Unified CCX Editor window) to the Design pane, and dropping it over the Start step, as shown in Figure 11-1.
Note Since you intend to accept the default triggering contact, no further configuration is necessary for this step.
The Play Prompt StepContinue the database.aef script by dragging a Play Prompt step from the Media palette into the Design pane.
Configure the Play Prompt step to play a welcome message to the caller, announcing that the script will play back a list of physicians and their addresses.
Figure 11-3 shows the configured Prompt tab of the Play Prompt customizer window.
Figure 11-3 Play Prompt Customizer Window—Configured Prompt Tab
Configure the Play Prompt step as follows:
• General tab
– Contact—Triggering Contact
11-5Cisco Unified Contact Center Express Getting Started with Scripts, Release 11.0(1)

Chapter 11 Designing a Database Script The DB Read Step
The step operates on the contact that triggers the execution of the script.
– Interruptible—Yes
External events can interrupt the playing of the prompt. (At this point the script has not yet queued the call, so this configuration has no effect.)
• Prompt tab
– Prompt—WelcomePrompt
WelcomePrompt is the prompt that the Play Prompt step plays back to welcome the caller.
– Barge in—Yes
The caller can interrupt the prompt playback.
– Continue on Prompt Errors—Yes
In the event of a prompt error, the script continues to play back the next prompt in the sequence or waits for caller input.
• Input tab
– Flush Input Buffer—No
The system does not erase previously entered input before capturing new caller input.
The DB Read StepContinue the database.aef script by dragging a DB Read step from the Database palette into the Design pane.
Configure the DB Read step to use SQL (Structured Query Language) commands to read the physician_locator table in the specified database.
11-6Cisco Unified Contact Center Express Getting Started with Scripts, Release 11.0(1)

Chapter 11 Designing a Database ScriptThe DB Read Step
Figure 11-4 shows the configured General tab of the DB Read customizer window.
Figure 11-4 DB Read Customizer Window—Configured General Tab
Configure the General tab of the DB Read customizer window as follows:
• DB Resource Name—getPhysicians
This choice names the query that is used by the subsequent DB Get step to read data from the database.
• Data Source Name—ALPINE00
This choice specifies the database that contains the desired information.
11-7Cisco Unified Contact Center Express Getting Started with Scripts, Release 11.0(1)

Chapter 11 Designing a Database Script The DB Read Step
Figure 11-5 shows the configured Field Selector tab of the DB Read customizer window,
Figure 11-5 DB Read Customizer Window—Configured Field Selector Tab
Configure the Field Selector tab as follows:
• Enter the SQL command select * from physician_locator, which tells the DB Read step to read all the data that exists in the physician_locator table.
The DB Read step has three output branches, Successful, Connection Not Available, and SQL Error. The following sections describe these output branches:
• The Successful Output Branch, page 11-8
• The Connection Not Available Output Branch, page 11-9
• The SQL Error Output Branch, page 11-9
The Successful Output BranchIf the DB Read step successfully reads the physician_locator table in the specified database, the script executes the Successful output branch.
11-8Cisco Unified Contact Center Express Getting Started with Scripts, Release 11.0(1)

Chapter 11 Designing a Database ScriptThe Label Step (Physician Loop)
Configure the Successful output branch of the DB Read step to concatenate all the information extracted from the database and play it back to the caller.
The Successful output branch is discussed in the following sections, beginning with The Label Step (Physician Loop), page 11-9.
The Connection Not Available Output BranchIf the DB Read step does not successfully read the physician_locator table in the specified database, the script executes the Connection Not Available output branch, and the script goes to the End step.
The SQL Error Output BranchIf the DB Read step cannot execute because of an error in the SQL command, the script executes the SQL Error output branch, and the script goes to the End step.
The Label Step (Physician Loop)Begin the Successful output branch of the DB Read step by dragging a Label step from the General palette into the Design pane, and dropping it over the Successful icon under the DB Read step icon.
Configure the Label step to provide a target for the beginning of a loop that will repeat until all the names in the database have been read back to the caller.
After the DB Read step, use a DB Get step within a Label step defined as Physician Loop. (See Figure 11-1.)
The DB Get StepContinue the Successful output branch of the DB Read step by dragging a DB Get step from the Database palette to the Design pane, and dropping it over the Label step icon under the Successful icon under the DB Read step icon.
Then configure the DB Get step to retrieve the information in the physicians_locator database.
11-9Cisco Unified Contact Center Express Getting Started with Scripts, Release 11.0(1)

Chapter 11 Designing a Database Script The DB Get Step
Figure 11-6 shows the configured General tab of the DB Get customizer window.
Figure 11-6 DB Get Customizer Window—Configured General Tab
In the DB Resource Name text field, specify “getPhysicians”, which is the query that retrieves one row of data at a time from the physician_locator table.
11-10Cisco Unified Contact Center Express Getting Started with Scripts, Release 11.0(1)

Chapter 11 Designing a Database ScriptThe DB Get Step
Figure 11-7 shows the configured Field Selection tab of the DB Get customizer window.
Figure 11-7 DB Get Customizer Window—Configured Field Selection Tab
Use the Field Selection tab to associate each field in the database table with a local variable.
The DB Get step has three output branches, Successful, No Data, and SQL Error. (See Figure 11-1.)
These following sections describe these output branches:
• The Successful Output Branch, page 11-11
• The No Data Output Branch, page 11-13
• The SQL Error Output Branch, page 11-17
The Successful Output BranchIf the DB Get step successfully obtains data from the database table and stores the data in the defined variables, the script executes the Successful output branch.
Configure the Successful output branch of the DB Get step to concatenate all the information extracted from the database, play it back to the caller.
11-11Cisco Unified Contact Center Express Getting Started with Scripts, Release 11.0(1)

Chapter 11 Designing a Database Script The DB Get Step
The Successful output branch contains two steps, discussed in the following sections:
• The Play Prompt Step, page 11-12
• The Goto Step (Physician Loop), page 11-13
The Play Prompt StepBegin the Successful output branch of the DB Get step by dragging a Play Prompt step from the General palette to the Design pane, and dropping it over the Successful icon under the DB Get step icon.
Then configures the Play Prompt step to play back to the caller the information retrieved from the database table.
Figure 11-8 shows the configured Prompt tab of the Play Prompt customizer window.
Figure 11-8 Play Prompt Customizer Window—Configured Prompt Tab
Set the Prompt variable to the following expression:
“Spoken_Name + DP[250] + S[Phone] + DP[250] + S[Address] + DP[250] + S[Name] + DP[250] + S[Category] + DP[250] + S[Zip_Code]”
This expression represents a prompt concatenation where the Play Prompt step plays back the Document variable Spoken_Name as a prompt.
11-12Cisco Unified Contact Center Express Getting Started with Scripts, Release 11.0(1)
Chapter 11 Designing a Database ScriptThe DB Get Step
DP[250] stands for 250 milliseconds of silence. All the S[xx] elements represent the xx String variables that the Play Prompt step converts to a prompt that spell out the contents of the variables.
The Goto Step (Physician Loop)
End the Successful output branch of the DB Get step by dragging a Goto step from the General palette to the Design pane, and dropping it over the Play Prompt step icon under the Successful icon under the DB Get step icon, as shown in Figure 11-1.
Then configure the Goto step to instruct the script to loop back to the DB Get step and continue to retrieve a row of data from the table each time this step executes.
When the script reads every row of data and no data is found, the script automatically drops down to the DB Get step No Data output branch. (See The No Data Output Branch, page 11-13.)
The No Data Output BranchIf the DB Get step does not find any data in the database table, or reaches the end of the table, the script executes the No Data output branch.
The No Data output branch contains four steps, discussed in the following sections:
• The DB Write Step, page 11-13
• The DB Release Step, page 11-16
• The Terminate Step, page 11-16
• The End Step, page 11-17
The DB Write Step
Begin the No Data output branch of the DB Get step by dragging a DB Write step from the Database palette to the Design pane, and dropping it over the No Data icon under the DB Get step icon, as shown in Figure 11-1.
Then configure the DB Write step to search the database table for entries for which the zip code is 99999 and delete them from the table.
11-13Cisco Unified Contact Center Express Getting Started with Scripts, Release 11.0(1)

Chapter 11 Designing a Database Script The DB Get Step
Figure 11-9 shows the configured General tab of the DB Write customizer window.
Figure 11-9 DB Write Customizer Window—Configured General Tab
Configure the General tab of the DB Write customizer window as follows:
• DB Resource Name—Next
You assign this name to identify this database query.
• Data Source Name—ALPINE00.
This variable specifies the database that contains the desired information.
11-14Cisco Unified Contact Center Express Getting Started with Scripts, Release 11.0(1)

Chapter 11 Designing a Database ScriptThe DB Get Step
Figure 11-10 shows the configured SQL tab of the DB Write customizer window.
Figure 11-10 DB Write Customizer Window—Configured SQL Tab
Configure the SQL tab as follows:
• Enter SQL Comments—delete from physician_locator where zip_code = 99999
This SQL command tells the step what to write to the database table.
Using the data in Table 11-1, the DB Write step deleted the last row of the table.
The DB Write step has the following three output branches, (each of which fall through to the DB Release step):
• Successful—The DB Write step successfully deleted the specified information.
• Connection Not Available—The DB Write step was not successful because a connection was not found.
• SQL Error—The DB Write step was not successful because of a SQL command error.
11-15Cisco Unified Contact Center Express Getting Started with Scripts, Release 11.0(1)

Chapter 11 Designing a Database Script The DB Get Step
The DB Release Step
Continue the No Data output branch of the DB Get step by dragging a DB Release step from the Database palette to the Design pane, and dropping it over the DB Write step icon under the No Data output branch of the DB Get step icon, as shown in Figure 11-1.
Then configure the DB Release step to close the SQL query and release the allocated resources.
The system returns the released DB connection to the connection pool, and no longer associates data with this connection.
Figure 11-11 shows the configured DB Release customizer window.
Figure 11-11 Configured DB Release Customizer Window
In the DB Resource Name text field, specify getPhysicians as the DB Resource to be released.
The Terminate Step
Continue the No Data output branch of the DB Get step by dragging a Terminate step from the Contact palette to the Design pane, and dropping it over the DB Release step icon under the No Data output branch of the DB Get step icon, as shown in Figure 11-1.
Then configure the Terminate step to terminate the outgoing call.
11-16Cisco Unified Contact Center Express Getting Started with Scripts, Release 11.0(1)

Chapter 11 Designing a Database ScriptThe End Step
The End Step
End the No Data output branch of the DB Get step by dragging an End step from the General palette to the Design pane, and dropping it over the DB Terminate step icon under the No Data output branch of the DB Get step icon, as shown in Figure 11-1.
The End step ends the script and releases all system resources. The End step requires no configuration and has no customizer.
The SQL Error Output BranchIf the DB Get step does not execute because of a SQL command error, the script executes the SQL Error output branch, and the script falls through to the End step to end the script.
The End StepConclude the database.aef script by dragging an End step from the General palette into the Design pane, and dropping it over the DB Read step.
The End step ends the script and releases all system resources. The End step requires no configuration and has no customizer.
11-17Cisco Unified Contact Center Express Getting Started with Scripts, Release 11.0(1)

Chapter 11 Designing a Database Script The End Step
11-18Cisco Unified Contact Center Express Getting Started with Scripts, Release 11.0(1)

Cisco Unified Contact Center Express Getting Sta
C H A P T E R 12
Designing a Cisco Unified IP IVR ScriptYou can use the Cisco Unified CCX Editor to design scripts that take advantage of Cisco Unified IP IVR (Interactive Voice Response) capability.
This section describes the design of an AutoAttendant (AA) script template, aa.aef, which is included with the Cisco Unified CCX Editor. This script can work in a Cisco Unified IP IVR system or a traditional ACD IVR system.
This chapter contains the following topics:
• The Sample AutoAttendant (aa.aef) Script Template, page 12-2
• The Start Step (Creating a Script), page 12-5
• The aa.aef Script Variables, page 12-6
• The Getting the Contact Information and Setting Up the Prompts, page 12-10
• Determining if the System is ASR Enabled, page 12-19
• Creating and Setting an Error Message Prompt, page 12-22
• Recognizing Input, page 12-24
• The DialByExtn Output Branch of the Simple Recognition Step, page 12-27
• The Successful Output Branch (of Get Digit String), page 12-30
• Confirming the Caller Input, page 12-35
• Localizing the Prompt Language, page 12-36
• Completing the Input Confirmation, page 12-38
• Transferring the Call, page 12-41
12-1rted with Scripts, Release 11.0(1)
Chapter 12 Designing a Cisco Unified IP IVR Script The Sample AutoAttendant (aa.aef) Script Template
• The DialByName Output Branch of the Simple Recognition Step, page 12-46
• The No Output Branch of the Simple Recognition Step, page 12-55
• The Operator Output Branch of the Simple Recognition Step, page 12-73
• The Concluding Steps of the Script, page 12-78
The Sample AutoAttendant (aa.aef) Script Template
This simple script template answers a call, asks for the name or extension of the person to whom the caller would like to be connected, and transfers the call.
Note You can modify the aa.aef file to create your own Cisco Unified IP IVR script. Please make a backup copy of the aa.aef file before modifying it, so that you always have access to the original file.
The aa.aef script template is a good example of how you can use various steps: steps in the Media palette to receive caller input; the Switch step in the General palette to switch based on a language; steps in the Prompt palette to create a variety of prompts; and steps in the Media palette to specify grammars that recognize caller input.
The aa.aef script template is also a good example of a media-neutral script that accepts either speech or Dual Tone Multi-Frequency (DTMF) input from the caller.
The aa.aef script can handle the following two media types:
• Cisco Media Termination (CMT)—Simple media termination, either playing a prompt or receiving DTMF digits
• Automatic Speech Recognition (ASR)—Speech recognition media
12-2Cisco Unified Contact Center Express Getting Started with Scripts, Release 11.0(1)

Chapter 12 Designing a Cisco Unified IP IVR ScriptThe Sample AutoAttendant (aa.aef) Script Template
Figure 12-1 shows the aa.aef script as it appears in the Design pane of the Cisco Unified CCX Editor window.
Figure 12-1 aa.aef Script
The aa.aef script performs the following tasks:
1. Accepts the call.
2. Plays a welcome prompt, asking the caller to perform one of three actions:
• Press or say “1” to enter an extension number
• Press or say “2” to enter the name of a person
If the caller chooses to spell a name, the script maps the letters entered against the available users defined in a specified directory and transfers the call to the primary extension of the user.
12-3Cisco Unified Contact Center Express Getting Started with Scripts, Release 11.0(1)

Chapter 12 Designing a Cisco Unified IP IVR Script The Sample AutoAttendant (aa.aef) Script Template
If more than one match occurs, the script prompts the caller to choose the correct extension. If too many matches occur, the script prompts the caller to enter more characters. If no match occurs, the script prompts the caller to enter another name.
• Press or say “0” to speak to an operator
Configure this welcome prompt as a parameter, which means that the administrator can configure this prompt when provisioning an application with this script. (For more information on provisioning applications, see the Cisco Unified Contact Center Express Administration Guide.)
3. When the script receives a valid extension, it transfers the call.
• If the destination is busy, the caller hears the system prompt, “The phone number you are trying to reach is currently busy.”
• If the destination is out of service, the caller hears the system prompt, “The phone number you are trying to reach is currently out of service.”
The aa.aef script uses audio prompts stored as .wav files in the wfavvid_1001\prompts\system\en_Us\AA\ directory and installed automatically with the Cisco Unified CCX Engine.
These audio prompts include the following:
• AAMainMenu_ASR.wav—Provides a menu of choices: press 1 or say “one” to enter an extension, press 2 or say “two” to enter the first few characters of a user name, or press 0 or say “zero” to speak to an operator.
• AASorry.wav—States that the transfer was not successful.
• AABusyExtn.wav—States that the dialed extension is busy.
• AAInvalidExtn.wav—States that the entered extension is not a valid choice.
• AAExntOutofService.wav—States that the entered extension is no longer in service.
• AAWelcome.wav—Greets the caller.
In the AutoAttendant application, you configure the filename and pathname for the AAWelcome.wav prompt by running the AA configuration wizard from the main menu of the Cisco Unified CCX Administration web interface. You can choose to change the default welcome prompt to reference a customized prompt.
12-4Cisco Unified Contact Center Express Getting Started with Scripts, Release 11.0(1)

Chapter 12 Designing a Cisco Unified IP IVR ScriptThe Start Step (Creating a Script)
Note For custom scripts, you need to record your own prompts. To record a prompt, see the Recording step information in the Cisco Unified Conact Center Express Editor Step Reference Guide or the Cisco Unified Contact Center Express Administration Guide.
The Start Step (Creating a Script)Begin to build the sample script by choosing File > New from the Cisco Unified CCX Editor menu bar. The Templates folder displays. Select the blank script and click OK.
A blank script containing a Start and End step opens in the Design pane of the Cisco Unified CCX Editor window.
Begin to build the sample script by choosing File > New from the Cisco Unified CCX Editor menu bar. The Cisco Unified CCX Editor places a Start step in the Design pane of the Cisco Unified CCX Editor window.
The Start step needs no configuration and has no customizer window. At this time, you might also want to give your new script a name and save it by selecting File > Save from the menu bar.
Our example script is called aa.aef.
12-5Cisco Unified Contact Center Express Getting Started with Scripts, Release 11.0(1)

Chapter 12 Designing a Cisco Unified IP IVR Script The aa.aef Script Variables
The aa.aef Script VariablesBegin the aa.aef script design process by using the Variable pane of the Cisco Unified CCX Editor to define script variables.
Figure 12-2 shows the variables of the aa.aef script as they appear in the Variable pane of the Cisco Unified CCX Editor.
Figure 12-2 Variables Pane of the aa.aef Script
12-6Cisco Unified Contact Center Express Getting Started with Scripts, Release 11.0(1)

Chapter 12 Designing a Cisco Unified IP IVR ScriptThe aa.aef Script Variables
Table 12-1 describes the variables used in the aa.aef script.
Table 12-1 Variables in the aa.aef Script
Variable NameVariable Type Value Function
AlwaysEnable DialByName
Boolean False Stores the information that indicates whether Dial By Name is always enabled for the script (regardless of the language associated with the incoming call or the type of media).
(See If ASR, page 12-19.)
MaxRetry Integer 3 Stores the maximum retries a caller can make in this script before the script terminates the call.
(See Localizing the Prompt Language, page 12-36.)
Define this variable as a parameter so that the administrator can configure it when provisioning an application with this script.
asr Boolean False Stores the information that indicates whether or not ASR is enabled for this call.
(See Get Contact Info, page 12-11.)
attempts Integer 1 Stores the number of times the script has attempted confirmation.
(See Localizing the Prompt Language, page 12-36.)
extnPrompt Prompt P[] Prompts the caller to either press or say the extension number.
(See The DialByExtn Output Branch of the Simple Recognition Step, page 12-27.)
extnXfer String "" Stores the extension to which the caller is transferred.
(See The Get Digit String Step, page 12-29.)
firstName String "" Stores the first name of the selected user.
12-7Cisco Unified Contact Center Express Getting Started with Scripts, Release 11.0(1)

Chapter 12 Designing a Cisco Unified IP IVR Script The aa.aef Script Variables
fullNamePrompt Prompt P[] Stores the full name of the user to be played back.
grammar Grammar G[] Stores the value SG[AA/AAWantToCall] assigned to it by the Set step.
(See The Explicit Confirmation Step, page 12-62.)
language Language L[en_US] Stores the current language associated with the call.
Default: English (United States)
(See Get Contact Info, page 12-11.)
lastName String "" Stores the last name of the selected user.
menuPrompt Prompt P[] Stores the result from the Create Conditional Prompt step. This prompt presents the initial menu of options for calling by name or by extension.
(See The First Create Conditional Prompt Step, page 12-12.)
name String "" Stores the written name of the person the caller is trying to reach.
(See The Successfully Receiving Caller Input, page 12-51.)
namePrompt Prompt P[] Asks the caller to say the name of the person the caller wants to reach.
(See The First Create Container Prompt Step, page 12-14.)
Table 12-1 Variables in the aa.aef Script (continued)
Variable NameVariable Type Value Function
12-8Cisco Unified Contact Center Express Getting Started with Scripts, Release 11.0(1)

Chapter 12 Designing a Cisco Unified IP IVR ScriptThe aa.aef Script Variables
operExtn String "" Stores the Operator extension the Call Redirect step uses to transfer the call to the operator.
(See The Call Redirect Step, page 12-80.)
Define this variable as a parameter so that the administrator can configure it when provisioning an application with this script.
prefixPrompt Prompt P[] Informs the caller of the status of the call. This value is dependent on many steps.
(See The DialByExtn Output Branch of the Simple Recognition Step, page 12-27.)
prompt Prompt P[] Used for a variety of purposes throughout the script.
(See The First Create Container Prompt Step, page 12-14.)
spokenName Document null Stores the audio document of the spoken name of the person the caller is trying to reach.
(See The Successfully Receiving Caller Input, page 12-51.)
ttsPrompt Prompt P[] Contains the TTS prompt for the user selected.
Note When TTS is available, the system can use this prompt instead of spelling back the full user name.
Table 12-1 Variables in the aa.aef Script (continued)
Variable NameVariable Type Value Function
12-9Cisco Unified Contact Center Express Getting Started with Scripts, Release 11.0(1)

Chapter 12 Designing a Cisco Unified IP IVR Script The Getting the Contact Information and Setting Up the Prompts
The Getting the Contact Information and Setting Up the Prompts
This section contains the following:
• Accept, page 12-10
• Get Contact Info, page 12-11
• The First Create Conditional Prompt Step, page 12-12
• The Second Create Conditional Prompt Step, page 12-13
• The First Create Container Prompt Step, page 12-14
• The Third Create Conditional Prompt Step, page 12-16
• The Play Prompt Step, page 12-16
• The Label Step (MainMenu), page 12-18
AcceptContinue to build the aa.aef script by dragging an Accept step from the Contact palette (in the Palette pane of the Cisco Unified CCX Editor window) to the Design pane, and dropping it over the Start step.
user User null Identifies the user that the caller chooses with the Name To User step.
(See The Name To User Step, page 12-48.)
welcomePrompt Prompt P[AA\Welcome.wav] Greets the caller.
(See The Play Prompt Step, page 12-16.)
Define this variable as a parameter so that the administrator can configure it when provisioning an application with this script.
Table 12-1 Variables in the aa.aef Script (continued)
Variable NameVariable Type Value Function
12-10Cisco Unified Contact Center Express Getting Started with Scripts, Release 11.0(1)

Chapter 12 Designing a Cisco Unified IP IVR ScriptThe Getting the Contact Information and Setting Up the Prompts
Because you intend to accept the default contact, no configuration is necessary for this step.
Get Contact InfoContinue the aa.aef script by dragging a Get Contact Info step from the Contact palette to the Design pane, and dropping it over the Accept step.
Then configure the Get Contact Info step to retrieve information about the contact that the script uses. This determines which prompts to use, based on whether or not Automatic Speech Recognition (ASR) is enabled, and, if so, what language the script uses.
Figure 12-3 shows the configured customizer window of the Get Contact Info step.
Figure 12-3 Configured Get Contact Info Customizer Window
12-11Cisco Unified Contact Center Express Getting Started with Scripts, Release 11.0(1)

Chapter 12 Designing a Cisco Unified IP IVR Script The Getting the Contact Information and Setting Up the Prompts
Configure the Get Contact Info customizer window as follows:
• Contact—Triggering Contact
The contact that triggered the script remains the contact for this step.
• Attribute/Variable—language and asr
The two variables for which the Get Contact Info step obtains values. Subsequent If steps use these values to determine the language context of the call and whether or not ASR is enabled for this call.
The First Create Conditional Prompt StepContinue to build the aa.aef script by dragging the first of three Create Conditional Prompt steps from the Prompt palette to the Design pane, and dropping it over the Get Contact Info step.
Configure the first Create Conditional Prompt step to play back one of two prompts, according to whether or not ASR is enabled for this call.
Figure 12-4 shows the configured customizer window for the first Create Conditional Prompt step.
Figure 12-4 Configured Create Conditional Prompt Customizer Window
Configure the first Create Conditional Prompt step as follows:
• Condition Expression—asr
12-12Cisco Unified Contact Center Express Getting Started with Scripts, Release 11.0(1)

Chapter 12 Designing a Cisco Unified IP IVR ScriptThe Getting the Contact Information and Setting Up the Prompts
The Boolean variable for which the Create Conditional Prompt step evaluates the Boolean expression of the variable (as defined by you when defining variables).
• True Prompt—SP[AA\AAMainMenu_ASR]
The script plays back this .wav file if the condition evaluates to true; that is, if ASR is enabled for this call.
• False Prompt—SP[AA\AAMainMenu]
The script plays back this .wav file if the condition evaluates to false; that is, if ASR is not enabled for this call.
• Output Prompt—menuPrompt
The variable that stores the prompt value resulting from this Create Conditional Prompt step.
The Second Create Conditional Prompt StepContinue to build the aa.aef script by dragging the second of three Create Conditional Prompt steps from the Prompt palette to the Design pane, and dropping it over the first Create Conditional Prompt step.
Configure the second Create Conditional Prompt step to play back one of two prompts, according to whether or not ASR is enabled for this call. The first prompt offers the caller the option to either press or say an extension; the second prompt offers the caller only the choice of pressing the extension.
Configure the properties of the second Create Conditional Prompt step in the same manner as the first Create Conditional Prompt step (see The First Create Conditional Prompt Step, page 12-12), with the following two exceptions:
• True Prompt—SP[AA\AAEnterExtn_ASR]
The script plays back this .wav file if the condition evaluates to true; that is, if ASR is enabled for this call.
• False Prompt—SP[AA\AAEnterExtn]
The script plays back this .wav file if the condition evaluates to false; that is, if ASR is not enabled for this call.
12-13Cisco Unified Contact Center Express Getting Started with Scripts, Release 11.0(1)
Chapter 12 Designing a Cisco Unified IP IVR Script The Getting the Contact Information and Setting Up the Prompts
Note The third Create Conditional Prompt step appears just after the next step, the first Create Container Prompt step.
The First Create Container Prompt StepContinue the aa.aef script by dragging a Create Container Prompt step from the Prompt palette to the Design pane, and dropping it over the second Create Conditional Prompt step.
Then configure the Create Container Prompt step to ask the caller to speak the name of the desired person.
This container prompt is an escalating container prompt, which consists of a series of prompts, each of which provides more information to the caller. If the first prompt attempt does not receive valid input, the step prompts the caller with the next prompt in the sequence. This progression continues until either the caller returns valid input or the step reaches the last prompt in the sequence.
12-14Cisco Unified Contact Center Express Getting Started with Scripts, Release 11.0(1)

Chapter 12 Designing a Cisco Unified IP IVR ScriptThe Getting the Contact Information and Setting Up the Prompts
Figure 12-5 shows the configured Create Container Prompt customizer window.
Figure 12-5 Configured Create Container Prompt Customizer Window
Configure the Create Container Prompt customizer window as follows:
• Prompt Container Type—escalating
The prompt container type is escalating, a series of prompts that provides increasing amounts of information.
• Prompts List Box
– SP[AA\AANameDial0_ASR]
– SP[AA\AANameDial1_ASR]
– SP[AA\AANameDial2_ASR]
The three prompts that are played, one after the other, if the media steps must use all three (or more) attempts at eliciting a valid response.
• Override Language (optional)—(not chosen)
12-15Cisco Unified Contact Center Express Getting Started with Scripts, Release 11.0(1)

Chapter 12 Designing a Cisco Unified IP IVR Script The Getting the Contact Information and Setting Up the Prompts
You can check this option in order to specify a different language than the original language context of the contact.
• Output Prompt—namePrompt
This prompt results from the Create Container Prompt step.
The Third Create Conditional Prompt StepContinue to build the aa.aef script by dragging the third of three Create Conditional Prompt steps from the Prompt palette to the Design pane, and dropping it over the Create Container Prompt step.
Configure the third Create Conditional Prompt step to play back one of two prompts, according to whether or not ASR is enabled for this call.
Configure the properties of the third Create Conditional Prompt step in the same manner as the first Create Conditional Prompt step (see The First Create Conditional Prompt Step, page 12-12), with the following two exceptions:
• True Prompt—namePrompt
The script plays back namePrompt (as configured by the previous Create Container Prompt step) if the condition evaluates to true; that is, if ASR is enabled for this call.
• False Prompt—AA/AANameDial
If ASR is not enabled, then the value of namePrompt becomes the system prompt AA/AANameDial (one of the system prompts included with the aa.aef file), which prompts the caller to spell the name of the desired person by pressing digits.
The Play Prompt StepContinue the aa.aef script by dragging a Play Prompt step from the Prompt palette to the Design pane, and dropping it over the third Create Conditional Prompt step, as shown in Figure 12-1.
Then configure the Play Prompt step to plays the prompts that the other Prompt steps create.
12-16Cisco Unified Contact Center Express Getting Started with Scripts, Release 11.0(1)

Chapter 12 Designing a Cisco Unified IP IVR ScriptThe Getting the Contact Information and Setting Up the Prompts
Figure 12-6 shows the configured Prompt tab of the Play Prompt customizer window.
Figure 12-6 Play Prompt Customizer Window—Configured Prompt Tab
Configure the three tabs of the Play Prompt customizer window as follows:
• General tab
– Contact—Triggering contact
The contact that triggered the script remains the contact for this step.
– Interruptible—No
No external events can interrupt the playback of the prompt.
• Prompt tab
– Prompt—welcomePrompt
This prompt plays back to greet the caller.
– Barge In—No
The caller must listen to the whole prompt before responding.
– Continue on Prompt Errors—Yes
If a prompt error occurs, the script continues to play the next prompt, or, if this is the last prompt in the sequence, the script waits for caller input.
• Input tab
– Flush Input Buffer— Yes
12-17Cisco Unified Contact Center Express Getting Started with Scripts, Release 11.0(1)

Chapter 12 Designing a Cisco Unified IP IVR Script The Getting the Contact Information and Setting Up the Prompts
The step erases previous input.
The Label Step (MainMenu)Continue the aa.aef script by dragging a Label step from the General palette to the Design pane, and dropping it over the Play Prompt step.
Then configure the Label step to create a target for the script. This target is used later in the script when an output branch reaches a timeout, unsuccessful, or otherwise dead-end position and the script returns the caller to the Label step to try again.
The Label step is named MainMenu.
Note For an example of configuring the Label step, see “The Label Step” section on page 6-10.
12-18Cisco Unified Contact Center Express Getting Started with Scripts, Release 11.0(1)
Chapter 12 Designing a Cisco Unified IP IVR ScriptDetermining if the System is ASR Enabled
Determining if the System is ASR EnabledThis section contains the following:
• If ASR, page 12-19
• The True Output Branch, page 12-20
• The False Output Branch, page 12-20
• The Switch Step, page 12-21
If ASRContinue the aa.aef script by dragging an If step from the General palette to the Design pane, and dropping it over the Label step.
Then configure the If step to determine which segment of the script handles the contact, depending on whether or not the system is ASR-enabled and Name To User capability is enabled or supported.
The If step evaluates the expression “asr || AlwaysEnableDialByName” (“either ASR is enabled, or the system allows the caller to enter the person’s name to which they would like to be connected”).
Note For an example of configuring the If step, see “The If Step” section on page 7-17.
12-19Cisco Unified Contact Center Express Getting Started with Scripts, Release 11.0(1)

Chapter 12 Designing a Cisco Unified IP IVR Script Determining if the System is ASR Enabled
Figure 12-7 shows the If step’s two output branches, True and False.
Figure 12-7 If Step Scripting
The following sections describe the two output branches of the If step:
• The True Output Branch, page 12-20
• The False Output Branch, page 12-20
The True Output BranchIf the If step evaluates the expression “asr || AlwaysEnableDialByName” as true, the script executes the True output branch, which allows the script to fall through to the subsequent Create Container Prompt step in the script.
Note Use an Annotate step to contain notes describing the function of the branch. (This step has no impact on script functionality.) For more information about using the Annotate step, see “The Annotate Step” section on page 8-6.
The False Output BranchIf the If step evaluates the expression “asr || AlwaysEnableDialByName” as false, the script executes the False output branch.
12-20Cisco Unified Contact Center Express Getting Started with Scripts, Release 11.0(1)

Chapter 12 Designing a Cisco Unified IP IVR ScriptDetermining if the System is ASR Enabled
Configure the False output branch of the If step to use a Switch step to allow the script to automatically enable the Dial By Name feature based on the language associated with the call. If the language is either English or Canadian French, then the script prompts the caller for the option to Dial By Name.
The False out put branch contains the Switch step, discussed below.
The Switch StepConfigure the False output branch of the If step by dragging a Switch step from the General palette to the Design pane, and dropping it over the False icon under the If step.
Then configure the Switch step to evaluate the value of the language variable (as retrieved by the previous Get Contact Info step) and to switch the language context of the call accordingly.
Figure 12-8 shows the configured Switch customizer window.
Figure 12-8 Configured Switch Customizer Window
12-21Cisco Unified Contact Center Express Getting Started with Scripts, Release 11.0(1)

Chapter 12 Designing a Cisco Unified IP IVR Script Creating and Setting an Error Message Prompt
Configure the Switch customizer window as follows:
• Switch Value—language
The variable that stores the current language of the call.
• Case(s)—L[en], L[fr_CA]
The language options available for the call.
The Switch step has three output branches, based on the language variable as specified in the Switch Expression text field: L[en], L[fr_CA], and Default.
The following sections describe the three output branches of the Switch step:
• The L[en] Output Branch, page 12-22
• The L[fr_CA] Output Branch, page 12-22
• The Default Output Branch, page 12-22
The L[en] Output BranchIf the Switch step determines that English is the language context of the call, the script executes the L[en] output branch and the script uses English in subsequent steps.
The L[fr_CA] Output BranchIf the Switch step determines that Canadian French is the language context of the call, the script executes the L[fr_CA] output branch, and the script uses Canadian French in subsequent steps.
The Default Output BranchIf the Switch step determines that Dial By Name is not supported for this call, the script executes the Default output branch.
Configure the Default output branch of the Switch step to use the Goto step to send the caller to the DialByExtn Label step under the Simple Recognition step. (See The Get Digit String Step, page 12-29.)
Creating and Setting an Error Message Prompt • The Second Create Container Prompt Step, page 12-23
• The Set Step, page 12-23
12-22Cisco Unified Contact Center Express Getting Started with Scripts, Release 11.0(1)

Chapter 12 Designing a Cisco Unified IP IVR ScriptCreating and Setting an Error Message Prompt
The Second Create Container Prompt StepContinue the aa.aef script by dragging a second Create Container Prompt step from the Prompt palette to the Design pane, and dropping it over the If step.
Then configure the second Create Container Prompt step to create an escalating prompt called prompt, which combines menuPrompt (the first prompt created in the script; see the “The First Create Conditional Prompt Step” section on page 12-12) with a new prompt called prefixPrompt.
The prefixPrompt variable initializes with no value in the beginning, but as the caller loops through the application and fails to be connected to a destination, this variable holds an error message to be played back to the caller.
Use an escalating prompt so that the error message plays only on the first attempt of the subsequent Simple Recognition step, which uses the prompt created by this step.
Configure this Create Container Prompt step as follows:
• Type—escalating
This step creates an escalating prompt.
• Prompts List Box
– prefixPrompt + menuPrompt
– menuPrompt
This specifies the prompt phrases that are played if the Media step uses more than one attempt at eliciting a valid response from the caller.
• Override Language (optional)—(not chosen)
You can check this option in order to specify a different language than the original language context of the contact.
• Output Prompt—prompt
This prompt results from this (second) Create Container Prompt step.
The Set StepContinue the aa.aef script by dragging a Set step from the General palette to the Design pane, and dropping it over the second Create Container Prompt step.
12-23Cisco Unified Contact Center Express Getting Started with Scripts, Release 11.0(1)

Chapter 12 Designing a Cisco Unified IP IVR Script Recognizing Input
Then configure the Set step to set the value of prefixPrompt to P[], which means it is empty.
This script uses this Set step to return callers to the MainMenu Label step to listen to menu options again, in order to clear this prompt of values that the script may have previously assigned.
Recognizing InputContinue the aa.aef script by dragging a Simple Recognition step from the Media palette to the Design pane, and dropping it over the Set step.
Then configure the Simple Recognition step to receive either speech or digits in response to prompts. The script steps under the Simple Recognition step transfer the call to the proper extension if the script receives valid input from the caller.
Note The Simple Recognition step is similar to the Menu step, with the added advantage that it allows you to utilize user-defined grammar for matching user input with options you provide.
Use this step to configure grammar variables that store the words or digits that the script must recognize in order to dial an extension number, a name, or the operator, depending on the input from the caller.
12-24Cisco Unified Contact Center Express Getting Started with Scripts, Release 11.0(1)

Chapter 12 Designing a Cisco Unified IP IVR ScriptRecognizing Input
Figure 12-9 shows the configured Filter tab of the Simple Recognition customizer window.
Figure 12-9 Simple Recognition Customizer Window—Configured Filter Tab
Configure the Simple Recognition customizer window as follows:
• General tab
– Contact—Triggering Contact
The contact that triggered this script remains the contact for this step.
– Interruptible—Yes
External events can interrupt the execution of this step.
• Prompt tab
– Prompt—prompt
The step plays this prompt back to the caller.
– Barge In—Yes
The caller can respond without first having to listen to the playback of the entire prompt.
12-25Cisco Unified Contact Center Express Getting Started with Scripts, Release 11.0(1)

Chapter 12 Designing a Cisco Unified IP IVR Script Recognizing Input
– Continue on Prompt Errors—Yes
If a prompt error occurs, the script continues to play the next prompt, or, if this is the last prompt in the sequence, the script waits for caller input.
• Input tab
– Timeout (in sec)—5
After playing all prompts, the script waits 5 seconds for initial input from the caller before re-attempting with a timeout error, or, if this was the last attempt, the script executes the Timeout output branch.
– Maximum Retries—5
The script will retry to receive input 5 times before sending the script to the Unsuccessful output branch.
– Flush Input Buffer—No
The script saves previous input.
• Filter tab
– Grammar—SG[AA\AAMainMenu]
The system grammar that the step uses to recognize caller input.
– Options Tag/Connection list box—DialByExtn, DialByName, Operator
The list of options the menu offers to the caller. The tags map to the output points to determine the execution of branching output paths.
Note The tag values must correspond to the tag values defined in the grammar.
12-26Cisco Unified Contact Center Express Getting Started with Scripts, Release 11.0(1)
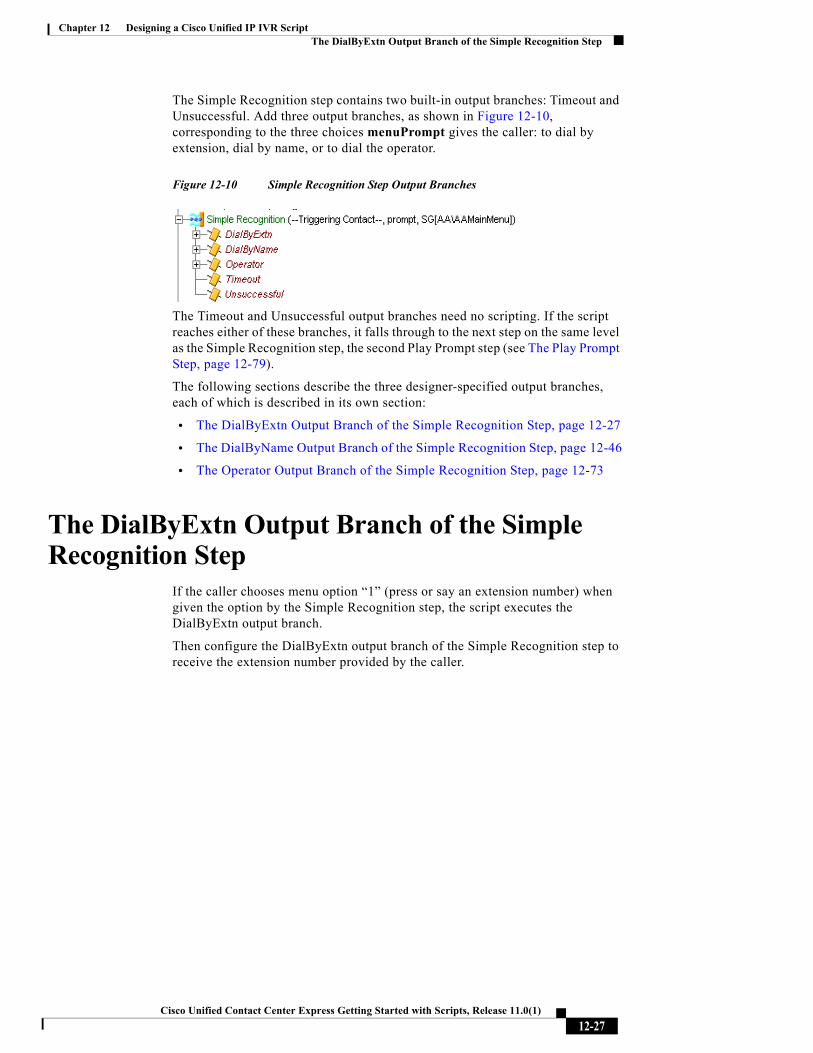
Chapter 12 Designing a Cisco Unified IP IVR ScriptThe DialByExtn Output Branch of the Simple Recognition Step
The Simple Recognition step contains two built-in output branches: Timeout and Unsuccessful. Add three output branches, as shown in Figure 12-10, corresponding to the three choices menuPrompt gives the caller: to dial by extension, dial by name, or to dial the operator.
Figure 12-10 Simple Recognition Step Output Branches
The Timeout and Unsuccessful output branches need no scripting. If the script reaches either of these branches, it falls through to the next step on the same level as the Simple Recognition step, the second Play Prompt step (see The Play Prompt Step, page 12-79).
The following sections describe the three designer-specified output branches, each of which is described in its own section:
• The DialByExtn Output Branch of the Simple Recognition Step, page 12-27
• The DialByName Output Branch of the Simple Recognition Step, page 12-46
• The Operator Output Branch of the Simple Recognition Step, page 12-73
The DialByExtn Output Branch of the Simple Recognition Step
If the caller chooses menu option “1” (press or say an extension number) when given the option by the Simple Recognition step, the script executes the DialByExtn output branch.
Then configure the DialByExtn output branch of the Simple Recognition step to receive the extension number provided by the caller.
12-27Cisco Unified Contact Center Express Getting Started with Scripts, Release 11.0(1)

Chapter 12 Designing a Cisco Unified IP IVR Script The DialByExtn Output Branch of the Simple Recognition Step
Figure 12-11 shows the scripting under the DialByExtn output branch of the Simple Recognition step.
Figure 12-11 DialByExtn Scripting
The DialByExtn contains the following steps, the last of which is discussed in its own section:
• The Label Step, page 12-28
• The Create Container Prompt Step, page 12-28
• The Set Step, page 12-29
• The Get Digit String Step, page 12-29
The Label Step Begin the DialByExtn output branch of the Simple Recognition step by dragging a Label step from the General palette to the Design pane, and dropping it over the DialByExtn icon under the Simple Recognition step.
Then configure the Label step to create a target for the Goto step under the default output branch of the If step above. (See If ASR, page 12-19.)
The Create Container Prompt Step Continue the DialByExtn output branch of the Simple Recognition step by dragging a Create Container Prompt step from the General palette to the Design pane, and dropping it over the Label step (DialByExtn) icon under the DialByExtn icon.
12-28Cisco Unified Contact Center Express Getting Started with Scripts, Release 11.0(1)

Chapter 12 Designing a Cisco Unified IP IVR ScriptThe DialByExtn Output Branch of the Simple Recognition Step
Then configure the Create Container Prompt step to create a concatenated container prompt, consisting of prefixPrompt (see The Second Create Container Prompt Step, page 12-23) and extnPrompt, a preset prompt that prompts the caller to either press or say the extension number (with a possible error message when looping back if there is an error connecting to the destination).
The Set StepContinue the DialByExtn output branch of the Simple Recognition step by dragging a Set step from the General palette to the Design pane, and dropping it over the Create Container Prompt icon under the DialByExtn icon.
Then configure the Set step to set the value of prefixPrompt to P[], which clears prefixPrompt of any values that the script may have previously assigned.
The Get Digit String StepConclude the DialByExtn output branch of the Simple Recognition step by dragging a Get Digit String step from the Media palette to the Design pane, and dropping it over the Set step icon under the DialByExtn icon.
Then configure the Get Digit String step to receive the digits entered by the caller in response to prompt, stores them in a result digit string variable named extnXfer, and then attempt to transfer the call.
Note For more information on configuring the Get Digit String step, see “The Get Digit String Step” section on page 7-25.
The Get Digit String has three output branches: Successful, Timeout, and Unsuccessful.
12-29Cisco Unified Contact Center Express Getting Started with Scripts, Release 11.0(1)

Chapter 12 Designing a Cisco Unified IP IVR Script The Successful Output Branch (of Get Digit String)
Figure 12-12 shows the output branches of the Get Digit String step.
Figure 12-12 Get Digit String Output Branches
The following sections describe the three output branches of the Get Digit String step:
• The Timeout Output Branch, page 12-30
• The Unsuccessful Output Branch, page 12-30
• The Successful Output Branch (of Get Digit String), page 12-30
The Timeout Output BranchIf the Get Digit String step does not receive input before reaching the timeout limit, the script executes the Timeout output branch, and the script skips the rest of the output branches of the Simple Recognition step and falls through to the second Play Prompt step (see The Play Prompt Step, page 12-79).
The Unsuccessful Output BranchIf the Get Digit String step is unsuccessful in receiving valid input, the script executes the Unsuccessful output branch, and the script skips the rest of the output branches of the Simple Recognition step and falls through to the second Play Prompt step (see The Play Prompt Step, page 12-79).
The Successful Output Branch (of Get Digit String)
If the Get Digit String step successfully receives caller input, the script executes the Successful output branch.
12-30Cisco Unified Contact Center Express Getting Started with Scripts, Release 11.0(1)

Chapter 12 Designing a Cisco Unified IP IVR ScriptThe Successful Output Branch (of Get Digit String)
Figure 12-13 shows the scripting of the Successful output branch of the Get Digit String step.
Figure 12-13 Get Digit String—Successful Branch Scripting
Configure the Successful output branch of the Get Digit String step to transfer the call.
The Successful output branch of the Get Digit String step contains an If step, discussed in the section that follows.
12-31Cisco Unified Contact Center Express Getting Started with Scripts, Release 11.0(1)

Chapter 12 Designing a Cisco Unified IP IVR Script The Successful Output Branch (of Get Digit String)
Transferring the Call if Recognition Is SuccessfulContinue the aa.aef script by dragging an If step from the General palette to the Design pane, and dropping it over the Get Digit String step. This section determines which part of the script handles the contact.
In the customizer window of the If step, set the condition toextnXfer == ""
The following sections describe the two output branches of the If step:
• The True Recognition Branch, page 12-32
• The False Recognition Branch, page 12-34
The True Recognition Branch The True Output branch of the If step contains the following steps:
• Setting the Retry Message, page 12-32
• Configuring the Number of Retries, page 12-33
Setting the Retry MessageFrom the General palette, drag the Set step below the True label and set the value of the prefixPrompt variable.
Configure the Set Customzer window as follows:
12-32Cisco Unified Contact Center Express Getting Started with Scripts, Release 11.0(1)

Chapter 12 Designing a Cisco Unified IP IVR ScriptThe Successful Output Branch (of Get Digit String)
• Variable—prefixPrompt
The prefixPrompt is used informing the caller of the status of the call.
• Value— SP[AA\AAInvalidExtn] + DP[500]
Configuring the Number of Retries
From the General palette, drag the If step below the Set step.
Configure the If step in the customizer window so that the condition reads Attempts < MaxRetry.
The Retry Branch
The True branch of the If step contains:
• Increment Step, page 12-33
• Goto MainMenu Step, page 12-34
Increment StepFrom the General palette, drag the Increment step and place it under the True branch. In the Increment step customizer window set the value of the Increment variable to Attempts.
12-33Cisco Unified Contact Center Express Getting Started with Scripts, Release 11.0(1)

Chapter 12 Designing a Cisco Unified IP IVR Script The Successful Output Branch (of Get Digit String)
Goto MainMenu StepTo finish the True branch of the If step, from the General palette, drag the Goto step under the Increment step and in the customizer window choose the MainMenu label.
The False Recognition Branch The False Output branch of the If transfer step contains the following steps:
• Drag a Create Generated Prompt step from the Prompt palette to the Design pane and drop it on the False output of the Successful icon under the Get Digit String step., page 12-35
• Use the Create Language Prompt step to localize the prompt with a specific language., page 12-36
12-34Cisco Unified Contact Center Express Getting Started with Scripts, Release 11.0(1)

Chapter 12 Designing a Cisco Unified IP IVR ScriptConfirming the Caller Input
• Continue the Successful output branch of the Get Digit String step by dragging an Implicit Confirmation step from the Media palette to the Design pane, and dropping it over the Create Generated Prompt step icon under the Successful icon under the Get Digit String step., page 12-38
Confirming the Caller InputDrag a Create Generated Prompt step from the Prompt palette to the Design pane and drop it on the False output of the Successful icon under the Get Digit String step.
Then configure the Create Generated Prompt step to create a prompt to play back to the caller the digits received, in order to confirm the caller input before transferring the call.
Figure 12-14 shows the configured Create Generated Prompt customizer window.
Figure 12-14 Configured Create Generated Prompt Customizer Window
Configure the Create Generated Prompt customizer window as follows:
12-35Cisco Unified Contact Center Express Getting Started with Scripts, Release 11.0(1)

Chapter 12 Designing a Cisco Unified IP IVR Script Localizing the Prompt Language
• Generator Type— telephone.number
Telephone.number is the generator type.
• Constructor Type—number
Number is the constructor type.
• Argument Information list box—extnXfer
The extnXfer variable stores the results of the number constructor.
• Override Language
Optional. Use only if the resulting prompt is played in a different language than the one defined by the contact in which the prompt is played back.
• Output Prompt—prompt
The prompt variable stores the value that results from this step.
Localizing the Prompt LanguageUse the Create Language Prompt step to localize the prompt with a specific language.
12-36Cisco Unified Contact Center Express Getting Started with Scripts, Release 11.0(1)

Chapter 12 Designing a Cisco Unified IP IVR ScriptLocalizing the Prompt Language
Figure 12-15 Configured Create Language Prompt Customizer Window
Configure the Create Language Prompt customizer window as follows:
• Options— Language and Prompt
Enter all the languages you want and all the prompt expression names or prompt expressions.
• Output Prompt— telephone.number
Enter the script variable where the prompt that results from the Create Language Prompt step will be stored.
You can use the Create Language Prompt step to adapt concatenating prompts to the sentence structures of different languages. For example, a normal grammar sequence for an English sentence is Subject + Verb + Object. For a Japanese sentence, it is Subject + Object + Verb. The selection of the prompt is based on the standard search for a matching language. For example, assuming a language context of {L[fr_FR}, L[en_GB]}, the search returns the first prompt defined for the following languages: L[fr_FR], L[fr], L[en_GB], L[en], and finally L[ ].
See Chapter 4, “Localizing Cisco Unified CCX Scripts” for more information on localizing scripts.
12-37Cisco Unified Contact Center Express Getting Started with Scripts, Release 11.0(1)
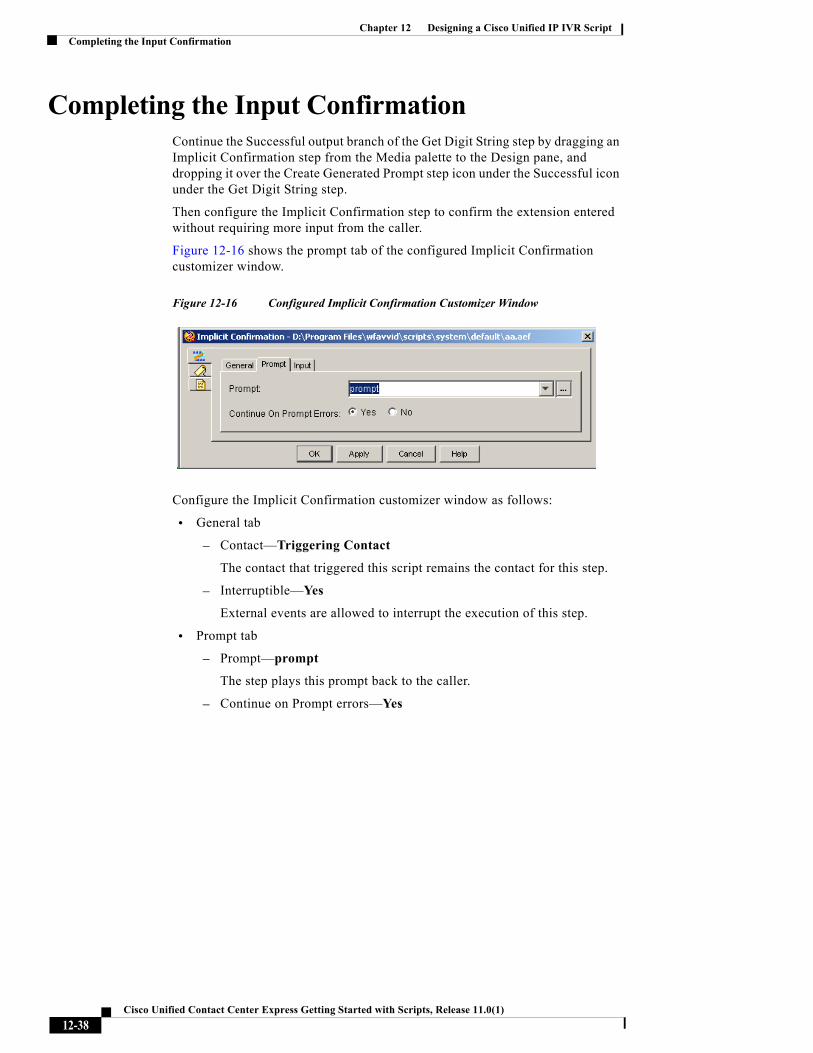
Chapter 12 Designing a Cisco Unified IP IVR Script Completing the Input Confirmation
Completing the Input ConfirmationContinue the Successful output branch of the Get Digit String step by dragging an Implicit Confirmation step from the Media palette to the Design pane, and dropping it over the Create Generated Prompt step icon under the Successful icon under the Get Digit String step.
Then configure the Implicit Confirmation step to confirm the extension entered without requiring more input from the caller.
Figure 12-16 shows the prompt tab of the configured Implicit Confirmation customizer window.
Figure 12-16 Configured Implicit Confirmation Customizer Window
Configure the Implicit Confirmation customizer window as follows:
• General tab
– Contact—Triggering Contact
The contact that triggered this script remains the contact for this step.
– Interruptible—Yes
External events are allowed to interrupt the execution of this step.
• Prompt tab
– Prompt—prompt
The step plays this prompt back to the caller.
– Continue on Prompt errors—Yes
12-38Cisco Unified Contact Center Express Getting Started with Scripts, Release 11.0(1)

Chapter 12 Designing a Cisco Unified IP IVR ScriptCompleting the Input Confirmation
In the event of a prompt error, the script will play the next prompt in the sequence, or if this is the last prompt, will wait for caller input.
• Input tab
– Timeout (in sec)— 2
The caller has 2 seconds to stop the transfer before the script accepts the confirmation and transfers the call.
The Implicit Confirmation step has two output branches: No and Yes.
The following sections describe these two output branches:
• The Caller Does Not Give Confirmation, page 12-39
• The Extension is Confirmed as Correct, page 12-41
The Caller Does Not Give ConfirmationIf the caller interrupts the Implicit Confirmation step and thereby does not give confirmation, the script executes the No output branch.
Configure the No output branch of the Implicit Confirmation step to Use an If step to try again, until the maximum number of retries is reached.
The No output branch contains the following step:
• Configuring the Retries, page 12-39
Configuring the RetriesConfigure the No output branch of the Implicit Confirmation step by dragging an If step from the General palette to the Design pane, and dropping it over the No icon under the Implicit Confirmation step.
Then configure the If step to allow the script to determine whether or not the maximum number of retries has been reached, by evaluating the expression “attempts < MaxRetry”, (“the number of attempts, as stored in the attempts variable, is less than the maximum number of retries, as stored in the MaxRetry variable”).
The If step has two output branches: True and False.
The following sections describe these two output branches:
12-39Cisco Unified Contact Center Express Getting Started with Scripts, Release 11.0(1)

Chapter 12 Designing a Cisco Unified IP IVR Script Completing the Input Confirmation
• The Caller With Retries Gives Confirmation, page 12-40
• The Caller Does Not Give Confirmation, page 12-41
The Caller With Retries Gives ConfirmationIf the If step determines that the maximum number of retries has not been reached, the script executes the True output branch.
Configure the True output branch of the If step to increment the number of retries by one and to give the caller another try.
The True output branch of the If step contains three functional steps:
The Play Prompt Step
Continue the True output branch of the If step by dragging a Play Prompt step from the Prompt palette to the Design pane, and dropping it over the True icon under the If step.
Then configure the Play Prompt step to play an empty prompt, P[], in order to flush the DTMF buffer of any digits that the script may have accumulated as part of the previous Implicit Confirmation step.
Note Configure the Play Prompt step with an empty prompt to enable the script to return immediately from this step after flushing out the buffer.
The Increment StepContinue the True output branch of the If step by dragging an Increment step from the General palette to the Design pane, and dropping it over the Play Prompt step icon under the True icon under If step.
Then configure the Increment step to increase the number of attempts until the maximum number of retries is reached.
12-40Cisco Unified Contact Center Express Getting Started with Scripts, Release 11.0(1)

Chapter 12 Designing a Cisco Unified IP IVR ScriptTransferring the Call
The Goto StepEnds the True output branch of the If step by dragging a Goto step from the General palette to the Design pane, and dropping it over the Increment step icon under the True icon under the If step.
Then configure the Goto step to return the caller to the beginning of the DialByExtn Label step at the beginning of the DialByExtn output branch of the Get Digit String step, in order to give the caller more attempts to input the proper extension.
The Caller Does Not Give ConfirmationIf the If step determines that the maximum number or retries has been reached, the script executes the False output branch.
Configure the False output branch of the If step to skip the rest of the steps under the Simple Recognition step and fall through to the second Play Prompt step (see The Play Prompt Step, page 12-79).
The Extension is Confirmed as CorrectIf the Implicit Confirmation step successfully confirms the extension, the script executes the Yes output branch of the Implicit Confirmation step.
Configure the Yes output branch of the Implicit Confirmation step to transfer the call.
The Yes output branch contains the following steps:
• Transferring the Call, page 12-41
• The If Step, page 12-45
Transferring the CallBegin the Yes output branch of the Implicit Confirmation step by dragging a Call Redirect step from the Call Contact palette to the Design pane and dropping it over the Yes icon under the Implicit Confirmation step.
12-41Cisco Unified Contact Center Express Getting Started with Scripts, Release 11.0(1)
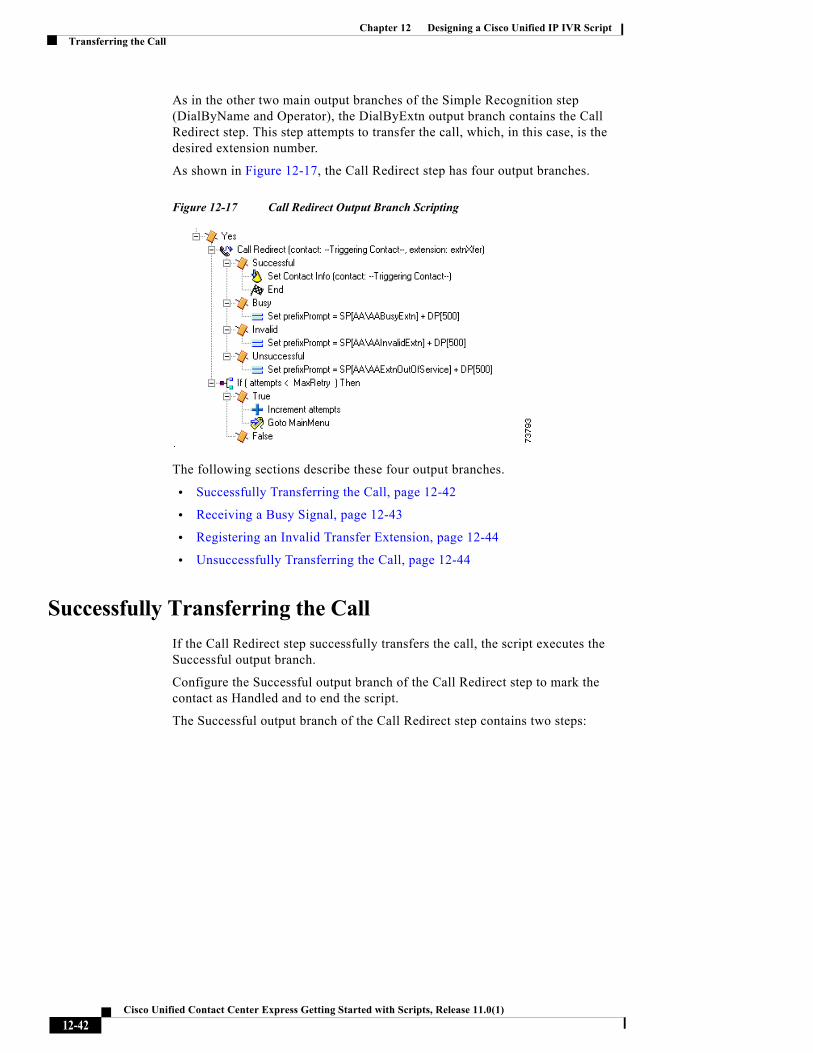
Chapter 12 Designing a Cisco Unified IP IVR Script Transferring the Call
As in the other two main output branches of the Simple Recognition step (DialByName and Operator), the DialByExtn output branch contains the Call Redirect step. This step attempts to transfer the call, which, in this case, is the desired extension number.
As shown in Figure 12-17, the Call Redirect step has four output branches.
Figure 12-17 Call Redirect Output Branch Scripting
The following sections describe these four output branches.
• Successfully Transferring the Call, page 12-42
• Receiving a Busy Signal, page 12-43
• Registering an Invalid Transfer Extension, page 12-44
• Unsuccessfully Transferring the Call, page 12-44
Successfully Transferring the CallIf the Call Redirect step successfully transfers the call, the script executes the Successful output branch.
Configure the Successful output branch of the Call Redirect step to mark the contact as Handled and to end the script.
The Successful output branch of the Call Redirect step contains two steps:
12-42Cisco Unified Contact Center Express Getting Started with Scripts, Release 11.0(1)

Chapter 12 Designing a Cisco Unified IP IVR ScriptTransferring the Call
• The Set Contact Info Step, page 12-43
• The End Step, page 12-43
The Set Contact Info Step
Begin the Successful output branch of the Call Redirect step by dragging a Set Contact Info step from the Contact palette to the Design pane, and dropping it over the Successful icon under the Call Redirect step, as shown in Figure 12-17.
Then configure the Set Contact Info step to mark the call as Handled.
Note For reporting purposes, you should use the Set Contact Info step to mark the contact as Handled; otherwise, reports may not show that the script successfully handled the contact.
The End StepConclude the Successful output branch of the Call Redirect step by dragging an End step from the General palette to the Design pane, and dropping it over the Set Contact Info step icon under the Successful icon under the Call Redirect step, as shown in Figure 12-17.
The End step ends this branch of the script.
Receiving a Busy SignalIf the Call Redirect step registers the destination extension as busy, the script executes the Busy output branch.
Configure the Busy output branch of the Call Redirect step to set the value of the prefixPrompt variable to inform the caller that the extension was busy.
The Busy output branch of the Call Redirect step contains the Set step.
12-43Cisco Unified Contact Center Express Getting Started with Scripts, Release 11.0(1)

Chapter 12 Designing a Cisco Unified IP IVR Script Transferring the Call
The Set StepConfigure the Busy output branch of the Call Redirect step by dragging a Set step from the General palette to the Design pane, and dropping it over the Busy icon under the Call Redirect step, as shown in Figure 12-17.
Then configure the Set step to set the value of prefixPrompt to contain a system prompt that plays back a message to the caller that the extension is busy.
Registering an Invalid Transfer ExtensionIf the Call Redirect step registers the destination extension as invalid, the script executes the Invalid output branch.
Configure the Invalid output branch of the Call Redirect step to set the value of the prefixPrompt variable to inform the caller that the extension was invalid.
The Invalid output branch of the Call Redirect step contains the Set step.
The Set StepConfigure the Invalid output branch of the Call Redirect step by dragging a Set step from the General palette to the Design pane, and dropping it over the Invalid icon under the Call Redirect step, as shown in Figure 12-17.
Then configure the Set step to set the value of prefixPrompt to contain a system prompt that plays back a message to the caller that the extension is invalid.
Unsuccessfully Transferring the CallIf the Call Redirect step registers the destination extension as out of service, the script executes the Unsuccessful output branch.
Configure the Unsuccessful output branch of the Call Redirect step to set the value of the prefixPrompt variable to inform the caller that the extension was out of service.
The Unsuccessful output branch of the Call Redirect step contains the Set step.
12-44Cisco Unified Contact Center Express Getting Started with Scripts, Release 11.0(1)
Chapter 12 Designing a Cisco Unified IP IVR ScriptTransferring the Call
The Set StepConfigure the Unsuccessful output branch of the Call Redirect step by dragging a Set step from the General palette to the Design pane, and dropping it over the Unsuccessful icon under the Call Redirect step, as shown in Figure 12-17.
Then configure the Set step to set the value of the prefixPrompt to play back a message to the caller that the extension is out of service.
The If StepEnd the Yes output branch of the Implicit Confirmation step by dragging an If step from the General palette to the Design pane, and dropping it over the Call Redirect step icon under the Implicit Confirmation step, as shown in Figure 12-17.
Then configure the If step to allow the script to determine whether or not the maximum number of retries has been reached, by evaluating the expression “attempts < MaxRetry”, (“the number of attempts, as stored in the attempts variable, is less than the maximum number of retries, as stored in the MaxRetry variable”).
The If step has two output branches, True and False.
The following sections describe these two output branches.
• The True Output Branch, page 12-45
• The False Output Branch, page 12-46
The True Output Branch
If the If step determines that the maximum number of retries has not been reached, the script executes the True output branch.
Configure the True output branch of the If step to allow the caller to keep returning to the MainMenu Label until it reaches the maximum number of retries.
The True output branch contains two steps:
• The Increment Step, page 12-46
• The Goto Step, page 12-46
12-45Cisco Unified Contact Center Express Getting Started with Scripts, Release 11.0(1)

Chapter 12 Designing a Cisco Unified IP IVR Script The DialByName Output Branch of the Simple Recognition Step
The Increment StepBegin the True output branch of the If step by dragging an Increment step from the General palette to the Design pane, and dropping it over the True icon under the If step, as shown in Figure 12-17. Then configure the Increment step to increase the numbers or retries by 1.
The Goto StepEnd the True output branch of the If step by dragging a Goto step from the General palette to the Design pane, and dropping it over the True step icon under the under the If step, as shown in Figure 12-17.
Then configure the Goto step to send the caller back to the Label step named MainMenu to provide the caller another opportunity to enter an extension.
The False Output Branch
If the If step determines that the maximum number of retries has been reached, the script executes the False output branch.
Configure the False output branch of the If step to fall through to the second Play Prompt step (see The Play Prompt Step, page 12-79).
The DialByName Output Branch of the Simple Recognition Step
If the caller chooses menu option “2” (press or say to enter the name of a person) when given the option by the Simple Recognition step, the script executes the DialByName output branch.
Configure the DialByName output branch of the Simple Recognition step to receive the name of the person the caller desires to reach.
12-46Cisco Unified Contact Center Express Getting Started with Scripts, Release 11.0(1)

Chapter 12 Designing a Cisco Unified IP IVR ScriptThe DialByName Output Branch of the Simple Recognition Step
Figure 12-18 shows the scripting under the DialByName output branch of the Simple Recognition step.
Figure 12-18 DialByName Output Branch Scripting
The DialByName output branch contains four functional steps, the last of which is described in its own section:
• The Label Step, page 12-47
• The Create Container Prompt Step, page 12-48
• Continue the Successful output branch of the Get Digit String step by dragging an Implicit Confirmation step from the Media palette to the Design pane, and dropping it over the Create Generated Prompt step icon under the Successful icon under the Get Digit String step., page 12-38
• The Set Step, page 12-48
• The Name To User Step, page 12-48
The Label StepBegin the DialByName output branch of the Simple Recognition step by dragging a Label step from the General palette to the Design pane, and dropping it over the DialByName icon under the Simple Recognition step icon, as shown in Figure 12-18.
Then name the Label step DialByName to provide a target for the script to provide the caller more opportunities if necessary to enter a name successfully.
12-47Cisco Unified Contact Center Express Getting Started with Scripts, Release 11.0(1)
Chapter 12 Designing a Cisco Unified IP IVR Script The DialByName Output Branch of the Simple Recognition Step
The Create Container Prompt Step Continue the DialByName output branch of the Simple Recognition step by dragging a Create Container Prompt step from the Prompt palette to the Design pane, and dropping it over the Label step icon under the DialByName icon under the Simple Recognition step icon, as shown in Figure 12-18.
Then configure the Create Container Prompt step to create a prompt that asks the caller to enter the name of the desired person.
The Set Step Continue the DialByName output branch of the Simple Recognition step by dragging a Set step from the General palette to the Design pane, and dropping it over the Create Container Prompt step icon under the Simple Recognition step icon, as shown in Figure 12-18.
Then configure the Set step to clear the value of the prefixPrompt variable, so that it can be assigned by subsequent steps.
The Name To User Step End the DialByName output branch of the Simple Recognition step by dragging a Name To User step from the Media palette to the Design pane, and dropping it over the Set step icon under the Simple Recognition step icon, as shown in Figure 12-18.
Then configure the Name To User step to allow the caller to find a user based on either DTMF digits or spoken input from the caller.
The Name To User customizer window has three tabs: General, Prompt, and Input.
12-48Cisco Unified Contact Center Express Getting Started with Scripts, Release 11.0(1)

Chapter 12 Designing a Cisco Unified IP IVR ScriptThe DialByName Output Branch of the Simple Recognition Step
Figure 12-19 shows the configured General tab of the Name To User customizer window.
Figure 12-19 Name To User Customizer Window—Configured General Tab
Configure the Name To User customizer window as follows:
• General tab
– Contact—Triggering Contact
The contact that triggered the script remains the contact for this step.
– Interruptible—Yes
External events can interrupt the playback of the prompt.
– Operator—Yes
The script gives the caller the option to connect to an operator by pressing “0” or saying “operator” in the appropriate language.
– Result User—user
The user variable stores the user object that maps to the selection of the caller.
• Prompt tab
– Prompt—prompt
The prompt variable stores the custom prompt the script plays back to the caller.
12-49Cisco Unified Contact Center Express Getting Started with Scripts, Release 11.0(1)

Chapter 12 Designing a Cisco Unified IP IVR Script The DialByName Output Branch of the Simple Recognition Step
– Match Threshold—4
If the number of matches is less than 4, the script prompts the caller to choose the correct entry from the list of matches. If the number of matches is greater than or equal to 4, the script prompts the caller to enter additional letters to reduce the number of matches.
– Barge In—Yes
The caller can respond without first having to listen to the playback of the entire prompt.
– Continue On Prompt Errors—Yes
If a prompt error occurs, the script continues to play the next prompt, or, if this prompt is the last in the sequence, the script waits for caller input.
• Input tab
– Initial Timeout (in sec)—5
The step times out if the script receives no input within 5 seconds after playing back the prompt.
– Interdigit Timeout (in sec)—3
The step times out if the script receives no input between digits for 3 seconds.
– Maximum Retries—5
The maximum number of retries is 5.
– Flush Input Buffer—No
The script saves input previously entered by the caller.
• Filter tab
– Input Length—30
Specifies that the script automatically triggers a lookup when the caller enters 30 digits.
– Terminating Digit—#
The terminating digit is “#”.
– Cancel Digit—*
The cancel digit is “*”.
12-50Cisco Unified Contact Center Express Getting Started with Scripts, Release 11.0(1)

Chapter 12 Designing a Cisco Unified IP IVR ScriptThe DialByName Output Branch of the Simple Recognition Step
The Name To User step has four output branches: Successful, Timeout Unsuccessful and Operator.
The Timeout and Unsuccessful output branches need no scripting. If the step times out, the script falls through to the second Play Prompt step (see The Play Prompt Step, page 12-79). If an invalid entry is made, after 5 attempts the script also falls through to the second Play Prompt step (see The Play Prompt Step, page 12-79).
Two output branches require scripting, each of which is described in its own section:
• The Successfully Receiving Caller Input, page 12-51
• The Operator Output Branch of the Simple Recognition Step, page 12-73
The Successfully Receiving Caller Input
If the Name to User step successfully receives caller input, the script executes the Successful output branch.
Then configure the Successful output branch of the Name To User step to receive confirmation of the name from the caller and to transfer the call.
The steps under this branch are similar to the steps under the Successful output branch of the Get Digit String step above (See The Get Digit String Step, page 12-29); the script requests confirmation, and redirects the call to the desired extension.
12-51Cisco Unified Contact Center Express Getting Started with Scripts, Release 11.0(1)

Chapter 12 Designing a Cisco Unified IP IVR Script The DialByName Output Branch of the Simple Recognition Step
Figure 12-20 shows the scripting under the Successful output branch of the Name To User step.
Figure 12-20 Name To User—Successful Output Branch Scripting
The Successful output branch of the Name To User step contains three main steps, the last of which is discussed in its own section:
• The Get User Info Step, page 12-53
• The If Step, page 12-54
• The Implicit Confirmation Step, page 12-54
12-52Cisco Unified Contact Center Express Getting Started with Scripts, Release 11.0(1)

Chapter 12 Designing a Cisco Unified IP IVR ScriptThe DialByName Output Branch of the Simple Recognition Step
The Get User Info Step
Begin the Successful output branch of the Name To User step by dragging a Get User Info step from the User palette to the Design pane, and dropping it over the Successful icon under the Name To User step icon, as shown in Figure 12-20.
Then configure the Get User Info step to make user attributes available to the script. Figure 12-21 shows the configured customizer window for the Get User Info step.
Figure 12-21 Configured Get User Info Customizer Window
Configure the Get User Info customizer window as follows:
• User—user
Specifies user as the variable that holds a handle to the user information selected by the Name To User step.
• Attribute/Variable text box
– Full Name—name
– Extension—extnXfer
– Spoken Name—spokenName
12-53Cisco Unified Contact Center Express Getting Started with Scripts, Release 11.0(1)

Chapter 12 Designing a Cisco Unified IP IVR Script The DialByName Output Branch of the Simple Recognition Step
The If Step
Continue the Successful output branch of the Name To User step by dragging an If step from the General palette to the Design pane, and dropping it over the Get User Info step icon under the Name To User step icon, as shown in Figure 12-20.
Then configure the If step to create a prompt based on whether or not a recording of the spoken name of the person whose extension is being called is available.
The If step evaluates the Boolean expression spokenName==null; or, the value of the Document variable spokenName is equal to null.
The If step has two output branches: True and False. (See Figure 12-20.)
The following sections describe the two output branches of the If step:
• The True Output Branch, page 12-54
• The False Output Branch, page 12-54
The True Output BranchIf the If step determines that a recording of the spoken name of the person whose extension is being called is not available, the script executes the True output branch.
Configure the True output branch of the If step to instruct prompt to play the system prompt SP[AA/AACalling], which does not speak the name of the person being called.
The False Output BranchIf the If step determines that a recording of the spoken name of the person whose extension is being called is available, the script executes the False output branch.
Configure the False output branch of the If step to instruct prompt to play the system prompt SP[AA/AACallingName], which is then followed by the spoken name.
The Implicit Confirmation Step End the Successful output branch of the Name To User step by dragging an Implicit Confirmation step from the Media palette to the Design pane, and dropping it over the If step icon under the Name To User step icon, as shown in Figure 12-20.
12-54Cisco Unified Contact Center Express Getting Started with Scripts, Release 11.0(1)

Chapter 12 Designing a Cisco Unified IP IVR ScriptThe No Output Branch of the Simple Recognition Step
Then configure the Implicit Confirmation step to implicitly confirm the name entered without demanding more input from the caller.
The Implicit Confirmation step performs in a similar way to the DialByExtn section above. (See Localizing the Prompt Language, page 12-36).
The Implicit Confirmation Step has two output branches: No and Yes. (See Figure 12-20.)
The following sections describe the two output branches of the Implicit Confirmation step:
• The No Output Branch of the Simple Recognition Step, page 12-55
• The Yes Output Branch, page 12-66
The No Output Branch of the Simple Recognition Step
If the Implicit Confirmation step does not successfully confirm the choice of the caller, the script executes the No output branch.
Configure the No output branch of the If step to create a prompt that will then provide the caller an opportunity to explicitly confirm the choice.
12-55Cisco Unified Contact Center Express Getting Started with Scripts, Release 11.0(1)
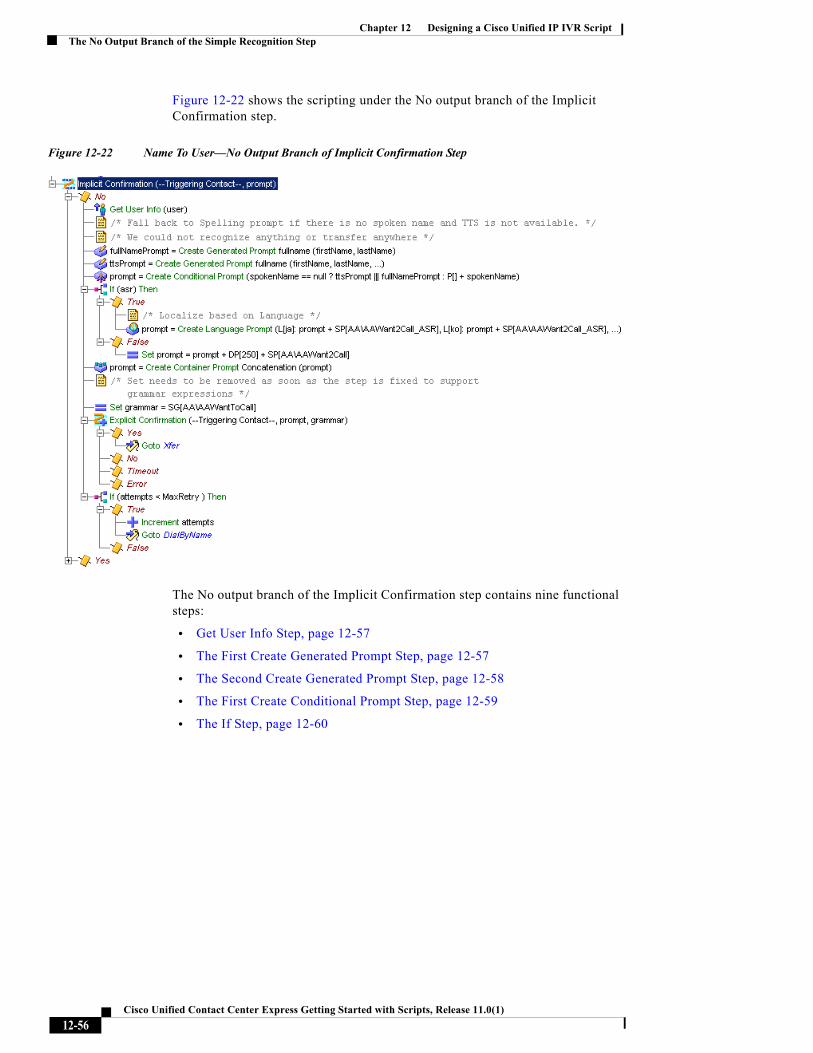
Chapter 12 Designing a Cisco Unified IP IVR Script The No Output Branch of the Simple Recognition Step
Figure 12-22 shows the scripting under the No output branch of the Implicit Confirmation step.
Figure 12-22 Name To User—No Output Branch of Implicit Confirmation Step
The No output branch of the Implicit Confirmation step contains nine functional steps:
• Get User Info Step, page 12-57
• The First Create Generated Prompt Step, page 12-57
• The Second Create Generated Prompt Step, page 12-58
• The First Create Conditional Prompt Step, page 12-59
• The If Step, page 12-60
12-56Cisco Unified Contact Center Express Getting Started with Scripts, Release 11.0(1)

Chapter 12 Designing a Cisco Unified IP IVR ScriptThe No Output Branch of the Simple Recognition Step
• The Create Container Prompt Step, page 12-61
• The Set Step, page 12-62
• The Explicit Confirmation Step, page 12-62
• The If Step, page 12-65
Get User Info Step The purpose of this step is to fall back to a spelling prompt if the name is not spoken or text to speech is not available. See The Get User Info Step, page 12-53 for an explanation of how to configure this step.
The First Create Generated Prompt Step Drag a Create Generated Prompt step from the Prompt palette to the Design pane, and drop it on the False output of the Successful icon under the Get User Info step.
Then configure the Create Generated Prompt step to create a prompt to play back to the caller the digits received, in order to confirm the caller input before transferring the call.
12-57Cisco Unified Contact Center Express Getting Started with Scripts, Release 11.0(1)

Chapter 12 Designing a Cisco Unified IP IVR Script The No Output Branch of the Simple Recognition Step
Figure 12-23 shows the configured Create Generated Prompt customizer window.
Figure 12-23 Create Generated Prompt customizer window
The Second Create Generated Prompt Step Enter a second Create Generated Prompt step.
12-58Cisco Unified Contact Center Express Getting Started with Scripts, Release 11.0(1)

Chapter 12 Designing a Cisco Unified IP IVR ScriptThe No Output Branch of the Simple Recognition Step
The First Create Conditional Prompt Step Begin the No output branch of the Implicit Confirmation step by dragging a Create Conditional Prompt step from the Prompt palette to the Design pane, and dropping it over the No output branch icon under the Implicit Confirmation step icon, as shown in Figure 12-22.
Then configure the first Create Conditional Prompt step to create a prompt based on whether or not the variable spokenName is null. (The spokenName variable is not null if a spoken name exists for the selected user in the directory.)
If it is true that spokenName is null, the prompt plays the prompt S[name], which corresponds to the name of the user spelled back one letter at a time. If the expression is false, (which means there is a recording of the name of the person), the prompt plays P[] + spokenName.
12-59Cisco Unified Contact Center Express Getting Started with Scripts, Release 11.0(1)
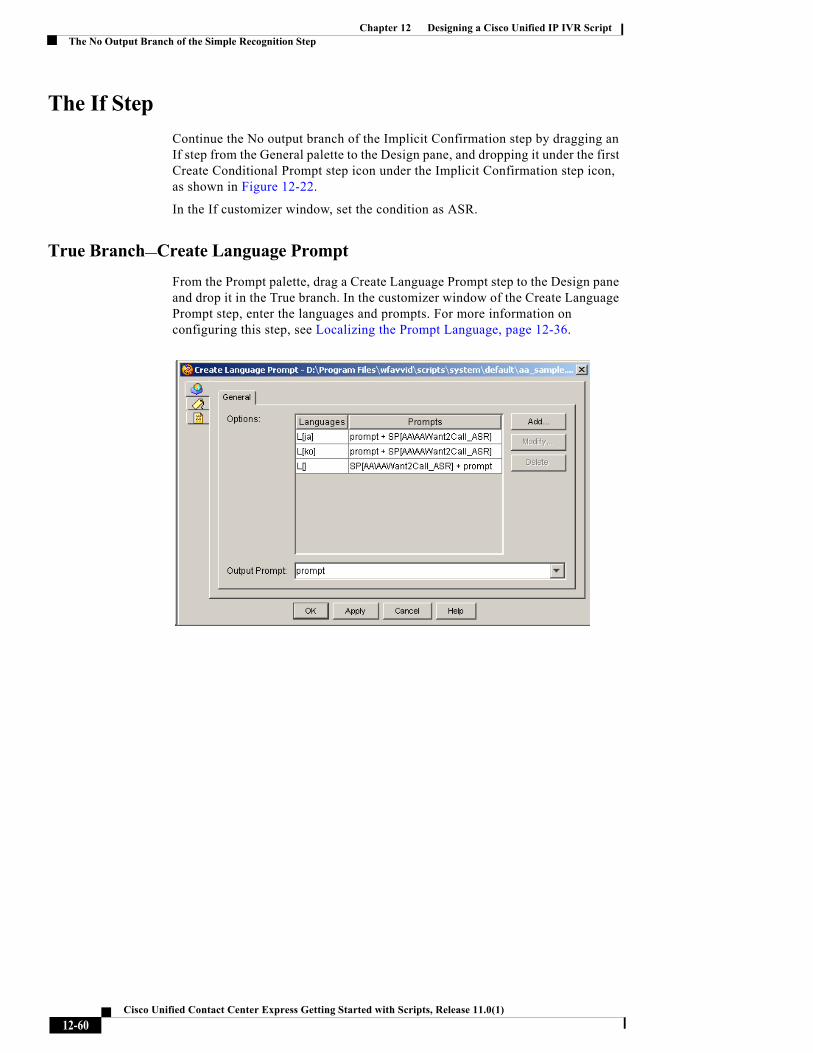
Chapter 12 Designing a Cisco Unified IP IVR Script The No Output Branch of the Simple Recognition Step
The If Step Continue the No output branch of the Implicit Confirmation step by dragging an If step from the General palette to the Design pane, and dropping it under the first Create Conditional Prompt step icon under the Implicit Confirmation step icon, as shown in Figure 12-22.
In the If customizer window, set the condition as ASR.
True Branch—Create Language PromptFrom the Prompt palette, drag a Create Language Prompt step to the Design pane and drop it in the True branch. In the customizer window of the Create Language Prompt step, enter the languages and prompts. For more information on configuring this step, see Localizing the Prompt Language, page 12-36.
12-60Cisco Unified Contact Center Express Getting Started with Scripts, Release 11.0(1)

Chapter 12 Designing a Cisco Unified IP IVR ScriptThe No Output Branch of the Simple Recognition Step
False Branch—Set Prompt
From the General palette, drag a Set step to the Design pane and drop it in the False branch. In the customizer window of the Set step, select the variable Prompt, and enter prompt + DP[250] + SP[AA\AAWant2Call] as its value.
Then configure the second Create Conditional Prompt step to create a prompt based on whether or not ASR is enabled for this call. If ASR is enabled, the script plays SP[AA/AAWant2Call_ASR] + prompt (for example, “Do you want to call John Doe?”). If ASR is not enabled for this call, then the script plays prompt + DP[250] + SP[AA/AAWant2Call] (for example, “John Doe, is this the name of the person you want to call?”.
The Create Container Prompt Step Continue the No output branch of the Implicit Confirmation step by dragging a Create Container Prompt step from the Prompt palette to the Design pane, and dropping it on the If step icon under the Implicit Confirmation step icon.
12-61Cisco Unified Contact Center Express Getting Started with Scripts, Release 11.0(1)

Chapter 12 Designing a Cisco Unified IP IVR Script The No Output Branch of the Simple Recognition Step
The Set Step Continue the No output branch of the Implicit Confirmation step by dragging a Set step from the Prompt palette to the Design pane, and dropping it over the second Create Conditional Prompt step icon under the Implicit Confirmation step icon, as shown in Figure 12-22.
Then configure the Set step to assign the system grammar SG[AA/AAWantToCall] to the grammar variable. This choice instructs the script how to interpret spoken input from the caller.
The Explicit Confirmation Step Continue the No output branch of the Implicit Confirmation step by dragging an Explicit Confirmation step from the Media palette to the Design pane, and dropping it over the Set step icon under the Implicit Confirmation step icon, as shown in Figure 12-22.
Then configure the Explicit Confirmation step to make an explicit confirmation of the name of the desired person.
12-62Cisco Unified Contact Center Express Getting Started with Scripts, Release 11.0(1)
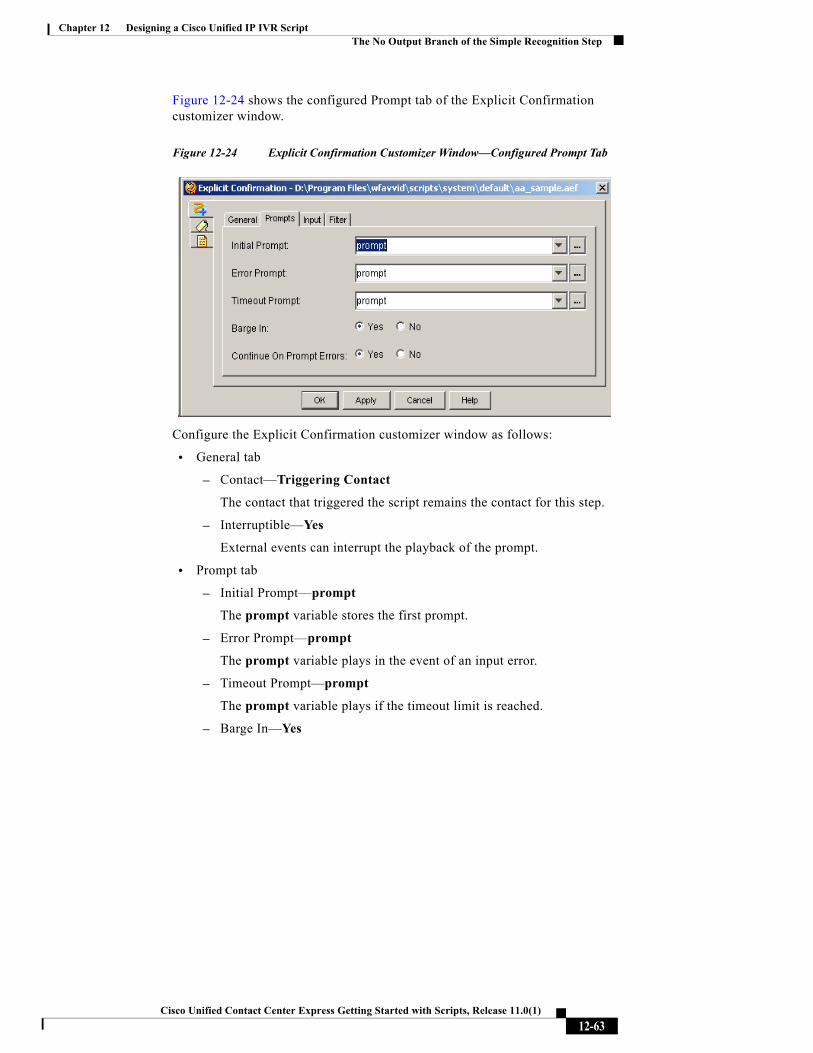
Chapter 12 Designing a Cisco Unified IP IVR ScriptThe No Output Branch of the Simple Recognition Step
Figure 12-24 shows the configured Prompt tab of the Explicit Confirmation customizer window.
Figure 12-24 Explicit Confirmation Customizer Window—Configured Prompt Tab
Configure the Explicit Confirmation customizer window as follows:
• General tab
– Contact—Triggering Contact
The contact that triggered the script remains the contact for this step.
– Interruptible—Yes
External events can interrupt the playback of the prompt.
• Prompt tab
– Initial Prompt—prompt
The prompt variable stores the first prompt.
– Error Prompt—prompt
The prompt variable plays in the event of an input error.
– Timeout Prompt—prompt
The prompt variable plays if the timeout limit is reached.
– Barge In—Yes
12-63Cisco Unified Contact Center Express Getting Started with Scripts, Release 11.0(1)

Chapter 12 Designing a Cisco Unified IP IVR Script The No Output Branch of the Simple Recognition Step
The caller can respond without first having to listen to the playback of the entire prompt.
– Continue on Prompt Errors—Yes
If a prompt error occurs, the script continues to play the next prompt, or, if this is the last prompt in the sequence, the script waits for caller input.
• Input tab
– Timeout (in sec)—5
After playing all prompts, the script waits 5 seconds for initial input from the caller before re-attempting with a timeout error, or, if this was the last attempt, the script executes the Timeout output branch.
– Maximum Retries—3
The script will attempt a maximum of 3 retries to receive confirmation before executing the Unsuccessful output branch.
– Flush Input Buffer—Yes
The step erases previous input.
• Filter tab
– Grammar—grammar
This variable is assigned the value SG[AA/AAWantToCall] by the Set step in the preceding section.
The Explicit Confirmation step has four output branches: Yes, No, Timeout, and Error.
The No, Timeout, and Error output branches do not require scripting. The script falls through to the If step (see The If Step, page 12-65) to allow the caller more attempts to confirm until the maximum retries limit is reached, after which the script falls through to the Play Prompt step at the same level as the Simple Recognition step. (See Figure 12-1.)
The following section describes the Yes output branch:
• The Yes Output Branch, page 12-64
The Yes Output BranchIf the Explicit Confirmation step successfully receives confirmation from the caller, the script executes the Yes output branch.
12-64Cisco Unified Contact Center Express Getting Started with Scripts, Release 11.0(1)
Chapter 12 Designing a Cisco Unified IP IVR ScriptThe No Output Branch of the Simple Recognition Step
Configure the Yes output branch of the Explicit Confirmation step to direct the script to the Xfer Label step under the Yes output branch of the Implicit Confirmation step (see The Label Step, page 12-68), which contains the steps necessary to redirect the call to the desired extension.
The If Step Finish the No output branch of the Implicit Confirmation step by dragging an If step from the General palette to the Design pane, and dropping it over the Explicit Confirmation step icon, as shown in Figure 12-22.
Configure the If step to determine whether or not the maximum number of retries has been reached, by evaluating the expression “attempts < MaxRetry”; or “the number of attempts (as stored by the attempts variable) is less than the maximum retries value stored in the MaxRetry variable.”
The If step has two output branches, True and False. (See Figure 12-22.)
The following sections describe the two output branches of the If step:
• The True Output Branch, page 12-65
• The False Output Branch, page 12-66
The True Output Branch
If the If step determines that the maximum number of retries has not been reached, the script executes the True output branch.
Configure the True output branch of the If step to provide the caller with another opportunity to enter the name of the desired person.
The following sections describe the two steps under the True output branch of the If step:
• The Increment Step, page 12-65
• The Goto Step (DialByName), page 12-66
The Increment StepBegin the True output branch of the If step by dragging an Increment step from the General palette to the Design pane, and dropping it under the True icon under If step, as shown in Figure 12-22.
12-65Cisco Unified Contact Center Express Getting Started with Scripts, Release 11.0(1)

Chapter 12 Designing a Cisco Unified IP IVR Script The No Output Branch of the Simple Recognition Step
Then configure the Increment step to increase the value of the attempts variable by 1.
The Goto Step (DialByName)End the True output branch of the If step by dragging a Goto step from the General palette to the Design pane, and dropping it over the Increment step icon under the True icon under the If step, as shown in Figure 12-22.
Then configure the Goto step to return the caller to the beginning of the DialByName Label step at the beginning of the DialByName output branch of the Name to User step, in order to give the caller more attempts to input the proper name.
The False Output BranchIf the If step determines that the maximum number of retries has been reached, the script executes the False output branch, and the script also falls through to the second Play Prompt step (see The Play Prompt Step, page 12-79).
The Yes Output BranchIf the Implicit Confirmation step is successful, the script executes the Yes output branch.
Configure the Yes output branch of the If step to redirect the call to the desired extension.
12-66Cisco Unified Contact Center Express Getting Started with Scripts, Release 11.0(1)

Chapter 12 Designing a Cisco Unified IP IVR ScriptThe No Output Branch of the Simple Recognition Step
Figure 12-25 shows the scripting under the Yes output branch of the Implicit Confirmation step.
Figure 12-25 Name To User—Yes Output Branch of Implicit Confirmation Step
The Yes output branch of the Implicit Confirmation step contains three functional steps directly underneath it:
• The Label Step, page 12-68
• The First If Step, page 12-68
• The Second If Step, page 12-72
12-67Cisco Unified Contact Center Express Getting Started with Scripts, Release 11.0(1)

Chapter 12 Designing a Cisco Unified IP IVR Script The No Output Branch of the Simple Recognition Step
The Label Step
Begin the Yes output branch of the Implicit Confirmation step by dragging a Label step from the General palette to the Design pane, and dropping it over the Yes icon under the Implicit Confirmation step icon, as shown in Figure 12-25.
Then configure the Label step to provide a target for the Yes output branch of the Explicit Confirmation step.
The First If StepContinue the Yes output branch of the Implicit Confirmation step by dragging an If step from the General palette to the Design pane, and dropping it over the Label step icon under the Implicit Confirmation step icon, as shown in Figure 12-25.
Then configure the first If step to direct the script based on whether or not the desired extension exists, by evaluating the expression “extnXfer != null”; or, “the value of the extnXfer variable (which stores the extension number) is not null.”
The If step has two output branches, True and False. (See Figure 12-25.)
The following sections describe the two output branches of the If step:
• The False Output Branch, page 12-68
• The True Output Branch, page 12-68
The False Output BranchIf the If step finds no extension exists for the selected user, the script executes the False output branch.
Configure the Set step underneath the False output branch to set the value of a prompt that will be played back to inform the caller that the extension was invalid.
The True Output BranchIf the If step evaluates the desired extension as valid, the script executes the True output branch.
Configure the True output branch of the If step to transfer the call.
The If step contains one step, described in its own section:
• The Call Redirect Step, page 12-69
12-68Cisco Unified Contact Center Express Getting Started with Scripts, Release 11.0(1)

Chapter 12 Designing a Cisco Unified IP IVR ScriptThe No Output Branch of the Simple Recognition Step
The Call Redirect StepBegin the True output branch of the first If step by dragging a Call Redirect step from the Call Contact palette to the Design pane, and dropping it over the True icon under the first If step icon, as shown in Figure 12-25.
As in the other two main output branches of the Simple Recognition step (DialByExtn and Operator), the DialByName output branch contains the Call Redirect step, which attempts to transfer the call, in this case, the desired extension number.
The Call Redirect step has four output branches:
• The Successful Output Branch, page 12-69
• The Busy Output Branch, page 12-70
• The Invalid Output Branch, page 12-71
• The Unsuccessful Output Branch, page 12-71
Note Adding a 2 second delay is a best practice when you have a script that performs a a transfer or redirect to another script. Without the delay, there will be a timing issue. When a transfer or redirect occurs, a call leg is initiated. If the transfer or redirect completes and then another transfer or redirect occurs, the call leg from the second transfer or redirect can get stuck. In this case, the second transfer or redirect fails. Adding a delay ensures that the second transfer or redirect leg can complete before continuing through the script.
The Successful Output Branch
If the Call Redirect step successfully transfers the call, the script executes the Successful output branch.
Configure the Successful output branch of the Call Redirect step to mark the contact as Handled and to end the script.
The Successful output branch of the Call Redirect step contains two steps:
• The Set Contact Info Step, page 12-70
• The End Step, page 12-70
12-69Cisco Unified Contact Center Express Getting Started with Scripts, Release 11.0(1)

Chapter 12 Designing a Cisco Unified IP IVR Script The No Output Branch of the Simple Recognition Step
The Set Contact Info StepBegin the Successful output branch of the Call Redirect step by dragging a Set Contact Info step from the Contact palette to the Design pane, and dropping it over the Successful icon under the Call Redirect step, as shown in Figure 12-25.
Then configure the Set Contact Info step to mark the call as Handled.
Note For reporting purposes, you should use the Set Contact Info step to mark the contact as Handled; otherwise, reports may not show that the script successfully handled the contact.
The End StepConclude the Successful output branch of the Call Redirect step by dragging an End step from the General palette to the Design pane, and dropping it over the Set Contact Info step icon under the Successful icon under the Call Redirect step, as shown in Figure 12-25.
The End step ends the script and releases all system resources.
The Busy Output BranchIf the Call Redirect step registers the destination extension as busy, the script executes the Busy output branch.
Configure the Busy output branch of the Call Redirect step to set the value of the prefixPrompt variable to inform the caller that the extension was busy.
The Busy output branch of the Call Redirect step contains the Set step.
The Set StepConfigure the Busy output branch of the Call Redirect step by dragging a Set step from the General palette to the Design pane, and dropping it over the Busy icon under the Call Redirect step, as shown in Figure 12-25.
Then configure the Set step to set the value of prefixPrompt to contain a system prompt that will play back a message to the caller that the extension is busy when the script falls through to the final Play Prompt step (see The Call Redirect Step, page 12-80).
12-70Cisco Unified Contact Center Express Getting Started with Scripts, Release 11.0(1)

Chapter 12 Designing a Cisco Unified IP IVR ScriptThe No Output Branch of the Simple Recognition Step
The Invalid Output Branch
If the Call Redirect step registers the destination extension as invalid, the script executes the Invalid output branch.
Configure the Invalid output branch of the Call Redirect step to set the value of the prefixPrompt variable to inform the caller that the extension was invalid.
The Invalid output branch of the Call Redirect step contains the Set step.
The Set StepConfigure the Invalid output branch of the Call Redirect step by dragging a Set step from the General palette to the Design pane, and dropping it over the Invalid icon under the Call Redirect step, as shown in Figure 12-25.
Then configure the Set step to set the value of prefixPrompt to contain a system prompt that plays back a message to the caller that the extension is invalid when the script falls through to the final Play Prompt step (see The Call Redirect Step, page 12-80).
The Unsuccessful Output Branch
If the Call Redirect step registers the destination extension as out of service, the script executes the Unsuccessful output branch.
Configure the Unsuccessful output branch of the Call Redirect step to set the value of the prefixPrompt variable to inform the caller that the extension was out of service.
The Unsuccessful output branch of the Call Redirect step contains the Set step.
The Set StepConfigure the Unsuccessful output branch of the Call Redirect step by dragging a Set step from the General palette to the Design pane, and dropping it over the Unsuccessful icon under the Call Redirect step, as shown in Figure 12-25.
Then configure the Set step to set the value of prefixPrompt contain a system prompt that plays back a message to the caller that the extension is out of service when the script falls through to the final Play Prompt step (see The Call Redirect Step, page 12-80).
12-71Cisco Unified Contact Center Express Getting Started with Scripts, Release 11.0(1)

Chapter 12 Designing a Cisco Unified IP IVR Script The No Output Branch of the Simple Recognition Step
The Second If Step
End the Yes output branch of the Implicit Confirmation step by dragging a second If step from the General palette to the Design pane, and dropping it over the first If step icon under the Implicit Confirmation step icon, as shown in Figure 12-25.
Then configure the second If step to direct the script based on whether or not the maximum number of retries has been reached, by evaluating the expression “attempts < MaxRetry”; or, “the number of attempts, as stored in the attempts variable, is less than the maximum number of retries allowed, as stored in the MaxRetry variable”).
The If step has two output branches, True and False. (See Figure 12-25.)
The following sections describe the two output branches of the If step:
• The False Output Branch, page 12-72
• The True Output Branch, page 12-72
The False Output BranchIf the second If step finds that the maximum number of retries has been reached, the script executes the False output branch, and the script falls through to the final Play Prompt step (see The Call Redirect Step, page 12-80).
The True Output BranchIf the If step finds that the maximum number of retries has not been reached, the script executes the True output branch.
Configure the True output branch of the If step to provide more opportunities for the caller to successfully enter a name.
The True output branch of the If step contains two functional steps:
• The Increment Step, page 12-72
• The Goto Step, page 12-73
The Increment StepBegin the True output branch of the second If step by dragging an Increment step from the General palette to the Design pane, and dropping it over the True icon under the True icon under the If step, as shown in Figure 12-25.
Then configure the Increment step to increase the value of the attempts variable by 1.
12-72Cisco Unified Contact Center Express Getting Started with Scripts, Release 11.0(1)

Chapter 12 Designing a Cisco Unified IP IVR ScriptThe Operator Output Branch of the Simple Recognition Step
The Goto StepEnd the True output branch of the second If step by dragging a Goto step from the General palette to the Design pane, and dropping it over the Increment step icon under the True icon under the If step, as shown in Figure 12-25.
Then configure the Goto step to return the caller to the beginning of the DialByName Label step at the beginning of the DialByName output branch of the Get Digit String step, in order to give the caller more attempts to input the proper extension.
The Operator Output Branch of the Simple Recognition Step
If the caller chooses menu option “3” (press or say to speak to an operator) when given the option by the Simple Recognition step, the script executes the Operator output branch.
Then configure the Operator output branch of the Simple Recognition step to transfer the call to an operator.
12-73Cisco Unified Contact Center Express Getting Started with Scripts, Release 11.0(1)

Chapter 12 Designing a Cisco Unified IP IVR Script The Operator Output Branch of the Simple Recognition Step
Figure 12-26 shows the scripting under the Operator output branch of the Simple Recognition step.
Figure 12-26 Simple Recognition—Operator Output Branch
The Operator output branch of the Simple Recognition step contains three steps, each of which is described in its own section:
• The Label Step (Xfer Operator), page 12-74
• The Call Redirect Step, page 12-75
• The If Step, page 12-77
The Label Step (Xfer Operator)Begin the Operator output branch of the Simple Recognition step by dragging a Label step from the General palette to the Design pane, and dropping it over the Operator icon under the Simple Recognition step icon, as shown in Figure 12-26.
Then configure the Label step to provide a target for the Goto step.
12-74Cisco Unified Contact Center Express Getting Started with Scripts, Release 11.0(1)

Chapter 12 Designing a Cisco Unified IP IVR ScriptThe Operator Output Branch of the Simple Recognition Step
The Call Redirect StepContinue the Operator output branch of the Simple Recognition step by dragging a Call Redirect step from the Call Contact palette to the Design pane, and dropping it over the Label step icon under the Simple Recognition step icon, as shown in Figure 12-26.
As in the other two main output branches of the Simple Recognition step (DialByExtn and DialByName), the Operator output branch contains the Call Redirect step, which attempts to transfer the call, in this case to the operator.
For examples using this step, see Chapter 18, “Designing Cisco Unified Gateway Scripts.”
The Call Redirect step has four output branches:
• The Successful Output Branch, page 12-75
• The Busy Output Branch, page 12-76
• The Invalid Output Branch, page 12-76
• The Unsuccessful Output Branch, page 12-77
The Successful Output Branch
If the Call Redirect step successfully transfers the call, the script executes the Successful output branch.
Configure the Successful output branch of the Call Redirect step to transfer the call.
The Successful output branch of the Call Redirect step contains two steps:
The Set Contact Info StepBegin the Successful output branch of the Call Redirect step by dragging a Set Contact Info step from the Contact palette to the Design pane, and dropping it over the Successful icon under the Call Redirect step, as shown in Figure 12-26.
Then configure the Set Contact Info step to mark the call as Handled.
Note For reporting purposes, you should use the Set Contact Info step to mark the contact as Handled; otherwise, reports may not show that the script successfully handled the contact.
12-75Cisco Unified Contact Center Express Getting Started with Scripts, Release 11.0(1)

Chapter 12 Designing a Cisco Unified IP IVR Script The Operator Output Branch of the Simple Recognition Step
The End StepConclude the Successful output branch of the Call Redirect step by dragging an End step from the General palette to the Design pane, and dropping it over the Set Contact Info step icon under the Successful icon under the Call Redirect step, as shown in Figure 12-26.
The End step ends the script and releases all system resources.
The Busy Output Branch
If the Call Redirect step registers the destination extension as busy, the script executes the Busy output branch.
Configure the Busy output branch of the Call Redirect step to set the value of the prefixPrompt variable to inform the caller that the extension was busy.
The Busy output branch of the Call Redirect step contains the Set step.
The Set StepConfigure the Busy output branch of the Call Redirect step by dragging a Set step from the General palette to the Design pane, and dropping it over the Busy icon under the Call Redirect step, as shown in Figure 12-26.
Then configure the Set step to set the value of prefixPrompt to contain a system prompt that plays back a message to the caller that the extension is busy.
The Invalid Output Branch
If the Call Redirect step registers the destination extension as invalid, the script executes the Invalid output branch.
Configure the Invalid output branch of the Call Redirect step to set the value of the prefixPrompt variable to inform the caller that the extension was invalid.
The Invalid output branch of the Call Redirect step contains the Set step.
The Set StepConfigure the Invalid output branch of the Call Redirect step by dragging a Set step from the General palette to the Design pane, and dropping it over the Invalid icon under the Call Redirect step, as shown in Figure 12-26.
12-76Cisco Unified Contact Center Express Getting Started with Scripts, Release 11.0(1)

Chapter 12 Designing a Cisco Unified IP IVR ScriptThe Operator Output Branch of the Simple Recognition Step
Then configure the Set step to set the value of prefixPrompt to contain a system prompt that plays back a message to the caller that the extension is invalid.
The Unsuccessful Output Branch
If the Call Redirect step registers the destination extension as out of service, the script executes the Unsuccessful output branch.
Configure the Unsuccessful output branch of the Call Redirect step to set the value of the prefixPrompt variable to inform the caller that the extension was out of service.
The Unsuccessful output branch of the Call Redirect step contains the Set step.
The Set StepConfigure the Unsuccessful output branch of the Call Redirect step by dragging a Set step from the General palette to the Design pane, and dropping it over the Unsuccessful icon under the Call Redirect step, as shown in Figure 12-26.
Then configure the Set step to set the value of prefixPrompt contain a system prompt that plays back a message to the caller that the extension is out of service.
The If Step
End the Operator output branch of the Simple Recognition step by dragging an If step from the General palette to the Design pane, and dropping it over the Call Redirect icon under the Simple Recognition step, as shown in Figure 12-26.
Then configure the If step to allow the script to determine whether or not the maximum number of retries has been reached, by evaluating the expression “attempts < MaxRetry”, (“the number of attempts, as stored in the attempts variable, is less than the maximum number of retries, as stored in the MaxRetry variable”).
The If step has two output branches, True and False.
The following sections describe these two output branches.
• The True Output Branch, page 12-78
• The False Output Branch, page 12-78
12-77Cisco Unified Contact Center Express Getting Started with Scripts, Release 11.0(1)

Chapter 12 Designing a Cisco Unified IP IVR Script The Concluding Steps of the Script
The True Output Branch
If the If step determines that the maximum number of retries has not been reached, the script executes the True output branch.
Configure the True output branch of the If step to allow the caller to keep returning to the MainMenu Label until it reaches the maximum number of retries.
The True output branch contains two steps:
• The Increment Step, page 12-78
• The Goto Step, page 12-78
The Increment StepBegin the True output branch of the If step by dragging an Increment step from the General palette to the Design pane, and dropping it over the True icon under the If step, as shown in Figure 12-26.
Then configure the Increment step to increase the value of the attempts variable by 1.
The Goto StepEnd the True output branch of the If step by dragging a Goto step from the General palette to the Design pane, and dropping it over the True step icon under the under the If step, as shown in Figure 12-26.
Then configure the Goto step to send the script back to the MainMenu label.
The False Output Branch
If the If step determines that the maximum number of retries has been reached, the script executes the False output branch.
Configure the False output branch of the If step to fall through to the next step at the same level in the script as the Simple Recognition step, which is the Play Prompt step. (See Figure 12-1.)
The Concluding Steps of the ScriptThis section contains the following:
12-78Cisco Unified Contact Center Express Getting Started with Scripts, Release 11.0(1)
Chapter 12 Designing a Cisco Unified IP IVR ScriptThe Concluding Steps of the Script
• The Play Prompt Step, page 12-79
• The Call Redirect Step, page 12-80
• The If Step, page 12-81
• The Play Prompt Step, page 12-81
• The Terminate Step, page 12-81
• The End Step, page 12-81
The Play Prompt StepIn case none of the steps and branches under the Simple Recognition step succeed in transferring the call, continue the aa.aef script by dragging a Play Prompt step from the Prompt palette to the Design pane, and dropping it over the Simple Recognition step, as shown in Figure 12-1.
Configure the Play Prompt step to (as a last resort) play a prompt informing the caller of the inability to transfer the call.
The Play Prompt Step plays prefixPrompt + SP[AA/AASorry], which informs the caller the reason the attempted transfer was unsuccessful.
12-79Cisco Unified Contact Center Express Getting Started with Scripts, Release 11.0(1)
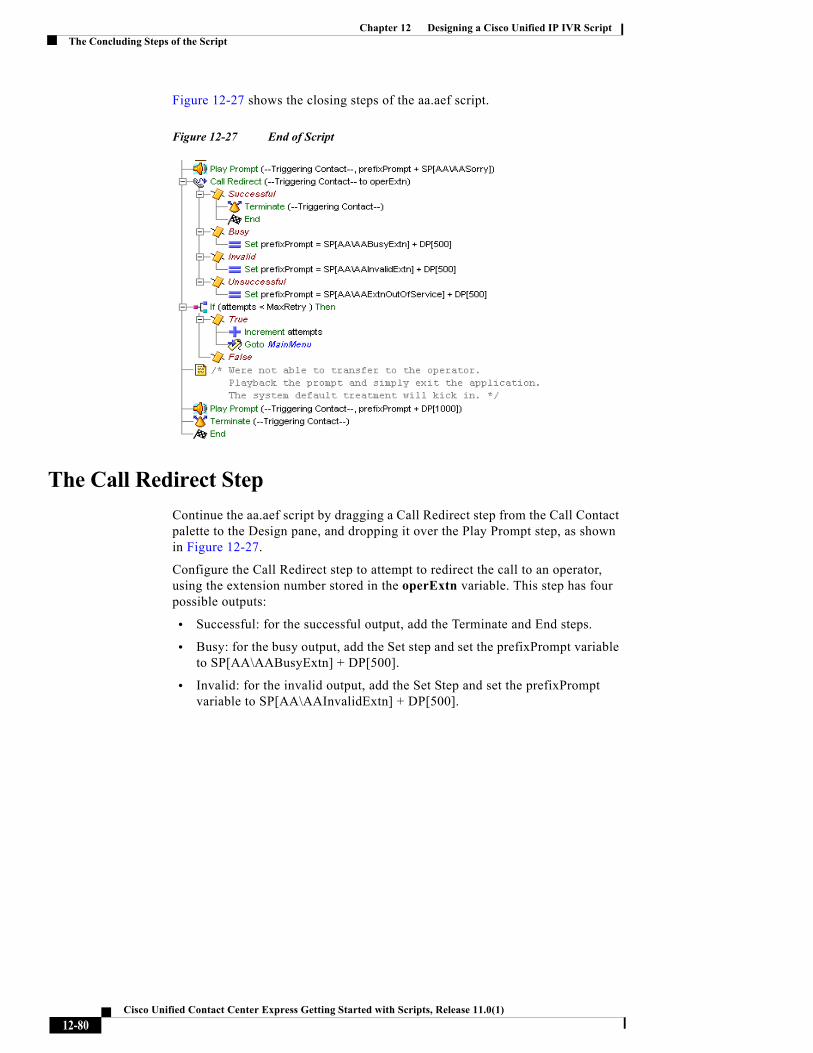
Chapter 12 Designing a Cisco Unified IP IVR Script The Concluding Steps of the Script
Figure 12-27 shows the closing steps of the aa.aef script.
Figure 12-27 End of Script
The Call Redirect StepContinue the aa.aef script by dragging a Call Redirect step from the Call Contact palette to the Design pane, and dropping it over the Play Prompt step, as shown in Figure 12-27.
Configure the Call Redirect step to attempt to redirect the call to an operator, using the extension number stored in the operExtn variable. This step has four possible outputs:
• Successful: for the successful output, add the Terminate and End steps.
• Busy: for the busy output, add the Set step and set the prefixPrompt variable to SP[AA\AABusyExtn] + DP[500].
• Invalid: for the invalid output, add the Set Step and set the prefixPrompt variable to SP[AA\AAInvalidExtn] + DP[500].
12-80Cisco Unified Contact Center Express Getting Started with Scripts, Release 11.0(1)

Chapter 12 Designing a Cisco Unified IP IVR ScriptThe Concluding Steps of the Script
• Unsuccessful: for the unsuccessful output, add the Set step and set the prefixPrompt variable to SP[AA\AAExtnOutOfService] + DP[500].
The If StepContinue the aa.aef script by dragging an If step from the General palette to the Design pane, and dropping it over the Call Redirect step, as shown in Figure 12-27.
Configure the If step to determine whether or not the maximum number of retries has been reached. As in the previous examples, the If step and Increment step allow the caller the maximum number of retries.
If the transfer is successful, the script ends.
The Play Prompt StepWhen the maximum number of retries is reached without successfully transferring the call to an operator, continue the aa.aef script by dragging a Play Prompt step from the Prompt palette to the Design pane, and dropping it over the If step, as shown in Figure 12-1.
Configure the Play Prompt step to play prefixPrompt, which explains why the transfer was unsuccessful.
The Terminate StepConclude the contact in the aa.aef script by dragging a Terminate step from the General palette to the Design pane and entering the triggering contact number into the customizer window.
The End StepConclude the aa.aef script by dragging a End step from the General palette to the Design pane.
The End step ends the script and releases all system resources. The End step requires no configuration and has no customizer.
12-81Cisco Unified Contact Center Express Getting Started with Scripts, Release 11.0(1)

Chapter 12 Designing a Cisco Unified IP IVR Script The Concluding Steps of the Script
12-82Cisco Unified Contact Center Express Getting Started with Scripts, Release 11.0(1)

Cisco Unified Contact Center Express Getting Star
C H A P T E R 13
Designing Contact-Neutral ScriptsYou can use the Cisco Unified CCX Editor to create a script that is contact neutral, that is, a script that accepts either a phone call or an HTTP request as the triggering contact.
This chapter describes the Cisco Unified CCX Editor steps used to create such a contact-neutral sample script, which executes one of two tasks, depending on the contact type:
• If the contact is a call, the script directs the contact to the beginning of a modified version of the Cisco Unified IP Interactive Voice Response (IVR) aa.aef script as described in Chapter 12, “Designing a Cisco Unified IP IVR Script.”
• If the contact is an HTTP request, the script expects an “Extension” parameter in the HTTP form to be defined with the extension to be called back.
This section contains the following topics:
• An Example Contact Neutral (Phone or HTTP) Script Template, page 13-2
• The Start Step (Creating a Script), page 13-3
• Contact-Neutral Script Variables, page 13-4
• The Accept Step, page 13-7
• The Get Contact Info Step, page 13-7
• The Switch Step, page 13-8
• The HttpContact Output Branch of the Switch Step, page 13-10
• The CallContact Branch of the Switch Step, page 13-19
• The Default Branch of the Switch Step, page 13-22
13-1ted with Scripts, Release 11.0(1)

Chapter 13 Designing Contact-Neutral Scripts An Example Contact Neutral (Phone or HTTP) Script Template
An Example Contact Neutral (Phone or HTTP) Script Template
The example template in Figure 13-1 shows a script that generates a web page containing a field that prompts the user for an extension, at which point the system posts this data to the script. Once the script starts, it extracts the extension and attempts to place a call to the given extension.
If the call fails, an error message is returned as a result to the HTTP request.
If the call succeeds, the script sends back a response to the HTTP request indicating that the call is connected, and then the call continues with the aa.aef script as if it was an inbound call.
13-2Cisco Unified Contact Center Express Getting Started with Scripts, Release 11.0(1)

Chapter 13 Designing Contact-Neutral ScriptsThe Start Step (Creating a Script)
Figure 13-1 Contact-Neutral Scripting Example Template
The Start Step (Creating a Script)Begin to build the sample script by choosing File > New from the Cisco Unified CCX Editor menu bar. The Templates folder displays. Select the blank script and click OK.
13-3Cisco Unified Contact Center Express Getting Started with Scripts, Release 11.0(1)

Chapter 13 Designing Contact-Neutral Scripts Contact-Neutral Script Variables
A blank script containing a Start and End step opens in the Design pane of the Cisco Unified CCX Editor window.
The Start step needs no configuration and has no customizer window. At this time, you might also want to give your new script a name and save it by selecting File > Save from the menu bar.
Our example script is called hello.aef.
Contact-Neutral Script VariablesBegin the contact-neutral sample script design process by using the Variable pane of the Cisco Unified CCX Editor to define script variables.
Figure 13-2 shows the variables of the contact-neutral sample script as they appear in the Variable pane of the Cisco Unified CCX Editor window.
Figure 13-2 Variable Pane of the Contact-Neutral Sample Script
13-4Cisco Unified Contact Center Express Getting Started with Scripts, Release 11.0(1)

Chapter 13 Designing Contact-Neutral ScriptsContact-Neutral Script Variables
Table 13-1 describes the variables used in the contact-neutral sample script.
Table 13-1 Variables in the Contact-Neutral Script
Variable Name Variable Type Value Function
CallControlGroupId Integer 0 Call Control Group with which the outbound call is associated.
(See The HttpContact Output Branch of the Switch Step, page 13-10.)
Mark this variable as a parameter to allow the administrator the option to change the value of this variable.
For more information, see the Cisco Unified Contact Center Express Administrator Guide.
PrimaryControlGroupId Integer 0 Stores the identifying number of the primary dialog group for handling the outbound call.
(See The HttpContact Output Branch of the Switch Step, page 13-10.)
Mark this variable as a parameter to allow the administrator the option to change the value of this variable.
For more information, see the Cisco Unified Contact Center Express Administrator Guide.
13-5Cisco Unified Contact Center Express Getting Started with Scripts, Release 11.0(1)

Chapter 13 Designing Contact-Neutral Scripts Contact-Neutral Script Variables
SecondaryControlGroupId Integer 0 Stores the Identifying number of the fallback dialog control group for handling the outbound call.
(See The HttpContact Output Branch of the Switch Step, page 13-10.)
Mark this variable as a parameter to allow the administrator the option to change the value of this variable.
For more information, see the Cisco Unified Contact Center Express Administration Guide.
asr boolean true Indicates whether or not the script is enabled for speech recognition.
(See The Get Contact Info Step, page 13-7.)
call Contact 0 Stores a handle to the call object to which the Cisco Unified IP IVR script will be applied.
(See The HttpContact Output Branch of the Switch Step, page 13-10.)
callbackExtn String "" Stores the extension number input from the web page prompt.
(See The HttpContact Output Branch of the Switch Step, page 13-10.)
contactType String "" Stores the information identifying the type of contact (telephone call or HTTP request).
(See Variable Pane of the Contact-Neutral Sample Script, page 13-4.)
language Language Stores the default language used for prompts.
(See The Get Contact Info Step, page 13-7.)
Table 13-1 Variables in the Contact-Neutral Script (continued)
Variable Name Variable Type Value Function
13-6Cisco Unified Contact Center Express Getting Started with Scripts, Release 11.0(1)

Chapter 13 Designing Contact-Neutral ScriptsThe Accept Step
The Accept StepContinue the script by dragging an Accept step from the Contact palette (in the Palette pane) to the Design pane of the Cisco Unified CCX Editor window, as shown in Figure 13-1. The script uses an Accept step to accept a contact, in this case either a telephone call or an HTTP request.
The Get Contact Info StepUse the Get Contact Info step to make available to the script the type of contact received.
Figure 13-3 shows the configured Get Contact Info customizer window.
Figure 13-3 Configured Get Contact Info Customizer Window
13-7Cisco Unified Contact Center Express Getting Started with Scripts, Release 11.0(1)

Chapter 13 Designing Contact-Neutral Scripts The Switch Step
Configure the Get Contact Info customizer window as follows:
• Type—contactType
The contactType variable stores the information identifying the type of contact (call or HTTP).
• Language—language
The language variable stores the language context of the contact.
• ASR Supported—asr
The asr variable stores the information that tells the script whether or not Automatic Speech Recognition (ASR) is supported on the local system.
The Switch StepNext, use a Switch step to switch the contact to the appropriate section of the script, depending on whether the contact is a telephone call or an HTTP contact.
Figure 13-4 shows the configured Switch customizer window.
Figure 13-4 Configured Switch Customizer Window
13-8Cisco Unified Contact Center Express Getting Started with Scripts, Release 11.0(1)

Chapter 13 Designing Contact-Neutral ScriptsThe Switch Step
Configure the Switch customizer window as follows:
• Switch Expression—contactType
The Switch step evaluates the value of the contactType variable (as assigned by the Get Contact Info step).
• Switch Cases
– HttpContact
The script executes this case if the contact type is an HTTP request made through a web browser.
Note The value in both switch cases is a string and requires quotes.
– CallContact
The script executes this case if the contact type is a telephone call.
As shown in Figure 13-5, the two cases appear as output branches underneath the Switch step in the script, along with the Default output branch that always appears under the Switch step.
Figure 13-5 Switch Step Output Branches
The following sections describe the three output branches of the Switch step:
• The HttpContact Output Branch of the Switch Step, page 13-10
• The CallContact Branch of the Switch Step, page 13-19
• The Default Branch of the Switch Step, page 13-22
13-9Cisco Unified Contact Center Express Getting Started with Scripts, Release 11.0(1)

Chapter 13 Designing Contact-Neutral Scripts The HttpContact Output Branch of the Switch Step
The HttpContact Output Branch of the Switch Step
If the contact is an HTTP request, the scripting under the HttpContact output branch executes and the script attempts to place the outbound call.
Figure 13-6 shows the scripting under the HttpContact output branch of the Switch step.
Figure 13-6 HttpContact Scripting
This section contains the following steps:
• The Get Http Contact Info Step, page 13-11
• The Place Call Step, page 13-11
13-10Cisco Unified Contact Center Express Getting Started with Scripts, Release 11.0(1)

Chapter 13 Designing Contact-Neutral ScriptsThe HttpContact Output Branch of the Switch Step
The Get Http Contact Info StepUse the Get Http Contact Info step to map the Extension parameter to the callbackExtn variable, which stores the extension number that the person making the request provides via the web browser.
Figure 13-7 shows the configured Parameters tab of the Get Http Contact Info customizer window.
Figure 13-7 Get Http Contact Info Customizer Window—Configured Parameters Tab
The Place Call StepAfter the Get Http Contact Info step, use the Place Call step to attempt to place the call back to the person who made the HTTP request.
(The Place Call step uses the extension number that the person entered through the web browser and that is stored in the callbackExtn variable.)
Configure the Place Call customizer window as follows:
• Destination Telephone No.—callbackExtn
The callbackExtn variable stores the destination number of the outbound call.
• Timeout (sec)—5
13-11Cisco Unified Contact Center Express Getting Started with Scripts, Release 11.0(1)
Chapter 13 Designing Contact-Neutral Scripts The HttpContact Output Branch of the Switch Step
The Place Call step waits 5 seconds before a Ring No Answer condition terminates the call.
• CallControlGroupId—CallControlGroupId
The CallControlGroupId variable stores the call control group information with which the outbound call is associated.
• Primary Dialog Group ID—PrimaryDialogGroupId
The PrimaryDialogGroupId variable stores the primary dialog group information with which the outbound call is associated.
• Secondary Dialog Group ID—SecondaryDialogGroupId
• The SecondaryDialogGroupId variable stores the secondary dialog group information with which the outbound call is associated.
• Call Contact—call
The call variable name stores a handle to the call object that the subsequent Cisco Unified IP IVR script uses.
The Place Call step has the following six default output branches:
• Successful—Call was successful.
• NoAnswer—Call was made, but there was no answer.
• Busy— Call was made, but there was no answer.
• Invalid—Call was not made because the extension was invalid.
• NoResource—Call was not made because no Resource was available.
• Unsuccessful—Call was not made because of an internal system error.
The following sections describe these output branches:
• The Successful Output Branch, page 13-13
• The Other Output Branches, page 13-17
13-12Cisco Unified Contact Center Express Getting Started with Scripts, Release 11.0(1)

Chapter 13 Designing Contact-Neutral ScriptsThe HttpContact Output Branch of the Switch Step
The Successful Output Branch
When the Place Call step successfully places the call, the script sends this information back to the web browser of the contacting person, marks the HTTP Contact as Handled, and sends the call to the beginning of the Cisco Unified IP IVR script.
Figure 13-8 shows the scripting under the Successful output branch of the Place Call step.
Figure 13-8 Successful Output Branch Script
This section contains the following steps:
• The Http Forward Step, page 13-13
• The Set Contact Info Steps, page 13-15
• The Get Contact Info Step, page 13-16
• The Goto Step, page 13-17
The Http Forward Step
Use the Http Forward step to send a (previously created) Java Server Page (JSP) template called CallConnected back to the originating web browser, to inform the web browser that the call has been connected.
13-13Cisco Unified Contact Center Express Getting Started with Scripts, Release 11.0(1)
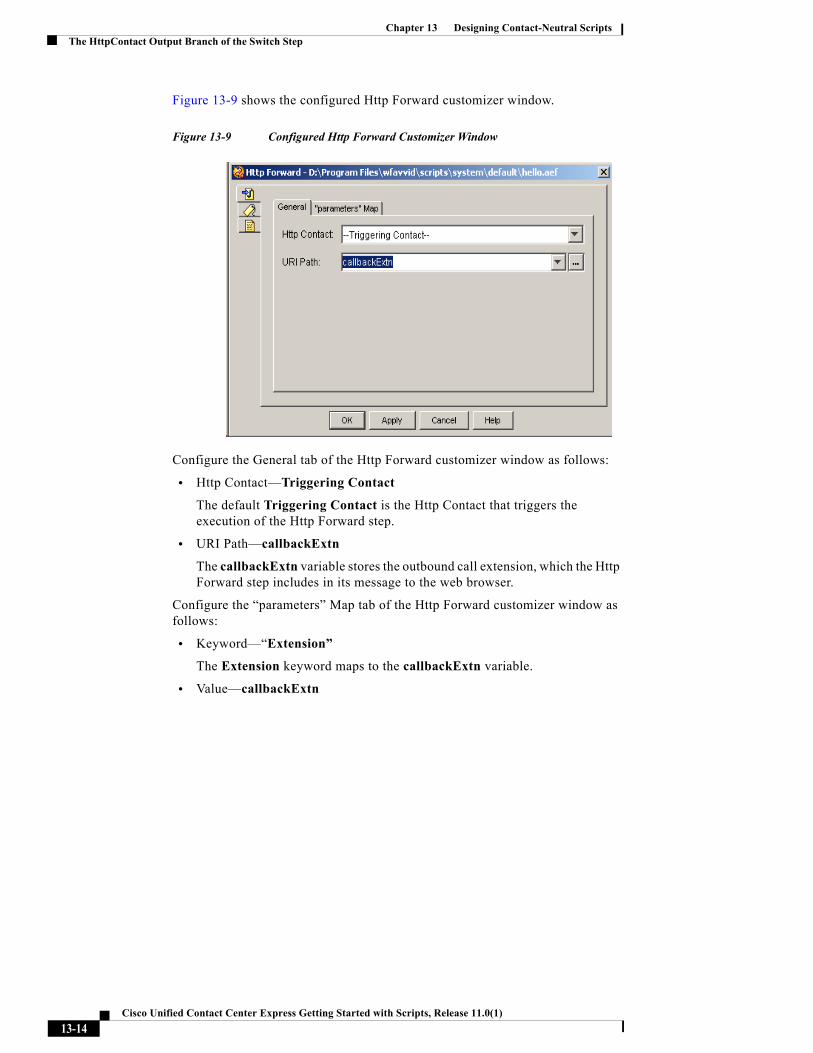
Chapter 13 Designing Contact-Neutral Scripts The HttpContact Output Branch of the Switch Step
Figure 13-9 shows the configured Http Forward customizer window.
Figure 13-9 Configured Http Forward Customizer Window
Configure the General tab of the Http Forward customizer window as follows:
• Http Contact—Triggering Contact
The default Triggering Contact is the Http Contact that triggers the execution of the Http Forward step.
• URI Path—callbackExtn
The callbackExtn variable stores the outbound call extension, which the Http Forward step includes in its message to the web browser.
Configure the “parameters” Map tab of the Http Forward customizer window as follows:
• Keyword—“Extension”
The Extension keyword maps to the callbackExtn variable.
• Value—callbackExtn
13-14Cisco Unified Contact Center Express Getting Started with Scripts, Release 11.0(1)

Chapter 13 Designing Contact-Neutral ScriptsThe HttpContact Output Branch of the Switch Step
The Set Contact Info Steps
After the Http Forward step, use the first Set Contact Info step to mark the HTTP Contact as Handled, which is useful for reporting purposes. Figure 13-10 shows the configured first Set Contact Info customizer window.
Figure 13-10 Configured First Set Contact Info Customizer Window
Next configure a second Set Contact Info step to assign the call variable (which is used by the subsequent Cisco Unified IP IVR script) the value of the language variable as the default language.
Figure 13-11 Configured Second Set Contact Info Customizer Window
13-15Cisco Unified Contact Center Express Getting Started with Scripts, Release 11.0(1)

Chapter 13 Designing Contact-Neutral Scripts The HttpContact Output Branch of the Switch Step
The Get Contact Info Step
Use the Get Contact Info step to determine whether or not ASR is enabled on the system. Figure 13-3 shows the configured Get Contact Info customizer window.
Figure 13-12 Configured Get Contact Info Customizer Window
Configure the Get Contact Info customizer window as follows:
• Contact—call
The call variable is the handle that identifies the contact throughout the rest of the Cisco Unified IP IVR script.
• ASR Supported—asr
The Get Contact Info step retrieves the information stored in the asr variable to tell the script whether or not ASR is supported for this call.
13-16Cisco Unified Contact Center Express Getting Started with Scripts, Release 11.0(1)

Chapter 13 Designing Contact-Neutral ScriptsThe HttpContact Output Branch of the Switch Step
The Goto Step
The last step under the Successful output branch of the Place Call step is a Goto step, which directs the script to the Label AAStart at the beginning of the Cisco Unified IP IVR script (see Figure 13-1.) From the AAStart label, the script is exactly the same as if the call had been an inbound call.
The Other Output Branches
For all the other output branches of the Place Call step, use a Send Http Response step to send an HTML file back to the originating web browser, with information on why the call was not able to be placed. An End step then ends the script.
Figure 13-13 shows the scripting under the other output branches of the Place Call step.
Figure 13-13 Other Output Branches of the Place Call Step
13-17Cisco Unified Contact Center Express Getting Started with Scripts, Release 11.0(1)

Chapter 13 Designing Contact-Neutral Scripts The HttpContact Output Branch of the Switch Step
This section contains the following steps:
• The Send Http Response Step, page 13-18
• The End Step, page 13-18
The Send Http Response Step
Use the Send Http Response step to send the HTML file back to the originating browser.
Figure 13-14 shows the configured Send Http Response customizer window.
Figure 13-14 Configured Send Http Response Customizer Window
Configure the Send Http Response customizer window as follows:
• HTTP Contact—Triggering Contact
The default Triggering Contact is the Http Contact that triggers the execution of the Send Http Response step.
• Document
For each output branch of the Place Call step executes, the Document file that contains the appropriate message.
The End Step
The End step ends the script and releases all system resources. The End step requires no configuration and has no customizer.
13-18Cisco Unified Contact Center Express Getting Started with Scripts, Release 11.0(1)
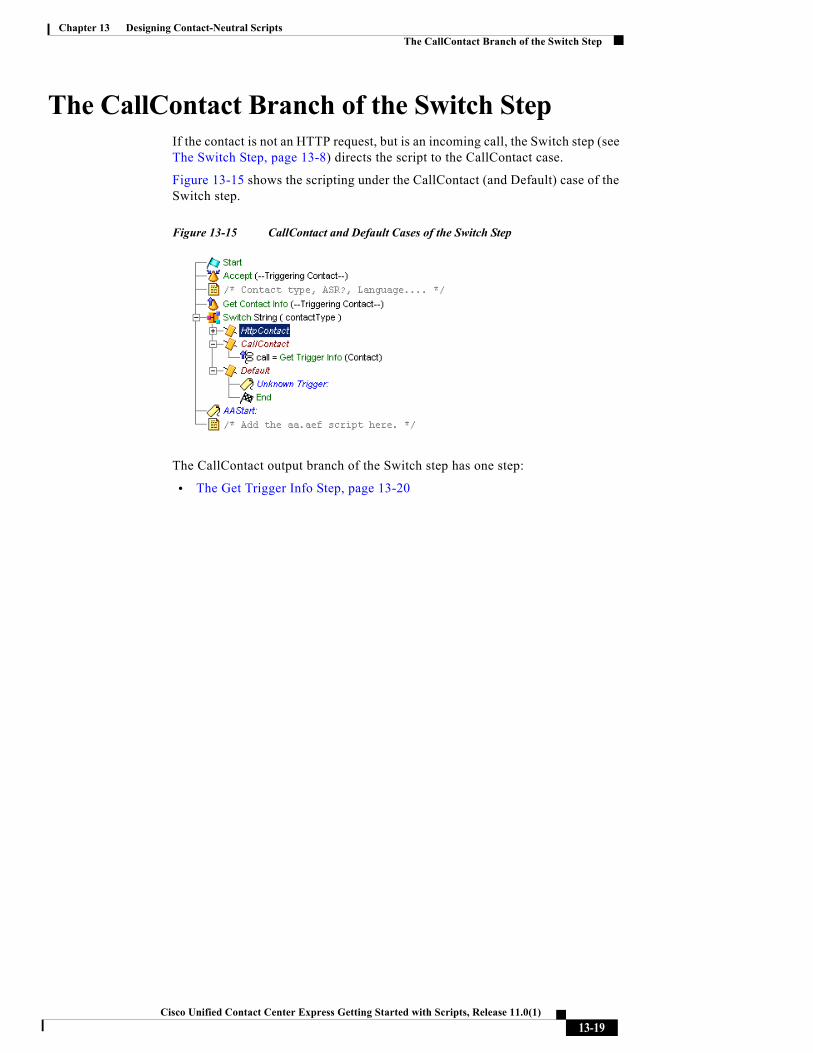
Chapter 13 Designing Contact-Neutral ScriptsThe CallContact Branch of the Switch Step
The CallContact Branch of the Switch StepIf the contact is not an HTTP request, but is an incoming call, the Switch step (see The Switch Step, page 13-8) directs the script to the CallContact case.
Figure 13-15 shows the scripting under the CallContact (and Default) case of the Switch step.
Figure 13-15 CallContact and Default Cases of the Switch Step
The CallContact output branch of the Switch step has one step:
• The Get Trigger Info Step, page 13-20
13-19Cisco Unified Contact Center Express Getting Started with Scripts, Release 11.0(1)

Chapter 13 Designing Contact-Neutral Scripts The CallContact Branch of the Switch Step
The Get Trigger Info StepUse the Get Trigger Info step to retrieve a handle to the triggering contact, which in this case is a call, and to save it into a variable named call.
Figure 13-16 shows the configured Get Trigger Info customizer window.
Figure 13-16 Configured Get Trigger Info Customizer Window
Choose the call variable, instead of the default Triggering Contact variable used by the Accept and Get Contact Info steps at the beginning of the script (see Figure 13-1), so that the subsequent Cisco Unified IP IVR script treats the contact as a call rather than an HTTP request.
13-20Cisco Unified Contact Center Express Getting Started with Scripts, Release 11.0(1)

Chapter 13 Designing Contact-Neutral ScriptsThe CallContact Branch of the Switch Step
Figure 13-17 shows the top level of the full Cisco Unified IP IVR script.
Figure 13-17 Full Cisco Unified IP IVR Scripting Example
After the AA Label, the script is identical to the aa.aef script described in Chapter 12, “Designing a Cisco Unified IP IVR Script,” with the exception that the call variable is selected as the triggering variable for many steps; for example, see the Play Prompt step after the last Create Conditional Prompt step and the Simple Recognition step.
13-21Cisco Unified Contact Center Express Getting Started with Scripts, Release 11.0(1)

Chapter 13 Designing Contact-Neutral Scripts The Default Branch of the Switch Step
The Default Branch of the Switch StepIf the trigger is not recognized as either an HTTP contact or a phone contact, the Default case of the Switch step executes, as shown in Figure 13-15.
The Default output branch of the Switch step has one step:
• The End Step, page 13-22
The End StepThe End step ends the script and releases all system resources. The End step requires no configuration and has no customizer.
13-22Cisco Unified Contact Center Express Getting Started with Scripts, Release 11.0(1)

Cisco Unified Contact Center Express Getting Sta
C H A P T E R 14
Designing a Script with Text-To-Speech (TTS)You can use the steps of the Cisco Unified CCX Editor to design scripts that take advantage of Text-To-Speech (TTS) capability. This chapter describes the design of such as script, TTSsample.aef.
Note Before using a TTS script as a Cisco Unified CCX application, you should first validate the script against the MCRP TTS vendor’s list of supported capabilities.
This chapter contains the following topics:
• An Example Text-To-Speech (TTS) Script, page 14-2
• The Start Step (Creating a Script), page 14-3
• TTS Script Variables, page 14-3
• The Accept Step, page 14-4
• The Set Contact Info Step, page 14-4
• The First Create TTS Prompt Step, page 14-5
• The Play Prompt Step, page 14-7
• The Create File Document Step, page 14-8
• The Second Create TTS Prompt Step, page 14-9
• The Annotate Step, page 14-10
• The Menu Step, page 14-11
14-1rted with Scripts, Release 11.0(1)

Chapter 14 Designing a Script with Text-To-Speech (TTS) An Example Text-To-Speech (TTS) Script
• The Terminate Step, page 14-15
• The End Step, page 14-15
An Example Text-To-Speech (TTS) ScriptThe TTSsample.aef script creates prompts based on text files that are played back as speech to callers, and provides a good example of how you can use the Set Contact Info step, the Create TTS Prompt step, the Create File Document step, and the Menu step to offer callers two menu choices, in this case based on whether the caller chooses English or Spanish.
Figure 14-1 shows the TTSsample.aef script as it appears in the Design pane of the Cisco Unified CCX Editor window.
Figure 14-1 Design Pane of the TTSsample.aef Script
14-2Cisco Unified Contact Center Express Getting Started with Scripts, Release 11.0(1)
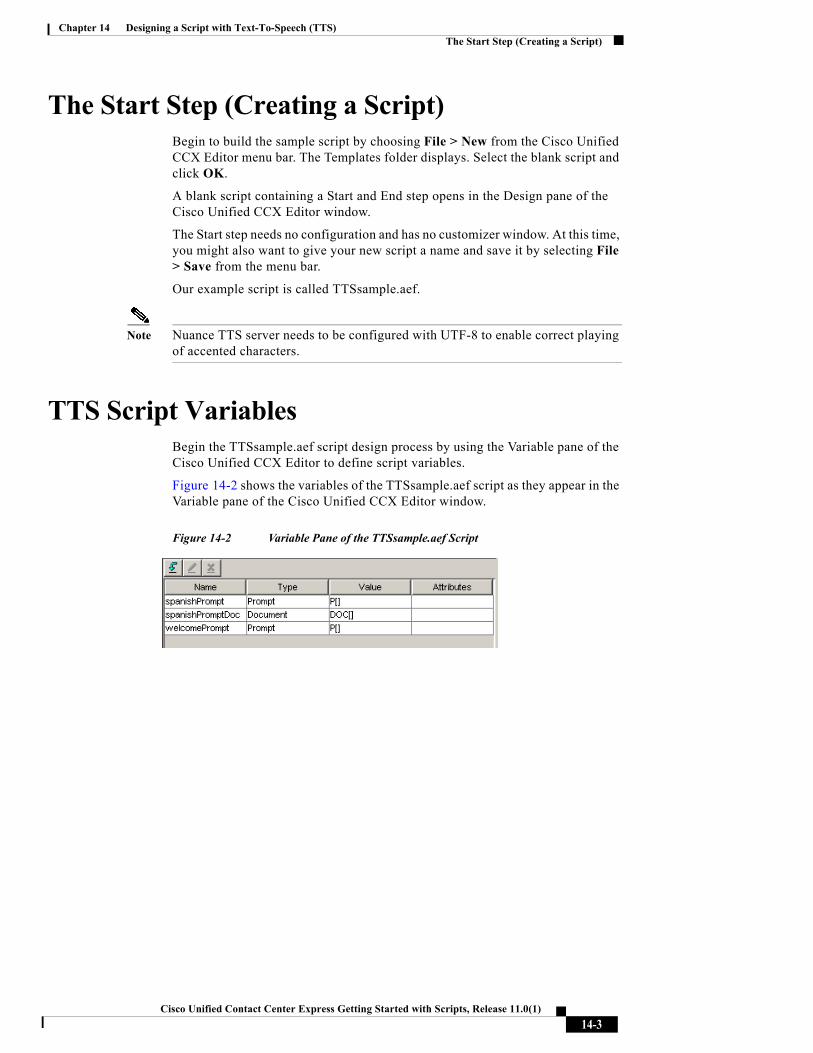
Chapter 14 Designing a Script with Text-To-Speech (TTS)The Start Step (Creating a Script)
The Start Step (Creating a Script)Begin to build the sample script by choosing File > New from the Cisco Unified CCX Editor menu bar. The Templates folder displays. Select the blank script and click OK.
A blank script containing a Start and End step opens in the Design pane of the Cisco Unified CCX Editor window.
The Start step needs no configuration and has no customizer window. At this time, you might also want to give your new script a name and save it by selecting File > Save from the menu bar.
Our example script is called TTSsample.aef.
Note Nuance TTS server needs to be configured with UTF-8 to enable correct playing of accented characters.
TTS Script VariablesBegin the TTSsample.aef script design process by using the Variable pane of the Cisco Unified CCX Editor to define script variables.
Figure 14-2 shows the variables of the TTSsample.aef script as they appear in the Variable pane of the Cisco Unified CCX Editor window.
Figure 14-2 Variable Pane of the TTSsample.aef Script
14-3Cisco Unified Contact Center Express Getting Started with Scripts, Release 11.0(1)

Chapter 14 Designing a Script with Text-To-Speech (TTS) The Accept Step
Table 14-1 describes the variables used in the TTSsample.aef sample script.
Table 14-1 Descriptions of Variables in the TTSsample.aef Script
Variable Name Variable Type Value Function
spanishPrompt Prompt — Prompt created by the second Create TTS Prompt step, which is played by the subsequent Menu step.
(See The Second Create TTS Prompt Step, page 14-9.)
spanishPromptDoc Document null Variable created by the Create File Document step to store a reference to the text file in order to make it available for the subsequent Create TTS Prompt.
(See The Create File Document Step, page 14-8.)
welcomePrompt Prompt — Prompt created by the first Create TTS Prompt step, which is played back by the subsequent Play Prompt step.
(See The First Create TTS Prompt Step, page 14-5.)
The Accept StepContinue to build the TTSsample.aef script by dragging an Accept step (from the Contact palette in the Palette pane) to the Design pane of the Cisco Unified CCX Editor window, as shown in Figure 14-1. The script uses an Accept step to accept a contact.
The Set Contact Info StepContinue to build the TTSsample.aef script by adding a Set Contact Info step (from the Contact palette), which modifies the context information associated with a contact. In this case, the script designer sets the language context of the call to L[en_US], which is American English.
14-4Cisco Unified Contact Center Express Getting Started with Scripts, Release 11.0(1)

Chapter 14 Designing a Script with Text-To-Speech (TTS)The First Create TTS Prompt Step
Figure 14-3 shows the configured Set Contact Info customizer window.
Figure 14-3 Configured Set Contact Info Customizer Window
The First Create TTS Prompt StepContinue to build the TTSsample.aef script by adding a Create TTS Prompt step (from the Prompt palette) to create a prompt based on text that you enter into the customizer window of the Create TTS Prompt step.
14-5Cisco Unified Contact Center Express Getting Started with Scripts, Release 11.0(1)

Chapter 14 Designing a Script with Text-To-Speech (TTS) The First Create TTS Prompt Step
Figure 14-4 shows the configured Create TTS Prompt Customizer window.
Figure 14-4 Configured Create TTS Prompt Customizer Window
Configure the Create TTS Prompt step as follows:
• Text Input—“Welcome to Company ABC”
The step converts this sentence into speech.
• Voice Gender—Neutral
The step uses the neutral voice gender.
Voice gender can be male, female, or neutral, if supported by the TTS provider. If optional voice genders are not supported, the system automatically falls back to a supported voice gender.
• Override provider (optional)
Variable or expression indicating a different TTS provider to be used when the prompt is played back instead of the provider defined for the contact.
• Override Language (optional)—English (United States) (en_US)
The prompt will be played back in American English.
14-6Cisco Unified Contact Center Express Getting Started with Scripts, Release 11.0(1)
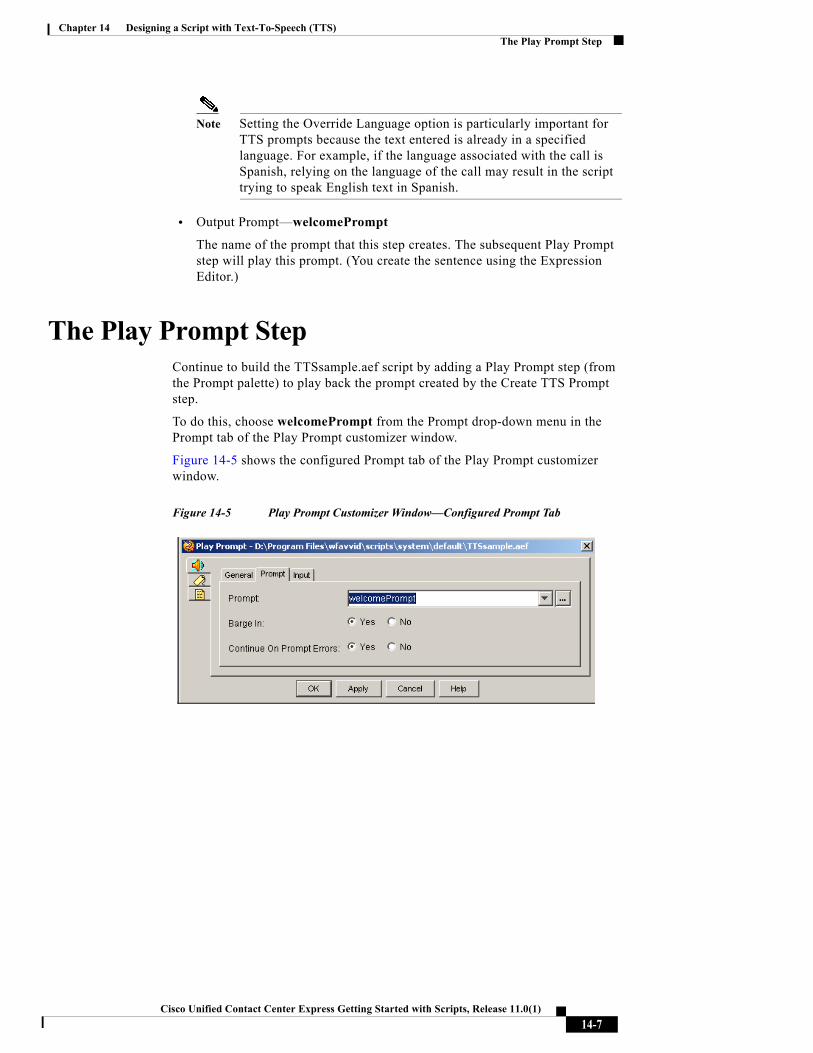
Chapter 14 Designing a Script with Text-To-Speech (TTS)The Play Prompt Step
Note Setting the Override Language option is particularly important for TTS prompts because the text entered is already in a specified language. For example, if the language associated with the call is Spanish, relying on the language of the call may result in the script trying to speak English text in Spanish.
• Output Prompt—welcomePrompt
The name of the prompt that this step creates. The subsequent Play Prompt step will play this prompt. (You create the sentence using the Expression Editor.)
The Play Prompt StepContinue to build the TTSsample.aef script by adding a Play Prompt step (from the Prompt palette) to play back the prompt created by the Create TTS Prompt step.
To do this, choose welcomePrompt from the Prompt drop-down menu in the Prompt tab of the Play Prompt customizer window.
Figure 14-5 shows the configured Prompt tab of the Play Prompt customizer window.
Figure 14-5 Play Prompt Customizer Window—Configured Prompt Tab
14-7Cisco Unified Contact Center Express Getting Started with Scripts, Release 11.0(1)

Chapter 14 Designing a Script with Text-To-Speech (TTS) The Create File Document Step
The Create File Document StepContinue to build the TTSsample.aef script by adding a Create File Document step (from the Document palette) to create a document variable, spanishPromptDoc, from a text file.
The subsequent Create TTS Prompt step will then use this document variable to create a prompt in the Spanish language.
Figure 14-6 shows the configured Create File Document customizer window.
Figure 14-6 Configured Create File Document Customizer Window
Configure the Create File Document customizer window as follows:
• Filename—“spanishPrompt.txt”
This filename represents the text file that holds the text that the subsequent Create TTS Prompt step will convert into speech.
• Document—spanishPromptDoc
This document variable will be used by the subsequent Create TTS Prompt step to create a Spanish language prompt.
14-8Cisco Unified Contact Center Express Getting Started with Scripts, Release 11.0(1)

Chapter 14 Designing a Script with Text-To-Speech (TTS)The Second Create TTS Prompt Step
The Second Create TTS Prompt StepUse a second Create TTS Prompt step (from the Prompt palette) to convert the text contained in the spanishPromptDoc variable into a prompt, spanishPrompt, that the subsequent Menu step will use to offer callers the choice of the Spanish language.
Figure 14-4 shows the configured second Create TTS Prompt customizer window.
Figure 14-7 Configured Second Create TTS Prompt Customizer Window
Configure the second Create TTS Prompt customizer window as follows:
• Text Input—spanishPromptDoc
The document that is the source of the text that is converted to speech.
• Voice Gender—Neutral
The prompt playback uses the default voice gender.
• Override Provider (optional)
Variable or expression indicating a different TTS provider to be used where the prompt is played back instead of the provider defined for the contact.
• Override Language (optional)—Spanish (Colombia) (es_CO)
The prompt will be played back in Colombian (American) Spanish.
14-9Cisco Unified Contact Center Express Getting Started with Scripts, Release 11.0(1)

Chapter 14 Designing a Script with Text-To-Speech (TTS) The Annotate Step
Note Make sure to specify that the prompt converts the language of the text, and not the language of the call, to speech.
• Output Prompt—spanishPrompt
The name of the prompt that this step creates and that the subsequent Menu step will play.
The Annotate StepAdd an Annotate step (from the General palette) after the second Create TTS Prompt step to insert a note describing the functionality of the subsequent Menu step.
Figure 14-8 shows the configured Annotate customizer window.
Figure 14-8 Annotate Customizer Window
Note The Menu step itself also contains two instances of the Annotate step.
14-10Cisco Unified Contact Center Express Getting Started with Scripts, Release 11.0(1)

Chapter 14 Designing a Script with Text-To-Speech (TTS)The Menu Step
The Menu StepContinue to build the TTSsample.aef script by adding a Menu step (from the Media palette) to offer the caller the choice between the English and Spanish languages.
Figure 14-9 shows the configured General tab of the Menu customizer window.
Figure 14-9 Menu Customizer Window—Configured General Tab
Configure the General tab of the Menu customizer window as follows:
• Contact—Triggering Contact
The Menu step acts upon the contact that triggered the execution of the Menu step.
• Interruptible—Yes
External events can interrupt the execution of this step.
14-11Cisco Unified Contact Center Express Getting Started with Scripts, Release 11.0(1)
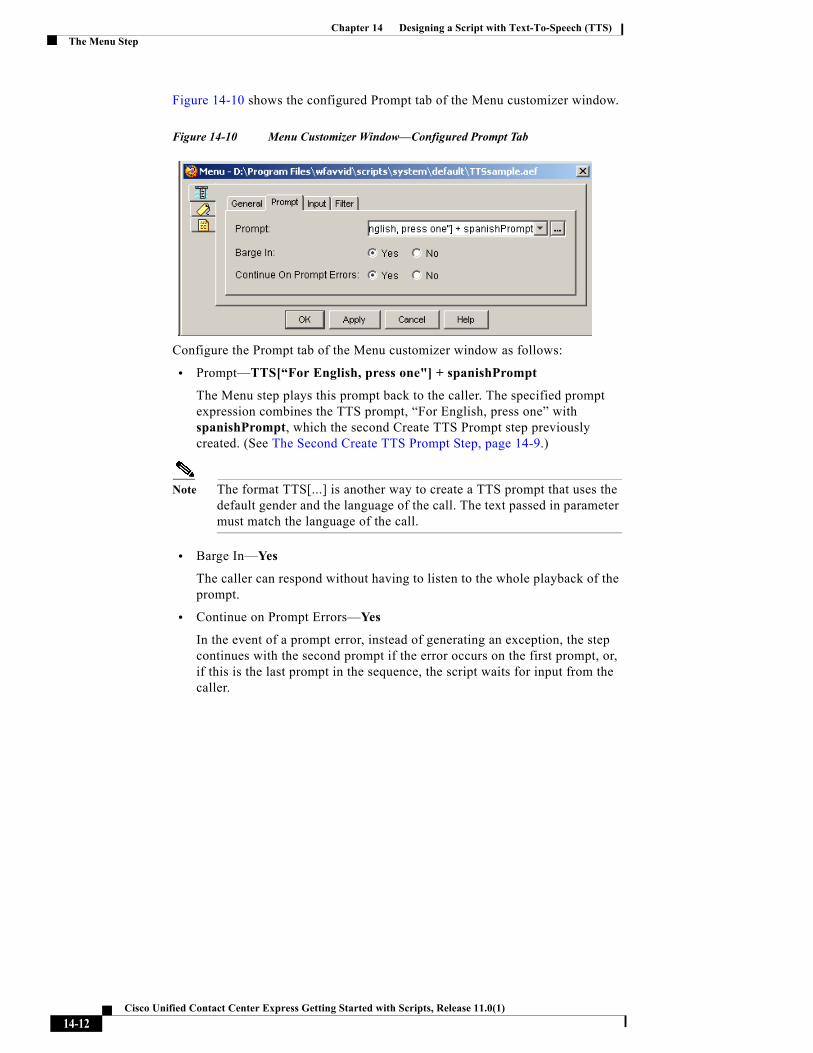
Chapter 14 Designing a Script with Text-To-Speech (TTS) The Menu Step
Figure 14-10 shows the configured Prompt tab of the Menu customizer window.
Figure 14-10 Menu Customizer Window—Configured Prompt Tab
Configure the Prompt tab of the Menu customizer window as follows:
• Prompt—TTS[“For English, press one"] + spanishPrompt
The Menu step plays this prompt back to the caller. The specified prompt expression combines the TTS prompt, “For English, press one” with spanishPrompt, which the second Create TTS Prompt step previously created. (See The Second Create TTS Prompt Step, page 14-9.)
Note The format TTS[...] is another way to create a TTS prompt that uses the default gender and the language of the call. The text passed in parameter must match the language of the call.
• Barge In—Yes
The caller can respond without having to listen to the whole playback of the prompt.
• Continue on Prompt Errors—Yes
In the event of a prompt error, instead of generating an exception, the step continues with the second prompt if the error occurs on the first prompt, or, if this is the last prompt in the sequence, the script waits for input from the caller.
14-12Cisco Unified Contact Center Express Getting Started with Scripts, Release 11.0(1)

Chapter 14 Designing a Script with Text-To-Speech (TTS)The Menu Step
Figure 14-11 shows the configured Input Tab of the Menu customizer window.
Figure 14-11 Menu Customizer Window—Configured Input Tab
Configure the Input tab of the Menu customizer window as follows:
• Timeout (in sec)—3
The system waits 3 seconds for input from the caller before sending the script to the Timeout output branch (after the script reaches the maximum number of attempts).
• Maximum Retries—3
The Menu step will plays the prompt to the caller up to 3 times after a timeout or invalid input response.
In this case, after 3 retries, the Menu step executes either the Timeout or Unsuccessful output branches, depending on whether the last try timed out or the caller entered an invalid input response.
• Flush Input Buffer—No
The caller can type ahead and the step will save the previous input.
14-13Cisco Unified Contact Center Express Getting Started with Scripts, Release 11.0(1)

Chapter 14 Designing a Script with Text-To-Speech (TTS) The Menu Step
Figure 14-12 shows the configured Filter Tab of the Menu customizer window.
Figure 14-12 Menu Customizer Window—Configured Input Tab
Configure the Filter tab of the Menu customizer window as follows:
• Options—English, Spanish
The Menu step offers these two menu choices to the caller. Use the Add button to enter these two options.
In this sample script (see Figure 14-1), the Menu step has the following four output branches:
• English—If this were a fully-functioning script, this output branch would contain steps providing business logic in an English language context.
• Spanish—If this were a fully-functioning script, this output branch would contain steps providing business logic in a Spanish language context.
• Timeout—If the script times out, the script will fall through to the closing steps of the script.
• Unsuccessful—If valid caller response is not received, the script will fall through to the closing steps of the script.
14-14Cisco Unified Contact Center Express Getting Started with Scripts, Release 11.0(1)
Chapter 14 Designing a Script with Text-To-Speech (TTS)The Terminate Step
The Terminate StepClose the sample script TTSsample.aef with a Terminate step (from the Contact palette), which ends the call.
The End StepConclude the TTSsample.aef script with an End step (from the General palette).
The End step ends the script and releases all system resources.
14-15Cisco Unified Contact Center Express Getting Started with Scripts, Release 11.0(1)

Chapter 14 Designing a Script with Text-To-Speech (TTS) The End Step
14-16Cisco Unified Contact Center Express Getting Started with Scripts, Release 11.0(1)

Cisco Unified Contact Center Express Getting Star
C H A P T E R 15
Designing Cisco Unified CCX VoiceXML ApplicationsThis chapter describes how to use the capabilities of Cisco Unified CCX 4.0 and later to develop VoiceXML applications.
This section includes the following topics:
• Understanding the Terminology, page 15-2
• A Prerequisite and a Recommendation, page 15-3
• Updating CRS 3.x VoiceXML Applications, page 15-3
• Designing Cisco Unified CCX VoiceXML Applications, page 15-6
• Creating VoiceXML Documents, page 15-6
• Creating Cisco Unified CCX Scripts that Run VoiceXML Documents, page 15-20
• Designing International Cisco Unified CCX VoiceXML Applications, page 15-29
• Cisco Unified CCX VoiceXML Application Troubleshooting Tips, page 15-32
For further information in this guide on Cisco Unified CCX VoiceXML applications, see:
• Appendix B, “VoiceXML Implementation for Cisco Voice Browser”
• Appendix A, “A Sample VoiceXML Log File”
15-1ted with Scripts, Release 11.0(1)

Chapter 15 Designing Cisco Unified CCX VoiceXML Applications Understanding the Terminology
Understanding the TerminologyThe following terms are used in this section:
• VoiceXML. Voice eXtensible Markup Language (VoiceXML) is a web-based standardized markup language for representing human-computer dialogs. VoiceXML:
– Is designed for creating audio dialogs that feature synthesized speech, digitized audio, recognition of spoken input and DTMF (Dual Tone Multi-Frequency) key input, recording of spoken input, telephony, and mixed initiative conversations. Its major purpose is to bring the advantages of Web-based development and content delivery to interactive voice response applications.
– Assumes a voice browser with:
• audio output (prerecorded speech or text-to-speech
• audio input (speech and/or DTMF digits)
– Follows the conventions of HTML and XML document format with <elements> and attributes.
– Is:
• A non-real-time means of communications, allowing users to access data at any time.
• Also called an XML application.
• VoiceXML Document. An executable VoiceXML file (text_file.vxml) is called a document. A VoiceXML interpreter loads a document file to execute it.
• Cisco Unified CCX Script. Cisco Unified CCX scripts can extend the functionality of a VoiceXML document. A Cisco Unified CCX script is a sequence of steps constructed in the Cisco Unified CCX Editor for controlling the flow of customer calls and multimedia contacts. You can use the steps of the Cisco Unified CCX Editor to design scripts that take advantage of the capabilities of VoiceXML. In a Cisco Unified CCX script you can link any number of times to one or more VoiceXML documents depending on what you need to accomplish.
• Cisco Unified CCX VoiceXML application. A Cisco Unified CCX VoiceXML application is a Cisco Unified CCX script (Cisco Unified CCX_Editor_file.aef) that links to a VoiceXML document (text_file.vxml).
15-2Cisco Unified Contact Center Express Getting Started with Scripts, Release 11.0(1)

Chapter 15 Designing Cisco Unified CCX VoiceXML ApplicationsA Prerequisite and a Recommendation
A Prerequisite and a RecommendationBefore using a VoiceXML document with a Cisco Unified CCX script, you should first validate that document against the Media Resource Control Protocol (MCRP) ASR and TTS vendor’s list of supported capabilities.
Developing applications that include Automatic Speech Recognition (ASR) is generally more difficult than developing non-ASR applications or Cisco Unified IP IVR scripts. To ensure a good user experience, Cisco provides consultancy services in different forms, please contact your Cisco Account Team to obtain more details on Development support plans.
Updating CRS 3.x VoiceXML ApplicationsAll VoiceXML documents (text_file_document.vxml) and CRS scripts (Cisco Unified CCX_script.aef) created with CRS Release 3.x will fail to load when you attempt to open them in Release 4.0(x). To fix this problem you need to change both the the VoiceXML document and how it is referenced in the CRS script:
• Update the VoiceXML 1.0 document referenced in the CRS script to a VoiceXML 2.0 document. For how to do this, see Converting Documents from VoiceXML 1.0 to VoiceXML 2.0, page 15-3.
The CRS Voice Browser currently supports VoiceXML 2.0 (including DTMF Browser and N-Best Recognition).
• Update the Voice Browser step in the CRS script so that it links properly to the VoiceXML document. For how to do this, see Converting Documents from VoiceXML 1.0 to VoiceXML 2.0, page 15-3.
Converting Documents from VoiceXML 1.0 to VoiceXML 2.0Convert your VoiceXML 1.0 documents to be compliant with VoiceXML 2.0. If you can validate it with a VoiceXML 2.0 DTD, then it will be compliant.
For all the changes made to VoiceXML 1.0 in VoiceXML 2.0, see Appendix J of the Voice Extensible Markup Language (VoiceXML) Version 2.0 specification at http://www.w3.org/TR/voicexml20/.
15-3Cisco Unified Contact Center Express Getting Started with Scripts, Release 11.0(1)

Chapter 15 Designing Cisco Unified CCX VoiceXML Applications Updating CRS 3.x VoiceXML Applications
Some example changes in Cisco’s implementation of VoiceXML 2.0. The bracketed references see the sections in the VoiceXML 2.0 specification containing the specified information:
• The <VXML> element now requires the xmlns attribute, and the version attribute for the <VXML> element must contain “2.0.” [VXML 1.1]
• There are some grammar definition and syntax changes. The Speech Recognition Grammar Specification (SRGS), the Speech Synthesis Markup Language Specification (SSML) MRCP grammars, and the Cisco DTMF RegEx specification replace the Nuance Grammar Specification Language (GSL).
• Time designations have changed. These are listed in the VoiceXML 2.0 specification. [VXML 6.5.2]
• Session variables have changed. These are listed in the VoiceXML 2.0 specification. [VXML 5.1.4]
• The <emp>, <div>, pros>, <sayas>, and <dtmf> elements are obsolete. [VXML Appendix J]
• Variables must be declared before being assigned [VXML 5.1.1].
• The wait/transition state model has been implemented [VXML 4.1.8]
See VoiceXML Implementation for Cisco Voice Browser, page B-1, for a list of all the features in the VoiceXML 2.0 specification that Cisco supports.
Converting VoiceXML CRS 3.x Scripts to CRS 4.x ScriptsTo convert a VoiceXML CRS 3.x script to a CRS 4.x script, open the script in the CRS Editor and update the Voice Browser step and the Create URL document step so that the script correctly invokes the Voice Browser. These steps are described in the Cisco Unified Contact Center Express Scripting and Development Series: Volume 2, Cisco Unified Contact Center Express Editor Reference Guide.
In CRS 4.x:
• The Voice Browser” step uses the URL Document parameter, rather than the URI.
• The Document variable can be initialized with the Create URL Document parameter (as used in voicebrowser.aef), or it can be manipulated dynamically at runtime.
15-4Cisco Unified Contact Center Express Getting Started with Scripts, Release 11.0(1)

Chapter 15 Designing Cisco Unified CCX VoiceXML ApplicationsUpdating CRS 3.x VoiceXML Applications
• VXML input parameters are specified in the Create URL Document step.
Note These parameters are not usable within the VXML document directly. Instead, they are passed to the server identified in the URL Document. They are only used by that server if it supports dynamic VOICEXML page generation (that is, by a JSP page).
• VXML output parameters are specified in the <exit> Attributes tab of the Voice Browser step.
Converting VoiceXML CRS 3.x or 4.x Scripts to CRS 5.x Scripts
To convert a VoiceXML CRS 3.x or 4.x script to a CRS 5.x script, open the script in the CRS Editor and update the Voice Browser step and the Create URL document step so that the script correctly invokes the Voice Browser. These steps are described in the Cisco Unified Contact Center Express Scripting and Development Series: Volume 2, Cisco Unified Contact Center Express Editor Reference Guide.
In CRS 5.x:
• The Voice Browser” step uses the URL Document parameter, rather than the URI.
• The Document variable can be initialized with the Create URL Document parameter (as used in voicebrowser.aef), or it can be manipulated dynamically at runtime.
• VXML input parameters are specified in the Create URL Document step.
Note These parameters are not usable within the VXML document directly. Instead, they are passed to the server identified in the URL Document. They are only used by that server if it supports dynamic VOICEXML page generation (that is, by a JSP page).
• VXML output parameters are specified in the <exit> Attributes tab of the Voice Browser step.
15-5Cisco Unified Contact Center Express Getting Started with Scripts, Release 11.0(1)
Chapter 15 Designing Cisco Unified CCX VoiceXML Applications Designing Cisco Unified CCX VoiceXML Applications
Designing Cisco Unified CCX VoiceXML Applications
To develop a Cisco Unified CCX VoiceXML application, complete the following steps:
Step 1 Create a VoiceXML document (text_file.vxml) that can be validated with a VoiceXML 2.0 DTD.
Step 2 Create a Cisco Unified CCX Editor script (Cisco Unified CCX_editor_file.aef) that calls the VoiceXML document.
Note Both VoiceXML documents and Cisco Unified CCX Editor scripts can use the CRTP protocol to fetch resources (documents, prompts and grammars) from the Cisco Unified CCX Repository. See How and Why To Use the CRTP Protocol, page 2-56.
Creating VoiceXML DocumentsA VoiceXML document is an XML (eXtensible Markup Language) text file. VoiceXML 2.0 is the version of VoiceXML that Cisco Unified CCX 4.0 supports.
You can use numerous tools to write VoiceXML, including simple text editors, server scripting languages, and third-party VoiceXML editors.
This section covers:
• Related Documentation, page 15-7
• A Sample VoiceXML Document, page 15-8
• Using Document Type Definitions, page 15-9
• Using SRGS Grammar Expressions, page 15-10
• Using Speech Recognition Input, page 15-10
• Using DTMF Input, page 15-11
15-6Cisco Unified Contact Center Express Getting Started with Scripts, Release 11.0(1)

Chapter 15 Designing Cisco Unified CCX VoiceXML ApplicationsCreating VoiceXML Documents
• Using Text to Speech Output, page 15-15
• Using the Voice Browser Cache, page 15-18
Related DocumentationSee the following documents for further information on VoiceXML:
• The Voice Extensible Markup Language (VoiceXML) Version 2.0 specification at http://www.w3.org/TR/voicexml20/ defines VoiceXML, the Voice Extensible Markup Language.
• The Speech Recognition Grammar Specification (SRGS) Version 1.0 at http://www.w3.org/TR/2003/TR-speech-grammar/ defines a standard syntax for representing grammars for use in speech recognition so that developers can specify the words and patterns of words to be listened for by a speech recognizer.
• The Cisco Regular Expression (Regex) Grammar Specification at http://www.cisco.com/univercd/cc/td/doc/product/software/ios122/rel_docs/vxmlprg/refgde1.htm#1050172 defines the Cisco dual tone multiple frequency (DTMF) grammar that you can use with VoiceXML.
• The Speech Synthesis Markup Language (SSML) Version 1.0 specification at http://www.w3.org/TR/speech-synthesis, defines a standard way to control aspects of synthesized speech such as pronunciation, volume, pitch, rate, and so on across different synthesis-capable platforms.
• The Natural Language Semantics Markup Language (NLSML) for the Speech Interface Framework specification at http://www.w3.org/TR/nl-spec/ defines a standard way to enable access to the Web using spoken interaction.
• The Semantic Interpretation for Speech Recognition (SI) specification at http://www.w3.org/TR/semantic-interpretation/ defines the process of Semantic Interpretation for Speech Recognition and the syntax and semantics of interpretation tags that can be added to speech recognition grammars to compute information to return to an application on the basis of rules and tokens that were matched by the speech recognizer.
• The VoiceXML 2.0 Implementation Report at http://www.w3.org/Voice/2004/vxml-ir describes the requirements for a VoceXML 2.0 Implementation Report and the process that the Voice Browser Working Group follows in preparing the report.
15-7Cisco Unified Contact Center Express Getting Started with Scripts, Release 11.0(1)

Chapter 15 Designing Cisco Unified CCX VoiceXML Applications Creating VoiceXML Documents
• The VoiceXML Forum at http://www.voicexml.org is an industry organization chartered with establishing and promoting the Voice Extensible Markup Language (VoiceXML) for accessing internet content and services through voice and telephone.
A Sample VoiceXML Document<?xml version="1.0" encoding="UTF-8"?><vxml xmlns="http://www.w3.org/2001/vxml" version="2.0"> <form id="get_address"> <field name="citystate"> <grammar type="application/srgs+xml" src="citystate.grxml"/> <prompt>Say a city and state.</prompt> </field>
<field name="street"> <grammar type="application/srgs+xml" src="citystate.grxml"/> <prompt> What street are you looking for? </prompt> </field> <filled> <prompt> You chose <value expr="street"/> in <value expr="citystate"/> </prompt> <exit/> </filled> </form></vxml>
In the preceding example:
• The first two lines (the <?xml> and the <vxml> elements) are required for the beginning of all VoiceXML 2.0 files.
• The <form> element, similar to an HTML form, controls the interaction or “dialog” with the user.
• Form <field> elements specify the contents of a VoiceXML dialog unit. Fields contain other elements, such as:
– <prompt> elements that control the output of synthesized speech and prerecorded audio and prompt a user for input.
15-8Cisco Unified Contact Center Express Getting Started with Scripts, Release 11.0(1)

Chapter 15 Designing Cisco Unified CCX VoiceXML ApplicationsCreating VoiceXML Documents
– <grammar> elements that specify what user input is acceptable for a field. In this case, the grammar element references the file that specifies the grammar, the rules by which to recognize input. The user input is stored in the variable that is named by the field.
– <filled> elements that specify actions to take when a field is filled in; that is, when the user has provided a valid value for the field.
Using Document Type DefinitionsA document type definition (DTD) defines the validity of an XML document. See Appendix B, “VoiceXML Implementation for Cisco Voice Browser,” for the DTD defined for VoiceXML 2.0. You can instruct the parser to validate the document by referencing the document in the document type declaration.
The Cisco Unified CCX Voice Browser includes a custom version of voicexml.dtd with some minor enhancements. The simplest way to use voicexml.dtd is to reference it with the URI (Uniform Resource Identifier) “http://IPAdress:9080/SDocuments/voicexml.dtd”in the <!DOCTYPE> element as in the following example: <<?xml version="1.0" encoding="UTF-8"?><!DOCTYPE vxml SYSTEM "http://10.78.94.224:9080/SDocuments/voicexml.dtd"><vxml xmlns="http://www.w3.org/2001/vxml" version="2.0"?>
Note Do not use file protocol to access voicexml.dtd.
You can also deploy a DTD with your documents on the document server, by providing the URI to access the file in the XML document type definition.
Using a DTD is optional. In the development phase, it can help you catch syntax errors in VoiceXML documents. After you test the code and find no syntax errors, you may choose not to use a DTD in the production phrase to maximize efficient performance (by eliminating the need for parsing the DTD file itself and the validation process).
15-9Cisco Unified Contact Center Express Getting Started with Scripts, Release 11.0(1)

Chapter 15 Designing Cisco Unified CCX VoiceXML Applications Creating VoiceXML Documents
Using SRGS Grammar ExpressionsWhen using SRGS grammar expressions, you should be aware of the following:
• Cisco Unified CCX 4.x VoiceXML documents use SRGS grammar specifications and syntax rather than Nuance SGL grammar syntax.
• If not supplied, a <grammar> element is filled in with appropriate default values for the required attributes: root, version, xml:lang, xmlns.
• The <rule> “id” attribute is generated automatically and referenced by the “root” attribute of the <grammar> element
• If this is an SRGS DTMF grammar, the “mode” attribute of the <grammar> element must be supplied and it must be set to “dtmf.”
Using Speech Recognition InputVoiceXML accepts speech or digit input, based on speech grammars and or DTMF grammars that specify the input that is acceptable to the VoiceXML Interpreter at a given time.
You define grammars using the <grammar> element. The example below shows how to create an application that asks for and recognizes four words: coffee, tea, milk, and nothing.
Example 15-1 Sample VoiceXML Script using Speech Recognition<form>
<field name="choice"><prompt>Would you like coffee, tea, milk, or nothing?</prompt><grammar xml:lang="en-US" type="application/srgs+xml version="1.0" mode="voice">
<rule id="drinks" > <one-of>
<item>coffee</item><item>tea</item><item>milk</item><item>nothing</item>
</one-of></rule>
</grammar></field>
<filled>Just a second.Your <value expr="choice"/> is ready.
</filled>
15-10Cisco Unified Contact Center Express Getting Started with Scripts, Release 11.0(1)

Chapter 15 Designing Cisco Unified CCX VoiceXML ApplicationsCreating VoiceXML Documents
</form>
In the preceding example, the <one-of> element defines a set of expressions (voice replies) that are valid. The Voice Recognition engine fills in the field choice when it recognizes a valid response according to the rules of the grammar. In this example, the exchange might sound like this:System: “Would you like some coffee, tea, milk, or nothing?”Caller: “Hot tea.”System: “Just a second. Your tea is ready.”
The Cisco Unified CCX Voice Browser supports SRGS and Cisco RegEx grammars, which are powerful languages for specifying speech input.
Using DTMF InputDTMF is a common form of caller input in IVR applications, and in many cases it is a good idea to design applications that give callers the choice to use either DTMF or speech input.
DTMF input is most commonly used for such purposes as menu navigation, getting a digit string (such as an account number) from the caller, and recognizing a digit pattern.
You can use one of the following methods to allow the script to determine when the DTMF input from the caller is complete:
• A caller enters a specific termination key; for example, the “#” key.
• A specified number of seconds have passed without the caller entering a tone.
• The caller enters a predefined number of tones.
You can use the following DTMF properties to specify when the sequence is complete:
• termchar—The terminating DTMF character for DTMF input recognition.
The default value is “#”. The value of empty string means no terminating DTMF character is defined.
• termtimeout—The terminating timeout to use when recognizing DTMF input.
The default value is “4s”.
15-11Cisco Unified Contact Center Express Getting Started with Scripts, Release 11.0(1)

Chapter 15 Designing Cisco Unified CCX VoiceXML Applications Creating VoiceXML Documents
This section contains the following topics:
• Using DTMF for Menu Navigation, page 15-12
• Receiving Digit String Input, page 15-13
• Using DTMF Grammar, page 15-14
Using DTMF for Menu Navigation
One of the most common uses of DTMF is to allow users to navigate a menu of choices. You can use <menu> element to accomplish this navigation, as follows:
1. Use the <menu> element for the main prompt. The menu prompt has two attributes: exact and approximate. Exact is the default and means the user must match every word of the grammar fragment in order for a recognition match to occur. Example 15-2 uses the default.
2. For each choice, insert a <choice> element.
3. Specify the DTMF key associated with the item and the next place to jump to when the item is chosen.
You may also insert a grammar in the <choice> element. This insertion allows the user to select the item either by pressing the DTMF key or by speaking the grammar item.
As an example of a banking application, the script gives the caller the following three choices, and then instructs the caller to press “*” when finished:
• For checking account balance, press 1.
• For savings account balance, press 2.
• For credit card balance, press 3.
In this example, the caller presses 3. The system informs the caller “Sorry, you don’t have a credit card account with us,” and again offers the caller the same three choices. The caller presses “*”, the system says “Thank you. Good-bye!” and ends the call.
Example 15-2 shows the scripting for the preceding banking application.
Example 15-2 Using DTMF
<menu id="main"> <prompt> For checking account balance, press 1.
15-12Cisco Unified Contact Center Express Getting Started with Scripts, Release 11.0(1)
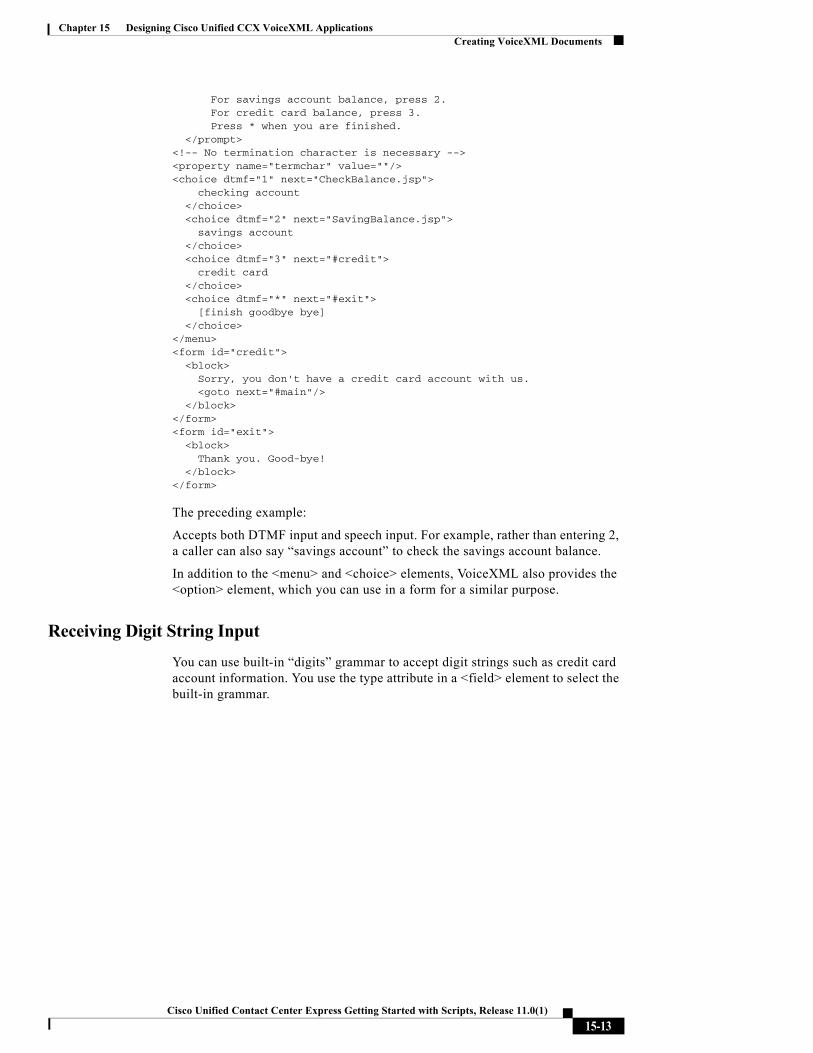
Chapter 15 Designing Cisco Unified CCX VoiceXML ApplicationsCreating VoiceXML Documents
For savings account balance, press 2. For credit card balance, press 3. Press * when you are finished. </prompt><!-- No termination character is necessary --><property name="termchar" value=""/><choice dtmf="1" next="CheckBalance.jsp"> checking account </choice> <choice dtmf="2" next="SavingBalance.jsp"> savings account </choice> <choice dtmf="3" next="#credit"> credit card </choice> <choice dtmf="*" next="#exit"> [finish goodbye bye] </choice></menu><form id="credit"> <block> Sorry, you don't have a credit card account with us. <goto next="#main"/> </block></form><form id="exit"> <block> Thank you. Good-bye! </block></form>
The preceding example:
Accepts both DTMF input and speech input. For example, rather than entering 2, a caller can also say “savings account” to check the savings account balance.
In addition to the <menu> and <choice> elements, VoiceXML also provides the <option> element, which you can use in a form for a similar purpose.
Receiving Digit String Input
You can use built-in “digits” grammar to accept digit strings such as credit card account information. You use the type attribute in a <field> element to select the built-in grammar.
15-13Cisco Unified Contact Center Express Getting Started with Scripts, Release 11.0(1)

Chapter 15 Designing Cisco Unified CCX VoiceXML Applications Creating VoiceXML Documents
Example 15-3 shows how to receive DTMF input for a credit card account number.
Example 15-3 Receiving Digit String Input
<form> <field name="creditNumber" type="digits">
Please enter your credit card number. Press the pound key when finished.
<filled> Your credit card number is <value expr="creditNumber" class="digits" mode="recorded"/>
<exit namelist="creditNumber"/></filled>
</field></form>
Using DTMF Grammar
The most flexible way to accept DTMF input is to use DTMF grammars that define how tones are interpreted.
To include DTMF tones in your grammar, use the format “dtmf-0” for each of the tones 0 through 9. You can also use “dtmf-star” for the star (“*”) key, “dtmf-pound” for the pound (“#”) key, and “dtmf-?” to indicate an unknown key.
However, if you specify mode = DTMF in the grammar element and then use an item list as in Example 15-4, you can use only numbers for the DTMF tones.
Example 15-4 shows a sample grammar that allows the caller to enter digits from the touch-tone pad. This example requests the user to use DTMF digits to enter PIN (Personal Identification Number) information. The grammar can be generated from the server from a user information database. It recognizes the key sequence 4-3-2-1.
Example 15-4 Using DTMF Grammar
<form> <field name="getPin">
<grammar xml:lang="en-US" root = "pin" mode="dtmf"> <rule id="pin" scope="public">
<one-of lang-list="en-US">
15-14Cisco Unified Contact Center Express Getting Started with Scripts, Release 11.0(1)

Chapter 15 Designing Cisco Unified CCX VoiceXML ApplicationsCreating VoiceXML Documents
<item> 4321 </item></one-of>
</rule></grammar>"Please enter your pin followed by the pound sign."
<!-- The pin is 4321 -->
<nomatch> Your input is incorrect. Please enter again. </nomatch>
<nomatch count="3"> Sorry access is denied. <exit/> </nomatch>
</field>
<block> Thank you. Please wait while we access your account. </block></form>
Using Text to Speech OutputThis section covers the following topics:
• Understanding Provider Fallback for TTS, page 15-15
• Understanding Where TTS Prompts are Played, page 15-16
• Understanding Gender Fallback for MRCP TTS, page 15-17
Understanding Provider Fallback for TTS
The TTS prompt requests can originate from VXML documents. VXML documents can use a property to specify a particular TTS provider. However, users have the option of not using this property.
15-15Cisco Unified Contact Center Express Getting Started with Scripts, Release 11.0(1)

Chapter 15 Designing Cisco Unified CCX VoiceXML Applications Creating VoiceXML Documents
In response to a TTS prompt request, the Provider Fallback goes through the following possible steps:
1. With a VXML document, the system first tries the provider explicitly chosen (from the Cisco Unified CCX application or the VXML property). A provider can satisfy the request if (a) it is in service AND (b) the language-gender attributes requested by the prompt are supported by the provider.
Each provider has a fallback mechanism to match the language-gender attributes. If the language specified is country specific such as en_US and the provider does not support it, it then checks if the base language, for example, 'en' is supported. For a detailed description of how gender attributed is matched please see Understanding Gender Fallback for MRCP TTS, page 15-17.
2. If the explicitly specified provider fails to match the request, OR if no provider is specified explicitly, the system uses the “Default TTS Provider” configured on the system parameters Cisco Unified CCX Application Administration web page.
3. If the System default provider fails to match the request, the system tries out all the providers configured through the TTS Cisco Unified CCX Application Administration web page. These providers are tried out in an indeterministic order.
4. If all the configured TTS providers fail, the system falls back on the CiscoSSMLLite provider. This provider however is only capable of playing out wav file prompts specified through the “audio” element in SSML and VXML. If the prompt request contains any text, an application exception is thrown and the caller gets a system error.
Understanding Where TTS Prompts are Played
Which server plays a TTS prompt depends on (a) the configuration of TTS providers and (b) the desired gender/locale/provider for a TTS prompt.
The following is the sequence used to determine which TTS provider plays a TTS prompt:
1. An Overwritten provider in the TTS prompt.
2. A System default provider (as configured in the System Parameters through the Cisco Unified CCX Administration web page).
3. All configured providers, one at a time, in an indeterministic order.
15-16Cisco Unified Contact Center Express Getting Started with Scripts, Release 11.0(1)

Chapter 15 Designing Cisco Unified CCX VoiceXML ApplicationsCreating VoiceXML Documents
For a detailed description of how the provider selection and fallback works, see Understanding Provider Fallback for TTS, page 15-15
If any one of these providers can serve the desired locale and gender of the TTS prompt, then that provider plays the prompt. In most cases, the provider is the MRCP TTS server.
There is also a lightweight TTS provider called Cisco LiteSSMLProcessor. This provider can handle only TTS prompts with SSML text that contains only audio elements referring to audio files. In this case, the TTS prompt is played by the Cisco Unified CCX server.
The Cisco LiteSSMLProcessor gets used only under the following two circumstances:
• The text in the TTS prompt is SSML enabled with only audio elements referring to audio files.
and
• None of the providers in the preceding list can serve the TTS prompt request or the overridden/system default provider has been set to Cisco LiteSSMLProcessor.
Understanding Gender Fallback for MRCP TTS
Whenever a locale for an MRCP TTS server is configured in Cisco Unified CCX, the genders available for that locale on that server are also specified. In addition, for every TTS provider, a default gender is specified for each locale. This default should correspond to a gender that is configured for that locale by the servers for that TTS Provider.
When using a TTS prompt, a user has the option to either use the com.cisco.tts.gender property or not specify any property, which causes the default gender to be used.
The fallback mechanism that Cisco Unified CCX uses is as follows:
1. If a gender property has been specified, Cisco Unified CCX uses that gender. If no TTS server is found for that gender, Cisco Unified CCX tries the default gender if its value is different from the overridden gender. If no TTS server is found for the default gender, then Cisco Unified CCX fails the request.
15-17Cisco Unified Contact Center Express Getting Started with Scripts, Release 11.0(1)
Chapter 15 Designing Cisco Unified CCX VoiceXML Applications Creating VoiceXML Documents
2. If a gender property has not been specified, Cisco Unified CCX uses the default gender for the locale specified in the TTS prompt. If no TTS server is found for the default gender, then Cisco Unified CCX tries Female, Male and Neutral gender in that sequence until a TTS server is found. If none is found, Cisco Unified CCX fails the request.
Using The CRTP ProtocolIn a VoiceXML document on a Cisco Unified CCX system, you can fetch resources from the Cisco Unified CCX Repository. The repository can be used to manage documents, prompts, and grammars, To allow access to the resources in the repository, you need to use a URL protocol provided by the Cisco Unified CCX system, The Cisco Repository Transfer Protocol (CRTP). It is similar to HTTP. However, in place of the Hostname and port number, the CRTP protocol contains a repository identifier and a language specifier.
Example 15-5 Using CRTP Protocol
<field name="aNumber"> <prompt>Press a number.</prompt> <grammar type="application/srgs+xml" mode="dtmf" src="crtp:/Grammars/number.grxml" /> </field>
This is a proprietary protocol, so no “non-Cisco” use agents are expected to recognize it. Whenever a CRTP URL must be passed to a non-Cisco user agent, it must first be converted to its HTTPO protocol equivalent. This is done by the Cisco Unified CCX system. This conversion should only be done right before the resource is needed to be fetched, as the conversion depends on the context at the time of the fetch. See How and Why To Use the CRTP Protocol, page 2-56 for more information on this protocol.
Using the Voice Browser CacheAny document retrieved through a HTTP GET in a VoiceXML document may be cached; for example, other VoiceXML documents, grammars, and audio files. The voicexml.dtd file will not be cached because the XML parser loads DTDs on every fetch.
15-18Cisco Unified Contact Center Express Getting Started with Scripts, Release 11.0(1)

Chapter 15 Designing Cisco Unified CCX VoiceXML ApplicationsCreating VoiceXML Documents
When the cache is enabled, all HTTP responses with a code of 200 are stored in the cache unless they exceed the size limit.
HTTP Cache keys are based on the URL. If the URL is a HTTP GET with values, the values will be part of the cache key as well.
When a request is made for the same URL, the cache response is checked for expiration. If it has not expired (based on the expires HTTP response header), a conditional HTTP request is made using the last-modified and/or etag values from the cached response.
Cache is controlled by the Web sender and by the set of vxml attributes containing the maxage and maxstale strings in the VoiceXML document.
If none of these headers were present in the cached response, it is assumed that the response is not cacheable.
The value of expires is subject to clock differences between computers. Last-modified is unaffected as it is sent back to the server as is.
Cache replacement policy is LRU.
Dynamic web pages (JSP, ASP, PHP, cgi-bin, and so on) are cacheable provided they are accessed via HTTP GET and they return the listed response header.
Contents cached based on HTTP headers use the following HTTP response headers:
• etag
• last-modified
• expires
Contents cached based on HTTP headers send the following HTTP request headers:
• if-none-match
• if-last-modified
15-19Cisco Unified Contact Center Express Getting Started with Scripts, Release 11.0(1)

Chapter 15 Designing Cisco Unified CCX VoiceXML Applications Creating Cisco Unified CCX Scripts that Run VoiceXML Documents
Creating Cisco Unified CCX Scripts that Run VoiceXML Documents
The Cisco Unified CCX Voice Browser is fully integrated with the Cisco Unified CCX Engine. You can use scripts designed in the Cisco Unified CCX Editor to extend VoiceXML applications (documents) by providing Cisco Unified CCX call control and resource management.
For example, you can use VoiceXML to build a speech dialog as a front end to collect information from the caller. You can then pass this information to a Cisco Unified CCX script, and when the agent receives the call, the information collected by VoiceXML will be available.
This section covers:
• Related Documentation, page 15-20
• A Sample Voicebrower.aef Script, page 15-20
• Creating a Script that Runs a VoiceXML Document, page 15-22
• Specifying TTS Providers in a Cisco Unified CCX Script, page 15-28
Related DocumentationFor complete descriptions of the Cisco Unified CCX steps used in creating Cisco Unified CCX Editor scripts, see the Cisco Unified Contact Center Express Scripting and Development Series: Volume 2, Cisco Unified Contact Center Express Editor Reference Guide.
A Sample Voicebrower.aef ScriptYou can use the bundled voicebrowser.aef script as an example for creating scripts that invoke a VoiceXML document. Figure 15-1 shows that script as it appears in the Design pane of the Cisco Unified CCX Editor.
15-20Cisco Unified Contact Center Express Getting Started with Scripts, Release 11.0(1)

Chapter 15 Designing Cisco Unified CCX VoiceXML ApplicationsCreating Cisco Unified CCX Scripts that Run VoiceXML Documents
Figure 15-1 Voicebrowser.aef Script
The Cisco Unified CCX Voicebrowser.aef sample script does the following:
1. Accepts a call.
2. Creates a URL document.
3. Starts the Voice Browser.
4. Terminates the call.
5. Ends the script and releases system resources.
Use the Voice Browser step in the Media palette of the Cisco Unified CCX Editor to invoke a VoiceXML application. This step can be used as many times in a script as is necessary.
15-21Cisco Unified Contact Center Express Getting Started with Scripts, Release 11.0(1)

Chapter 15 Designing Cisco Unified CCX VoiceXML Applications Creating Cisco Unified CCX Scripts that Run VoiceXML Documents
When creating a Cisco Unified CCX VoiceXML script, you can also execute other steps in addition to VoiceXML. The purpose of this sample script is only to illustrate how to create a Cisco Unified CCX script that runs a VoiceXML document.
Creating a Script that Runs a VoiceXML DocumentThis section uses the sample voicebrowser.aef script described in the preceding section to show to create a Cisco Unified CCX script that runs a VoiceXML document.
This section covers:
• Step 1: The Start Step (Creating a Script), page 15-22
• Step 2: Create Two Voicebrowser Script Variables, page 15-23
• Step 3: Enter the Accept Step, page 15-24
• Step 4: Enter the Create URL Document Step, page 15-24
• Step 5: Enter the Voice Browser Step, page 15-25
• Step 6: Enter the Terminate Step, page 15-28
• Step 7: Enter The End Step, page 15-28
Step 1: The Start Step (Creating a Script)
Begin to build the sample script by choosing File > New from the Cisco Unified CCX Editor menu bar. The Templates folder displays. Select the blank script and click OK.
A blank script containing a Start and End step opens in the Design pane of the Cisco Unified CCX Editor window.
Begin to build the sample script by choosing File > New from the Cisco Unified CCX Editor menu bar. The Cisco Unified CCX Editor places a Start step in the Design pane of the Cisco Unified CCX Editor window.
The Start step needs no configuration and has no customizer window. At this time, you might also want to give your new script a name and save it by selecting File > Save from the menu bar.
Our example script is called voicebrowser.aef.
15-22Cisco Unified Contact Center Express Getting Started with Scripts, Release 11.0(1)
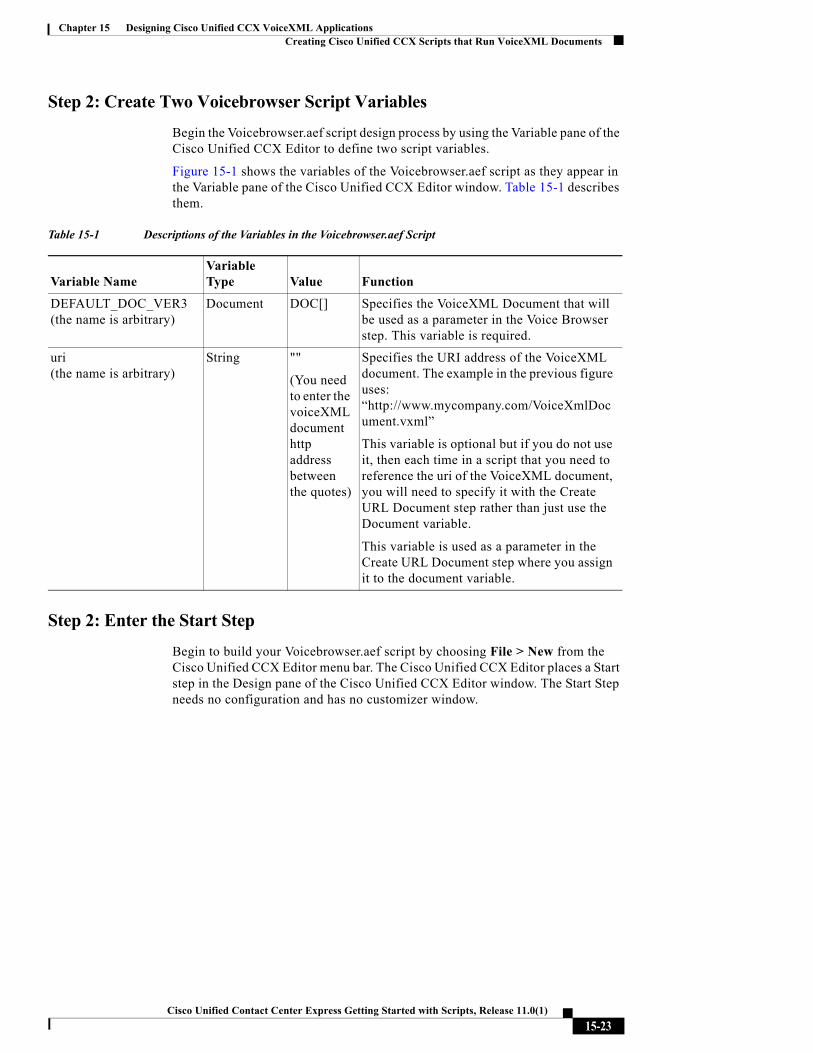
Chapter 15 Designing Cisco Unified CCX VoiceXML ApplicationsCreating Cisco Unified CCX Scripts that Run VoiceXML Documents
Step 2: Create Two Voicebrowser Script Variables
Begin the Voicebrowser.aef script design process by using the Variable pane of the Cisco Unified CCX Editor to define two script variables.
Figure 15-1 shows the variables of the Voicebrowser.aef script as they appear in the Variable pane of the Cisco Unified CCX Editor window. Table 15-1 describes them.
Table 15-1 Descriptions of the Variables in the Voicebrowser.aef Script
Variable NameVariable Type Value Function
DEFAULT_DOC_VER3 (the name is arbitrary)
Document DOC[] Specifies the VoiceXML Document that will be used as a parameter in the Voice Browser step. This variable is required.
uri (the name is arbitrary)
String ""
(You need to enter the voiceXML document http address between the quotes)
Specifies the URI address of the VoiceXML document. The example in the previous figure uses: “http://www.mycompany.com/VoiceXmlDocument.vxml”
This variable is optional but if you do not use it, then each time in a script that you need to reference the uri of the VoiceXML document, you will need to specify it with the Create URL Document step rather than just use the Document variable.
This variable is used as a parameter in the Create URL Document step where you assign it to the document variable.
Step 2: Enter the Start Step
Begin to build your Voicebrowser.aef script by choosing File > New from the Cisco Unified CCX Editor menu bar. The Cisco Unified CCX Editor places a Start step in the Design pane of the Cisco Unified CCX Editor window. The Start Step needs no configuration and has no customizer window.
15-23Cisco Unified Contact Center Express Getting Started with Scripts, Release 11.0(1)

Chapter 15 Designing Cisco Unified CCX VoiceXML Applications Creating Cisco Unified CCX Scripts that Run VoiceXML Documents
Step 3: Enter the Accept Step
Continue to build the Voicebrowser.aef script by dragging an Accept step (from the Contact palette in the Palette pane) to the Design pane of the Cisco Unified CCX Editor. The script uses an Accept step to accept a contact.
Step 4: Enter the Create URL Document Step
In the Create URL Document step customizer window, in the separate selection boxes, select the string variable uri and the document variable DEFAULT_DOC_VER3 that you created and click OK. This assigns the URL address in the string variable to the document variable.
This step defines the XML document variable, uri, to be used in your script for specifying the VoiceXML document that you will run in the script.
The Create URL Document step does not issue a HTTP request. The request occurs when the document variable is used by another step, such as the Send Response step or the Send JSP step, or, as in our example script, the VoiceBrowser step.
15-24Cisco Unified Contact Center Express Getting Started with Scripts, Release 11.0(1)

Chapter 15 Designing Cisco Unified CCX VoiceXML ApplicationsCreating Cisco Unified CCX Scripts that Run VoiceXML Documents
Figure 15-2 Create URL Document Customizer Window
In this example, parameters are not used. If you use parameters, they are passed to the web server where the VXML document is located for use by the web server.
Step 5: Enter the Voice Browser Step
In the VoiceBrowser step, in the Contact selection box, select the triggering contact that will run the VoiceXML document. Then, in the VXML Document selection box, select the VXML document and click OK.
The VoiceBrowser step assigns the trigger to run the VoiceXML document at the URL specified by the VXML Document variable. When a caller phones that trigger number, the caller accesses the VoiceXML programming in the VoiceXML document.
15-25Cisco Unified Contact Center Express Getting Started with Scripts, Release 11.0(1)

Chapter 15 Designing Cisco Unified CCX VoiceXML Applications Creating Cisco Unified CCX Scripts that Run VoiceXML Documents
Figure 15-3 shows the General tab of the Voice Browser customizer window configured with the example VXML document variable. You can use the Expression Editor button next to the VXML Document select list to include the VXML document in an expression in the Cisco Unified CCX VoiceXML script.
Figure 15-3 Voice Browser Customizer Window—General Tab
Figure 15-4 shows the <exit> Attributes tab of the Voice Browser customizer window.
The sample script voicebrowser.aef does not use this tab.
Use the <exit> Attributes tab to return information from the Voice Browser step. For example, the script in Example 15-3 on page 15-14 returns the credit card number collected. Using the data in that example, you could pass the credit card information to a script variable. To do that, you would first have to create a script
15-26Cisco Unified Contact Center Express Getting Started with Scripts, Release 11.0(1)

Chapter 15 Designing Cisco Unified CCX VoiceXML ApplicationsCreating Cisco Unified CCX Scripts that Run VoiceXML Documents
variable in the Cisco Unified CCX Editor and then, in the <exit> Attributes <namelist> tab of the Voice Browser step customizer window, you would add the mapping of the VoiceXML “creditNumber” to the “creditNumber” variable.
Figure 15-4 Voice Browser Customizer Window—<exit > Attributes Tab
Figure 15-5 shows Prompt tab of the Voice Browser customizer window.
The sample script voicebrowser.aef does not use this tab.
Use this tab if you do not want the Cisco Unified CCX script to continue if there are errors when the VoiceXML document is run. The default is for the script to continue.
15-27Cisco Unified Contact Center Express Getting Started with Scripts, Release 11.0(1)

Chapter 15 Designing Cisco Unified CCX VoiceXML Applications Creating Cisco Unified CCX Scripts that Run VoiceXML Documents
Figure 15-5 Voice Browser Customizer Window— Prompt Tab
Step 6: Enter the Terminate Step
Close the sample script Voicebrowser.aef with a Terminate step (from the Contact palette), which ends the call.
Step 7: Enter The End Step
Conclude the Voicebrowser.aef script with an End step (from the General palette).
The End step ends the script and releases all system resources.
Specifying TTS Providers in a Cisco Unified CCX ScriptIn addition to the supported TTS providers, the Cisco Unified CCX Administration interface also allows the creation of new providers. Anytime a new provider is added, Cisco Unified CCX updates the editor machines with the new TTS provider information. This is done by synchronizing a file between the Cisco Unified CCX server and the editor machines.
15-28Cisco Unified Contact Center Express Getting Started with Scripts, Release 11.0(1)

Chapter 15 Designing Cisco Unified CCX VoiceXML ApplicationsDesigning International Cisco Unified CCX VoiceXML Applications
Designing International Cisco Unified CCX VoiceXML Applications
The Cisco Unified CCX Voice Browser can generate TTS prompts and recognize speech in selected languages. In addition, the Voice Browser localizes built-in grammars such as date and time. The script automatically activates the grammar for specific languages based on the language context of the call.
For a list of built-in grammar support, see Built-in Type Implementation, page B-12 of Appendix B, “VoiceXML Implementation for Cisco Voice Browser.”
You can select a language for an application in one of several ways:
• Configure the language of the application in the Cisco Unified CCX Administration web interface. This method is the most convenient for applications that use a single language. (For more information on language configuration, see the Cisco Unified Contact Center Express Administration Guide.)
• Use the Set Contact Info in the Cisco Unified CCX script before invoking the Voice Browser step, in order to make language information available to the script.
• Use the xml:lang attribute on the <vxml>, <grammar>, or <prompt> element. With this method, scripts can use multiple languages.
– To specify the language for a VoiceXML document, use the xml:lang attribute in the <vxml> element.
– To specify the language for individual prompt or grammar, set the xml:lang attribute in the <prompt> or <grammar> element.
The following examples illustrate the use of the xml:lang attribute.
15-29Cisco Unified Contact Center Express Getting Started with Scripts, Release 11.0(1)

Chapter 15 Designing Cisco Unified CCX VoiceXML Applications Designing International Cisco Unified CCX VoiceXML Applications
Example 15-6 is a main menu that requests users to select the language, prompting users in both English and Spanish. The xml:lang attributes in the <prompt> elements specify the language to use for each prompt.
Example 15-6 mainmenu.vxml
<?xml version="1.0" encoding="UTF-8"?><vxml xmlns="http://www.w3.org/2001/vxml" version="2.0"><form> <field name="language"> <!-- read in English --> <prompt xml:lang="en"> For English, press 1. </prompt> <!-- read in Spanish --> <prompt xml:lang="es-MX"> Para Español, oprima 2. </prompt>
<grammar xml:lang="en-US" type="application/srgs+xml version="1.0" mode="dtmf">
<rule id="choice" > <one-of>
<item>1</item><item>2</item>
</one-of></rule>
</grammar> <filled> <if cond="language=='1'"> <goto next="info_en.vxml"/> <elseif cond="language=='2'"/> <goto next="info_es.vxml"/> </if> </filled> </field></form></vxml>
In Example 15-7, if the user selects Spanish, the script executes the document info_es.vxml. The xml:lang attribute of the <vxml> element specifies the Spanish language for the entire document.
15-30Cisco Unified Contact Center Express Getting Started with Scripts, Release 11.0(1)

Chapter 15 Designing Cisco Unified CCX VoiceXML ApplicationsDesigning International Cisco Unified CCX VoiceXML Applications
Example 15-7 info_es.vxml
<?xml version="1.0" encoding="ISO-8859-1"?><vxml xmlns="http://www.w3.org/2001/vxml"version="2.0 "xml:lang="es-M> <form>
<field name="q"> <prompt> ¿Desea escuchar las noticias o el tiempo? </prompt>
<grammar xml type="application/srgs+xml version="1.0" mode="voice">
<rule id="choice" > <one-of>
<item>las noticias</item><item>el tiempo</item>
</one-of></rule>
</grammar><filled>
<submit next=”getInfo.jsp”/> </filled> </field></form></vxml>
Note When you create non-English XML files, you must accurately set the character encoding. XML uses Unicode (UTF-8) by default, but you can use other encoding methods. For example, many Western European language text editors use ISO-8859-1 (latin-1) encoding by default. In this case, you must set the encoding attribute of the XML declaration correctly, as shown in the example above.
Although you may specify xml:lang in <grammar>, note that Cisco Unified CCX does not support recognition of multiple languages at the same time. If the <grammar> elements specify conflicting languages, the last one specified will take precedence.
See Using VXML to Implement a Language Not Available in Cisco Unified CCX, page 4-5 for further information.
15-31Cisco Unified Contact Center Express Getting Started with Scripts, Release 11.0(1)

Chapter 15 Designing Cisco Unified CCX VoiceXML Applications Cisco Unified CCX VoiceXML Application Troubleshooting Tips
Cisco Unified CCX VoiceXML Application Troubleshooting Tips
The following are helpful tips when troubleshooting your voiceXML application:
• Check the Cisco Unified CCX subsystems in service: CMT, JTAPI, MRCP ASR&TTS, Voice Browser.
• Test the URI in the Web browser.
• Check the Provider selection.
• Validate files: VXML, grammar, audio.
• Check file fetching locations.
• Use a DTD to check for the correct syntax.
• Do performance tuning: exclude the DTD and use caching facilities (VXML, HTTP)
• In the Cisco Unified CCX system, trace the contact flow:
– The SS_VB subsystem is used to control tracing for the Voicebrowser, and the “Debugging” level provides debug output.
– Other related subsystems to check:
• SS_MRCP_TTS
• SS_MRCP_ASR
• SS_CMT
• Check the log file
15-32Cisco Unified Contact Center Express Getting Started with Scripts, Release 11.0(1)

Cisco Unified Contact Center Express Getting St
C H A P T E R 16
Designing Scripts for Cisco Unified IP IVRYou can use the steps of the Cisco Unified CCX Editor to design scripts that take advantage of the Cisco Unified Contact Center Enterprise (CCE) solution.
This chapter describes the steps used to create scripts that interact with the Cisco Unified Intelligent Call Management Enterprise (ICME) subsystem of the Cisco Unified CCX system.
This section contains the following topics:
• The Service Control Interface, page 16-1
• Call Variables, page 16-3
• ICM Script Types, page 16-7
• Sample VRU Script Templates, page 16-10
The Service Control Interface The Service Control interface allows the Cisco Unified ICME software to provide call-processing instructions to the Cisco Unified CCX system. It also provides the Cisco Unified ICME software with event reports indicating changes in call state.
16-1arted with Scripts, Release 11.0(1)

Chapter 16 Designing Scripts for Cisco Unified IP IVR The Service Control Interface
The Service Control interface supports the following four label types:
• Normal—The Normal label is a character string that encodes instructions for routing the call. It contains either a directory number to which the Cisco Unified CCX system routes the call or the name of a user prompt that represents an announcement.
• Busy—The Busy label indicates that the caller receives a busy treatment.
• Ring No Answer—The Ring No Answer (RNA) label indicates that the caller receives an RNA treatment.
• Default Label—The Default label indicates that the Cisco Unified CCX system runs the default script or runs the system default treatment if no default script is configured.
In addition to these label types the Cisco Unified IP IVR product supports the following special extensions as part of the Normal label:
• Extensions starting with “#” or “*”
These extensions trigger a network take back and transfer. For the redirect to be successful, the script out-pulses the specified string as is and then monitors the call for a hang-up event, for a maximum of 5 seconds.
You can use the “,” character to insert a 1 second pause.
• Extensions ending with “.wav”
These extensions trigger a network announcement type of redirect, in which the script simulates a ring-back tone and then plays back the specified .wav file 4 times, and then finally simulates a fastbusy tone. The transfer is successful if at any time the caller hangs up or if the script reaches the end of the fastbusy tone and disconnects the call.
• Extensions equal to “PROBLEMS”
These extensions trigger a network announcement type of transfer (see above) with a system problem announcement.
• Extensions equal to “BUSY”, “RNA”, “FASTBUSY”, or “DIALTONE”
These extensions cause the script to generate the specified audio treatment before terminating the call. The transfer is successful if at any time the caller hangs up or the script reaches the end of the audio treatment. The script then reports the call as disconnected rather than as redirected.
16-2Cisco Unified Contact Center Express Getting Started with Scripts, Release 11.0(1)

Chapter 16 Designing Scripts for Cisco Unified IP IVRCall Variables
Call Variables This section contains the following topics:
• Using Call Variables, page 16-3
• Using Expanded Call Variables, page 16-3
• Using Error Variables, page 16-4
• Using the Parameter Separator, page 16-4
• Configuring Encoding and Decoding Types, page 16-5
Using Call VariablesThe Cisco Unified ICME software supports several Call Variables. The Cisco Unified ICME System, the Enterprise Server, and the CiscoUnified CCX system use these strings to pass values to each other. You can use the following variables in your scripts:
• VRU Script Name
• ConfigParam
• Call.CallingLineID
• Call.CallerEnteredDigits
• Call.PeripheralVariable1 to Call.PeripheralVariable10
• Call.AccountNumber
Using Expanded Call Variables The Cisco Unified ICME, the Enterprise Server, and the Cisco Unified CCX system also pass expanded call variables to each other, but you must use the Cisco Unified CCX Editor to define or enable these variables individually.
16-3Cisco Unified Contact Center Express Getting Started with Scripts, Release 11.0(1)

Chapter 16 Designing Scripts for Cisco Unified IP IVR Call Variables
Note If you are using Cisco Unified CCX, your variables must also be defined through the Cisco Finesse Administration.
See the Cisco Unified Contact Center Express Scripting and Development Series: Volume 2, Editor Step Reference Guide and the Cisco Contact Center Express Administration Guide for more information about Call variables and ICME-related topics.
See Get Enterprise Call Info Step for more information about Call variables and ICME-related topics.
Using Error VariablesIf a VRU (Voice Response Unit) script runs without any errors, the system sets the ResultCode field of the run_script_result message to true. You can change the result using the Set ICM Result step (from the ICM palette).
Note For more information, see “Call Contact Step Descriptions” in the Cisco Unified Contact Center Express Scripting and Development Series: Volume 2, Editor Step Reference Guide.
Using the Parameter Separator You can send multiple values—or tokens—within one variable, so you can avoid using many variables at the same time.
The parameter separator is a character that defines the boundary between the different tokens in one variable. The token numbering begins with 0.
Note You specify this separator on the Cisco Unified CCX Administrator’s System Parameters web page.
16-4Cisco Unified Contact Center Express Getting Started with Scripts, Release 11.0(1)

Chapter 16 Designing Scripts for Cisco Unified IP IVRCall Variables
For example, if the parameter separator is “|”, you can send an expanded call variable astrue | 4 | 4/3/2000
where the value of token number 0 is “true”, token number 1 is “4”, and token number 2 is “4/3/2000”.
The following variables can have multiple tokens separated by the parameter separator:
• Peripheral (1-10)
• Expanded Call (ECC)
• ConfigParam
• VRU Script Name
Note The VRU Script Name variable holds the name of a VRU script to run when the Cisco Unified CCX system receives a Run Script request from the Cisco ICME software. The Cisco Unified CCX system reads only the first token (token number 0) as VRU Script Name; the rest of the tokens are passed on (with the script name - token #0) to be used as regular variable tokens.
The Get/Set Enterprise Call Info steps of the Call Contact palette in the Cisco Unified CCX Editor allow you to set and read different tokens in the variables passed between the Cisco Unified CCX system and the Cisco Unified ICME Server.
Note For more information, see “Call Contact Step Descriptions” in the Cisco Unified Contact Center Express Scripting and Development Series: Volume 2, Editor Step Reference Guide.
Configuring Encoding and Decoding Types When the Cisco Unified CCX system receives variables from the Cisco Unified ICME software or Enterprise Server, the variables do not have an associated type (such as Integer or Float). To use these variables in Cisco Unified ICME VRU or Cisco Unified CCX scripts, the Cisco Unified CCX system first
16-5Cisco Unified Contact Center Express Getting Started with Scripts, Release 11.0(1)

Chapter 16 Designing Scripts for Cisco Unified IP IVR Call Variables
decodes them to one of the available types. When the script sends variables back to the Cisco Unified ICME Server, the Cisco Unified CCX system then encodes them into a form the Cisco Unified ICME Server can use, depending on the type of the local Cisco Unified CCX script variable.
Table 16-1 lists the encoding types that the Cisco Unified CCX system supports.
Note The Input format is the data decoded from the Cisco Unified ICME Server variables to the Cisco Unified CCX script local variables. The Output format is the data encoded from the Cisco Unified CCX script local variables to the Cisco Unified ICME Server variables.
Table 16-1 Encoding Types That Cisco Unified CCX Supports
Encoding Type Input Format Example Input Output Format
Integer—32-bit signed integer
The Cisco Unified CCX Editor supports three formats:
• Decimal—a sequence of digits without a leading 0. Digits can range from 0 to 9.
• Hexadecimal—in the form 0xDigits, where Digits can range from 0 to 9, a to f, and A to F.
• Octal—in the form 0Digits, where Digits can range from 0 to 7.
Decimal:
• 25
• -34
• 900
Hexadecimal:
• 0x1e
• 0x8A5
• 0x33b
Octal:
• 033
• 0177
Decimal digits from 0 to 9 with no leading 0
Long—64-bit signed integer.
16-6Cisco Unified Contact Center Express Getting Started with Scripts, Release 11.0(1)

Chapter 16 Designing Scripts for Cisco Unified IP IVRICM Script Types
ICM Script Types The Cisco Unified CCX system runs three different types of ICM scripts:
• Initial Scripts, page 16-8
• Default Scripts, page 16-8
• VRU Scripts, page 16-9
Float—32-bit floating number
[-]Digits.DigitsExponentTrailer
where:
• Digits are digits from 0 to 9.
• Exponent is an optional exponent with a leading e or E.
• Trailer is one of f, F, d, or D to specify a float or a double. The trailer is optional.
3.1415927f 6.02e23F 25 -4.2323E5f
Same as input
Double—64-bit floating number
0.843 1.871E3d .23e-123 -3.4e34
Same as input
Boolean To designate this non-case-sensitive type:
• True—Use 1, t, y, true, or yes.
• False—Use 0, f, n, false, or no.
Yes F 0 n
Either true or false
String Type requires no conversion. Hello world Same as input
Date Use the format mm/dd/yyyy where mm is the month, dd is the day, and yyyy is the year.
10/22/1999 3/30/2000
Same as input
Time Use the format Hh:MmTod
where Hh is the hour, Mm is the minute, and Tod is am or pm. This type is not case-sensitive.
12:20am 09:05PM
Same as input
Table 16-1 Encoding Types That Cisco Unified CCX Supports (continued)
Encoding Type Input Format Example Input Output Format
16-7Cisco Unified Contact Center Express Getting Started with Scripts, Release 11.0(1)

Chapter 16 Designing Scripts for Cisco Unified IP IVR ICM Script Types
Initial Scripts The Cisco Unified CCX system runs initial scripts when it receives a call on a JTAPI (Java Telephony Application Programming Interface) trigger associated with a post-route application. You set the initial script when you configure a Cisco Unified ICME post-route application. (For more information, see the Cisco Unified Contact Center Express Application Administration Guide.)
If you leave the Initial Script field empty, no initial script runs.
Note Because initial scripts are run on the Cisco Unified CCX system before the system notifies the Cisco Unified ICME about the call, you can use the Get Enterprise Call Info step or the Set Enterprise Call Info step, but not the Set ICM Result step.
Default Scripts The Cisco Unified CCX system runs the default script whenever the Cisco Unified ICME software sends a default label, when the Cisco Unified CCX system times out waiting for the Cisco Unified ICME to provide instructions, or when communication with the Cisco Unified ICME software is lost.
Note Because default scripts can run without access to the Cisco Unified ICME software, you should never use any ICM step in a default script.
You set the default script when you configure the Cisco Unified ICME translation route or post-route applications. (For more information, see the Cisco Contact Center Express Administrator Guide.)
If you leave the Default Scripts field blank, the Cisco Unified CCX system runs the system default message, which announces that the system is experiencing technical difficulties.
16-8Cisco Unified Contact Center Express Getting Started with Scripts, Release 11.0(1)

Chapter 16 Designing Scripts for Cisco Unified IP IVRICM Script Types
VRU Scripts Cisco VRU script design does not handle complete calls, but provides different call-handling instructions to be executed sequentially by the Cisco Unified CCX server. For example, the VRU scripts may play a prompt or acquire dual tone multi-frequency (DTMF) values.
The VRU scripts run when the Cisco Unified ICME software sends a Run VRU Script request to the Cisco Cisco Unified CCX system using a Run VRU Script node in an ICM script. Before the Cisco Unified ICME software can call a VRU script, you must configure and upload the script to the Repository. (For details, see the Script Management information in the Cisco Unified Contact Center Express Administration Guide.)
Note Because the VRU scripts run only when the Cisco Cisco Unified CCX system is in communication with the Cisco Unified ICME, you can use any ICM step in a VRU script.
PreConnect scripts and VRU scripts that run when Cisco Unified ICME software sends a connect request to the Cisco Unified CCX system before the Cisco Unified CCX system routes the call. When the Cisco Unified CCX system receives the connect request, it checks the Expanded Call Context variable. If the variable is empty, the Cisco Unified CCX system routes the call to the label sent by the Cisco Unified ICME. If the VRU Script Name variable is not blank, the Cisco Unified CCX system simulates a Run VRU Script request, using the first token of the variable as the file name of the VRU script to run. In addition, the Cisco Unified CCX system sends the ConfigParam variable and other tokens in the VRU Script Name variable to the PreConnect script.
If the PreConnect script returns a result of false, the Cisco Unified CCX system handles it as a failure-to-connect error, and does not attempt to route to the requested destination.
You must enable the VRU Script Name expanded call variable to use this feature. If you want to send values using the ConfigParam variable, you must enable the ConfigParam expanded call variable. For more information, see the “Using Expanded Call Variables” section on page 16-3.
16-9Cisco Unified Contact Center Express Getting Started with Scripts, Release 11.0(1)
Chapter 16 Designing Scripts for Cisco Unified IP IVR Sample VRU Script Templates
Sample VRU Script TemplatesThe Cisco Unified CCX system ships with the following three VRU sample script templates:
• Basic Queuing (BasicQ.aef), page 16-10
• Visible Queuing (VisibleQ.aef), page 16-11
• Collect Digits (CollectDigits.aef), page 16-12
Basic Queuing (BasicQ.aef) The BasicQ script template (BasicQ.aef) does not use any ICM steps. It simply plays several prompts (and puts the call on hold), looping through them until an agent phone becomes free and the Cisco Unified ICME can route the call to the agent.
This script has no variables defined.
The Cisco Unified CCX system accepts the call with the Accept step. Next, it plays the ICMStayOnline.wav file using the Play Prompt step, then puts the call on hold for 30 seconds using the Call Hold and Delay steps.
The script uses the Call UnHold step to take the call off hold, plays the ICMWait4NextAvail.wav file, and then puts the call back on hold for another 60 seconds. This sequence repeats until a connect request is sent to connect the call to an available agent.
16-10Cisco Unified Contact Center Express Getting Started with Scripts, Release 11.0(1)

Chapter 16 Designing Scripts for Cisco Unified IP IVRSample VRU Script Templates
Figure 16-1 shows BasicQ.aef as it appears in the Design pane of the Cisco Unified CCX Editor.
Figure 16-1 BasicQ.aef Script in the Cisco Unified CCX Editor Design Pane
Visible Queuing (VisibleQ.aef) The VisibleQ script template (VisibleQ.aef) uses the GetEnterpriseCallInfo step to retrieve the expected wait time from the Cisco Cisco Unified ICME and to relay that information to the caller.
Before accepting the call, the GetEnterpriseCallInfo step retrieves information for Cisco Cisco Unified ICME. The script copies the value of the expanded call variable user.expected.wait.time to the local variable WaitTime as an Integer.
Then, the Accept step accepts the call. The script plays several messages. It starts by playing ICMVisibleQAnn1.wav. It then plays the variable WaitTime, the ICMSecond.wav file, and ICMVisibleQAnn2.wav file.
The script then puts the call on hold for 30 seconds, takes the call off hold, plays the ICMWait4NextAvail.wav prompt, and puts the call back on hold for another 60 seconds. This sequence loops until an agent is free to take the call, as in the BasicQ script.
16-11Cisco Unified Contact Center Express Getting Started with Scripts, Release 11.0(1)

Chapter 16 Designing Scripts for Cisco Unified IP IVR Sample VRU Script Templates
Figure 16-2 shows VisibleQ script as it appears in the Design pane of the Cisco Unified CCX Editor.
Figure 16-2 VisibleQ.aef Script in the Cisco Unified CCX Editor Design Pane
Collect Digits (CollectDigits.aef) The CollectDigits script template, CollectDigits.aef, uses the Set ICM Data step to collect the caller account numbers, and send them back to the Cisco Unified ICME system.
16-12Cisco Unified Contact Center Express Getting Started with Scripts, Release 11.0(1)

Chapter 16 Designing Scripts for Cisco Unified IP IVRSample VRU Script Templates
Figure 16-3 shows the CollectDigits script as it appears in the Design pane of the Cisco Unified CCX Editor.
Figure 16-3 CollectDigits.aef Script in the Cisco Unified CCX Editor Design Pane
First the Accept step accepts the call, and then the script uses the Get Digit String step to ask the caller to enter an account number, which is assigned to Result Digit String acctno.
The Set Enterprise Call Info step stores the result in Field Name Call.CallerEnteredDigits field so that it can be returned back to the Cisco Unified ICME system for further processing.
16-13Cisco Unified Contact Center Express Getting Started with Scripts, Release 11.0(1)

Chapter 16 Designing Scripts for Cisco Unified IP IVR Sample VRU Script Templates
16-14Cisco Unified Contact Center Express Getting Started with Scripts, Release 11.0(1)

Cisco Unified Contact Center Express Getting St
C H A P T E R 17
Designing Cisco Unified CCX ScriptsCisco Unified Contact Center Express (CCX) is an automatic call distributor (ACD) for enterprise organizations.
You can use the Cisco Unified CCX Editor to design scripts that take advantage of Cisco Unified CCX capability.
This chapter describes the design of such a script, SessionEnabled.aef, and also serves as a good demonstration of the use of the steps from the Session palette for session management and the use of a default script that executes if an error occurs in the main script.
This section contains the following topics:
• A Sample Cisco Unified CCX Script Template, page 17-2
• The Start Step (Creating a Script), page 17-2
• Cisco Unified CCX Script Variables, page 17-3
• The Accept Step, page 17-6
• The Get Contact Info Step, page 17-6
• The Get Session Info Step, page 17-6
• The If Steps, page 17-7
• Recording a Name, page 17-24
• The Select Resource Step, page 17-26
• Using Default Scripts, page 17-32
17-1arted with Scripts, Release 11.0(1)

Chapter 17 Designing Cisco Unified CCX Scripts A Sample Cisco Unified CCX Script Template
A Sample Cisco Unified CCX Script TemplateThe sample Cisco Unified CCX script template performs the following functions:
1. Accepts a call.
2. Asks the caller to enter an account number.
3. Records the caller’s name.
4. Does one of the following:
• Connects the caller to an agent
• Queues the call and sets a priority, based on whether or not the caller has already entered an account number on a previous attempt to connect during the same session, and/or if the main script has already failed and the caller has been re-routed back to the main script.
Figure 17-1 shows the top-level view of the sample Cisco Unified CCX script in the Design pane of the Cisco Unified CCX Editor.
Figure 17-1 Cisco Unified CCX Sample Script Design Pane—Top-level View
The Start Step (Creating a Script)Begin to build the sample script by choosing File > New from the Cisco Unified CCX Editor menu bar. The Templates folder displays. Select the blank script and click OK.
17-2Cisco Unified Contact Center Express Getting Started with Scripts, Release 11.0(1)

Chapter 17 Designing Cisco Unified CCX ScriptsCisco Unified CCX Script Variables
A blank script containing a Start and End step opens in the Design pane of the Cisco Unified CCX Editor window.
The Start step needs no configuration and has no customizer window. At this time, you might also want to give your new script a name and save it by selecting File > Save from the menu bar.
Our example script is called SessionEnabled.aef.
Cisco Unified CCX Script VariablesThe designer begins the script design process by using the Variable pane of the Cisco Unified CCX Editor to define script variables.
Figure 17-2 shows the variables of the sample Cisco Unified CCX script as they appear in the Variable pane of the Cisco Unified CCX Editor.
Figure 17-2 Cisco Unified CCX Sample Script Variable Pane
Table 17-1 describes the variables used in the Cisco Unified CCX sample script.
17-3Cisco Unified Contact Center Express Getting Started with Scripts, Release 11.0(1)

Chapter 17 Designing Cisco Unified CCX Scripts Cisco Unified CCX Script Variables
Table 17-1 Variable Descriptions for the Sample Cisco Unified CCX Script
Variable NameVariable Type Value Function
CSQ String "" Stores Contact Service Queue information from which to find a resource. (See The Select Resource Step, page 17-26.)
The designer marks this variable as a parameter to allow the administrator the option to change the value of this variable.
For more information, see the Cisco Unified Contact Center Express Administration Guide.
DelayWhileQueued Integer 30 Length of time the script will delay before sending the call back through the queue loop. (See The Queued Output Branch, page 17-30.)
The designer marks this variable as a parameter to allow the administrator the option to change the value of this variable.
For more information, see the Cisco Unified Contact Center Express Administration Guide.
WelcomePrompt Prompt P[CDWelcome.wav Welcomes the caller. (See The Play Prompt Step, page 17-11.)
The designer marks this variable as a parameter to allow the administrator the option to change the value of this variable.
For more information, see the Cisco Unified Contact Center Express Administration Guide.
17-4Cisco Unified Contact Center Express Getting Started with Scripts, Release 11.0(1)

Chapter 17 Designing Cisco Unified CCX ScriptsCisco Unified CCX Script Variables
accountNum String "" Stores the account number entered by the caller. (See The Play Prompt Step, page 17-11.)
failureCount Integer 0 Stores the number of times a call has failed. (See The Session Steps, page 17-14)
language Language English (United States) (en_US)
Stores the language selection made by the caller. (See The Third If Step, page 17-9.)
name Document null Stores the spoken name of the caller. (See Recording a Name, page 17-24)
prompted Boolean false Stores information to determine whether or not the caller has heard WelcomePrompt. (See The First If Step, page 17-9.)
queued Boolean false Stores the information used to determine whether or not the call has been queued. This information will be useful in the default script to determine whether or not the main script failed while in or outside of queue. (See The Connected Output Branch, page 17-28 and The Queued Output Branch, page 17-30.)
resourceID String "" Stores the Resource ID of the chosen agent. (See The Select Resource Step, page 17-26.)
session Session null Stores session information for the call. (See The Get Contact Info Step, page 17-6.)
session2 Session null Stores previous session information based on the accountNum variable. (See The Session Steps, page 17-14.)
Table 17-1 Variable Descriptions for the Sample Cisco Unified CCX Script (continued)
Variable NameVariable Type Value Function
17-5Cisco Unified Contact Center Express Getting Started with Scripts, Release 11.0(1)

Chapter 17 Designing Cisco Unified CCX Scripts The Accept Step
The Accept StepThe designer continues to build the sample script by dragging an Accept step (from the Contact palette in the Palette pane) to the Design pane of the Cisco Unified CCX Editor window, as shown in Figure 17-1.
The script uses an Accept step to accept a contact, in this case a telephone call.
The Get Contact Info StepThe designer continues to build the sample script by adding a Get Contact Info step, which determines whether or not contact information already exists for this caller (based on a previous call).
The Get Contact Info step extracts information from the Session object and stores it in a Session variable named session.
The Get Session Info StepThe designer continues to build the sample script by adding a Get Session Info step, which evaluates the value of session, attempting to retrieve previous information collected from the caller, who may have been disconnected during a previous call or transferred back into the Cisco Unified CCX queue by an agent. A caller can be transferred back into the queue if the script fails, in which case the Cisco Cisco Unified CCX system falls back to the default script (see Using Default Scripts, page 17-32), or if an agent routes the call back to the route point.
17-6Cisco Unified Contact Center Express Getting Started with Scripts, Release 11.0(1)
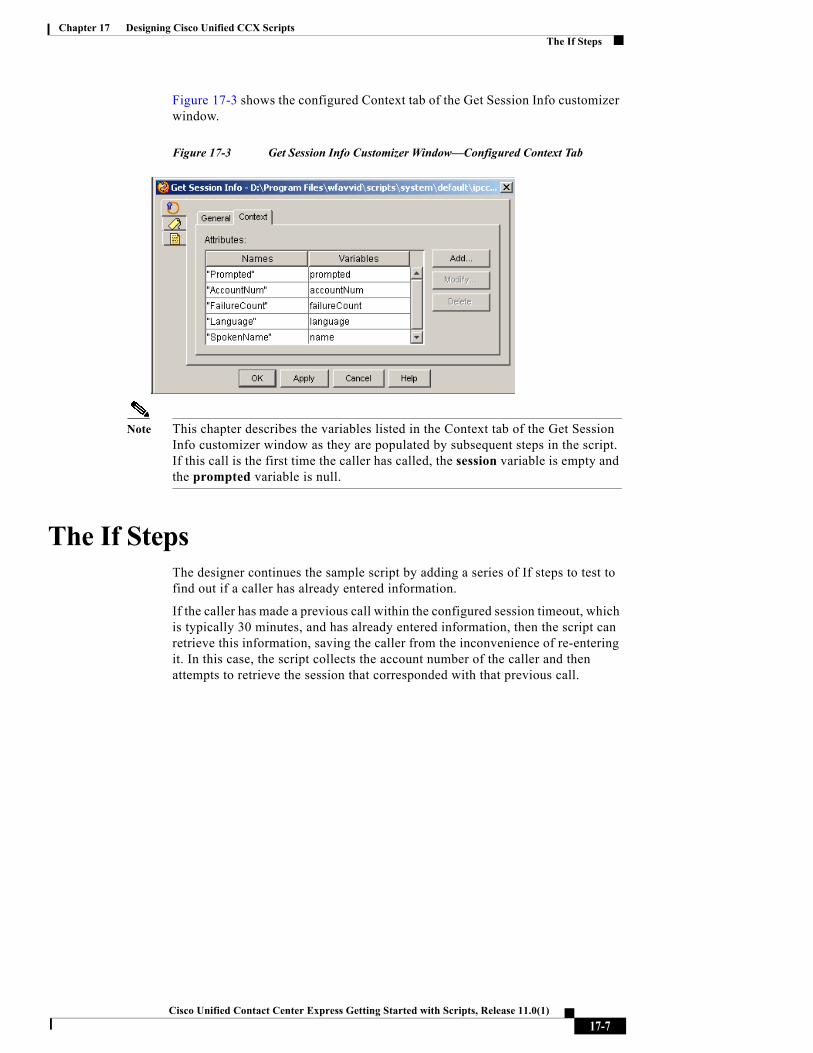
Chapter 17 Designing Cisco Unified CCX ScriptsThe If Steps
Figure 17-3 shows the configured Context tab of the Get Session Info customizer window.
Figure 17-3 Get Session Info Customizer Window—Configured Context Tab
Note This chapter describes the variables listed in the Context tab of the Get Session Info customizer window as they are populated by subsequent steps in the script. If this call is the first time the caller has called, the session variable is empty and the prompted variable is null.
The If StepsThe designer continues the sample script by adding a series of If steps to test to find out if a caller has already entered information.
If the caller has made a previous call within the configured session timeout, which is typically 30 minutes, and has already entered information, then the script can retrieve this information, saving the caller from the inconvenience of re-entering it. In this case, the script collects the account number of the caller and then attempts to retrieve the session that corresponded with that previous call.
17-7Cisco Unified Contact Center Express Getting Started with Scripts, Release 11.0(1)

Chapter 17 Designing Cisco Unified CCX Scripts The If Steps
If an agent transferred the call back into the queue managed by this script, then the session that stores all the collected information is still associated with the call. The series of If steps at the beginning of the script verifies this fact, after having retrieved this information from the session using the Get Session Info step.
Figure 17-4 shows the scripting under the first three If steps in the beginning of the sample Cisco Unified CCX script.
Figure 17-4 If Steps
This section contains the following steps:
• The First If Step, page 17-9
• The Second If Step, page 17-9
• The Third If Step, page 17-9
• The Fourth If Step, page 17-10
• The Play Prompt Step, page 17-11
• The Get Digit String Step, page 17-11
• The Session Steps, page 17-14
• Choosing a Language, page 17-21
17-8Cisco Unified Contact Center Express Getting Started with Scripts, Release 11.0(1)

Chapter 17 Designing Cisco Unified CCX ScriptsThe If Steps
The First If StepThe designer adds the first If step to evaluate the expression, prompted==null; or, the value of the prompted variable (which was obtained from the session) is equal to null.
The script uses the Boolean prompted variable to determine whether or not the caller has heard the WelcomePrompt prompt (which plays later in the script).
If the expression is true, then the Set step under the True output branch has not executed yet, because when it does execute, it sets the value of prompted to false. (See Figure 17-4.)
Note A false value, when tested by a subsequent If step, tells the script that the caller has already entered an account number, and the script falls through to a Select Resource step to attempt to connect to an agent.
The Second If StepThe designer adds a second If step to evaluate the expression, failureCount==null; or, the value of the failureCount variable (which was obtained from the session) is equal to null.
The script uses the failureCount Integer variable to determine how many times the call has failed. If the expression is true, this tells the script that this is the first time for this call, and the Set step initializes the value of failureCount to 0. (See Figure 17-4.) This information will be useful later in the script to determine priority of queueing and in the associated default script to determine if the call has failed more then once in the main script.
If this expression is false, then the value of failureCount is not changed.
The Third If StepThe designer adds a third If step to evaluate the expression, language!=null; or, the value of the language variable (which was obtained from the session) is not equal to null.
17-9Cisco Unified Contact Center Express Getting Started with Scripts, Release 11.0(1)
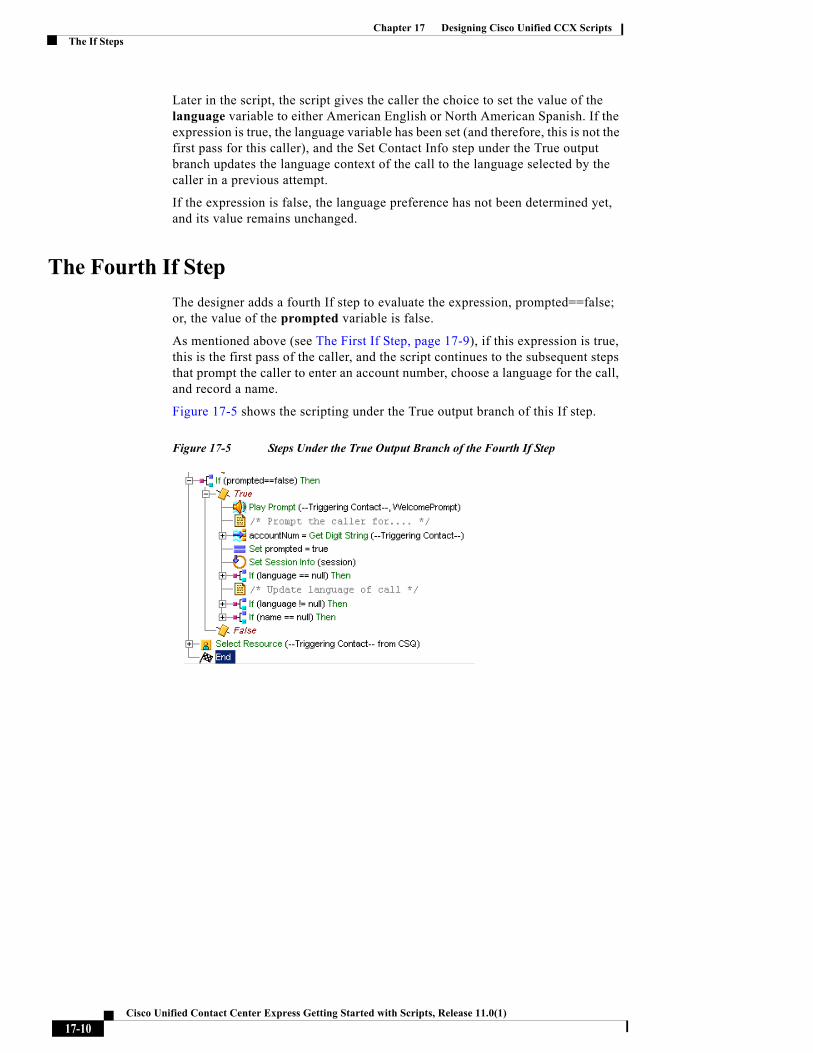
Chapter 17 Designing Cisco Unified CCX Scripts The If Steps
Later in the script, the script gives the caller the choice to set the value of the language variable to either American English or North American Spanish. If the expression is true, the language variable has been set (and therefore, this is not the first pass for this caller), and the Set Contact Info step under the True output branch updates the language context of the call to the language selected by the caller in a previous attempt.
If the expression is false, the language preference has not been determined yet, and its value remains unchanged.
The Fourth If StepThe designer adds a fourth If step to evaluate the expression, prompted==false; or, the value of the prompted variable is false.
As mentioned above (see The First If Step, page 17-9), if this expression is true, this is the first pass of the caller, and the script continues to the subsequent steps that prompt the caller to enter an account number, choose a language for the call, and record a name.
Figure 17-5 shows the scripting under the True output branch of this If step.
Figure 17-5 Steps Under the True Output Branch of the Fourth If Step
17-10Cisco Unified Contact Center Express Getting Started with Scripts, Release 11.0(1)
Chapter 17 Designing Cisco Unified CCX ScriptsThe If Steps
If this expression is false, the steps under the True output branch of this If step have already been executed on a previous attempt, and the script can send the caller directly to the Select Resource step to be connected to an agent or placed in queue.
The True output branch of the fourth If step contains the following steps:
• The Play Prompt Step, page 17-11
• The Get Digit String Step, page 17-11
• The Session Steps, page 17-14
• Choosing a Language, page 17-21
• Recording a Name, page 17-24
The Play Prompt StepThe Play Prompt step under the True output branch of If step plays back the prompt WelcomePrompt, which welcomes the caller.
The Get Digit String StepAfter this Play Prompt step executes, the Get Digit String step prompts the caller to enter an account number and then receives caller input.
The designer configures the Get Digit String customizer window as follows:
• General tab
– Contact—Triggering Contact
The contact that triggered the script remains the contact for this step.
– Interruptible—Yes
External events can interrupt the execution of this step.
– Result Digit String—accountNum
The accountNum variable stores the digits entered by the caller (and is used by the subsequent Session steps).
17-11Cisco Unified Contact Center Express Getting Started with Scripts, Release 11.0(1)

Chapter 17 Designing Cisco Unified CCX Scripts The If Steps
• Prompt tab
– Prompt—P[EnterAccountNum]
This prompt asks the caller to enter an account number.
Barge In—Yes
The caller can enter an account number without first having to listen to the playback of the entire prompt.
– Continue on Prompt Errors—Yes
In the event of a prompt error, the script continues to play back the next prompt in the sequence, or waits for caller input if the last prompt has been played.
• Input tab
– Initial Timeout (in sec)—5
The system waits 5 seconds for initial input from the caller before executing the Timeout output branch (after the maximum number of retries has been reached).
– Interdigit Timeout (in sec)—3
The system waits 3 seconds for the caller to enter the next digit, after receiving initial input from the caller, before executing the Timeout output branch (after the maximum number of retries has been reached).
(Does not apply for ASR channels.)
– Maximum Retries—3
The step makes 3 retries to receive valid input before executing the Unsuccessful output branch.
– Flush Input Buffer—No
The system saves previously entered input while the caller types ahead.
– Clear Input Buffer on Retry—Yes
The script clears the input buffer, erasing previously-entered digits whenever the step makes a new attempt at collecting caller input.
17-12Cisco Unified Contact Center Express Getting Started with Scripts, Release 11.0(1)

Chapter 17 Designing Cisco Unified CCX ScriptsThe If Steps
• Filter tab
– Input Length—10
The minimum number of digits required before the step returns automatically is 10. (This minimum number applies only to non-ASR channels; however, with ASR channels no more digits than specified will be returned.)
– Digits Filter
All the numeric options are checked. The alphabetical options and “*” and “#” and not selected.
The step treats the numbers from 0 to 9 as valid entries, and treats the keys “*” and “#” and the letters A through D as invalid characters to collect.
– Terminating Digit—#
The key the caller can use to indicate completion of input.
– Cancel Digit—*
The key the caller can use to start over. (The cancel key works only until the script reaches the maximum number of retries.)
As shown in Figure 17-6, The Get Digit String step has three output branches.
• Successful—If the Successful output branch executes, the script uses a series of Session steps as described in the next section.
• Timeout—If the Timeout output branch executes, a Set step sets the accountNum to null, meaning that the account number was not received, and so the script treats the call as new.
• Unsuccessful—If the Unsuccessful output branch executes, a Set step sets the accountNum to null, meaning that the account number was not received, and so the script treats the call as new.
17-13Cisco Unified Contact Center Express Getting Started with Scripts, Release 11.0(1)

Chapter 17 Designing Cisco Unified CCX Scripts The If Steps
Figure 17-6 Get Digit String Step—Output Branches
The Session StepsThis section describes the session management tasks accomplished by the scripting under the Successful output branch of the Get Digit String step.
The script determines whether or not the caller has made a recent call and previously entered all the necessary information, in which case a session may already exist. The script uses the account number to map the current call to any previous session information. The subsequent steps attempt to retrieve the previous session and if found, associate this new call contact with the original session.
17-14Cisco Unified Contact Center Express Getting Started with Scripts, Release 11.0(1)

Chapter 17 Designing Cisco Unified CCX ScriptsThe If Steps
Figure 17-7 shows the scripting under the Successful output branch of the Get Digit String step.
Figure 17-7 Get Digit String Step—Successful Output Branch
The Get Session step under the Annotate step attempts to get previous session information based on the accountNum variable, and to store it in the session2 variable. (This information is useful to the subsequent If step, which tests to determine whether or not session information existed for the previous call.)
Figure 17-8 shows the context tab of the configured Get Session customizer window.
17-15Cisco Unified Contact Center Express Getting Started with Scripts, Release 11.0(1)

Chapter 17 Designing Cisco Unified CCX Scripts The If Steps
Figure 17-8 Configured Get Session Customizer Window
The If step under the Get Session step evaluates the expression session2!=null; or, the session2 variable is not null.
If this expression is true, session information does exist for the previous call, and the script uses the following steps under the True output branch of the If step (see Figure 17-8) in order to re-associate the current call to this older session:
• Set step— Sets the value of the session variable to equal the session2 variable.
The session variable is used by subsequent steps in the script so that from this step on, the script uses only the previous session information.
• Set Contact Info step—Associates the new call to the old session and deletes the temporary blank session that the script automatically associated with the new call.
• Get Session Info step—Uses the session variable to retrieve values for the failureCount and language variables (used by subsequent If steps).
• If step—Evaluates the expression failureCount==null; or, the value of the failureCount variable is equal to null.
– If the True output branch executes and failureCount is empty, the call has not failed before this step, and a Set step initializes the value to 0.
– If the False output branch executes and failureCount has already been assigned a value, then this value is left unchanged and is subsequently used to determine the queuing priority to assign to this call.
17-16Cisco Unified Contact Center Express Getting Started with Scripts, Release 11.0(1)

Chapter 17 Designing Cisco Unified CCX ScriptsThe If Steps
If the expression session2!=null is false, then session information no longer exists, and the Session Mapping step adds new mapping for this session.
The script then continues with the temporary session object that the script originally associated with this call, and then re-populates the information by collecting it from the caller. The script maps the new session using the account number so that the script can retrieve it later for another call from the same customer.
Figure 17-9 shows the configured Session Mapping customizer window.
Figure 17-9 Configured Session Mapping Customizer Window
As shown in Figure 17-10, after the steps under the Get Digit String step execute, a Set step sets the value of the prompted variable to true.
17-17Cisco Unified Contact Center Express Getting Started with Scripts, Release 11.0(1)
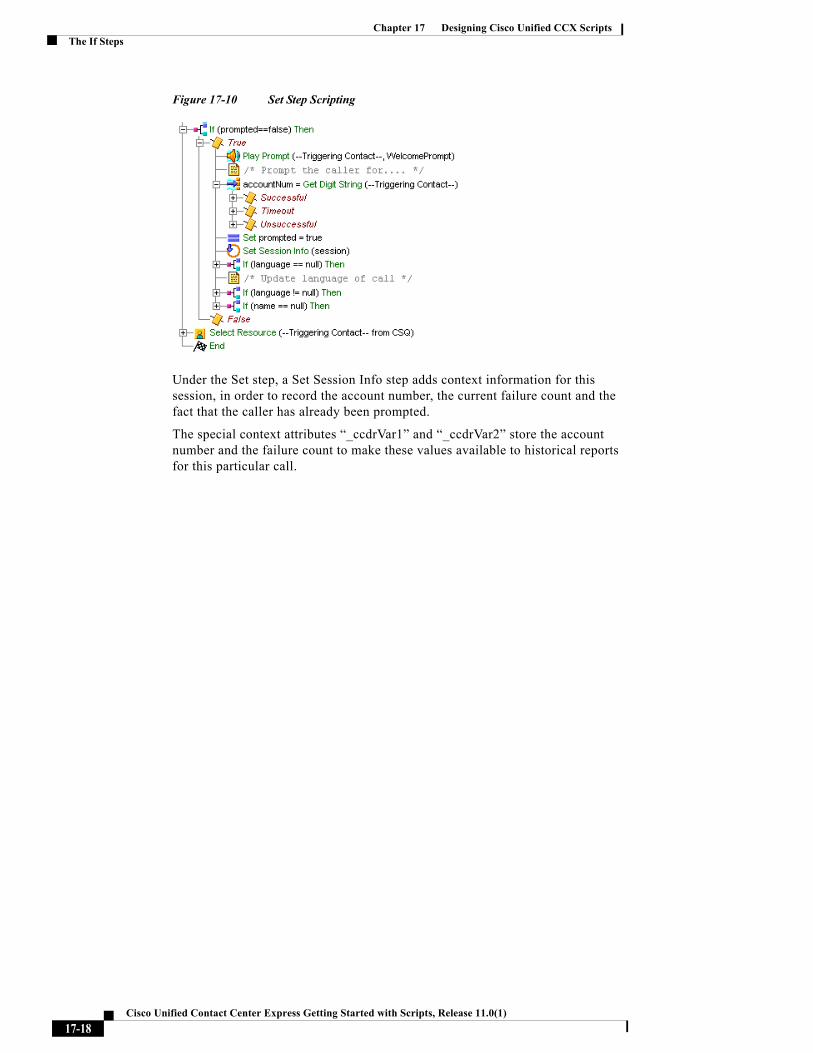
Chapter 17 Designing Cisco Unified CCX Scripts The If Steps
Figure 17-10 Set Step Scripting
Under the Set step, a Set Session Info step adds context information for this session, in order to record the account number, the current failure count and the fact that the caller has already been prompted.
The special context attributes “_ccdrVar1” and “_ccdrVar2” store the account number and the failure count to make these values available to historical reports for this particular call.
17-18Cisco Unified Contact Center Express Getting Started with Scripts, Release 11.0(1)

Chapter 17 Designing Cisco Unified CCX ScriptsThe If Steps
Figure 17-11 shows the configured Context tab of the Set Session Info customizer window.
Figure 17-11 Set Session Info Customizer Window—Configured Context Tab
The Set Session Info step adds the context information described in Table 17-2.
Table 17-2 Set Session Info Properties
Attribute Value Description
Prompted prompted Stores the value that indicates whether or not the caller has previously heard the welcoming prompt.
AccountNum accountNum Caller account number
_ccdrVar1 accountNum Places the specified variable values in the Contact Call Detail Record (CCDR) for this call. (You can write a custom report to display these values.)
17-19Cisco Unified Contact Center Express Getting Started with Scripts, Release 11.0(1)

Chapter 17 Designing Cisco Unified CCX Scripts The If Steps
_ccdrVar2 failureCount Places the specified variable values in the Contact Call Detail Record (CCDR) for this call. (You can write a custom report to display these values.)
FailureCount failureCount Stores the value that indicates how many times the call has failed, in order to set queueing priority (or in the default script, to decide if the script attempts to queue the caller again by re-routing the call back to the main script or announces that “we are experiencing problems” and requests the caller to call back later.
Table 17-2 Set Session Info Properties (continued)
Attribute Value Description
17-20Cisco Unified Contact Center Express Getting Started with Scripts, Release 11.0(1)
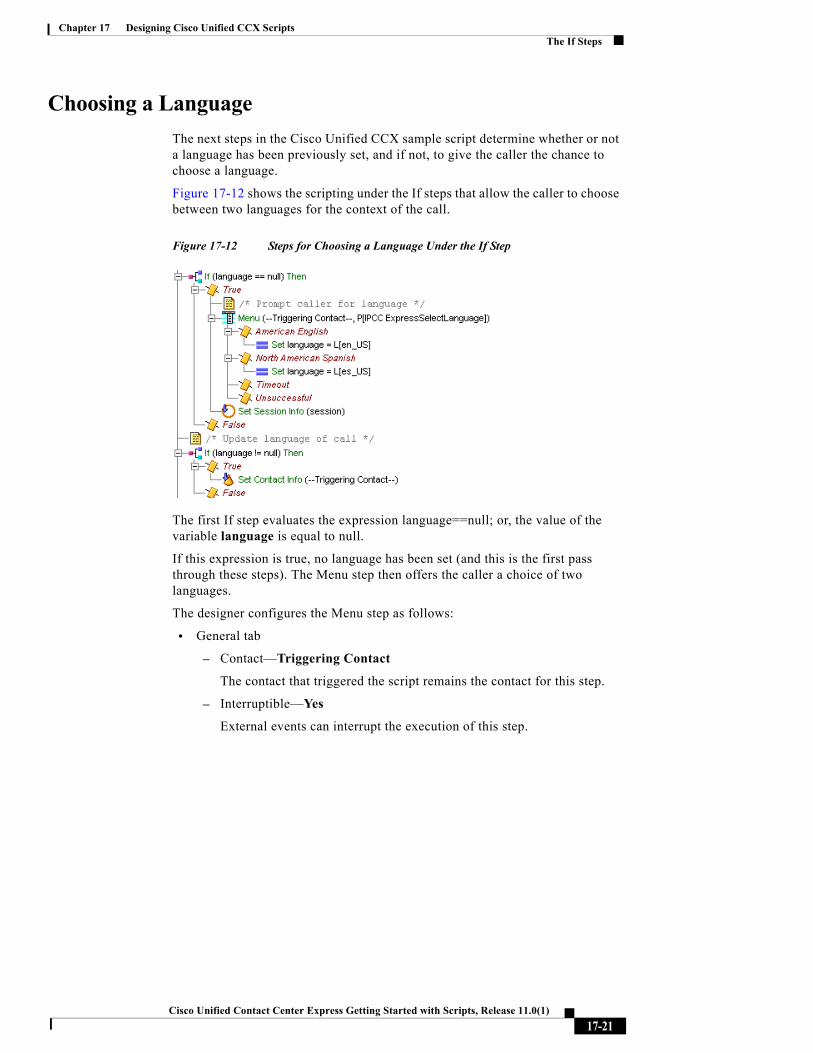
Chapter 17 Designing Cisco Unified CCX ScriptsThe If Steps
Choosing a LanguageThe next steps in the Cisco Unified CCX sample script determine whether or not a language has been previously set, and if not, to give the caller the chance to choose a language.
Figure 17-12 shows the scripting under the If steps that allow the caller to choose between two languages for the context of the call.
Figure 17-12 Steps for Choosing a Language Under the If Step
The first If step evaluates the expression language==null; or, the value of the variable language is equal to null.
If this expression is true, no language has been set (and this is the first pass through these steps). The Menu step then offers the caller a choice of two languages.
The designer configures the Menu step as follows:
• General tab
– Contact—Triggering Contact
The contact that triggered the script remains the contact for this step.
– Interruptible—Yes
External events can interrupt the execution of this step.
17-21Cisco Unified Contact Center Express Getting Started with Scripts, Release 11.0(1)

Chapter 17 Designing Cisco Unified CCX Scripts The If Steps
• Prompt tab
– Prompt—P[SelectLanguage]
This system prompt asks the caller to choose a language.
– Barge In—Yes
The caller can choose a language without first having to listen to the playback of the entire prompt.
– Continue on Prompt Errors—Yes
In the event of a prompt error, the script continues to play back the next prompt in the sequence, or waits for caller input if the last prompt has been played.
• Input tab
– Timeout (in sec)—3
The script executes the Timeout output branch if no input is received within 3 seconds and the script has reached the maximum number of retries.
– Maximum Retries—3
The step makes 3 attempts to receive valid input before executing the Unsuccessful output branch.
– Flush Input Buffer—No
The system does not erase previously entered input before capturing new caller input.
• Filter tab
– Add as connection options: American English and North American Spanish.
The Menu step in this script has the following output branches (see Figure 17-12):
• American English—If the caller chooses this choice, a Set step sets the language variable to en_US, or American English.
• North American Spanish—If the caller chooses this choice, a Set step sets the language variable to es_US, or North American Spanish.
17-22Cisco Unified Contact Center Express Getting Started with Scripts, Release 11.0(1)
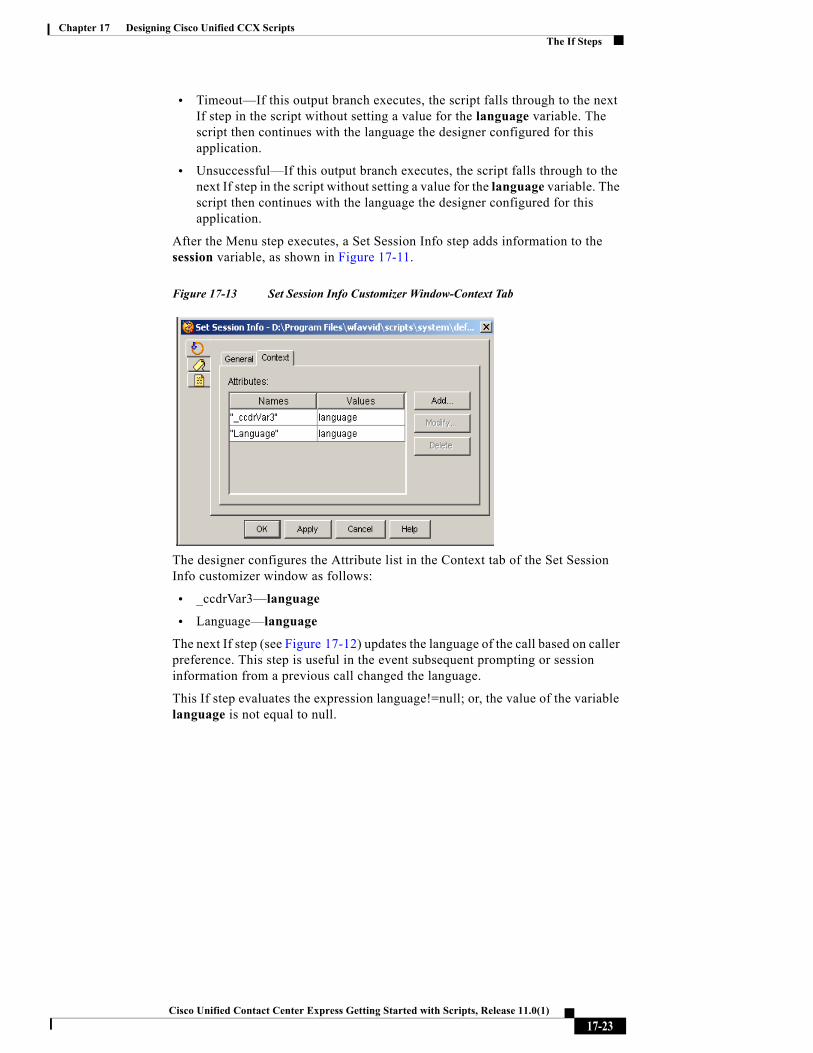
Chapter 17 Designing Cisco Unified CCX ScriptsThe If Steps
• Timeout—If this output branch executes, the script falls through to the next If step in the script without setting a value for the language variable. The script then continues with the language the designer configured for this application.
• Unsuccessful—If this output branch executes, the script falls through to the next If step in the script without setting a value for the language variable. The script then continues with the language the designer configured for this application.
After the Menu step executes, a Set Session Info step adds information to the session variable, as shown in Figure 17-11.
Figure 17-13 Set Session Info Customizer Window-Context Tab
The designer configures the Attribute list in the Context tab of the Set Session Info customizer window as follows:
• _ccdrVar3—language
• Language—language
The next If step (see Figure 17-12) updates the language of the call based on caller preference. This step is useful in the event subsequent prompting or session information from a previous call changed the language.
This If step evaluates the expression language!=null; or, the value of the variable language is not equal to null.
17-23Cisco Unified Contact Center Express Getting Started with Scripts, Release 11.0(1)

Chapter 17 Designing Cisco Unified CCX Scripts The If Steps
If this expression is true, the caller has chosen a language. In this case, the Set Contact Info step then makes the information in the language variable available to the rest of the script.
Note The script could also modify the value of the CSQ variable to account for the language chosen by the caller. For example, the system may contain one CSQ for English-speaking callers and another CSQ for Spanish speakers.
Recording a NameAnother If step evaluates the expression, name==null; or, the value of the name variable obtained from the session is equal to null.
As shown in Figure 17-14, if this expression is true, the caller has not previously recorded a name, and so the Recording step prompts the caller to do so.
Figure 17-14 Recording Step Scripting
If the Recording step is successful, the Set Session Info step adds this value of the name variable to the session so that it may be used again later; for example, to provide a more personal service.
17-24Cisco Unified Contact Center Express Getting Started with Scripts, Release 11.0(1)

Chapter 17 Designing Cisco Unified CCX ScriptsThe If Steps
Figure 17-15 shows the configured Context tab of the Set Session Info customizer window.
Figure 17-15 Configured Set Session Info Customizer Window—Context Tab
17-25Cisco Unified Contact Center Express Getting Started with Scripts, Release 11.0(1)

Chapter 17 Designing Cisco Unified CCX Scripts The Select Resource Step
The Select Resource StepThe designer continues to build the sample script by adding a Select Resource step, which queues a call to a specific set of agents, based on the configuration in the Cisco Unified CCX Administration web interface.
Figure 17-16 shows the configured Select Resource customizer window.
Figure 17-16 Configured Select Resource Customizer Window
The designer configures the Select Resource customizer window as follows:
• Call Contact—Triggering Contact
The step connects the call that triggered the script to the available resource.
• Routing Target Type—Contact Service Queue
Variable indicating the routing method. The call will be routed to an available agent in the specified CSQ.
17-26Cisco Unified Contact Center Express Getting Started with Scripts, Release 11.0(1)

Chapter 17 Designing Cisco Unified CCX ScriptsThe Select Resource Step
Note If you set this field to Resource, the CSQ Target field is renamed to Resource Target. Resource Routing Target Type is only available for Cisco Unified CCX Enhanced Edition. If you use Resource Routing Target Type with Cisco Unified CCX Standard edition, Cisco Unified CCX Engine will be unable to load the script.
• CSQ Target—CSQ
The CSQ String variable stores Contact Service Queue information from which to find a resource.
• Connect—Yes
The call automatically connects the call to the available resource the instant the resource becomes available.
Note If No is selected, the step chooses the resource, if available, but does not yet connect it. In this situation, the designer can add additional script steps to the Selected output branch before connecting the call to the resource. If the resource is unavailable, the step queues the call.
• Timeout—12
The step waits 12 seconds before the script retrieves the contact back into the queue.
• Resource Selected
This is an optional user string variable identifying the chosen agent. This is left blank in the example application.
For more information about the Select Resource step, see the “ACD Step Descriptions,” in the Cisco Unified Contact Center Express Scripting and Development Series: Volume 1, Script Reference Guide.
Note For more information on configuring agents, see the Cisco Unified Contact Center Express Administration Guide.
The Select Resource step has two output branches, Connected and Queued, which are described in the following sections.
17-27Cisco Unified Contact Center Express Getting Started with Scripts, Release 11.0(1)

Chapter 17 Designing Cisco Unified CCX Scripts The Select Resource Step
The Connected Output BranchWhen the script connects the call to an agent, the steps under the Connected output branch of the Select Resource step modify variable values and session information in order to help set priorities should the call later need to be queued.
Figure 17-17 shows the scripting under the Connected output branch of the Select Resource step.
Figure 17-17 Select Resource Step Scripting—Connected Output Branch
The following steps execute under the Connected output branch:
• Set step—Sets the value of the queued variable to false.
This value indicates that the call has not been queued.
• Set step—Sets the value of the variable failureCount to 0.
The failureCount variable stores the information on how many times the call has failed.
• Set Session Info step—Updates the session variable to include the new value for the failureCount variable.
17-28Cisco Unified Contact Center Express Getting Started with Scripts, Release 11.0(1)

Chapter 17 Designing Cisco Unified CCX ScriptsThe Select Resource Step
Figure 17-18 shows the configured Set Session Info customizer window.
Figure 17-18 Set Session Info Customizer Window—Context Tab
17-29Cisco Unified Contact Center Express Getting Started with Scripts, Release 11.0(1)

Chapter 17 Designing Cisco Unified CCX Scripts The Select Resource Step
The Queued Output BranchAs shown in Figure 17-19, if the script has queued the call, a series of steps under the Queued output branch of the Select Resource step modify priority settings, depending on how many times the call has looped through these queue steps.
Figure 17-19 Select Resource Step Scripting—Queued Output Branch
The Set step under the Queued output branch sets the value of the queued variable to true.
After the Set step, a series of If steps and Set Priority steps modify call priority based on the following variables:
• accountNum
– If the expression accountNum!=null is true, the caller has already entered an account number, and so a Set Priority step increases the priority of the call by 1.
17-30Cisco Unified Contact Center Express Getting Started with Scripts, Release 11.0(1)

Chapter 17 Designing Cisco Unified CCX ScriptsThe Select Resource Step
This allows the script to give more priority to a customer who has previously entered an account number.
– If the expression accountNum!=null is false, the caller has not entered an account number, and so a Set Priority step decreases the priority of the call by 1.
• failureCount
– If the expression failureCount > 0 is true, this is means that the call has already failed, and so a Set Priority step increases the priority of the call by 1.
By increasing the priority of this caller, the script attempts to reduce the time in queue that the caller will have to spend the second time in queue.
– If the expression failureCount > 0 is false, this is means that the call has not already failed, and the script does not modify the priority.
After these If steps, the designer establishes a loop by using a Label step named queueLoop, followed by a Play Prompt step, a Call Hold step, a Delay step, and finally a Goto step, which directs the script back to the queueLoop Label.
The Play Prompt step informs the caller that the call has been placed on hold, the Call Hold step places the call on hold, and the Delay step delays the call based on the length of time stored in the DelayWhileQueued variable (which in this script is 30 seconds).
The designer configures the Delay step to be interruptible in the event of an agent becoming available, at which point the script connects the call based on the information in the Select Resource step.
17-31Cisco Unified Contact Center Express Getting Started with Scripts, Release 11.0(1)

Chapter 17 Designing Cisco Unified CCX Scripts Using Default Scripts
Using Default ScriptsA default script provides a final feedback to the contact regarding a system problem (and does not continue a service or restart a service).
The Cisco Cisco Unified CCX system automatically invokes a default script if the main script:
• Cannot be loaded.
• Terminates abnormally because of a system or script error.
All script variables from the main script can initialize the default script variables, if the designer defines them using the same name and type.
This section contains the following sections:
• Variables for a Default Cisco Unified CCX Script, page 17-32
• Writing a Default Script, page 17-34
Variables for a Default Cisco Unified CCX ScriptFigure 17-20 shows the Variable pane of a default Cisco Unified CCX script.
Figure 17-20 Variable Pane of the Default Cisco Unified CCX Script
17-32Cisco Unified Contact Center Express Getting Started with Scripts, Release 11.0(1)

Chapter 17 Designing Cisco Unified CCX ScriptsUsing Default Scripts
Table 17-3 describes the variables used in the example default Cisco Unified CCX script.
Table 17-3 Variable Descriptions for the Example Default Cisco Unified CCX Script
Variable Name
Variable Type Value Function Correspondence
CSQ String — Stores Contact Service Queue information from which to find a resource.
(See The Select Resource Step, page 17-26.)
This variable is populated with the corresponding value of the variable with the same name from the main Cisco Unified CCX script.
session Session null Stores session information for the call.
(See The Get Contact Info Step, page 17-6.)
This variable is populated with the corresponding value of the variable with the same name from the main Cisco Unified CCX script.
failureCount Integer 0 Stores the number of times a call has failed.
(See The Session Steps, page 17-14)
This variable is populated with the corresponding value of the variable with the same name from the main Cisco Unified CCX script.
accountNum String — Stores the account number entered by the caller.
(See The Play Prompt Step, page 17-11.)
This variable is populated with the corresponding value of the variable with the same name from the main Cisco Unified CCX script.
name Document null Stores the spoken name of the caller.
(See Recording a Name, page 17-24)
This variable is populated with the corresponding value of the variable with the same name from the main Cisco Unified CCX script.
17-33Cisco Unified Contact Center Express Getting Started with Scripts, Release 11.0(1)

Chapter 17 Designing Cisco Unified CCX Scripts Using Default Scripts
Writing a Default ScriptThe following example describes a sample Cisco Unified CCX default script using the variables described in the previous section.
The default script performs the following function:
• If it is the first time the call has failed, the script prompts the caller (with their name, if available), and asks the caller to stay on the line while the script makes another attempt to connect to an agent by transferring the caller back to the route point originally configured for the application.
In this case, the session remains associated with the new incoming call received by the main Cisco Unified CCX script.
• If this is the second time the call has failed, the script redirects the caller to an announcement indicating that the call cannot be connected, and then asks the caller to call back later.
active Boolean true Stores information to determine whether or not the call is active.
(See Using Default Scripts, page 17-32.)
—
queued Boolean false Stores the information used to determine whether or not the call has been queued.
(See The Connected Output Branch, page 17-28 and The Queued Output Branch, page 17-30.)
This variable is populated with the corresponding value of the variable with the same name from the main Cisco Unified CCX script.
extn String — Stores the extension used by the Call Redirect step to attempt to re-queue the caller.
(See Using Default Scripts, page 17-32.)
—
Table 17-3 Variable Descriptions for the Example Default Cisco Unified CCX Script (continued)
Variable Name
Variable Type Value Function Correspondence
17-34Cisco Unified Contact Center Express Getting Started with Scripts, Release 11.0(1)

Chapter 17 Designing Cisco Unified CCX ScriptsUsing Default Scripts
Figure 17-21 shows the top level of the example Cisco Unified CCX default script as it appears in the Design pane.
Figure 17-21 Cisco Unified CCX Default Script—Top Level
The Get Contact Info step determines whether or not the call is active (if the call is no longer active, then it means that the caller has hung up).
As shown in Figure 17-22, the If step underneath the Get Contact Info step evaluates this information, and if the call is not active, an End step underneath the True output branch of this If step ends the call.
Figure 17-22 Cisco Unified CCX Default Script—Inactive Call
If the call is active, then the next If step determines whether or not the call is in queue. If the call is in queue, a Dequeue step dequeues the call, and a Call Unhold step takes the call off hold.
Note It is important to remember that the script defines the queued variable with the same type and name as in the main Cisco Unified CCX script, so that its value is populated with the last value of the corresponding variable in the Cisco Unified CCX script.
17-35Cisco Unified Contact Center Express Getting Started with Scripts, Release 11.0(1)

Chapter 17 Designing Cisco Unified CCX Scripts Using Default Scripts
If the call is active, then an Accept step accepts the call.
This is done to make sure that the call is accepted. If the Cisco Unified CCX script had failed before the Accept step, the call would still be ringing and the script would not be able to provide any feedback to the caller as to the error that was encountered.
Figure 17-23 shows the scripting of these steps.
Figure 17-23 Cisco Unified CCX Default Script—Queued Status
As shown in Figure 17-24, since one of the main functions of this script is to determine the number of times the call has failed, the designer uses an Increment step to increase the value of the failureCount variable by 1.
Figure 17-24 Cisco Unified CCX Default Script—Session and Name Status
The If step under the Increment step tests the value of the session variable. If the value of this variable is not null, there is session information associated with the call that needs to be updated by the Set Session Info step, which updates value of the failureCount variable.
The next If step tests for the value of the name variable. If the caller has recorded a name into this variable in the main Cisco Unified CCX script, then a Play Prompt step plays this name, followed by a short silence.
17-36Cisco Unified Contact Center Express Getting Started with Scripts, Release 11.0(1)

Chapter 17 Designing Cisco Unified CCX ScriptsUsing Default Scripts
As shown in Figure 17-25, the next steps determine which of two prompts the caller hears after the short silence, depending on whether the call has failed once or twice.
Figure 17-25 Cisco Unified CCX Default Script—Prompts
If the value of failureCount is 1, then the Play Prompt plays a prompt explaining that there were problems in connecting, and asking the caller to stay on the line while another attempt is made to connect to an agent. The Call Redirect step then attempts to connect the caller to the extension the caller entered, using the extn variable. If this is successful, an End step ends the script.
If the value of failureCount is not 1, it must be 2, in which case the Set step sets the value of the extn variable to a user prompt that the script uses to announce that the call could not be connected and asking the caller to call back later. The Call Redirect step redirects the caller to this announcement, and an End step ends the script.
17-37Cisco Unified Contact Center Express Getting Started with Scripts, Release 11.0(1)

Chapter 17 Designing Cisco Unified CCX Scripts Using Default Scripts
17-38Cisco Unified Contact Center Express Getting Started with Scripts, Release 11.0(1)

Cisco Unified Contact Center Express Getting St
C H A P T E R 18
Designing Cisco Unified Gateway ScriptsYou can design Cisco Unified CCX scripts to interact with Cisco Unified ICM Enterprise (ICME) scripts in a Cisco Unified Contact Center Express (CCX) system integrated with a Cisco Unified ICME system through the Cisco Unified Gateway.
In such an integrated system, the Cisco Unified CCX software is linked as an ACD to the Cisco Unified ICME software.
This chapter contains the following topics:
• Scripting on a Cisco Unified Gateway System, page 18-2
• Using Variables, page 18-3
– Using Cisco Pre-Defined Enterprise Call Variables, page 18-4
– Using Enterprise Expanded Call Context (ECC) Variables, page 18-5
– Using Variables Multiple Times, page 18-8
• Example Cisco Unified Gateway Post-Routing Scripts, page 18-9
– A Sample Cisco Unified CCX Script that Selects a CSQ, page 18-11
– A Sample Cisco Unified CCX Script that Selects an Agent, page 18-17
– A Sample Cisco Unified CCX Script that Selects a Route Point, page 18-24
• A Summary Process for Defining Enterprise Variables, page 18-31
For further information on designing Cisco Unified Gateway scripts, see the following:
18-1arted with Scripts, Release 11.0(1)

Chapter 18 Designing Cisco Unified Gateway Scripts Scripting on a Cisco Unified Gateway System
• Cisco IPCC Gateway Deployment Guide
• ICM Scripting and Media Routing Guide Cisco ICM/IPCC Enterprise & Hosted Editions
• SS7 Gateway Configuration Tool User Guide for Cisco ICM Enterprise & Hosted Editions
Scripting on a Cisco Unified Gateway SystemThe Cisco Unified CCX Editor contains three steps that specifically interface with the Cisco Unified Gateway:
• Get Enterprise Call Info / Set Enterprise Call Info (Call Contact palette).
Use these steps to retrieve or send data from one part of your system to another. In an Cisco Unified Gateway deployment this enables getting/setting data from Cisco Unified CCX to the Cisco Finesse Desktop.
Note This step should be placed in a CRS 4.0 script before the call gets connected to an agent. This means the step in the script should be placed before the Request Route or Select Resource Step.
• Request Route (ACD palette).
Use the Request Route step to request a call routing location from Cisco Unified ICME software. A Cisco Unified CCX script can then use that location to redirect a call. The Request Route step has two output branches:
– Selected. The Request Route step successfully returned a routing destination from Cisco Unified ICME software.
– Failed. The Request Route step failed to return a routing destination from Cisco Unified ICME software.
See the Cisco Unified Contact Center Express Scripting and Development Series: Volume 2, Editor Step Reference Guide for descriptions of the preceding steps.
18-2Cisco Unified Contact Center Express Getting Started with Scripts, Release 11.0(1)

Chapter 18 Designing Cisco Unified Gateway ScriptsUsing Variables
Using VariablesIn Cisco Unified CCX scripts that interact with Cisco Unified ICME scripts through the Cisco Unified Gateway, you can use three types of variables:
• Local variables that you define in the Cisco Unified CCX script in the Variable pane of the Cisco Unified CCX Editor.
• Cisco predefined enterprise call variables that you can select in the General tab of the customization window of the Set and Get Enterprise Call Info steps
• Enterprise ECC variables that you can define in the Expanded Call Variable tab of the Set and Get Enterprise Call Info steps when you need more variables than are available in the predefined call variable list.
Cisco Unified CCX uses Enterprise Call Variables and Enterprise Expanded Call Context Variables when passing data between the integrated systems that make up a Cisco Unified Gateway system: the Cisco Unified CCX system.
This means that you must use the Set Enterprise Call Info and Get Enterprise Call Info steps to take data stored in a local Cisco Unified CCX script variable or for use in a Cisco Unified ICME script.
Defining Local Cisco Unified CCX Script VariablesBegin the Cisco Unified Gateway script design process first by using the Variable pane of the Cisco Unified CCX Editor to define your local variables for your Cisco Unified CCX script.
For information about defining variables in Cisco Unified CCX scripts, see Defining, Using, and Updating Script Variables, page 2-31. For example Cisco Unified CCX script variables used in a Cisco Unified CCX Cisco Unified Gateway script, see Script Variables Used in the PostRouteSimple.aef Script, page 18-25.
18-3Cisco Unified Contact Center Express Getting Started with Scripts, Release 11.0(1)
Chapter 18 Designing Cisco Unified Gateway Scripts Using Variables
Using Cisco Pre-Defined Enterprise Call VariablesIn addition to the script variables that you can define in the Variable pane of the Cisco Unified CCX Editor window, you can use the following Cisco predefined strings as enterprise call variables in Cisco Unified CCX in the Set Enterprise Call Info and Get Enterprise Call Info steps to pass information between the Cisco Unified ICME system and the Cisco Unified CCX system:
• VRU Script Name
• ConfigParam
• Call.CallingLineID
• Call.CallerEnteredDigits
• Call.PeripheralVariable1 to Call.PeripheralVariable10 This populates the fields "customCallVar1" through "customCallVar10" in the ContactCallDetail records of the db_cra database.
• Call.AccountNumber The Add button opens the Add Field window and permits you to apply the value (Values) of a local variable to the pre-defined Cisco call variable (Names). Tokens permit multiple values to be assigned and are only used in a Cisco Unified ICME environment.
These enterprise call variables are all written to the db_cra database.
Note These enterprise call variables are available from a list in the General tab of the Customization window only in the Set Enterprise Call Info and Get Enterprise Call Info steps. In the Set Enterprise Call Info and Get Enterprise Call Info steps, you assign the values of local script variables to the enterprise script variables.
The Cisco Unified ICME Server, the Cisco Unified CCX system, and the Cisco Finesse Desktop support these call variables for passing data among themselves.
If you need more call variables than those predefined in the General tab, use ECC variables.
Note While the Cisco pre-defined enterprise call variables are all written to the db_cra database and thus can be used in reporting, the ECC call variables are not written to the db_cra dabase and cannot be used in Cisco Unified CCX reporting.
18-4Cisco Unified Contact Center Express Getting Started with Scripts, Release 11.0(1)
Chapter 18 Designing Cisco Unified Gateway ScriptsUsing Variables
Using Enterprise Expanded Call Context (ECC) Variables The Cisco Cisco Unified ICME Server, the Cisco Cisco Unified CCX system, and the Cisco Finesse Desktop can also pass ECC variables to each other.
Enterprise ECC data fields are used by all applications in the Cisco Unified CCX Cluster. There can be as many as 200 user-defined fields defined in the Field List (index numbers 0-199) of expanded call variables. These field values do not appear in the ContactCallDetail records as there are no fields reserved for them.
Cisco Unified CCX has some pre-defined ECC variables. For a list of the Cisco Unified CCX system default ECC variables, see Cisco Unified Contact Center Express Scripting and Development Series: Volume 2, Editor Step Reference Guide.
Note Every enterprise ECC variable must be separately defined on all parts of the system that sends and receives the variable data: the Cisco Unified CCX Editor in Cisco Unified CCX and the Cisco Finesse Desktop.
Defining ECC Variables in the Cisco Finesse AdministrationTo define an ECC variable in the Cisco Finesse Administration, select Enterprise Data > Field List.
When creating a new Field, a unique Index number (Index) between 0-199 is assigned. The Field Name (Field Name) is the name of the field called by the layout list and is case sensitive. The Display Name (Display Name) is the name (Field) that will show on the agent desktop with the value of the field.
See the Cisco Finesse Administration Guide for more information on defining ECC variables in the Cisco Finesse Administration.
Defining ECC Variables in the Cisco Unified CCX EditorTo define an ECC variable in the Cisco Unified CCX Editor, do the following.
18-5Cisco Unified Contact Center Express Getting Started with Scripts, Release 11.0(1)

Chapter 18 Designing Cisco Unified Gateway Scripts Using Variables
Procedure
Step 1 From the Cisco Unified CCX Editor menu bar, choose Settings > Expanded Call Variables.
The Expanded Call Variables window appears.
Figure 18-1 Expanded Call Variables Window
Step 2 In the tool bar, click the Add New Variable icon.
The Edit Expanded Call Variable dialog box appears.
Figure 18-2 Edit Expanded Call Variable Dialog Box
Step 3 In the Name text field, enter the ECC variable name as defined in the Cisco Unified ICME configuration (or the Cisco Finesse Administration using Cisco Unified CCX).
Step 4 In the Type drop-down menu, choose the type of expanded call variable (scalar or array).
Step 5 In the Description text field, enter a description of the variable.
18-6Cisco Unified Contact Center Express Getting Started with Scripts, Release 11.0(1)
Chapter 18 Designing Cisco Unified Gateway ScriptsUsing Variables
Step 6 Click OK.
The Edit Expanded Call Variable dialog box closes, and the variable name, type, and description appear under their respective columns in the Cisco Unified ICME Expanded Call Variables window (or the Cisco Finesse Administration using Cisco Unified CCX).
Step 7 Click the dialog box’s Close (X) button.
The Expanded Call Variables window closes, and the ECC variable is now available to your script. It will be listed in the Enterprise Call Info step’s drop-down list as ---name--, where name is the value you entered in the Variable Name field.
Configuring ECC Variables in a Cisco Unified CCX Script
Use the Expanded Call Variables tab of the Set and Get Enterprise Call Info step property windows to configure ECC variables in Cisco Unified CCX scripts. The Add button in the customization window opens the Add ECC Variable window so you can apply the value (Values) of a local variable to a user-defined Expanded Call Variable (Names).
Note See the “Cisco Contact Center Express Administration Guide” and the Cisco Unified ICME Software IPCC Installation and Configuration Guide for information on configuring Cisco Unified ICME software for Cisco Unified CCX and for defining and configuring ECC variables in Cisco Unified ICME software.
Defining ECC Variables for a Post Call Treatment ScriptCustomize a Cisco Unified CCX Script for the post call treatment to be played for the customer after the agent ends the call. Follow the procedure to define an ECC Variable to achieve the post call treatment.
Step 1 From the Cisco Unified CCX Editor application, open an existing icd.aef script.
Step 2 From the Call Contact palette, select Set Enterprise Call Info.
Step 3 Drag and drop the selected step in the script before the Select Resource step.
18-7Cisco Unified Contact Center Express Getting Started with Scripts, Release 11.0(1)

Chapter 18 Designing Cisco Unified Gateway Scripts Using Variables
Step 4 Define a variable for the post call treatment by name PostCallTreatment and of type Scalar as per the steps provided in the section, Defining ECC Variables in the Cisco Unified CCX Editor, page 18-5.
Note The name of the variable must be PostCallTreatment. It is case-sensitive.
Step 5 For the new variable PostCallTreatment set the type as int from the drop down list available and enter a number value in the Value field.
Step 6 Select the Final checkbox.
Step 7 Add the new ECC Variable created to the Set Enterprise Call Info step.
a. Right click on the Set Enterprise Call Info step and then click Properties.
b. In the Expanded Call Variables tab, Click Add.
c. Select the field values of the ECC Variable PostCallTreatment as defined earlier.
d. Click OK >Apply > OK.
Step 8 Ensure the ECC variable name defined for the post call treatment is listed against the selected step.
Using Variables Multiple Times
Note When an enterprise call variable or an enterprise ECC variable is used multiple times in the step, the result will be indeterminate in the following cases:
• If an enterprise call variable is set multiple times with the same token.
• If an enterprise ECC variable of type scalar is set multiple times with the same token.
• If an array element of an enterprise ECC variable of type array is set multiple times with the same token.
18-8Cisco Unified Contact Center Express Getting Started with Scripts, Release 11.0(1)

Chapter 18 Designing Cisco Unified Gateway ScriptsExample Cisco Unified Gateway Post-Routing Scripts
Example Cisco Unified Gateway Post-Routing Scripts
In Cisco Unified Gateway deployments where the Cisco Unified CCX system is connected to a Cisco Unified ICME system as the child system, the Cisco Unified CCX system can use the Cisco Unified ICME system for post routing. Post routing is typically used to enable the Cisco Unified ICME system to determine the best routing solution based on the current situation at the contact center.
The following are three sample post-routing scripts that illustrate three different ways of post routing through the Cisco Unified Gateway. In each of these examples, the script accepts the call from the Cisco Unified CallManager in the Cisco Unified CCX system and then queries the Cisco Unified ICME system through the Request Route step. The Cisco Unified CCX system then routes the call based on the return value of the Request Route step supplied by the Cisco Unified ICME system.
In the first sample script, the call is routed to a CSQ. In the second sample script, the call is routed to an agent. And in the third sample script, the call is routed to a route point.
These are the sample scripts:
• PostRouteSelectCSQ.aef: The Request Route step returns a label corresponding to a CSQ which is used in the Select Resource step.
• PostRouteSelectAgent.aef: The Request Route step returns a label corresponding to an agent extension which is used in the Select Resource step.
• PostRouteSelectSimple.aef: The Request Route step returns a label corresponding to a route point which is used in the Call Redirect step.
Each of three sample Cisco Unified CCX scripts presume a Cisco Unified ICME script designed to interact with the Cisco Unified CCX script, depending on what Cisco Unified CCX resource is wanted: a CSQ, an agent, or a route point.
Note An important point from these examples is that the Cisco Unified ICME and Cisco Unified CCX script writers need to work together during both design and implementation to ensure that the correct type of information is returned by the
18-9Cisco Unified Contact Center Express Getting Started with Scripts, Release 11.0(1)

Chapter 18 Designing Cisco Unified Gateway Scripts Example Cisco Unified Gateway Post-Routing Scripts
Cisco Unified ICME script through the Cisco Unified CCX Request Route step and is used properly by the Cisco Unified CCX script to route the call appropriately.
18-10Cisco Unified Contact Center Express Getting Started with Scripts, Release 11.0(1)

Chapter 18 Designing Cisco Unified Gateway ScriptsExample Cisco Unified Gateway Post-Routing Scripts
A Sample Cisco Unified CCX Script that Selects a CSQFigure 18-3 displays the sample PostRouteSelectCSQ script as it appears in the Cisco Unified CCX Editor window.
Figure 18-3 PostRouteSelectCSQ.aef Script—Select CSQ
18-11Cisco Unified Contact Center Express Getting Started with Scripts, Release 11.0(1)
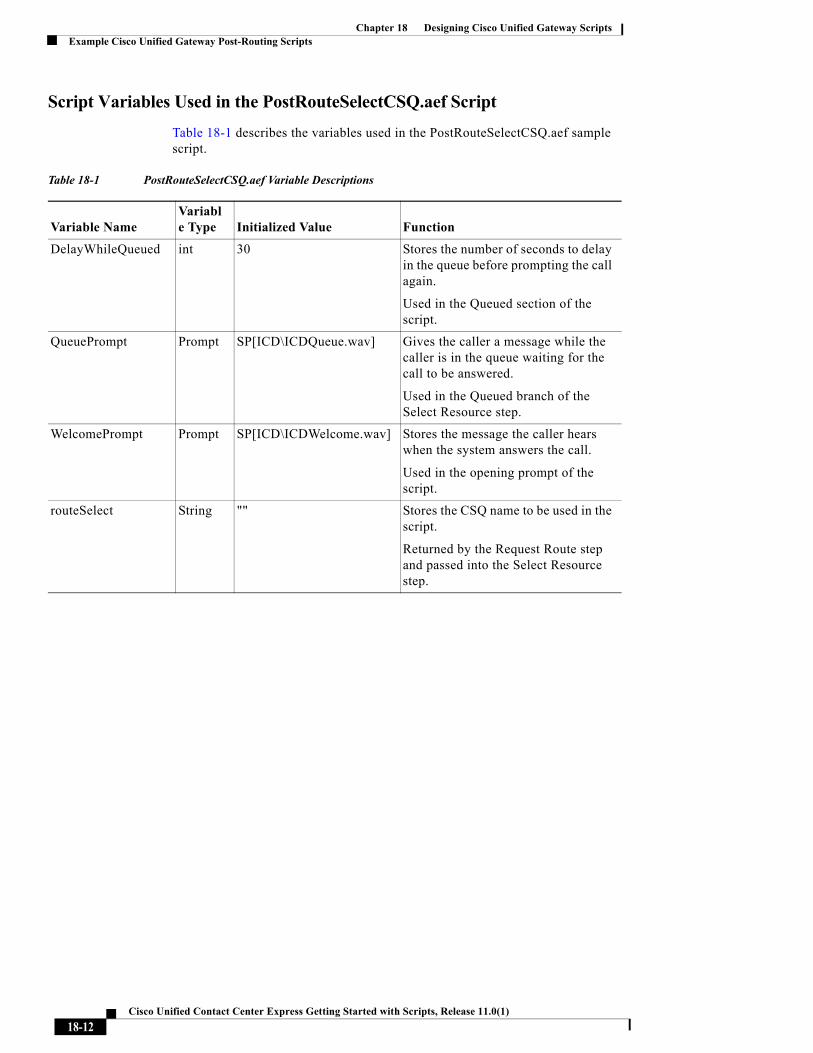
Chapter 18 Designing Cisco Unified Gateway Scripts Example Cisco Unified Gateway Post-Routing Scripts
Script Variables Used in the PostRouteSelectCSQ.aef Script
Table 18-1 describes the variables used in the PostRouteSelectCSQ.aef sample script.
Table 18-1 PostRouteSelectCSQ.aef Variable Descriptions
Variable NameVariable Type Initialized Value Function
DelayWhileQueued int 30 Stores the number of seconds to delay in the queue before prompting the call again.
Used in the Queued section of the script.
QueuePrompt Prompt SP[ICD\ICDQueue.wav] Gives the caller a message while the caller is in the queue waiting for the call to be answered.
Used in the Queued branch of the Select Resource step.
WelcomePrompt Prompt SP[ICD\ICDWelcome.wav] Stores the message the caller hears when the system answers the call.
Used in the opening prompt of the script.
routeSelect String "" Stores the CSQ name to be used in the script.
Returned by the Request Route step and passed into the Select Resource step.
18-12Cisco Unified Contact Center Express Getting Started with Scripts, Release 11.0(1)

Chapter 18 Designing Cisco Unified Gateway ScriptsExample Cisco Unified Gateway Post-Routing Scripts
Script Flow for the PostRouteSelectCSQ.aef Script
1. The script receives the call from the Cisco Unified CallManager.
Figure 18-4 Configured General tab of the Accept Step
2. The script plays a welcome message to the caller.
Figure 18-5 Configured Prompt tab of the Play Prompt Step
18-13Cisco Unified Contact Center Express Getting Started with Scripts, Release 11.0(1)

Chapter 18 Designing Cisco Unified Gateway Scripts Example Cisco Unified Gateway Post-Routing Scripts
3. In the Request Route step, the script requests a route label from the Cisco Unified ICME system for a CSQ in the Cisco Unified CCX system.
Figure 18-6 Configured General tab of the Request Route Step
4. The Set Enterprise Call Info step puts the label contained in the routeSelect variable into the enterprise call variable, call.PeripheralVariable2. In this case, the label is a CSQ identifier. This variable can be displayed on the Cisco Finesse Desktop.
Figure 18-7 Configured General tab of the Set Enterprise Call Info Step
No enterprise Extended Call Variables are used in this script.
18-14Cisco Unified Contact Center Express Getting Started with Scripts, Release 11.0(1)

Chapter 18 Designing Cisco Unified Gateway ScriptsExample Cisco Unified Gateway Post-Routing Scripts
5. If the route request fails, the script selects a default CSQ.
Figure 18-8 Configured General tab of the Set Step
Figure 18-9 Configured General tab of the Select Resource Step
18-15Cisco Unified Contact Center Express Getting Started with Scripts, Release 11.0(1)

Chapter 18 Designing Cisco Unified Gateway Scripts Example Cisco Unified Gateway Post-Routing Scripts
6. If the call is not answered before the time limit, a prompt is played, and the call is put in the queue to repeat the process until the call is answered or droped by the caller.
Figure 18-10 Configured Prompt tab of the Play Prompt Step
In the General tab of the Play Prompt Step:
– Triggering Contact is selected as the contact
– Interruptible option is Yes. This means that as soon as the call is answered, this queue prompt will be interrupted.
In the Input tab of the Play Prompt Step:
– Flush Input Buffer option is No
Figure 18-11 Configured General tab of the Delay Step
18-16Cisco Unified Contact Center Express Getting Started with Scripts, Release 11.0(1)

Chapter 18 Designing Cisco Unified Gateway ScriptsExample Cisco Unified Gateway Post-Routing Scripts
A Sample Cisco Unified CCX Script that Selects an Agent
Figure 18-12 PostRouteSelectAgent.aef Script—Select Agent
18-17Cisco Unified Contact Center Express Getting Started with Scripts, Release 11.0(1)

Chapter 18 Designing Cisco Unified Gateway Scripts Example Cisco Unified Gateway Post-Routing Scripts
Script Variables Used in the PostRouteSelectAgent.aef Script
Table 18-2 describes the variables used in the PostRouteSeclectAgent.aef sample script displayed in Figure 18-12.
Table 18-2 PostRouteSelectAgent.aef Variable Descriptions
Variable NameVariable Type Initialized Value Function
CSQ String "Should be initialized to a default CSQ name"
Used to route to a catch-all CSQ in case of failure within the script.
Used in the Set Enterprise Call Info step and in the Select Resource step.
DelayWhileQueued int 30 Stores the number of seconds to delay in the queue before prompting the call again.
Used in the Queued section of the script.
PromptOne Prompt P[gen\number\One.wav] Stores the message the caller hears when the call is answered.
Used in the opening Play Prompt step.
QueuePrompt Prompt SP[ICD\ICDQueue.wav] Stores a message for the caller to be played when the call is in queue waiting to be answered.
Used in the Queued branch of the Select Resource step.
18-18Cisco Unified Contact Center Express Getting Started with Scripts, Release 11.0(1)

Chapter 18 Designing Cisco Unified Gateway ScriptsExample Cisco Unified Gateway Post-Routing Scripts
Script Flow for the PostRouteSelectAgent.aef Script
1. The script accepts the call from the Cisco Unified CallManager.
Figure 18-13 Configured General tab of the Accept Step
2. The caller is welcomed.
RouteSelectAgent String "" Stores the agent identifier that is received from the Cisco Unified ICME system.
Returned by the Request Route step and passed to the Get User step.
SelectedAgent User null Stores the Agent User information corresponding to the routeSelectAgent string selected by the Cisco Unified ICME system.
A user object returned from the Get User step and passed into the Select Resource step.
Table 18-2 PostRouteSelectAgent.aef Variable Descriptions (continued)
Variable NameVariable Type Initialized Value Function
18-19Cisco Unified Contact Center Express Getting Started with Scripts, Release 11.0(1)
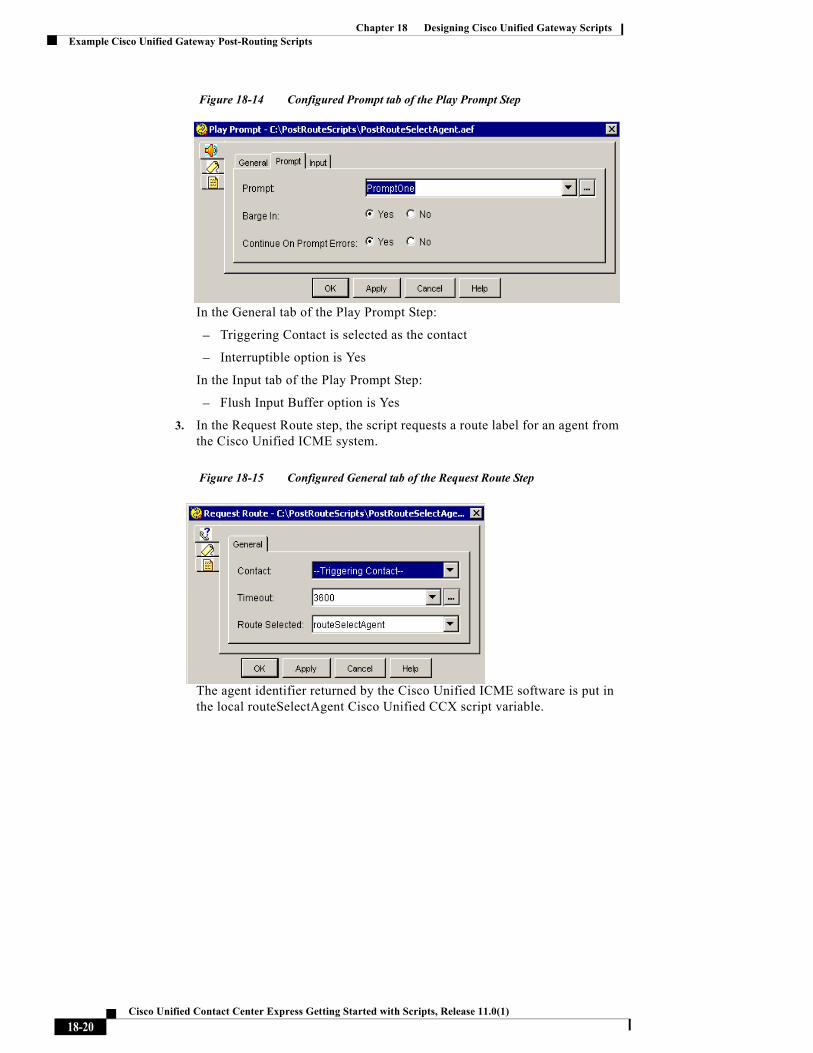
Chapter 18 Designing Cisco Unified Gateway Scripts Example Cisco Unified Gateway Post-Routing Scripts
Figure 18-14 Configured Prompt tab of the Play Prompt Step
In the General tab of the Play Prompt Step:
– Triggering Contact is selected as the contact
– Interruptible option is Yes
In the Input tab of the Play Prompt Step:
– Flush Input Buffer option is Yes
3. In the Request Route step, the script requests a route label for an agent from the Cisco Unified ICME system.
Figure 18-15 Configured General tab of the Request Route Step
The agent identifier returned by the Cisco Unified ICME software is put in the local routeSelectAgent Cisco Unified CCX script variable.
18-20Cisco Unified Contact Center Express Getting Started with Scripts, Release 11.0(1)

Chapter 18 Designing Cisco Unified Gateway ScriptsExample Cisco Unified Gateway Post-Routing Scripts
Note In this script, if the Cisco Unified ICME script returns a CSQ or a route point, rather than a string identifying the agent, the script will fail.
4. In the Get User step, the Cisco Unified CCX script returns a user object corresponding to the input agent identifer named in the RouteSelectAgent variable, which is stored in the SelectedAgent variable.
Figure 18-16 Configured General tab of the Get User Step
5. In the Select Resource step, the script rings the phone number identified by the agent ID in the SelectedAgent variable.
18-21Cisco Unified Contact Center Express Getting Started with Scripts, Release 11.0(1)

Chapter 18 Designing Cisco Unified Gateway Scripts Example Cisco Unified Gateway Post-Routing Scripts
Figure 18-17 Configured General tab of the Select Resource Step
Note For agent based routing to succeed, the state of the selected agent must be ready. The Select Resource step will fail if the selected agent is in any state other than ready. The Cisco Unified ICME system can determine the current state of an agent, although there is no guarantee that the agent state will not change between when the Cisco Unified ICME system returns information and the Cisco Unified CCX script routes the call based on that information. Despite that, depending on the design of the script, the time between the two should be extremely small, making it unlikely that this will occur.
18-22Cisco Unified Contact Center Express Getting Started with Scripts, Release 11.0(1)

Chapter 18 Designing Cisco Unified Gateway ScriptsExample Cisco Unified Gateway Post-Routing Scripts
6. If the call is not answered, then the script plays a prompt.
Figure 18-18 Configured Prompt tab of the Second Play Prompt Step
In the General tab of the Play Prompt Step:
– Triggering Contact is selected as the contact
– Interruptible option is Yes
In the Input tab of the Play Prompt Step:
– Flush Input Buffer option is No
7. The script will ring for the time set in the DelayWhileQueued variable, play a prompt to tell the caller to please wait, and then ring again.
Figure 18-19 Configured General tab of the Delay Step
18-23Cisco Unified Contact Center Express Getting Started with Scripts, Release 11.0(1)
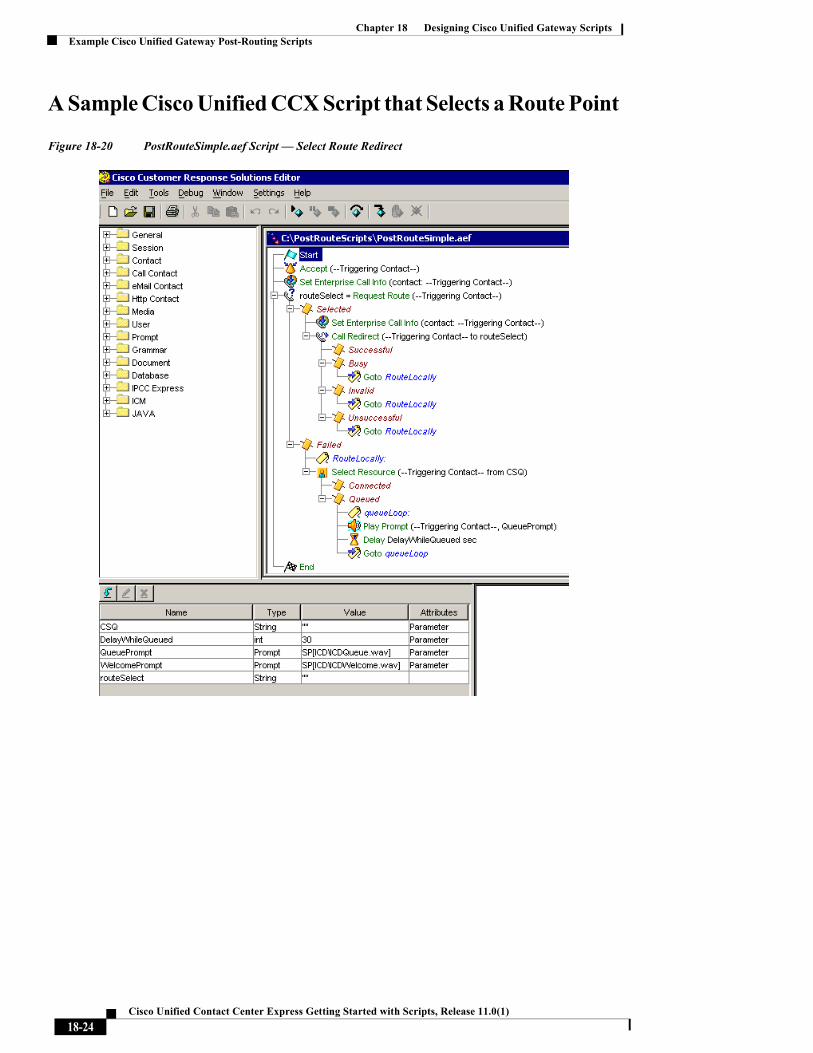
Chapter 18 Designing Cisco Unified Gateway Scripts Example Cisco Unified Gateway Post-Routing Scripts
A Sample Cisco Unified CCX Script that Selects a Route Point
Figure 18-20 PostRouteSimple.aef Script — Select Route Redirect
18-24Cisco Unified Contact Center Express Getting Started with Scripts, Release 11.0(1)

Chapter 18 Designing Cisco Unified Gateway ScriptsExample Cisco Unified Gateway Post-Routing Scripts
Script Variables Used in the PostRouteSimple.aef Script
Table 18-3 describes the variables used in the PostRouteSimple.aef sample script as displayed in Figure 18-20.
Table 18-3 PostRouteSimple.aef Variable Descriptions
Variable NameVariable Type Initialized Value Function
CSQ String "Should be initialized to a default CSQ name"
Used to route a catch-all CSQ in case of failure within the script.
Used in the Set Enterprise Call Info step and in the Select Resource step.
DelayWhileQueued int 30 Stores the number of seconds to delay in the queue before playing the prompt message again.
Used in the Queued section of the script.
QueuePrompt Prompt SP[ICD\ICDQueue.wav] Stores a message to be played while the call is in the queue waiting to be answered.
Used in the Queued branch of the Select Resource step.
WelcomePrompt Prompt SP[ICD\ICDWelcome.wav] Stores the message the caller hears when the system first answers the call.
Used in the opening prompt of the script.
RouteSelect String "" Stores the route identifier received from the Cisco Unified ICME system.
Returned by the Request Route step and passed into the Call Redirect step.
18-25Cisco Unified Contact Center Express Getting Started with Scripts, Release 11.0(1)

Chapter 18 Designing Cisco Unified Gateway Scripts Example Cisco Unified Gateway Post-Routing Scripts
Script Flow for the PostRouteSimple.aef Script
1. The Cisco Unified CCX script accepts the call from the Cisco Unified CallManager.
2. The Set Enterprise Call Info step put the value contained in the local CSQ variable into the Enterprise call.PeripheralVariable5. This means that value can then be used in the Cisco Finesse Desktop software or in a Cisco Unified ICME script. This might be used, for example, to display the current CSQ on the Agent Desktop.
Figure 18-21 Configured General tab of the Set Enterprise Call Info Step
Expanded Call Variables are not used in this sample script.
18-26Cisco Unified Contact Center Express Getting Started with Scripts, Release 11.0(1)

Chapter 18 Designing Cisco Unified Gateway ScriptsExample Cisco Unified Gateway Post-Routing Scripts
3. The Request Route step requests a label from the Cisco Unified ICME system which the Cisco Unified ICME system sends back and which is stored in the RouteSelect variable. In this example, the returned value is a route point rather than an agent or CSQ identifier. For example: extension 13526.
Figure 18-22 Configured General tab of the Request Route Step
4. The Set Enterprise Call Info step puts the route point contained in the routeSelect variable into the enterprise call variable, call.PeripheralVariable2. This variable can be used to display the phone number on the Cisco Finesse Desktop.
Figure 18-23 Configured General tab of the Second Set Enterprise Call Info Step
Expanded Call Variables are not used in this script.
18-27Cisco Unified Contact Center Express Getting Started with Scripts, Release 11.0(1)

Chapter 18 Designing Cisco Unified Gateway Scripts Example Cisco Unified Gateway Post-Routing Scripts
5. The Cisco Unified CCX script, in the Call Redirect step, redirects the call to the selected route point and is stored in the string variable routeSelect.
Figure 18-24 Configured General tab of the Call Redirect Step
Note The Redirect step essentially places a new call—terminating the original call. This results in a double-counting for statistics regarding the Connected state.
18-28Cisco Unified Contact Center Express Getting Started with Scripts, Release 11.0(1)
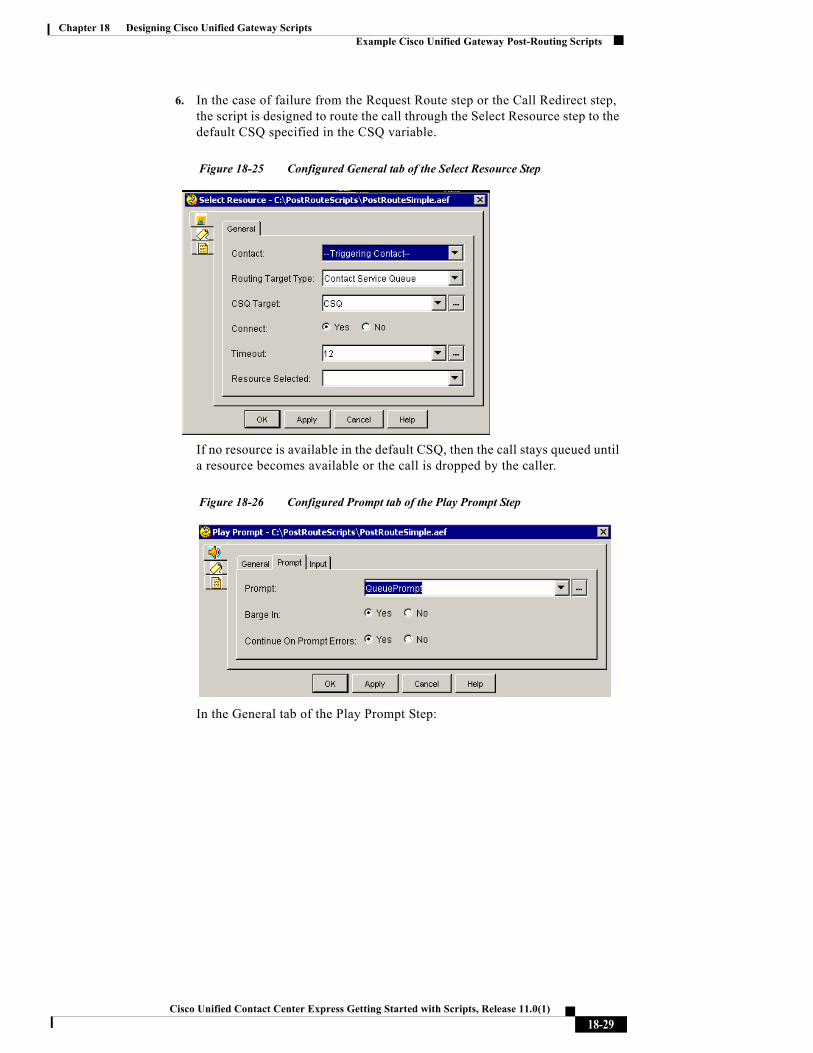
Chapter 18 Designing Cisco Unified Gateway ScriptsExample Cisco Unified Gateway Post-Routing Scripts
6. In the case of failure from the Request Route step or the Call Redirect step, the script is designed to route the call through the Select Resource step to the default CSQ specified in the CSQ variable.
Figure 18-25 Configured General tab of the Select Resource Step
If no resource is available in the default CSQ, then the call stays queued until a resource becomes available or the call is dropped by the caller.
Figure 18-26 Configured Prompt tab of the Play Prompt Step
In the General tab of the Play Prompt Step:
18-29Cisco Unified Contact Center Express Getting Started with Scripts, Release 11.0(1)

Chapter 18 Designing Cisco Unified Gateway Scripts Example Cisco Unified Gateway Post-Routing Scripts
– Triggering Contact is selected as the contact
– Interruptible option is Yes. This means that as soon as the call is answered, this queue prompt will be interrupted.
In the Input tab of the Play Prompt Step:
– Flush Input Buffer option is No
Figure 18-27 Configured General tab of the Delay Step
18-30Cisco Unified Contact Center Express Getting Started with Scripts, Release 11.0(1)

Chapter 18 Designing Cisco Unified Gateway ScriptsA Summary Process for Defining Enterprise Variables
A Summary Process for Defining Enterprise Variables
The following steps summarize the process for defining enterprise variables in the Cisco Unified CCX system. See the Cisco Unified ICME documentation for how to define ECC variables in Cisco Unified ICME software.
Step 1 Create an ECC variable in the Cisco Finesse Administration (Enterprise Data Configuration > Enterprise Data > Field List).
18-31Cisco Unified Contact Center Express Getting Started with Scripts, Release 11.0(1)

Chapter 18 Designing Cisco Unified Gateway Scripts A Summary Process for Defining Enterprise Variables
Step 2 Create a new layout using the Cisco Finesse Administration and add fields to the layout (Enterprise Data Configuration > Enterprise Data).
Step 3 Configure the Set Enterprise Call Info (Expanded Call Variables tab) step in your Cisco Unified CCX script to set values for the ECC Variables.
18-32Cisco Unified Contact Center Express Getting Started with Scripts, Release 11.0(1)

Chapter 18 Designing Cisco Unified Gateway ScriptsA Summary Process for Defining Enterprise Variables
Step 4 Configure the Set Enterprise Call Info (Expanded Call Variables tab) step in your Cisco Unified CCX script to use a custom layout that was created in Step 2.
Step 5 Configure the Set Enterprise Call Info (General tab) step using in your Cisco Unified CCX script to set values for the Cisco predefined Call Peripheral Variables.
18-33Cisco Unified Contact Center Express Getting Started with Scripts, Release 11.0(1)

Chapter 18 Designing Cisco Unified Gateway Scripts A Summary Process for Defining Enterprise Variables
Step 6 Check your list of Call Peripheral Variables in the Set Enterprise Call Info step.
Step 7 Check your list of ECC Variables in the Set Enterprise Call Info step.
18-34Cisco Unified Contact Center Express Getting Started with Scripts, Release 11.0(1)

Chapter 18 Designing Cisco Unified Gateway ScriptsA Summary Process for Defining Enterprise Variables
Step 8 Check the values set in the Set Enterprise Call Info step displayed on the Cisco Finesse Desktop.
18-35Cisco Unified Contact Center Express Getting Started with Scripts, Release 11.0(1)

Chapter 18 Designing Cisco Unified Gateway Scripts A Summary Process for Defining Enterprise Variables
18-36Cisco Unified Contact Center Express Getting Started with Scripts, Release 11.0(1)
Cisco Unified Contact Center Express Getting St
C H A P T E R 19
Designing a Generic Recognition ScriptThis chapter contains the following:
• About the Generic Recognition Steps, page 19-1
• N-Best Recognition and Multiple Interpretations, page 19-2
• The Script Flow for a Generic Recognition Script, page 19-3
• An Example Script, GenericRecoExample.aef, page 19-7
About the Generic Recognition StepsThe Generic Recognition step is used when something more complex than a selection menu is needed in a speech dialog. The Generic Recognition step allows the application designer to use an arbitrarily complex Speech Recognition Grammar. These grammars can be used to build mixed initiative dialogs. They can be ambiguous. They can assign meaning to the results returned using semantic interpretation. They can allow multiple results to be returned.
The result returned by a recognition using this step is stored in an opaque data object that is associated with a name that is assigned in this step. The information in this result object can be extracted using two other steps: Get Recognition Result Info Step and Get Recognition Interpretation Step. These two steps along with the Generic Recognition Step are designed to work together.
The Generic Recognition steps are available from the Cisco Unified CCX Step Editor Media palette.
19-1arted with Scripts, Release 11.0(1)

Chapter 19 Designing a Generic Recognition Script N-Best Recognition and Multiple Interpretations
Figure 19-1 Cisco Unified CCX Step Editor Media palette
For how the Generic Recognition set of steps work together in a script and for the descriptions of these steps, see the Cisco Unified Contact Center Express Scripting and Development Series: Volume 2, Editor Step Reference Guide.
N-Best Recognition and Multiple Interpretations The Generic Recognition set of steps improve speech recognition by providing multiple recognition results enabled by N-Best Recognition and multiple interpretations. It also can assign meaning to the utterance through the use of semantic interpretation:
• N-Best Recognition, page 19-2
• Multiple Interpretations, page 19-3
N-Best RecognitionN-Best Recognition allows the Speech Recognizer to return more than one result if there are several branches in the grammar that sound like the utterance. This allows the application to choose the best result based on additional criteria.
19-2Cisco Unified Contact Center Express Getting Started with Scripts, Release 11.0(1)

Chapter 19 Designing a Generic Recognition ScriptThe Script Flow for a Generic Recognition Script
In some advanced voice applications, a single result may not be sufficient. For example, an airline reservation application might ask the user for destination and departure cities. The speech-recognition engine might not be able to distinguish between the two possible utterances that can sound the same or similar like "Austin" and "Boston." Ideally, the application would obtain both these possible results so that it could prompt for clarification, "Did you mean Austin, Texas; or Boston, Massachusetts?"
Using N-best recognition, the speech-recognition engine returns a list of different possible utterances whose confidence levels are high enough for consideration.
Multiple InterpretationsIn some applications, a single recognized utterance may have multiple interpretations. The same utterance can appear in more than one place in the grammar. For example, Austin could be interpreted as Austin, Texas or Austin, California.
The Generic Recognition set of steps uses these two recognition features (N-Best Recognition and Multiple Interpretations) together to provide better speech recognition flexibility when needed.
When these preceding two features are combined, if the user says something that sounds like either "Austin" or "Boston," the speech-recognition engine would find two possible results, "Austin" and "Boston." The first of these results would have two possible interpretations: "Austin, Texas" and "Austin, California." A sophisticated application could then prompt the user, "Did you mean Austin, Texas; Austin, California; or Boston, Massachusetts?"
The Script Flow for a Generic Recognition ScriptThe following is an example of how n-best recognition and multiple interpretations can be done using a grammar and a script:
• An Example Grammar Used With Generic Recognition, page 19-4
• An Example Script Algorithm Used With Generic Recognition, page 19-5
19-3Cisco Unified Contact Center Express Getting Started with Scripts, Release 11.0(1)

Chapter 19 Designing a Generic Recognition Script The Script Flow for a Generic Recognition Script
An Example Grammar Used With Generic Recognition The example grammar is an SRGS grammar. Note that there are three items that sound very similar - "cisco", "tisco" and "misco". Also note that there are two items with the same word, "cisco", but different values for the security tag, "cisco1" and "cisco2".
<?xml version="1.0" encoding="ISO-8859-1"?><grammar xml:lang="en-US" version="1.0" xmlns="http://www.w3.org/2001/06/grammar" root="Securities"> <rule id="Securities" scope="public"> <ruleref uri="#Names"/> </rule> <rule id="Names"> <one-of> <item> <item> cisco </item> <tag>security=" cisco1"</tag> </item> <item> <item> cisco </item> <tag>security=" cisco2"</tag> </item> <item> <item> tisco </item> <tag>security=" tisco"</tag> </item> <item> <item> misco </item> <tag>security="misco"</tag> </item> <item> <item> microsoft </item> <tag>security="microsoft"</tag> </item> </one-of> </rule></grammar>
19-4Cisco Unified Contact Center Express Getting Started with Scripts, Release 11.0(1)

Chapter 19 Designing a Generic Recognition ScriptThe Script Flow for a Generic Recognition Script
An Example Script Algorithm Used With Generic Recognition
Note This algorithm does not describe all the input and output parameters, only the ones relevant to demonstrate n-best recognition.
Step 1 Use the Generic Recognition step.
Input: UserGrammar (for example, An Example Grammar Used With Generic Recognition, page 19-4)
Output: resultData (a private variable that contains the recognition result) resultCount (the number of results in the resultData)
Step 2 Set integer i = 0. This variable is used to index into the resultData and varies from 0 to one less than the number of results obtained in step 1.
Step 3 While (i < resultCount)
a. Use Get Recognition Result Info step
b. Input: ResultData (data from step 1) i (used to index into the ResultData.
c. Output: Utterance (text representing what was spoken), ConfLevel (indicates how closely this recognition matches the spoken word) interpCount (indicates number of interpretations in the result)
d. Set integer j = 0. This variable is used to index into the result to retrieve the interpretations
e. while (j<interpCount) (1) Use Get Recognition Interpretation Step (2) Input: resultData (data from step 1) i (used to index into resultData) j (interpretation index) (3) Output:
19-5Cisco Unified Contact Center Express Getting Started with Scripts, Release 11.0(1)

Chapter 19 Designing a Generic Recognition Script The Script Flow for a Generic Recognition Script
If slots are defined in the grammar, their values get stored in the specified variables (4) Set j = j+1
f. Set i = i+1
Step 4 End
With the example grammar and example script logic as described in this section and the preceding one, if a customer says "cisco", the customer may get back a recognition result containing three results: "cisco", "tisco" and "misco" respectively. Each of these results represents a different utterance and can have a different confidence level.
Note The output can vary depending on how the utterance (the word) was spoken and the value of the confidence level configured in the Generic Recognition step.
19-6Cisco Unified Contact Center Express Getting Started with Scripts, Release 11.0(1)

Chapter 19 Designing a Generic Recognition ScriptAn Example Script, GenericRecoExample.aef
An Example Script, GenericRecoExample.aef Figure 19-2 displays an example script, GenericRecoExample.aef, as it appears in the Cisco Unified CCX Editor window. This script uses the generic recognition steps and the preceding algorithm. The example is displayed with unexpanded code branches so you can see the layout of the whole on one page. The code is expanded in later examples so you can see all the steps.
Figure 19-2 Example Generic Recognition Script
19-7Cisco Unified Contact Center Express Getting Started with Scripts, Release 11.0(1)

Chapter 19 Designing a Generic Recognition Script An Example Script, GenericRecoExample.aef
Script Variables Used in the Example Generic Recognition Script
Table 19-1 lists the variables, with the exception of the prompt variables, that are specific to the generic recognition steps.
Table 19-1 GenericRecoExample.aef Generic Recognition Variable Descriptions
Variable NameVariable Type Initialized Value Function/Description
rule_Name_or_Context String "Securities\securities" The name of the grammar file to be used in the recognition.
confLevel int The confidence threshold. This determines how closely a result must match the utterance before it is returned by the recognizer.
interpIndex int 0 The index used to select the interpretation in the currently selected result.
maxResult int 5 Contains the maximum number of results that can be returned by the recognition.
numinterp int 0 Contains the number of interpretations in the currently selected result.
resultCount int number of results The number of results in the result collection returned by the recognition.
resultIndex int 0 Used to select the specific result from the result collection.
securitySlotValue String " " A string variable to receive the value from the slot named "security". This is the name of a stock.
utterance String " " A string variable to receive the utterance for each result.
19-8Cisco Unified Contact Center Express Getting Started with Scripts, Release 11.0(1)

Chapter 19 Designing a Generic Recognition ScriptAn Example Script, GenericRecoExample.aef
Getting a Collection of Results Figure 19-3 shows the opening set of steps in the example script. These steps get the utterance "results." This is where the user’s input is first returned.
This part of the script illustrates Step 1 and Step 2 of the preceding algorithm (An Example Script Algorithm Used With Generic Recognition, page 19-5).
Note For descriptions of each step used in the example script, see the Cisco Unified Contact Center Express Scripting and Development Series: Volume 2, Editor Step Reference Guide. The purpose of this chapter is just to highlight some of these steps and to illustrate how they are used rather than to explain each step in detail.
Figure 19-3 The Opening Set of Steps in the Example Generic Recognition Script
19-9Cisco Unified Contact Center Express Getting Started with Scripts, Release 11.0(1)

Chapter 19 Designing a Generic Recognition Script An Example Script, GenericRecoExample.aef
Figure 19-4 Generic Recognition Step, Example General Tab Customization Window
Figure 19-5 Generic Recognition Step, Example Prompt Tab Customization Window
19-10Cisco Unified Contact Center Express Getting Started with Scripts, Release 11.0(1)

Chapter 19 Designing a Generic Recognition ScriptAn Example Script, GenericRecoExample.aef
Figure 19-6 Generic Recognition Step, Example Input Tab Customization Window
Figure 19-7 Generic Recognition Step, Example Filter Tab Customization Window
19-11Cisco Unified Contact Center Express Getting Started with Scripts, Release 11.0(1)

Chapter 19 Designing a Generic Recognition Script An Example Script, GenericRecoExample.aef
Getting All the Information for All the ResultsThe next series of steps in the example script is Step 3 of the algorithm (An Example Script Algorithm Used With Generic Recognition, page 19-5).
Use the Get Recognition Result Info step to:
• Extract the Results from the recognition performed in the Generic Recognition step. There may be more than one result. The Result Index is used to select the desired result. The range is 0 (zero) to one less than the number of results. Each result will contain one or more interpretations.
• Extract the number of interpretations for a result.
• Extract the confidence level for each result.
• Extract the string which represents the actual utterance that was recognized for each result.
Figure 19-8 Getting All the Recognition Information
19-12Cisco Unified Contact Center Express Getting Started with Scripts, Release 11.0(1)

Chapter 19 Designing a Generic Recognition ScriptAn Example Script, GenericRecoExample.aef
Figure 19-9 Generic Recognition Result Info Step, Example General Tab Customization Window
Getting Interpretations for Each Result and Prompting with Each
The final set of steps in this example uses the Get Recognition Interpretation step to get each interpretation for each result and to play the prompt for each interpretation. This represents the inner loop in Step 3 of the algorithm (An Example Script Algorithm Used With Generic Recognition, page 19-5).
19-13Cisco Unified Contact Center Express Getting Started with Scripts, Release 11.0(1)

Chapter 19 Designing a Generic Recognition Script An Example Script, GenericRecoExample.aef
Figure 19-10 Playing Prompts for Each Interpretation
19-14Cisco Unified Contact Center Express Getting Started with Scripts, Release 11.0(1)
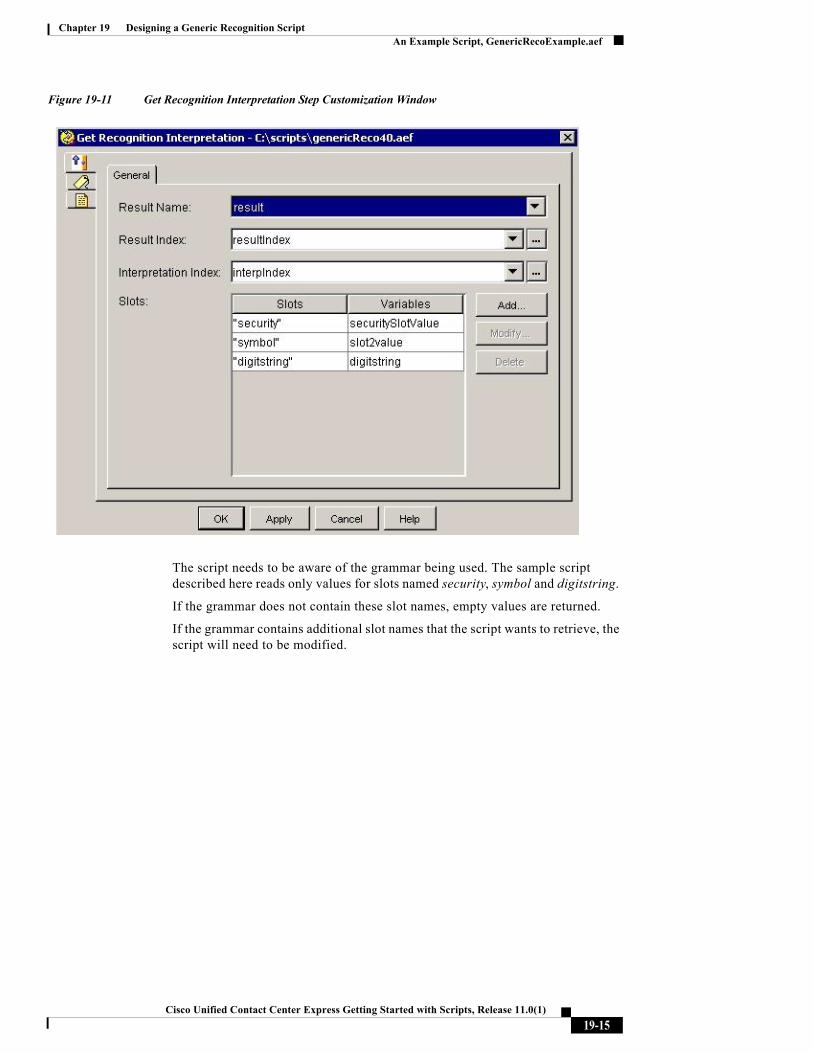
Chapter 19 Designing a Generic Recognition ScriptAn Example Script, GenericRecoExample.aef
Figure 19-11 Get Recognition Interpretation Step Customization Window
The script needs to be aware of the grammar being used. The sample script described here reads only values for slots named security, symbol and digitstring.
If the grammar does not contain these slot names, empty values are returned.
If the grammar contains additional slot names that the script wants to retrieve, the script will need to be modified.
19-15Cisco Unified Contact Center Express Getting Started with Scripts, Release 11.0(1)

Chapter 19 Designing a Generic Recognition Script An Example Script, GenericRecoExample.aef
19-16Cisco Unified Contact Center Express Getting Started with Scripts, Release 11.0(1)

Cisco Unified Contact Center Express Getting Sta
C H A P T E R 20
Uninstallation of Unified CCX EditorNote The Unified CCX Editor uninstallation should not be done through the Add Remove programs window.
To uninstall the Cisco Unified CCX Editor program, run the UninstallCiscoUnifiedCCXEditor.exe and do the following:
Step 1 In the maintenance window, select the "remove" radio button and click next
Step 2 In the "remove program" dialog-box, click the "remove" button. This will begin the uninstallation procedure of the Cisco Unified CCX Editor application.
20-1rted with Scripts, Release 11.0(1)

Chapter 20 Uninstallation of Unified CCX Editor
20-2Cisco Unified Contact Center Express Getting Started with Scripts, Release 11.0(1)

Cisco Unified Contact Center Express Getting St
A P P E N D I X A
A Sample VoiceXML Log FileThis appendix includes the following topics:
• A Brief Description of a VoiceXML Log File, page A-1
• Excerpts from the Sample VoiceXML Log File, page A-2
• Sample VoiceXML Log File Selection, page A-3
Note This is a sample voice XML log file with SS_VB debug turned on. Your log file contents may vary depending on your system configuration, scripts, and caller interactions.
A Brief Description of a VoiceXML Log File Each line in a Voice XML log file contains a system message. Each log line is numbered sequentially and consists of:
• Line number
• Date and Time of event
• Task Message abbreviation and ID number
• Brief description of the event
A-1arted with Scripts, Release 11.0(1)

Appendix A A Sample VoiceXML Log File Excerpts from the Sample VoiceXML Log File
Note For easier reference, the lines in the sample log file that are listed in Table A-1 are displayed in BLUE in the log file. Clicking on the number in the table brings you to that line in the log file. Clicking on the number beginning that line in the log file brings you to its explanation in this table.
Excerpts from the Sample VoiceXML Log File Table A-1 Some Items to Notice in the Sample Log File
Line Number Message Event
615109 Instantiating new WFMRCPDialogServicesAdapterImpl
The start of the MRCP(ASR) Voice Browser
615120 Invoke: http://mediaserver/vxmldocs/AA.vxml
The URL for the Voice Browser
615126 WFCallControlImpl.getOriginator() = 2011 The caller ID
615127 WFCallControlImpl.getLocalUri() = 1002 The dialed number
615186 handlMenuElement(): adding dtmf choice grammar string = one
Managing a VXML menu
615233 <speak version="1.0" xmlns="http://www.w3.org/2001/10/synthesis "> Welcome to the automated attendant. To enter the phone number of the person you are trying to reach, say or press 1. To enter the name of the person you are trying to reach, say or press 2. To transfer to the operator, say or press 0. </speak>
The first prompt to the caller
A-2Cisco Unified Contact Center Express Getting Started with Scripts, Release 11.0(1)

Appendix A A Sample VoiceXML Log FileSample VoiceXML Log File Selection
Sample VoiceXML Log File Selection615109: Jun 01 08:25:21.912 EDT %MIVR-SS_VB-7-UNK:Task:43000009351 VoiceBrowserDialogImpl: Instantiating new WFMRCPDialogServicesAdapterImpl
615110: Jun 01 08:25:22.131 EDT %MIVR-SS_VB-7-UNK:Task:43000009351 Here is the DefaultCompilationConfig set in the JVM en_US
615111: Jun 01 08:25:22.131 EDT %MIVR-SS_VB-7-UNK:Task:43000009351 DefaultCompilationConfig will be set to en_US 615112: Jun 01 08:25:22.131 EDT %MIVR-SS_VB-7-UNK:Task:43000009351 DefaultCompilationConfig is now set to JVM en_US
615113: Jun 01 08:25:22.178 EDT %MIVR-SS_VB-7-UNK:Task:43000009351 VBContext: Constructing 615114: Jun 01 08:25:22.350 EDT %MIVR-SS_VB-7-UNK:HttpCache trace disabled (from voicebrowser.properties)
615115: Jun 01 08:25:22.381 EDT %MIVR-SS_VB-7-UNK:HttpCache enabled size: 25000000
615116: Jun 01 08:25:22.381 EDT %MIVR-SS_VB-7-UNK:Task:43000009351 VBProperties::Constructing 615117: Jun 01 08:25:22.381 EDT %MIVR-SS_VB-7-UNK:Task:43000009351
VBProperties.initDefaultProperties()
615118: Jun 01 08:25:22.397 EDT %MIVR-SS_VB-7-UNK:Task:43000009351 VBProperties::Initializing 615119: Jun 01 08:25:22.397 EDT %MIVR-SS_VB-7-UNK:Task:43000009351 Here creating
currentPathURI=file:C:/Program Files/wfavvid_1001/
615120: Jun 01 08:25:22.397 EDT %MIVR-SS_VB-7-UNK:Task:43000009351 Invoke: http://mediaserver/vxmldocs/AA.vxml
615121: Jun 01 08:25:22.412 EDT %MIVR-SS_VB-7-UNK:Task:43000009351 JsScript - optimization
615243 Heard: 'one' The first heard caller resonse = “one”
Table A-1 Some Items to Notice in the Sample Log File
Line Number Message Event
A-3Cisco Unified Contact Center Express Getting Started with Scripts, Release 11.0(1)
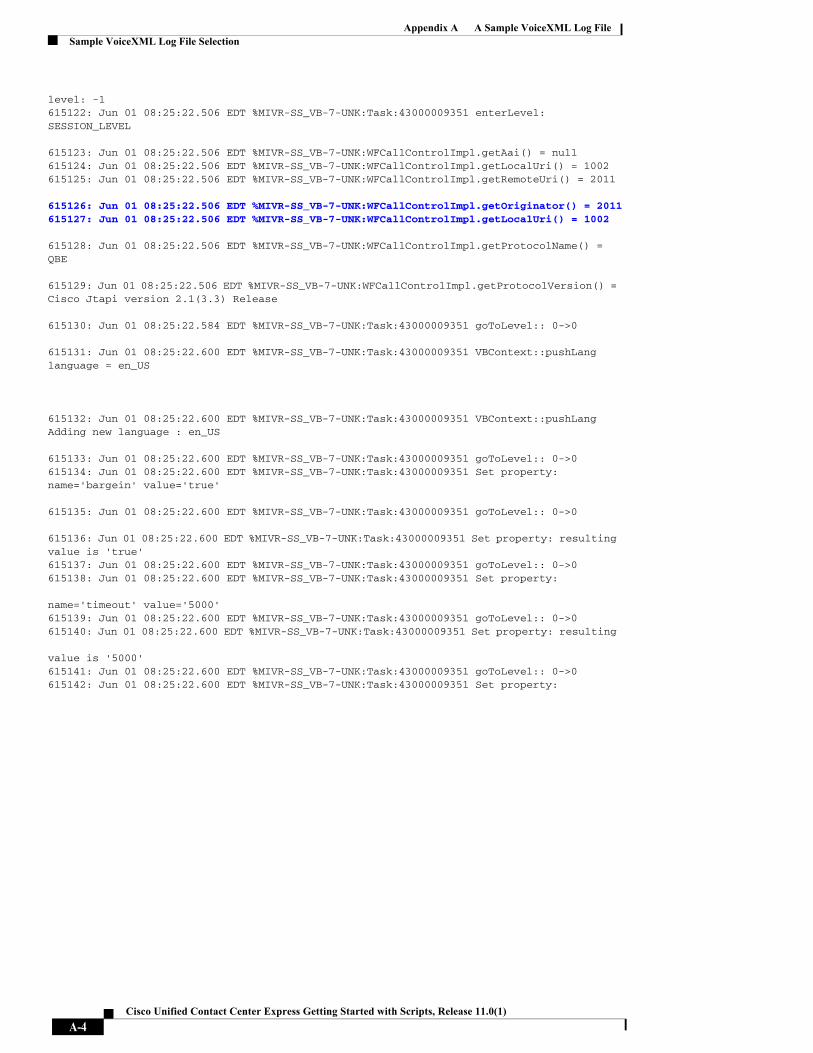
Appendix A A Sample VoiceXML Log File Sample VoiceXML Log File Selection
level: -1 615122: Jun 01 08:25:22.506 EDT %MIVR-SS_VB-7-UNK:Task:43000009351 enterLevel: SESSION_LEVEL
615123: Jun 01 08:25:22.506 EDT %MIVR-SS_VB-7-UNK:WFCallControlImpl.getAai() = null 615124: Jun 01 08:25:22.506 EDT %MIVR-SS_VB-7-UNK:WFCallControlImpl.getLocalUri() = 1002 615125: Jun 01 08:25:22.506 EDT %MIVR-SS_VB-7-UNK:WFCallControlImpl.getRemoteUri() = 2011
615126: Jun 01 08:25:22.506 EDT %MIVR-SS_VB-7-UNK:WFCallControlImpl.getOriginator() = 2011 615127: Jun 01 08:25:22.506 EDT %MIVR-SS_VB-7-UNK:WFCallControlImpl.getLocalUri() = 1002
615128: Jun 01 08:25:22.506 EDT %MIVR-SS_VB-7-UNK:WFCallControlImpl.getProtocolName() = QBE
615129: Jun 01 08:25:22.506 EDT %MIVR-SS_VB-7-UNK:WFCallControlImpl.getProtocolVersion() = Cisco Jtapi version 2.1(3.3) Release
615130: Jun 01 08:25:22.584 EDT %MIVR-SS_VB-7-UNK:Task:43000009351 goToLevel:: 0->0
615131: Jun 01 08:25:22.600 EDT %MIVR-SS_VB-7-UNK:Task:43000009351 VBContext::pushLang language = en_US
615132: Jun 01 08:25:22.600 EDT %MIVR-SS_VB-7-UNK:Task:43000009351 VBContext::pushLang Adding new language : en_US
615133: Jun 01 08:25:22.600 EDT %MIVR-SS_VB-7-UNK:Task:43000009351 goToLevel:: 0->0 615134: Jun 01 08:25:22.600 EDT %MIVR-SS_VB-7-UNK:Task:43000009351 Set property: name='bargein' value='true'
615135: Jun 01 08:25:22.600 EDT %MIVR-SS_VB-7-UNK:Task:43000009351 goToLevel:: 0->0
615136: Jun 01 08:25:22.600 EDT %MIVR-SS_VB-7-UNK:Task:43000009351 Set property: resulting value is 'true' 615137: Jun 01 08:25:22.600 EDT %MIVR-SS_VB-7-UNK:Task:43000009351 goToLevel:: 0->0 615138: Jun 01 08:25:22.600 EDT %MIVR-SS_VB-7-UNK:Task:43000009351 Set property:
name='timeout' value='5000' 615139: Jun 01 08:25:22.600 EDT %MIVR-SS_VB-7-UNK:Task:43000009351 goToLevel:: 0->0 615140: Jun 01 08:25:22.600 EDT %MIVR-SS_VB-7-UNK:Task:43000009351 Set property: resulting
value is '5000' 615141: Jun 01 08:25:22.600 EDT %MIVR-SS_VB-7-UNK:Task:43000009351 goToLevel:: 0->0 615142: Jun 01 08:25:22.600 EDT %MIVR-SS_VB-7-UNK:Task:43000009351 Set property:
A-4Cisco Unified Contact Center Express Getting Started with Scripts, Release 11.0(1)

Appendix A A Sample VoiceXML Log FileSample VoiceXML Log File Selection
name='com.cisco.tts.gender' value='female' 615143: Jun 01 08:25:22.600 EDT %MIVR-SS_VB-7-UNK:Task:43000009351 goToLevel:: 0->0 615144: Jun 01 08:25:22.600 EDT %MIVR-SS_VB-7-UNK:Task:43000009351 Set property: resulting
value is 'female' 615145: Jun 01 08:25:22.600 EDT %MIVR-SS_VB-7-UNK:Task:43000009351 goToLevel:: 0->0 615146: Jun 01 08:25:22.600 EDT %MIVR-SS_VB-7-UNK:Task:43000009351 Set property:
name='termchar' value='#' 615147: Jun 01 08:25:22.600 EDT %MIVR-SS_VB-7-UNK:Task:43000009351 goToLevel:: 0->0 615148: Jun 01 08:25:22.600 EDT %MIVR-SS_VB-7-UNK:Task:43000009351 Set property: resulting
value is '#' 615149: Jun 01 08:25:22.600 EDT %MIVR-SS_VB-7-UNK:Task:43000009351 goToLevel:: 0->0 615150: Jun 01 08:25:22.600 EDT %MIVR-SS_VB-7-UNK:Task:43000009351 Set property:
name='termtimeout' value='4000' 615151: Jun 01 08:25:22.600 EDT %MIVR-SS_VB-7-UNK:Task:43000009351 goToLevel:: 0->0 615152: Jun 01 08:25:22.600 EDT %MIVR-SS_VB-7-UNK:Task:43000009351 Set property: resulting
value is '4000'
615153: Jun 01 08:25:22.600 EDT %MIVR-SS_VB-7-UNK:Task:43000009351 goToLevel:: 0->0
615155: Jun 01 08:25:22.600 EDT %MIVR-SS_VB-7-UNK:Task:43000009351 goToLevel:: 0->0
615156: Jun 01 08:25:22.600 EDT %MIVR-SS_VB-7-UNK:Task:43000009351 Set property: resulting value is '32'
615157: Jun 01 08:25:22.600 EDT %MIVR-SS_VB-7-UNK:Task:43000009351 VoiceBrowser.invokeApplication(level:0): [URI=http://mediaserver/vxmldocs/AA.vxml fragment=null]
615158: Jun 01 08:25:22.600 EDT %MIVR-SS_VB-7-UNK:Task:43000009351 enterScope: application
615159: Jun 01 08:25:22.600 EDT %MIVR-SS_VB-7-UNK:Task:43000009351 enterLevel: APPLICATION_LEVEL
615160: Jun 01 08:25:22.631 EDT %MIVR-SS_VB-7-UNK:Task:43000009351 VXMLDocumnet.loadbAndParse() start = 1117628722631
615161: Jun 01 08:25:22.631 EDT %MIVR-SS_VB-7-UNK:Task:43000009351 VXMLDocumnet.loadAndParse(), req.getMethod() =
615162: Jun 01 08:25:22.631 EDT %MIVR-SS_VB-7-UNK:Task:43000009351 VXMLDocumnet.loadAndParse(), add thread (TimeoutThread_1117628722631_1) to Map
A-5Cisco Unified Contact Center Express Getting Started with Scripts, Release 11.0(1)

Appendix A A Sample VoiceXML Log File Sample VoiceXML Log File Selection
615163: Jun 01 08:25:22.631 EDT %MIVR-SS_VB-7-UNK:Task:43000009351 VXMLDocumnet.loadbAndParse(): the total number of fetching threads = 0
615164: Jun 01 08:25:22.631 EDT %MIVR-SS_VB-7-UNK:Task:43000009351 VXMLDocumnet.loadbAndParse(): calling aThread (TimeoutThread_1117628722631_1) start().
615165: Jun 01 08:25:22.631 EDT %MIVR-SS_VB-7-UNK:Task:43000009351 VXMLDocumnet.loadbAndParse(): fetching (http://mediaserver/vxmldocs/AA.vxml) timeout attribute=0
615166: Jun 01 08:25:22.631 EDT %MIVR-SS_VB-7-UNK:Task:43000009351 VXMLDocumnet.loadbAndParse().aThread.run() thread (TimeoutThread_1117628722631_1) start = 1117628722631 state=STARTED
615167: Jun 01 08:25:22.631 EDT %MIVR-SS_VB-7-UNK:Task:43000009351 VXMLDocumnet.loadbAndParse().aThread.run() thread (TimeoutThread_1117628722631_1) set VxmlDocument's state to DONE, state=DONE
615168: Jun 01 08:25:22.631 EDT %MIVR-SS_VB-7-UNK:Task:43000009351 VXMLDocumnet.loadbAndParse().aThread.run() (done) thread (TimeoutThread_1117628722631_1) end=1117628722631, time=0
615169: Jun 01 08:25:22.631 EDT %MIVR-SS_VB-7-UNK:Task:43000009351 VXMLDocumnet.loadbAndParse(): after join(), state=DONE time=1117628722631 fetching took=0
615171: Jun 01 08:25:22.631 EDT %MIVR-SS_VB-7-UNK:Task:43000009351
VXMLDocumnet.loadAndParse(), now parse a Document from req.getDocObj() 615172: Jun 01 08:25:22.740 EDT %MIVR-SS_VB-7-UNK:xmlParser statistics: created=1 discarded=0 maxsize=-1
615174: Jun 01 08:25:22.803 EDT %MIVR-SS_VB-7-UNK:Task:43000009351 [Error] AA.vxml (line:8
column:18) Document is invalid: no grammar found. 615175: Jun 01 08:25:22.818 EDT %MIVR-SS_VB-7-UNK:Task:43000009351 XML DocumentType: name=null public id=null system id=null
615176: Jun 01 08:25:22.818 EDT %MIVR-SS_VB-7-UNK:xmlParser statistics: created=1
discarded=0 maxsize=50 615177: Jun 01 08:25:22.818 EDT %MIVR-SS_VB-7-UNK:Task:43000009351 VXMLDocumnet.loadbAndParse() end = 1117628722818 time = 187
A-6Cisco Unified Contact Center Express Getting Started with Scripts, Release 11.0(1)

Appendix A A Sample VoiceXML Log FileSample VoiceXML Log File Selection
615178: Jun 01 08:25:22.818 EDT %MIVR-SS_VB-7-UNK:Task:43000009351 exitLevel: APPLICATION_LEVEL 615179: Jun 01 08:25:22.818 EDT %MIVR-SS_VB-7-UNK:Task:43000009351 goToLevel:: 0->0 615180: Jun 01 08:25:22.818 EDT %MIVR-SS_VB-7-UNK:Task:43000009351 exitScope: application
615181: Jun 01 08:25:22.818 EDT %MIVR-SS_VB-7-UNK:Task:43000009351 enterScope: application 615182: Jun 01 08:25:22.818 EDT %MIVR-SS_VB-7-UNK:Task:43000009351 enterLevel: APPLICATION_LEVEL
615183: Jun 01 08:25:22.818 EDT %MIVR-SS_VB-7-UNK:Task:43000009351 enterScope: document
615184: Jun 01 08:25:22.834 EDT %MIVR-SS_VB-7-UNK:Task:43000009351 enterLevel: DOCUMENT_LEVEL 615185: Jun 01 08:25:22.834 EDT %MIVR-SS_VB-7-UNK:Task:43000009351 traverseDocument:
http://mediaserver/vxmldocs/AA.vxml base=http://mediaserver/vxmldocs/AA.vxml
615186: Jun 01 08:25:22.834 EDT %MIVR-SS_VB-7-UNK:Task:43000009351 PormItemTraverser:handlMenuElement(): adding dtmf choice grammar string = one
615187: Jun 01 08:25:22.834 EDT %MIVR-SS_VB-7-UNK:Task:43000009351 FormItemTraverser:handlMenuElement(): choice grammar string = one 615188: Jun 01 08:25:22.834 EDT %MIVR-SS_VB-7-UNK:Task:43000009351 goToLevel:: 0->2 615189: Jun 01 08:25:22.834 EDT %MIVR-SS_VB-7-UNK:Task:43000009351 goToLevel:: 2->2
615190: Jun 01 08:25:22.834 EDT %MIVR-SS_VB-7-UNK:Task:43000009351 goToLevel:: 2->2 615191: Jun 01 08:25:22.834 EDT %MIVR-SS_VB-7-UNK:Task:43000009351 VBGrammaraHandler::addInLineGrammar() grammar = [grammar: null] Type = 1
615192: Jun 01 08:25:22.850 EDT %MIVR-SS_VB-7-UNK:Task:43000009351 handleGrammarElement : value of grammar string = null 615193: Jun 01 08:25:22.850 EDT %MIVR-SS_VB-7-UNK:Task:43000009351 goToLevel:: 2->2 615194: Jun 01 08:25:22.850 EDT %MIVR-SS_VB-7-UNK:Task:43000009351 goToLevel:: 2->2
615195: Jun 01 08:25:22.850 EDT %MIVR-SS_VB-7-UNK:Task:43000009351 goToLevel:: 2->2 615196: Jun 01 08:25:22.850 EDT %MIVR-SS_VB-7-UNK:Task:43000009351 VBGrammaraHandler::addInLineGrammar() grammar = [grammar: null] Type = 1
615197: Jun 01 08:25:22.850 EDT %MIVR-SS_VB-7-UNK:Task:43000009351 handleGrammarElement :
value of grammar string = null 615198: Jun 01 08:25:22.850 EDT %MIVR-SS_VB-7-UNK:Task:43000009351 FormItemTraverser:handlMenuElement(): adding dtmf choice grammar string = 2
A-7Cisco Unified Contact Center Express Getting Started with Scripts, Release 11.0(1)

Appendix A A Sample VoiceXML Log File Sample VoiceXML Log File Selection
615199: Jun 01 08:25:22.865 EDT %MIVR-SS_VB-7-UNK:Task:43000009351 FormItemTraverser:handlMenuElement(): choice grammar string = 2 615200: Jun 01 08:25:22.865 EDT %MIVR-SS_VB-7-UNK:Task:43000009351 goToLevel:: 2->2 615201: Jun 01 08:25:22.865 EDT %MIVR-SS_VB-7-UNK:Task:43000009351 goToLevel:: 2->2
615202: Jun 01 08:25:22.865 EDT %MIVR-SS_VB-7-UNK:Task:43000009351 goToLevel:: 2->2 615203: Jun 01 08:25:22.865 EDT %MIVR-SS_VB-7-UNK:Task:43000009351 VBGrammaraHandler::addInLineGrammar() grammar = [grammar: null] Type = 1
615204: Jun 01 08:25:22.865 EDT %MIVR-SS_VB-7-UNK:Task:43000009351 handleGrammarElement : value of grammar string = null 615205: Jun 01 08:25:22.865 EDT %MIVR-SS_VB-7-UNK:Task:43000009351 goToLevel:: 2->2 615206: Jun 01 08:25:22.865 EDT %MIVR-SS_VB-7-UNK:Task:43000009351 goToLevel:: 2->2
615207: Jun 01 08:25:22.865 EDT %MIVR-SS_VB-7-UNK:Task:43000009351 goToLevel:: 2->2 615208: Jun 01 08:25:22.865 EDT %MIVR-SS_VB-7-UNK:Task:43000009351 VBGrammaraHandler::addInLineGrammar() grammar = [grammar: null] Type = 1
615209: Jun 01 08:25:22.865 EDT %MIVR-SS_VB-7-UNK:Task:43000009351 handleGrammarElement :
value of grammar string = null 615210: Jun 01 08:25:22.865 EDT %MIVR-SS_VB-7-UNK:Task:43000009351 FormItemTraverser:handlMenuElement(): adding dtmf choice grammar string = 0
615211: Jun 01 08:25:22.865 EDT %MIVR-SS_VB-7-UNK:Task:43000009351 FormItemTraverser:handlMenuElement(): choice grammar string = 0 615212: Jun 01 08:25:22.865 EDT %MIVR-SS_VB-7-UNK:Task:43000009351 goToLevel:: 2->2
615213: Jun 01 08:25:22.865 EDT %MIVR-SS_VB-7-UNK:Task:43000009351 goToLevel:: 2->2 615214: Jun 01 08:25:22.865 EDT %MIVR-SS_VB-7-UNK:Task:43000009351 goToLevel:: 2->2 615215: Jun 01 08:25:22.865 EDT %MIVR-SS_VB-7-UNK:Task:43000009351
VBGrammaraHandler::addInLineGrammar() grammar = [grammar: null] Type = 1
615216: Jun 01 08:25:22.865 EDT %MIVR-SS_VB-7-UNK:Task:43000009351 handleGrammarElement : value of grammar string = null 615217: Jun 01 08:25:22.865 EDT %MIVR-SS_VB-7-UNK:Task:43000009351 goToLevel:: 2->2 615218: Jun 01 08:25:22.865 EDT %MIVR-SS_VB-7-UNK:Task:43000009351 goToLevel:: 2->2 615219: Jun 01 08:25:22.865 EDT %MIVR-SS_VB-7-UNK:Task:43000009351 goToLevel:: 2->2 615220: Jun 01 08:25:22.865 EDT %MIVR-SS_VB-7-UNK:Task:43000009351
VBGrammaraHandler::addInLineGrammar() grammar = [grammar: null] Type = 1
A-8Cisco Unified Contact Center Express Getting Started with Scripts, Release 11.0(1)

Appendix A A Sample VoiceXML Log FileSample VoiceXML Log File Selection
615221: Jun 01 08:25:22.865 EDT %MIVR-SS_VB-7-UNK:Task:43000009351 handleGrammarElement : value of grammar string = null 615222: Jun 01 08:25:22.881 EDT %MIVR-SS_VB-7-UNK:Task:43000009351 goToLevel:: 2->2 615223: Jun 01 08:25:22.912 EDT %MIVR-SS_VB-7-UNK:Task:43000009351 enterLevel:
DIALOG_LEVEL 615224: Jun 01 08:25:22.912 EDT %MIVR-SS_VB-7-UNK:Task:43000009351 traverseDialog: id=aa 615225: Jun 01 08:25:22.912 EDT %MIVR-SS_VB-7-UNK:Task:43000009351 enterScope: dialog 615226: Jun 01 08:25:22.928 EDT %MIVR-SS_VB-7-UNK:Task:43000009351 enterLevel: FIELD_LEVEL 615227: Jun 01 08:25:22.928 EDT %MIVR-SS_VB-7-UNK:Task:43000009351 DialogTraverser:
traverseDialog(): -- Beginning Select Phase
615228: Jun 01 08:25:22.928 EDT %MIVR-SS_VB-7-UNK:Task:43000009351 DialogTraverser: traverseDialog(): Selected element = menu name = 615229: Jun 01 08:25:22.928 EDT %MIVR-SS_VB-7-UNK:Task:43000009351 DialogTraverser:
traverseDialog(): -- Beginning Collect Phase 615230: Jun 01 08:25:22.928 EDT %MIVR-SS_VB-7-UNK:Task:43000009351 goToLevel:: 2->4 615231: Jun 01 08:25:22.928 EDT %MIVR-SS_VB-7-UNK:Task:43000009351 goToLevel:: 4->4 615232: Jun 01 08:25:22.928 EDT %MIVR-SS_VB-7-UNK:Task:43000009351 goToLevel:: 4->4
615233: Jun 01 08:25:22.943 EDT %MIVR-SS_VB-7-UNK:Task:43000009351 Setting gender as female for prompt = TTS:Dom[<?xml version="1.0"?>
<speak version="1.0" xmlns="http://www.w3.org/2001/10/synthesis">
Welcome to the automated attendant. To enter the phone number of the person you are trying to reach, say or press 1. To enter the name of the person you are trying to reach, say or press 2. To transfer to the operator, say or press 0.
</speak> ]
615234: Jun 01 08:25:22.975 EDT %MIVR-SS_VB-7-UNK:Task:43000009351 Play: TTS:Dom[<?xml version="1.0"?> <speak version="1.0" xmlns="http://www.w3.org/2001/10/synthesis"> Welcome to the automated attendant. To enter the phone number of the person you are trying to reach, say or press 1. To enter the name of the person you are trying to reach, say or press 2. To transfer to the operator, say or press 0. </speak>
] 615235: Jun 01 08:25:22.975 EDT %MIVR-SS_VB-7-UNK:Task:43000009351 FormItemTraverser:handlMenuElement(): adding dtmf choice grammar string = one
615236: Jun 01 08:25:22.990 EDT %MIVR-SS_VB-7-UNK:Task:43000009351
A-9Cisco Unified Contact Center Express Getting Started with Scripts, Release 11.0(1)

Appendix A A Sample VoiceXML Log File Sample VoiceXML Log File Selection
FormItemTraverser:handlMenuElement(): choice grammar string = one 615237: Jun 01 08:25:22.990 EDT %MIVR-SS_VB-7-UNK:Task:43000009351 FormItemTraverser:handlMenuElement(): adding dtmf choice grammar string = 2
615238: Jun 01 08:25:22.990 EDT %MIVR-SS_VB-7-UNK:Task:43000009351
FormItemTraverser:handlMenuElement(): choice grammar string = 2 615239: Jun 01 08:25:22.990 EDT %MIVR-SS_VB-7-UNK:Task:43000009351 FormItemTraverser:handlMenuElement(): adding dtmf choice grammar string = 0
615240: Jun 01 08:25:22.990 EDT %MIVR-SS_VB-7-UNK:Task:43000009351 FormItemTraverser:handlMenuElement(): choice grammar string = 0 615241: Jun 01 08:25:22.990 EDT %MIVR-SS_VB-7-UNK:Task:43000009351 Listen: 615242: Jun 01 08:25:39.288 EDT %MIVR-SS_VB-7-UNK:Task:43000009351 goToLevel:: 4->4
615243: Jun 01 08:25:39.288 EDT %MIVR-SS_VB-7-UNK:Task:43000009351 Heard: 'one'
615244: Jun 01 08:25:39.288 EDT %MIVR-SS_VB-7-UNK:Task:43000009351 playAndRecognize returns: one
615245: Jun 01 08:25:39.288 EDT %MIVR-SS_VB-7-UNK:Task:43000009351 VoiceDomParser:handleMenuElement: utterance = one
615246: Jun 01 08:25:39.288 EDT %MIVR-SS_VB-7-UNK:Task:43000009351 DialogTraverser: traverseDialog(): -- Beginning Process phase
615247: Jun 01 08:25:39.288 EDT %MIVR-SS_VB-7-UNK:Task:43000009351 VBResultProcessor.processNlsmlResult(): gmParentName=choice, id=, name=, type=, slot=, result=<?xml version='1.0'?><result><interpretation grammar="session:[email protected]" confidence="94"><input mode="speech">one</input><instance><SWI_literal>one</SWI_literal><SWI_grammarName>session: [email protected]</SWI_grammarName><SWI_meaning>{SWI_literal:one}</SWI_meaning></in stance></interpretation></result>
A-10Cisco Unified Contact Center Express Getting Started with Scripts, Release 11.0(1)
Cisco Unified Contact Center Express Getting S
A P P E N D I X B
VoiceXML Implementation for Cisco Voice BrowserThis appendix includes the following topics:
• VoiceXML 2.0 Element Implementation, page B-2
• VoiceXML Properties Implementation, page B-10
• Standard Session Variables Implementation, page B-11
• Built-in Type Implementation, page B-12
• The <value> Data Format, page B-14
B-1tarted with Scripts, Release 11.0(1)

Appendix B VoiceXML Implementation for Cisco Voice Browser VoiceXML 2.0 Element Implementation
VoiceXML 2.0 Element ImplementationTable B-1 describes the Cisco Unified CCX implementation of VoiceXML 2.0 elements. It contains:
• The list of all the elements defined in the W3C Voice Extensible Markup Language (VoiceXML) Version 2.0.
• The elements in the Speech Synthesis Markup Language Version 1.0 specification that Cisco Unified CCX supports. SML elements are available in VoiceXML 2.0.
• The elements in the Speech Recognition Grammar Specification (SRGS) Version 1.0 that Cisco Unified CCX supports. SRGS elements are available in VoiceXML 2.0.
Note At run time, the system ignores unsupported or unimplemented attributes.
Table B-1 VoiceXML 2.0 Element Implementation
Element Attributes Notes
<assign> name expr
Fully supported by the Cisco Unified CCX implementation.
<audio> src fetchtimeout fetchint maxage maxstale expr
The following attributes are not supported:
• fetchint
• The <audio expr> tag when nested in a <prompt> tag.
The following audio file formats are supported:
• audio/wav
The following codec is supported for each file format:
• G.711 ULAW
<block> name expr cond
Fully supported by the Cisco Unified CCX implementation.
<break> strength time
Fully supported by the Cisco Unified CCX implementation.
B-2Cisco Unified Contact Center Express Getting Started with Scripts, Release 11.0(1)

Appendix B VoiceXML Implementation for Cisco Voice BrowserVoiceXML 2.0 Element Implementation
<catch> event count cond
Fully supported by the Cisco Unified CCX implementation.
<choice> dtmf accept next expr event eventexpr message messageexpr fetchaudio fetchint fetchtimeout maxage maxstale
The following attributes are not supported:
• fetchint
Note The <choice> element’s dtmf attribute can be set only to dtmf=”*”, dtmf=”#”, or dtmf=”0” if it is being used in conjunction with a <menu> element and the dtmf attribute is set to dtmf=”true”.
<clear> namelist Fully supported by the Cisco Unified CCX implementation.
<desc> xml:lang Not supported by the Cisco Unified CCX implementation.
<disconnect> no attributes Fully supported by the Cisco Unified CCX implementation.
<else> no attributes Fully supported by the Cisco Unified CCX implementation.
<elseif> cond Fully supported by the Cisco Unified CCX implementation.
<emphasis> level Fully supported by the Cisco Unified CCX implementation.
<enumerate> no attributes Fully supported by the Cisco Unified CCX implementation.
<error> count cond
Fully supported by the Cisco Unified CCX implementation.
<example> no attributes Fully supported by the Cisco Unified CCX implementation.
<exit> expr namelist
Fully supported by the Cisco Unified CCX implementation.
Parameters are returned to variables configured in the Voice Browser step.
Table B-1 VoiceXML 2.0 Element Implementation (continued)
Element Attributes Notes
B-3Cisco Unified Contact Center Express Getting Started with Scripts, Release 11.0(1)
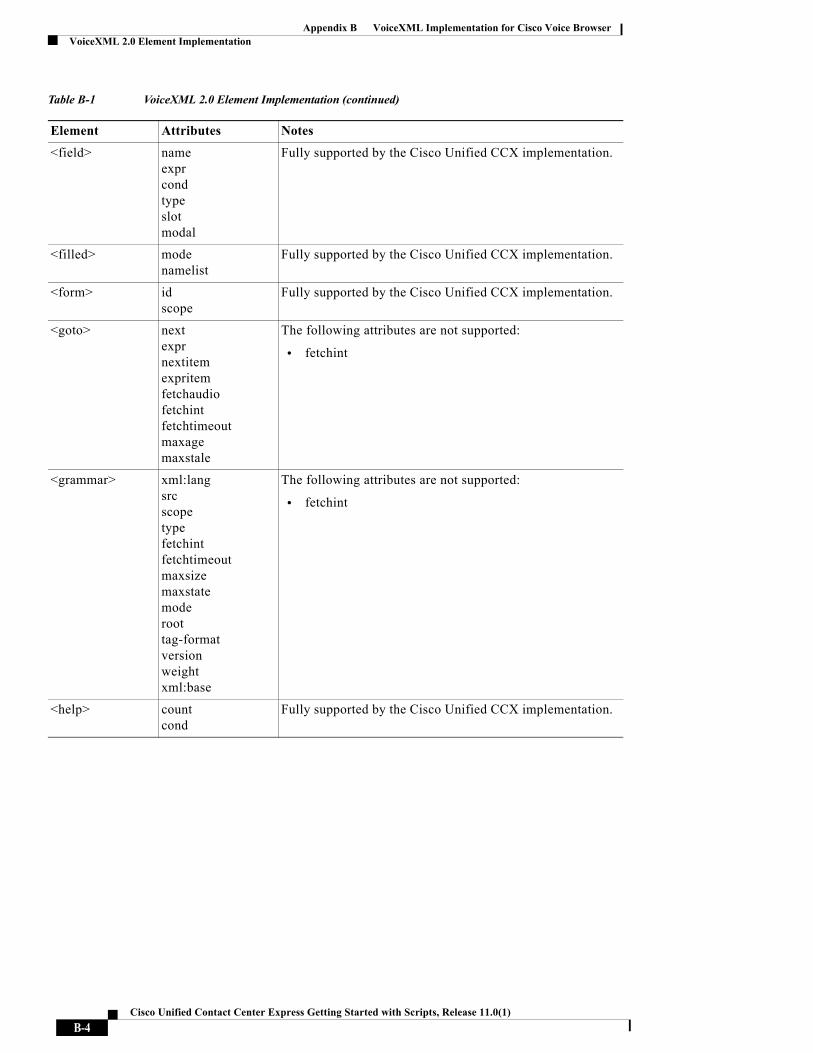
Appendix B VoiceXML Implementation for Cisco Voice Browser VoiceXML 2.0 Element Implementation
<field> name expr cond type slot modal
Fully supported by the Cisco Unified CCX implementation.
<filled> mode namelist
Fully supported by the Cisco Unified CCX implementation.
<form> id scope
Fully supported by the Cisco Unified CCX implementation.
<goto> next expr nextitem expritem fetchaudio fetchint fetchtimeout maxage maxstale
The following attributes are not supported:
• fetchint
<grammar> xml:lang src scope type fetchint fetchtimeout maxsize maxstate mode root tag-format version weight xml:base
The following attributes are not supported:
• fetchint
<help> count cond
Fully supported by the Cisco Unified CCX implementation.
Table B-1 VoiceXML 2.0 Element Implementation (continued)
Element Attributes Notes
B-4Cisco Unified Contact Center Express Getting Started with Scripts, Release 11.0(1)

Appendix B VoiceXML Implementation for Cisco Voice BrowserVoiceXML 2.0 Element Implementation
<if> cond Fully supported by the Cisco Unified CCX implementation.
<initial> name expr cond
Fully supported by the Cisco Unified CCX implementation.
<item> tag weight
Fully supported by the Cisco Unified CCX implementation.
<lexicon> type uri
Not supported by the Cisco Unified CCX implementation.
<link> next dtmf expr event eventexpr fetchaudio fetchint fetchtimeout maxsize maxstate message messageexpr
The following attributes are not supported:
• fetchint
<log> label expr
Fully supported by the Cisco Unified CCX implementation.
<mark> name Not supported by the Cisco Unified CCX implementation.
<menu> id scope dtmf accept
Fully supported by the Cisco Unified CCX implementation.
Note If the <menu> element dtmf attribute is set to dtmf=”true”, then the <choice> element dtmf attribute can be set to only one of the following: dtmf=”*”, dtmf=”#”, and dtmf=”0”.
<meta> name content http-equiv
Fully supported by the Cisco Unified CCX implementation.
http-equiv may contain Date and Expires properties
Table B-1 VoiceXML 2.0 Element Implementation (continued)
Element Attributes Notes
B-5Cisco Unified Contact Center Express Getting Started with Scripts, Release 11.0(1)

Appendix B VoiceXML Implementation for Cisco Voice Browser VoiceXML 2.0 Element Implementation
<metadata> creator rights subject
Fully supported by the Cisco Unified CCX implementation.
<noinput> count cond
Fully supported by the Cisco Unified CCX implementation.
<nomatch> count cond
Fully supported by the Cisco Unified CCX implementation.
<object> name expr cond classid codebase codetype data type archive fetchint fetchtimeout maxage maxstale
No platform object is supported in the Cisco Unified CCX implementation.
<one-of> tag Fully supported by the Cisco Unified CCX implementation.
<option> dtmf accept value
Fully supported by the Cisco Unified CCX implementation.
<p> XML:lang Fully supported by the Cisco Unified CCX implementation.
<param> name expr value valuetype type
Fully supported by the Cisco Unified CCX implementation.
<phoneme> alphabet ph
Fully supported by the Cisco Unified CCX implementation.
Table B-1 VoiceXML 2.0 Element Implementation (continued)
Element Attributes Notes
B-6Cisco Unified Contact Center Express Getting Started with Scripts, Release 11.0(1)

Appendix B VoiceXML Implementation for Cisco Voice BrowserVoiceXML 2.0 Element Implementation
<prompt> bargein bargeintype cond count timeout xml:lang xml:base
For bargein, only “speech” is supported.
<property> name value
Supported in the Cisco Unified CCX implementation.
See VoiceXML Properties Implementation, page B-10 for the list of properties supported.
<prosody> pitch contour range rate duration volume
Not supported by the Cisco Unified CCX implementation.
<record> name expr cond modal beep maxtime finalsilence dtmfterm type
The following attributes are not supported:
• finalsilence
• type (accepts only the default format)
Voice recording supports the following codec:
• G711_ULAW format
Simultaneous recognition and recording is not supported.
Note Note that the record variable should be used only for submitting the audio using the <submit> element. Use of the variable in other ECMAScript expression is not supported.
<reprompt> no attributes Fully supported by the Cisco Unified CCX implementation.
<return> event eventexpr message messageexpr namelist
Fully supported by the Cisco Unified CCX implementation.
Table B-1 VoiceXML 2.0 Element Implementation (continued)
Element Attributes Notes
B-7Cisco Unified Contact Center Express Getting Started with Scripts, Release 11.0(1)

Appendix B VoiceXML Implementation for Cisco Voice Browser VoiceXML 2.0 Element Implementation
<rule> ID scope
Fully supported by the Cisco Unified CCX implementation.
<ruleref> tag uri
Fully supported by the Cisco Unified CCX implementation.
<s> no attributes Fully supported by the Cisco Unified CCX implementation.
<say-as> phon sub class
Fully supported by the Cisco Unified CCX implementation.
<script> src charset fetchint fetchtimeout maxage maxstale
The following attributes are not supported:
• fetchint
<sub> alias Not supported by the Cisco Unified CCX implementation.
<subdialog> name expr cond namelist src srcexp method enctype fetchaudio fetchtimeout fetchint maxage maxstale
The following attributes are not supported:
• fetchint
Table B-1 VoiceXML 2.0 Element Implementation (continued)
Element Attributes Notes
B-8Cisco Unified Contact Center Express Getting Started with Scripts, Release 11.0(1)
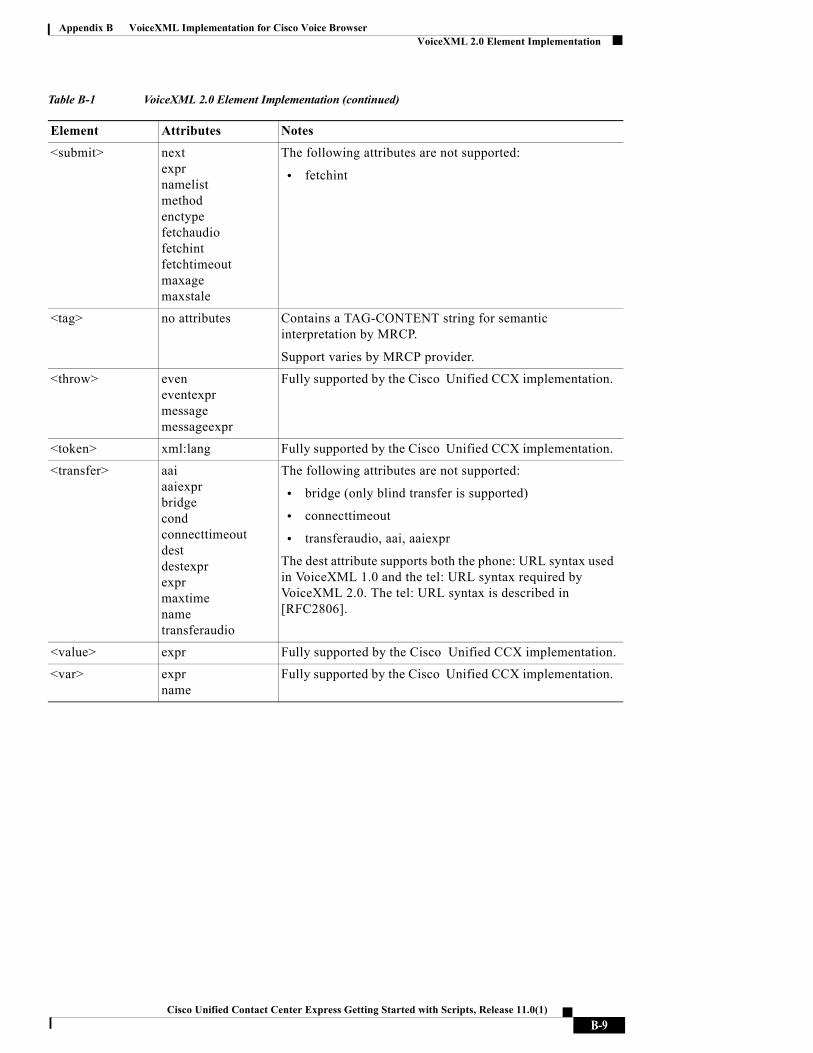
Appendix B VoiceXML Implementation for Cisco Voice BrowserVoiceXML 2.0 Element Implementation
<submit> next expr namelist method enctype fetchaudio fetchint fetchtimeout maxage maxstale
The following attributes are not supported:
• fetchint
<tag> no attributes Contains a TAG-CONTENT string for semantic interpretation by MRCP.
Support varies by MRCP provider.
<throw> even eventexpr message messageexpr
Fully supported by the Cisco Unified CCX implementation.
<token> xml:lang Fully supported by the Cisco Unified CCX implementation.
<transfer> aai aaiexpr bridge cond connecttimeout dest destexpr expr maxtime name transferaudio
The following attributes are not supported:
• bridge (only blind transfer is supported)
• connecttimeout
• transferaudio, aai, aaiexpr
The dest attribute supports both the phone: URL syntax used in VoiceXML 1.0 and the tel: URL syntax required by VoiceXML 2.0. The tel: URL syntax is described in [RFC2806].
<value> expr Fully supported by the Cisco Unified CCX implementation.
<var> expr name
Fully supported by the Cisco Unified CCX implementation.
Table B-1 VoiceXML 2.0 Element Implementation (continued)
Element Attributes Notes
B-9Cisco Unified Contact Center Express Getting Started with Scripts, Release 11.0(1)

Appendix B VoiceXML Implementation for Cisco Voice Browser VoiceXML Properties Implementation
VoiceXML Properties ImplementationThe table below lists standard VoiceXML 2.0 properties supported in Cisco Unified CCX implementation.
Table B-2 Supported Standard VoiceXML 2.0 Properties
Property Name Description
bargein Specifies whether or not barge-in to voice prompts is allowed. Allowed values are "true" and "false". Default value is "true".
fetchtimeout Sets the timeout for fetching the content from the web. The default value is "4s".
timeout The time after which a noinput event is thrown by the platform. The default value is "5s".
termchar Specifies the termination keys to be used in a particular DTMF recognition. More than one key can be specified. The default value is “#”. Use blank “ ” to represent no termination key. (Recognition ends with timeout.)
termtimeout Specifies the timeout in seconds for DTMF recognition. The default value is "4s".
<voice> xml:lang gender age variant name
Not supported by the Cisco Unified CCX implementation.
<vxml> application version xmlns xml:base xml:lang
Fully supported by Cisco's Cisco Unified CCX implementation.
The version attribute must contain the value "2.0".
Table B-1 VoiceXML 2.0 Element Implementation (continued)
Element Attributes Notes
B-10Cisco Unified Contact Center Express Getting Started with Scripts, Release 11.0(1)
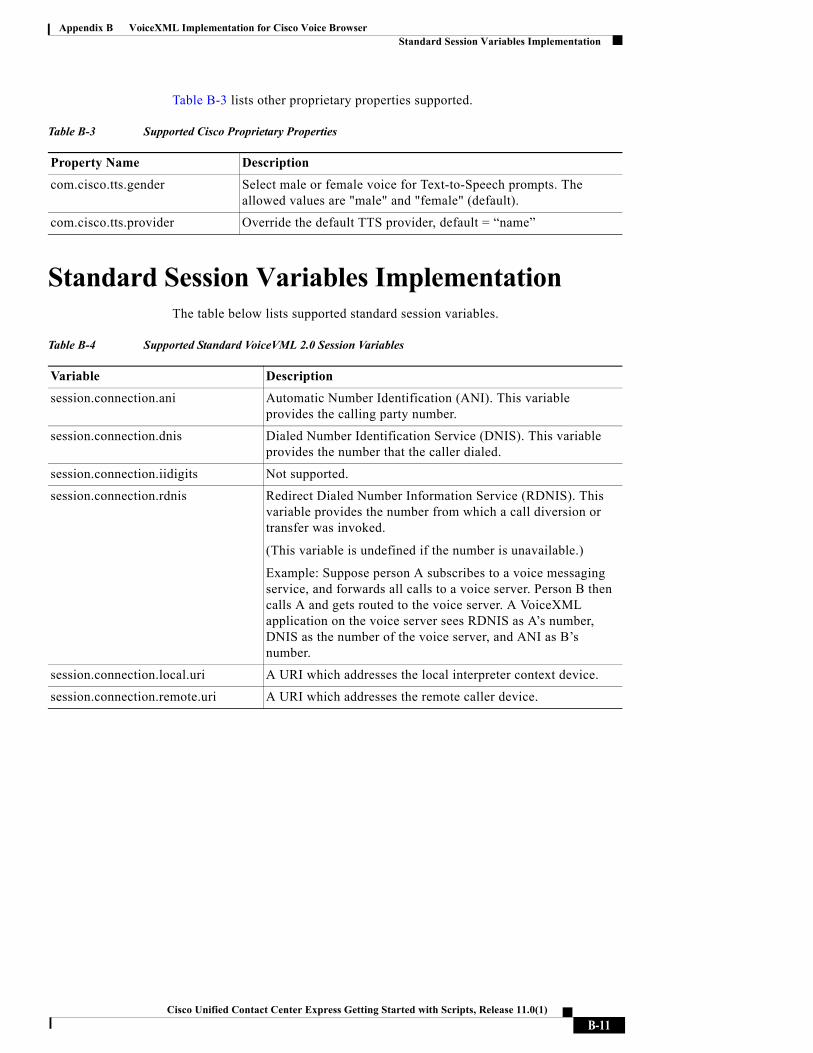
Appendix B VoiceXML Implementation for Cisco Voice BrowserStandard Session Variables Implementation
Table B-3 lists other proprietary properties supported.
Table B-3 Supported Cisco Proprietary Properties
Property Name Description
com.cisco.tts.gender Select male or female voice for Text-to-Speech prompts. The allowed values are "male" and "female" (default).
com.cisco.tts.provider Override the default TTS provider, default = “name”
Standard Session Variables ImplementationThe table below lists supported standard session variables.
Table B-4 Supported Standard VoiceVML 2.0 Session Variables
Variable Description
session.connection.ani Automatic Number Identification (ANI). This variable provides the calling party number.
session.connection.dnis Dialed Number Identification Service (DNIS). This variable provides the number that the caller dialed.
session.connection.iidigits Not supported.
session.connection.rdnis Redirect Dialed Number Information Service (RDNIS). This variable provides the number from which a call diversion or transfer was invoked.
(This variable is undefined if the number is unavailable.)
Example: Suppose person A subscribes to a voice messaging service, and forwards all calls to a voice server. Person B then calls A and gets routed to the voice server. A VoiceXML application on the voice server sees RDNIS as A’s number, DNIS as the number of the voice server, and ANI as B’s number.
session.connection.local.uri A URI which addresses the local interpreter context device.
session.connection.remote.uri A URI which addresses the remote caller device.
B-11Cisco Unified Contact Center Express Getting Started with Scripts, Release 11.0(1)

Appendix B VoiceXML Implementation for Cisco Voice Browser Built-in Type Implementation
Built-in Type ImplementationSupported built-in types are listed below:
• Boolean
• date
• digits
• currency
• number
• phone
session.connection.protocol.name The connection protocol. The name also represents the subobject name for protocol specific information. For instance, if session.connection.protocol.name is 'q931', session.connection.protocol.q931.uui might specify the user-to-user information property of the connection.
session.connection.protocol.version The version of the connection protocol.
session.connection.redirect An array representing the connection redirection paths. The first element is the original called number, the last element is the last redirected number. Each element of the array contains a uri, pi (presentation information), si (screening information), and reason property. The reason property can be either "unknown", "user busy", "no reply", "deflection during alerting", "deflection immediate response", "mobile subscriber not reachable".
session.connection.originator Directly references either the local or remote property (For instance, the following ECMAScript would return true if the remote party initiated the connection: var caller_initiate = connection.originator == connection.remote).
session.cisco.asravailable Cisco Proprietary. Read Only. Indicates whether or not the ASR server is available.
Table B-4 Supported Standard VoiceVML 2.0 Session Variables (continued)
Variable Description
B-12Cisco Unified Contact Center Express Getting Started with Scripts, Release 11.0(1)

Appendix B VoiceXML Implementation for Cisco Voice BrowserBuilt-in Type Implementation
• time (Time designations for properties and attributes is “s” or “ms,” except maxage, maxstale, (and audio/document/grammar/script variants).
Some deviations are listed as follows:
• Number built-in grammar does not support decimal numbers. It accepts number from 0 to 999,999.
• Phone built-in grammar does not support extension recognition.
• Parameterization of built-in types is not implemented.
Built-in grammar files are in the directory <install_directory>\grammars\system\.
See your MRCP vendor for the maximum number of digits that your Digit grammar accepts.
Grammars of the languages are filed in the respective directories designated by the locales.
Note Any modification to these files demands a through knowledge of SRGS and SSML MRCP grammar syntax and is done at the customer’s risk.
Table B-5 TTS/SSML/Audio Built-In Type Summary
VXML <prompt> (VXML 2.0 Appendix P)
SSML <say-as> element (SSML S 2.1.4) Mapping from VXML to SSML
interpret-as Format (optional field)
Number Number ordinal Format field not used
Number cardinal Format field not usedPhone Number telephone Format field is usedDate Date mdy Format field not usedDigits Digits Format field not used
Ordinal, Cardinal, Letters, Words
Not mapped
Boolean, currency, Time
No mapping – Unchanged from VXML 1
B-13Cisco Unified Contact Center Express Getting Started with Scripts, Release 11.0(1)
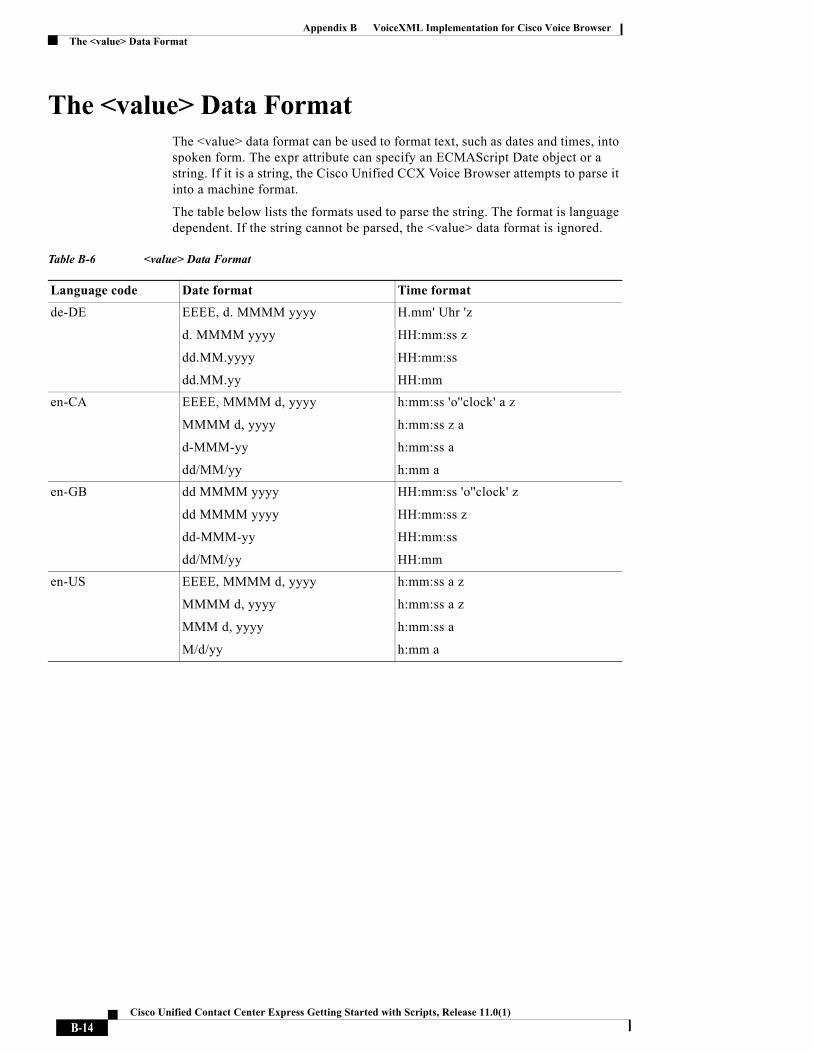
Appendix B VoiceXML Implementation for Cisco Voice Browser The <value> Data Format
The <value> Data FormatThe <value> data format can be used to format text, such as dates and times, into spoken form. The expr attribute can specify an ECMAScript Date object or a string. If it is a string, the Cisco Unified CCX Voice Browser attempts to parse it into a machine format.
The table below lists the formats used to parse the string. The format is language dependent. If the string cannot be parsed, the <value> data format is ignored.
Table B-6 <value> Data Format
Language code Date format Time format
de-DE EEEE, d. MMMM yyyy
d. MMMM yyyy
dd.MM.yyyy
dd.MM.yy
H.mm' Uhr 'z
HH:mm:ss z
HH:mm:ss
HH:mm
en-CA EEEE, MMMM d, yyyy
MMMM d, yyyy
d-MMM-yy
dd/MM/yy
h:mm:ss 'o''clock' a z
h:mm:ss z a
h:mm:ss a
h:mm a
en-GB dd MMMM yyyy
dd MMMM yyyy
dd-MMM-yy
dd/MM/yy
HH:mm:ss 'o''clock' z
HH:mm:ss z
HH:mm:ss
HH:mm
en-US EEEE, MMMM d, yyyy
MMMM d, yyyy
MMM d, yyyy
M/d/yy
h:mm:ss a z
h:mm:ss a z
h:mm:ss a
h:mm a
B-14Cisco Unified Contact Center Express Getting Started with Scripts, Release 11.0(1)

Appendix B VoiceXML Implementation for Cisco Voice BrowserThe <value> Data Format
The table below lists the legend of the format. The information is based on Sun JDK’s java.text.SimpleDateFormat documentation.
es-CO EEEE d' de 'MMMM' de 'yyyy
d' de 'MMMM' de 'yyyy
d/MM/yyyy
d/MM/yy
hh:mm:ss a z
hh:mm:ss a z
hh:mm:ss a
hh:mm a
es-MX EEEE d' de 'MMMM' de 'yyyy
d' de 'MMMM' de 'yyyy
d/MM/yyyy
d/MM/yy
hh:mm:ss a z
hh:mm:ss a z
hh:mm:ss a
hh:mm a
fr-CA EEEE d MMMM yyyy
d MMMM yyyy
yy-MM-dd
yy-MM-dd
H' h 'mm z
HH:mm:ss z
HH:mm:ss
HH:mm
fr-FR EEEE d MMMM yyyy
d MMMM yyyy
d MMM yy
dd/MM/yy
HH' h 'mm z
HH:mm:ss z
HH:mm:ss
HH:mm
Table B-6 <value> Data Format (continued)
Table B-7 Format Legend
Symbol Meaning Presentation Example
G era designator (Text) AD
y year (Number) 2005
M month in year (Text & Number) July & 07
d day in month (Number) 10
h hour in am/pm (1~12) (Number) 12
B-15Cisco Unified Contact Center Express Getting Started with Scripts, Release 11.0(1)

Appendix B VoiceXML Implementation for Cisco Voice Browser The <value> Data Format
The count of pattern letters determines the format:
• Text
– 4 or more pattern letters—Use full form.
– Fewer than 4 pattern letters—Use short or abbreviated form if one exists.
• Number
– The minimum number of digits.
Shorter numbers are zero-padded to this amount. Year is handled specially; that is, if the count of 'y' is 2, the Year will be truncated to 2 digits.
H hour in day (0~23) (Number) 0
m minute in hour (Number) 30
s second in minute (Number) 55
S millisecond (Number) 978
E day in week (Text) Tuesday
D day in year (Number) 189
F day of week in month (Number) 2 (2nd Wed in July)
w week in year (Number) 27
W week in month (Number) 2
a am/pm marker (Text) PM
k hour in day (1~24) (Number) 24
K hour in am/pm (0~11) (Number) 0
z time zone (Text) Pacific Standard Time
' escape for text (Delimiter)
'' single quote (Literal) '
Table B-7 Format Legend (continued)
Symbol Meaning Presentation Example
B-16Cisco Unified Contact Center Express Getting Started with Scripts, Release 11.0(1)

Appendix B VoiceXML Implementation for Cisco Voice BrowserThe <value> Data Format
• Text & Number
– 3 or over—Use text.
– Fewer than 3—Use number.
Any characters in the pattern that are not in the ranges of ['a'...'z'] and ['A'...'Z'] will be treated as quoted text. For instance, characters like ':', '.', ' ', '#' and '@' will appear in the resulting time text even they are not enclosed within single quotes.
B-17Cisco Unified Contact Center Express Getting Started with Scripts, Release 11.0(1)

Appendix B VoiceXML Implementation for Cisco Voice Browser The <value> Data Format
B-18Cisco Unified Contact Center Express Getting Started with Scripts, Release 11.0(1)

Cisco Unified Contact Center Express Getting S
I N D E X
A
Accept step
using in a basic Unified CCX script 6-5
Annotate step
using 14-10
ASR
enabled scripts 4-4
supported media 5-8
Authenticate User step
using in a basic script 7-32
B
BasicQ script (BasicQ.aef) 16-10
BigDecimal
variables 2-42
BigInteger
variables 2-42
Boolean
variables 2-40
Break option, in debug menu 2-10
breakpoints, inserting 2-11
broadcast.aef 8-2
built-in variable data types
basic 2-37
Byte
variables 2-38
C
Call Hold step
using in a Unified CCX script 17-31
Call Redirect step
and error output branches 2-55
using in a Unified IP IVR script 12-41, 12-69, 12-75
Call Subflow step
using 8-13
call variables 16-3, 18-4
changing the order of steps 2-26
Character
variables 2-40
Cisco IP Auto-Attendant 12-3
Cisco Unified CCX Editor
creating a script 2-25
Design pane 2-27
File menu 2-8
IN-1tarted with Scripts, Release 11.0(1)

Index
how to start 1-1
overview 2-1
Clear All Breakpoints option, in Debug menu 2-11
Close option, in File menu 2-8
CollectDigits script (CollectDigits.aef) 16-12
compound
grammar
about 5-10
indexing 5-10
Contact management, overview 5-1
Contact variable 2-38
Continue On Prompt Errors option 2-53
Copy option, in Edit menu 2-9
Create Conditional Prompt step
using in a Unified IP IVR script 12-12
Create Container Prompt step
using in a Unified IP IVR script 12-14
Create File Document step
using 14-8
using in a web-enabled script 9-10
Create Generated Prompt step
using in a Unified IP IVR script 12-35, 12-57
Create TTS Prompt step
using 14-5, 14-9
Create XML Document step
using in a web-enabled client script 10-9
creating a script 2-25
Currency
IN-2Cisco Unified Contact Center Express Getting S
variables 2-40
customizers, defined 2-28
Cut option, in Edit menu 2-9
D
Database steps
using in scripts 11-1
Date
variables 2-42
DB Get step
in a database script 11-9
DB Read step
in a database script 11-6
DB Release step
in a database script 11-16
DB Write step
in a database script 11-13
debugging
non-reactive 2-52
reactive 2-49
Debug menu 2-10
Debug menu options
Break 2-10
Clear All Breakpoints 2-11
Disable Breakpoint 2-11
Enable Breakpoint 2-11
End 2-10
Insert Breakpoint 2-11
tarted with Scripts, Release 11.0(1)

Index
Pending Response 2-11
Reactive Application 2-11
Start 2-10
Step Over 2-10
Validate 2-10
decoding ICME variables 16-5
decoding ICM variables 2-44
default scripts, overview 5-19
defining variables 2-32
Delay step
using in a basic Unified CCX script 6-12
using in a Unified CCX script 17-31
Delete option, in Edit menu 2-9
Design pane 2-27
Disable Breakpoint, in Debug menu 2-11
displaying step properties 2-28
Document
variables 2-41
double
variables 2-43
DTMF
suported media 5-8
using DTMF grammar 15-14
using DTMF input 15-11
dynamic web pages
creating 9-4
Cisco Unified Contact Center Express
E
Edit menu options
Copy 2-9
Cut 2-9
Delete 2-9
Expand All 2-9
Find 2-9
Find Label 2-9
Find Next 2-9
Paste 2-9
Redo 2-9
Undo 2-9
Edit Variable
properties 2-33
Enable Breakpoint option, in Debug menu 2-11
encoding ICME variables 16-5
encoding ICM variables 2-44
End option, in Debug menu 2-10
error output branches 2-55
error variables 16-4
Expand All option, in Edit menu 2-9
Expanded Call Variables 2-35, 18-5
in Settings menu 2-15
Explicit Confirmation step
using in a Unified IP IVR script 12-62
exporting variables 2-43
Expression Editor
All Variables selection box 3-3
pop-up menu 3-7
IN-3Getting Started with Scripts, Release 11.0(1)

Index
tabbed toolbar 3-7
using 3-2
expressions
expession panel 2-45
licensing 3-9
Extract XML Document step
using in a web-enabled client script 10-10
F
File menu options
Close 2-8
New 2-8
Open 2-8
Print 2-9
Properties 2-9
Save 2-9
Save As 2-9
Find Label option, in Edit menu 2-9
Find Next option, in Edit menu 2-9
Find option, in Edit menu 2-9
float
variables 2-41
G
Generic Recognition
about 19-1
script algorithm 19-5
IN-4Cisco Unified Contact Center Express Getting S
Generic Recognition step
using 19-7
Get Contact Info step, using 17-6
Get Digit String step
using in a basic script 7-25
using in a Unified IP IVR script 12-29
Get Digit String step, using 17-11
Get HTTP Contact Info step
using in a web-enabled script 9-8
Get Recognition Result Info step
using 19-12
Get Session Info step, using 17-6, 17-16
Get Session step, using 17-15
Get User Info step
using in a Unified IP IVR script 12-53
Goto step
using in a basic Unified CCX script 6-14
using in a Unified CCX script 17-31
grammar
templates 5-9
variables 2-39
grammars
automatic conversion 5-8
file grammar formats 5-7
overview 5-4
passing grammars to steps 5-9
search algorithm 5-6
system 5-5
user 5-5
tarted with Scripts, Release 11.0(1)

Index
H
Http Forward Step
in a contact neutral script 13-13
I
icd.aef
overview 6-2
ICME
call variables 16-3, 18-4
default scripts 16-8
error variables 16-4
Expanded Call Variables 2-35, 18-5
predefined call variables 2-36, 18-6
VRU scripts 16-9
ICM variables
decoding/encoding 2-44
If step
using in a multiple contact script 8-15
Implicit Confirmation step
using in a Unified IP IVR script 12-38, 12-54
Increment step
using in a Unified IP IVR script 12-40, 12-66, 12-72
Insert Breakpoint option, in Debug menu 2-11
Integer (int)
variables 2-41
Iterator variables 2-40
Cisco Unified Contact Center Express
J
Java
licensing 3-9
K
Keyword Transform Document step
using in a web-enabled script 9-11
L
Label step
using in a basic script 7-11
using in a basic Unified CCX script 6-10
using in a Unified IP IVR script 12-18
language
variables 2-40
licensing, expressions 3-9
locallizing scripts 4-1
long
variables 2-43
M
mapping identifiers
using 5-3
media
media-less calls 5-25
media neutrality 5-26
IN-5Getting Started with Scripts, Release 11.0(1)

Index
overview 5-24
Menu step
using 14-11
using in a basic script 7-40
MRCP
language packs 4-5
N
Name to User step
using in a basic script 7-11
using in a Unified IP IVR script 12-48
N-Best Recognition 19-2
New option, in File menu 2-8
New Variable
dialog box 2-32
non-reactive debugging 2-52
O
Open option, in File menu 2-8
outbound calls, placing 8-21
P
Palette pane
definition 2-18
tips for using 2-24
passing grammars to steps 5-9
IN-6Cisco Unified Contact Center Express Getting S
Paste option, in Edit menu 2-9
Pending Response option, in Debug menu 2-11
peripheral variables 16-3, 18-4
Place Call step
using 8-21
Play Prompt step
using in a multiple contact script 8-19
using in a Unified IP IVR script 12-16
predefined call variables 2-36, 18-6
Print option, in File Mmenu 2-9
Prompt
variables 2-39
prompts
how to configure 5-16
how to create or customize 5-15
how to record 5-15
overview 5-11
search algorithm 5-13
user 5-12
properties, displaying step 2-28
Properties option, in File menu 2-9
R
Reactive Application option, in Debug menu 2-11
reactive debugging 2-49
Recording step
using in a basic script 7-37
using in a multiple contact script 8-8
tarted with Scripts, Release 11.0(1)
Index
Recording step, using 17-24
Redo option, in Edit menu 2-9
remote method invocation 2-10
removing or showing
Expression Editor toolbar 3-8
Request Route step 18-14
S
Sample Scripts
BasicQ.aef 16-10
CollectDigits.aef 16-12
Unified Gateway scripts 18-3
VisibleQ.aef 16-11
voicebrowser.aef 15-20
Sample scripts
broadcast.aef (for multiple contacts) 8-2
hello.aef (web-enabled script) 9-1
SNU.aef (basic script) 7-2
Save As option, in File menu 2-9
Save option, in File menu 2-9
script interruption, overview 5-22
Script Variables 18-3
Select Resouce step
using in a basic Unified CCX script 6-7
Select Resouce step, using 17-26
Send Http Response step
using in a web-enabled script 9-14
Service Control interface, Unified ICME 16-1
Cisco Unified Contact Center Express
Session
variables 2-39
session management, overview 5-3
session management steps, using 17-14
Session Mapping step, using 17-17
session objects, using 5-4
Set Contact Info step, using 17-16
Set Enterprise Call Info step 18-14
Set Priority step, using 17-30
Set Session Info step, using 17-24
Set step
using in a multiple contact script 8-12, 8-15
using in a Unified IP IVR script 12-23
Settings menu 2-11
Settings menu options
Expanded Call Variables 2-15
Short
variables 2-38
Simple Recognition step
using in a Unified IP IVR script 12-24
speech recognition, using 15-10
spoken name
how to upload 5-18
Start option, in Debug menu 2-10
Start step
using in a basic script 6-2
static web pages
creating 9-3
Step Over option, in Debug menu 2-10
IN-7Getting Started with Scripts, Release 11.0(1)

Index
String
variables 2-41
subflows, calling 8-13
Switch step
using in a Unified IP IVR script 12-22
Synchronize License 2-14
T
The Set step
using in a Unified IP IVR script 12-48
Time
variables 2-42
toolbar 2-16
TTS
enabled scripts 4-4
language packs 4-5
U
Undo option, in Edit Mmenu 2-9
Unified CCX Editor
Overview 1-1
Unified CCX script
example 6-2
User variables 2-38
IN-8Cisco Unified Contact Center Express Getting S
V
Validate option, in Debug menu 2-10
variables
BigDecimal 2-42
BigInteger 2-42
Boolean 2-40
built-in data types
basic 2-37
byte 2-38
call 16-3, 18-4
char 2-40
Contact 2-38
Currency 2-40
Date 2-42
defining 2-32
Document 2-41
double 2-43
error 16-4
exporting 2-43
float 2-41
for Unified gateway scripts 18-3
Grammar 2-39
ICME call 2-36, 18-6
ICME Expanded Call Varibles 2-35, 18-5
in broadcast.aef 8-4
in icd.aef script 6-3
in SNU script 7-4
int 2-41
Iterator 2-40
tarted with Scripts, Release 11.0(1)

Index
language 2-40
long 2-43
Prompt 2-39
properties 2-33
Session 2-39
Short 2-38
String 2-41
Time 2-42
user 2-38
VisibleQ script (VisibleQ.aef) 16-11
Voice Browser
architecture 5-30
development tools 5-32
overview 5-28
VoiceXML
built-in type implementation B-12
element implementation B-2
international applications 15-29
overview 5-29
passing parameters 15-26
properties implementation B-10
standard session variables implementation B-11
VoiceXML Sample Document 15-8
VRU scripts 16-9, 16-10, 16-11, 16-12
W
web-enabled client application, creating 10-1
web-enabled scripts 9-1
Cisco Unified Contact Center Express
web server script
creating 9-1
IN-9Getting Started with Scripts, Release 11.0(1)

Index
IN-10Cisco Unified Contact Center Express Getting S
tarted with Scripts, Release 11.0(1)