citrix virtual apps and desktops
TRANSCRIPT
Citrix Virtual Apps and Desktops Your Implementation Guide – App Layering Configuration

Citrix Virtual Apps and Desktops Service Installation Guide – App Layering Configuration
© COPYRIGHT 2019 CITRIX SYSTEMS
CITRIX SYSTEMS, INC.
ii
LEGAL NOTICE This document is furnished "AS IS" without warranty of any kind. This document is not supported under any Citrix standard support program. Citrix Systems, Inc. disclaims all warranties regarding the contents of this document, including, but not limited to, implied warranties of merchantability and fitness for any particular purpose. This document may contain technical or other inaccuracies or typographical errors. Citrix Systems, Inc. reserves the right to revise the information in this document at any time without notice. This document and the software described in this document constitute confidential information of Citrix Systems, Inc. and its licensors, and are furnished under a license from Citrix Systems, Inc. Copyright © 2019 Citrix Systems, Inc. All rights reserved. Citrix, the Citrix logo, and other marks herein are the property of Citrix Systems, Inc. and/or one of its subsidiaries, and may be registered in the U.S. and other countries. Other marks appearing herein are trademarks of their respective owners.

Citrix Virtual Apps and Desktops Service Installation Guide – App Layering Configuration
© COPYRIGHT 2019 CITRIX SYSTEMS
CITRIX SYSTEMS, INC.
iii
CONTENTS
1 INTRODUCTION .........................................................................................................................1
1.1 DOCUMENT PURPOSE ......................................................................................................... 1
1.2 INTENDED AUDIENCE .......................................................................................................... 1
2 CONFIGURATION STEPS .............................................................................................................2
2.1 APP LAYERING ENTREPRISE LAYER MANAGER.................................................................... 2 2.1.1 ELM Initial Configuration .....................................................................................................................2 2.1.2 Connect to the ELM Console................................................................................................................5 2.1.3 File Share Configuration.......................................................................................................................7 2.1.4 Hypervisor Connector Configuration ...................................................................................................7 2.1.5 Active Directory Configuration ............................................................................................................8
2.2 OS LAYER CREATION .......................................................................................................... 11 2.2.1 Template VM Preparation .................................................................................................................11 2.2.2 Create the OS Layer ...........................................................................................................................17
2.3 PLATFORM LAYER CREATION ............................................................................................ 20 2.3.1 Create the Layer .................................................................................................................................20 2.3.2 Edit the Layer .....................................................................................................................................22 2.3.3 Finalize the Layer ...............................................................................................................................23
2.4 APPLICATION LAYER CREATION ........................................................................................ 25 2.4.1 Create the Layer .................................................................................................................................25 2.4.2 Edit the Layer .....................................................................................................................................28 2.4.3 Finalize the Layer ...............................................................................................................................29
2.5 CREATE A LAYERED MACHINE CATALOG .......................................................................... 31 2.5.1 Template Creation .............................................................................................................................31 2.5.2 Publish the Layered Image .................................................................................................................34 2.5.3 Create the Machine Catalog and Delivery Group ..............................................................................34
2.6 CREATE ELASTIC APP LAYERS ............................................................................................ 35 2.6.1 Elastic Layer Assignment ....................................................................................................................35
3 APPENDIX ............................................................................................................................... 37
3.1 APP LAYERING ELM AZURE DEPLOYMENT ........................................................................ 37 3.1.1 ELM Package Download .....................................................................................................................37 3.1.2 Deploy the Appliance .........................................................................................................................39 3.1.3 App Layering Connector App Registration.........................................................................................40 3.1.4 App Layering Connector Storage Account .........................................................................................43
Citrix Virtual Apps and Desktops Service Installation Guide – App Layering Configuration
© COPYRIGHT 2019 CITRIX SYSTEMS
CITRIX SYSTEMS, INC.
1
1 INTRODUCTION
1.1 DOCUMENT PURPOSE
This Implementation Guide outlines the steps to configure App Layering to be used in conjunction with the Citrix Virtual Apps and Desktops Service and the On-Premises equivalent. App Layering is a Citrix technology utilized to separate your Operating System, platform tools and applications in separate layers, allowing you to reduce the time taken to manage your Windows applications and images, regardless of the hypervisor or Provisioning Service in use (including Microsoft Azure as a platform for App Layering).
This document details the steps to follow, after importing your corresponding Enterprise Layer Management (ELM) appliance on your corresponding hypervisor. It covers common configuration options and is not intended for custom designs or specialized use cases of the Citrix Virtual Apps and Desktops Service or the On-Premises equivalent and App Layering. For additional information, please see the Citrix Virtual Apps and Desktops Service product documentation and the Citrix App Layering product documentation.
1.2 INTENDED AUDIENCE
The intended audience for this document includes systems administrators, engineers, architects and technical stakeholders in charge of configuring App Layering for the Citrix Virtual Apps and Desktops service.
Citrix Virtual Apps and Desktops Service Installation Guide – App Layering Configuration
© COPYRIGHT 2019 CITRIX SYSTEMS
CITRIX SYSTEMS, INC.
2
2 CONFIGURATION STEPS
Pre-requisites: In order to configure App Layering, you will need a specific appliance that runs the Enterprise Layer Manager (ELM) technology.
- Currently, these are the supported hypervisors: Citrix Hypervisor, MS Hyper-V, Nutanix AHV and VMWare vSphere. This is also supported on both MS Azure and Azure Government.
- Each backend environment has its own unique appliance. You must download the corresponding appliance or installation package (for MS Azure) and import it to your environment. All appliances can be found on the Citrix Downloads website.
Note: Click on the Select a product… dropdown and then click on the Citrix App Layering download button to obtain the latest Product Software version.
- For specific details on how to download and import ELM appliances to your hypervisor or Public Cloud, please refer to the “Install Appliance” section on the Citrix App Layering product documentation.
2.1 APP LAYERING ENTREPRISE LAYER MANAGER
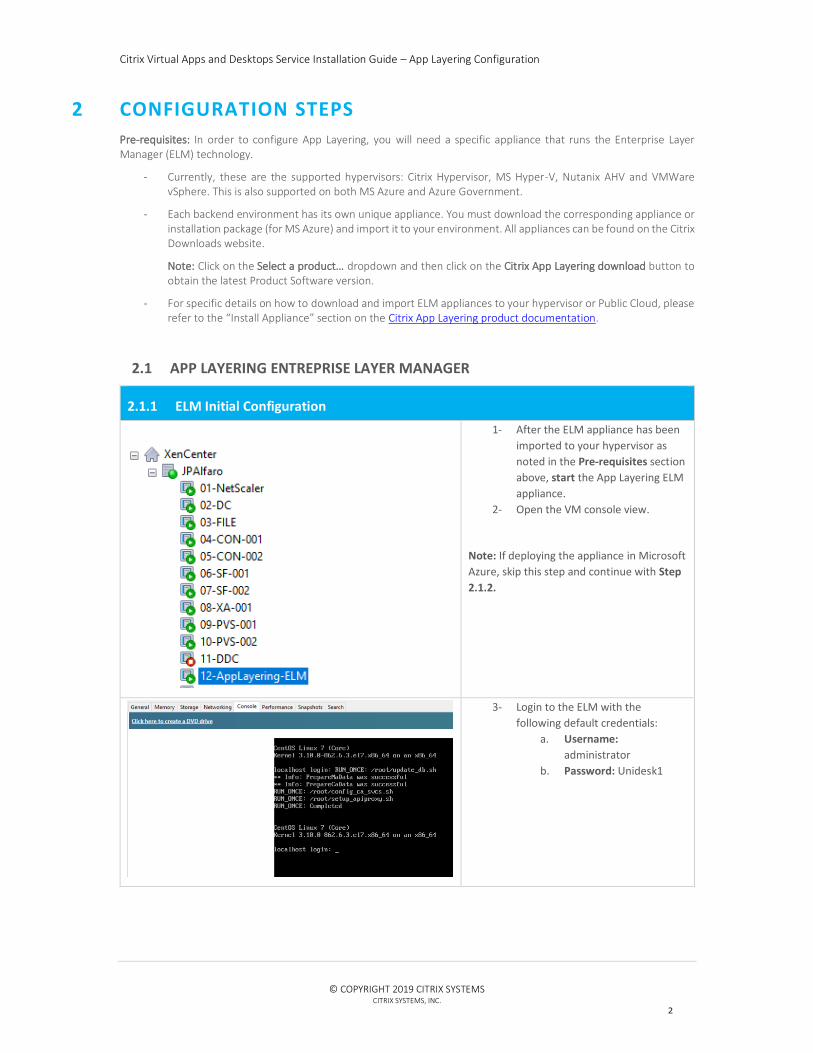
2.1.1 ELM Initial Configuration
1- After the ELM appliance has been
imported to your hypervisor as
noted in the Pre-requisites section
above, start the App Layering ELM
appliance.
2- Open the VM console view.
Note: If deploying the appliance in Microsoft
Azure, skip this step and continue with Step
2.1.2.
3- Login to the ELM with the
following default credentials:
a. Username:
administrator
b. Password: Unidesk1
Citrix Virtual Apps and Desktops Service Installation Guide – App Layering Configuration
© COPYRIGHT 2019 CITRIX SYSTEMS
CITRIX SYSTEMS, INC.
3
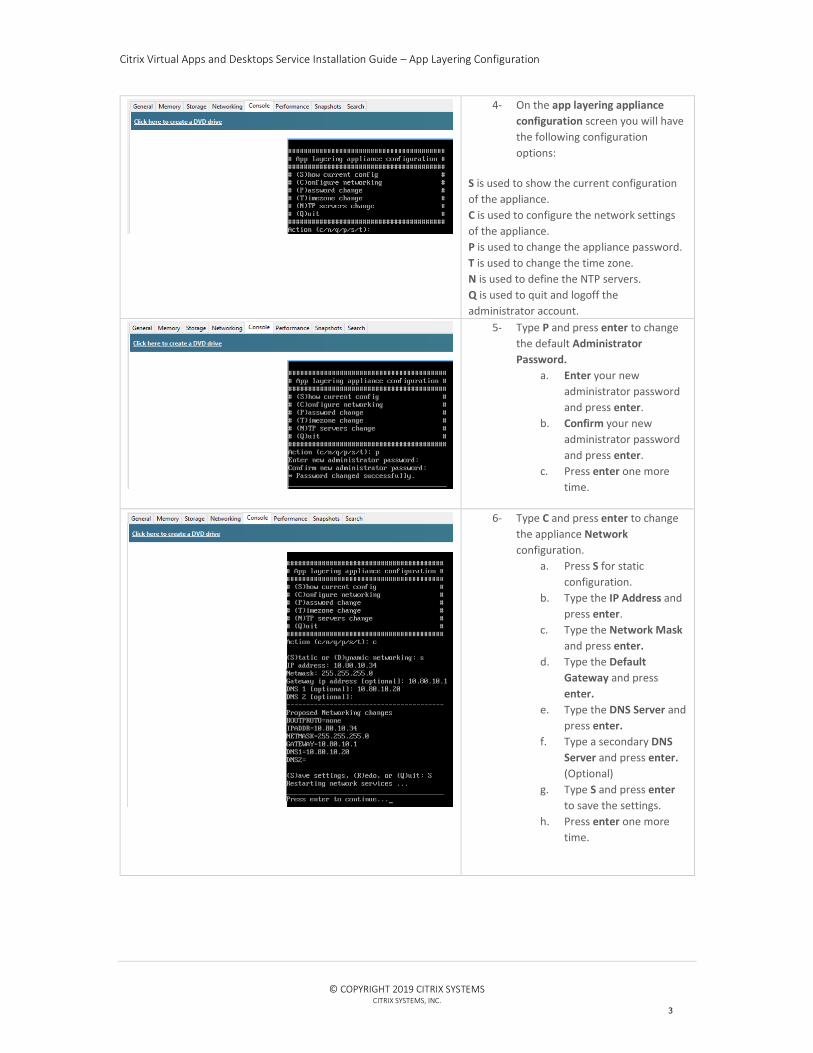
4- On the app layering appliance
configuration screen you will have
the following configuration
options:
S is used to show the current configuration
of the appliance.
C is used to configure the network settings
of the appliance.
P is used to change the appliance password.
T is used to change the time zone.
N is used to define the NTP servers.
Q is used to quit and logoff the
administrator account.
5- Type P and press enter to change
the default Administrator
Password.
a. Enter your new
administrator password
and press enter.
b. Confirm your new
administrator password
and press enter.
c. Press enter one more
time.
6- Type C and press enter to change
the appliance Network
configuration.
a. Press S for static
configuration.
b. Type the IP Address and
press enter.
c. Type the Network Mask
and press enter.
d. Type the Default
Gateway and press
enter.
e. Type the DNS Server and
press enter.
f. Type a secondary DNS
Server and press enter.
(Optional)
g. Type S and press enter
to save the settings.
h. Press enter one more
time.

Citrix Virtual Apps and Desktops Service Installation Guide – App Layering Configuration
© COPYRIGHT 2019 CITRIX SYSTEMS
CITRIX SYSTEMS, INC.
4
7- Type N and press enter to change
the appliance NTP Server
configuration.
a. Type the number of NTP
Servers you wish to
configure and press
enter.
b. Type the IP Address or
DNS Name and press
enter. (Repeat this for
any additional NTP
Server you wish to
configure)
c. Type S and press enter
to save the settings.
8- Type T and press enter to change
the appliance Time Zone
configuration.
a. Press enter to see a list
of time zones.
b. After looking at the time
zone list, note the
number of time zone you
wish to use and press Q.
c. Type the time zone
number and press Enter.
d. Type Y to confirm the
selection and press
enter.
e. Press enter one more
time.
9- Type Q and press enter to exit the
ELM configuration screen.
Citrix Virtual Apps and Desktops Service Installation Guide – App Layering Configuration
© COPYRIGHT 2019 CITRIX SYSTEMS
CITRIX SYSTEMS, INC.
5
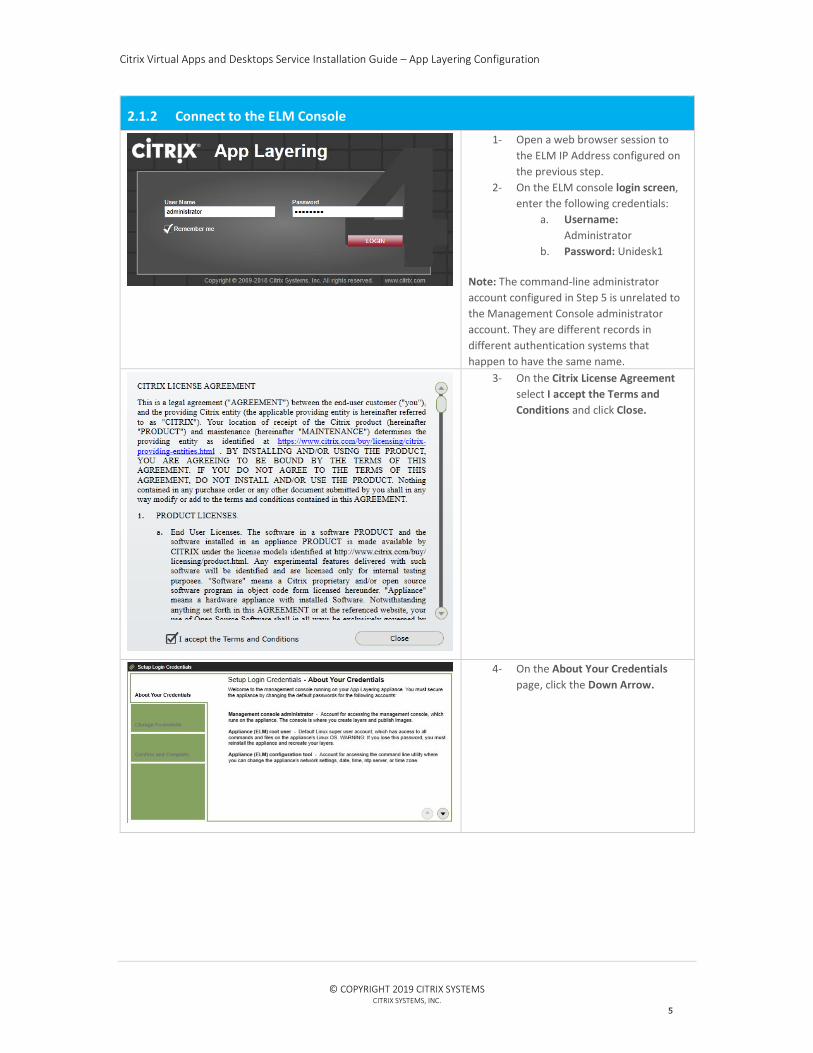
2.1.2 Connect to the ELM Console
1- Open a web browser session to
the ELM IP Address configured on
the previous step.
2- On the ELM console login screen,
enter the following credentials:
a. Username:
Administrator
b. Password: Unidesk1
Note: The command-line administrator
account configured in Step 5 is unrelated to
the Management Console administrator
account. They are different records in
different authentication systems that
happen to have the same name.
3- On the Citrix License Agreement
select I accept the Terms and
Conditions and click Close.
4- On the About Your Credentials
page, click the Down Arrow.
Citrix Virtual Apps and Desktops Service Installation Guide – App Layering Configuration
© COPYRIGHT 2019 CITRIX SYSTEMS
CITRIX SYSTEMS, INC.
6
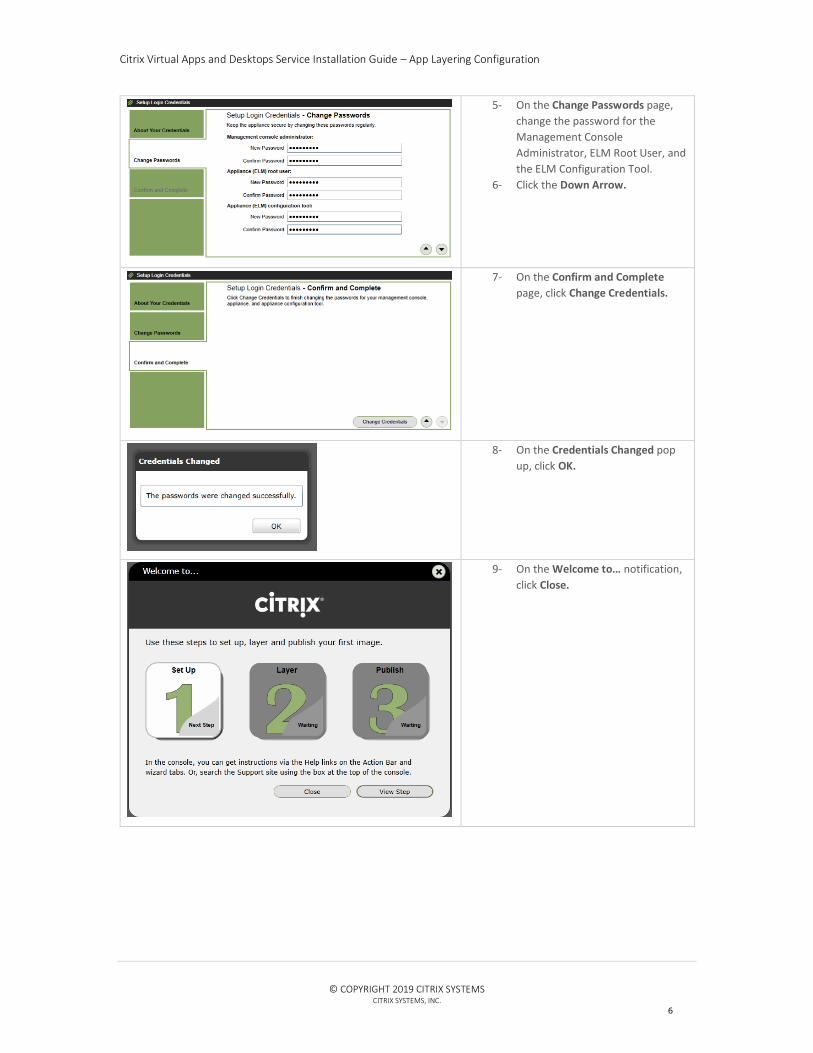
5- On the Change Passwords page,
change the password for the
Management Console
Administrator, ELM Root User, and
the ELM Configuration Tool.
6- Click the Down Arrow.
7- On the Confirm and Complete
page, click Change Credentials.
8- On the Credentials Changed pop
up, click OK.
9- On the Welcome to… notification,
click Close.

Citrix Virtual Apps and Desktops Service Installation Guide – App Layering Configuration
© COPYRIGHT 2019 CITRIX SYSTEMS
CITRIX SYSTEMS, INC.
7
2.1.3 File Share Configuration
1- Navigate to System > Settings and
Configuration and scroll down to
Network File Shares.
2- Click Edit.
3- On the Network File Shares
screen, enter the following
information:
a. SMB File Share Path
b. User name
c. Password
4- Click Test SMB Share and make
sure a Success response is
received.
5- Click Save.
2.1.4 Hypervisor Connector Configuration
1- Navigate to System > Connectors.
2- Click Add Connector Config
3- On the Choose a Connector Type
pop up, select the type that
matches your configuration
requirements and click New.
Note: The steps to configure the connector
can change from one hypervisor to another.
4- On the connector configuration
page, enter a name for your
Configuration.
Citrix Virtual Apps and Desktops Service Installation Guide – App Layering Configuration
© COPYRIGHT 2019 CITRIX SYSTEMS
CITRIX SYSTEMS, INC.
8
5- On the Connector Configuration
blade, enter the required
information.
6- Click CHECK CREDENTIALS to
validate the communication.
Note: The required information in this
screen will vary from one connector type to
another.
7- On the Virtual Machine Clone
Settings blade, select your Virtual
Machine Template and Storage
Repository.
8- Click TEST to make sure the
configuration is valid.
9- Click Save.
Note: The virtual machine template to be
selected here must already be configured on
your hypervisor, this template does not
require an OS disk and can be quickly
created by simply creating a VM on your
hypervisor, configure its vCPU and RAM, and
then convert the VM to a template.
2.1.5 Active Directory Configuration
1- Navigate to Users > Directory
Service.
2- Click Create Directory Junction.
Citrix Virtual Apps and Desktops Service Installation Guide – App Layering Configuration
© COPYRIGHT 2019 CITRIX SYSTEMS
CITRIX SYSTEMS, INC.
9
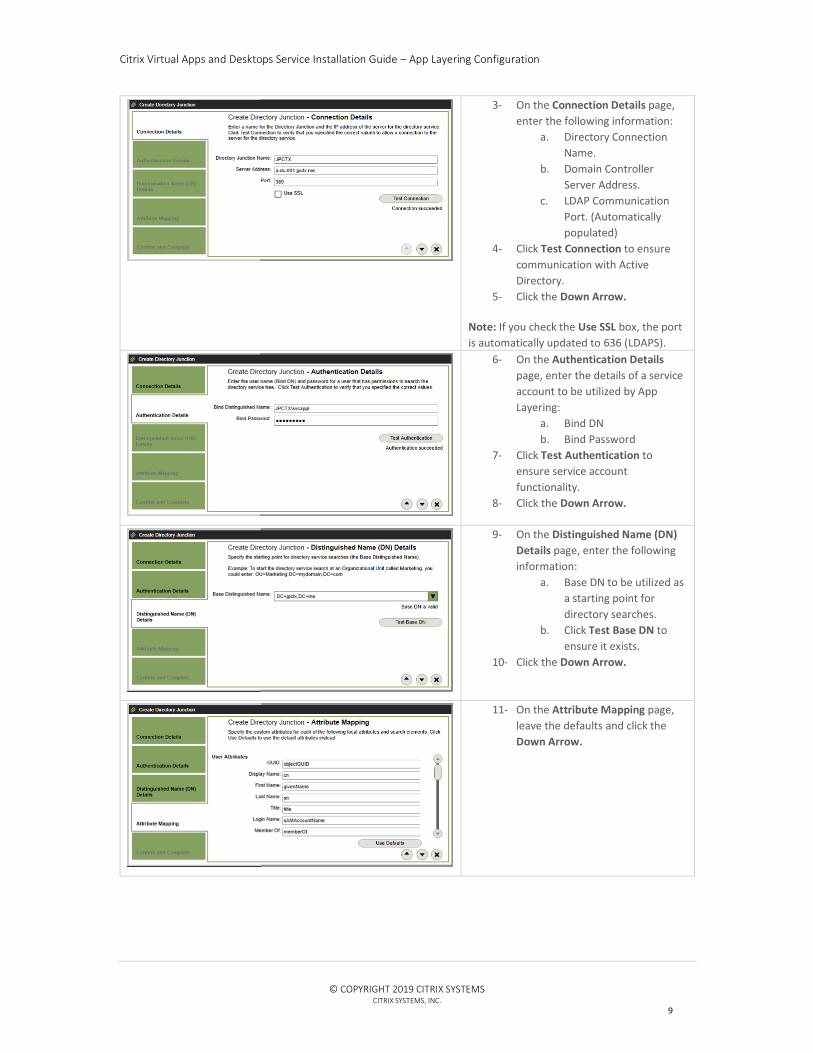
3- On the Connection Details page,
enter the following information:
a. Directory Connection
Name.
b. Domain Controller
Server Address.
c. LDAP Communication
Port. (Automatically
populated)
4- Click Test Connection to ensure
communication with Active
Directory.
5- Click the Down Arrow.
Note: If you check the Use SSL box, the port
is automatically updated to 636 (LDAPS).
6- On the Authentication Details
page, enter the details of a service
account to be utilized by App
Layering:
a. Bind DN
b. Bind Password
7- Click Test Authentication to
ensure service account
functionality.
8- Click the Down Arrow.
9- On the Distinguished Name (DN)
Details page, enter the following
information:
a. Base DN to be utilized as
a starting point for
directory searches.
b. Click Test Base DN to
ensure it exists.
10- Click the Down Arrow.
11- On the Attribute Mapping page,
leave the defaults and click the
Down Arrow.
Citrix Virtual Apps and Desktops Service Installation Guide – App Layering Configuration
© COPYRIGHT 2019 CITRIX SYSTEMS
CITRIX SYSTEMS, INC.
10
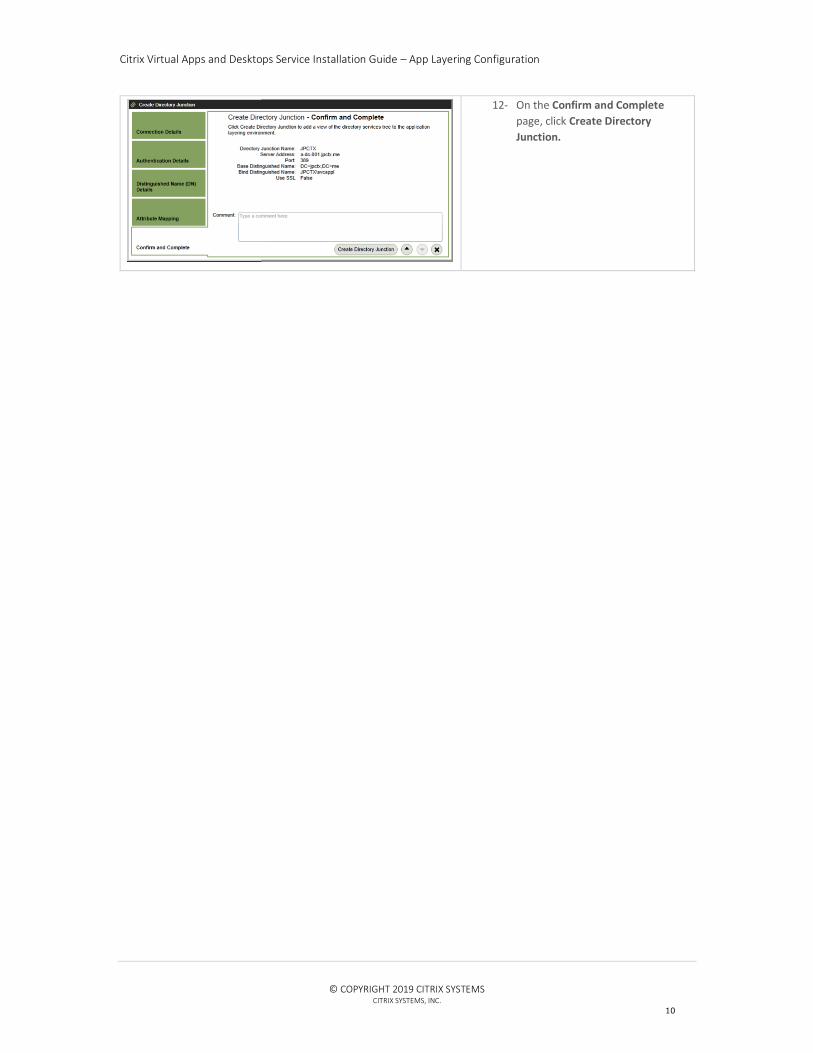
12- On the Confirm and Complete
page, click Create Directory
Junction.
Citrix Virtual Apps and Desktops Service Installation Guide – App Layering Configuration
© COPYRIGHT 2019 CITRIX SYSTEMS
CITRIX SYSTEMS, INC.
11
2.2 OS LAYER CREATION
2.2.1 Template VM Preparation
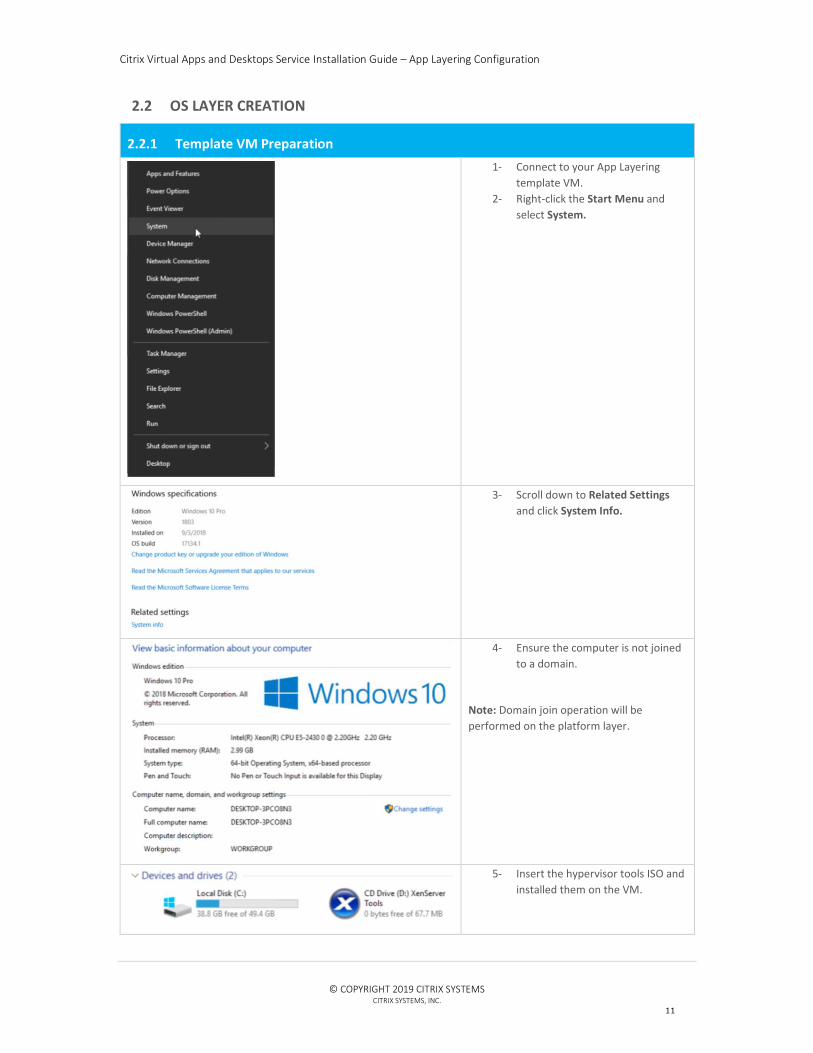
1- Connect to your App Layering
template VM.
2- Right-click the Start Menu and
select System.
3- Scroll down to Related Settings
and click System Info.
4- Ensure the computer is not joined
to a domain.
Note: Domain join operation will be
performed on the platform layer.
5- Insert the hypervisor tools ISO and
installed them on the VM.
Citrix Virtual Apps and Desktops Service Installation Guide – App Layering Configuration
© COPYRIGHT 2019 CITRIX SYSTEMS
CITRIX SYSTEMS, INC.
12
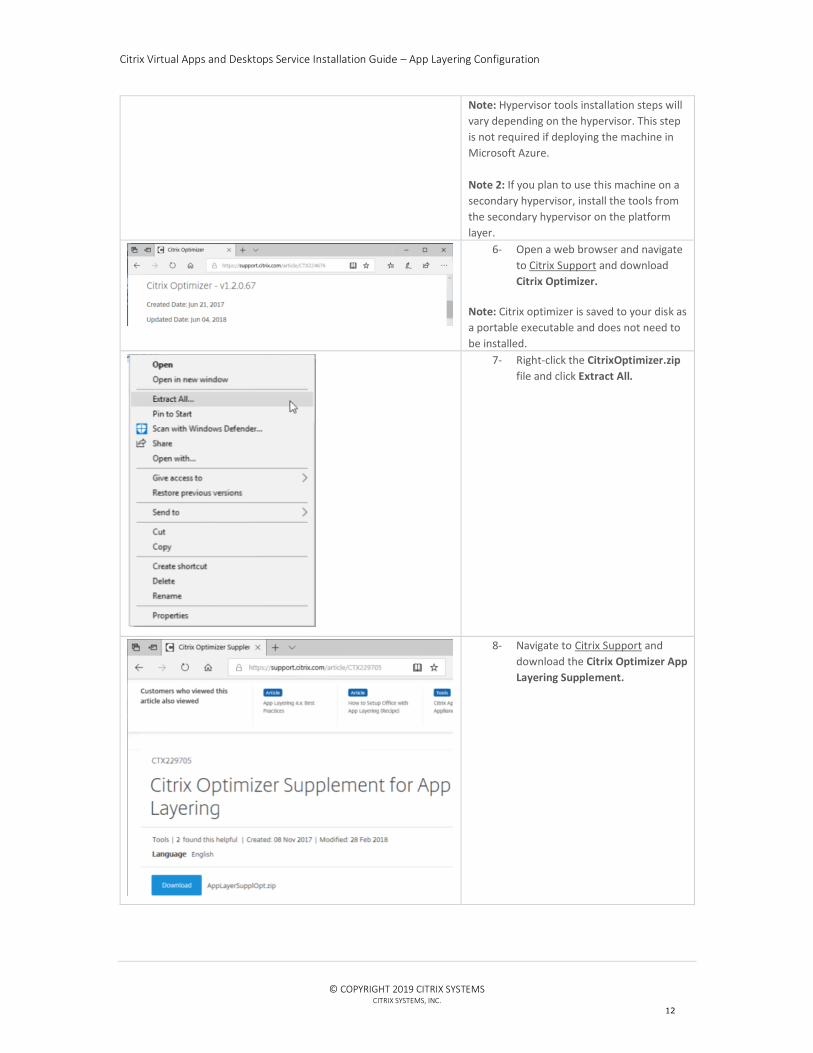
Note: Hypervisor tools installation steps will
vary depending on the hypervisor. This step
is not required if deploying the machine in
Microsoft Azure.
Note 2: If you plan to use this machine on a
secondary hypervisor, install the tools from
the secondary hypervisor on the platform
layer.
6- Open a web browser and navigate
to Citrix Support and download
Citrix Optimizer.
Note: Citrix optimizer is saved to your disk as
a portable executable and does not need to
be installed.
7- Right-click the CitrixOptimizer.zip
file and click Extract All.
8- Navigate to Citrix Support and
download the Citrix Optimizer App
Layering Supplement.
Citrix Virtual Apps and Desktops Service Installation Guide – App Layering Configuration
© COPYRIGHT 2019 CITRIX SYSTEMS
CITRIX SYSTEMS, INC.
13
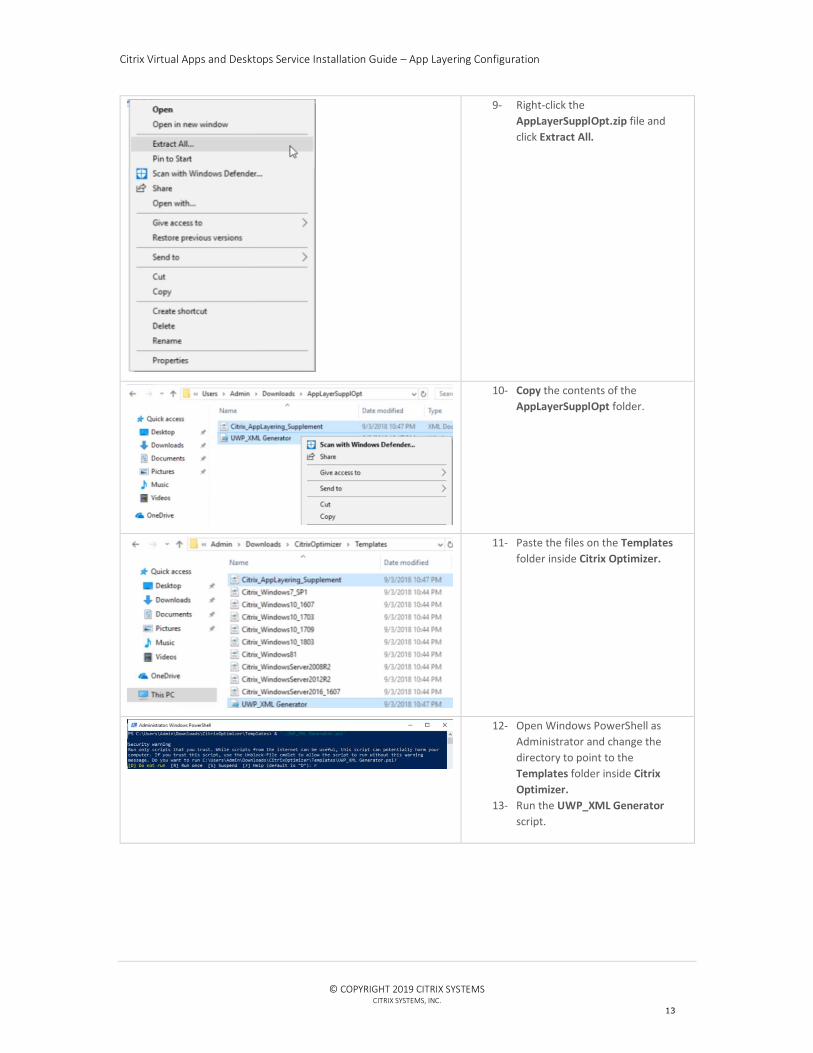
9- Right-click the
AppLayerSupplOpt.zip file and
click Extract All.
10- Copy the contents of the
AppLayerSupplOpt folder.
11- Paste the files on the Templates
folder inside Citrix Optimizer.
12- Open Windows PowerShell as
Administrator and change the
directory to point to the
Templates folder inside Citrix
Optimizer.
13- Run the UWP_XML Generator
script.
Citrix Virtual Apps and Desktops Service Installation Guide – App Layering Configuration
© COPYRIGHT 2019 CITRIX SYSTEMS
CITRIX SYSTEMS, INC.
14
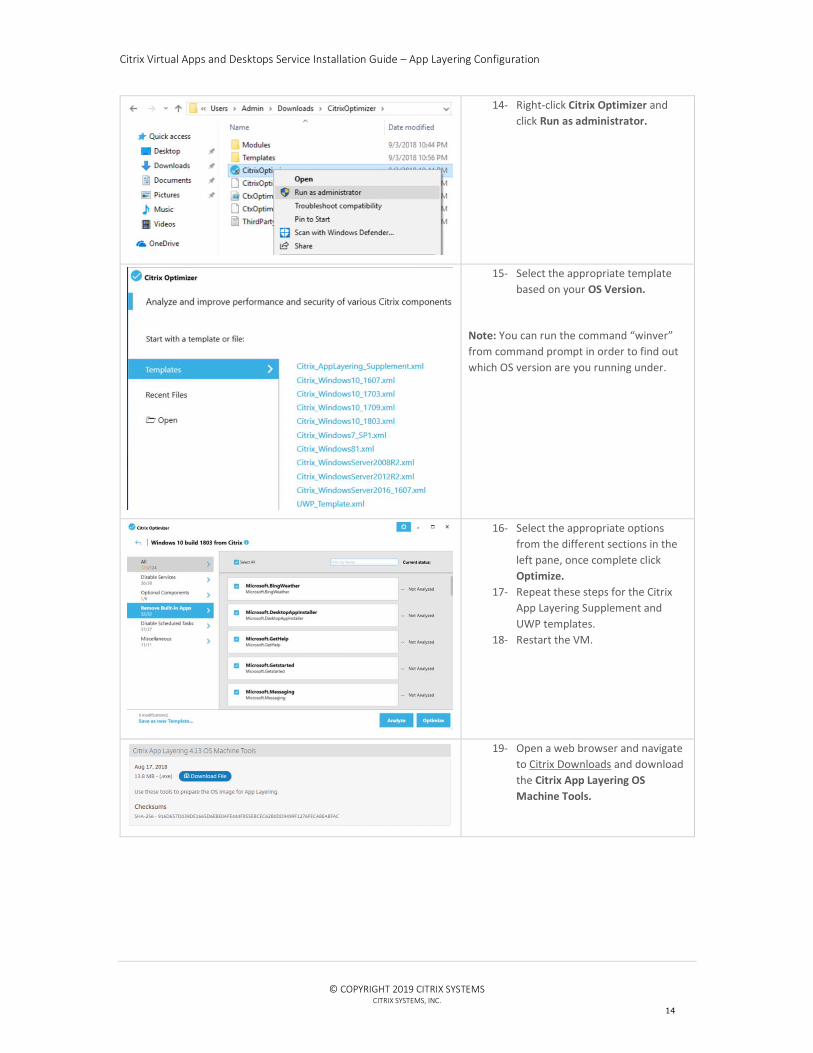
14- Right-click Citrix Optimizer and
click Run as administrator.
15- Select the appropriate template
based on your OS Version.
Note: You can run the command “winver”
from command prompt in order to find out
which OS version are you running under.
16- Select the appropriate options
from the different sections in the
left pane, once complete click
Optimize.
17- Repeat these steps for the Citrix
App Layering Supplement and
UWP templates.
18- Restart the VM.
19- Open a web browser and navigate
to Citrix Downloads and download
the Citrix App Layering OS
Machine Tools.
Citrix Virtual Apps and Desktops Service Installation Guide – App Layering Configuration
© COPYRIGHT 2019 CITRIX SYSTEMS
CITRIX SYSTEMS, INC.
15
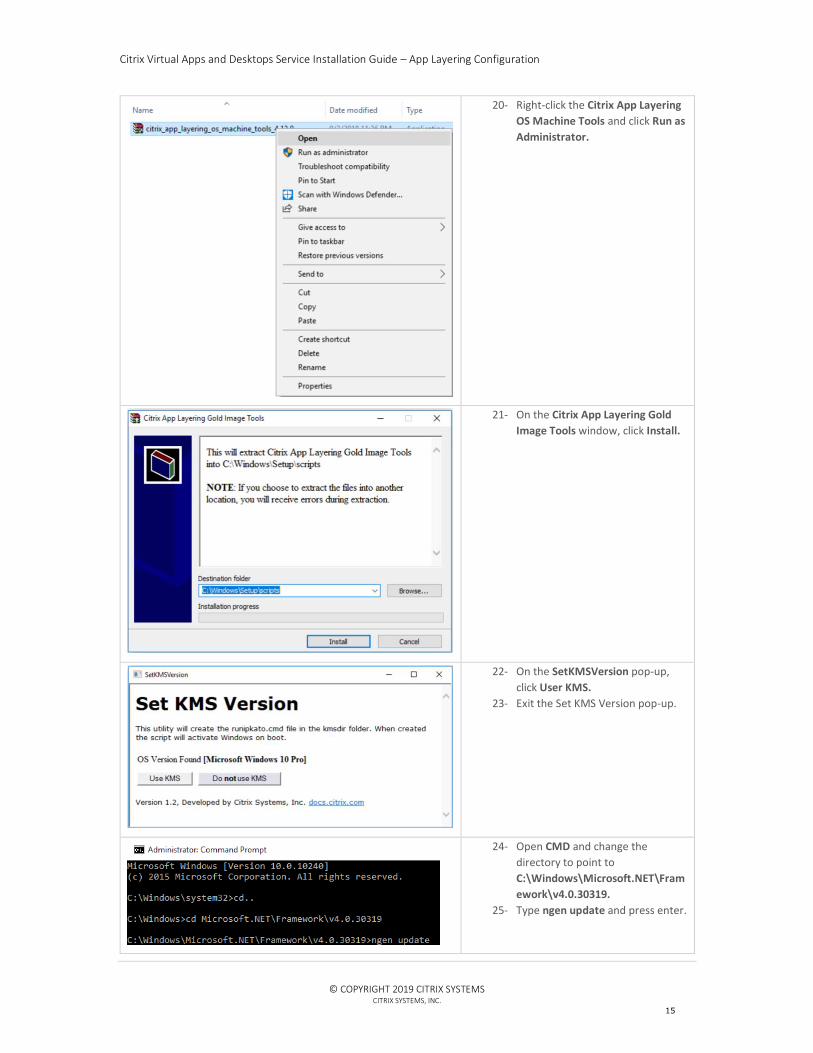
20- Right-click the Citrix App Layering
OS Machine Tools and click Run as
Administrator.
21- On the Citrix App Layering Gold
Image Tools window, click Install.
22- On the SetKMSVersion pop-up,
click User KMS.
23- Exit the Set KMS Version pop-up.
24- Open CMD and change the
directory to point to
C:\Windows\Microsoft.NET\Fram
ework\v4.0.30319.
25- Type ngen update and press enter.
Citrix Virtual Apps and Desktops Service Installation Guide – App Layering Configuration
© COPYRIGHT 2019 CITRIX SYSTEMS
CITRIX SYSTEMS, INC.
16
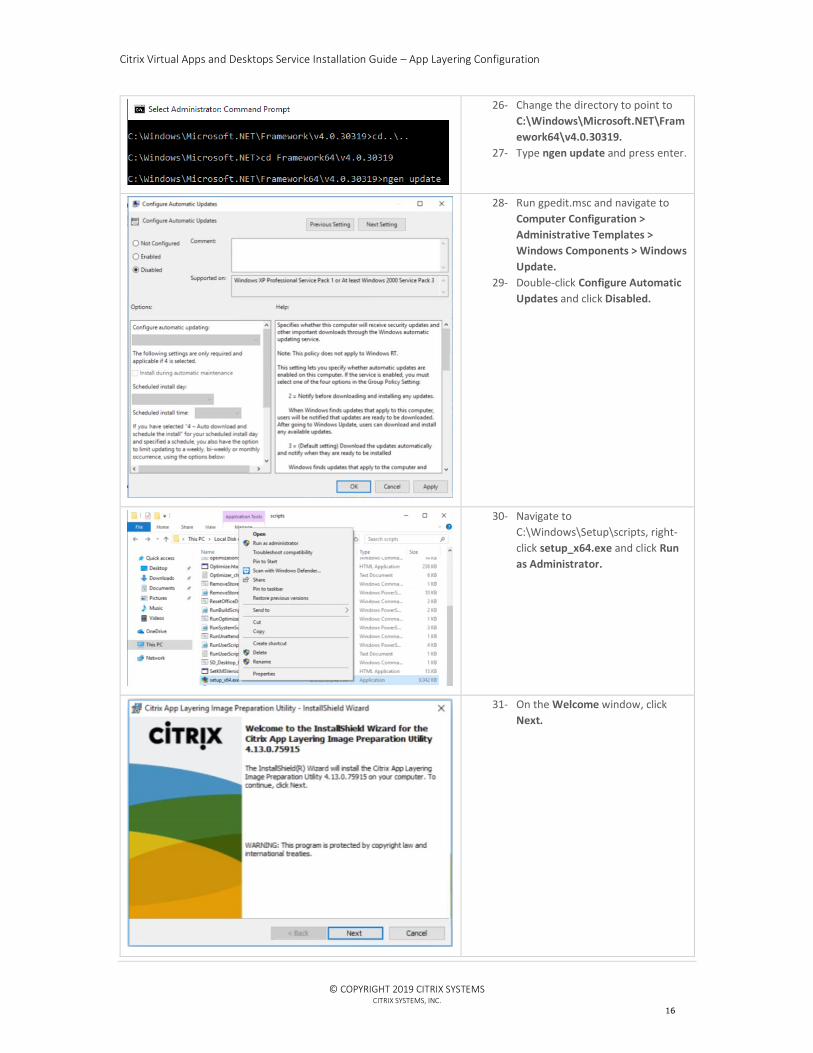
26- Change the directory to point to
C:\Windows\Microsoft.NET\Fram
ework64\v4.0.30319.
27- Type ngen update and press enter.
28- Run gpedit.msc and navigate to
Computer Configuration >
Administrative Templates >
Windows Components > Windows
Update.
29- Double-click Configure Automatic
Updates and click Disabled.
30- Navigate to
C:\Windows\Setup\scripts, right-
click setup_x64.exe and click Run
as Administrator.
31- On the Welcome window, click
Next.
Citrix Virtual Apps and Desktops Service Installation Guide – App Layering Configuration
© COPYRIGHT 2019 CITRIX SYSTEMS
CITRIX SYSTEMS, INC.
17
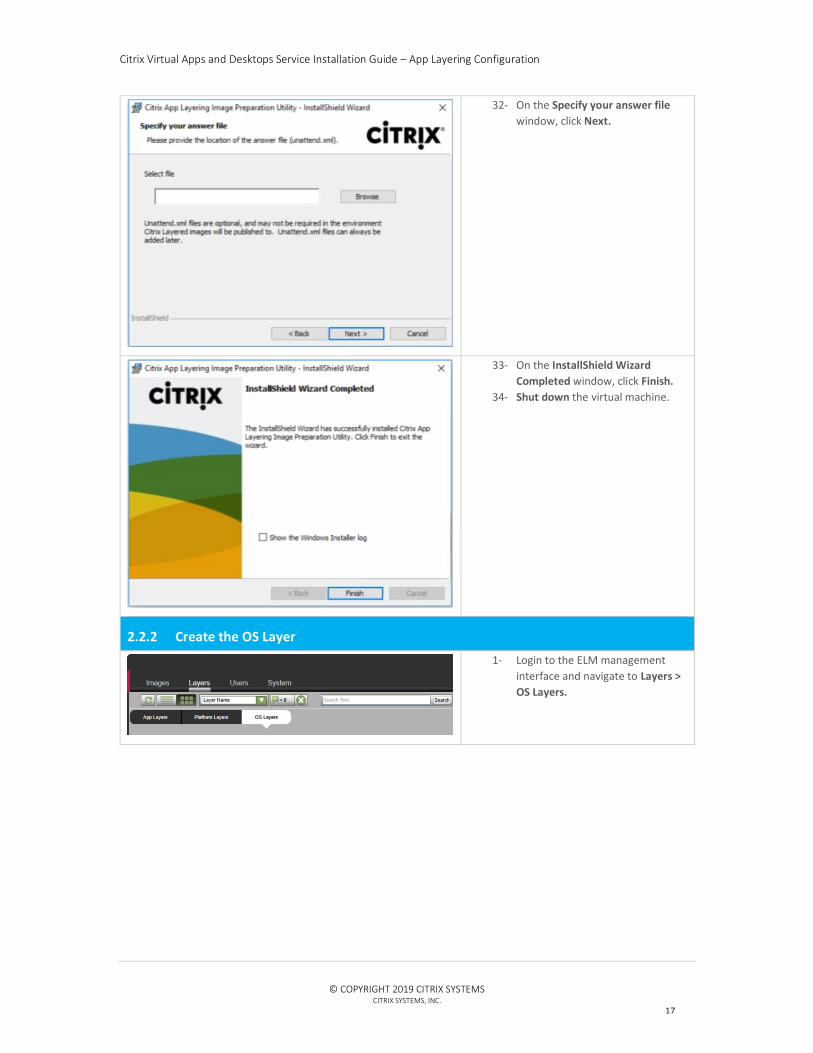
32- On the Specify your answer file
window, click Next.
33- On the InstallShield Wizard
Completed window, click Finish.
34- Shut down the virtual machine.
2.2.2 Create the OS Layer
1- Login to the ELM management
interface and navigate to Layers >
OS Layers.

Citrix Virtual Apps and Desktops Service Installation Guide – App Layering Configuration
© COPYRIGHT 2019 CITRIX SYSTEMS
CITRIX SYSTEMS, INC.
18
2- Click Create OS Layer.
3- On the Layer Details page, enter
the following information:
a. Layer Name
b. Layer Description
c. Version Number
d. Version Description
e. Max Layer Size (GB)
4- Click the Down Arrow.
5- On the Connector page, select
your Hypervisor Connector created
earlier and click the Down Arrow.
Citrix Virtual Apps and Desktops Service Installation Guide – App Layering Configuration
© COPYRIGHT 2019 CITRIX SYSTEMS
CITRIX SYSTEMS, INC.
19
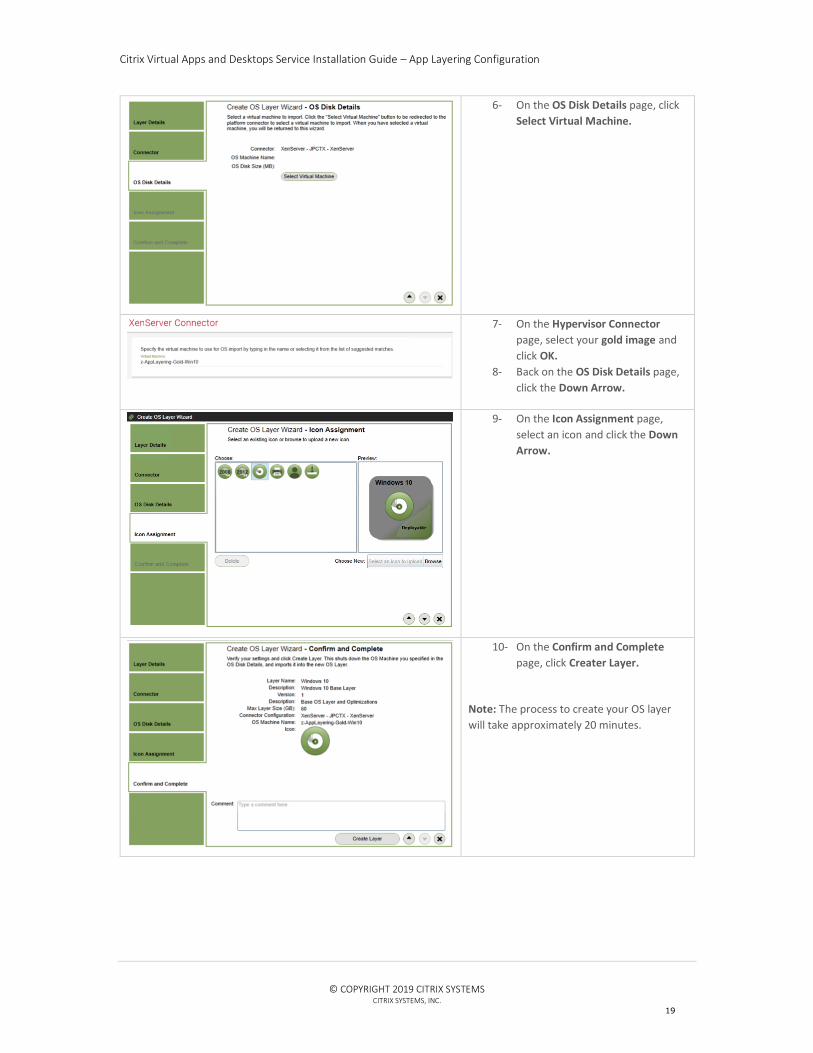
6- On the OS Disk Details page, click
Select Virtual Machine.
7- On the Hypervisor Connector
page, select your gold image and
click OK.
8- Back on the OS Disk Details page,
click the Down Arrow.
9- On the Icon Assignment page,
select an icon and click the Down
Arrow.
10- On the Confirm and Complete
page, click Creater Layer.
Note: The process to create your OS layer
will take approximately 20 minutes.
Citrix Virtual Apps and Desktops Service Installation Guide – App Layering Configuration
© COPYRIGHT 2019 CITRIX SYSTEMS
CITRIX SYSTEMS, INC.
20
2.3 PLATFORM LAYER CREATION
2.3.1 Create the Layer
1- Login to the ELM console.
2- Navigate to Layers > Platform
Layers.
3- Click Create Platform Layer.
4- On the Layer Details page, enter
the following information:
a. Layer Name
b. Layer Description
c. Version
d. Version Description
e. Max Layer Size (GB)
5- Click the Down Arrow.
Citrix Virtual Apps and Desktops Service Installation Guide – App Layering Configuration
© COPYRIGHT 2019 CITRIX SYSTEMS
CITRIX SYSTEMS, INC.
21
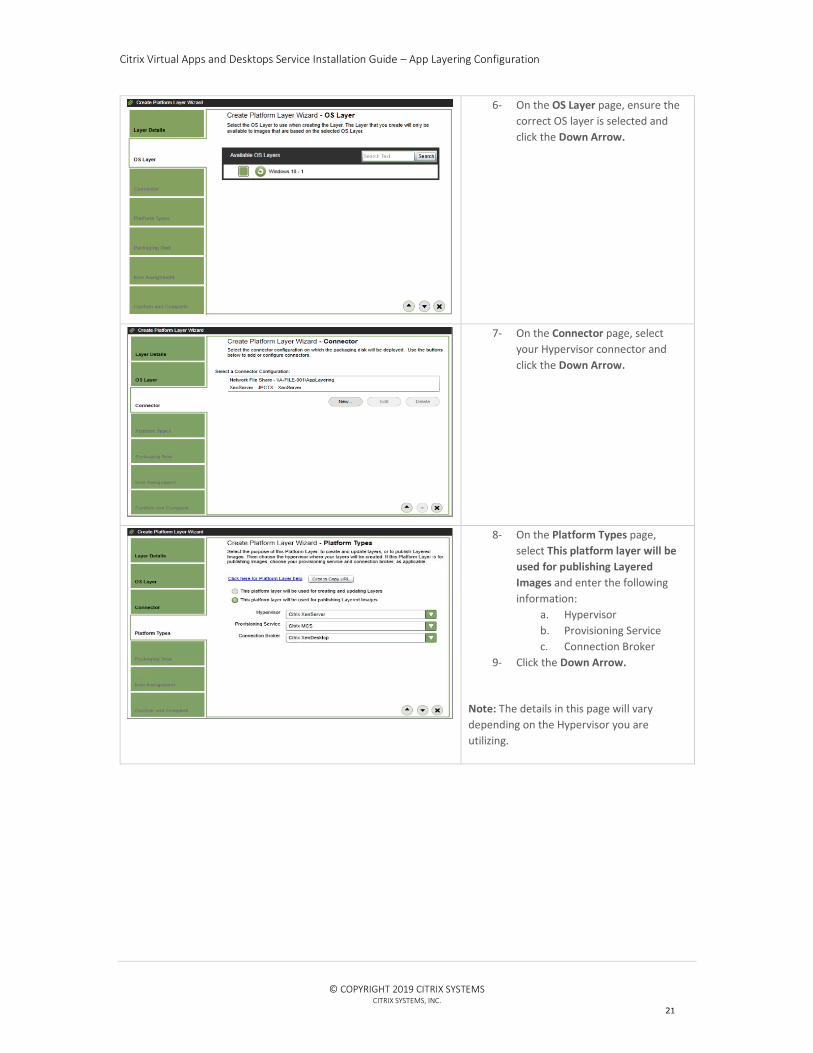
6- On the OS Layer page, ensure the
correct OS layer is selected and
click the Down Arrow.
7- On the Connector page, select
your Hypervisor connector and
click the Down Arrow.
8- On the Platform Types page,
select This platform layer will be
used for publishing Layered
Images and enter the following
information:
a. Hypervisor
b. Provisioning Service
c. Connection Broker
9- Click the Down Arrow.
Note: The details in this page will vary
depending on the Hypervisor you are
utilizing.
Citrix Virtual Apps and Desktops Service Installation Guide – App Layering Configuration
© COPYRIGHT 2019 CITRIX SYSTEMS
CITRIX SYSTEMS, INC.
22
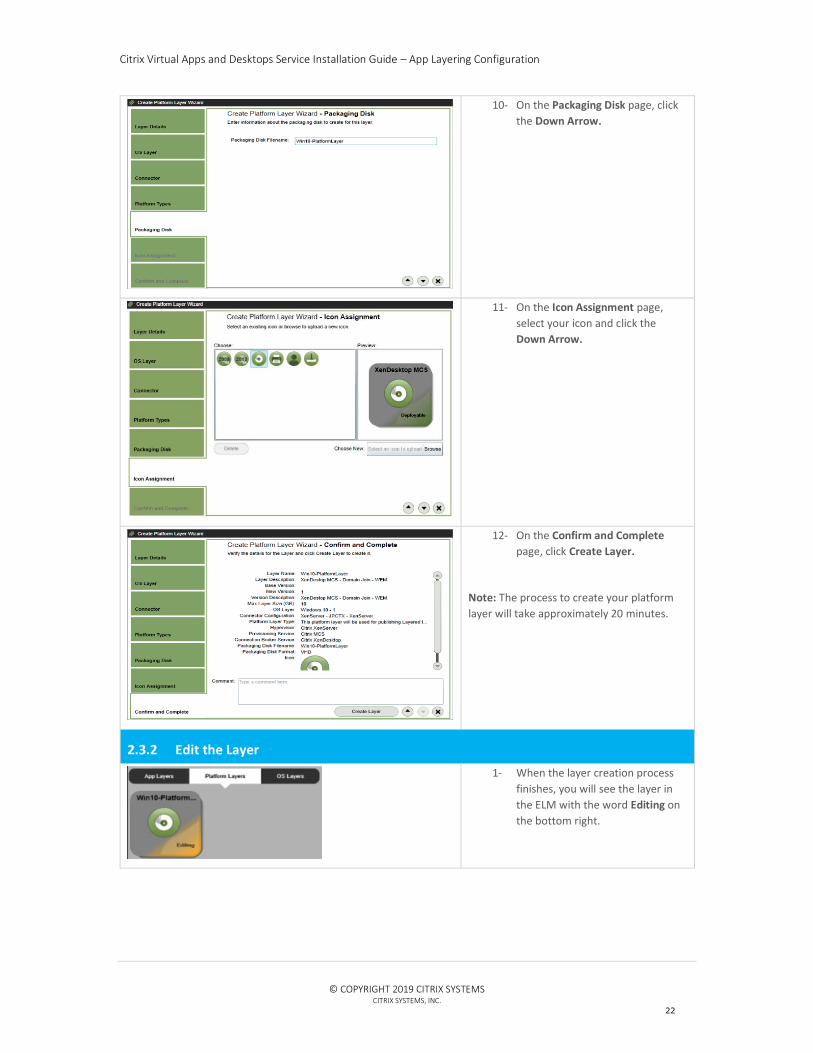
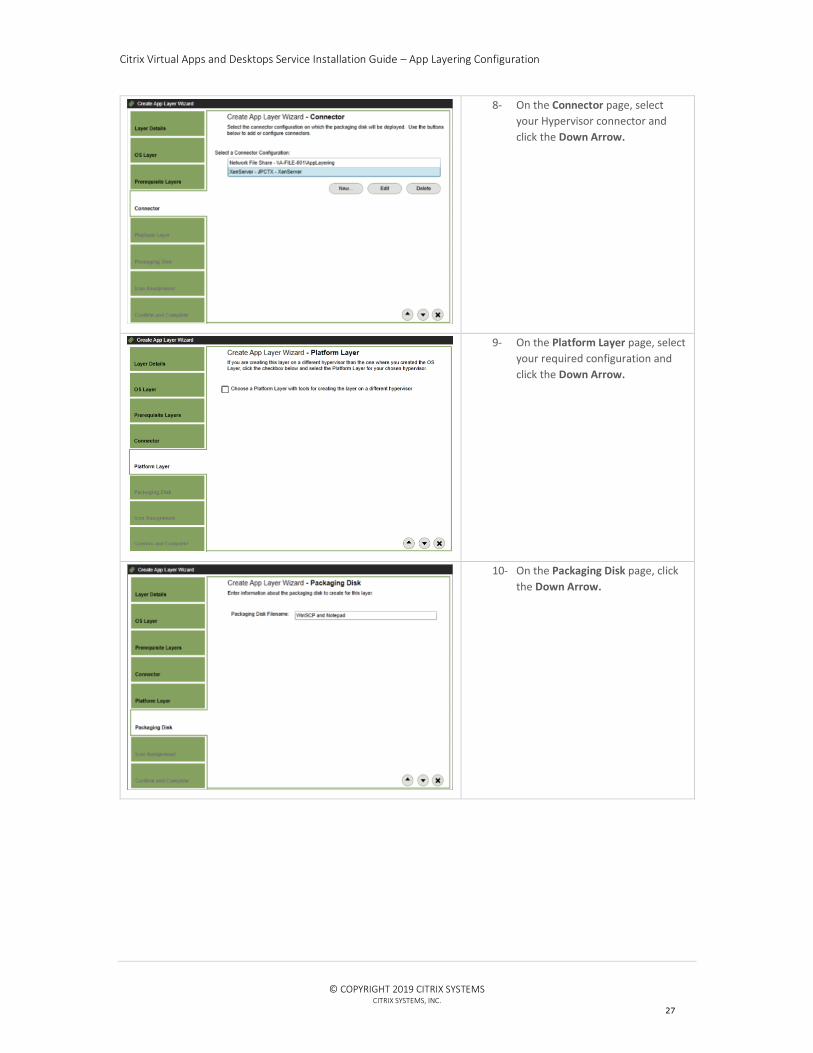
10- On the Packaging Disk page, click
the Down Arrow.
11- On the Icon Assignment page,
select your icon and click the
Down Arrow.
12- On the Confirm and Complete
page, click Create Layer.
Note: The process to create your platform
layer will take approximately 20 minutes.
2.3.2 Edit the Layer
1- When the layer creation process
finishes, you will see the layer in
the ELM with the word Editing on
the bottom right.
Citrix Virtual Apps and Desktops Service Installation Guide – App Layering Configuration
© COPYRIGHT 2019 CITRIX SYSTEMS
CITRIX SYSTEMS, INC.
23
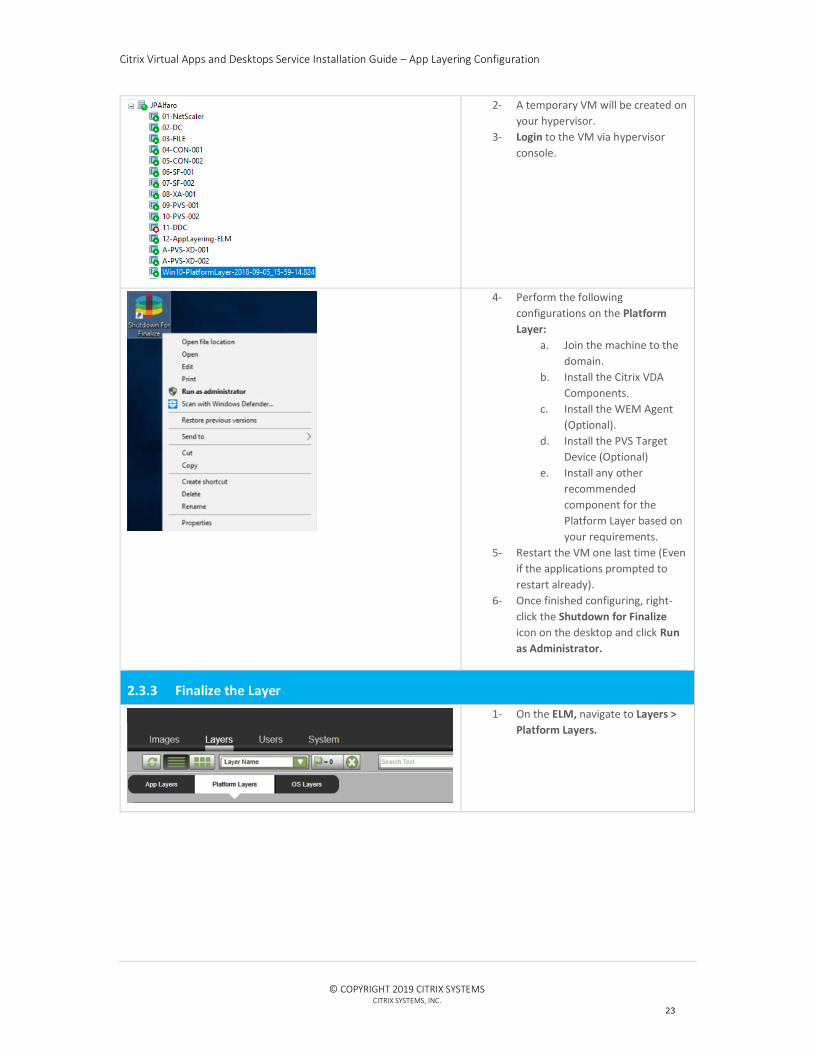
2- A temporary VM will be created on
your hypervisor.
3- Login to the VM via hypervisor
console.
4- Perform the following
configurations on the Platform
Layer:
a. Join the machine to the
domain.
b. Install the Citrix VDA
Components.
c. Install the WEM Agent
(Optional).
d. Install the PVS Target
Device (Optional)
e. Install any other
recommended
component for the
Platform Layer based on
your requirements.
5- Restart the VM one last time (Even
if the applications prompted to
restart already).
6- Once finished configuring, right-
click the Shutdown for Finalize
icon on the desktop and click Run
as Administrator.
2.3.3 Finalize the Layer
1- On the ELM, navigate to Layers >
Platform Layers.
Citrix Virtual Apps and Desktops Service Installation Guide – App Layering Configuration
© COPYRIGHT 2019 CITRIX SYSTEMS
CITRIX SYSTEMS, INC.
24
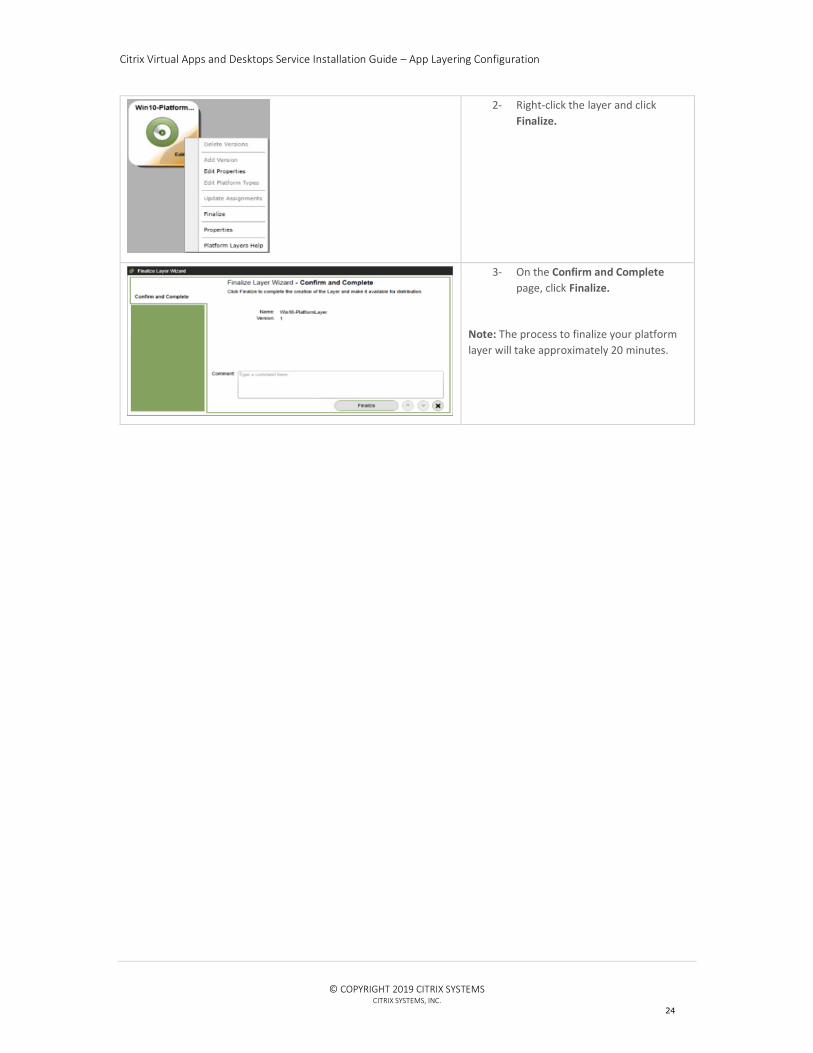
2- Right-click the layer and click
Finalize.
3- On the Confirm and Complete
page, click Finalize.
Note: The process to finalize your platform
layer will take approximately 20 minutes.
Citrix Virtual Apps and Desktops Service Installation Guide – App Layering Configuration
© COPYRIGHT 2019 CITRIX SYSTEMS
CITRIX SYSTEMS, INC.
25
2.4 APPLICATION LAYER CREATION
2.4.1 Create the Layer
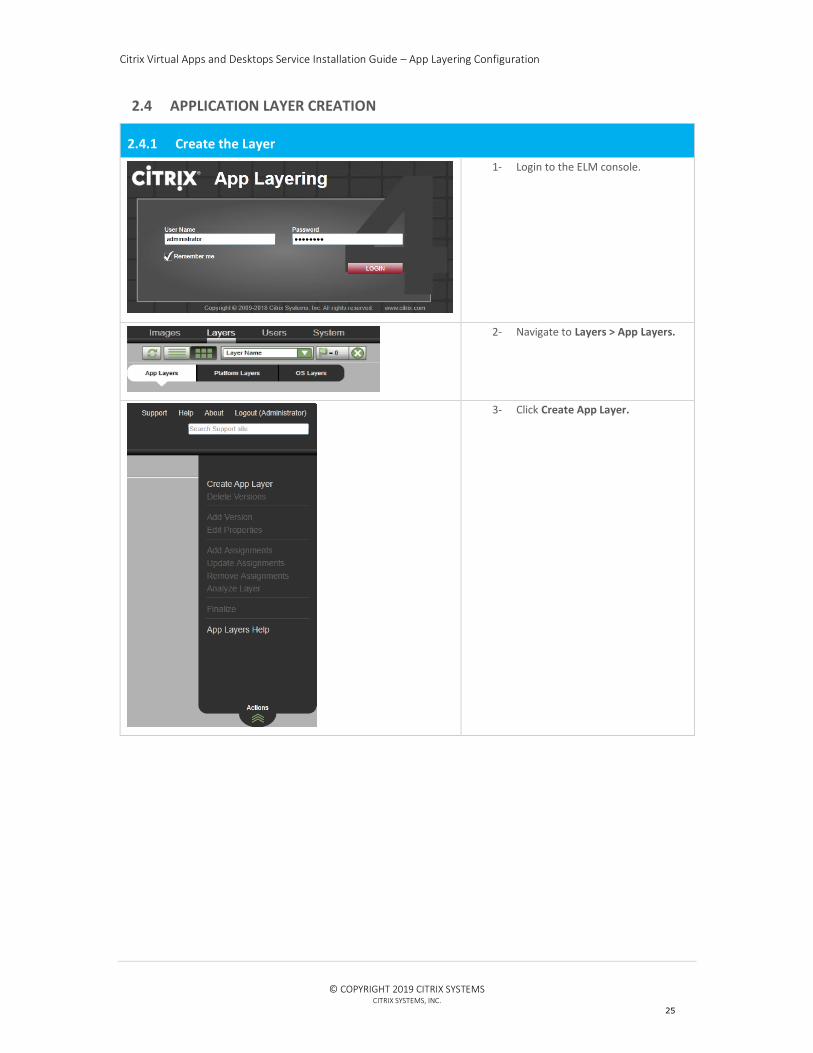
1- Login to the ELM console.
2- Navigate to Layers > App Layers.
3- Click Create App Layer.
Citrix Virtual Apps and Desktops Service Installation Guide – App Layering Configuration
© COPYRIGHT 2019 CITRIX SYSTEMS
CITRIX SYSTEMS, INC.
26
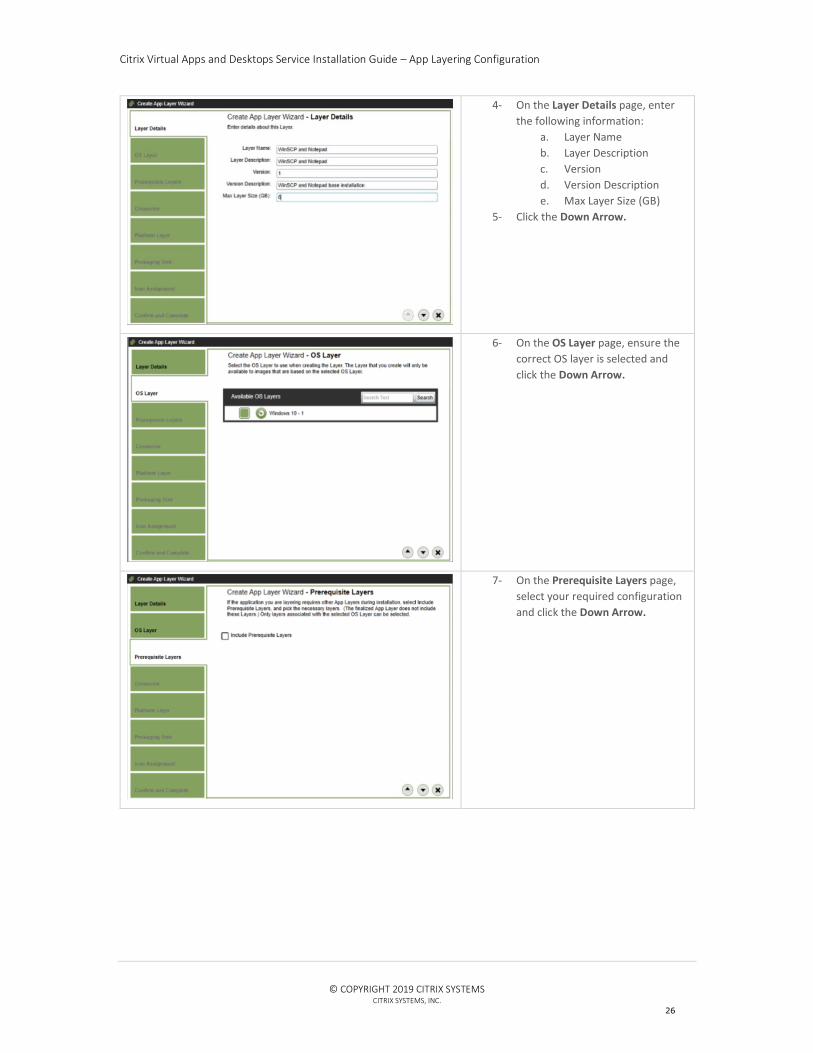
4- On the Layer Details page, enter
the following information:
a. Layer Name
b. Layer Description
c. Version
d. Version Description
e. Max Layer Size (GB)
5- Click the Down Arrow.
6- On the OS Layer page, ensure the
correct OS layer is selected and
click the Down Arrow.
7- On the Prerequisite Layers page,
select your required configuration
and click the Down Arrow.
Citrix Virtual Apps and Desktops Service Installation Guide – App Layering Configuration
© COPYRIGHT 2019 CITRIX SYSTEMS
CITRIX SYSTEMS, INC.
27
8- On the Connector page, select
your Hypervisor connector and
click the Down Arrow.
9- On the Platform Layer page, select
your required configuration and
click the Down Arrow.
10- On the Packaging Disk page, click
the Down Arrow.
Citrix Virtual Apps and Desktops Service Installation Guide – App Layering Configuration
© COPYRIGHT 2019 CITRIX SYSTEMS
CITRIX SYSTEMS, INC.
28
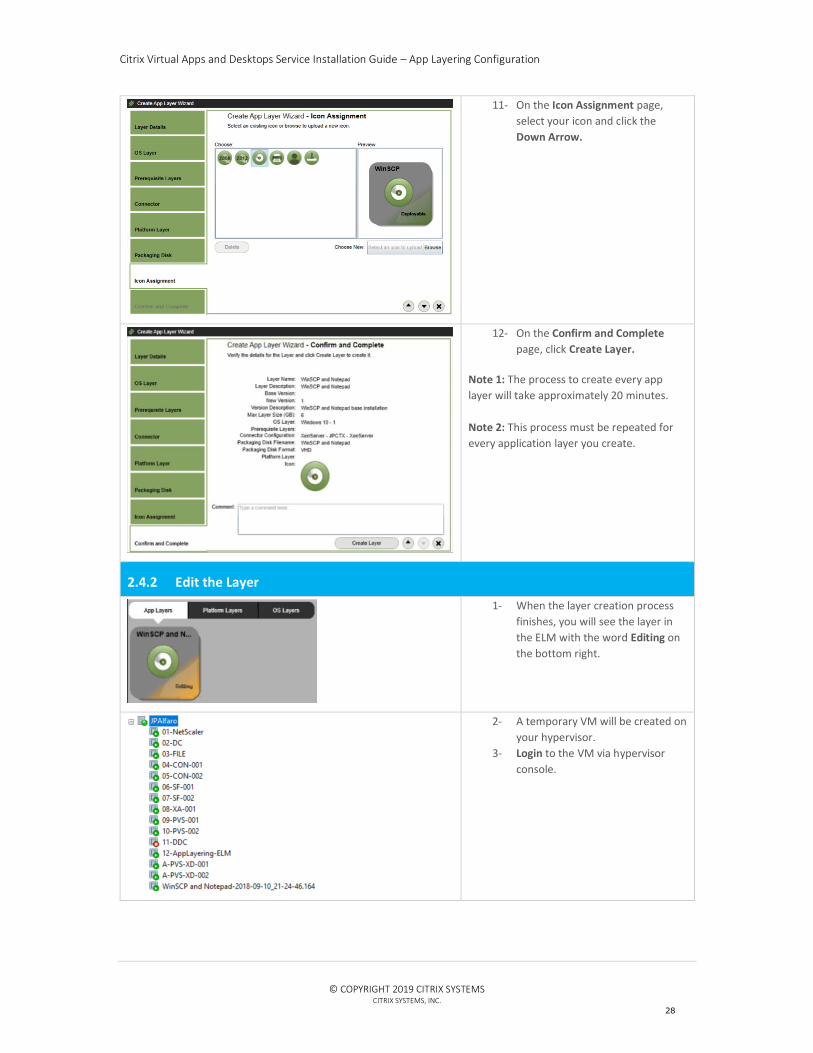
11- On the Icon Assignment page,
select your icon and click the
Down Arrow.
12- On the Confirm and Complete
page, click Create Layer.
Note 1: The process to create every app
layer will take approximately 20 minutes.
Note 2: This process must be repeated for
every application layer you create.
2.4.2 Edit the Layer
1- When the layer creation process
finishes, you will see the layer in
the ELM with the word Editing on
the bottom right.
2- A temporary VM will be created on
your hypervisor.
3- Login to the VM via hypervisor
console.
Citrix Virtual Apps and Desktops Service Installation Guide – App Layering Configuration
© COPYRIGHT 2019 CITRIX SYSTEMS
CITRIX SYSTEMS, INC.
29
4- Perform the installation of your
desired applications on the layer.
5- Restart the VM one last time (Even
if the application prompted to
restart already).
6- Once finished configuring, right-
click the Shutdown for Finalize
icon on the desktop and click Run
as Administrator.
2.4.3 Finalize the Layer
1- On the ELM, navigate to Layers >
App Layers.
2- Right-click the layer and click
Finalize.
3- On the Script Path page, select
your required configuration and
click the Down Arrow.
Citrix Virtual Apps and Desktops Service Installation Guide – App Layering Configuration
© COPYRIGHT 2019 CITRIX SYSTEMS
CITRIX SYSTEMS, INC.
30
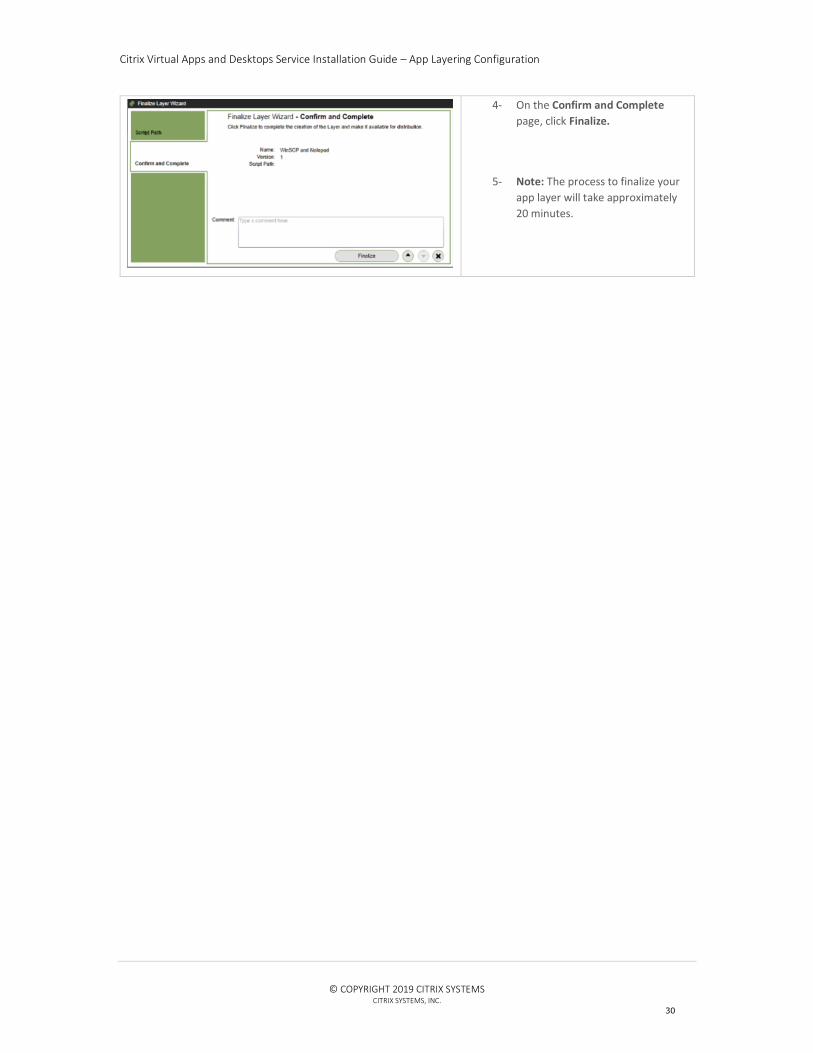
4- On the Confirm and Complete
page, click Finalize.
5- Note: The process to finalize your
app layer will take approximately
20 minutes.
Citrix Virtual Apps and Desktops Service Installation Guide – App Layering Configuration
© COPYRIGHT 2019 CITRIX SYSTEMS
CITRIX SYSTEMS, INC.
31
2.5 CREATE A LAYERED MACHINE CATALOG
2.5.1 Template Creation
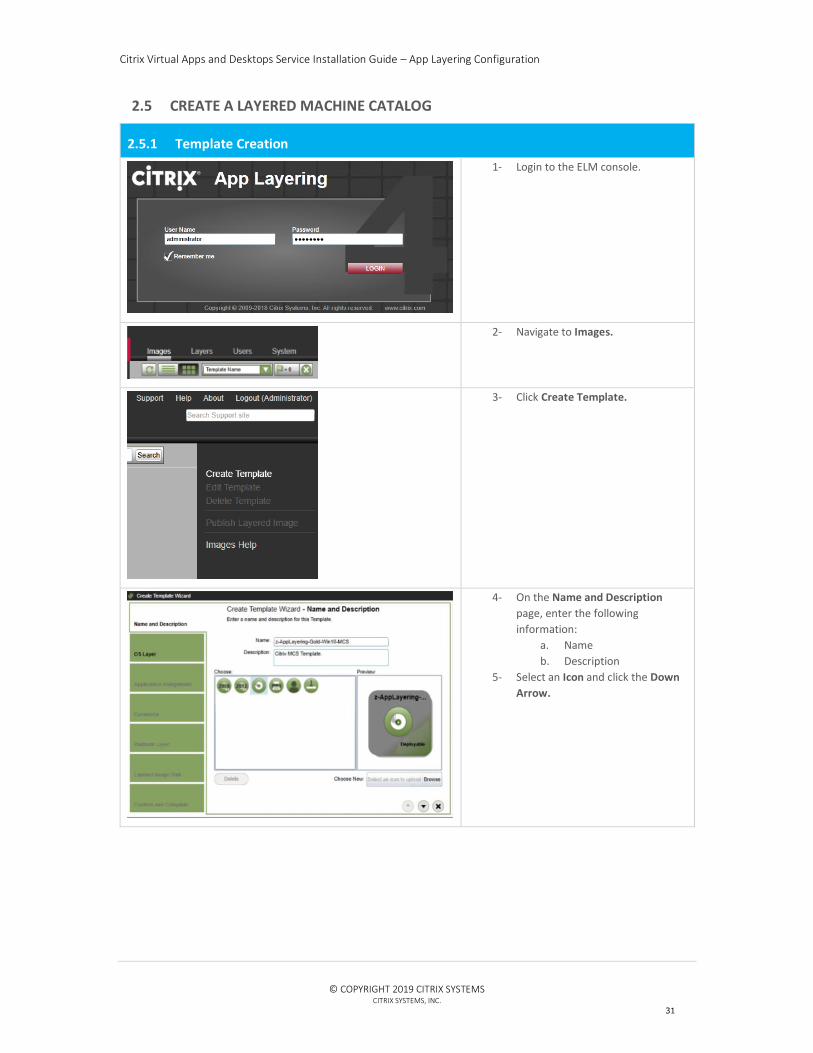
1- Login to the ELM console.
2- Navigate to Images.
3- Click Create Template.
4- On the Name and Description
page, enter the following
information:
a. Name
b. Description
5- Select an Icon and click the Down
Arrow.
Citrix Virtual Apps and Desktops Service Installation Guide – App Layering Configuration
© COPYRIGHT 2019 CITRIX SYSTEMS
CITRIX SYSTEMS, INC.
32
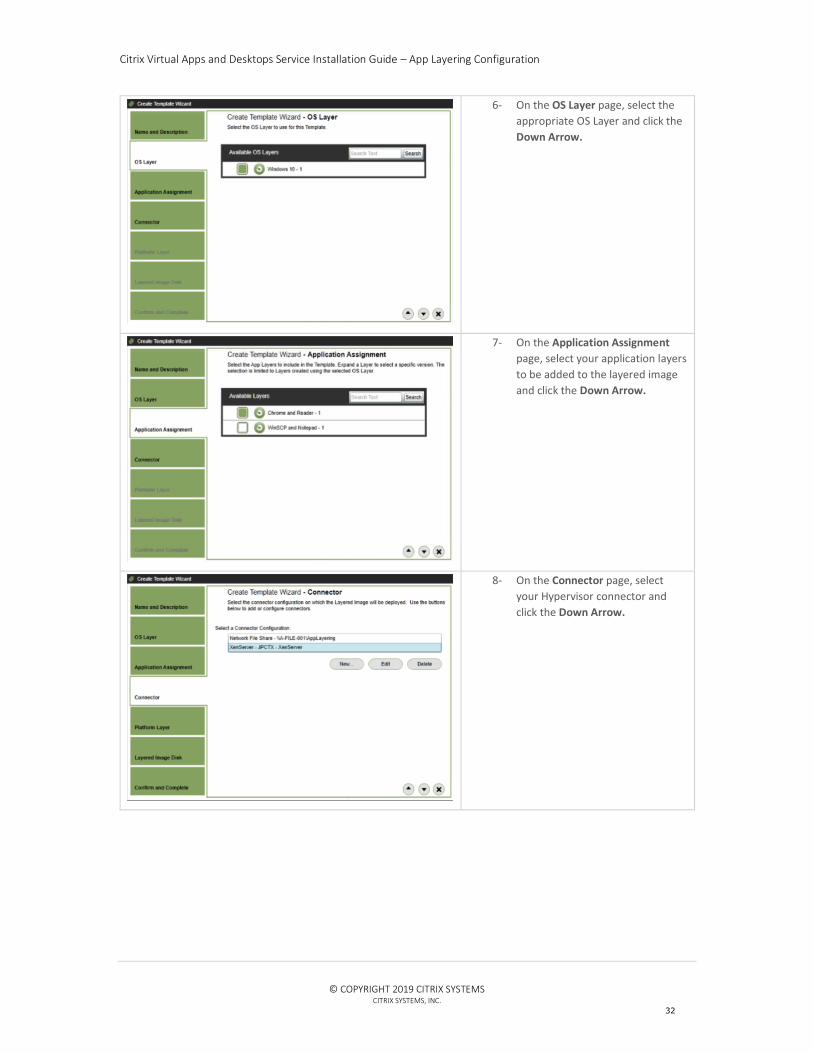
6- On the OS Layer page, select the
appropriate OS Layer and click the
Down Arrow.
7- On the Application Assignment
page, select your application layers
to be added to the layered image
and click the Down Arrow.
8- On the Connector page, select
your Hypervisor connector and
click the Down Arrow.
Citrix Virtual Apps and Desktops Service Installation Guide – App Layering Configuration
© COPYRIGHT 2019 CITRIX SYSTEMS
CITRIX SYSTEMS, INC.
33
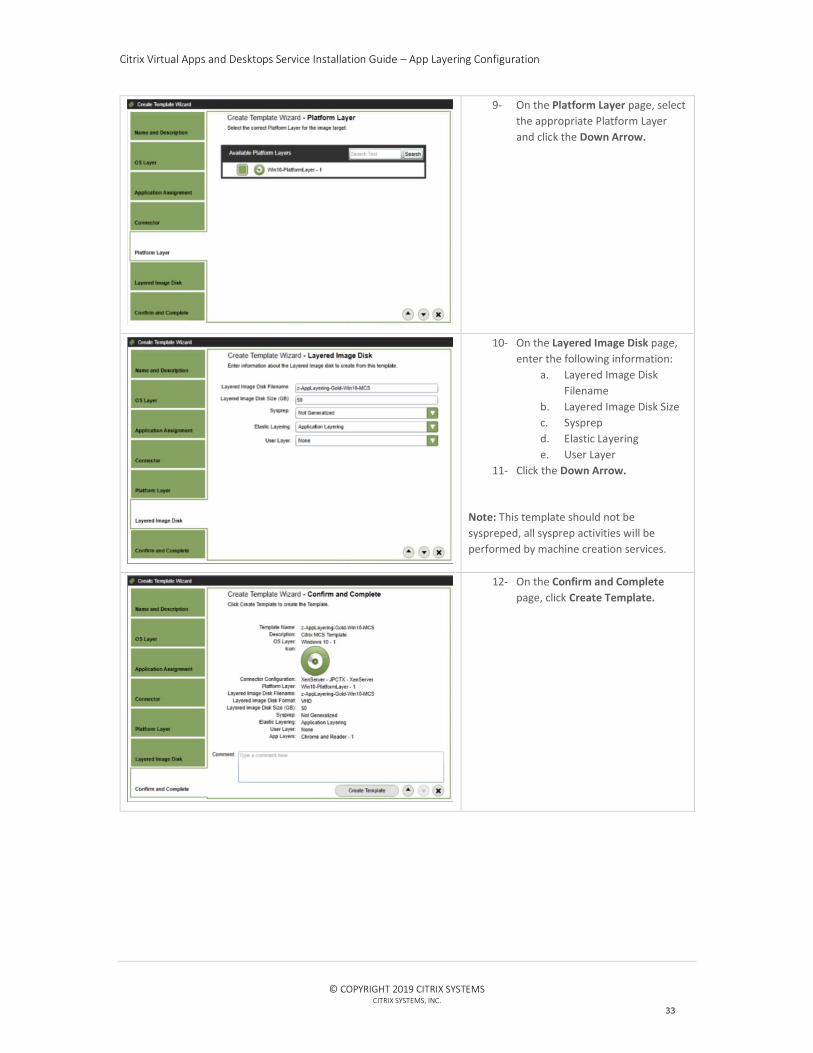
9- On the Platform Layer page, select
the appropriate Platform Layer
and click the Down Arrow.
10- On the Layered Image Disk page,
enter the following information:
a. Layered Image Disk
Filename
b. Layered Image Disk Size
c. Sysprep
d. Elastic Layering
e. User Layer
11- Click the Down Arrow.
Note: This template should not be
syspreped, all sysprep activities will be
performed by machine creation services.
12- On the Confirm and Complete
page, click Create Template.
Citrix Virtual Apps and Desktops Service Installation Guide – App Layering Configuration
© COPYRIGHT 2019 CITRIX SYSTEMS
CITRIX SYSTEMS, INC.
34
2.5.2 Publish the Layered Image
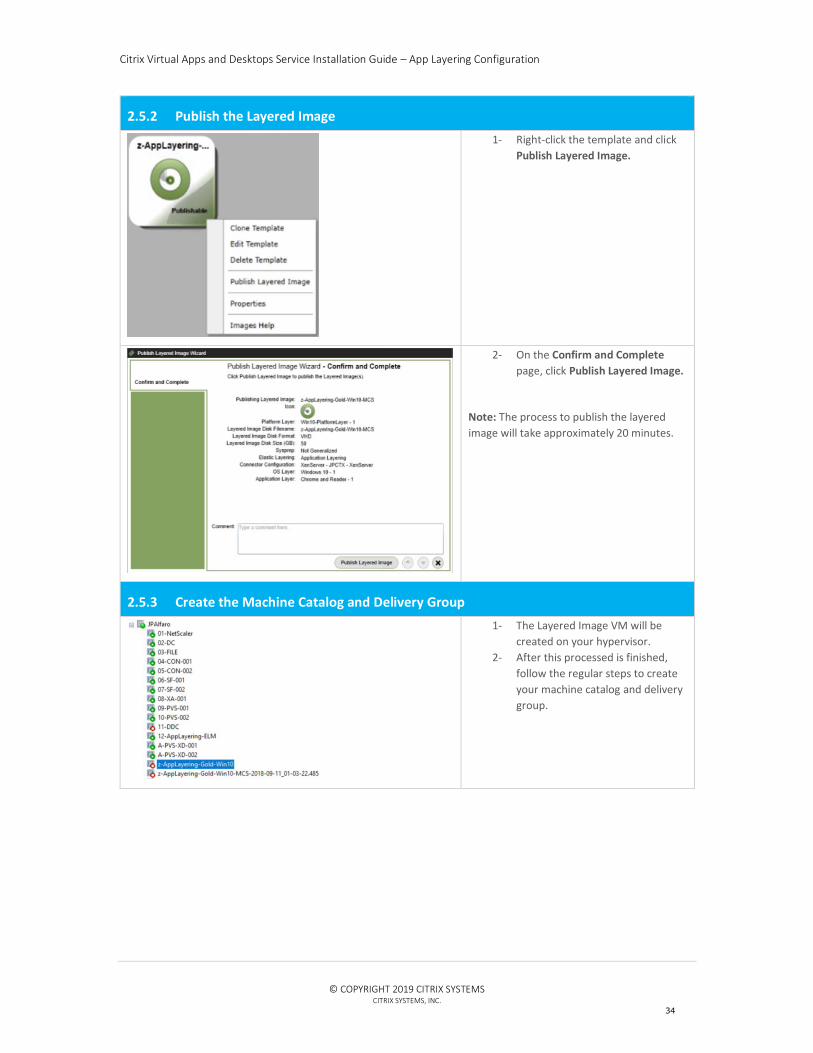
1- Right-click the template and click
Publish Layered Image.
2- On the Confirm and Complete
page, click Publish Layered Image.
Note: The process to publish the layered
image will take approximately 20 minutes.
2.5.3 Create the Machine Catalog and Delivery Group
1- The Layered Image VM will be
created on your hypervisor.
2- After this processed is finished,
follow the regular steps to create
your machine catalog and delivery
group.
Citrix Virtual Apps and Desktops Service Installation Guide – App Layering Configuration
© COPYRIGHT 2019 CITRIX SYSTEMS
CITRIX SYSTEMS, INC.
35
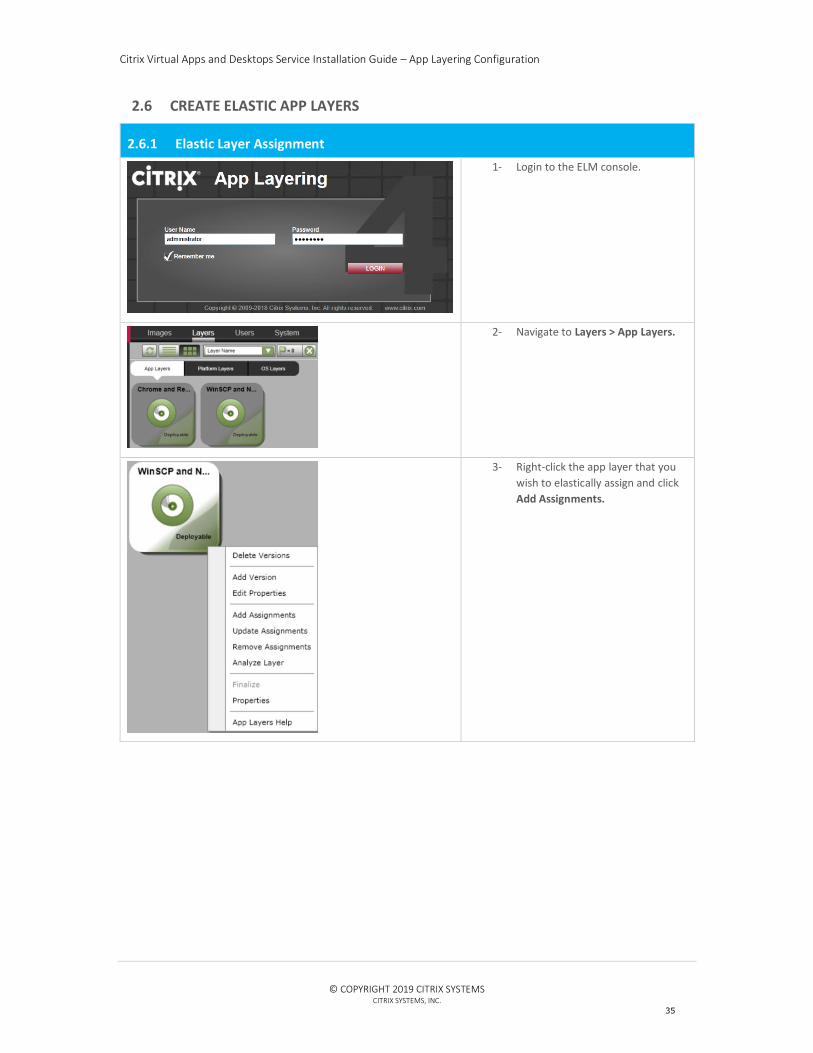
2.6 CREATE ELASTIC APP LAYERS
2.6.1 Elastic Layer Assignment
1- Login to the ELM console.
2- Navigate to Layers > App Layers.
3- Right-click the app layer that you
wish to elastically assign and click
Add Assignments.
Citrix Virtual Apps and Desktops Service Installation Guide – App Layering Configuration
© COPYRIGHT 2019 CITRIX SYSTEMS
CITRIX SYSTEMS, INC.
36
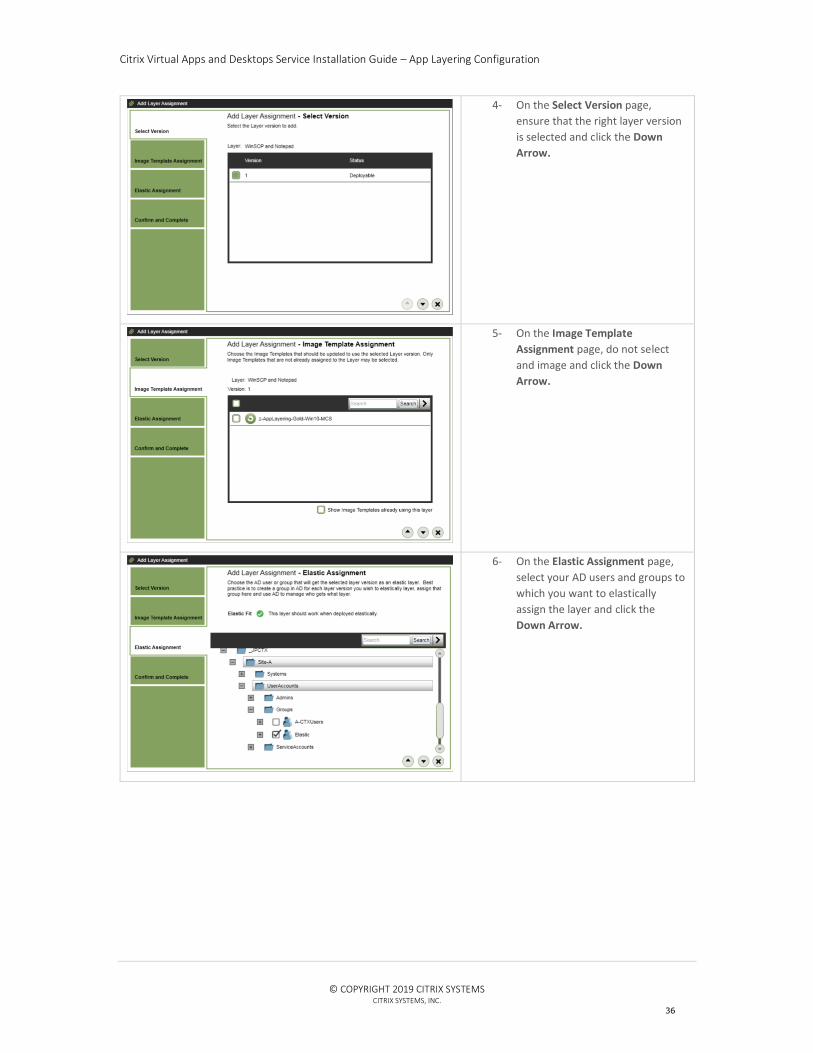
4- On the Select Version page,
ensure that the right layer version
is selected and click the Down
Arrow.
5- On the Image Template
Assignment page, do not select
and image and click the Down
Arrow.
6- On the Elastic Assignment page,
select your AD users and groups to
which you want to elastically
assign the layer and click the
Down Arrow.
Citrix Virtual Apps and Desktops Service Installation Guide – App Layering Configuration
© COPYRIGHT 2019 CITRIX SYSTEMS
CITRIX SYSTEMS, INC.
37
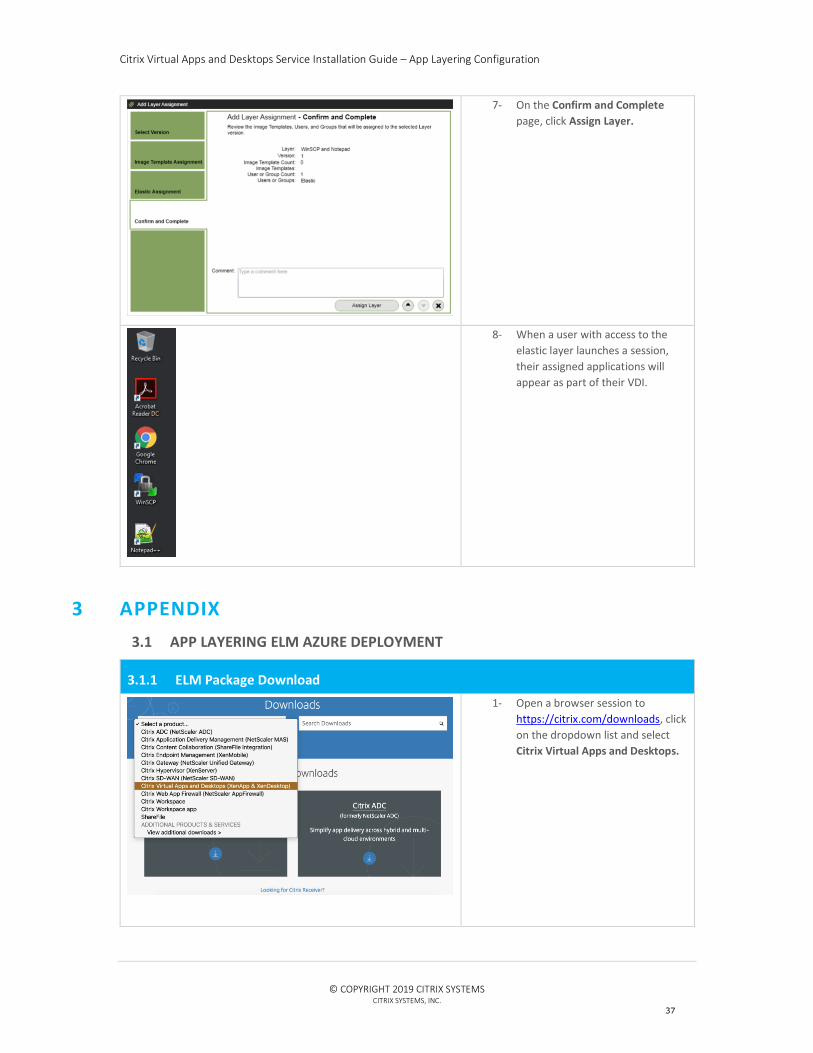
7- On the Confirm and Complete
page, click Assign Layer.
8- When a user with access to the
elastic layer launches a session,
their assigned applications will
appear as part of their VDI.
3 APPENDIX
3.1 APP LAYERING ELM AZURE DEPLOYMENT
3.1.1 ELM Package Download
1- Open a browser session to
https://citrix.com/downloads, click
on the dropdown list and select
Citrix Virtual Apps and Desktops.
Citrix Virtual Apps and Desktops Service Installation Guide – App Layering Configuration
© COPYRIGHT 2019 CITRIX SYSTEMS
CITRIX SYSTEMS, INC.
38
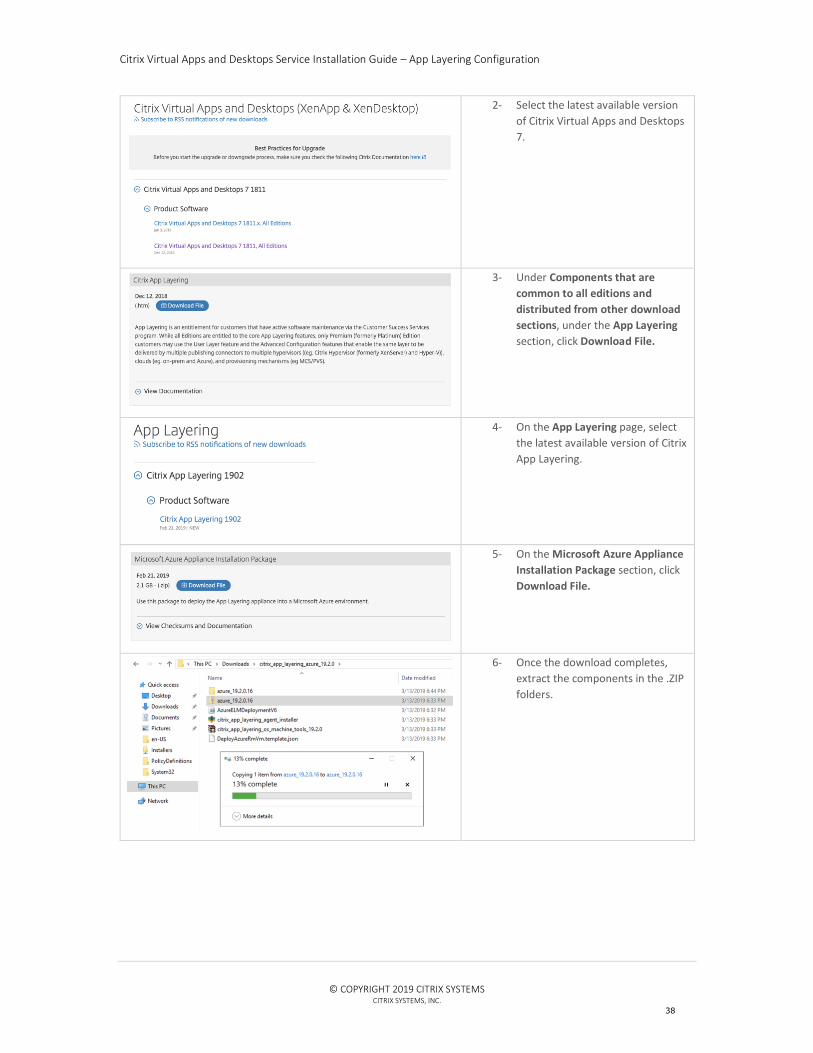
2- Select the latest available version
of Citrix Virtual Apps and Desktops
7.
3- Under Components that are
common to all editions and
distributed from other download
sections, under the App Layering
section, click Download File.
4- On the App Layering page, select
the latest available version of Citrix
App Layering.
5- On the Microsoft Azure Appliance
Installation Package section, click
Download File.
6- Once the download completes,
extract the components in the .ZIP
folders.
Citrix Virtual Apps and Desktops Service Installation Guide – App Layering Configuration
© COPYRIGHT 2019 CITRIX SYSTEMS
CITRIX SYSTEMS, INC.
39
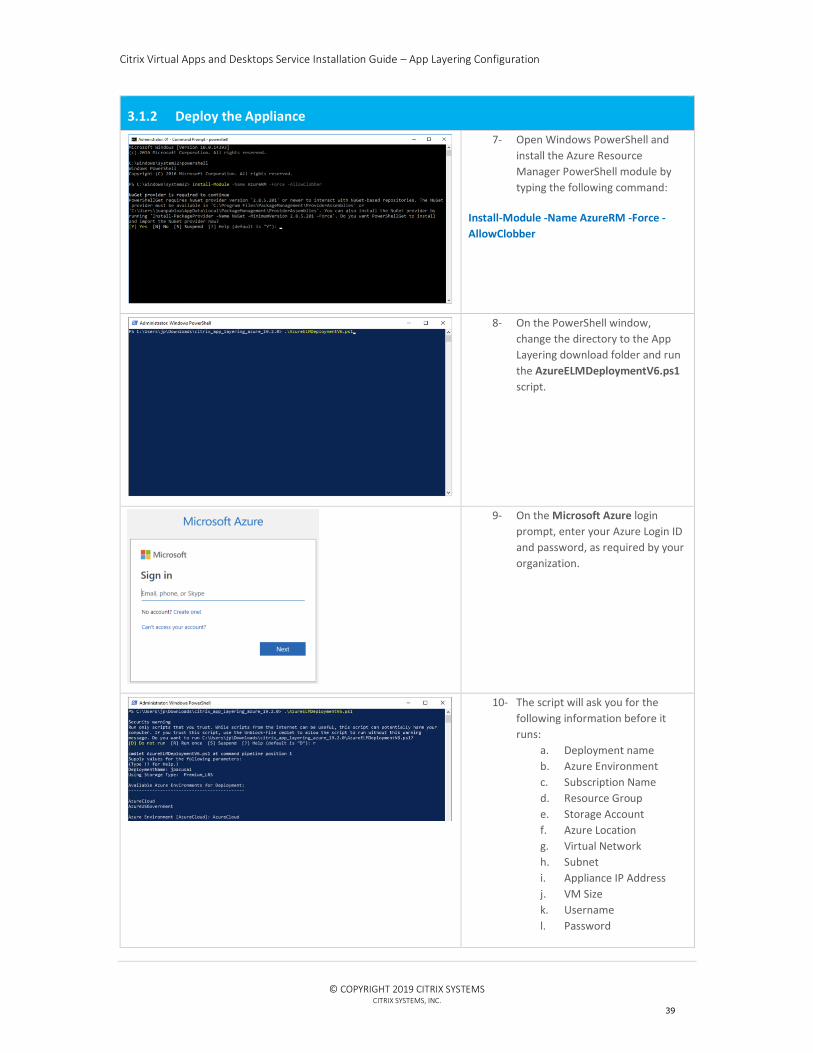
3.1.2 Deploy the Appliance
7- Open Windows PowerShell and
install the Azure Resource
Manager PowerShell module by
typing the following command:
Install-Module -Name AzureRM -Force -
AllowClobber
8- On the PowerShell window,
change the directory to the App
Layering download folder and run
the AzureELMDeploymentV6.ps1
script.
9- On the Microsoft Azure login
prompt, enter your Azure Login ID
and password, as required by your
organization.
10- The script will ask you for the
following information before it
runs:
a. Deployment name
b. Azure Environment
c. Subscription Name
d. Resource Group
e. Storage Account
f. Azure Location
g. Virtual Network
h. Subnet
i. Appliance IP Address
j. VM Size
k. Username
l. Password
Citrix Virtual Apps and Desktops Service Installation Guide – App Layering Configuration
© COPYRIGHT 2019 CITRIX SYSTEMS
CITRIX SYSTEMS, INC.
40
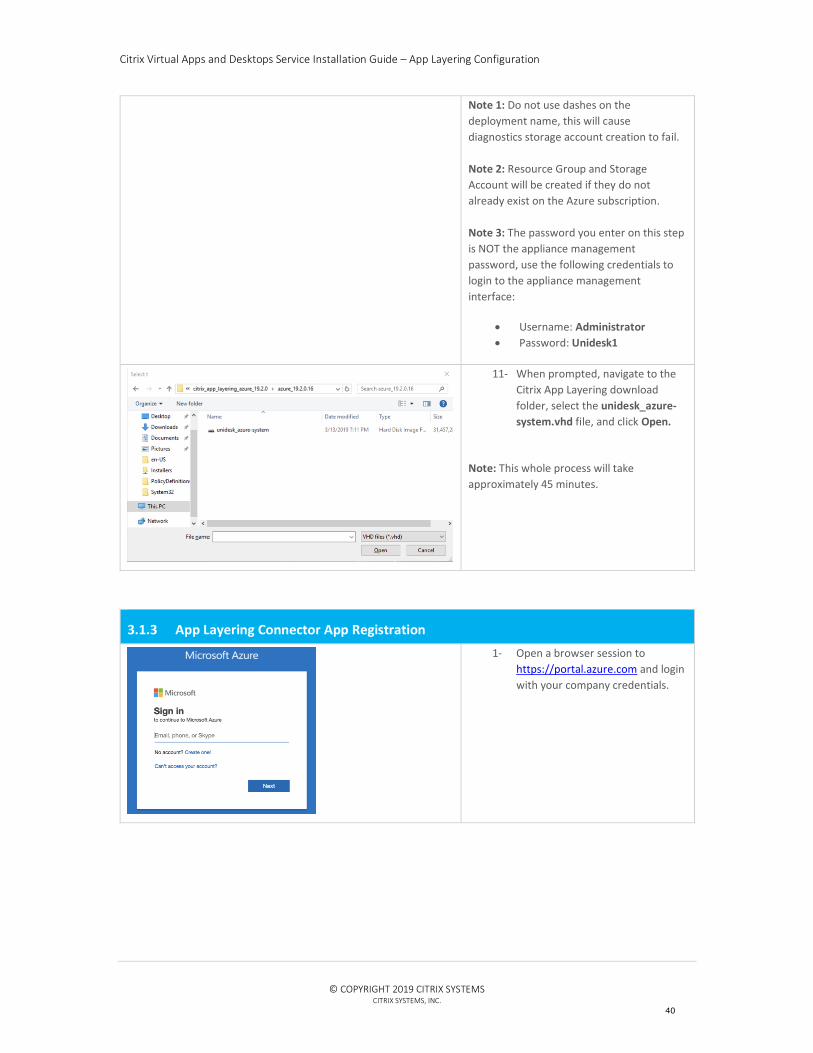
Note 1: Do not use dashes on the
deployment name, this will cause
diagnostics storage account creation to fail.
Note 2: Resource Group and Storage
Account will be created if they do not
already exist on the Azure subscription.
Note 3: The password you enter on this step
is NOT the appliance management
password, use the following credentials to
login to the appliance management
interface:
• Username: Administrator
• Password: Unidesk1
11- When prompted, navigate to the
Citrix App Layering download
folder, select the unidesk_azure-
system.vhd file, and click Open.
Note: This whole process will take
approximately 45 minutes.
3.1.3 App Layering Connector App Registration
1- Open a browser session to
https://portal.azure.com and login
with your company credentials.
Citrix Virtual Apps and Desktops Service Installation Guide – App Layering Configuration
© COPYRIGHT 2019 CITRIX SYSTEMS
CITRIX SYSTEMS, INC.
41
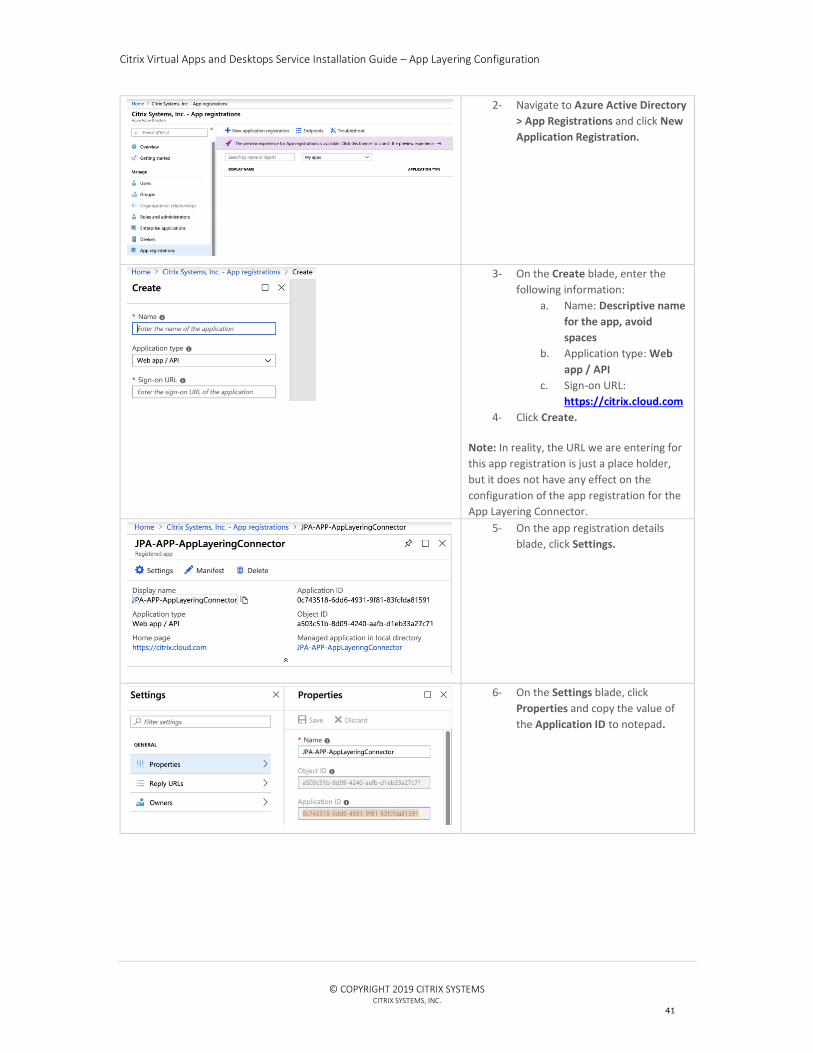
2- Navigate to Azure Active Directory
> App Registrations and click New
Application Registration.
3- On the Create blade, enter the
following information:
a. Name: Descriptive name
for the app, avoid
spaces
b. Application type: Web
app / API
c. Sign-on URL:
https://citrix.cloud.com
4- Click Create.
Note: In reality, the URL we are entering for
this app registration is just a place holder,
but it does not have any effect on the
configuration of the app registration for the
App Layering Connector.
5- On the app registration details
blade, click Settings.
6- On the Settings blade, click
Properties and copy the value of
the Application ID to notepad.
Citrix Virtual Apps and Desktops Service Installation Guide – App Layering Configuration
© COPYRIGHT 2019 CITRIX SYSTEMS
CITRIX SYSTEMS, INC.
42
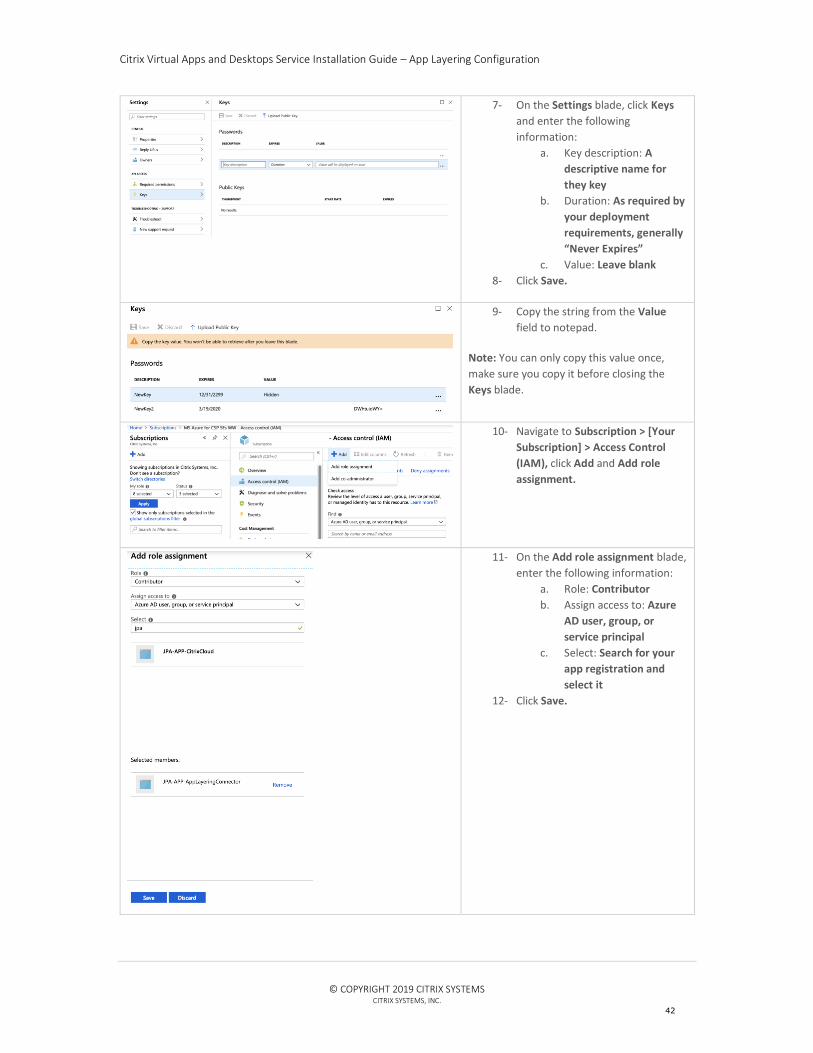
7- On the Settings blade, click Keys
and enter the following
information:
a. Key description: A
descriptive name for
they key
b. Duration: As required by
your deployment
requirements, generally
“Never Expires”
c. Value: Leave blank
8- Click Save.
9- Copy the string from the Value
field to notepad.
Note: You can only copy this value once,
make sure you copy it before closing the
Keys blade.
10- Navigate to Subscription > [Your
Subscription] > Access Control
(IAM), click Add and Add role
assignment.
11- On the Add role assignment blade,
enter the following information:
a. Role: Contributor
b. Assign access to: Azure
AD user, group, or
service principal
c. Select: Search for your
app registration and
select it
12- Click Save.
Citrix Virtual Apps and Desktops Service Installation Guide – App Layering Configuration
© COPYRIGHT 2019 CITRIX SYSTEMS
CITRIX SYSTEMS, INC.
43
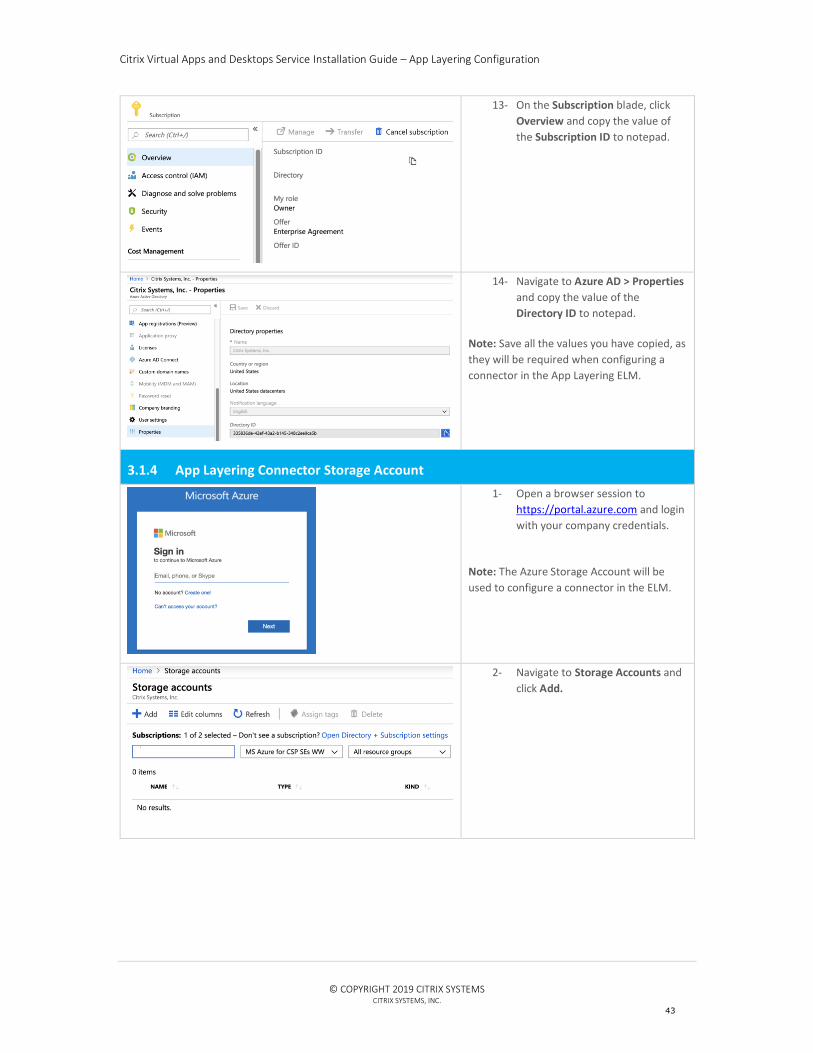
13- On the Subscription blade, click
Overview and copy the value of
the Subscription ID to notepad.
14- Navigate to Azure AD > Properties
and copy the value of the
Directory ID to notepad.
Note: Save all the values you have copied, as
they will be required when configuring a
connector in the App Layering ELM.
3.1.4 App Layering Connector Storage Account
1- Open a browser session to
https://portal.azure.com and login
with your company credentials.
Note: The Azure Storage Account will be
used to configure a connector in the ELM.
2- Navigate to Storage Accounts and
click Add.
Citrix Virtual Apps and Desktops Service Installation Guide – App Layering Configuration
© COPYRIGHT 2019 CITRIX SYSTEMS
CITRIX SYSTEMS, INC.
44
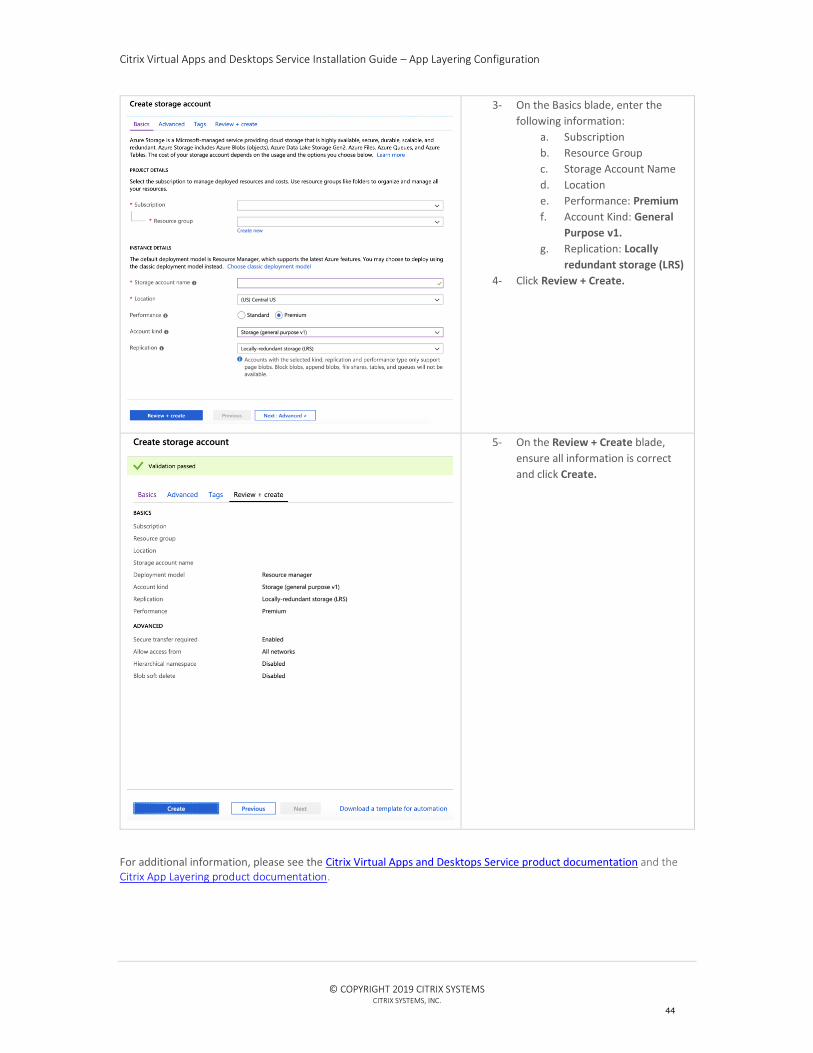
3- On the Basics blade, enter the
following information:
a. Subscription
b. Resource Group
c. Storage Account Name
d. Location
e. Performance: Premium
f. Account Kind: General
Purpose v1.
g. Replication: Locally
redundant storage (LRS)
4- Click Review + Create.
5- On the Review + Create blade,
ensure all information is correct
and click Create.
For additional information, please see the Citrix Virtual Apps and Desktops Service product documentation and the Citrix App Layering product documentation.