clairity mobile app user guide - acuity brands · acuity brands one lithonia way conyers, ga 30012...
TRANSCRIPT
Acuity Brands | One Lithonia Way Conyers, GA 30012 Phone: 800.535.2465 www.acuitycontrols.com © 2017 Acuity Brands Lighting, Inc. All rights reserved. 06/20/17 1 of 22
Clairity Mobile App User Guide
Acuity Brands | One Lithonia Way Conyers, GA 30012 Phone: 800.535.2465 www.acuitycontrols.com © 2017 Acuity Brands Lighting, Inc. All rights reserved. 06/20/17 2 of 22
Welcome to the Acuity Controls “Clairity” mobile app that has been optimized to quickly and easily startup nLight® AIR lighting control solutions. Clairity is available for both Android™ and iOS devices.
This guide explains all the features and functionality within the Clairity mobile app. If you still have questions, please reach out to our Technical Support line at 1-800-535-2465.
ContentsStartup Process Overview .................................................................................................................................. 3Out of Box Functionality..................................................................................................................................... 3Download Clairity ............................................................................................................................................... 3Enable Bluetooth on Your Mobile Device ....................................................................................................... 4Create a User Account ........................................................................................................................................ 4Forgot my Password ............................................................................................................................................ 5Sign into the App ................................................................................................................................................. 5Support ................................................................................................................................................................. 5Saving and Retrieving Site Information ........................................................................................................... 5Recent Sites Screen ............................................................................................................................................. 6Create a New Site ................................................................................................................................................ 6Search for an Existing Site ................................................................................................................................. 7Edit an Existing Site Name or Address ............................................................................................................ 7Create a New Group ........................................................................................................................................... 7Search for an Existing Group ............................................................................................................................. 8Groups – Edit Existing ......................................................................................................................................... 8Discovering New nLight AIR Devices & Adding Devices to a Group .......................................................... 9Moving Devices on the Grid ............................................................................................................................10Removing Devices from the Grid ....................................................................................................................11Making Customer Requests a Reality .............................................................................................................11Adding Discovered nLight AIR Devices to a Zone .......................................................................................14Changing which nLight AIR Devices are in an Existing Zone .....................................................................15Selecting a Behavior for a Zone ......................................................................................................................15Behaviors Explained .........................................................................................................................................16Calibrating the Daylighting in an Area ...........................................................................................................17High End and Low End Trim ............................................................................................................................18Firmware Updates .............................................................................................................................................18Site Access ..........................................................................................................................................................19Sharing Sites ......................................................................................................................................................19Communication Architecture ...........................................................................................................................19Who to Call if You Have Questions .................................................................................................................20Updating Clairity ...............................................................................................................................................20Multiple Users on One Site ..............................................................................................................................20Reprogramming an Area ..................................................................................................................................20Whole Group Decommissioning .....................................................................................................................21Physically Removing Equipment .....................................................................................................................21Definition of Terms ............................................................................................................................................22
Acuity Brands | One Lithonia Way Conyers, GA 30012 Phone: 800.535.2465 www.acuitycontrols.com © 2017 Acuity Brands Lighting, Inc. All rights reserved. 06/20/17 3 of 22
Startup Process OverviewnLight AIR consists of fixtures, with integrated sensors and wall switches. There are no communication wires between the fixtures and wall switches. Defining how these devices operate together is applied within the Clairity mobile app.An overview of the startup process we recommend you follow is shown below.
NOTE: A definition of terms section is located near the end of this guide.
1. Install and energize the equipment. You can proceed to the next step once all nLight AIR equip-ment has been installed in a given functional area of the building.
2. Download the Clairity app (first time users must follow the steps to create a user account)3. Create the site4. Create the first group, identify devices, and associate with the grid5. Create all zones6. Set behaviors for each zone7. Return to step 4 when you’re ready to move to the next group
Download ClairityStart by downloading the Clairity mobile app from the Apple store (AC Clairity). The app is no charge.
Requirements:
• iPhone 5, iPhone 6, and iPhone 7, iPads, with iOS v8.1 or newer• Android – Samsung S7 Edge and Lenovo Tab 3
Out of Box FunctionalityPrior to programming, the devices will operate in their out of box functionality:• Fixtures - All operate independently, and have occupancy enabled. 10 minutes after vacancy, the
lights will dim to their dim level. After 7.5 more minutes of no activity, the lights will turn off.• Switches - Do not control any fixtures
Acuity Brands | One Lithonia Way Conyers, GA 30012 Phone: 800.535.2465 www.acuitycontrols.com © 2017 Acuity Brands Lighting, Inc. All rights reserved. 06/20/17 4 of 22
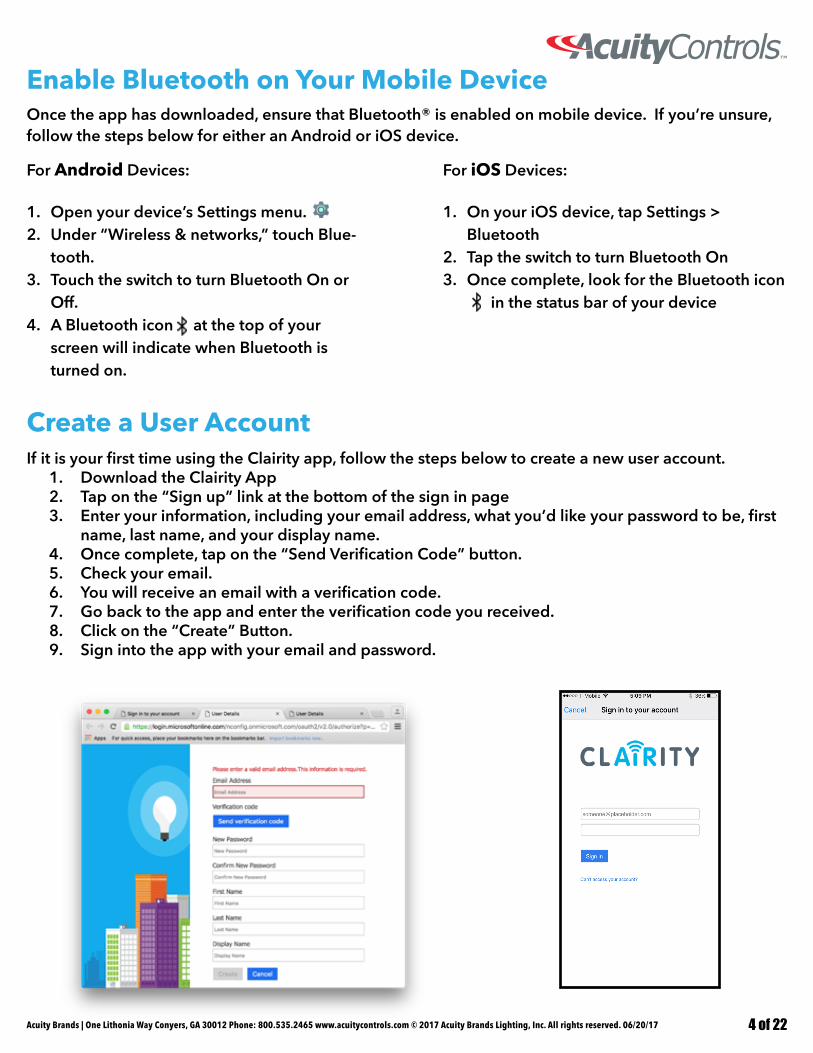
If it is your first time using the Clairity app, follow the steps below to create a new user account.1. Download the Clairity App2. Tap on the “Sign up” link at the bottom of the sign in page 3. Enter your information, including your email address, what you’d like your password to be, first
name, last name, and your display name. 4. Once complete, tap on the “Send Verification Code” button. 5. Check your email.6. You will receive an email with a verification code. 7. Go back to the app and enter the verification code you received. 8. Click on the “Create” Button.9. Sign into the app with your email and password.
Enable Bluetooth on Your Mobile DeviceOnce the app has downloaded, ensure that Bluetooth® is enabled on mobile device. If you’re unsure, follow the steps below for either an Android or iOS device.
For Android Devices:
1. Open your device’s Settings menu.2. Under “Wireless & networks,” touch Blue-
tooth.3. Touch the switch to turn Bluetooth On or
Off.4. A Bluetooth icon at the top of your
screen will indicate when Bluetooth is turned on.
For iOS Devices:
1. On your iOS device, tap Settings > Bluetooth
2. Tap the switch to turn Bluetooth On3. Once complete, look for the Bluetooth icon
in the status bar of your device
Create a User Account
Acuity Brands | One Lithonia Way Conyers, GA 30012 Phone: 800.535.2465 www.acuitycontrols.com © 2017 Acuity Brands Lighting, Inc. All rights reserved. 06/20/17 5 of 22
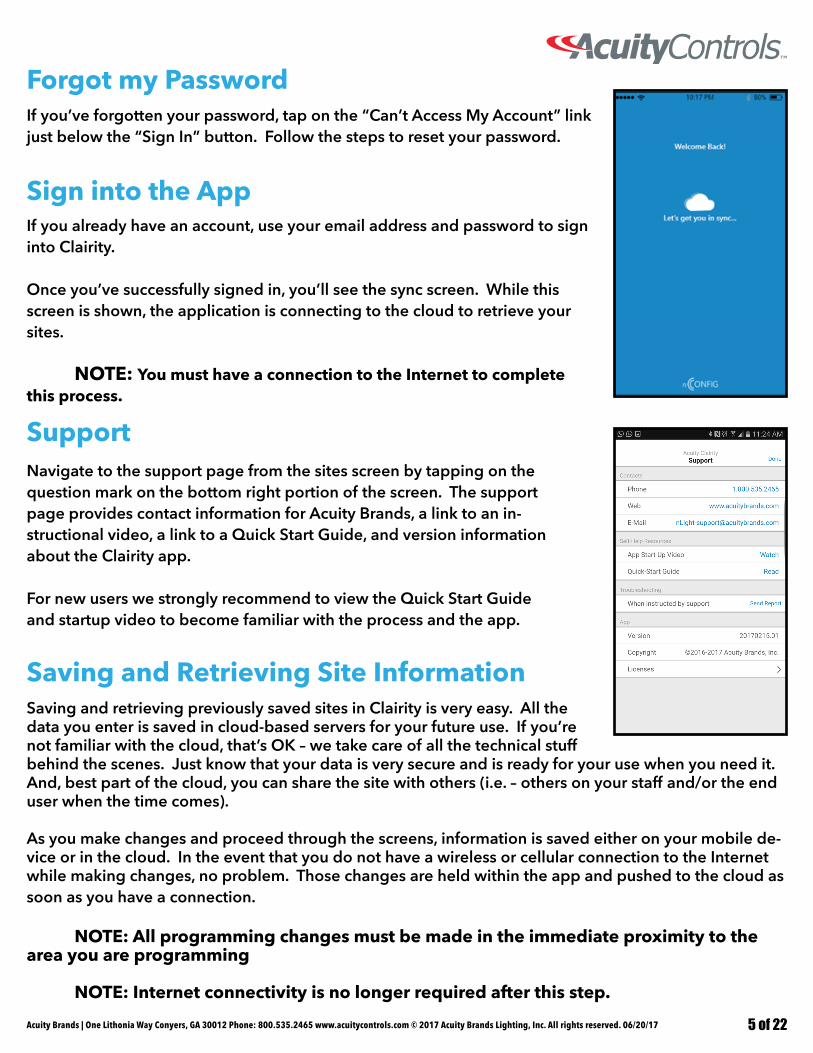
Forgot my PasswordIf you’ve forgotten your password, tap on the “Can’t Access My Account” link just below the “Sign In” button. Follow the steps to reset your password.
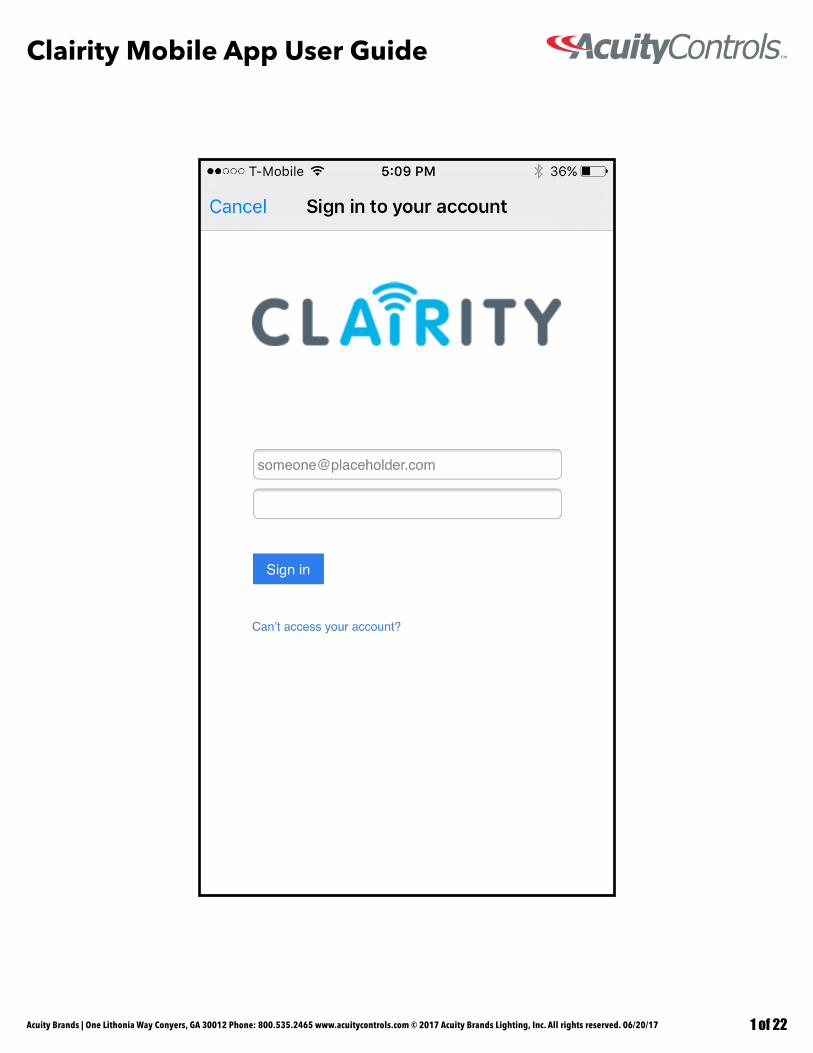
Sign into the AppIf you already have an account, use your email address and password to sign into Clairity.
Once you’ve successfully signed in, you’ll see the sync screen. While this screen is shown, the application is connecting to the cloud to retrieve your sites.
NOTE: You must have a connection to the Internet to complete this process.
SupportNavigate to the support page from the sites screen by tapping on the question mark on the bottom right portion of the screen. The support page provides contact information for Acuity Brands, a link to an in-structional video, a link to a Quick Start Guide, and version information about the Clairity app.
For new users we strongly recommend to view the Quick Start Guide and startup video to become familiar with the process and the app.
Saving and Retrieving Site InformationSaving and retrieving previously saved sites in Clairity is very easy. All the data you enter is saved in cloud-based servers for your future use. If you’re not familiar with the cloud, that’s OK – we take care of all the technical stuff behind the scenes. Just know that your data is very secure and is ready for your use when you need it. And, best part of the cloud, you can share the site with others (i.e. – others on your staff and/or the end user when the time comes).
As you make changes and proceed through the screens, information is saved either on your mobile de-vice or in the cloud. In the event that you do not have a wireless or cellular connection to the Internet while making changes, no problem. Those changes are held within the app and pushed to the cloud as soon as you have a connection.
NOTE: All programming changes must be made in the immediate proximity to the area you are programming
NOTE: Internet connectivity is no longer required after this step.
Acuity Brands | One Lithonia Way Conyers, GA 30012 Phone: 800.535.2465 www.acuitycontrols.com © 2017 Acuity Brands Lighting, Inc. All rights reserved. 06/20/17 6 of 22
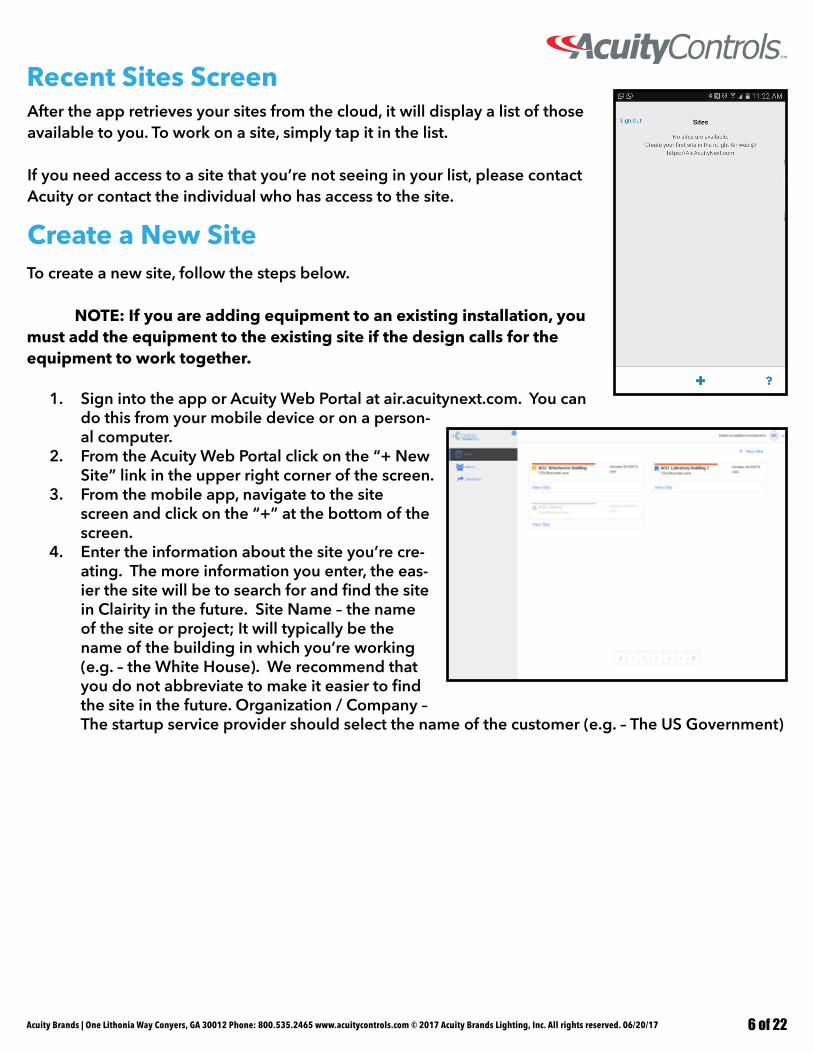
Recent Sites ScreenAfter the app retrieves your sites from the cloud, it will display a list of those available to you. To work on a site, simply tap it in the list.
If you need access to a site that you’re not seeing in your list, please contact Acuity or contact the individual who has access to the site.
Create a New SiteTo create a new site, follow the steps below.
NOTE: If you are adding equipment to an existing installation, you must add the equipment to the existing site if the design calls for the equipment to work together.
1. Sign into the app or Acuity Web Portal at air.acuitynext.com. You can do this from your mobile device or on a person-al computer.
2. From the Acuity Web Portal click on the “+ New Site” link in the upper right corner of the screen.
3. From the mobile app, navigate to the site screen and click on the “+” at the bottom of the screen.
4. Enter the information about the site you’re cre-ating. The more information you enter, the eas-ier the site will be to search for and find the site in Clairity in the future. Site Name – the name of the site or project; It will typically be the name of the building in which you’re working (e.g. – the White House). We recommend that you do not abbreviate to make it easier to find the site in the future. Organization / Company – The startup service provider should select the name of the customer (e.g. – The US Government)
Acuity Brands | One Lithonia Way Conyers, GA 30012 Phone: 800.535.2465 www.acuitycontrols.com © 2017 Acuity Brands Lighting, Inc. All rights reserved. 06/20/17 7 of 22
If you need to change the site name, change the site address, or change the site organization, you may use app (on the site overview screen) or the Acuity Web Portal at air.acuitynext.com to make those changes.
All other changes are made through the Clairity app. For example, if you need to change a programming parameter for an existing site, this is done by first searching for the site, selecting it and making the necessary changes on the group, zone, or behavior screens.
Edit an Existing Site Name or Address
Search for an Existing SiteThe Sites Screen will display all the sites to which the user can access. For some users who visit numer-ous sites, we have made it easy to search for the site you need. To access the site search feature:
1. Navigate to the Sites Screen. 2. Enter the name of the site in the search bar at the top of the screen. 3. The list of sites that match your search criteria will update automatically4. Select the site you need to access from the list of sites
The search is not case sensitive.
Create a New Group
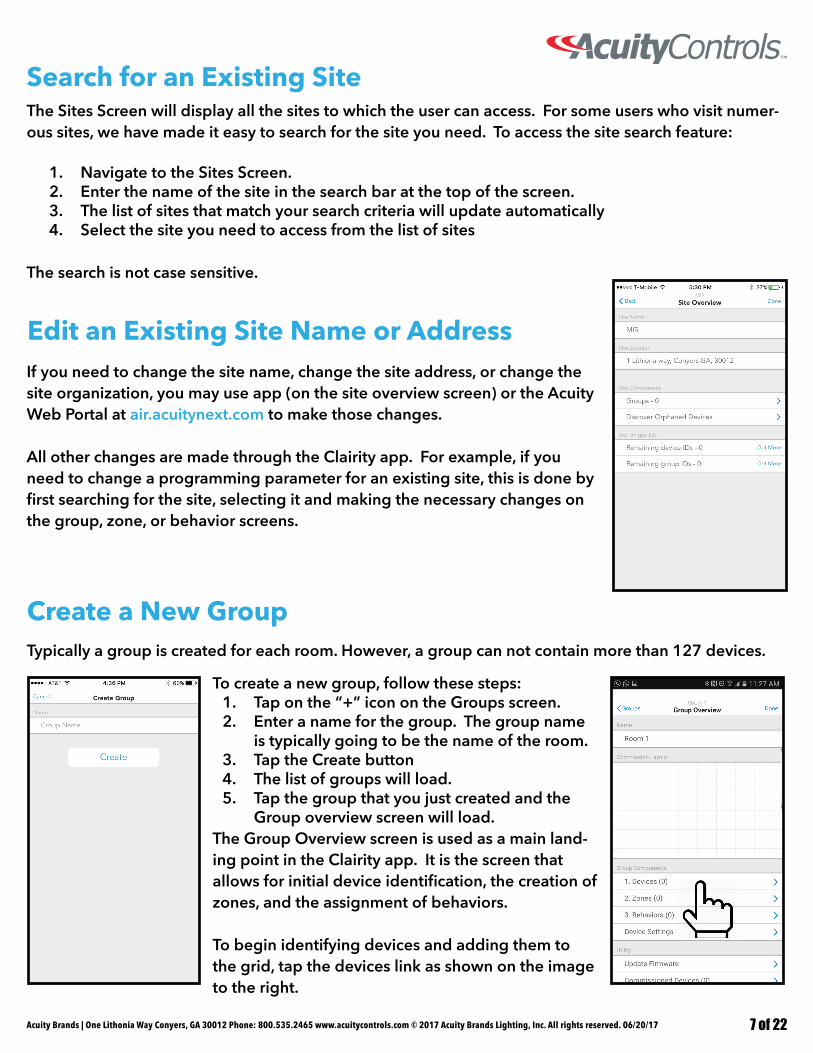
To create a new group, follow these steps:1. Tap on the “+” icon on the Groups screen. 2. Enter a name for the group. The group name
is typically going to be the name of the room. 3. Tap the Create button4. The list of groups will load. 5. Tap the group that you just created and the
Group overview screen will load.The Group Overview screen is used as a main land-ing point in the Clairity app. It is the screen that allows for initial device identification, the creation of zones, and the assignment of behaviors.
To begin identifying devices and adding them to the grid, tap the devices link as shown on the image to the right.
Typically a group is created for each room. However, a group can not contain more than 127 devices.
Acuity Brands | One Lithonia Way Conyers, GA 30012 Phone: 800.535.2465 www.acuitycontrols.com © 2017 Acuity Brands Lighting, Inc. All rights reserved. 06/20/17 8 of 22
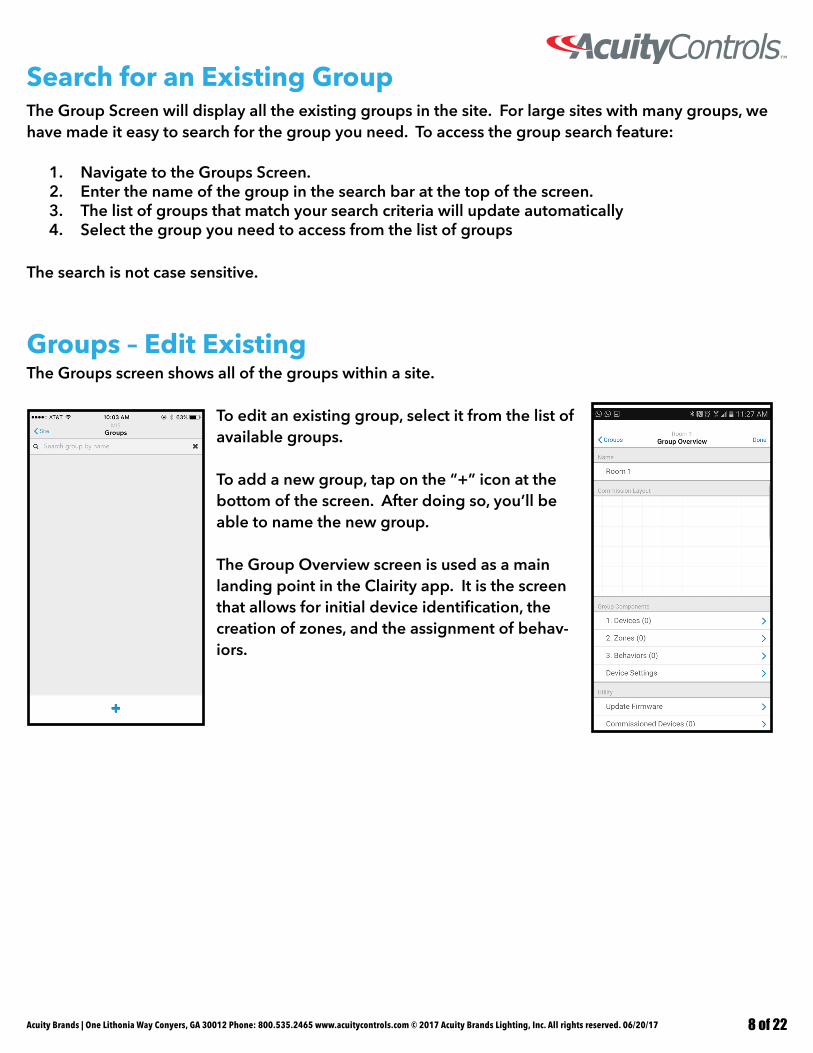
Groups – Edit ExistingThe Groups screen shows all of the groups within a site.
To edit an existing group, select it from the list of available groups.
To add a new group, tap on the “+” icon at the bottom of the screen. After doing so, you’ll be able to name the new group.
The Group Overview screen is used as a main landing point in the Clairity app. It is the screen that allows for initial device identification, the creation of zones, and the assignment of behav-iors.
Search for an Existing GroupThe Group Screen will display all the existing groups in the site. For large sites with many groups, we have made it easy to search for the group you need. To access the group search feature:
1. Navigate to the Groups Screen. 2. Enter the name of the group in the search bar at the top of the screen. 3. The list of groups that match your search criteria will update automatically4. Select the group you need to access from the list of groups
The search is not case sensitive.
Acuity Brands | One Lithonia Way Conyers, GA 30012 Phone: 800.535.2465 www.acuitycontrols.com © 2017 Acuity Brands Lighting, Inc. All rights reserved. 06/20/17 9 of 22
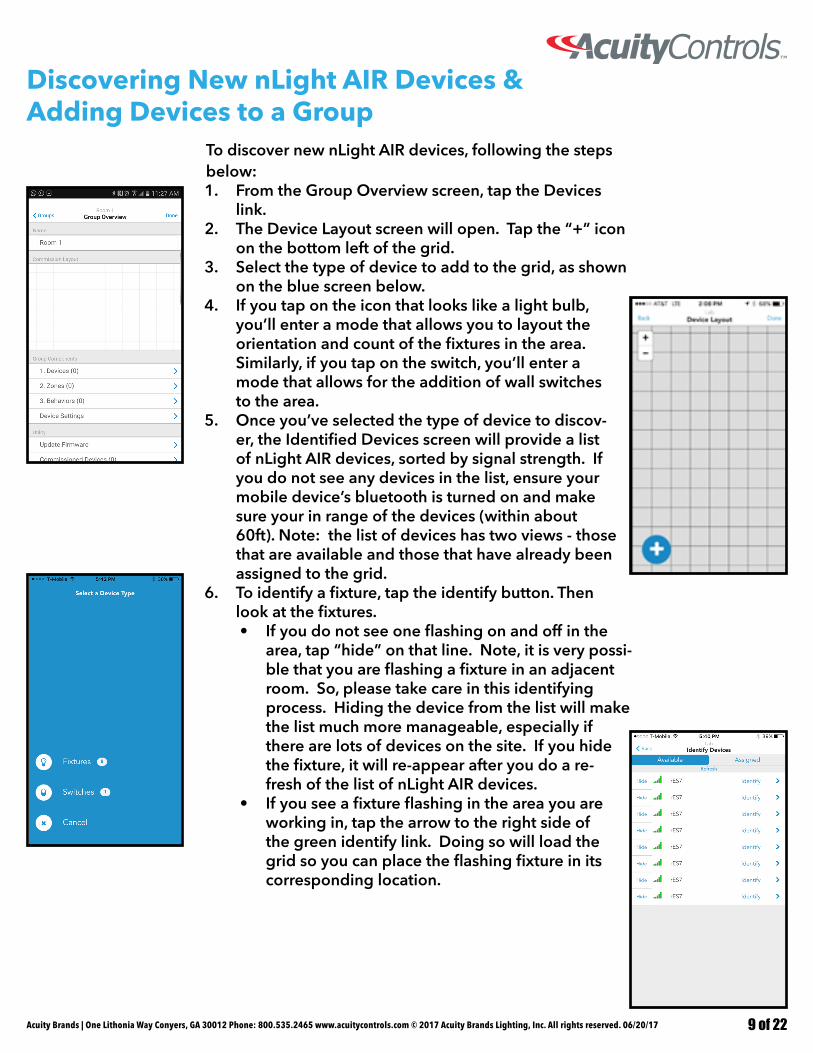
Discovering New nLight AIR Devices & Adding Devices to a Group
To discover new nLight AIR devices, following the steps below:1. From the Group Overview screen, tap the Devices
link.2. The Device Layout screen will open. Tap the “+” icon
on the bottom left of the grid. 3. Select the type of device to add to the grid, as shown
on the blue screen below. 4. If you tap on the icon that looks like a light bulb,
you’ll enter a mode that allows you to layout the orientation and count of the fixtures in the area. Similarly, if you tap on the switch, you’ll enter a mode that allows for the addition of wall switches to the area.
5. Once you’ve selected the type of device to discov-er, the Identified Devices screen will provide a list of nLight AIR devices, sorted by signal strength. If you do not see any devices in the list, ensure your mobile device’s bluetooth is turned on and make sure your in range of the devices (within about 60ft). Note: the list of devices has two views - those that are available and those that have already been assigned to the grid.
6. To identify a fixture, tap the identify button. Then look at the fixtures. • If you do not see one flashing on and off in the
area, tap “hide” on that line. Note, it is very possi-ble that you are flashing a fixture in an adjacent room. So, please take care in this identifying process. Hiding the device from the list will make the list much more manageable, especially if there are lots of devices on the site. If you hide the fixture, it will re-appear after you do a re-fresh of the list of nLight AIR devices.
• If you see a fixture flashing in the area you are working in, tap the arrow to the right side of the green identify link. Doing so will load the grid so you can place the flashing fixture in its corresponding location.
Acuity Brands | One Lithonia Way Conyers, GA 30012 Phone: 800.535.2465 www.acuitycontrols.com © 2017 Acuity Brands Lighting, Inc. All rights reserved. 06/20/17 10 of 22
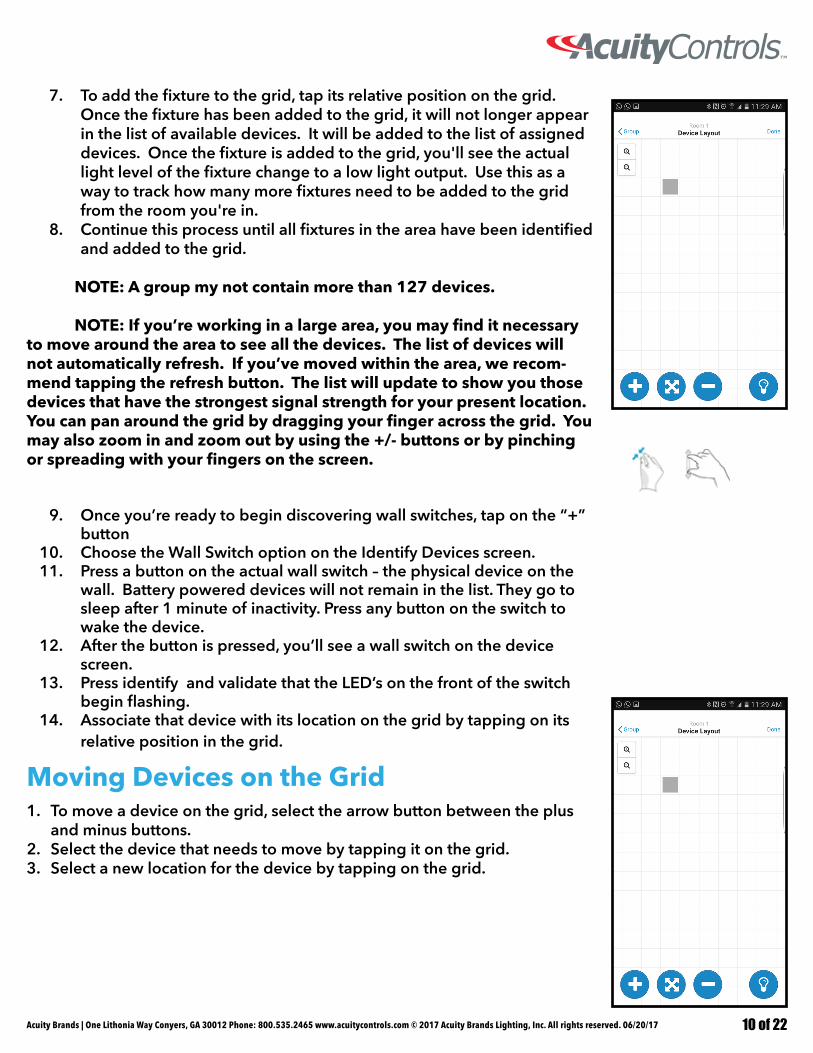
7. To add the fixture to the grid, tap its relative position on the grid. Once the fixture has been added to the grid, it will not longer appear in the list of available devices. It will be added to the list of assigned devices. Once the fixture is added to the grid, you'll see the actual light level of the fixture change to a low light output. Use this as a way to track how many more fixtures need to be added to the grid from the room you're in.
8. Continue this process until all fixtures in the area have been identified and added to the grid.
NOTE: A group my not contain more than 127 devices.
NOTE: If you’re working in a large area, you may find it necessary to move around the area to see all the devices. The list of devices will not automatically refresh. If you’ve moved within the area, we recom-mend tapping the refresh button. The list will update to show you those devices that have the strongest signal strength for your present location. You can pan around the grid by dragging your finger across the grid. You may also zoom in and zoom out by using the +/- buttons or by pinching or spreading with your fingers on the screen.
9. Once you’re ready to begin discovering wall switches, tap on the “+” button
10. Choose the Wall Switch option on the Identify Devices screen. 11. Press a button on the actual wall switch – the physical device on the
wall. Battery powered devices will not remain in the list. They go to sleep after 1 minute of inactivity. Press any button on the switch to wake the device.
12. After the button is pressed, you’ll see a wall switch on the device screen.
13. Press identify and validate that the LED’s on the front of the switch begin flashing.
14. Associate that device with its location on the grid by tapping on its relative position in the grid.
Moving Devices on the Grid1. To move a device on the grid, select the arrow button between the plus
and minus buttons. 2. Select the device that needs to move by tapping it on the grid.3. Select a new location for the device by tapping on the grid.
Acuity Brands | One Lithonia Way Conyers, GA 30012 Phone: 800.535.2465 www.acuitycontrols.com © 2017 Acuity Brands Lighting, Inc. All rights reserved. 06/20/17 11 of 22
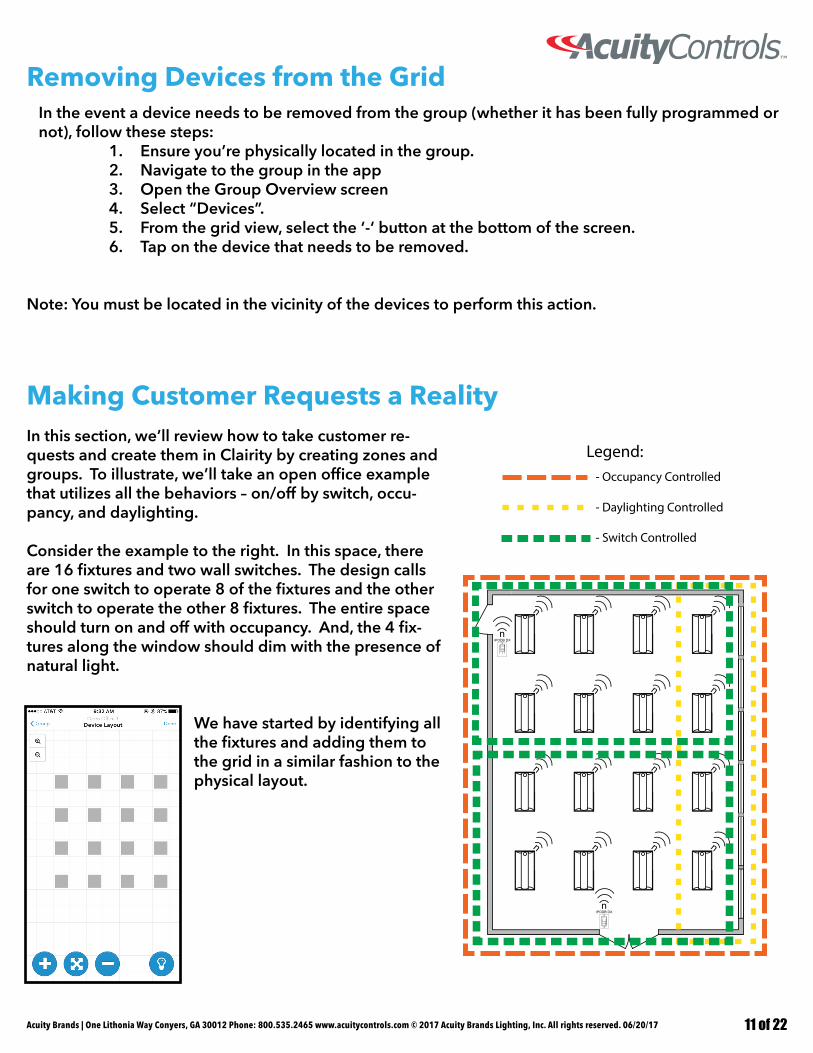
Legend:
- Daylighting Controlled
- Occupancy Controlled
- Switch Controlled
In this section, we’ll review how to take customer re-quests and create them in Clairity by creating zones and groups. To illustrate, we’ll take an open office example that utilizes all the behaviors – on/off by switch, occu-pancy, and daylighting.
Consider the example to the right. In this space, there are 16 fixtures and two wall switches. The design calls for one switch to operate 8 of the fixtures and the other switch to operate the other 8 fixtures. The entire space should turn on and off with occupancy. And, the 4 fix-tures along the window should dim with the presence of natural light.
We have started by identifying all the fixtures and adding them to the grid in a similar fashion to the physical layout.
Making Customer Requests a Reality
Removing Devices from the GridIn the event a device needs to be removed from the group (whether it has been fully programmed or not), follow these steps:
1. Ensure you’re physically located in the group.2. Navigate to the group in the app3. Open the Group Overview screen4. Select “Devices”.5. From the grid view, select the ‘-‘ button at the bottom of the screen. 6. Tap on the device that needs to be removed.
Note: You must be located in the vicinity of the devices to perform this action.
Acuity Brands | One Lithonia Way Conyers, GA 30012 Phone: 800.535.2465 www.acuitycontrols.com © 2017 Acuity Brands Lighting, Inc. All rights reserved. 06/20/17 12 of 22
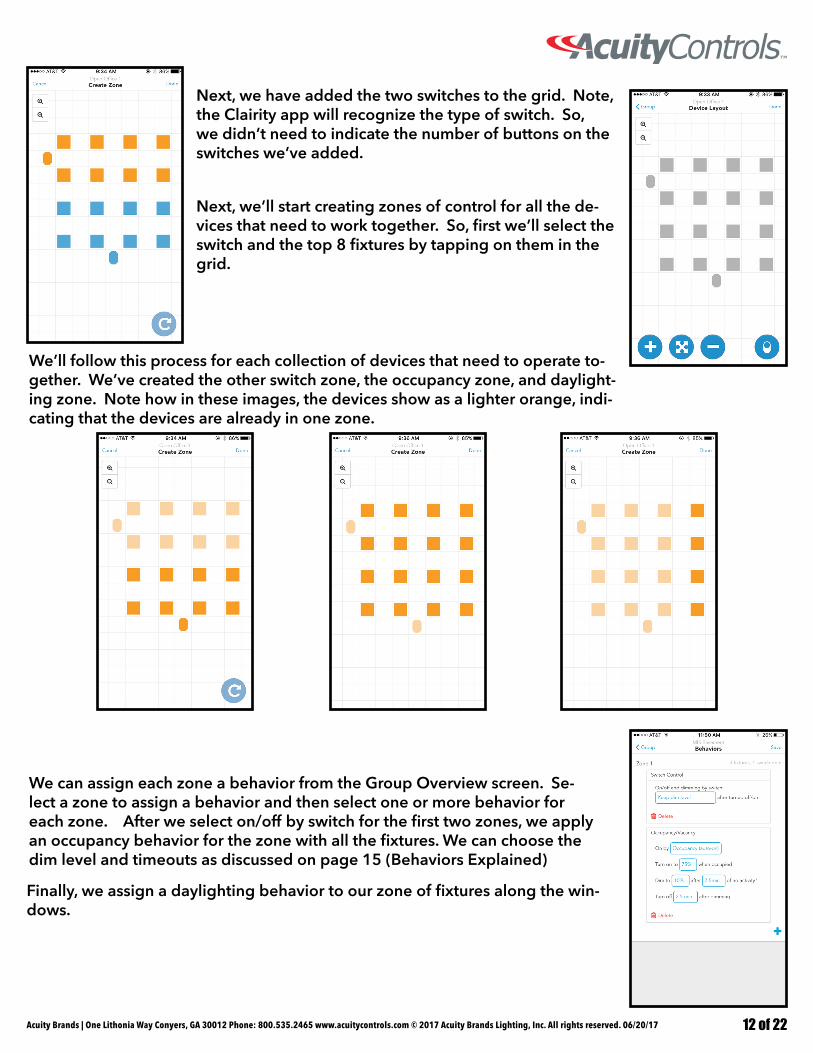
We’ll follow this process for each collection of devices that need to operate to-gether. We’ve created the other switch zone, the occupancy zone, and daylight-ing zone. Note how in these images, the devices show as a lighter orange, indi-cating that the devices are already in one zone.
We can assign each zone a behavior from the Group Overview screen. Se-lect a zone to assign a behavior and then select one or more behavior for each zone. After we select on/off by switch for the first two zones, we apply an occupancy behavior for the zone with all the fixtures. We can choose the dim level and timeouts as discussed on page 15 (Behaviors Explained)
Next, we have added the two switches to the grid. Note, the Clairity app will recognize the type of switch. So, we didn’t need to indicate the number of buttons on the switches we’ve added.
Next, we’ll start creating zones of control for all the de-vices that need to work together. So, first we’ll select the switch and the top 8 fixtures by tapping on them in the grid.
Finally, we assign a daylighting behavior to our zone of fixtures along the win-dows.
Acuity Brands | One Lithonia Way Conyers, GA 30012 Phone: 800.535.2465 www.acuitycontrols.com © 2017 Acuity Brands Lighting, Inc. All rights reserved. 06/20/17 13 of 22
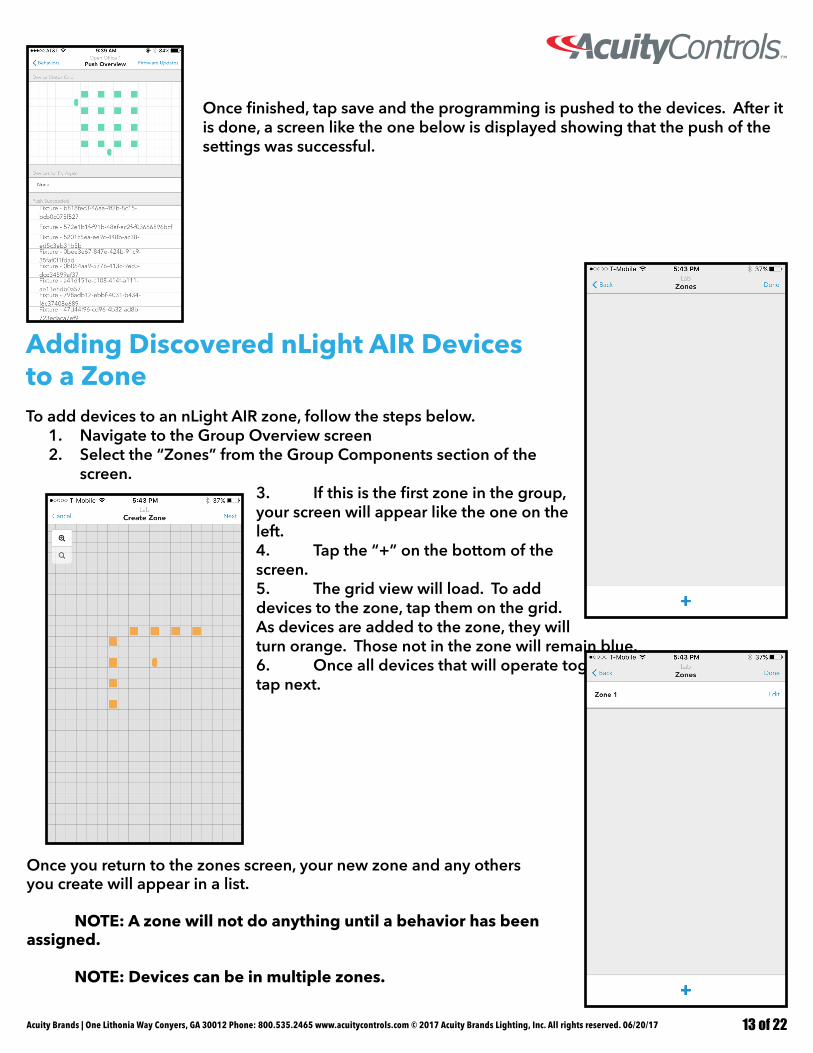
Adding Discovered nLight AIR Devices to a Zone To add devices to an nLight AIR zone, follow the steps below.
1. Navigate to the Group Overview screen2. Select the “Zones” from the Group Components section of the
screen. 3. If this is the first zone in the group, your screen will appear like the one on the left. 4. Tap the “+” on the bottom of the screen. 5. The grid view will load. To add devices to the zone, tap them on the grid. As devices are added to the zone, they will turn orange. Those not in the zone will remain blue. 6. Once all devices that will operate together have been selected, tap next.
Once you return to the zones screen, your new zone and any others you create will appear in a list.
NOTE: A zone will not do anything until a behavior has been assigned. NOTE: Devices can be in multiple zones.
Once finished, tap save and the programming is pushed to the devices. After it is done, a screen like the one below is displayed showing that the push of the settings was successful.
Acuity Brands | One Lithonia Way Conyers, GA 30012 Phone: 800.535.2465 www.acuitycontrols.com © 2017 Acuity Brands Lighting, Inc. All rights reserved. 06/20/17 14 of 22
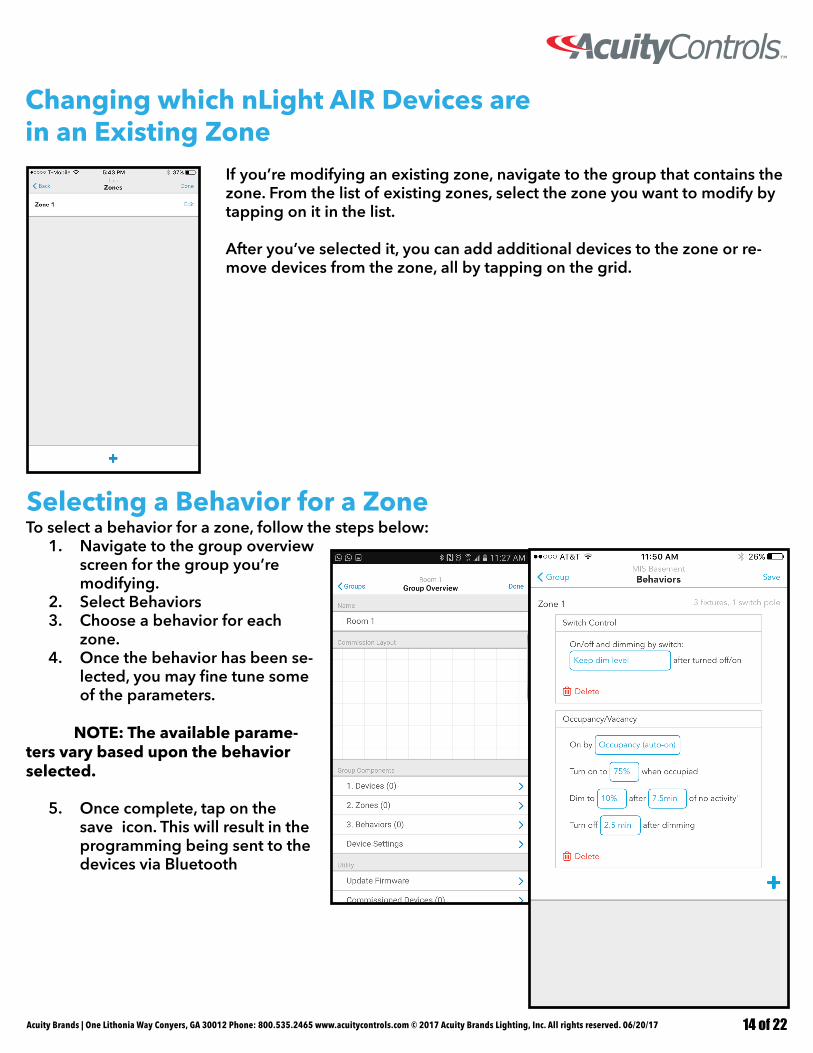
Changing which nLight AIR Devices are in an Existing Zone
If you’re modifying an existing zone, navigate to the group that contains the zone. From the list of existing zones, select the zone you want to modify by tapping on it in the list.
After you’ve selected it, you can add additional devices to the zone or re-move devices from the zone, all by tapping on the grid.
Selecting a Behavior for a ZoneTo select a behavior for a zone, follow the steps below:
1. Navigate to the group overview screen for the group you’re modifying.
2. Select Behaviors3. Choose a behavior for each
zone.4. Once the behavior has been se-
lected, you may fine tune some of the parameters.
NOTE: The available parame-ters vary based upon the behavior selected.
5. Once complete, tap on the save icon. This will result in the programming being sent to the devices via Bluetooth
Acuity Brands | One Lithonia Way Conyers, GA 30012 Phone: 800.535.2465 www.acuitycontrols.com © 2017 Acuity Brands Lighting, Inc. All rights reserved. 06/20/17 15 of 22
Behaviors ExplainedBelow is a summary of all behaviors and how they can be configured. Please note that a zone may have one or more behaviors.
1. On / Off by switch • Can be applied to any zone that has at least one fixture and one switch. • You may select if the light comes on to full bright or if it turns on to the prior dim level when
the on button is pressed.• If combined with daylighting turning the lights on will make the fixtures go to their day
lighting level. If the switch has raise and lower buttons, the user may raise the light level above the daylighting level.
• If combined with occupancy the switch will override the occupancy behavior for 1 minute
2. Occupancy• Can be applied to any zone with at least 1 fixture.• Configurable parameters include
1. On by• Occupancy (Auto on) - lights will turn on when at least 1 sensor in the zone sees
motion. Lights will dim down after “X” minutes of no activity.• Vacancy (On by Switch) - Lights must be turned on via a switch. Lights will dim down
after “X” minutes of no activity.2. Turn on to xx% when occupied3. Dim to % - The level the lights will dim to after “X” minutes of no activity.4. After “X” minutes of no activity - The time delay between the sensors no longer sensing
motion and the lights dimming to the dim to %.5. Turn off time - The time delay between the dim to light level and the lights turning off.
Total time between no motion and the lights turning off is the sum of the turn off time and the dim after time.
• Immediately after sending programming values to the fixtures, the fixtures require a few minutes to synchronize before following the programmed time outs.
3. Daylighting • Can be applied to any zone with at least 1 fixture.• Must be calibrated after programming has been sent to the fixtures. This can be done by
navigating to the group overview screen, selecting device settings, and selecting photosen-sor calibration.

Acuity Brands | One Lithonia Way Conyers, GA 30012 Phone: 800.535.2465 www.acuitycontrols.com © 2017 Acuity Brands Lighting, Inc. All rights reserved. 06/20/17 16 of 22
Calibrating the Daylighting in an Area
To calibrate daylighting, follow the steps below:1. Navigate to the Group. 2. From device settings choose photosensor calibration. 3. Manually adjust the set-point or choose to auto-calibrate the photosensor.
Note: You need to program a daylighting behavior for the daylighting zone

Acuity Brands | One Lithonia Way Conyers, GA 30012 Phone: 800.535.2465 www.acuitycontrols.com © 2017 Acuity Brands Lighting, Inc. All rights reserved. 06/20/17 17 of 22
High End and Low End TrimTrim levels set the allowable dimming range for all the fixtures within a group. These settings do not affect a fixture’s ability to turn off.
High end trim is typically used to reduce the lighting energy consumption or to improve space occu-pant comfort in over-lit areas. The fixture will never go higher than its trimmed value regardless of a control input from a wall switch or photosensor. For example, setting high end trim to 90% will reduce the maximum achievable lumen output by 10% for a group of fixtures.
1. To change the levels, navigate to the group you want to trim in the Clairity mo-bile app.
2. Tap on “Device Settings”. 3. Tap on "Hi/Low end trim"4. Use the sliders to adjust the high and low end trim for the group. 5. Once the desired values have been chosen, tap the save link in the upper right
corner of the screen. Again, the light levels in the area may change during this process.
6. Once complete, tap the group link in the upper left portion of the screen.
Firmware Updates
The Clairity mobile app is able to update the firmware in the nLight AIR devices. This should only be done when instructed by Acuity Tech Support or upon receiv-ing a notification from the mobile app. To do so, ensure you’re physically located in range of the group to be updated. Navigate to the appropriate group in the Clairity mobile app. Near the bottom of the group overview screen, tap “Update Firmware”. The Firmware update screen will show the latest version of firmware available and a summary of the firmware versions of the devices in the group. To update all devices, tap on the “Update All” button.
This process may take 20 - 30 minutes. Please do not leave the area during the firmware update process.
The low end trim setting will change the minimum lumen output for a group of fixtures. Again, this setting does not stop a fixture from turning off when an off command is received.
NOTES:• Depending on the current light level and the high and low end values you wish
to set, the actual light levels may change – this is expected behavior.• You must be in range of the group to make high and low end trim adjustments.
Acuity Brands | One Lithonia Way Conyers, GA 30012 Phone: 800.535.2465 www.acuitycontrols.com © 2017 Acuity Brands Lighting, Inc. All rights reserved. 06/20/17 18 of 22
Site Access
Sharing Sites
For any site you create, you will have access to that site upon subsequent logins. However, you will not be able to see sites you did not create until access is granted to you. Please contact the original site creator to request access or reach out to Acuity.
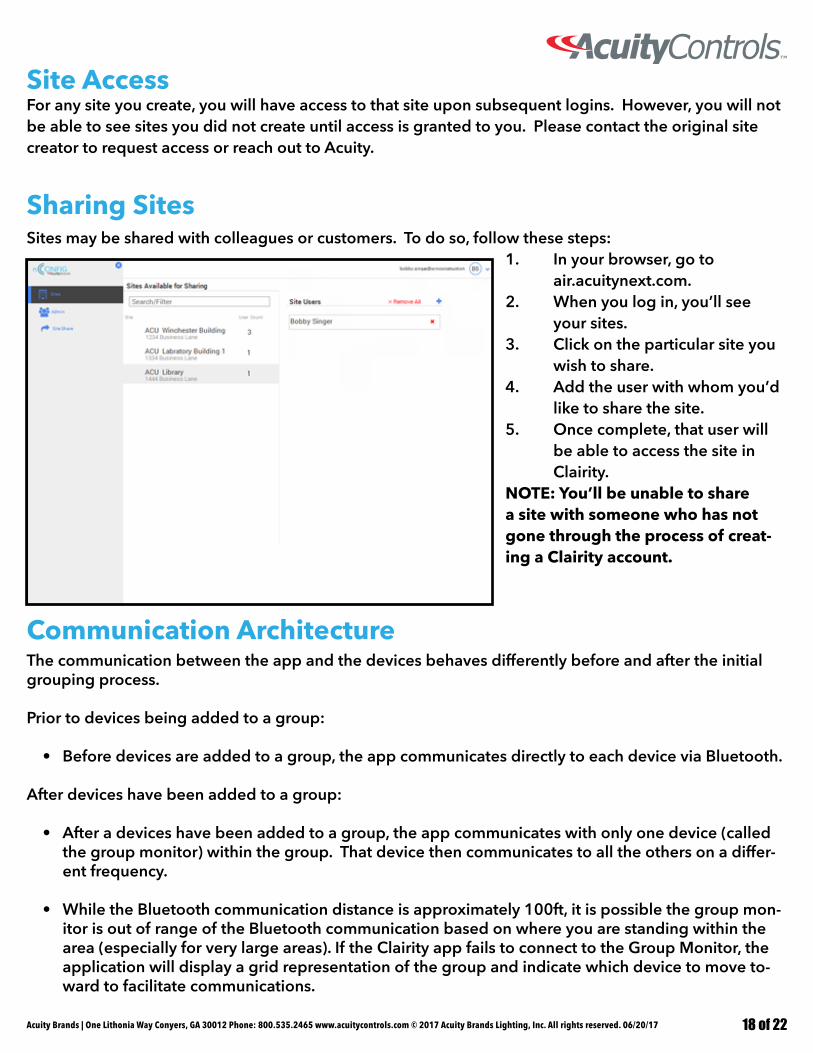
Sites may be shared with colleagues or customers. To do so, follow these steps:1. In your browser, go to air.acuitynext.com.2. When you log in, you’ll see your sites. 3. Click on the particular site you wish to share. 4. Add the user with whom you’d like to share the site. 5. Once complete, that user will be able to access the site in Clairity. NOTE: You’ll be unable to share a site with someone who has not gone through the process of creat-ing a Clairity account.
Communication ArchitectureThe communication between the app and the devices behaves differently before and after the initial grouping process.
Prior to devices being added to a group:
• Before devices are added to a group, the app communicates directly to each device via Bluetooth.
After devices have been added to a group:
• After a devices have been added to a group, the app communicates with only one device (called the group monitor) within the group. That device then communicates to all the others on a differ-ent frequency.
• While the Bluetooth communication distance is approximately 100ft, it is possible the group mon-itor is out of range of the Bluetooth communication based on where you are standing within the area (especially for very large areas). If the Clairity app fails to connect to the Group Monitor, the application will display a grid representation of the group and indicate which device to move to-ward to facilitate communications.
Acuity Brands | One Lithonia Way Conyers, GA 30012 Phone: 800.535.2465 www.acuitycontrols.com © 2017 Acuity Brands Lighting, Inc. All rights reserved. 06/20/17 19 of 22
Who to Call if You Have Questions
Updating Clairity
Reprogramming an Area
Multiple Users on One Site
For support with your nLight AIR controls system and the Clairity mobile app, please contact Acuity Technical Support at 1-800-535-2465
In the event that a new version of Clairity is developed, you’ll receive a notification through the app store that a new version has been made available. We recommend reading through the release notes associated with the new version so you can learn of the new features and capabilities of the new ver-sion prior to downloading it.
More than one service provider may use the Clairity app at one time. This is most common in the case of large sites with relatively short construction cycles. Each user can run through the startup process (create groups, create zones, set behaviors). We have a few recommendations for how to maximize their efficiency.
• Any user who has access to the site can grant access to others.
• We suggest each resource work in a different portion of the building. The distance between re-sources minimizes the likelihood that devices will be flashed in someone else’s area. Resources cannot perform startup activities within the same group.
• In the event that simultaneous users are in a building that has poor cellular coverage, we recom-mend regular communication with your colleagues to ensure each knows who is starting up which portion of the building, as changes they make on their mobile device will not show on your mobile device until those changes can be pushed to the cloud through a cellular or wireless connection.
If changes need to be made to a given area, navigate to the group that corresponds with that area. The same process is followed for button reprogramming, occupancy sensor adjustments, and photosensor recalibration.
• On the Group Overview screen, tap on "Behaviors" • Adjust the behavior accordingly. The behavior screen allows for the adjustment of occupancy pa-
rameters and switch settings.• Tap save and the programming will be pushed to the nLight AIR devices.
Acuity Brands | One Lithonia Way Conyers, GA 30012 Phone: 800.535.2465 www.acuitycontrols.com © 2017 Acuity Brands Lighting, Inc. All rights reserved. 06/20/17 20 of 22
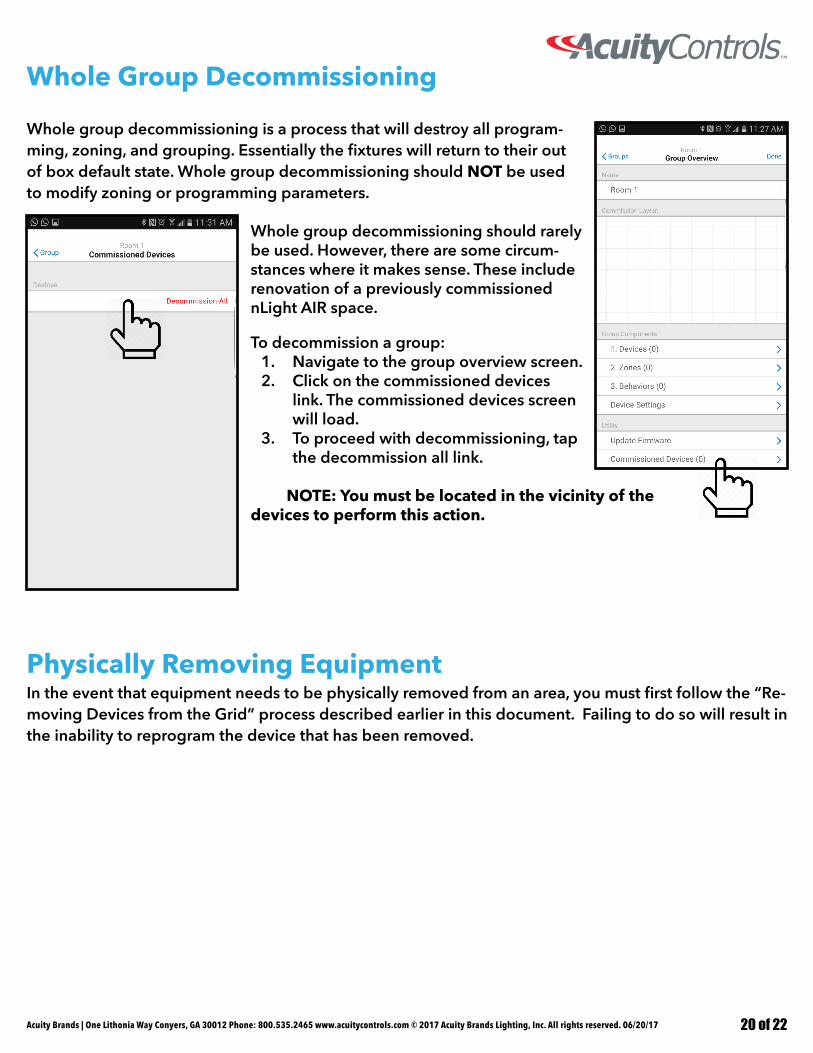
Whole Group Decommissioning
Whole group decommissioning is a process that will destroy all program-ming, zoning, and grouping. Essentially the fixtures will return to their out of box default state. Whole group decommissioning should NOT be used to modify zoning or programming parameters.
Whole group decommissioning should rarely be used. However, there are some circum-stances where it makes sense. These include renovation of a previously commissioned nLight AIR space.
To decommission a group:1. Navigate to the group overview screen.2. Click on the commissioned devices
link. The commissioned devices screen will load.
3. To proceed with decommissioning, tap the decommission all link.
NOTE: You must be located in the vicinity of the devices to perform this action.
Physically Removing EquipmentIn the event that equipment needs to be physically removed from an area, you must first follow the “Re-moving Devices from the Grid” process described earlier in this document. Failing to do so will result in the inability to reprogram the device that has been removed.
Acuity Brands | One Lithonia Way Conyers, GA 30012 Phone: 800.535.2465 www.acuitycontrols.com © 2017 Acuity Brands Lighting, Inc. All rights reserved. 06/20/17 21 of 22
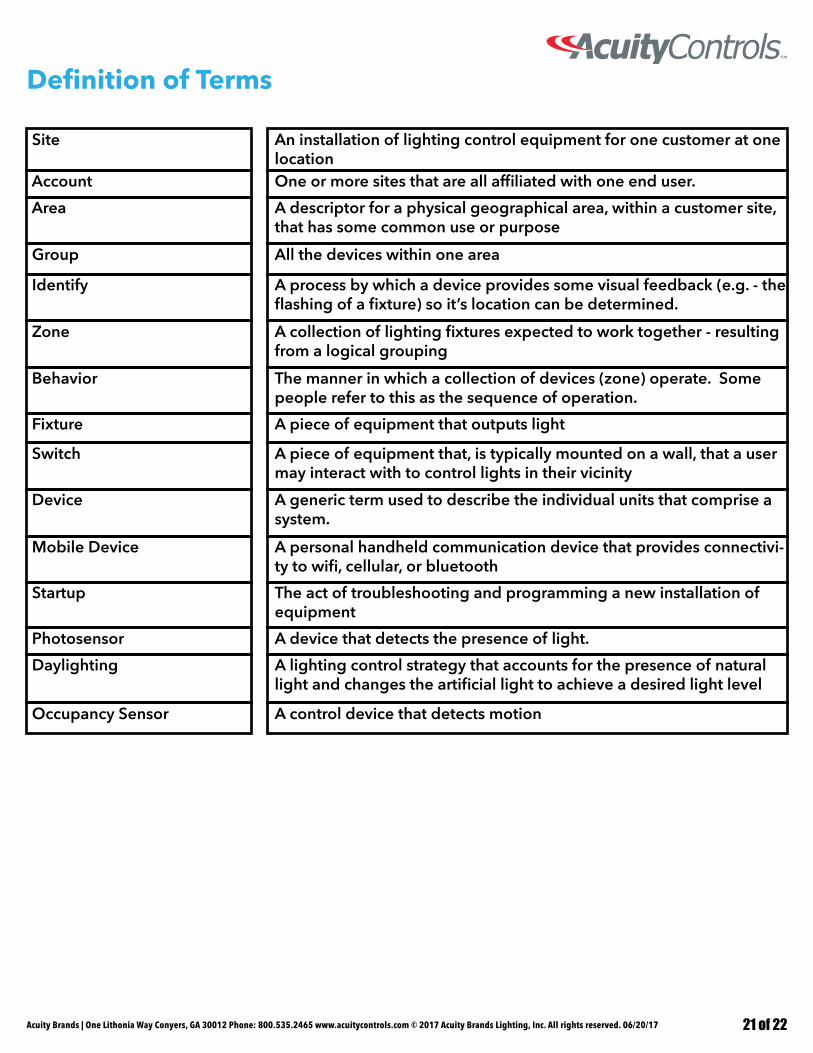
Definition of Terms
Site An installation of lighting control equipment for one customer at one location
Account One or more sites that are all affiliated with one end user.
Area A descriptor for a physical geographical area, within a customer site, that has some common use or purpose
Group All the devices within one area
Switch A piece of equipment that, is typically mounted on a wall, that a user may interact with to control lights in their vicinity
Identify A process by which a device provides some visual feedback (e.g. - the flashing of a fixture) so it’s location can be determined.
Zone A collection of lighting fixtures expected to work together - resulting from a logical grouping
Photosensor A device that detects the presence of light.
Fixture A piece of equipment that outputs light
Behavior The manner in which a collection of devices (zone) operate. Some people refer to this as the sequence of operation.
Startup The act of troubleshooting and programming a new installation of equipment
Mobile Device A personal handheld communication device that provides connectivi-ty to wifi, cellular, or bluetooth
Daylighting A lighting control strategy that accounts for the presence of natural light and changes the artificial light to achieve a desired light level
Occupancy Sensor A control device that detects motion
Device A generic term used to describe the individual units that comprise a system.
Acuity Brands | One Lithonia Way Conyers, GA 30012 Phone: 800.535.2465 www.acuitycontrols.com © 2017 Acuity Brands Lighting, Inc. All rights reserved. 06/20/17 22 of 22
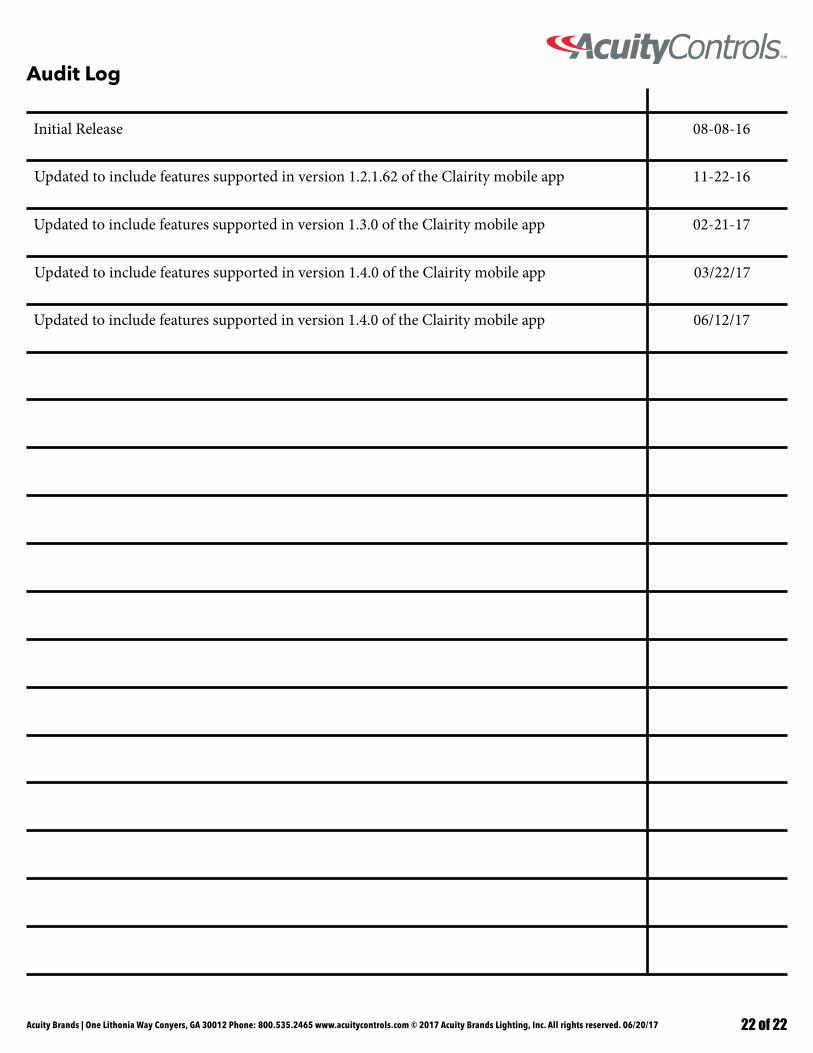
Audit Log
Initial Release 08-08-16
Updated to include features supported in version 1.2.1.62 of the Clairity mobile app 11-22-16
Updated to include features supported in version 1.3.0 of the Clairity mobile app 02-21-17
Updated to include features supported in version 1.4.0 of the Clairity mobile app 03/22/17
Updated to include features supported in version 1.4.0 of the Clairity mobile app 06/12/17