clariion server support products for windows servers ... · pdf fileemc clariion server...
TRANSCRIPT

EMC CLARiiON Server SupportProducts for Windows Servers
Installation GuideP/N 300–002–038, Revision A12
March 3, 2008
This guide describes how to install and remove the EMC® Navisphere®Host Agent, Navisphere Storage System Initialization Utility, NavisphereServer Utility, Navisphere Command Line Interface (CLI), VSS Provider(Windows Server 2003 only), admhost, and admsnap software on aMicrosoft server running the Windows Server 2008, Windows Server 2003,or Windows 2000 operating system.
As of release 6.26, the VSS Provider is no longer supported. For more information,refer to About the VSS Provider (Windows 2003 only), page 6 .
For information on supported operating system versions and serversoftware with a CX3 series or CX series storage system, refer to the E-Lab™Interoperability Navigator on the Powerlink® website. For AX4–5 series orAX150 series storage systems, refer to the Support Matrix link on the Installpage of the storage-system support website. For AX100 series systems,refer to the Supported Configurations in the “Technical descriptions” section,of the storage-system support website.
This document uses the term “CX3 series” to refer to CX3 model 10 systems, CX3model 20 systems, CX3 model 40 systems, and CX3 model 80 systems, and theterm “CX series” to refer to CX200, CX300 series, CX400, CX500 series, CX600, andCX700 storage systems. This document also uses the term “AX4-5 series” to referto AX4-5SC, AX4-5SCi, AX4-5, AX4-5i storage systems, and the term “AX series”to refer to AX150 series and AX100 series storage systems. AX150 series systemsinclude the AX150SC, AX150SCi, AX150, and AX150i. AX100 series systems includethe AX100SC, AX100SCi, AX100, and AX100i.
Topics include:
About EMC Navisphere server software ......................................... 3
1
Software for your storage system.................................................... 8Finding current information ........................................................... 9Installing and removing the Navisphere Storage System InitializationUtility .......................................................................................... 10Running the Navisphere Storage System Initialization Utility ........... 13Determining whether to install the host agent or server utility........... 19Requirements for the host agent, server utility, and CLI ................... 22Installing or removing the Navisphere Host Agent and CLI ............. 23Using the Event Monitor configuration file...................................... 33Running the Navisphere Host Agent .............................................. 34Installing and removing the Navisphere Server Utility ..................... 37Modifying TCP/IP registry settings ................................................ 43Running the Navisphere Server Utility ........................................... 46Installing and removing the Admhost Utility .................................. 48Running the Admhost Utility ......................................................... 51Installing and removing the Admsnap Utility.................................. 54Running the Admsnap Utility ........................................................ 57Installing and removing Navisphere Integrator ............................... 58Using Navisphere Integrator .......................................................... 67Silent installations and removals using the InstallAnywherepackage........................................................................................ 68
2 EMC CLARiiON Server Support Products for Windows Servers Installation Guide
About EMC Navisphere server software
The EMC server-based software listed below is available on the serversupport CD that shipped with your storage system or your upgradekit (for upgrading AX4-5 series or AX series systems to NavisphereManager).
For information on the server software supported with yourCLARiiON® storage system and the minimum FLARE® versionrequired, refer to Software for your storage system, page 8 .
Navisphere Storage System Initialization Utility
Navisphere Host Agent
Navisphere Server Utility
Admhost Utility
Admsnap Utility
Navisphere Command Line Interface (CLI)
Navisphere Integrator
About the Navisphere Storage System Initialization Utility
For Fibre Channel storage systems, use the utility to discover storagesystems and set network parameters (IP address, subnet mask, anddefault gateway). In addition, for iSCSI storage systems with iSCSIdata ports attached to Windows servers, use the utility to set networkparameters for these ports.
For CX series storage systems, an authorized service provider must install andrun the initialization utility.
You can run the initialization utility from the server support CD or youcan install it on a server or other host such as a Navisphere off-array
EMC CLARiiON Server Support Products for Windows Servers Installation Guide 3
management station. The only requirement is that the host be connectedto the same network subnet as the storage-system management ports.
About the Navisphere Host Agent
The host agent registers the server’s host bus adapter (HBA) with theattached storage system when the host agent service starts. This actionsends the initiator records for each HBA to the storage system. Initiatorrecords are used to control access to storage-system data.
The agent can then retrieve information from the storage systemautomatically at startup or when requested by Manager or CLI.
The host agent can also:
Send operating system drive mapping information to the attachedCLARiiON® storage systems.
Monitor storage-system events and notify personnel by email, page,or modem when any designated event occurs.
Retrieve LUN world wide name (WWN) and capacity informationfrom Symmetrix® storage systems.
About the Navisphere Server Utility
The server utility allows you to perform the following functions:
Update server information to the storage system — Lets yousend the server name and IP address to the storage system and,if needed later on, allows you to update or view this data. ForWindows servers running Navisphere Server Utility version 6.20 orlater, if the Registration Service feature remains enabled after theinstallation of the server utility, the utility automatically registersthe server’s NICs or HBAs with the storage system and updatesserver information whenever the configuration changes (forexample, when you mount new volumes or create new partitions).
Configure iSCSI connections or mutual CHAP — For servers withMicrosoft iSCSI initiators you can configure iSCSI connections,such as logging on, logging off, or removing an iSCSI target, andcan configure mutual CHAP. In order to use this option, you mustinstall the latest supported version of the Microsoft iSCSI Initiatorsoftware. This option is only available with Navisphere ServerUtility version 6.20 or later.
4 EMC CLARiiON Server Support Products for Windows Servers Installation Guide

You do not need to install the Microsoft iSCSI initiator software on serversrunning the Windows Server 2008 operating system. The software is partof the operating system.
Verify server high availability (HA) — Lets you determine if theserver is configured for high availability (HA) by verifying thatthe server has at least one connection path to each storage-systemSP, and that PowerPath® or some other failover software, such asDMP or PV Links, is running. The utility does not detect any othernative failover software, such as Sun StorEdge Traffic Manager orLinux native multipath (MPIO).
Use the snapshot feature — On storage systems with NavisphereExpress, you can start and stop a snapshot on the source server(server assigned to the source virtual disk), or you can allow orremove access to the snapshot by the secondary server (serverassigned to the snapshot).
You can run the Navisphere Server Utility from the CD or you caninstall it on the servers that are connected to the storage system. Westrongly recommend that you install the utility on each server that isconnected to the storage system.
On AX4–5 series storage systems with Navisphere Manager, you cannot usethe server utility to manage snapshots. Instead, you must install and use theadmsnap utility.
About the Admhost Utility
The Admhost Utility is an executable program that you can runinteractively or with a script. It runs only on Microsoft WindowsServer 2008, Windows Server 2003, or Windows 2000 operatingsystems, and works with replication software applications (forexample, SAN Copy™, SnapView™ and MirrorView™/A devices),and non-replication software devices.
Use admhost commands to:
Scan for new storage devices
Assign drive letters to the devices
EMC CLARiiON Server Support Products for Windows Servers Installation Guide 5

Make storage devices inaccessible to the server operating system
Flush cache data to disk
List drive letters and worldwide names for all server devices
About the Admsnap Utility
The Admsnap Utility is an executable program that you can runinteractively or with a script to manage SnapView® clones andsnapshots. The Admsnap Utility resides on the servers connected tothe storage system with the SnapView driver installed.
Unless indicated otherwise, all references to a Windows server refer toWindows Server 2008, Window Server 2003 or Windows 2000 servers only.
Use admsnap commands to:
Scan for new storage devices
Assign drive letters to the devices
Make storage devices inaccessible to the server operating system
Flush cache data to disk
List drive letters and worldwide names for all server devices
List current snapshot devices
Map and unmap to a SnapView session
Start and stop a SnapView session
If you upgraded to Navisphere Manager and want to manage snapshots,you must use the SnapView software and the Admsnap Utility. For moreinformation on SnapView and admsnap, refer to the Navisphere Manager helpand the EMC SnapView Command Line Interfaces Reference.
About the VSS Provider (Windows 2003 only)
As of release 6.26, the CLARiiON VSS Provider is no longer supportedwith the Admsnap Utility. The substitute for this technology is theEMC VSS Provider. The EMC VSS Provider requires that you install theCLARAPI application, which is available as part of the EMC Solutions
6 EMC CLARiiON Server Support Products for Windows Servers Installation Guide

Enabler kit. You can download both the EMC VSS Provider and theEMC Solutions Enabler kit from the Powerlink website. For moreinformation, refer to the EMC Admsnap Release Notes, the EMC VSSProvider Release Notes, and the EMC Solutions Enabler Release Notes.
If you are installing a version prior to 6.26, refer to revision A09 or earlier ofthis guide.
About the Navisphere CLI
The CLI complements or is an alternative to Manager. It provides acommand line interface for storage-system management, includingstorage provisioning, status and configuration information retrieval,and control. You can use the CLI to automate management functionsthrough shell scripts and batch files. For more information, refer to theEMC Navisphere Command Line Interface (CLI) Reference Guide.
About the Navisphere Integrator
Navisphere Integrator allows system administrators who usethird-party management software to manage EMC storage systems.Navisphere Integrator communicates between network managementsoftware and Navisphere SP or Host Agents. Integrator connectsthrough a local area network (LAN) to Navisphere Agents onstorage-system storage processors (SPs) or hosts (servers) that arerunning the Windows NT or Windows 2000 operating system or oneof several UNIX operating systems. Navisphere Agents manage thestorage systems they are configured to manage.
Navisphere Integrator is available for the following networkmanagement software products:
CA-Unicenter TNG Framework
HP OpenView management software
Tivoli NetView management software
EMC ControlCenter Open Edition
EMC CLARiiON Server Support Products for Windows Servers Installation Guide 7

Software for your storage system
Table 1 lists the minimum FLARE version that your CLARiiON storagesystem requires and the server software that it supports.
Table 1 Minimum FLARE versions and supported software
Storage system Minimum FLARE version Supported server software
AX4-5 series 02.23.050.5.5xx (NavisphereExpress and NavisphereManager)
AX4-5 series 02.23.050.5.xxx (NavisphereExpress)
AX150 series 02.20.xxx.5.yyy
AX100 series 02.16.xxx.5.yyy
Storage systems with Navisphere Express— Navisphere Storage System Initialization Utility— Navisphere Server Utility— VSS Provider— Navisphere CLIStorage systems with Navisphere Manager— Navisphere Storage System Initialization Utility— Navisphere Host Agent— Navisphere Server Utility— Admsnap Utility— Admhost Utility— VSS Provider— Navisphere Integrator— Navisphere CLI
CX3–10c 03.24.010.5.xxx
CX3 model 20 systems, CX3model 40 systems, and CX3model 80 systems
03.22.xxx.5.yyy
CX700, CX500 series, andCX300 series
02.16.xxx.5.yyy
Storage systems with Navisphere Manager— Navisphere Storage System Initialization Utility— Navisphere Host Agent— Navisphere Server Utility— Admsnap Utility— Admhost Utility— VSS Provider— Navisphere Integrator— Navisphere CLI
8 EMC CLARiiON Server Support Products for Windows Servers Installation Guide

Finding current information
The most up-to-date information about the CLARiiON® serversoftware is posted on the EMC Powerlink® website. We recommendthat you download the latest information before you install any serversoftware.
To access EMC Powerlink, use the following link:
http://Powerlink.EMC.com
After you log in, select Support > Technical Documentation andAdvisories and find the following:
Navisphere Host Agent/CLI and Utilities Release Notes.
EMC SnapView Command Line Interfaces Reference (P/N 069001181).
The latest revision of this guide that is applicable to your softwareversion. For information on FC4700 storage systems, refer torevision A06 of this guide.
EMC Installation Roadmap for CX3 Series, CX Series, AX4-5 Series,AX Series, and FC Series Storage Systems (P/N 069001166), whichprovides a checklist of the tasks that you must complete to installyour storage system in a storage area network (SAN) or directattach configuration.
For the most current management and security content, refer to theEMC Navisphere Manager help.
For Navisphere CLI commands, refer to the latest revision ofthe EMC Navisphere Command Line Interface (CLI) Reference (P/N300–003–628).
EMC CLARiiON Server Support Products for Windows Servers Installation Guide 9
Installing and removing the Navisphere Storage System InitializationUtility
EMC recommends that you install the utility on the server; however,you can run the Navisphere Storage System Initialization Utility fromthe server support CD.
Installation prerequisites
To use the Navisphere Storage System Initialization Utility on aWindows server to initialize a storage system, the server must meetthe following requirements:
Run a supported version of the operating system.
Be connected to the same subnet as the 10/100 management ports ofthe storage system that you want to initialize. This server may alsobe a server with Fibre Channel connections to the storage system.
If you have an earlier version of the storage system initialization utilityinstalled, you must uninstall it before installing an updated version.
Installing the Navisphere Storage System Initialization Utility on a Windows server
EMC recommends that you install the most recent version of theNavisphere Storage System Initialization Utility software that isappropriate for your configuration. You can download the most recentversion from either the software download page on the Powerlink®website (CX3 series, CXseries, AX4-5 series) or on the storage-systemsupport website (AX series). You can also install the software from theserver support CD (any storage system); however, the CD may notcontain the most recent version for your configuration.
1. Log in as the administrator (or someone who has administrativeprivileges) to the Windows server that is on the same subnet asthe storage system.
2. To download the software for CX3 series, CX series, AX4-5 seriesstorage systems, do the following:
a. On the Powerlink website, select Support > SoftwareDownloads and Licensing and navigate to the NavisphereStorage System Initialization Utility download section, whichmay be in either the CLARiiON Navisphere Storage System
10 EMC CLARiiON Server Support Products for Windows Servers Installation Guide
Initialization Utility section or the CLARiiON NavisphereHost Based Agent/CLI WindowsNT/Windows 2000 and 2003section.
b. Select the appropriate Navisphere Storage System InitializationUtility version to download and select the option to save thesoftware to your server.
c. In the directory where you saved the software, double-click theexecutable file to start the installation wizard.
3. To download the software for AX series storage systems, do thefollowing:
a. On the storage-system support website, select the link todownload software.
b. Navigate to the Navisphere Storage System Initialization Utilitydownload section and select the option to save the softwareto your server.
c. In the directory where you saved the software, double-click theexecutable file to start the installation wizard.
4. To install the software from the server support CD (any storagesystem), do the following:
a. In the drive of a Windows server, insert the server support CD,which shipped with the storage system or the upgrade kit (forupgrading AX4-5 series or AX series systems to NavisphereManager).
The server support menu opens. If you do not see the serversupport menu, follow these steps to open it:
From the Windows taskbar, select:Start > Run
In the Run dialog box, enter the following program name,and then click OK:
For CX3 series or CX seriesdrive:\CXSeries.exe
For AX4-5 series or AX seriesdrive:\AXSeries.exe
where drive is the letter for the CD drive.
EMC CLARiiON Server Support Products for Windows Servers Installation Guide 11

b. Select your language, if prompted for it.
c. From the main menu, click Install Products on Server.
d. From the Install Products menu, click Navisphere StorageSystem Initialization Utility to open the installation wizard.
5. Follow the instructions on the installation screens to install theinitialization utility.
A user interface (UI) and a text-based version of the utility areinstalled.
6. When the installation is complete, click Done to exit the wizard.
7. If you installed the initialization utility from the CD, close the serversupport menu by selecting Main Menu and then Exit. You can nowremove the CD from the server’s CD drive.
Removing the Navisphere Storage System Initialization Utility on a Windows server
1. On the Windows server running the Storage System InitializationUtility that you want to remove, log in as the administrator or theequivalent.
2. Select Start > Settings > Control Panel.
3. On the Control Panel pane, double-click Add/Remove Programs.The Add/Remove Programs dialog box opens.
4. Select Navisphere Storage System Initialization Utility and clickChange/Remove.
5. If asked to confirm the removal, click OK. You have removed theapplication.
12 EMC CLARiiON Server Support Products for Windows Servers Installation Guide

Running the Navisphere Storage System Initialization Utility
You can run the storage system initialization utility from the server onwhich it is installed or from the server support CD. Before continuingmake sure that the storage system is powered up completely.
Starting and using the storage system initialization utility on a Windows server
This section describes the various methods for starting and using thestorage system initialization utility.
Starting the initialization utility from a host
To start the UI version of the initialization utility from the server, selectStart > Programs > EMC > Navisphere > Navisphere Storage SystemInitialization.
A text-based version and a command line version of the utility areinstalled automatically when you install the UI version of the utility. Tostart the text-based version, at a command prompt enter cd C:\ProgramFiles\EMC\Navisphere Storage System Initialization Wizard; then enterNaviInitToolCLI.exe.
To start the command line version, at a command prompt enter cd C:\ProgramFiles\EMC\Navisphere Storage System Initialization Wizard; then enter./naviinittoolcli and any of the command line switches in Using the commandline initialization utility, page 17.
Starting the initialization utility from CD
1. Log in to the Windows server as the administrator or someone whohas administrative privileges.
2. In the server’s drive, insert the server support CD, which shippedwith the storage system or the upgrade kit (for upgrading AX4-5series or AX series systems to Navisphere Manager). The serversupport menu opens. If you do not see the server support menu,follow these steps to open it:
From the Windows taskbar, select:Start > Run
EMC CLARiiON Server Support Products for Windows Servers Installation Guide 13
In the Run dialog box, enter the following program name, andthen click OK:
For CX3 series or CX seriesdrive:\CXSeries.exe
For AX4-5 series or AX seriesdrive:\AXSeries.exe
where drive is the letter for the CD drive.
3. From the main menu select Run Products from CD. The RUNPRODUCTS page opens.
4. Select Navisphere Storage System Initialization Utility.
Using the UI version of the initialization utility
1. Read the license agreement and click I accept and Next.
The utility automatically scans the subnet for supported storagesystems. When this storage-system discovery operation is complete,the utility lists, by hardware serial number, all uninitialized andinitialized storage systems it found. The storage-system serialnumber is on a blue label located on the SPE chassis behind thefront bezel.The hardware serial number is on a blue label on therear of the chassis.
If the discovery operation did not find the storage system youare installing, verify that the storage system’s management portsare properly cabled to the LAN on which the server resides. Themanagement ports and the server must both reside on the samesubnet.
2. From the Uninitialized Systems list, select the storage system andclick Next.
3. Using the information in the “Storage-System Management Ports”worksheet from the storage-system configuration planning guide,planning worksheets document, or the administration worksheet,follow the instructions on the screen to change the storage system’sname, if desired, and to set the following network parameters forthe storage-system 10/100 management ports:
14 EMC CLARiiON Server Support Products for Windows Servers Installation Guide

Parameter Description
Storage Processor A - IPADDRESS
Storage Processor B - IPADDRESS
IP address for SP A and SP B management ports.For a CX3 series storage system, this IP addresscannot be 128.221.1.250, 128.221.1.251,192.168.1.1,or 192.168.1.2. For an AX4-5 series or AX seriesstorage system, this IP address cannot be 192.168.1.1or 192.168.1.2.
Subnet Mask Subnet mask associated with the LAN to which thestorage-system management port is connected.
Default Gateway Default gateway address for the LAN to which thestorage-system management port is connected.
4. Enter the name you want for the storage system; it cannot exceed32 characters.
5. For each iSCSI data port on each SP that you will use, set thefollowing port parameters, where X is the storage-system SP (A orB) and Y is the SP’s data port number (0 or 1):
Parameter Description
SP X Port Y IP ADDRESS IP address for the iSCSI data port. For a CX3series storage system, this IP address cannot be128.221.1.250 or 28.221.1.251. For an AX4-5 seriesor AX series storage system, this IP address cannotbe 192.168.1.1 or 192.168.1.2.
SP X Port Y Subnet Mask Subnet mask associated with the LAN to which theiSCSI data port will connect.
SP X Port Y Direct Attach Gateway address of 0.0.0.0 that you cannot change.Set this parameter only if the iSCSI data port willconnect directly to the server and not through a LAN.
SP X Port Y Gateway Default gateway address for the LAN to which theiSCSI data port will connect.
6. Using the information in the completed “Storage-SystemManagement Ports” worksheet from the storage-systemconfiguration planning guide, planning worksheets document, orthe administration worksheet, follow the instructions on the screento change the storage system’s name, if desired, and to set thefollowing management user account settings for the storage system:
EMC CLARiiON Server Support Products for Windows Servers Installation Guide 15

Account setting Description
User name Username for the management port. A valid username muststart with a letter, can contain only letters and numbers, cannotexceed 32 characters, and is case–sensitive. For example,blindmice3 is a valid username and is a different usernamefrom BLINDMICE3.
Password Password for the management port. A valid password cancontain only letters and numbers, cannot exceed 32 characters,and is case–sensitive. For example, mousetrap2 is a validpassword and is a different password from MOUSETRAP2.
Confirm Password Previously entered password for password verification.
7. Click Next to view the summary of the network settings andmanagement user account settings for the storage system.
8. In the message box about the storage system having been initialized,click OK.
9. If the settings are correct, click Finish.
10. If you need to initialize more storage systems, select the checkboxand click Finish.
The checkbox is not displayed if there are no more storage systems toinitialize.
11. To activate support for your AX4-5 series storage system, selectActivate support now and click OK.
For a CX3 series storage systemIf you entered an SP IP address for the first time or changed an SP IPaddress, the utility reboots the storage system, and the SP fault light onthe back of each SP starts blinking. The reboot takes several minutesto complete. When it has completed, the SP fault light (LEDs) on eachSP stops blinking and remains off.
For an AX4-5 series storage systemIf you entered an SP IP address for the first time or changed an SPIP address, the utility reboots the storage system, and green activitylights flash. The reboot takes 5 to 6 minutes to complete. When it hascompleted, the power button on each SP remains solid/steady green.
16 EMC CLARiiON Server Support Products for Windows Servers Installation Guide
For an AX series storage systemIf you entered an SP IP address for the first time or changed an SP IPaddress, the utility reboots the storage system and the SP boot/faultlight on the back of each SP starts blinking. The reboot takes severalminutes to complete. When it has completed, the SP boot/fault light oneach SP stops blinking and remains off.
Using the command line initialization utility
To use the command line version of the initialization utility, use any ofthe switches below with the naviinittoolcli command.
To start the command line version of the initialization utility, at a commandprompt enter cd C:\Program Files\EMC\Navisphere Storage SystemInitialization Wizard; then enter ./naviinittoolcli.
eula [-language language]
discover [-all] [-xml]
configure –serial serialnumber [-file filename] [–ipaspAIpaddress|–sphosta spAhostname] [-ipb spBIpaddress|–sphostb spBhostname] [–mask subnetmask] [–gateway gatewayaddress][-user username] [–password password] [–storagename storageName][-help]
where:
eula
Displays the EMC end-user license agreement (EULA) in the specified language.
-language language The default language is English. Currently, the only validlanguage is English.
discover
Discovers and displays a list of partially initialized storage systems.
-all Discovers and displays a list of initialized and partiallyinitialized storage systems.
-xml Specifies that the output is in xml format.
configure
Specifies the network parameters for the specified storage system.
EMC CLARiiON Server Support Products for Windows Servers Installation Guide 17
-serial serialnumber Specifies the serial number of the storage system you wantto initialize.
-file filename Specifies the name of the file that will store all the networkparameters.
-ipa spAipaddress|-sphostaspAhostname
Specifies the IP address of SP A, or the server name for SPA for the specified storage system.
-ipb spBipaddress|-sphostbspBhostname
Specifies the IP address of SP B, or the server name for SPB for the specified storage system.
-mask subnetmask Specifies the subnet mask for the specified storage system.
gateway gateway Specifies the gateway for the specified storage system.
-user username Specifies the storage-system login username.
-password password Specifies the storage-system login password.
storagenamestoragename
Specifies the name for the specified storage system.
-help Displays the help screen and does not start the initializationprocess.
18 EMC CLARiiON Server Support Products for Windows Servers Installation Guide
Determining whether to install the host agent or server utility
Depending on your application needs, you can install the host agent,server utility, or both on an attached server.
If you want to install both applications, you must install version 6.22.20or later of the server utility either before or after you install the hostagent. The registration feature of the server utility will be disabledand the host agent will be used to register the server’s NICs or iSCSIHBAs to the storage system.
Prior to version 6.22.20 of the server utility, you could not install the host agentand server utility on the same server. However, you could install them ondifferent servers that are connected to the same storage system.
If you do not want to install both applications, but want to use someof the features available in the server utility, you can run the serverutility from the server support CD.
If you have an AX4-5 series or AX series storage system runningNavisphere Express, you must install the server utility. The host agentis supported only on CX3 series, CX series, AX4-5 series, and AX seriesstorage systems running Navisphere Manager.
Table 2 describes the differences between the host agent and the serverutility on a server attached to a storage system.
Depending on the version of the server utility, some of the features listed inTable 2 may not be available.
EMC CLARiiON Server Support Products for Windows Servers Installation Guide 19

Table 2 Differences between the host agent and the server utility
Function Host agent Server utility
Pushes LUN mappingand OS information to thestorage system.
Yes – LUN mapping information isdisplayed in the Manager UI next tothe LUN icon or with the CLI usingthe -lunmapinfo command.
AX4–5 series and AX series storage systemsYes – LUN mapping information is displayed in theManager UI next to the LUN icon, or with the CLI usingthe -lunmapinfo command. In Navisphere Express thisinformation is displayed in the Manage Virtual Disks page.Note: The text Manually Registered appears next to thehostname icon in the Manager UI indicating that the host agent wasnot used to register this server.CX3 series and CX series storage systemsNo – LUN mapping information is not sent to the storage system. Onlythe server’s name, ID, and IP address are sent to the storage system.Note: The text Manually Registered appears next to thehostname icon in the Manager UI indicating that the host agent wasnot used to register this server.
Runs automatically tosend information to thestorage system.
Yes – No user interaction isrequired.
AX4–5 series and AX series storage systemsYes – You can control whether server information isautomatically sent to the storage system by enabling or disabling theregistration service feature (see note at the end of the table). Thisfeature is automatically enabled during the installation of the serverutility, but you can stop the service at any time through the servicesoption in the Microsoft user interface.CX3 series and CX series storage systemsYes – You can control whether server information is auto-matically sent to the storage system by enabling or disabling theregistration service feature (see note at the end of the table). Thisfeature is automatically enabled during the installation of the serverutility, but you can stop the service at anytime through the servicesoption in the Microsoft user interface. Note that only the server’sname, ID, and IP address are sent to the storage system; LUNmapping information is not sent.
Provides high-availability(HA) validation.
No – You can run the server utility’sHA validation feature from the CDwithout having to install the serverutility.
AX4–5 series and AX series storage systemsCurrently not supported.CX3 series and CX series storage systemsYes – The HA validation feature verifies that failover soft-ware is installed on the server and that working paths exist betweenthe server and each SP in the storage system.
20 EMC CLARiiON Server Support Products for Windows Servers Installation Guide

Function Host agent Server utility
Requires networkconnectivity to the storagesystem.
Yes – Network connectivity allowsLUN mapping information to beavailable to the storage system.
AX4–5 series and AX series storage systemsNo – LUN mapping information is sent through a data pathto the storage system.CX3 series and CX series storage systemsNo – LUN mapping information is not sent to the storagesystem. Note that if you are using the server utility to upload a highavailability report to the storage system, you must have networkconnectivity.
Requires installation. Yes – You must install the hostagent on the server.
AX4–5 series and AX series storage systemsNo – You can run the server utility from the CD. However,we recommend that you install it on the server. You must install theutility to use the registration service feature (described above).CX3 series and CX series storage systemsNo – You can run the server utility from the CD. However,we recommend that you install it on the server. You must install theserver utility to use the registration service feature.
Note: If you install the host agent and then version 6.22.20 or later of the server utility, the server utility’s registration service feature willnot be installed. Prior to version 6.22.20 of the server utility, you could not install the host agent and server utility on the same server.
EMC CLARiiON Server Support Products for Windows Servers Installation Guide 21

Requirements for the host agent, server utility, and CLI
To run the host agent, CLI, or server utility, your server must meetthe following requirements:
Run a supported version of the Windows Server 2008, WindowsServer 2003 or Windows 2000 operating system.
For Fibre Channel connections, have the EMC CLARiiONsupported HBA hardware and driver installed.
Be connected to at least one SP (two SPs for high-availability) ineach storage system either directly or through a switch or hub. EachSP must have an IP connection.
For the host agent and CLI only - Be on a TCP/IP network connectedto at least one SP (two SPs for high-availability) in the storagesystem. The TCP/IP network connection allows the server to sendLUN mapping information to the storage system and it allowsNavisphere Manager or CLI to communicate with the storagesystem over the network.
Have a configured TCP/IP network connection to any remote hoststhat you will use to manage the server’s storage systems, including:
any server whose browser you will use to access Manager 6.X.
any Windows Server 2008, 2003, or Windows 2000 serverrunning Storage Management Server software.
any AIX, HP-UX, Linux, VMware ESX Server, NetWare, Solaris,Windows Server 2003, or Windows 2000 server running the CLI.
If you want to use the CLI on the server to manage storage systems ona remote server, the server must be on a TCP/IP network connectedto both the remote server and each SP in the remote server’s storagesystem. The remote server can be running AIX, HP-UX, Linux, Solaris,or the Windows operating system.
For information about the specific revisions of the server operating systemand the storage-system FLARE and Access Logix software that are requiredfor your version of the host agent, see the release notes for the host agenton the EMC Powerlink website. To access this website, see Finding currentinformation, page 9 .
22 EMC CLARiiON Server Support Products for Windows Servers Installation Guide
Installing or removing the Navisphere Host Agent and CLI
To modify an existing host agent configuration refer to the next section.
If you want to install the host agent and use some of the features in the serverutility, see Determining whether to install the host agent or server utility, page 19.
Installing the Navisphere Host Agent on a Windows server
EMC recommends that you install the most recent version ofthe Navisphere Host Agent software that is appropriate for yourconfiguration. You can download the most recent version from eitherthe software download page on the Powerlink website (CX3 series, CXseries, AX4-5 series) or on the storage-system support website (AXseries). You can also install the software from the server support CD(any storage system); however, the CD may not contain the most recentversion for your configuration.
1. Log in to the Windows server as the administrator or a user whohas administrative privileges.
2. If you are running a version prior to 6.26 of the host agent, youmust remove it before continuing with the installation.
3. To download the software for CX3 series, CX series, and AX4-5series storage systems, do the following:
a. On the Powerlink website, select Support > SoftwareDownloads and Licensing and navigate to the CLARiiONNavisphere Host Agent/ CLI download section for Windows.
b. Select the appropriate Navisphere Host Agent version todownload and select the option to save the software to yourserver.
c. In the directory where you saved the software, double-click theexecutable file to start the installation wizard.
4. To download the software for AX series storage systems withNavisphere Manager, do the following:
a. On the storage-system support website, select the link todownload software.
EMC CLARiiON Server Support Products for Windows Servers Installation Guide 23
b. Navigate to the Navisphere Host Agent/CLI download andselect the option to save the software to your server.
c. In the directory where you saved the software, double-click theexecutable file to start the installation wizard.
5. To install the software from the server support CD (any storagesystem), do the following:
a. In the server’s drive, insert the server support CD, whichshipped with the storage system or the upgrade kit (forupgrading AX4-5 series or AX series systems to NavisphereManager).
The server support menu opens. If you do not see the serversupport menu:
From the Windows taskbar, select Start > Run.
In the Run dialog box, enter the following program name,and then click OK:
For CX3 series or CX seriesdrive:\CXSeries.exe
For AX4-5 series or AX seriesdrive:\AXSeries.exe
where drive is the letter for the CD drive.
b. From the main menu select Install Products on Server.
The INSTALL PRODUCTS page opens.
c. Select Navisphere Host Agent.
6. Follow the instructions on the installation screens to install theNavisphere Host Agent.
The Navisphere Host Agent software is installed on the Windowsserver. If you selected the default destination folder, the softwareis installed in the drive:\Program Files\EMC\Navisphere Agentdirectory on Windows Server 2003 (32-bit) or Windows 2000systems or the drive:\Program Files (x86)\EMC\Navisphere Agentdirectory on Windows Servers 2008 and 2003 (64-bit) systems.
24 EMC CLARiiON Server Support Products for Windows Servers Installation Guide

Once the Navisphere Host Agent installation is complete, theInitialize Privileged User List dialog box is displayed.
7. In the Initialize Privileged User List dialog box, perform one ofthe following:
If the Config File field contains a file entry, then a hostagent configuration file already exists on the server from aprevious agent installation. Select Use Existing File to use thisconfiguration file or select Browse to use a different file. Thehost agent configuration file contains a list of login names forthis server. Only users logged in as listed in the Privileged UserList can send CLI commands to the storage system.
If the Config File field does not contain a file entry, a hostagent configuration file does not exist on the server. SelectCreate/Overwrite File and browse to the agent.config file. Youwill then need to add users to the Privileged User List (loginnames for this server). Only users logged in as listed in thePrivileged User List can send CLI commands to the storagesystem.
There must be at least one entry in the Privileged User List or an errormessage will appear.
To add a user to the list
Click Add to open the Add Privileged User dialog box.
In the Add Privileged User dialog box, under User Name, enterthe person’s account username, for example, Administrator.
Under System Name, enter the name of the host runningNavisphere Manager (for example, Host4) and click OK.
To remove a privileged user from the listSelect the privileged username, and click Remove.
8. Click OK to save the new privileged user list and/or the newconfiguration file.
The program saves the host agent configuration file with the newprivileged user entries and starts the host agent.
9. In the Navisphere Agent Setup dialog box, click Finish.
EMC CLARiiON Server Support Products for Windows Servers Installation Guide 25
A command line window opens indicating that the host agentservice is starting.
10. If you are prompted to reboot the server, click Yes.
If you do not reboot before you run the Microsoft iSCSI SoftwareInitiator, the NIC initiators cannot log in to the storage system.
11. If you updated the host agent and were using event monitor,restore the event monitor configuration from a previously copiedNavimon.cfg file:
a. Stop the agent:
At the Windows server, log in as the administrator or theequivalent.
From the desktop, right-click My Computer and selectManage > Services and Applications > Services.
The Services pane opens.
In the Services pane, right-click Navisphere Agent andselect Stop.
If asked to confirm your request to stop the agent service,click Yes, and close the Services pane or dialog box.
b. Move or copy the saved Navimon.cfg to the real Navimon.cfgfile.
c. Start the agent:
At the Windows server, log in as the administrator or theequivalent.
From the desktop, right-click My Computer and select:Manage > Services and Applications > Services.
The Services pane opens.
In the Services pane, right-click Navisphere Agent andselect Start.
If you want the host agent to start automatically at systemstartup:
Right-click Navisphere Agent and select Properties.
The Navisphere Agent Properties dialog box opens.
Select the General tab.
In Startup Type, select Automatic.
26 EMC CLARiiON Server Support Products for Windows Servers Installation Guide
The host agent will now start automatically at systemstartup.
Close Computer Management.
It may take a few minutes for the host agent to start if eitherapplications are using the storage system or the SP event logis large and the host agent configuration file is not set up.
12. Click Done to exit the installation wizard.
13. If you have a multihomed host (multiple NIC cards installed onthe host), create an agentID.txt file to ensure that the agent findsthe correct NIC card.
A multihomed host machine has multiple IP addresses connected tonetworks; it is physically connected to multiple data links that can be on thesame or different networks. When you install Navisphere Host Agent on amultihomed host, the host agent, by default, binds to the first NIC in thehost. If your host is multihomed, for the host agent to successfully registerwith the desired CLARiiON storage system, you need to configure the hostagent to bind to a specific NIC. You do this by setting up an agentID.txt file.
a. Using a text editor that does not add special formatting, createa file named agentID.txt (case sensitive) in the directoryC:/ProgramFiles/EMC/Navisphere Agent.
b. Add the following two separate lines to the agentID.txt file,with no special formatting:
First line: Fullyqualified hostname of the host
Second line: IP address of the HBA/NIC port that you
want Navisphere agent to use
For example, if your host is named host28 on the domainmydomain.com and your host contains two HBAs/NICs,HBA1/NIC1 with IP address 192.111.222.2 and HBA2/NIC2with IP address 192.111.222.3, and you want the host agent touse NIC 2, you would configure agentID.txt as follows:
host28.mydomain.com192.111.222.3
EMC CLARiiON Server Support Products for Windows Servers Installation Guide 27

The agentID.txt file should contain only these two lines, without anyformatting. The first line should contain the hostname and the secondline should contain the IP address of the HBA/NIC port as describedabove. Both lines should end with a carriage return. As a result, thecursor will be on a third line but this line should not contain any text.
c. Save the agentID.txt file.
d. If a HostIdFile.txt file is present in the C:/Program-Files/EMC/Navisphere Agent directory, delete or rename it.
e. Restart the host agent.
f. Once the host agent has restarted, verify that the host agent isusing the correct IP address that is entered in the agentID.txtfile by doing one of the following:
In Navisphere Manager, verify that the host IP address is thesame as the IP address that you entered in the agentID.txtfile. If the address is the same, the agentID.txt file isconfigured correctly.
View the new HostIdFile.txt file. You should see the IPaddress that is entered in the agentID.txt file.
14. If you installed the host agent from the CD, close the server supportmenu by selecting Main Menu and then Exit. You can now removethe CD from the server’s CD drive.
15. Verify that Navisphere Agent is installed using the Add/RemovePrograms dialog box.
Installing Navisphere CLI on a Windows server
EMC recommends that you install the most recent version of theNavisphere CLI software that is appropriate for your configuration.You can download the most recent version from either the softwaredownload page on the Powerlink website (CX3 series, CX series, AX4-5series) or on the storage-system support website (AX series). You canalso install the software from the server support CD (any storagesystem); however, the CD may not contain the most recent version foryour configuration.
1. Log in to the Windows server as the administrator or someone whohas administrative privileges.
28 EMC CLARiiON Server Support Products for Windows Servers Installation Guide

2. If an earlier version of the CLI is already installed, you must removeit before continuing with the installation. The installation programdoes not let you overwrite an existing version.
3. To download the software for CX3 series, CX series, or AX4-5 seriesstorage systems, do the following:
a. On the Powerlink website, select Support > SoftwareDownloads and Licensing and navigate to the CLARiiONNavisphere Host Agent/ CLI download section for Windows.
b. Select the appropriate Navisphere Host Agent/CLI version todownload and select the option to save the software to yourserver.
c. In the directory where you saved the software, double-click theexecutable file to start the installation wizard.
4. To download the software for AX series storage systems withNavisphere Manager, or for AX4-5 series storage systems withNavisphere Express, do the following:
a. On the storage-system support website, select the link todownload software.
b. Navigate to the Navisphere CLI download and select the optionto save the software to your server.
c. In the directory where you saved the software, double-click theexecutable file to start the installation wizard.
5. To install the software from the server support CD (any storagesystem), do the following:
a. In the server’s drive, insert the server support CD that shippedwith your storage system or your upgrade kit (for upgradingAX4-5 series or AX series systems to Navisphere Manager).
The server support menu opens. If you do not see the serversupport menu:
From the Windows taskbar, select Start > Run.
In the Run dialog box, enter the following program name,and then click OK:
For CX3 series or CX seriesdrive:\CXSeries.exe
For AX4-5 series or AX seriesdrive:\AXSeries.exe
EMC CLARiiON Server Support Products for Windows Servers Installation Guide 29

where drive is the letter for the CD drive.
b. From the main menu select Install Products on Server. TheINSTALL PRODUCTS page opens.
c. Select Navisphere CLI.
If you did not remove a previously installed version of the CLI, amessage appears indicating that the software discovered a previousversion and cannot continue with the installation until it is removed.
6. Follow the instructions on the installation screens to install theNavisphere CLI.
7. When the installation is complete, click Done to exit the wizard.
You have installed the Navisphere CLI software on a Windowsserver. If you selected the default destination folder, the software isinstalled in one of the following locations:
On Windows Server 2003 (32-bit) or Windows 2000 systems
drive:\Program Files\EMC\Navisphere CLI
On Windows Server 2008 and 2003 (64-bit) systems
drive:\Program Files (x86)\EMC\Navisphere CLI
8. If you installed the Navisphere CLI from the CD, close the serversupport menu by selecting Main Menu and then Exit. You can nowremove the CD from the server’s CD drive.
9. Verify that Navisphere CLI is installed using the Add/RemovePrograms dialog box.
Removing the host agent on a Windows server
To avoid losing site-specific information, copy the host agent configuration file(agent.config) and the event monitor configuration file (Navimon.cfg) to a safelocation or rename it before removing any Navisphere software.
1. On the Windows server running the host agent that you want toremove, log in as the administrator or the equivalent.
30 EMC CLARiiON Server Support Products for Windows Servers Installation Guide
2. Stop the host agent service as follows:
a. From the desktop, right-click My Computer and select:
Manage > Services and Applications > Services
The Services pane opens.
b. Stop the host agent:
In the Services pane, right-click Navisphere Agent andselect Stop.
If asked to confirm your request to stop the agent service,click Yes.
c. Close the Services pane.
3. Select Start > Settings > Control Panel.
4. On the Control Panel pane, double-click Add/Remove Programs.The Add/Remove Programs pane opens.
5. Select Navisphere Agent and click Change/Remove, and if asked toconfirm the removal, click OK. The install wizard dialog box opens.
6. When asked to remove the entire Navisphere Agent directory,click Yes or No. If you select Yes, the software removes the entireNavisphere agent directory, which includes the agent.configand Navimon.cfg files. This file contains all site-specific agentconfigurations from the server. If you click Yes, a confirmationdialog opens asking if you want to proceed.
7. Click Yes, to proceed and remove the entire Navisphere agentdirectory or click No, to cancel the removal of this directory.
Removing Navisphere CLI Windows server
1. On the Windows server that is running the CLI that you want toremove, log in as the administrator or the equivalent.
2. Select Start > Settings > Control Panel.
3. On the Control Panel pane, double-click Add/Remove Programs.The Add/Remove Programs pane opens.
4. Select Navisphere CLI and click Change/Remove, and if asked toconfirm the removal, click OK. The install wizard dialog box opens.
EMC CLARiiON Server Support Products for Windows Servers Installation Guide 31
5. Click Finish. You have removed the application.
32 EMC CLARiiON Server Support Products for Windows Servers Installation Guide
Using the Event Monitor configuration file
The Navisphere Host Agent can monitor storage-system events andtake such action as sending email or paging you if specified eventsoccur. The Event Monitor that ships with Navisphere Managerprovides an interactive way to define these events and actions. If youdo not have Event Monitor, you can still define such events and actionsby editing the Event Monitor configuration file.
On Windows Server 2003 (32-bit) or Windows 2000 systems
drive:\Program Files\EMC\Navisphere Agent\Navimon.cfg
On Windows Server 2008 and 2003 systems (64-bit)
drive:\Program Files (x86)\EMC\Navisphere Agent\Navimon.cfg
The file is self-documenting; that is, text in it describes how to defineevents and the actions you want taken if the events occur. You cantest the file after editing it using the Navisphere CLI commandresponsetest, as explained in the Navisphere Command Line InterfaceReference.
EMC CLARiiON Server Support Products for Windows Servers Installation Guide 33

Running the Navisphere Host Agent
This section describes how to test the host agent connections and howto start and stop the host agent.
Starting and stopping the Navisphere Host Agent
This section describes how to start and stop the host agent service. Thissection also describes how to configure the storage system connected tothe server.
When a storage system experiences heavy input/output traffic (that is,applications are using the storage system), information may not be reportedto the host agent in a timely manner, resulting in the host agent taking severalminutes to execute a storage-system management task. This behavior is mostevident when one host agent is managing multiple storage systems. Also, if theSP event log is large and the host agent configuration file is set up to read allevents, it may take a few minutes for the host agent to start.
Starting the host agent
1. At the Windows server, log in as the administrator or the equivalent.
2. From the desktop, right-click My Computer and select Manage.
The Computer Management window opens.
3. Select Services and Applications > Services.
The Services pane opens.
4. In the Services pane, right-click Navisphere Agent and select Start.
5. If you want the host agent to start automatically at system startup:
a. Right-click Navisphere Agent and select Properties.
The Navisphere Agent Properties dialog box opens.
b. Select the General tab.
c. In Startup Type, select Automatic.
6. Close Computer Management.
34 EMC CLARiiON Server Support Products for Windows Servers Installation Guide
The host agent will now start automatically at system startup.
It may take a few minutes for the host agent to start when:
Applications are using the storage system, or
The SP event log is large and the host agent configuration file isnot set up.
Stopping the host agent
1. At the Windows server, log in as the administrator or the equivalent.
2. From the desktop, right-click My Computer and select Manage >Services and Applications > Services .
The Services pane opens.
3. In the Services pane, right-click Navisphere Agent and select Stop.
4. If asked to confirm your request to stop the agent service, click Yes,and close the Services pane or dialog box.
Testing the host agent connections
Before continuing, you should test the host agent connections asfollows:
1. Start the host agent as described in Starting and stopping theNavisphere Host Agent, page 34.
2. Look for any errors on the console and in the operating system logto make sure the agent started and no device errors occurred.
3. Verify that the host agent on the server can see the storage systemas follows:
a. Enter the following CLI command:naviseccli |navicli [-d device]| -h hostname port-list -hba
You cannot specify both the –d switch and –h switch.
where:
EMC CLARiiON Server Support Products for Windows Servers Installation Guide 35
[-d device] is the device name for the storage system (onlysupported with legacy systems).
-h hostname is the IP address of the SP.
For each HBA in the server, a listing similar to the following willbe displayed. For storage systems in a SAN (shared storage)environment, the listing includes HBAs in all connected hosts.Information about each HBA:HBA UID: 10:00:00:60:B0:3E:46:AC:10:00:00:60:B0:3E:46:ACServer Name: siux134Server IP Address: 128.221.208.134HBA Model Description:HBA Vendor Description:HBA Device Driver Name:Information about each port of this HBA:SP Name: spaHBA Devicename: sp0Trusted: NOLogged In: YESSource ID: 1Defined: YESInitiator Type: 0Storage Group Name:Storage Group 134
b. In the listing, examine the information for each HBA installed inthe host to verify the path from the HBA to the SP.
Host agent status and error logging
While the system is running, the operating system tracks informationabout host agent events and host agent errors, and places thisinformation in log files on the server.
The host agent error log tracks information about the host agent’sstartup, the host agent shutdown, and errors that might occur, such asthe host agent’s inability to access a device in the configuration file. Ifproblems occur, log files are a good place to start your troubleshooting.
36 EMC CLARiiON Server Support Products for Windows Servers Installation Guide

Installing and removing the Navisphere Server Utility
This section describes how to install the Navisphere Server Utility.
If you have a Microsoft iSCSI initiator, you must install the Microsoft iSCSISoftware Initiator because the Navisphere Server Utility uses it to configureiSCSI connections.
Downloading and installing the Microsoft iSCSI software initiator
IMPORTANT
The Navisphere Server Utility does not support Windows 64–bitoperating systems. Therefore, the server utility will not discover theMicrosoft iSCSI initiator if a 64–bit operating system is used.
1. Open a web browser and connect to the Microsoft website:http://www.microsoft.com
2. Go to the Downloads page.
3. Search for iscsi initiator.
4. Select and download the latest supported initiator software andrelated documentation.
For information on supported software on a CX3 series or CX seriesstorage system, refer to the E-Lab™ Interoperability Navigator onthe Powerlink website: http://Powerlink.EMC.com.
For information on supported software on an AX4–5 series or AXseries storage system, refer to the support matrix on the Installpage of the storage-system support website, or to the SupportedConfigurations in the “Technical descriptions” section of thestorage-system support website.
To determine which file to download:
a. Right-click My Computer and select Manage.
b. Select System Information > System Summary.
EMC CLARiiON Server Support Products for Windows Servers Installation Guide 37
c. View the System Type option. If x86 is displayed, you have a32–bit system. If IA64, AMD64, or x64 is displayed, you have a64–bit system and need to install the appropriate 64–bit version(IA or AMD).
5. After you download the appropriate software, double-click theexecutable to open the installation wizard and click Next at thewelcome screen.
6. Depending on which version of PowerPath® you are running, atthe Installation Options screen, select one of the following:
PowerPath iSCSI is no longer available for CX3 series and CX series storagesystems.
PowerPath 4.6 or later (AX4–5, CX3, and CX series) and PowerPathiSCSI 1.1 or later (AX150 and AX100 series)
With PowerPath 4.6 or later, select Microsoft MPIO Multipathing Supportfor iSCSI only if the initiator is on a Windows Server 2003 server.
For NICs – select Initiator Service > Software Initiator >Microsoft MPIO Multipathing Support for iSCSI, then clickNext.
If the Microsoft MPIO Multipathing Support for iSCSI option is notchecked, the installer will attempt to uninstall the Microsoft iSCSIDSM and the core MS MPIO files. However, if there is another DSMinstalled, such as the one included with PowerPath 4.6 or later, thenthe core MS MPIO files will not be uninstalled. The setup wizarddetermines if another DSM is installed by checking the MS MPIOsupported device list.
For iSCSI HBAs – select Initiator Service > MPIO MultipathingSupport for iSCSI, then click Next.
Do not select Software Initiator for iSCSI HBAs.
38 EMC CLARiiON Server Support Products for Windows Servers Installation Guide
PowerPath 4.5.1 or earlier
For NICs – select Initiator Service > Software Initiator, andclick Next.
Do not select Microsoft MPIO Multipathing Support for iSCSI.
For iSCSI HBAs – select Initiator Service and click Next.
Do not select Microsoft MPIO Multipathing Support for iSCSI orSoftware Initiator.
7. Read and accept the license agreement and click Next to installthe software.
8. At the completion screen, click Finish if this is a new installation. Ifthis is an upgrade, you must reboot the system to apply the updates.To reboot automatically, click Finish. To reboot later, select Do notrestart now and then click Finish. If you have a NIC and will bemodifying the TCP/IP registry settings in the next section, you donot need to reboot now. If you have an iSCSI HBA, download andinstall the QLogic SANsurfer software.
Installing the Navisphere Server Utility on a Windows server
EMC recommends that you install the most recent version of theNavisphere Server Utility software that is appropriate for yourconfiguration. You can download the most recent version from eitherthe software download page on the Powerlink website (CX3 series, CXseries, AX4-5 series) or on the storage-system support website (AXseries). You can also install the software from the server support CD(any storage system); however, the CD may not contain the most recentversion for your configuration.
If you are running PowerPath 4.6 or later, you must install version 6.22.20 orlater of the Navisphere Server Utility. If your server is connected only to anAX100 series storage system running Navisphere Server Utility version 2.19 orearlier, and you are adding an AX150 series storage system, you must installthe version that shipped with your AX150 series system.
EMC CLARiiON Server Support Products for Windows Servers Installation Guide 39

1. Log in to the Windows server as the administrator or someone whohas administrative privileges.
2. To download the software for CX3 series, CX series, or AX4-5 seriesstorage systems, do the following:
a. On the Powerlink website, select Support > SoftwareDownloads and Licensing and navigate to the NavisphereServer Utility download section, which may be in eitherthe CLARiiON Navisphere Server Utility section or theCLARiiON Navisphere Manager section.
b. Select the appropriate Navisphere Server Utility version todownload and select the option to save the software to yourserver.
c. In the directory where you saved the software, double-click theexecutable file to start the installation wizard.
3. To download the software for AX series storage systems, do thefollowing:
a. On the storage-system support website, select the link todownload software.
b. Navigate to the Navisphere Server Utility download and selectthe option to save the software to your server.
c. In the directory where you saved the software, double-click theexecutable file to start the installation wizard.
4. To install the software from the server support CD (any storagesystem), do the following:
a. In the server’s drive, insert the server support CD, whichshipped with the storage system or the upgrade kit (forupgrading AX4-5 series or AX series systems to NavisphereManager).
The server support menu opens. If you do not see the serversupport menu, follow these steps to open it:
From the Windows taskbar, select:Start > Run
In the Run dialog box, enter the following program name,and then click OK:
For CX3 series or CX seriesdrive:\CXSeries.exe
40 EMC CLARiiON Server Support Products for Windows Servers Installation Guide

For AX4-5 series or AX seriesdrive:\AXSeries.exe
where drive is the letter for the CD drive.
b. Select your language, if prompted for it.
c. From the main menu, click Install Products on Server.
d. From the Install Products menu, click Navisphere ServerUtility to open the installation wizard.
5. Follow the instructions on the installation screens and accept allthe defaults.
If you do not have the host agent installed, do not disable the registrationservice feature (it is enabled by default). The registration servicefeature automatically registers the server’s NICs or HBAs with thestorage system after the installation and updates server informationto the storage system whenever the server configuration changes (forexample, when you mount new volumes or create new partitions).If you have the host agent installed and you are installing version 6.22.20or later of the server utility, the server utility’s registration service featurewill be disabled by default and we recommend that you do not installit. Prior to version 6.22.20 of the server utility, you could not install bothapplications on the same server.
6. If you are prompted about updating information when the serverstarts, click Yes.
7. If you are prompted to reboot the server, click Yes.
You must reboot the server when the installation dialog prompts you toreboot. If the server is connected to the storage system with NICs and youdo not reboot before you run the server utility, the NIC initiators cannotlog in to the storage system.
8. When the installation is complete, click Done to exit the wizard.
EMC CLARiiON Server Support Products for Windows Servers Installation Guide 41

9. If you installed the server utility from the CD, close the serversupport menu by selecting Main Menu and then Exit. You can nowremove the CD from the server’s CD drive.
Removing the server utility on a Windows server
1. On the Windows server running the server utility that you want toremove, log in as the administrator or the equivalent.
2. Select Start > Settings > Control Panel.
3. On the Control Panel pane, double-click Add/Remove Programs.The Add/Remove Programs pane opens.
4. Select Navisphere Server Utility and click Change/Remove, andif asked to confirm the removal, click OK.
If you are prompted to save HAV report files, and you click No, all the highavailability report files generated will be deleted.
You have removed the application.
42 EMC CLARiiON Server Support Products for Windows Servers Installation Guide

Modifying TCP/IP registry settings
This section is recommended if you are running a version of the NavisphereServer Utility that is earlier than 6.24.1.4.0 and have a Microsoft iSCSIconfiguration. This section is required for all Microsoft iSCSI clusterconfigurations that are running a version of the Navisphere Server Utility thatis earlier than 6.24.1.4.0.
You can improve the performance of any NICs that will be usedprimarily for iSCSI traffic rather than general network traffic bychanging the network settings so that NICs immediately acknowledgeincoming TCP segments. If you are running a version of the NavisphereServer Utility that is earlier than 6.24.1.4.0, you need to manuallymodify the TCP/IP registry settings, as described below, to improveperformance. If you are running Navisphere Server Utility version6.24.1.4.0 or later, you can use the Optimize Network Interfaces (NICs) foriSCSI option in the server utility. For more information on this option,refer to the server utility’s online help.
! CAUTION
The following section contains information about modifying TCP/IPregistry settings. Before you modify the registry, make sure youback it up and understand how to restore the registry if a problemoccurs. For information about how to back up, restore, and edit theregistry, click the following link to the Microsoft Knowledge Base:http://support.microsoft.com/kb/256986/.
Depending on your operating system type, follow the appropriateprocedure below to modify the TCP/IP settings for network interfacescarrying iSCSI traffic so that they immediately acknowledge incomingTCP segments.
Windows Server 2003 SP1 or later
1. Determine which IP addresses or DHCP IP addresses are used foriSCSI traffic.
2. Start the Registry Editor.
EMC CLARiiON Server Support Products for Windows Servers Installation Guide 43

a. Select Start >Run.
b. Enter Regedit and click OK.
3. Locate and then click the following registry subkey:
HKEY_LOCAL_MACHINE > SYSTEM > CurrentControlSet >Services > Tcpip > Parameters > Interfaces
The interfaces will be listed below the Interfacesfolder by automatically generated GUIDs, for example,064A622F-850B-4C97-96B3-0F0E99162E56.
4. Click each of the interface GUIDs and perform the following steps:
a. Select the IPAddress or DhcpIPAddress parameters that are usedfor iSCSI traffic.
b. Select Edit > New > DWORD value.
c. Name the new value TcpAckFrequency and assign it a valueof 1.
5. Exit the Registry Editor.
6. Restart Windows for this change to take effect.
Windows 2000 SP3 or later
1. Determine which IP addresses or DHCP IP addresses are used foriSCSI traffic.
2. Start the Registry Editor.
a. Select Start >Run.
b. Enter Regedit and click OK.
3. Locate and then click the following registry subkey:
HKEY_LOCAL_MACHINE > SYSTEM > CurrentControlSet >Services > Tcpip > Parameters > Interfaces
The interfaces will be listed below the Interfacesfolder by automatically generated GUIDs, for example,064A622F-850B-4C97-96B3-0F0E99162E56.
4. Click each of the interface GUIDs and perform the following steps:
a. Select the IPAddress or DhcpIPAddress parameters that are usedfor iSCSI traffic.
44 EMC CLARiiON Server Support Products for Windows Servers Installation Guide

b. Select Edit > New > DWORD value.
c. Name the new value TcpDelAckTicks and assign it a value of 0.
5. Exit the Registry Editor.
6. Restart Windows for this change to take effect.
EMC CLARiiON Server Support Products for Windows Servers Installation Guide 45

Running the Navisphere Server Utility
This section describes how to start and use the server utility.
Starting the Navisphere Server Utility
You can run the server utility from the server or from the serversupport CD.
For Windows servers, you must install version 6.20 or later of the server utilityon the server to use the utility’s registration service feature. This featureautomatically updates server information to the storage system.
Starting the Navisphere Server Utility on a Windows server
1. Run the Navisphere Server Utility by selecting Start > Programs >EMC > Navisphere > Navisphere Server Utility.
2. Select your language, if prompted for it.
A text-based version of the utility is installed automatically when youinstall the utility. To start the text-based version, at a command promptenter cd C:\Program Files\EMC\Navisphere Server Utility then enterNaviServerUtilCLI.exe.
Starting the Navisphere Server Utility for Windows on the CD
1. Log in to the Windows server as the administrator or someone whohas administrative privileges.
2. In the server’s drive, insert the server support CD, which shippedwith the storage system or the upgrade kit (for upgrading AX4-5series or AX series systems to Navisphere Manager).
The server support menu opens. If you do not see the serversupport menu, open it:
a. From the Windows taskbar, select Start > Run.
b. In the Run dialog box, enter the following program name, andthen click OK:
46 EMC CLARiiON Server Support Products for Windows Servers Installation Guide

For CX3 series or CX seriesdrive:\CXSeries.exe
For AX4–5 series or AX seriesdrive:\AXSeries.exe
where drive is the letter for the CD drive.
3. From the main menu select Run Products from CD.
The RUN PRODUCTS page opens.
4. Select Navisphere Server Utility.
Using the Navisphere Server Utility
For information on using the Navisphere Server Utility, includinghow to perform manual checks after generating a high availabilityreport, click Help from the utility’s Help menu or if you are runningthe text-based version of the utility, select Start > Programs > EMC >Navisphere > Navisphere Server Utility Help.
EMC CLARiiON Server Support Products for Windows Servers Installation Guide 47

Installing and removing the Admhost Utility
The Admhost Utility is supported only on the following MicrosoftWindows platforms: Windows Server 2008, Windows Server 2003, orWindows 2000.
For the supported versions of these operating systems, see the Admhost ReleaseNotes.
Installing the Admhost Utility on a Windows server
EMC recommends that you install the most recent version of theAdmhost Utility software that is appropriate for your configuration.You can download the most recent version from the software downloadpage on the Powerlink website (CX3 series, CX series, AX4-5 series) oron the storage-system support website (AX series). You can also installthe software from the server support CD (any storage system); however,the CD may not contain the most recent version for your configuration.
1. Log in to the Windows server as the administrator or as someonewho has administrator privileges.
2. You cannot install admhost over an existing version. If you thinkadmhost is already installed, see Removing the Admhost Utility, page50.
3. To download the software for CX3 series , CX, or AX4-5 seriesstorage systems, do the following:
a. On the Powerlink website, select Support > SoftwareDownloads and Licensing and navigate to the Admhost Utilitydownload section, which may be in the CLARiiON SanCopysection.
b. Select the appropriate Admhost Utility version to downloadand select the option to save the software to your server.
c. In the folder where you saved the software, double-click theexecutable file to start the installation wizard.
4. To install the software from the server support CD (any storagesystem), do the following:
48 EMC CLARiiON Server Support Products for Windows Servers Installation Guide

a. In the server’s drive, insert the server support CD that shippedwith your storage system or your upgrade kit (for upgradingAX4-5 series or AX series systems to Navisphere Manager).
The server support menu opens. If you do not see the serversupport menu, follow these steps to open it:
From the Windows taskbar, select Start > Run.
In the Run dialog box, enter the following program name,and then click OK:
For CX3 series or CX seriesdrive:\CXSeries.exe
For AX4-5 series or AX seriesdrive:\AXSeries.exe
where drive is the letter for the CD drive.
b. From the main menu select Install Products on Server.
The INSTALL PRODUCTS page opens.
c. Select Admhost Utility and then select the Windows operatingsystem running on the server. The following three options areavailable:
Windows Server 2008
Windows Server 2003
Windows 2000
The Navisphere Admhost Setup page opens.
5. Follow the instructions on the installation screens to install theAdmhost Utility.
6. When the installation is complete, click Finish to exit the wizard.
You have installed the admhost software. If you selected the defaultdestination folder, admhost is installed in the directory C:\ProgramFiles\EMC\Navisphere Admhost.
EMC CLARiiON Server Support Products for Windows Servers Installation Guide 49
7. If you installed the Admhost Utility from the CD, close the serversupport menu by selecting Main Menu and then Exit. You can nowremove the CD from the server’s CD drive.
Removing the Admhost Utility
To remove admhost, navigate to Start > Settings > Control Panel> Add/Remove Programs > Navisphere Admhost and clickAdd/Remove.
50 EMC CLARiiON Server Support Products for Windows Servers Installation Guide
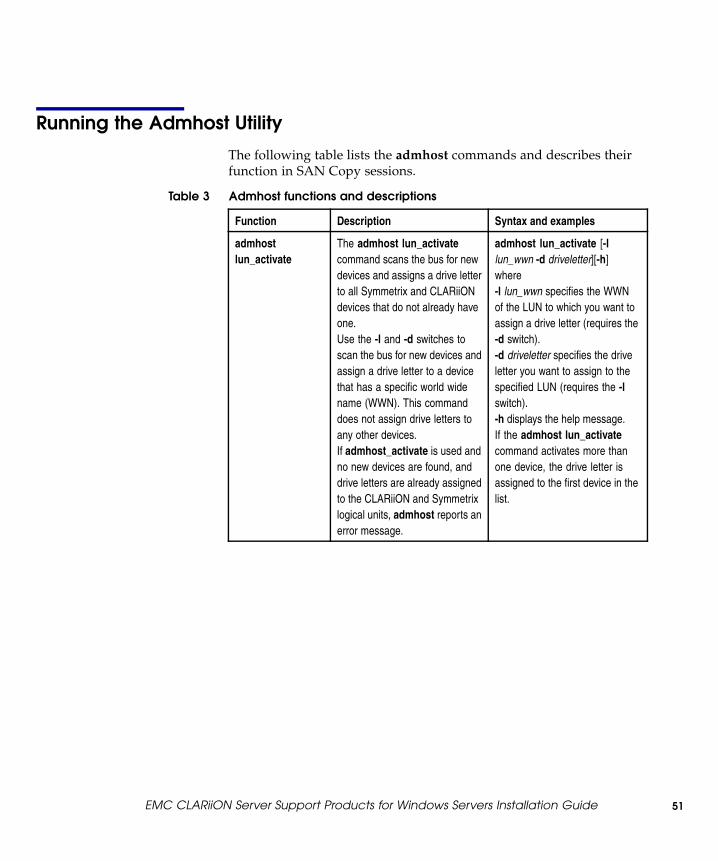
Running the Admhost Utility
The following table lists the admhost commands and describes theirfunction in SAN Copy sessions.
Table 3 Admhost functions and descriptions
Function Description Syntax and examples
admhostlun_activate
The admhost lun_activatecommand scans the bus for newdevices and assigns a drive letterto all Symmetrix and CLARiiONdevices that do not already haveone.Use the -l and -d switches toscan the bus for new devices andassign a drive letter to a devicethat has a specific world widename (WWN). This commanddoes not assign drive letters toany other devices.If admhost_activate is used andno new devices are found, anddrive letters are already assignedto the CLARiiON and Symmetrixlogical units, admhost reports anerror message.
admhost lun_activate [-llun_wwn -d driveletter][-h]where-l lun_wwn specifies the WWNof the LUN to which you want toassign a drive letter (requires the-d switch).-d driveletter specifies the driveletter you want to assign to thespecified LUN (requires the -lswitch).-h displays the help message.If the admhost lun_activatecommand activates more thanone device, the drive letter isassigned to the first device in thelist.
EMC CLARiiON Server Support Products for Windows Servers Installation Guide 51

Function Description Syntax and examples
admhostlun_deactivate
The admhost lun_deactivatecommand attempts to takedevices offline and make theminaccessible to the operatingsystem. The command deletesthe drive letter and dismounts thedevice.Use the admhost lun_activatecommand to bring the volumeback online.
admhost lun_deactivate -oobjectName [-t object type][-h]where-o objectName specifies the driveletter of the device you want todeactivate. If you specify thedevice name, admhost finds thedevice, deletes its drive letter,dismounts it, and then takes thedevice offline.-t object_type is an optionalswitch that specifies the objecttype (device or driveletter) of thedevice you want to deactivate.-h displays the help message.
admhost lun_flush The admhost lun_flushcommand flushes all write cachedata, for the specified device(object_name) to disk.
admhost lun_flush [-h] -oobject_name [-t object_typedevice|driveletter]where-h displays a help message.-o object_name specifies thename or drive letter of the deviceyou want to flush.-t object_type is an optionalswitch that specifies the objecttype (device or driveletter) of thedevice you want to flush.If you specify the devicename, admhost identifies thecorresponding device and driveletter.
52 EMC CLARiiON Server Support Products for Windows Servers Installation Guide
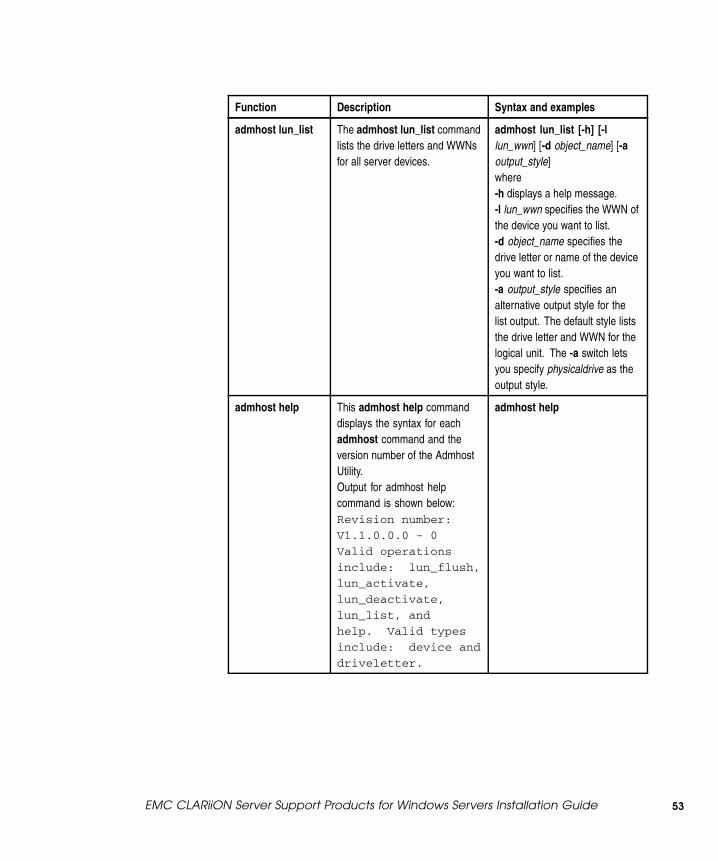
Function Description Syntax and examples
admhost lun_list The admhost lun_list commandlists the drive letters and WWNsfor all server devices.
admhost lun_list [-h] [-llun_wwn] [-d object_name] [-aoutput_style]where-h displays a help message.-l lun_wwn specifies the WWN ofthe device you want to list.-d object_name specifies thedrive letter or name of the deviceyou want to list.-a output_style specifies analternative output style for thelist output. The default style liststhe drive letter and WWN for thelogical unit. The -a switch letsyou specify physicaldrive as theoutput style.
admhost help This admhost help commanddisplays the syntax for eachadmhost command and theversion number of the AdmhostUtility.Output for admhost helpcommand is shown below:Revision number:
V1.1.0.0.0 - 0
Valid operations
include: lun_flush,
lun_activate,
lun_deactivate,
lun_list, and
help. Valid types
include: device and
driveletter.
admhost help
EMC CLARiiON Server Support Products for Windows Servers Installation Guide 53

Installing and removing the Admsnap Utility
EMC strongly recommends that you install admsnap on all serversconnected to a storage system that has the SnapView driver installed.The Admsnap Utility is supported only on the following MicrosoftWindows platforms: Windows Server 2008, Windows Server 2003, orWindows 2000.
Important: If you are upgrading your storage system to FLARE OEversion 02.19.xxx.5.yyy or later, you must upgrade admsnap to version2.9.x or later. Before you upgrade FLARE, verify that your operatingsystem version supports admsnap version 2.9.x or later. Refer to theAdmsnap Release Notes.
Installation prerequisites
Before you can install and use the Admsnap Utility, you must:
Install SnapView on a supported CLARiiON storage system. Fora list of supported storage systems, refer to the release notes forSnapView and admsnap.
Enable data access control on the same CLARiiON storage system.
Installing the Admsnap Utility on a Windows server
EMC recommends that you install the most recent version of theAdmsnap Utility software that is appropriate for your configuration.You can download the most recent version from the software downloadpage or on the storage-system support website (AX4-5 series or AXseries storage systems with Navisphere Manager). You can also installthe software from the server support CD (any storage system); however,the CD may not contain the most recent version for your configuration.
1. Log in to the Windows server as the administrator or as someonewho has administrative privileges.
2. If admsnap is already installed, refer to Removing the AdmsnapUtility on a Windows server, page 56.
The remove step is needed because the installation program will not letyou install admsnap over an existing revision.
54 EMC CLARiiON Server Support Products for Windows Servers Installation Guide
3. To download the software for CX3 series, CX series, or AX4-5 seriesstorage systems, do the following:
a. On the Powerlink website, select Support > SoftwareDownloads and Licensing and navigate to the Admsnap Utilitydownload section, which may be in either the CLARiiONSnapView section or the SnapView section.
b. Select the appropriate Admsnap Utility version to downloadand select the option to save the software to your server.
c. In the folder where you saved the software, double-click theexecutable file for your operating system to start the installationwizard.
4. To download the software for AX series storage systems withNavisphere Manager, do the following:
a. On the storage-system support website, select the link todownload software.
b. Navigate to the Admsnap Utility download section and selectthe option to save the software to your server.
c. In the folder where you saved the software, double-click theexecutable file for your operating system to start the installationwizard.
5. To install the software from the server support CD (any storagesystem), do the following:
a. In the server’s drive, insert the server support CD, whichshipped with the storage system or the upgrade kit (forupgrading AX4-5 series or AX series systems to NavisphereManager).
The server support menu opens. If you do not see the serversupport menu:
From the Windows taskbar, select Start > Run.
In the Run dialog box, enter the following program name,and then click OK:
For CX3 series or CX seriesdrive:\CXSeries.exe
For AX4-5 series or AX seriesdrive:\AXSeries.exe
EMC CLARiiON Server Support Products for Windows Servers Installation Guide 55
where drive is the letter for the CD drive.
b. From the main menu select Install Products on Server.
The INSTALL PRODUCTS page opens.
c. Select Admsnap Utility and then select the Windows operatingsystem running on the server. The following two options areavailable:
Windows Server 2008
Windows Server 2003
Windows 2000
The Navisphere Admsnap Setup page opens.
6. Follow the instructions on the installation screens to install theAdmsnap Utility.
7. When the installation is complete, click Finish to exit the wizard.
If you selected the default destination folder, admsnap is installedin one of the following:
On Windows Server 2003 (32-bit) or Windows 2000 systems
drive:\Program Files\EMC\Navisphere Admsnap
On Windows Server 2008 and 2003 (64-bit) systems
drive:\Program Files (x86)\EMC\ Navisphere Admsnap
8. If you installed the Admsnap Utility from the CD, close the serversupport menu by selecting Main Menu and then Exit. You can nowremove the CD from the server’s CD drive.
Removing the Admsnap Utility on a Windows server
If you want to remove the Admsnap Utility, select Start > Settings >Control Panel > Add/Remove Programs > Navisphere Admsnap andclick Remove.
56 EMC CLARiiON Server Support Products for Windows Servers Installation Guide

Running the Admsnap Utility
Refer to the EMC SnapView Command Line Interfaces Reference forinformation on running admsnap commands.
EMC CLARiiON Server Support Products for Windows Servers Installation Guide 57

Installing and removing Navisphere Integrator
Integrator is supported on CX3 series, CX series, AX4-5 series, and AXseries storage systems with Navisphere Manager.
EMC recommends that you install the most recent version ofthe Navisphere Integrator software that is appropriate for yourconfiguration. You can download the most recent version from thesoftware download page on the Powerlink website (CX3 series andCX series) or on the storage-system support website (AX4-5 series orAX series storage systems). You can also install the software from theserver support CD (any storage system); however, the CD may notcontain the most recent version for your configuration.
For the revisions of the network management software that NavisphereIntegrator supports, refer to the release notes for your version of Integrator.The release notes are available at http://Powerlink.EMC.com. To find therelease notes, log in to Powerlink, and select Support > Documentation/WhitePaper Library.
Installing Navisphere Integrator with CA-Unicenter TNG
This section describes how to install Navisphere Integrator withCA-Unicenter TNG Framework.
Before installing Integrator:
You must install CA-Unicenter TNG.
You must reboot the server if it has not been rebooted sinceCA-Unicenter TNG was installed.
Installing Integrator
1. Log in to the Windows management station as either administratoror someone who has administrative privileges.
2. If a version of Navisphere Integrator is already installed, removeit as described in Removing Navisphere Integrator, page 66 beforeinstalling the new version of Integrator.
3. To download the software for CX3 series or CX series storagesystems, do the following:
58 EMC CLARiiON Server Support Products for Windows Servers Installation Guide

a. On the Powerlink website, select Support > SoftwareDownloads and Licensing and navigate to the NavisphereIntegrator download section, which may be in the CLARiiONNavisphere Manager section.
b. Select the appropriate Navisphere Integrator version todownload and select the option to save the software to yourmanagement station.
c. In the directory where you saved the software, double-click theexecutable file to start the installation wizard.
The InstallShield Wizard automatically begins the installationprocess. After the splash screen, the Navisphere IntegratorSetup dialog box is displayed.
4. To download the software for AX4-5 series or AX series storagesystems with Navisphere Manager, do the following:
a. On the storage-system support website, select the link todownload software.
b. Navigate to the Integrator download section and select theoption to save the software to your server.
c. In the folder where you saved the software, double-click theexecutable file for your operating system to start the installationwizard.
5. To install the software from the server support CD (any storagesystem), insert the Navisphere Integrator CD in the managementstation’s CD drive.
The InstallShield Wizard automatically begins the installationprocess. After the splash screen, the Navisphere Integrator Setupdialog box is displayed.
If you do not see the Navisphere Integrator Installer dialog box,follow these steps to start the installation:
a. From the Windows taskbar, select Start and then Run.
b. In the Run dialog box, enter the following program name, andthen click OK:
drive: \nisetup.exe
EMC CLARiiON Server Support Products for Windows Servers Installation Guide 59
where drive is the letter for the CD drive.
6. When asked whether to integrate with EMC ControlCenter®, clickNo.
If you want to integrate with EMC ControlCenter, refer to Integratingwith EMC ControlCenter Open Edition, page 65.
7. Click Next to continue.
The Navisphere Integrator Setup dialog box displays the licenseagreement.
8. Read the license agreement, and click Yes to accept the terms.
The CA Unicenter TNG Repository Information screen opens.
The default values are displayed. These are the correct values ifyou did not specify different values in your CA-Unicenter TNGmanagement software.
9. Enter information in the Repository, Username, and Passwordfields and click Next.
The Navisphere Integrator Setup - Navisphere IntegratorInstallation screen opens.
10. In the URL box, enter the IP address of the system on which youinstalled the Navisphere Manager software.
This system must have the storage management server software installed.
11. Click Next, and then click Finish.
When the installation is complete, you can modify the values forvarious Navisphere Integrator parameters, as described in the
60 EMC CLARiiON Server Support Products for Windows Servers Installation Guide
manual, EMC Navisphere Integrator Administrator’s Guide (P/N069001144).
Installing Navisphere Integrator with HP OpenView
This section describes how to install Navisphere Integrator with HPOpenView management software.
Before installing Integrator:
You must install Windows SNMP services and HP OpenView.
You must reboot the server if it has not been rebooted since HPOpenView was installed.
Installing Integrator
1. Log in to the Windows management station as either administratoror someone who has administrative privileges.
2. If a version of Navisphere Integrator is already installed, removeit as described in Removing Navisphere Integrator, page 66 beforeinstalling the new version of Integrator.
3. To download the software for CX3 series or CX series storagesystems, do the following:
a. On the Powerlink website, select Support > SoftwareDownloads and Licensing and navigate to the NavisphereIntegrator download section, which may be in the CLARiiONNavisphere Manager section.
b. Select the appropriate Navisphere Integrator version todownload and select the option to save the software to yourmanagement station.
c. In the folder where you saved the software, double-click theexecutable file to start the installation wizard.
The InstallShield Wizard automatically begins the installationprocess. After the splash screen, the Navisphere IntegratorSetup dialog box is displayed.
4. To install the software from the server support CD (any storagesystem), insert the Navisphere Integrator CD in the managementstation’s CD drive.
EMC CLARiiON Server Support Products for Windows Servers Installation Guide 61

The InstallShield Wizard automatically begins the installationprocess. After the splash screen, the Navisphere Integrator Setupdialog box is displayed.
If you do not see the Navisphere Integrator Installer dialog box,follow these steps to start the installation:
a. From the Windows taskbar, select Start and then Run.
b. In the Run dialog box, enter the following program name, andthen click OK:
drive: \nisetup.exe
where drive is the letter for the CD drive.
5. When asked whether to integrate with EMC ControlCenter®, clickNo.
If you want to integrate with EMC ControlCenter, refer to Integratingwith EMC ControlCenter Open Edition, page 65.
6. Click Next to continue.
The Navisphere Integrator Setup dialog box displays the licenseagreement.
7. Read the license agreement, and click Yes to accept the terms.
The Setup Status screen displays information about the progress ofthe installation, which may take several seconds.
8. If the NMM Console Output Display dialog box appears, close it.
The Navisphere Integrator Setup - Navisphere IntegratorInstallation screen opens.
9. In the URL box, enter the IP address of the system on which youinstalled the Navisphere Manager software.
This system must have the storage management server software installed.
62 EMC CLARiiON Server Support Products for Windows Servers Installation Guide

When the installation is complete, the Navisphere IntegratorSetup dialog box displays the InstallShield Wizard Complete
message.
10. Click Finish in the Navisphere Integrator Setup dialog box.
When the installation is complete, you can modify the values forvarious Navisphere Integrator parameters, as described in the manual,EMC Navisphere Integrator Administrator’s Guide (P/N 069001144).
Installing Navisphere Integrator with Tivoli NetView
This section describes how to install Navisphere Integrator with TivoliNetView management software.
Before installing Integrator:
You must install Windows SNMP services and Tivoli NetView.
You must reboot the server if it has not been rebooted since TivoliNetView was installed.
Installing Integrator
1. Log in to the Windows management station as either administratoror someone who has administrative privileges.
2. If a version of Navisphere Integrator is already installed, removeit as described in Removing Navisphere Integrator, page 66 beforeinstalling the new version of Integrator.
3. To download the software for CX3 series or CX series storagesystems, do the following:
a. On the Powerlink website, select Support > SoftwareDownloads and Licensing and navigate to the NavisphereIntegrator download section, which may be in the CLARiiONNavisphere Manager section.
b. Select the appropriate Navisphere Integrator version todownload and select the option to save the software to yourmanagement station.
c. In the folder where you saved the software, double-click theexecutable file to start the installation wizard.
The InstallShield Wizard automatically begins the installationprocess. After the splash screen, the Navisphere IntegratorSetup dialog box is displayed.
EMC CLARiiON Server Support Products for Windows Servers Installation Guide 63
4. To install the software from the server support CD (any storagesystem), insert the Navisphere Integrator CD in the managementstation’s CD drive.
The InstallShield Wizard automatically begins the installationprocess. After the splash screen, the Navisphere Integrator Setupdialog box is displayed.
If you do not see the Navisphere Integrator Installer dialog box,follow these steps to start the installation:
a. From the Windows taskbar, select Start and then Run.
b. In the Run dialog box, enter the following program name, andthen click OK:
drive: \nisetup.exe
where drive is the letter for the CD drive.
5. When asked whether to integrate with EMC ControlCenter®, clickNo.
If you want to integrate with EMC ControlCenter, refer to Integratingwith EMC ControlCenter Open Edition, page 65.
6. Click Next to continue.
The Navisphere Integrator Setup dialog box displays the licenseagreement.
7. Read the license agreement, and click Yes to accept the terms.
The Setup Status screen displays information about the progress ofthe installation, which may take several seconds.
The Navisphere Integrator Setup - Navisphere IntegratorInstallation screen opens.
8. In the URL box, enter the IP address of the system on which youinstalled the Navisphere Manager software.
64 EMC CLARiiON Server Support Products for Windows Servers Installation Guide

This system must have the storage management server software installed.
When the installation is complete, the Navisphere IntegratorSetup dialog box displays the InstallShield Wizard Complete
message.
9. Click Finish in the Navisphere Integrator Setup dialog box.
When the installation is complete, you can modify the values forvarious Navisphere Integrator parameters, as described in the manual,EMC Navisphere Integrator Administrator’s Guide (P/N 069001144).
Integrating with EMC ControlCenter Open Edition
This section describes how to install Navisphere Integrator with EMCControlCenter Open Edition, perform the following installation steps:
1. Log in to the Windows management station as either administratoror someone who has administrative privileges.
2. If a version of Navisphere Integrator is already installed, removeit as described in Removing Navisphere Integrator, page 66 beforeinstalling the new version of Integrator.
3. To download the software for CX3 series or CX series storagesystems, do the following:
a. On the Powerlink website, select Support > SoftwareDownloads and Licensing and navigate to the NavisphereIntegrator download section, which may be in the CLARiiONNavisphere Manager section.
b. Select the appropriate Navisphere Integrator version todownload and select the option to save the software to yourmanagement station.
c. In the folder where you saved the software, double-click theexecutable file to start the installation wizard.
The InstallShield Wizard automatically begins the installationprocess. After the splash screen, the Navisphere IntegratorSetup dialog box is displayed.
4. To install the software from the server support CD (any storagesystem), insert the Navisphere Integrator CD in the managementstation’s CD drive.
EMC CLARiiON Server Support Products for Windows Servers Installation Guide 65

The InstallShield Wizard automatically begins the installationprocess. After the splash screen, the Navisphere Integrator Setupdialog box is displayed.
If you do not see the Navisphere Integrator Installer dialog box,follow these steps to start the installation:
a. From the Windows taskbar, select Start and then Run.
b. In the Run dialog box, enter the following program name, andthen click OK:
drive: \nisetup.exe
where drive is the letter for the CD drive.
5. In the Navisphere Integrator Installer dialog box, click yes tointegrate with EMC ControlCenter.
The InstallShield Wizard walks you through the installation process.
6. Accept all defaults in the InstallShield Wizard until you are askedto enter an IP address.
7. When the system asks you to enter the IP address you want addedto the Navisphere.idf file, enter the IP address of an SP or serveron which Manager is installed.
Removing Navisphere Integrator
You must remove Navisphere Integrator before installing a newerversion of it.
1. From the Windows taskbar, select Start > Settings > Control Panel,and double-click Add/Remove Programs.
2. Click the Add/Remove icon.
3. Click Navisphere Integrator.
4. Click Change/Remove.
Navisphere Integrator is removed from the server.
66 EMC CLARiiON Server Support Products for Windows Servers Installation Guide

Using Navisphere Integrator
For information on using Navisphere Integrator, refer to the EMCNavisphere Integrator Administrator’s Guide.
EMC CLARiiON Server Support Products for Windows Servers Installation Guide 67
Silent installations and removals using the InstallAnywhere package
This section applies to release 6.26 or later of Navisphere server software. If youare installing a version prior to 6.26, refer to revision A09 or earlier of this guide.
A silent installation and removal uses a command line interface toinstall or remove applications on all attached Windows servers. Toperform the installation or removal, you need to create a responsefile on one of the attached servers. A response file stores the setupconfiguration, which allows you to install or remove the applicationson all remaining attached Windows servers by using one commandthat requires no user input.
The following Navisphere products support silent installations andremovals:
Initialization utility
Host agent
Server utility
CLI
Admsnap for Windows Server 2008
Admhost for Windows Server 2008
The host agent is not supported on an AX4–5 series or AX series system withNavisphere Express. The Navisphere CLI is not supported on an AX seriessystem with Navisphere Express.
Preparing for a silent installation
Before you begin the silent installation process, you need to determineif you are performing an upgrade, a new install, or both. If you areperforming a new install and an upgrade in the same environment, youwill need to perform the following steps twice; the first time for thenew installation and the second for the upgrade.
68 EMC CLARiiON Server Support Products for Windows Servers Installation Guide
Only a system administrator can perform a silent installation and removal.
Creating the response file
This section describes how to create a response file. The responsefile will store the setup configuration so that you can install theinitialization utility, host agent, Navisphere CLI, or server utility onall attached Windows servers using one command. Since no input isrequired, this type of installation is referred to as a silent installation.
1. In the server’s drive, insert the server support CD, which shippedwith the storage system or the upgrade kit (for upgrading AX4-5series or AX series systems to Navisphere Manager).
2. From the main menu, click Browse CD Contents.
3. Select the Windows folder, then select the folder for the softwareyou want to install. For example, the naviagent folder.
You can only create a response file for the initialization utility, host agent,Navisphere CLI, or server utility software packages.
4. Copy the executable installation package to a folder on your localhard drive.
5. Open a command prompt window and navigate to the folder whereyou put the executable installation package. For example, if youcopied the installation package to a folder called ResponseFile onyour C: drive, you would enter cd ResponseFile in the commandwindow.
6. Depending which executable installation package you copied instep 4, enter one of the following commands:
NaviAgent.exe –r
NaviCLI.exe –r
NaviServerUtil.exe –r
NaviInitTool.exe –r
Admsnap_win2k8.exe –r
Admhost_win2k8.exe –r
EMC CLARiiON Server Support Products for Windows Servers Installation Guide 69

7. Follow the instructions in the installation wizard. When theinstallation is complete, the installer creates a file in the currentworking directory called installer.properties. This file containsyour responses during the installation process.
8. Navigate to the installer.properties file and rename the file tosoftware_name.properties, where software_name is the name ofthe software you installed. For example, NaviAgent.properties.Continue to the next section to perform a silent install.
If you are performing a new install and an upgrade in the sameenvironment, rename the file to software_nameNew.properties,where software_name is the name of the software you installed. Forexample, NaviAgentNew.properties.
9. If you are performing a new install and an upgrade in thesame environment, repeat steps 4 through 6, then rename theinstaller.properties file to software_nameUpgrade.properties,where software_name is the name of the software you installed. Forexample, NaviAgentUpgrade.properties.
10. Move the properties file or files to a working directory or shareddirectory.
Running the silent installation
Follow the procedure below to perform a silent install.
The InstallAnywhere installation package can use UNC paths or drive paths.
1. On another attached Windows server (not the same server on whichyou created the response file), open a command prompt window.
2. Depending on where you put the properties file that was created inthe previous section, run one of the following commands:
If properties file is in the current working directory
software_name.exe -i silent -f software_name.properties
For example, NaviAgent.exe -i silent -f NaviAgent.properties,or if you are performing a new install and an upgradein the same environment, NaviAgent.exe -i silent –fNaviAgentNew.properties or NaviAgent.exe -i silent –fNaviAgentUpgrade.properties.
70 EMC CLARiiON Server Support Products for Windows Servers Installation Guide

If properties file is on a share
software_name.exe -i silent –f \\UNC_PATH\soft-ware_name.properties
For example, NaviAgent.exe -i silent –f \\UNC_PATH\Navi-Agent.properties
If the properties file is given without a path, the installation package willlook in the current working directory only.
3. The installation process will start in silent mode.
4. Repeat steps 2 and 3 on all remaining attached Windows servers.
Preparing for a silent removal
Follow the procedure below to perform a silent removal.
1. On the Windows server in which you performed the silent install,open a command prompt window.
2. Navigate to the directory in which you installed the software, andenter the following command:
drive:\install_directory\software_name\uninstall.exe -i silent
3. Repeat steps 1 and 2 on any other attached Windows servers inwhich you want to remove the software.
EMC CLARiiON Server Support Products for Windows Servers Installation Guide 71

Copyright© 2004–2008 EMC Corporation. All Rights Reserved.
EMC believes the information in this publication is accurate as of its publication date. Theinformation is subject to change without notice.
THE INFORMATION IN THIS PUBLICATION IS PROVIDED "AS IS." EMC CORPORATIONMAKES NO REPRESENTATIONS OR WARRANTIES OF ANY KIND WITH RESPECT TOTHE INFORMATION IN THIS PUBLICATION, AND SPECIFICALLY DISCLAIMS IMPLIEDWARRANTIES OF MERCHANTABILITY OR FITNESS FOR A PARTICULAR PURPOSE.
Use, copying, and distribution of any EMC software described in this publication requires anapplicable software license.
For the most up-to-date regulatory document for your product line, go to the TechnicalDocumentation and Advisories section on EMC Powerlink.
For the most up-to-date listing of EMC product names, see EMC Corporation Trademarks onEMC.com
All other trademarks mentioned herein are the property of their respective owners.
72 EMC CLARiiON Server Support Products for Windows Servers Installation Guide