classica26 e-bike instruction manual e-bike instruction manual ... do not leave the battery pack in...
TRANSCRIPT
1
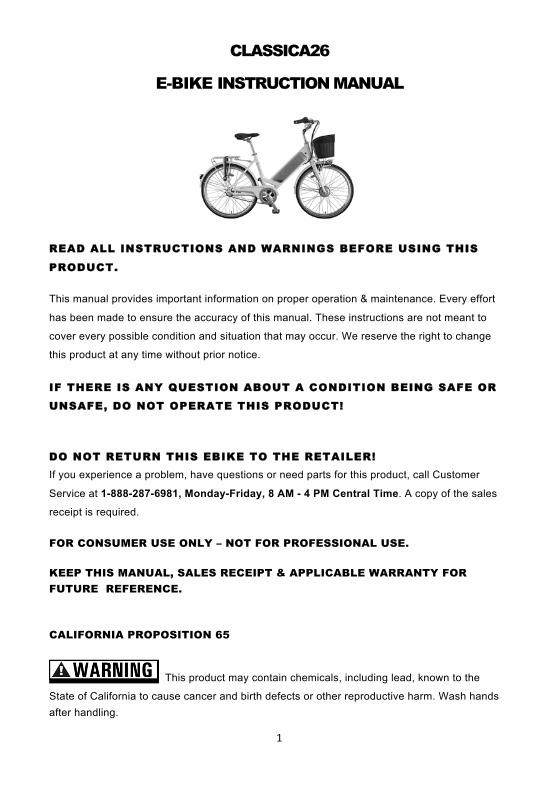
CLASSICA26 E-BIKE INSTRUCTION MANUAL
READ ALL INSTRUCTIONS AND WARNINGS BEFORE USING THIS
PRODUCT.
This manual provides important information on proper operation & maintenance. Every effort
has been made to ensure the accuracy of this manual. These instructions are not meant to
cover every possible condition and situation that may occur. We reserve the right to change
this product at any time without prior notice.
IF THERE IS ANY QUESTION ABOUT A CONDITION BEING SAFE OR
UNSAFE, DO NOT OPERATE THIS PRODUCT!
DO NOT RETURN THIS EBIKE TO THE RETAILER! If you experience a problem, have questions or need parts for this product, call Customer
Service at 1-888-287-6981, Monday-Friday, 8 AM - 4 PM Central Time. A copy of the sales
receipt is required.
FOR CONSUMER USE ONLY – NOT FOR PROFESSIONAL USE.
KEEP THIS MANUAL, SALES RECEIPT & APPLICABLE WARRANTY FOR FUTURE REFERENCE.
CALIFORNIA PROPOSITION 65
This product may contain chemicals, including lead, known to the
State of California to cause cancer and birth defects or other reproductive harm. Wash hands after handling.
0201310
2
1 YEAR LIMITED WARRANTY This eBike includes a 12-month warranty against manufacturing defects in materials or
workmanship on its frame, battery, controller, and motor assembly. This warranty is void in its
entirety by any modification of the frame, fork, or components. This warranty is expressly
limited to the repair or replacement of a defective item, and said repair or replacement is the
sole remedy of the warranty. This warranty extends from the date of purchase, is offered only to
the original owner, and is not transferable. This warranty applies only to Benelli by Buffalo Corp
eBike CLASSICA26 or CLASSICA28 purchased through an authorized dealer or distributor.
Benelli by Buffalo Corp is not responsible for incidental or consequential damages. Some states
do not allow the exclusion of incidental or consequential damages, so the above exclusion may
not apply to you. Proof of purchase is required. A bicycle must be registered with Buffalo
Corporation before a warranty claim may be processed. Claims made outside the country of
purchase may be subject to fees and additional restrictions.
THIS WARRANTY DOES NOT COVER:
• Normal wear and tear
• Damage or failure due to accident, misuse, abuse, or neglect
• Improper assembly
• Improper follow-up maintenance
• Non-compatible installation of components that were not part of the scope of delivery at
the time the product was handed over, or damage caused by unprofessional installation of
these add-on components.
• Labor charges for part replacement or changeover
Register your new eBike within 30 days after purchase in order to activate the warranty. Register via mail with your warranty card, or via email at [email protected]
TERMS OF WARRANTY
For your reference, we’ve outlined the comprehensive terms of the warranty below:
• Frame, Battery, Controller, and Motor Assembly — are warranted to be free from defects
in material or workmanship for a period of TWELVE (12) months from purchase. After any
warranty period has elapsed, you may purchase spare and replacement parts by contacting us.
• Replacement Batteries (if provided) — are warranted to be free from defects in material
or workmanship for a period of SIX (6) months from purchase.
3
IMPORTANT SAFETY INSTRUCTIONS BEFORE YOU RIDE
STOP!
Read all safety warnings and all instructions. Failure to follow the warnings and instructions
may result in electric shock, fire and/or serious injury.
Save all safety warnings and instructions for future reference.
Do not open the Pedal Assist Drive System (PAS) by yourself. The drive unit is maintenance-
free and must be repaired only by qualified experts and only with original spare parts. This will
ensure that the safety of the drive unit is maintained. Unauthorized opening of the drive unit
will void warranty claims.
All components mounted to the drive unit and all other components of the eBike drive may be
replaced only with identical components or components specifically approved for your eBike
by the bicycle manufacturer. This protects the drive unit against overload and damage.
Use only original Benelli by Buffalo Corp supplied battery packs approved for your eBike by
the manufacturer. Using other battery packs can lead to injuries and pose a fire hazard. When
using other battery packs, Benelli by Buffalo Corp shall not assume any liability and warranty.
Do not ride the electric bike without the battery pack. The battery pack must be on the bike
while riding; else the bike has no lights when needed.
Handle your battery pack with care. Do not drop or impact the battery pack. Mishandling of the
battery pack could lead to severe damage or over-heating. In an extremely rare case, a
battery pack that has been severely impacted or otherwise mishandled could potentially catch
fire. If you suspect damage to your battery pack, visit your dealer immediately for inspection.
Remove battery from bike before charging. Bring indoors and allow battery to reach room
temperature before charging. The battery pack can be stored at temperatures between -10°C
and +60°C. Take care that the maximal storage temperature is not exceeded. As an example,
do not leave the battery pack in a vehicle in summer and store it out of direct sunlight.
Store the battery pack in a dry, well-ventilated location. Protect the battery pack against
moisture and water. Under unfavorable weather conditions, it is recommended e.g. to remove
the battery pack from the bike and store it in an enclosed location until being used again.
4
Always remove battery from Benelli by Buffalo Corp eBike before working on the bicycle or if
you transport the bike by car or plane. Accidental activation of the bicycle drive system can
result in serious injury.
Battery pack and charger contain regulated materials and must be dispose in accordance with
national and/or local laws. Do not discard the battery and charger into fire, water or ordinary
household waste/garbage. Take to a waste facility or recycler.
The battery of this bicycle is subject to transportation regulations for handling hazardous
materials. The battery must be removed before flying and may be subject to special handling
by the carrier.
Failure to observe these warnings can result in electrical fires, explosion, or severe burns or
electrocution.
YOU CAN BE YOU SERIOUSLY INJURED, PARALYZED OR
KILLED IF YOU IGNORE THESE WARNINGS.
Do not make any modifications to your Benelli by Buffalo Corp.
Do not sit on the bicycle with the kickstand down. Kickstand is not designed to support the
weight of a person. Make sure kickstand is up before riding.
Do not misuse the electric bike by riding it without a saddle. If the saddle gets stolen, it may
lead to hazardous situations when still riding on the electric bike without a saddle.
If you purchased the Classica26, do not overload the rear rack.
The maximum allowable weight for the rear rack is 40 lbs.
Correct tightening force on fasteners (nuts, bolts, screws) on your
bicycle is important. If too little force is applied, the fastener may not hold securely. If too
much force is applied, the fastener can strip threads, stretch, deform or break. Either way,
incorrect tightening force can result in component failure, which can cause you to lose control
and fall.
Please read and observe the safety warnings and instructions enclosed in the operating
instructions of the battery pack as well as in the operating instructions of your Benelli by
Buffalo Corp eBike.
5
INTENDED USE
The Benelli by Buffalo Corp Classica eBike Series Classica26/Classica28 has an electric
pedal assist drive system (PAS). The drive assist system consists of a drive unit, a battery, a
computer control, and various electronic components (harness wires, sensors, and switches).
When the assist system is turned ON, the drive unit engages to provide power only while you
are pedaling. The amount of power provided by the drive unit depends on your pedaling force
and the assistance mode/level you set with the handlebar control unit. At anytime, if you stop
pedaling, the drive assist will disengage. The drive assist system power reduces progressively
and cuts off as the bike reaches a speed of 15.5 MPH or sooner if you stop pedaling. The
drive assist re-engages when speed drops below 15.5 MPH as long as the pedals are turning.
Whenever the drive assist system is turned OFF, you can pedal the bike normally. The drive
system will not engage.
The Benelli by Buffalo Corp Classica26/Classica28 is designed to be a city bike with the
intended use for paved roads, gravel or dirt roads that are in good condition and on bike
paths. Always observe the traffic rules when cycling on public roads. City bicycles are not
suitable for off-road use. Using this bicycle off road can result in serious injury and is never
recommended.
WHAT ARE E-BIKES?
Electric bicycles or “E-Bike” have a small electric motor that provides assistance to allow rides
to accelerate, climb hills, and overcome wind resistance more easily than manually powered
bikes. E-Bikes are not scooters or motorcycles although the classification of each State in the
United States is still very broad and sometimes put into similar categories. It’s important to
note the rules and regulations of the State you intend to ride in before use. The Benelli by
Buffalo Corp Classic E-Bike Series is associated with the general classification of bicycle-style
electric bicycles (BSEB) because it has an electric motor powered up to 750 watts that goes
slower than 20 miles per hour.
Even if you have ridden a bicycle for years, it is important for every person to read the
Owner’s Manual and understand it. Before your first ride, make sure you are comfortable and
confident when sitting on the bike. If an adjustment does not feel right or something feels
loose, check to ensure you are properly fitted to the bike. Pick a controlled environment, away
from cars, other cyclists, obstacles or other hazards for your first ride.
6
Wear a helmet when riding your bicycle.
Become familiar with the brake levers against throttling, variable throttle performance while
pedaling and not pedaling. The first ride should be started with the Pedal Assist feature off
and then slowly throttling to feel the engagement of the HUB motor.
Riding a bicycle is an inherently dangerous activity, and it is your responsibility to ride safely
and within your abilities. Be aware that other road users do not expect that an electric bike can
ride faster than a normal bike. Riding faster also increases the risk of accidents. Do not ride
abusively. Ride only on paved roads with tires staying on the ground. Proper assembly is vital
to the safe operation of your bicycle.
NOTE TO PARENTS:
This eBike is intended for use by adult riders only. Many state laws require electric bicycle
riders to be a minimum age of 16 with some states having minimum ages set as low as 10
years old and other states up to 18 years old. As a parent you are responsible for the activities
and safety of your minor child including the following of your state and local laws in regards to
the riding of an electric bicycle by a minor (under the age of 18). That includes, if your state
allows a minor to ride, making sure that your minor child can safely ride and control all of the
operations of the bicycle, and fully understands all warnings and. Please read on if you have
determined that your minor child can legally and safely ride and control all of the operations of
the bicycle. That includes making sure that the bicycle is properly fitted to the child; that it is in
good repair and safe operating condition; that you and your child have learned and
understand the safe operation of the bicycle; and that you and your child have learned,
understand and obey not only the applicable local motor vehicle, bicycle and traffic laws, but
also the common sense rules of safe and responsible bicycling.
MAX WEIGHT CAPACITY
The maximum permitted gross weight of the bike comprises the weight of the bike, the weight
of the rider and the weight of the luggage. If you purchased the Benelli Classica26 do not over
load the rear rack.
MAX GROSS WEIGHT 300 lbs
MAX WEIGHT OF RIDER 250 lbs
REAR RACK 40 lbs (N/A on CLASSICA28)
The Benelli by Buffalo Corp eBike Pedal Assist System assists you with up to 250 watts of
power, which takes you up to the speed of 15.5 MPH.

7
GENERAL WARNING
Like any sport, bicycling involves the risk of injury and damage. By choosing to ride a bicycle,
you assume the responsibility for that risk, so you need to know — and to practice — the rules
of safe and responsible riding and of proper use and maintenance. Proper use and
maintenance of your bicycle reduces risk of injury.
This Manual contains many Warnings and Cautions concerning the consequences of failure to
maintain or inspect your bicycle and of failure to follow safe cycling practices.
This image followed by the word WARNING indicates a potentially
hazardous situation that, if not avoided, could result in serious injury or death.
This image followed by the word CAUTION indicates a potentially
hazardous situation, which, if not avoided, may result in minor or moderate injury, serious,
damage to the bicycle or the voiding of your warranty or is an alert against unsafe practices.
Many of the Warnings and Cautions say you may lose control and fall. Because any fall can
result in serious injury or even death, we do not always repeat the warning of possible injury
or death. Because it is impossible to anticipate every situation or condition that can occur
while riding, this manual makes no representation about the safe use of the bicycle under all
conditions. There are risks associated with the use of any bicycle which cannot be predicted
or avoided, and which are the sole responsibility of the rider.
GETTING STARTED
1.) Unpack The Bike And Check The Contents
Open the side of the box and roll the bike out using a two-person team. Contents include:
n 10.4AH Samsung Lithium Ion Battery
n 36V Charger & Power Cable
n Pair of pedals (marked L and R on the end of the spindle)
n Set of 2 keys for your eBike
n Assembly Tools (4mm, 5mm, 6mm Hex Keys & Double Sided Wrench)
8
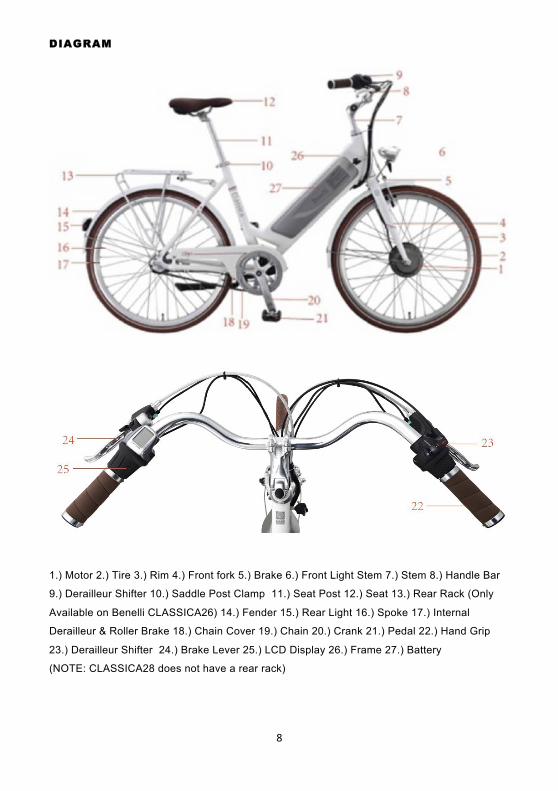
DIAGRAM
1.) Motor 2.) Tire 3.) Rim 4.) Front fork 5.) Brake 6.) Front Light Stem 7.) Stem 8.) Handle Bar
9.) Derailleur Shifter 10.) Saddle Post Clamp 11.) Seat Post 12.) Seat 13.) Rear Rack (Only
Available on Benelli CLASSICA26) 14.) Fender 15.) Rear Light 16.) Spoke 17.) Internal
Derailleur & Roller Brake 18.) Chain Cover 19.) Chain 20.) Crank 21.) Pedal 22.) Hand Grip
23.) Derailleur Shifter 24.) Brake Lever 25.) LCD Display 26.) Frame 27.) Battery
(NOTE: CLASSICA28 does not have a rear rack)
9
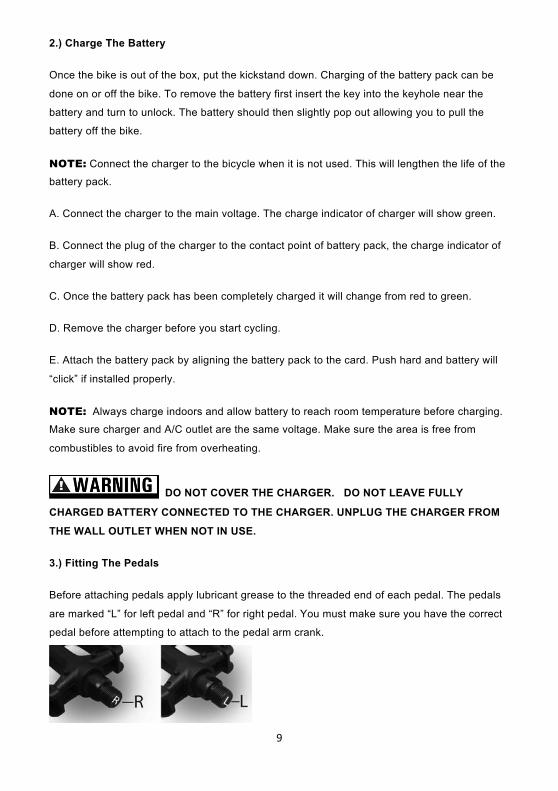
2.) Charge The Battery
Once the bike is out of the box, put the kickstand down. Charging of the battery pack can be
done on or off the bike. To remove the battery first insert the key into the keyhole near the
battery and turn to unlock. The battery should then slightly pop out allowing you to pull the
battery off the bike.
NOTE: Connect the charger to the bicycle when it is not used. This will lengthen the life of the
battery pack.
A. Connect the charger to the main voltage. The charge indicator of charger will show green.
B. Connect the plug of the charger to the contact point of battery pack, the charge indicator of
charger will show red.
C. Once the battery pack has been completely charged it will change from red to green.
D. Remove the charger before you start cycling.
E. Attach the battery pack by aligning the battery pack to the card. Push hard and battery will
“click” if installed properly.
NOTE: Always charge indoors and allow battery to reach room temperature before charging.
Make sure charger and A/C outlet are the same voltage. Make sure the area is free from
combustibles to avoid fire from overheating.
DO NOT COVER THE CHARGER. DO NOT LEAVE FULLY
CHARGED BATTERY CONNECTED TO THE CHARGER. UNPLUG THE CHARGER FROM
THE WALL OUTLET WHEN NOT IN USE.
3.) Fitting The Pedals
Before attaching pedals apply lubricant grease to the threaded end of each pedal. The pedals
are marked “L” for left pedal and “R” for right pedal. You must make sure you have the correct
pedal before attempting to attach to the pedal arm crank.

10
The marking can be found at the end of the axel pedal that will be inserted into the pedal arm
crank.
Left Pedal must be tightened counter clockwise into left arm crank. Carefully tighten using the
supplied pedal wrench until the pedal is fully tightened.
• Right Peal must be tightened clockwise into right arm crank (located on the same side as bike chain).
• Both pedals (each side L and R) thread toward the front of the bike to tighten, and toward the back of the bike to loosen.
Screwing the right pedal into the left crank arm and/or vice versa will
seriously damage pedal and/or pedal crank arm.
4.) Adjust The Handlebars
Holding the tire in place, adjust the angle the handlebars by loosening the nut(s) on top of the
handlebar stem with provided hex key. Then align the handlebars with the frame and front tire.
Tighten two nuts on both sides of the handlebar.
The angle of the handlebar can be raised or lowered depending on your preference. To
change handlebar height, loosen the nut(s) on the side or front of the handlebar joint and
adjust the handlebars to a comfortable position before tightening. Check to make sure the
brake levers, gear shifts, displayer, bar ends and other parts attached to the handlebars are
positioned comfortably. These can all be adjusted using one of the included hex keys.

11
5.) Adjusting the Seat Height
In order to obtain the most comfortable riding position and offer the best possible pedaling
efficiency, the seat height should be set correctly in relation to the rider’s leg length. The
correct saddle height should not allow leg strain from over-extension, and the hips should not
rock from side to side when pedaling. To determine the correct saddle height:
• Sit on the bike saddle. Try to reach the pedal
with your heel when it is in the bottom position. Your
knee should be more or less fully straightened out.
(Image A)
• Place the balls of your feet on the center of
the pedal. If your knee is now slightly bent, the
saddle height is correct. (Image B)
To adjust the seat height:
• Open the quick-release device as far as possible. • Turn the adjusting nut anticlockwise to further slacken the quick-release
device.
To close the quick-release device, proceed as follows:
• Adjust the clamping strength by turning the adjusting nut. • If the quick-release device closes too easily, open it again and turn the
adjusting nut clockwise. • If the quick-release device still closes too easily repeat the previous step. • If the quick-release device is too difficult to close, turn the adjusting nut
anticlockwise. • Turn back the quick-release lever from the OPEN position so you can see the
outer side of the lever or the lettering CLOSE.

12
When closed, quick-release levers must lie flat against the
frame, fork and saddle clamp. Make sure that quick-release devices for the hubs point
backwards when closed, as otherwise they could snag on obstructions when the bike
is moving and open. This could lead to serious accidents.
All quick-release devices must be tightened securely before you set off. Check this
before every journey. If you leave your bike unattended, check that all quick-release
devices are correctly secured before setting off again. When closing the quick-release
lever to lock it, it must be necessary to apply a force that causes you to make a fist
with your hand as otherwise the quick-release device could come loose.
Never tighten the seat post if the maximum mark or stop mark is
above the top of the seat tube as otherwise you could injure yourself or damage the seat post.
Always observe the specified tightening torques.
The minimum insertion depth is marked on the seat post. If this is not the case, the minimum
insertion depth must be 7.5 cm. In frames with long seat tubes that project beyond the top
tube, the minimum insertion depth is 10 cm.
Adjusting The Saddle Angle
Your bike saddle should be as close as possible to horizontal. Make use
of longer bike rides to find out what your most comfortable seat position
is. If you want to tilt the saddle, tilt it very slightly forwards. If you tilt the
saddle back, this can quickly lead to pain or physical injury.
• Turn the clamping screw counterclockwise to loosen it. • Tilt the bike saddle to the required angle. • Turn the clamping screw clockwise to tighten it. • Tilt the bike seat to the required angle by applying force on seat.
Do not set the seat so high that the max guide line on the seat post is visible.

13
6.) Check & Adjust Tire Pressure
The size & pressure rating are marked on the sidewall of the tire. The most important part of
this information for you is Tire Pressure. The best and safest way to inflate a bicycle tire to the
correct pressure is with a bicycle pump that has a built-in pressure gauge.
Never inflate a tire beyond the maximum pressure marked on
the sidewall. Exceeding maximum pressure may blow the tire off the rim, causing damage to the bike and injury to the rider and bystanders.
There is a safety risk in using gas station air hoses or other
air compressors. They are not made for bicycle tires. They move a large volume of air very rapidly, and will raise the pressure in your tire very rapidly, which could cause the tube to explode. Tire pressure is given either as maximum pressure or as a pressure range. How a tire performs under different terrain or weather conditions depends largely on tire pressure. Inflating the tire to near its maximum recommended pressure gives the lowest rolling resistance; but also produces the harshest ride. High pressures work best on smooth, dry pavement. Very low pressures, at the bottom of the recommended pressure range, give the best performance on smooth, slick terrain such as hard-packed clay, and on deep, loose surfaces such as deep, dry sand. Tire pressure that is too low for your weight and the riding conditions can cause a puncture of the tube by allowing the tire to deform sufficiently to pinch the inner tube between the rim and the riding surface.
Pencil type automotive tire gauges can be inaccurate and
should not be relied upon for consistent, accurate pressure readings. Instead, use a high quality dial gauge.
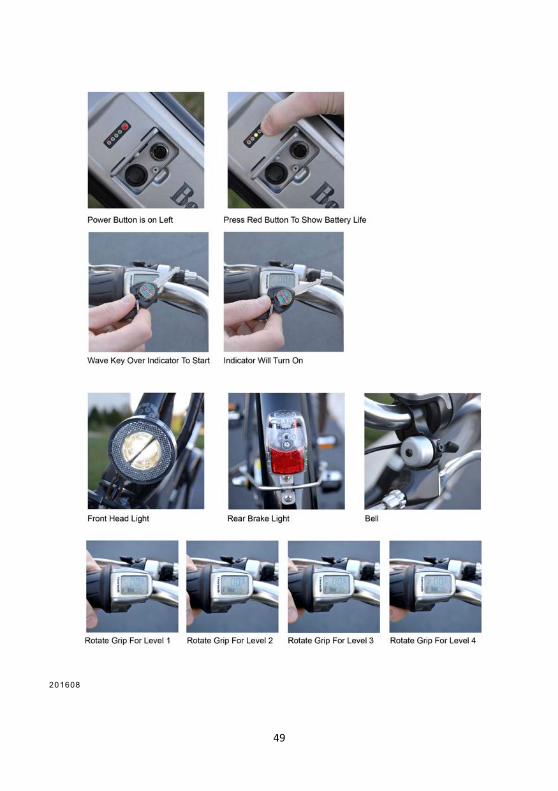
7.) Power On The Bike
Before you ride, insert the battery in the battery holder until it locks in place, and remove the
key. Turn on the bike’s pedal assist system on the handlebar control unit.
**IMPORTANT** HOW TO TURN ON BIKE WITH KEY You should not be pedaling when
turning on the power. If the battery is fully charged, all lights next to the power button will be
lit. See manual for more information on modes. As you pedal, the motor will provide
assistance at the selected power level.

14
8.) Check The Lights
To turn on front headlight twist power shifting handle forward for about 2 seconds and return
to original position. Front headlight should now be turned on. When ready to turn headlight off,
twist power shifting handle forward again for 2 seconds and return to original position.
CHECK THE FOLLOWING BEFORE EACH RIDE:
Make sure the battery is fully charged and locked in the rear bike rack.
Check tire pressure and wheel condition. Make sure wheel quick release are firmly closed.
Check the drive chain condition. Make sure it is clean and well lubricated.
Check the bicycle front and rear lighting to make sure it works properly.
Check the bicycle brakes, make sure they are working well.
Inspect condition of electrical cables so that cables are kinks free and no signs of abrasive
wear.
Check the fork for damage (fork legs, fork boot, crown, dropouts, accessories/brake mounts,
fender attachment)
Look for damage (e.g., loose parts, cracks, deep scratches, dents)
Make sure the fork works properly. Things that can indicate a serious problem are any
unusual “clunking” or knocking noises, changes in travel , an over extended or compressed
boot, any changes in the way the fork has been working, or any leaking fluids.
Frame
The form of the frame depends on the bike type and function. Frames are manufactured from
different materials – steel or aluminum alloys or carbon (carbon fiber), for example. Both the
Benelli CLASSICA26 and CLASSICA28 are made from alloy and are fixed position that cannot
be adjusted.
NOTE: The frame number of the bike is stamped on the seat tube, the head tube or the
bottom bracket housing. It may also be found on the motor suspension. If stolen the Benelli
eBike can be identified by the frame number. To identify the bike properly, it is important to
note down the whole number in the right order.

15
Never ride your bike if the frame is warped or cracked. On no account
should you attempt to repair damaged parts. This can lead to accidents. Replace defective
parts before you ride the bike again.
Accidents do happen. If you are involved in an accident or crash, have your bike checked by a
professional bike workshop before riding it again. If defects on the frame or components go
unnoticed this can lead to accidents. If your bike does not roll forwards easily in a straight line,
this could mean that the frame is warped. In this case, have the steering stability checked by a
professional bike workshop.
Headset
The headset is the bearing for the bike fork in the frame. If the headset has been properly
adjusted, it will turn easily. In doing so, no play should be evident.
The headset is subject to a large amount of stress due to impacts with the road surface. This
can cause it to come loose or affect its setting. Have the play and ease of movement of the
headset checked regularly by your specialist cycle shop
If you do not adjust the headset properly or tighten it too tightly, this
could cause breakages. This should therefore always be carried out by a professional bike
workshop. If you ride with the headset loose, this could damage the bearing shells or fork.
Fork
The front wheel is held in place by the bike fork. The bike fork
consists of two fork blades, the fork crown and steering tube.
They can be adjusted in different ways and provide a greater
degree of riding comfort.
Specific information on your suspension fork is provided in the
manufacturer's operating instructions which you can find on the CD or the manufacturer's
website.

16
Never ride with a damaged bike fork. Do not attempt to repair a
defective bike fork. This can lead to serious accidents. If you notice that the bike fork is
warped or otherwise damaged, replace it before using the bike again.
Avoid sudden changes in ground level and riding off road. This can damage the fork and lead
to serious accidents.
Check regularly that the screws on the bike fork are securely fastened. If screws are allowed
to come loose, this can cause serious accidents.
Chain rings
Chain rings are wear parts. Their service life depends on various factors like maintenance and
care, type of use and distance travelled.
Bottom bracket and cranks
The cranks must be securely fastened as this could otherwise damage
the crank set. The cranks can come loose which is why you should regularly check whether
they are securely fastened by attempting to rock If there is play in the cranks, have the bike
checked and the cranks fastened securely by a professional bike workshop.
Wheels
The wheels connect the bike with the surface you are riding on. The wheels are subject to a
particularly high level of stress due to unevenness of the riding surface and the weight of the
rider.
The wheels are carefully checked and trued prior to delivery. However, the spokes may settle
when you ride the first mile on your bike.
Have the wheels checked again and tuned if necessary after the first 50 miles by a specialist
cycle shop.
You should subsequently regularly check the tension in the spokes and have loose or
damaged spokes replaced, and/or have the wheel trued, by a specialist cycle shop.
17
The wheel can be attached to the frame and fork in a number of different ways. In addition to
the standard systems in which the wheel is held on by axle nuts or quick-release devices,
different types of floating axles exist. These can be held in place by a screw connection or
different types of quick-release devices. If your bike has a floating axle, please also refer to
the enclosed manufacturer's user manual or visit the web pages of the relevant manufacturer
in the Internet.
Tighten all screws to the prescribed torque as otherwise screws could
shear off and components could come loose or detach altogether.
Checking the hubs
To check the hub bearings, proceed as follows:
Lift the wheel and spin it.
Check whether the wheel continues to turn through several revolutions before it stops moving.
If it stops suddenly, the bearing is damaged. This does not apply for front wheels with hub
dynamos.
To determine whether there is play in the hub bearing, try rocking the wheel in the bike fork or
rear triangle backwards and forwards perpendicular to the direction of travel.
If you notice that there is play between the bearings or if you encounter resistance when
turning the wheel, have the hub bearing adjusted by a specialist cycle shop.
Checking the Rims
If you are using a rim brake, the rim is subject to a higher degree of wear.
If a rim is worn it loses stability, which makes it more susceptible to
damage. If the rim is deformed, cracked or broken this can lead to serious accidents. If you
notice changes in a rim on your bike, do not ride on it. Have the problem checked by a
professional bike workshop.

18
TIRES
A large number of different tire types exist. The bike's off-road capability and rolling resistance
depend on tread profile.
Only inflate the tire to the maximum permissible tire pressure as
otherwise it may burst.
Inflate the tire at least to the specified minimum air pressure. If the tire pressure is too low, the
tire may detach from the rim.
The maximum permissible tire pressure, and normally also the
minimum permissible pressure, can be found on the tire sidewall.
Always replace the tire with a tire of the same type, dimension and
profile as otherwise the ride characteristics may be adversely affected. This can lead to
accidents.
Tires are wear parts. Check the tread depth; tire pressure and condition
of the tire sidewalls regularly. Replace worn tires before using the bike.
NOTE: Note the dimension of the fitted tire. Standard designations are used when stating
the tire dimension.
CLASSICA28 comes with 28” tire and tire width about 1.57”
CLASSICA26 comes with 26” tire and tire with of 1.5”
The inner tube maintains the pressure inside the tire. It is inflated via a valve. Three valve
types exist:

19
All three have a cap to protect them from ingress of dirt.
To inflate an inner tube with a Sclaverand or road valve, proceed as follows:
Unscrew the valve cap anticlockwise with your fingers.
Unscrew the knurled nut anticlockwise.
Push the knurled nut with your finger briefly into the valve until air escapes.
Inflate the inner tube using a suitable tire pump.
Screw the knurled nut back down.
Screw the cap clockwise back onto the valve.
NOTE: Ask a specialist cycle shop for advice on which tire pump is suitable for your valve.
If you find any damage, DO NOT ride the bike.
Contact Customer Service.
Pedal Assist System
The first ride should be started with the Pedal Assist feature off and then slowly throttling to
feel the engagement of the HUB motor.
The Benelli by Buffalo Corp eBike Pedal Assist System supports you when riding, as long as
you are pedaling. Without pedaling, there is no assistance. The motor output always depends
on the amount of your pedaling power.
When applying less pedaling power, the assistance or support will be lower than when
applying a lot of pedaling power. This applies independent of the assistance Level. The eBike
drive automatically switches off at speeds in excess of 15.5 MPH. When the speed falls below
15.5 MPH the drive is automatically available again. An exception applies for the push
assistance function, in which the eBike can be pushed at low speed without pedaling. The
20
eBike can also be ridden as a normal bicycle without assistance at any time, by either
switching off the eBike system or setting the assistance level to “OFF”. The same applies
when the battery pack is empty.
The fundamental idea behind the Pedal Assist System is not only to be able to cover greater
distances more quickly, but also do this comfortably. You can choose to relax and let the bike
do the work, exert yourself more physically, or simply to get from A to B as fast as possible.
You can decide this yourself by choosing an appropriate assist level. This gives you more
confidence on the road, as the powerful acceleration gives you more control and a greater
degree of security.
Factors Affecting Assistance Range
1. Battery Charge Level - A fully charged battery will provided the greatest range. Before
every ride, make sure the battery is fully charged.
2. Assistance Mode & Support Level - The assistance mode and support level you select
during the ride will affect the operating range.
3. Temperature & Wind Conditions - Extreme cold or hot conditions will result in more rapid
depletion of the battery’s energy, reducing available range. Overcoming strong winds on the
cycling route will shorten assistance range since more battery energy is required. Conversely,
a tailwind (wind behind you) acts to propel the cycle reducing the energy requirement.
4. Rider Weight & Cargo - Adding weight to the bicycle (rider or cargo) cycle will require the
drive unit to work harder, requiring more battery energy - shorter range. If you carry a
backpack or extra luggage on the rack, more energy will be needed, and overall range will be
reduced.
5. Tire Pressure/Condition- Make sure your tires are in good shape (e.g. good tread,
undamaged) and pressurized properly according to the tire sidewall markings. Poor tire
condition or inadequate air pressure will shorten range.
6. Shifting Gears & Braking - You should shift gears similarly to a normal pedaling bicycle.
Efficient gear changes will result in greatest available range. Maintaining a uniform speed and
effective braking will help you maximize the energy stored in the battery.
21
7. Accelerating From Stopped - The drive system utilizes more battery energy during it initial
acceleration. Therefore, a commute with frequent starting and stopping will consume more
energy, shortening range. You can extend your range by carefully managing your speed
throughout the trip to avoid unnecessary starts and stops.
8. Drive Chain Condition - Be sure to keep the chain clean and well lubricated. Have the chain
replaced with a new one.
9. Pedaling - Pedaling steadily with moderate effort with the drive unit will result in the greatest
range. While all that is required to engage the assistance is a turning pedal, you’ll want to
contribute especially on uphill or rough terrain. If you rely solely on the drive unit, the range
will be much shorter.
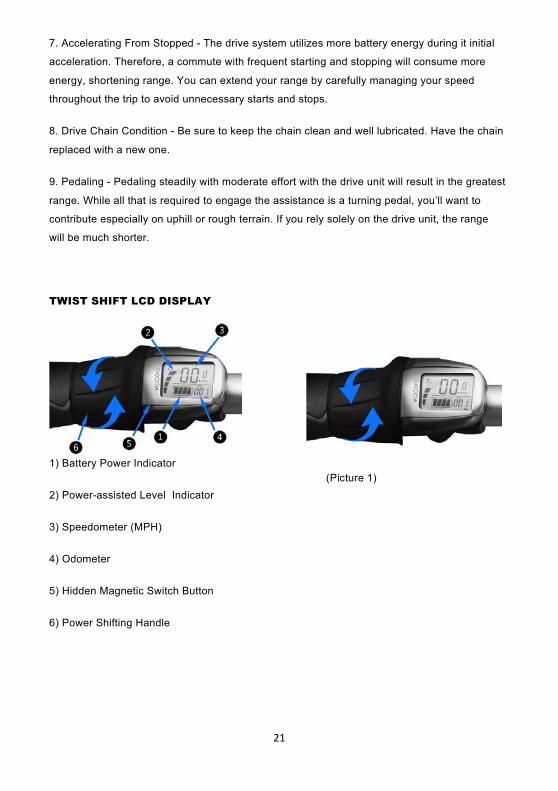
TWIST SHIFT LCD DISPLAY
1) Battery Power Indicator
2) Power-assisted Level Indicator
3) Speedometer (MPH)
4) Odometer
5) Hidden Magnetic Switch Button
6) Power Shifting Handle
(Picture 1)

22
TURN ON/OFF
In order to power the LCD Display you must first hold the magnetic Benelli by Buffalo Corp key
(that is provided) over the middle of the LCD Display. The electric system will magically turn
on showing all the display features as seen in above “Picture 1”.
NOTE: You must first make sure the Samsung Battery pack is properly attached and
charged before LCD Display will work. Once battery is attached the switch will need to be in
the start position where the GREEN light is illuminated.
Put the key in a safe place until the LCD Display needs to be turned ON again.
BATTERY POWER INDICATOR
The battery power level is shown on ① Battery Power Indicator. The image shown in “Picture
1” shows the indicator with full power. When the battery is fully charged there will be four black
segments shown. When riding the eBike in assist mode it will consume power slowly and one
by one the segments will be eliminated. When the battery is low the last battery segment will
begin to flash. The battery must be recharged immediately to continue Power Assist Mode.
POWER ASSISTED LEVEL ADJUSTMENT
The level of assistance of the Benelli by Buffalo Corp eBike can be adjusted when pedaling
via the ⑥ Power Shifting Handle.
To increase the assistance level, twist power shifting handle forward.
Level 0 is “OFF”: The drive is switched off; the eBike can be operated as a normal bicycle
through pedaling with no power assistance.
Level 1 is “ECO”: Effective assistance at maximum efficiency for maximum cruising range.
Level 2 is “Tour”: Uniform assistance, for touring with long cruising range.
Level 3 is “Sport“: Powerful assistance for sporting riding off road as well as for urban traffic.
Level 4 is “Turbo”: Maximum assistance supporting highest cadence for sporting riding.
To decrease the level of assistance twist power shifting handle backward to your desired
power level as noted above.
23
SWITCHING FRONT HEADLIGHT ON/OFF
To turn on front headlight twist power shifting handle forward for about 2 seconds and return
to original position. Front headlight should now be turned on. When ready to turn headlight off,
twist power shifting handle forward again for 2 seconds and return to original position.
Speedometer
After the power on, the battery power display window will show the ③ Speedometer
automatically. When the bike is not moving it will display zero. The speedometer always
displays the current speed of the eBike.
Odometer
Once the power is on, the mileage the eBike has traveled will display on the ④ odometer. The
mileage is tracked no matter if the rider is using the pedal assist motor or riding normally.
*Attention: The range of the mileage display is 999 miles. Once maximum mileage has been
achieved, the display will reset to zero.
Automatic Switch-Off
If you stop and do not move your Benelli by Buffalo Corp eBike for 5 minutes, the system
switches off automatically. If you subsequently want to ride using the assistance, you will need
to use your key and turn on the LCD display as mentioned above.
BRAKING SYSTEM
Brake lever
The bike is equipped as standard with a suitable brake lever. Check regularly that when you
operate the brake lever it does not reach the handlebar and make contact with it. With the
brake lever pulled, push the bike forward and check whether the braking performance is
sufficient. If the bike rolls slightly forwards, you will need to have the brake cable readjusted or
the brake pads replaced.

24
Hub brakes
Hub brakes are virtually maintenance-free as the brake block is inside the hub.
If applied continuously for an extended period, hub brakes become
very hot. This reduces the braking performance and ultimately complete failure of the brake.
You should adapt your handling accordingly.
Front Rim Brakes
Your Benelli eBike is equipped with Front Tektro 857AL V-Brakes.
V-brakes produce an extremely high braking force. You should
therefore familiarize yourself with the V-brake and only apply the brake gradually. Practice
emergency braking until you are sure you will be able to remain fully in control of your bike if
you have to apply the brakes with force.
If additional suspension elements in the brake system (power modulators) are used
improperly, this can lead to serious accidents. The required spring strength of the power
modulator depends on the gross weight of the bike.
If the brake blocks are so worn that you can no longer see notches, have them replaced by a
professional bike workshop.

25
Readjusting the Brake
The brakes on your bike are set correctly at the factory or by your cycle dealer. The gap
between the brake block and the rim is roughly 1 – 1.5 mm. However, as the brake blocks
wear down the gap steadily increases and the brake lever must travel a greater distance to
achieve the same braking effect. You should therefore inspect the brake at regular intervals
and adjust it if the brake lever travel distance is too great or the brake is not working properly.
Rear Brakes
Your Benelli eBike is equipped with Shimano Roller Rear Brakes
With back-pedal brakes the Shimano Roller breaking force is transmitted by the foot via the
chain to the brake system. If applied continuously for an extended period, back-pedal brakes
become very hot. This reduces the braking performance and can result in complete failure of
the brake. You should adapt your handling accordingly.
The back-pedal brake is operated by pedaling backwards. The force
applied by the back-pedal brake varies depending on the position of your feet/pedals. If the
crank arms are vertical, i.e. one of your feet is in the highest position and the other is in the
lowest position, you cannot brake hard. Move the crank arms into a horizontal position if you
think you may want/ have to brake.
NOTE: The back-pedal brake is easy to apply in a controlled manner. The maximum braking
performance is only reached after a certain run-in period. Operate the back-pedal brake
carefully to familiarize yourself with it and get a feel for its retarding effect.
If you have not used your bike for a while, there may be surface rust in the brake drum which
can increase the braking force. If you have not used your bike for some time, you should
brake gently several times when riding off to remove the surface rust. This prevents sudden
blocking of the brake.
If excessive overheating of the hub occurs, this can lead to loss of lubricant and a sharper
braking effect. In these cases, have the brake checked by a professional bike workshop.
26
Readjusting The Rear Brakes
After checking that the wheel does not
easily run while the brake cable is
being pulled, depress the brake lever
about 10 times as far as the grip in
order to run the brake cable
(A) Depress about 10 times
NOTE: If brake cable is not run in, it
will need to be adjusted again after
only a short period of use.
Turn the cable adjustment bold (A) of
the brake unit or brake lever so that
there is a 15mm gap.
(The amount of brake lever gap is the
distance from the position where the
brake lever is not operated to the
position where a force is felt suddenly
when the brake lever is pulled.)
(A) Cable Adjustment bolt
After depressing the brake lever to check
the braking performance, secure the
cable adjustment bold with the cable
adjustment nut (B).

27
Avoid operating the back-pedal brake continuously on long descents
as the internal components of the brake system can become extremely hot which reduces
braking performance. On long steep descents, always
alternate between the rear wheel brake and the second
brake (front wheel brake) to allow the rear wheel brake
to cool down. As the brake drum can become
extremely hot when braking for prolonged periods, you
should not touch it for at least 30 minutes after riding.
Check the brake as follows:
Pull the front wheel and then the rear wheel hand brake lever with the same amount of force
as you would apply when braking sharply during a ride. Then push the bike forwards.
The rear wheel should lock and the front wheel should decelerate so rapidly that the bike
starts to tip forwards.
Adjusting Brake-Pad Clearance In Relation To The Rim
Turn the cable adjustment bolt to adjust the clearance between the brake pad and the rim.
Turn the bolt inwards (clockwise) to increase the brake-pad clearance. Turn the bolt outwards
(anticlockwise) to reduce the brake-pad clearance. The clearance between the brake blocks
and rim should be roughly 1mm.
Adjusting Cable-Pull
28
Wear of Brake Pad
Most brake pads for rim brakes come with
grooves or notches.
If these grooves are worn and can no longer
be seen, this is normally a sign that the brake
pad is worn.
Do not ride your bike if the brake
pads are worn. Have them replaced by a professional bike
workshop instead.
If required, you can readjust the rebound force via the spring adjustment screw so that both
brake arms move symmetrically. Once you have done this, check that the brake is working
properly (see "Readjusting the brake").
If the brake is still not working properly, or the brake pad is so worn
that it is not possible to readjust it, have your bike checked at a professional bike workshop
and replace the brake block.
If gear-shift components are loose, worn, damaged or adjusted
incorrectly, this poses a risk of injury to the rider. Have the derailleur gears adjusted at a
professional bike workshop.
NOTE: Always contact your specialist cycle shop if:
If you notice the chain jumps on the chain rings or sprockets when riding
If you hear unusual noises or you cannot change gears easily
If the front derailleur, rear derailleur, or other gear-shift components are loose, damaged or
distorted.
If chain links are defective or worn.

29
The bike chain must not be on the smallest chain ring at the front and
the small outer rear sprocket wheel simultaneously. The bike chain must not be on the largest
chain ring at the front and large inner sprocket wheel at the rear simultaneously. Otherwise
the bike chain could jump off.
Never pedal backwards when changing gears as you could damage
the gear-shift mechanism.
Only make changes to the gear-shift system carefully and in small increments. If settings are
made incorrectly, the bike chain could jump off the sprocket wheel and cause serious injury. If
you are unsure about what to do, have this work carried out by a professional bike workshop.
NOTE: Even if the gear system is perfectly adjusted, it can produce noise if the chain is
running at an extremely sharp angle. This does not mean it is defective and does not damage
the drive. As soon as the chain is at a shallower angle, the noise should dissipate.
Hub gears
This User Manual describes the handling of typical, commercially available gear-shift
components of a gear hub on a city or trekking bike. For other components, refer to the
separate information or enclosed instructions.
If you have questions on installation, adjustment, maintenance and operation, please consult a
specialist cycle shop.
If the hub is mounted on the frame, the correct fixing washers must be
used on both sides and the hub nuts must be tightened to the prescribed torque (see
"Technical data").
If the fixing washers are used on one side only or the hub nuts are
tightened incorrectly, the hub may mal-function: It could rotate. This could cause the shifting
cable to pull the handlebar to one side and cause a serious accident.

30
NOTE: The gears can be changed when the pedals are turning. Very occasionally, the hub
may produce a harmless noise which is caused by its internal cogs and stop notches.
If you encounter resistance when turning the wheel, t he brake pads will need to be replaced
or the hub will need to be lubricated. This should be done by a professional bike workshop.
If the chain jumps off the sprockets when you are riding, the slack in the chain must be taken
up immediately.
If there is no further scope for adjustment, the sprockets and chain must be replaced.
Shimano Nexus 3 Speeds
Turn the twist-shift lever to select 1 of 3 gears. Level 1 is least resistance speed
Increasing pedal force (increasing resistance) indicator towards 3
Decreasing pedal force (decreasing resistance) indicator towards 1
These instructions on operation of the Shimano twist-
shift grips also apply for other makes of twist-shift
grips.
Adjusting Gears With Shimano Hub Gears
Set the REVO-SHIFT lever to 2

31
Next, turn the cable adjustment bolt (A) to align the red line (D) on the push rod with the end
(C) of the hub axel.
(A) Cable Adjustment Bolt
(B) Push Rod
(C) End Of The Hub
(D) Red Line On The Push Rod
(E) Yellow Lines
(F) Yellow Part Of The Link
Move the REVO-SHIFT lever from 3 to 1 then back to 3. Repeat this two or three times and
check to see that the gears are being shifted. Move the REVO-SHIFT lever from 1 to 2 again
and make sure that the red line on the push rod is aligned with the end of the hub axel.
Fix the cable adjustment bolt with cable adjustment nut (G).
Adjusting Gears
Move the REVOSHIT lever from 1 to 3.
Check to be sure that the yellow setting
lines (A) on the cassette joint bracket (C)
and pulley are aligned at this time.
The Yellow setting lines on the cassette
joint are located in two places. NOTE: Use
the one that is easiest to see: When the
bicycle is upright or When the bicycle is
upside down.

32
Yellow marking lines appear at two points on the cassette joint. Use the line which is most
clearly visible. If the yellow setting lines are not aligned, turn the cable adjustment bolt of the
cassette joint to align the setting lines. After this, move the shifting lever again from 3 to 1 then
back to 3, and re-check to be sure that the yellow setting lines are aligned.
NOTE: If the yellow setting lines are not aligned,
turn the cable adjustment bolt of the cassette joint to align the setting lines. After this, move
the shifting lever again from 3 to 1 then back to 3, and re-check to be sure that the yellow
setting lines are aligned.
After adjusting the cassette joint, cut
off the excess length of
inner cable. Then install the inner end
cap (D).
(C) 15-20 mm
(D) Inner End Cap
Turn the cable adjustment bolt on the
shift lever to align the marking lines.
Next, set the REVO-SHIFT lever from
position 4 to position 1 then back to
position 4. Check that the yellow
marking lines still line up.
33
Bike chain
Clean and lubricate your bike chain regularly.
To prevent premature wear of the bike chain when using derailleur gears, select gears that
keep the chain skew as marginal as possible.
To check the wear in the bike chain, proceed as follows:
Take the section of the chain that rests on the front chain ring between your thumb and
forefinger.
Pull the bike chain off the chain ring. If the bike chain can be lifted by a significant amount, it is
worn and must be replaced by a new one.
With hub gears, the chain tension must be adjusted so that vertical play of one to two
centimeters is present in the unsupported chain span between the chain ring and sprocket
wheel.
To take up the slack in the bike chain, proceed as follows:
Loosen the rear wheel nuts.
Pull the wheel back into the dropouts until only the permissible amount of play is present in
the bike chain.
Tighten all screw connections carefully clockwise.
Tighten all screws to the prescribed torque as otherwise screws could
shear off and components could come loose or detach altogether (see "Technical data").
Maintenance of bike chains
Bike chains are wear parts. Bike chains with hub gears wear out after roughly 1,000 miles,
and after roughly 500 miles with derailleur gears.
34
If the bike chain is worn, it can break and cause a crash. If your bike
chain is worn, have it replaced by your specialist cycle shop before using the bike again.
Battery Management
Your battery is a 10.4AH Samsung Lithium-Ion Battery. The battery is sealed and
maintenance free with no serviceable parts. Opening the battery will void the warranty.
One of the main benefits of this type of battery is its low weight combined with a high capacity.
Li-ion batteries only weigh half as much as comparable nickel metal hybrid or nickel-cadmium
batteries. This means you carry less battery weight and more battery power.
Charging The Battery
There is no memory effect. You can therefore fully recharge your battery after every trip.
Recharge the battery after every trip. This means you can set off immediately the next time
you use your bike and you also increase the service life of the battery.
If you are not using the battery, you must recharge it after 3 months at the latest.
High degree of safety due to battery management
The battery cannot be damaged as a result of a short-circuit. If this were to happen, the
battery management would switch off the battery.
You can simply leave the battery standing in the charger as it prevents overcharging.
Storage
If you do not need your battery for a while, store it at a temperature of +10 °C at three quarters
of its full charge capacity.
The battery enters sleep mode to prevent it from totally discharging.
These benefits are available due to highly effective battery management that has been
adapted to this specific application and by tuning the battery for operation with a 250 watt
motor.

35
Observe the following points to increase the service life of your eBike Samsung Battery:
Make sure that the battery is fully charged before you ride your bike for the first time or after
you have not used it for a while.
You should run the battery all the way down to empty for the first three charging cycles. This
allows the battery to reach its maximum capacity.
If you continuously run the battery to empty during normal operation, this reduces its service
life.
If you partially recharge the battery frequently during normal operation, this has a favorable
effect on its service life.
You should therefore partially recharge the battery whenever possible: Try not to run the
battery all the way down to empty and recharge it even after a short period of operation.
If you are having problems with the battery, place it in the charger for one minute. A reset
occurs, during which the battery management disables sleep mode for example. After this, the
battery will work again.
Ideally you should charge the battery at a temperature of between +10 °C and +30 °C. It takes
longer to charge the battery at low temperatures, the battery will not charge up at
temperatures higher than
+30 °C. Ideally, you should charge and store the battery inside your house or in a warm
garage when the outside temperature is low. In this case you should only fit the battery on
your bike just before using it.
If you are transporting your eBike by car, take the battery out of its holder and transport it
separately.
The battery is ideally stored for longer periods charged to 75% of its capacity at a temperature
of +10 °C
Battery Information System
There is a control panel with four LEDs and a button ("Push") on the side of the battery that
faces outwards. The 4 LEDs indicate the charge level. To see what level the battery is
36
currently at press the “Push Button”. Information about the battery and its charge state is
provided based on the number of LEDs that light up and the way in which they light up.
The Battery
Batteries are wear parts. Wear parts also come with a 1-year warranty.
If the battery develops a fault during this period, your specialist cycle shop will of course
replace it. A fault does not constitute normal ageing and battery wear.
The service life of the battery depends on different factors. The most important wear-relevant
factors are:
1) The number of charge cycles
2) The age of the battery.
When you have fully charged and discharged your battery 400 times, it will still have 80% of
its initial capacity providing it has been well looked after:
From a technical standpoint therefore, the battery is "used" at this point. It also goes without
saying that the battery ages. Even if you do not use your battery, its capacity reduces.
You can extend the service life of the battery by fully recharging it after every journey, even if
it is small. The li-ion cobalt battery has no memory effect.
You can also extend the service life of the battery by using the assistance selectively. Avoid,
for example, using gears that make pedaling difficult with the most powerful assist level.
Battery Holder
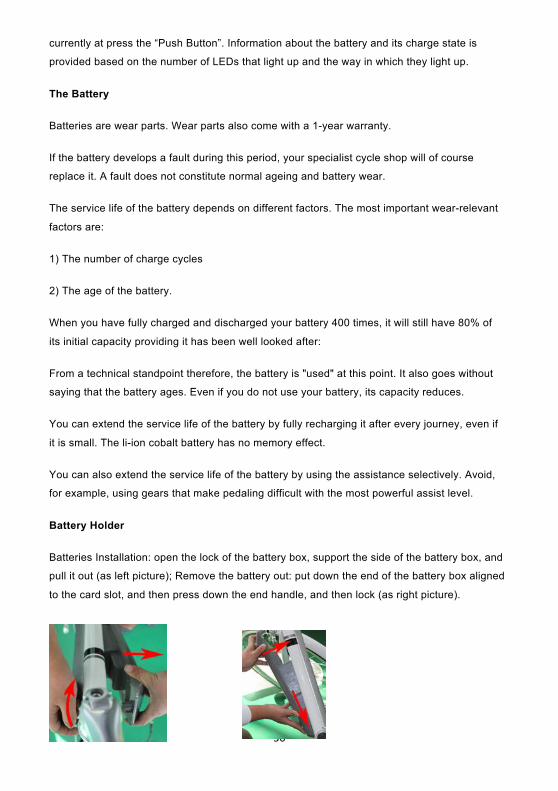
Batteries Installation: open the lock of the battery box, support the side of the battery box, and
pull it out (as left picture); Remove the battery out: put down the end of the battery box aligned
to the card slot, and then press down the end handle, and then lock (as right picture).

37
Charging the position: To connect the charger interface in this location.
Charger
Read the two stickers on the charger before using it for the first time.
Do not use other chargers. Only charge the battery using the charger
provided.
NOTE: If used incorrectly, the device may be damaged or inflict injuries.
Before cleaning the charger, always pull the plug out of the socket to avoid a short-circuit
and/or physical injury.
Only use the charger in dry rooms.
Only place the charger in a secure stable position on a suitable surface.
Do not cover the charger or place any objects on it as otherwise it could overheat and catch
fire
CARE & MAINTENANCE
Your new Benelli by Buffalo Corp eBike was designed for ease of use and owner servicing.
There are no tasks which require advanced skills. Most maintenance and replacing of parts
were designed to be accomplished by the typical bicycle rider. Please read this section to
learn how to keep your Benelli by Buffalo Corp eBike performing like new.
Keeping your eBike clean and free from dirt is essential regular maintenance routine. Dirt on
and around seals and drive train components can cause premature wear and dirt on paint and
38
part finishes can cause premature aging. If storing your bicycle outdoors under the elements,
you must keep it covered with a cover to avoid rain, snow or dirt damaging your new bicycle.
To clean your bicycle, follow these instructions:
Your bicycle incorporates electrical components; it is advised when washing your bicycle you
should first cover the throttle and battery terminals. Use a plastic bag or a plastic wrap to
cover the components. Place the bag or wrap around the complete throttle assembly and use
a rubber band or tape to secure. The battery should be removed prior to cleaning and a plastic
bag or wrap secured by tape can be used to cover the battery terminal. If you are planning for
a ride after washing, it is recommended the saddle also be covered. The saddle has miniature
holes where there is stitching and water can seep into these small holes.
NOTE: DO NOT use a powerful water jet or high-pressure cleaner. If water under high
pressure is directed at the bike, it can enter the bearings. This can dilute the lubricant, which
increases friction. This leads to rusting and irreparable damage to the bearings.
NOTE: DO NOT clean your bike with acids, grease, hot oil brake cleaners (apart from brake
discs) or fluids containing solvents. These substances attack the surface of the bike and
accelerate wear.
Dispose of used lubricants, cleaning agents and care products in an environmentally sound
manner. Do not pour these substances into the domestic waste, down the drain or into natural
water bodies or the soil.
To wash your bicycle you will need a small bucket of warm water with car soap, sponge, small
brush, chain lube and a few rags or towels.
• Rinse your bicycle off with a light spray of water to remove any dirt on the surface. Using
the sponge and warm soapy water, wash the frame and frame components; which include the
forks, handlebar and seat post. Start from the top of the bicycle working your way down.
• Once the frame is washed, use the sponge to clean the motor, spokes, chain guard and
rims.
• The tires, pedals, crankset and chain will be the remaining items needing to be washed.
Use the brush first on the tires and then the pedals. Rinse the brush and then using the warm
soapy water, clean the chain ring, freewheel and finally the chain. If the chain and drive train
are very dirty or greasy, a bicycle degreaser should be utilized.

39
• After washing, spray the bicycle down with fresh water.
• Use the rags or towels to dry off the bicycle. Start by drying the frame first, followed by the
components, the wheels, tires and then the drive train.
• Once the drive train is dry, use a chain lube to lubricate the chain.
NOTE: DO NOT allow care products or oils to come into contact with brake pads, brake
discs and the rim's brake contact surfaces. This could reduce the effectiveness of the brake.
Treat all parts that are susceptible to corrosion more frequently than other parts with
preservatives and care products, especially during the winter and in aggressive environments
such as coastal regions as otherwise your bike will corrode (rust) more powerfully and quickly.
Clean all galvanized and chrome-plated parts as well as stainless-steel components regularly.
Preserve these parts after cleaning with spray wax. Make sure that wax does not come into
contact with brake discs and rims. If you stop using your bike for a while, in the winter for
example, store it in a dry place at a constant temperature. Before putting your bike into
storage, inflate both tires to the prescribed tire pressure.
MAINTENANCE
Your bike is a technical product that must be regularly checked. The following table lists only
supplemental maintenance items. Many parts on your bike are subject to a higher degree of
wear due to their function and depending on their use.
NOTE: Have your bike checked regularly at a professional bike workshop and have the wear
parts replaced.
NOTE: Do not allow fluid oils to come into contact with the brake pads, brake contract
surfaces on the rim, or brake blocks as this could otherwise impair the effectiveness of the
brake.

40
Tires
Due to their function, bike tires are subject to wear. This depends on how the bike is used and
the rider can influence this significantly.
Do not brake so sharply that the wheels lock.
Check the tire pressure regularly. The maximum permissible tire pressure, and normally also
the minimum permissible pressure, can be found on the tire wall.
If necessary, inflate the tire up to the specified value. This reduces wear.
Do not expose the tires to things that can damage them such as sunlight, petrol, oil, etc.
Rims in conjunction with rim brakes
Owing to the interaction of the rim brake with the rim, not only the brake pad but also the rim is
subject to function related wear. If fine cracks appear or the rim flanges deform when the tire
pressure increases, this indicates increased wear. Wear indicators on the rim allow its wear
condition to be easily identified.
Check the wear condition of the rim at regular intervals.
Brake pads
The brake pads on rim, roller, drum and disc brakes are subject to wear, the extent of which
depends on how the bike is used. If the bike is ridden in hilly regions, or use din a sporty
manner, the brake pads may need to be replaced more often.
Check the wear condition of the pads regularly and, if necessary, have them replaced by a
professional bike workshop.
Bike chains
The bike chain is subject to function-related wear the extent of which depends on
care/maintenance and how the bike is used (mileage, rain, dirt, salt, etc.).

41
To increase the service life of the bike, clean the bike chains regularly and lubricate the chain.
The chain should be lubricated at each of the links. You can turn the crank counter clockwise
while lubricating each area of pivot.
Have the chain replaced by a professional bike workshop once its wear limit has been
reached.
Lubricating is always at the point where 2 surfaces touch together and friction is created. Your
local neighborhood bicycle shop or most mass merchants who sell bicycles will offer various
types of lubes for your bicycle
Chain Rings, Sprocket Wheels, and Jockey Wheels
In bikes with derailleur gears, the sprocket wheels, chain rings and jockey wheels are subject
to function-related wear. The extent of the wear depends on care/maintenance and how the
bike is used (mileage, rain, dirt, salt, etc.).
To increase the service life of the bike, you should clean and lubricate these parts regularly.
Have them replaced by a professional bike workshop once their wear limit has been reached.
Headlights & Taillights
Bulbs and other lamps are subject to function-related wear and therefore may need to be
replaced. In case you need to replace damaged bulbs, always carry spare ones with you.
Handlebar tapes and handle grips
Handlebar tapes and handle grips are subject to function related wear and therefore may need
to be replaced. Check regularly that the handles are securely seated.
Hydraulic oils and lubricants
The effectiveness of hydraulic oils and lubricants decreases over time. If lubricants are not
replaced, this increases the wear of the relevant components and bearings.
Clean and reduplicate all relevant components and bearings regularly.
Have the brake fluid for disc brakes checked regularly, and replaced if necessary.
42
Gear-shift and brake cables
Carry out regular maintenance on all break and gear-shift cables. Have defective parts
replaced at a professional bike workshop. This may be necessary especially if the bike is often
left outdoors and is exposed to the effects of the weather.
Bearings
All bearings on the bike, such as the headset, wheel hubs, pedals and bottom brackets, are
subject to function-related wear which depends on the intensity and duration of use and how
well the bike is looked after. Check these parts regularly.
Clean and lubricate them regularly.
MAINTENANCE SCHEDULE
Have your Benelli by Buffalo Corp eBike serviced regularly. The schedule in the table below is
a rough guide for cyclists who ride their bicycle between 500 - 1,000 Miles or 50 - 100 hours of
use a year. Riding more often or on poor road services will require maintenance more
frequently. To ensure safety during riding, please check all screws and moving parts every
month. Routine maintenance on brake, transmission and others shall be guaranteed to keep
normal functions of all parts any time.

43

44
Tightening Torques For Screw Connections
Only use provided tools or appropriate tools for assembly. A torque
wrench for example, to tighten the screw connections as otherwise the screws could shear off
or break.
NOTE: If you tighten screws too tightly, this could damage the components. You should
therefore always observe the prescribed tightening torque.

45
Model Benelli CLASSICA26
Max. Speed 15.5 MPH w/ Pedal Assist
Battery Range Up To 45 Miles
Charge time 4-‐6 hours
Electric System
Battery 36v10.4ah Samsung cell li-‐ion battery
Controller Sine ware, super Silence
Display Goccia Patent Twist LCD display, 4 PAS level
Motor 250 Watt Brushless Front Hub Motor
Light(F/R) F: Spanninga SWINGO; R: Spanninga PIXEO
Vehicle Specifications
FORK Alloy, fixed
HEADSET Neco
STEM Zoom, adjustable, alloy
HANDLEBAR Alloy, 26" : 640mm
GRIPS HL, EVA material
SEAT POST Alloy
SEAT TUBE CLAMP alloy, quick release
SADDLE Selle Royal, RIO
SHIFT LEVERS Shimano Nexus 3 speeds
REAR DERAILLEUR Shimano Nexus 3 speeds
46
REAR DERAILLEUR
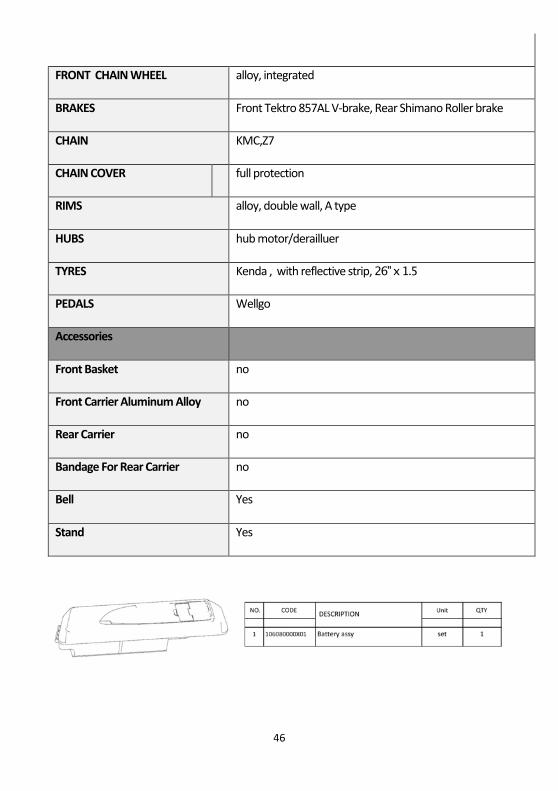
FRONT CHAIN WHEEL alloy, integrated
BRAKES Front Tektro 857AL V-‐brake, Rear Shimano Roller brake
CHAIN KMC,Z7
CHAIN COVER full protection
RIMS alloy, double wall, A type
HUBS hub motor/derailluer
TYRES Kenda , with reflective strip, 26" x 1.5
PEDALS Wellgo
Accessories
Front Basket no
Front Carrier Aluminum Alloy no
Rear Carrier no
Bandage For Rear Carrier no
Bell Yes
Stand Yes
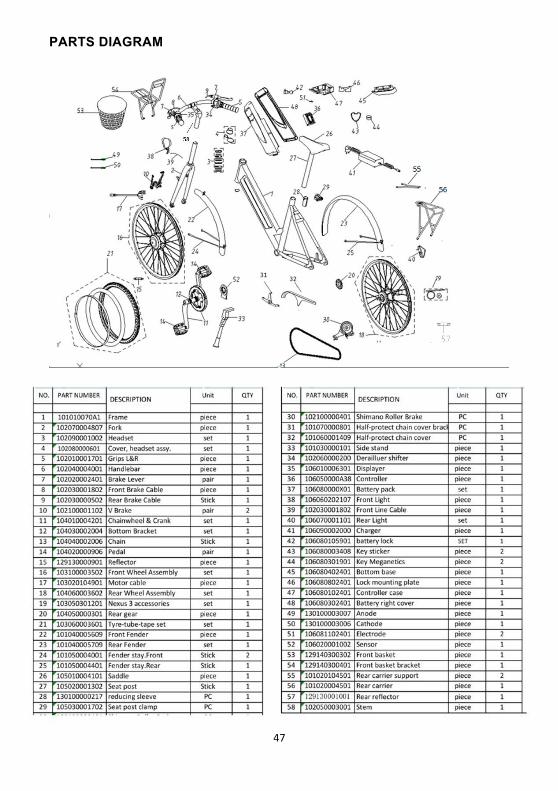
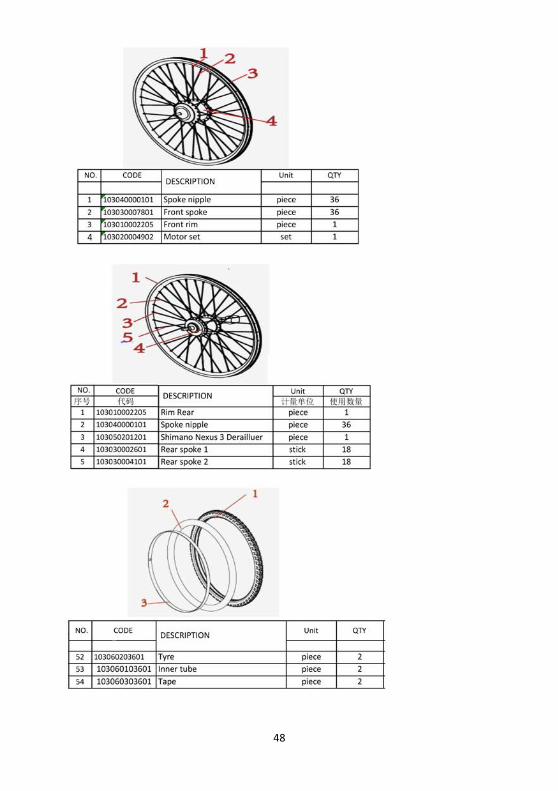
47
PARTS DIAGRAM
48
49
2 0 1 6 0 8