cleaning & caring for limestone objects
TRANSCRIPT

CLEANING & CARING FOR
LIMESTONE OBJECTS
Guidance prepared by
Stefanie Müller
Student Conservator from Durham University (Master of Arts in Conservation of Archaeological & Museum Objects)
at the University of Cambridge Museums
Version 2.0 · May 2021

1
TABLE OF CONTENTS
Preamble ______________________________________________________________________ 2
Cleaning & Caring for Limestone Objects _____________________________________________ 3
1. Introduction ____________________________________________________________ 3
1.1. What is Limestone? _____________________________________________________ 3
1.2. What does Limestone look like? ___________________________________________ 4
1.3. How does Limestone Deteriorate? _________________________________________ 5
1.3.1. Soluble Salts _________________________________________________________ 5
1.3.2. Air Pollution _________________________________________________________ 7
1.3.3. Frost Damage & Wind Erosion___________________________________________ 7
1.3.4. Biological Growth_____________________________________________________ 8
1.3.5. Further Causes of Damage ____________________________________________ 10
1.4. Identifying Damage ____________________________________________________ 11
1.5. When to Contact a Professional Conservator ________________________________ 12
2. Cleaning Techniques _____________________________________________________ 13
2.1. Reasons for Cleaning & Potential Risks _____________________________________ 13
2.2. What to Consider Before Cleaning? _______________________________________ 14
2.3. Dry Cleaning Methods __________________________________________________ 15
2.4. Wet Cleaning Methods _________________________________________________ 18
2.5. What to do if none of this is sufficient? ____________________________________ 19
2.6. Do’s and Don’ts – A Summary of Limestone Cleaning _________________________ 20
3. How to Store and Exhibit Your Limestone Objects ______________________________ 21
BIBLIOGRAPHY _________________________________________________________________ 23
Appendix – Practical Guide _______________________________________________________ 24
Acknowledgements _____________________________________________________________ 26
Disclaimer ____________________________________________________________________ 29

2
PREAMBLE
This guide describes good practices in limestone object cleaning. It outlines how
limestone objects can deteriorate and it aids in the decision making on whether an
object needs cleaning, to what extent, and what technique might be appropriate. The
guide also gives advice for the storage and exhibition of limestone objects.
Additionally, it includes information on where to get further help and support.
The guide is intended for those involved in or responsible for decision making about
conservation activities, such as local authority staff, custodians, staff responsible for
collections care, and staff overseeing volunteers.
A short practical version of this guide for those conducting limestone object cleaning
is available in the appendix.
Image on front page showing architectural limestone features. Image courtesy of Dr. Emily Williams.

3
CLEANING & CARING FOR LIMESTONE OBJECTS
1. Introduction
1.1. What is Limestone?
Humans have utilised stone since the earliest times with the ancient Egyptians being the first
people to quarry limestone in huge quantities for their pyramid constructions. Stone has always
been considered a very important material and many quarries used to be in royal ownership.1
A stone is a piece of rock that has been detached from the Earth’s crust. Rocks are aggregates
of minerals and are typically clustered into three categories: igneous, sedimentary, and
metamorphic.2 Limestones belong to the sedimentary kind and make up about 28% of the Earth’s
surface.3 Sedimentary rocks are the products that form when the Earth’s surface is being exposed
to the atmosphere, mainly to rainfalls and wind: The surface undergoes a weathering process where
pre-existing rocks are physically disintegrated, transported (called erosion), and deposited in a new
place.4 Sedimentary rocks are built up in layers over thousands of years. While igneous and
metamorphic rocks are usually hard and have a very low porosity, sedimentary rocks are
comparably soft (i.e. they can be easier scratched) and can be quite porous.5
Limestones mainly consist of calcium carbonate in the form of the mineral calcite. They are
formed either via direct precipitation of calcium carbonate from ground, rain, or sea water, or
through fossilised shells of one or more organisms (the organisms use calcium carbonate from their
habitat to build their shells or skeletons). Some limestones are created through the erosion of pre-
existing limestones.6
1 F.G. Dimes. 1998a. ‘The nature of building and decorative stones’. In Ashurst, J. and Dimes, F.G. (eds.) Conservation of Building and Decorative Stone. Oxford: Butterworth-Heinemann: 19. 2 Dimes 1998a: 22. 3 F.G. Dimes. 1998b. ‘Sedimentary rocks’. In Ashurst, J. and Dimes, F.G. (eds.) Conservation of Building and Decorative Stone. Oxford: Butterworth-Heinemann: 61. 4 K.C. Beck. 2021. Sedimentary rock. Viewed 09. February 2021 <https://www.britannica.com/science/sedimentary-rock>. 5 Madhu. 2011. Difference Between Igneous Rocks and Sedimentary Rocks. Viewed 09. February 2021 <https://www.differencebetween.com/difference-between-igneous-rocks-and-vs-sedimentary-rocks/#Sedimentary%20Rocks>. 6 Dimes 1998b: 86ff.
Remember: Although stones are said to be hard materials and your object may seem to be difficult to break, bend, or deform, it can still be soft and easily scratched.

4
1.2. What does Limestone look like?
Limestones can vary greatly in their appearance and properties depending on their provenance
and composition. In its purest form, limestone is nearly white, but only few limestones consist
entirely of calcium carbonate. Most contain other minerals and inclusions that influence their
colour like clay, dolomite, quartz, or even mud. Occasionally iron minerals and pyrite may be
present.7 Limestones vary in colour from black, brown, orange, green to buff, cream, yellow, and
white. Some may even be pinkish.8 Limestones range from dense stones with low porosity to soft
chalky and highly porous ones. They can be coarse or have a very fine texture.9 With some
experience, it is possible to differentiate a limestone from a sandstone (another form of
sedimentary rock) which is important since specific treatment methods may be appropriate for one
type of stone but not for the other. Limestones, for example, are susceptible to acidic substances.
The exact provenance and composition, however, can only be determined through laboratory-
based tests and consultation with experienced geologists.10
Because limestone was readily available and relatively easy to quarry and to carve, it has been
extensively used for building purposes.11 Entire buildings, walls, or features can be made of
limestone (like the Haddon Hall in Derbyshire, the walls of Cardiff Castle, the columns at Durham
Cathedral, or various features at colleges in Cambridge).12 But it has also been used widely for stone
artefacts. Due to its softness, limestone was often carved and thus used for altars and inscription
stones, gravestones, for statues, sculptures, monuments, and reliefs.13
Upon closer inspection – and often hiding under a layer of dust and soiling - the object may
show tool marks or traces of surface finishes like paint and gilding (decoration with gold leaf or
powder). A maker’s mark may be carved into the stone. These are all important evidence of the
object’s manufacturing process: With a mason’s axe the rough form of the object was cut out, and
then further shaped using picks, punches, and points struck by hammer or mallet. Different sizes of
tools were used. With flat chisels and drills, the stone was further refined, and designs and
inscriptions were added. Further smoothing of the surface was accomplished using metal tools like
rasps or riffles, and stone grit.14 Stone objects may have been finished with a primer and painted
over in various colours, or other types of coatings and additions like Plaster of Paris (a quick-setting
gypsum plaster in fine powder-form that hardens when moistened and dried) may have been
7 Dimes 1998b: 89. 8 N. Durnan. 2015. ‘Chapter Nine: Limestone’. In Henry, A. (ed.) Stone Conservation: Principles and Practice. Abingdon: Routledge: 162. 9 Durnan 2015: 162. 10 F.G. Dimes. 1998c. ‘Determination of a sample’. In Ashurst, J. and Dimes, F.G. (eds.) Conservation of Building and Decorative Stone. Oxford: Butterworth-Heinemann: 150f. 11 New World Encyclopedia. n.d. Uses of limestone. Viewed 23. March 2021 <www.newworldencyclopedia.org/entry/Limestone#Uses_of_limestone>. 12 Dimes 1998b: 90ff. 13 British Museum. n.d. Collection Search for: Place: Europe -> England, Material: Limestone. Collection search conducted on 23. March 2021 <https://www.britishmuseum.org/collection/search?place=Europe&place=England&material=limestone&image=true&view=grid&sort=object_name__asc&page=1>. 14 V&A. n.d. Sculpture techniques. Viewed 15. February 2021 <https://www.vam.ac.uk/articles/sculpture-techniques>.
The treatment methods described in this guide can be used on all types of limestone if properly executed. So, do not worry too much if you are unable to identify the exact stone type that your object is made of.

5
added. Stone was often gilded or decorated with silver and other metals applied in leaf or powder
form over a suitable priming.15
The object can also show other signs of “dirt” and inclusions that come from its use life or from
old repairs (Plaster of Paris fills, metal pins, adhesives etc.). It is important to consider whether
these are really harmful to the object, or whether their removal would also remove a part of the
object’s history.
1.3. How does Limestone Deteriorate?
It has been calculated that on average 1.5 to 3 millimetres of outdoor limestone erode every
100 years in temperature climates. This can cause inscriptions on tombstones and other surface
decorations to vanish within 300 years in the UK.16
The main causes of deterioration are:
• Soluble Salts
• Air pollution
• Frost damage & Wind Erosion
• Biological Growth
• Museum Visitors
• Inappropriate (Past) Treatments
• Clay and mud inclusions in the stone that are susceptible to moisture
1.3.1. Soluble Salts
Together with air pollution, soluble salts are one of the main causes for deterioration, and salt
crystallisation can be very damaging to porous stones like limestones.17 Salts are transported to the
pores and fissures by water. On outdoor stones this is usually rainwater, indoors the often
hygroscopic (water-loving) salts attract moisture from the air. When the stone dries, the water
evaporates, and the salts deposit either on the surface or within the stone. This is called
crystallisation. With every cycle of wetting and subsequent drying the salts redissolve and
recrystallise, often moving around inside the stone’s pore system and increasing in volume. This
causes pressure to be exerted on the pore walls within the stone. When the pressure exceeds the
15 L.R. Rogers. n.d. Sculpture. Viewed 15. February 2021 <https://www.britannica.com/art/sculpture>. 16 S. Scheerer. 2008. Microbial biodeterioration of outdoor stone monuments. Assessment methods and control strategies. PhD Thesis. Cardiff University. Ann Arbor: ProQuest LLC: 19. 17 D.B. Honeyborne. 1998. ‘Weathering and decay of masonry’. In Ashurst, J. and Dimes, F.G. (eds.) Conservation of Building and Decorative Stone. Oxford: Butterworth-Heinemann: 154.
Remember: Beneath the dirt layer may be traces of the stone’s history that must be preserved. Not all dirt is recent staining. Surface decorations may not have been as colourful as we would expect, so be careful not to miss anything.

6
strength of the stone, damage in the form of cracks, surface flaking and powdering can occur.18 Salts
can also damage the stone due to different rates of thermal expansion: At the same temperature,
salts like sodium chloride expand much more than the calcite that makes up limestone causing
internal stresses that again can result in cracks.19
Once salts have been introduced to the stone, wet-cleaning as well as changes in relative
humidity and temperature can often be sufficient to cause salt damage.20 Salt contamination inside
the pores can only be detected with certain laboratory-based tests, whereas salt growth on the
stones’ surface may be visible in the form of a white powder (called efflorescence). Efflorescence
can be unaesthetic but is usually harmless21 – at least on undecorated surfaces.
Stones are contaminated with soluble salts from several sources:22
• Air pollution can introduce sulphates and nitrates
• Rising damp can introduce salts from the soil
• Salts may be introduced during burial or historic use lives (e.g. salted meats have been stored
in stone vessels during Medieval times)
• Near the ocean, sodium chloride may be blown in by the wind
• De-icing salts in winter
• Unsuitable cleaning products (caustic soda or caustic potash are often advertised for cleaning
limestone but can be converted to sodium or potassium sulphates by acids in the air), garden
fertilisers and so on
18 E. Doehne and C.A. Price. 2010. Stone Conservation: An Overview of Current Research. Los Angeles: The Getty Conservation Institute: 15. 19 Western Australian Museum. 2017. Stone and Geological Collections. Viewed 16 February 2021. <https://manual.museum.wa.gov.au/conservation-and-care-collections-2017/stone-and-geological-collections>. 20 J. Larson. 1998. ‘The conservation of stone monuments in churches’. In Ashurst, J. and Dimes, F.G. (eds.) Conservation of Building and Decorative Stone. Oxford: Butterworth-Heinemann: 189. 21 Honeyborne 1998: 154. 22 Doehne & Price 2010: 15, Honeyborne 1998: 155.
Remember: Your object may contain harmful soluble salts even if you cannot see them. Humidity and water can cause damage – even months or years after its exposure.
Examples of stone features having experienced material loss (left), surface flaking/chipping (middle) and stone splitting (right). Images taken by author with kind permission from Burwell Museum & Windmill.

7
1.3.2. Air Pollution
Factories, transportation, domestic heating systems, and other forms of human activity are the main causes that pollute our air with small carbon particles and sulphurous gases. When these gases combine with water, acid rain (sulphurous and sulphuric acids) is formed. This can react with calcium carbonate (the main constituent of limestone) to form partially soluble calcium sulphate dihydrate – also called gypsum. As water evaporates, the gypsum crystallises on the limestone’s surface23 slowing down the attack.24 Where limestone objects are exposed to regular rainfalls, the gypsum is washed off leaving behind a fresh surface that anew can be attacked by acid rain. This process is called sulphation. With time, sulphation of limestone will erode the stone’s surface.25 In sheltered areas, a transparent crust is formed. This is quickly polluted by atmospheric carbon particles forming a black crust. The crust may be very thin or accumulate to a thickness of several centimetres.26 Blisters can form and burst, exposing fresh limestone to further acid attack, for example introduced in foggy weather.27
1.3.3. Frost Damage & Wind Erosion
Frost damage is less common than deterioration caused by air pollution and salt crystallisation
but can nonetheless be severe. It usually only happens when a stone is very wet or when water is
caught and collected in crevices. Remember, a snow layer may be the cause for wetness in winter.
As the water freezes inside the stone’s pores, it expands (ice occupies around 9% more volume than
water). In stones that have small pores this can have a similar effect like salt crystallisation: the ice
exerts too much pressure onto the pore walls and the stone cracks, sometimes resulting in pieces
of stone breaking off.28 Outdoor limestone objects should therefore never be wet-cleaned in winter
when there is a risk of frost.
Wind erosion is more of a problem with historic ruins and other large monuments that are
regularly exposed to strong winds. The wind can directly abrade the stone’s surface. With
limestones, strong winds can further accelerate the problems associated with salt crystallisation
and acid rain as they cause the stone to dry out quickly.29 Near oceans, strong winds can transport
ocean mist including high concentrations of sodium chloride salts to the object.
23 K.C. Normandin and D. Slaton. 2015. ‘Chapter Eight: Cleaning Techniques’. In Henry, A. (ed.) Stone Conservation: Principles and Practice. Abingdon: Routledge: 129. 24 Honeyborne 1998: 156. 25 Honeyborne 1998: 156, Doehne & Price 2010: 11. 26 Restorative Techniques. 2012. Problems of Carbon Sulphation - Cleaning Properly Not Just Done Purely For Aesthetic Reasons. Viewed 15. February 2021 <https://www.restorative-products.com/news/2012/problems-of-carbon-sulphation-cleaning-properly-not-just-done-purely-for-aesthetic-reasons>. 27 Honeyborne 1998: 156, Durnan 2015: 164. 28 Honeyborne 1998: 159ff. 29 Honeyborne 1998: 164.
Remember: Manually washing off the gypsum crust will expose fresh limestone to the atmosphere. Without shelter, the cycle will start anew gradually eroding your object.
8
1.3.4. Biological Growth
Next to small animals like birds who may physically harm the object by picking on the stone to
collect seeds and grit – with the additional risk of their droppings producing harmful acids –
biological growth in the form of mosses, lichens, bacteria, fungi, moulds, and plants pose another
risk for stone deterioration. Most biological growth, however, is harmless and might even serve as
protective barrier against moisture and wind.30 Their main effect will be aesthetic as biological
growth often results in discolouration and obscuring parts of the object. Some types of mosses and
lichens are protected by law.31
Yet, some types of growth may cause structural damage and other forms of surface deterioration:
• Woody plants can cause damage to the substrate since their roots can penetrate the pore
system, in that way dislodging stone pieces.32 But since limestone that is in sound condition
commonly has a dense and fine-grained composition, plant penetration is usually poor and
mainly superficial or along cracks and fissures.33
• Mosses are often superficial and may retain water to the surface thus exposing the stone to a
constant supply of moisture that can cause or accelerate salt damage. On fragile surfaces, their
roots may cause pitting.34
• Algae usually collect superficially and do not penetrate the stone. A thick layer that accumulates
within joints and cracks, though, can create an environment that favours the growth of other
organisms and woody plants. Some types of algae produce a type of slime that can expand and
contract during wetting and drying cycles thus causing the stone’s surface to flake or spall off.35
• Fungi are one of the most common organisms growing on stone objects. Their strands (hyphae)
can penetrate stone surfaces to collect nutrients, at the same time secreting a small amount of
acid that may cause damage to the limestone surface.36
• Lichens are a combined form of algae and fungi. Their hyphae can penetrate the surface and
secret acids. They are slow-growing, and some rare forms can cause bleaching, blistering, or
pitting.37
30 J.A. Eklund. 2013. Biological Growth on Masonry: Identification & Understanding. Edinburgh: Historic Scotland: 2, Historic England. 2019c. Conserving Stone War Memorials: Cleaning with Biocides. Viewed 09. February 2021 <https://www.youtube.com/watch?v=Zp6obZuFhm0>, Doehne & Price 2010: 21. 31 Eklund 2013: 6. 32 Eklund 2013: 5. 33 T. Warscheid and J. Braams. 2000. ‘Biodeterioration of stone: a review’. In International Biodeterioration & Biodegradation. 46 (2000) 343-368: 345f. 34 Eklund 2013: 3 & 5, Historic England. 2019a. Reasons for Cleaning Stone War Memorials. Viewed 09. February 2021 <https://www.youtube.com/watch?v=xQVUl_LfAQk>, Historic England 2019c. 35 Eklund 2013: 4. 36 Eklund 2013: 5. 37 Eklund 2013: 5, Historic England 2019c.
Mosses, algae, lichens, and fungi are the main forms of biological growth on limestones. Remember: Most organisms are harmless and might be protected by law. Is it really necessary to remove them?

9
Moisture is the main favouring factor for biological growth.38 The extent of biological activity
depends on the stone’s composition and properties like porosity and roughness of its surface (many
organisms seem to favour rougher surfaces over sleek ones).39 Reducing dampness and exposure
of the stone is therefore the best approach to control biological growth.
➢ Regular cleaning may further roughen the stone’s surface thus creating even more favourable
growth conditions.
➢ Some spores are always likely to survive any cleaning and will cause re-growth.40
➢ Susceptibility to cleaning techniques can vary from species to species, and many organisms’
contribution to biodeterioration have scarcely been studied.41 Hence, commercial products like
biocides are often not efficient or will just bring short-term relief – not to mention their harmful
effects on humans, the environment, or the object itself.42
38 Warscheid & Braams 2000: 344 & 349. 39 Warscheid & Braams 2000: 344, Eklund 2013: 4, Historic England 2019c. 40 Eklund 2013: 6f. 41 Scheerer 2008: 189. 42 Eklund 2013: 7, Warscheid & Braams 2000: 357, Scheerer 2008: 189.
Remember: Protecting your object from moisture is the best way to control biological growth.
Example of a gravestone (left) and a limestone building feature (right) with biological growth. Image courtesy of Dr. Emily Williams.
Example of moss growing on stone surface. Image taken by author with kind permission
from Burwell Museum & Windmill.

10
1.3.5. Further Causes of Damage
Museum visitors always pose a certain degree of risk to objects: Next to vandalism, for example
in the form of graffiti, they might accidentally stumble over objects on the ground, and they might
touch objects, sit, or stand on them thus causing abrasion and soiling (e.g. from oily fingers, food,
drinks etc.). Large numbers of visitors can increase temperature and relative humidity inside a room,
thus accelerating the risk for salt damage.43
Another cause for object deterioration may be inappropriate (past) treatments. As described
before, extensive exposure to water – for example through water cleaning – can cause salt damage,
erode the surface, and pose long-term risks. Limestones are especially susceptive to acids as these
have the ability to dissolve calcium carbonate (the main component of limestone). All kinds of
chemicals, solvents, surface coatings, and biocides can be dangerous to the object if used by
unskilled persons and should thus only be applied by professional conservators who have the
equipment to do in-depth analysis of the soiling and the stone’s composition and the experience
and expertise on various treatment techniques.
Finally, clay and mud inclusions in the stone may readily pick-up moisture and swell, thus
posing a risk for the stone to split.45
43 Honeyborne 1998: 172. 44 H. Jaeschke. 2021. E-Mail to S. Mueller on 10. February 2021. 45 Jaeschke 2021.
Remember: With the wrong cleaning product, limestone will dissolve. Imagine an effervescent Vitamin C tablet in water - the effect is just the same.44

11
1.4. Identifying Damage
The extent of deterioration can vary greatly from stone to stone as it depends on its chemical
composition (what minerals are present and to what extent) as well as physical properties like
porosity and texture.46 A number of laboratory-based analytical techniques are available to
conservators to identify damage, especially inside the stone, as well as its extent.
However, with careful visual examination many signs of damage like salt efflorescence,
biological growth, fractures, fissures, cracks etc. can be detected also by untrained eyes.
Tips to Properly Examine Your Object:
• Examine your object in appropriate lighting (daylight rather than twilight, use a desk lamp if
necessary).
• It can help to use a magnifying glass.
• If you have them try to compare the object to old photographs to see how features may have
changed.
• Document everything you see:
➢ Use a notebook, make little drawings, and take pictures to document everything that seems
suspicious to you. Even if you are not sure what it is or whether it is harmful – you might be
able to use your documentation to get advice from a stone conservator afterwards. Not only
is documentation good practice, but you will also be able to determine the success of your
cleaning and monitor any future changes.
➢ Make sure to use some kind of scale in your drawings and photographs to indicate the size
of the damage (if nothing else, holding a finger next to the damage may be a good solution).
➢ Use good lighting, and make sure that what you want to photograph is clearly visible in your
picture (close enough, captured in its entirety, not covered).
➢ Be careful not to scratch the object with your scale, camera, pens, magnifying glass etc.
• Take your time: The longer you look at the object, the more you might see.
• Follow a schematic approach (e.g. from top to bottom, from left to right) to not miss out on
areas.
• And as always: Practice makes perfect. With experience you will be able to easier detect
irregularities and identify potentially harmful damage.
46 Normandin & Slaton 2015: 132ff.

12
1.5. When to Contact a Professional Conservator
➢ When your object is damaged or seems unstable (shows cracks, breaking-off pieces, has a
flaking, spalling, crumbling, or powdering surface). A professional conservator may be able to
repair and consolidate any damaged areas. Do not attempt to glue pieces together yourself.
➢ When you are not sure what kind of soiling you have and whether it is harmful or might even
be part of the object’s history. It is always better to consult with a conservator who may have
the appropriate tools to analyse the soiling and to advice on whether it should be cleaned or
not.
➢ When you monitor your object over a certain time and observe sudden changes (e.g. salt
efflorescence, new soiling of unknown origin, new fissures or cracks). A conservator may be able
to identify the cause.
➢ When you are not sure whether you have the right plan or appropriate skills and tools to clean
the object. It is always better to ask a conservator to revise your approach before irreversible
damage is done.
47 Find a specialist conservator via ICON: https://www.icon.org.uk/resources/caring-for-your-collection/finding-a-conservator-you-can-trust.html 48 Find a specialist conservator via AIC: https://www.culturalheritage.org/about-conservation/find-a-conservator 49 Find a specialist conservator via CCI: https://www.canada.ca/en/conservation-institute/corporate/org-structure.html#a2e
Be aware that not every conservator is specialised in stone conservation. The best way to find
a specialist conservator is via local professional bodies. In the UK this is the Conservation
Register of The Institute of Conservation (Icon)47 - the register is free to use -, in the United
States the American Institute for Conservation (AIC)48, and in Canada the Canadian
Conservation Institute (CCI)49.
In the UK, museum development providers can assist in finding funding information and in
applying for financial help for your project. An overview of the current Museum Development
providers can be found here: https://mduk.org.uk/programmes .

13
2. Cleaning Techniques
2.1. Reasons for Cleaning & Potential Risks
You have thoroughly examined your object and detected soiling that you want to remove?
Before you do so, always question the origin of the soiling. Is it recent dirt, or could it also come
from the object’s past use life, its manufacturing process, or could it even be traces of former
surface decoration (paint, gilding etc.)? These are all evidence of the object’s history and should
not be removed. Some of it may not be clearly visible as it is obscured by dust and debris. Work
carefully. You do not know what you might discover. If you are afraid that historic soiling or
decorations might pose a risk to the object or hinder your cleaning approach, contact a stone
conservator. They will help come up with a strategy.
You want to remove biological growth? Remember that most organisms are harmless, and
some might even be protected by law.
Always question your motivation for cleaning. It is not appropriate to clean just to make the
object look nice and shiny.50 In fact, soiling may actually serve an object’s historic integrity - why
should it look like new when it is hundreds of years old?
Even when using appropriate cleaning techniques and tools there is a number of risks that
cleaning poses, and they should be balanced against the wish to clean:
• Surface damage and loss: the object may look more stable than it actually is. If in doubt
contact a stone conservator.
• Removing some encrustations and soiling can inevitably remove original material (e.g. the
calcium sulphate crust on limestone caused by acid rain is a product of chemical alteration
of original material).
• Deposition of soluble salts introduced by commercial products.
• New staining caused by water run-off.
• A freshly cleaned surface can make the object more susceptible to pollutants and biological
growth.
Soiling and biological growth should only be removed if they are harmful to the object, visually
obtrusive, or obscure important features like inscriptions or decorations.51 Plan upfront what you
want to remove, why, and to what extent. In most cases not the whole object will require cleaning
and a localised approach may be the most appropriate – though be careful to avoid your object
getting a patchy look of cleaned and uncleaned sections.
50 C. Willett. 2017. Conserving War Memorials: Cleaning. Edinburgh: Historic England: 5, Jaeschke 2021, J. Appell. 2010. Cleaning Gravestones, Monuments & Stone Sculptures. Viewed 09. February 2021 <http://www.gravestonepreservation.info/articles/cleaning-gravestones-monuments-stone-sculptures>. 51 Historic England 2019a.

14
2.2. What to Consider Before Cleaning?
A number of points should be considered before cleaning. The following gives you a checklist
that may need adding to depending on your individual objects and circumstances. The next sections
in this guide will give you ideas on how to tackle these points:
□ Make sure that you have documented and photographed the object before cleaning.
□ Have a plan on what you want to remove, how, and to what extent. What is your goal?
□ Manage your time. Cleaning may take longer than you expect as you take a cautious approach
and might need to clean narrow crevices and carvings.
□ Where will you carry out cleaning? Prepare cushioning under the object, make sure that it can
be accessed from all sides to avoid extensive handling. Make sure that it is out of the way from
people walking by.
□ How do you plan to collect dirt residues and water run-off?
□ Do you need Personal Protective Equipment (PPE)? Look at the information box below for
some advice.
□ Any cleaning technique should be tested upfront on a small and discreet area of the object to
assess its efficiency, potential risk of damage, to manage expectations, and to plan how long
the entire cleaning process will take.
□ Plan to finish an object’s entire side in one day once you start wet-cleaning to avoid patches
through irregular drying.
□ Do not wet-clean outdoor objects in winter when there is a risk of frost.
□ Photograph the object after cleaning and document your work: What did you do? How did
you do it? What materials did you use? Some damage may only become apparent in the long-
term, and your documentation can then be helpful in finding a solution.
□ Know where you want to put the object once it has been cleaned and prepare the area. Make
sure that the object is not being introduced to the same damaging conditions again. See section
3 for advice on display and storage conditions.
□ Stone objects – especially those displayed outdoors - can be very heavy. Carry them with
several people or use appropriate lifting equipment. Before lifting, know where you want to
place the object and make sure that your path has been cleared.
□ ____________________________________________________________________________
____________________________________________________________________________
□ ____________________________________________________________________________
____________________________________________________________________________
□ ____________________________________________________________________________
____________________________________________________________________________

15
2.3. Dry Cleaning Methods
As you have seen in the previous chapters, water can do a lot of damage to limestone objects.
It is therefore best to start cleaning your object with dry methods first. The following will remove
dust, soiling and other loosely bound particles as well as superficial organic growth from your object:
Brushes:
✓ Soft bristle brushes are available in various shapes and sizes. Have a couple of them at hand to
choose the one that works best on large areas, small crevices, and around decorations. It is very
important to use a soft brush as limestone can be easily scratched and damaged.
✓ Cover the brush ferrule (it is often made of metal) with masking tape or similar so that it cannot
accidentally scratch the object.
✓ Start with the softest brush available.
✓ Plan how to collect the loosened dirt. Indoors a vacuum on low suction can be useful (a low
suction is very important so you do not accidentally dislodge any stone pieces or decorations).
Never use the vacuum directly on the object but hold it away a couple of centimetres. Cover the
hose of your vacuum with a fine mesh to collect anything that may come off accidentally (and
stop vacuuming and brushing immediately if parts of the stone’s surface are crumbling off). The
following video by South West Museum Development demonstrates this very well:
https://southwestmuseums.org.uk/resources/cleaning-dry-methods.52
✓ Only use clean brushes so you do not contaminate your object with any unwanted substances.
52 South West Museum Development Programme. n.d. SWANS How-To Videos – Cleaning: Dry Methods. Viewed 17 March 2021 <https://southwestmuseums.org.uk/resources/cleaning-dry-methods/>.
Advice on PPE
Personal Protective Equipment (PPE) like gloves, lab coats, safety goggles etc. should be worn
whenever there is a risk of the operator being harmed by cleaning products, residues on the
object, or the object itself.
➢ Do not wear open-toed shoes, no high heels, etc. When handling heavy stones, consider
wearing shoes with a steel cap.
➢ Wear disposable gloves when handling hazardous substances. Also, consider that some of
the dirt on your object might be harmful (e.g. bird droppings – pigeons, for example, can
transmit a range of diseases to humans), and that your object may have been treated with
harmful substances in the past (e.g. biocides). Always cover cuts and wounds on your hands
with a plaster and protect them with disposable gloves.
➢ Wear a dust mask (FFP3 is recommended) when cleaning heavy dust, mould, or fungi
spores off your object. If possible, use a vacuum with a HEPA filter.

16
✓ Work slowly and observe closely what is being removed. Is it just dust and soiling, or is the
stone’s surface friable and easily removed by brushing? Are there any surface paints, gilding, or
other decorations beneath the dirt layer? Do they come off with brushing? If so, stop
immediately and consult a stone conservator to avoid losing parts of the original object.
Never ever use wire brushes, steel wool, or other kinds of stiff brushes. They will scratch and
abrade the soft limestone surface and can do a lot of damage. Wire brushes may additionally
leave behind small steel particles that can cause rust staining.
Brushes can be purchased in art shops, hardware stores, and various online shops. You might also
have access to office supply shops and purchasing consortiums if you are part of a local authority or
similar large organisation. The following products from PEL serve as references for what you should
look for:
Source: PEL Online Shop.53 Cheaper options are available in art shops and hardware stores.
Sponges:
✓ Sponges can be useful to remove dirt and greasy deposits that are more adherent to the object.
Again, it is important to use a soft sponge like Smoke Sponge that is made of vulcanised natural
rubber, microfibre sponges like PEL’s Conservators’ Sponge or cosmetic sponge wedges (made
of polyurethane). They can all be cut into the shape and size that you need. Smoke Sponge can
be made of synthetic material or latex (be careful with allergies and add a caution to your risk
assessment for working with latex sponges).
✓ A small dust blower can be useful to remove sponge residues and debris as you go along.
✓ Once done, remove any sponge residues with a soft bristle brush.
Do not use erasers, kitchen, pot, or cleaning sponges as they can damage your object.
Do not scrub your object with the sponge. Carefully dab the sponge across the dirty area and it
will pick up dust and soiling. The following video by Philatelic Preservation - albeit demonstrated
on paper - shows this very well: https://youtu.be/zinsJ6F0Kuk.54
53 PEL. 2021a. Dusting & Cleaning Brushes. Viewed 16 February 2021 <https://www.preservationequipment.com/Catalogue/Equipment-Tools/Brushes/ Dusting-Brushes>. 54 Philatelic Preservation. 2014. Dry cleaning paper with a smoke sponge. Viewed 17 March 2021 <https://www.youtube.com/watch?v=zinsJ6F0Kuk>.
17
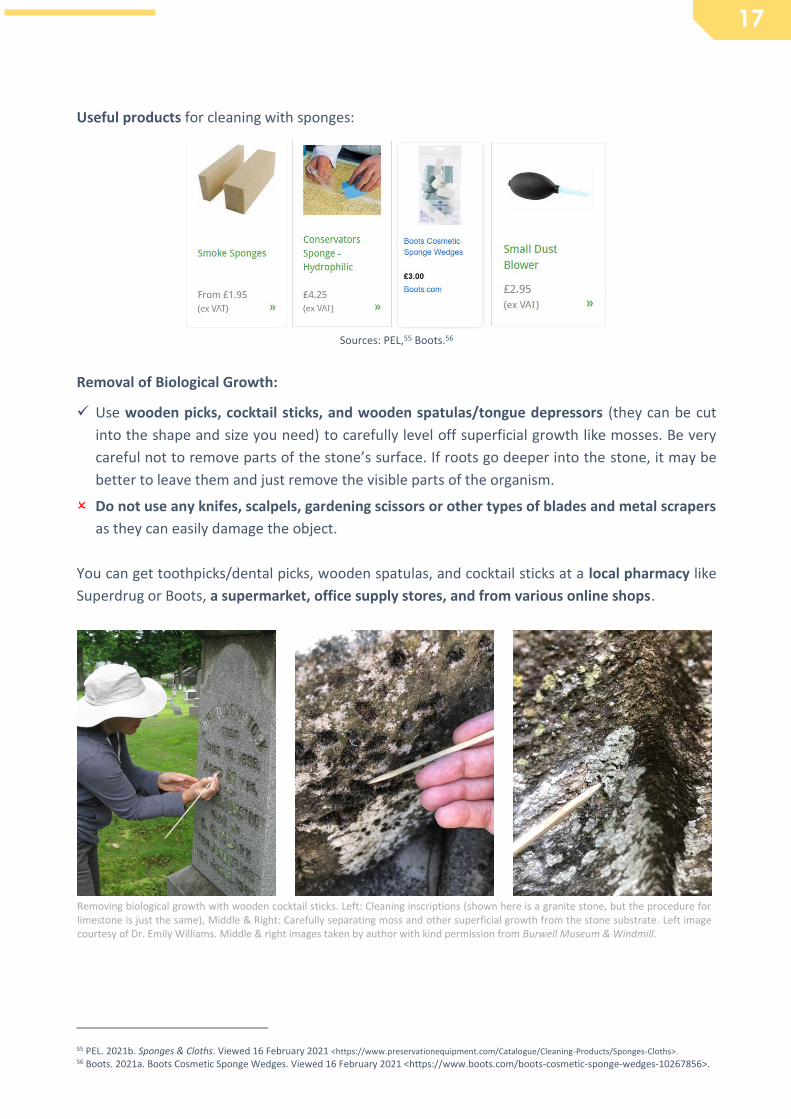
Useful products for cleaning with sponges:
Sources: PEL,55 Boots.56
Removal of Biological Growth:
✓ Use wooden picks, cocktail sticks, and wooden spatulas/tongue depressors (they can be cut
into the shape and size you need) to carefully level off superficial growth like mosses. Be very
careful not to remove parts of the stone’s surface. If roots go deeper into the stone, it may be
better to leave them and just remove the visible parts of the organism.
Do not use any knifes, scalpels, gardening scissors or other types of blades and metal scrapers
as they can easily damage the object.
You can get toothpicks/dental picks, wooden spatulas, and cocktail sticks at a local pharmacy like
Superdrug or Boots, a supermarket, office supply stores, and from various online shops.
55 PEL. 2021b. Sponges & Cloths. Viewed 16 February 2021 <https://www.preservationequipment.com/Catalogue/Cleaning-Products/Sponges-Cloths>. 56 Boots. 2021a. Boots Cosmetic Sponge Wedges. Viewed 16 February 2021 <https://www.boots.com/boots-cosmetic-sponge-wedges-10267856>.
Removing biological growth with wooden cocktail sticks. Left: Cleaning inscriptions (shown here is a granite stone, but the procedure for limestone is just the same), Middle & Right: Carefully separating moss and other superficial growth from the stone substrate. Left image courtesy of Dr. Emily Williams. Middle & right images taken by author with kind permission from Burwell Museum & Windmill.

18
When reading about dry-cleaning techniques, you may come across other options like sand- or
grit-blasting, air-abrasion, power tools, or other abrasive techniques. Inappropriate use of any of
these can lead to severe object damage and can also pose health and safety risks for the operator.
Even if carried out in the most careful way it can cause material loss. Operators must be trained and
experienced and will need appropriate PPE57 – do not attempt to use any of these yourself.
2.4. Wet Cleaning Methods
Water can be very effective in removing stubborn soiling and staining.58 But exposing your
limestone object to moisture always bears the risk of salt movement, efflorescence, surface erosion,
and can create favourable growing conditions for biological organisms. Damage sometimes only
becomes apparent years later so it must be used with caution:
✓ Before you start cleaning, test your chosen method on a small discreet section of your object.
Let it dry thoroughly and inspect the area closely for any potential damage. Has it become softer
than the surrounding stone? Do you see staining?
✓ Always use clean water, ideally deionised or distilled water to avoid staining and contamination
with mineral salts.
✓ Only clean where absolutely needed. In most cases it is not necessary to clean the whole object.
✓ Use lightly dampened cotton swabs (squeeze them out between your fingers). Apply them in a
rolling motion, never rub them over the surface. Cotton seems to be soft, but its fibres can be
quite scratchy on soft surfaces (often only visible under a microscope). The following video by
South West Museum demonstrates this very well: https://southwestmuseums.org.uk/resources/cleaning-
wet-methods.59 To save money and make swabs as thin or thick as you need, use wooden sticks
and roll small pieces of cosmetic cotton wool around one end. Use an old glass jar with a hole in
the lid to collect used cotton. The toothpick can be reused multiple times.
✓ Soiling and dirt are often softened with a little water and can then be removed easily with dry
cleaning tools (brushes, wooden picks etc.). No need to wet-clean until all soiling is gone.
✓ If you need to clean a larger area, use a Fine Mist Sprayer with an adjustable nozzle. This will
keep the amount of water that your object is exposed to to a minimum and is much better
controllable than larger volumes.
✓ Although this might be counter-intuitive, clean from the bottom up to avoid staining from run-
off water as dry stone will readily absorb the dirty water.60
✓ Immediately collect run-off water with sponges, tissue, or cotton swabs to avoid new staining.
✓ Regularly take a step back from the object to make sure that your cleaning results look even.61
57 Normandin & Slaton 2015: 147. 58 Willett 2017: 8. 59 South West Museum Development Programme. n.d. SWANS How-To Videos – Cleaning: Wet Methods. Viewed 17 March 2021 <https://southwestmuseums.org.uk/resources/cleaning-wet-methods/>. 60 Appell 2010. 61 Historic England. 2019b. Conserving Stone War Memorials: Water Washing. Viewed 09. February 2021 <https://www.youtube.com/watch?v=sGX9E_f5f00>.

19
Never use pressure washing, not even low-pressure as limestone is soft and easily damaged by
water hitting the surface. So, no gardening hoses and sprayers.
Do not add any chemicals or detergents to the water to avoid staining and long-term damage.
Water is an efficient solvent and can dissolve historic paints and surface coatings. Stop
immediately if this begins to happen.
Materials you might find useful:
Sources: Tesco,63 Boots,64 and PEL.65
2.5. What to do if none of this is sufficient?
Remember your initial cleaning goal. What did you want to remove, why and to what extent?
Is the soiling, crust, biological growth really harming the object or is it just an aesthetic issue? Never
aim for a nice and shiny “like-new” object.
Take a step back: Your museum visitors will not be standing as close to the object as you
currently are. If it is hardly visible from a 6-feet distance, then it is probably not necessary to remove.
If you are still not satisfied with the result or think the soiling might be harmful, contact a
specialist conservator (see page 11 for contact details).
62 H. Jaeschke. 2021. E-Mail to S. Mueller on 10. February 2021. 63 Tesco. 2021. Tesco De-Ionised Water 2.5L. Viewed 16 February 2021 <https://www.tesco.com/groceries/en-GB/search?query=deionised%20water>. 64 Boots. 2021b. Boots Cosmetic Cotton Wool Balls x100. Viewed 16 February 2021 <https://www.boots.com/boots-cosmetic-cotton-wool-balls-x-100-10111654>. 65 PEL. 2021c. Sprayers. Viewed 16 February 2021 <https://www.preservationequipment.com/Catalogue/Equipment-Tools/Sprayers>.
Remember: Surfaces that withstand a short contact with water may become much softer with prolonged exposure.62 Always use the least amount of water needed.

20
2.6. Do’s and Don’ts – A Summary of Limestone Cleaning
Consider why you want to remove something Is it really harmful? Could it be part of the object’s history?
Do not aim for an “as-new” look
Only use soft bristle brushes and soft sponges Do not use wire brushes, steel wool, or other
stiff brushes
If you need to use water, use blotted cotton
swabs and gentle mist spraying only Do not use abrasives
no power-tools, abrasive paper, etc.
Use clean water only deionised, distilled
No pressure water washing no garden hoses and similar
Use the minimum amount of water necessary For a minimum amount of time & exactly where needed
Test upfront
Do not use any chemicals, solvents,
detergents, or other commercial products Dissolve your object, stain it, contaminate it with harmful salts
Remember that most biological growth is
harmless and is best controlled when avoiding
moisture
Do not use extensive amounts of water Softens your object, erodes its surface, favours salt damage
& biological growth, can bring many long-term problems
Take your time, observe closely what you are
removing Stop immediately when you see any damage Do not wet-clean when there is a risk of frost
Photograph and document your work Before and after cleaning
Do not remove biological growth that is
protected by law
Do not use any biocides

21
3. How to Store and Exhibit Your Limestone Objects
Once you have cleaned your object make sure that it does not go back to the same potentially
damaging environment where it comes from. A few simple measures can help to avoid or at least
slow-down future soiling, biological growth, and other forms of deterioration:
Outdoors:
➢ Where possible, raise the object off the ground to avoid people stumbling over, and to avoid
salt-laden moisture creeping in from the ground. This can for example be done by placing the
stone on a bed of gravel.
➢ Have a mud-free surface under the object to avoid splashbacks. Make sure that rainwater does
not pool around the object.66
➢ Shelter your object from wind as far as possible to avoid direct abrasion, increased drying rates,
and to limit the impact of airborne salts.67
➢ Make sure that roofs and tree branches do not hang over the object as water may drip down,
continuously eroding your object. Birds also like to nest under roofs and in trees, and their acidic
droppings are harmful to limestone.
➢ As your object could contain organic components like paint pigments or coatings, keep them out
of direct sunlight. Especially UV light can severely fade out any colours and cause cracking and
embrittlement of surface coatings.68 Limestone itself also is susceptible to heat and its structure
may weaken upon exposure.
➢ Keep plant growth away and where this cannot be avoided cut the plants back regularly.
➢ If possible, install a roof or shelter to keep
rainwater and direct sunlight away. Make sure
that the roof is still protective when the sun is at
its lowest point (Winter Solstice).69
➢ Do not cover your stone with a polythene sheet
or similar.70 This will create a micro-climate
wherein temperatures can rise rapidly and
condensation may be held against the object.
➢ Keep lawn mowers and grass trimmers at a distance to avoid physical damage.71
➢ When using water sprinklers, make sure they are not directed at your object.72
➢ Install a sign to prevent visitors from touching the object. Where possible erect a barrier.
➢ Avoid using de-icing salts near your objects as much as possible.
66 Jaeschke 2021. 67 Western Australian Museum 2017. 68 D.D. Hartin, W. Baker, R. Barclay and G. Prytulak. 2018. Caring for outdoor objects. Viewed 16 February 2021 <https://www.canada.ca/en/conservation-institute/services/preventive-conservation/guidelines-collections/outdoor-objects.html>. 69 Hartin, Baker, Barclay & Prytulak 2018. 70 Jaeschke 2021. 71 Hartin, Baker, Barclay & Prytulak 2018. 72 Hartin, Baker, Barclay & Prytulak 2018.
Example of a roof being built to protect the stones from rainwater and sunlight. Image taken by author with kind permission from Burwell Museum & Windmill.

22
Indoors:
➢ Raise the object off the ground to avoid people stumbling over.
➢ Make sure that your object is kept away from acidic materials: Oak wood, MDF (medium density
fibreboard), plywood and chipboard often contain organic acids like formic and acetic acid73 that
can dissolve limestone. Display materials, storage shelves, but also historic wood objects are
potential sources. Prevent your object from being in direct contact with potentially harmful
materials, and do not place them together in a sealed display case or storage box. When using
tissue or cardboard boxes to store your object, make sure they are acid-free.
➢ Make sure that your storage or display area has good ventilation, and that relative humidity and
temperature are kept as stable as possible. Install a datalogger to monitor changes
continuously, not just sporadic checks74 as these will not indicate effects like heaters going on
and off, opening and closing hours of the museum, daytime vs night-time conditions, rainy days
vs sunny days etc.
➢ Keep windows and doors closed as much as possible on rainy days.
➢ Keep your object out of direct sunlight and away from radiators and hot water pipes. Light and
heat can damage organic components and weaken the stone structure due to different rates of
thermal expansion between salts and the limestone itself.
➢ Maintain good housekeeping: Regularly clean your storage and display areas to keep away
nutrients that may attract biological organisms, and to avoid dust and grime to collect on your
object.
➢ Handle your object with gloves to avoid salts, oils, and dirt from fingers to be absorbed into the
stone due to its porous structure. Use nitrile gloves, not fabric, since fabric fibres might easily
catch on the porous stone breaking off pieces. Where wearing gloves is not feasible (e.g. because
the object is too heavy and you need a very good grip) touch the object with very clean hands
only.
➢ Keep handling to a minimum to minimise the risk of accidentally dropping and breaking the
object.
73 L.R. Lee and D. Thickett. 2011. ‘Selection of Materials for the Storage and Display of Museum Objects’. In Caple, C. (ed.) Preventive Conservation in Museums. Abingdon: Routledge: 243. 74 Jaeschke 2021.

23
BIBLIOGRAPHY
Appell, J. 2010. Cleaning Gravestones, Monuments & Stone Sculptures. Viewed 09. February 2021 <http://www.gravestonepreservation.info/articles/cleaning-gravestones-monuments-stone-sculptures>.
Beck, K.C. 2021. Sedimentary rock. Viewed 09. February 2021 <https://www.britannica.com/science/sedimentary-rock>.
Boots. 2021a. Boots Cosmetic Sponge Wedges. Viewed 16 February 2021 <https://www.boots.com/boots-cosmetic-sponge-wedges-10267856>.
Boots. 2021b. Boots Cosmetic Cotton Wool Balls x100. Viewed 16 February 2021 <https://www.boots.com/boots-cosmetic-cotton-wool-balls-x-100-10111654>.
British Museum. n.d. Collection Search for: Place: Europe -> England, Material: Limestone. Search conducted on 23. March 2021 <https://www.britishmuseum.org/collection/search? place=Europe&place=England&material=limestone&image= true&view=grid&sort=object_name__asc&page=1>.
Dimes, F.G. 1998a. ‘The nature of building and decorative stones’. In Ashurst, J. and Dimes, F.G. (eds.) Conservation of Building and Decorative Stone. Oxford: Butterworth-Heinemann.
Dimes, F.G. 1998b. ‘Sedimentary rocks’. In Ashurst, J. and Dimes, F.G. (eds.) Conservation of Building and Decorative Stone. Oxford: Butterworth-Heinemann.
Dimes, F.G. 1998c. ‘Determination of a sample’. In Ashurst, J. and Dimes, F.G. (eds.) Conservation of Building and Decorative Stone. Oxford: Butterworth-Heinemann.
Doehne, E. and Price, C.A. 2010. Stone Conservation: An Overview of Current Research. Los Angeles: The Getty Conservation Institute.
Durnan, N. 2015. ‘Chapter Nine: Limestone’. In Henry, A. (ed.) Stone Conservation: Principles and Practice. Abingdon: Routledge.
Eklund, J.A. 2013. Biological Growth on Masonry: Identification & Understanding. Edinburgh: Historic Scotland.
Hartin, D.D., Baker, W., Barclay, R. and Prytulak, G. 2018. Caring for outdoor objects. Viewed 16 February 2021 <https://www. canada.ca/en/conservation-institute/services/preventive-conservation/guidelines-collections/outdoor-objects.html>.
Historic England. 2019a. Reasons for Cleaning Stone War Memorials. Viewed 09. February 2021 <https://www.youtube.com/watch?v=xQVUl_LfAQk>.
Historic England. 2019b. Conserving Stone War Memorials: Water Washing. Viewed 09. February 2021 <https://www.youtube.com/watch?v=sGX9E_f5f00>.
Historic England. 2019c. Conserving Stone War Memorials: Cleaning with Biocides. Viewed 09. February 2021 <https://www.youtube.com/watch?v=Zp6obZuFhm0>.
Honeyborne, D.B. 1998. ‘Weathering and decay of masonry’. In Ashurst, J. and Dimes, F.G. (eds.) Conservation of Building and Decorative Stone. Oxford: Butterworth-Heinemann.
Jaeschke, H. 2021. E-Mail to S. Mueller on 10. February 2021.
Larson, J. 1998. ‘The conservation of stone monuments in churches’. In Ashurst, J. and Dimes, F.G. (eds.) Conservation of Building and Decorative Stone. Oxford: Butterworth-Heinemann.
Lee, L.R. and Thickett, D. 2011. ‘Selection of Materials for the Storage and Display of Museum Objects’. In Caple, C. (ed.) Preventive Conservation in Museums. Abingdon: Routledge.
Madhu. 2011. Difference Between Igneous Rocks and Sedimentary Rocks. Viewed 09. February 2021 <https://www.differencebetween.com/difference-between-igneous-rocks-and-vs-sedimentary-rocks/#Sedimentary%20Rocks>.
New World Encyclopedia. n.d. Uses of limestone. Viewed 23. March 2021 <www.newworldencyclopedia.org/entry/ Limestone#Uses_of_limestone>.
Normandin, K.C. and Slaton, D. 2015. ‘Chapter Eight: Cleaning Techniques’. In Henry, A. (ed.) Stone Conservation: Principles and Practice. Abingdon: Routledge.
PEL. 2021a. Dusting & Cleaning Brushes. Viewed 16 February 2021 <https://www.preservationequipment.com/Catalogue/Equipment-Tools/Brushes/ Dusting-Brushes>.
PEL. 2021b. Sponges & Cloths. Viewed 16 February 2021 <https://www.preservationequipment.com/Catalogue/Cleaning-Products/Sponges-Cloths>.
PEL. 2021c. Sprayers. Viewed 16 February 2021 <https://www.preservationequipment.com/Catalogue/Equipment-Tools/Sprayers>.
Restorative Techniques. 2012. Problems of Carbon Sulphation - Cleaning Properly Not Just Done Purely For Aesthetic Reasons. Viewed 15. February 2021 <https://www.restorative-products.com/news/2012/problems-of-carbon-sulphation-cleaning-properly-not-just-done-purely-for-aesthetic-reasons>.
Rogers, L.R. n.d. Sculpture. Viewed 15. February 2021 <https://www.britannica.com/art/sculpture>.
Scheerer, S. 2008. Microbial biodeterioration of outdoor stone monuments. Assessment methods and control strategies. PhD Thesis. Cardiff University. Ann Arbor: ProQuest LLC.
Tesco. 2021. Tesco De-Ionised Water 2.5L. Viewed 16 February 2021 <https://www.tesco.com/groceries/en-GB/search?query=deionised%20water>.
V&A. n.d. Sculpture techniques. Viewed 15. February 2021 <https://www.vam.ac.uk/articles/sculpture-techniques>.
Warscheid, T. and Braams, J. 2000. ‘Biodeterioration of stone: a review’. In International Biodeterioration & Biodegradation. 46 (2000) 343-368.
Western Australian Museum. 2017. Stone and Geological Collections. Viewed 16 February 2021. <https://manual.museum.wa.gov.au/conservation-and-care-collections-2017/stone-and-geological-collections>.
Willett, C. 2017. Conserving War Memorials: Cleaning. Edinburgh: Historic England.

24
APPENDIX – PRACTICAL GUIDE

25

26

27

28
ACKNOWLEDGEMENTS
My sincere thanks go to Deborah Walton, University of Cambridge Museums (UCM) Regional
Conservation Officer, for offering me the opportunity to work on this exciting project, for
advising, and for proof-reading.
I also wish to thank Helena Jaeschke, Conservation Development Officer at the South West
Museum Development Programme, for advising and for offering great practical examples that
help to make the content of this guideline more accessible.
Many thanks furthermore go to Dr. Emily Williams, Director MA in Conservation of
Archaeological and Museum Objects at Durham University, for proof-reading and for providing
fantastic images that help in visualising limestone deterioration and cleaning.
I would also like to extend my thanks to Alison Giles, Education Officer at Burwell Museum &
Windmill, for allowing me to assess the St. Andrew’s Stones and to test cleaning options on
them.
And finally, I would like to thank my placement supervisor and UCM Organics Conservator,
Kirstie French, for valuable discussions on the subject matter of this guideline.

29
DISCLAIMER
This document is intended to offer informal advice and general guidance. It is not
intended to be a substitute for the professional advice of a professionally qualified
conservator. If in doubt, please consult with a professional conservator. The author
and her partners accept no liability for the loss or damage which may arise if this
guidance is followed. The author and her partners neither owe nor accept any duty or
responsibility to any reader of this document, regardless of whether such reader makes
use of the information provided in this document or not.
The information contained is not exhaustive and other sources of information are
available. Further aspects not covered in this document may need to be considered.
The author and her partners do not assume any obligations to review or update this
document in case of new scientific findings with regard to the treatment of limestone
objects or in case that any information that might be considered to be of vital
importance for the treatment of limestone objects should be found to be missing in
the document at hand.
For the avoidance of doubt, any claims relating to this document will be determined in
accordance with German law with German courts having exclusive jurisdiction.