clear corrugated sheet ranges installation guide
TRANSCRIPT

Installation Guide
www.clearamber.com
Clear Corrugated Sheet Ranges

CORRAPOL® : Installation Guide
CORRAPOL® High Profile Corrugated Sheet
CORRAPOL® Low Profile Corrugated SheetScrew Cap Fixings
CORRAPOL® Stainless Steel Fixing (included)
Ridge Gasket (included)
CORRAPOL® High Profile Foam Eaves Filler
CORRAPOL® Super Ridge BarCORRAPOL® Rock n’ Lock Side Flashing
CORRAPOL® Rock n’ Lock Wall Side Flashing
CORRAPOL® Top Wall Flashing
95mm
33.5
mm
20mm
14mm
CORRAPOL® Stainless Steel Fixing (included)
125mm
125mm
97m
m
67mm
149mm
44m
m
95mm
40m
m
95mm
40m
m
NEW NEW
CORRAPOL® Low Profile Eaves Filler
76mm
76mm
23m
m
18m
m
© Copyright – Clear Amber Group Ltd – May 20212 | www.clearamber.com
Fixings not included
Fixings not included
132mm
104.5mm

© Copyright – Clear Amber Group Ltd – May 2021 www.clearamber.com | 3
CORRAPOL® Super Ridge End Cap
NEW
56.5
mm
BACK VIEW
150m
m
PLAN VIEW
157mm
SIDE ELEVATION
MEASURE the roof1
Measure the roof
IMPORTANT – Take all MEASUREMENTS of the roof so you can work out the correct plan for the sheet coverage. Allow an extra 70mm overhang on the slope length for the sheet overhang.
Tools required
Wear protective gloves and glasses.
Clamp, fine toothed bladed jigsaw and tin snips.
A hammer, cordless screwdriver/drill, tape measure a straight edge tool and suitable sealant / sealant gun.
Fine toothed bladed Chop Saw
Installation

© Copyright – Clear Amber Group Ltd – May 20214 | www.clearamber.com
DETERMINE OVERLAPS for larger slopes2 See diagrams below for overlap,
depth and angle details
Overlapping sheets5˚-10°
32cm
Overlapping sheets
18cm
>15º
Roof slopes of 15˚ or greater: Gradients of 1 in 4 or higher
Overlap every sheet by one corrugation peak Maximum distance of
50cm from the centre of each rafter
Roof slopes of 10˚ – 15˚: Gradients of 1 in 6 – 1 in 4
Overlap every sheet by one corrugation peak
Maximum distance of 40cm from the centre of each rafter
Maximum distance of 40cm from the centre of each rafter
Use fixings sheets every corrugation at the eaves and sheet overlaps. Fix every other corrugation on intermediate purlins.
Overlapping sheets
22cm
10°-15º
Roof slopes of 5˚ – 10˚: Gradients of 1 in 11 – 1 in 6
Overlap every sheet by two corrugation peaks

© Copyright – Clear Amber Group Ltd – May 2021 www.clearamber.com | 5
Install the CORRAPOL® Foam Eaves Fillers3
For best performance and sealing install CORRAPOL® Foam Eaves Fillers along the horizontal purlins and all fixing points of the roof. These will make installation easier, provide a stronger roof and give greater sealing properties from draughts etc.
IMPORTANT – To keep the roof watertight and weatherproof, install CORRAPOL® Eaves Fillers along fixing points of the roof.
Prepare the CORRAPOL® Rock n’ Lock Side Flashing4
Cut a mitre edge at the top end of the CORRAPOL® Rock n’ Lock Side and Wall Flashing so it finishes with a vertical end when offered up to the upper end of the roof slope.
Cut the lower end of the CORRAPOL® Rock n’ Lock Side Flashing to the same length as the slope PLUS allowing approximately 70mm beyond the eaves beam for an overhang.
70mm overhang on both sides
Front elevation of the CORRAPOL® Rock n’ Lock Side Flashing
Cut the CORRAPOL® Rock n’ Lock Side Flashing to the required length with a chop saw which has a fine-toothed blade suitable for cutting aluminium.
Pre-drill 5mm pilot holes approximately 250mm apart on the CORRAPOL® Rock n’ Lock Side Flashing on the top flat area or the vertical side.
TILT the CORRAPOL® Rock n’ Lock Side Flashing and ROCK the first corrugated sheet peak into the curve of the flashing.
c
STRAIGHTEN and LOCK the CORRAPOL® Rock n’ Lock Side Flashing into place giving a
perfect finish to the edge of your roof structure.
a
b
© Copyright – Clear Amber Group Ltd – May 20216 | www.clearamber.com
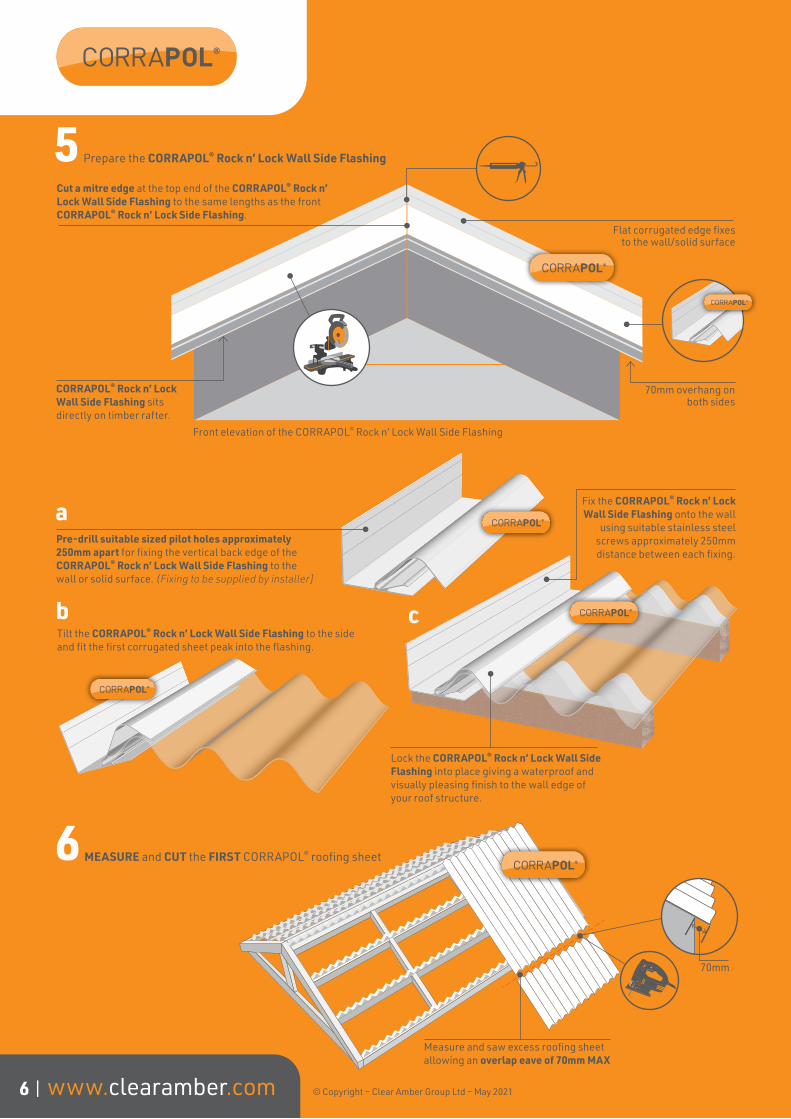
Pre-drill suitable sized pilot holes approximately 250mm apart for fixing the vertical back edge of the CORRAPOL® Rock n’ Lock Wall Side Flashing to the wall or solid surface. (Fixing to be supplied by installer]
a
Tilt the CORRAPOL® Rock n’ Lock Wall Side Flashing to the side and fit the first corrugated sheet peak into the flashing.
b
Lock the CORRAPOL® Rock n’ Lock Wall Side Flashing into place giving a waterproof and visually pleasing finish to the wall edge of your roof structure.
Fix the CORRAPOL® Rock n’ Lock Wall Side Flashing onto the wall
using suitable stainless steel screws approximately 250mm distance between each fixing.
c
MEASURE and CUT the FIRST CORRAPOL® roofing sheet6
Measure and saw excess roofing sheet allowing an overlap eave of 70mm MAX
70mm
CORRAPOL® Rock n’ Lock Wall Side Flashing sits directly on timber rafter.
Flat corrugated edge fixes to the wall/solid surface
Cut a mitre edge at the top end of the CORRAPOL® Rock n’ Lock Wall Side Flashing to the same lengths as the front CORRAPOL® Rock n’ Lock Side Flashing.
Front elevation of the CORRAPOL® Rock n’ Lock Wall Side Flashing
Prepare the CORRAPOL® Rock n’ Lock Wall Side Flashing5
70mm overhang on both sides

© Copyright – Clear Amber Group Ltd – May 2021 www.clearamber.com | 7
Fit the CORRAPOL® Rock n’ Lock Wall Side Flashing and FIRST Corrugated Sheet7IMPORTANT: Make sure you use either plastic headed nails OR screw cap fixings through the corrugation peak and not the trough. Fix with the supplied stainless steel screws and CORRAPOL® screw caps.
Fit EITHER roof nails OR screw cap fixings at EVERY SECOND CORRUGATION PEAK at each of the purlins, plus the top and bottom of the roof structure.
95mm
40m
m
95mm
40m
m
Direction of the wind
Laying direction
Prepare the FINAL CORRAPOL® roofing sheets for both sides8 IMPORTANT – To avoid vertical cuts, overlap the roofing sheets by more than two corrugation peaks to the EXACT MATCH of the roof dimensions.
Always finish the roof sheet at the end of a corrugated sheet, never make a vertical cut.
NEVER THROUGH THE TROUGH
Refer to point number 2 of installation guide for overlap details
Joint Sheets - end to end overlap example9 JOINING SHEETS (END TO END):If sheets need to be joined end to end, ensure an appropriate overlap, refer to details in Step 2.
Foam Eaves Filler

© Copyright – Clear Amber Group Ltd – May 20218 | www.clearamber.com
10
Fit the CORRAPOL® Rock n’ Lock Side Flashing to the opposite side of the roof.
Fit the CORRAPOL® Rock n’ Lock Side Flashing and Corrugated Sheets
FIX EITHER through the top OR through the side of the bar.
Install the CORRAPOL® Super Ridge and End Caps11
Slide the foam eaves filler into the two side slots of the CORRAPOL® Super Ridge before installing onto the roof.
Pre-drill 5mm pilot holes approximately 250mm apart on the top of the CORRAPOL® Super Ridge.
Cut the aluminium CORRAPOL® Super Ridge to the required length with the fine toothed bladed chop saw.
Fill small 2mm gap between the CORRAPOL® Ridge End Cap and the Super Ridge Bar with suitable sealant to create a waterproof seal on both sides of the roof.
Measure the distance between the CORRAPOL® Side Flashing and Wall Flashing allowing an extra
10mm on either side to create an overlap.
Cut the end tip of the CORRAPOL® Ridge End
Cap to fit the space at the back of the Wall Flashing
Section view of the CORRAPOL® Super Ridge Bar and the CORRAPOL® Super Ridge End Caps in place
Fixings not included
Fit lead flashing to create a waterproof seal
Once the End Caps and Ridge Bar are fully sealed fit onto the peak of the roof
Fit the CORRAPOL® Super Ridge End Caps onto either end of the CORRAPOL® Super Ridge before fixing onto the peak of the roof.

© Copyright – Clear Amber Group Ltd – May 2021 www.clearamber.com | 9
Measure and cut the width of the CORRAPOL® Top Wall Flashing so the top flat edge of the flashing, touching the top curved area of the CORRAPOL® Rock n’ Lock Side and Wall Flashing.
Cut off the Eaves Filler lugs at a 45° angle to accommodate the curve on the CORRAPOL® Side and Wall Flashing Bars.
Use suitable sealant along the top flat edge between the two bars to give a waterproof seal.
Finish of the back wall edge of a Lean-to roof using the CORRAPOL® Top Wall Flashing12
Fixings not included
Tilt the angled edge towards the wall to change the pitch variant.
Lead flashing
< T
OP
WA
LL
>
CORRAPOL® Stormroof Sheet
Eaves Filler

CORRAPOL® | IG | V1.06 | 05-21
Inasmuch as Clear Amber have no control over the circumstances in which our material may be used, or site specific parameters, we cannot guarantee that any particular results will be achieved. Users should carry out their own tests to determine the suitability of the material for their application.
© Copyright – Clear Amber Group Ltd – May 2021. No part of this publication may be copied, reproduced, scanned, or stored in any electronic database, whether in whole or in part, in any form or by any means, without permission in writing from Clear Amber. Clear Amber will not hesitate to take appropriate legal action if its rights in this respect are infringed.
WARNING : REGISTERED DESIGNS & PATENTSThe IP of the designs in this brochure are protected by internationally registered design rights. Many products are also protected with active or pending Patents. Clear Amber will not hesitate to take appropriate legal action if its rights in this respect are infringed.