clearcase tutorial
DESCRIPTION
ClearcaseTRANSCRIPT
CASEVision™/ClearCase Tutorial
Document Number 007-1614-020

CASEVision™/ClearCase TutorialDocument Number 007-1614-020
CONTRIBUTORS
Written by John PosnerEngineering contributions by Atria Software, Inc.
© Copyright 1994, Silicon Graphics, Inc.— All Rights Reserved© Copyright 1994, Atria Software, Inc.— All Rights ReservedThis document contains proprietary and confidential information of SiliconGraphics, Inc. The contents of this document may not be disclosed to third parties,copied, or duplicated in any form, in whole or in part, without the prior writtenpermission of Silicon Graphics, Inc.
RESTRICTED RIGHTS LEGENDUse, duplication, or disclosure of the technical data contained in this document bythe Government is subject to restrictions as set forth in subdivision (c) (1) (ii) of theRights in Technical Data and Computer Software clause at DFARS 52.227-7013 and/or in similar or successor clauses in the FAR, or in the DOD or NASA FARSupplement. Unpublished rights reserved under the Copyright Laws of the UnitedStates. Contractor/manufacturer is Silicon Graphics, Inc., 2011 N. Shoreline Blvd.,Mountain View, CA 94039-7311.
Silicon Graphics and IRIS are registered trademarks and IRIX is a trademark ofSilicon Graphics, Inc. Apollo is a registered trademark of Apollo Computer, Inc.ClearCase and Atria are registered trademarks of Atria Software, Inc. FrameMaker isa registered trademark of Frame technology, Inc. Hewlett-Packard, HP, Apollo,Domain/OS, DSEE, and HP-UX are trademarks or registered trademarks of theHewlett-Packard Company. IBM is a registered trademark of International BusinessMachines Corporation. Macintosh is a registered trademark of Apple Computer, Inc.OPEN LOOK is a trademark of AT&T. OSF and Motif are trademarks of The OpenSoftware Foundation, Inc. PostScript is a trademark of Adobe Systems, Inc. Sun,SunOS, Solaris, SunSoft, SunPro, SPARCworks, NFS, and ToolTalk are trademarks orregistered trademarks of Sun Microsystems, Inc.UNIX is a trademark of AT&T BellLaboratories. X Window System is a trademark of the Massachusetts Institute ofTechnology.

iii
Contents
Preparing to Use CASEVision/ClearCase xiiiVerify ClearCase Installation xiii
Installation at an Alternate Location xivModify Your Shell Startup Script xiv
Search Path for Executables xvSearch Path for Manual Pages xvOther ClearCase Search Paths xviShell Command Prompt xviiClearCase Build Umask xviiiCreate Command Aliases xixLog In Again xix
Verify Connections with ClearCase Server Hosts xixLicense Server Host xixRegistry Host xx
Start Using ClearCase xxSet Up for Integration Products xx
1. CASEVision/ClearCase Tutorial:Developing a ‘Hello World’ Program 1Overview 2
Abbreviations 2“Personalizing” the Tutorial 2Command Output 2
iv
Contents
Setting the Stage: The ‘hello’ Project 3First Release 3Second Release 4
Go to an appropriate directory 4Run the ‘CHECK’ script 5Create a subdirectory in which all tutorial data will reside 5Background: ClearCase VOBs 6Create a new VOB 7Activate the VOB by Mounting It 8Run the ‘REL1REL2’ script to create the first two releases 8Try to access the VOB—oops, you need a ‘view’ 9Background: ClearCase Views 9Create a ’view’ 11’Set’ the view 11Change to the source directory 12List directory contents (UNIX style) 12List directory contents (ClearCase style) 13List a version tree 14Use extended naming to access particular versions 15Run old executables out of the ‘bin’ directory 16
2. Working on a New Release 19Get your bearings 19Is anyone else working on this program? 19Verify that a file cannot be changed until it is checked out 20Checkout a source file 20Revise the checked-out source file 22Rebuild the program 24Test the program 24Get some help on the ‘list checkouts’ command 25What source files are checked out? 26Checkin the revised source file(s) 26Verify the changes resulting from the checkin 27
Contents
v
3. Exploring Derived Objects 29Get your bearings 29List the derived objects you just built 29Examine the config rec of the program just built 30Verify the contents of the config rec 32Investigate the wink-in of ‘hello.o’ 32Explore the ‘private’ nature of derived objects 33Get ready to fix that bug! 34
4. Exploring View Configurations 35Get your bearings 35List the elements in the source directory 36Turn back the clock to Release 2 36List the source directory again 37Verify that this view selects different versions of files 37Switch to Release 1 38Verify the switch 38Explore the history of the source directory 39Return to the present 40Exit the historical view 40

vi
Contents
5. Fixing a Bug in an Old Release 41Get your bearings 43Create a new view for your bugfix work 44Set the bugfix view 44Reconfigure the bugfix view to “turn back the clock” 45There are no derived objects in this new view! 45Try to make a branch — oops! 45Create the branch type for bugfix work 46Make a branch in element ‘util.c’ 46Fix the bug 47Rebuild the program 48Run the program to test the fix 48Examine the build history of ‘hello’ 48Compare the configurations of two builds 49Checkin the fixed source file 51Which version does your view select now? 52Show the updated version tree of the modified source file 52Exit the bugfix view 52
6. Performing a Merge 53Get your bearings 54Plan the completion of development for a new release 54Return to the ‘tut’ view 54Determine which source files need to be merged 55Checkout file ‘util.c’ 56Edit the checked-out file 57Merge in the changes made on the ‘rel2_bugfix’ branch 57Examine the merge hyperlink 60What did the merge change? 61Rebuild the program 61Test the change 62Test the change for the superuser case 62Checkin the revised file 62

Contents
vii
7. Defining a Release 65Get your bearings 65Label the release (part1): create a version label type 66Label the release (part 2): attach version labels to sources 66Re-label the release sources (just to make a point) 67Install the ‘hello’ executable in the ‘bin’ directory 68Label the release (part 3): attach labels in the ‘bin’ directory 68
8. Revising a Directory Structure 69Get your bearings 70Compare versions of a directory 70Prepare to do some new development 71Checkout the source directory 71Create a new file element 72Checkin the source directory 72Compare the new directory to its predecessor 73Modify the new source file 73Modify the old source files 73Rebuild the program 75Test the program 75What files need to be checked in? 76Checkin the sources 76
9. Summing Up / Cleaning Up 77Get your bearings 77Verify that all binaries are accessible in the ‘bin’ directory 77Exit the view 78Unmount the VOB 78Delete all the views you’ve created 78Remove the VOB storage area 79Remove the directory that contained all the storage areas 79Say good-bye! 79


ix
Figures
Figure 1-1 VOB Storage Directory 6Figure 1-2 Mounted VOB 7Figure 1-3 ClearCase view 10Figure 1-4 Example Version Trees 15Figure 2-1 Using the checkout Command 21Figure 6-1 Merging Changes to a File 57

xi
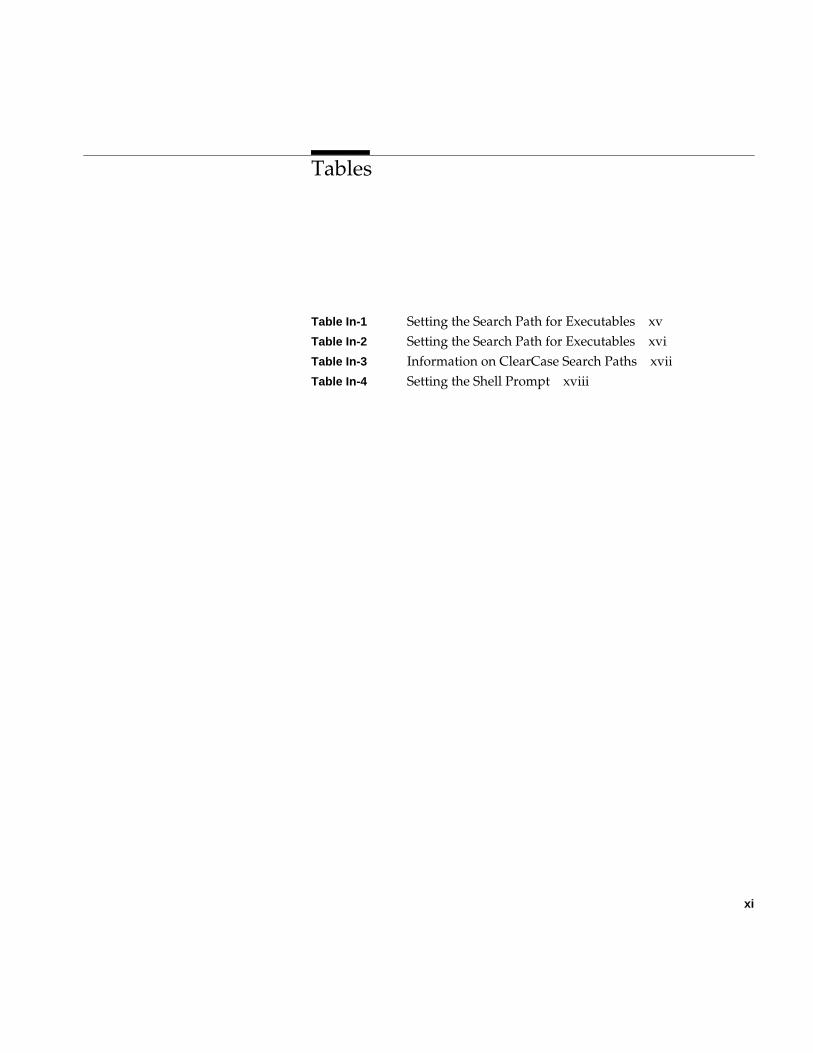
Tables
Table In-1 Setting the Search Path for Executables xvTable In-2 Setting the Search Path for Executables xviTable In-3 Information on ClearCase Search Paths xviiTable In-4 Setting the Shell Prompt xviii


xiii
Preparing to Use CASEVision/ClearCase
This chapter is a “quick-start” guide, which will be useful if you’ve justjoined a development group using ClearCase. Here are some assumptionswe’ve made:
• ClearCase is already up and running on your network.
• You’ll be using a particular “home host” for most of your ClearCasework; ClearCase has already been installed there. (If this is not true, seethe CASEVision/ClearCase Release Notes.)
• You have sufficient access rights to create a ClearCase view, and/or youhave access to at least one existing ClearCase view.
In this chapter, you will:
• verify ClearCase installation
• modify your startup scripts for ClearCase
• verify connections to ClearCase server hosts
Verify ClearCase Installation
ClearCase must be explicitly installed on your “home host”. Check whetherit has been installed at the standard location:
% ls -ld /usr/atria
Depending on installation options, /usr/atria may be an actual directory,located on your home host or on another host, or a symbolic link.

xiv
Preparing to Use CASEVision/ClearCase
Installation at an Alternate Location
If there is no /usr/atria on your host, check with your system administrator tosee if ClearCase was installed at an alternate location. If this is the case, makea note of the alternate installation pathname (for example, /opt/ccase); you’llneed to use this pathname when you modify your shell startup script. IfClearCase is not installed at all on your host, consult with your systemadministrator or see the CASEVision/ClearCase Administration Guide forstep-by-step instructions.
Modify Your Shell Startup Script
Access to ClearCase programs and on-line documentation (manual pages)depends on certain environment variable settings. The most reliable way toestablish these settings is to edit your shell startup script:
Shell Program Startup Script in Home Directory
C shell .cshrc
Bourne shell profile
Korn shell profile
Note: We recommend that C shell users avoid placing ClearCase settings infile .login, which is executed only by “login shells”.

Modify Your Shell Startup Script
xv
Search Path for Executables
First, add the ClearCase bin directory to your executables search path, asshown in Table In-1. The variable ATRIAHOME must be set if ClearCase isinstalled at a location other than /usr/atria.
Search Path for Manual Pages
You can skip this section if you won’t be using ClearCase on-line manualpages at all — for example, if you intend to rely on the help facility built intothe ClearCase graphical user interface. You can also skip the rest of thissection if you will always use the cleartool man subcommand to accessmanual pages — it doesn’t require a search path.
Users of UNIX-based operating systems are accustomed to using the man(1)command to get on-line documentation. ClearCase includes acomprehensive set of manual pages, accessible in several ways:
• through the standard man command (UNIX® command-line interface)
• through the standard xman command (X Window System™ graphicalinterface)
• through the man subcommand built into the cleartool program
The standard man and xman commands can locate manual page files in avariety of locations. These programs can use — but don’t require — a searchpath specified by the environment variable MANPATH. If you wish to read
Table In-1 Setting the Search Path for Executables
.cshrc (C shell) .profile (Bourne/Korn shell)
ClearCase installed at standardlocation, /usr/atria
set path=($path /usr/atria/bin) PATH=${PATH}:/usr/atria/binexport PATH
ClearCase installed at alternatelocation, /opt/ccase
setenv ATRIAHOME /opt/ccaseset path=($path $ATRIAHOME/bin)
ATRIAHOME=/opt/ccasePATH=${PATH}:$ATRIAHOME/binexport ATRIAHOME PATH
xvi
Preparing to Use CASEVision/ClearCase
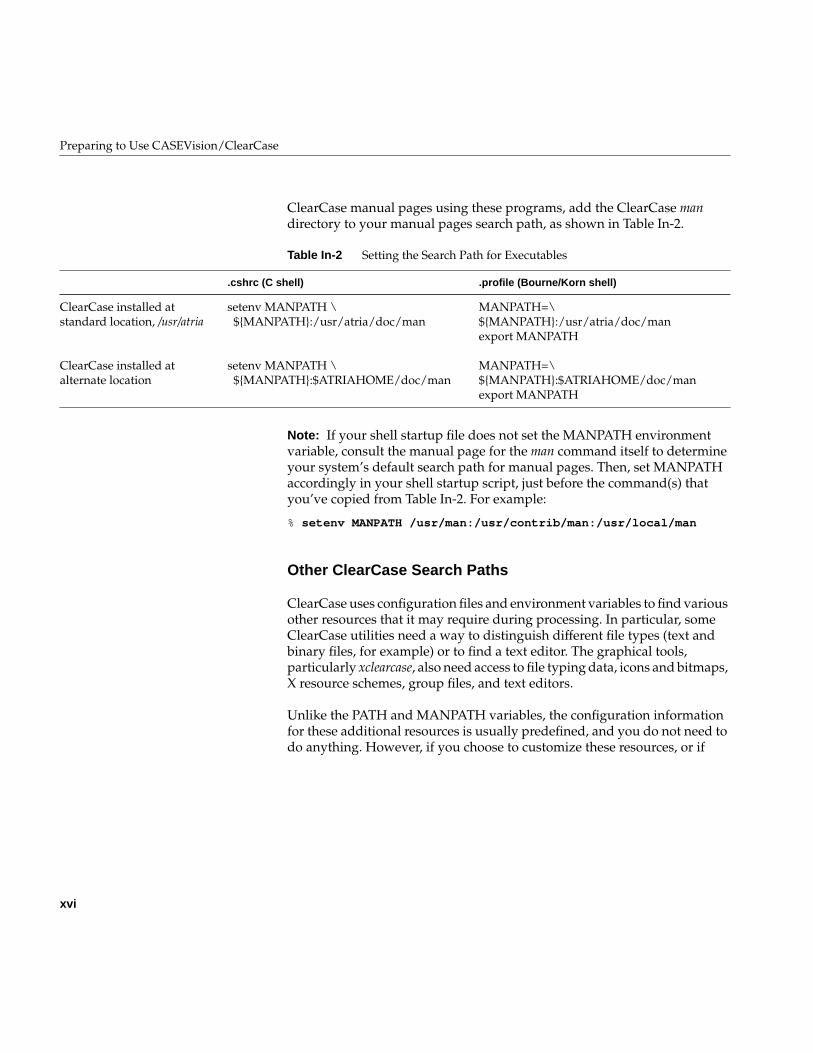
ClearCase manual pages using these programs, add the ClearCase mandirectory to your manual pages search path, as shown in Table In-2.
Note: If your shell startup file does not set the MANPATH environmentvariable, consult the manual page for the man command itself to determineyour system’s default search path for manual pages. Then, set MANPATHaccordingly in your shell startup script, just before the command(s) thatyou’ve copied from Table In-2. For example:
% setenv MANPATH /usr/man:/usr/contrib/man:/usr/local/man
Other ClearCase Search Paths
ClearCase uses configuration files and environment variables to find variousother resources that it may require during processing. In particular, someClearCase utilities need a way to distinguish different file types (text andbinary files, for example) or to find a text editor. The graphical tools,particularly xclearcase, also need access to file typing data, icons and bitmaps,X resource schemes, group files, and text editors.
Unlike the PATH and MANPATH variables, the configuration informationfor these additional resources is usually predefined, and you do not need todo anything. However, if you choose to customize these resources, or if
Table In-2 Setting the Search Path for Executables
.cshrc (C shell) .profile (Bourne/Korn shell)
ClearCase installed atstandard location, /usr/atria
setenv MANPATH \ ${MANPATH}:/usr/atria/doc/man
MANPATH=\${MANPATH}:/usr/atria/doc/manexport MANPATH
ClearCase installed atalternate location
setenv MANPATH \ ${MANPATH}:$ATRIAHOME/doc/man
MANPATH=\${MANPATH}:$ATRIAHOME/doc/manexport MANPATH
Modify Your Shell Startup Script
xvii
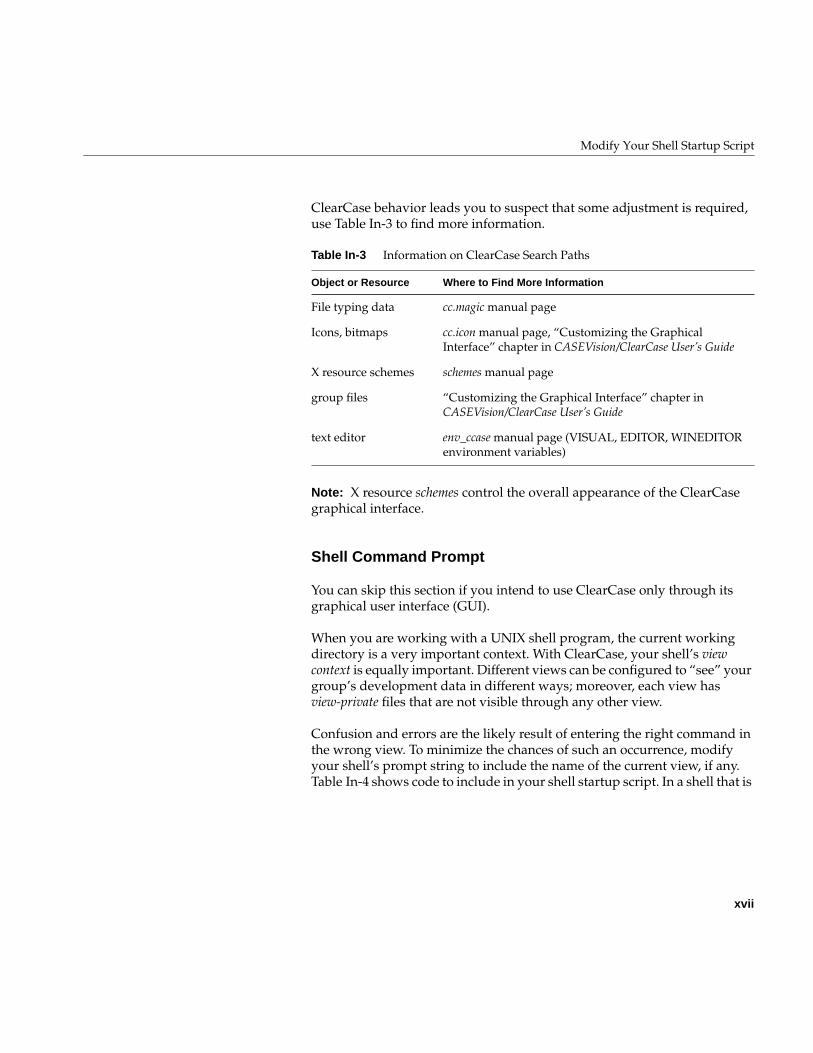
ClearCase behavior leads you to suspect that some adjustment is required,use Table In-3 to find more information.
Note: X resource schemes control the overall appearance of the ClearCasegraphical interface.
Shell Command Prompt
You can skip this section if you intend to use ClearCase only through itsgraphical user interface (GUI).
When you are working with a UNIX shell program, the current workingdirectory is a very important context. With ClearCase, your shell’s viewcontext is equally important. Different views can be configured to “see” yourgroup’s development data in different ways; moreover, each view hasview-private files that are not visible through any other view.
Confusion and errors are the likely result of entering the right command inthe wrong view. To minimize the chances of such an occurrence, modifyyour shell’s prompt string to include the name of the current view, if any.Table In-4 shows code to include in your shell startup script. In a shell that is
Table In-3 Information on ClearCase Search Paths
Object or Resource Where to Find More Information
File typing data cc.magic manual page
Icons, bitmaps cc.icon manual page, “Customizing the GraphicalInterface” chapter in CASEVision/ClearCase User’s Guide
X resource schemes schemes manual page
group files “Customizing the Graphical Interface” chapter inCASEVision/ClearCase User’s Guide
text editor env_ccase manual page (VISUAL, EDITOR, WINEDITORenvironment variables)
xviii
Preparing to Use CASEVision/ClearCase
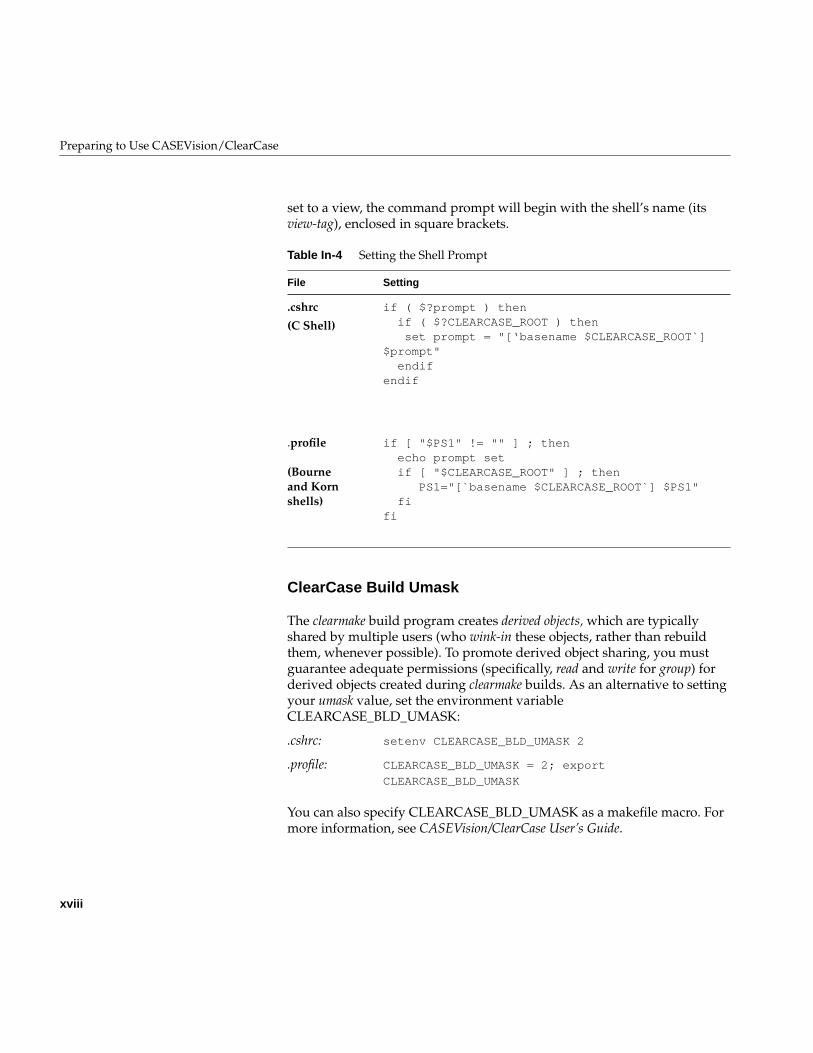
set to a view, the command prompt will begin with the shell’s name (itsview-tag), enclosed in square brackets.
ClearCase Build Umask
The clearmake build program creates derived objects, which are typicallyshared by multiple users (who wink-in these objects, rather than rebuildthem, whenever possible). To promote derived object sharing, you mustguarantee adequate permissions (specifically, read and write for group) forderived objects created during clearmake builds. As an alternative to settingyour umask value, set the environment variableCLEARCASE_BLD_UMASK:
.cshrc: setenv CLEARCASE_BLD_UMASK 2
.profile: CLEARCASE_BLD_UMASK = 2; export
CLEARCASE_BLD_UMASK
You can also specify CLEARCASE_BLD_UMASK as a makefile macro. Formore information, see CASEVision/ClearCase User’s Guide.
Table In-4 Setting the Shell Prompt
File Setting
.cshrc
(C Shell)
if ( $?prompt ) then if ( $?CLEARCASE_ROOT ) then set prompt = "[‘basename $CLEARCASE_ROOT`]$prompt" endifendif
.profile
(Bourneand Kornshells)
if [ "$PS1" != "" ] ; then echo prompt set if [ "$CLEARCASE_ROOT" ] ; then PS1="[`basename $CLEARCASE_ROOT`] $PS1" fifi

Verify Connections with ClearCase Server Hosts
xix
Create Command Aliases
Skip this section if you intend to use ClearCase only through its graphicaluser interface (GUI). Otherwise, you may find it helpful to add commandaliases like the following to your shell startup file:
% alias ct cleartool% alias ctco cleartool checkout% alias ctci cleartool checkin
Log In Again
After you’ve made all the modifications to your shell startup script, log out,then log in again. The procedures in the remainder of this chapter will testand verify the changes you’ve made.
Verify Connections with ClearCase Server Hosts
ClearCase is a distributed application: in addition to running client processeson your home host, it runs server processes on other hosts in the network. Anetwork-wide data storage registry is located on one host, which must beglobally accessible.
License Server Host
One particularly important host is the network-wide license server host.ClearCase programs refuse to work unless they can obtain an availablelicense from this host; verify your connection with it by entering thiscommand:
% clearlicenseLicense server on host "saturn".Running since ...
If this fails because the program clearlicense cannot be found, you made anerror in setting up your search path (“Search Path for Executables” onpage xv). If clearlicense is invoked, but it does not display a message like theone above, see the “Licensing Errors” section of its manual page.

xx
Preparing to Use CASEVision/ClearCase
Registry Host
Each ClearCase host in the network has a registry directory: subdirectory rgyof /usr/adm/atria, the ClearCase administration directory. On one networkhost, the registry server host, the registry directory contains access-pathinformation for all VOBs and views in the local area network. If thecommand cleartool lsvob lists one or more VOBs, you are properlyconnected to the registry server host.
If cleartool lsvob fails, display the one-line contents of file/usr/adm/atria/rgy/rgy_hosts.conf. Verify your connection to the named hostusing any of various OS utilities or their equivalents: ping, rlogin, rsh and soon. If you are still not confident of your connection to the registry server host,consult your system administrator.
Start Using ClearCase
You are now ready to start using ClearCase. We recommend that you workthrough the step-by-step instructions in the following chapters. When youhave completed working in this tutorial’s “practice” environment, see theCASEVision/ClearCase User’s Guide for additional help in setting up your“real” work environment.
Set Up for Integration Products
ClearCase is designed to work well with other UNIX applications andsoftware development tools. Interoperability with some third-partyapplications has been optimized through integration software. In some cases,this software is bundled with the base ClearCase product (for example,H-P® SoftBench). In other cases, it is available separately (for example,QualTrak DDTS).
Each of the integrations has its own documentation. Determine whatintegration software, if any, you’ll be using. Consult the manual for each onefor instructions on installation, and on adjusting your operatingenvironment. SoftBench and ToolTalk users should read the respectivechapters in the CASEVision/ClearCase User’s Guide.
1
Chapter 1
1. CASEVision/ClearCase Tutorial:Developing a ‘Hello World’ Program
This tutorial is designed for developers with no previous experience withClearCase software. The goal is to provide a “feel” for the product, itscapabilities, and its modes of usage. You will not explore every productfeature—just the ones most commonly used and most characteristic ofClearCase’s special capabilities.
As you work through this tutorial, feel free to consult other ClearCasedocumentation:
CASEVision/ClearCase Concepts Guidea high-level discussion of product features
CASEVision/ClearCase User’s Guide and Administration Guidecollections of technical notes, many of which provide“cookbook recipes” for performing common, multiple-steptasks with ClearCase
CASEVision/ClearCase Reference Pagesprinted versions of all the manual pages
ClearCase reference documentation is organized into “manual pages”, instandard man(1) format. Many of the commands you’ll be using aresubcommands of a single program, called cleartool. Each subcommand hasits own manual page, accessible through cleartool itself. For example, todisplay the manual page for the lshistory subcommand, enter this command
% cleartool man lshistory
Each of the ClearCase GUI programs has its own context-sensitive helpfacility. Installation instructions, release notes, and supplementary technicalnotes are also provided in the ClearCase.

2
Chapter 1: CASEVision/ClearCase Tutorial: Developing a ‘Hello World’ Program
Overview
This tutorial is structured as a sequence of steps. Each step describes the taskto be accomplished, shows what you should type, and shows thecorresponding output.
Abbreviations
Many of the commands in this tutorial involve use of the cleartool command,which supports many command options. Such options can always beabbreviated to three characters. For example, you can use –rep instead of–replace. Likewise, certain subcommand names can be abbreviated (forexample, des for describe). For clarity, we generally uses the spelled-outforms of subcommand names and options.
“Personalizing” the Tutorial
Data structure naming--You will have some flexibility in naming variousdata structures created during the course of this tutorial. We suggest thatyou “personalize” these names—for example, by incorporating yourusername into a pathname. This will enable many users at your site to workthrough the tutorial without interfering with each other.
Tutorial lesson sequence--You can also customize the tutorial by runningonly a subset of the available lessons—a refresher course on lessons 5 and 6,for example. For more information, see the README file in the doc/tutorialsubdirectory of the ClearCase installation directory (/usr/atria, by default).
Command Output
The sample command output shown in this tutorial was created on a SunOShost by a user with umask 002, using a C shell. Your command output willdiffer; to facilitate comparisons, we use these symbols:
USER indicates your username (UNIX login)
GROUP indicates your principal group, as recorded in the passworddatabase

Setting the Stage: The ‘hello’ Project
3
HOST indicates the hostname of the machine you are using towork through the tutorial
HOME indicates the pathname of your home directory
VOBTAG the location in the file system where you access a ClearCaseversioned object base (VOB). Each VOB is a permanent datarepository.
DATESTRING indicates a date-time string, such as Mar 30 10:23, whichwill vary depending on context, and on when you run thetutorial
Setting the Stage: The ‘hello’ Project
Most programmers don’t join a project at its beginning, but at some laterdate. In this tutorial, you will join a project that has just seen its secondrelease. In the UNIX tradition, this project is a “Hello, World” program.(Your employer has actually found a way to make customers pay for such aprogram!)
First Release
The first release is a “classic” version. The executable is named hello; it isimplemented with a single C-language source file, along with a makefile:
hello.c source file
Makefile makefile (target description file)
Here is some sample output:
% helloHello, world!%

4
Chapter 1: CASEVision/ClearCase Tutorial: Developing a ‘Hello World’ Program
Second Release
The second release of the program adds some “sizzle”—it retrieves theuser’s login name and home directory from environment variables, andincludes these values in an expanded message. For example:
% helloHello, USER!Your home directory is /net/HOST/home/USER.It is now Fri Jun 18 15:25:01 1993.%
The calls to the environment are implemented as functions in an auxiliarysource file, util.c; declarations and required #include statements for thesefunctions are located in a header file, hello.h:
util.c auxiliary source file
hello.h application header file
Did you notice the bug in this second release? There is a <newline> characterat the end of the date string, which pushes the period at the end of thesentence onto the next line. You’ll fix this bug in Lesson 5.
Now, it’s time to start work.
Step 1. Go to an appropriate directory
Go to a directory that affords you some privacy. The tutorial will createClearCase data structures below this directory; accordingly, it must:
• be a directory for which you have “write” permission
• be in a disk partition with at least 5Mb of free disk storage
• be physically located on a ClearCase installation host (required toenable creation of ClearCase data structures)
The “preferred” location is your home directory. But you may need to selectanother location—for example, if your home directory is located on ace%ntral file server host, where ClearCase is not installed.
% cd $HOME

Setting the Stage: The ‘hello’ Project
5
or, possibly
% mkdir /usr/tmp/USER ; cd /usr/tmp/USER
If you select a location outside your home directory, be sure to “personalize”it, as discussed on page 2.
Note: On some systems (DEC Alpha, for example), files in /tmp and /usr/tmpare routinely deleted, at reboot time and/or by periodic cron jobs. Somesystems (Solaris 2.x, for example), configure /tmp as swap space, which willcause Step 5 to fail later in this lesson. Check with your system administratorbefore using /tmp or /usr/tmp as a storage location. ♦
Step 2. Run the ‘CHECK’ script
To verify that you’ll be able to work through the tutorial successfully, runthis script:
% /usr/atria/doc/tutorial/CHECK
The CHECK script verifies that:
• ClearCase is installed on the host where you are logged in.
• A ClearCase license is available for use by you.
• A C-language compiler, required for building software during thetutorial, is accessible through your search path.
• The host on which your current working directory physically residessupports the creation and management of ClearCase data structures.
• Your search path includes the directory that contains the ClearCaseuser-level commands.
If any of these requirements is not satisfied, the CHECK script displays amessage explaining how to remedy the situation. For more information onthese issues, read the comments in the CHECK script itself.
Step 3. Create a subdirectory in which all tutorial data will reside
Create a subdirectory—assumed hereafter to be named tut—then go to thatsubdirectory. All ClearCase data structures created during this tutorial(except for file system mount points) will be stored in the tut subdirectory.
In the command output printed in thismanual, the directory you go to in thisstep is indicated by the symbol HOME.
6
Chapter 1: CASEVision/ClearCase Tutorial: Developing a ‘Hello World’ Program
% mkdir tut% cd tut
Step 4. Background: ClearCase VOBs
With ClearCase, a project’s permanent and/or shared data storage isorganized into versioned object bases (VOBs). Most real-life projects use acollection of related VOBs, but for this tutorial, a single VOB will suffice.
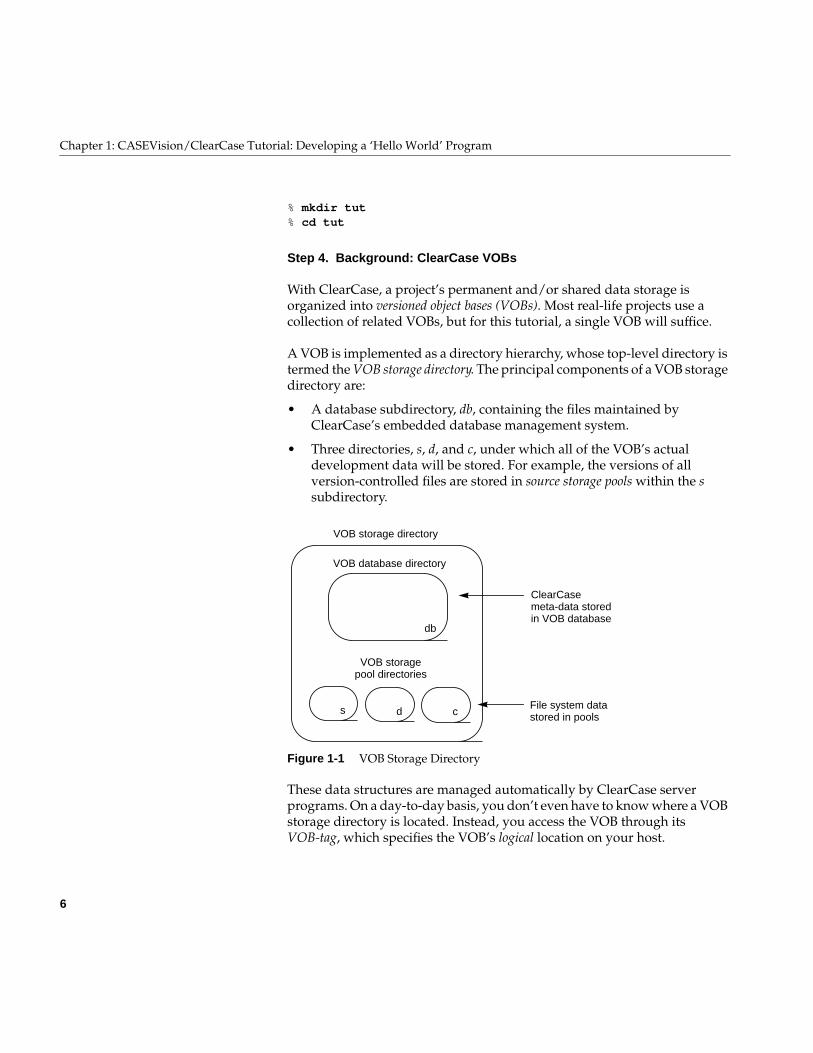
A VOB is implemented as a directory hierarchy, whose top-level directory istermed the VOB storage directory. The principal components of a VOB storagedirectory are:
• A database subdirectory, db, containing the files maintained byClearCase’s embedded database management system.
• Three directories, s, d, and c, under which all of the VOB’s actualdevelopment data will be stored. For example, the versions of allversion-controlled files are stored in source storage pools within the ssubdirectory.
Figure 1-1 VOB Storage Directory
These data structures are managed automatically by ClearCase serverprograms. On a day-to-day basis, you don’t even have to know where a VOBstorage directory is located. Instead, you access the VOB through itsVOB-tag, which specifies the VOB’s logical location on your host.
VOB database directory
VOB storagepool directories
VOB storage directory
ClearCasemeta-data storedin VOB database
File system datastored in pools
db
s d c

Setting the Stage: The ‘hello’ Project
7
On UNIX systems, a VOB-tag is actually a mount point, because each a VOBis mounted and accessed as a separate file system. (A typical UNIX mountmakes an entire disk partition accessible; a type-MVFS mount providesaccess to the directory structure created by a mkvob command.) Once a VOBis activated (mounted), you can access it using ClearCase programs andstandard UNIX programs.
Figure 1-2 Mounted VOB
Step 5. Create a new VOB
Let’s create your tutorial VOB now. The mkvob command, which creates aVOB, also requires that you specify its VOB-tag. We suggest that you mountthe VOB in directory /tmp, and that you use this “formula” to devise aVOB-tag:
VOB-tag = /tmp/USER_HOST_hw
(The “hw” stands for “Hello, world”.) It is important to personalize andlocalize the VOB-tag—other users may run the tutorial on the same host, andyou may have occasion to run the tutorial on another host.
Throughout this manual, we refer to the location where you’ve mounted theVOB using the symbol VOBTAG.
UNIX rootdirectory
VOB
VOB-tag(VOB mount point)
When mounted as a type-MVFSfile system, a VOB can beaccessed like a standard
directory tree

8
Chapter 1: CASEVision/ClearCase Tutorial: Developing a ‘Hello World’ Program
% cleartool mkvob -tag VOBTAG -c "tutorial VOB" tut.vbsCreated versioned object base.Host-local path: HOST:HOME/tut/tut.vbsGlobal path: VOBTAGVOB ownership: owner USER group GROUPAdditional groups: ...
Step 6. Activate the VOB by Mounting It
% mkdir VOBTAG% cleartool mount VOBTAG
(The VOBTAG “mount-over” directory may already exist. If so, mkdir issues aharmless error message.) The ClearCase mount command makes the VOBaccessible to user-level software at the pathname specified by VOBTAG.
Note: If your VOB-tag directory gets deleted (for example, you put it in /tmpand a cron job deletes it) don’t worry; the VOB is safe. Simply repeat this stepto reactivate it. ♦
Step 7. Run the ‘REL1REL2’ script to create the first two releases
Your new, empty VOB is now ready to use. Our plan was to join the projectafter its second release, so run a script to create the first two releases. Youmust specify the VOB-tag as a command-line argument.

Setting the Stage: The ‘hello’ Project
9
% /usr/atria/doc/tutorial/REL1REL2 VOBTAG . . .****************************************************** ** Releases "REL1" and "REL2" have been created. ** You are now ready to create another release, ** to be called "REL3". ** ******************************************************
The VOB now contains a considerable amount of development data:
• A src subdirectory, with two versions of Makefile, three versions ofhello.c, one version of hello.h, and one version of util.c.
• A bin subdirectory, with two versions of the compiled program hello.
The VOB stores all the versions of all these files (and, as you’ll see in thistutorial, a good deal of other information, too).
Step 8. Try to access the VOB—oops, you need a ‘view’
Let’s try to see what all that data looks like.
% cd VOBTAG% ls -l
Nothing appears because, in some sense, a VOB contains too much data. It isonly on rare occasions that you want to see all of a file’s historical versions.So instead of showing you a potentially confusing glut of data, ClearCaseblocks out the data completely.
Step 9. Background: ClearCase Views
Most of the time, you wish to see just one version of each of a VOB’s files.(Often, it’s the most recent version, but sometimes not.) Together, aconsistent, matched set of versions constitute a particular configuration of thesource tree. ClearCase includes a powerful and flexible tool for defining,viewing, and working with configurations—the view. In essence, a viewmakes any VOB appear to be a standard directory tree, by selecting oneversion of each version-controlled object.
10
Chapter 1: CASEVision/ClearCase Tutorial: Developing a ‘Hello World’ Program
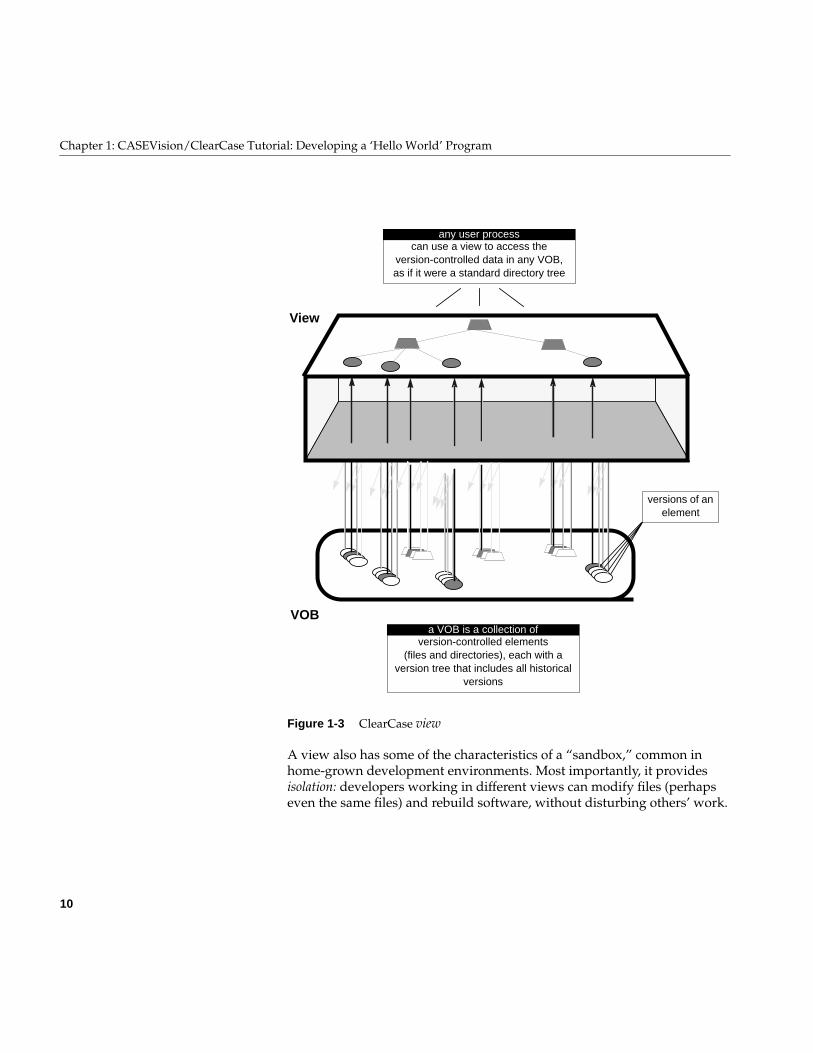
Figure 1-3 ClearCase view
A view also has some of the characteristics of a “sandbox,” common inhome-grown development environments. Most importantly, it providesisolation: developers working in different views can modify files (perhapseven the same files) and rebuild software, without disturbing others’ work.
VOB
View
can use a view to access theversion-controlled data in any VOB,as if it were a standard directory tree
any user process
versions of anelement
version-controlled elements(files and directories), each with a
version tree that includes all historicalversions
a VOB is a collection of

Setting the Stage: The ‘hello’ Project
11
It’s often useful to think of the view as being above the file system instead ofwithin it, an omnipresent lens through which you can see all the data onyour host—in particular, all mounted VOBs.
Step 10. Create a ’view’
The REL1REL2 script you ran in Step 7 created a view, which it used to createand modify source files, and to build the first two releases of the hello project.Now, create your own view, in which you’ll continue project development.
Syntactically, creating a view is much like creating a VOB: you specify a viewstorage directory (the view’s “real” location), along with a view-tag (the view’slogical location). On a day-to-day basis, you reference a view using itsview-tag—you can safely forget about the view storage directory itself.
A view-tag takes the form of a simple directory name; use this formula todevise a tag for this view:
view-tag = USER_HOST_tut
For example, if you are user “eve” working on host “venus”, you would useview-tag eve_venus_tut. (Be sure to personalize all the ClearCaseview-tags you create—each view-tag you create is globally visible!)
% cd HOME/tut% cleartool mkview -tag USER_HOST_tut tut.vwsCreated view.Host-local path: HOST:HOME/tut/tut.vwsGlobal path: /net/HOST/HOME/tut/tut.vws
Step 11. ’Set’ the view
Once you have created a view, you can use it in several ways. The simplestway is to create a shell process that accesses all of your host’s data throughthat view. Such a process is said to be set to the view.
% cleartool pwv -short** NONE **% echo $$3409% cleartool setview USER_HOST_tut

12
Chapter 1: CASEVision/ClearCase Tutorial: Developing a ‘Hello World’ Program
% cleartool pwv -shortUSER_HOST_tut% echo $$3506
The pwv (“print working view”) commands before and after the setviewcommand show that the new shell is, indeed, set to the view namedUSER_HOST_tut. The echo commands display the process number of thecurrent shell, showing that a new shell process has been created.
Now, let’s get acquainted with the hello project.
Step 12. Change to the source directory
Development environments based on “sandboxes” force you to practicedouble-think—where you work (your sandbox) differs from where thesources are “really” stored (perhaps an SCCS or RCS source tree). WithClearCase, there is no such artificial distinction. Once you set a view, youwork directly with the “real” source tree. For the most part, you can forgetthat you are using a special mechanism (the view) to access the data. We usethe term transparency to describe this property of views.
To summarize, you simply set your view context with a setview command,and then work directly with your data—“set it and forget it.”
Your VOB is mounted at VOBTAG. Let’s go there.
% cd VOBTAG
Step 13. List directory contents (UNIX style)
The REL1REL2 script created this directory structure (Discussion of a VOB’slost+found directory is beyond the scope of this manual.):
VOBTAG/src/bin
The src directory stores the hello project’s source files; the bin directory storesthe project’s binaries, as they are to be released to customers. (Actually, eachrelease consists of just one binary file, named hello.) All the files are allversion-controlled in exactly the same way—ClearCase can handle any kind

Setting the Stage: The ‘hello’ Project
13
of file. (This capability makes it preferable to characterize a VOB as a“development tree”, rather than a “source tree”.) Let’s see what the VOB’ssource directory contains.
% cd src% ls -ltotal 4-r--r--r-- 1 USER GROUP 134 May 20 15:40 Makefile-r--r--r-- 1 USER GROUP 196 May 20 15:41 hello.c-r--r--r-- 1 USER GROUP 140 May 20 14:46 hello.h-r--r--r-- 1 USER GROUP 223 May 20 17:05 util.c
As far as standard UNIX ls(1) is concerned (along with vi(1), cat(1), cp(1), andall other standard UNIX programs), this is simply a directory containingsome sources files and a makefile. Note that the files are all read-only.
Step 14. List directory contents (ClearCase style)
Each of the files listed above is a file element, with a hierarchical version tree.All of the versions of each file element are stored in the VOB; but just oneversion is visible through the “lens” of your view. The ClearCase variant ofthe ls command shows exactly which version appears.
% cleartool ls -short
Makefile@@/main/2hello.c@@/main/3hello.h@@/main/1util.c@@/main/1
(Directories in a VOB are elements, too, with version trees of their own. We’llwait until Lesson 4 to work with this ClearCase feature.)
For example, hello.c@@/main/3 indicates that for file element hello.c, yourview selects version 3 on the main branch.
Why does your view select these particular versions? Because they are thenewest ones in their respective version trees. We will exploreversion-selection by views and user-defined configurations in Lesson 4.
14
Chapter 1: CASEVision/ClearCase Tutorial: Developing a ‘Hello World’ Program
Step 15. List a version tree
Although your view selects just one version of an element, you can list theentire version tree.
% cleartool lsvtree -all hello.c
hello.c@@/mainhello.c@@/main/0hello.c@@/main/1hello.c@@/main/2 (REL1)hello.c@@/main/3 (REL2)
This version tree is very simple: a single “main” branch contains a fewversions, with no subbranches. Version 2 has been assigned a version label,“REL1”; version 3 has been labeled “REL2”. Version labels play an importantrole in ClearCase. They provide mnemonic access to versions—it’s easier toremember the label “REL2” than it is to remember “version 3 went into thesecond release.” More important, when applied throughout a developmenttree, a single label can define a collection of versions—for example, version2 of Makefile, version 3 of hello.c, version 1 of hello.h, and version 1 of util.c.
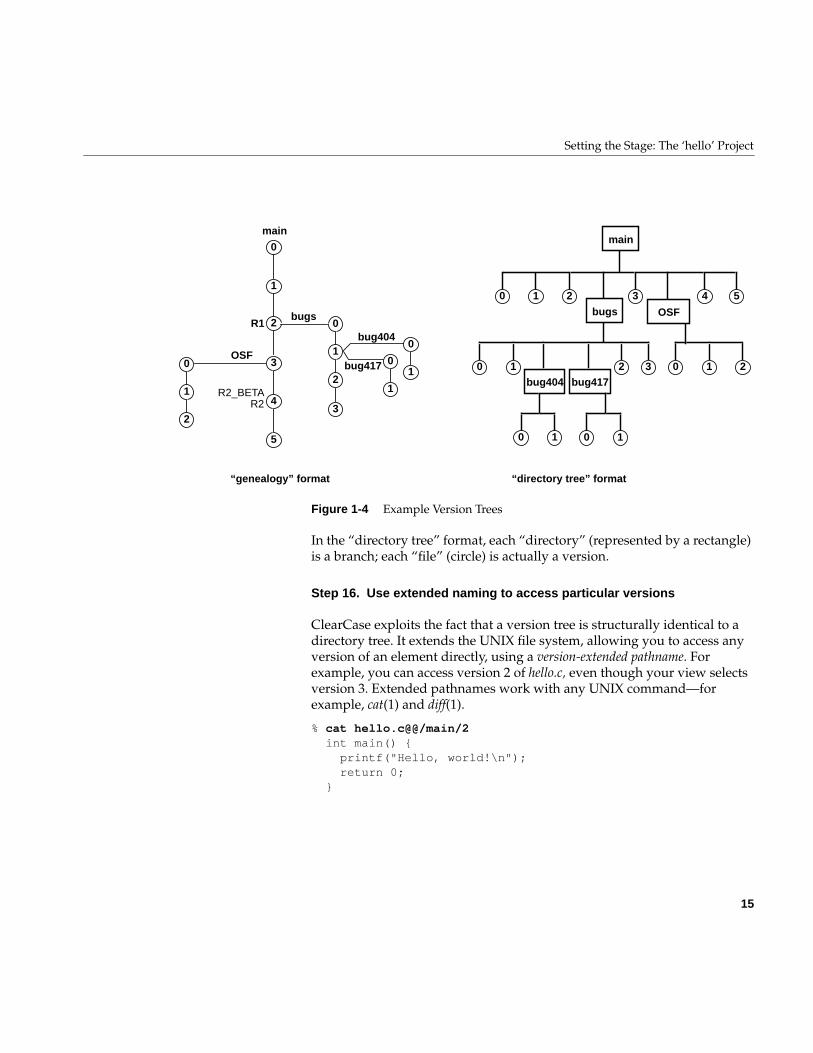
The use of slash ( / ) characters in the lsvtree listing suggests that anelement’s version tree is analogous to a directory tree. In fact, the structuresare identical. The version tree for hello.c does not make a particularlyinteresting picture at this point, so compare the ways in which a fictionalelement with many subbranches can be pictured:
Setting the Stage: The ‘hello’ Project
15
Figure 1-4 Example Version Trees
In the “directory tree” format, each “directory” (represented by a rectangle)is a branch; each “file” (circle) is actually a version.
Step 16. Use extended naming to access particular versions
ClearCase exploits the fact that a version tree is structurally identical to adirectory tree. It extends the UNIX file system, allowing you to access anyversion of an element directly, using a version-extended pathname. Forexample, you can access version 2 of hello.c, even though your view selectsversion 3. Extended pathnames work with any UNIX command—forexample, cat(1) and diff(1).
% cat hello.c@@/main/2 int main() { printf("Hello, world!\n"); return 0; }
main
10 2 43
bugs OSF
10 2bug404 bug417
3
5
10 2
10 10
1
5
2
3
4
0
1
2
bugs
OSF0
1bug417
0
1
2
0
1
bug404
0
R2_BETAR2
R1
3
main
“genealogy” format “directory tree” format
16
Chapter 1: CASEVision/ClearCase Tutorial: Developing a ‘Hello World’ Program
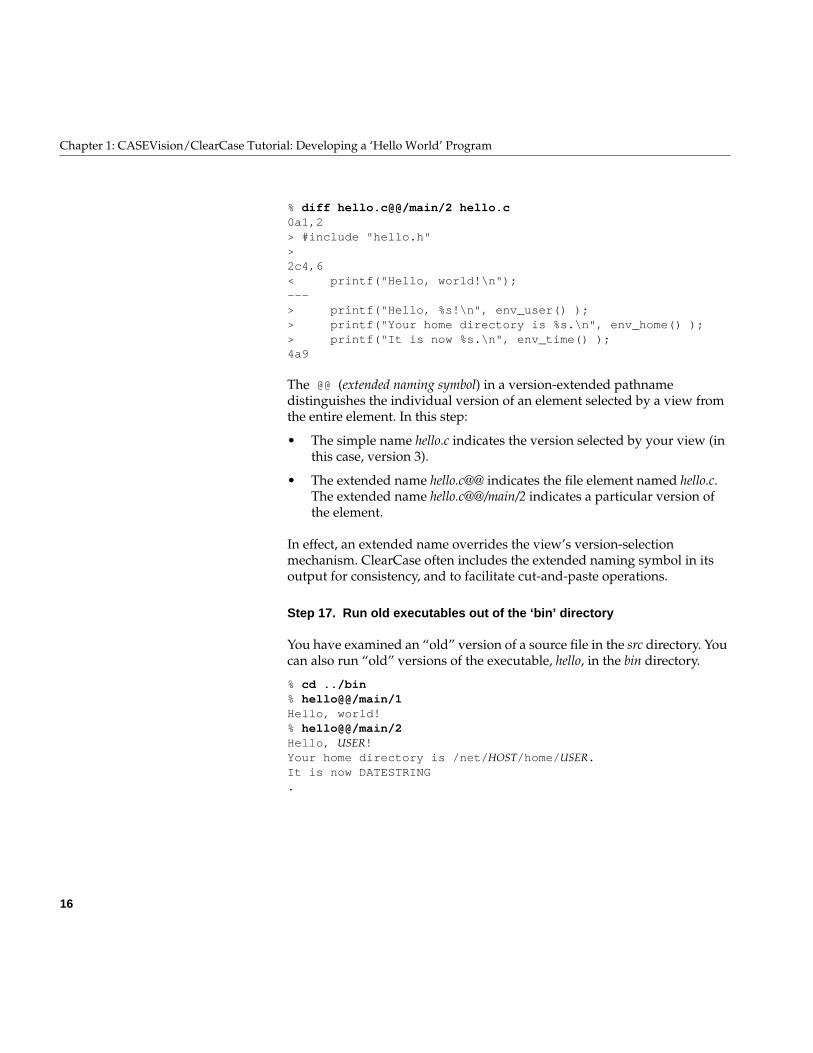
% diff hello.c@@/main/2 hello.c0a1,2> #include "hello.h">2c4,6< printf("Hello, world!\n");---> printf("Hello, %s!\n", env_user() );> printf("Your home directory is %s.\n", env_home() );> printf("It is now %s.\n", env_time() );4a9
The @@ (extended naming symbol) in a version-extended pathnamedistinguishes the individual version of an element selected by a view fromthe entire element. In this step:
• The simple name hello.c indicates the version selected by your view (inthis case, version 3).
• The extended name hello.c@@ indicates the file element named hello.c.The extended name hello.c@@/main/2 indicates a particular version ofthe element.
In effect, an extended name overrides the view’s version-selectionmechanism. ClearCase often includes the extended naming symbol in itsoutput for consistency, and to facilitate cut-and-paste operations.
Step 17. Run old executables out of the ‘bin’ directory
You have examined an “old” version of a source file in the src directory. Youcan also run “old” versions of the executable, hello, in the bin directory.
% cd ../bin% hello@@/main/1Hello, world!% hello@@/main/2Hello, USER!Your home directory is /net/HOST/home/USER.It is now DATESTRING.

Setting the Stage: The ‘hello’ Project
17
As in Step 16, a version-extended pathname accesses a particular version ofan element. In this case, the versions are executables, not sources. TheREL1REL2 script checked in the “first release” build of hello as version 1 ofelement VOBTAG/bin/hello. Similarly, it checked in the “second release” buildof hello as version 2 of the same element.


19
Chapter 2
2. Working on a New Release
In this lesson, you’ll get a feel for the basic development cycle in a ClearCaseenvironment: checkout-edit-compile-test-checkin. Your task is to start workon a third release of the hello program. You will revise the env_user() functionto simplify the pathname reported as the user’s home directory.
Step 18. Get your bearings
At the end of the preceding lesson, you were in the bin directory, in a shellset to view USER_HOST_tut. Verify that you are still in the same situation.Then, return to the source directory, src.
% cleartool pwv -shortUSER_HOST_tut% pwdVOBTAG/bin% cd ../src
If you’ve gotten lost, you may need to use a full pathname to find the sourcedirectory.
cd VOBTAG/src
If this command fails, it is probably because you exited the shell that was setto your view. Enter the following commands to reestablish your viewcontext and your working directory within the VOB.
cleartool setview USER_HOST_tutcd VOBTAG/src
Step 19. Is anyone else working on this program?
Like SCCS and RCS, ClearCase uses a “checkout-edit-checkin” paradigm tocontrol creation of new versions of elements. Before you start working, use

20
Chapter 2: Working on a New Release
the lscheckout (“list checkouts”) command to determine whether any otheruser, working in another view, is currently using any of the source files.
% cleartool lscheckout%
It’s unlikely that anyone else would intrude on your tutorial, but notimpossible. Any user working on your host can use the mount(1M)command to see that a VOB is mounted at VOBTAG. Your umask value at thetime the REL1REL2 script created the VOB determines whether other userscan access the data in your VOB.
Step 20. Verify that a file cannot be changed until it is checked out
Just to be mischievous, let’s try to defeat the system. If you own a standardfile, you can make it writable with chmod(1). But this doesn’t work for aClearCase element.
% ls -l util.c-r--r--r-- 1 akp user 223 May 20 17:05 util.c% chmod 644 util.cchmod: util.c: Read-only file system
(The exact text of the error message varies from system to system.)
The only way to make an element writable is to perform a checkoutcommand. Similarly, you cannot delete util.c, even though you own it andyou own the directory in which it resides. To the standard UNIX rm(1)command, a VOB is a read-only file system.
Step 21. Checkout a source file
The only way to modify the contents of element util.c is to perform a checkoutcommand. In ordinary version-control systems, the “double-think” comesinto play here. For example, if util.c were under SCCS control, you wouldenter a command that reads one file (s.util.c in the “real” source tree) andwrites another file (util.c in your sandbox).
ClearCase simplifies your life (and your system administrator’s) bydispensing with the double-think. You name the element itself in the checkoutcommand; the only apparent change is that the file goes from read-only toread-write. But ClearCase has done more than a simple chmod(1)—it has

21
made a copy of the read-only file you listed in Step 20, creating a read-write“checked-out” version. Your view makes this file appear to be located in thecurrent working directory, VOBTAG/src. In fact, the checked-out version isstored within your view’s private storage area, under a name that onlyClearCase cares about.
Figure 2-1 Using the checkout Command
% cleartool checkout util.cCheckout comments for "util.c":shorten HOME string.Checked out "util.c" from version "/main/1".% ls -l util.c-rw-rw-r-- 1 USER user 223 DATESTRING util.c% cleartool ls -short util.cutil.c@@/main/CHECKEDOUT
The cleartool ls command verifies that the checked out version now appearsin your view.
read-only read-write
before checkout:one version of the element is
selected by the view to appear as aread-only file
after checkout:the version that was copied to
view-private storage appears as aread-write file
View
VOB

22
Chapter 2: Working on a New Release
Note: By default, cleartool prompts you for a comment when you perform acheckout. This comment gives you a chance to “declare your intentions”. Itwill be visible to all other ClearCase users while you have the file checkedout. ♦
Whenever you are prompted for a comment by any cleartool subcommand,you can type as many lines as you like. The comment ends when you type<EOF> (typically, <Ctrl-d>) at the beginning of a line, or when you enter aline that contains a single “.” character.
Step 22. Revise the checked-out source file
The only change to be made in util.c is an update to the env_home() function.If the pathname in the HOME environment variable starts with the string“/net/”, we assume that it has the form “/net/hostname/usr/...”. (Suchhome directory pathnames are typical of environments using automount(1M)to access remote file systems.) Accordingly, we strip off the first twocomponents of the pathname, and return the remainder.
Note: In this step, and throughout this tutorial, you will not edit files usinga text editor. Instead, you’ll overwrite a checked-out version with a file froma repository of guaranteed-correct files, the doc/tutorial subdirectory of theClearCase installation directory (/usr/atria or $ATRIAHOME). ♦

23
% cp /usr/atria/doc/tutorial/ut.2 util.c% cleartool diff util.c@@/main/1 util.c********************************<<< file 1: util.c@@/main/1>>> file 2: util.c********************************--------------[after 15]-----------|------------[inserted 16-17]----------- -| char *b,*c; | |------------[changed 19-20]---------|-----------[changed to 21-31]---------- else | else { return home_env; | if ( strncmp(“/net/”, home_env, + -| /* strip prefix from pathname + | b = strchr(home_env+1, ‘/’); | c = strchr(b+1, ‘/’); | return c; | } else { | /* use pathname as-is */ | return home_env; | } | } |-
This invocation of the cleartool diff command answers the question, “Whatchanges have I made since I checked out this file?”. How can you determinewhich historical version to compare the current version with? The outputfrom the checkout command in Step 21 indicates that you checked out version1. Entering a cleartool lscheckout command would verify this. But the bestprocedure is to use the –pred option:
cleartool diff -pred util.c
With this option, ClearCase automatically determines the predecessor to thespecified version. The predecessor of the checkedout version of util.c isdefined to be the version from which it was checked out, in this case /main/1.
In the future, we will use diff –pred whenever we need to ask “what’schanged in this file?”.
24
Chapter 2: Working on a New Release
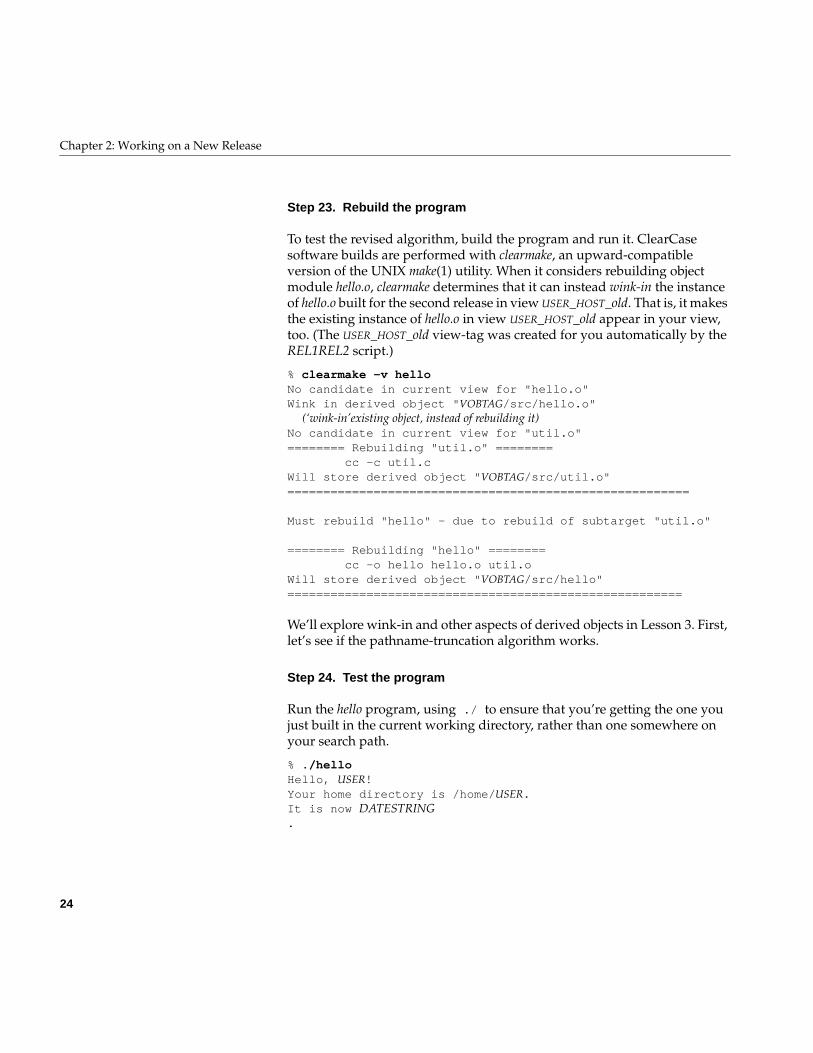
Step 23. Rebuild the program
To test the revised algorithm, build the program and run it. ClearCasesoftware builds are performed with clearmake, an upward-compatibleversion of the UNIX make(1) utility. When it considers rebuilding objectmodule hello.o, clearmake determines that it can instead wink-in the instanceof hello.o built for the second release in view USER_HOST_old. That is, it makesthe existing instance of hello.o in view USER_HOST_old appear in your view,too. (The USER_HOST_old view-tag was created for you automatically by theREL1REL2 script.)
% clearmake -v helloNo candidate in current view for "hello.o"Wink in derived object "VOBTAG/src/hello.o" (‘wink-in’existing object, instead of rebuilding it)No candidate in current view for "util.o"======== Rebuilding "util.o" ======== cc -c util.cWill store derived object "VOBTAG/src/util.o"========================================================
Must rebuild "hello" - due to rebuild of subtarget "util.o"
======== Rebuilding "hello" ======== cc -o hello hello.o util.oWill store derived object "VOBTAG/src/hello"=======================================================
We’ll explore wink-in and other aspects of derived objects in Lesson 3. First,let’s see if the pathname-truncation algorithm works.
Step 24. Test the program
Run the hello program, using ./ to ensure that you’re getting the one youjust built in the current working directory, rather than one somewhere onyour search path.
% ./helloHello, USER!Your home directory is /home/USER.It is now DATESTRING.

25
The good news is that the algorithm works; the bad news is that the bug isstill there! Don’t worry—you’ll get to fix it soon.
Step 25. Get some help on the ‘list checkouts’ command
To complete the checkout-edit-compile-test-checkin cycle conscientiously,you must checkin all the files that you checked out. Perhaps you know thatthe lscheckout command has an option that reports only your view’scheckouts, but what is the correct syntax? If you’ve forgotten it (or neverknew it!), ClearCase offers two levels of help. First, you can get a syntaxsummary.
% cleartool help lscheckoutUsage: lscheckout | lsco [-long | -short | -fmt format] [-cview] [-brtype branch-type] [-me | -user login-name] [-recurse | -directory | -all | -avobs |-areplicas] [pname ...]
If this is not sufficient, you can display the manual page for the lscheckoutcommand.
% cleartool man lscheckoutcleartool MISC. REFERENCE MANUAL PAGES cleartool
NAME lscheckout - list checkouts of an element
SYNOPSIS lsc/heckout | lsco [ -r/ecurse | -d/irectory | -all | -avo/bs | -areplicas] [ -l/ong | -s/hort | -fmt format-string ] [ -me | -use/r login-name ] [ -cvi/ew ] [ -brt/ype branch-type-name ] [ pname ... ]
DESCRIPTION Lists the checkout records (the “checkouts”) for oneor more elements. You can restrict the listing to particularelements and/or to checkouts made in the current view... . . .
(This is equivalent to the shell command man ct+lscheckout.) The optionyou want is –cview. Let’s use it.
26
Chapter 2: Working on a New Release
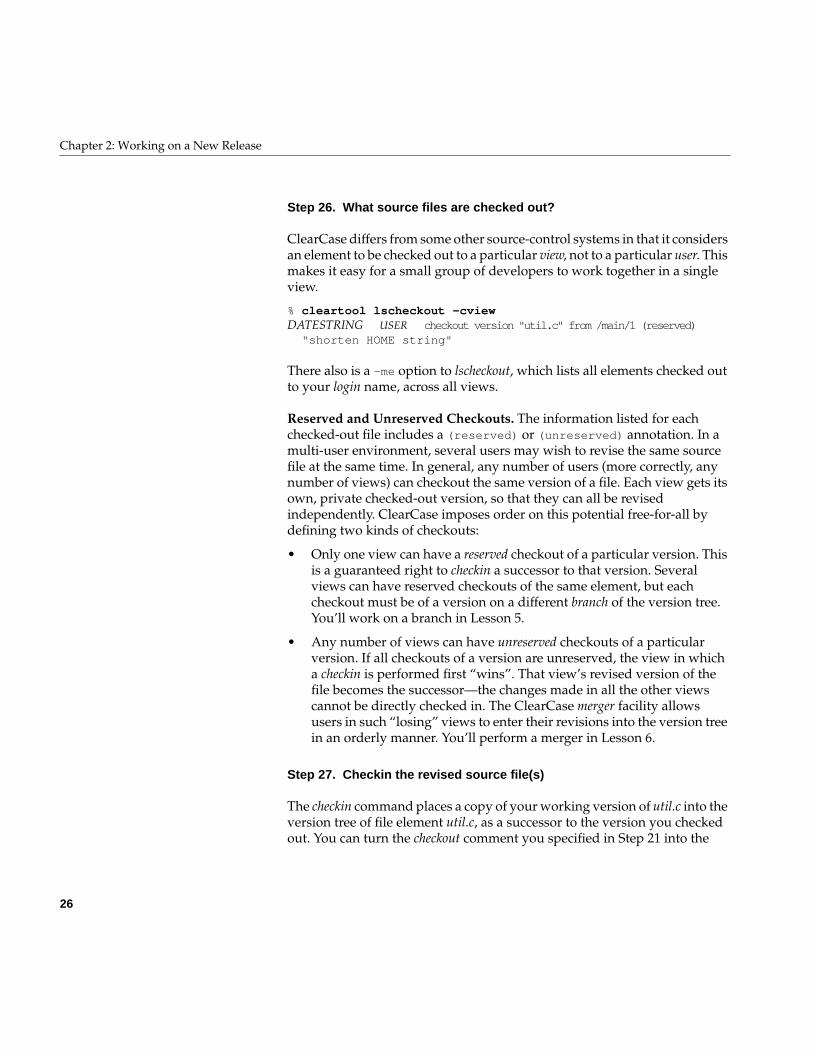
Step 26. What source files are checked out?
ClearCase differs from some other source-control systems in that it considersan element to be checked out to a particular view, not to a particular user. Thismakes it easy for a small group of developers to work together in a singleview.
% cleartool lscheckout -cviewDATESTRING USER checkout version "util.c" from /main/1 (reserved) "shorten HOME string"
There also is a –me option to lscheckout, which lists all elements checked outto your login name, across all views.
Reserved and Unreserved Checkouts. The information listed for eachchecked-out file includes a (reserved) or (unreserved) annotation. In amulti-user environment, several users may wish to revise the same sourcefile at the same time. In general, any number of users (more correctly, anynumber of views) can checkout the same version of a file. Each view gets itsown, private checked-out version, so that they can all be revisedindependently. ClearCase imposes order on this potential free-for-all bydefining two kinds of checkouts:
• Only one view can have a reserved checkout of a particular version. Thisis a guaranteed right to checkin a successor to that version. Severalviews can have reserved checkouts of the same element, but eachcheckout must be of a version on a different branch of the version tree.You’ll work on a branch in Lesson 5.
• Any number of views can have unreserved checkouts of a particularversion. If all checkouts of a version are unreserved, the view in whicha checkin is performed first “wins”. That view’s revised version of thefile becomes the successor—the changes made in all the other viewscannot be directly checked in. The ClearCase merger facility allowsusers in such “losing” views to enter their revisions into the version treein an orderly manner. You’ll perform a merger in Lesson 6.
Step 27. Checkin the revised source file(s)
The checkin command places a copy of your working version of util.c into theversion tree of file element util.c, as a successor to the version you checkedout. You can turn the checkout comment you specified in Step 21 into the

27
checkin comment by typing . followed by <Return>. (Alternatively, you canenter another comment, effectively discarding the checkout comment.)
% cleartool checkin util.cDefault:shorten HOME stringCheckin comments for "util.c": ("." to accept default).Checked in "util.c" version "/main/2".
Step 28. Verify the changes resulting from the checkin
Superficially (for example, to UNIX ls), the only change to a checked-inelement is that the file changes from read-write to read-only. But ClearCasecommands show that much more has happened.
% ls -l util.c-r--r--r-- 1 USER GROUP 357 DATESTRING util.c% cleartool ls -short util.cutil.c@@/main/2 (no longer checked-out)% cleartool lshistory util.cDATESTRING USER create version "util.c@@/main/2" "shorten HOME string"20-May-1992 cory create version "util.c@@/main/1"(REL2) "define user, home, time functions"20-May-1992 cory create version "util.c@@/main/0"20-May-1992 cory create branch "util.c@@/main"20-May-1992 cory create file element "util.c@@" "define user, home, time functions"% cleartool lsvtree -all util.cutil.c@@/mainutil.c@@/main/0util.c@@/main/1 (REL2)util.c@@/main/2 (new version added to branch)
We introduced an additional cleartool command here, lshistory (“listhistory”). This command displays a chronological listing of events in thelifetime of element util.c. Contrast this with lsvtree, which displays thecurrent structure of the element, without regard to how and when thestructure grew.

29
Chapter 3
3. Exploring Derived Objects
In this lesson, you’ll take a closer look at an important ClearCase feature:sharing of the derived objects produced in builds.
Step 29. Get your bearings
At the end of the preceding lesson, you were in the src directory, in a shell setto view USER_HOST_tut. Verify that you are still in the same situation.
% cleartool pwv -shortUSER_HOST_tut% pwdVOBTAG/src
If you’ve gotten lost, you may need to use a full pathname to find the sourcedirectory.
cd VOBTAG/src
If this command fails, it is probably because you exited the shell that was setto your view. Enter the following commands to reestablish your viewcontext and your working directory within the VOB.
cleartool setview USER_HOST_tutcd VOBTAG/src
Step 30. List the derived objects you just built
A file produced by a build script under control of the clearmake build utilityis called a derived object (or DO). The target hello you specified in Step 23 is aderived object; so are its sub-targets, hello.o and util.o. (And so are compilerlisting files and other such files that are not even specified anywhere in themakefile.)
The cleartool ls command provides a simple derived object listing:

30
Chapter 3: Exploring Derived Objects
% cleartool ls -l hello hello.o util.oderived object hello@@DATESTRING.nnn (derive object ID)derived object hello.o@@DATESTRING.nnn (derive object ID)derived object util.o@@DATESTRING.nnn (derive object ID)
The -l (“long”) option expands the listing to include the words derivedobject, but the distinctive DO name format makes derived objects easilyrecognizable without this annotation. Each DO is assigned a unique derivedobject ID, which incorporates its file name and a date-time stamp. These IDsenable users, and ClearCase, to distinguish the instances of the same filesbuilt in different views.
The three DOs look (and behave) the same, but as you will see shortly, hello.ois actually shared by multiple views. When first created in some ClearCaseview, a DO is unshared, and it is stored “locally” in the view. Subsequentexecutions of clearmake in other views can cause the derived object to becomeshared among views. Here is what happened to hello.o to make it a “sharedderived object”:
• The REL1REL2 script used clearmake to build hello.o in viewUSER_HOST_old.
• In Step 23, you performed a build in view USER_HOST_tut. During thisbuild, clearmake determined that rebuilding hello.o in this view wouldproduce an exact copy of an existing instance in another view.Accordingly, it saved time and storage space by performing a wink-in ofthe existing file. That is, it made the same derived object, hello.o, appearin both views, USER_HOST_old and USER_HOST_tut.
Step 31. Examine the config rec of the program just built
clearmake used “circumstantial evidence” to decide that rebuilding hello.owas unnecessary:
• All the source versions that were used to build hello.o in theUSER_HOST_old view are the same as the source versions selected by theUSER_HOST_tut view.
• The build script that was used to build hello.o in the USER_HOST_oldview matches the script that would be used now in the USER_HOST_tutview.
31
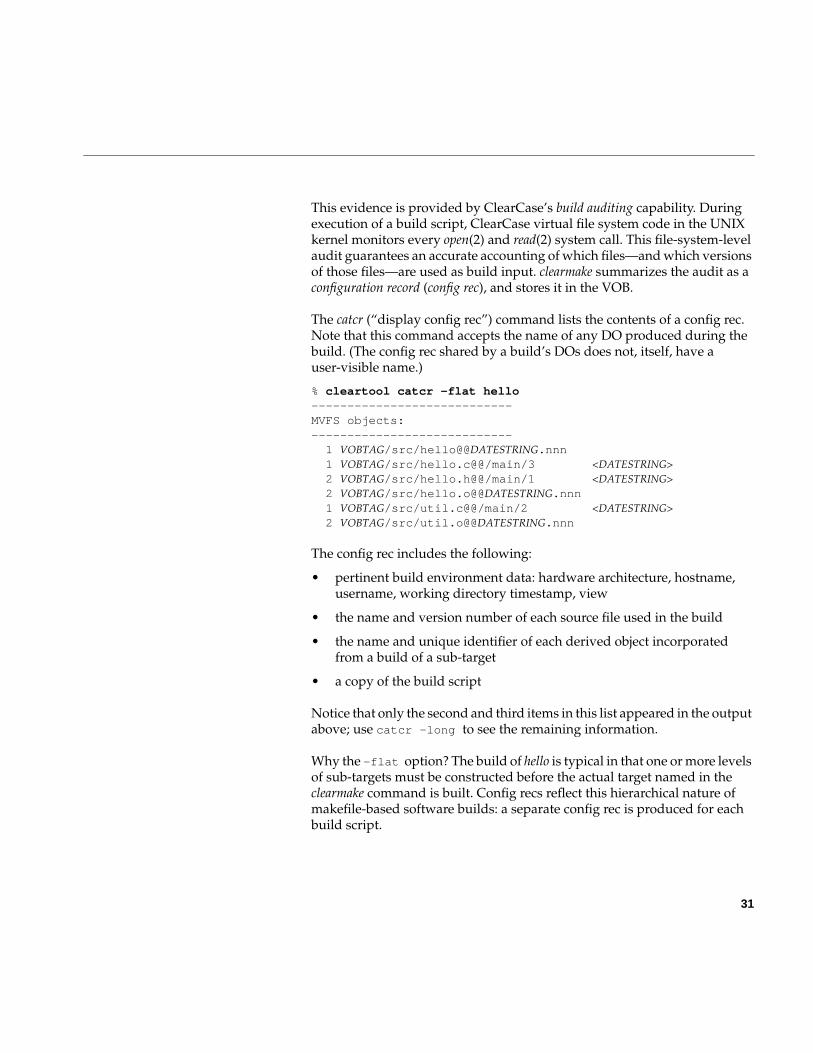
This evidence is provided by ClearCase’s build auditing capability. Duringexecution of a build script, ClearCase virtual file system code in the UNIXkernel monitors every open(2) and read(2) system call. This file-system-levelaudit guarantees an accurate accounting of which files—and which versionsof those files—are used as build input. clearmake summarizes the audit as aconfiguration record (config rec), and stores it in the VOB.
The catcr (“display config rec”) command lists the contents of a config rec.Note that this command accepts the name of any DO produced during thebuild. (The config rec shared by a build’s DOs does not, itself, have auser-visible name.)
% cleartool catcr -flat hello----------------------------MVFS objects:---------------------------- 1 VOBTAG/src/hello@@DATESTRING.nnn 1 VOBTAG/src/hello.c@@/main/3 <DATESTRING> 2 VOBTAG/src/hello.h@@/main/1 <DATESTRING> 2 VOBTAG/src/hello.o@@DATESTRING.nnn 1 VOBTAG/src/util.c@@/main/2 <DATESTRING> 2 VOBTAG/src/util.o@@DATESTRING.nnn
The config rec includes the following:
• pertinent build environment data: hardware architecture, hostname,username, working directory timestamp, view
• the name and version number of each source file used in the build
• the name and unique identifier of each derived object incorporatedfrom a build of a sub-target
• a copy of the build script
Notice that only the second and third items in this list appeared in the outputabove; use catcr -long to see the remaining information.
Why the –flat option? The build of hello is typical in that one or more levelsof sub-targets must be constructed before the actual target named in theclearmake command is built. Config recs reflect this hierarchical nature ofmakefile-based software builds: a separate config rec is produced for eachbuild script.

32
Chapter 3: Exploring Derived Objects
By default, the command catcr hello lists the config rec for the top-levelbuild only. Using the –flat option causes clearmake to combine three configrecs into a single report:
• the config rec for the top-level build(build script: cc -o hello hello.o util.o)
• the config rec for the build of sub-target hello.o(build script cc -c hello.c)
• the config rec for the build of sub-target util.o(build script cc -c util.c)
Step 32. Verify the contents of the config rec
Since this is the first time you’ve examined a config rec, you may be just alittle skeptical of the claim that ClearCase build auditing is guaranteed toproduce a correct listing. So verify that the source file versions reported inthe config rec for hello are, indeed, the versions currently in your view.
% cleartool ls -short *.chello.c@@/main/3util.c@@/main/2
Step 33. Investigate the wink-in of ‘hello.o’
When clearmake built target hello in Step 23, it announced that it wasperforming a wink-in of an existing hello.o instead of building a new hello.o.The lsdo (“list derived objects”) command verifies that your view is nowsharing this file with another view. Displaying the config rec for this fileverifies that it was, indeed, built in another view.
% cleartool lsdo -l hello.oDATESTRING (USER.GROUP) create derived object "hello.o@@DATESTRING.nnn" Getreferences: 2 (shared) => HOST:HOME/tut/old.vws (two views now share) => HOST:HOME/tut/tut.vws (this derived object)% cleartool catcr hello.oTarget hello.o built on host "HOST" by USER.GROUPReference Time DATESTRING, this audit started DATESTRINGView was HOST:HOME/tut/old.vwsInitial working directory was HOST:VOBTAG/src----------------------------

33
MVFS objects:----------------------------VOBTAG/src/hello.c@@/main/3 <DATESTRING>VOBTAG/src/hello.h@@/main/1 <DATESTRING>VOBTAG/src/hello.o@@DATESTRING----------------------------Variables and Options:----------------------------MKTUT_CC=cc----------------------------Build Script:----------------------------cc -c hello.c----------------------------
Step 34. Explore the ‘private’ nature of derived objects
An element cannot be modified unless you enter a checkout command. (Andit cannot be deleted except with the rmelem (“remove element”) command,which is beyond the scope of this tutorial.) Such restrictions would becumbersome for derived objects—developers like to build, rebuild, clean up,and rebuild again at will. So ClearCase allows derived objects to be deletedor overwritten with standard UNIX commands.
Deleting a shared derived object from your view does not simultaneouslyremove it from the other views that share it. Rather, deleting the DO merelyreduces its reference count. The other views continue to see the DO—yourview sees no file with that name. And since the DO still exists, it remains acandidate for wink-in during subsequent rebuilds.
Let’s play with the shared derived object hello.o, verifying that it can bedeleted from your view and then winked-in again.
% rm hello.o (deleted in your view)% ls hello.ols: hello: No such file or directory% cleartool lsdo -l hello.oDATESTRING (USER.GROUP@HOST) create derived object "hello.o@@DATESTRING.nnn" references: 1 (shared) => HOST:HOME/tut/old.vws
(survives in other view)
34
Chapter 3: Exploring Derived Objects
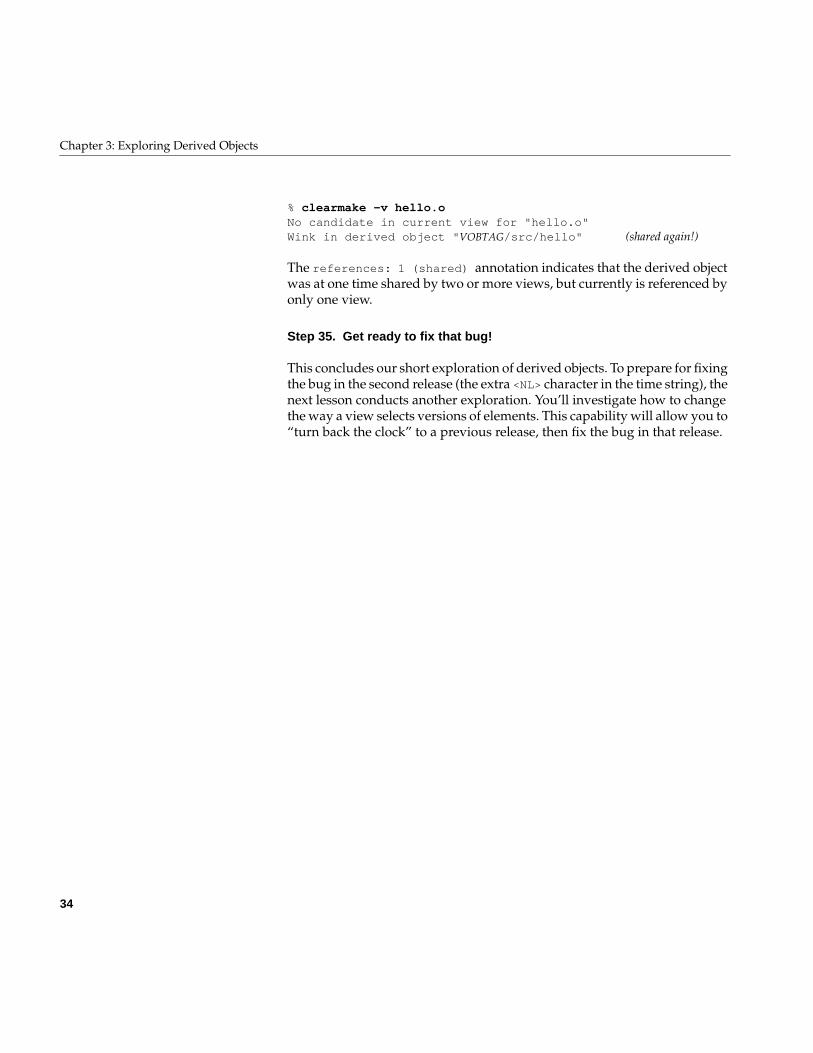
% clearmake -v hello.oNo candidate in current view for "hello.o"Wink in derived object "VOBTAG/src/hello" (shared again!)
The references: 1 (shared) annotation indicates that the derived objectwas at one time shared by two or more views, but currently is referenced byonly one view.
Step 35. Get ready to fix that bug!
This concludes our short exploration of derived objects. To prepare for fixingthe bug in the second release (the extra <NL> character in the time string), thenext lesson conducts another exploration. You’ll investigate how to changethe way a view selects versions of elements. This capability will allow you to“turn back the clock” to a previous release, then fix the bug in that release.
35
Chapter 4
4. Exploring View Configurations
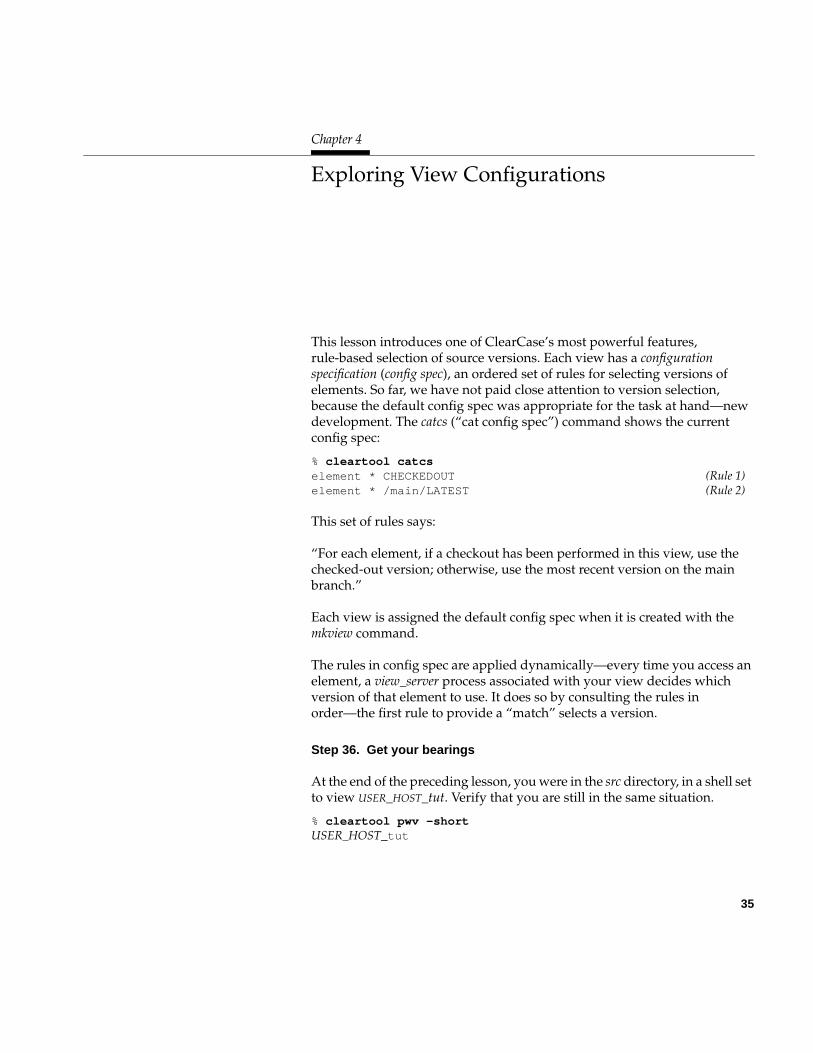
This lesson introduces one of ClearCase’s most powerful features,rule-based selection of source versions. Each view has a configurationspecification (config spec), an ordered set of rules for selecting versions ofelements. So far, we have not paid close attention to version selection,because the default config spec was appropriate for the task at hand—newdevelopment. The catcs (“cat config spec”) command shows the currentconfig spec:
% cleartool catcselement * CHECKEDOUT (Rule 1)element * /main/LATEST (Rule 2)
This set of rules says:
“For each element, if a checkout has been performed in this view, use thechecked-out version; otherwise, use the most recent version on the mainbranch.”
Each view is assigned the default config spec when it is created with themkview command.
The rules in config spec are applied dynamically—every time you access anelement, a view_server process associated with your view decides whichversion of that element to use. It does so by consulting the rules inorder—the first rule to provide a “match” selects a version.
Step 36. Get your bearings
At the end of the preceding lesson, you were in the src directory, in a shell setto view USER_HOST_tut. Verify that you are still in the same situation.
% cleartool pwv -shortUSER_HOST_tut
36
Chapter 4: Exploring View Configurations
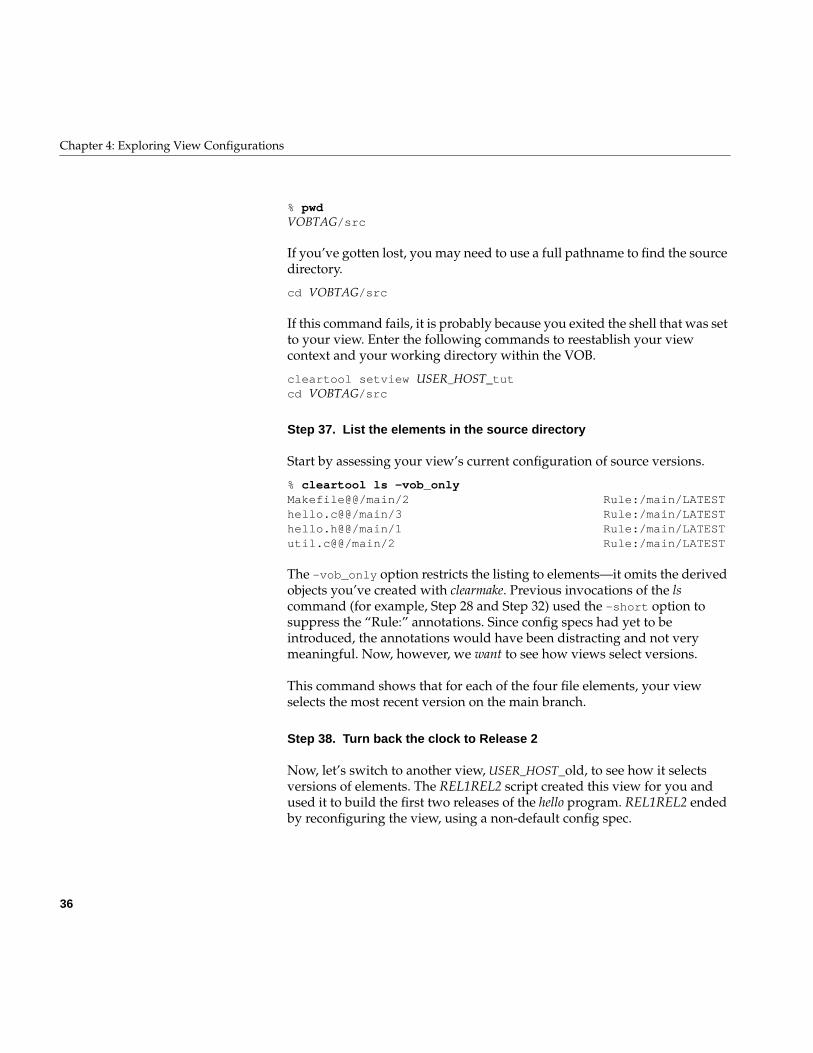
% pwdVOBTAG/src
If you’ve gotten lost, you may need to use a full pathname to find the sourcedirectory.
cd VOBTAG/src
If this command fails, it is probably because you exited the shell that was setto your view. Enter the following commands to reestablish your viewcontext and your working directory within the VOB.
cleartool setview USER_HOST_tutcd VOBTAG/src
Step 37. List the elements in the source directory
Start by assessing your view’s current configuration of source versions.
% cleartool ls -vob_onlyMakefile@@/main/2 Rule:/main/LATESThello.c@@/main/3 Rule:/main/LATESThello.h@@/main/1 Rule:/main/LATESTutil.c@@/main/2 Rule:/main/LATEST
The –vob_only option restricts the listing to elements—it omits the derivedobjects you’ve created with clearmake. Previous invocations of the lscommand (for example, Step 28 and Step 32) used the –short option tosuppress the “Rule:” annotations. Since config specs had yet to beintroduced, the annotations would have been distracting and not verymeaningful. Now, however, we want to see how views select versions.
This command shows that for each of the four file elements, your viewselects the most recent version on the main branch.
Step 38. Turn back the clock to Release 2
Now, let’s switch to another view, USER_HOST_old, to see how it selectsversions of elements. The REL1REL2 script created this view for you andused it to build the first two releases of the hello program. REL1REL2 endedby reconfiguring the view, using a non-default config spec.

37
% exit% cleartool setview USER_HOST_old% cleartool catcselement * REL2
The catcs command reveals that this view is configured with a single rule,which says:
“For each element, use the version assigned the REL2 version label.”
Evidently, this is a view that “turns back the clock” to the Release 2 era. Let’sexplore.
Note: Exiting your current shell is not required before you set a new view.We do so in this tutorial for simplicity—you will never be more than oneshell level away from your starting point. ♦
Step 39. List the source directory again
Go to the source directory, then enter the same command as in Step 37 toverify that different versions of the elements are selected.
% cd VOBTAG/src% cleartool ls -vob_onlyMakefile@@/main/2 Rule: REL2hello.c@@/main/3 Rule: REL2hello.h@@/main/1 Rule: REL2util.c@@/main/1 Rule: REL2
These are the same versions that were most recent when you began thistutorial (Step 14).
Step 40. Verify that this view selects different versions of files
Just to make sure that this is an old configuration, check that source file util.c,as seen through this view, has none of the string-manipulation changes youentered in Step 22.
% tail -7 util.c char * env_time() { time_t clock; time(&clock);

38
Chapter 4: Exploring View Configurations
return ctime(&clock); }
And check that the executable, ../bin/hello, is also the old version, which doesnot massage the reporting of your home directory.
% ../bin/helloHello, USER!Your home directory is /net/HOST/home/USER.It is now DATESTRING.
Step 41. Switch to Release 1
Now, let’s turn back the clock again, to Release 1. This time, instead of settinga view that already has a different config spec, we’ll change theconfiguration of an existing view, USER_HOST_tut. The setcs (“set configspec”) command performs the reconfiguration, using a config spec stored ina text file.
% exit% cleartool setview USER_HOST_tut% cleartool setcs /usr/atria/doc/tutorial/cs.2% cleartool catcselement * REL1
Once again, there is a single rule. It says:
“For each element, use the version assigned the REL1 version label.”
Step 42. Verify the switch
Once again, go to the source directory and enter the ls command to verify thenew view configuration.
% cd VOBTAG/src% cleartool ls -vob_onlyMakefile@@/main/1 Rule: REL1hello.c@@/main/2 Rule: REL1
What happened to hello.h and util.c? You have turned back the clock to a timebefore these elements were created in the src directory. In a view configured

39
for Release 1, it is altogether appropriate that these latter-day elements donot appear. ClearCase implements this feature by allowing directoriesthemselves to be version-controlled. Each version of a directory elementcatalogs (contains a list of) a certain set of names:
• Version 1 of directory element src (labeled REL1) catalogs two elementnames: hello.c and Makefile.
• Version 2 of directory element src (labeled REL2) catalogs four elementnames: hello.c, hello.h, util.c, and Makefile.
Step 43. Explore the history of the source directory
Your view sees elements hello.c and Makefile only, because it selects the REL1version of the directory element src, just as it selects the REL1 versions of thefile elements. You can verify this by using the –d (“directory”) option to thels command.
% cleartool ls -d . .@@/main/1 Rule: REL1
For even more confirmation, examine the version tree of directory elementsrc, and list the events in this element’s history.
% cleartool lsvtree ..@@/main.@@/main/1 (REL1).@@/main/2 (REL2)% cleartool lshistory -d .DATESTRING USER import directory element ".@@"20-May.1416 cory create directory version ".@@/main/2" @(REL2) "Release 2: add hello.h, util.c"07-May.09:13 akp create directory version ".@@/main/1" (REL1) "Release 1: hello.c, Makefile"03-May.09:56 akp create directory version ".@@/main/0"03-May.09:56 akp create branch ".@@/main"03-May.09:56 akp create directory element ".@@" "create source directory and binaries directory for "hello world" program"Verify that the view selects 'Release 1' file versions
To complete your exploration of the Release 1 era, verify that the view selectsthe correct (very old) version of source file hello.c, no version at all of filehello.h, and the correct version of executable hello.

40
Chapter 4: Exploring View Configurations
% cat hello.cint main() { printf("Hello, world!\n"); return 0; }% cat hello.hcat: cannot open hello.h: No such file or directory% ../bin/helloHello, world!
Notice that we had you examine, but not change, files with your currentone-rule config spec (element * REL1). It does not make sense to try andadd a new version (or element) with such a config spec. The new versionwould be invisible to your view until the REL1 label was applied, and youmust be able to see it to label it!
Step 44. Return to the present
After you fix a bug in Lesson 5, you’ll do additional new development inLesson 6. In anticipation of this future need for a “new development” view,reset your current view, USER_HOST_tut, to use the default config spec.
% cleartool setcs -default% cleartool catcselement * CHECKEDOUTelement * /main/LATEST
Step 45. Exit the historical view
Exit the view, so that you revert to the shell you were using when you startedthe tutorial.
% exit% cleartool pwv -short** NONE **% pwdHOME

41
Chapter 5
5. Fixing a Bug in an Old Release
In this lesson, you’ll (finally) fix the bug first discovered in the introductionto Lesson 1. You’ll work in a new view, created expressly for maintenancework. This view’s config spec will take advantage of an important ClearCasefeature—the ability to create branches in an element’s version tree.
ClearCase makes it easy to implement this strategy for fixing a bug:
1. You start with the exact version of each source file that was used tobuild the “broken” executable.
2. For each source file that must be changed to fix the bug, you createversions on a subbranch of the element’s version tree, not on the mainbranch.
3. The same branch name is used in the version tree for every file elementinvolved in the bugfix.
Using branches allows two or more projects to “grow” an element’s versiontree independently. For example, it might take you several weeks to fix aparticular bug. (Don’t worry—the bug in this lesson will take about oneminute to fix.) Working on a branch means that the element does not go “outof play” while you’re implementing the fix. Another developer is free tomodify the same element for a different purpose, as long as he or she workson a different branch.
At any time, the changes made on one branch can be merged into any otherbranch. You’ll perform a merge in Lesson 6.
ClearCase views support the branch-oriented approach to maintenance in anatural way. When starting your bugfix work, you establish a view that isconfigured to meet the guidelines listed above. You’ll create a new view withthe appropriate config spec:

42
Chapter 5: Fixing a Bug in an Old Release
element * CHECKEDOUTelement * .../rel2_bugfix/LATESTelement * REL2
Let’s see how the rules in this config spec meet the three guidelines listedabove.
Guideline #1
You need a view that selects the version of each source file that went into thebuilding of the second release. When it created that release, the REL1REL2script attached version label REL2 to the then-current source versions:
cleartool mklabel REL2 Makefile hello.c hello.h util.c . ..
Note that the “.” and “..” at the end of this command name the currentworking directory and its parent, the VOB’s top-level directory. You saw inLesson 4 that the ability to access different versions of directories plays acritical role in “turning back the clock” to a previous release.
Now, a single config spec rule selects all those versions:
element * REL2
Since every element involved in the second release was labeled REL2, thisone rule “reconstructs” the entire source environment for the release.
Guidelines #2 and #3
The config spec must also reflect the policy that all bugfixes to a file be madeon a branch off the REL2 version of that file.
If the branch named rel2_bugfix is used in each element to be modified for thebugfix, a single rule configures your view to see the maintenance work:
element * .../rel2_bugfix/LATEST
You also need one of the rules from the default config spec:
element * CHECKEDOUT
As always, this rule allows you to work with checked-out files. Note that thisrule need not be modified to work with files on a branch.

43
The order of the three rules is important. In particular Rule 2 precedes Rule3 because your view must “prefer” the maintenance branch (if it exists in aparticular element) to the main branch.
The “...” notation in Rule2 is a ClearCase extension, used here to matchzero or more intervening branch levels. Rule2 matches any element with arel2_bugfix branch, whether it “sprouted” from the main branch(/main/rel2_bugfix) or from some other branch (/main/nt_port/rel2/rel2_bugfix,for example).
Variations on this Config Spec
You might also include the default config spec’s last rule as your last rule:
element * /main/LATEST
This rule is not required in this tutorial, because every element you need toaccess has been labeled REL2 and, thus, is matched by the element * REL2rule. If you wish to access version-controlled data not involved in the helloproject (and not labeled REL2), you would need this extra rule, too.
Config specs have a feature that both automates the process of creatingbranches and ensures consistent naming of those branches. This“auto-make-branch” feature is turned on by modifying Rule 3:
element * REL2 -mkbranch rel2_bugfix
With this rule, developers do not need to enter mkbranch commands. Instead,whenever a checkout of a REL2 version is performed, ClearCaseautomatically creates a branch with the name specified in the config rule,and performs a checkout on that branch.
Step 46. Get your bearings
At the end of the preceding lesson, you were in your original directory (wesuggested that you start this tutorial in your home directory), in a shell thatwas not set to any view. Verify that you are still in the same situation.
% cleartool pwv -short** NONE **% pwdHOME
44
Chapter 5: Fixing a Bug in an Old Release
In this tutorial, we have instructed you to exit one view before enteringanother one. In practice, you would more likely create a new window foryour work with a new view. There is no need to “shut down” a view (or theshells that are set to it) before you use another one. Using multiple windowsallows you to switch back and forth between views easily.
If you’ve gotten lost, find out whether your current shell is set to a view:
cleartool pwv
If you are set to a view, exit the shell process, in order to return to a shell thatis not set to a view. (Try cleartool pwv again, to make sure!) Then returnto the directory you were in when you started this tutorial (for example, withthe command cd $HOME).
Step 47. Create a new view for your bugfix work
First, create the new view, placing its storage directory next to that of theexisting USER_HOST_tut view (which you created in Step 10).
% cleartool mkview -tag USER_HOST_fix 'pwd'/tut/fix.vwsCreated view.Host-local path: HOST:HOME/tut/fix.vwsGlobal path: /net/HOST/HOME/tut/fix.vwsIt has the following rights:User : USER : rwxGroup: GROUP : rwxOther: : r-x
As before, your umask value determines the permissions on the new view.
Step 48. Set the bugfix view
You have created a new view, USER_HOST_fix, but you are not yet using it. Setthe new view with a setview command.
% cleartool setview USER_HOST_fix% cleartool pwv -shortUSER_HOST_fix
You are now in a new shell process, which is set to view USER_HOST_fix.

45
Step 49. Reconfigure the bugfix view to “turn back the clock”
Every view is created with the default config spec, which is stored in file/usr/atria/default_config_spec. You can edit a view’s config spec with a texteditor (edcs command), or replace the contents of the config spec by copyingan ordinary ASCII file (setcs command). To avoid typing mistakes, use thecopying method.
% cleartool setcs /usr/atria/doc/tutorial/cs.1% cleartool catcselement * CHECKEDOUTelement * .../rel2_bugfix/LATESTelement * REL2
Step 50. There are no derived objects in this new view!
The derived objects you built in Step 23 are still in the USER_HOST_tut view,but you can’t see them from here. A view makes source elements appearautomatically, but it acquires derived objects only when you enter clearmakecommands to build them. Since you are using a newly-created view,USER_HOST_fix, it contains no derived objects (yet).
To gain another perspective on this situation, consider that a view serves twofunctions—it selects versions of elements to appear in developmentdirectories, and it provides an isolated work area. Derived objects pertain tothe isolated-work-area role of a view, not to its version-selection role.
% pwdHOME% cd VOBTAG/src% cleartool lsMakefile@@/main/2 Rule: REL2hello.c@@/main/3 Rule: REL2hello.h@@/main/1 Rule: REL2util.c@@/main/1 Rule: REL2
Step 51. Try to make a branch — oops!
We’re now going to make a (harmless) mistake, in order to emphasize apoint. The file util.c needs to be edited to fix the bug in the time string.According to policy, you must make a branch in its version tree.

46
Chapter 5: Fixing a Bug in an Old Release
% cleartool mkbranch rel2_bugfix util.ccleartool: Error: Type not found: "rel2_bugfix".
What happened? Before a branch can be created in any element’s versiontree, it is first necessary to define the name rel2_bugfix for use in the currentVOB, using the mkbrtype (“make branch type”) command.
Several aspects of ClearCase adhere to this two-step model. For example, theversion labels REL1 and REL2 are attached to the source versions used tobuild the first two product releases. The mklabel command attached theselabels, but only after the mklbtype command created a corresponding versionlabel type.
Separating the definition of information from the application of thatinformation to source elements allows the establishment of administrativecontrols, and facilitates such operations as changing all existing versionlabels REL2 to RELEASE2.0.
Step 52. Create the branch type for bugfix work
We re-emphasize here a point made earlier: you should create only onebranch type. The strategy is to make branches with the same name for allelements that require modifications for the bugfix.
% cleartool mkbrtype -c "fix: date-string bug" rel2_bugfixCreated branch type "rel2_bugfix".
As with checkin, you can (and should) enter a comment describing themeaning and intended usage of a branch type. Such comments are listedwith the lstype –brtype command.
Step 53. Make a branch in element ‘util.c’
This bugfix is simple—it requires that only one file, util.c, be modified. Themkbranch command automatically performs a checkout on the branch itcreates. The terminal message indicates this fact, and the ls commandverifies it.
% cleartool mkbranch -nc rel2_bugfix util.cCreated branch "rel2_bugfix" from "util.c" version "/main/1".Checked out "util.c" from version "/main/rel2_bugfix/0".
47
% cleartool ls util.cutil.c@@/main/rel2_bugfix/CHECKEDOUT from/main/rel2_bugfix/0 Rule: CHECKEDOUT
You can see that:
• Before the checkout, your view selects the version of util.c labeled REL2(using Rule 3 in the config spec).
• The mkbranch command creates a branch named rel2_bugfix,“sprouting” it from the REL2 version. Version 0 on this branch has thesame data as the version at which the branch was created.
• After the checkout, your view selects the checked-out version.
Step 54. Fix the bug
The fix itself is easy: use string-manipulation functions to remove the trailingnewline character from the time string returned by env_time().
% cp /usr/atria/doc/tutorial/ut.3 util.c% cleartool diff -pred util.c********************************<<< file 1:VOBTAG/src/util.c@@/main/rel2_bugfix/0>>> file 2: util.c********************************-------------[after 25]-------|--------[inserted 26]--------- -| char *s; |-------------[changed 28]------|-------[changed to 29-31]----- return ctime(&clock); | s = ctime(&clock); -| s[ strlen(s)-1 ] = '\0'; | return s; |-
Note: If you are working at a graphics display that is running the X WindowSystem, you might wish to try this variant of the above command:
cleartool xdiff -pred util.c
This shows the differences between the two versions in a separate, scrollableX window. You can close the xdiff window with the Quit option on the Panelpull-down menu.
48
Chapter 5: Fixing a Bug in an Old Release
Step 55. Rebuild the program
That’s all there is to fixing the bug—now let’s test the fix.
% clearmake -v helloNo candidate in current view for "hello.o"Wink in derived object "VOBTAG/src/hello.o
(derived object ’hello.o’ built in another view gets winked-in to this view)No candidate in current view for "util.o"
======== Rebuilding "util.o" ======== cc -c util.cWill store derived object "VOBTAG/src/util.o"========================================================
Must rebuild "hello" - due to rebuild of subtarget "util.o"
======== Rebuilding "hello" ======== cc -o hello hello.o util.oWill store derived object "VOBTAG/src/hello"========================================================
Note that clearmake doesn’t need to build hello.o, even though there is no suchfile in this view. Since you made no change to any of the dependencies ofhello.o, the instance previously built in view USER_HOST_tut qualifies forwink-in.
Step 56. Run the program to test the fix
Did you fix the bug?
% ./helloHello, USER!Your home directory is /net/HOST/home/USER.It is now DATESTRING.
Yes, you did!
Step 57. Examine the build history of ‘hello’
The VOB now catalogs several builds of the hello program, performed inseveral views:
49
• The REL1REL2 script built hello twice in view USER_HOST_old, once forthe REL1 release and once for the REL2 release.
• In Lesson 2, you built a hello in view USER_HOST_tut. This buildmodified the string reported as the user’s home directory.
• In this lesson, you built a hello in view USER_HOST_fix, fixing the bug inthe time string.
By default, the lsdo command shows these builds in reverse-chronologicalorder.
% cleartool lsdo -l -zero helloDATESTRING-1(USER.GROUP@HOST) (in the ’fix’ view) create derived object "hello@@DATESTRING.nnn" references: 1 => HOST:HOME/tut/fix.vwsDATESTRING-2(USER.GROUP@HOST) (in the ’tut’ view) create derived object "hello@@DATESTRING.nnn" references: 1 => HOST:HOME/tut/tut.vwsDATESTRING(USER.GROUP@neptune) (in the ’old’ view (Release 2)) create derived object "hello@@DATESTRING.nnn" references: 1 => HOST:HOME/tut/old.vwsDATESTRING(USER.GROUP@neptune) (in the ’old’ view (Release 1)) create derived object "hello@@DATESTRING.nnn" references: 0 => HOST:HOME/tut/old.vws
The references: 0 annotation means that the data for this instance of hellois no longer available. The Release 2 build of hello in the USER_HOST_old viewoverwrote the Release 1 build. You can still examine its config rec (untilClearCase automatically “scrubs” it), but there is no longer any file to beexecuted.
The lsdo command omits zero-referenced derived objects unless you specifythe -zero option.
Step 58. Compare the configurations of two builds
The diffcr (“diff config recs”) command compares different builds of aprogram by their configurations—that is, on the basis of what sourceversions were used, what build script, what build options, and so on. For
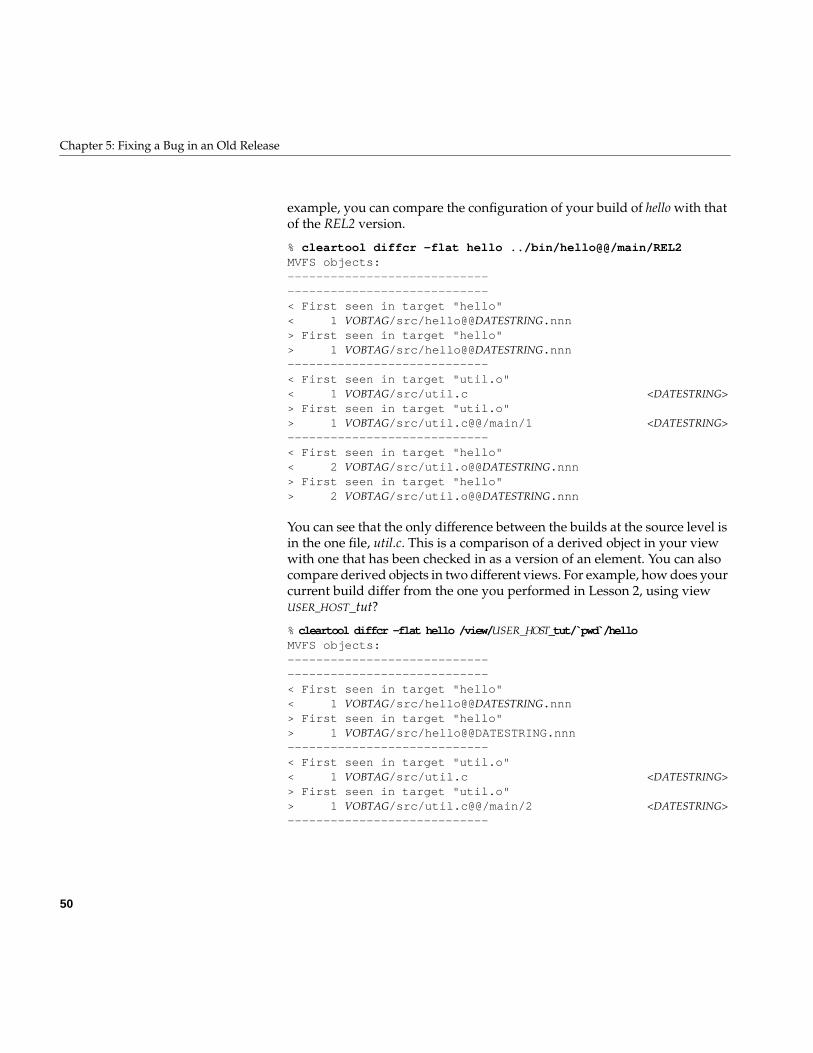
50
Chapter 5: Fixing a Bug in an Old Release
example, you can compare the configuration of your build of hello with thatof the REL2 version.
% cleartool diffcr -flat hello ../bin/hello@@/main/REL2MVFS objects:--------------------------------------------------------< First seen in target "hello"< 1 VOBTAG/src/hello@@DATESTRING.nnn> First seen in target "hello"> 1 VOBTAG/src/hello@@DATESTRING.nnn----------------------------< First seen in target "util.o"< 1 VOBTAG/src/util.c <DATESTRING>> First seen in target "util.o"> 1 VOBTAG/src/util.c@@/main/1 <DATESTRING>----------------------------< First seen in target "hello"< 2 VOBTAG/src/util.o@@DATESTRING.nnn> First seen in target "hello"> 2 VOBTAG/src/util.o@@DATESTRING.nnn
You can see that the only difference between the builds at the source level isin the one file, util.c. This is a comparison of a derived object in your viewwith one that has been checked in as a version of an element. You can alsocompare derived objects in two different views. For example, how does yourcurrent build differ from the one you performed in Lesson 2, using viewUSER_HOST_tut?
% cleartool diffcr -flat hello /view/USER_HOST_tut/̀ pwd̀ /helloMVFS objects:--------------------------------------------------------< First seen in target "hello"< 1 VOBTAG/src/hello@@DATESTRING.nnn> First seen in target "hello"> 1 VOBTAG/src/hello@@DATESTRING.nnn----------------------------< First seen in target "util.o"< 1 VOBTAG/src/util.c <DATESTRING>> First seen in target "util.o"> 1 VOBTAG/src/util.c@@/main/2 <DATESTRING>----------------------------
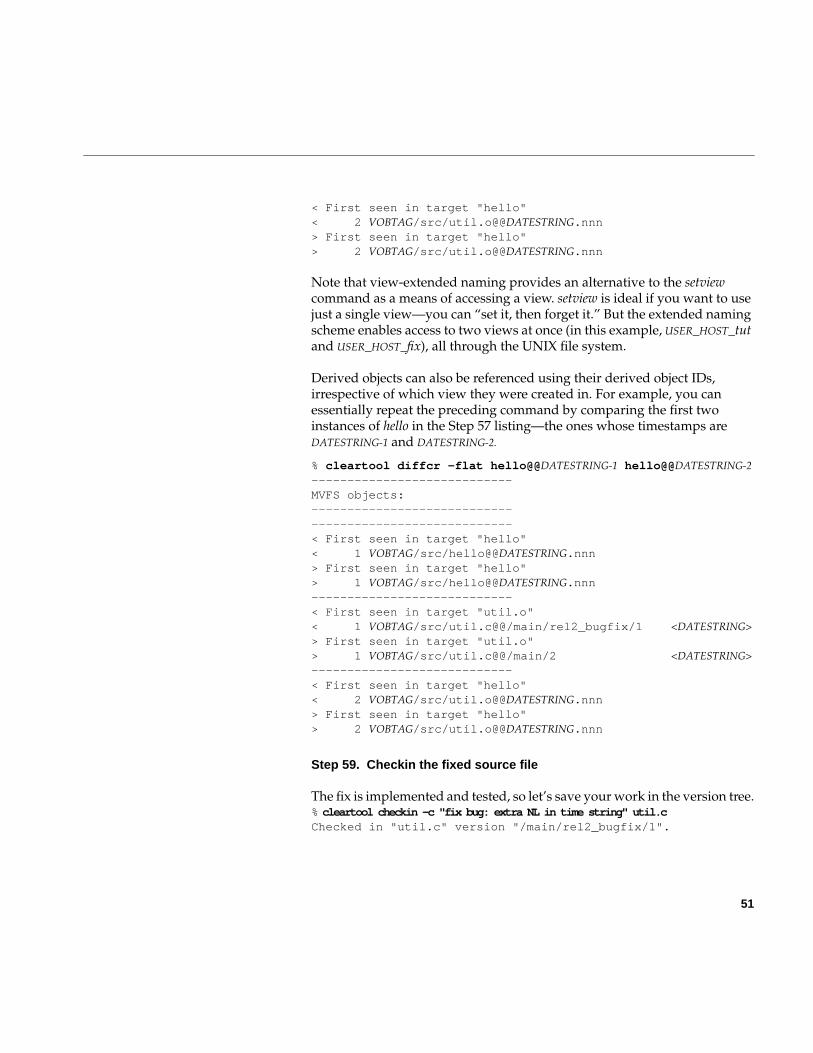
51
< First seen in target "hello"< 2 VOBTAG/src/util.o@@DATESTRING.nnn> First seen in target "hello"> 2 VOBTAG/src/util.o@@DATESTRING.nnn
Note that view-extended naming provides an alternative to the setviewcommand as a means of accessing a view. setview is ideal if you want to usejust a single view—you can “set it, then forget it.” But the extended namingscheme enables access to two views at once (in this example, USER_HOST_tutand USER_HOST_fix), all through the UNIX file system.
Derived objects can also be referenced using their derived object IDs,irrespective of which view they were created in. For example, you canessentially repeat the preceding command by comparing the first twoinstances of hello in the Step 57 listing—the ones whose timestamps areDATESTRING-1 and DATESTRING-2.
% cleartool diffcr -flat hello@@DATESTRING-1 hello@@DATESTRING-2----------------------------MVFS objects:--------------------------------------------------------< First seen in target "hello"< 1 VOBTAG/src/hello@@DATESTRING.nnn> First seen in target "hello"> 1 VOBTAG/src/hello@@DATESTRING.nnn----------------------------< First seen in target "util.o"< 1 VOBTAG/src/util.c@@/main/rel2_bugfix/1 <DATESTRING>> First seen in target "util.o"> 1 VOBTAG/src/util.c@@/main/2 <DATESTRING>----------------------------< First seen in target "hello"< 2 VOBTAG/src/util.o@@DATESTRING.nnn> First seen in target "hello"> 2 VOBTAG/src/util.o@@DATESTRING.nnn
Step 59. Checkin the fixed source file
The fix is implemented and tested, so let’s save your work in the version tree.% cleartool checkin -c "fix bug: extra NL in time string" util.cChecked in "util.c" version "/main/rel2_bugfix/1".
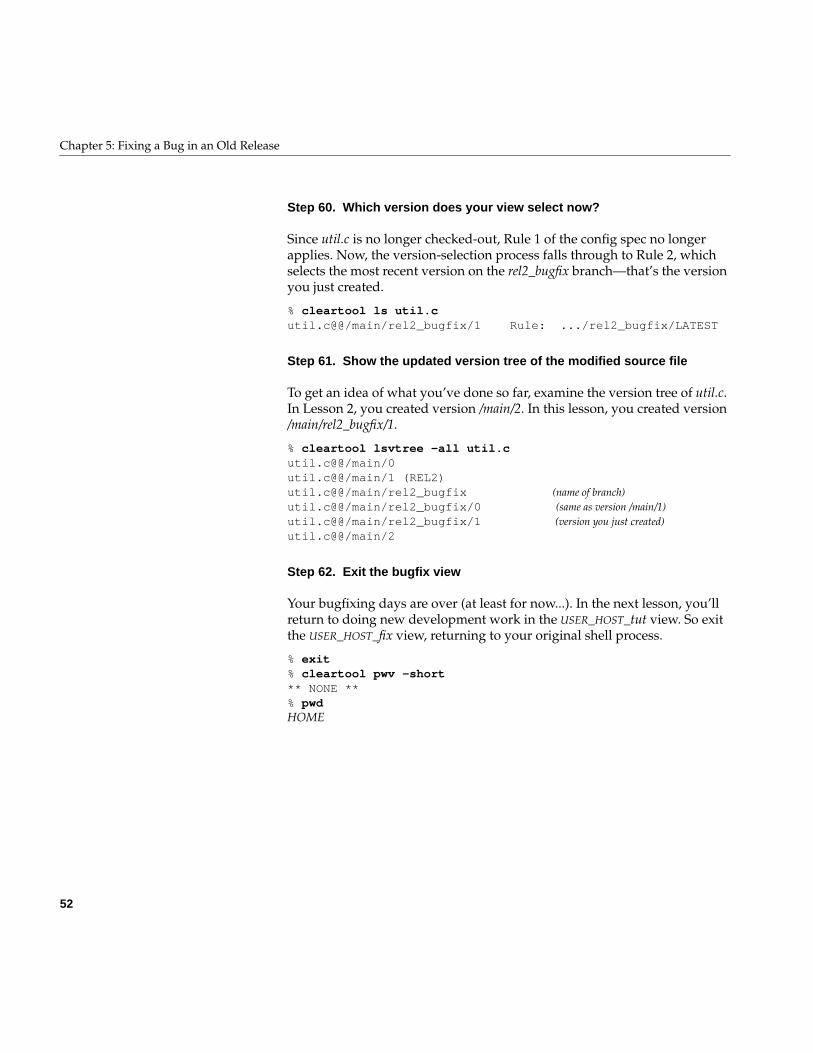
52
Chapter 5: Fixing a Bug in an Old Release
Step 60. Which version does your view select now?
Since util.c is no longer checked-out, Rule 1 of the config spec no longerapplies. Now, the version-selection process falls through to Rule 2, whichselects the most recent version on the rel2_bugfix branch—that’s the versionyou just created.
% cleartool ls util.cutil.c@@/main/rel2_bugfix/1 Rule: .../rel2_bugfix/LATEST
Step 61. Show the updated version tree of the modified source file
To get an idea of what you’ve done so far, examine the version tree of util.c.In Lesson 2, you created version /main/2. In this lesson, you created version/main/rel2_bugfix/1.
% cleartool lsvtree -all util.cutil.c@@/main/0util.c@@/main/1 (REL2)util.c@@/main/rel2_bugfix (name of branch)util.c@@/main/rel2_bugfix/0 (same as version /main/1)util.c@@/main/rel2_bugfix/1 (version you just created)util.c@@/main/2
Step 62. Exit the bugfix view
Your bugfixing days are over (at least for now...). In the next lesson, you’llreturn to doing new development work in the USER_HOST_tut view. So exitthe USER_HOST_fix view, returning to your original shell process.
% exit% cleartool pwv -short** NONE **% pwdHOME

53
Chapter 6
6. Performing a Merge
In preceding lessons, you performed two different development tasks, usingtwo different views:
• In Lesson 2, you did some new development using viewUSER_HOST_tut, starting from the source base for the REL2 release. Sincethis is a tutorial, not “real life”, the development involved changing asingle source file, util.c.
• In Lesson 5, you fixed a bug in the REL2 release, using viewUSER_HOST_fix. Once again, the change involved a single sourcefile—and once again, it was util.c.
In this lesson, you’ll resume your new development work, having fixed thebug. The diversion wasn’t a waste of time, however. The bug in the timestring still exists in your new-development version (the most recent versionon the main branch). As you move the hello program into the future, you can(and should) also cleanse it of its past sins. ClearCase makes this easy—theprocess of merging changes made on subbranches (for example, rel2_bugfix)into the main line of development (the main branch) is highly automated.
The merge facility encourages frequent use of branches for developmenttasks, and frequent resynchronizing of the branches. This methodologyallows people to keep working: for example, a release engineer mightrequire that a file be “frozen” at a particular version. Furthermore, adeveloper might need the frozen version’s branch for last-minute fixes orworkarounds. In such situations, a developer can simply make a branch offthe frozen version, and keep working. After the release engineer hasrelinquished control of the branch, the developer can merge his or herchanges back into it.

54
Chapter 6: Performing a Merge
Step 63. Get your bearings
At the end of the preceding lesson, you were in your original directory (wesuggested that you start this tutorial in your home directory), in a shell thatwas not set to any view. Verify that you are still in the same situation.
% cleartool pwv -short** NONE **% pwdHOME
If you’ve gotten lost, find out whether your current shell is set to a view:
cleartool pwv
If you are set to a view, exit the shell process, in order to return to a shell thatis not set to a view. (Try cleartool pwv again, to make sure!) Then returnto the directory you were in when you started this tutorial (for example, withthe command cd $HOME).
Step 64. Plan the completion of development for a new release
Let’s suppose that the only new feature to be added is an enhancement to theenv_user() function in file util.c—if the user happens to be root, anappropriately respectful message is to be substituted for the standardmessage:
Hello, Your Excellency.
... instead of:
Hello, root.
Step 65. Return to the ‘tut’ view
To resume your new development work, return to the USER_HOST_tut view,and go to the source directory.
% cleartool setview USER_HOST_tut% cd VOBTAG/src
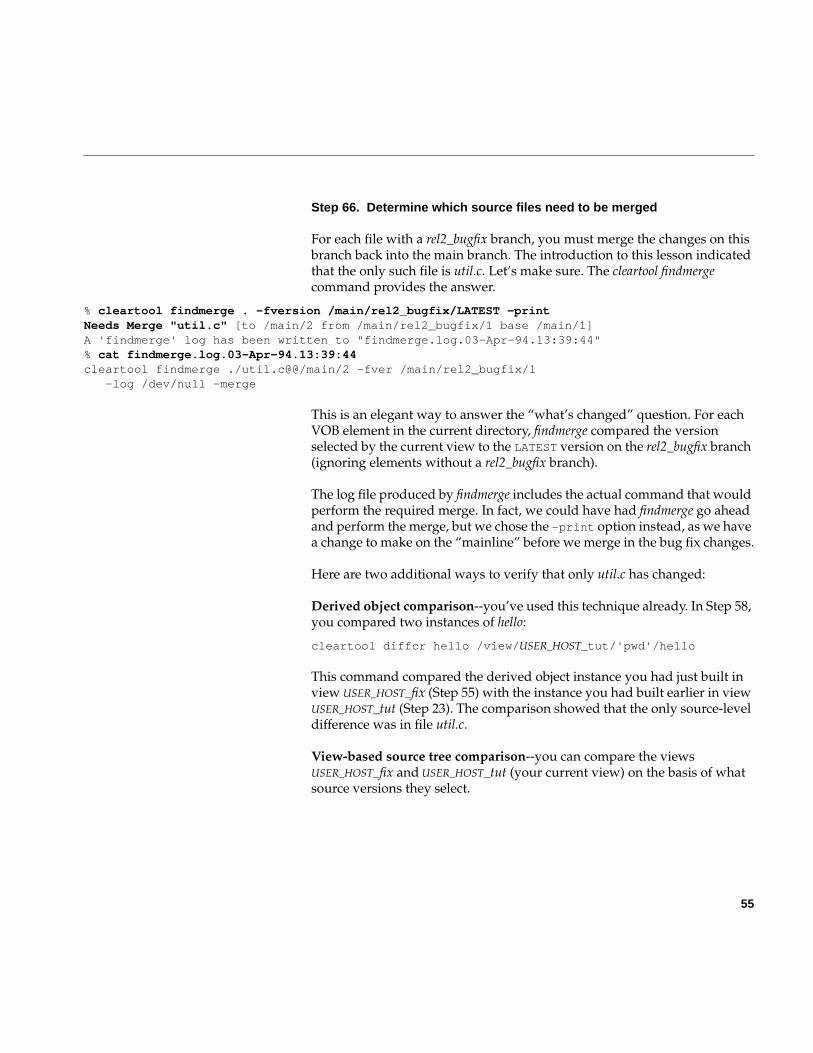
55
Step 66. Determine which source files need to be merged
For each file with a rel2_bugfix branch, you must merge the changes on thisbranch back into the main branch. The introduction to this lesson indicatedthat the only such file is util.c. Let’s make sure. The cleartool findmergecommand provides the answer.
% cleartool findmerge . -fversion /main/rel2_bugfix/LATEST -printNeeds Merge "util.c" [to /main/2 from /main/rel2_bugfix/1 base /main/1]A 'findmerge' log has been written to "findmerge.log.03-Apr-94.13:39:44"% cat findmerge.log.03-Apr-94.13:39:44cleartool findmerge ./util.c@@/main/2 -fver /main/rel2_bugfix/1 -log /dev/null -merge
This is an elegant way to answer the “what’s changed” question. For eachVOB element in the current directory, findmerge compared the versionselected by the current view to the LATEST version on the rel2_bugfix branch(ignoring elements without a rel2_bugfix branch).
The log file produced by findmerge includes the actual command that wouldperform the required merge. In fact, we could have had findmerge go aheadand perform the merge, but we chose the -print option instead, as we havea change to make on the “mainline” before we merge in the bug fix changes.
Here are two additional ways to verify that only util.c has changed:
Derived object comparison--you’ve used this technique already. In Step 58,you compared two instances of hello:
cleartool diffcr hello /view/USER_HOST_tut/'pwd'/hello
This command compared the derived object instance you had just built inview USER_HOST_fix (Step 55) with the instance you had built earlier in viewUSER_HOST_tut (Step 23). The comparison showed that the only source-leveldifference was in file util.c.
View-based source tree comparison--you can compare the viewsUSER_HOST_fix and USER_HOST_tut (your current view) on the basis of whatsource versions they select.

56
Chapter 6: Performing a Merge
% cleartool ls -vob_only -shortMakefile@@/main/2hello.c@@/main/3hello.h@@/main/1util.c@@/main/2% cleartool ls -vob_only -short /view/USER_HOST_fix/'pwd'/view/USER_HOST_fix/VOBTAG/src/Makefile@@/main/2/view/USER_HOST_fix/VOBTAG/src/hello.c@@/main/3/view/USER_HOST_fix/VOBTAG/src/hello.h@@/main/1/view/USER_HOST_fix/VOBTAG/src/util.c@@/main/rel2_bugfix/1
The listing corroborates the fact that only file util.c was changed for thebugfix. Similarly, we can use findmerge with the -ftag option (rather than-fversion) to find the files modified for the Rel2 bugfix. The -ftagargument compares versions in different views, rather than versions ondifferent branches. (The -whynot option explains why the other files do notneed to be merged.)
% cleartool findmerge . -ftag USER_HOST_fix -whynot -printNo merge "." [to/from same version /main/2]No merge "./Makefile" [to/from same version /main/2]No merge "./hello.c" [to/from same version /main/3]No merge "./hello.h" [to/from same version /main/1]Needs Merge "util.c" [to /main/2 from /main/rel2_bugfix/1base /main/1]A 'findmerge' log has been written to"findmerge.log.04-Apr-94.10:22:37"% cat findmerge.log.04-Apr-94.10:22:37cleartool findmerge ./util.c@@/main/2 -fver /main/rel2_bugfix/1 -log /dev/null -merge
Let’s go ahead and add the new development changes to util.c, then mergein the bugfix changes.
Step 67. Checkout file ‘util.c’
As always, the first step in modifying a source file is to perform a checkout.Since you have returned to a view with the default config spec, the checkoutoccurs on the main branch.
% cleartool checkout -nc util.cChecked out "util.c" from version "/main/2".

57
Step 68. Edit the checked-out file
Now, put in the change to the message displayed to a superuser.
% cp /usr/atria/doc/tutorial/ut.4 util.c% cleartool diff -pred util.c********************************<<< file 1: VOBTAG/util.c@@/main/2>>> file 2: util.c********************************---------[changed 7-8]--|-------[changed to 7-12]------ if (user_env) | if (user_env) { return user_env; | if ( strcmp(user_env,"root") == + -| return "Your Excellency"; | else | return user_env; | } |-
You would typically compile and test this change, but let’s go ahead andmerge in the bugfix change first.
Step 69. Merge in the changes made on the ‘rel2_bugfix’ branch
The merge compares three versions of the file element: the two versions tobe merged and their “common ancestor”:
Figure 6-1 Merging Changes to a File
1
2
0
1
0
mainbranch
rel2_bugfixbranch
Contributor
contributor
base version
(checked-outversion)
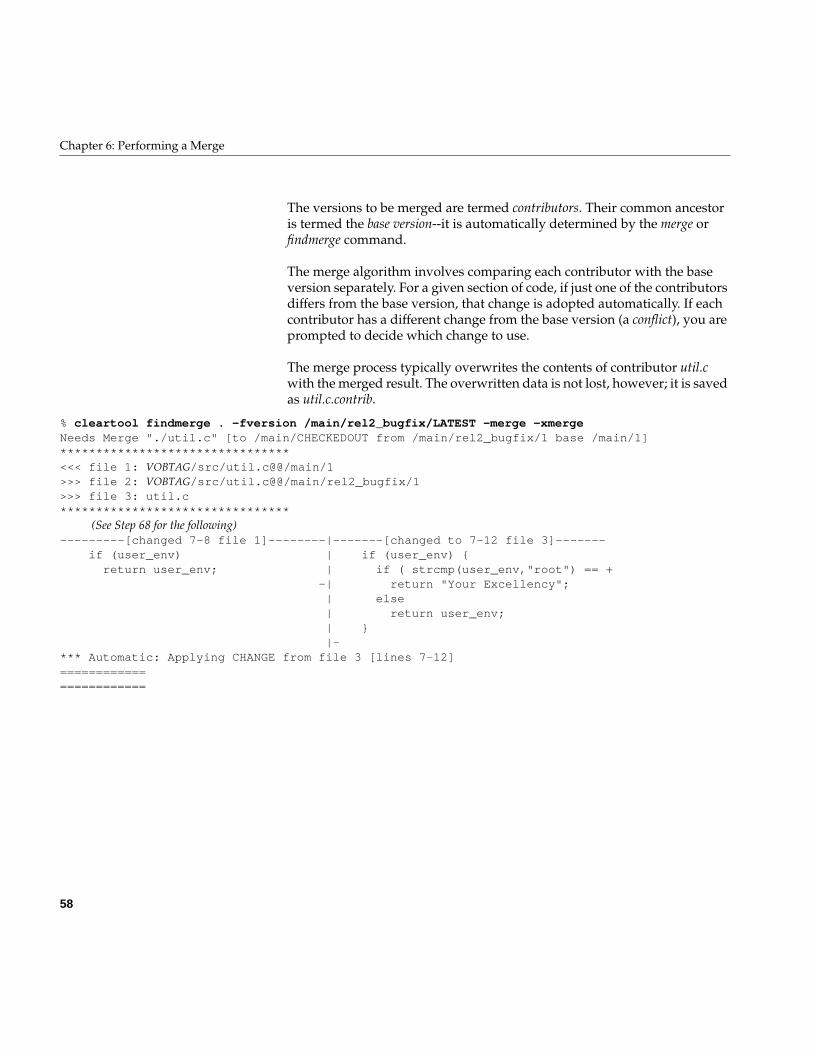
58
Chapter 6: Performing a Merge
The versions to be merged are termed contributors. Their common ancestoris termed the base version--it is automatically determined by the merge orfindmerge command.
The merge algorithm involves comparing each contributor with the baseversion separately. For a given section of code, if just one of the contributorsdiffers from the base version, that change is adopted automatically. If eachcontributor has a different change from the base version (a conflict), you areprompted to decide which change to use.
The merge process typically overwrites the contents of contributor util.cwith the merged result. The overwritten data is not lost, however; it is savedas util.c.contrib.
% cleartool findmerge . -fversion /main/rel2_bugfix/LATEST -merge -xmergeNeeds Merge "./util.c" [to /main/CHECKEDOUT from /main/rel2_bugfix/1 base /main/1]********************************<<< file 1: VOBTAG/src/util.c@@/main/1>>> file 2: VOBTAG/src/util.c@@/main/rel2_bugfix/1>>> file 3: util.c********************************
(See Step 68 for the following)---------[changed 7-8 file 1]--------|-------[changed to 7-12 file 3]------- if (user_env) | if (user_env) { return user_env; | if ( strcmp(user_env,"root") == + -| return "Your Excellency"; | else | return user_env; | } |-*** Automatic: Applying CHANGE from file 3 [lines 7-12]========================
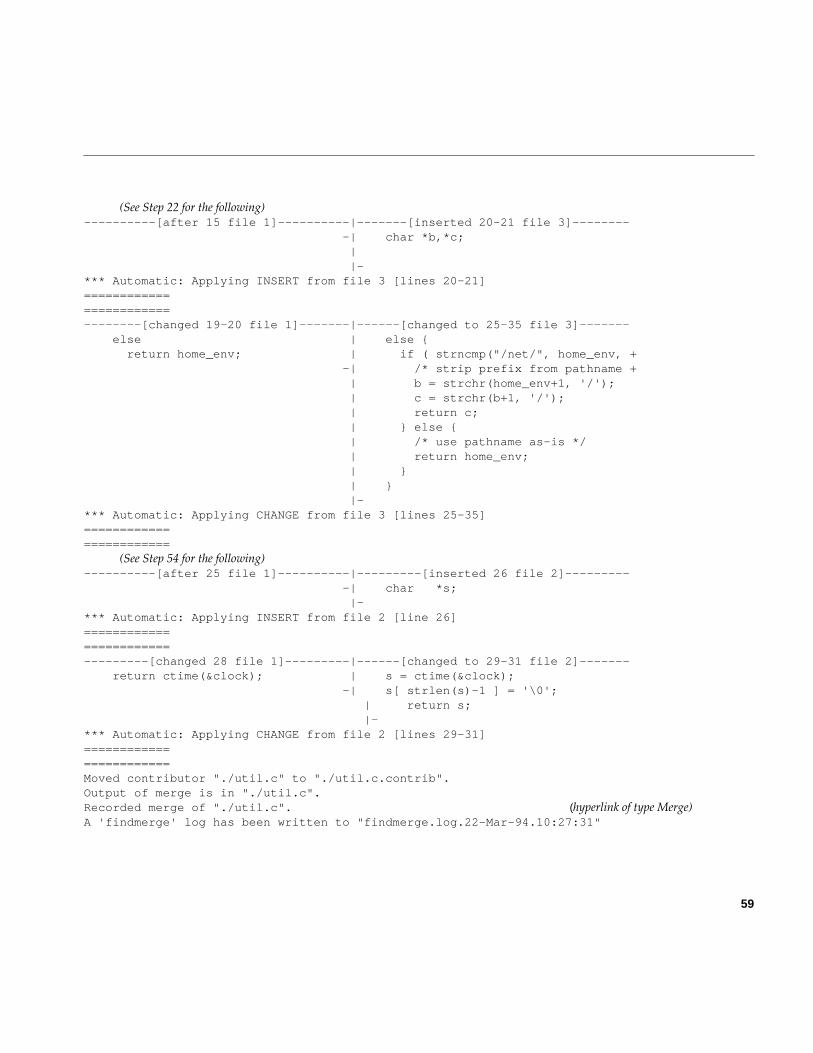
59
(See Step 22 for the following)----------[after 15 file 1]----------|-------[inserted 20-21 file 3]-------- -| char *b,*c; | |-*** Automatic: Applying INSERT from file 3 [lines 20-21]========================--------[changed 19-20 file 1]-------|------[changed to 25-35 file 3]------- else | else { return home_env; | if ( strncmp("/net/", home_env, + -| /* strip prefix from pathname + | b = strchr(home_env+1, '/'); | c = strchr(b+1, '/'); | return c; | } else { | /* use pathname as-is */ | return home_env; | } | } |-*** Automatic: Applying CHANGE from file 3 [lines 25-35]========================
(See Step 54 for the following)----------[after 25 file 1]----------|---------[inserted 26 file 2]--------- -| char *s; |-*** Automatic: Applying INSERT from file 2 [line 26]========================---------[changed 28 file 1]---------|------[changed to 29-31 file 2]------- return ctime(&clock); | s = ctime(&clock); -| s[ strlen(s)-1 ] = '\0'; | return s; |-*** Automatic: Applying CHANGE from file 2 [lines 29-31]========================Moved contributor "./util.c" to "./util.c.contrib".Output of merge is in "./util.c".Recorded merge of "./util.c". (hyperlink of type Merge)A 'findmerge' log has been written to "findmerge.log.22-Mar-94.10:27:31"
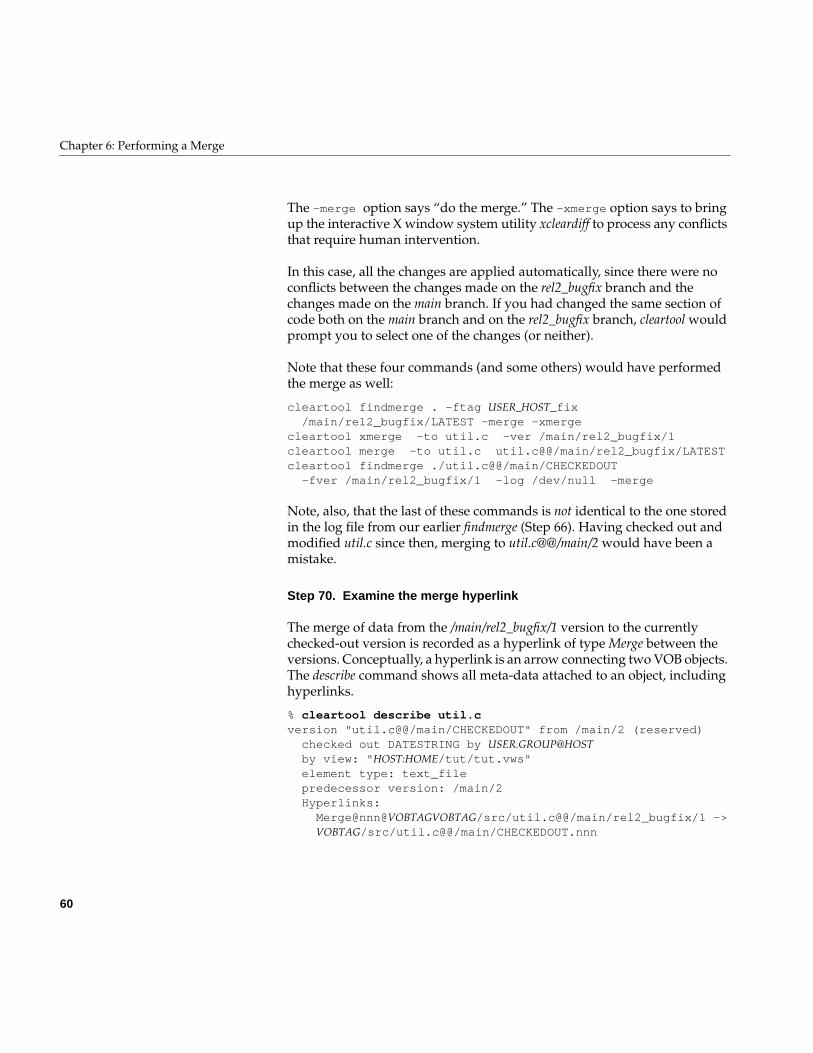
60
Chapter 6: Performing a Merge
The -merge option says “do the merge.” The -xmerge option says to bringup the interactive X window system utility xcleardiff to process any conflictsthat require human intervention.
In this case, all the changes are applied automatically, since there were noconflicts between the changes made on the rel2_bugfix branch and thechanges made on the main branch. If you had changed the same section ofcode both on the main branch and on the rel2_bugfix branch, cleartool wouldprompt you to select one of the changes (or neither).
Note that these four commands (and some others) would have performedthe merge as well:
cleartool findmerge . -ftag USER_HOST_fix /main/rel2_bugfix/LATEST -merge -xmergecleartool xmerge -to util.c -ver /main/rel2_bugfix/1cleartool merge -to util.c util.c@@/main/rel2_bugfix/LATESTcleartool findmerge ./util.c@@/main/CHECKEDOUT -fver /main/rel2_bugfix/1 -log /dev/null -merge
Note, also, that the last of these commands is not identical to the one storedin the log file from our earlier findmerge (Step 66). Having checked out andmodified util.c since then, merging to util.c@@/main/2 would have been amistake.
Step 70. Examine the merge hyperlink
The merge of data from the /main/rel2_bugfix/1 version to the currentlychecked-out version is recorded as a hyperlink of type Merge between theversions. Conceptually, a hyperlink is an arrow connecting two VOB objects.The describe command shows all meta-data attached to an object, includinghyperlinks.
% cleartool describe util.cversion "util.c@@/main/CHECKEDOUT" from /main/2 (reserved) checked out DATESTRING by USER.GROUP@HOST by view: "HOST:HOME/tut/tut.vws" element type: text_file predecessor version: /main/2 Hyperlinks: Merge@nnn@VOBTAGVOBTAG/src/util.c@@/main/rel2_bugfix/1 ->
VOBTAG/src/util.c@@/main/CHECKEDOUT.nnn
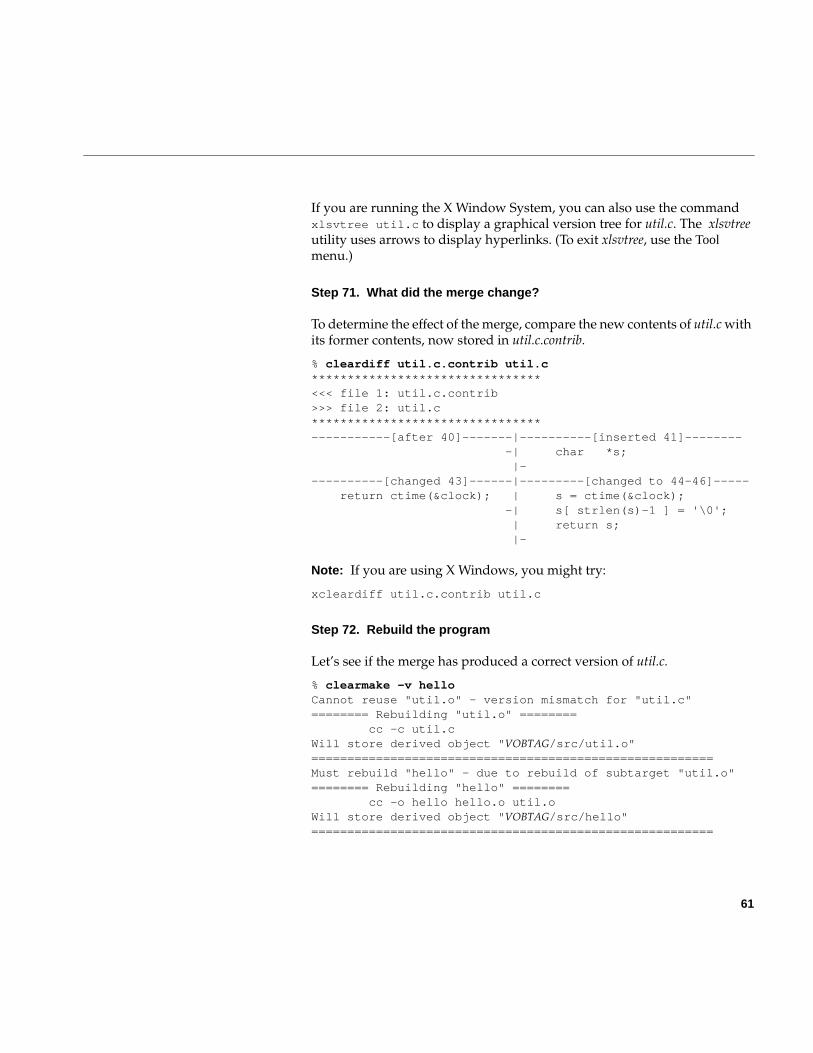
61
If you are running the X Window System, you can also use the commandxlsvtree util.c to display a graphical version tree for util.c. The xlsvtreeutility uses arrows to display hyperlinks. (To exit xlsvtree, use the Toolmenu.)
Step 71. What did the merge change?
To determine the effect of the merge, compare the new contents of util.c withits former contents, now stored in util.c.contrib.
% cleardiff util.c.contrib util.c********************************<<< file 1: util.c.contrib>>> file 2: util.c********************************-----------[after 40]-------|----------[inserted 41]-------- -| char *s; |-----------[changed 43]------|---------[changed to 44-46]----- return ctime(&clock); | s = ctime(&clock); -| s[ strlen(s)-1 ] = '\0'; | return s; |-
Note: If you are using X Windows, you might try:
xcleardiff util.c.contrib util.c
Step 72. Rebuild the program
Let’s see if the merge has produced a correct version of util.c.
% clearmake -v helloCannot reuse "util.o" - version mismatch for "util.c"======== Rebuilding "util.o" ======== cc -c util.cWill store derived object "VOBTAG/src/util.o"========================================================Must rebuild "hello" - due to rebuild of subtarget "util.o"======== Rebuilding "hello" ======== cc -o hello hello.o util.oWill store derived object "VOBTAG/src/hello"========================================================
62
Chapter 6: Performing a Merge
So far, so good—the program recompiles.
Step 73. Test the change
Now, let’s see if the merged util.c has produced a hello program that executescorrectly.
% ./helloHello, USER!Your home directory is /home/USER.It is now DATESTRING.
It does!
Step 74. Test the change for the superuser case
Recall that you put in a change that handles a superuser differently from anordinary user. A look at the code (Step 68) indicates that you can fool the helloprogram into thinking you are a superuser simply by changing the value ofthe USER environment variable. Do it in a short-lived Bourne shell, tominimize the risk to the current shell.
% env USER=root helloHello, Your Excellency!Your home directory is /home/USER.It is now DATESTRING.
Everything is working fine.
Step 75. Checkin the revised file
You’ve enhanced the hello program, and you’ve integrated a bugfix change.Now, the boss says, “Ship it!”, so let’s package your work as an official“release”.
As always, the first thing to do is to make sure all source files are checked in.
% cleartool lscheckoutDATESTRING USER checkout version "util.c" from /main/2 (reserved)
63
% cleartool checkin util.cCheckin comments for "util.c":special form of username message for root usermerge in fix to time string from bugfix branch.Checked in "util.c" version "/main/3".

65
Chapter 7
7. Defining a Release
Each development shop has its own approach to defining, administering,and producing customer releases. ClearCase does not force you to adopt oneapproach over all others. In this tutorial, we explain the facilities that makecertain approaches particularly natural and easy.
Having progressed this far in the tutorial, you have been exposed to theClearCase method of defining the source base for a release. At the beginningof the tutorial, we spoke of the “first release” and the “second release” of thehello program. We soon switched, however, to describing these as the “REL1release” and the “REL2 release”. That is, we switched to considering arelease to be a particular set of source versions—those versions that havebeen labeled with a particular version label.
Thus, the “REL2 release” is defined by the versions of elements hello.c, hello.h,util.c, and Makefile that are labeled REL2. And we are about to define a thirdrelease by attaching the label REL3 to a set of source versions.
It may occur to you that this method of defining a release is circular. How doyou keep track of all the particular versions, so that you can attach a label tothem? You’ll see that ClearCase has good facilities in this regard, both forsimple situations (like the one in this tutorial) and for complex ones,involving many programs and development trees.
Step 76. Get your bearings
At the end of the preceding lesson, you were in the src directory, in a shell setto view USER_HOST_tut. Verify that you are still in the same situation.
% cleartool pwv -shortUSER_HOST_tut% pwdVOBTAG/src

66
Chapter 7: Defining a Release
If you’ve gotten lost, you may need to use a full pathname to find the sourcedirectory.
cd VOBTAG/src
If this command fails, it is probably because you exited the shell that was setto your view. Enter the following commands to reestablish your viewcontext and your working directory within the VOB.
cleartool setview USER_HOST_tutcd VOBTAG/src
Step 77. Label the release (part1): create a version label type
Defining version labels works in much the same way as defining names forbranches of version trees (Step 52). There are two steps:
• Create a version label type, using the mklbtype (“make version labeltype”) command. This is an administrative object that defines aparticular version label for subsequent use in this VOB.
• Attach the version label to one or more element versions, using themklabel (“make version label”) command.
% cleartool mklbtype REL3Comments for "REL3":Release 3 version label.Created label type "REL3".
Having defined version label REL3 for use within this VOB, you can nowattach it to elements.
Step 78. Label the release (part 2): attach version labels to sources
This is a very simple product release. It consists of a single executableprogram, hello, whose source tree consists of a single directory (the one youare in), VOBTAG/src. You have just built the instance of hello that will beshipped, so your view’s versions of the sources are the ones that should getthe REL3 label.
67
% cleartool mklabel REL3 Makefile hello.c hello.h util.c . ..
Created label "REL3" on "Makefile" version "/main/2".Created label "REL3" on "hello.c" version "/main/3".Created label "REL3" on "hello.h" version "/main/1".Created label "REL3" on "util.c" version "/main/3".Created label "REL3" on "." version "/main/2".Created label "REL3" on ".." version "/main/1".
As discussed in the introduction to Lesson 5, the “.” and “..” argumentsinclude the current working directory and the parent directory in the list ofelements whose current version is to be labeled. In general, version labelsshould be applied to the entire chain of directories between the currentdirectory and the VOB mount point. In this example, the parent directory isthe VOB mount point.
Since every source file and directory is now labeled REL3, anyone canreconstruct the source base for this release with a single config spec rule:element * REL3.
Step 79. Re-label the release sources (just to make a point)
That was easy, but not particularly realistic. In real life, an individualdeveloper often is not the person who decides when a program is goodenough to release. It is more likely that a QA manager or developmentmanager will make such decisions, having tested a particular build of theprogram.
ClearCase supports this kind of release policy easily. After some build of thehello program is finally approved for release by the powers-that-be, theconfig rec of that build can drive the assignment of version labels to sources.Exercise this feature now, using an alternative form of the mklabel command.The output shows that the work of the preceding step is repeated.
% cleartool mklabel -replace -config hello REL3Label "REL3" already on "VOBTAG" version "/main/1".Label "REL3" already on "VOBTAG/src" version "/main/2".Label "REL3" already on "VOBTAG/src/hello.c" version "/main/3".Label "REL3" already on "VOBTAG/src/hello.h" version "/main/1".Label "REL3" already on "VOBTAG/src/util.c" version "/main/3".

68
Chapter 7: Defining a Release
Note that this version of the command did not attempt to label the Makefile.This is because the config rec does not list a version of the Makefile. Instead,the config rec includes the text of the build script that was executed.
This strategy allows a Makefile to support many targets independently. AMakefile-level change requires a rebuild only of the target whose build scriptor dependencies are modified—all other targets are still “up-to-date”. (If theconfig rec listed a version of the Makefile, the entire Makefile would be adependency of each of its targets. Each time the Makefile changed, everytarget would be rendered “out-of-date”.)
Step 80. Install the ‘hello’ executable in the ‘bin’ directory
You have taken care of the sources. Now for the executable in the bindirectory.
% cleartool checkout -nc ../bin/helloChecked out "../bin/hello" from version "/main/2".% cleartool checkin -from ./hello -rm ../bin/helloCheckin comments for "../bin/hello":Release 3 version.Checked in "../bin/hello" version "/main/3".
Your new executable is checked in. (The -rm option deletes the checked-outcopy of ../bin/hello, suppressing the Save private copy? prompt thatotherwise appears when you check in a version from an alternate locationwith -from.)
Now let’s apply the REL3 label the release directory (../bin) and its contents(../bin/hello).
Step 81. Label the release (part 3): attach labels in the ‘bin’ directory
% cleartool mklabel REL3 ../bin ../bin/helloCreated label "REL3" on "../bin" version "/main/1".Created label "REL3" on "../bin/hello" version "/main/3".
Note that, like Step 78, this step attaches a version label to thecurrently-selected version of a directory—this time, it is ../bin. (There is noneed to “walk up the tree” to the VOB mount point—the parent directory of../bin is the VOB mount point, which has already been labeled.)
69
Chapter 8
8. Revising a Directory Structure
In preceding lessons, you saw that ClearCase provides version-control ofdirectory elements as well as file elements. Ordinary version-control systemshandle the fact that the contents of source files change from release to release.ClearCase directory elements enable handling of additional kinds ofrelease-to-release changes: files added, deleted, and renamed; files moved toa different directory; even major directory tree overhauls.
In this lesson, you’ll do some new development that involves creating a newversion of directory element src. Before going on, however, let’s take a fewmoments to clarify what a version of a directory element contains. Like astandard UNIX directory, a version of a ClearCase directory elementcontains a list of names. The following kinds of objects can be named in adirectory version:
• file element
• directory element (sometimes called a “subdirectory” to emphasize therelationship to its parent directory element)
• VOB symbolic link (this kind of object is beyond the scope of thistutorial)
Whenever you wish to change a directory’s list of names, you must create anew version of the directory. This means checking out the directory,modifying it, and checking it back in. Modifications to a directory include:
• creating new file and directory elements
• removing names of file and directory elements
• renaming file and directory elements
• creating additional VOB hard links to existing file elements
70
Chapter 8: Revising a Directory Structure
Step 82. Get your bearings
At the end of the preceding lesson, you were in the src directory, in a shell setto view USER_HOST_tut. Verify that you are still in the same situation.
% cleartool pwv -shortUSER_HOST_tut% pwdVOBTAG/src
If you’ve gotten lost, you may need to use a full pathname to find the sourcedirectory.
cd VOBTAG/src
If this command fails, it is probably because you exited the shell that was setto your view. Enter the following commands to reestablish your viewcontext and your working directory within the VOB.
cleartool setview USER_HOST_tutcd VOBTAG/src
Step 83. Compare versions of a directory
In Lesson 4, you changed config specs in order to access “old” versions of thesrc source directory. An alternative method is to use version-extendedpathname to reach directly into the version tree of a directory element. Forexample, you can examine the Release 1 contents of src and its Release 3contents without having to change your config spec at all.
% cd ..% cleartool ls -vob_only src@@/main/REL1src@@/main/REL1/Makefile@@src@@/main/REL1/hello.c@@% cleartool ls -vob_only src@@/main/REL3src@@/main/REL3/Makefile@@src@@/main/REL3/hello.c@@src@@/main/REL3/hello.h@@src@@/main/REL3/util.c@@
Several times during this tutorial, you have used syntax likesrc@@/main/REL1 to name a version of a file element. Version-extendedpathnames for file and directory versions have exactly the same format.Since src is a directory element, ls is the appropriate command for examining

71
the contents of one of its versions. For versions of file elements, cat or more isappropriate.
As always, the -vob_only option excludes view-private objects and derivedobjects. Without this option, the ls listing would include both the currentlyexisting view-private and derived objects and the “old” versions selected bythe view.
Were you expecting to see particular versions of the source files in theselistings? This would be incorrect—a directory version does not containversions of elements; it only contains names of elements.
Note: There was no need to change to the parent directory in this step. Youcan “dive into” the version tree of the current directory with aversion-extended pathname like .@@/main/REL1. Similar comments applyto performing a checkout of the current working directory (which you’ll dosoon). Since this format is a bit confusing at first, we used a more intuitivecommand sequence.
Step 84. Prepare to do some new development
The new development work involves splitting the work of file hello.c intotwo parts. In previous releases, hello.c both composed a message anddisplayed it. Now, the job of composing the message will be implemented bya hello_msg() function, whose source code is in a new file, msg.c. The main()function in hello.c will now simply display whatever message is composedby hello_msg().
(This change might by motivated by the desire to create variants of the helloprogram, which present their messages in different ways. For example, anxhello variant might display the message in an X Window System window.)
Step 85. Checkout the source directory
Your work involves creating a new source file, msg.c, which you (naturally)wish to place under source control. In other words, you wish to modify thesrc directory element by adding the name msg.c. Before you make thismodification, you must first checkout the directory.
% cleartool checkout -nc srcChecked out "src" from version "/main/2".

72
Chapter 8: Revising a Directory Structure
Step 86. Create a new file element
The mkelem (“make element”) command creates a new element.
% cd src% cleartool mkelem msg.cCreation comments for "msg.c":new file to generate message.Created element "msg.c" (type "text_file").Checked out "msg.c" from version "/main/0".
ClearCase automatically chooses text_file as the element type, because itrecognizes the .c file name suffix on msg.c. Versions of text_file elements arestored efficiently, as deltas in a single data container file, in much the same wayas SCCS or RCS versions.
The mkelem command automatically performs a checkout of the new fileelement, so that you can edit it immediately.
Step 87. Checkin the source directory
The creation of the msg.c file element is the only change you need to make tothe current directory, so check it in.
% cleartool checkin .Default:Added file element "msg.c".Checkin comments for ".": ("." to accept default).Checked in "." version "/main/3".
You need not keep the src directory checked-out in order to modify the fileswithin it. (Remember that you modified files often in the preceding lessons,all without having to checkout the src directory.) Directories and files areclosely related, but they evolve independently:
• Checking out a file allows you to change its contents (for example, witha text editor).
• Checking out a directory allows you to change its contents—the namesof file elements (and other directory elements)—for example, bycreating new elements, renaming elements, and removing elements.
73
Step 88. Compare the new directory to its predecessor
ClearCase includes the ability to diff directories. Let’s confirm our change tothe src directory.
% cleartool diff -predecessor .********************************<<< directory 1: /_tmp/gdvob/src@@/main/2>>> directory 2: .********************************-----------------------------|---------------[ added ]------- -| msg.c 09-Feb.16:31 USER
Step 89. Modify the new source file
The new source file, msg.c, is currently empty. Let’s “write” some code in theusual way (for this tutorial), by copying it from the repository.
% cp /usr/atria/doc/tutorial/ms.1 msg.c% cat msg.c#include "hello.h"
char * hello_msg() { static char msg[256];
sprintf (msg, "Hello, %s!\nYour home directory is %s.\nIt is now %s.\n", env_user(), env_home(), env_time() );
return msg; }
Step 90. Modify the old source files
In addition to creating msg.c, your task involves modifying hello.c, hello.h,and the Makefile. Since this is ground that we’ve covered before, let’s do itwithout much ceremony.

74
Chapter 8: Revising a Directory Structure
% cleartool checkout -nc hello.c hello.h MakefileChecked out "hello.c" from version "/main/3".Checked out "hello.h" from version "/main/1".Checked out "Makefile" from version "/main/2".
% cp /usr/atria/doc/tutorial/hc.4 hello.c% cleartool diff -pred hello.c********************************<<< file 1: VOBTAG/src/hello.c@@/main/3>>> file 2: hello.c********************************---------[changed 4-6]-------------|-------[changed to 4]------printf("Hello, %s!\n", env_user() +| printf(hello_msg());printf("Your home directory is %s.+|-printf("It is now %s.\n", env_time+|% cp /usr/atria/doc/tutorial/hh.2 hello.h% cleartool diff -pred hello.h********************************<<< file 1: VOBTAG/src/hello.h@@/main/1>>> file 2: hello.h********************************-----------[after 7]----------|----------[inserted 8]--------- -| extern char *hello_msg(); |-% cp /usr/atria/doc/tutorial/mk.3 Makefile% cleartool diff -pred Makefile********************************<<< file 1: VOBTAG/src/Makefile@@/main/2>>> file 2: Makefile********************************------------[changed 3-4]------------|-------[changed to 3-4]--------hello: hello.o util.o | hello: hello.o util.o msg.o $(MKTUT_CC) -o hello hello.o u+ | $(MKTUT_CC) -o hello hello.o u+ -|--------------[after 11]--------------|----------[inserted 12-14]----- -| msg.o: | $(MKTUT_CC) -c msg.c |
|-------------[changed 13]-------------|----------[changed to 16]------ rm -f hello hello.o util.o | rm -f hello hello.o util.o msg+
These commands prove (once again) that a directory need not bechecked-out when you modify the contents of its files.

75
Step 91. Rebuild the program
That’s all the editing to be done. Let’s compile.
% clearmake -v helloCannot reuse "hello.o" - version mismatch for "hello.c"
======== Rebuilding "hello.o" ======== cc -c hello.cWill store derived object "VOBTAG/src/hello.o"========================================================
Cannot reuse "util.o" - version mismatch for "hello.h"
======== Rebuilding "util.o" ======== cc -c util.cWill store derived object "VOBTAG/src/util.o"========================================================
No candidate in current view for "msg.o"
======== Rebuilding "msg.o" ======== cc -c msg.cWill store derived object "VOBTAG/src/msg.o"========================================================
Must rebuild "hello" - due to rebuild of subtarget "hello.o"
======== Rebuilding "hello" ======== cc -o hello hello.o util.o msg.oWill store derived object "VOBTAG/src/hello"========================================================
Note that clearmake rebuilds all the object modules, since you’ve edited allthe source files for this program.
Step 92. Test the program
Make sure that the hello program still runs correctly.
% ./helloHello, USER!Your home directory is /home/USER.It is now DATESTRING.
76
Chapter 8: Revising a Directory Structure
Step 93. What files need to be checked in?
You’ve made quite a few source changes. It may be difficult to recall exactlywhich files you have checked out. The command lscheckout –cview
–short saves you the trouble of having to remember.
% cleartool lscheckout -cview -shortMakefilehello.chello.hmsg.c
Compare this listing with that in Step 26, when you used the –cview option,but not the –short option.
Step 94. Checkin the sources
The file name list displayed by the preceding command is exactly what youneed to specify to the next command, checkin. The C shell ‘!!‘ idiomincorporates this list into the checkin command, as the list of files to bechecked in.
% cleartool checkin -c "modularize msg generation + display"‘!!‘Checked in "Makefile" version "/main/3".Checked in "hello.c" version "/main/4".Checked in "hello.h" version "/main/2".Checked in "msg.c" version "/main/1".

77
Chapter 9
9. Summing Up / Cleaning Up
We hope that you have gotten the “feel” of using ClearCase. Numerically,you have used only a small fraction of the product’s commands and features.But these are the commands that you will use most often in your day-to-daydevelopment work. Before cleaning up, take a few moments to review whatyou have accomplished.
Step 95. Get your bearings
At the end of the preceding lesson, you were in the src directory, in a shell setto view USER_HOST_tut. Verify that you are still in the same situation.
% cleartool pwv -shortUSER_HOST_tut% pwdVOBTAG/src
If you’ve gotten lost, you may need to use a full pathname to find the sourcedirectory.
cd VOBTAG/src
If this command fails, it is probably because you exited the shell that was setto your view. Here’s how to reestablish your view context, and then go to theright source directory in the VOB.
cleartool setview USER_HOST_tutcd VOBTAG/src
Step 96. Verify that all binaries are accessible in the ‘bin’ directory
The bin directory contains all three releases of the hello program. Each ischecked-in as a version of element ../bin/hello. Let’s execute all the versions,just to see how far the project has progressed.

78
Chapter 9: Summing Up / Cleaning Up
% cd ../bin% hello@@/main/REL1Hello, world!% hello@@/main/REL2Hello, USER!Your home directory is /net/HOST/home/USER.It is now DATESTRING.% hello@@/main/REL3Hello, USER!Your home directory is /home/USER.It is now DATESTRING.
Note: The remaining steps guide you through a cleanup process that returnsyour machine to its state when you began this tutorial. If you wish to workfurther with the data and views you’ve created, you can stop right here. ♦
Step 97. Exit the view
There is no further use for the views you’ve created, so you can delete them.First, however, exit your shell process, which is set to the USER_HOST_tutview.
% exit% cleartool pwv -short** NONE **% pwdHOME
You are now back where you started, in a shell that is not set to any view.
Step 98. Unmount the VOB
Unmount the VOB that you have used in this tutorial, and remove themount-over directory.
% cleartool umount VOBTAG% rmdir VOBTAG
Step 99. Delete all the views you’ve created
The REL1REL2 script you executed at the start of this tutorial created a viewwith view-tag USER_HOST_old. You created two additional views,
79
USER_HOST_tut and USER_HOST_fix. Use rmview (“remove view”) commandsto delete the storage areas of these views and to remove their view-tag andview storage entries in the ClearCase registry files.
% cleartool rmview -force -tag USER_HOST_tut% cleartool rmview -force -tag USER_HOST_old% cleartool rmview -force -tag USER_HOST_fix
The -force option suppresses error conditions related to the fact that a VOBassociated with a view still holds derived objects created in that view.
Step 100. Remove the VOB storage area
Having unmounted the VOB, you can delete its storage area (which youcreated back at Step 5 in HOME/tut or /usr/tmp/USER/tut).
% cleartool rmvob HOME/tut/tut.vbs
Remove versioned object base "HOME/tut/tut.vbs"? [no] yesRemoved versioned object base "HOME/tut/tut.vbs".
Confirmation is required for this step, unless you use the -force option.
Step 101. Remove the directory that contained all the storage areas
The tut directory is now empty, since the three view storage areas and theVOB storage area are all gone. You can now remove this empty directory.
% rmdir tut
That completes the cleanup!
Step 102. Say good-bye!
This concludes the ClearCase Tutorial. We hope that you have enjoyed thetrip, and have gotten a good idea of how ClearCase can help you get yourwork done more easily and more reliably.


Tell Us About This Manual
As a user of Silicon Graphics products, you can help us to better understand your needsand to improve the quality of our documentation.
Any information that you provide will be useful. Here is a list of suggested topics:
• General impression of the document
• Omission of material that you expected to find
• Technical errors
• Relevance of the material to the job you had to do
• Quality of the printing and binding
Please send the title and part number of the document with your comments. The partnumber for this document is 007-1614-020.
Thank you!
Three Ways to Reach Us
• To send your comments by electronic mail, use either of these addresses:
– On the Internet: [email protected]
– For UUCP mail (through any backbone site): [your_site]!sgi!techpubs
• To fax your comments (or annotated copies of manual pages), use thisfax number: 650-965-0964
• To send your comments by traditional mail, use this address:
Technical PublicationsSilicon Graphics, Inc.2011 North Shoreline Boulevard, M/S 535Mountain View, California 94043-1389
