click here to take test now -...
TRANSCRIPT

C.O.E. CONTIN
UING EDUCATIO
N
CONTINUING EDUCATION
All Rights Reserved. Materials may not be copied, edited, reproduced, distributed, imitated in any way without written permission from C.O.E.
CONTINUING EDUCATION. It is not meant to provide medical, legal or professional services advice. If necessary, it is recommended that you consult
a medical, legal or professional services expert licensed in your state.
Page 1 of 29
All Rights Reserved. Materials may not be copied, edited, reproduced, distributed, imitated in any way without written permission from
C.O.E. CONTINUING EDUCATION. It is not meant to provide medical, legal or professional services advice. If necessary, it is recommended that you
consult a medical,
legal or professional services expert licensed in your state.
C.O.E.
1
Click Here To Take Test Now
(Complete the Reading Material first then click on the Take Test Now
Button to start the test. Test is at the bottom of this page)
5 HR. SKIN CARE ENHANCEMENT AND FACIAL TONING
The Benefits of Skin Care Therapies Esthetics is the application of various treatments to the skin, to maintain its health and vitality.
Estheticians are trained in skin wellness, helping their clients balance oil and moisture content and
achieve a healthy, youthful complexion. As well as various facial treatments (described in more detail
below), they commonly also perform body treatments such as salt or sugar scrubs, moisturizing or
slenderizing body wraps, hair removal techniques such as waxing or threading, and hand/foot
treatments to rejuvenate the skin.
A variety of treatments and products are used to protect skin from environmental hazards and combat
fine lines, wrinkles, and a dull, uneven skin tone. Estheticians are also skilled in managing conditions
such as acne, rosacea, eczema, and dry skin, to name just a few. And finally, skin care treatments are
wonderfully relaxing and rejuvenating. If smooth, healthy skin is your goal, visiting a skin care
professional can benefit you.
In this course you will also be introduced to the trending service of Facial Yoga and Toning, a growing
phenomenon being used to combat signs of aging.
What’s the difference between dermatology, cosmetology, and esthetics?
Dermatology is a branch of the medical profession, practiced by licensed physicians who specialize in
disorders of the skin. Esthetic practice specifically excludes diagnosis, prescription, or any other service,

CONTINUING EDUCATION
All Rights Reserved. Materials may not be copied, edited, reproduced, distributed, imitated in any way without written permission from C.O.E.
CONTINUING EDUCATION. It is not meant to provide medical, legal or professional services advice. If necessary, it is recommended that you consult
a medical, legal or professional services expert licensed in your state.
Page 2 of 29
All Rights Reserved. Materials may not be copied, edited, reproduced, distributed, imitated in any way without written permission from
C.O.E. CONTINUING EDUCATION. It is not meant to provide medical, legal or professional services advice. If necessary, it is recommended that you
consult a medical,
legal or professional services expert licensed in your state.
C.O.E.
2
procedure, or therapy that requires a medical license. If you’re being treated by a dermatologist, your
esthetician can provide complementary and support therapies. In addition, estheticians are trained to
recognize early signs of many medical conditions affecting the skin, and will refer you to a dermatologist
in such a case.
Cosmetology is the study of beauty treatments including nail care, hair care and styling, makeup
application, skin care and more. Esthetics is one branch of cosmetology; some estheticians work in other
branches of cosmetology in addition to their skin care practice.
Techniques and Products Techniques used by estheticians include facial steaming, wrapping, exfoliation, waxing, pore cleansing,
extraction, and chemical peels. Creams, lotions, wraps, clay or gel masks, and salt scrubs are used.
Machines may also be used to help deliver high-tech services.
Some common therapies:
Chemical peel: An exfoliation process, very effective in treating a large range of skin concerns
such as aging, sun damage, acne, mild scarring, improving overall skin brightness and evening
skin tone. Peels can be light, moderate or deep. Light peels require no down time from work or
normal activities. Moderate peels may require a day or two of down time, and deep peels can
require a week or more to allow the skin to fully heal. Estheticians who are not working in a
medical setting perform light to moderate peels only. Deep peels are performed by a physician,
or under a physician’s supervision, for your safety.
Exfoliation: The removal of dead skin cells manually (scrubbing, brushing, or using a system such
as microdermabrasion), with a chemical peel (a product that causes dead skin cells to shed) or
with an enzymatic product that digests dead skin cells.
Extraction: This is the process of deep cleansing the pores, either manually (using gloved hands
and cotton or tissue around the fingers, with gentle pressure to remove the impacted pore) or
using a metal extraction implement designed to clear blocked pores. This can also include the
use of a lancet (a small sharp blade to lift the dead cells of the skin prior to extraction).
Facial: A facial is the most popular treatment performed by estheticians. It is a good way for
your therapist to get a good understanding of your skin prior to suggesting more aggressive
treatments. A facial generally includes makeup removal and skin cleansing, exfoliation by
mechanical, enzymatic or chemical means, steaming, extractions, facial massage, a treatment
mask, serum/moisturizer and sunblock. For most people, facials can be scheduled every four
weeks, although your therapist may recommend a different schedule based on your individual
needs.

C.O.E. CONTIN
UING EDUCATIO
N
CONTINUING EDUCATION
All Rights Reserved. Materials may not be copied, edited, reproduced, distributed, imitated in any way without written permission from C.O.E.
CONTINUING EDUCATION. It is not meant to provide medical, legal or professional services advice. If necessary, it is recommended that you consult
a medical, legal or professional services expert licensed in your state.
Page 3 of 29
All Rights Reserved. Materials may not be copied, edited, reproduced, distributed, imitated in any way without written permission from
C.O.E. CONTINUING EDUCATION. It is not meant to provide medical, legal or professional services advice. If necessary, it is recommended that you
consult a medical,
legal or professional services expert licensed in your state.
C.O.E.
3
Microdermabrasion: The process of resurfacing the skin using a machine that sands the skin’s
epidermal (outer) layer, using either a wand tipped with crushed diamonds, or a spray of special
crystals which are then suctioned back up along with the dead skin cells. It can be very helpful in
improving skin texture, fine lines and the effectiveness of home care product penetration.
Waxing: Waxing removes unwanted hair at the root. There are two different types of waxes:
hard and soft. Soft wax is applied warm to the skin in a thin layer in the direction of hair growth.
Cloth strips are then applied to the warm wax, rubbed in the direction of hair growth, and
quickly pulled off in the opposite direction. This method is best used on larger areas of the body
such as the legs, back or chest. Hard wax is used without cloth strips. It is applied warm, in a
layer about the thickness of a nickel, allowed to dry and then removed quickly in the opposite
direction of hair growth. Hard wax is less irritating to sensitive skin and is excellent for the bikini,
underarm and facial areas.
Scarring
Scar (Defined) Scars are areas of fibrous tissue (fibrosis) that replace normal skin after injury. A scar results from the
biological process of wound repair in the skin and other tissues of the body. Thus, scarring is a natural
part of the healing process. With the exception of very minor lesions, every wound (e.g., after accident,
disease, or surgery) results in some degree of scarring. An exception to this are animals with complete
regeneration, which regrow tissue without scar formation.
In its simplest medical sense, scar tissue is connective tissue that has formed over a wound through
tissue such as skin, muscle or internal organs. The human body is incapable of reforming damaged areas
back to their original composition so a fibrous tissue is rebuilt in its place. This replacement tissue has
limited capabilities compared to the original – for example, in its ability to produce sweat.
The process of wound healing is a complicated one, and the resulting scar can vary in appearance
greatly from person to person, and also greatly even on one individual, depending on the location and
type of injury
Scar tissue is composed of the same protein (collagen) as the tissue that it replaces, but the fiber
composition of the protein is different; instead of a random basketweave formation of the collagen
fibers found in normal tissue, in fibrosis the collagen cross-links and forms a pronounced alignment in a
single direction. This collagen scar tissue alignment is usually of inferior functional quality to the normal
collagen randomized alignment. For example, scars in the skin are less resistant to ultraviolet radiation,
and sweat glands and hair follicles do not grow back within scar tissues. A myocardial infarction,

CONTINUING EDUCATION
All Rights Reserved. Materials may not be copied, edited, reproduced, distributed, imitated in any way without written permission from C.O.E.
CONTINUING EDUCATION. It is not meant to provide medical, legal or professional services advice. If necessary, it is recommended that you consult
a medical, legal or professional services expert licensed in your state.
Page 4 of 29
All Rights Reserved. Materials may not be copied, edited, reproduced, distributed, imitated in any way without written permission from
C.O.E. CONTINUING EDUCATION. It is not meant to provide medical, legal or professional services advice. If necessary, it is recommended that you
consult a medical,
legal or professional services expert licensed in your state.
C.O.E.
4
commonly known as a heart attack, causes scar formation in the heart muscle, which leads to loss of
muscular power and possibly heart failure. However, there are some tissues (e.g. bone) that can heal
without any structural or functional deterioration.
Etymology of Scarring First attested in English in the late 14th century CE, the word scar derives from Old French escharre,
from Late Latin eschara, which is the latinisation of the Greek ἐσχάρα (eskhara), meaning "hearth,
fireplace", but in medicine "scab, eschar on a wound caused by burning or otherwise".
Different Types of Scar Tissue
Atrophic
Atrophic scars are sunken, depressed areas of scar tissue. The scar tissue is generally very thin and
weak, and blood vessels can be seen very close to the surface. They are caused when insufficient
collagen is laid down in the wound. This sort of scar tends to be formed as the result of acne, though
some scarification work (especially when no aftercare regime is followed) will result in this sort of scar.
Normal
A wound healed under optimum conditions will form scar tissue that is almost the same colour and
thickness as the skin around the wound, and be substantially smaller than the original wound. The body
tries to form scars which mimic the tissue around them. A large number of scarification pieces heal like
this, most of the people who get scarification work are young and healthy, and consequently their
bodies heal wounds very well, even if aftercare techniques are followed. For the first couple of months
the scars may be red/purple, but over time they will fade through pink to white, leaving a very subtle
effect on pale skinned individuals.
Hypertrophic
Hypertrophic scars are raised scars which do not extend beyond the border of the wound. They are
formed when the rate of collagen production in a wound exceeds the rate of collagen breakdown.
Unlike keloid scars, the collagen fibers are still aligned evenly within the scar, so the scar will be more
even, and less likely to be painful when you move. Hypertrophic scar formation can be encouraged by
giving the wound a difficult healing environment, although the predisposition to forming hypertrophic
scar tissue is a genetic trait. Hypertrophic scars sometimes form next to piercings, especially on the ear.
They often fade in colour and become less raised over time, especially when any irritant (i.e. piece of

C.O.E. CONTIN
UING EDUCATIO
N
CONTINUING EDUCATION
All Rights Reserved. Materials may not be copied, edited, reproduced, distributed, imitated in any way without written permission from C.O.E.
CONTINUING EDUCATION. It is not meant to provide medical, legal or professional services advice. If necessary, it is recommended that you consult
a medical, legal or professional services expert licensed in your state.
Page 5 of 29
All Rights Reserved. Materials may not be copied, edited, reproduced, distributed, imitated in any way without written permission from
C.O.E. CONTINUING EDUCATION. It is not meant to provide medical, legal or professional services advice. If necessary, it is recommended that you
consult a medical,
legal or professional services expert licensed in your state.
C.O.E.
5
jewelry) is removed. Wearing high quality, well-fitting jewelry and massaging regularly with Vitamin E oil
can help reduce hypertrophic scar tissue around piercings.
Keloid
Keloid scars are large, raised, generally uneven scars that extend beyond the border of the original
injury. The word ‘keloid’ is very commonly misused by individuals who are actually referring to
hypertrophic scarring. People with dark skin are much more likely to form keloid scar tissue, especially
on the back, shoulders, upper arms, and earlobes. Keloid scars are formed when the rate of collagen
production in a wound exceeds the rate of collagen breakdown, and the collagen fibers align themselves
in a random pattern (as opposed to in parallel lines as in normal scars). It is not known exactly what
triggers the formation of keloid scars, but it is thought that the wound healing factors mentioned above
can influence keloid formation. Keloid scars tend to increase in size over time. Keloids also occasionally
form next to piercings, and while removing the jewelry and rubbing with Vitamin E oil may help, it is
likely that a medical professional will have to assist with their removal.
Hidradenitis Suppurativa Hidradenitis suppurativa is a chronic, scarring disease that affects the apocrine, or sweat glands. It is a
common skin condition but is frequently misdiagnosed. Hidradenitis suppurativa does not occur before
puberty. Most people are between 20 to 40 years old when they develop hidradenitis suppurativa. It can
be a disabling and distressing skin condition.
The cause of HS remains unknown and experts disagree over proposed causes.
Cause of Hidradenitis Suppurativa The exact cause of hidradenitis suppurativa is disputed. Because it looks similar to acne, some
investigators believe that it is caused by the formation of keratin plugs in the follicles. Because
hidradenitis suppurativa occurs in areas that contain apocrine, or sweat, glands, other investigators
believe that it is caused by a blockage of the apocrine gland. In either case, the plugged gland or follicle
becomes larger, ruptures, and becomes infected. Obesity and cigarette smoking may be triggering
factors.
Appearance of Hidradenitis Suppurativa Hidradenitis suppurativa occurs in areas of the body that contain sweat glands including the armpits,
groin, buttocks, scalp, and under the female breast. When the condition is mild it may only present as a
cluster of 2 or 3 blackheads that communicate under the skin. Once the disease begins, it gets
progressively worse. The extensive, deep inflammation leads to painful abscesses. These heal
incompletely and cause cord-like scars on the skin. The infection can progress under the skin in tracts
linking the abscesses. These boils can be very painful and restrict movement of the affected area.

CONTINUING EDUCATION
All Rights Reserved. Materials may not be copied, edited, reproduced, distributed, imitated in any way without written permission from C.O.E.
CONTINUING EDUCATION. It is not meant to provide medical, legal or professional services advice. If necessary, it is recommended that you consult
a medical, legal or professional services expert licensed in your state.
Page 6 of 29
All Rights Reserved. Materials may not be copied, edited, reproduced, distributed, imitated in any way without written permission from
C.O.E. CONTINUING EDUCATION. It is not meant to provide medical, legal or professional services advice. If necessary, it is recommended that you
consult a medical,
legal or professional services expert licensed in your state.
C.O.E.
6
Lesions occur in any body areas with hair follicle although intertriginous areas such as the axilla, groin,
and perianal region are more commonly involved. This theory includes most of the following potentials
indicators:
Post-pubescent individuals are more likely to exhibit HS.
Plugged apocrine (sweat) gland or hair follicle
Excessive sweating
Sometimes linked with other auto-immune conditions
Androgen dysfunction
Genetic disorders that alter cell structure
Patients with more advanced cases may find exercise intolerably painful, which may increase
the rate of obesity among sufferers.
The historical understanding of the disease suggests dysfunctional apocrine glands or dysfunctional hair
follicles, possibly triggered by a blocked gland, create inflammation, pain, and a swollen lesion.
Triggering Factors There are several triggering factors that should be taken into consideration.
Obesity is an exacerbating rather than a triggering factor, through mechanical irritation,
occlusion, and maceration.
Tight clothing, and clothing made of heavy, non-breathable materials.
Deodorants, depilation products, shaving of the affected area – their association with
hidradenitis suppurativa is still an ongoing debate amongst researchers.
Drugs, in particular oral contraceptives (i.e., oral hormonal birth control; "the pill") and lithium.
Hot and especially humid climates (dry/arid climates often cause remission).
Diagnosing Hidradenitis Suppurativa Hidradenitis suppurativa is diagnosed clinically based on its appearance. There are no lab tests or
biopsies that establish the diagnosis. In the early stages, it can be misdiagnosed as an isolated boils.
Many people are embarrassed by the multiple infections thinking they are ingrown hairs in sensitive
areas. They do not go to the health care provider until the boils have become numerous or intolerable.
Treatment of Hidradenitis Suppurativa Treating hidradenitis suppurativa is difficult. It is best treated in the early stages before extensive
scarring develops. However, it must be diagnosed correctly. The following are some of the treatment
options:
Antibiotics - Oral antibiotics may help suppress the inflammation especially in mild cases, but they do
not cure the disease. The same antibiotics that are used for acne are used for hidradenitis suppurativa,

C.O.E. CONTIN
UING EDUCATIO
N
CONTINUING EDUCATION
All Rights Reserved. Materials may not be copied, edited, reproduced, distributed, imitated in any way without written permission from C.O.E.
CONTINUING EDUCATION. It is not meant to provide medical, legal or professional services advice. If necessary, it is recommended that you consult
a medical, legal or professional services expert licensed in your state.
Page 7 of 29
All Rights Reserved. Materials may not be copied, edited, reproduced, distributed, imitated in any way without written permission from
C.O.E. CONTINUING EDUCATION. It is not meant to provide medical, legal or professional services advice. If necessary, it is recommended that you
consult a medical,
legal or professional services expert licensed in your state.
C.O.E.
7
only in higher doses. These antibiotics include erythromycin, tetracycline, minocycline, and doxycycline.
Topical antibiotics do not help.
Isotretinoin (Accutane) - Isotretinoin may be helpful in mild cases, but the response is unpredictable.
Sometimes isotretinoin is used to reduce the size of the affected areas prior to surgery. Isotretinoin does
have significant side effects and must not be used by pregnant women.
Steroid injection - Injecting a steroid into an inflamed lesion is sometimes helpful. The injection helps
reduce inflammation and may be used if an area is especially painful. Steroid injections are normally
combined with other treatments.
Surgery - In moderate to severe cases, surgery is the most definitive option. Taking out only the
immediately affected area only leads to recurrence of the disease. The treatment of choice is called
wide local excision. In this procedure, the affected area and surrounding normal tissue are surgically
excised. The excision is not stitched back together but left open to heal from the inside out. Skin grafts
may be placed in the excised area to speed healing.
Introduction to Facial Yoga and Toning: How to Do a Complete Facial
Workout Face exercises, also called “face yoga and toning”, “face firming”, “face lifting” or “facial resistance
training”, are exercises designed to tone and strengthen the 55 muscles of the face to give you a natural
non-invasive face lift without surgery.

CONTINUING EDUCATION
All Rights Reserved. Materials may not be copied, edited, reproduced, distributed, imitated in any way without written permission from C.O.E.
CONTINUING EDUCATION. It is not meant to provide medical, legal or professional services advice. If necessary, it is recommended that you consult
a medical, legal or professional services expert licensed in your state.
Page 8 of 29
All Rights Reserved. Materials may not be copied, edited, reproduced, distributed, imitated in any way without written permission from
C.O.E. CONTINUING EDUCATION. It is not meant to provide medical, legal or professional services advice. If necessary, it is recommended that you
consult a medical,
legal or professional services expert licensed in your state.
C.O.E.
8
Why would you want to tone your face muscles? Because the muscles that sit underneath the skin
provide it with support, and when those muscles become weak through disuse, they start to atrophy or
waste away. Once that happens, the skin can start to sag due to gravity, and develop fine lines and
wrinkles as a result of declining collagen levels.
By strengthening your facial muscles however, you can help to slow down this process by keeping the
skin tight and firm. Furthermore, face exercises will also stimulate the production of collagen, so you
should notice a reduction in the appearance of wrinkles too.
Another benefit of doing face exercises is that they increase the flow of blood to the skin. With
improved blood circulation, your face will appear more radiant as its complexion or skin tone will be
improved.
Exercising the muscles of the face also serves to stimulate the lymphatic system that sits underneath the
skin. This system relies entirely upon movement for it to operate, and is what’s responsible for removing
waste and toxins from the body.
So by doing face exercises on a regular basis, you will also help to improve the clarity of your skin so that
you suffer from less spots, pimples and discolorations.
The overall result of doing facial exercises is a natural face lifting effect that produces a younger and
more attractive looking you. And this is exactly what you shall learn how to do in this guide, as we
discuss the different types of face exercises for the different parts of the face.
The Muscles of the Face Below is a picture that shows the muscles of
the face. You may find it helpful to look at
this picture when doing your face lifting
exercises, as it will allow you to better
visualize the specific muscles that you are
working out.
Face exercises strengthen the muscles of
the face, and also stimulate collagen and
elastin production.
1. Occipitofrontalis
2. Levator labii superioris

C.O.E. CONTIN
UING EDUCATIO
N
CONTINUING EDUCATION
All Rights Reserved. Materials may not be copied, edited, reproduced, distributed, imitated in any way without written permission from C.O.E.
CONTINUING EDUCATION. It is not meant to provide medical, legal or professional services advice. If necessary, it is recommended that you consult
a medical, legal or professional services expert licensed in your state.
Page 9 of 29
All Rights Reserved. Materials may not be copied, edited, reproduced, distributed, imitated in any way without written permission from
C.O.E. CONTINUING EDUCATION. It is not meant to provide medical, legal or professional services advice. If necessary, it is recommended that you
consult a medical,
legal or professional services expert licensed in your state.
C.O.E.
9
3. Zygomaticus minor
4. Zygomaticus major
5. Buccinator
6. Levator anguli oris
7. Depressor labii inferioris
8. Temporalis
9. Procerus
10. Orbicularis oculi
11. Levator labii superioris alaeque nasi
12. Orbicularis oris
13. Masseter
14. Depressor anguli oris
15. Mentalis
16. Platysma
The following picture shows some of the lines that can appear on the face as a result of normal aging:

CONTINUING EDUCATION
All Rights Reserved. Materials may not be copied, edited, reproduced, distributed, imitated in any way without written permission from C.O.E.
CONTINUING EDUCATION. It is not meant to provide medical, legal or professional services advice. If necessary, it is recommended that you consult
a medical, legal or professional services expert licensed in your state.
Page 10 of 29
All Rights Reserved. Materials may not be copied, edited, reproduced, distributed, imitated in any way without written permission from
C.O.E. CONTINUING EDUCATION. It is not meant to provide medical, legal or professional services advice. If necessary, it is recommended that you
consult a medical,
legal or professional services expert licensed in your state.
C.O.E.
10
There are many regions on the face that the signs of aging can show.
Just for interest, the picture below shows a Chinese face map. The Chinese believe that you can tell a lot
about the health of the body simply by looking at the face. So there may be some other benefits to
doing face exercises in addition to the benefits that it has on your skin.
The Chinese believe that organs can be mapped to the face.
How to Make Face Exercises Work In order for any type of face exercise to be effective, your muscles must be stimulated past a “critical
threshold“. Below this threshold, face exercises are largely ineffective.
The easiest way to determine whether you have passed the critical threshold is to look out for a mild
burning or stinging sensation in your muscles after doing your workout.

C.O.E. CONTIN
UING EDUCATIO
N
CONTINUING EDUCATION
All Rights Reserved. Materials may not be copied, edited, reproduced, distributed, imitated in any way without written permission from C.O.E.
CONTINUING EDUCATION. It is not meant to provide medical, legal or professional services advice. If necessary, it is recommended that you consult
a medical, legal or professional services expert licensed in your state.
Page 11 of 29
All Rights Reserved. Materials may not be copied, edited, reproduced, distributed, imitated in any way without written permission from
C.O.E. CONTINUING EDUCATION. It is not meant to provide medical, legal or professional services advice. If necessary, it is recommended that you
consult a medical,
legal or professional services expert licensed in your state.
C.O.E.
11
This sensation is due to the buildup of lactic acid, and indicates that your muscles have been sufficiently
stressed for them to grow and develop stronger. You can get rid of this burning sensation simply by
massaging the affected area.
Most of the face exercises on this page are isometric face exercises, as they are based on the principle of
contracting and relaxing your muscles in order to increase their strength. It is this muscle contraction
and relaxation that gives you the burn when doing face lifting exercises.
Bodybuilders eat protein rich foods immediately after a workout to maximize muscle growth. You
should follow a similar principle when doing face exercises, by doing them shortly before or after a meal.
Bodybuilders know that after a workout they should eat foods rich in protein, as this allows the muscles
to grow bigger and repair themselves. Normally, this is done within 30 minutes after a workout.
You can therefore maximize the benefits you get from face exercises by doing them shortly before or
after you eat; this will provide the muscles you have just exercised with the protein (amino acids) they
need.
Face Exercise Preparation & Skin Care Facial exercises are, for many people, a way to hold back the signs of aging without having to resort to
facelift plastic surgery.
As a result, it’s not uncommon for age conscious individuals to incorporate face exercises into their
regular anti-aging skin care routine, as this way they can tackle aging with both cosmetics and with
exercise.
Before you begin doing face exercises, there are a few things that you should do to prepare first:
Wash your hands
As you will be touching your face with your fingers, always make sure that your hands have been
properly cleansed with soap. Touching your face with dirty hands will transfer bacteria to the face,
which could then cause an outbreak of spots and pimples to develop.
Cleanse and moisturize your face
If you get into the habit of washing and cleansing your face before you do your face exercises, you’ll find
it much easier to fit them into your schedule as you will be incorporating them into your normal
everyday skincare routine.

CONTINUING EDUCATION
All Rights Reserved. Materials may not be copied, edited, reproduced, distributed, imitated in any way without written permission from C.O.E.
CONTINUING EDUCATION. It is not meant to provide medical, legal or professional services advice. If necessary, it is recommended that you consult
a medical, legal or professional services expert licensed in your state.
Page 12 of 29
All Rights Reserved. Materials may not be copied, edited, reproduced, distributed, imitated in any way without written permission from
C.O.E. CONTINUING EDUCATION. It is not meant to provide medical, legal or professional services advice. If necessary, it is recommended that you
consult a medical,
legal or professional services expert licensed in your state.
C.O.E.
12
After your face has been cleansed, apply a light moisturizer. This is important, because by keeping your
skin moist you will reduce the likelihood of it forming micro-creases which could develop into unwanted
fine lines.
As you will be touching your face with your fingers, always make sure that your hands have been
properly cleansed with soap. Touching your face with dirty hands will transfer bacteria to the face,
which could then cause an outbreak of spots and pimples to develop.
Below we look at some of the different types of face exercises that you can now try:
Facial Exercise Techniques
Forehead
Exercising your forehead muscles (occipitofrontalis/frontalis muscle) can be very beneficial in helping to
maintain a younger looking appearance. This is because when your forehead starts to sag it can also
cause your upper eyelids to sag, which can then make your face look old and tired.
By keeping your forehead skin nice and tight, you can therefore make your face look more refreshed and
awake without having to undergo a surgical face lift, brow lift or Botox. If you have very saggy upper
eyelids however, you may require upper eyelid surgery (blepharoplasty) in order to obtain satisfactory
results.

C.O.E. CONTIN
UING EDUCATIO
N
CONTINUING EDUCATION
All Rights Reserved. Materials may not be copied, edited, reproduced, distributed, imitated in any way without written permission from C.O.E.
CONTINUING EDUCATION. It is not meant to provide medical, legal or professional services advice. If necessary, it is recommended that you consult
a medical, legal or professional services expert licensed in your state.
Page 13 of 29
All Rights Reserved. Materials may not be copied, edited, reproduced, distributed, imitated in any way without written permission from
C.O.E. CONTINUING EDUCATION. It is not meant to provide medical, legal or professional services advice. If necessary, it is recommended that you
consult a medical,
legal or professional services expert licensed in your state.
C.O.E.
13
The following routine targets the lower forehead in addition to the upper region of the eyebrows.
• Place one finger horizontally across the top of each eyebrow and pull down slightly.
• Raise your eyebrows working against the resistance created by the weight of your fingers.
• Hold momentarily, and then lower your eyebrows again.
• Repeat 20 times.
When doing this sequence, remember to look out for the “burn” as that will indicate that you are doing
the exercise correctly.
Forehead Face Exercise Two
How to reduce forehead wrinkles with face yoga and toning
This routine targets the mid and upper forehead regions.
• Place four fingers vertically at the sides of the forehead, just above the end of your eyebrows and
in front of your temples.
• Stretch your forehead tight.
• Raise and lower your eyebrows.
• Repeat 20 times.
The skin between your eyebrows
The following routine targets the corrugator supercilii muscle and the procerus muscle.

CONTINUING EDUCATION
All Rights Reserved. Materials may not be copied, edited, reproduced, distributed, imitated in any way without written permission from C.O.E.
CONTINUING EDUCATION. It is not meant to provide medical, legal or professional services advice. If necessary, it is recommended that you consult
a medical, legal or professional services expert licensed in your state.
Page 14 of 29
All Rights Reserved. Materials may not be copied, edited, reproduced, distributed, imitated in any way without written permission from
C.O.E. CONTINUING EDUCATION. It is not meant to provide medical, legal or professional services advice. If necessary, it is recommended that you
consult a medical,
legal or professional services expert licensed in your state.
C.O.E.
14
This exercise can be beneficial for those who have worry lines or glabellar lines as a result of frowning or
scowling a lot. These lines between the eyebrows can cause you to look angry or unhappy, even though
you may not actually be feeling that way.
• Place four fingers horizontally across each eyebrow.
• Pull the eyebrows away from each other so that you pull the skin gently towards the temples.
• Now try to bring your eyebrows together, working against the resistance created by your fingers.
You should eventually feel a burn in the center of your forehead, in your “third eye”.
• Repeat 10 times.
Although this sequence can be a little tricky to master, once you get the hang of it, you should start
noticing fewer lines and a lifting effect of the skin between your eyebrows.
Special note concerning forehead wrinkles
Note: The forehead often contains the deepest wrinkles on the entire face, and this is especially true in
males. However, these lines are not really true wrinkles but rather “expression lines” or “character
lines” as they are sometimes called.
Eyes The exercise for the muscles that surround the eyes looks deceptively easy. The basic exercise is easy.
It's done by just partially winking one eye at a time, and holding the wink for a second, and then
repeating the movement. I suggest 50 repetitions. (I do two sets of 50 repetitions.) There is no need to
scrunch up the skin in the crow's feet area when doing this exercise, but there is the need to contract
firmly both the orbicularis oculi muscles around each eye and the nasalis muscles that are on each side
of the nasal bone.
There is an advanced version of this exercise that is more effective but you have to gain control of the
occipitalis muscle at the back of the head to do it. I discuss gaining control of this important muscle
when I describe exercise 5 for the scalp muscles. I'll tell you how to do the advanced exercise then.

C.O.E. CONTIN
UING EDUCATIO
N
CONTINUING EDUCATION
All Rights Reserved. Materials may not be copied, edited, reproduced, distributed, imitated in any way without written permission from C.O.E.
CONTINUING EDUCATION. It is not meant to provide medical, legal or professional services advice. If necessary, it is recommended that you consult
a medical, legal or professional services expert licensed in your state.
Page 15 of 29
All Rights Reserved. Materials may not be copied, edited, reproduced, distributed, imitated in any way without written permission from
C.O.E. CONTINUING EDUCATION. It is not meant to provide medical, legal or professional services advice. If necessary, it is recommended that you
consult a medical,
legal or professional services expert licensed in your state.
C.O.E.
15
I put this exercise first among the five exercises because the first indication that we are getting older is
those lines that form in the skin around the eyes. (The skin around the eyes is the thinnest and most
delicate of the whole body.) This exercise will definitely not eliminate the fine lines but it will make them
less noticeable.
Before doing any facial exercise you should apply some lubricant to the area around the muscles being
exercised. I splash some water on my face before doing the exercises. You may want to apply your
favorite moisturizer to your skin before you start. Don't do any of these exercises with a dry face.
After applying some lubrication to the skin around the eyes, place the fingertips of the hands under both
eyes just under the orbital bone. Even though the pressure you will apply is gentle, it will give sufficient
resistance to all the muscles above the orbital bone. Now while the resistance is being applied by your
fingers, close your eyes tightly. You'll feel all the muscles in the neighborhood being worked strongly.
Hold the contraction for either one or two seconds. Do as many repetitions as you feel comfortable with.
I usually do three sets of twenty-five reps. This is the one exercise that I do almost every day because the
muscles and skin around the eyes is one of the two areas where deterioration is first evident as a person
gets older. The other area is the front of the neck. Try this exercise in the morning while you're lying in
bed - a good way to start the day.
This exercise will get rid of any bagginess around the lower eyelids and will probably get rid of any
hooded upper eyelids too. But improvement will take time. Don't believe those optimistic statements
about rejuvenation in a few weeks. Muscles and skin take time to respond.
If you lightly touch the skin around your eye when doing this face workout, you should be able to feel
the muscles contracting underneath the skin. These are the muscles that you are strengthening with this
eye exercise, and over time they will become firmer and tighter preventing laxity or sag in that area.
Crow’s feet face exercise

CONTINUING EDUCATION
All Rights Reserved. Materials may not be copied, edited, reproduced, distributed, imitated in any way without written permission from C.O.E.
CONTINUING EDUCATION. It is not meant to provide medical, legal or professional services advice. If necessary, it is recommended that you consult
a medical, legal or professional services expert licensed in your state.
Page 16 of 29
All Rights Reserved. Materials may not be copied, edited, reproduced, distributed, imitated in any way without written permission from
C.O.E. CONTINUING EDUCATION. It is not meant to provide medical, legal or professional services advice. If necessary, it is recommended that you
consult a medical,
legal or professional services expert licensed in your state.
C.O.E.
16
Crow’s feet/periorbital lines are the fine wrinkles that develop in the skin of the outside corners of the
eye. They can occur prematurely in people who smile or squint a lot, and if left untreated, can eventually
develop into very deep and noticeable wrinkles.
The following face exercise can be used to prevent crow’s-feet wrinkles from appearing, or reduce the
appearance of existing wrinkles.
• Place one finger vertically at the sides of each eye.
• Gently close your eyes, working against the resistance created by your fingers.
• Open your eyes.
• Repeat this 20 times.
If you are doing this face exercise correctly, you should feel your fingers being pulled in slightly towards
the eye.
An alternative method is to place your fingertips in the corners of your eyes. Some people find this
method to be more effective, as it allows them to place greater resistance on the orbicularis oculi
muscle.
Face exercise for droopy upper eyelids
As you age your eyelids will naturally start to sag. In some cases, the eyelids can sag so much that they
seem to cover most of the eyes. This can not only make a person look old, but can also give them a
permanent “tired look” to their face.
The droopy eyelid exercise described below targets the levator palpebrae superioris, which is a muscle
that allows you to lift your upper eyelid when you open your eyes. It also targets the corrugator muscle,
which is the muscle that sits directly underneath your eyebrow.
C.O.E. CONTIN
UING EDUCATIO
N
CONTINUING EDUCATION
All Rights Reserved. Materials may not be copied, edited, reproduced, distributed, imitated in any way without written permission from C.O.E.
CONTINUING EDUCATION. It is not meant to provide medical, legal or professional services advice. If necessary, it is recommended that you consult
a medical, legal or professional services expert licensed in your state.
Page 17 of 29
All Rights Reserved. Materials may not be copied, edited, reproduced, distributed, imitated in any way without written permission from
C.O.E. CONTINUING EDUCATION. It is not meant to provide medical, legal or professional services advice. If necessary, it is recommended that you
consult a medical,
legal or professional services expert licensed in your state.
C.O.E.
17
• Place four fingers horizontally underneath the bottom of your eyebrow. Alternatively, place one
finger horizontally running along the bottom of your eyebrow.
• Lower your eyebrow, pushing against the resistance created by your fingers. Hold for a count of
5.
• Raise your eyebrows.
• Repeat 20 times.
Note: The exercise for droopy eyelids can be done with both eyes at the same time or with one eye
individually. You may however, get better control doing one eye at a time.
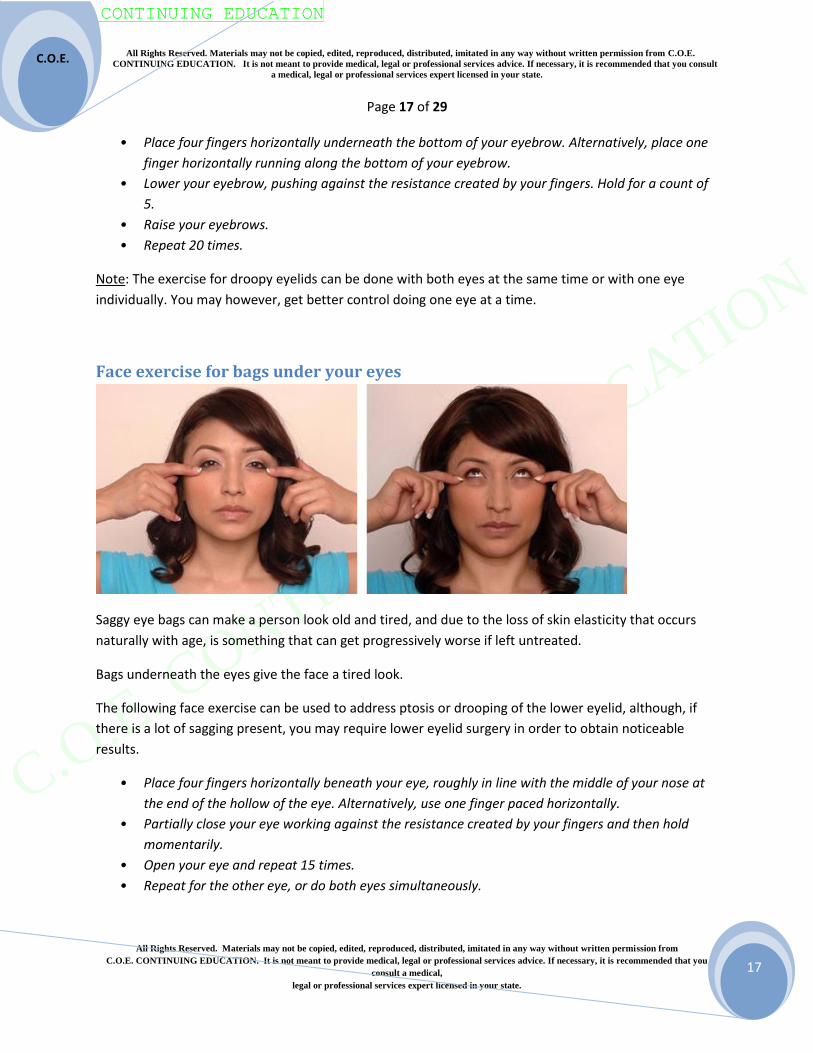
Face exercise for bags under your eyes
Saggy eye bags can make a person look old and tired, and due to the loss of skin elasticity that occurs
naturally with age, is something that can get progressively worse if left untreated.
Bags underneath the eyes give the face a tired look.
The following face exercise can be used to address ptosis or drooping of the lower eyelid, although, if
there is a lot of sagging present, you may require lower eyelid surgery in order to obtain noticeable
results.
• Place four fingers horizontally beneath your eye, roughly in line with the middle of your nose at
the end of the hollow of the eye. Alternatively, use one finger paced horizontally.
• Partially close your eye working against the resistance created by your fingers and then hold
momentarily.
• Open your eye and repeat 15 times.
• Repeat for the other eye, or do both eyes simultaneously.

CONTINUING EDUCATION
All Rights Reserved. Materials may not be copied, edited, reproduced, distributed, imitated in any way without written permission from C.O.E.
CONTINUING EDUCATION. It is not meant to provide medical, legal or professional services advice. If necessary, it is recommended that you consult
a medical, legal or professional services expert licensed in your state.
Page 18 of 29
All Rights Reserved. Materials may not be copied, edited, reproduced, distributed, imitated in any way without written permission from
C.O.E. CONTINUING EDUCATION. It is not meant to provide medical, legal or professional services advice. If necessary, it is recommended that you
consult a medical,
legal or professional services expert licensed in your state.
C.O.E.
18
Note: Bags underneath the eyes can be caused by tiredness or excess fluid retention due to a high salt
intake in the diet. Be sure to rule out these causes to obtain maximum benefit from your eye bag
workout.
Nose
Face Exercise for the Nose
The nasalis muscle sits across the bridge of the nose. There are two parts to the nasalis muscle; the
compressor naris which allows you to compress your nostrils together, and the dilator naris which
allows you to flare your nostrils.
The effect of sagging skin on the nose can cause nose wrinkles. These tend to first appear on the sides of
the nose, and then later above the bridge of the nose where it forms the T-zone.
Nose Thinning Face Yoga and Toning
Smaller Nose with Face Yoga and Toning
Alternative nose exercise:
• Place your finger or thumb underneath the tip of your nose.
• Lift your nose up slightly with your finger or thumb.
• Press your nose down working against the resistance of your finger or thumb.
• Repeat 20 times.
This nose exercise can also be done by pinching your nostrils closed with one hand, and then flaring
them open against the resistance of your pinch.

C.O.E. CONTIN
UING EDUCATIO
N
CONTINUING EDUCATION
All Rights Reserved. Materials may not be copied, edited, reproduced, distributed, imitated in any way without written permission from C.O.E.
CONTINUING EDUCATION. It is not meant to provide medical, legal or professional services advice. If necessary, it is recommended that you consult
a medical, legal or professional services expert licensed in your state.
Page 19 of 29
All Rights Reserved. Materials may not be copied, edited, reproduced, distributed, imitated in any way without written permission from
C.O.E. CONTINUING EDUCATION. It is not meant to provide medical, legal or professional services advice. If necessary, it is recommended that you
consult a medical,
legal or professional services expert licensed in your state.
C.O.E.
19
Facial exercise for nasolabial folds
You can help to lessen the appearance of nasolabial folds with the following routine:
• Open your mouth as wide as you can vertically. You want to move your upper teeth as far as
possible from your lower teeth in a vertical direction.
• Look upwards towards the ceiling.
• Hold this position for a count of 20 seconds, and you should start to feel a burn running down the
sides of your nose where the nasolabial folds are found.
Cheeks
The following face exercises can be used to tone up your cheeks, as they will target the muscles that run
across your cheek and also the muscles that surround your mouth (i.e., the levator labii superioris,
zygomaticus minor, zygomaticus major and orbicularis oris).
Exercising your cheek muscles is very important because they play a big role in the formation of facial
expressions. If your cheeks sag for example, then this can cause the corners of your mouth to turn
downwards and make it look as though you are sad or unhappy.
Yoga and toning facial exercises: How to tone and lift cheeks
Upper cheek exercise

CONTINUING EDUCATION
All Rights Reserved. Materials may not be copied, edited, reproduced, distributed, imitated in any way without written permission from C.O.E.
CONTINUING EDUCATION. It is not meant to provide medical, legal or professional services advice. If necessary, it is recommended that you consult
a medical, legal or professional services expert licensed in your state.
Page 20 of 29
All Rights Reserved. Materials may not be copied, edited, reproduced, distributed, imitated in any way without written permission from
C.O.E. CONTINUING EDUCATION. It is not meant to provide medical, legal or professional services advice. If necessary, it is recommended that you
consult a medical,
legal or professional services expert licensed in your state.
C.O.E.
20
• Place your fingers horizontally on the top of your cheeks just beneath your eyes.
• Smile, moving the corners of your mouth upwards.
• As you smile and lift your cheeks you should feel the resistance created by the weight of your
fingers.
• Hold momentarily and then relax.
• Repeat 20 times.
Middle cheek exercise
1. Place one finger from each hand horizontally across the middle of your cheek, roughly at the
level of the end of your nose.
2. Smile and raise the corners of your mouth upwards.
3. You will know when you have the right place because you will feel the muscles of your cheeks lift
your fingers up.
4. Hold momentarily and then relax.
5. Repeat 20 times.
Note: When exercising your cheeks there is no need to scrunch up your face, as all you are aiming for is
to gently lift your fingers with your cheek muscles. So the first few times you do this, have a look in the
mirror to check that you aren’t creasing your skin.
Face yoga and toning for chubby cheeks
The following steps demonstrate a face exercise called the “cheek fat flattener” for sculpting flabby or
chubby cheeks. It exercises the orbicularis oris around your mouth, the zygomatic arch muscle above
your cheek bone and the modiolus muscles on either side of your mouth.
• Trap some air in your mouth so that you can expand one of your cheeks.
• Move the trapped air to behind your bottom lip, then to your other cheek and then behind your
upper lip.
• Continue moving the air around your mouth, holding for a count of 3 at each position.
The good thing about this chubby cheeks exercise is that you can do it anywhere and at any time. So if
you are stuck at the traffic lights in your car, why not give this exercise a go to kill some time?!

C.O.E. CONTIN
UING EDUCATIO
N
CONTINUING EDUCATION
All Rights Reserved. Materials may not be copied, edited, reproduced, distributed, imitated in any way without written permission from C.O.E.
CONTINUING EDUCATION. It is not meant to provide medical, legal or professional services advice. If necessary, it is recommended that you consult
a medical, legal or professional services expert licensed in your state.
Page 21 of 29
All Rights Reserved. Materials may not be copied, edited, reproduced, distributed, imitated in any way without written permission from
C.O.E. CONTINUING EDUCATION. It is not meant to provide medical, legal or professional services advice. If necessary, it is recommended that you
consult a medical,
legal or professional services expert licensed in your state.
C.O.E.
21
Mouth
Face exercises for the mouth and lips.
This mouth exercise will firm the muscles around your mouth (buccinator and orbicularis oris muscles),
which, over time, will help to give your mouth and lips a fuller looking appearance. Best of all, it will
exercise the same muscles that the facial flex face exerciser targets but at no cost!
• Place one finger from each hand inside the corners of your mouth, as though you had hooks in
your mouth corners.
• Pull the mouth slightly apart.
• Now pull your mouth closed (sideways), working against the resistance created by the pull of
your fingers.

CONTINUING EDUCATION
All Rights Reserved. Materials may not be copied, edited, reproduced, distributed, imitated in any way without written permission from C.O.E.
CONTINUING EDUCATION. It is not meant to provide medical, legal or professional services advice. If necessary, it is recommended that you consult
a medical, legal or professional services expert licensed in your state.
Page 22 of 29
All Rights Reserved. Materials may not be copied, edited, reproduced, distributed, imitated in any way without written permission from
C.O.E. CONTINUING EDUCATION. It is not meant to provide medical, legal or professional services advice. If necessary, it is recommended that you
consult a medical,
legal or professional services expert licensed in your state.
C.O.E.
22
• Relax.
• Repeat this 30-50 times.
The good thing about this particular face exercise is that by working out the orbicularis oris muscle you
will also be working out many other muscles of the face. As shown in the picture below for example, the
muscles in your cheeks, upper lip, lower lip, chin, jowls and neck will also be exercised.
The benefits of this are a reduced appearance/development of nasolabial folds, oral commissures
(downturned mouth), perioral lines and smile lines.
Mouth corners
This routine targets the corners of your mouth, and so helps to prevent the mouth corners from sagging
downwards and affecting your facial expression. Sagging mouth corners make you look unhappy when
your mouth is closed.
• Gently grab the inside corners of your mouth with your thumb and finger.
• Your finger will be inside your mouth, your thumb will be outside on top. You can also do this the
other way around, with your thumb inside and your finger outside.
• Open and close your mouth (sideways), working against the resistance created by your fingers.
• Repeat this 20 times.
This is a similar face exercise to the one previously described. But because you are applying more
resistance to your mouth corners, your mouth will get a stronger workout with this routine.
Luscious lips exercise
Here is something specifically for your lips to make them look fuller and younger. You will know if you
have done this lip exercise correctly as your lips will have a slight burn to them after you have finished
your repetitions.
Alternative method:
• Purse your lips together and extend them outwards.
• With your lips pursed tightly, open and close them like a goldfish.
• Repeat 20 times.
Try to find your own limit when doing this lip shaping exercise, as it can be quite tough to do on the first
few occasions. You should however, find it easier with subsequent attempts and be able to do more
repetitions.

C.O.E. CONTIN
UING EDUCATIO
N
CONTINUING EDUCATION
All Rights Reserved. Materials may not be copied, edited, reproduced, distributed, imitated in any way without written permission from C.O.E.
CONTINUING EDUCATION. It is not meant to provide medical, legal or professional services advice. If necessary, it is recommended that you consult
a medical, legal or professional services expert licensed in your state.
Page 23 of 29
All Rights Reserved. Materials may not be copied, edited, reproduced, distributed, imitated in any way without written permission from
C.O.E. CONTINUING EDUCATION. It is not meant to provide medical, legal or professional services advice. If necessary, it is recommended that you
consult a medical,
legal or professional services expert licensed in your state.
C.O.E.
23
Jowls Facial Exercise for the Jowls
This face exercise targets the jowls. When your jowls sag, it makes the lower face appear to droop
downwards over the jaw line. This can make a person look prematurely aged, and can also affect the
overall character and expression of the face.
• Place four fingers from each hand along the jaw line.
• You should place your pinky finger in line roughly where the corner of your mouth ends (still on
your jaw line).
• Smile so that you move the corners of your mouth upwards.
• When you do this correctly, you should feel the muscle under your fingers pulling up slightly.
• Repeat this 20 times.
Face Exercises - Lift Your Sagging Jowls
• Open your mouth and drop your lower jaw towards the floor.

CONTINUING EDUCATION
All Rights Reserved. Materials may not be copied, edited, reproduced, distributed, imitated in any way without written permission from C.O.E.
CONTINUING EDUCATION. It is not meant to provide medical, legal or professional services advice. If necessary, it is recommended that you consult
a medical, legal or professional services expert licensed in your state.
Page 24 of 29
All Rights Reserved. Materials may not be copied, edited, reproduced, distributed, imitated in any way without written permission from
C.O.E. CONTINUING EDUCATION. It is not meant to provide medical, legal or professional services advice. If necessary, it is recommended that you
consult a medical,
legal or professional services expert licensed in your state.
C.O.E.
24
• Push your jaw forward so that you feel a tension in your cheeks near the ears. Hold for a count of
10.
• Draw your jaw inwards.
• Repeat 10 times.
Jowl exercises can be difficult to master, as some people find it hard to locate the muscles of the jowl.
Furthermore, jowl muscles also tend to be quite weak and underdeveloped in comparison to the other
muscles of the face, which can then make it difficult to know whether or not you are exercising them.
With practice however, your jowl muscles will become stronger and you will find this exercise easier to
do. When that happens, droopy jowls will slowly become firmer and tighter with less droop.
Chin Face Exercises for the Chin
A double chin is caused by a combination of excess fat around the chin and jaw line, and excess loose
sagging skin due to elastin depletion and poor muscle tone. This extra or lax skin can make it appear as
though a person has two chins due to the large wrinkle or fold that the hanging skin creates.
People with a double chin are usually overweight, although, this isn’t always the case as skinny people
can also have a double chin. But either way, having a double chin will make you look as though you are
overweight even if the rest of your body can’t be seen.
Chin and Jaw Toner

C.O.E. CONTIN
UING EDUCATIO
N
CONTINUING EDUCATION
All Rights Reserved. Materials may not be copied, edited, reproduced, distributed, imitated in any way without written permission from C.O.E.
CONTINUING EDUCATION. It is not meant to provide medical, legal or professional services advice. If necessary, it is recommended that you consult
a medical, legal or professional services expert licensed in your state.
Page 25 of 29
All Rights Reserved. Materials may not be copied, edited, reproduced, distributed, imitated in any way without written permission from
C.O.E. CONTINUING EDUCATION. It is not meant to provide medical, legal or professional services advice. If necessary, it is recommended that you
consult a medical,
legal or professional services expert licensed in your state.
C.O.E.
25
Natural Facelift/Facial Exercises: Lose Your Double Chin and Tone Your Jawline with Face works
• Lift your head and tilt it back with your chin pointing towards the ceiling.
• Push your jaw forward so that you feel a stretch underneath the chin. Hold for a count of 10.
• Whilst holding this position, slowly lower your chin a few inches and then slowly lift it back up
again. Keep your head in a straight line as you do this. Repeat 20 times.
Note: In order to fully get rid of a double chin, you must also lose weight because a double chin is
caused by both loose skin and excess fat accumulation. So if you only do face exercises, you will only be
addressing one part of the problem. The best way to lose weight is to go on a carbohydrate restricted
diet.
Chin lift exercise 2
• Place your thumb at the bottom of your chin, so that it’s on the skin above your chin bone. You
will be in a position as though you were sucking your thumb.
• Now lower your chin without moving your head, working against the resistance created by your
thumb. You should feel the Mentalis muscle pushing down on your thumb when you do this.
• Raise your chin.
• Repeat this 50 times.
This chin exercise can also be done without using your fingers or thumb, although it is more effective
when you are pushing against some form of resistance. You will know when you are doing this exercise
correctly, as you will feel the muscle on your chin pushing against your finger and pushing it downwards.
Chin lift exercise 3
The following chin exercise is a bit more challenging, but it’s very effective at helping to firm and tone up
the chin line.
• Place the palm of your hand underneath the bottom of your chin, so that your palm is facing
upwards as though you were resting your chin on your palm.
• Now push up gently with your palm.
• Against the resistance created by your palm, lower and raise your jaw as though you were
making a chewing motion.
After a few repetitions, you should feel the muscles in your lower chin area being worked out. Do as
many reps as you can, and gradually build up the amount of reps that you do each day.
Note: This exercise can also be done using your fist instead of your palm.
Chin exercise 4

CONTINUING EDUCATION
All Rights Reserved. Materials may not be copied, edited, reproduced, distributed, imitated in any way without written permission from C.O.E.
CONTINUING EDUCATION. It is not meant to provide medical, legal or professional services advice. If necessary, it is recommended that you consult
a medical, legal or professional services expert licensed in your state.
Page 26 of 29
All Rights Reserved. Materials may not be copied, edited, reproduced, distributed, imitated in any way without written permission from
C.O.E. CONTINUING EDUCATION. It is not meant to provide medical, legal or professional services advice. If necessary, it is recommended that you
consult a medical,
legal or professional services expert licensed in your state.
C.O.E.
26
With this chin exercise you don’t need to use your hands, so it’s something that you can do quickly
anytime you have a few spare moments to kill.
• Lower your chin down onto your chest and push down hard.
• Keeping your chin on your chest, move your head from side to side.
• Repeat this 20 times.
This facial exercise will help to tone up both your chin and your neckline, although some people find it
an uncomfortable face exercise to do.
Neck Face Exercise for the Neck
This neck exercise will prevent or reverse sagging skin on the neckline, sometimes called a “turkey
neck”, by targeting the platysma muscle.
• Open your mouth wide, pulling the corners of your mouth downwards towards your neck (not
with your hands).
• As you do this you should feel your neck muscles tighten, and if you touched your neck, you
would be able to feel your neck muscles tense up.
• Hold for a moment.
• Relax.
• Repeat 5-10 times.

C.O.E. CONTIN
UING EDUCATIO
N
CONTINUING EDUCATION
All Rights Reserved. Materials may not be copied, edited, reproduced, distributed, imitated in any way without written permission from C.O.E.
CONTINUING EDUCATION. It is not meant to provide medical, legal or professional services advice. If necessary, it is recommended that you consult
a medical, legal or professional services expert licensed in your state.
Page 27 of 29
All Rights Reserved. Materials may not be copied, edited, reproduced, distributed, imitated in any way without written permission from
C.O.E. CONTINUING EDUCATION. It is not meant to provide medical, legal or professional services advice. If necessary, it is recommended that you
consult a medical,
legal or professional services expert licensed in your state.
C.O.E.
27
You will know if you are doing it correctly as you will be able to see the muscles of your neck contract if
you were watching yourself in a mirror.
Neck Firming Exercise 2
This neck lift exercise targets your whole neck, but is especially beneficial for the muscles on the sides of
your neck.
• Lie down on the floor on your back.
• Raise your head slightly off the floor.
• Turn your head from side to side, trying to touch your shoulders with your chin.
• Repeat this 20 times.
Neck Firming Exercise 3
This neck exercise targets your whole neck, but is especially beneficial for the strip of your neck that
runs directly below your chin and along your throat (turkey neck).
• Lie down on the floor on your back.
• Raise your head slightly off the floor.
• With your head raised, try to touch your chest with your chin.
• Turn your head from side to side, keeping your chin close to the chest.
• Repeat this 20 times.
This neck exercise is virtually identical to the previous one just described. The only difference is that you
are keeping your chin on your chest as you move your head from side to side.
Neck Exercise 4 for Double Chin
This face exercise can help to get rid of a double chin.
Facial Exercise Will Beat That Double Chin
• Tilt your head back and push your tongue upwards into the roof of your mouth.
• Hold for a count of 10.
Neck exercise 5 for increased blood flow
The following neck exercise can be beneficial for increasing blood flow to the head and improving
eyesight and brain function.
• Stand up and nod your head. Look up at the ceiling at high as possible, and then down at the
floor as low as possible. Try to build up to 50 repetitions.

CONTINUING EDUCATION
All Rights Reserved. Materials may not be copied, edited, reproduced, distributed, imitated in any way without written permission from C.O.E.
CONTINUING EDUCATION. It is not meant to provide medical, legal or professional services advice. If necessary, it is recommended that you consult
a medical, legal or professional services expert licensed in your state.
Page 28 of 29
All Rights Reserved. Materials may not be copied, edited, reproduced, distributed, imitated in any way without written permission from
C.O.E. CONTINUING EDUCATION. It is not meant to provide medical, legal or professional services advice. If necessary, it is recommended that you
consult a medical,
legal or professional services expert licensed in your state.
C.O.E.
28
You can make this exercise harder by getting on your hands and knees, like a dog or a cat, and then
raising your head up towards the ceiling and down towards the floor.
The angle in which your body is positioned will create an extra form of resistance that your head and
neck muscles can work against, thereby enhancing the effectiveness of this exercise.
Facial Massage A face massage increases blood circulation and stimulates the lymphatic system.
Massaging the face can be beneficial for improving your complexion, as it will help to stimulate healthy
blood circulation and also stimulate the lymphatic system of the face.
To massage the face, it’s convenient to do so after moisturizing with a day cream or night cream. Simply
massage your skin in a circular upwards motion, working from bottom to top in each area of the face.
What to do After Your Face Yoga and Toning Routine After finishing the face exercise routine the following steps are helpful:
• While standing up, bend over at the waist so that you head is below your heart. Or, bend over
while sitting down in a chair.
• Then tap your face gently with your fingers. You can also tap and massage your hair/scalp.
Carrying out these steps will increase blood flow to the face, and so will nourish the skin with fresh
oxygenated blood making it appear more vibrant and with a richer color.
Summary We hope that this course has introduced you to useful information that can aid you in performing an
effective service for your clients. Anti-aging techniques, massage, and communicating with your client
about skin health are a great bonus to add to your service menu.

C.O.E. CONTIN
UING EDUCATIO
N
CONTINUING EDUCATION
All Rights Reserved. Materials may not be copied, edited, reproduced, distributed, imitated in any way without written permission from C.O.E.
CONTINUING EDUCATION. It is not meant to provide medical, legal or professional services advice. If necessary, it is recommended that you consult
a medical, legal or professional services expert licensed in your state.
Page 29 of 29
All Rights Reserved. Materials may not be copied, edited, reproduced, distributed, imitated in any way without written permission from
C.O.E. CONTINUING EDUCATION. It is not meant to provide medical, legal or professional services advice. If necessary, it is recommended that you
consult a medical,
legal or professional services expert licensed in your state.
C.O.E.
29
Click Here To Take Test Now
(Complete the Reading Material first then click on the Take Test Now
Button to start the test. Test is at the bottom of this page)
SKIN CARE ENHANCEMENT AND FACIAL TONING TRUE/FALSE QUESTIONARRE
1. Dermatology is a branch of the medical profession, practiced by licensed physicians who specialize in disorders of the skin.
2. Esthetic practice specifically excludes diagnosis, prescription, or any other service, procedure, or therapy that requires a medical license.
3. Light peels require no down time from work or normal activities. Moderate peels may require a day or two of down time, and deep peels can require a week or more to allow the skin to fully heal.
4. A facial generally includes makeup removal and skin cleansing, exfoliation by mechanical, enzymatic or chemical means, steaming, extractions, facial massage, a treatment mask, serum/moisturizer and sunblock.
5. Soft wax is applied warm to the skin in a thin layer in the direction of hair growth. 6. Hard wax is less irritating to sensitive skin and is excellent for the bikini, underarm and facial
areas. 7. Hypertrophic scars are raised scars which do not extend beyond the border of the wound. They
are formed when the rate of collagen production in a wound exceeds the rate of collagen breakdown.
8. Hidradenitis suppurativa is a chronic, scarring disease that affects the apocrine, or sweat glands. It is a common skin condition but is frequently misdiagnosed.
9. In order for any type of face exercise to be effective, your muscles must be stimulated past a “critical threshold“.
10. Before doing any facial exercise you should apply some lubricant to the area around the muscles being exercised.