clinical application guide -...
TRANSCRIPT

CLINICAL APPLICATION GUIDE
DIAGNOSTIC INSTRUMENTS & PERIODONTAL SCALERS/CURETTES
DIAGNOSTIC INSTRUMENTATION
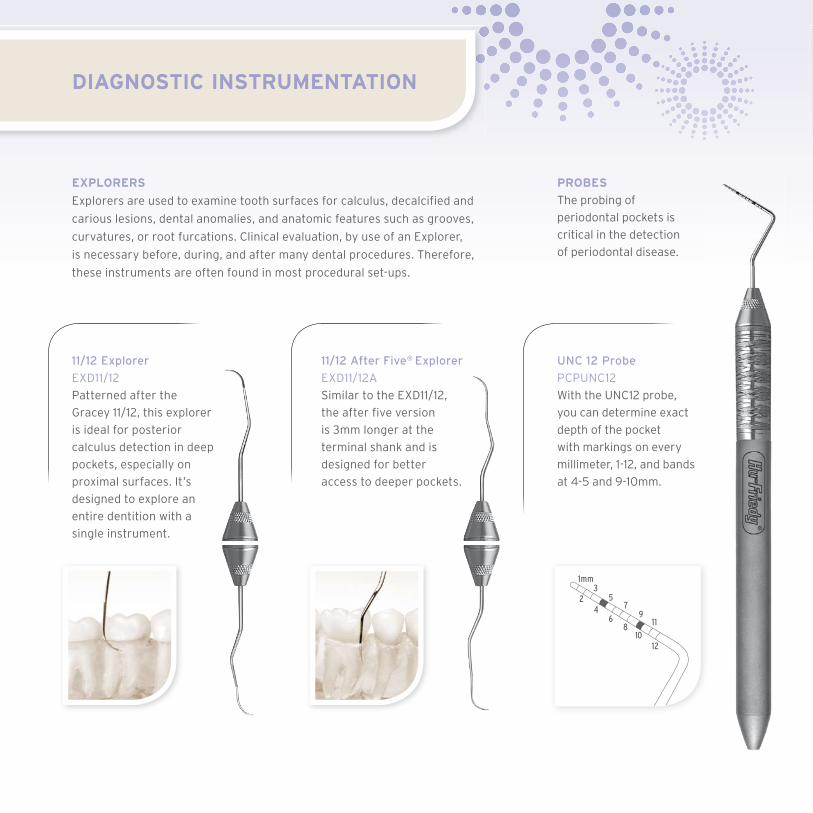
EXPLORERS Explorers are used to examine tooth surfaces for calculus, decalcified and carious lesions, dental anomalies, and anatomic features such as grooves, curvatures, or root furcations. Clinical evaluation, by use of an Explorer, is necessary before, during, and after many dental procedures. Therefore, these instruments are often found in most procedural set-ups.
PROBES The probing of periodontal pockets is critical in the detection of periodontal disease.
1mm
24
35
67
89
1011
12
1mm
23
45
67
89
1011
12
11/12 ExplorerEXD11/12Patterned after the Gracey 11/12, this explorer is ideal for posterior calculus detection in deep pockets, especially on proximal surfaces. It’s designed to explore an entire dentition with a single instrument.
11/12 After Five® ExplorerEXD11/12A Similar to the EXD11/12, the after five version is 3mm longer at the terminal shank and is designed for better access to deeper pockets.
UNC 12 Probe PCPUNC12With the UNC12 probe, you can determine exact depth of the pocket with markings on every millimeter, 1-12, and bands at 4-5 and 9-10mm.

SICKLE SCALERS
TO REMOVE CALCULUS:
1. Adapt the tip 1/3 of the cutting edge against the tooth, under the deposit.
2. Tilt the facial surface of the blade toward the tooth to achieve an approximate 85° angle between the tooth and the blade.
3. Apply lateral pressure against the tooth and pull the scaler fi rmly upward to dislodge the deposit. Both sides (cutting edges) of the blade can be used for mesial or distal applications.
• Designs available for light, moderate and heavy deposit removal
• Available for anterior or posterior applications
• Mainly used to remove interproximal supragingival or subgingival calculus located just below the gingival margin
Straight Blade Design204S
• Ideal for interproximal calculus removal
• Excellent for broad supragingival facial and lingual surfaces
Curved Blade DesignSH6/79
• For removal of interproximal deposits
• Small sickle scalers excellent for removal of deposits under contact areas and for overlapping teeth with tight contact areas
CUTTING EDGE
FACE
LATERAL SURFACE
BACK90°TIP
CUTTING EDGE
FACE
LATERAL SURFACE
BACK90°TIP
CUTTING EDGE
FACE
LATERAL SURFACE
BACK
TIP
CUTTING EDGE
FACE
LATERAL SURFACE
BACK
TIP
PULL STROKE
85°
LATERALPRESSURE
**
* The drawing and clinical pictures shown here are representative of a general scaler.
* The drawing and clinical pictures shown here are representative of a general scaler.

Standard Gracey Curette
Originally designed to be finishing curettes for fine scaling and root planing, Gracey curettes were developed in the 1940’s by Dr. Clayton Gracey in coordination with Hugo Friedman, the founder of Hu-Friedy.
Each Gracey blade is offset at 70˚ andhas one cutting edge—the lower edge. The combination of this unique blade and 9 different shank designs for specific tooth surfaces provide improved adaptation and deposit removal in scaling procedures.
Rigid & Extra Rigid Gracey
• Shank diameter is wider than standard Gracey curette
• Blade width is the same as standard Gracey curette
• Rigid: Used for moderate to heavy calculus removal
• Extra Rigid: Used for tenacious calculus removal
GRACEY CURETTESINSTRUMENTATION: The blade of a Gracey curette is correctly adapted when the lower cutting edge is against the tooth, and the terminal shank is parallel to the tooth surface being scaled. Apply lateral pressure against the tooth (root) and pull upward, maintaining the parallel shank.
• The blade is offset from the shank at 70°. This creates one cutting edge which is referred to as the lower edge.
• Gracey curettes are used in a set to completely scale the dentition.
CUTTING EDGE
FACE
TOE
LATERAL SURFACE
BACK
70°CUTTING EDGE
FACE
TOE
LATERAL SURFACE
BACK
70°CUTTING EDGE
FACE
TOE
LATERAL SURFACE
BACK
70°
Standard vs. Rigid,SG1/2R9
WIDER
Standard Gracey, SG1/291
PULL STROKE
85°
LATERALPRESSURE

After Five® Gracey
• Terminal shank is 3mm longer than Standard Gracey
• Longer terminal shank allows better access to deep pockets and areas with recession
• Blade is 10% thinner than standard Gracey curette to allow for less tissue distention when accessing deeper pockets
Mini Five Gracey
• Terminal shank is 3mm longer than Standard Gracey
• Compared to the standard Gracey curette, blade is 50% shorter and 10% thinner
• Good for scaling in deep, narrow pockets
Micro Mini Five Gracey
• Longer terminal shank designed to access deep periodontal pockets
• Blade is 20% thinner than a Mini Five Gracey to help reduce tissue distension and ease gingival insertion
GRACEY 1/2 GRACEY 7/8 GRACEY 11/12 GRACEY 17/18GRACEY 15/16GRACEY 13/14
Standard vs. After Five,SRPG1/291
Standard vs. Mini Five,SAS1/291
Standard vs. Micro Mini Five,SMS1/291
Biogent Curettes
• Latest advances in bio-type based periodontal therapy
• Provide more tissue friendly approach and ehnanced pocket access
• Shorter and thinner blade and different angulation between the shank and the working end
Standard vs. Biogent Curettes,SG1/29LC

GRACEY COLOR CHART
or
or
ANTERIOR1/2, 3/4, 5/6
BUCCAL/LINGUAL7/8, 9/10
MESIAL SURFACESPREMOLARS, MOLARS
11/12, 15/16
DISTAL SURFACESPREMOLARS, MOLARS
13/14, 17/18*
Refer to the chart to match instruments with area of
application by using the color-coded diagram below.application by using the color-coded diagram below.
Gracey Type
Shank Design& Diameter
Blade Length
Blade Width Available Patterns & Area of Use*
Standard(Finishing)
Standard Standard Standard 1/2, 3/4, 5/67/8, 9/1011/12, 15/1613/14, 17/18*
Rigid Standard design, increased shank diameter
Standard Standard 1/2, 3/4, 5/67/8, 9/1011/12, 15/1613/14, 17/18*
After Five®* Longer terminal shank, standard diameter
Standard Decreased by 10%compared to Standard
1/2, 3/4, 5/67/811/12, 15/1613/14
Rigid After Five
Longer terminal shank, increased diameter
Standard Decreased by 10%compared to Standard
1/2, 3/4, 5/67/811/12, 15/1613/14
Mini Five Longer terminal shank, standard diameter
Decreasedby 50%
Decreased by 10%compared to Standard
1/2, 3/4, 5/67/811/12, 15/1613/14, 17/18*
Rigid Mini Five
Longer terminal shank, increased diameter
Decreasedby 50%
Decreased by 10%compared to Standard
1/2, 3/4, 5/67/811/12, 15/1613/14
Micro Mini Five
Longer terminal shank, increased diameter
Decreasedby 50%
Decreased by 20% compared to Mini Five®
1/27/811/1213/14
Biogent Specific Angulation Shorter than the Standard
Thinner than the Standard
1/27/811/1213/14
*The 17/18 is a unique pattern, having a longer terminal shank and slightly shorter blade.
* All these Curettes and Scalers are available also in the new handle Resin 8 Color.
* For the part codes and handles please refer to the general catalogue.
NEW Resin 8 Colors*, featuring EverEdge Technology, allows for easy identification by matching lightweight color handles with this color chart.

Universal curettes are designed for moderate calculus removal on supragingival and subgingival tooth surfaces. The blade of a universal curette has a round toe and back, and two cutting edges for scaling, making it an efficient design for scaling the entire mouth. Universal curettes are also available with rigid shanks in select patterns for moderate to heavy calculus removal.
POSTERIOR UNIVERSAL INSTRUMENTATION SEQUENCE
1. Begin at the distal line angle of the most posterior tooth. Direct the toe of the blade toward the distal with the terminal shank angled slightly toward the tooth.
2. Apply strokes from the line angle to the contact area.
3. Turn the toe toward the mesial to scale the buccal and mesial surfaces. Continue this sequence to complete the posterior region.
4. Switch ends and repeat from the lingual aspect.
UNIVERSAL CURETTES
1 2 3 4 5 6 7 8
1 2
6 7D I5
84
93
102
111
12
3 4 5 6 7 8
Surfaces toward Surfaces toward
INSTRUMENTATION: The correct working end for scaling is evident when the toe is directed interproximally and the terminal shank is parallel to the tooth. To remove deposits, the cutting edge is applied to the tooth surface and the facial surface of the blade is tilted toward the tooth to achieve an approximate 85° angle between the tooth and blade. Apply lateral pressure against the tooth and pull upward while maintaining contact with the tooth.
Hu-Friedy’s popular universal curettes are available in the Lavender Resin 8 Colors Handle!
ANTERIOR UNIVERSAL INSTRUMENTATION SEQUENCE
To scale the facial surfaces:
1. Place the toe of the blade toward the proximal surface with the handle parallel to the tooth.
2. Apply strokes to remove deposits from the centerline of the tooth to the proximal surface. Work from canine to canine.
3. Switch working ends and repeat for surfaces away from you.
4. Repeat all of the above for the lingual surfaces.
CUTTING EDGE
TOE
BACK90°LATERAL
SURFACE
FACE
CUTTING EDGE
TOE
BACK90°LATERAL
SURFACE
FACE
COLUMBIA SCALER SC4R/4L9
PULL STROKE
85°
LATERALPRESSURE
* For the other Universal curettes, please refer to the general catalogue.

For more information about Hu-Friedy’s Total Solutions visit
hu-friedy.eu
PERIODONTAL
AFTER
WHITE
ORTHODONTIC
AFTER
WHITE
RESTORATIVE
AFTER
WHITE
SURGICAL
AFTER
WHITE
ULTRASONIC SCALING
AFTER
WHITE
ENDODONTIC
AFTER
WHITE
AFTER
WHITE
INSTRUMENT MANAGEMENT
Manufacturer: Hu-Friedy Mfg. Co., LLC | 3232 N. Rockwell Street | Chicago, IL 60618 | USACustomer Care Department: Hu-Friedy Mfg. B.V. | P.O. Box 29025 | NL-3001 GA Rotterdam | NetherlandsFree Phone 00800 48 37 43 39 | Free Fax 00800 48 37 43 40 | Website: Hu-Friedy.eu
©2013 Hu-Friedy Mfg. Co., LLC. All rights reserved. HF-567GB/0213