clinical booklet soprolife uk int - acteongroup.com · of dental caries in his patient. in mode ii,...
TRANSCRIPT

Clinical booklet
English

1
AcknowledgementsThis clinical guide was written with the guidance and backing of Prof. H. Tassery,PU-PH, Head Professor - Marseilles School of Dentistry - University of theMediterranean - Marseilles, of the research team linked to this project and with the support of scientific consultants.
The diagnostic protocols and operatory sequences linked to the natural fluorescence of the teeth refer to the international scientific publications listed in the Bibliography.
SOPRO’s experience in the field of intra-oral video has been greatly enriched by input from dentists who, through their professionalism, have contributed to the development of new concepts.
But our special thanks go to each SOPRO user who shows faith in us, each time they choose one of our products.
Pierre MontillotC.E.O. SOPRO ACTEON GROUP

2
Contents
Product overview . . . . . . . . . . . . . . . . . . . . . . . . . . . . . . . . . . . . . . . . . . . 3
Introduction . . . . . . . . . . . . . . . . . . . . . . . . . . . . . . . . . . . . . . . . . . . . . . 4
Technology . . . . . . . . . . . . . . . . . . . . . . . . . . . . . . . . . . . . . . . . . . . . . . . . 51. Intra-oral video . . . . . . . . . . . . . . . . . . . . . . . . . . . . . . . . . . . . . . . . . . . 62. The visual power of the camera compared to that of the eye . . . . . . . . . 63. The fluorescence effect . . . . . . . . . . . . . . . . . . . . . . . . . . . . . . . . . . . . . 9
Clinical Applications . . . . . . . . . . . . . . . . . . . . . . . . . . . . . . . . . . . . . . . . 111. Classification and managing the risk of caries . . . . . . . . . . . . . . . . . . . 122. Methods for diagnosing carious lesions . . . . . . . . . . . . . . . . . . . . . . . . . 133. Monitoring during the treatment of carious lesions . . . . . . . . . . . . . . . . 15
The Product . . . . . . . . . . . . . . . . . . . . . . . . . . . . . . . . . . . . . . . . . . . . . . 171. SOPROLIFE and its accessorie . . . . . . . . . . . . . . . . . . . . . . . . . . . . . . . . 18
Decisional diagrams and clinical sequences . . . . . . . . . . . . . . . . . . . . . . 191. Amelar lesion stage [0] . . . . . . . . . . . . . . . . . . . . . . . . . . . . . . . . . . . . 202. Amelar lesion stage [0 – 1] . . . . . . . . . . . . . . . . . . . . . . . . . . . . . . . . . . 243. Carious activity . . . . . . . . . . . . . . . . . . . . . . . . . . . . . . . . . . . . . . . . . . 294. Dentinal lesion stage [1 ; 2 et > 2] . . . . . . . . . . . . . . . . . . . . . . . . . . . . 32
Bibliography . . . . . . . . . . . . . . . . . . . . . . . . . . . . . . . . . . . . . . . . . . . . . . 42

3
Product overview
A unique viewAn anatomical view of the tooth as a native fluorescent image facilitates assessment of the condition of the tissue under observation:
- image enlargement up to 100-fold - reproducible chromatic magnification of endogenous fluorescence only, without
the use of pseudo-colour imaging software - unmatched resolution in fluorescent imagery
A clinical instrumentSOPROLIFE enhances effectiveness and efficiency, in that it facilitates the process of assessing the risk of caries by highlighting the level of activity in risk-prone areas.
Because it can be adapted to the most complex of clinical situations, it enables the practitioner to quickly adjust his treatment options.
Remarkable precision in diagnosing damaged areas:
In mode I, the Diagnosis mode, SOPROLIFE makes it possible to detect damage at various clinical stages, without loss of consistency and in very high resolution.
By means of a transparency effect, in fluorescence mode II, Treatment, it enables actual spatial mapping of unbroken tissue areas which are suspect.
Continuous useThe use of LIFE.D.T. (Light-Induced Fluorescence Evaluator Diagnosis-Treatment) protocol makes SOPROLIFE an indispensable tool in general practice.
• Diagnosis/follow-up: fluorescence mode I for diagnostic support and personalised patient follow-up.
• Treatment: fluorescence mode II for discriminating between healthy and damaged tissue during preparation.
• Observation/motive: Daylight camera mode.
SOPROLIFE: an effective and versatile real-time tissue differentiation device, for preserving dental structures and speeding up the daily diagnostic procedures employed by dentists.

4
Introduction
As part of the diagnostic process in odontology, clinical examinations rely on visual information and tactile sensation obtained with the aid of a mirror and a probe, methods which are limited in terms of reliability, not to mention traumatic.
Non-invasive diagnostic support devices have appeared on the scene within recent years. These operate using the laws of transillumination, laser radiation and differential quantitative measurement of fluorescence or electric impedance.
However, they offer limited scope for detection and their usage restrictions make it difficult to integrate them into a daily dental practice.
Serious consideration of the needs of the restorative dentistry practitioner, combined with SOPRO’s established expertise in surgical and dental imagery, has made it possible to develop SOPROLIFE, a fluorescence imaging system based on technological efficiency, and unmatched to date. By making use of the autofluorescence of dentine, SOPROLIFE becomes an indispensable aid for the practitioner preferring minimally invasive dentistry.
In its three operating modes (Diagnosis, Treatment, Daylight), SOPROLIFE is used “live” as it is free from ultraviolet or ionising radiation.
In mode I, Diagnosis, it provides the practitioner with information on the presence of damage and the risk of caries in a particular area. It also enables him to assess the risk of dental caries in his patient.
In mode II, Treatment, SOPROLIFE allows surgical monitoring to be carried out. It guides the dentist in making his preparations, supplements the information provided by the radiograph on the density and quality of the tissue, and supplies information on the history of caries in the damaged area (orientation and expansion). As a complementary tool to the radiograph, it is easily integrated into patient follow-up care, significantly altering the patient-therapist relationship, to the benefit of all concerned.
This clinical booklet proposes combining the effectiveness of the SOPROLIFE with the diagnostic protocols described in the literature. It exposes the practitioner to a new concept of dentistry, illustrated with stunning, previously unpublished photos.

Technology

66
As the core of the SOPRO industry, the intra-oral video combines several areas of skill: optics, electronics and signal processing, as well as micro-engineering.
An area illuminated by optical methods such LED is captured by an image sensor (of the CCD or CMOS type), electronically processed by specific circuits and routed towards display and storage peripherals.
Fluorescence imaging for diagnostic purposes requires a very high image quality. The technology developed by SOPRO for achieving this high level of quality is the result of very substantial experimental work, supported by several international patents.
This technology uses native autofluorescence and eliminates the need for software interfaces employing pseudo-colours, which are liable to approximative interpretations.
The human eye makes us aware of our environment by interpreting the luminous flux which enters it.
The retina, a layer of cells covering the eyeball, is composed of photosensitive cells, rods and cones. These photosensitive receptors convert the optical signal into sensory impulses, interpreted by the brain.
Rods, which are sensitive to low levels of light intensity, come into play for nocturnal vision. Their maximum spectral sensitivity is located in the blue-green region, at 507 nm. They maintain a fairly low level of sharpness and have a rather slow reaction rate.
Cones are responsible for the perception of colour, owing to their 3 pigments: their spectral sensitivity peaks at 450 nm for blues, 540 nm for greens and 610 nm for reds. Maximum intensity over the entire visible spectrum is set at 555 nm. They play a role in our daytime vision.
Under favourable lighting conditions, the eye is highly sensitive to colour variations. An eye
1. The intra-oral video
2. The visual power of the camera compared
to that of the eye
7
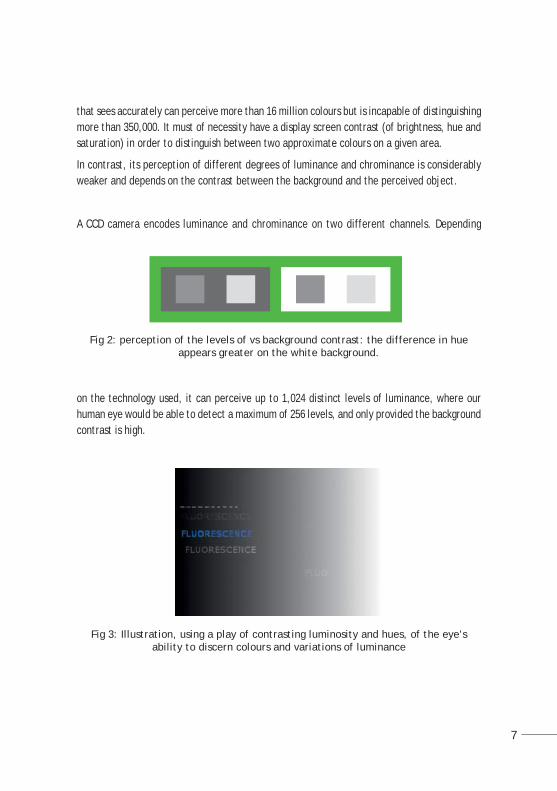
Fig 3: Illustration, using a play of contrasting luminosity and hues, of the eye’s ability to discern colours and variations of luminance
Fig 2: perception of the levels of vs background contrast: the difference in hue appears greater on the white background.
that sees accurately can perceive more than 16 million colours but is incapable of distinguishing more than 350,000. It must of necessity have a display screen contrast (of brightness, hue and saturation) in order to distinguish between two approximate colours on a given area.
In contrast, its perception of different degrees of luminance and chrominance is considerably weaker and depends on the contrast between the background and the perceived object.
A CCD camera encodes luminance and chrominance on two different channels. Depending
on the technology used, it can perceive up to 1,024 distinct levels of luminance, where our human eye would be able to detect a maximum of 256 levels, and only provided the background contrast is high.

8
Fig 4: The brightness of the green component (2) has been deliberately reduced in some places, in a way that is almost imperceptible to the human eye (contrast
manipulation). In these same areas, the brightness of the red component (1) is more intense. When the red and green images are superimposed (3), the modified areas
are distinguished by the hue contrast.
1
=
3
2
+
The word “Fluorescence” in gradated grey is invisible on an identical gradated background. The other two representations of “Fluorescence” in more contrastive degrees of grey, are visible due to luminance contrast. The inscription in blue shows the same luminance gradation as the background but is visible owing to the contrast of hue.
This is what makes it possible to achieve the technology embodied by the camera: highlighting contrasting variations of luminance and hue that the human eye alone would be unable to detect.
Fluorescence is a light emission that is produced when molecules existing in a normally stable

9
3. The fluorescence effect
state (solid or liquid) are illuminated by a light source in the UV range (< 400 nm) or in the visible range(> 400 nm). Note that humans perceive visible light along a spectral band ranging from 380 nm to 720 nm.
a. TheoryThe theory, illustrated by the diagram below, can be broken down into the following stages:
1 The photons (elementary light particles) provided by an external light source such as a laser or a lamp (with a narrow wavelength bandwidth) radiate along the tooth material/s (enamel and dentine).
2 The energy applied by the excitation source (LED camera) to the material (dentine) causes energy to increase in the material’s elementary particles, which then become very unstable.
3 In order to return to a stable state, they release their energy excess by emitting photons lower in energy than the excitation source and the higher wavelength (Stokes’ Law). This is the fluorescence effect.
b. Autofluorescence
Fig. 5

10
Some molecules in the body give off fluorescence with light excitation as the only external stimulus. This is then known as autofluorescence or endogenous fluorescence, unlike induced or exogenous fluorescence which use exogenous fluorophores that can be systemically or topically administered.
This is the autofluorescence process employed by SOPROLIFE. It is based on the stimulation of endogenous fluorophores, which are present in dental tissue.
This non-invasive imaging can also be safely conducted and does not require exogenous fluorophores, which can be toxic and require strict regulation.

Clinical Applications
1212
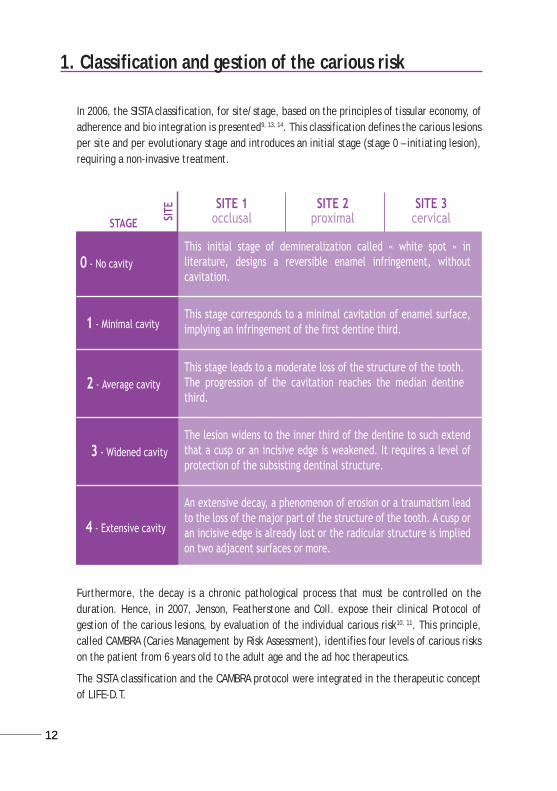
1. Classification and gestion of the carious risk
SITE 1occlusal
SITE 2proximal
SITE 3cervicalSTAGE SI
TE
0 - No cavityThis initial stage of demineralization called « white spot » in literature, designs a reversible enamel infringement, without cavitation.
1 - Minimal cavityThis stage corresponds to a minimal cavitation of enamel surface, implying an infringement of the first dentine third.
2 - Average cavityThis stage leads to a moderate loss of the structure of the tooth. The progression of the cavitation reaches the median dentine third.
3 - Widened cavityThe lesion widens to the inner third of the dentine to such extend that a cusp or an incisive edge is weakened. It requires a level of protection of the subsisting dentinal structure.
4 - Extensive cavity
An extensive decay, a phenomenon of erosion or a traumatism lead to the loss of the major part of the structure of the tooth. A cusp or an incisive edge is already lost or the radicular structure is implied on two adjacent surfaces or more.
Furthermore, the decay is a chronic pathological process that must be controlled on the duration. Hence, in 2007, Jenson, Featherstone and Coll. expose their clinical Protocol of gestion of the carious lesions, by evaluation of the individual carious risk10, 11. This principle, called CAMBRA (Caries Management by Risk Assessment), identifies four levels of carious risks on the patient from 6 years old to the adult age and the ad hoc therapeutics.
The SISTA classification and the CAMBRA protocol were integrated in the therapeutic concept of LIFE-D.T.
In 2006, the SISTA classification, for site/stage, based on the principles of tissular economy, of adherence and bio integration is presented9, 13, 14. This classification defines the carious lesions per site and per evolutionary stage and introduces an initial stage (stage 0 – initiating lesion), requiring a non-invasive treatment.
13
2. Methods of diagnosis of the carious lesions
a. Notions of sensitivity and of specificity The sensitivity is defined as being the capacity of a system to detect an entity (person, tissue, etc…) presenting a given pathology.
The specificity is the capacity to correctly identify an entity presenting no pathology.
b. Carious riskThe carious risk is defined by a set of criteria (food behavior, hygiene, oral flora, saliva pH, socio-economical middle,) linked to the surrounding and the physiology of the patient. Its evaluation constitutes the first stage of diagnosis.
c. Clinical inspection The aim of the visual diagnosis is to detect any opacity coloration or changing of translucidity with or without drying.
On clean teeth, the use of a mirror and of adapted magnifying devices, under good lighting conditions, optimize the visual inspection, but does not prevent the diagnosis to be subjective and constraint by the difficulty of access for certain sites and the lack of lighting in the posterior areas15.
We can add that morphology and discolorations which can be observed in the pits and fissures are not systematically synonymous of decay12, 17.
d. ProbingAccording to the geometrical characteristics of the probe and of the anatomy of the pits and fissures, this method gives no reliable indication of the presence of a lesion on the considered area6.
Moreover, the probing can be traumatic on an intact area of surface enamel but weakened in subsurface3.
The probing can also carry bacteria from one site to another6.
The carious diagnosis of the occlusal faces constitutes a challenge for the dentist and when there is no cavitation7, the performances of the two methods previously described are generally weak.
Moreover, the decision of treatment selections and the decision making would be improved by the visual inspection through an intra-oral video camera4.
14
Comparison of the accuracy of different methods of diagnosisof the decays of the fissures
100 %
VI VIM BW VI + BW VI + P
90 %
80 %
70 %
60 %
50 %
40 %
30 % 20 %
10 %
0 %
VI Visual inspectionVIM Visual inspection and magnification BW Bitewing radiography
VI + BW Visual inspection & BitewingVI + P Visual inspection and Probing
Specificity
Sensitivity
Methods of diagnosis
EvaluationSensitivity &
Specificityfor each
method vshistological
cuts.
e. Conventional radiographyThe enamel and the dentine are high density masses.
This is the reason why, in occlusal (site 1), conventional radiography offers a low sensitivity for enamel lesions (45% alone and 49% combined with visual inspection), as shown the study led by Lussi12 in 1993, on the methods of detection of the caries of the pits and fissures without macroscopic cavitation. In revenge, the specificity of conventional radiography remains rather high (83% to 90% combined with visual inspection).
In proximal (site 2), radiography is actually the most performing diagnostic tool for the detection of the amelodentinal attacks on bitewing clichés. Its sensitivity ranges from 71 and 100%. It depends of the localization of the suspected lesion (proximal, vestibular, palatine or lingual). Its specificity17 is between 99 and 100%.
Consider also that radiography largely under evaluate the size of the lesions, in depth and in stage of evolution7, 15.

15
3.Monitoring during the treatment of carious lesions
a. Histology linked to the carious processThe mechanisms of defense of the tooth, directly linked to the odonblast cells responsible for the manufacture of dentine, start when an external aggression is detected.
These cells are directly located in the interface between the pulp and the dentine. Their extension inside the dentinar tubuli gives them an extreme sensitivity to detect an aggression.
They react in a more or less erratic way when an acid element appears beyond the barrier constituted by the enamel, or also when bacteria enter and reach the dentine and start the process of destruction of the mineralized tissues.
When the carious process is very active, the progression of a fulgurous carious lesion do not leave time for the odontoblasts to manufacture sclerotic dentine which aim is to isolate the pulp from the carious process (See. Carious activity p. 88). At worst, a restorative dentine or an atubular fibro dentine will be synthesized.
When the carious process is slower, the odontoblasts are able to manufacture this intra tubular, peripulpar and sclerotic dentine, often colored (brown) (See. Carious activity p 89).
b. Problem of the exaeresis of decayed tissuesFaced to the limits imposed by instrumentation and to the weak power of the eye, the dentist often has subjective selection criteria: the variations of colors and the toughness of residual dentinal tissues.
During a conservative care, the dentist mixing his preparation is always confronted to the dilemm a that constituted the conservation (or not) of the dentine in the interface infected/affected, and the identification of the presence of tertiar dentine which he can keep1.
The perenity of the restoration and hence the prognosis of the tooth depend upon the quality of the preparation, of the surgical treatment and of the realization of a functional and waterproof obturation.
c. Advantages of the fluorescence based technologyUp to now, the technologies using the phenomenon of fluorescence brought an advantage to the usual methods of diagnostics (starting caries) but they are lacking of sensitivity5 or of specificity, their limited capacity of exploration and their large constraint of use (compulsory cleaning, total obscurity, calibration, etc…).

16

The product

1818
The product
1. SOPROLIFE and its accessorie
SOPROLIFE hand-piece
SOPROLIFE intra-oral tip
Light shield
Hand-piece holder
Docking station
1 2 3
54

Decisional diagramsand clinical sequences
LIFE.DT MethodLight-Induced Fluorescence Evaluator
Diagnostic and Treatment
Diagrams and clinical sequences of images under fluorescence, presented
thanks to the LIFE.D.T (Light-Induced Fluorescence Evaluator - Diagnostic and
Treatment) protocol are the result of many months of research and collaboration
with Pr H. Tassery (PU-PH. Head Professor- Marseilles Dental School - Université
de la Méditerranée – Marseilles – France).
All along this booklet, the clinical situations the most often met in the practice
of conservative odontology are explained with respect to published diagnostic
protocols.

2020
1. Amelar lesion stage [0]
Board n°1
Pre-requisite: mode I Diagnostic – no probe used
High carious risk Weak carious risk
Caution procedure:
Sealing with CVI or resin
Application of varnish NaF
Reminder at D + 3 to 4 monthsRecommendation: follow up
of the CAMBRA protocol
Reminder at D + 12to 24 months
Anfractuous pits and fissures not too suspect without cleaning
Careful cleaning of the pits and fissures (Sodium bicarbonate )
Varnish or sealing if andonly if important creviceof the fissures or difficultaccess for hygiene purpose
(CAMBRA protocol)
a. Site 1: Pits and fissuresAnterior and posterior teeth, blind retro-coronary radiology (bitewing)
. .

21
Amelar lesion stage [0] - Board n°1
1 2
43
Under white light, an opacification of the enamel, of chalky complexion, hardly detectable with the mirror is displayed prominently on this 28.Pre-requisite: no probing.
After cleaning, one can see that the underlying dentinal fluorescence, in acid green, is of normal aspect. But the presence of grayish areas of enamel demineralization is confirmed.
Radiography shows no lesion in the amelodentinal masses.
Under blue light, sediment appears at the surface of the enamel. Grey white spots representing areas of demineralization appear on the edge of the distal and mesial fissures.
Visible to the eye.
Visible thanks to SOPROLIFE
Radiography cliché
Carious risk: weak
. .
Therapeutic decisionapplication of a fluoride varnish and hygiene recommendations.
Reminder at D + 12 to 24 months

22
Amelar lesion stage [0]
The modification of the fluorescenceis an alert
(Demineralization of the contours,fall of luminosity)
Observation in mode I Diagnostic
Research of infiltration on the restoration contours madewith amalgam or composite
Board n°2
Cleaning with sodium bicarbonate
No Alert
The alert is maintained
Disparition of the alert
If the presence of a lesion is confirmed, Classical preparation
and per-operatory monitoringin mode II Treatment
Bitewing Diagnostic of confirmation
Reminder at D + 3 to 24 months according to the carious risk (CAMBRA protocol)
b. Site 1: stage [0] on the contours of an amalgam or of a composite
. .

23
Amelar lesion stage [0] - Board n°2
1 2
Carious risk: weak
Under white light, this amalgam can be suspected of infiltration in it’s lingual side. The contact joints are rather irregular.
Under blue light, in mode I Diagnostic, the contours of the amalgam appear intact, independently from the metallic discolorations that mask the fluorescence. The radiography noticed no lesion.
. .
Therapeutic decisionno intervention on this amalgam, apart from a possible re-sealing of
the marginal edges.
24
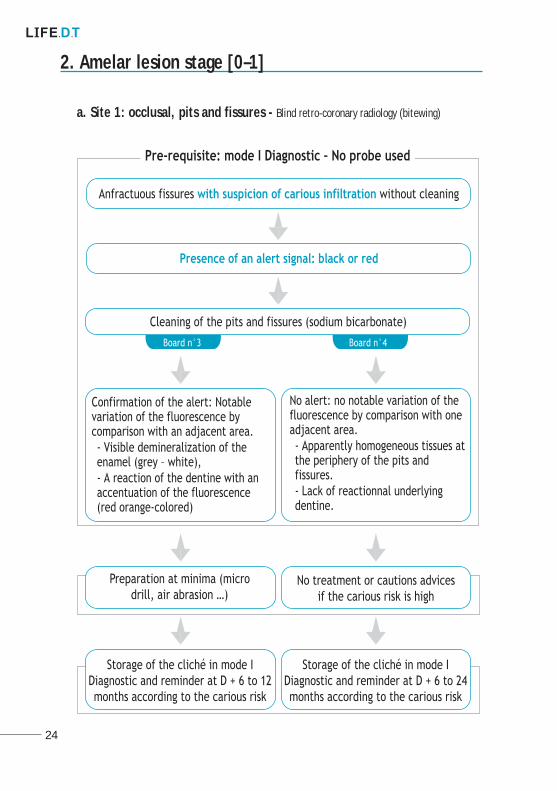
2. Amelar lesion stage [0–1]
Anfractuous fissures with suspicion of carious infiltration without cleaning
Presence of an alert signal: black or red
Cleaning of the pits and fissures (sodium bicarbonate)
Board n°3 Board n°4
Pre-requisite: mode I Diagnostic – No probe used
Confirmation of the alert: Notable variation of the fluorescence by comparison with an adjacent area.- Visible demineralization of the enamel (grey – white),- A reaction of the dentine with an accentuation of the fluorescence (red orange-colored)
No alert: no notable variation of the fluorescence by comparison with one adjacent area. - Apparently homogeneous tissues at the periphery of the pits and fissures.- Lack of reactionnal underlying dentine.
Storage of the cliché in mode I Diagnostic and reminder at D + 6 to 12 months according to the carious risk
Storage of the cliché in mode I Diagnostic and reminder at D + 6 to 24 months according to the carious risk
Preparation at minima (micro drill, air abrasion …)
No treatment or cautions advicesif the carious risk is high
a. Site 1: occlusal, pits and fissures - Blind retro-coronary radiology (bitewing)
. .

25
Amelar lesion stage [0–1] - Board n°3
3
1 2
4
Carious risk: weak
Under white light, a very anfractuous pit appears in the central fissure.
After cleaning with sodium bicarbonate, the red orange colored dentinar fluorescence sets to focus in the fissure adjacent to the pit (on the left) and at the bottom of the mesial fissure constitute a real alert, requiring to operate at minima.
The radiography shows no amelar lesion.
Under blue light, the complex architecture of the fissure and the pit appears. A modification of the fluorescence is focused in mode I Diagnostic on the edges and at the bottom of this fissure. It is detectable by a loss of luminosity of the dentinar fluorescence through the enamel compared tothe healthy dentinal and amelar masses observed at the periphery. This phenomenon goes with a demineralization of the enamel at the surface and in the depths of this fissure.
. .
Therapeutic decision- High carious risk for this fissure: sealing with resin or preparation at minima (micro drill, air abrasion …), and obturation.- Reminder at D + 3 to 24 months according to the carious risk.

26
Amelar lesion stage [0–1] - Board n°4
3
1 2
4
Carious risk: weak
Under white light, the central fissure shows a light brown and rather suspects coloration.
After cleaning, the red alert nearly completely disappeared. It was a sediment. There is no dentinal attack in this fissure and its architecture is simple. In revenge, an amelar demineralization is detected on the distal fissure.
The radiography shows no amelar or dentinal lesion on this molar.
In mode I Diagnostic, an alert appears in red-rose but no modification of the fluorescence of the underlying tissues appears. The luminosity of the contours of the fissure is similar to the one of the adjacent areas.
. .
Therapeutic decision - Hygiene recommendations- Preventive sealing (resin)- Reminder at D+ 3 to 12 months according to the carious risk

27
Amelar lesion stage [0–1]
Pre-requisite: mode I Diagnostic – No probe used
mode II Treatment
No cavitation Cavitationstage 1 Board n°5
Varnish is applied and hygiene recommendations
According to the competencies and available equipment:
- tunnel technic,- slot technic,
Or, classical preparation
Monitoring of the exeresis usedof the tissues, active or
semi active lesion
Reminder at D + 6 to 12 months according to the carious risk
(CAMBRA protocol)
Reminder at D + 3 to 6 months according to the carious risk
(CAMBRA protocol)
b. Site 2: Proximal areas with starting lesions or attack of the amelodentinal junction. Standard gold bitewing.
Only and only if the hygiene is satisfactory:Prioritary choice to keep the marginal crest
. .

28
Amelar lesion stage [0-1] - Board n°5
Carious risk: high, restorative therapeutic after reduction of the carious risk.
21
5
3
4 6
87
Under white light, the inspection of the occlusal side gives no hints on this molar (1). The radiography confirms the presence of an amelodentinal lesion of stage 1 (2). In mode I Diagnostic, a lateral vision would have informed of the presence of an attack by a contrast of luminosity, or at least a contrast of colors (underlying red orange colored shadow).
It is decided to treat this lesion with the SLOT method. Picture (3) shows the pre-preparation phase.
Under blue light, the cavity is opened and controlled in mode II Treatment (4). The infected and no conservable tissues are removed with the excavator (5, white light). The cavity is controlled again (6) in mode II.
After conditioning of the tissues, the obturation is done by injection (7) of ionomer glass (ex: Dentine Conditioner – GC Fuji II LC).A post operatory radiography is done to control the obturation.
. .

29
3. Carious activity
As explained in Chap. “Clinical”, the pulp owns defensive mechanism capable to generate cicatricial tissue and grouped under the name of tertiary dentine.
The tissular reactions, appropriate to each stage of evolution of the carious process, are expressed by variations of luminosity and tint.
These variations depends on the activity of the lesion and of time.
a. Classification of the tissular states- Healthy dentine: very bright acid green- Perception of the enamel backed with an healthy dentine: light green to blue according to the thickness of the enamel- If quick processus:
- Completely decayed infected dentine: green / black- Infected / affected Interface: bright red- Affected dentine (end of treatment): dark green (cf. picture 6 p 78)
At the end of the treatment, there can still be a red shadow at the bottom of the cavity, linked to a very hard tissue. This shadow represents the tertiary dentine and testifies of the answer of the pulp to the carious attack.
- If slow processus:- Completely decayed infected dentine: green / black- Infected / affected Interface: black red (cf. picture 2 p 79)- Affected dentine (end of treatment): red and dark green veil (cf. picture 4 p79)
Let us note that in some cases, such as cares under amalgam, the usual tints are deeply modified by the tattooing of the salted out metallic ions.
. .

30
Carious activity
1
3
4
5
6
8
7
9
10
2
1
2
3
4
5
b. Lesions ranked Stage 2 - 3 active
Under white light, this molar appears totally healthy, all the more if the observation is done with a mirror (1). Under blue light, in mode I Diagnostic, the comparison of the mesial and distal marginal ridges immediately informs the dentist on the presence of a lesion of Stage 2 minimum (2).
Healthy enamel cusp, backed by a healthy dentinal structure non pathological.
Marginal ridge, backed by a unstructured dentine.
At the opening : view by transparency of the infected/affected interface in the case of an active lesion (on the left, the luminosity of the red remains rather high and homogeneous on the whole picture ; on the right, the luminosity of the green falls at the bottom of the cavity).
Fragment of demineralized enamel
Conservable affected dentine (clinical sense)
Infected/Affected Interface (clinical sense)
Conservable tissues – End of the preparation
Control of the good positioning of the metallic matrix
Finalization with semi-active ultrasonic inserts(ExcavusTM ACTEON) particularly on the walls to optimize the gluing.
Infected Dentine (green- black)
The marginal ridge can’t be kept in this case. Opening (3)
. .

3131
Carious activity
1
2
3
4
2
3
4
1
Sclerotic dentine, hard and conservable at the bottom of the cavity (red shadow), testifying of a slow carious process.
c. Lesions ranked Stage 2 – 3 slowed
Under white light, in mode Daylight, nothing appears suspect apart from the transparency of the marginal ridge on the first proximal third of this molar.
Underlying healthy dentine, bright green
Infected dentine (black-green) letting appear an underlying sclerotic dentine (red-black) testifying of a slow carious process.
Sclerotic dentine met at the bottom of the cavity in the infected/affected interface.
. .
Therapeutic decision At the end of the preparation, on a slow processus et contrarily to an active one, a hard and brown red sclerotic dentine constantly persists that it is not systematically necessary to totally remove.
32
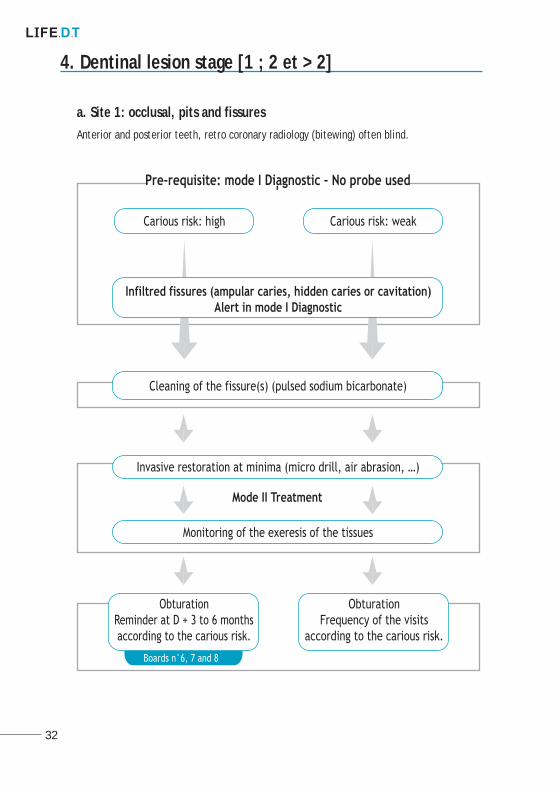
4. Dentinal lesion stage [1 ; 2 et > 2]
Boards n°6, 7 and 8
Pre-requisite: mode I Diagnostic – No probe used
Mode II Treatment
Cleaning of the fissure(s) (pulsed sodium bicarbonate)
Invasive restoration at minima (micro drill, air abrasion, …)
Monitoring of the exeresis of the tissues
ObturationReminder at D + 3 to 6 monthsaccording to the carious risk.
ObturationFrequency of the visits
according to the carious risk.
Carious risk: high Carious risk: weak
Infiltred fissures (ampular caries, hidden caries or cavitation)Alert in mode I Diagnostic
a. Site 1: occlusal, pits and fissures Anterior and posterior teeth, retro coronary radiology (bitewing) often blind.
. .

33
Dentinal lesion stage [1 ; 2 and > 2] - Board n°6
1 2 3
4 5
7 8
6
Carious risk: moderate to high. Instituted Individual Dental Prophylaxis (IDP) 2
Under white light, this premolar shows a very suspect fissure (1). Under blue light, a variation of fluorescence appears around and in the fissure (2). The radiography shows no lesion in occlusal (3). Confronted to this alert, it is decided to clean the occlusal surface with sodium bicarbonate.
After cleaning (4), an alert is clearly confirmed in mode I Diagnostic. The lesion, ranked at stage 1, leads to realize a very light preparation at minima (5 and 6). The mode II Treatment allows focusing on a dentinal attack. The first step of the genesis of a sclerotic dentine is observed (6).
The mode II Treatment points out the infected/affected interface more obviously. It informs the dentist on the limits of exeresis of the decayed tissues while the clinical sense is kept (7). Restoration with fluid composite (8). New visit for control of the suspect adjacent areas (7)
. .

34
Dentinal lesion stage [1 ; 2 and > 2] - Board n°7
1 2 3
4 5
7 8
6
Carious risk: moderate
Under white light, the mesial fissure appears suspect (1). In mode I Diagnostic, the alert is confirmed (2). It is decided to operate by opening with the micro drill and to control step by step (3).
Infected dentine seems to be located under the amelar interface. It is decided to prepare the amelodentinal tissues classically (4).
The mode II Treatment reveals the carious activity in bright red (active mode) (6) and a fragment of decayed dentine in dark green grey. Control of the final exeresis (7) and obturation (8). Option: cleaning with sodium bicarbonate, ozone sterilization and preventive sealing.
. .
35
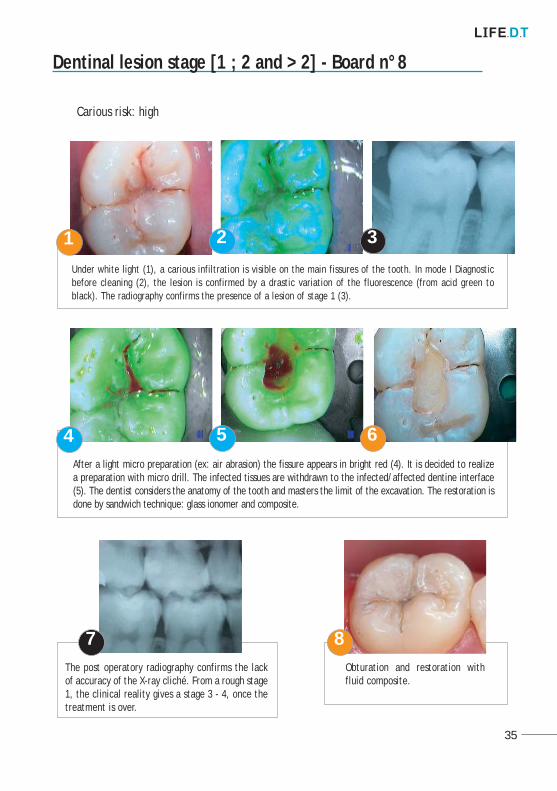
Dentinal lesion stage [1 ; 2 and > 2] - Board n°8
1 2 3
4 5
7 8
6
Carious risk: high
Under white light (1), a carious infiltration is visible on the main fissures of the tooth. In mode I Diagnostic before cleaning (2), the lesion is confirmed by a drastic variation of the fluorescence (from acid green to black). The radiography confirms the presence of a lesion of stage 1 (3).
After a light micro preparation (ex: air abrasion) the fissure appears in bright red (4). It is decided to realize a preparation with micro drill. The infected tissues are withdrawn to the infected/affected dentine interface (5). The dentist considers the anatomy of the tooth and masters the limit of the excavation. The restoration is done by sandwich technique: glass ionomer and composite.
The post operatory radiography confirms the lack of accuracy of the X-ray cliché. From a rough stage 1, the clinical reality gives a stage 3 - 4, once the treatment is over.
Obturation and restoration with fluid composite.
. .

36
Dentinal lesion stage [1 ; 2 and > 2]
Observation in Mode I diagnostic
Board n°9 Board n°10 Board n°11
- Marginal ridge appearing white/grey on a ± limited area.- Rupture of homogeneity of color at the surface of the enamel: underlying loss of dentinal support.
- Underlying loss ofintegrity, visible thanks to the fall of luminosity in a ± limited area.Modification of the structure of the underlying dentine.
- Marginal ridge intact or not in surface.- Light lowering of the luminosity in occlusal vision but entry point in proximal vision.- High probability for an entry point close to the gum (very low) with presence of healthy dentine close to the amelodentinal junction.
Observation in Mode II: Pre-operatory monitoring
Classical preparation (Fall of the marginal ridge)
Activity and histology of the lesion
According to the skills and available equipment: - tunnel technique,- slot technique
Diagnostic bitewing given with a relative precision
b. Site 2: the proximal areas – retro-coronary radiology (bitewing) Gold Standard in spite of an under-evaluation
. .

37
Dentinal lesion stage [1 ; 2 and > 2] - Board n°9
1
3 4 5
6 7 8
2
Carious risk: high. Instituted Individual Dental Prophylaxis (IDP) 2.
Under blue light, a grey-white limited area is pointed out (1). It constitutes a rupture of homogeneity of color compared to the two marginal ridges. The radiography confirms the presence of multiple lesions including the one studied (2). It is decided to make a classical preparation for this site 2 stage 2.
At the opening (3), the demineralized enamel is characterized in opaque grey-white. At the bottom of the cavity, the bright red color (4) testifies of the presence of an infected /affected interface. The lesion is rather active. The completely decayed tissues are wet and black-green. This cliché also shows by transparency the extension of the lesion in mesial under a bridge of healthy dentine. It is thus necessary to continue the exeresis with the excavator (5) until the obtention of an affected dentine of a green less luminous than the one of the healthy dentinal masses and of a dark red shadow testifying of the presence of tertiary dentine (sclerotic).
Once the preparation is finished (6), the dentist will check that the walls are free from demineralized tissues (7). The restoration is done with a micro hybrid nano charged composite (8).
. .

38
Dentinal lesion stage [1 ; 2 and > 2] - Board n°10
1 2
4 5
3
Carious risk: high, in spite of an instituted individual dental prophylaxis
Under white light, the magnification allows to distinguish a lightly clear area (1). Under blue light, if you look at the amalgam located in proximal of the next teeth, an area appears (red circle) in a green less luminous than the one of the whole tooth. This area marks the beginning of the lack of the dental backing (2). The radiography confirms the presence of a lesion of site 2, class 2 minimum. It is decided to realize a classical preparation (3)
The exeresis of the demineralized tissues and of the infected dentine characterized by a humid green/black color is done (4). The brown red surface visible in mode II Treatment corresponds to a hard tertiary sclerotic dentine to be kept (5). The restoration is done with composite.
. .

39
Dentinal lesion stage [1 ; 2 and > 2] - Board n°11
1 2
3 4 5
I
I I
Under white light, the occlusal face of this molar does not appear very suspect except if we consider its light transparency and a misleading small point similar to a cavitation at the level of the proximal area (1).
In mode I Diagnostic, the occlusal vision puts forward a misleading red point because there is no cavitation. The luminosity of the two marginal ridges is not similar.
The radiography confirms the presence of a lesion of site 2, stage 1 to 2 (2).
Carious risk: moderate to high
It is decided to make a classical preparation. At the opening, the lack of fluorescence of the grey black tissues testifies of a slowed carious activity (3). The decayed tissues are removed until the obtention of a red brown and hard tertiary sclerotic dentine (4). The walls are clean and let appear a dark green affected dentine.
The restoration is done with micro-hybrid nano-charged composite (5).
. .

40
Dentinal lesion stage [1 ; 2 and > 2] - Board n°12
1 2
4
7
65
3II
I
The restoration is done with composite (7).
Carious risk: moderate to high
In mode I Diagnostic, the presence of a partial fracture is noted on this old amalgam (1). An area of infiltration is revealed under macroscopic view (2). The radiography done after this positive control confirmed the presence of a caries renewal under the amalgam. It is decided to replace the amalgam (3).
In mode II Treatment, after removal of most part of the amalgam, the infiltrated black tissues, relatively hard, are progressively excavated (4). The lesion extends despite the presence of metallic oxides released by the amalgam (5). It can be identified at a site 1 stage 2 - 3. These metallic oxides hide the fluorescence of the affected dentine (persistence of the black at the bottom of the cavity). The fluorescence of the underlying affected dentine allows realizing the control of the operatory sequence. The tissues at the bottom of the cavity are extremely hard (6).
. .

41
Dentinal lesion stage [1 ; 2 and > 2] - Board n°13
7
1 2 3
4 5 6
I
Obturation (7). The restoration is done by sandwich technique: glass-ionomer and composite
. .
The composite done during a first treatment was disturbing and painful
Under white light, as in mode I Diagnostic, the occlusal view informs only on the aspect of the composite (1 and 2). It is decided to remove this composite because of the sensitivity and of its non functional aspect (3). The underlying tissues have been unfiltered and renewal of the carious activity is well confirmed (3 and 4)
The exeresis of the infected tissues is controlled step by step in mode II Treatment. The walls are cleaned to guarantee a good waterproofing of the future restoration (5). At the bottom of both cavities, brown red sclerotic dentine is found (6).

42
Bibliography
1. Banerjee A, Watson TF, Kidd EAM. Dentine caries: take it or leave it? Dental Update (2000); 27:272-276.
2. Droz D, Blique M, Courson F. Which prevention for dental health? Arch Pediatr (2006); 13:682-684.
3. Ekstrand K, Qvist V, Thylstrup. A Light microscope study of the effect of probing in occlusal surfaces.Caries Res (1987); 21:368-374.
4. Erten H, Uçtasli MB, Akarslan ZZ, Uzun O, Semiz M. Restorative treatment decision making with unaided visual examination, intraoral camera and operating microscope. Oper Dent (2006); 31:55-59.
5. Hamilton JC, Gregory WA, Valentine JB. DIAGNOdent measurements and correlation with the depth and volume of minimally invasive cavity preparation. Oper Dent (2006); 31-3:291-296.
6. Hennequin M, Lasfargues JJ. La démarche diagnostique en cariologie. Réalités Cliniques (1999); 10:515-539.
7. Kidd EA, Ricketts DN, Pitts NB. Occlusal caries diagnosis: a changing challenge for clinicians and epidemiologists. J Dent (1993); 21:323-331.
8. Kidd EA, Ricketts DN, Beighton D. Criteria for caries removal at the enamel-dentine junction: A clinical and microbiological study. Br Dent J (1996);180:287-291.
9. Lasfargues JP, Kaleka R, Louis JJ. Le concept SISTA, un nouveau guide thérapeutique en cariologie. Réalités Cliniques (2000); 11:103-122.
10. Jenson L, Budenz A, Featherstone JDB, Ramos-Gomez FJ, Spolsky V, Young DA. Clinical protocols for caries management by risk assessment. J Calif Dent Assoc (2007); 35:714-723.
11. Featherstone JDB, Domejean-Orliaguet S, Jenson L, Wolff M, Young DA. Caries assessment in practice for age6 through adult. J Calif Dent Assoc (2007); 35:703-713.
12. Lussi A. Comparison of different methods for the diagnosis of fissure caries without cavitation. Caries Res (1993); 27:409-416.
13. Mount GJ, Hum WR. A revised classification of carious lesions by site and size. Quintessence Int (1997);28:301-303.
14. Mount GJ, Tyas MJ, Duke ES, Lasfargues JJ and Kaleka R, Hume WR. A proposal for a new classification of lesions of exposed tooth surfaces. Int Dent J (2006); 56:82-91.
15. Pitts NB. Diagnostic methods for caries: what is appropriate, when? J Dent (1991); 19:377-382.
16. Vaarkamp J, Tenbosch J, Verdonschol EH, Bronkhorste M. The real performance of bitewing radiography and fiberoptic transillumination in approximal caries diagnosis; J Dent Res (2000); 79:1747-1751.
17. Verdonschot EH, Bronkhorst EM, Burgersdijk RC, Konig KG, Schaeken MJ, Truin GJ. Performance of some diagnostic systems in examinations for small carious lesions. Caries Res (1992); 26:59-64.

43
Memo

44

SOPRO • A company of ACTEON Group ZAC Athélia IV - Avenue des Genévriers - 13705 LA CIOTAT cedex • FRANCE
Tel + 33 (0) 442 98 01 01 • Fax + 33 (0) 442 71 76 90 E-mail : [email protected] • www.acteongroup.com
Non
cont
ract
ual d
ocum
ent -
Ref
. : 01
1349
E C
opyr
ight© 20
16 SO
PRO.
All
right
s res
erve
d. N
o inf
orm
ation
or p
art o
f this
doc
umen
t may
be r
epro
duce
d or
tran
smitt
ed in
any f
orm
with
out t
he p
rior p
erm
ission
of SO
PRO.