cluster book 2 - blue - e q
TRANSCRIPT

Student Feedback Areas for Improvement
Satisfactory/Unsatisfactory
Trainee/Assessor Name: ………………………………………………………………..
Trainee/Assessor Signature: ……………………………..……………………………
WILSONTON STATE HIGH SCHOOL FSK20113 Certificate II Skills for Work and Vocational Pathways
Name: ___________________________
Teacher: _________________________
Date Completed: __________________
CLUSTER 2 INDUCTION ‐ Blue
BSBIWHS201A – Contribute to health and safety to self and others FSKRDG10 – Read and respond to routine workplace information FSKNUM014 ‐ Calculate with whole numbers and familiar fractions, decimals and percentages for work FSKNUM15 – Estimate, measure and calculate routine metric measurements for work
You will be given time to complete this booklet in class. You may also be required to use your own time. Assistance may be given with literacy and numeracy support.
Trainee/Assessor Guide

Title FSK20113 Certificate II in skills for Work and Vocational Pathways Cluster 2 ‐ Induction
Unit of Competency BSBIWHS201A – Contribute to health and safety to self and others FSKRDG10 – Read and respond to routine workplace information FSKNUM014 ‐ Calculate with whole numbers and familiar fractions, decimals and percentages for work FSKNUM15 – Estimate, measure and calculate routine metric measurements for work
Student Name
Assessor Name
Start Date
Resources Resources required will be provided by your teacher.
Student Declaration I declare:
The work submitted is my own and has not been written for me by any other person.
Student Signature: Date:
Assessment Condition/Instructions and summary
There are three tasks to be completed
Assessment task Date received Satisfactory Not Satisfactory
1 Booklet
2
3
OVERALL ASSESSMENT RESULT
Competent
Not Yet Competent
Assessor Signature:
Date:
Feedback to Learner

FOLIO CHECKLIST
Assessment Task Date Satisfactory Not
Satisfactory
1 New Staff Induction Checklist
2 Hazard signs
3
Signs and measurement in the workplace
4 Reading evacuation maps
5 Awards and rates of pay
6 Identify tools and their use in the workplace
7 Conduct a job safety analysis
8 Identifying hazards
9 Reporting hazards
10 Record of OHS meeting
OVERALL ASSESSMENT RESULT:
Assessor Signature:
Date:
Feedback to Learner:
Activity 1 – New Staff Induction
Checklist You have started a part time job at Woolworths, Brassall as a customer service assistant.
You started last Monday. You will need to check the date!
Complete the Induction Checklist on the next page.
You have received all the items except:
Provided with a site tour.
Your site tour is being arranges for next Monday. The person responsible for this will
be Andrew Smith.
Introduced to Health and safety representatives.
You will meet with the health and safety representatives tomorrow. The person
responsible for this is Julia Smart.
Provided with information on WorkCover and Return to Work programs.
This will be at the health and safety representatives meeting tomorrow. The person
responsible for this is Julia Smart.
Use todays date for completion date for any items that are ticked as Yes.
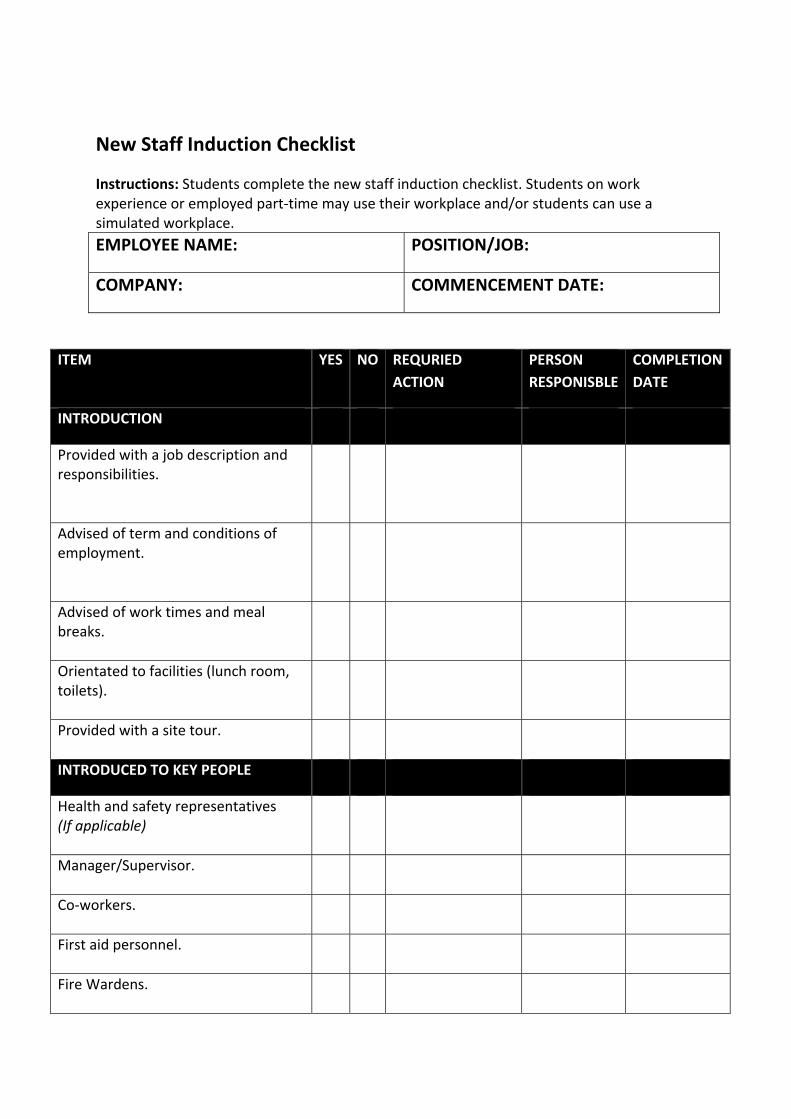
New Staff Induction Checklist
Instructions: Students complete the new staff induction checklist. Students on work experience or employed part‐time may use their workplace and/or students can use a simulated workplace.
EMPLOYEE NAME: POSITION/JOB:
COMPANY: COMMENCEMENT DATE:
ITEM YES NO REQURIED
ACTION
PERSON
RESPONISBLE
COMPLETION
DATE
INTRODUCTION
Provided with a job description and responsibilities.
Advised of term and conditions of employment.
Advised of work times and meal breaks.
Orientated to facilities (lunch room, toilets).
Provided with a site tour.
INTRODUCED TO KEY PEOPLE
Health and safety representatives (If applicable)
Manager/Supervisor.
Co‐workers.
First aid personnel.
Fire Wardens.

ITEM YES NO REQURIED
ACTION
PERSON
RESPONISBLE
COMPLETION
DATE
WORKPLACE RELATED
INFORMATION
Provided with personal security (storing belongings etc.)
Shown specific work area.
Provided with keys/security pass (if applicable)
HEALTH AND SAFETY
Provided access to health and safety policy and procedures
Informed of evacuation procedure.
Advised of roles and responsibilities for safety.
Shown first aid facilities and procedures.
Provided information on hazards and controls in the workplace.
Shown hazard and incident reporting procedures, including location of forms that need to be completed.
Advised of consultation procedures.
Instructed on how to correctly use and store personal protective equipment (if applicable)
Shown incident/injury/near miss reporting procedure including location of forms.
Informed of location and use of fire fighting and emergency equipment.
Advised of emergency procedures,
including emergency exits, assembly
points and who to contact.

Shown location of Material Safety
Date Sheets (MSDS) for hazardous
substances.
Discussed general housekeeping
procedures.
Provided with information on
WorkCover and Return To Work
programs.
Informed of security procedures.
Conducted by:________________________________ Signature: ____________________________
(Inductee) Employee: __________________________ Signature: ____________________________
Date Conducted: _______________________________

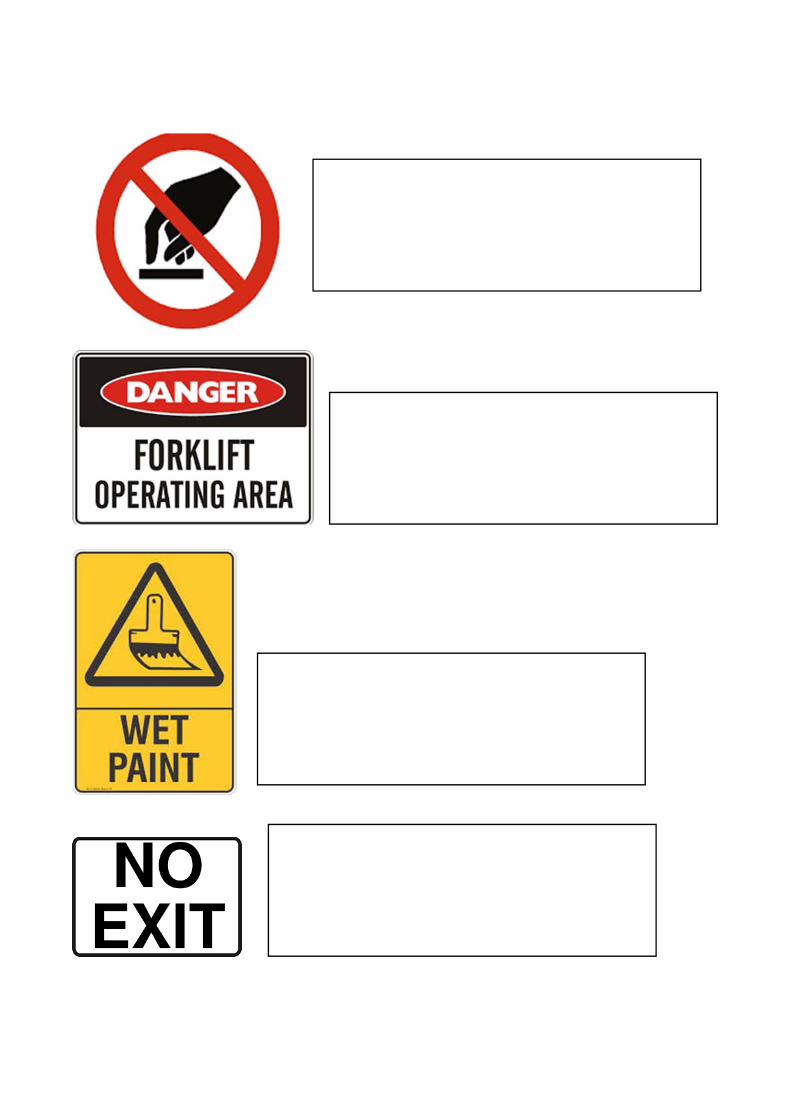
Activity 2 – Hazard Signs Use the examples below to identify the hazard signs and answer the questions that follow. Prohibition signs – these are signs that indicate something that you must not do. They are made up of a red circle border with a line through it, a white background and black symbol. Mandatory signs – these signs tell you that you must wear special safety equipment. They are made up of a blue solid circle and white symbol. Restriction signs – these signs tell a limitation placed on an activity or use in the area concerned. They are made up of a red circular border, no crossbar, and a white background. Hazard warning signs – these signs warn you of a danger or risk to your health. They are made up of a yellow triangle with a black border and a black symbol. Emergency Information signs – these signs show where emergency safety equipment is kept. They are made up of a green solid rectangle with a while symbol or text. Fire signs – these signs tell you the location of fire alarms and firefighting facilities. They are made up of a red solid rectangle with while text. Danger Hazard signs – these signs warn of a hazard or hazardous condition that could be life‐threatening. They have the word DANGER in white on a red background, a black border and black text. Dangerous Goods signs – (also known as Hazardous chemicals signs) are defined in the Australian dangerous goods code. They are used to indicate what is in a tank or package and how it needs to be stored and transported.

1. What hazard does this sign relate to? 2. What do the colour of the sign indicate?

Activity 3 – Signs and Measurement in
the Workplace The following signs are commonly seen in the workplace or your daily life.
Fill in the table below by answering the questions: 1. What does the sign mean? 2. What unit of measurement is used in the sign?
The sign What does the sign mean? What unit of measurement
is used in the sign?
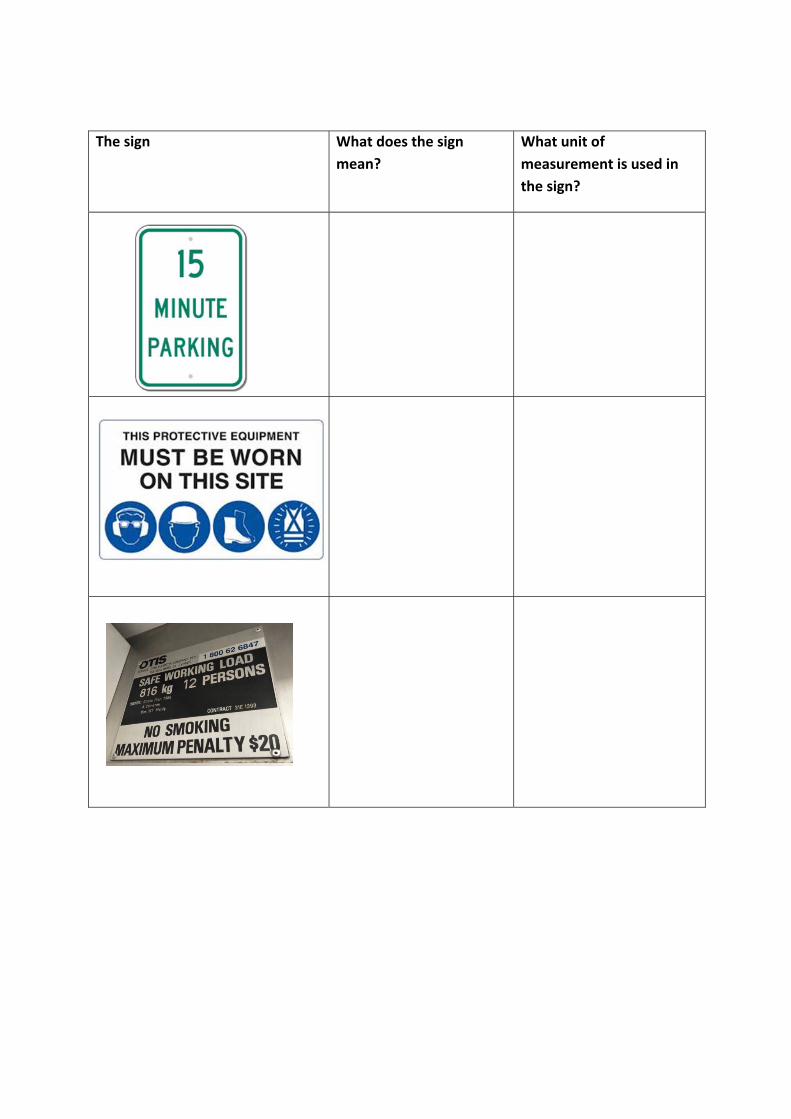
The sign What does the sign
mean?
What unit of
measurement is used in
the sign?

Activity 4 – Reading Evacuation Maps Instructions: You have been employed as an administrative assistant in an office. Your supervisor has asked you to read and familiarise yourself with the following evacuation map. After you have read and analysed the map, answer the question below. Conditions and requirements: Students may study the map as a group. Students can work together to familiarise themselves with the particular features.
1. How many emergency exits are there in the
building?
2. On the diagram, circle the locations of the fire
extinguishers in the building.
3. Explain where the assembly area is located, in
relation to other parts of the building.
4. According to the emergency procedures, what
is the first thing you must do if you notice a fire?
5. What kind of fire extinguishers are in the
building?
6. What is the third stage of an evacuation listed
on the map?
7. Where is the fire hydrant located?
8. What does the green arrow mean?


Activity 5 – Awards and Rates of Pay Instructions: You are currently enrolled in a civil construction traineeship. Read the tables below which outline the pay rates for civil construction trainees and all other trainees and answer the questions that follow. The minimum WEEKLY rate payable to civil construction trainees are as follows:
ITEM STAGE 1 STAGE 2 STAGE 3
$ $ $
BASIC RATE 559.22 601.02 651.12
INDUSTRY ALLOWANCE 26.81 26.81 26.81
SPECIAL ALLOWANCE 7.70 7.70 7.70
TOTAL WEEKLY RATE 593.73 635.53 685.63
Rates of pay for trainees, other than civil construction trainees are as follows:
ITEM Skill level B Skill level B
$ $
BASIC RATE 475.52 490.52
INDUSTRY ALLOWANCE 26.81 26.81
SPECIAL ALLOWANCE 7.70 7.70
TOTAL WEEKLY RATE 507.03 525.03
Please note: the above information is available in the MA000020 – Building and Construction General On‐site
Award 2010.
Questions: 1. What is the base pay rate for a stage 2 civil construction trainee?
2. Who earns more money per week? A stage 1 civil construction trainee or a skill level A (not a civil construction trainee). How much do they earn?

3. Compare the industry allowance and special allowance given to civil construction trainees and other trainees.
4. You are currently stage 1 civil construction trainee. How much more will you earn when you reach stage 3? *Show working.
Activity 6 – Identify tools and their use in the workplace Instructions: Answer the following questions for each tool: 1. Identify the tool and how they are used in the workplace. 2. Identify the occupations) who would use the tool. 3. List any possible hazards associated with using the tool.
1.
2.
3.
1.
2.
3.
1.
2.
3.

1.
2.
3.
1.
2.
3.
1.
2.
3.
1.
2.
3.
1.
2.
3.

Activity 7 – Conduct a Job Safety Analysis Most jobs can be described in a number of small steps. An important point to remember is to keep the steps in their correct sequence. Any step which is out of order may miss serious potential hazards or introduce hazards which do not actually exist. Each step is recorded in sequence. Make notes about what is done rather than how it is done.
CHANGING A TYRE
MOPPING A HARD FLOOR Instructions: Read the list below for Supplies and Personal Protective Equipment and Procedure for mopping a hard floor. Fill in the table that follows to complete a job safety analysis for mopping a hard floor. Conditions and Requirements: Use the information provided in the lists below to complete a JOB SAFETY ANALYSIS for mopping hard floors in the table on the next page. The first step has been done for you.
List 1: Supplies and Personal Protective Equipment Mop and Handle Goggles/safety glasses (required for dispensing chemicals) Mop bucket & wringer Wet floor signs Floor cleaning chemical (at correct dilution) Non‐slip shoes Latex/vinyl gloves (optional)
List 2: Procedure 1. Put on personal protection equipment 2. Gather supplies 3. Place wet floor signs around area to be mopped 4. Fill mop bucket with appropriate floor cleaning chemical (at correct dilution) 5. Dip mop into bucket and wet thoroughly, then using wringer, wring mop until damp 6. Place mop on floor and mopping in a figure eight (continue steps 5 & 6 until floor is clean) 7. Rinse mop and mop bucket thoroughly with clean water 8. Empty mop bucket 9. Return supplies used to their proper areas 10. Wash hands thoroughly
Sequence of Events
Potential Accidents or Hazards
Preventative Measures
Parking Vehicle
a) Vehicle too close to passing vehicle.
a) Drive to area well clear of traffic. Turn on hazard lights. b) Choose a firm, level parking area. c) Apply the parking break, leave transmission in PARK, place blocks in front and back of the wheel diagonally opposite to the flat.
b) Vehicle on uneven soft ground
c) Vehicle may roll
Remove spare and tool kit
a) Strain from lifting spare
a) Turn spare into upright position in the wheel well. Using your legs and standing as close as possible, lift spare out of truck and roll to flat tyre.
Pry off hub cap and loosen lug bolts (nuts)
a) Hub may pop off and hit you
a) Pry off hub cap using steady pressure. b) Use proper lug wrench, apply steady pressure slowly.
b) Lug wrench may slip

JOB SAFETY ANALYSIS FOR MOPPING A HARD FLOOR Step Description Potential accidents or
hazards Preventative measures
1 Put on Personal Protective Equipment
‐‐ Personal Protective Equipment (PPE) should include goggles/safety glasses (required for dispensing chemical), non‐slip shoes, latex/vinyl gloves.
2 Gather supplies Back Injury, Muscle Strain
3 Place wet floor signs around area to be mopped
4 Fill mop bucket with appropriate floor cleaning chemical (at correct dilution)
5 Dip mop into bucket and wet thoroughly, then using wringer, wring mop until damp
6 Place mop on floor and mopping in a figure eight (continue steps 5 & 6 until floor is clean)
7 Rinse mop and mop bucket thoroughly with clean water
8 Empty mop bucket
9 Return supplies used to their proper areas
10 Wash hands thoroughly

Activity 8 – Identifying Hazards Identify 4 potential hazards in your workplace. The first one has been done for you.
Hazard Possible Harmful Effects
What can the supervisor do to prevent injury/illness
What can you do to prevent injury/illness
Uneven pavers in walkways.
Trip hazard Re‐lay pavers Paint a yellow line to caution walkers of the trip hazard
Put up hazard tape, witches cones until pavers are fixed or line is painted.
Chemicals in science laboratory.
Machines in manual arts, furnishings, metal work.
Hot food and liquids in hospitality kitchen and dining room.

Activity 9 – Reporting Hazards PART A – COMPLETING FORMS
Instructions – Choose One hazard (from previous page) to report using the report form below. Use the current date and time.
HAZARD REPORT FORM THIS SECTION TO BE COMPLETED BY THE REPORTER OF THE HAZARD Date: Time: Where is the hazard located:
Circle the risk:
1, 2, 3, 4, 5 or 6
Risk Assessment Matrix
How serious could the injury be?
How likely is it to be that serious
Very Likely
Likely Unlikely Very Unlikely
Who is at risk: What action was taken: (DECIDE WHAT SHOULD HAVE BEEN DONE) Further recommendations: Reported by: Referred to: (Workplace manager or delegate)
Death or permanent injury
Long term illness or injury
Medical attention & several days’ off
5
First aid needed 5 6Severity – is how seriously a person could be harmed.
Likelihood – is an estimate of how probable it is for the hazard to cause harm.
Legend (as a guide only) 1. Extreme risk; action to rectify the hazard should commence immediately. 2. High risk; action to rectify hazard should occur within 48 hours. 3. Medium risk; action to rectify hazard should occur within 7 days. 4. Low risk; action to rectify hazard should occur within 14 days. 5 & 6. Minimal risk, action to rectify hazard should occur within 21 days.
PART B: THIS SECTION TO BE COMPLETED AFTER THE WORKPLACE MEETING.
Corrective action: Completed Incomplete Interim/short control(s) required: Long term control(s) required: Workplace managers’ signature: __________________________
Workplace managers’ signature: __________________________ Date: ______________ If further consultation and risk management is required please complete a risk management plan.

Activity 10 – Record of OHS Meetings Instructions: Participate in the consultative process of an OHS meeting and record notes. Complete the OHS template below using the hazard report from PART A on previous page. The meeting took place last Tuesday, started at 10am and finished at 11:30am. The chair of the meeting was Bobby Young. Attendees are: Sam Brown, Abigail Kendall, Felicity Simpson, yourself. Apologies received from Ken McGee (Apologies means people who were unable attend) Agenda items were: Replacement of faded yellow lines around machinery. Installation of blinds to reduce glare in classrooms New hazard – list the one hazard chosen from previous exercises. Accidents since meeting – John Power slipped on some water, received first aid for a cut and bruise to the leg.
RECORD OF OHS MEETINGS
Chair Date:
Meeting Commenced: Meeting Concluded:
Attendees:
Apologies:
Agenda Items
1.
2.

3 New Hazard Reported:
Corrective Actions: Action By: Action Completed Date:
4. Accidents and investigations since last meetings:
Reviewed by Managing Director: (LEAVE THIS BLANK)
Signature _____________________________________
Date _______________________________